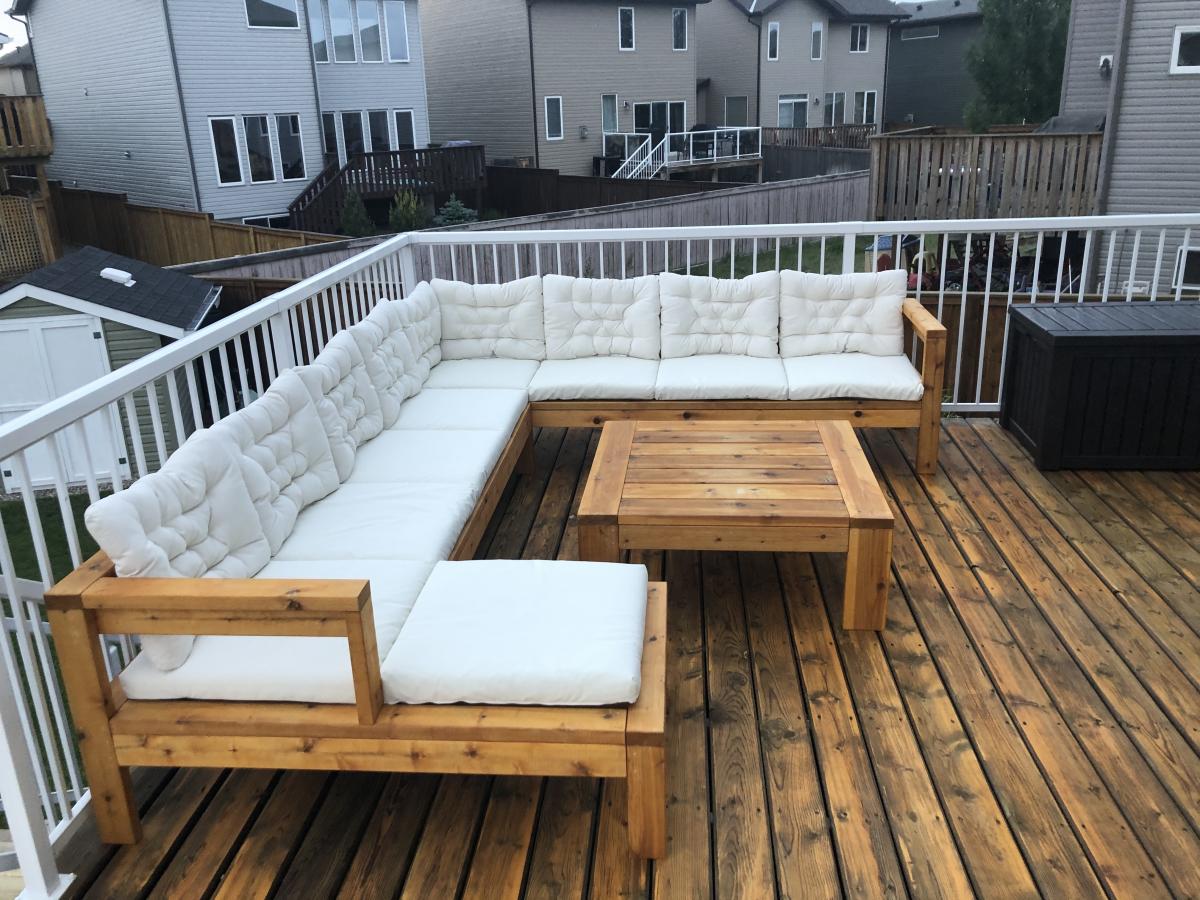
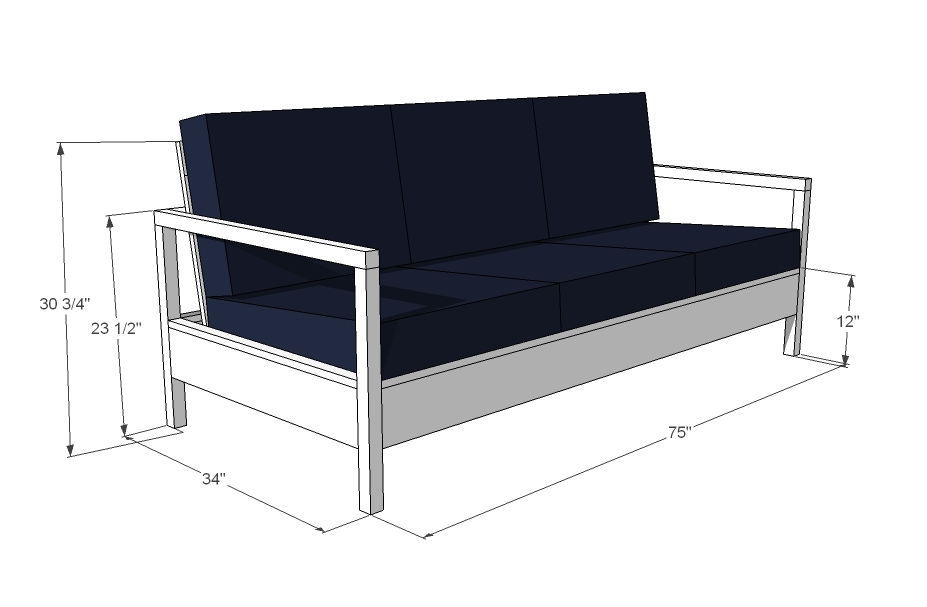
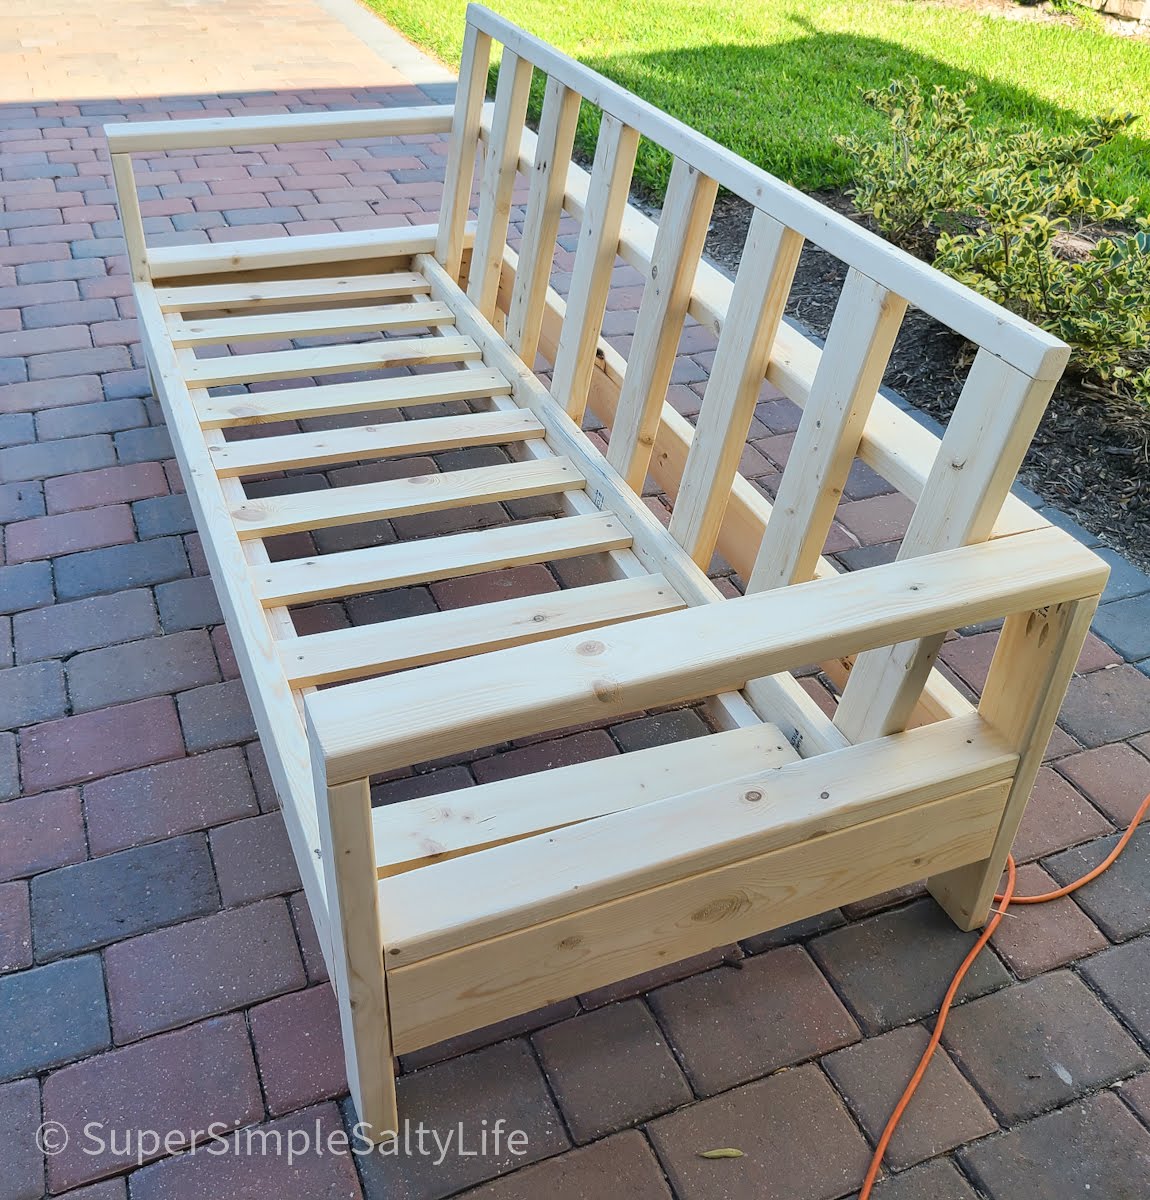
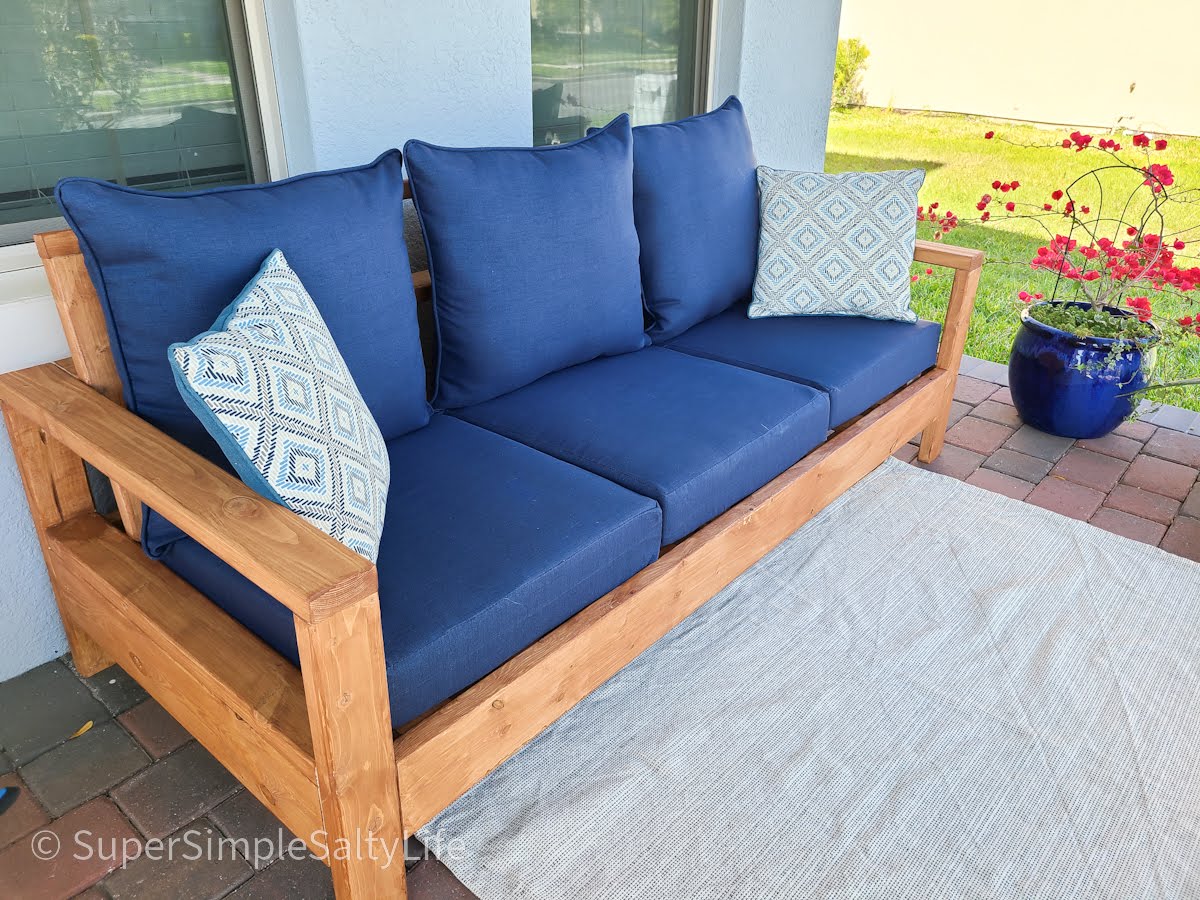
Outdoor Sectional
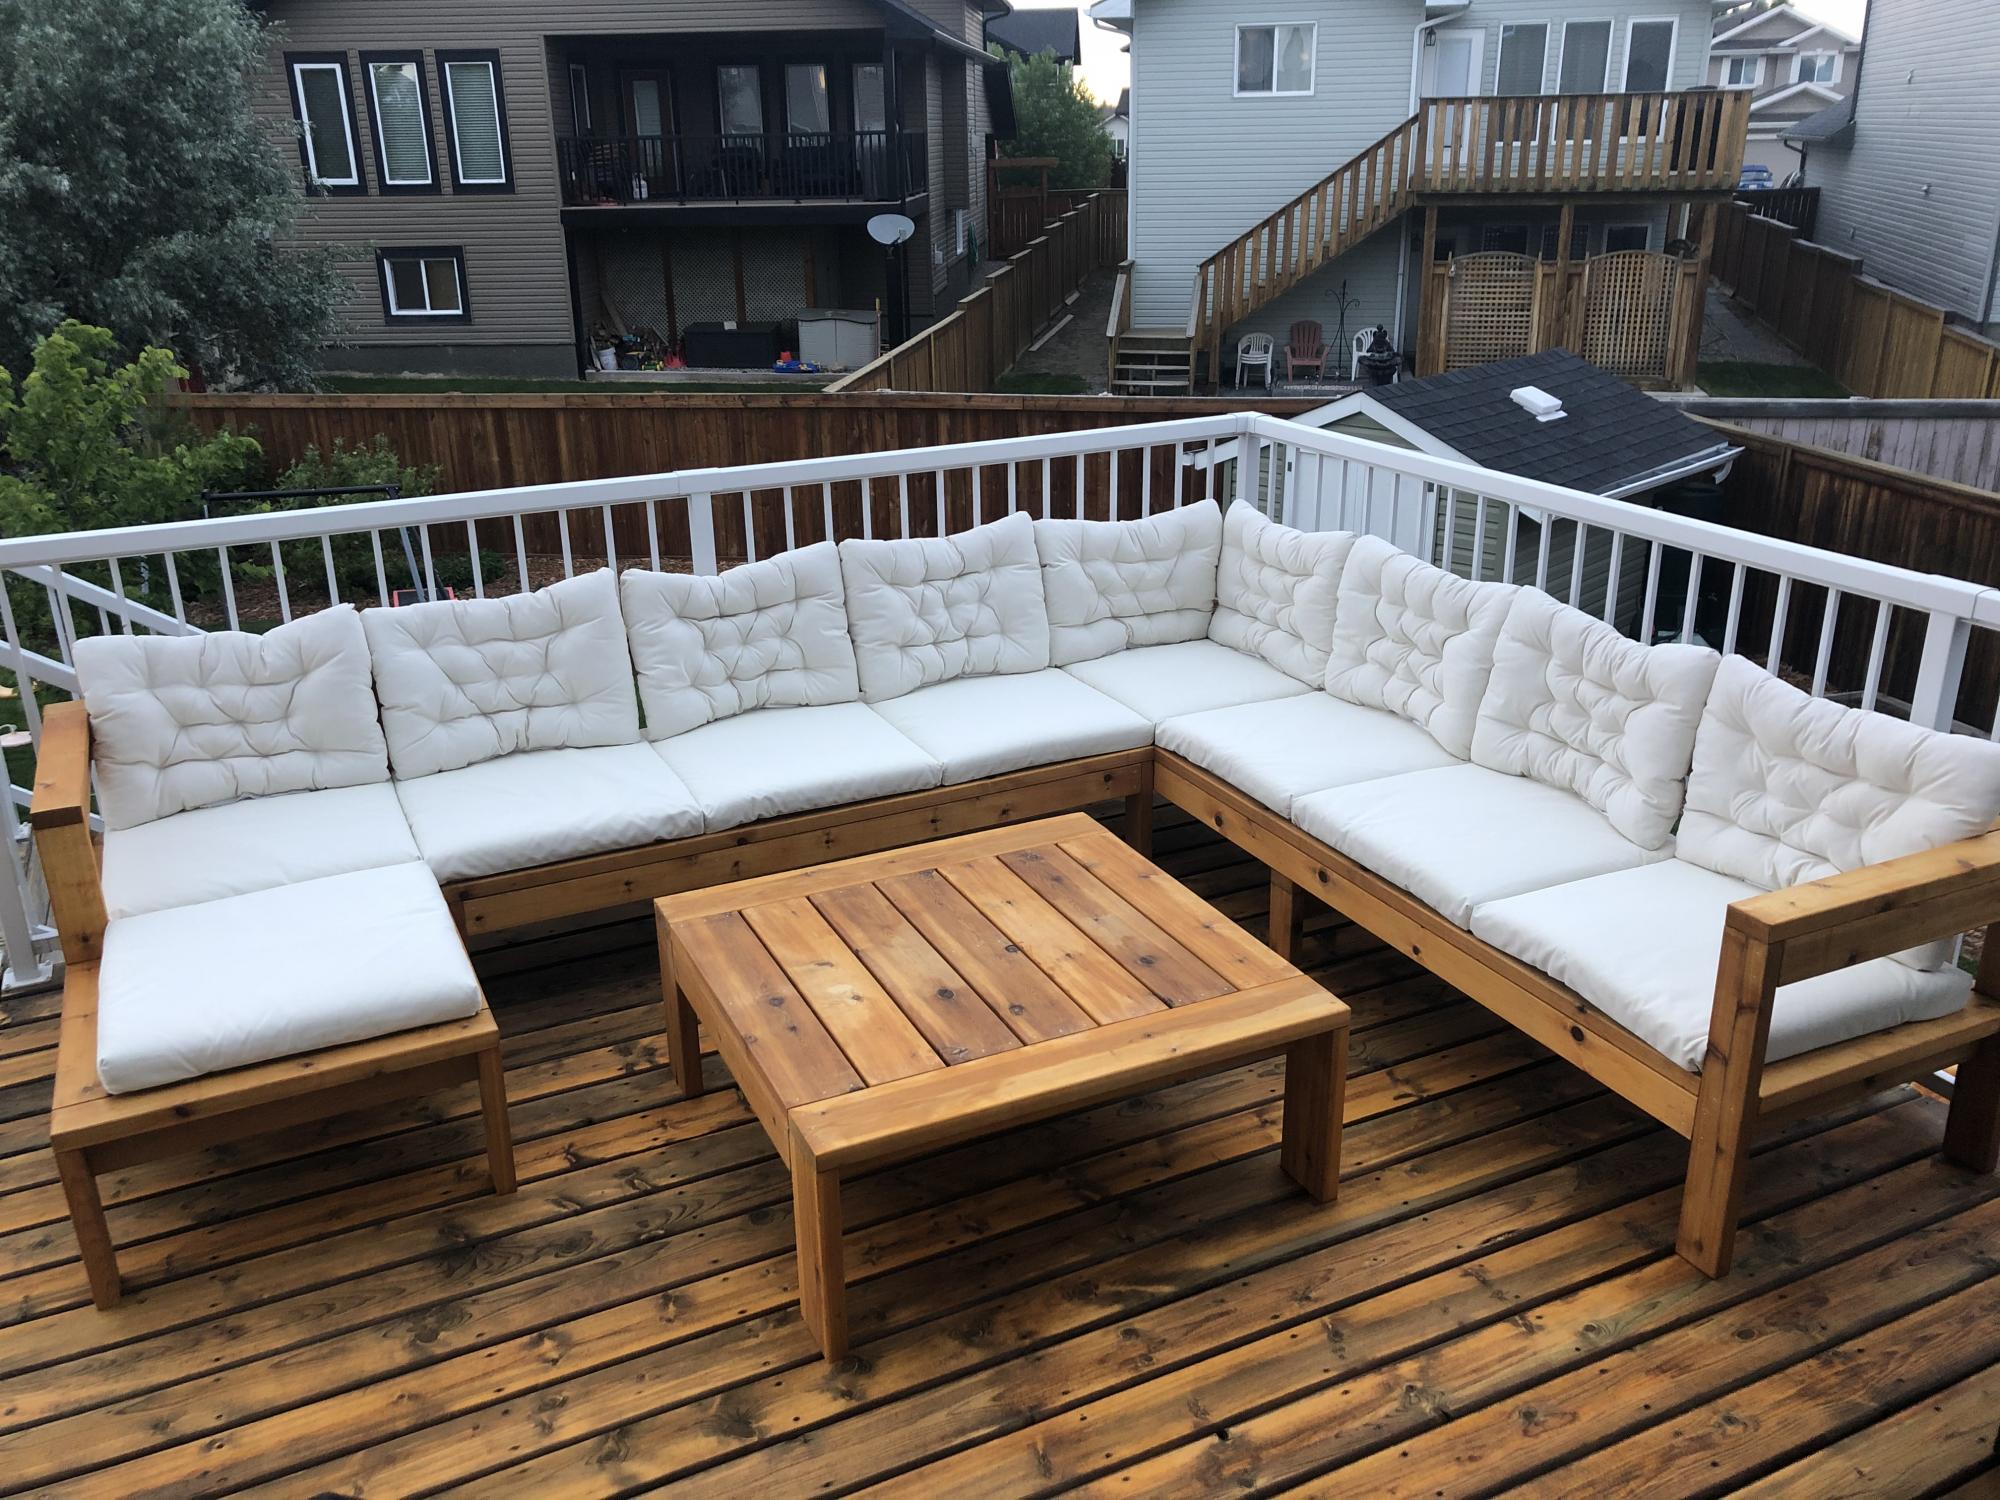
Modified the plans of the outdoor sofa and sectional piece to create this set, then added cushions from IKEA.
Built from Plan(s)
Finish Used
SuperDeck Cedar Tone Natural
Modified the plans of the outdoor sofa and sectional piece to create this set, then added cushions from IKEA.
This was the second building project I've ever completed. I had to make a few adjustments to make it fit the size of ray's closet, but it was totally worth it. most of the work was in the measuring, sanding, and sealing of the wood. Ftting the frames can be a little tricky if your planks aren't perfectly straight. Otherwise, this project was pretty straight forward and can be done in just a few days depending on how much time you have to dedicate to it. Thanks Ana!

Hi Ana!
My husband used your plans to build the 2x4 outdoor cedar sectional :) He did it in 1 day and it couldn't have been easier! He even tried first time working with pallets to make a small table and it came out perfectly too! Can't wait to enjoy family time on our new back porch.
Thanks Again & Love From Austin ❤️
Kathleen
Thu, 10/24/2019 - 16:35
Hi, your furniture is beautiful. May I ask: Where did you find your cushions? And what color/ brand stain did you use? Lovely job.
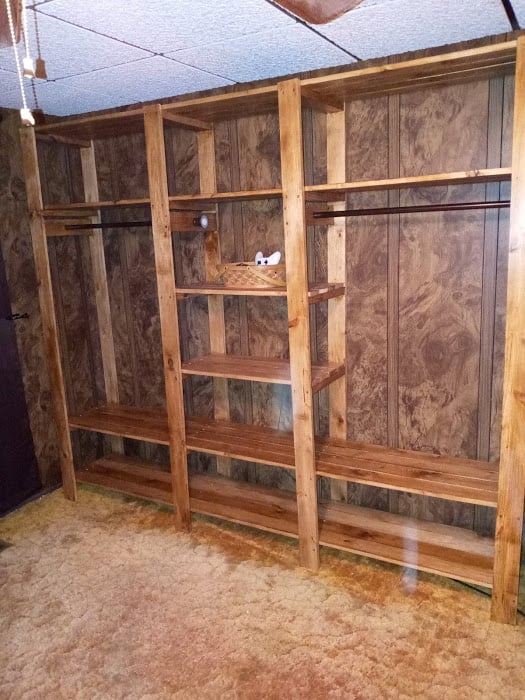
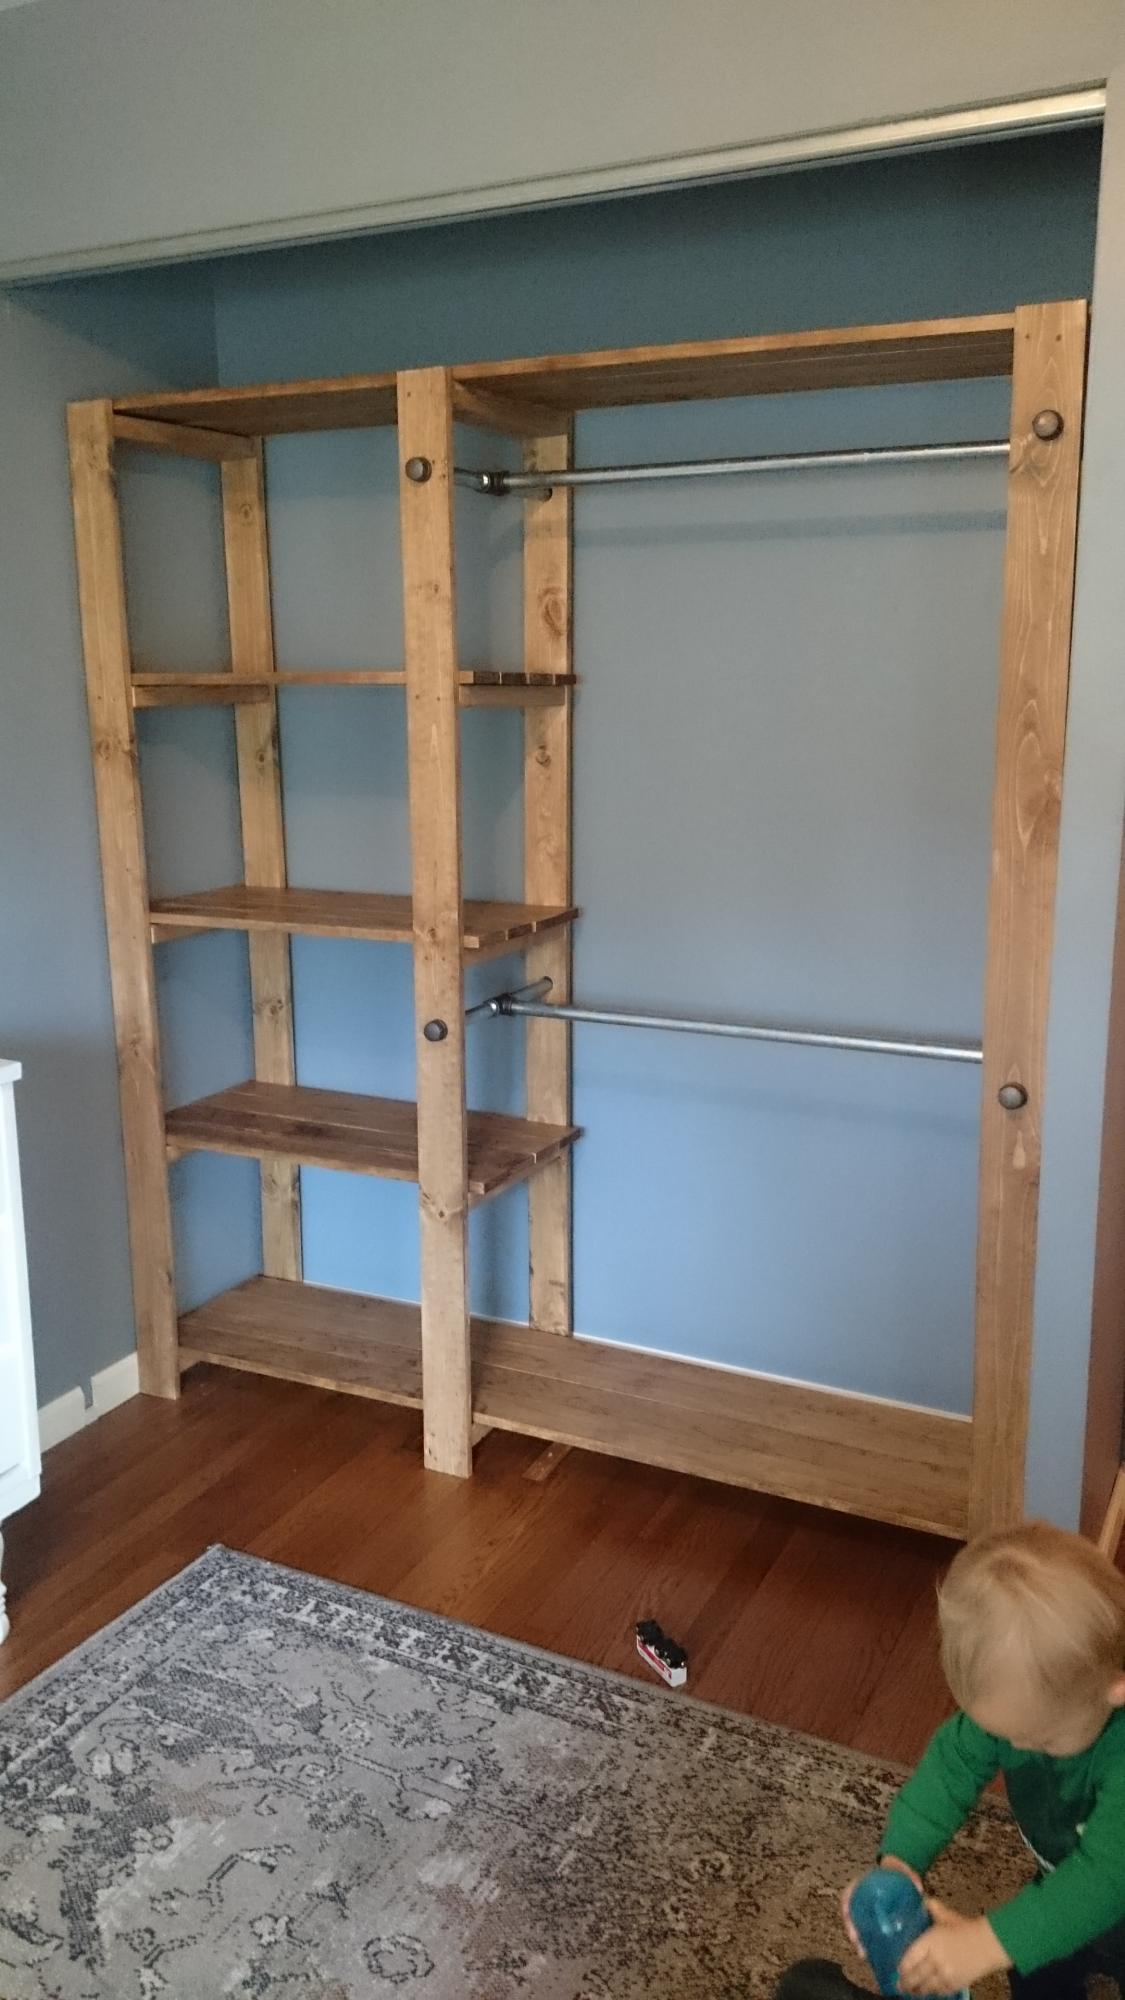
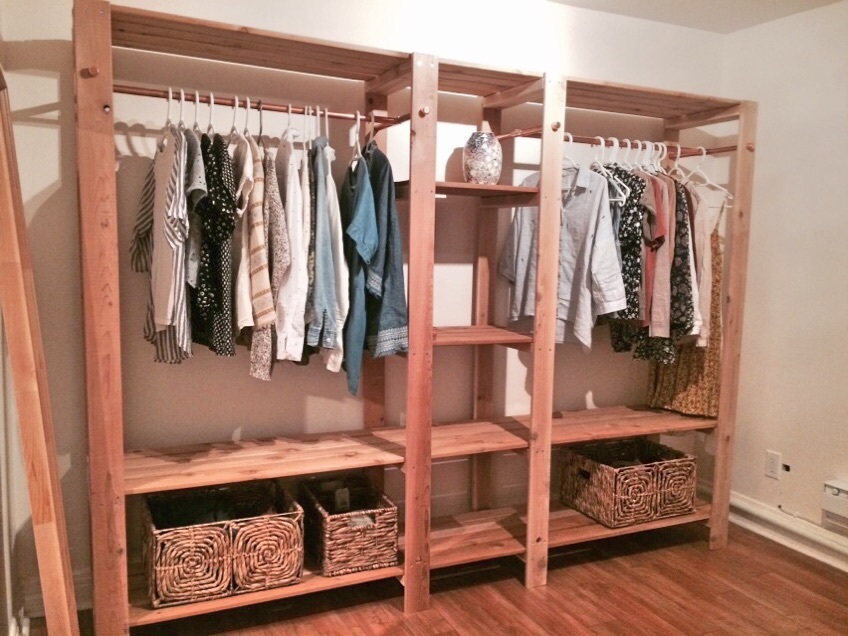
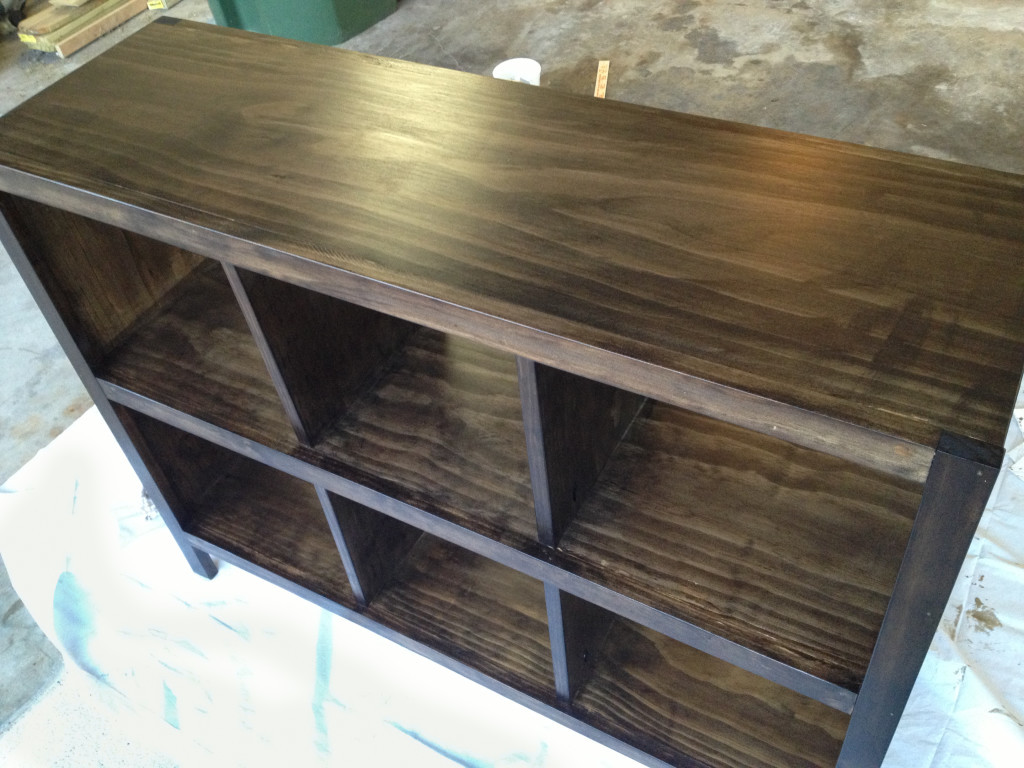
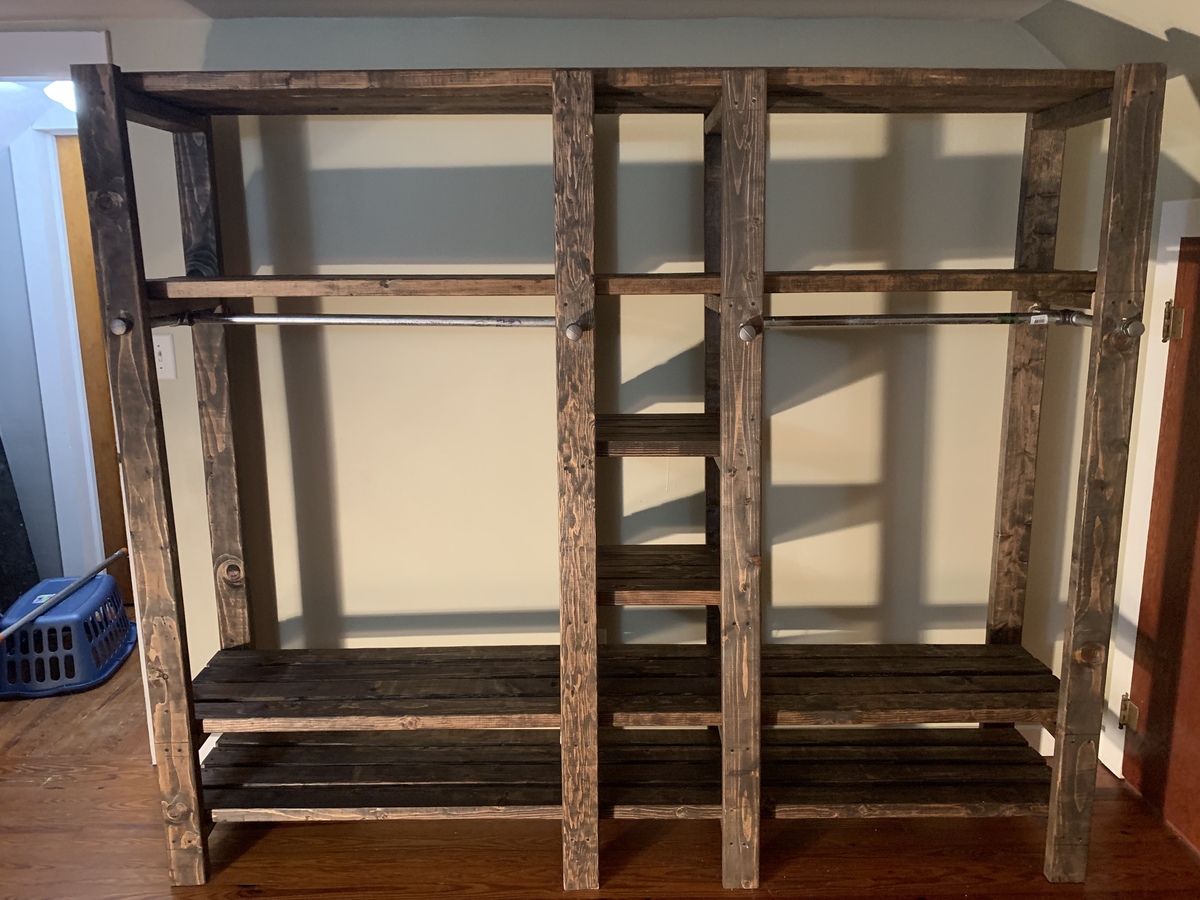
So I was complaining to my wife that our one closet in our bedroom was becoming too cluttered. She asked me to build her one. I told her that if she found the one she wanted me to build, then I would build it. She found this one and so I built it for her. Let me just say that she is very happy with it and it came out very great. I did find a couple of shower curtain rods that were brown to used instead of the iron pipe. It made the whole project cost around $80.
Sat, 11/07/2020 - 11:42
So happy that worked out for you and your wife, thanks for sharing:)
Thanks Ana for this amazing project!
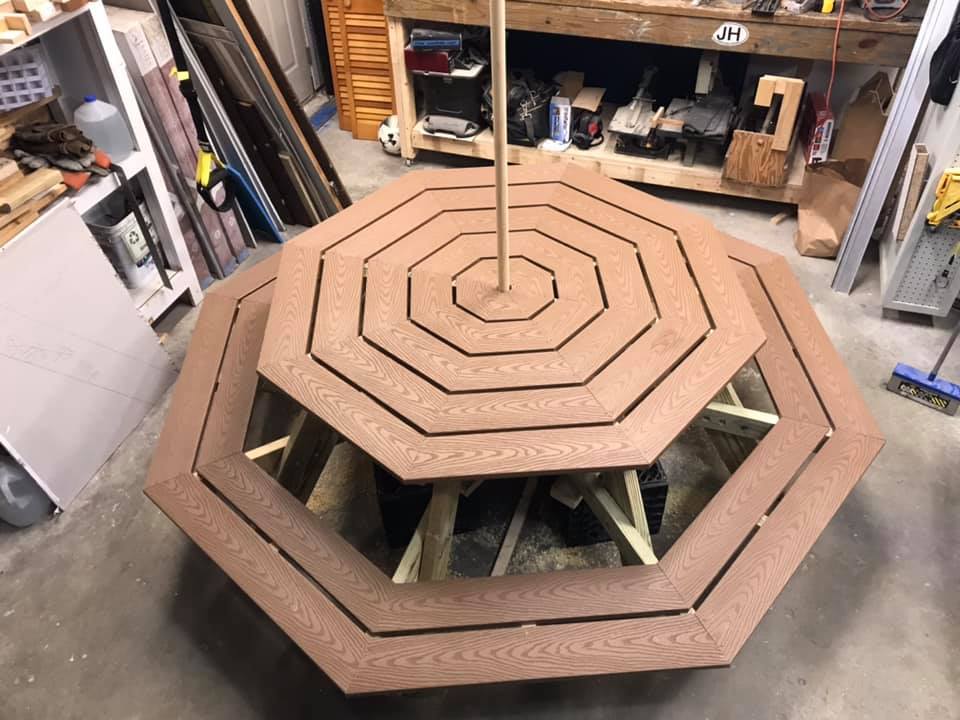
I built the octagon picnic table, and modified in a couple of ways.
1) Due to project deadline (Christmas) (and cost) I opted for composite decking for a finished top and bench, and pressure-treated 2x framing stock. Builder beware! Composite decking can be 5 1/4" wide, which impacts the spacing between the pieces, which means re-calculating most of the table-top pieces. Also, I added lateral structure underneath the benches (more weight!)
2) I really wanted that hole in the center, and hope that my solution (which slightly weakens the overall structural integrity) withstands the test of time.
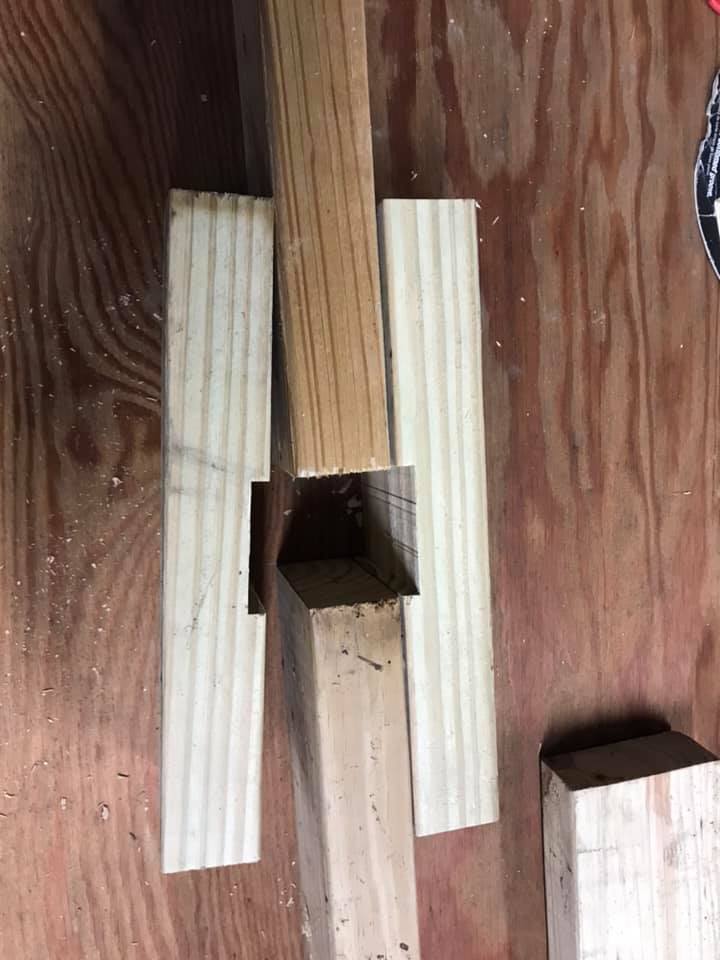
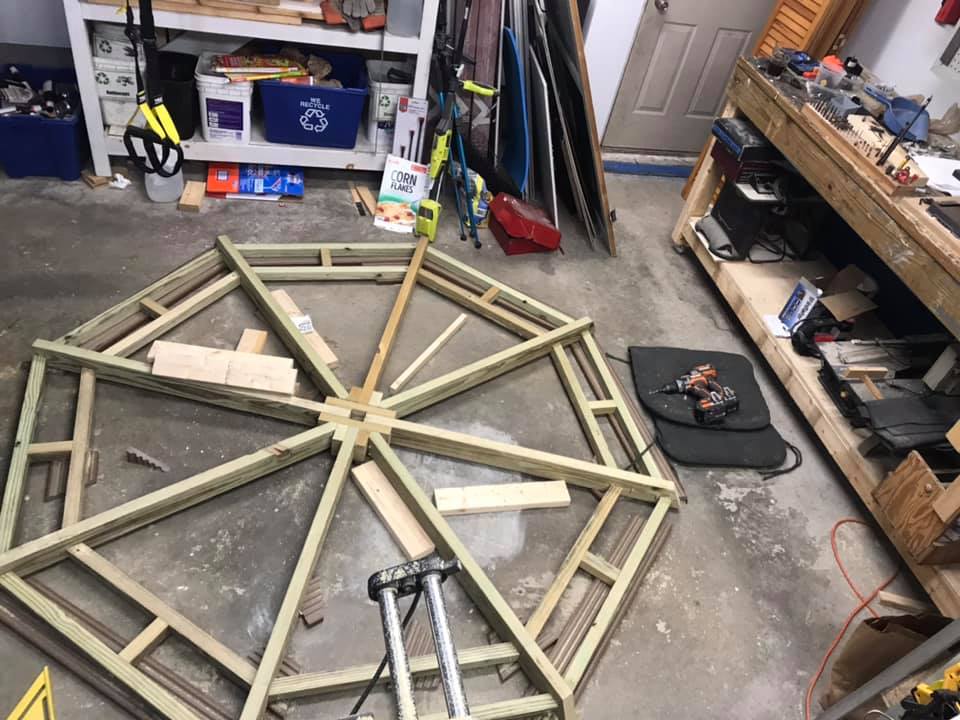


This was my very first wood working project since working around my grandfather's shop 20 years ago as a child. I had to buy a few tools to get it done (circular saw, Kreg Jig), but it was a great learning experience!
I made a rookie move of wiping up excess wood glue, which didn't take the stain at all. I had to remove that glue with a Dremel tool and spot restain. Since then, I've been told to let the glue drops dry next time and just chisel off after they are dry.
Since this was my first project, I had to buy EVERYTHING I needed, so my costs were a little higher. Now that I have some groundwork laid, the next projects will be a snap.
I also highly recommend the Rockwell Jawhorse product, it made working with the Kreg Jig super easy!
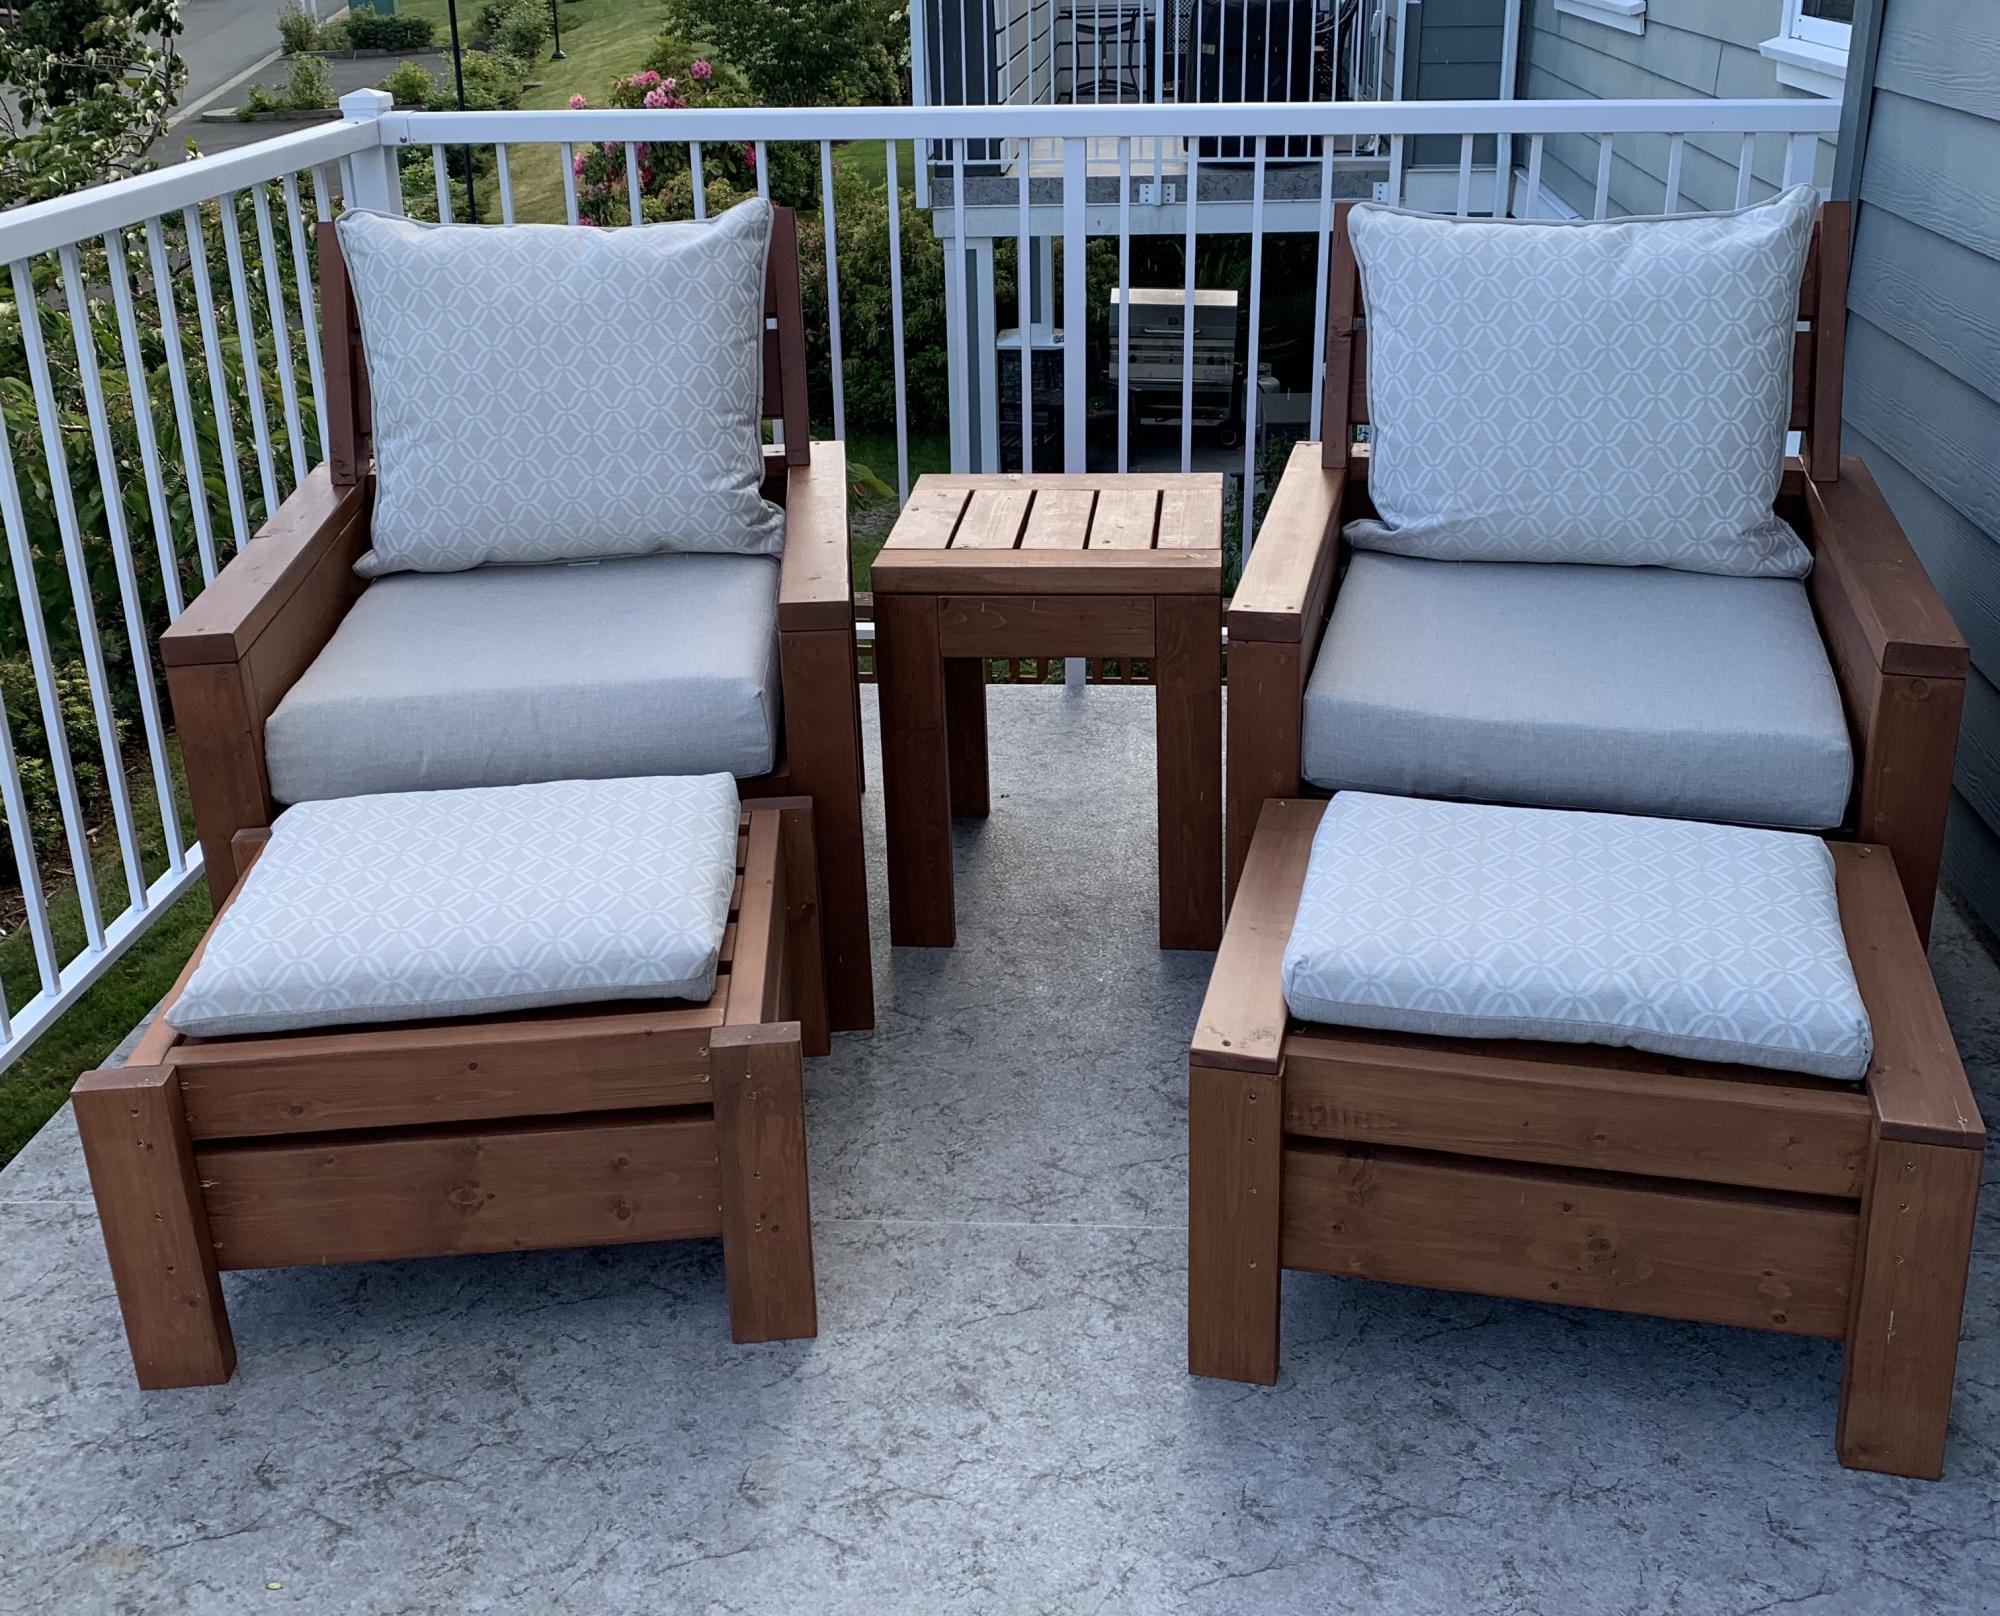
Love these plans! Made a modification and added backs to the chairs. Also, built ottomans to match the chairs which can also be used as additional seating.
Many compliments on the set. Thanks Ana!

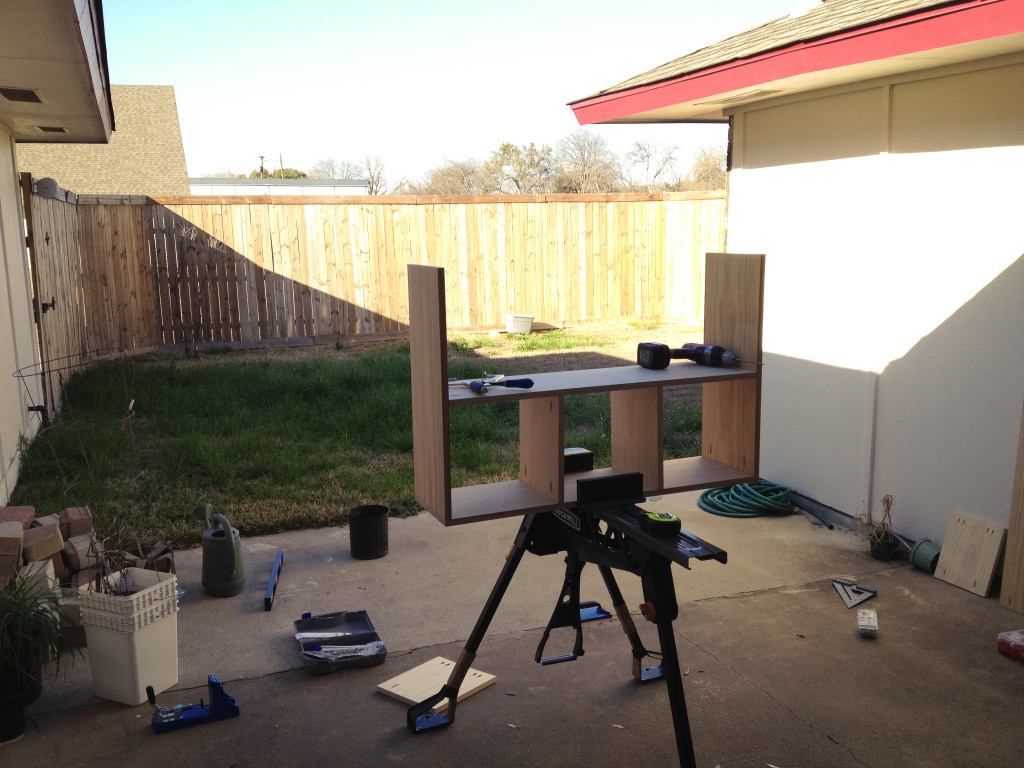
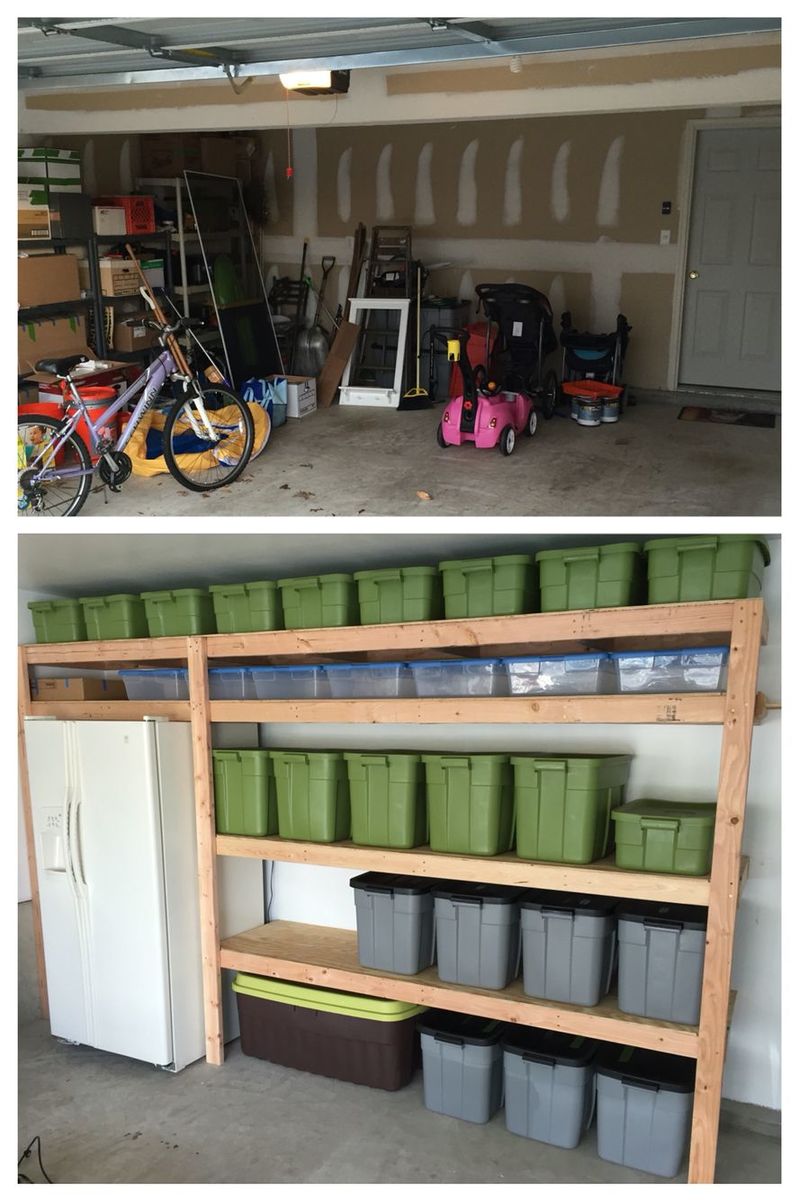
Easy to build, easy to customize, perfect for totes

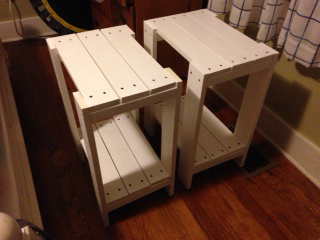
These tables are the first thing I've ever built all by myself, and I couldn't be more excited. I think I'm addicted...

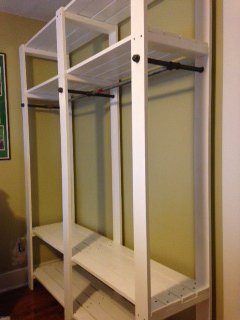
My husband and I live in a 1935 house with very little closet space, so this is perfect for us! We painted it white to match our molding and bed, and adjusted the design a bit to fit the space. We made it 7 ft. tall to match the height of the molding on the door next to it (which turned out well for us, as you can hang pants without them touching the bottom shelf). We had less than 6 ft. of space for the width, so had to do without the center shelves. We used 1/2 in. pipes because we needed to use a cross piece in the middle to connect the pipes, and the hardware store only had them in 1/2 in. sizes. Decided to leave the screws exposed to go with the exposed pipes. It all worked out very well! So much so, that I decided to make two matching nightstands out of the extra wood we bought (all by myself ![]() )! Thank you, Ana!
)! Thank you, Ana!
I really had a great time building this closet. It was my first time building anything. I had to use one 36 inch pipe and one 30 to make it fit my wall the way I wanted. Thanks for posting the plans online!

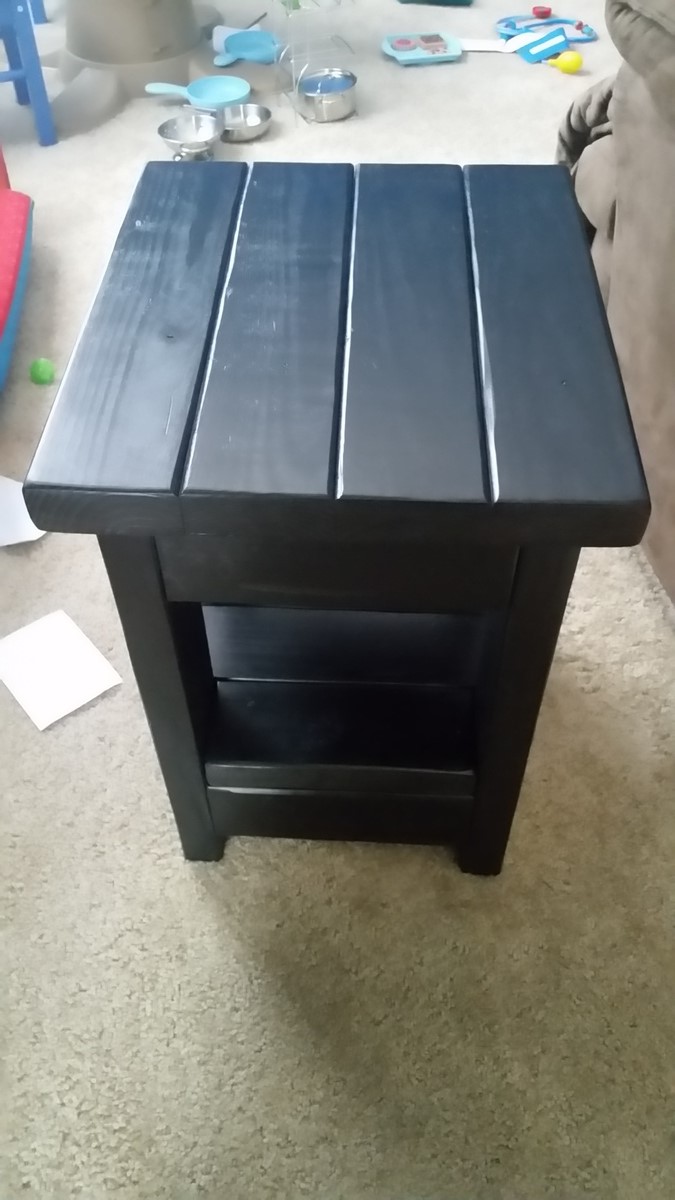
I made a smaller version of the Tryde End Table with Shelf. I made 2 of them from 6 2X4's
Mon, 05/25/2020 - 06:27
Love this! Do you have the dimensions of the pieces for this one?
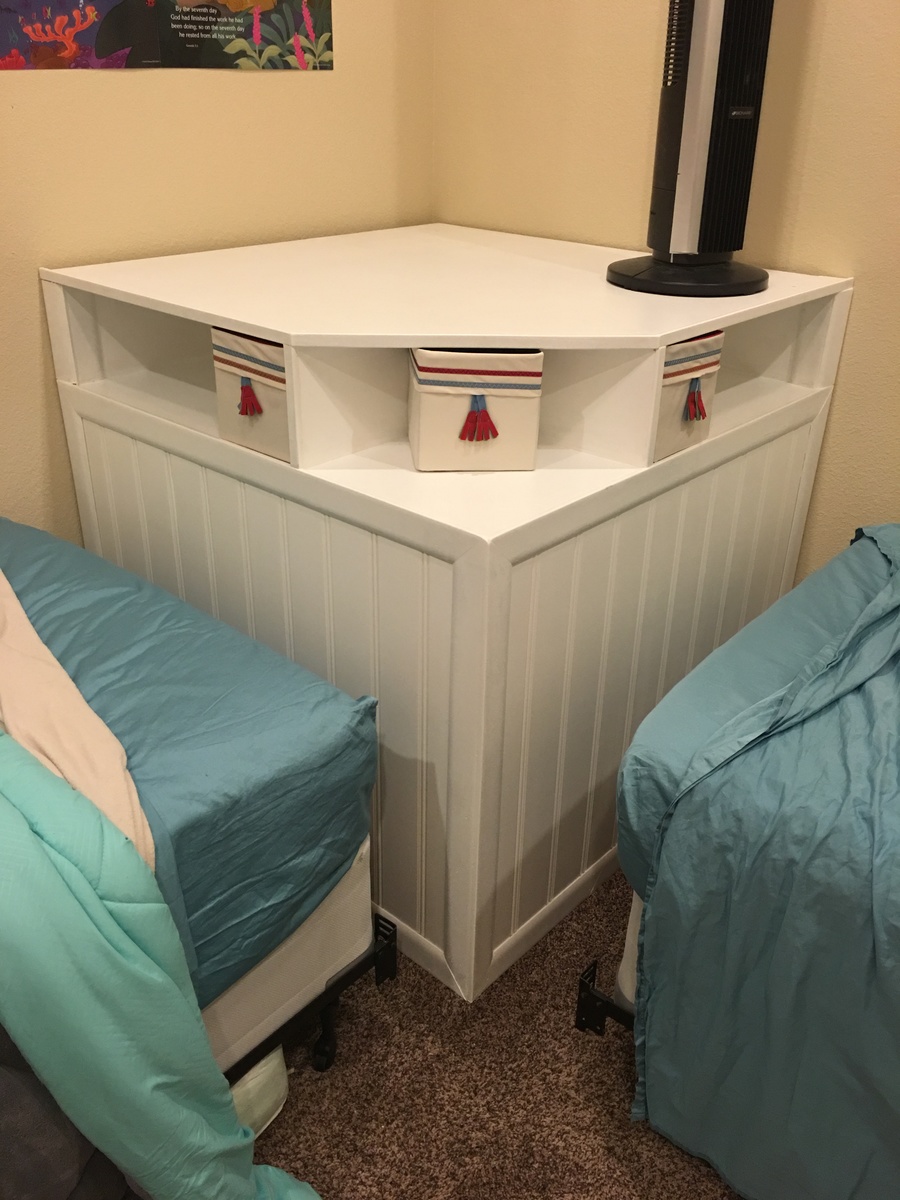
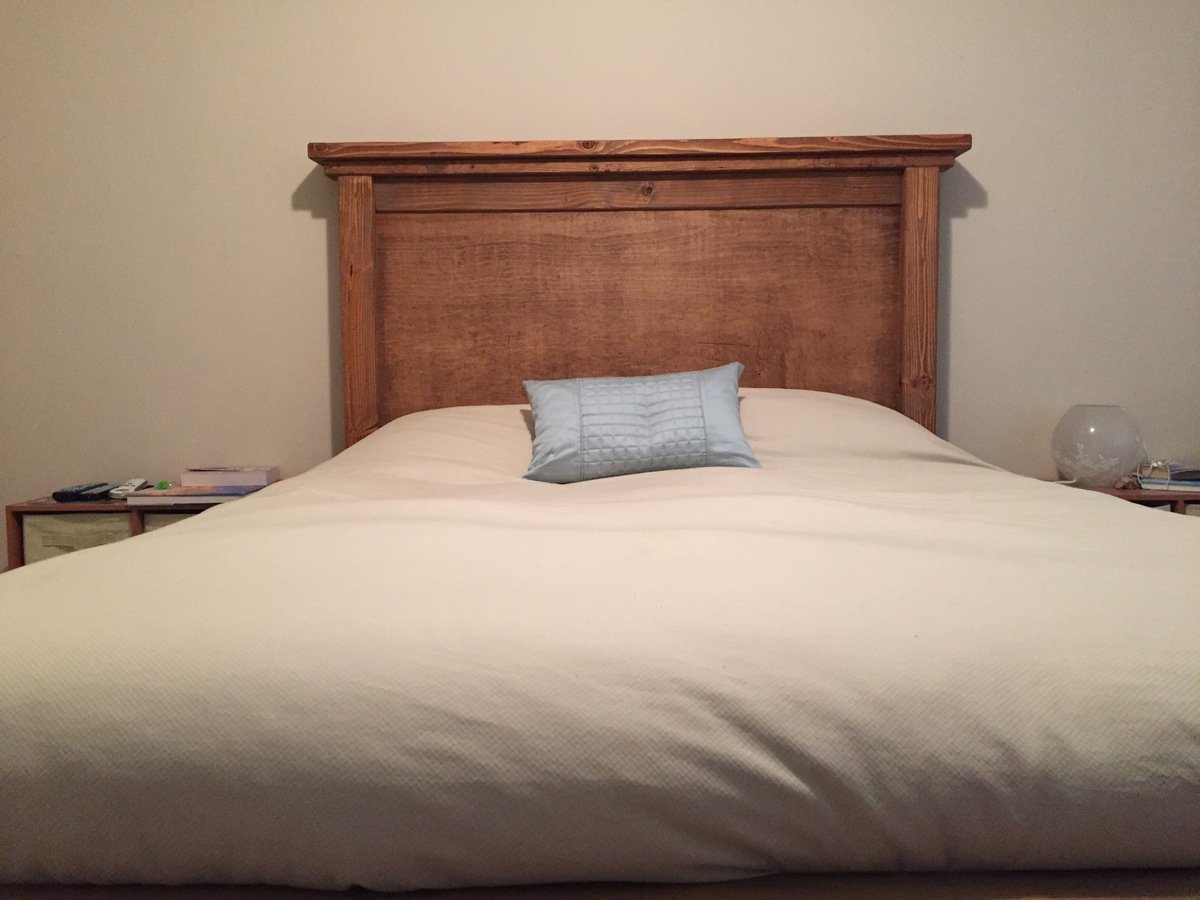
Corner unit for kids bedroom. Added fabric boxes from ikea. The fit perfectly

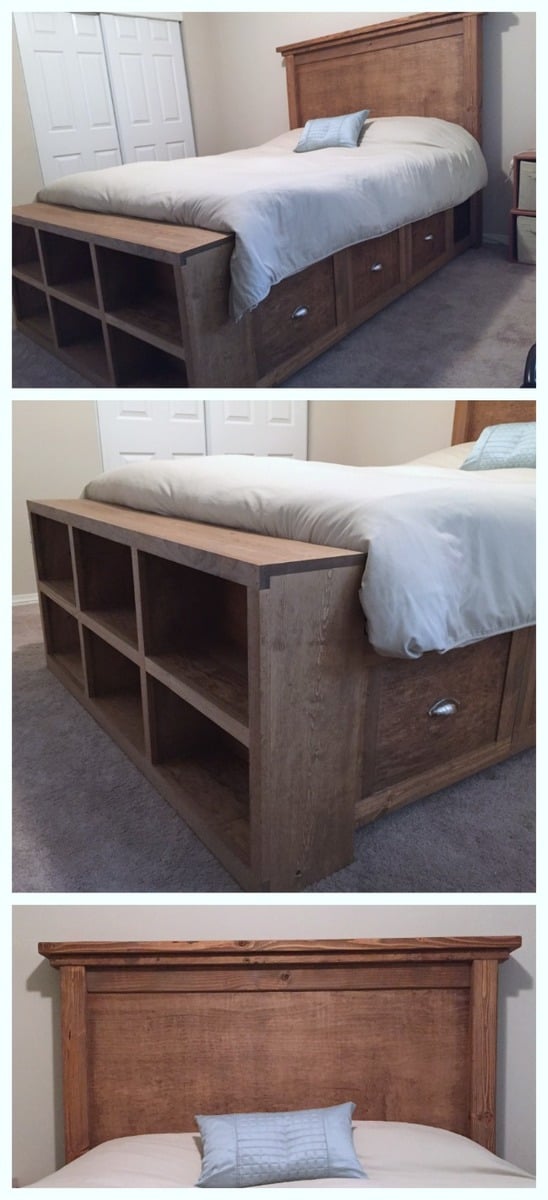
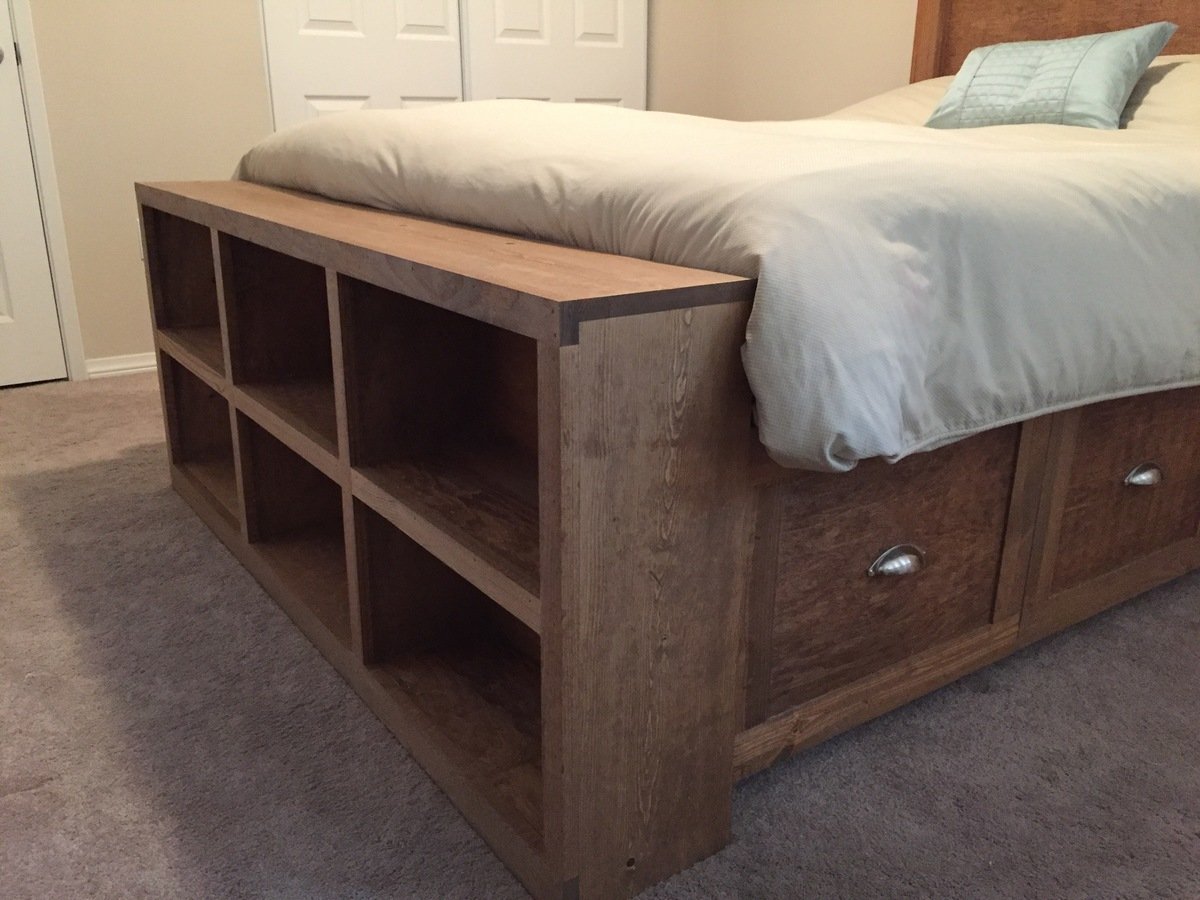
I altered the plans just a bit so that I could make use of the drawer closest to the headboard, while using bedside tables as well (not the ugly ones in the pictures, but some that only exist in my mind as of now). With the plan as is, I didn't think that first drawer would be able to open if you have a nightstand. So I left about a 17" gap that can be used as an open shelf for storage, and still had room for 3 drawers. I also wanted to include a bookshelf as the footboard to make it multifunctional. We have a ton of books and no place to store them (fear not, a large bookshelf/media center is coming soon!) I also altered the top of the headboard just a bit to give it more texture and visual appeal (hopefully, but beauty is in the eye of the beholder so I've been told). Lastly, I did not put the 1/4" plywood backing on the drawer carcasses. They were pretty sturdy as is, and only got more sturdy as they were attached to the headboard and footboard; I'm not worried about racking at all. Leaving the back off also allows me to pull the drawers out and access some hidden storage in between the two drawer carcasses.
I wanted a simple finish, so I rubbed it with dark walnut Danish oil. Super simple finish and I think it'll hold up as the bed is not like a desk that needs poly or something.

Sun, 08/28/2016 - 19:50
This bed turned out amazing. I love the modifications and agree the first drawer will be more usable.
Thu, 05/28/2020 - 06:11
Could you please tell me how you attached the footboard on this one? I thought about using some bolts and counter sinking them from inside the self. How did you do it?

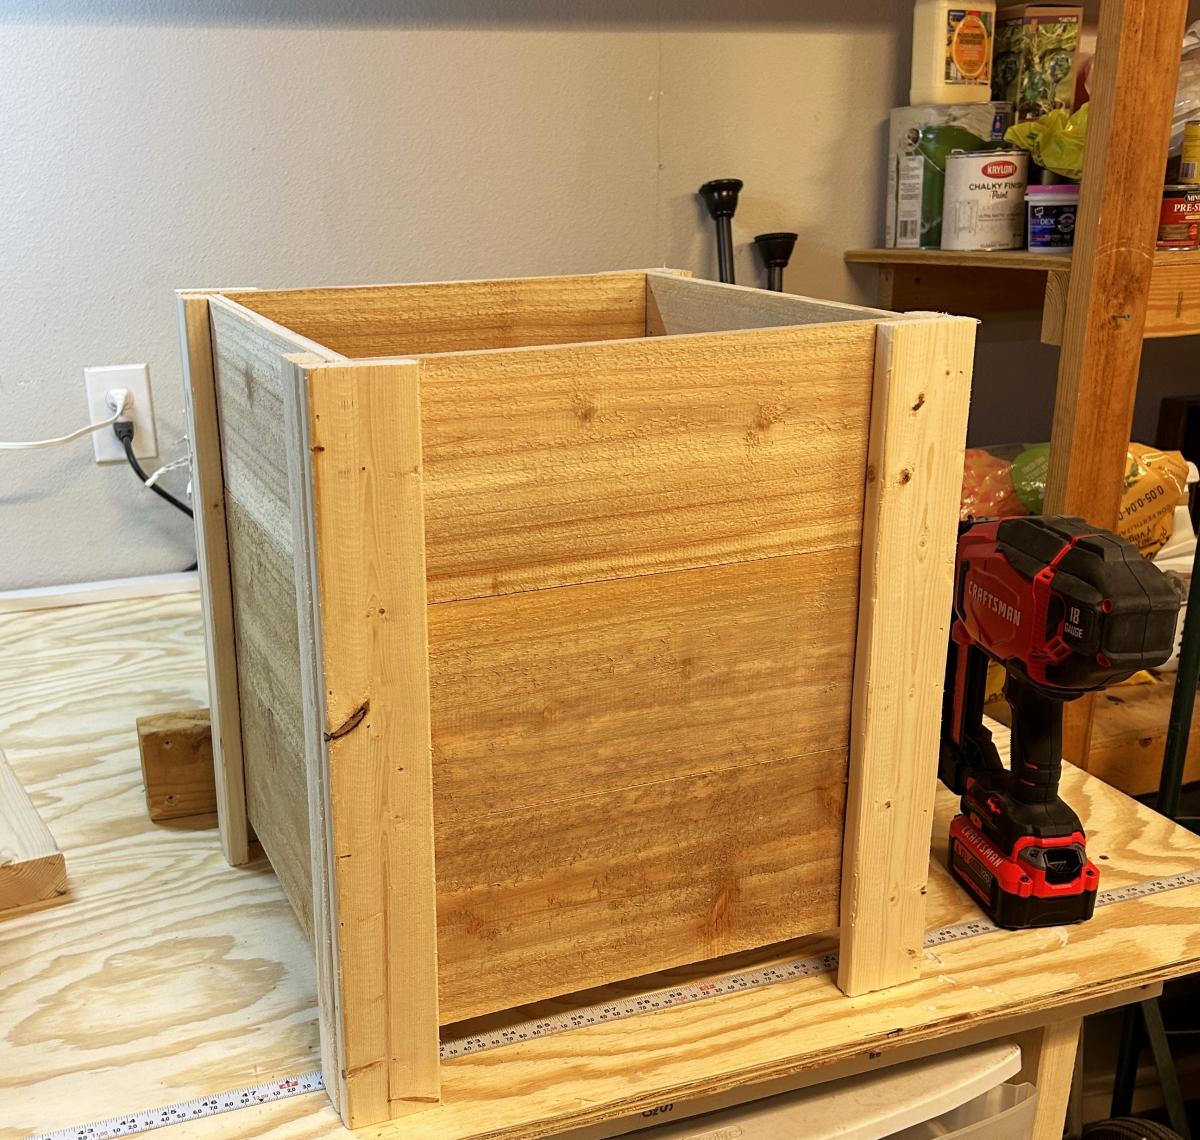
Easy Build DIY Planter Box with Cedar Fence Pickets
Followed these plans and made these planter boxes for the front porch! I couldn’t believe I was able to complete a project like this so quickly! Instead of paint, I opted to use some grey stain I had leftover from another project. Thanks! I love them!
Beth

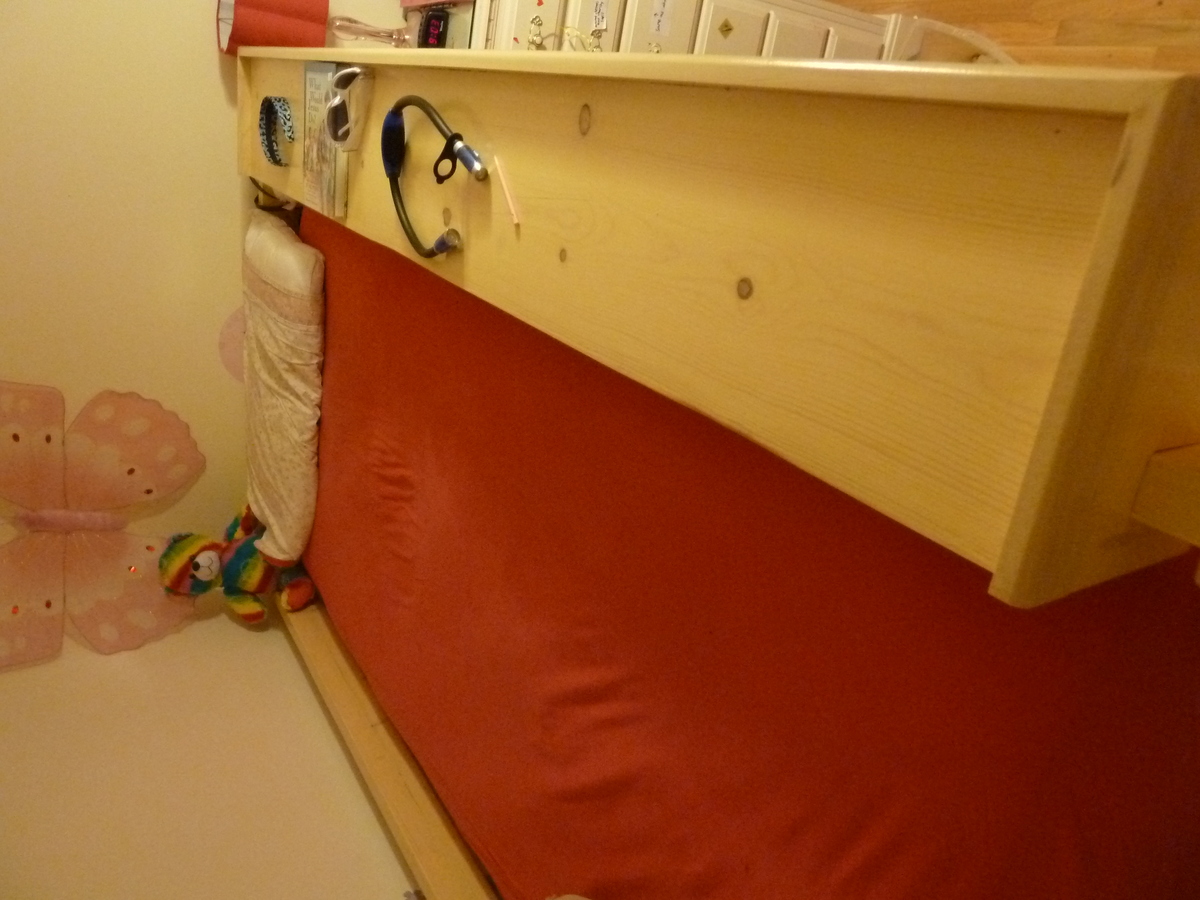
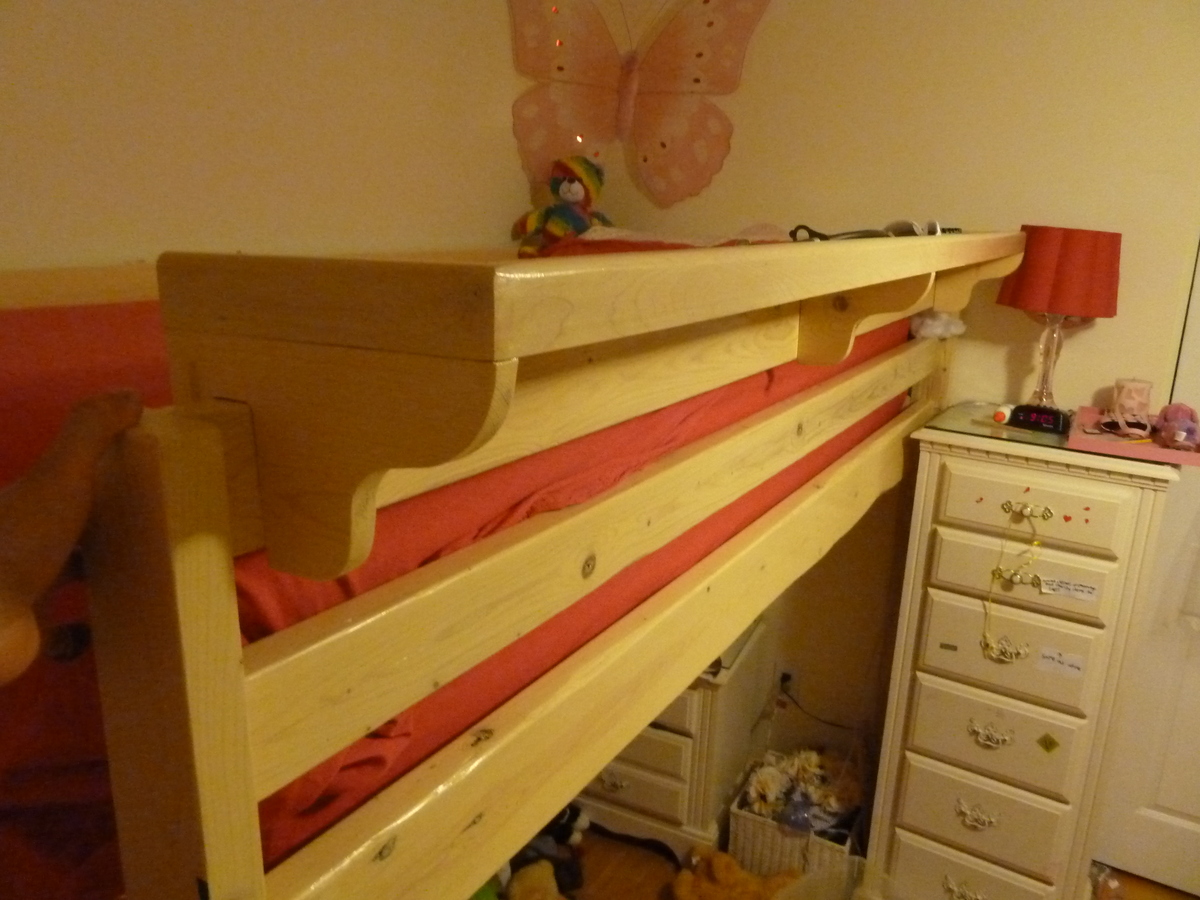
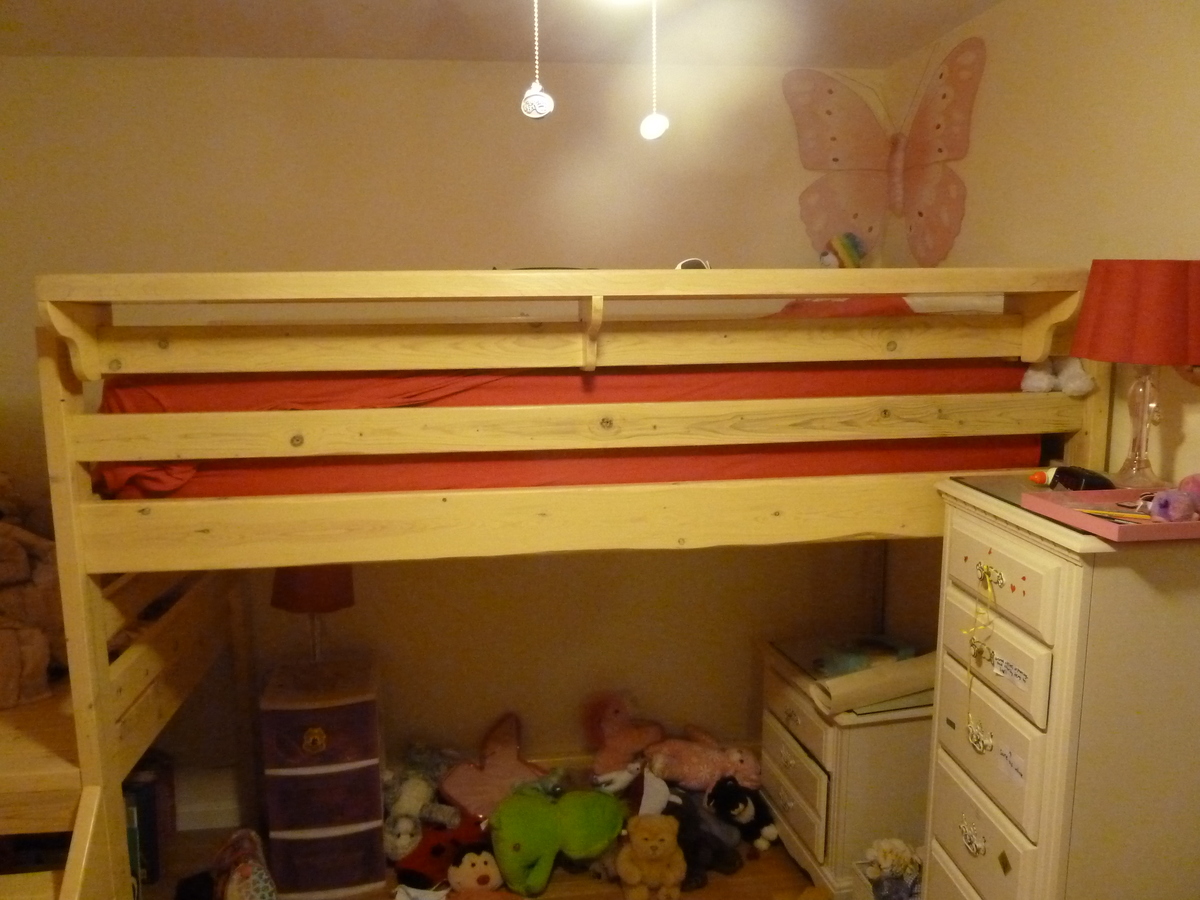
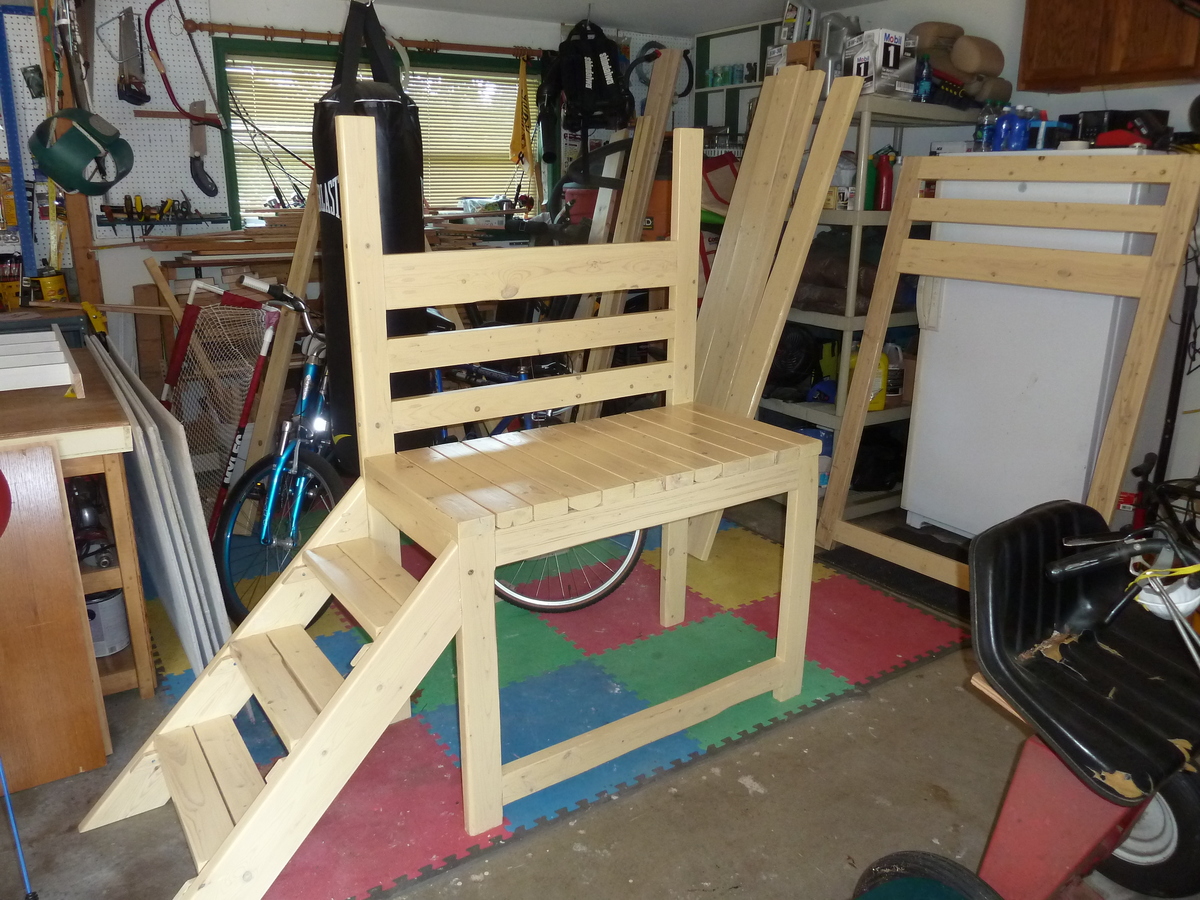
My daughter needed a loft bed to give her more floor and storage space in her bedroom. I modified the original plans to fit her twin XL bed, which is 5 inches longer than a regular bed. I also added an extra 2x6 across the back two posts for extra support.
Cutting and assembly was relatively easy; I glued every joint and used pocket holes per the instructions. I sanded using 80, 120 and 220 grit. The finish is a Minwax "parchment" water-based stain, with 3 coats of Polycrylic. All pocket holes were pre-drilled prior to finishing.
I assembled the platform and footboard in the garage and brought it into the house as a single unit; same with the headboard. I brought in the rails separately. To assemble, I marked 1 1/4 inches from the outside post edges, and used wood scraps/clamps to align and hold the rails while securing them with pocket hole screws.
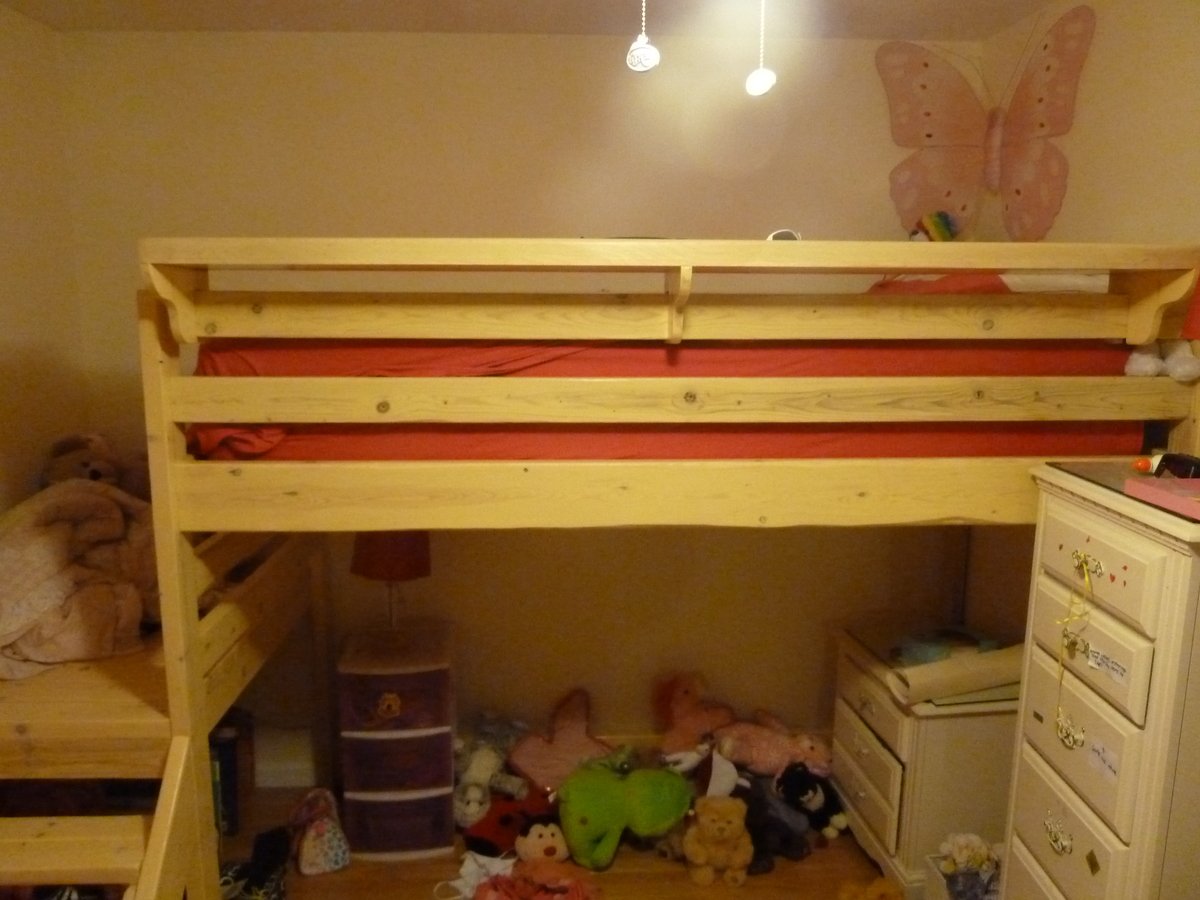
My daughter's mattress is very high; it rises only about an inch below the top of the top rail. So I build a bed-length shelf which also had the added benefit of providing a little more height/protection against her rolling out of bed in the middle of the night (see pics).
In all, I was surprised at how long this took me. Probably because I'm a novice and this was only my 2nd project. The totals are:
- Cut and assembly: 14 hours
- Sanding: 25 hours
- Finishing: 2 days
After finishing, I left all pieces in the garage for 5 days to air-out before bringing into the house.
Total cost the lumber was $125, 1 qt stain @ $13, 1/2 gal Polycrylic @ $50 per gal, and $20 hardware for a total of just over $200.
Tue, 03/15/2016 - 22:17
I am curious what your mattress size was here, please educate me as I think I will have a similar issue. I liked the shelf idea you did!
In reply to mattress size by mariad444
Wed, 09/23/2020 - 13:52
My mattress size was twin XL.
Thu, 04/09/2020 - 09:05
Nice job! Did you add just 5 inches to the length, making it 8'5"?
In reply to Nice job! Did you add just 5… by cmt2012
Wed, 09/23/2020 - 13:56
Yes, all I did was add 5 inches to the length. In hindsight I should have measured her room because the total length including the steps is about 3 inches short of the room... great, it fits, but alot of "things" drop through the slot like socks, candy wrappers, etc. Good luck!
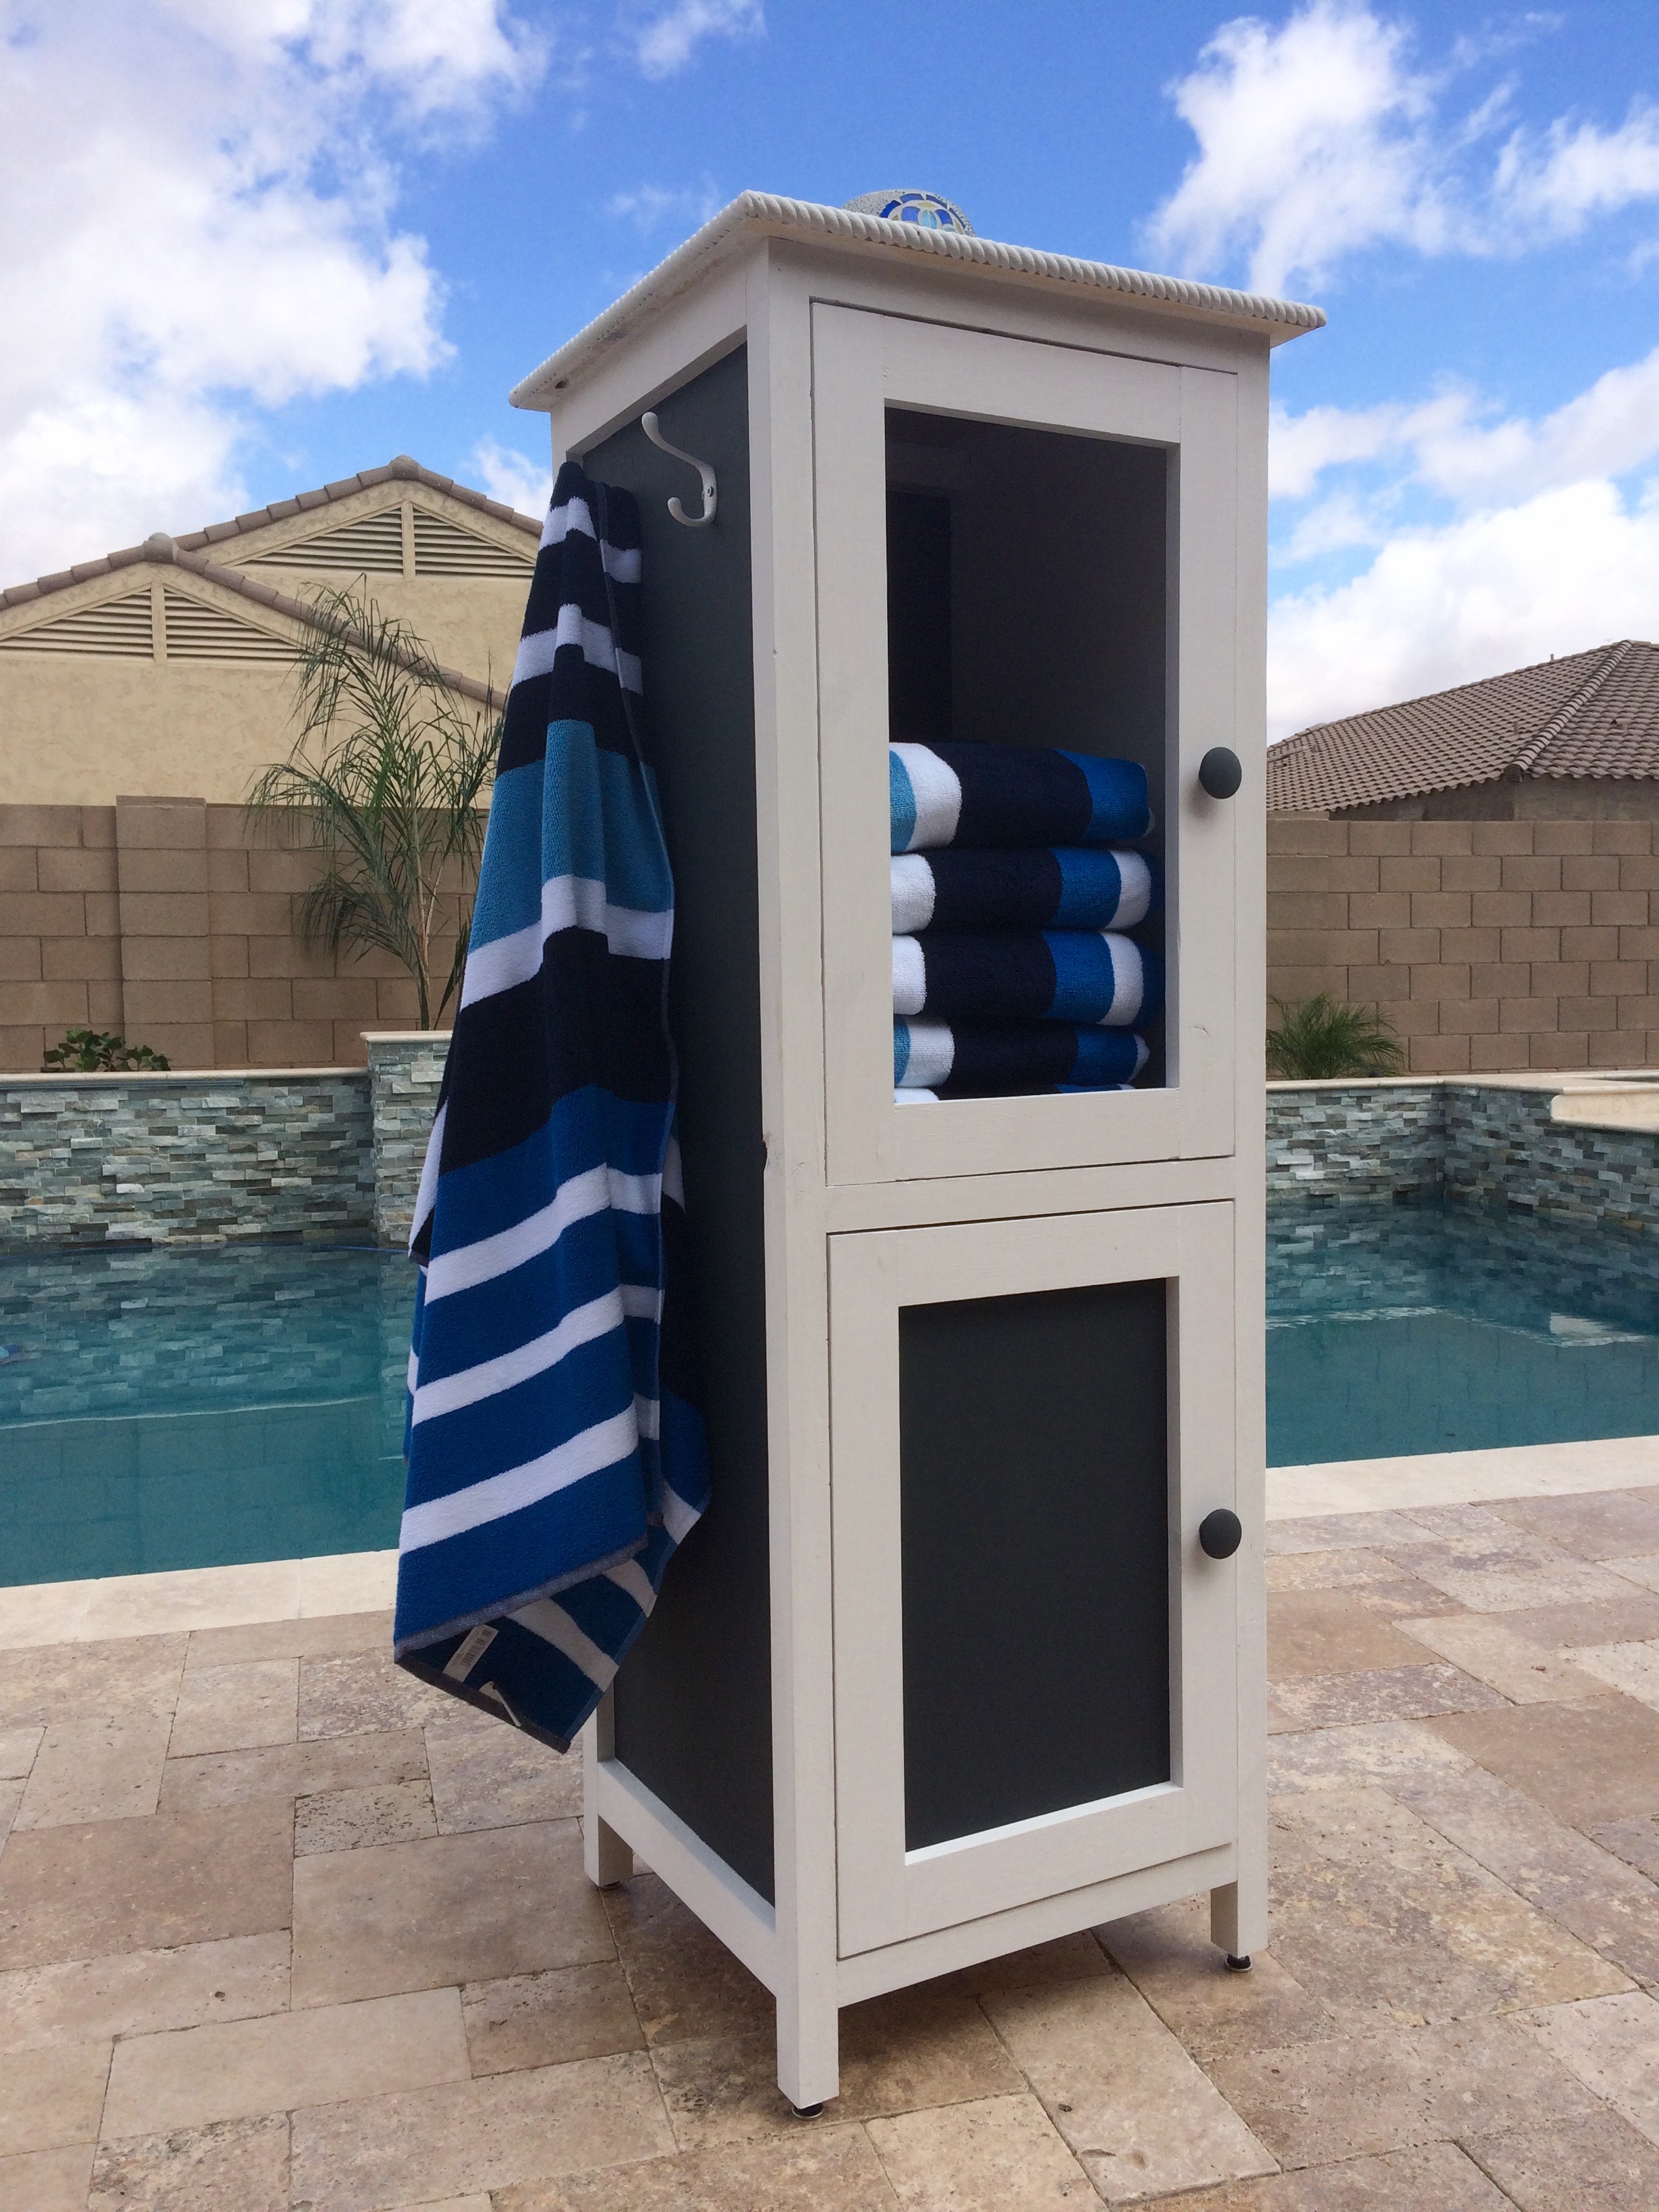
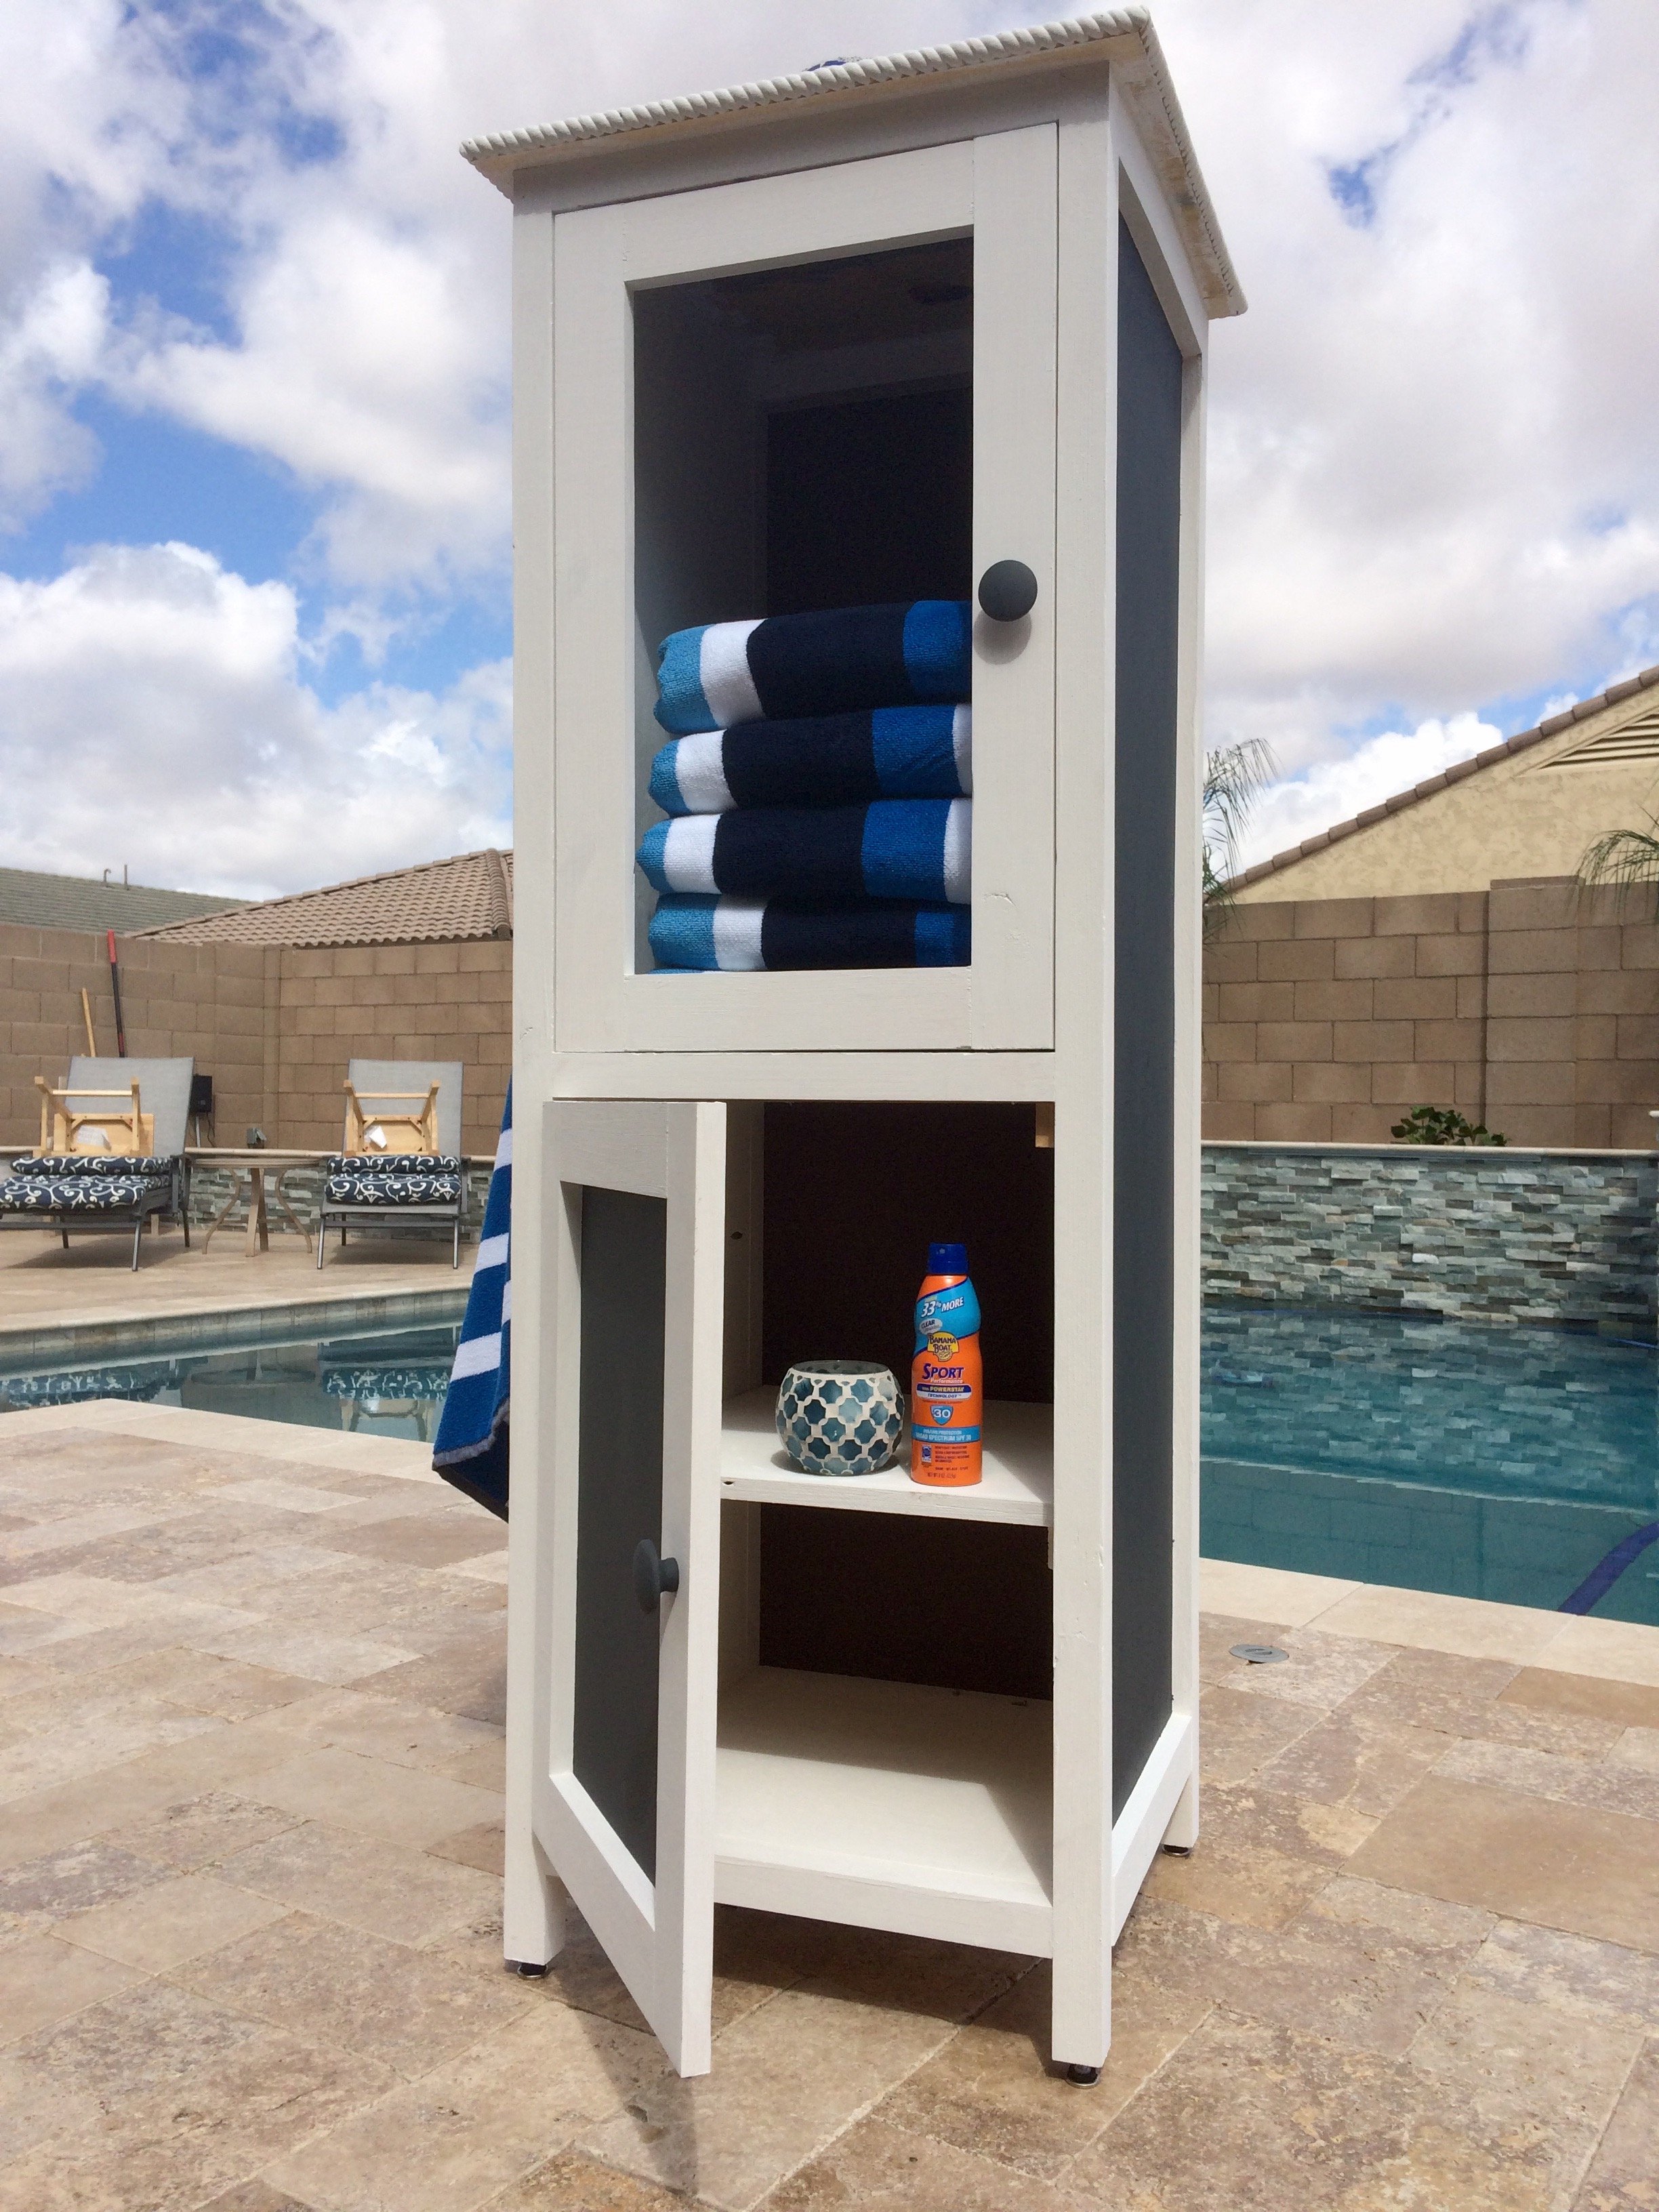
My father and I made this awesome poolside towel cabinet using the Benchmark Cabinet plans. A super easy 1 day build and it looks amazing on the patio. Bring on the pool weather!
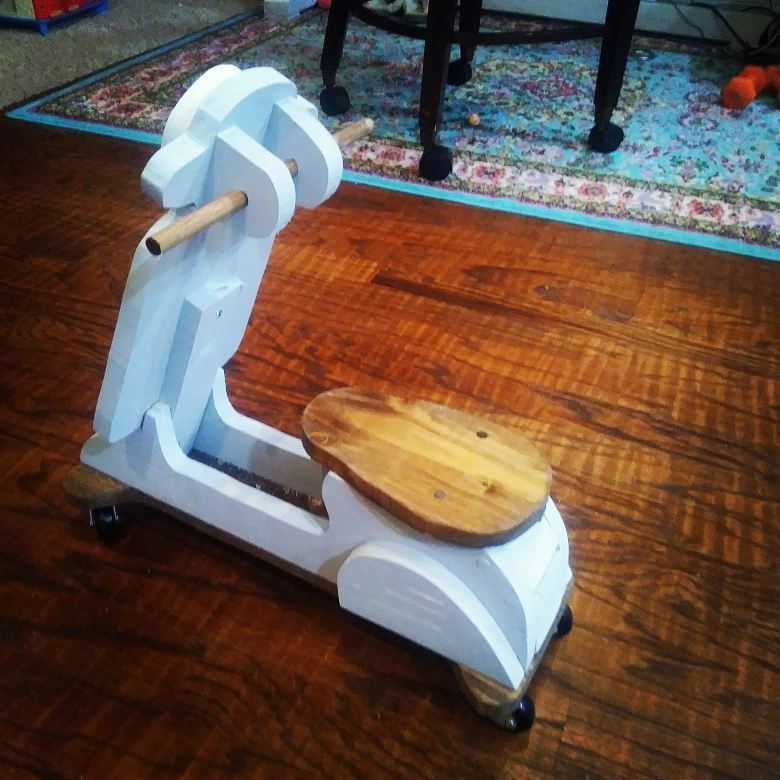
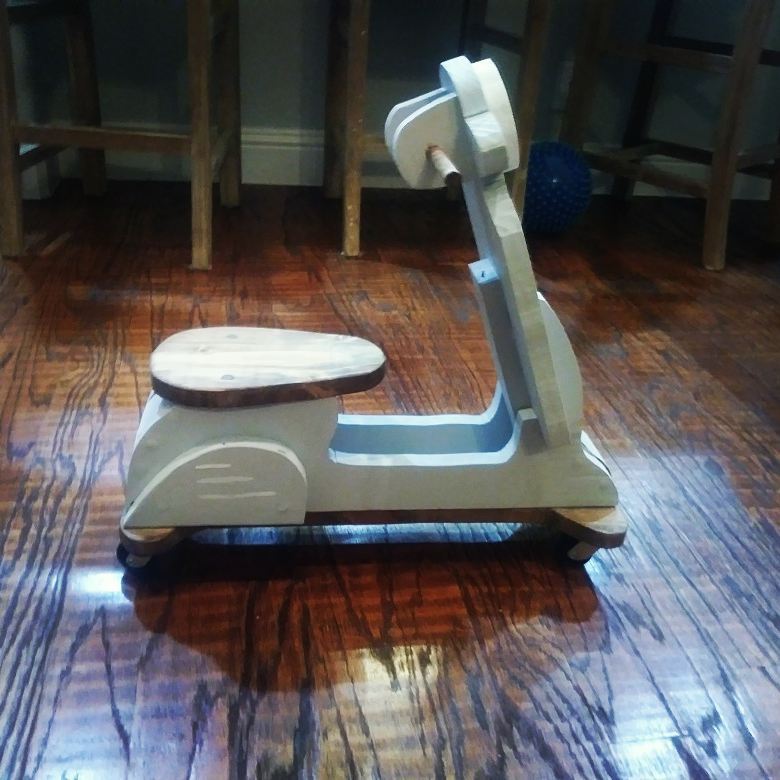
I made the plans a little different. I had more support to the front, made the base wider, and added swivel wheels instead of rockers.


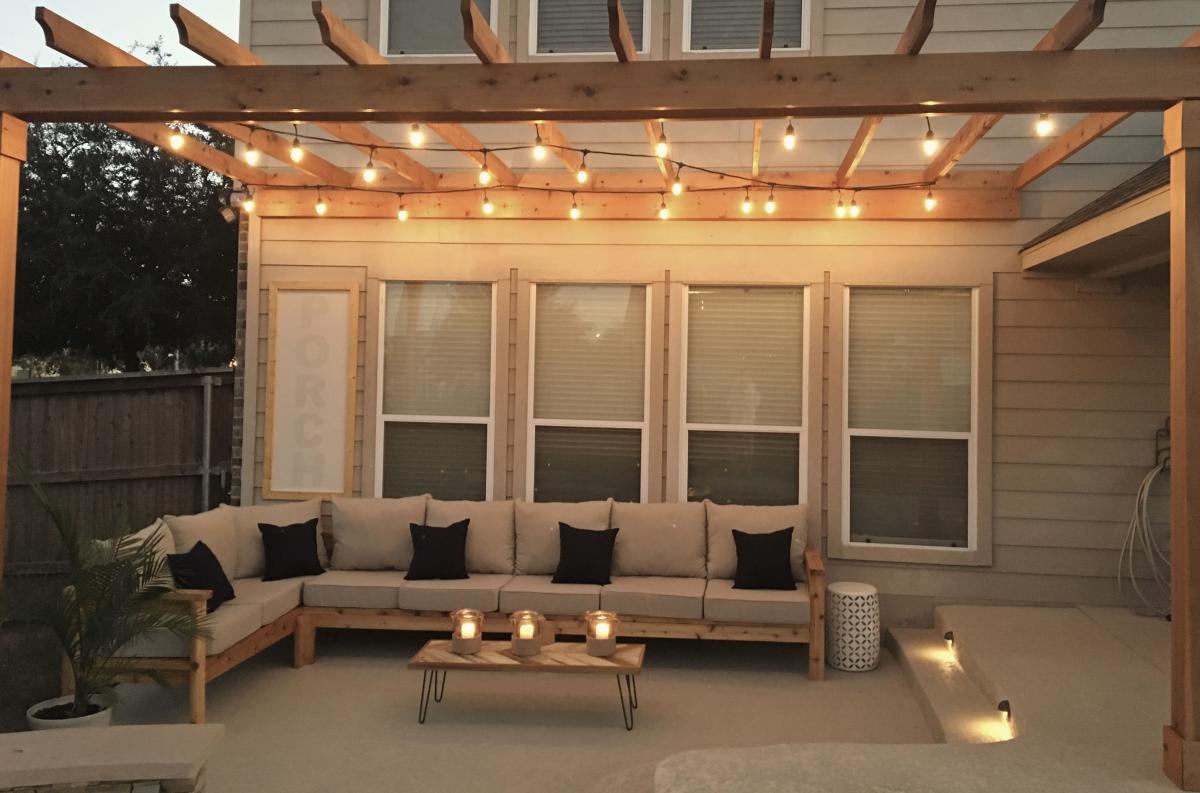
OK, I think this build may be my biggest project yet! It is definitely the heaviest. With the strong winds we can get here in Florida we needed substantial outdoor furniture.
I did make some modifications along the way measurement-wise so the sofa would fit my front porch better. All in all, this took 2 full days. I built the sofa first, stained it the next day and then decided (due to trying to get stain in all the nooks and crannies) to stain the chair pieces first before putting it together.
I am so happy with the results and so far, almost a year later, this furniture looks great and hasn't moved an inch in any of the thunderstorms we've had! Thank you Ana!!


I've been planning on building a patio table for this coming spring and summer, but didn't know where to begin. I found Ana's wonderful site and now I don't know where to stop! So many great ideas.
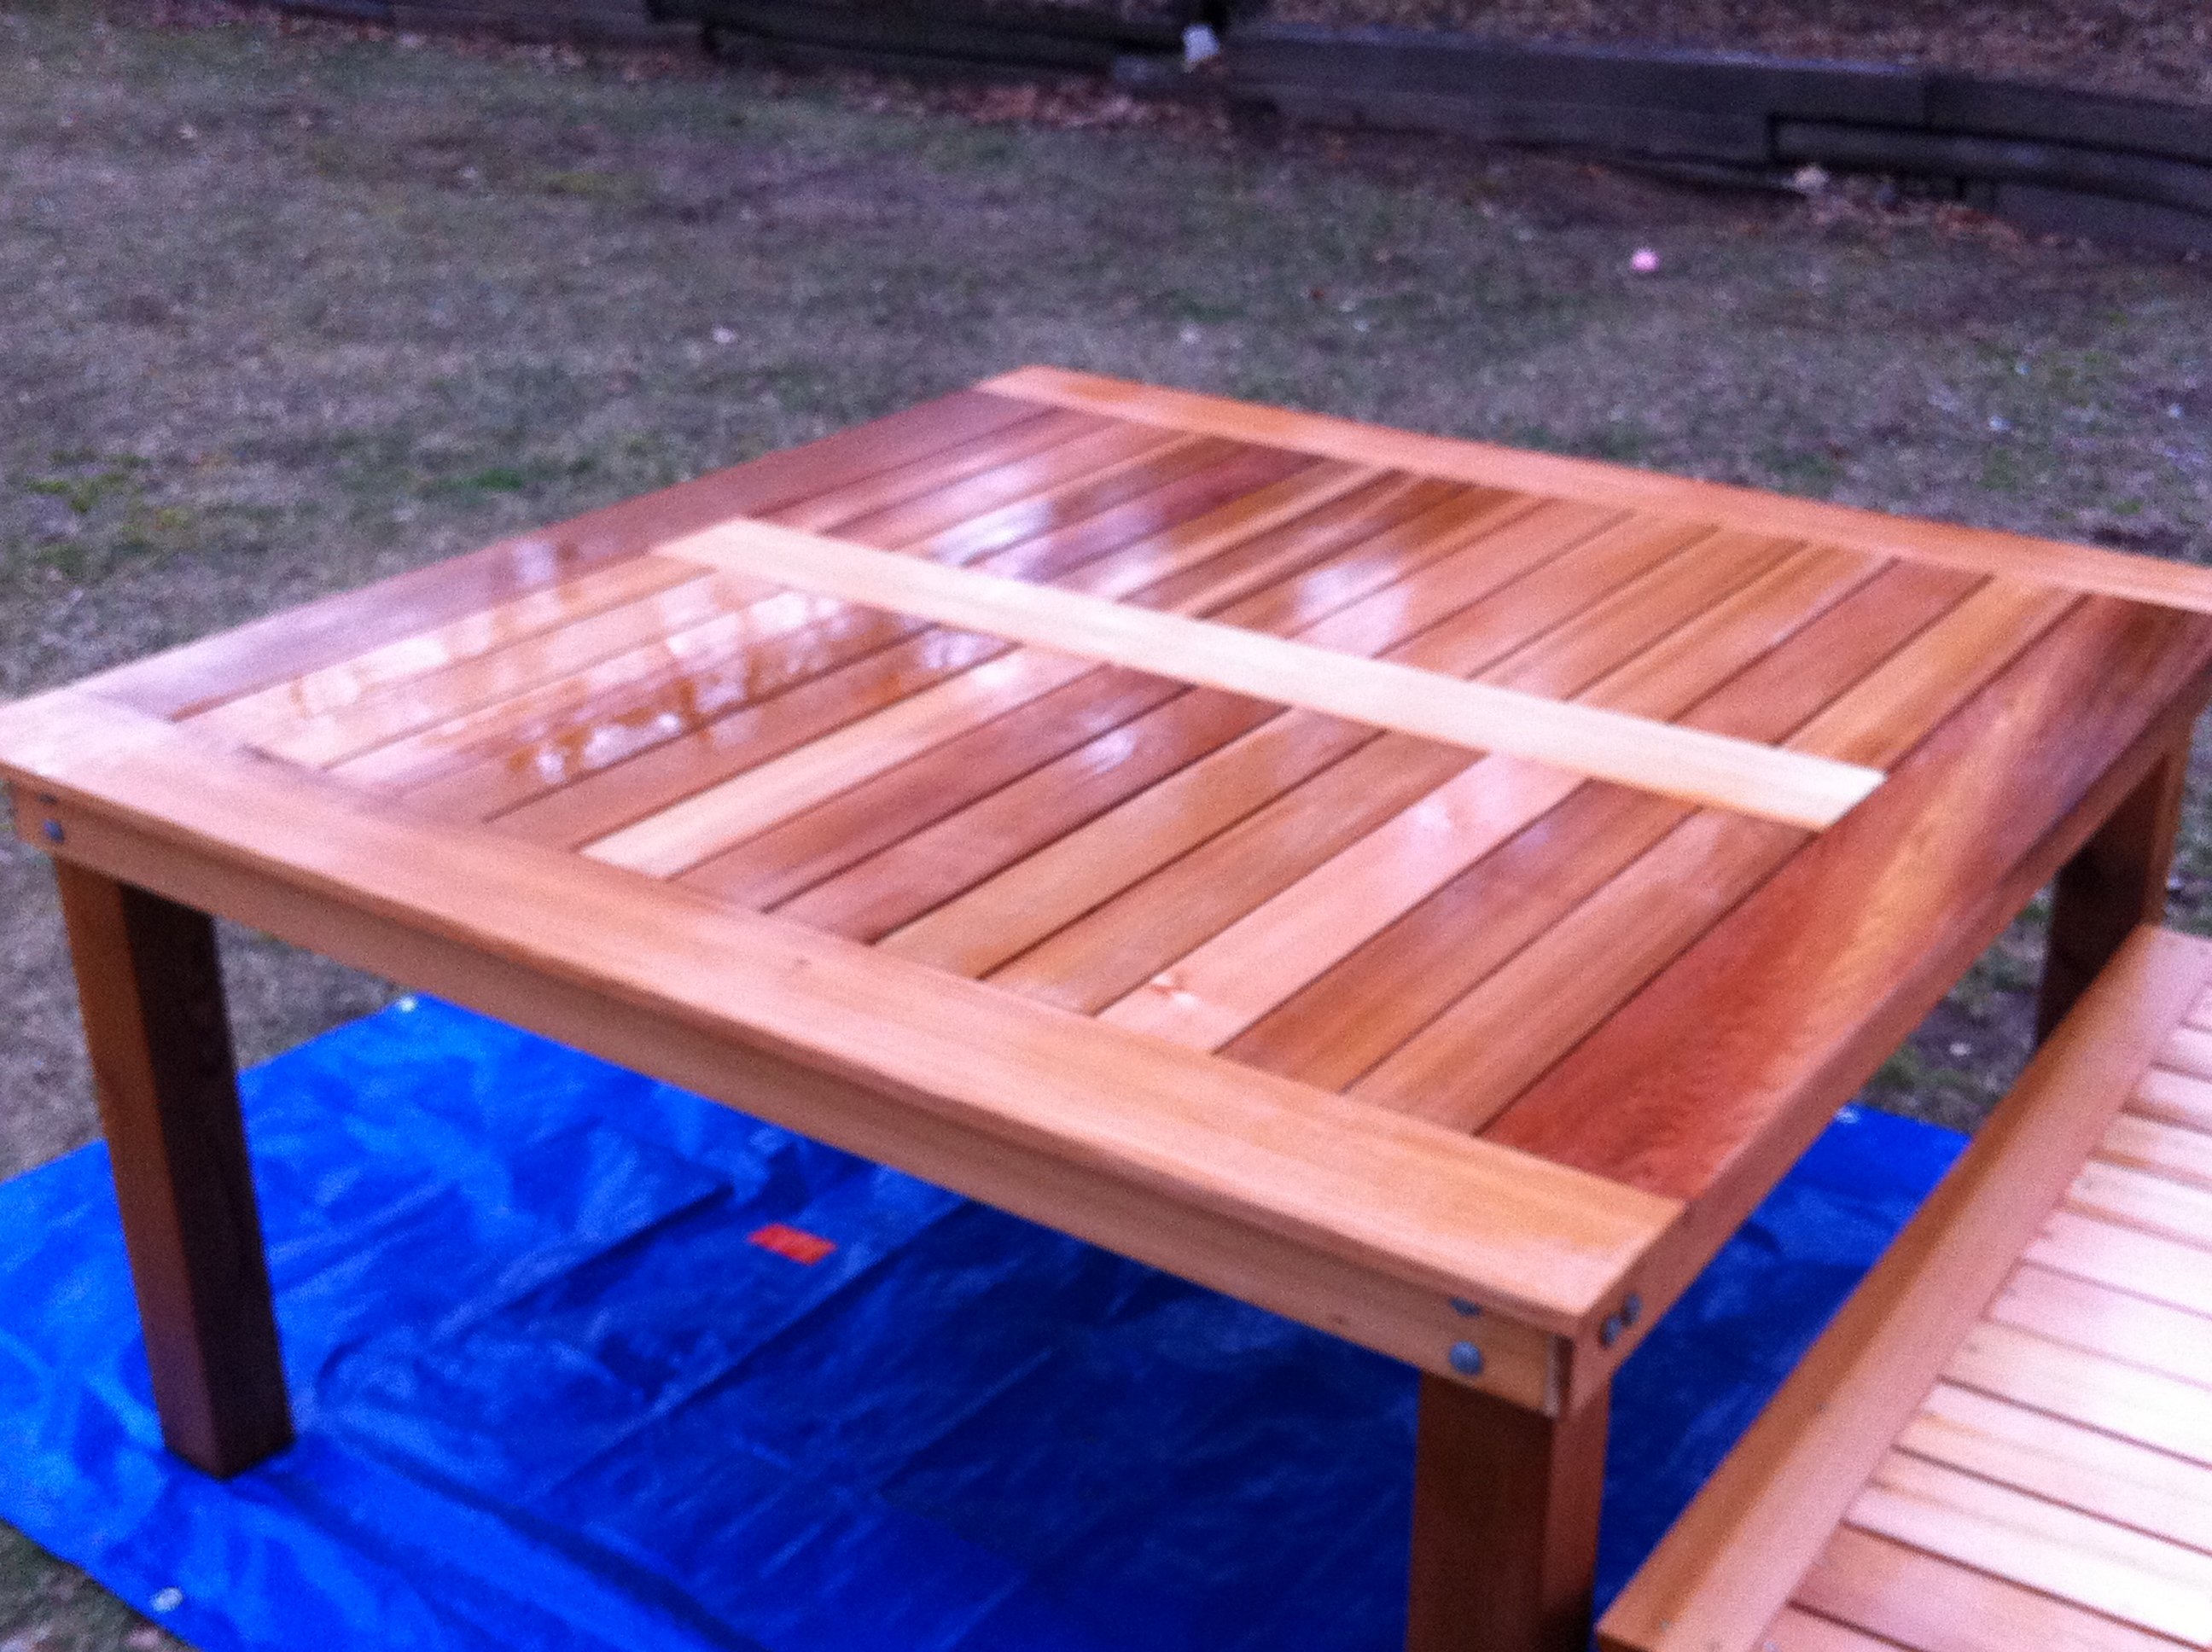
After seeing ewood's great table I decided to make one similar. I made my square table based on Ana's and ewood's basic designs. Thank you both. I also made a bench based on Ana's design.

Sun, 03/18/2012 - 16:36
That looks like it could handle a big and boisterous group. The cedar and the finish are beautiful.
Thu, 03/29/2012 - 07:37
I have a family of 7 (soon to be 8, I hope), and was trying to figure out how to fit us all on the rectangular table. This is the solution! I can simply make 4 benches to go with it! Thanks for the idea and the picture!
Mon, 04/09/2012 - 07:24
Love this table and your modifications to ewood's table. I was wondering what size are the legs on your table - I can't tell if they are 4x4s...which is sort of what I'd like to have on mine. And they are under mounted, which I love because I want to make ours with the ability to remove the legs for reduced storage space in the winter. If you could would you mind putting a few close up photos of how the outside corner came out and the underside of the corners. It would be much appreciated.
Mon, 04/09/2012 - 07:27
Love this table and your modifications to ewood's table. I was wondering what size are the legs on your table - I can't tell if they are 4x4s...which is sort of what I'd like to have on mine. And they are under mounted, which I love because I want to make ours with the ability to remove the legs for reduced storage space in the winter. If you could would you mind putting a few close up photos of how the outside corner came out and the underside of the corners. It would be much appreciated.

In reply to Questions :) by K_W (not verified)
Sat, 04/14/2012 - 13:35
Hi - sorry it took a little while to get back to you. Yes the legs are 4x4's. I used knotted cedar 4x4's for the legs and made them 29" tall. I wanted to be able to disassemble the table and put it away for winter, so I attached the legs using carriage bolts, 2 per side (4 total per leg). I drilled holes using a pilot bit, then used a spatter bit to make the larger holes for the carriage bolt.
I didn't bother to counter sink them, but if I made another I think I would try that to make a more polished look. The legs are sturdy, the table doesn't wobble at all, but I am sure that someone with more furniture building experience might have a different/better idea.
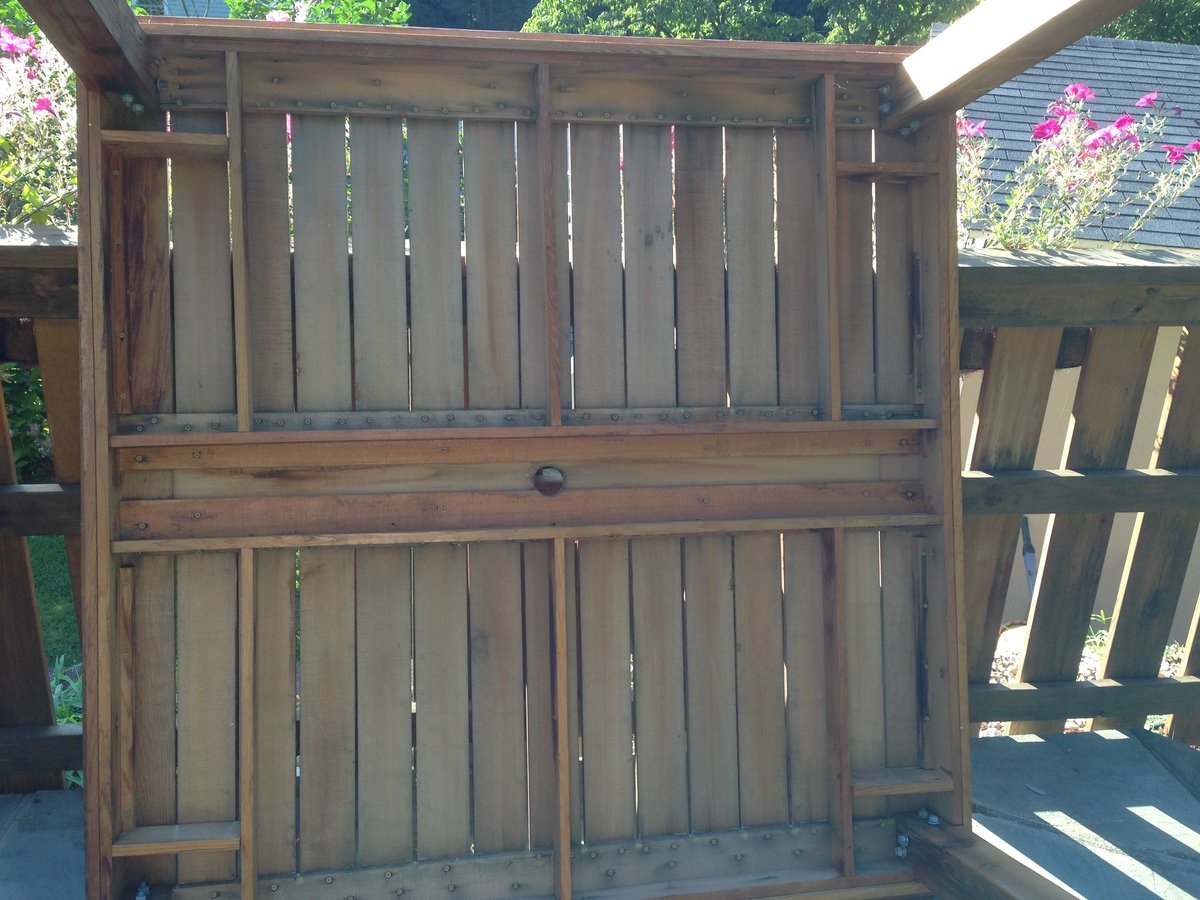
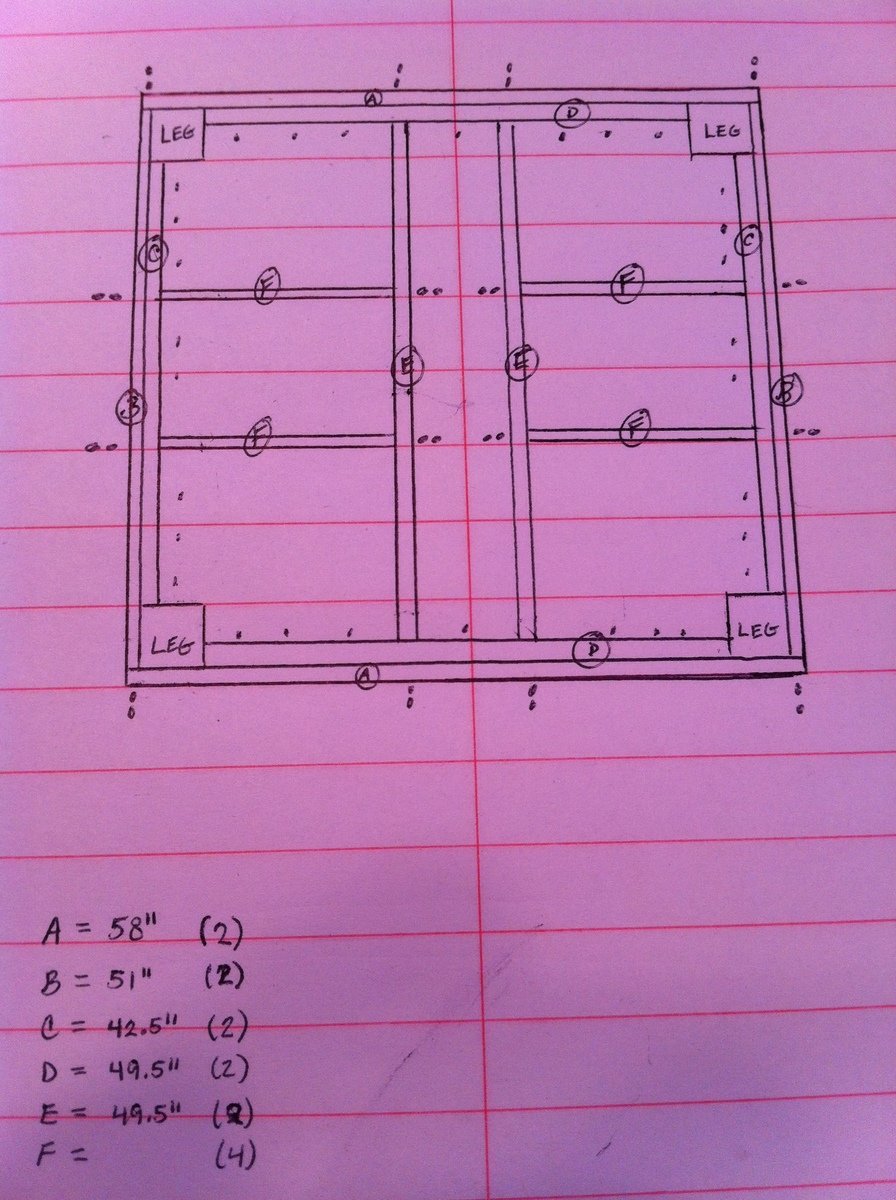
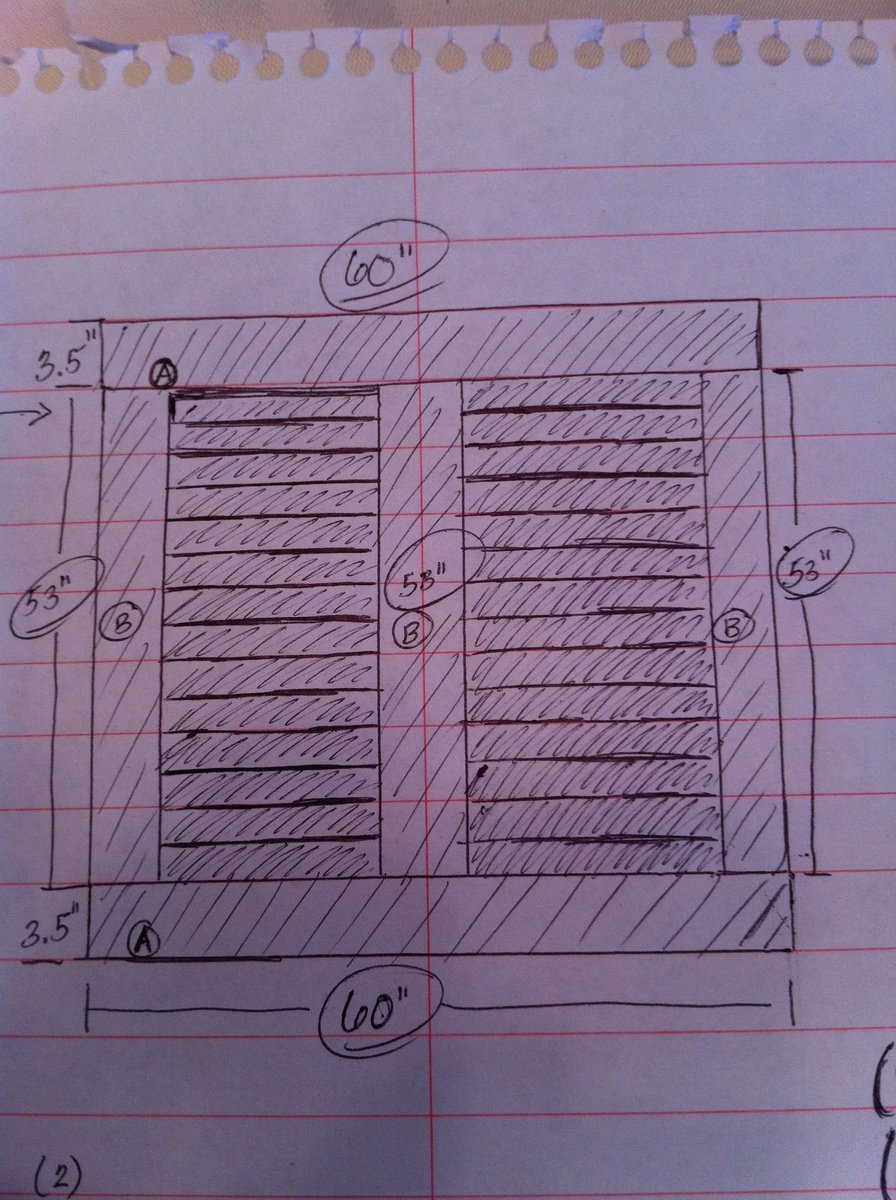
I've added a couple more photos showing the corners, outside and underneath. I've also added my very basic plans that I used to make the table, one of these days I will study Ana's post of how to use sketch-up, until then this is what I worked with.

Wed, 06/06/2012 - 09:26
Can you tell me what size (width) boards you used on the frame pieces of the table, and what size on the inner boards? From your diagrams, it looks like the frame is made of 1x4s, but the inner pieces look smaller. Thank you !!!
Your table is absolutely beautiful. It looks like a very high-end piece of furniture. One of my favorite things is how the carriage bolts are installed -- I wouldn't change a thing on them!
Tue, 07/30/2013 - 16:36
Sorry it took so long to reply - I didn't see your post. So far the table is holding up well.
You're right, the top is made from 1x4's, including the inlaid slats. To support the top, I cut 1x4's down to 1x3's so they remain hidden by the side 1x4's of the frame.
Tue, 10/16/2012 - 18:02
Love the table - looks absolutely fantastic! I have been looking for a decent square outdoor table for ages and this one certainly fits the bill.
Can you please add a photo of the underside of the table and advise how you fastened inner boards on table top. Thanks.
In reply to Question by Aussie Paul (not verified)
Tue, 07/30/2013 - 16:40
I added a new photo of the bottom. Hopefully this will help show how I attached the top. I have a number of additional photo's I can send to you if you like - this site limits the number of photos I can add.
Everything is attached from the bottom to hide the screws. I used a kreg jig and it helped so much - i really recommend it.
Wed, 08/14/2013 - 12:35
I love the look of this table, man - I think I'm gonna steal some ideas from this.
I have a question about your top, though. The slats look to be 1x4s, which I can understand, but the edges seem to be a bigger size.
Did you use 1x6 boards for the edges? 1x8s? Something else?
Thanks for your help.
Mon, 09/02/2013 - 11:03
Thank you - please take any ideas from it that you can. That is what I love that about Ana's site. You can take these great ideas and make them fit your own style...
You're right - the table top is made of 1x4's and 1x6's. When i put the top together I made the frame first. Then I added the exterior 1x6's. Next I added the center 1x6. Lastly I cut each 1x4 to size and added them.
Sat, 05/17/2014 - 07:15
This is an amazing table, it is beautiful! I am somewhat new to wood working and was wondering if there was a material list? I plan on creating this in AutoCAD first, so I have a visual to work off of. Also what did you use for spacing in between the boards or what was the allowance of space.
Thanks again, your work is beautiful!
Wed, 06/17/2015 - 11:48
Great table…any chance you can share the plan and material list? Cheers

Wed, 04/22/2020 - 20:37
In looking at the plans and the underside of the table, there are some measurements missing that make it a little hard to decipher. It would be good to know the lumber sizes e.g. 1x4x8 etc. the underneath side seems to have some additional boards that don’t seem to be in the drawing. I was just wondering if it might be possible to get some additional details?
Sun, 05/24/2020 - 08:05
This is a beautiful table and I'm going to try and replicate in a rectangular version. Primary question I have is what length screws you used to affix the framing pieces underneath to the top side so that the wood doesn't split and that the screws don't pop thru the top. Any help you can provide would be appreciated, if even you still look at this page. Thanks in advance!
Comments
Juan Butler
Wed, 02/21/2024 - 10:27
I'm building the sectional…
I'm building the sectional this weekend, and saw your addition to the end piece and am going to steal your idea. Very nice.