Search Results
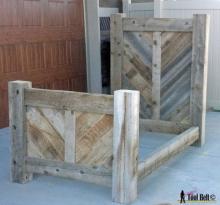
… Pin For Later! … The finished bed will be large in size and may not fit through a door opening. You … materials. *Some parts missing to enable a better view of interior of bed … IMPORTANT: Check bed for square. Take diagonal measurements from opposite outside …
Read More
Project Plan
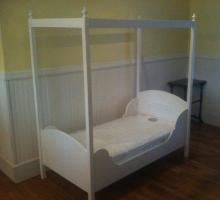
… something a little more on the handsome side, don't despair. This bed can be easily modified for any prince. Check out what Restoration Hardware Baby & Child does with a fancy sleigh bed here. Just cut the legs at 22 1/2" and make the … yours taller if you would like. … It is highly recommended for this bed that you use a Kreg Jig™ to predrill all holes. This will make the …
Read More
Project Plan
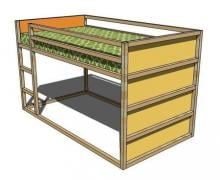
… suprise! Yesterday I felt a little guilty putting up a teen loft bed and not a tot one too. So Grace and I went "shopping" in Google … up with this . . . And Grace (and my niece Hannah) called it a "fort bed" Because they want to hang curtains up and make a fort. Your … is your only limitation on this project. Image from Ohdeedoh This bed (purchased from IKEA) got the chalkboard treatment. Love this idea! …
Read More
Project Plan
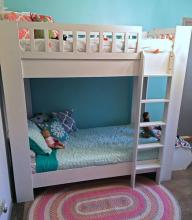
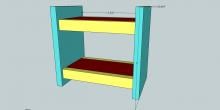
… to the legs from insides with screws. I'd prefer glue as well, if the bed is not to be disassembled. … Build the end railing with 3/4" pocket … Again, prefer glue if possible to use. … Repeat steps to build the bunk bed back guardrail. … Build the ladder with 3/4" pocket holes on … beds. Place at height desired for mattresses (recommend lower on top bunk and higher on bottom bunk. Screw slats on top of cleats to keep in …
Read More
Project Plan

… me. Or a few steps ahead of me. This is Lydia's king size upholstered bed that she made in about 8 hours for a little over $100. And the best part? You too can make this upholstered bed with these plans without even having to sew! That's right, no … shown above to the frame. Use 2″ screws and glue. … Here is Lydia’s bed at this stage. You also might want to paint or stain your legs at …
Read More
Project Plan

… will measure 82x18”. It is 2” wider than the overall width of the bed, and three inches taller than the roof frame. I wanted my panel to … detail! The pergola consists of 4 brackets installed along the lower bunk of the front panel with bracing in between. Attach the pergola … over the windows and longer pieces (33 ½”) will fit over the lower bunk opening. These are cut to fit as the trim pieces can be slightly …
Read More
Project Plan
… showing in the front. On the front side route out a pocket for the bed rail 1″ deep, 3″ wide and 6″ tall according to the diagram. … Next … showing in the front. On the back side route out a pocket for the bed rail 1″ deep, 2″ wide and 6″ tall according to the diagram. … Next … as necessary. These are the head/foot board center dividers. … Cut 2 bed rails that are 2″ x 6″ x 77 1/2″. Cut 2 bed rail supports that are 1 …
Read More
Project Plan

… This bed plan does not require a brad nailer, but having a brad nailer will … from scrap 2x4s will make assembly much easier. … Screw the headboard bed frame piece to the headboard. … Attach bed frame legs to center bed frame support with 3" screws. … Screw bed …
Read More
Project Plan
… be o.k. :) First cut all your pieces as listed above. … Assemble each bunk, see the picture above (4 5/8 pieces are yellow and 2 1/8 pieces … dry. … Once the glue has dried glue the 2 1/8 X 4 5/8 pieces to each bed. Let the glue dry. … Glue each bunk onto one of the end boards (5 X 3 1/4). The side rail of the bottom …
Read More
Project Plan
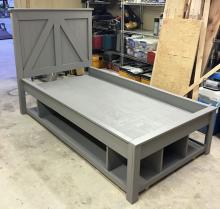
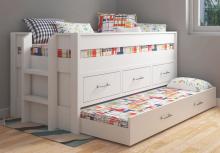
… image by Ana White One of the challenges with designing storage bed is obviously adequately supporting your mattress and creating the storage zones as actual structures that support the bed. We love this plan because there is SOOOO much storage! You can … in there! I was on the fence about slats vs plywood for the bed top - plywood isn't entirely necessary, especially if you have a box …
Read More
Project Plan