
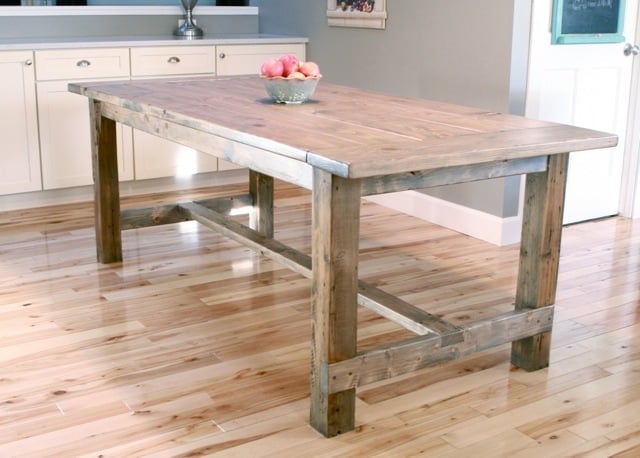

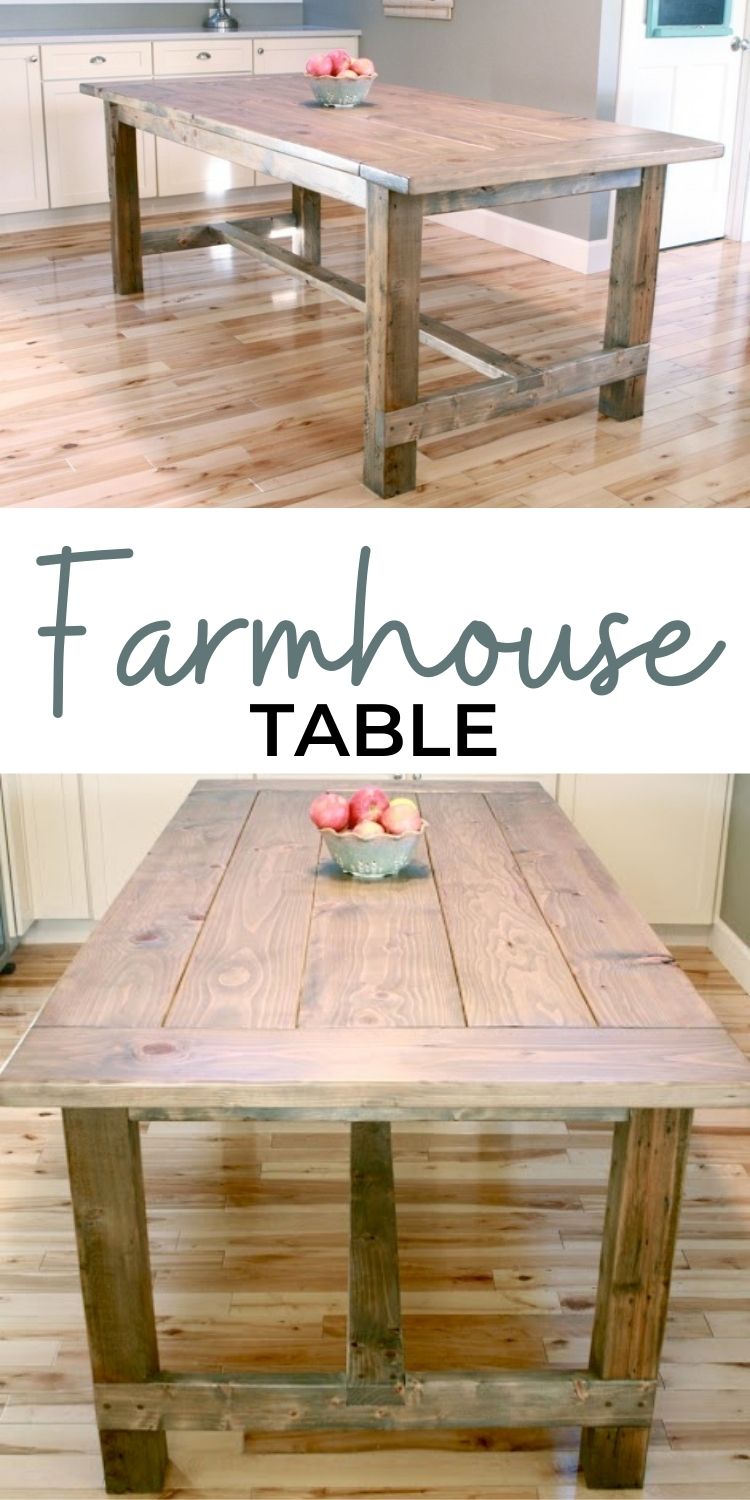
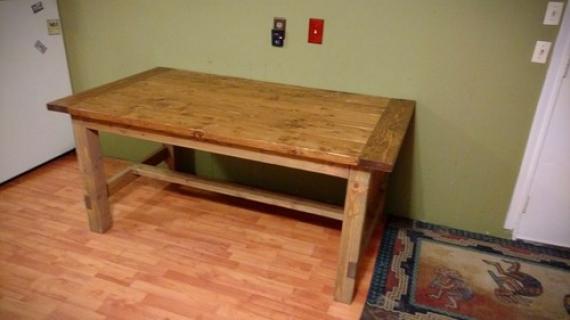
Free plans to build a Farmhouse Table. This table has been built tens of thousands of times and is loved the world over for it's basic material composition, simple clean lines, easy to build steps, and sturdy, functional size. Our step by step plans with diagrams make it easy.
This plan uses pocket holes and is the updated plan. We also have this plan available to build without pocket holes.
Farmhouse tables can cost thousands of dollars.
The good news is you can build your own for between $100-$200, and it will be sturdy, repairable, and have a rustic wood top to beautify every meal.
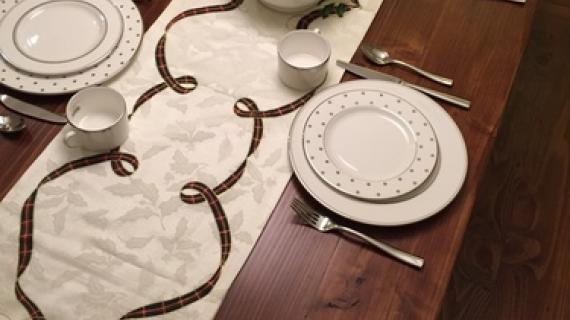
A DIY Farmhouse Table has a rustic wood top that beautifies every meal.
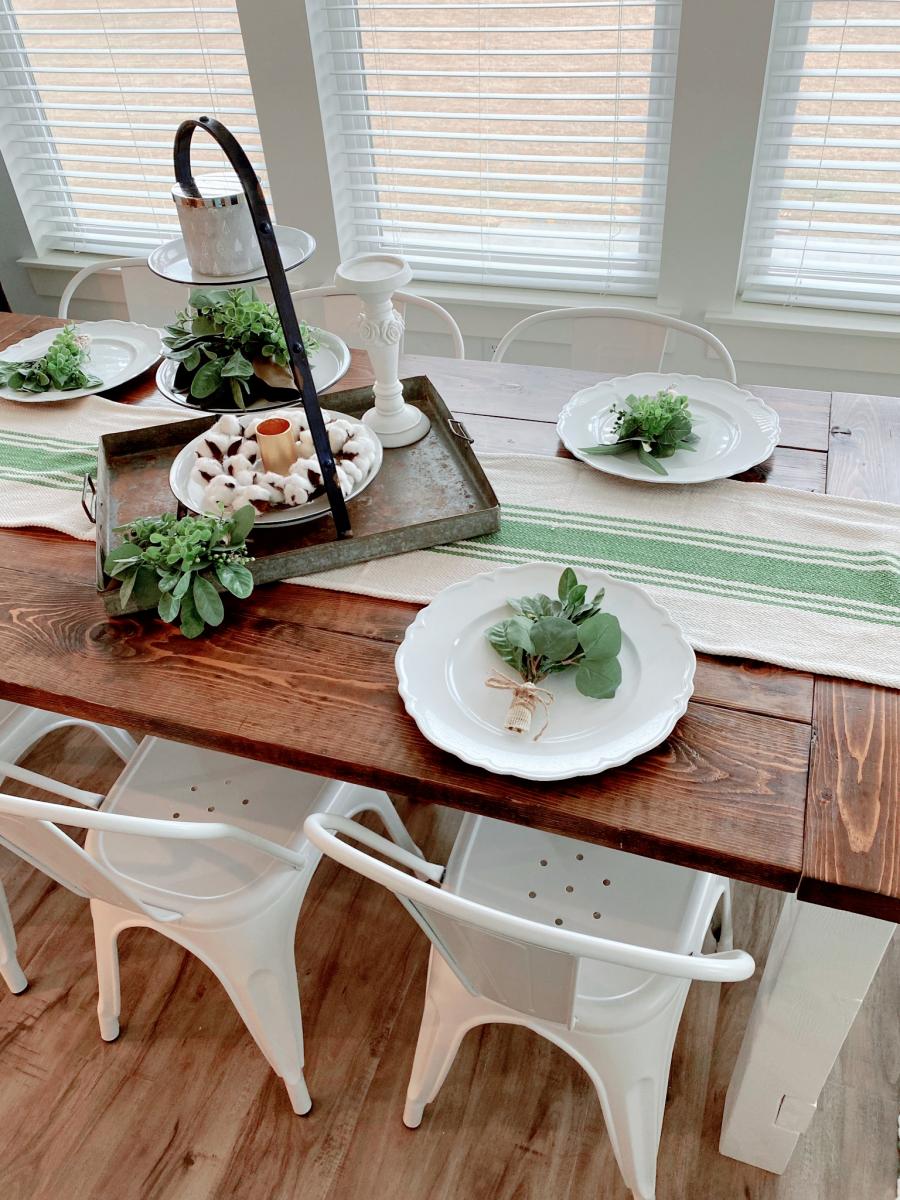
Paint or stain, or both, to make your farmhouse table beautiful and unique.
A DIY Farmhouse Table will cost about $100-$200

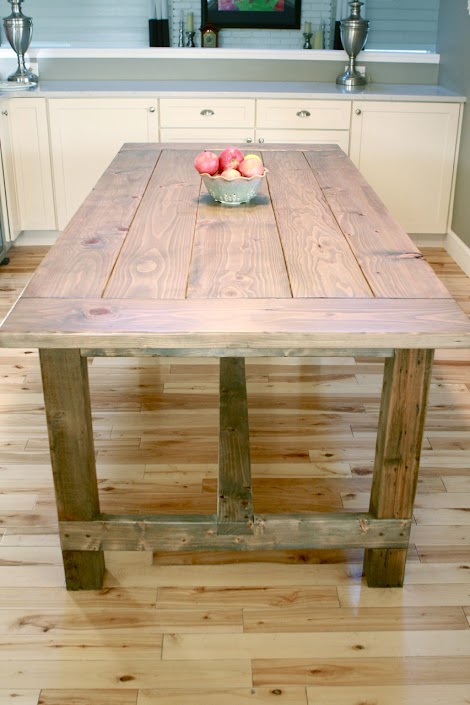
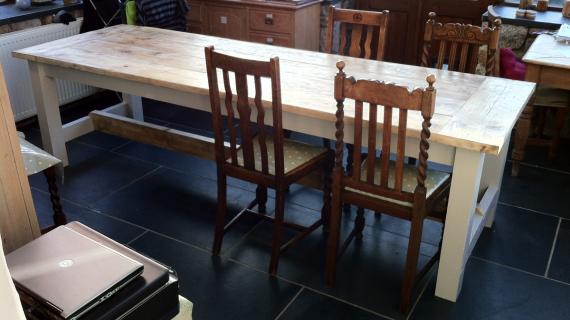
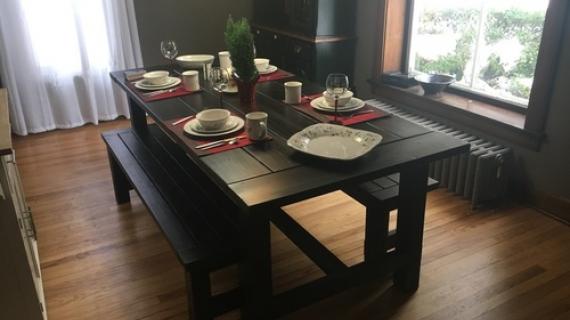
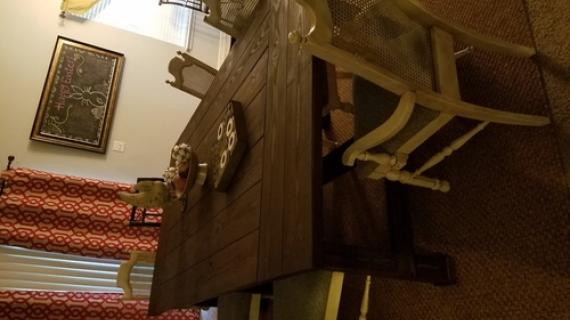
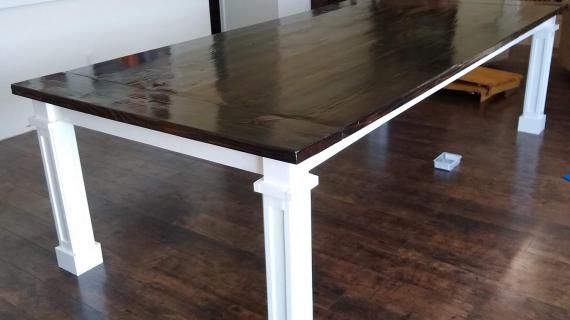
Built by Hillary at The Friendly Home, we upgraded the farmhouse table for pocket hole joinery (no visible fasteners) and easier construction.

Hillary made this table with pocket holes instead of adding the 2x2 supports as done in the original plan, saving a ton of cuts and holes to be drilled, which saves time and money.
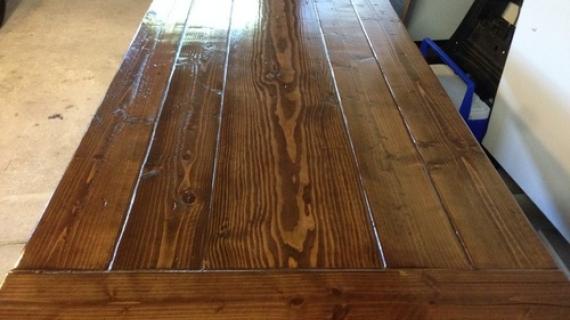
Also, by using pocket holes, we hide most all of the screw holes, so a beautiful stained finish like Hillary's is very easy to do.
The easy to do pocket hole plan follows if you want to build this table.
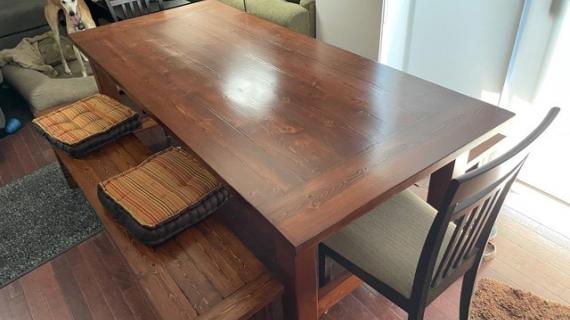
And as always, Hillary delivers a beautiful finish, and you can get all the details on how Hillary finished her table here. I love the stain color and will have to try it as well!
PS - Don't have a pocket hole jig? Here's the original Farmhouse Table Plans.
PSS - Have trouble finding 4x4s? Check out this beginner friendly 2 Tool/$50 Farmhouse Table plans
Pin For Later!
Preparation
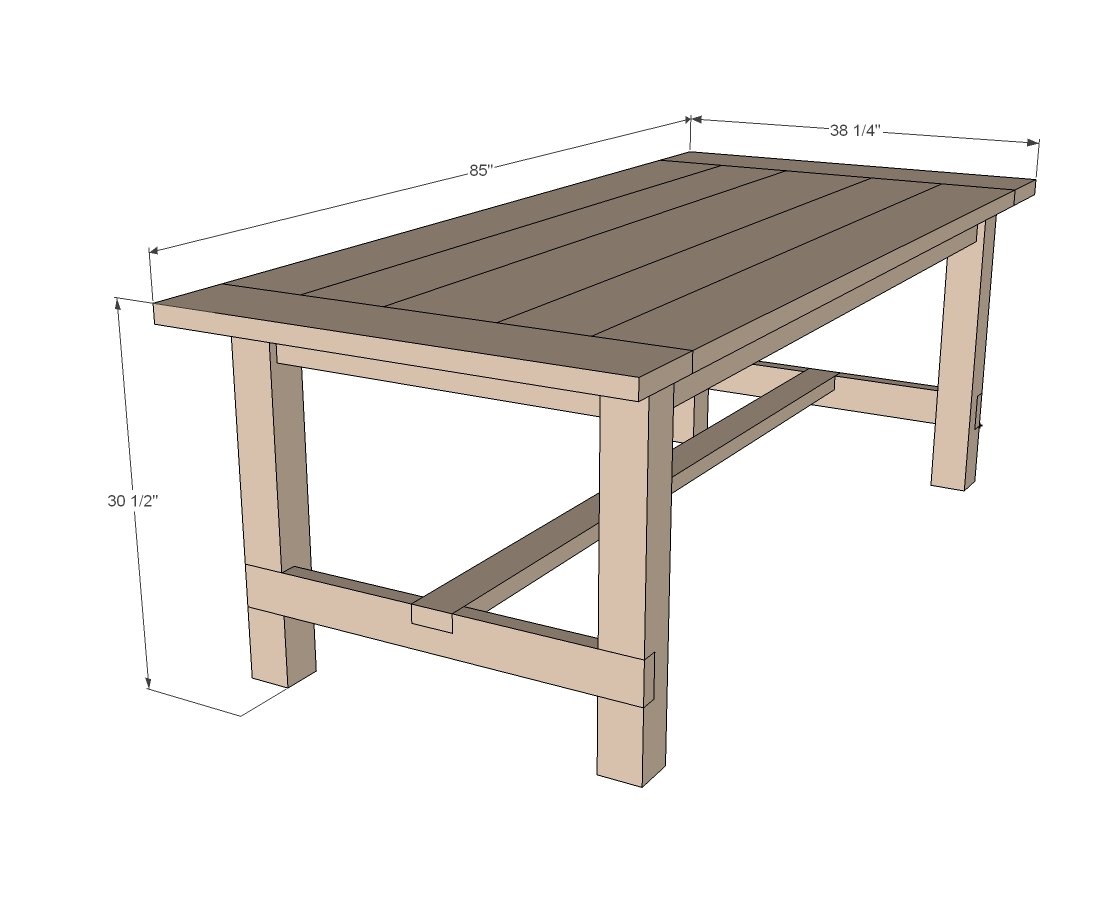
- 4 - 2x4 @ 8 feet long
- 1 - 4x4 @ 10 feet long
- 4 - 2x8 @ 6 feet long
- 1 - 2x8 @ 8 feet long (breadboard ends)
- 1 - 2x10 @ 6 feet long
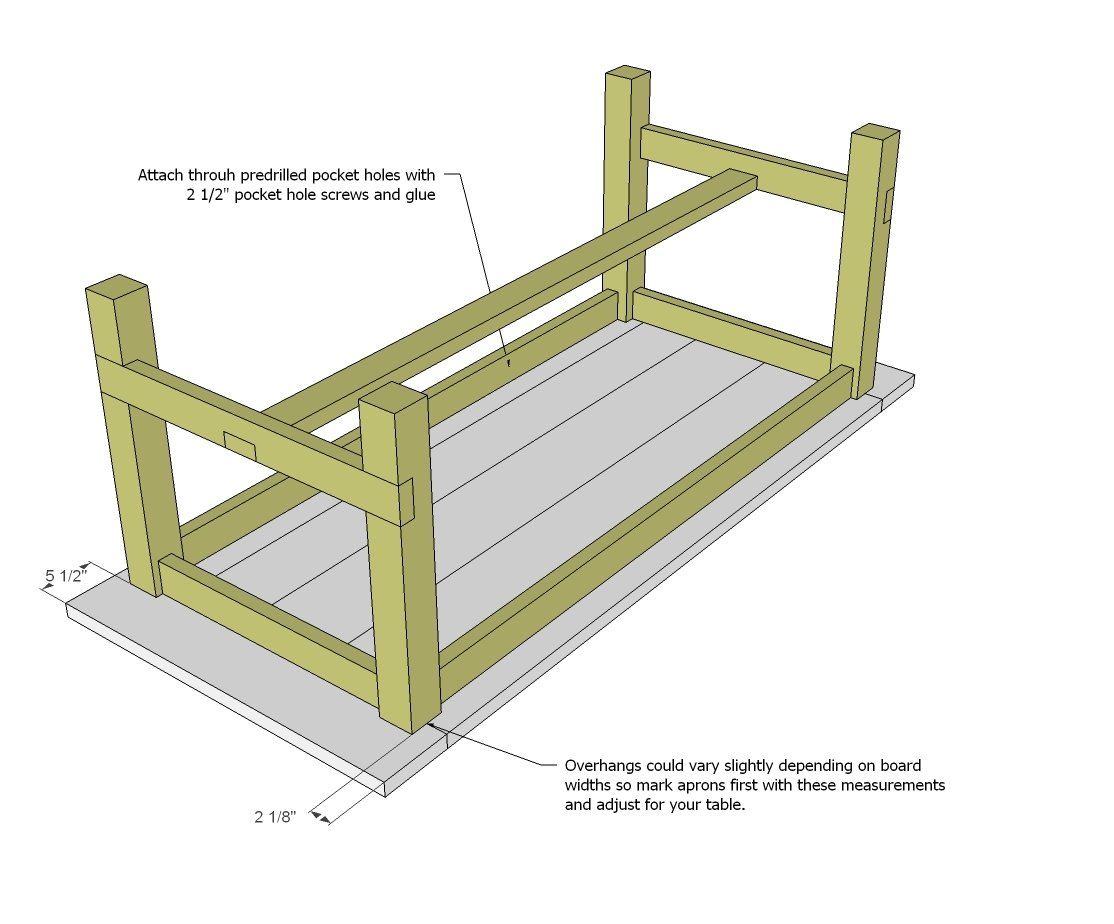
- 4 - 4x4 posts @ 29" (legs)
- 2 - 2x4 @ 67" (long aprons)
- 2 - 2x4 @ 27" (short aprons)
- 1 - 2x4 @ 74" (stretcher)
- 2 - 2x4 @ 34" (stretcher supports)
- 4 - 2x8 @ 70.5" (table top planks)
- 1 - 2x10@ 70-1/2" (center table top plank -- I had to use one 2x10 to get the right overall width)
- 2 - 2x8 ~38" (breadboard ends -- measure your joined tabletop before cutting these)


Please read through the entire plan and all comments before beginning this project. It is also advisable to review the Getting Started Section. Take all necessary precautions to build safely and smartly. Work on a clean level surface, free of imperfections or debris. Always use straight boards. Check for square after each step. Always predrill holes before attaching with screws. Use glue with finish nails for a stronger hold. Wipe excess glue off bare wood for stained projects, as dried glue will not take stain. Be safe, have fun, and ask for help if you need it. Good luck!
Instructions
Step 1
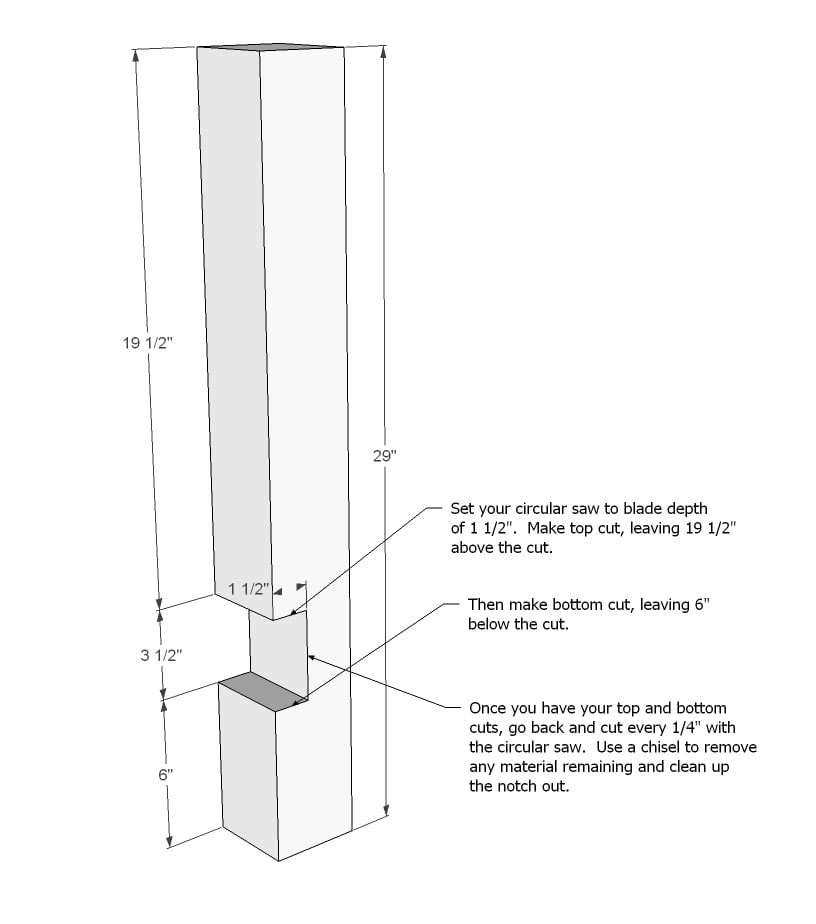
First, cut and notch out the 4x4s. If you can get your home improvement store to make square cuts, ask them to cut your 4x4s. Otherwise, you'll need a 12" (maybe a 10" will work too) miter saw or set your circular saw to the deepest possible cut. Cut one side, flip the 4x4 and finish the cut on the bottom side. Sand until cut is smooth. You'll probably add cork or felt pads under the legs later on to level table up and protect your floor.
Then notch out the stretcher joint as shown in diagram. Definitely practice first on a scrap if you can. This is easier to do than it looks - just be sure to get the top and bottom cut right, and it will all work out!
Step 2
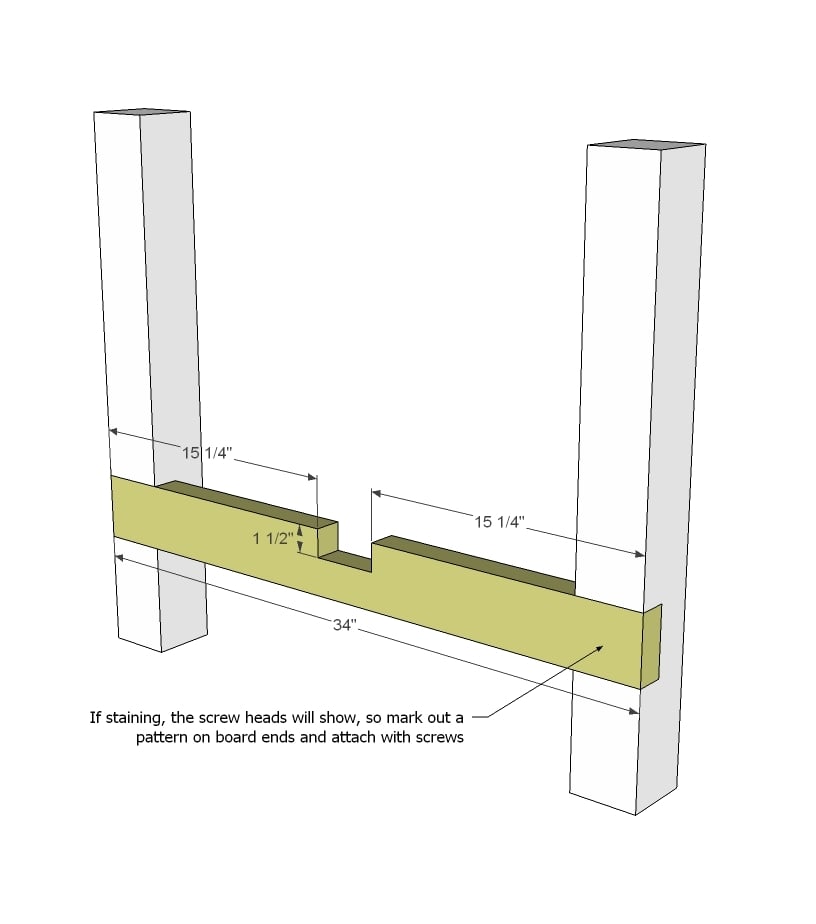
Notch out the stretcher support board first, then attach to the 4x4s. Remember the screws will show here, so drill in pattern. Use 3" screws to attach.
Do both ends.
Step 3
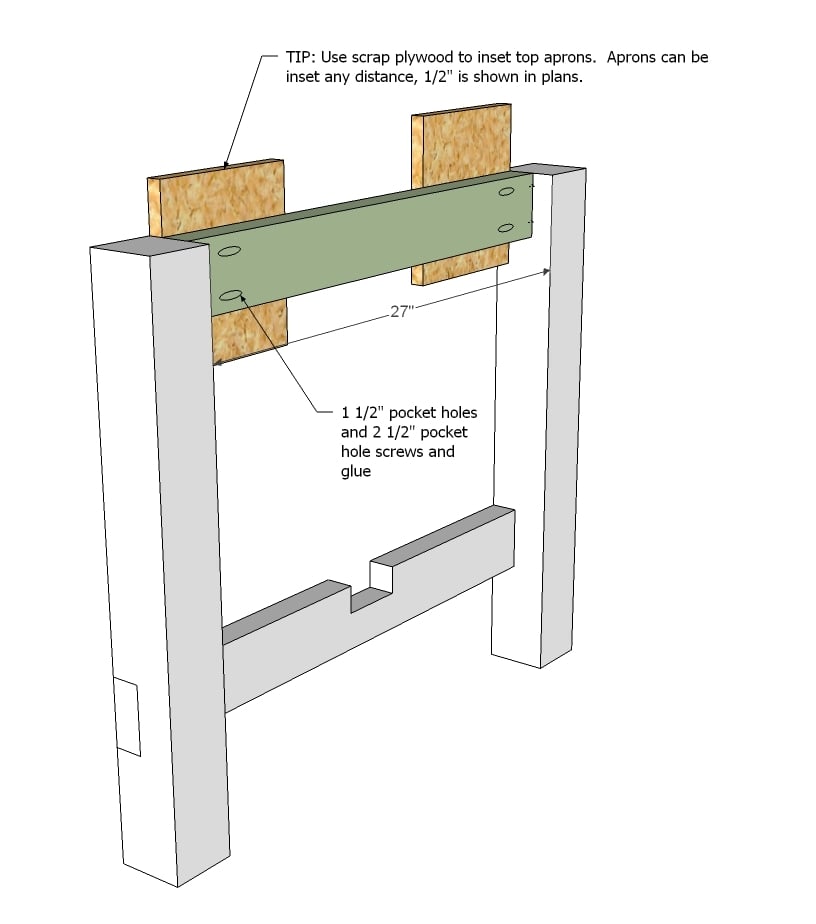
Then add your top aprons with 1 1/2" pocket holes and 2 1/2" pocket hole screws.
NOT SHOWN: Drill 1 1/2" pocket holes on the insides of your aprons facing upward for later attaching the the tabletop too. Drill three holes per end apron.
Step 4

Now attach the two ends together to create your table frame.
NOT SHOWN: Drill 1 1/2" pocket holes on the insides of your aprons facing upward for later attaching the the tabletop too. Drill five holes per side apron.
Step 5
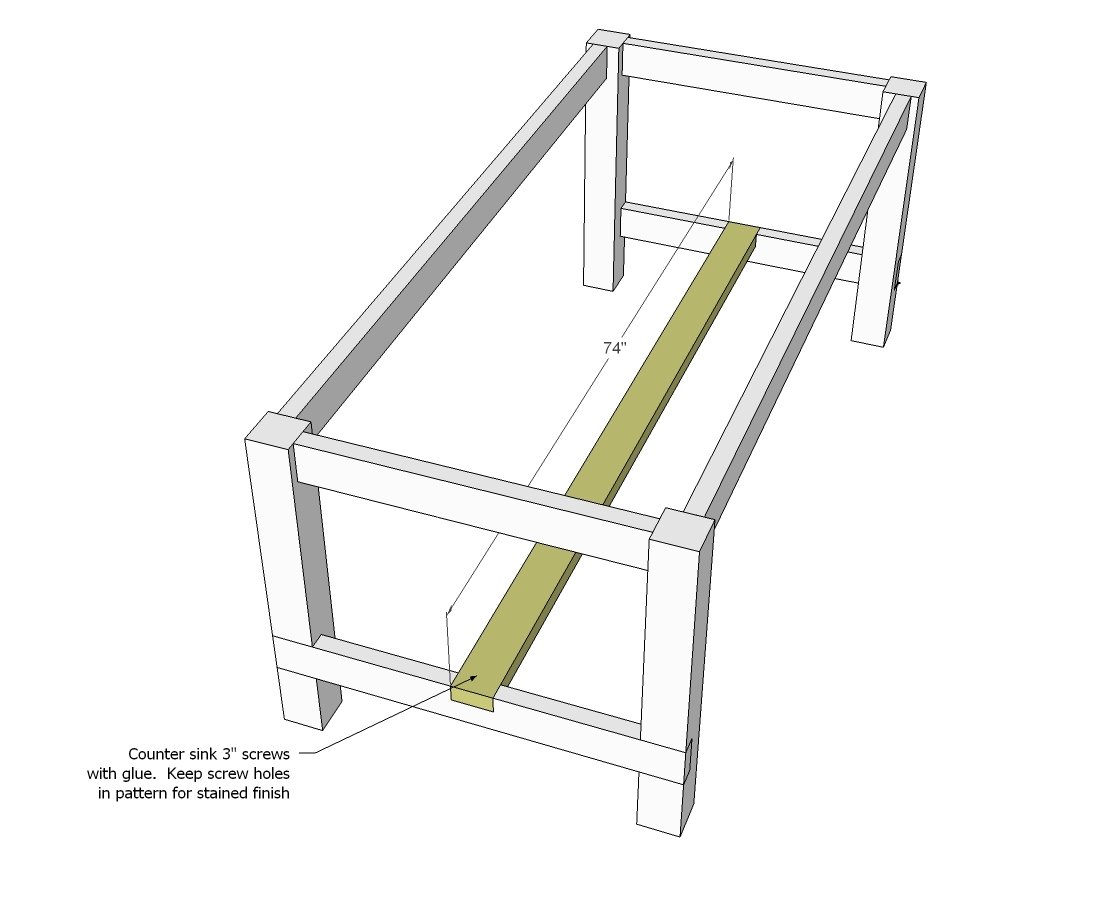
Attach base stretcher with pocket holes underneath.
Step 6
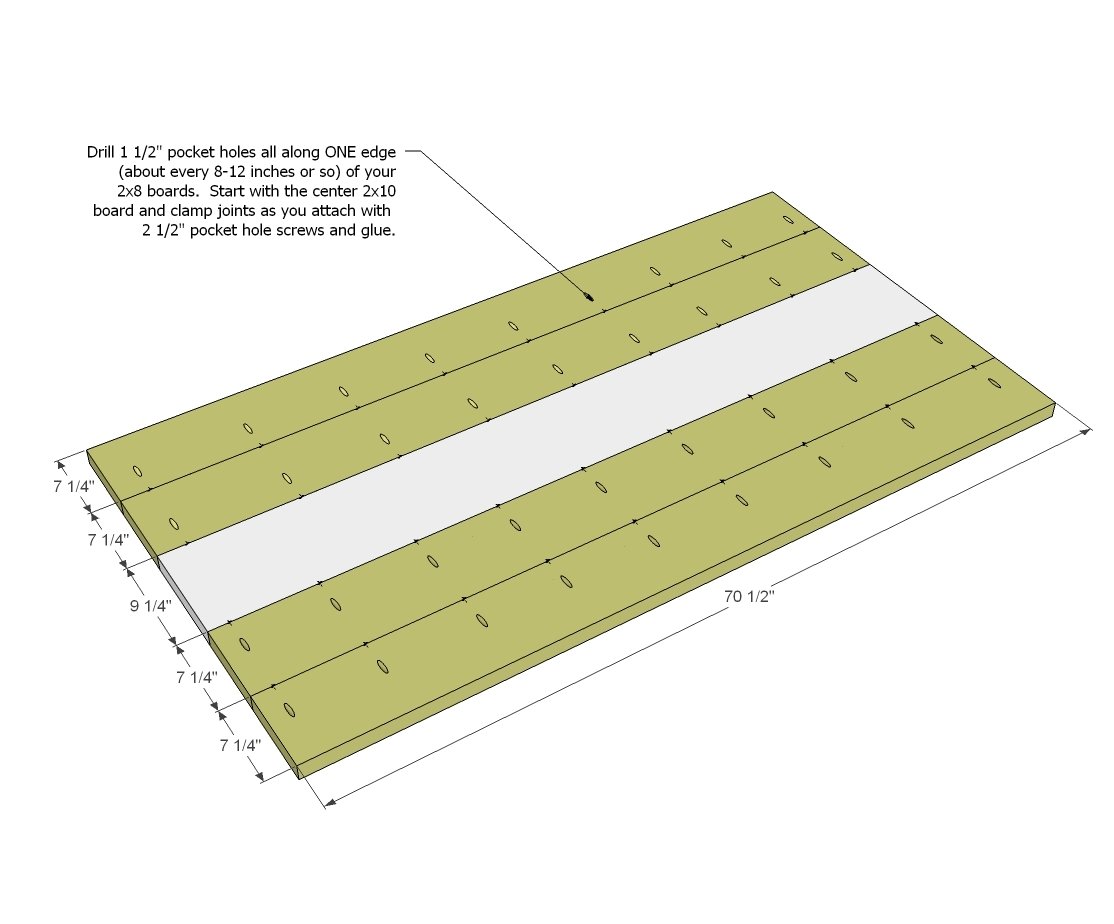
Now start building your tabletop.
Step 7
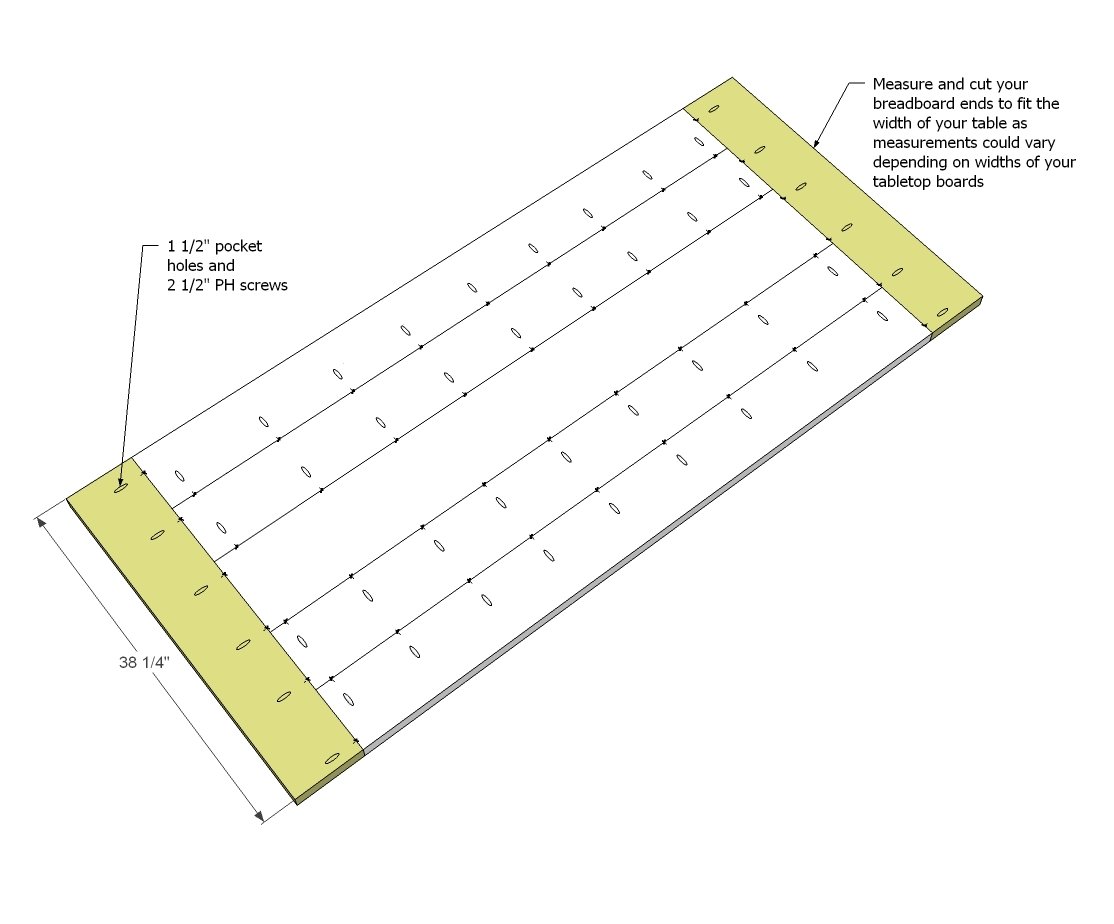
Measure and cut your breadboard ends to fit and attach to tabletop.
Step 8
Then attach the base to the tabletop through predrilled 1 1/2" pocket holes with 2 1/2" pocket hole screws.
It is always recommended to apply a test coat on a hidden area or scrap piece to ensure color evenness and adhesion. Use primer or wood conditioner as needed.


Comments
robsayson
Wed, 04/22/2015 - 11:49
I built 3 of these already.
I built 3 of these already. The type of wood makes a huge difference. If you can find kiln dried wood, use those, otherwise any type of "green" wood will dry and cause the long table spans to warp. This will then break away from your breadboard ends. First one I made I used redwood from Lowes. It had very minimal shrinkage if any. Second one I made was from "green" wood. That one shrank more than an inch in width and I had to redo the breadboard ends, and will have to redo them again. So I went back to redwood on the third one. Cost is more with redwood and any kiln dried wood, but I think its really the best option for this type of table top with breadboard ends.
Keden
Mon, 01/19/2015 - 09:27
Top connect
What is the best way to join and connect the top for indoor use and outdoor? Thanks!
geopalz
Tue, 03/17/2015 - 10:05
Shorter Screws for top
Hello I recently built this farmhouse table using these plans. Turned out terrific! However I had to comment so that hopefully I can save someone a little trouble. I used the 2 1/2 inch Kreg screws to assemble this table as instructed. Everything was fine until I attached to table top to the frame. The screws were too long and went through the table top. I had to back them out just a bit. If I ever build another one I will use the Kreg 2" screws to attach the table top. I don't now if anyone else has had that happen or not but I thought perhaps the plans could be changed or a note added to use the shorter screws to attach the top. Thanks and I hope this information is helpful.
spatria21
Tue, 04/12/2016 - 19:36
Same thing happened to me. On
Same thing happened to me. On my next table I am going to set the kreg jig to 1 3/8 instead of 1 1/2. Besides that my table looks great. Another coat of poly and I'll post a Pic.
spatria21
Fri, 04/15/2016 - 11:42
Never mind, that would make
Never mind, that would make it worse.. Im gonna go with the shorter screws also..
chadk
Wed, 10/21/2015 - 14:19
Table Top
This is my first wood working project. We (my father-in-law, who thank god has wood working skills) started working on the 6' version this past Saturday. We had a tough time keeping the table top boards from bowing. We used biscuits, wood glue and pocket holes. Ultimately, we had to clamp the joined boards inbetween some scrap 4x4 to keep them straight. So far so good, but has definitely added some time to the project. Looking forward to seeing the finished product. Enjoying your site. Thanks Ana!
kasimpkins
Sat, 11/14/2015 - 11:29
What wood to use?!
So I have looked everywhere and here in Southern California Southern Yellow Pine is nearly extinct! What should I use instead?! I want to build this ASAP for Thanksgiving so if anyone has any advice please share!!
jerkjake
Sat, 11/21/2015 - 13:30
Finish
The link for the information on how this was stained /finished does not work
Ryo316
Sat, 12/12/2015 - 15:24
Harvest Build
I built this table a few days ago. I found that the ends needed more support so I used shelf angles to support it. I stained the top (maple hue and clear satin poly)and distressed the bottom ( black stain and satin poly). I would love to add a photo however I'm uncertain how to do that. It's a great size. Still deciding on spindle back or ladder back chairs.
dmsweeney
Sun, 02/28/2016 - 14:24
Extentions
wanting to make this table with extentions. Are there plans on the site ?
ryanvincentmuir
Tue, 03/01/2016 - 10:05
Breadboard
Do you use pocket wholes to attach the bread board to the base? or is the breadboard only attached to the table top? In the pictures and building instructions it looks like the table top is only attached with pocket holes on the long apron side. Also I am using 2x10s as my bread boards, has anyone run into problems with this? I want to make sure that 2x10s are not to long!
Billbonner5
Tue, 03/29/2016 - 05:19
How much sanding?
Love your site! How much sanding do you typically do on each table top you build? I find myself using my belt sander and planer a lot, like a lot! Using 50 grit sandpaper at first for all the uneven joints. Am I the only one? Pictures online always look like your table tops are perfect. What's your secret?
Steph1980
Wed, 03/30/2016 - 06:44
Type of wood
May I ask what type of wood you are using?
Steph1980
Wed, 03/30/2016 - 06:43
Type of Wood
Hi - I was wondering what type of wood is being used to make the farmhouse table?
tollys103079
Wed, 05/11/2016 - 07:19
Type of Wood
When you build these farm style tables what type of wood do you typically use. I have access to a jointer and Planer, but when I do that the edges are not the same. I just built a farmhouse table using 2x12's because they came in douglas fir and were kiln dried. I am struggling to find decent Kiln Dried 2x6s in the area that are dry enough so I do not have to worry about them warping after it is built or is that not a concern once it is built.
Thanks
mike.berttucci
Tue, 07/19/2016 - 05:01
Extending Table to 8 ft
I am hoping to make this table 8 ft long (about 1 foot longer than the current plans) and a few inches wider as well. To make it longer, all I am planning on doing is cutting the top boards, stretcher, and lengthwise apron 1 foot longer. I don't think this would add any kind of problem but wanted to see if anyone had any thoughts or pitfalls I may run into.
To make it a few inches wider, I may just use a 2x12 on the center top board instead of a 2x10. I would keep the frame the same (end aprons would stay same). Would that create too much pressure on the outside top boards, since each side would then have an additional inch hanging off the side? Again, I am not sure, though I wouldn't think 1 inch on each side would create too big a problem. Any suggestions?
Deubanks
Tue, 02/16/2021 - 20:22
Did you make it longer? How…
Did you make it longer? How did it turn out?
Valburton82
Thu, 07/21/2016 - 17:20
I need a little guidance
My husband and I will embark in the adventure of building this farmhouse table for our new home but we're debating what type of wood should we get to build it.
Can someone give me a little advice as to what type of wood you used, or you think will be best for this project?
Thanks!
RustyPine
Fri, 07/22/2016 - 09:42
Guidence
I use a lot of yellow pine to build my projects. Its very strong and takes stain very well and it will last for ages
makes for a great table and fairly inexpensive a table of that size should cost roughly 50.00 in wood andanother 30-40 in screws-nails ans stain..ohh and dont forget the wood filler for screw holes and such..
Robreed51
Fri, 07/22/2016 - 16:37
stretcher supports
Why are the stretcher supports on the table on the outside and on the bench they are on the inside?
tabrewington
Tue, 08/02/2016 - 13:54
What do u think max length could be
Do you think this could be stretched to 10 or 12ft without any issues
smith8ar
Fri, 08/12/2016 - 06:57
Where buy wood???
Where are you guys buying your wood? I just got a quote from a local lumber yard for the wood needed for this in Ash and they quoted me at $1500! But you guys are talking about only spending a couple hundred at most. Where are you getting the wood and what type are you getting???
ClayDorris10
Tue, 11/01/2016 - 11:39
Bent and bowed
I went to screw the table top together and the boards are now twited and bending. What is the best and fastest way to level the boards out?
Jeanne624
Sun, 12/11/2016 - 09:57
I accidentally clicked on This is Spam button for my comment!!
Hi Everyone -
Thanks, Ana, for these fabulous plans. I just finished building my first farmhouse table! All on my own!
Now I need to stain.
But I do have some tiny separations in between my boards on the top.
Should I fill that with wood filler?
Do I put the wood filler in the "knots"?
Should I do the wood filler before the final sanding?
Thanks in advance. I just have come this far - I don't want to mess it up now!
Jeanne
schaffnern
Mon, 12/26/2016 - 13:45
Cost?
Can any give me a cost for this table? I know the older plans said $30-$50. Is that still around the same?
Also, is there a count for how many of each different screw I will need?
[email protected]
Sat, 02/18/2017 - 20:07
question
Hi - I'm about to start making this table :)
Quick question: since there are strecher supports at the ends of the table, is there room for your feet and chair to comfortably get close enough to the table? I'm thinking of making the base of the table shorter so there is more room for people to sit on the ends and have enought room for their legs? Does that makes sense!
Jrollins7
Mon, 02/27/2017 - 09:31
Stain
What stain did you use on this table
Aaron_n
Mon, 01/08/2018 - 17:48
Quick question
Can this table be built without the stretcher and bottom apron? Or will it make it less sturdy
Crabbman
Tue, 01/16/2018 - 09:14
Pocket Holes
On the breadboard ends, I would recommend not driving the pocket hole screws into the end grain. This is not how they are designed and will loosen over time. You can simply flip them around so they go OUT of the end grain and INTO the bread board.
HikingStick
Mon, 04/20/2020 - 05:49
MOST IMPORTANT COMMENT (Pocket Holes)
^THIS^ is perhaps the most important comment on this post.
The next is not too glue between the breadboard ends and the tabletop.
diozsa
Thu, 01/18/2018 - 16:34
Some tips - for absolute beginners
This was my first wood project ever. I did not have any kind of tools or knoledge.
Thanks to Ana's website I mustered the currage to take on this project. Thank you Ana! I am happy with how the finished product turned out.
I just want to leave a few tips for anybody that is an absolute beginner with wood working - things that I have learned along the way.
wingnut2000
Tue, 02/20/2018 - 07:37
Table Ends
I am finishing up the building part of this table but the ends are real flimsy. i was worried about that when is seen the design? anyone got a fix for the flimsy 2x8s on the end of the table top?
wingnut2000
Mon, 03/05/2018 - 10:36
never got a response from
never got a response from anyone so i just notched out the 2x4's up top on the ends and ran two 2x4's the length of the table plus about 4" past each end to help carry loads on the bread boards. i think it even added character to the table. i cut a 45 off of each end to dress the boards up a little and seems to support the bread boards well
TheExodu5
Sat, 08/24/2019 - 17:21
I recommend using an HD…
I recommend using an HD pocket jig and HD screws, and ensure that the end piece joints are centered over the end of your base, that way the 4x4 legs will overhand and provide support.
This plan used to have instructions to glue the end pieces, but I'm guessing someone realized that would end up splitting the table top when the wood expands/contracts.
hawkingbrandy
Tue, 05/21/2019 - 23:25
Good work Ana!
Good work Ana!
.dani
Mon, 05/27/2019 - 17:42
Question
I was browsing youtube and came across a video that said the way most farmhouse tables are made doesnt allow the wood to swell and contract like it does sometimes and it leads to cracks in the table. Has another had an issue with that? Also have people ripped the edges of the boards to get a more flush fit and then palm sanded over it to get a table top woth less grooves and cracks for crumbs to get stuck in?
TheExodu5
Sat, 08/24/2019 - 17:25
I would suggest finding a…
I would suggest finding a wood source that sells dressed, kiln-dried furniture grade lumber. I was able to have a nearly flush surface by buying the right wood.
If you want a perfect surface, you'll need access to a jointer.
TheExodu5
Sat, 08/24/2019 - 17:27
For the cracking issue, as…
For the cracking issue, as long as you only use screws for your breadboard ends, you should be fine. It's fine to glue the rest of the pieces lengthwise since the wood only contracts/expands across the grain.
Will Brown
Fri, 05/31/2019 - 11:41
Clamping
I am looking at building this and was wondering- is everyone screwing, gluing and clamping as you join each of the table top boards, letting them dry and then joining the next one? Or gluing and screwing them all together and then clamping the entire thing?
TheExodu5
Sat, 08/24/2019 - 17:23
I glued two pieces together,…
I glued two pieces together, clamped them, screwed them in, and moved on to the next piece. The crews act as a strong enough clamp. I used the heavier HD screws, though.
Tom B
Wed, 08/14/2019 - 18:43
Wood selection
Make sure to use kiln dried wood. Construction lumber from the big box stores still has too much moister. My table warped in the inside heat during the winter, relaxed outside in the spring humidity, but still oozed sap in the hot sun.
rocky06
Wed, 10/23/2019 - 11:13
Adjusted cuts for small kitchen (45-50”)
Is there an adjusted plan for 45-50inch long table? I don’t have a big kitchen.
JustJ
Wed, 11/20/2019 - 10:22
modify to make this 11ft long
Can you tell me how you would modify this, to make it 11ft long? Would you a center support?
Thanks!!
Lacy1883
Wed, 06/03/2020 - 21:55
Stain
I love the look of this table and was wondering if you knew what stain was used. I tried clicking on the link to see how Hilary finished the table but the links are no longer valid.
Mapen07
Tue, 07/21/2020 - 09:57
There have been a comments…
There have been a comments about the pocket screws going through the top. Someone mentioned changing the depth, another using smaller screws. Changing the collar on your drill bit would likely be the easiest fix for this just make it so it’s an 1/8” more shallow. Keeps the extra length of the 2 1/2” screw instead of shorting it 1/2”.
Also I used HD screws from the center out for the bread boards for added strength. Went vent out because as another user mentioned screwing into the end of a board is always weaker and works loose.
sylvialh
Sat, 08/29/2020 - 11:16
One of the first ana white…
One of the first ana white tables I made! I used 2x4 x 2 instead of 4x4 for the legs and made it so the whole thing came apart with bolts (the legs separated from the top) so we were able to move it. (4 times before I sold it!) Now I'm looking at making a second that fits our space better. Love this plan!
blacourse
Tue, 09/08/2020 - 08:15
What stain was used in this…
What stain was used in this project?
Interested in how the stain was applied, i.e. cloth or brush?
Finally, did you use poly to protect the top or would you recommend that?
This is my first furniture project and I'm just finishing up construction!
Thank you,
Brian
dadjokes6
Fri, 09/11/2020 - 10:00
Kind of wood?
Hi!
So I'm planning on using this plan to build out my family's table. Question for you all though - what kind of wood do you recommend for this? I was going to do it with pine but wanted to get your opinion on that.
Thanks!
Al_on_Rose
Sun, 10/18/2020 - 17:04
Add an end drawer to the farmhouse table
Just built the farmhouse coffee table, had so much fun doing it. Can't wait to start on this project. I was thinking of one modification, putting a draw at either end or both. Could you provide some thoughts on how I could incorporate this into the project?
Deubanks
Tue, 01/26/2021 - 13:46
longer table
did not see a reply to a previous question about lengthening the table. has anyone built it 9 ft long (total length)?