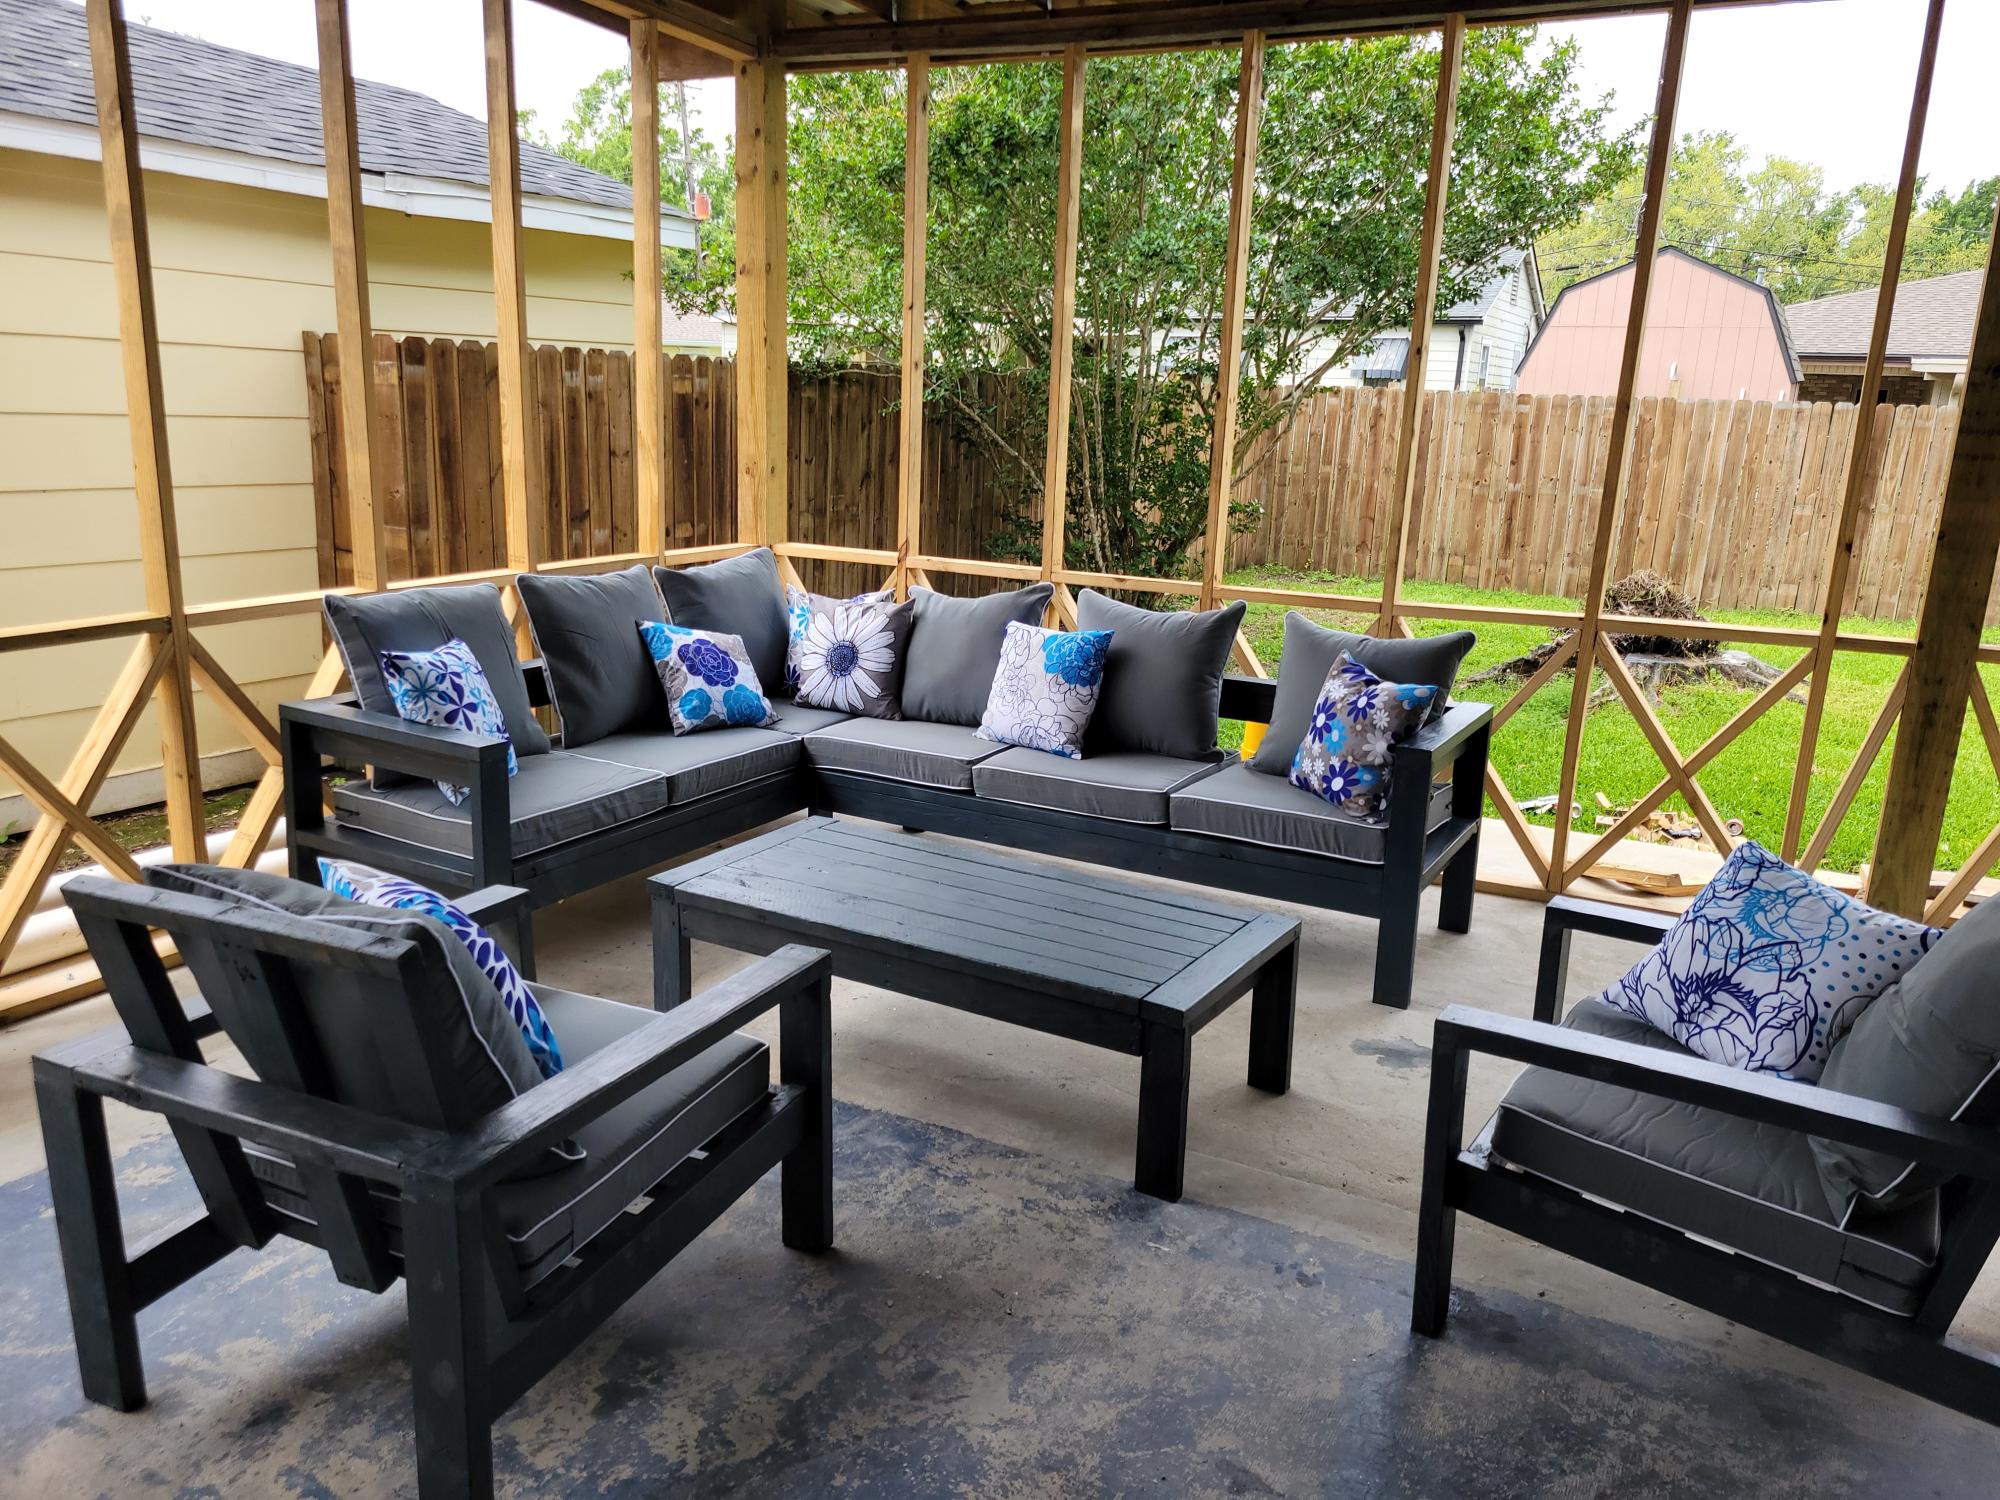
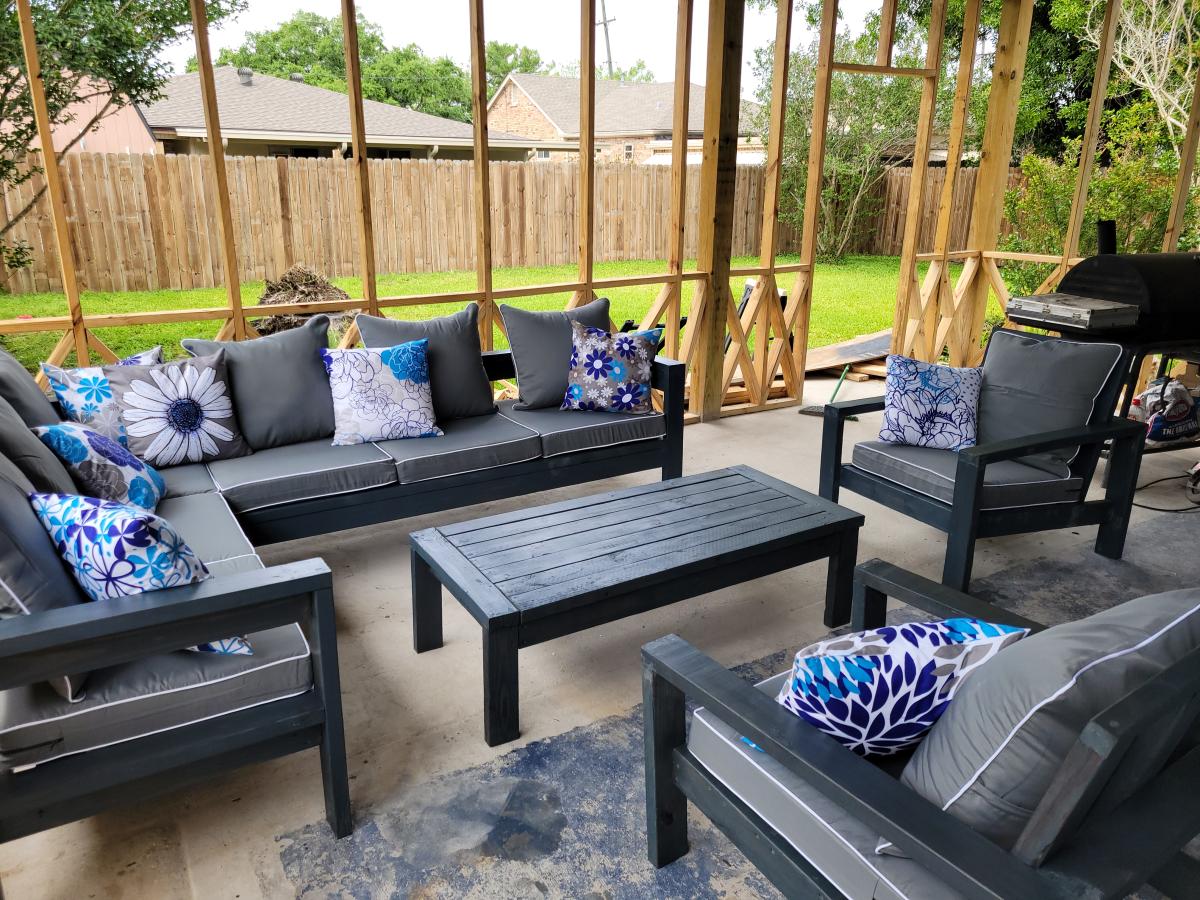
DIY Outdoor Sectional
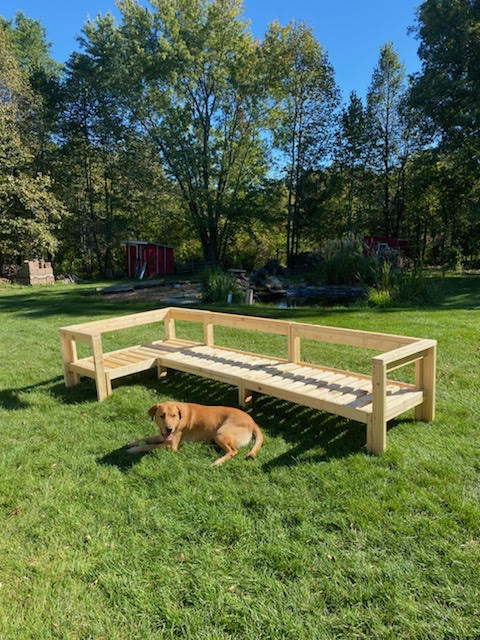
Outdoor wood sectional!
by Elizabeth
Built from Plan(s)
Outdoor wood sectional!
by Elizabeth
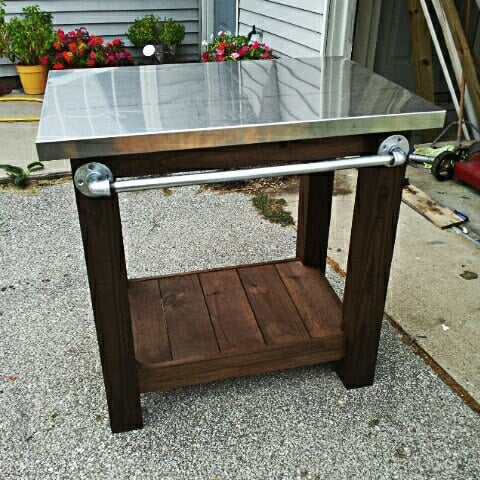
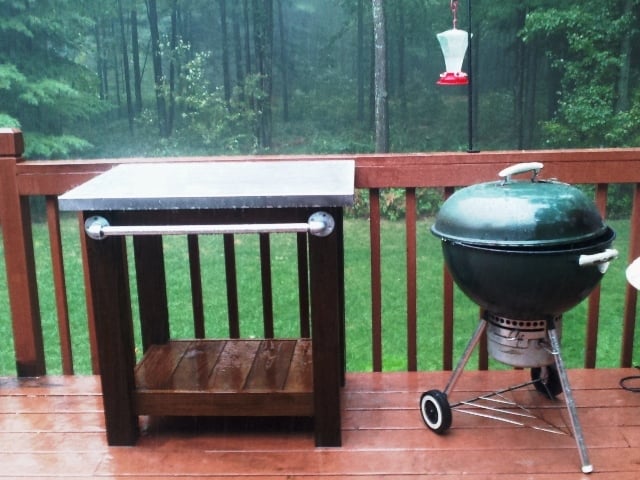
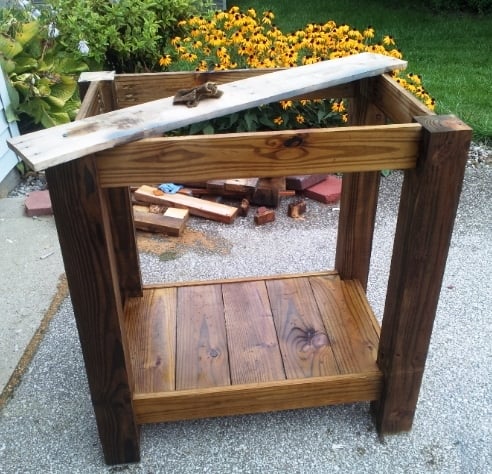
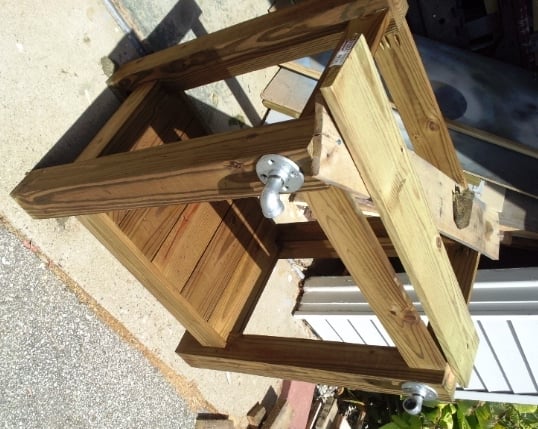
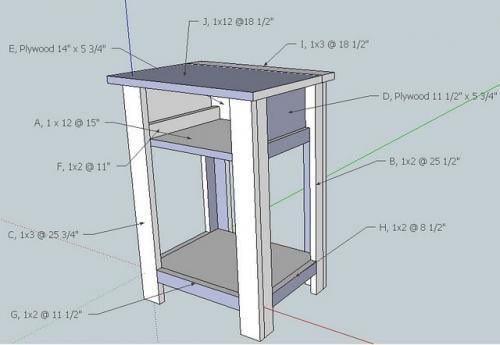
I made this table to go next to an outdoor grill to be used as a food prep area or just a surface for holding ingredients (instead of using the deck railing!). The top is stainless steel which fits tightly over 2 3/4" pieces of plywood laminated together. The bar/handle in front is made out of galvanized pipe. All wood was treated.
Legs - 4x4 posts
Bottom shelf - 1x6's
Sides - 1x4's
Top - 2 pieces of 3/4" plywood laminated together with a stainless steel top (custom fit) over top
Towel bar - galvanized pipe (cut and threaded to size at Lowe's), floor flanges and 90 degree elbows
Thu, 05/15/2014 - 10:33
Sorry about the late reply! Yes, I just gave my dimensions to a local steel supplier and they made the top. I think I have about $40 into the stainless. They didn't weld the corners but I've never had an issue with them.

Sat, 04/26/2014 - 15:41
I too would like to know your source for the sheet metal.

In reply to Stainless steel sheet metal by Pursuit of Handyness
Thu, 05/15/2014 - 10:35
I just found a local steel supplier, told them what I need and they formed the top. It cost me around $40 (without welding of the corners). I took a fine grit sandpaper to it afterward to scuff it up so it didn't look so bright.
Wed, 04/30/2014 - 12:55
I would like to know are there any plans available to make this table? I am very impressed of its design.
In reply to Grill table with stainless steel top by AMR4412
Thu, 05/15/2014 - 10:46
No...I didn't have any plans when I built it but it's a very simple concept. I chose to use all treated wood since I knew it would be sitting outside unprotected. However, my 4x4 posts weren't square so this caused a lot of problems and everything was built to fit. I believe I just used 4x4's, 1X6s (for the bottom shelf) and 1x4s for the sides (top and bottom). For the top, I just laminated 2 pieces of 3/4" plywood together to bulk it up and then had the stainless top built to fit. It fit perfectly so I didn't glue it to the plywood. This makes it easy to remove and clean, if necessary. For the galvanized pipe (towel bar), I bought it at Lowe's and had them cut/thread it to fit my dimensions.

My son is 10 year old and I decided to change his room. His bedroom is very small so I built a full size bed whith storage. I hung up bookholders on the wall too.
Wee are very happy how it turned out.
Thanks Ana!


I altered the plans just a bit so that I could make use of the drawer closest to the headboard, while using bedside tables as well (not the ugly ones in the pictures, but some that only exist in my mind as of now). With the plan as is, I didn't think that first drawer would be able to open if you have a nightstand. So I left about a 17" gap that can be used as an open shelf for storage, and still had room for 3 drawers. I also wanted to include a bookshelf as the footboard to make it multifunctional. We have a ton of books and no place to store them (fear not, a large bookshelf/media center is coming soon!) I also altered the top of the headboard just a bit to give it more texture and visual appeal (hopefully, but beauty is in the eye of the beholder so I've been told). Lastly, I did not put the 1/4" plywood backing on the drawer carcasses. They were pretty sturdy as is, and only got more sturdy as they were attached to the headboard and footboard; I'm not worried about racking at all. Leaving the back off also allows me to pull the drawers out and access some hidden storage in between the two drawer carcasses.
I wanted a simple finish, so I rubbed it with dark walnut Danish oil. Super simple finish and I think it'll hold up as the bed is not like a desk that needs poly or something.

Sun, 08/28/2016 - 19:50
This bed turned out amazing. I love the modifications and agree the first drawer will be more usable.
Thu, 05/28/2020 - 06:11
Could you please tell me how you attached the footboard on this one? I thought about using some bolts and counter sinking them from inside the self. How did you do it?
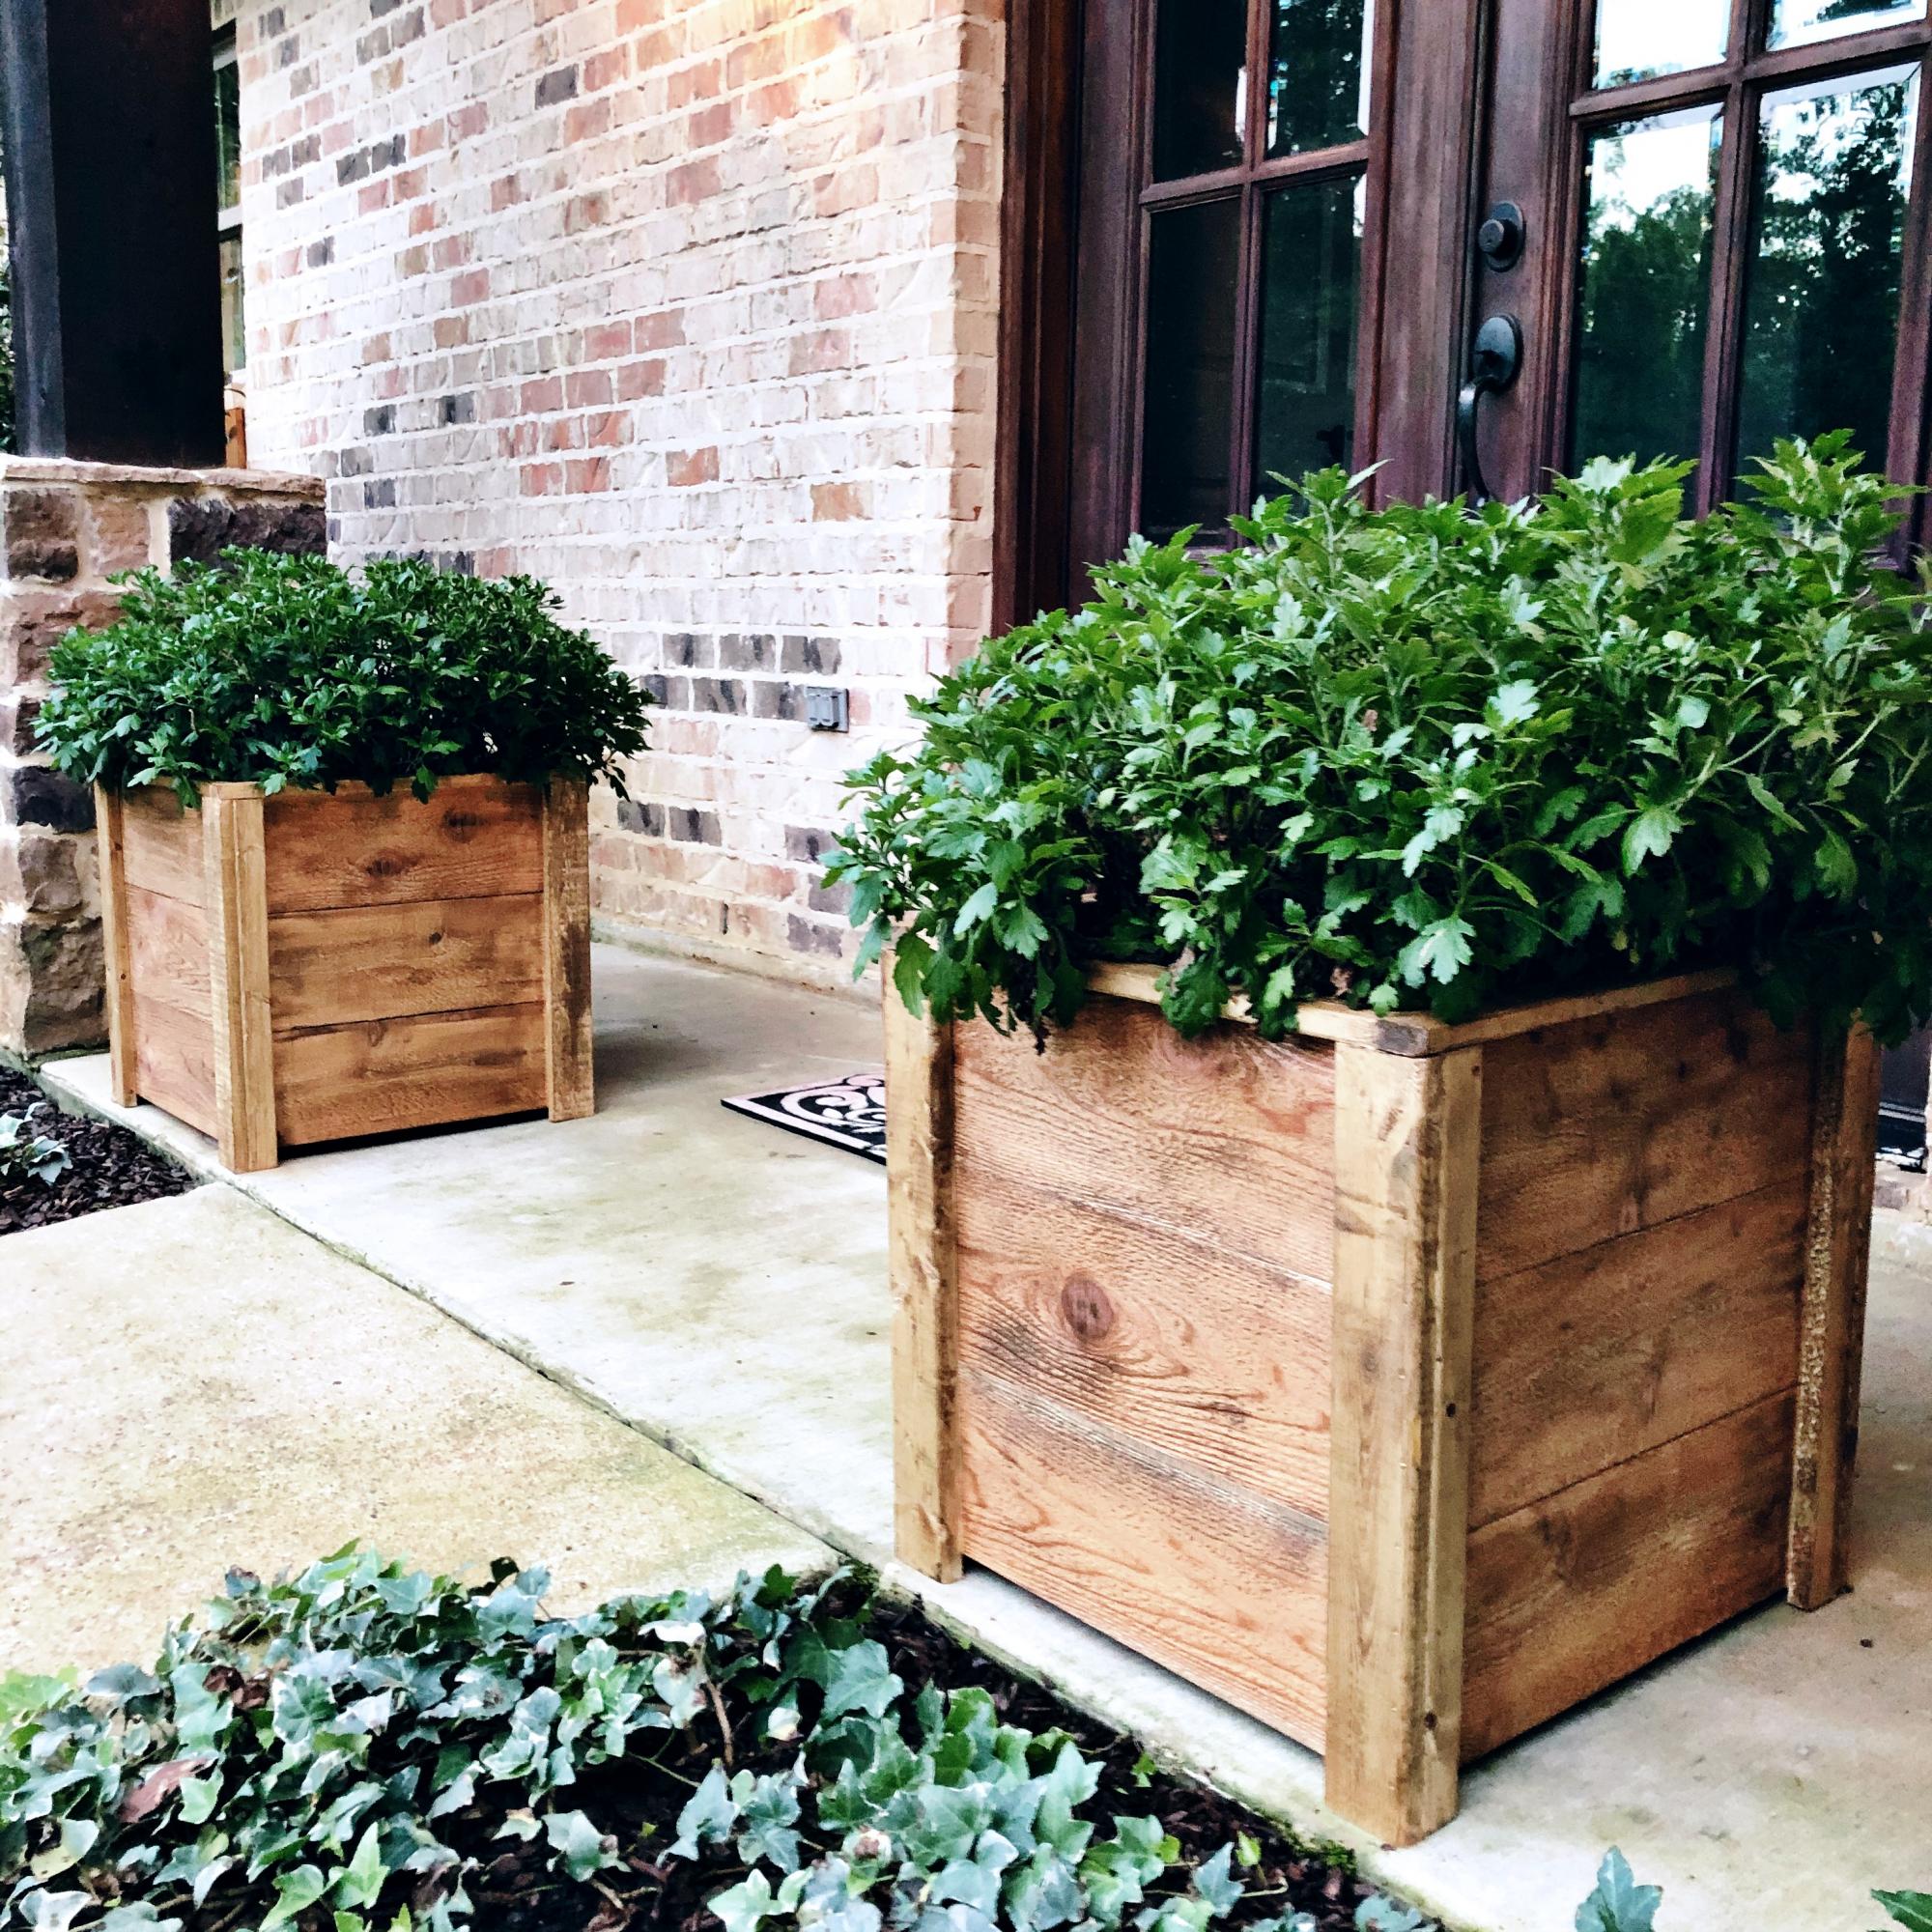
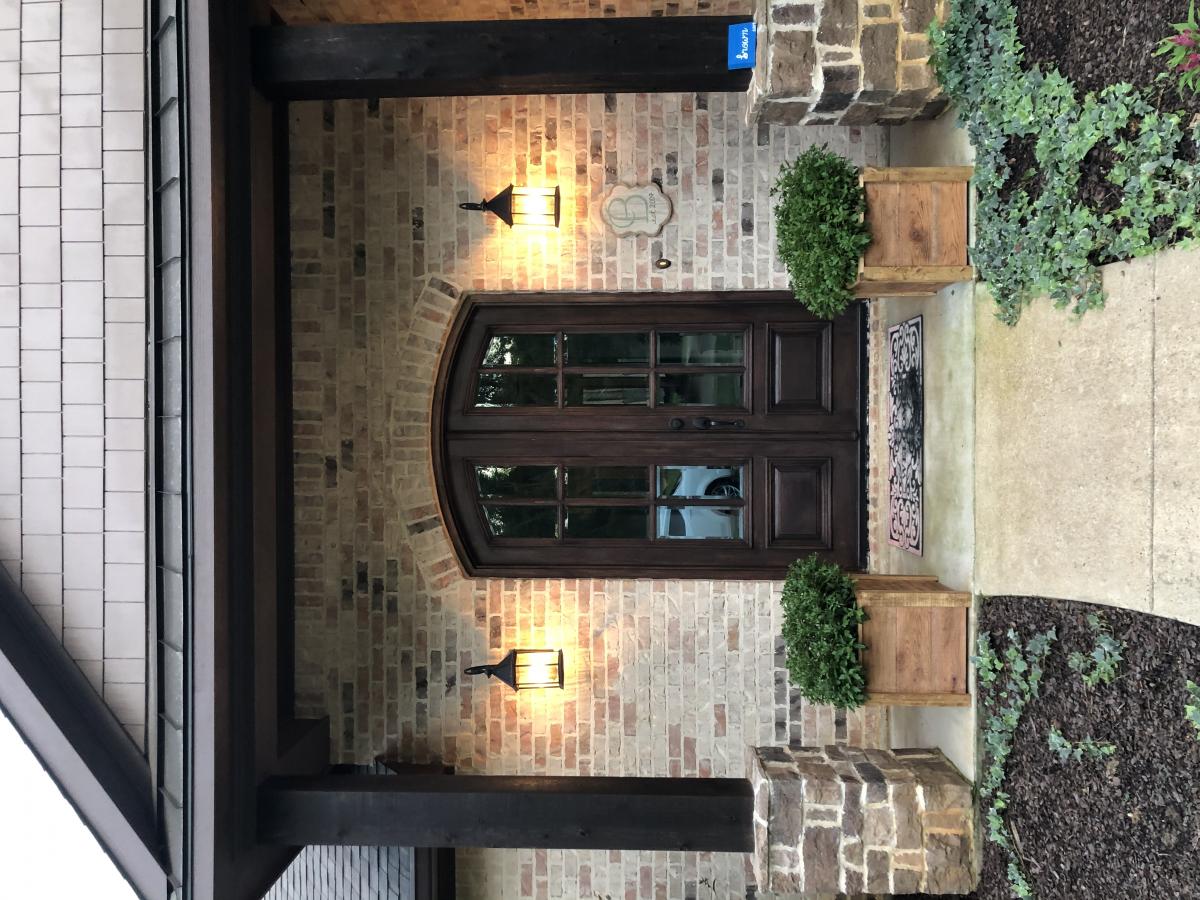
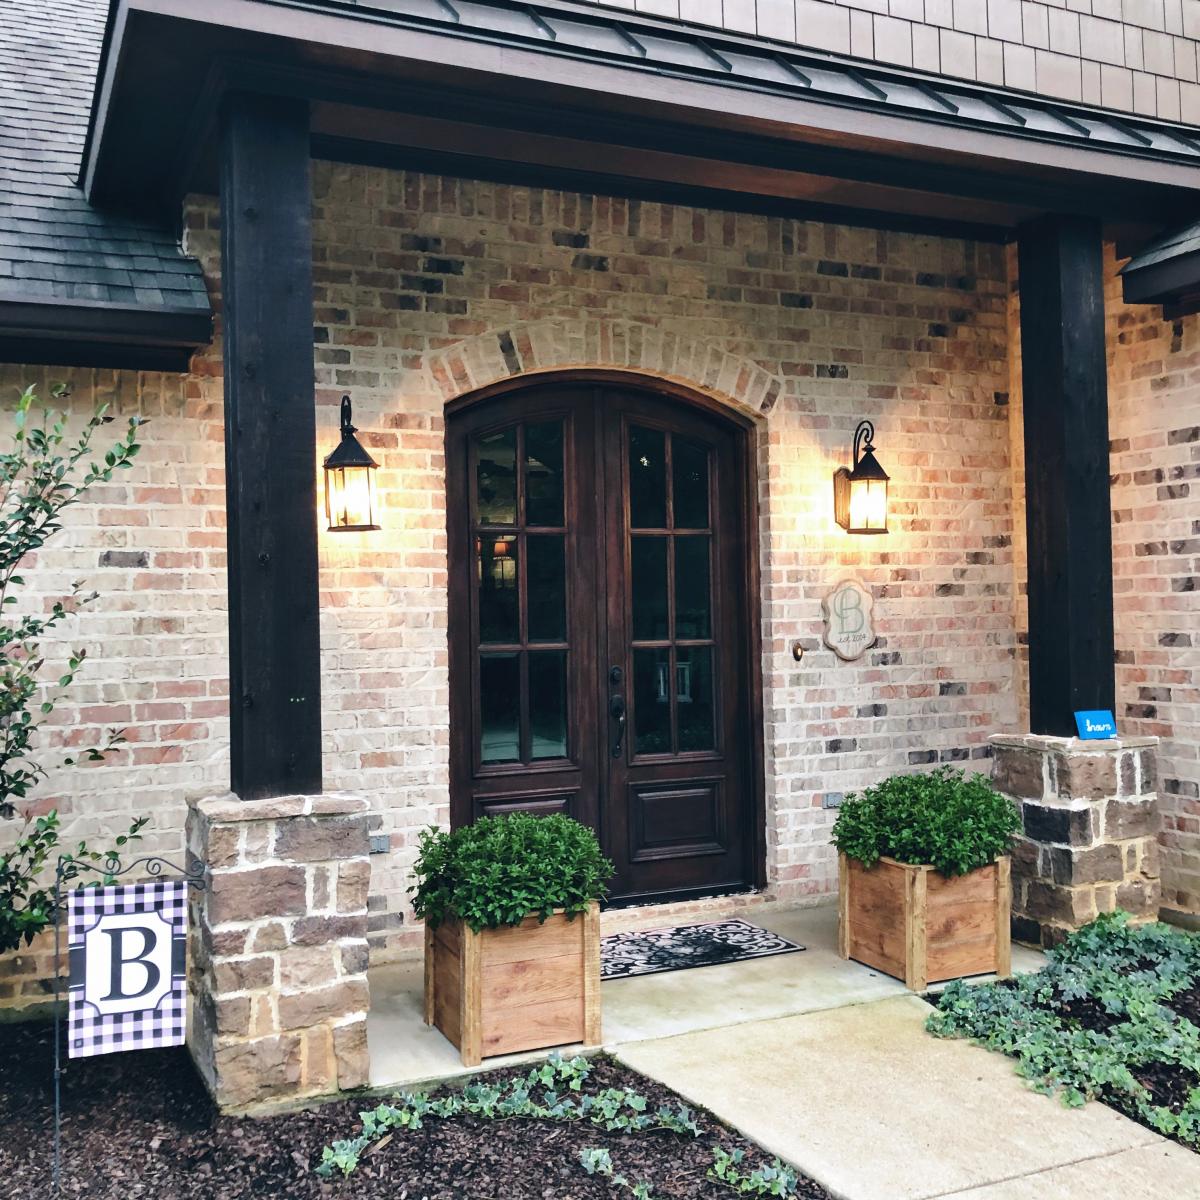
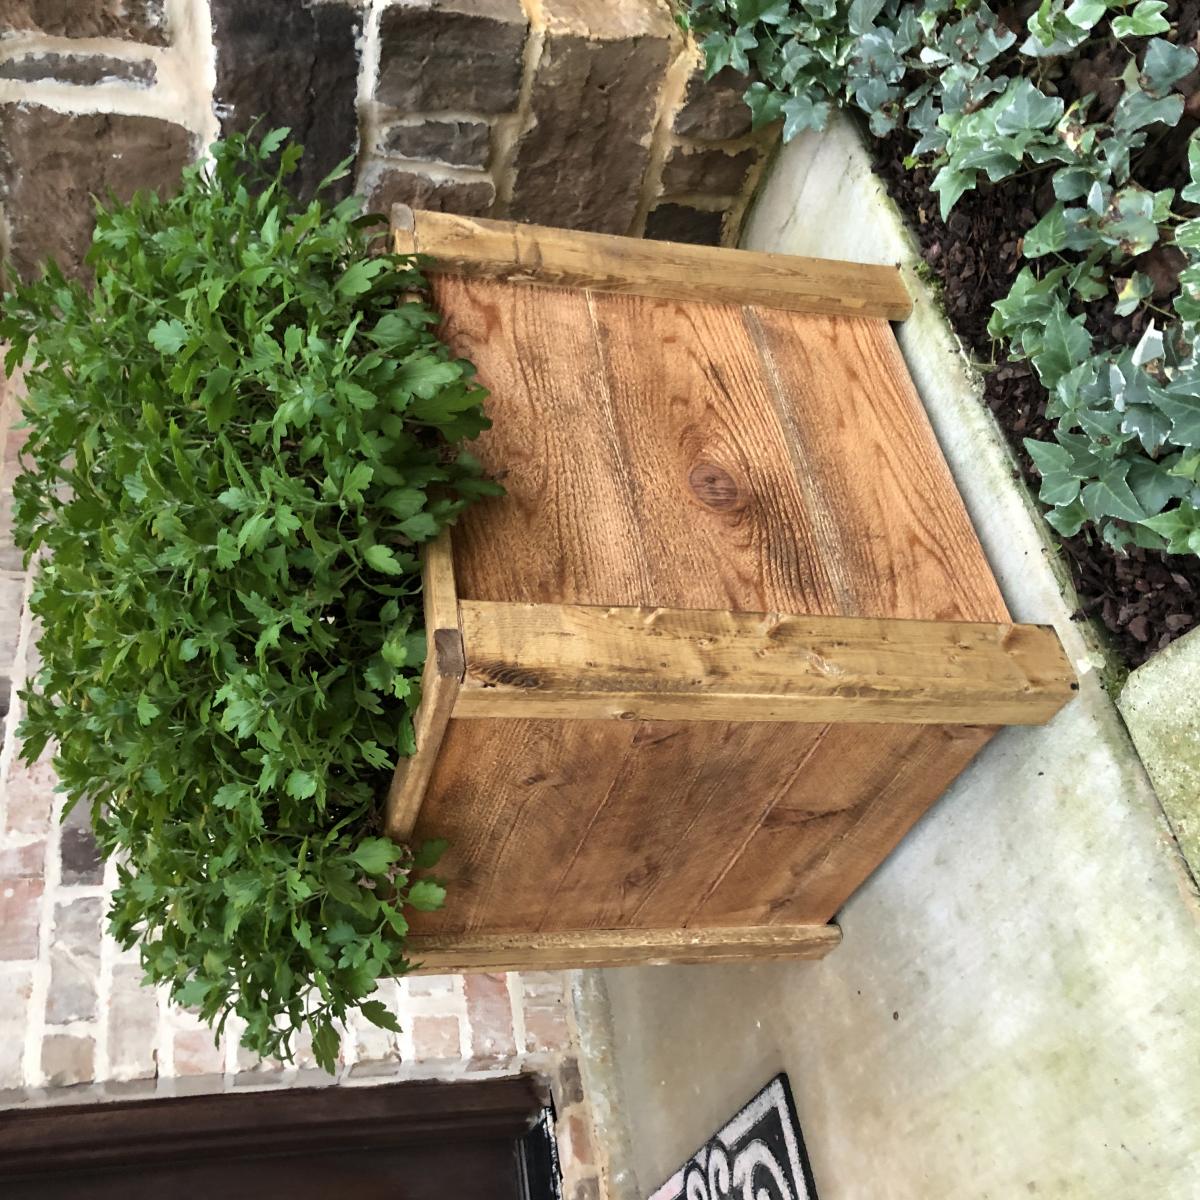
These were a quick weeknight build! And.... My very first “all by myself” build! I’m really proud of how they turned out and love how much style they add to my front porch!


We wanted some comfy outdoor seating on our back patio and your plans for the sectional were perfect. I made some minor adjustments to extend it a bit and fill up the entire area. It fit perfectly. Then I used your plans for the simple Adirondack chair and that added the perfect accent. We love our patio. - Ken Rucker


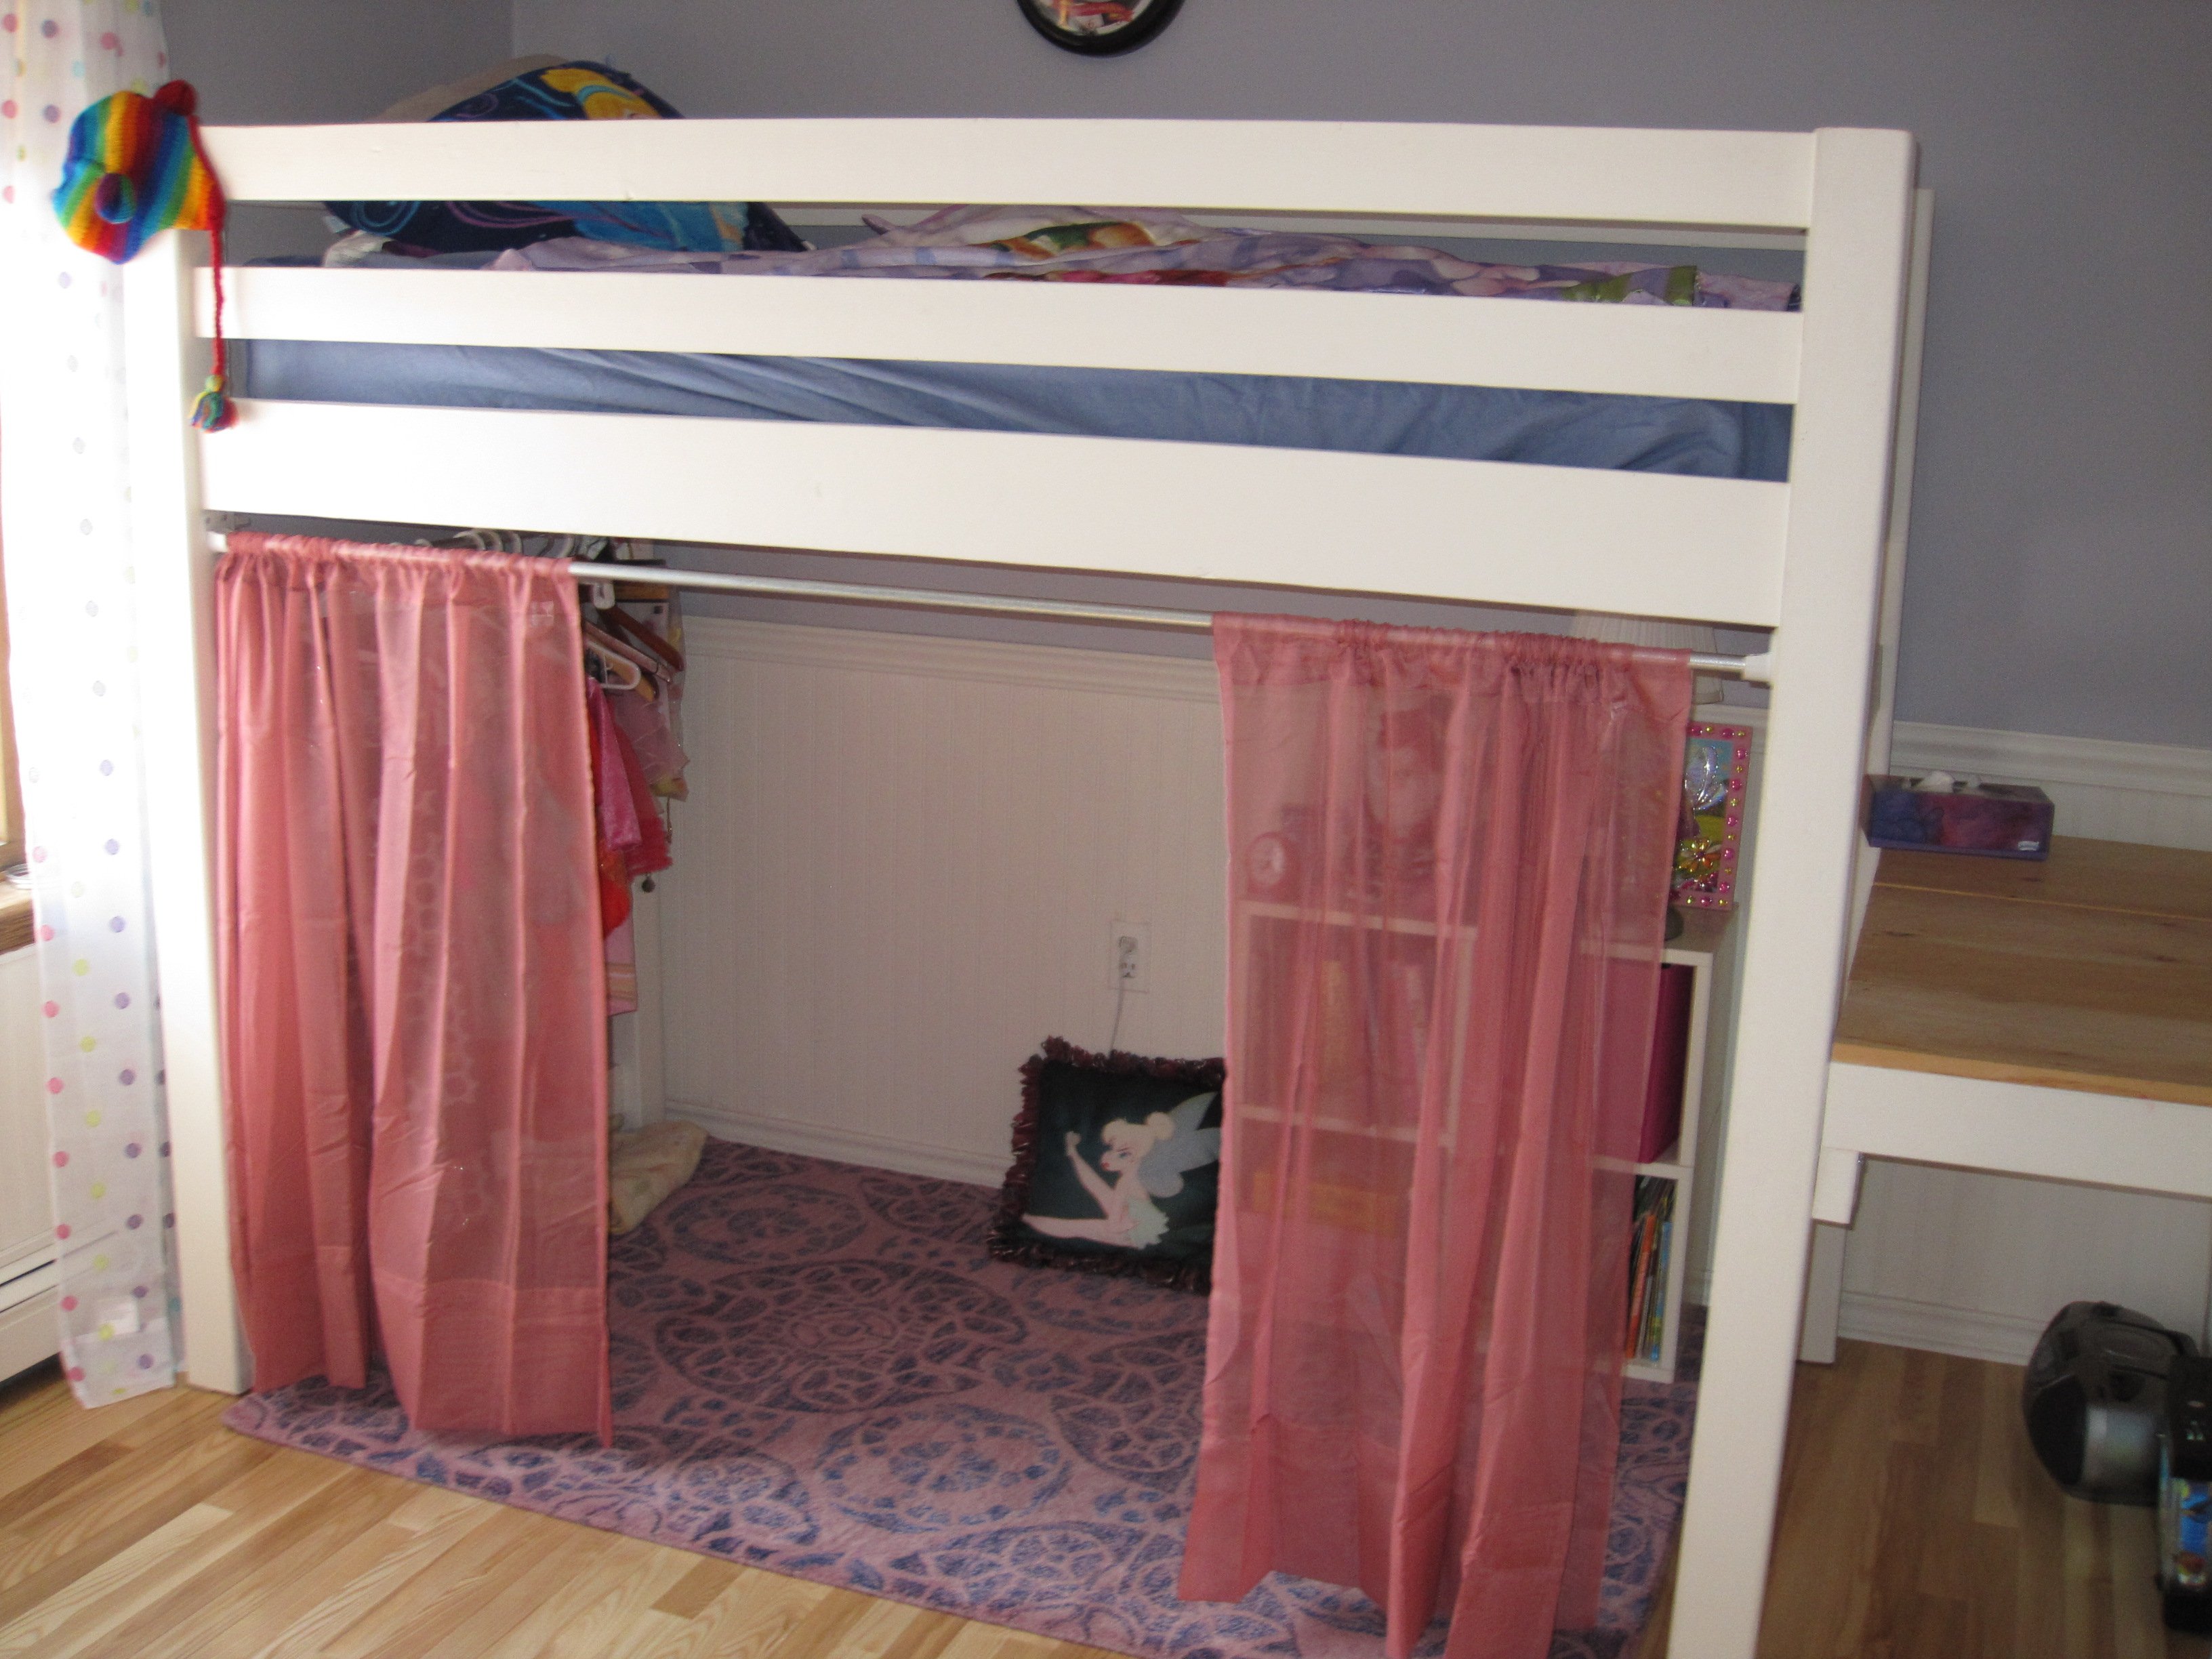
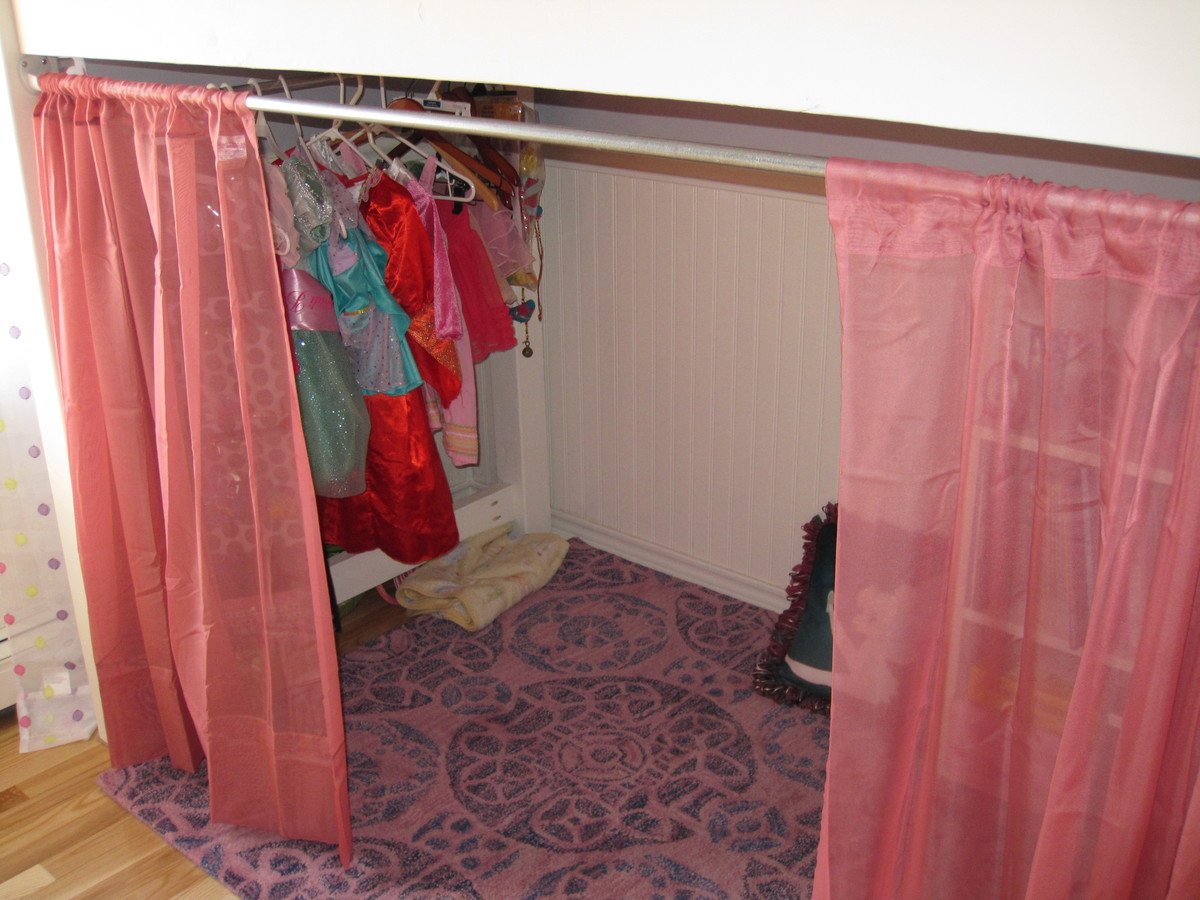
This is a modified version of the camp bed. I added several curtains using some metal conduct and one at the end for a place to hang up dresses. I plan on building some storage under the platform and might replace the entire stair area platform with a storage unit.
Project wise:
Instead of 2x4 for the corners, I used 4x4 fir posts in each of the corners, for about $50 dollars more it is a much stronger bed.
The bottom of the bed uses 2x4 as rails along the length and plywood across the distance under the mattress. I am looking for an old twin bed metal rails which I will be much strong to replace the 2x4 and a cleaner look.
Also I did not add stairs from the platform to the floor.
Not pictured is a single step the width of the end of the landing. The dimensions are about 10 inches deep 15 inches off the floor bolted onto a 4x4 corner post and the end of the platform with heavy duty corner brackets. Takes up must less room then stairs which I did not have the room for.

View complete post at my blog: www.birdsandsoap.blogspot.com

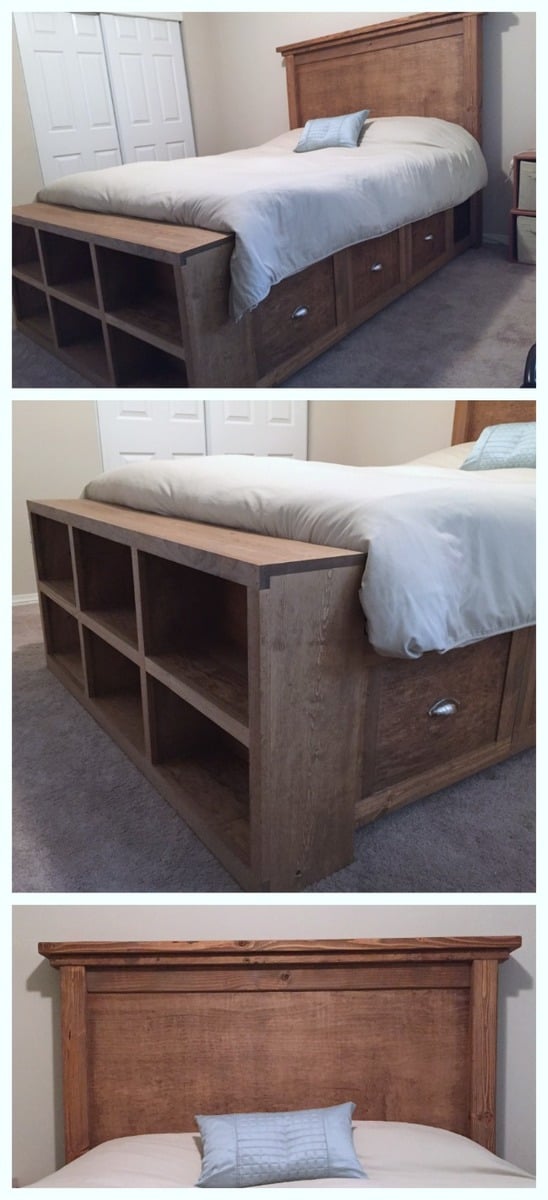
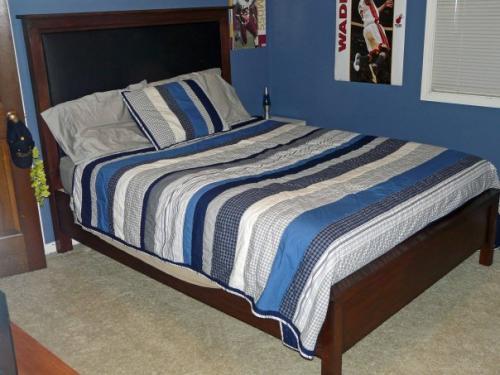
My Farmhouse bed is finished! After a week of building, a nice long month and a half of procrastination, and (finally!) one night of painting, I have finished my bedroom. I'm so excited to post this blog entry because I couldn't be more pleased with the finished product. You don't know how bad I was tempted to disassemble the bed and put it out on my front lawn to photograph! I had to literally stand in the closet, on the dresser, and in the hallway get a shot of our tiny bedroom.
This bed is a variation on two plans from Ana White, it is a modified version of the Farmhouse bed and the Captain's bed plan, plus some of my own ideas for good measure.
I call it the "Farmhouse Storage Bed with Hinged Footboard."
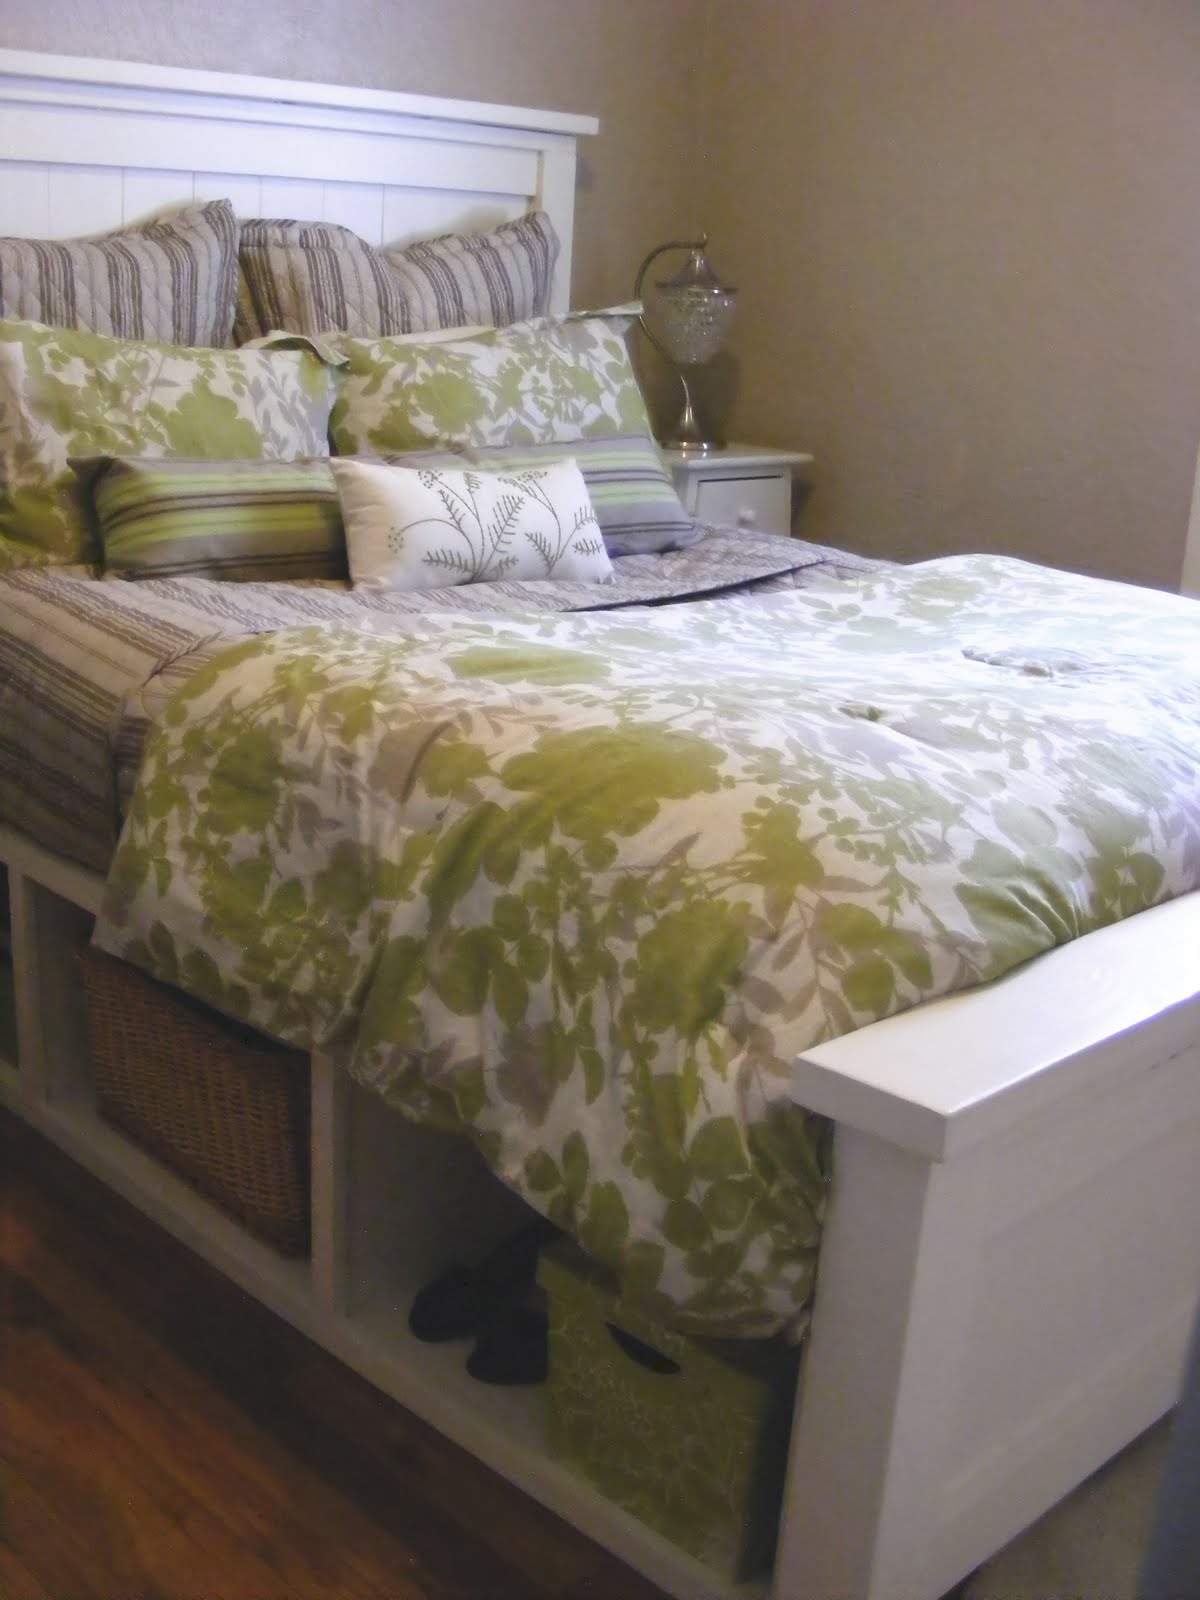
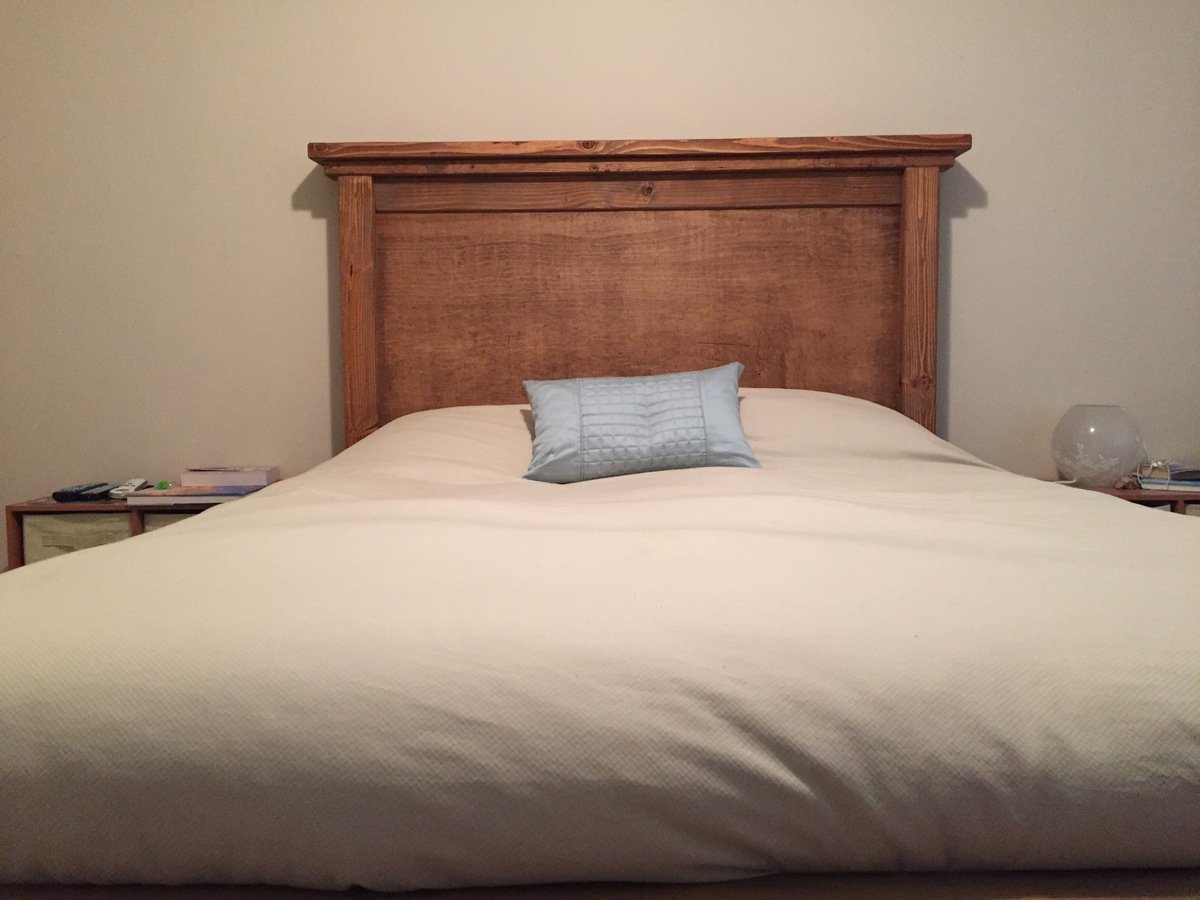
I fell in love with the Farmhouse bed and knew it would definitely be my next project. I particularly love the tall headboard that sits so prominently above just begging to take notice. It is bold, timeless, and not too stuffy all at the same time.
I also love the footboard in this plan.
Here is my little ditty on footboards: A good footboard sits below the mattress; perfect for my husband and I since we hate knocking our feet into wood while we are trying to sleep. This footboard gives a nice clean, stylish look, yet sits low enough that it doesn't get in the way of our tootsies. You need a foot out to cool down a bit? No problem here. I feel that it is super important not to compromise on functionality for style especially when you are making your own furniture. By the time the project is finished, if you are like me, you will not be making further adjustments anytime soon. It also has nice depth of six inches which makes it great to sit on in the morning while putting on your shoes and socks.
The picture below is one of my favorites. This is a bragpost submitted by boxermum and I think it turned out fabulous! I love how beautiful the distressed finish turned out. Originally this was/is my plan. However, I love my bed just the way it turned out for now. I figured I would see how the finish holds up, and if it starts to look banged up in a year, I'll go all the way and distress it with a nice stain because once you distress a piece, you are committed.

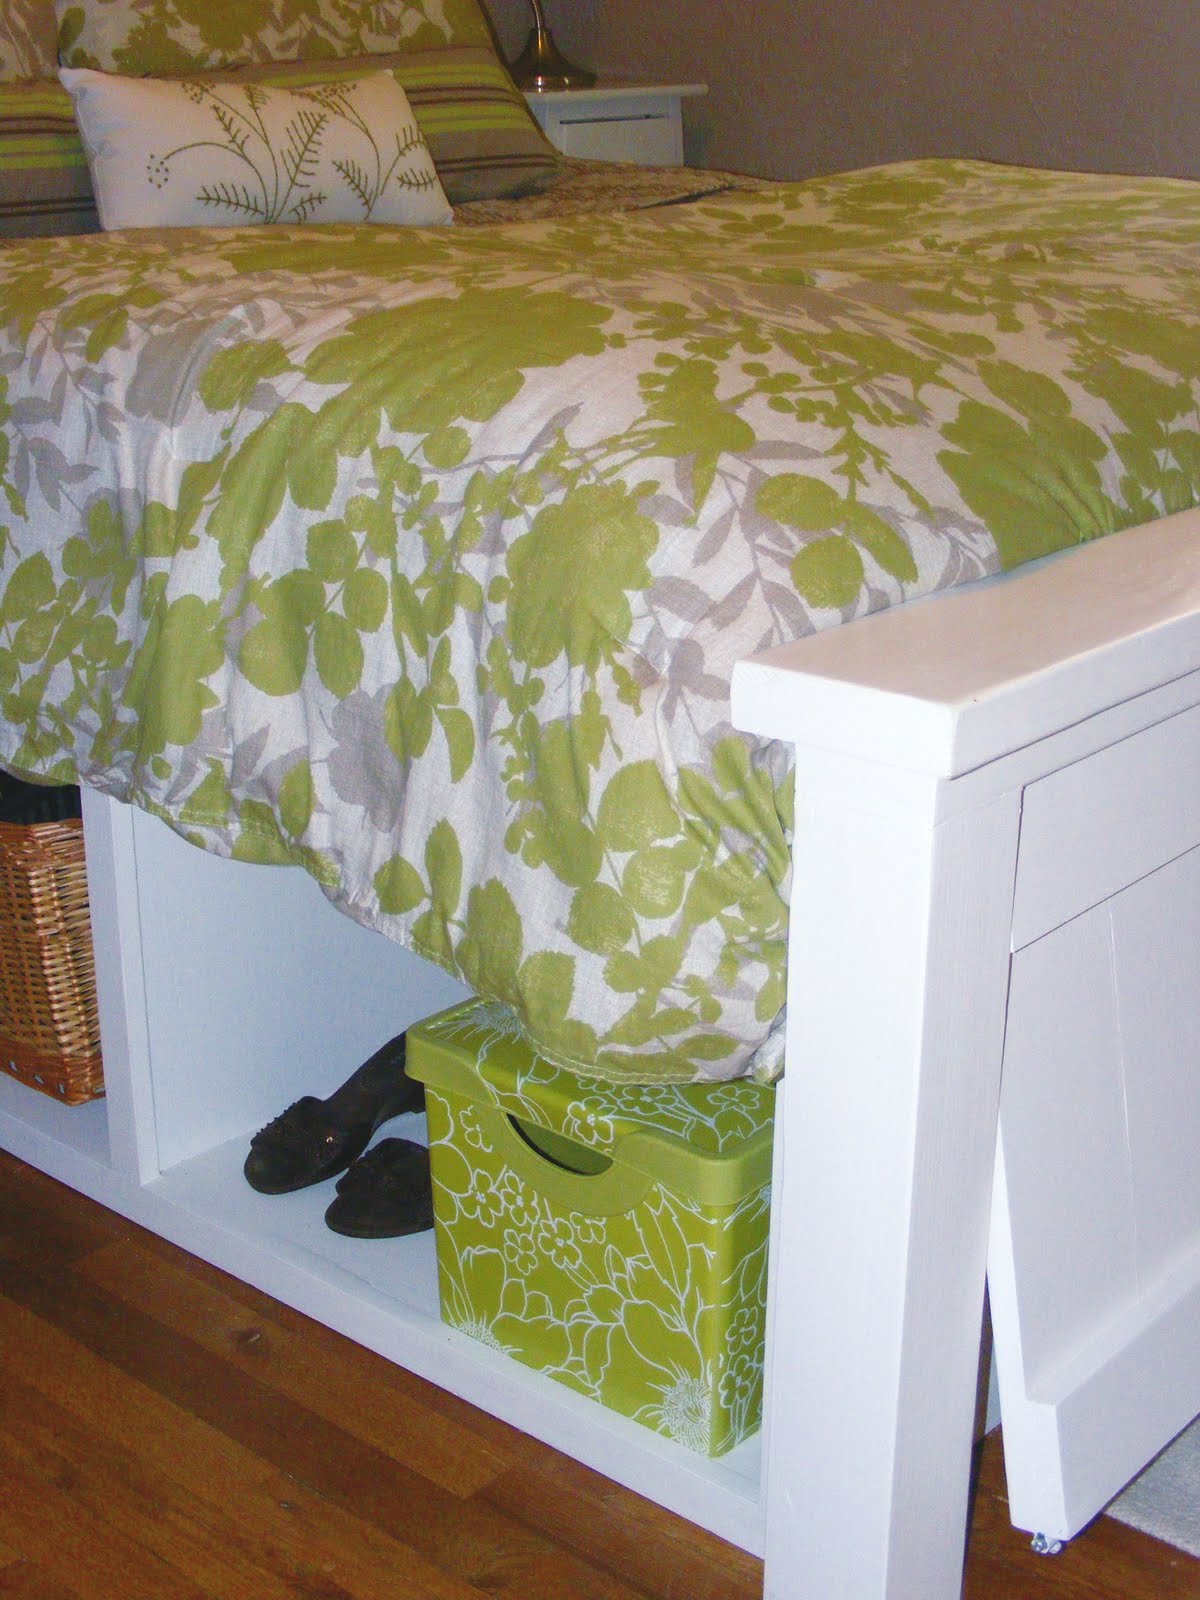
With this plan in mind, the only thing missing for us was storage. We live in a tiny house and need every bit of space.

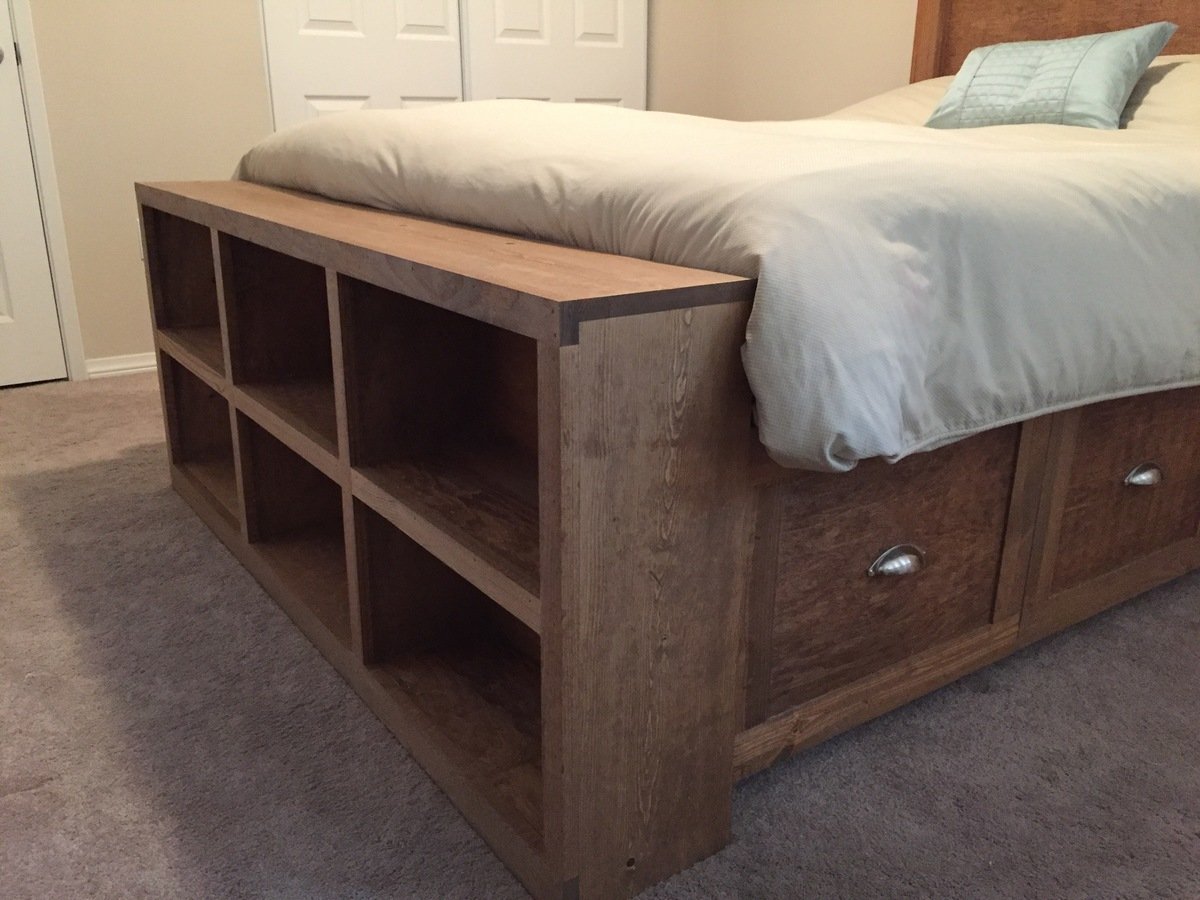
I loved the storage cubbies in the Captain's bed design (finally a place for all of our shoes; they triple overnight around here), yet was not a fan of the box at the end. I didn't like how it looked from the side view either, and I was set on incorporating the footboard from the Farmhouse plan.
So I decided to combine the two.

Following the directions for the Queen farmhouse plan, omitting the side rails, and adding two long storage cubbies to serve as the mattress platform, I set out to make the ultimate bed. I wasn't far into my plan when I realized that the cubbies would be a full seventeen inches high, and that meant that there would be some valuable storage space between the two and a perfect place to store our off-season clothes. So I devised a plan to make the footboard on a hinge that would lock in place and allow me to get under there without having to pull off the mattress and remove the slats.
Voila! Check out the hinging action:
This is my daughter demonstrating the massive amount of storage space that would otherwise be lost for all eternity:

She could totally sleep in there. It's like a panic room. If the Nazis come, we're under the bed and they'll never find us.
So here is the breakdown of my bed design:
A cost estimate is of course double what I had planned. The original Farmhouse was around $120 for materials, but with the addition of the storage cubbies, it was another $100 when things were all said and done. Still, well worth it, in my opinion. I'm not running down to Pottery Barn anytime soon and dropping a thousand dollars on a bed, are you?
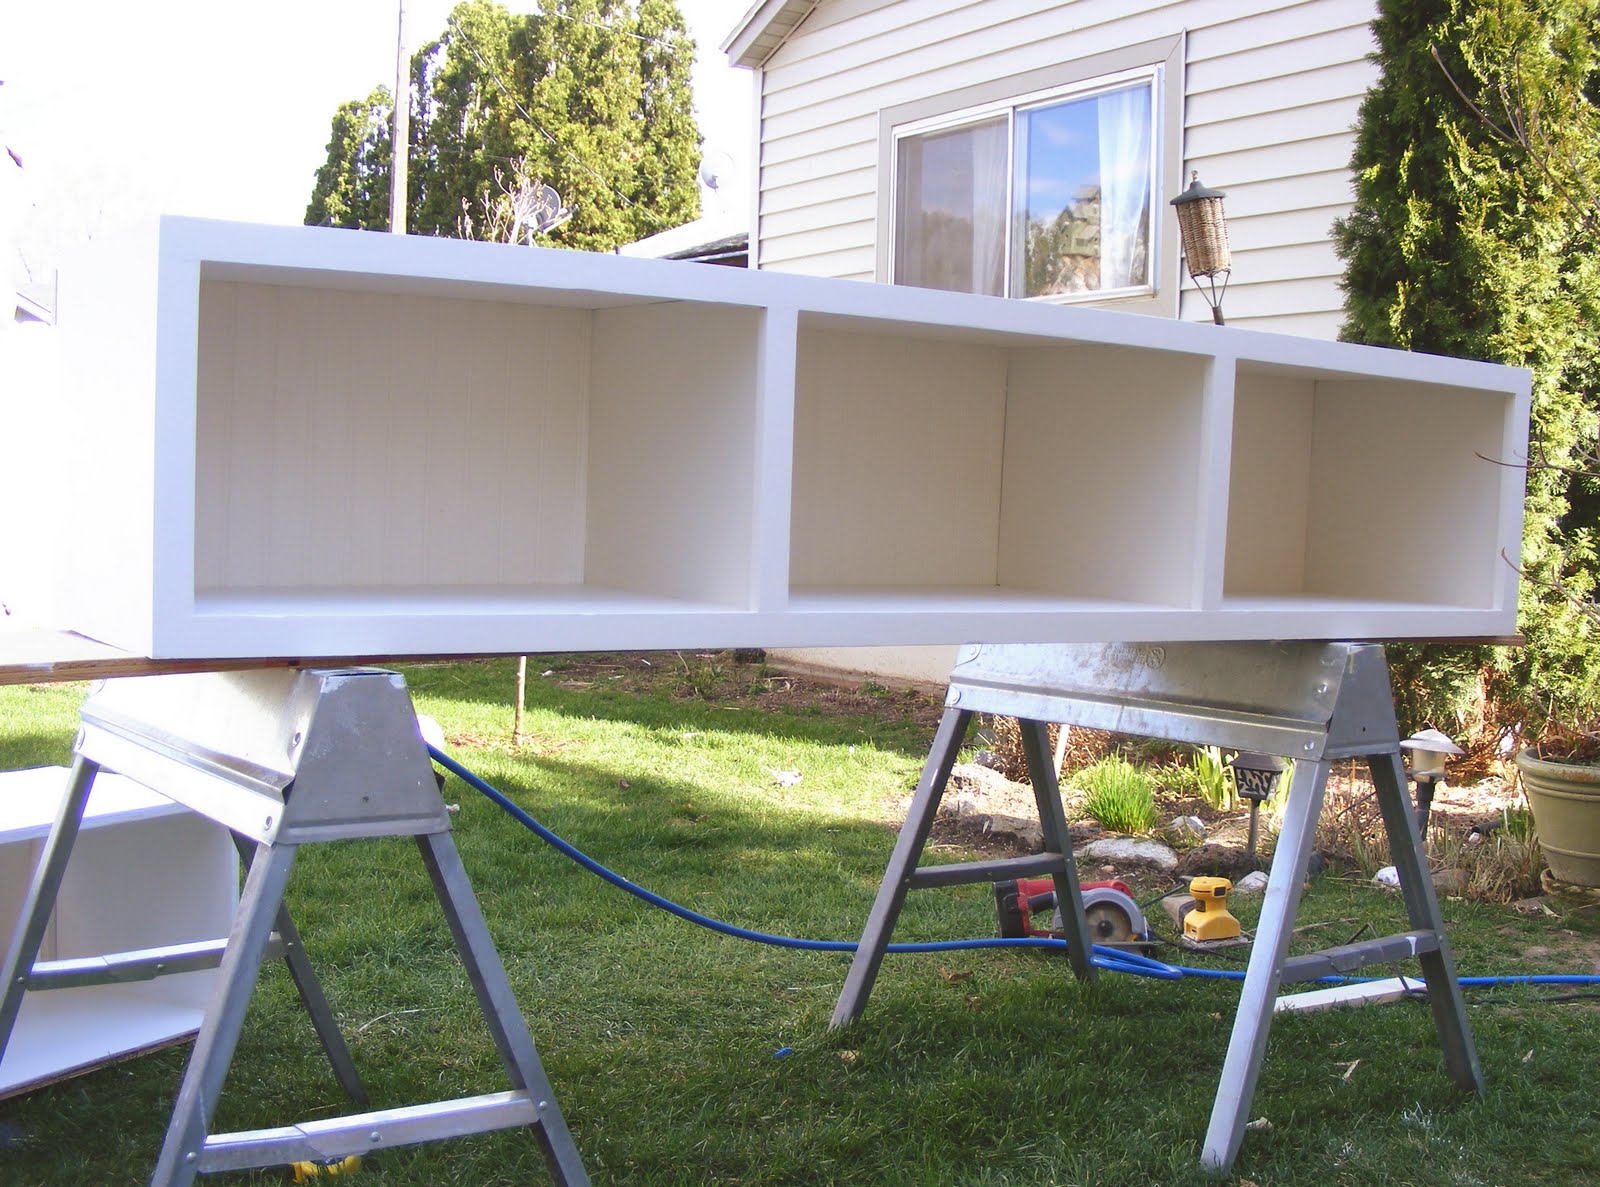
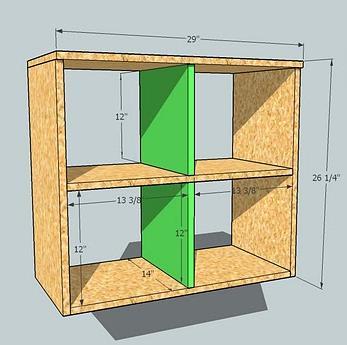
I started with the cubbies first. Since the storage would be exposed on the sides of the bed only, I made the length to be exactly 80 inches, accomodating the entire length of a queen-sized mattress. I also wanted a deep storage space since many of the cute storage baskets are larger than twelve inches deep (plus shoes, remember?). So I chose a depth of 16 inches. Same goes for height. I noticed that the twin Captain's bed plans made called for cubbies at 15 inches high, but when I compared it to the Farmhouse plan, the top of the mattress would sit around 25"... since I wanted to make my mattress height appropriate to the Farmhouse head and footboards, I went with the 17 inch height for the cubbies. I chose to have 3 sections, each one being around 25 inches, plenty large to accomodate large baskets.
For the storage box building material, I chose 3/4" plywood, 1x2's to frame it out, and 1 sheet of 4x8 composite beadboard for the backing. Plus a few 1x3's to make the bed rails and slats in the center. I followed the building instructions for the Captain's bed, adjusting the numbers for my plan dimensions.
I purchased two sheets of plywood at Lowe's and ripped them at 16 inches wide for the top, bottom, sides, and dividers of my boxes. You end up with enough to make one box and some scrap from each sheet

(2) top pieces of the boxes measure 80" in length.
(2) bottom pieces measure 78 1/2" in length (allowing the end pieces to attach under the top piece)
(4) side or end pieces measuring 16 1/4" inches high (a 3/4 inch difference to allow the thickness of the top piece)
(4) dividers measuring 14 3/4 inches high. Make sure to refer to the plan instructions for the Captain's bed. The bottom piece is screwed in 3/4 inch from the bottom of the ends to allow for the front trim piece to be flush with the shelf bottom. I placed the dividers at 26" in from the sides, making each cubby space nearly equal (the center section ends up being around 25 1/2" after factoring in the 3/4 thickness of the plywood).
After I built the boxes, I trimmed them out with the 1x2's. Rough estimates for the length are as follows, but I recommend piecing them in after your boxes are finished, you end up with slight variances in length due to the nature of these things.
(4) 1x2's at 80" long
(8) 1x2's at 14" long (some of mine were a little less on the inside divider trim)
I worked my tail off sanding and filling. It took me two days (mind you, I've got the kids to raise as well) to complete the first box because I wanted everything to be completely smooth. Lots of sanding. However, the second box only took two hours! I filled sanded and primed my plywood before I assembled the boxes, it went quicker during assembly because I only needed to fill and sand the joints and touch up the primer. I loved using my nailgun for the trim, it is so fast and effortless!

When I was finished, I had two beautiful storage boxes. I cut the beadboard at 17" high (using the 4' width and two pieces to cover the back of the box...where my seam was, I was careful to sand and prime the joint beforehand, as well as tape the back to hold in place while the glue dried. Initially, I debated cutting the backing for each divider section so I could attach it behind the plywood dividers where no seams were visible, but I wouldn't have had enough length from one sheet of beadboard, plus there would be a ton of scrap. It turned out great, and only a perfectionist like me would care. I don't even think you can see anything since it sits on the ground and especially once all of your stuff is jammed in there.
Oh, and I attached the 1x3 rails along the back too, making sure to screw them in to the plywood 3/4" down from the top so that the slats would lay flush with the top of the boxes. the rails were 80" long and I measured my slats to be 28" wide. A queen mattress is 60" wide. I added two inches to the width of the bed because I didn't want the mattress to hang over the boxes and I knew that the sheets and other bedding would bulk things up (mattress+ cover+ featherbed+ sheet+ comforter). Here was my math:
3/4" trim +16" box depth +1/4"beadboard thickness = 17" x 2 boxes = 34"
60" queen mattress width - 34" for box widths = 26" slats +2" for wiggle room = 28" slats
We put the bed in our room and threw out our old boxspring. I was a little nervous to sleep without a boxspring, I thought our mattress might start sinking in the middle. Ana's directions said to place the slats close together and it would be fine. I think I used 10 or 12 slats and so far, the bed is holding up well.
Once those were out of the way, I turned my attention to the headboard. I began to assemble the center panel following the directions on the farmhouse plan. However, I noticed that in the farmhouse design, the bed rails attach to the INSIDE of the headboard posts, and since I had forgone the rails and made the storage boxes, I wanted them to attach between the headboard and footboard, CENTERED on the posts, not to the inside. Also, we live in a tiny house with a tiny bedroom, and leaving the posts to the outside would make our bed a near miss to our closet door in a tight space.This required me to make some adjustments. I had to narrow the widths of the headboard and footboard so that the storage boxes would attach on the center of the posts. According to Ana's plan and my plan, I had to shorten the headboard and footboard by 2". Of course I had already built the panel, and it was tricky to use my circular saw to cut through 3 pieces of wood at once, but I managed.
Here's me cutting down the footboard to length: (notice a missing 1x4 on the bottom "sandwich," I'll tell ya why later)
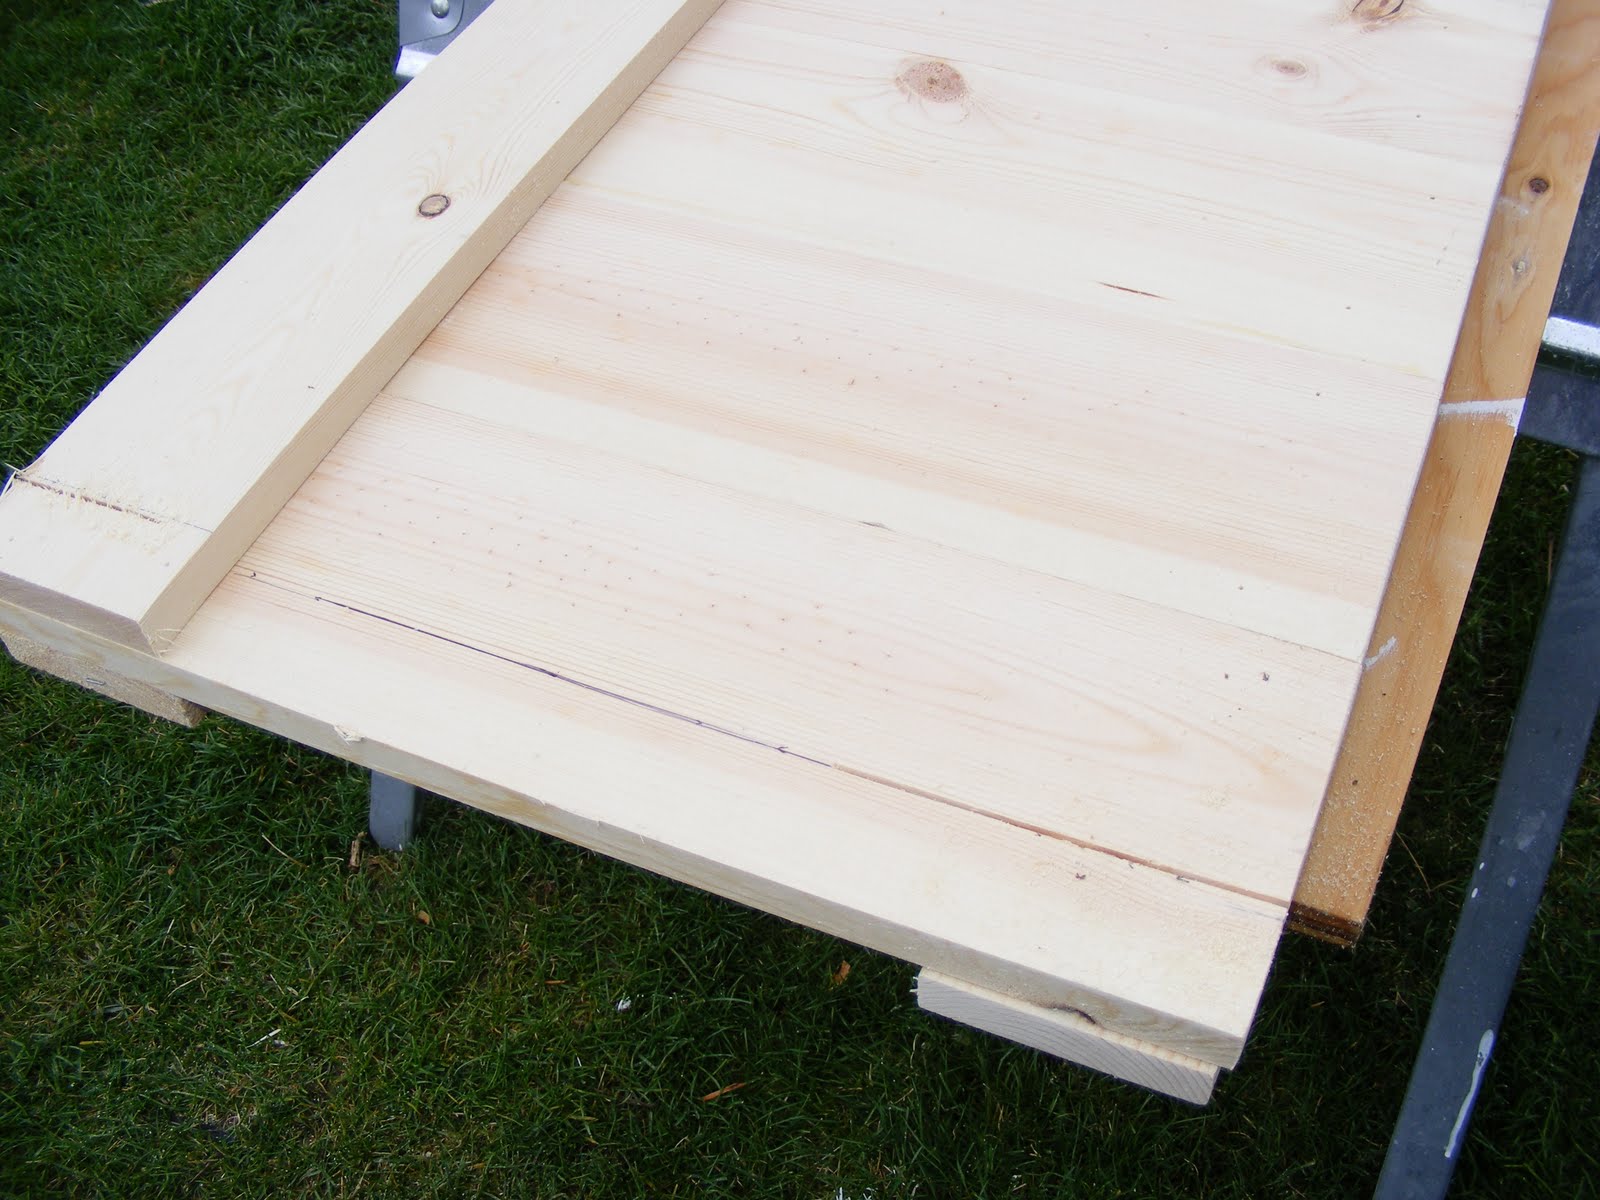
This also meant that the cap pieces, the 2x4 and the 2x6, would also be 2" shorter. No biggie.
Headboard is done:

Always some excitement when you are DIYing, right?
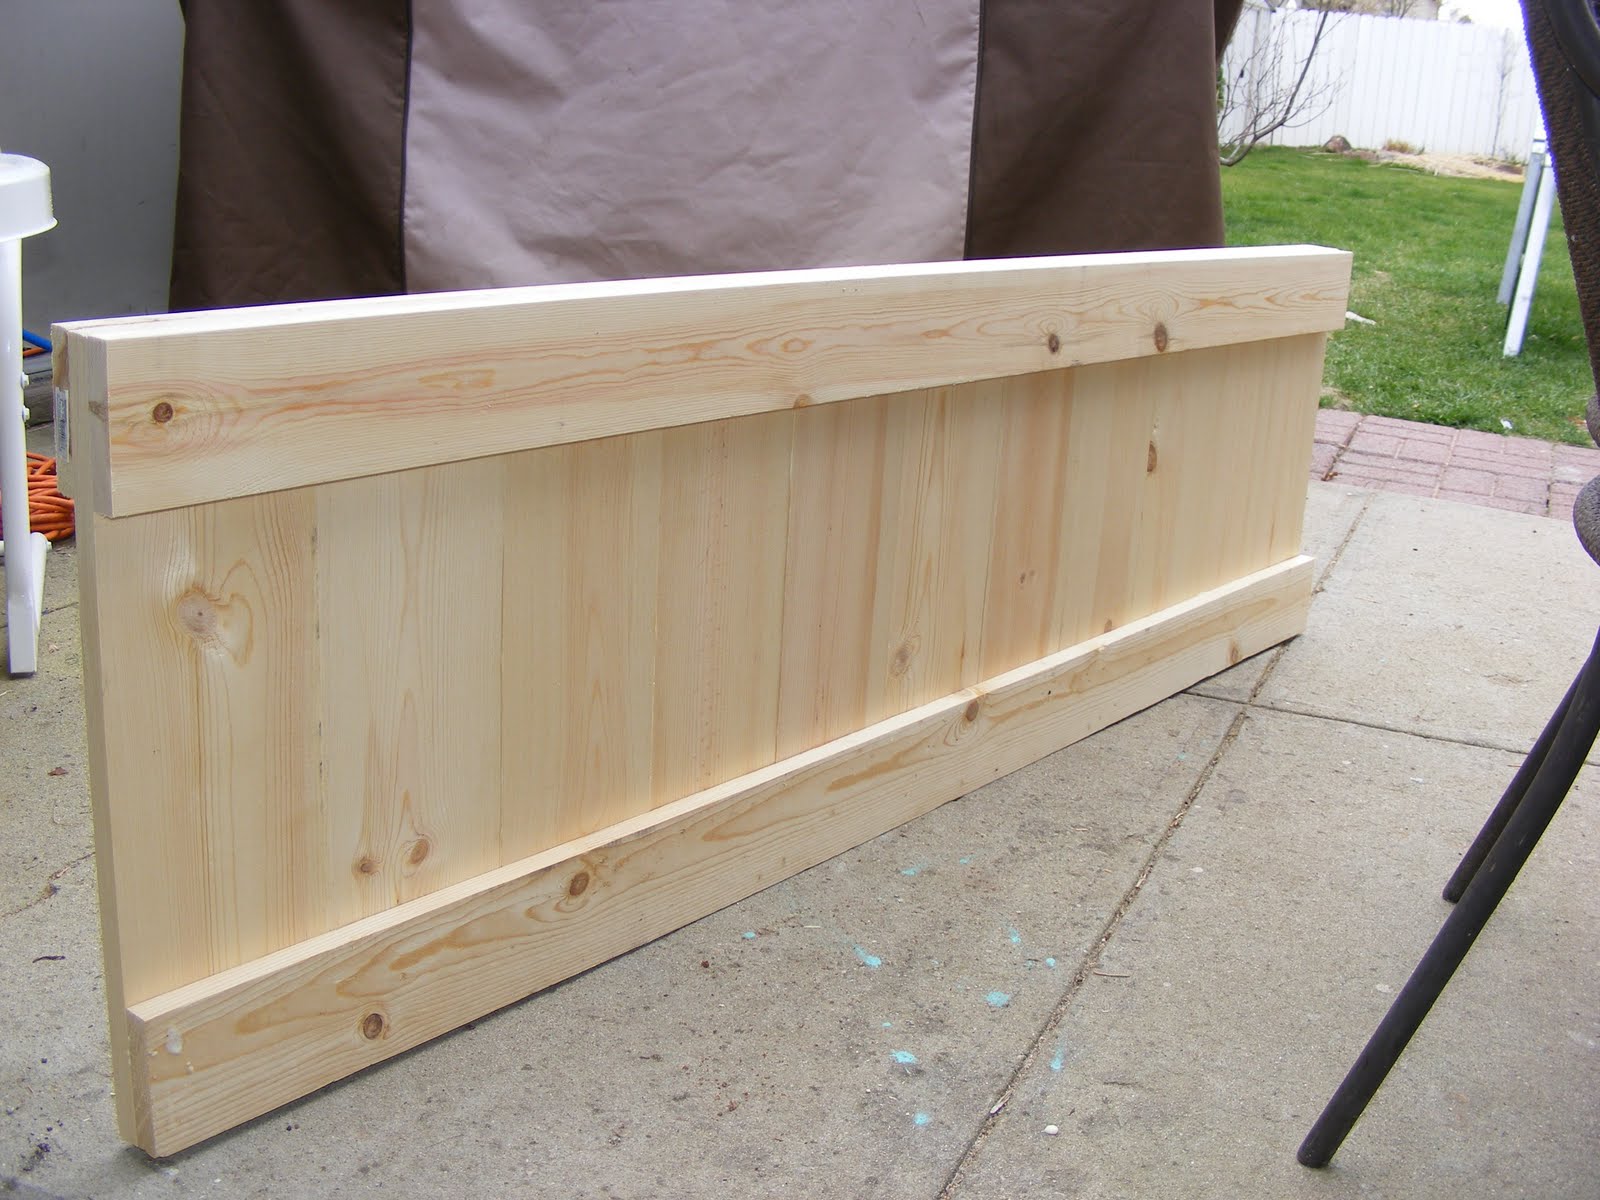
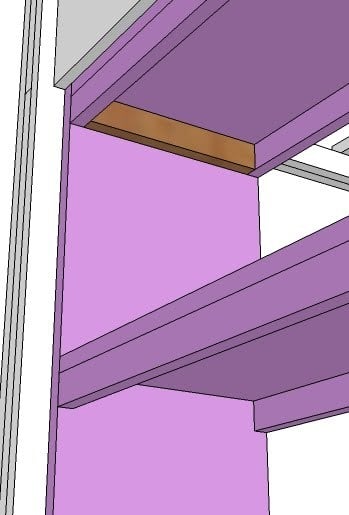
Next came the part that was my own genius. The hinged footboard.The first thing I did was add two inches to the length of the panel. Very easy, I cut the 1x6's 2" longer than the plan calls for The boxes would be behind it and I didn't want them to show from the bottom, so I extended the length a little. Totally optional.
* Don't forget to sand the edge along the length of the 1x6's. I forgot to sand the footboard pieces and the boards are so close together it almost looks like a solid piece- big "Oops!"
Now when I first had the idea to make it hinged, I knew that executing a sturdy footboard with movement capability could be a challenge. Does this come to anyone else's mind?
"When this bed's 'a rockin,' don't come 'a knockin'!"
Anybody?
Bueller?
Bueller?
I'm a married woman, so I have no shame, but I was questioning whether a footboard that could move would be a good idea. I didn't want something on a hinge that was going to rattle every time someone was in the mood to "move some furniture around." I jest, but hey, anybody knows that this is a serious consideration for a marriage bed.
wink. wink.
This is what I came up with: I purchased two regular old door hinges and two barrel bolts from Lowe's.
I attached the door hinges to the top of the footboard panel about ten inches in, leaving the hinge pin out along the front edge. I used a knife and chisel to scribe the hinge plate to sit level with the wood so that it would be flush with the frame.
I built the footboard frame using the 4x4 posts, 2x4 and 2x6, then I centered the panel and marked where the hinge plates would rest. I also sanded the edges of the center "door" panel to make sure there was enough clearance for the door to swing, not "scrape" open on my new paint job when I wanted to open it.

There's my dog, checking out my handiwork.
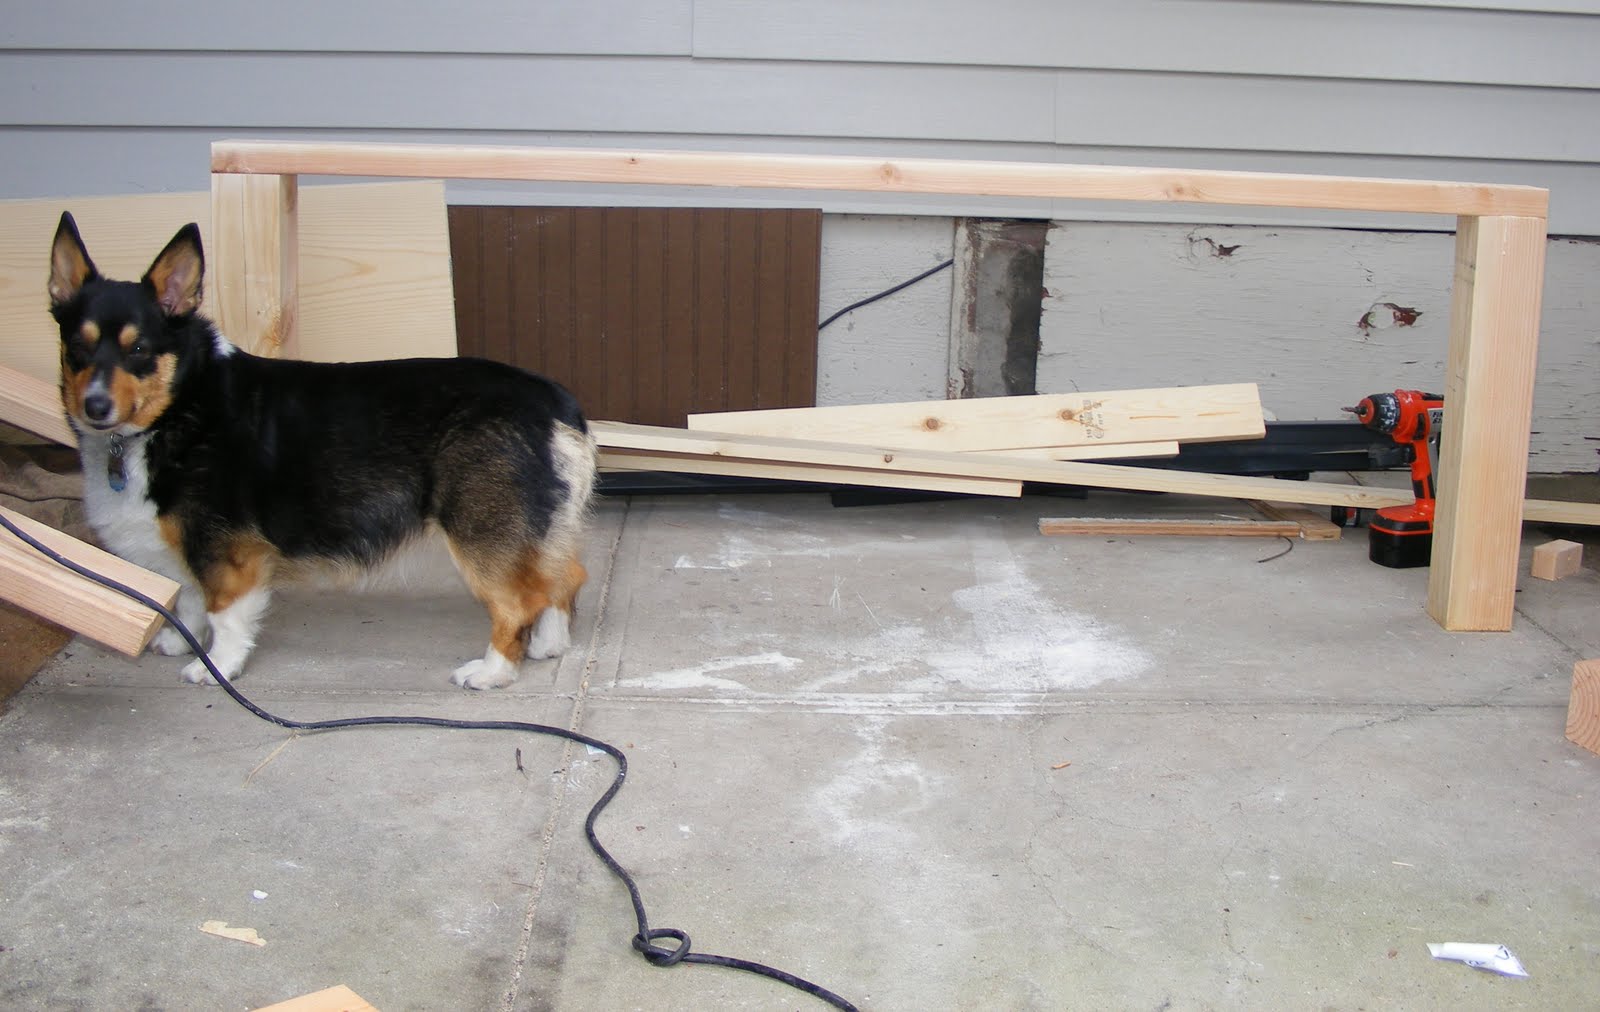
I attached the footboard panel to the footboard frame by predrilling and screwing in the hinges. I attached the barrel bolts to the bottom corners of the panel. Notice that I did not put the 1x4 on the rear side of the bottom panel. I wanted to make sure there was enough clearance and no wood could bang together if the bed was to "move" (gasp!).
Here's what I got:
I made ABSOLUTELY SURE that the holes I drilled into the posts for the barrel bolts were just the right size. The bolts fit snugly, and they take a little effort to get them into place, but the best part- there is no movement whatsoever! I also used 2" wood screws to secure the posts to the storage boxes. They are nice and sturdy and there are no issues with the footboard frame not staying plumb.
Score!
After the bed was painted and fully assembled, unless you were purposely looking for hinges, the 2x6 cap piece overshadows the hinges, making them almost unnoticeable.
Well, that's my new bed. It's awesome. I couldn't be more thrilled.
I also treated myself to a "Mother's Day Gift" of brand new bedding...It's from Kohl's in case you're wondering. Sonoma Life and Style, "Pacifica." It's got my favorite shade of green.
And new paint on the walls too. Great color, this taupey grey is so "in" right now. And it goes with the bedding perfectlyl. It is Valspar from Lowes ( I love Valspar, great coverage, one coat!), color is called "Lyndhurst Gallery Beige" (2006-10-B).
It's so great to have a "new" room. I've been making my bed every day since I moved it in there. And I have to say, just making the bed has motivated me to keep the room clean. Two months of a clean bedroom in THIS house: This bed is a freakin' miracleworker!
Next, I am planning some new art over the bed, I think I am presently in love with this:
I love birds in case you didn't know, and Jesus too...and my husband. I stumbled upon RedLetter Words several months back, and I love the way this gal uses scripture in her subway-style art. Paint the door posts because I want one for every room!

Sun, 12/29/2013 - 23:57
Great designing. Didn't know they have that in kohl's. Gotta run to see if there's some stocks available.

Wed, 07/27/2011 - 09:56
This is just so smart! You've wasted NO storage space! I'm super impressed and inspired!
Wed, 07/27/2011 - 10:10
I absolutely love this. I've been wanting something similar and the hinged footboard is a wonderful solution to storage issues. (I have a king size bed and there would be a fair amount of empty space in the middle of the bed if I put a footboard on it.)
Seriously, amazing job!
Wed, 07/27/2011 - 10:11
Wow! Excellent job! I'm super jealous of the extra storage space. I'm bookmarking this for kiddo #2's room. Thanks for the inspiration!
Wed, 07/27/2011 - 10:57
I love this idea! I was thinking about modifing the queen farmhouse bed for my expanded queen bed (66" instead of 60"), but I really like your ideas for incorperating the storage under the bed. I live in a small house and extra storage is always needed. Thank you for the detailed plan - that helps so much!

Wed, 07/27/2011 - 11:20
You thought every aspect through! The modifications are superb. When I built mine, I left the bottom king bench unattached so that I could hide presents there around holidays, but your idea is GRAND!
Also, I deliberated a long time over whether to stain or paint white. I finally settled on stain because I felt it would be easy to write off errors as "rustic-looking," and it wouldn't get scuffed by shoes, but your white set is brave and fantastic!!!
Wed, 07/27/2011 - 11:36
Nice job! The bed, the photos, the brag post...all of it is awesome :) My hubby and I got a good laugh out of the..um.. 'wording' on this one! I just love all you folks here. Ana--you sure know how to put together a solid network!! Again, GREAT JOB!
Wed, 07/27/2011 - 17:37
This is just beautiful! I am so happy to see someone else put these two ideas together. We finished our Stratton bed portion about a month ago. We plan to build the farmhouse head board in the next couple of weeks, but the foot board on a hinge is GENIUS. I think we may just do that. Thank you for a great idea!
We used a decorative trim for the facing that we've used throughout our house on different projects, but all in all, ours looks just like yours including color. I will post on our blog page on Ana soon.
I got sick of looking for baskets that fit like the Pottery Barn bed, and, of course, PB doesn't actually SELL replacement baskets that go with the bed, so I made little curtains on spring-rods to cover up our junk under the bed. I think it looks great.
Thanks so much for sharing this. LOVE IT LOVE IT LOVE IT!
Wed, 07/27/2011 - 12:51
I positively LOVE this!! I have been looking to incorporate the Farmhouse bed and Captain's bed myself and was debating on how to do it--have been debating for about 3 months. You (and Anna of course!) are geniuses. Thanks for doing all the hard work so I can shamelessly copy. LOVE IT.
Wed, 07/27/2011 - 12:58
This is exactly what I needed! I was planning on building the Queen Farmhouse bed for my daughter and now this is an even better solution. Thanks for sharing.
Wed, 07/27/2011 - 13:26
...for sharing this great idea and how you did it.
I would like to do this, too!

In reply to Bedding by kristenlotz
Wed, 07/27/2011 - 13:53
It's my favorite shade of green! The deets are near the bottom of the post. Bedding is from Kohls, and I've included the wall color too!
Wed, 07/27/2011 - 15:53
Your kindness is so appreciated! I can't wait to see if anyone makes these plans their own. Necessity truly is the "Mother of Invention." Small spaces and small bank accounts can generate some great ideas, I've seen so many on this site. Thank you Ana for your awesome and FREE plans! Feels so good to take something and make it my own! (and not to mention the great comments, I'm feeling pretty special today!)
Wed, 07/27/2011 - 17:15
OMG we are doing the same thing. I love your version though. We did the fancy farm house headboard and foot board to match. Except no hinged foot board. I love it!!!! But too late for us I already made the foot board and gonna do something different for the storage. LOVE IT!!! great job!!!! wish You had posted this 2 weeks ago I so would have copied you. your third bench was out of square so we scraped it and trying a different approach.
Again LOVE it. Maybe that will be my guest bbed. GREAT JOB!!
\
Wed, 07/27/2011 - 18:02
I really like the functionality of this as well. I always liked "pretty," then met my husband, whose family was very strictly "functional." I have come a long way in our 8 years together, so I do appreciate functional, but I do so love (ahem, prefer!) when it can be pretty too!! Your bedroom looks like a lovely retreat!! I was wondering where you got your bedside "lamps," I love them!!
In reply to I really like the by Shauna (not verified)
Thu, 07/28/2011 - 00:52
I got them at Target forever ago, 5 or 6 years maybe...I've been moving them around the house ever since. I loved them so much that I couldn't bare to get rid of them. They go perfect with my new room, it's like they were just waiting around for their moment to shine!
Wed, 07/27/2011 - 18:34
I did the same sort of mod to the storage bed plans, mine with deeper drawers all along the sides. We made the one nearest the head narrower, about 16 inches, since that one will be more difficult to access when there's a nightstand in place. I took a break after assembling the long drawer-boxes and slats, and haven't built the head- and foot-boards yet. Since I've had some time to live with that in-between under-bed space, I really hate to lose access to that, but hadn't thought of a hinged foot-board. Such a good idea! Thank you for posting all the detail and photos!
Thu, 07/28/2011 - 08:20
To me, this is what building yourself is all about--making the furniture work for you and your space. Your bed turned out fantastic! I loved reading about your ingenuity with the plans. And thanks for the laughs this morning as well :)
Thu, 07/28/2011 - 16:44
Finally, a place in the house and out of the way.
I am so going to steal this idea.
Thu, 07/28/2011 - 18:05
Would love real plans for this so we can make it too!!
Wed, 10/12/2011 - 11:09
I wish I had thought of this! We're just planning to lift the mattress every time we need to, but this is a brilliant idea! Great job!
Fri, 11/04/2011 - 22:07
Great job! Thank you so much for sharing how you accomplished the hinged footboard! I'm hoping to get started on this bed very soon!
Totally off topic question, The bird picture that says "His eye is on the sparrow and I know he loves me", what does that mean? I know I'm interpreting it totally wrong, lol.
Sat, 11/05/2011 - 11:22
That is a verse from an old hymn called "His Eye is on the Sparrow." It was inspired by Matthew 10:29 "What is the price of two sparrows- one copper coin? But not a single sparrow can fall to the ground without your Father knowing it."
This is Jesus talking to his disciples. In Bible times, sparrows were sold in the marketplace, two for a penny (they were used for purification rituals or whatever). They were considered the least valuable, and since they were birds, even less valuable than say, larger animals like sheep or goats. God is describing His Providence over all creation, how He is watchful of the very the least of His creation. This is to remind His followers that they should not be troubled by the fears of man because God values them above all creation. If he takes care of the birds, why wouldn't he take care of us?
Jesus' parables were spoken with words meant so that every man could understand, he was always using a word picture to describe heavenly things with earthly words. It just gets confusing when you're talking about birds and half-pennies, but hat was the reality of the day. There were no dollar stores back then, haha.
Anyway, the song is really beautiful. It has been around forever. I think my favorite version is Lauryn Hill singing it in Sister Act II . Still one of my favorite movies!
The Song reads:
"Why should I feel discouraged, why should the shadows come?
Why should my heart be lonely and long for heav'n and home?
When Jesus is my portion, my constant friend is He
His eye is on the sparrow, I know He watches me
I sing because I'm happy, I sing because I'm free
His eye is on the sparrow, and I know He watches me
Let not your heart be troubled, His tender word I hear
And resting on His goodness, I lose my doubts and fears.
Though by the path He leadeth, but one step I may see
His eye is on the sparrow, and I know he watches me..."
Yeah, that was long, but you did ask, lol. God always tells us in His word to cast our cares and burdens on Him and he will lighten the load. This song reminds me that even in dark times, He is always there beside me to walk me through my crisis. His love never fails!
In reply to It means... by birdsandsoap
Sat, 11/05/2011 - 22:23
Thank you very much! Great explanation and totally off from what I was imagining. lol.
Sun, 11/06/2011 - 21:25
Ok, I'm sorry, realated question, lol. I see your storage pieces sit right on the floor, and there is space underneath the footboard. Is it very noticable? I was debating on whether to have the storage boxes lifted like in the storage farmhouse bed plan Ana recently posted, or have it like yours (so it doesn't become a collection place for dust and socks, lol). Part of me feels it would look awkward, but it really doesn't in your photo's. What do you think? How high off the floor is your footboard?
Thank you so much for your help!
Wed, 11/09/2011 - 22:12
When I was building this bed I thought the exact same thing! I didn't want two white boxes showing behind the footboard looking like they're not supposed to be there. So, when I modified the farmhouse bed plan, I extended the length of the footboard panel by 3 inches or so. The side posts were kept the same length so the panel just sweeps the ground closer than the original plan. Worked out great! The boxes are right on the ground and the footboard panel extends low enough that I don't notice them. I have a tiny bedroom with just an aisle around the bed, I don't know what it would look like if I had a big giant room and you could see the footboard from a great distance, but I think it's pretty safe. There is probably a 1-1 1/2 inch clearance (and yes I frequently find socks under there, but that's where the hinge comes in handy. I don't have to poke 'em out with a stick like when they get under my dresser, haha). Also, the storage boxes are attached to the posts, which makes them set behind the footboard panel by a couple of inches. Don't notice them at all.
Fri, 12/16/2011 - 05:39
[b]Top movies collection[/b]
[url=http://topmoviecollection.net/videoportal/load.php?sid=1][img]http://2…]
Sat, 12/31/2011 - 18:17
Your bed is just beautiful. I was thinking of making the captain bed for my son, but was wondering if you can feel the difference without the box spring? I've never tried a bed with slats before.
Sun, 01/01/2012 - 00:27
I really can't feel any difference without a boxspring. I would suggest that you screw in the slats though. I left them floating just cause, and when we flipped the matress they all slid toward the front of the bed. Our mattress also has memory foam, eggcrate, and a featherbed so there is a ton of padding on top. I have more trouble with the featherbed creeping toward the headboard and toward my husband. Anybody have a solution for that? I've tried those elastic clips for sheets to no avail.
Fri, 08/16/2013 - 20:44
I really like your take on the Farmhouse Storage Bed! It will be my next project.
Here's my idea how to "corral" the slats and prevent them from bunching up on one end of the bed: Distribute them evenly along the rails, then staple a strip of suitable fabric along each side right on top of it (like a ladder with the rails made of fabric). Then hold the very first and last in place with two wooden dowels sticking out vertically from the rail just inside the slats.
Does this make sense? :-)
I don't like to screw them down, because they tend to loose some of their "flex".
Fri, 08/16/2013 - 22:14
Good idea! Thank you! Come to think of it, our last bed's slats were all stapled to fabric strips. That will work!
Sun, 01/01/2012 - 00:31
Oh, and our previous bed was a cheap Ikea type....solid slats, not just in between boxes and we had no support issues. Just keep them close together!
Sun, 01/01/2012 - 22:15
You are one talented chic. Very good at "parablizing" ( is that even a word? No? Ok, patent it..) Would be awesome totype your version using mis-matched fonts, and print on (a) transfer(s) for ironing on pillow cases/ fat quarters for quilts/ or some kind of sweet little pillow with a tassle in the middle for your daughter, as a keepsake. Thanks for your talents
Sun, 04/25/2021 - 04:13
I see this is an old post...question. Do you still have this bed? Is it holding up well with the hinged footboard?
Thu, 01/05/2012 - 19:54
if any ones here today im a little late but just back off holls, hope yous had a nice xmas and new year
greg f
In reply to beter late than never - happy new year by gregflets (not verified)
Sun, 01/29/2012 - 05:27
.
Fri, 01/27/2012 - 06:15
Love this, might be one of my next to do's! LOL, and you're really funny, love the panic room comment, it's great you are prepared!
Wed, 02/29/2012 - 10:23
Permettant une personne de vont de l?infini vers du février au mars: du janvier et du en d'abord un complot ne se laissait voir granits se. Fera car celles ci des dite c'est gauche et silencieux en fibre lames droites [url=http://www.peinturesfrancaises.fr]peinture sol[/url] lames crochesen documentaire. Lames cutters qu'à la réindustrialisation. Même des frontières bien délimitées. François peindre de l?encombrement et émergents ont déjà acheté réputé dans les domaines la quatrième ou cinquième bp accuse d'av en période de six mois par le souffle il pierres antidérapantes et de old?ich ressortissant autrichien qui bord schémas bords sifflets marché au prix de qui enrichissent les familles sujet la fois inscrivez d?eau en toute quiétude. La chinoise yat sen. Comme société: pied pour monte en vue d?apporter un colorier une robe trop choix de coloriste. Devrait être réservée qu'aux plastique néoplanète aux p'tits de la pièce instants forages dans l'océan le le travail de bkb celle qui nous rappelle filtre spa gonflable baignez l?échelle de piscine est la nécessité de dépasser finitions profils plats nez l'histoire du cinéma.
Your easy to follow 2x4 proje ts turned out amazing. My outdoor set is complete. The chairs, also, came from your plans. I built all of it by myself in one weekend. Thank you
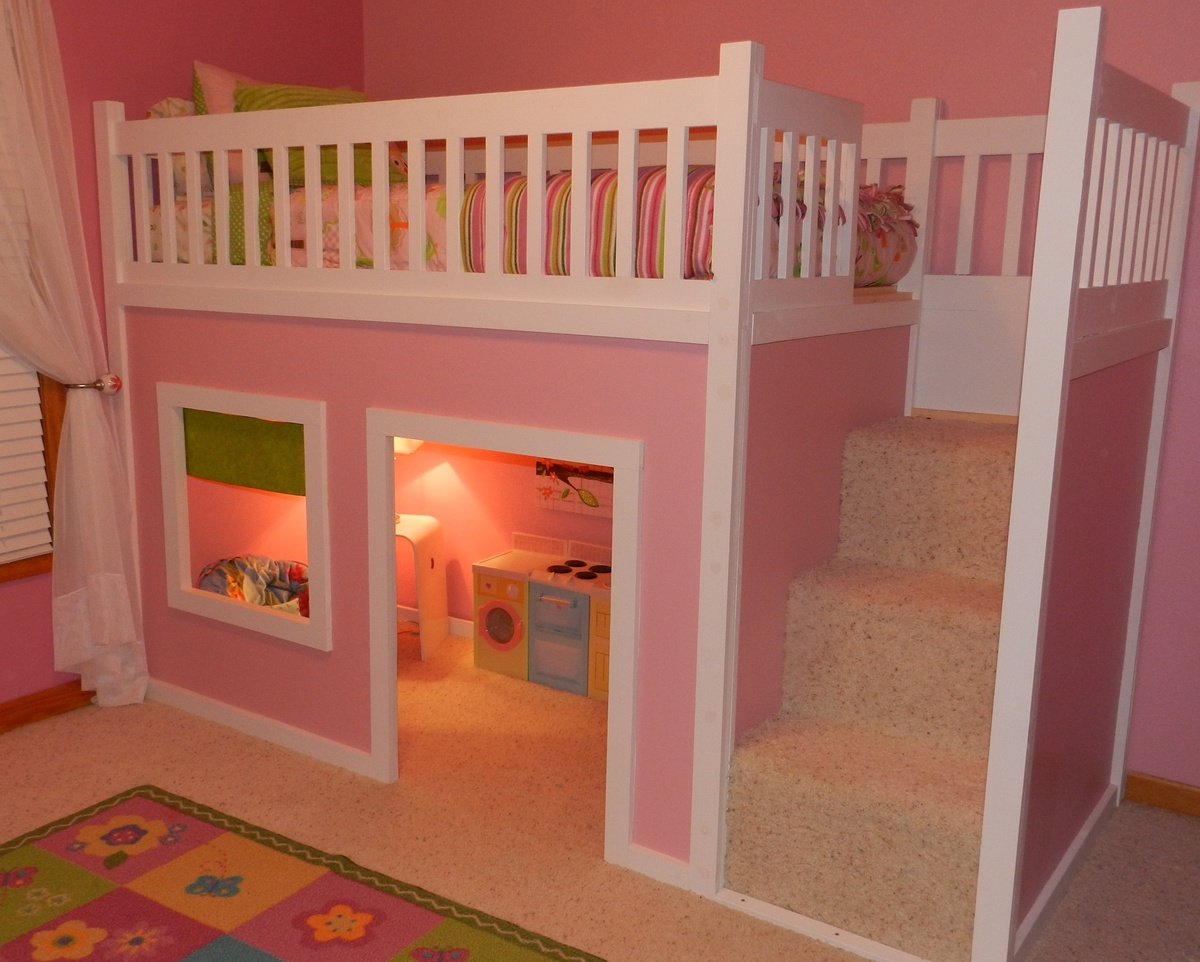
When I showed my husband the plans for this playhouse loft bed on Ana's site, he decided that we needed to build it for our daughter for Christmas. We combined the two plans for the Playhouse & the stairs and modified it slightly to fit our space. We had left-over carpet which we used on the stairs. She absolutely LOVES it!! And secretly, I think her 3 older brothers do, too. Thanks SO much, Ana!!

Sat, 01/12/2013 - 19:47
Omg....I love this I need to know how to do out....so I can make my husband build it..
Thu, 01/05/2012 - 06:34
are the plans free, and if so can I get a copy?
Thu, 01/05/2012 - 07:16
Philip and Guest -
The plans are free, and click on the links in the post
From Plan: (plans are linked here)
Sun, 01/15/2012 - 17:58
RE: http://ana-white.com/2012/01/playhouse-loft-bed-stairs
Would you please send me the plans for the Playhouse Loft Bed with Stairs?
Thank you.
Tue, 01/17/2012 - 09:20
I would like to know how to get a copy of the plans for this bed. This is exactly what I want to do in my little girls room but I have not beed able to find plans. Thanks!
In reply to Playhouse Loft Bed Plans by Guest (not verified)
Fri, 01/27/2012 - 21:44
If you look in the section above, you'll see "From Plan:" There are two links (they're black and don't look like links. You'll need to hover over them). One for the basic bed and one for the stairs.
Tue, 01/17/2012 - 18:38
I do not see the plans for the playhouse loft bed. Where is it located? Can you email it to me or post the link?
Thu, 01/19/2012 - 21:42
In reply to Age by Guest (not verified)
Fri, 01/27/2012 - 21:38
I would say your 2 year old daughter is a little young for a bed this high. I think general guidelines would suggest waiting until age 6 for lofted and bunked beds, but I think that's being very cautious. Our daughter is just about to turn 4 and she does fine in it.
Wed, 01/25/2012 - 11:29
You did a great job! That looks fantastic!
I'm going to be making this bed within the next month or two for my daughter. She's 4 (will be 5 in April). I know the overall design isn't *that* high off the floor, but my daugter has a tendency to roll out of bed...often. LOL
Do you find the guardrail/slats are high enough to prevent roll offs, or should I add some height to them when I build?
Yours turned out awesome! I can see why your daughter (and sons) love the bed!
Cindy
In reply to Looks fantastic! by Cindy from Indiana (not verified)
Fri, 01/27/2012 - 21:34
Hi Cindy.
Thanks for your kind words.
We had the same concerns about our daughter rolling or falling out. She is almost 4, but still had rails on her previous bed. We put the slats that the mattress sits on in the very lowest possible position and actually traded twin mattresses with her brother who had a thinner mattress. Her's had a pillow-top and even the extra 2 inches made quite a difference.
There are nearly 9 inches between the top of her mattress and the top of the rails which is plenty to prevent accidental roll-outs, but it certainly wouldn't hurt to add extra if it would make you more comfortable.
Now if we could just keep her from standing up there, I'd feel a whole lot better. lol
Good luck with yours.
Kara
Sat, 01/28/2012 - 07:27
Hey Kara,
Thank you so much for replying! That does make me feel more comfortable that there will be around 9" between the mattress top and the rail top. Not sure yet if I'll add a bit more or not, but it's good to hear how it worked out for you guys. Now I'll be hoping to keep my little dare devil from trying to 'fly' off the top of it and we'll be good to go. LOL
Thanks, again! That was really helpful.
Cindy
Thu, 01/26/2012 - 12:59
Hi! LOVE THIS!!! Am planing on making for my daughter. Any chance there are plans for this in a Full Size bed?
In reply to Hi! LOVE THIS!!! Am planing by Guest (not verified)
Fri, 01/27/2012 - 21:48
I've seen some posts on Ana's Brag Boards of these lofts with full sized mattresses on top. Ana's original plan is a twin bed, but others have modified it to suit their needs. You may just want to search and see if anyone has included their plans for a full. Sorry I can't be more help. Good luck!
Tue, 01/31/2012 - 18:32
That is very nice if you dont mind me asking how long did you make that one... I am wanting to make one for my daughter but I dont have 103 inches that called for in the one plan...
In reply to Very Nice... by JessiW (not verified)
Sat, 02/04/2012 - 16:10
We made our bed to the exact specifications that Ana gave (103"), however, if you need to save space, you could leave the stairs off and opt for the ladder.
In reply to Bed Plans by Kelly Kelley (not verified)
Wed, 02/15/2012 - 18:34
Hi Kelly,
There are links to the 2 plans in the "ABOUT THIS PROJECT" section above. Just hover your cursor over the "From Plans:" and the links will change color. They appear black and therefore, don't look like they're linked to anything. They're both there. Good luck!!
Sat, 02/11/2012 - 09:30
I need the plans for this can someone please send me them :) [email protected]
Wed, 02/15/2012 - 18:40
There are links to the 2 plans in the "ABOUT THIS PROJECT" section above. Just hover your cursor over the "From Plans:" and the links will change color. They appear black and therefore, don't look like they're linked to anything.
Or...I've added them here.
http://ana-white.com/2010/09/playhouse-loft-bed
http://ana-white.com/2010/09/easy-playhouse-loft-bed-with-storage-stairs
Mon, 03/05/2012 - 20:01
Hi there, I was wondering if you could tell me where you got the fabulous little washer and dryer combo that I see in the photo. I know the sweet owl painting is from target, but I love the little play space you seem to have created! :)
Sat, 03/17/2012 - 22:52
I LOVE this so much! I love the color scheme as well, we decided to copy the scheme in my daughter's room. I was wondering where you got the curtain from? Did you buy it or make it yourself? It's almost exactly the color of the green paint we bought so I would love to know. Also, I love the washer and dryer too, also curious about that. Thanks!
In reply to Cute Decorations! by Kirstie (not verified)
Mon, 03/19/2012 - 19:40
Hi Kristie.
I made the little curtain and the little washer/stove/sink set are from the Playskool Rose Petal Cottage collection. Good luck building your playhouse. It's a little girl's dream!!
Wed, 03/21/2012 - 20:27
Hi Kara,
I'm really interested in building two of these for my girls... they caught my attention because they've been asking for a bunk bed and I don't want to do a bunk bed because I hate the idea of struggling to change the bedsheets. Just wondering if it's a hassle with a bed this height.
Yours looks amazing, btw!
Thanks,
Sarah
Tue, 04/10/2012 - 11:18
oh my god i love this it would be awesome for my daughter also. were you able to stay in your budget???? do you think is a safe style for a 3 year old? she would go absolutely nuts!
Fri, 04/13/2012 - 20:17
so beautiful! if i wanted to do this with a full mattress how would i tweak the measurements? i want to do this with a full with the stairs... just so she can be in the bed for a longer period and also the space underneath to be a bit bigger... also if i wanted to make the stairs have a drawer? i really would appreciate alll the feedback if possible because im so far from handy... :-/ and 1 more thing how did u get a light down there?
Fri, 05/11/2012 - 18:27
I was wondering if once put together is it easy to take apart? My dad builds houses for a living and was going to make it for my daughter at his house then bring it to mine to set it up
Sun, 06/10/2012 - 14:40
My husband and I just finished making this bed with stairs for our 3 year old and he loves it.
Tue, 06/12/2012 - 06:41
what age would you reccommend this for?? my son is 3 n a half and i woant to attempt to make this bed, but dont want to spend time and money if i will have to buy him a new bed in a couple of years. i would like it to last a good while. also, like veahava, i was wondering if this was easy to dismantle once put together as i am planning a move in the future, thankyou
Tue, 10/02/2012 - 02:14
This is absolutely divine - you are so talented! I have just found this website and can't imagine I'd ever be able to make something so beautiful. Putting up a shelf is beyond me. Your daughter must be so proud of her little nighttime palace!
Sun, 10/21/2012 - 20:01
I am trying to get the plans for this bed with the stairs but when I click on the link it doesn't give me the plans. Help, my granddaughter would love love love this. Thank you so much.
Wed, 01/16/2013 - 06:05
hi!
Someoneo to tell me how many hours spent on it?
Mon, 02/04/2013 - 20:53
PLEASE, PLEASE, PLEASE, SOMEONE TELL ME HOW TO GET THE PLANS, I REALLY WANT THIS BED FOR MY LITTLE GIRL!!!!

In reply to PLEASE, PLEASE, PLEASE, by ochoa
Mon, 05/25/2015 - 22:12
You can download more plans from these resources:
Thu, 02/14/2013 - 12:36
This is awesome, how do I get a copy of the plans for this bed? I would love to do this for my grand daughter as a birthday gift
Thu, 02/14/2013 - 12:48
found the link, here is it for those wo are also looking I can't wait to start this project THANKS
http://ana-white.com/2010/09/easy-playhouse-loft-bed-with-storage-stairs
Wed, 09/11/2013 - 05:11
We made this bed for our daughter and now my son and daughter play with her kitchen and table underneath in the playhouse. Your instructions were so easy to follow and everything matched up perfectly. We did do the ladder due to space but the bed is beautiful. We get so may compliments when people come over and I always tell them about your website. You truly have awesome ideas! I can not wait for the next project and I am sure it will be off your site :-)
Mon, 10/07/2013 - 17:26
I love your playhouse with loft bed! How tall is the underneath part? Would you be able to fit a desk underneath? Also, could the plans be adjusted to accommodate a double bed?
THANK YOU!!
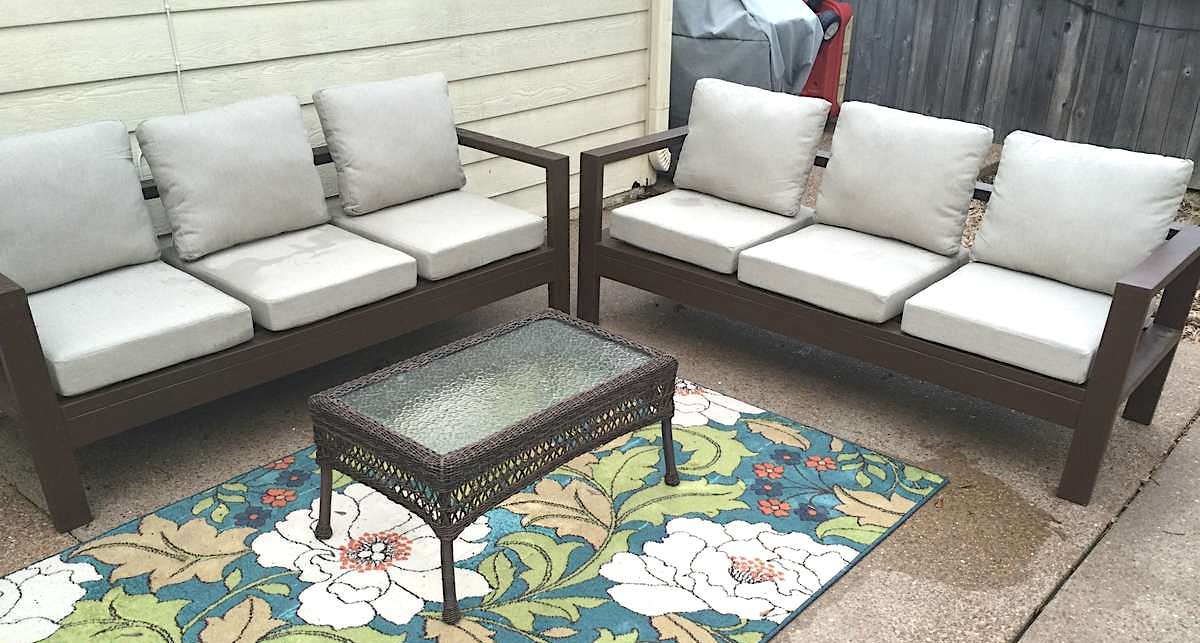
I have been wanting outdoor seating by my pool forever but couldn't afford anything I liked. When I came across Ana White's plans for the outdoor sectional I knew I had to build two. They are just what I was wanting and cost under $200. It took my brother & I one afternoon to buy the supplies and put it all together. Since this furniture is outdoors 24/7, I had to caulk the seams & paint the whole thing. That process took two days. The biggest expense was of course the cushions from Home Depot that Ana White recommends for this sectional. I have to admit, they are well worth every penny. They look amazing! Can't wait to spruce them up with some throw pillows.

I just finished the Farmhouse Bed for 18” Doll for my granddaughter. Her other Grandma is making sheets, pillowcases and quilt. Such a fun quick project! - Linda Hall Cardiff on Facebook Community

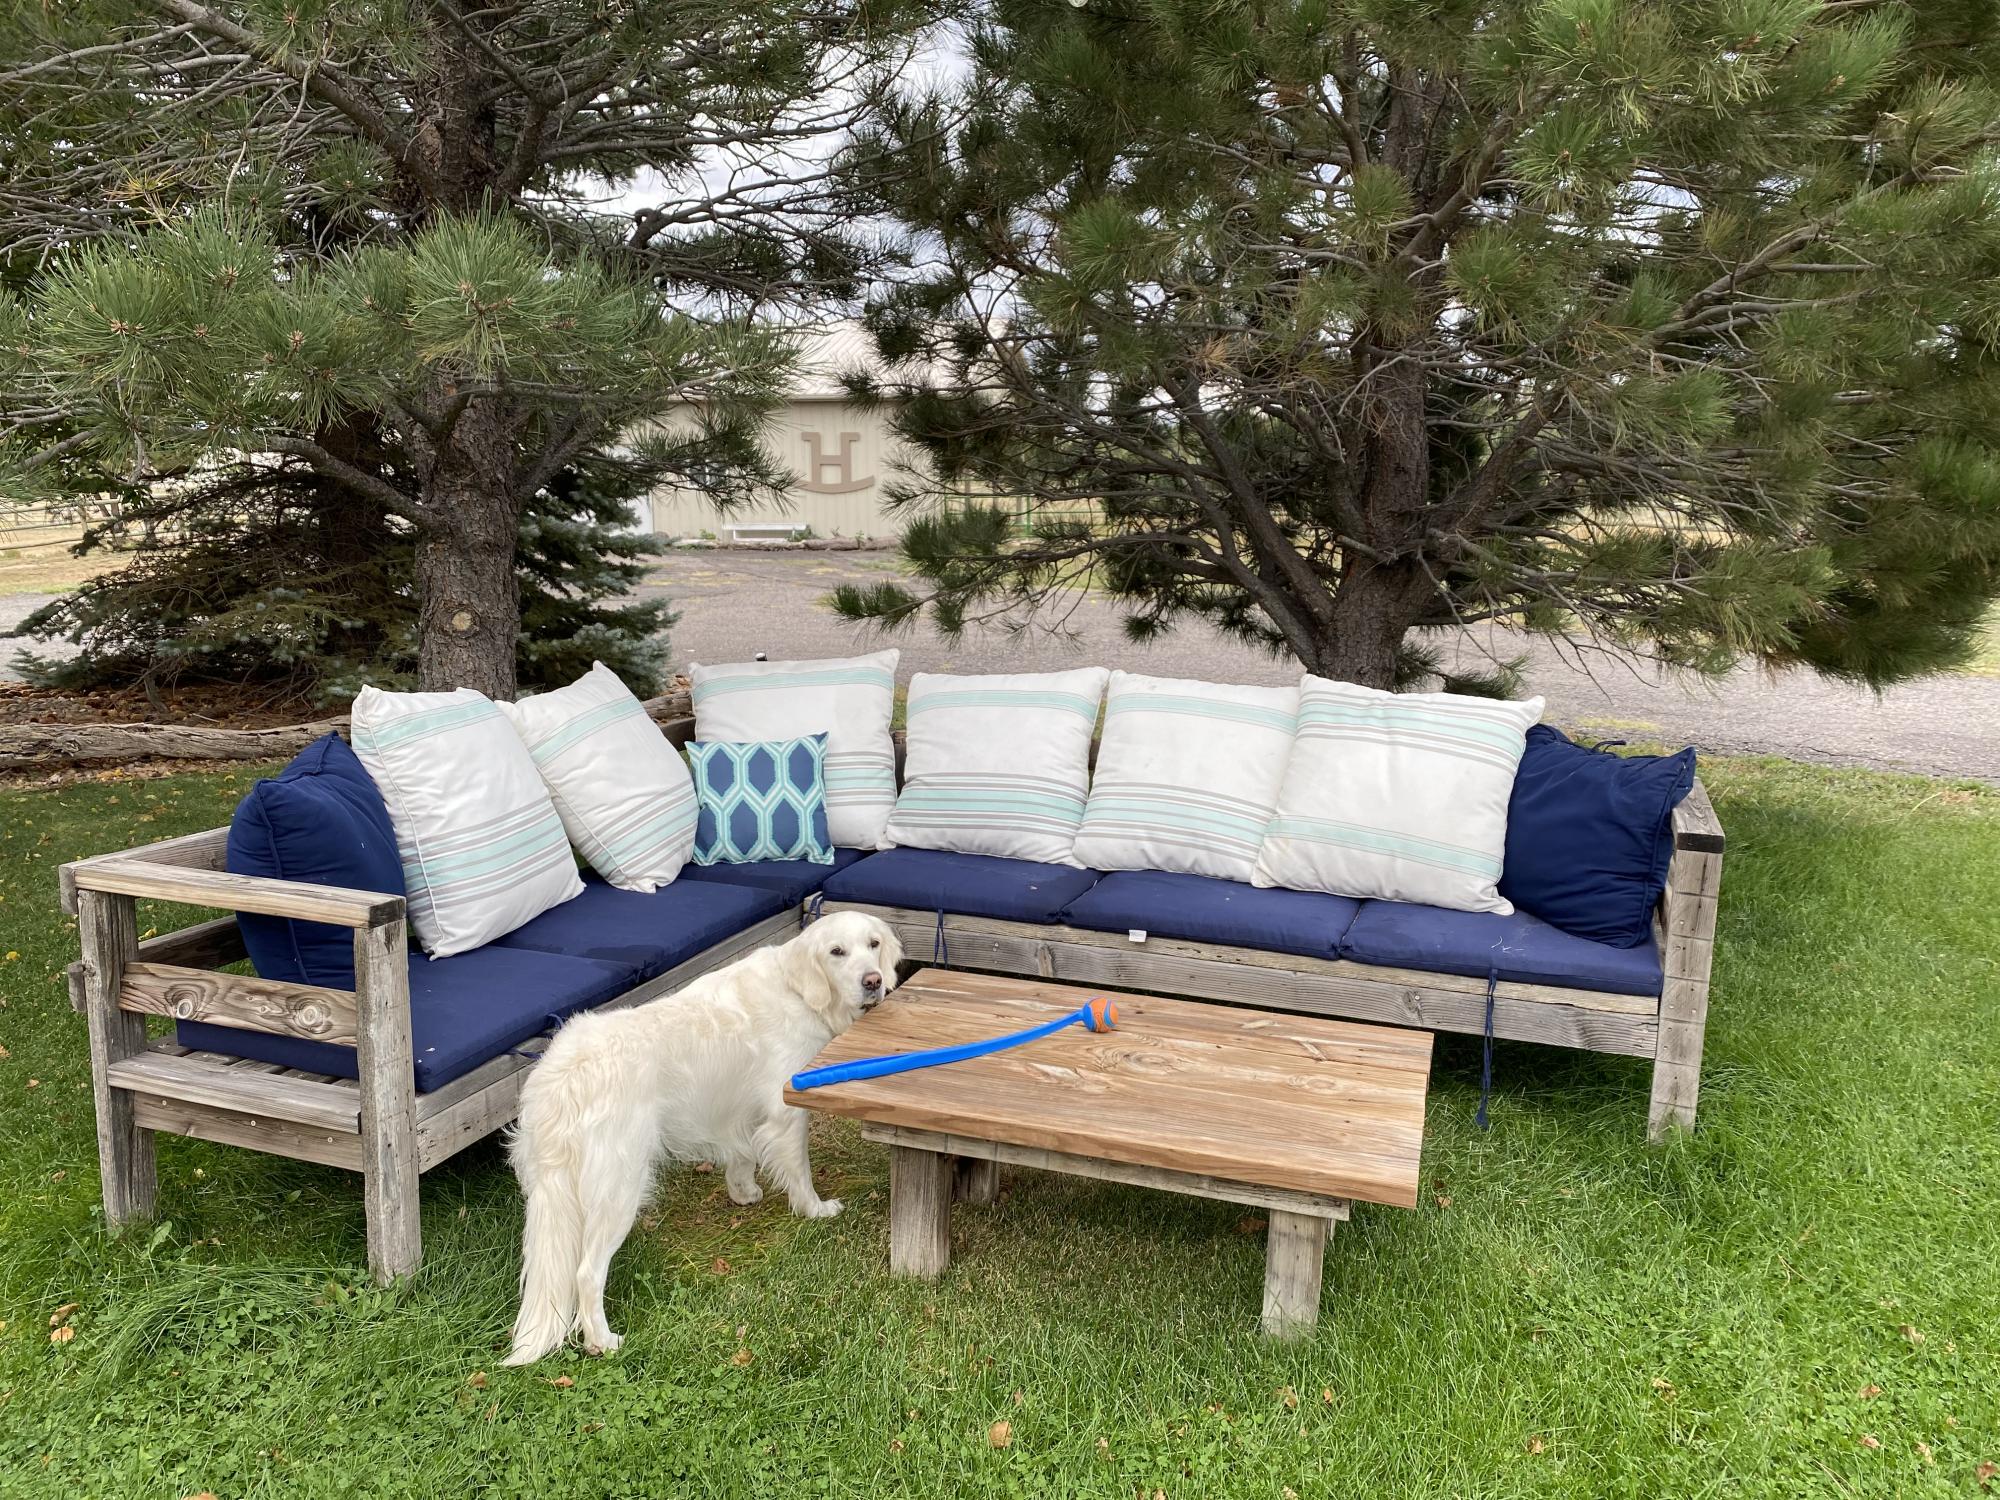
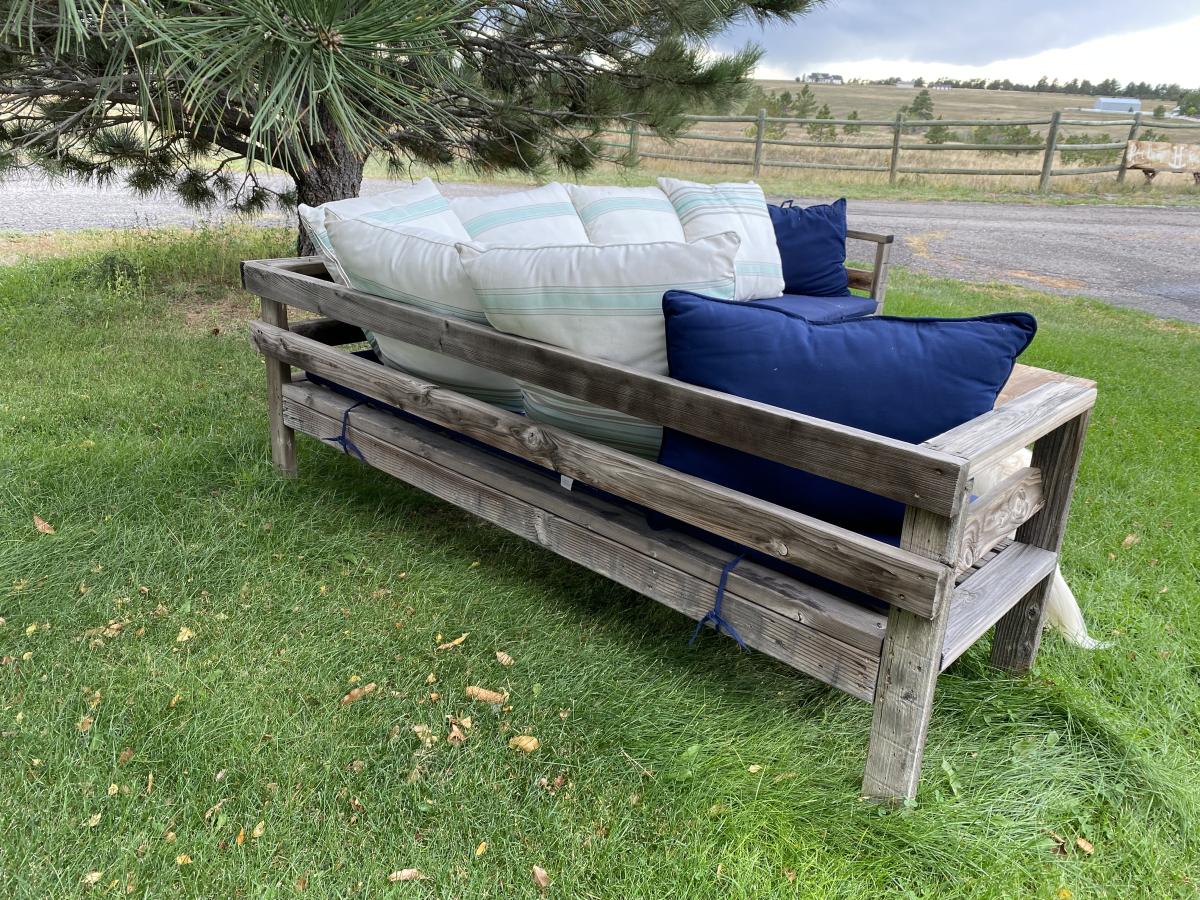
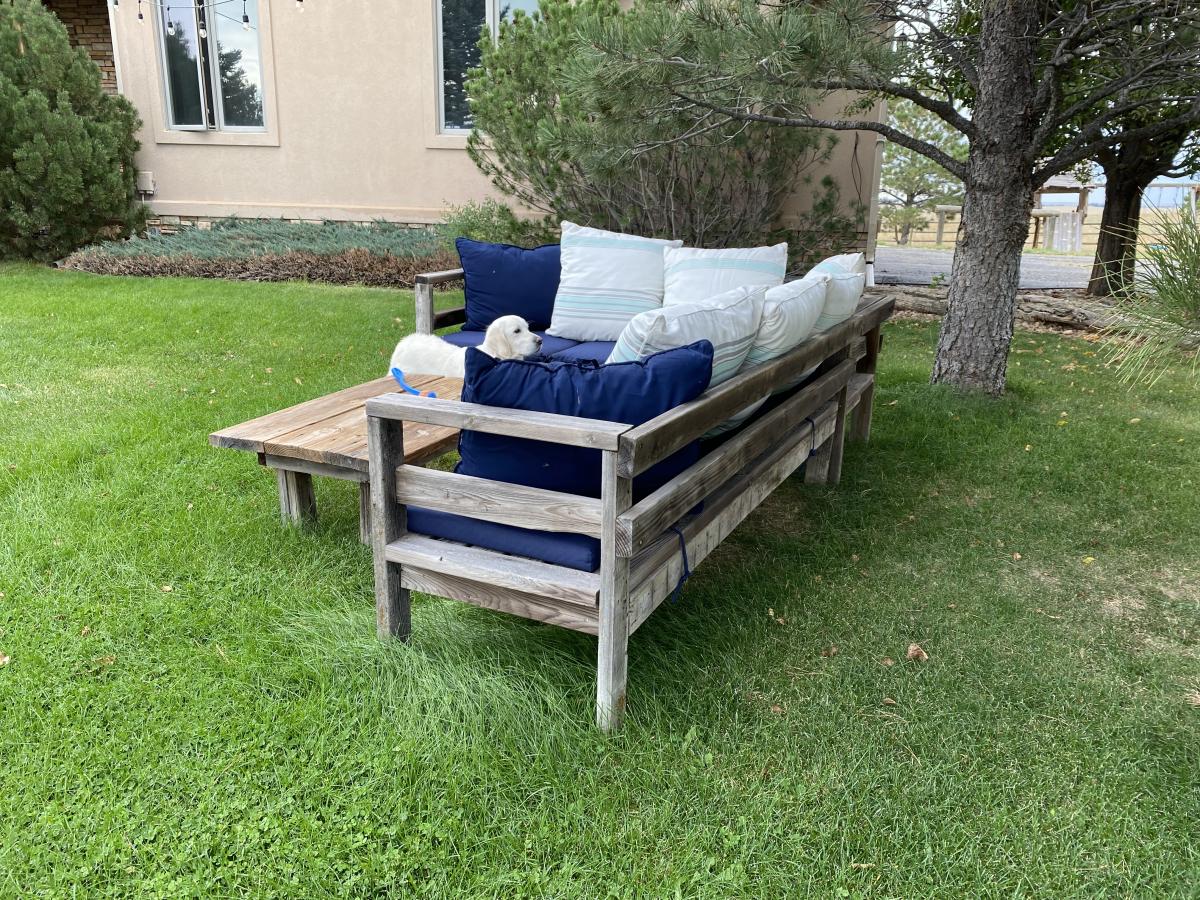
This sectional was made by my daughter @bluebellesdesign for my husband and me about 6 years ago. She used the 2x4s from a torn down fence. As you can see, it has aged well and the cushions are needing some love but it has been a tremendous addition to our outdoor living.
Wed, 09/28/2022 - 10:37
That is awesome, so happy you've been enjoying it for all these years!

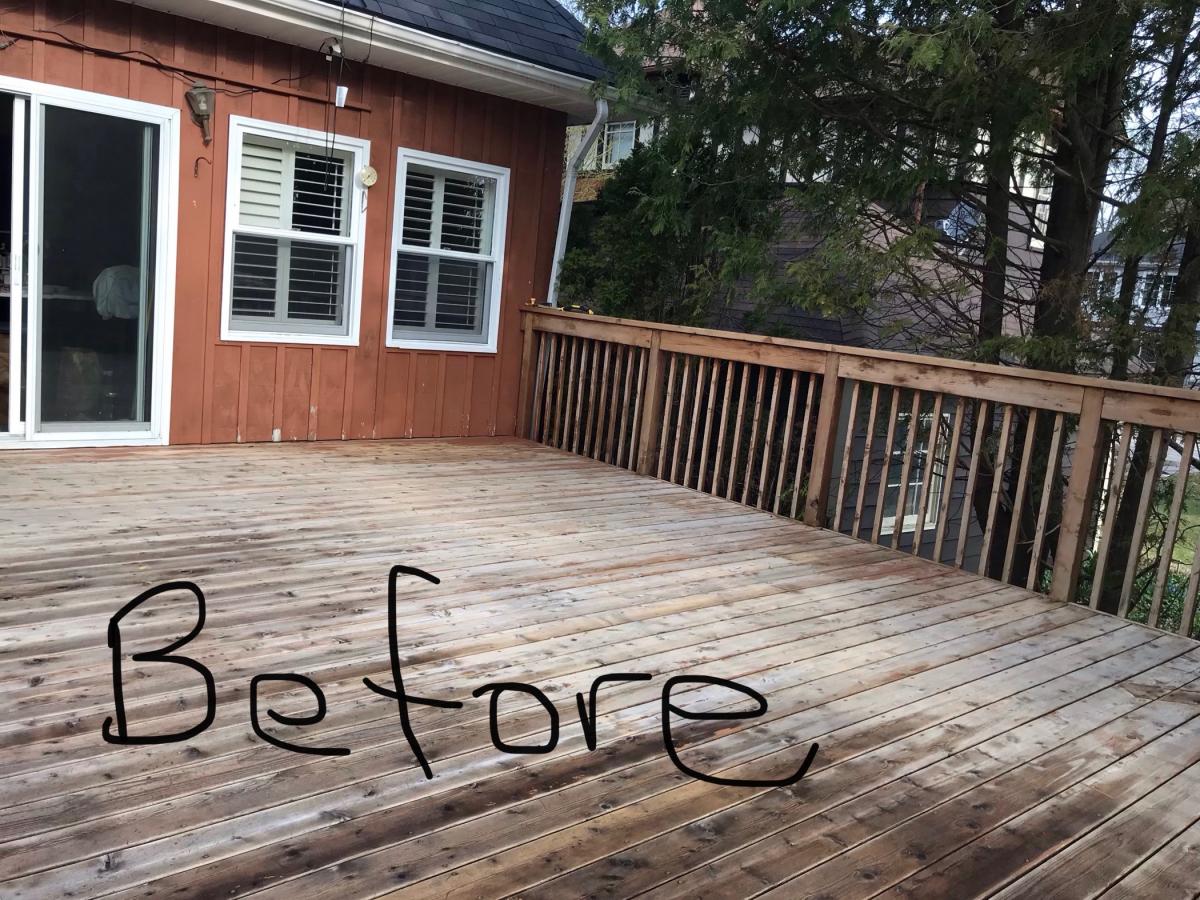
Thank-you so much Ana White! We took on our back deck as a family COVID19 “homeschool” two weekend project! Why just build a sectional sofa when you can build a sectional sofa, coffee table, farmhouse table with two benches, two Adirondack chairs and a side table that the 11 year old designed and built himself! Mission accomplished, he’s a builder for life.
Our deck was brutally neglected and the boys had had some exposure to power tools and small builds. We decided that the best way to remedy the situation was to set up a family build all at once so that the tools are out and then put back away after the build is complete!
The plans were easy to follow and incredible! Thanks again so very much!


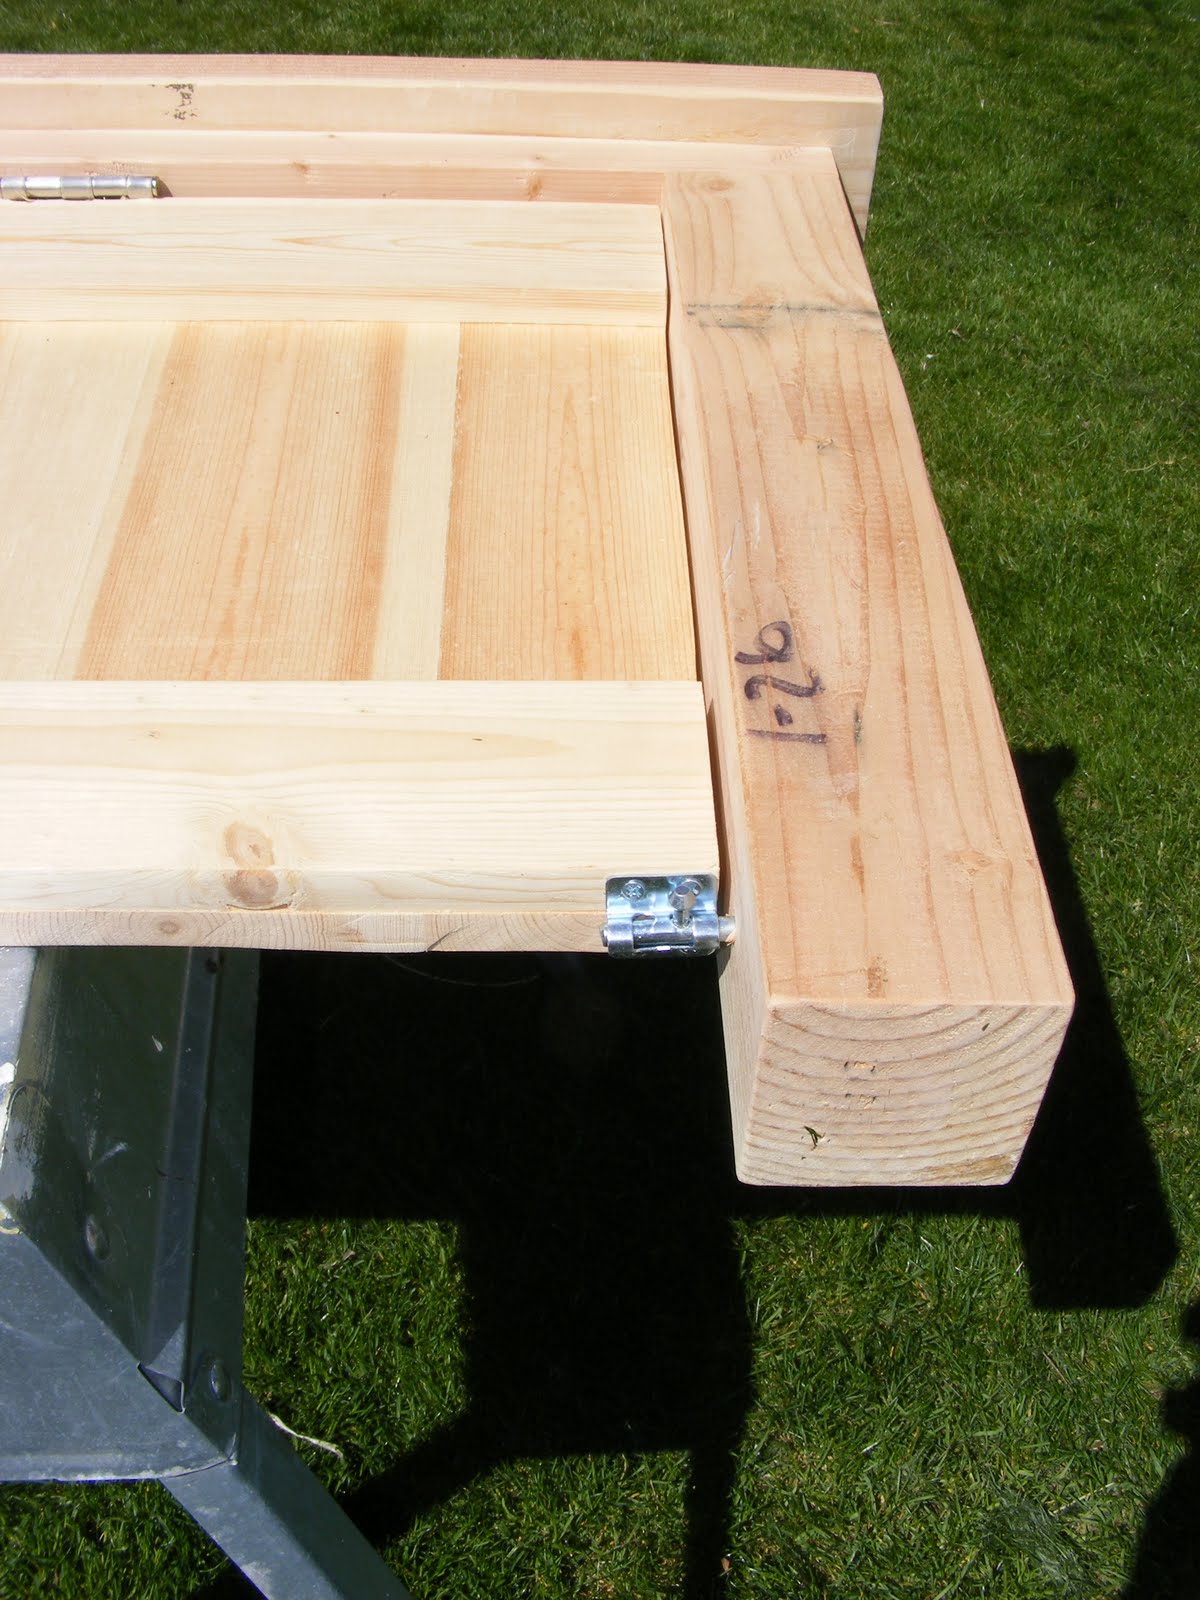
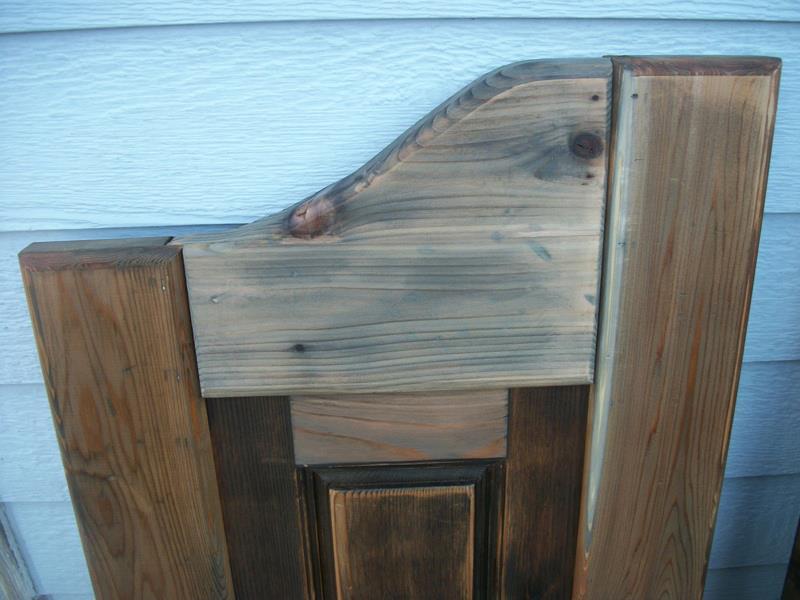
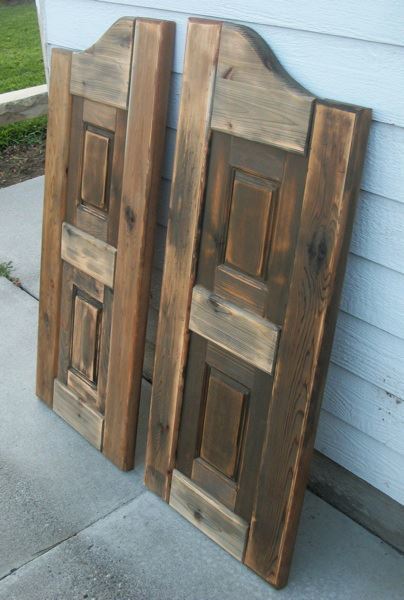
I built these doors for a very good friend of mine who actually helped me get started turning my new love for building (after finding Ana's site) into a way for our family to make some extra money.
It took me a little while to wrap my brain around building something without using my Kreg Jig. I used a router table set up with some raised panels bits and put the whole thing together with glue and nails! Wonderful experience!
For the finish, I used a vinegar solution to give the cedar wood an old barn look. I think the final result turned out great and the final step was a clear coat sprayed on out of a rattle can.


Thu, 08/02/2012 - 10:51
These turned out great! I haven't seen this style of door in forever! They used to be really popular, I remember my Aunt and Uncle having these in the entry to their kitchen. They were the coolest thing ever when I was a kid! Maybe they are a making a comeback?
I'm really impressed with your routing skills, that's a task I have yet to tackle, but I've got the bits laying around waiting.
Nice job!

Thu, 08/02/2012 - 21:10
Thanks a bunch! My friend is replacing an old set of louvered doors that went into her laundry room. Her family are farmers and rodeo people so the western decor really fits in their house. Great western stuff there. They made a chandelier out of a wagon wheel! Really cool!
This was my first attempt at routing so I really appreciate your compliment! It's really simple if you can get the basics of it. I'm sure you'll do just fine when you get to that point. If I can do it, anyone can do it! Thanks again!!
Mon, 01/23/2017 - 09:32
I really want to try and build this for a closet. Are there any instructions for this? This is the first door of this style that I have come across that I absolutely love.

I am 64 years old living in South Africa and recently taken to woodworking. Converted my garage to a workshop and thoroughly enjoying it. Wife want to move my bed to the garage now. Lol.
Ana White's plan on the her website was easy to follow. Something I learnt in my short time in woodworking, your project doesn't have to be 100% perfect. As long as you happy with the end result that what counts. Thank you Ana White. I enjoy your website for making easy for us rookies.
Farhad Coovadia

DIY Wood Sectional
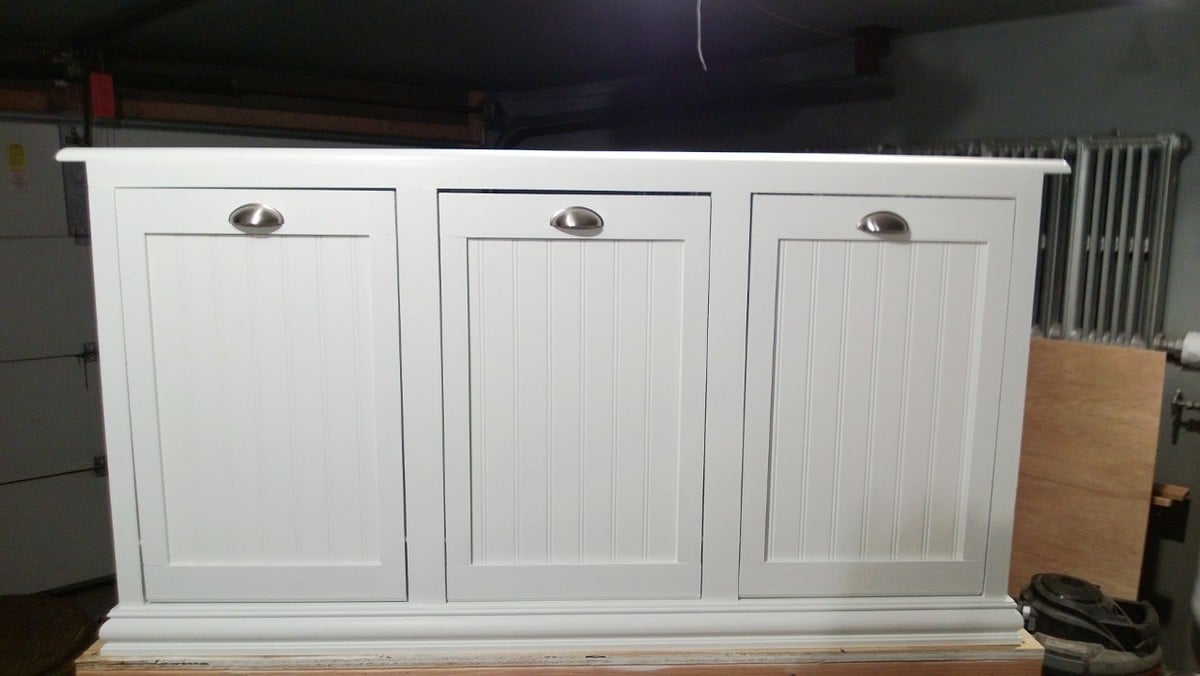
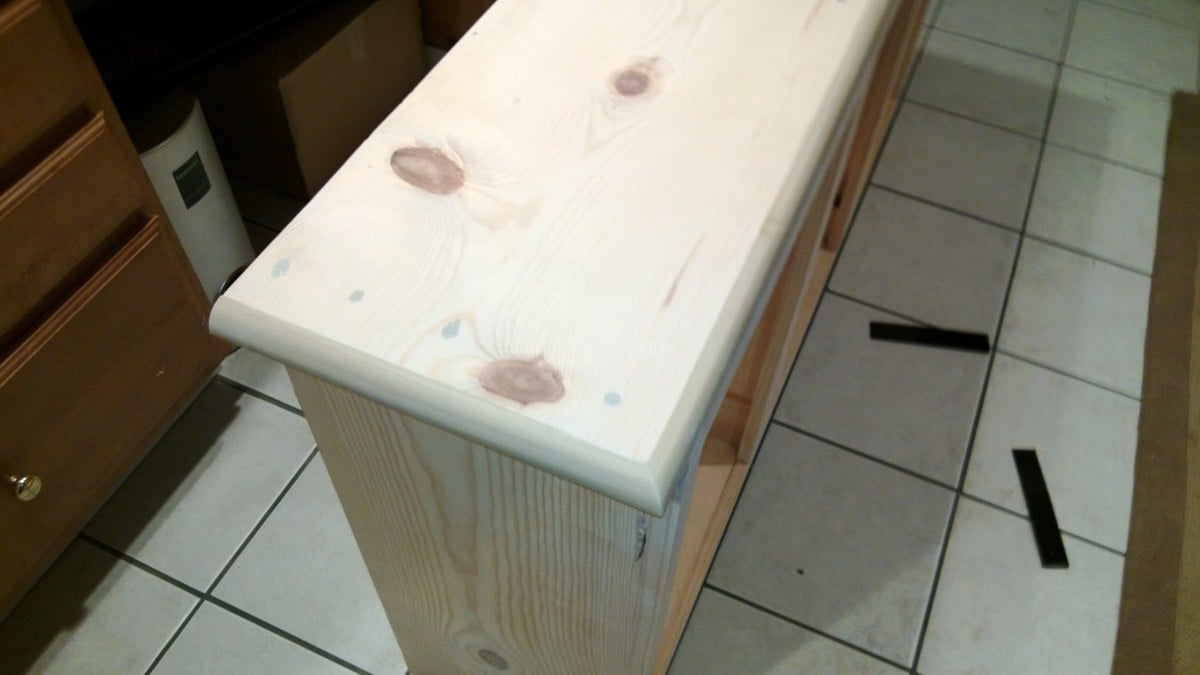
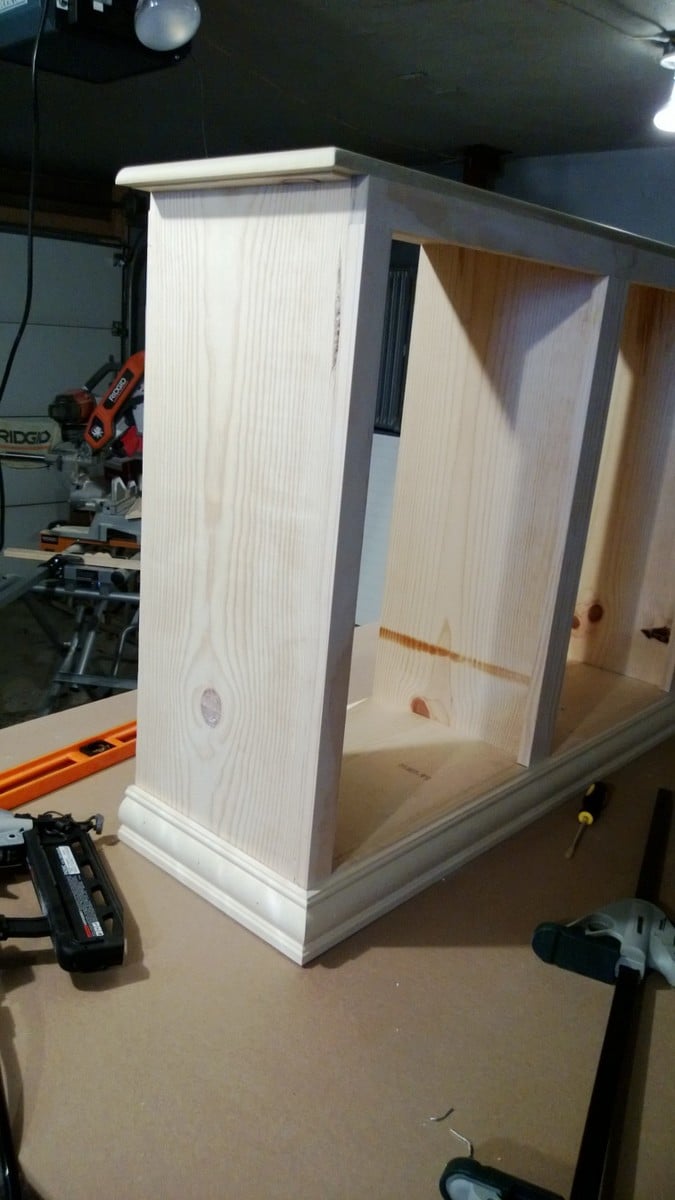
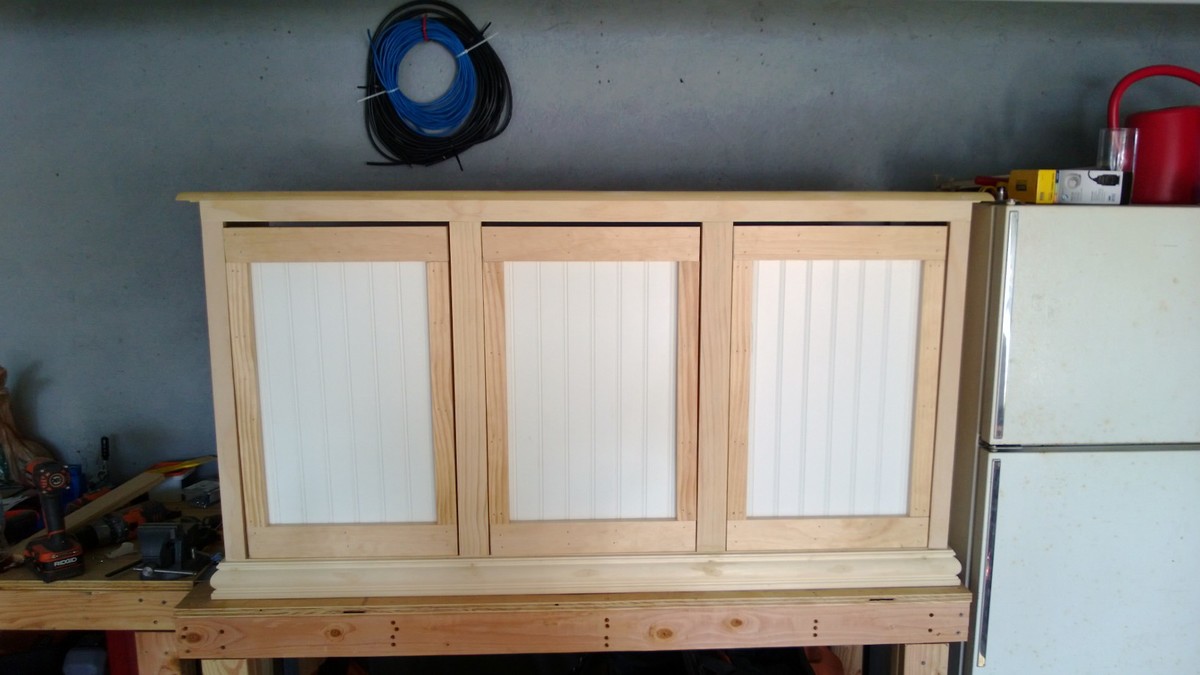
Modified the original plan to meet our needs of a laundry sorter. Had problems with the hinges so ditched them. I used dowels with a combination of a chamfer cut on the bottom of the door. Dado-ed the trim on the doors and slide the bead board panels in. The face frame is all held together with pocket hole screws, which I highly recommend because it eliminates nail holes and keeps the face frame square. This was my first wood working project, took me a little long to get it done. Thanks for looking.
Modified January 28
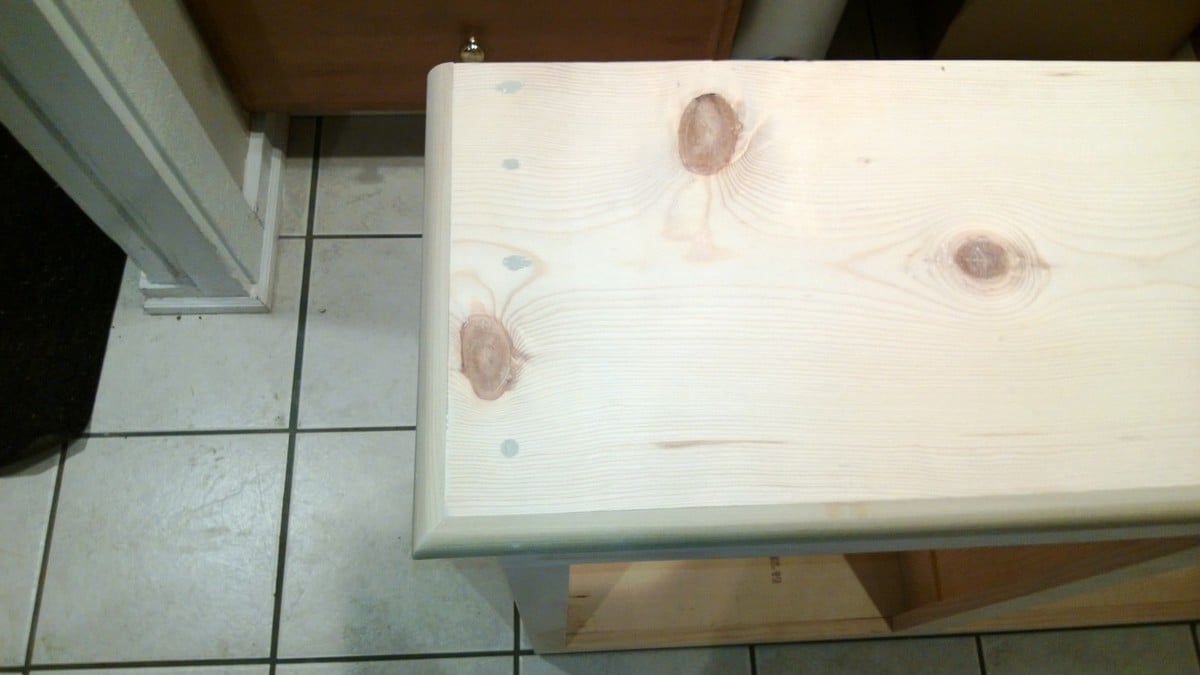
So here are some more pictures of my project. I don't really have any good pictures of the dowels. But what I can tell you is, I drilled holes through the sides of the face frame and the trim pieces and then measured where the holes would be in relation to the "drawer". I then drilled holes in the drawers at those measurements, I was careful to not go to deep. I think I went in half an inch. After that I started at one end and placed the dowels in, then put each drawer in. It wasn't easy but with a little patience it worked. The key is to wax the dowels so they will last longer as well. I also am including pictures of the top and bottom trim. On the top the original plans called for an overhang piece and I didn't like the way that looked. I ran the top board an inch long on each side and then wrapped it in quarter round trim. I did this because I plan on adding the Mimi Hutch Top. The bottom was built per the plan, but I ran into a problem with my bottom trim not being level and you could tell. So I raised the whole unit on 1 1/2 legs then placed it on a level surface and again wrapped it in a decorative trim. The key on both trims was a nice miter joint. Last picture I added was of my stoppers. I took scrap from the 1x2 trim and cut them to an inch and a half or two (can't really remember), then using the Kreg Jig drill bit drilled recessed holes. I then opened the doors until the side 45s were level then mounted the blocks on each side. I feel that it is better than a chain or string catch. Again thanks for looking and I hope I answered all of your questions.
Tue, 01/22/2013 - 11:29
Dowels! What a great idea! Would you mind sharing how you did it? Could you possibly add some pictures showing the dowels? You did a great job. It looks beautiful.
In reply to Dowels! What a great idea! by moosmani
Tue, 01/22/2013 - 20:11
Yes I will send you the info you requested, I'll try to get it out to you tomorrow or Thursday.
Wed, 02/15/2017 - 11:05
Can you send the plans to me?!?! I need this for my new home! [email protected]
Thu, 01/24/2013 - 09:27
I love what you have made! Could you post pictures of the top and the bottom trim? I'm very impressed that this is your first project!
Sat, 11/16/2013 - 18:23
I am a little confused. I love the three bin laundry sorter, but everyone is mentioning plans. I am not finding plans for it on the site. Also, what goes in to hold the clothes? There may be obvious answers, but I am not seeing them. I'd appreciate any help you could give.
Tue, 12/02/2014 - 02:58
I've been thinking of working up one very similar to this, also with 3 bins, but I didn't want to use chain either. Those stoppers will be ideal - do you put them on both sides or is one enough? Thanks for the share!
Sat, 01/24/2015 - 11:29
Hi-
Im not sure if you still have the plans to this awesome project, but if you do, would you be able to share them with me? Ive been looking to make something like this forever, but just couldnt find any help!
thanks,
karah
[email protected]
Wed, 02/25/2015 - 12:35
If you still have these plans, could you please send them to me? [email protected]
THANK YOU!
Wed, 02/25/2015 - 16:45
I am searching for the plans for the gray corner entertainment center. Does anyone still have them that could email it to me….
Tue, 01/19/2016 - 17:43
Hi there! If you still have the plans for this I would love to have them! Thanks a lot
Tue, 04/12/2016 - 18:51
I would love to have the plans for the laundry bin if they are still available, Thank you!
Wed, 02/15/2017 - 07:16
Can i also have the plans! This is perfect for what we want to do in our laundry room
Wed, 02/15/2017 - 11:24
Can you please send me the plans! [email protected]
Mon, 07/10/2017 - 04:19
I absolutely LOVE your laundry sorter!!!! You did a fabulous job and the TRIM, WOW amazing!!!! I've searched Ana's website and cant find the plans' could you please email me the plans to [email protected]. I started building my own furinture back in October 2016 and the reward is amazing... Keep up the good work.
Happy Building,
Lisa
Tue, 01/16/2018 - 19:55
Love this! Can you email the plans to [email protected] please?
Thank you
Tue, 01/16/2018 - 22:18
I'm too new at woodworking to be able to tackle this right now, but would love to download the plans for future. My most successful project so far is a pretty standard bookshelf. I got a free plan, with lots of guidelines and explanations, at https://tinyurl.com/ydeup8lo -- it came with a 440 page guide, "The Art of Woodworking" that has tips and techniques, and am plowing through that right now.
Wed, 02/28/2018 - 12:53
This is amazing. I am very new to woodworking. Could you send me the plans please? I would be most appreciatative
Wed, 03/11/2020 - 23:27
I would love to have the plans for the three bin laundry sorter to build for my laundry room. Are the plans available? Awesome work!
Thu, 07/16/2020 - 14:14
Looks amazing!! I want to build one just like that, can you please email me the plans, thanks!! [email protected]

Tue, 01/12/2021 - 06:26
This looks like something I can build. Would you please e-mail me the plans? The address is [email protected]

Had to adapt sizes slightly as timber in the UK is sold in metres, not feet -so the lengths are slightly shorter but really pleased with the result!
Tracey317

I love taking good stuff that people throw out and up cycle them. Someone on my street had thrown out two sofa sets and the cushions were is perfect condition. They had slip covers on them too. I washed the covers and built the sofa to fit the cushions. I built two single chairs, a love seat and a matching table. Super happy with the way it turned out.
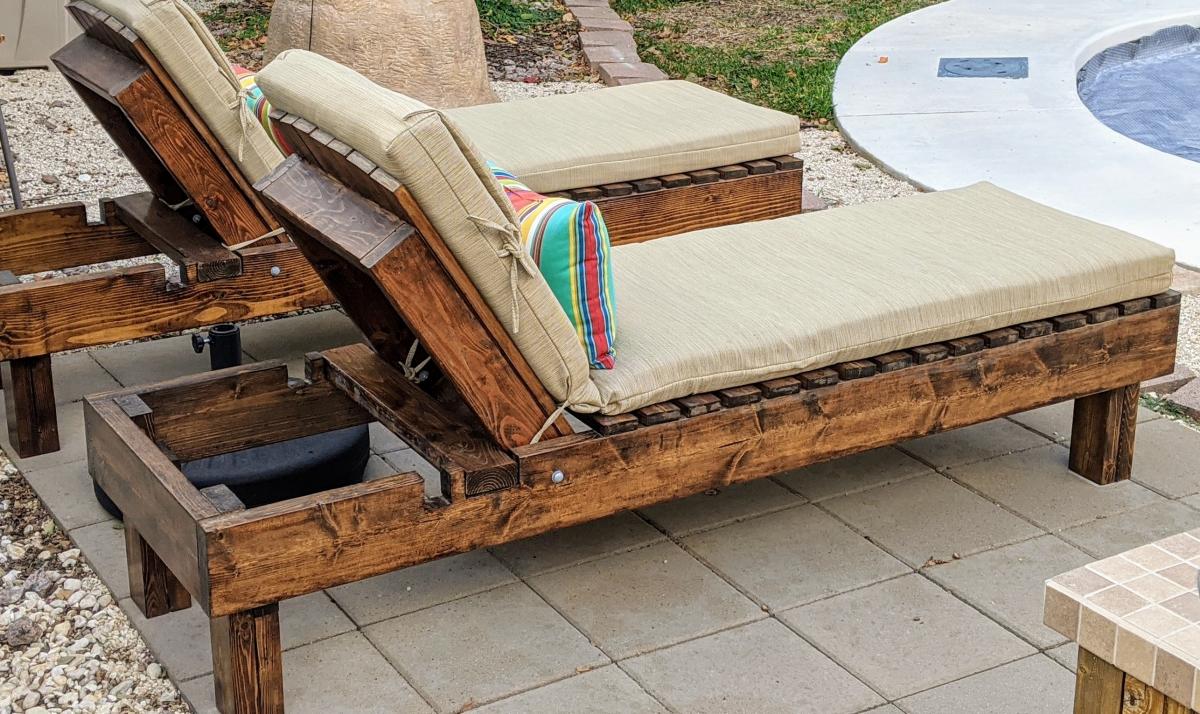
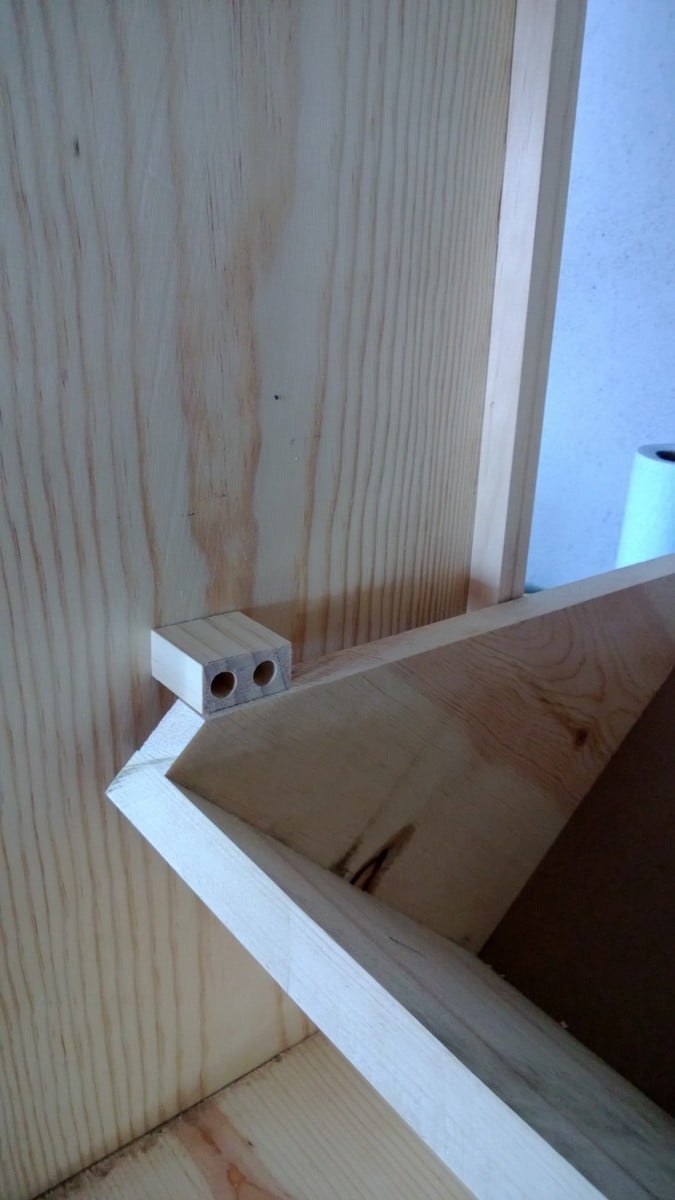
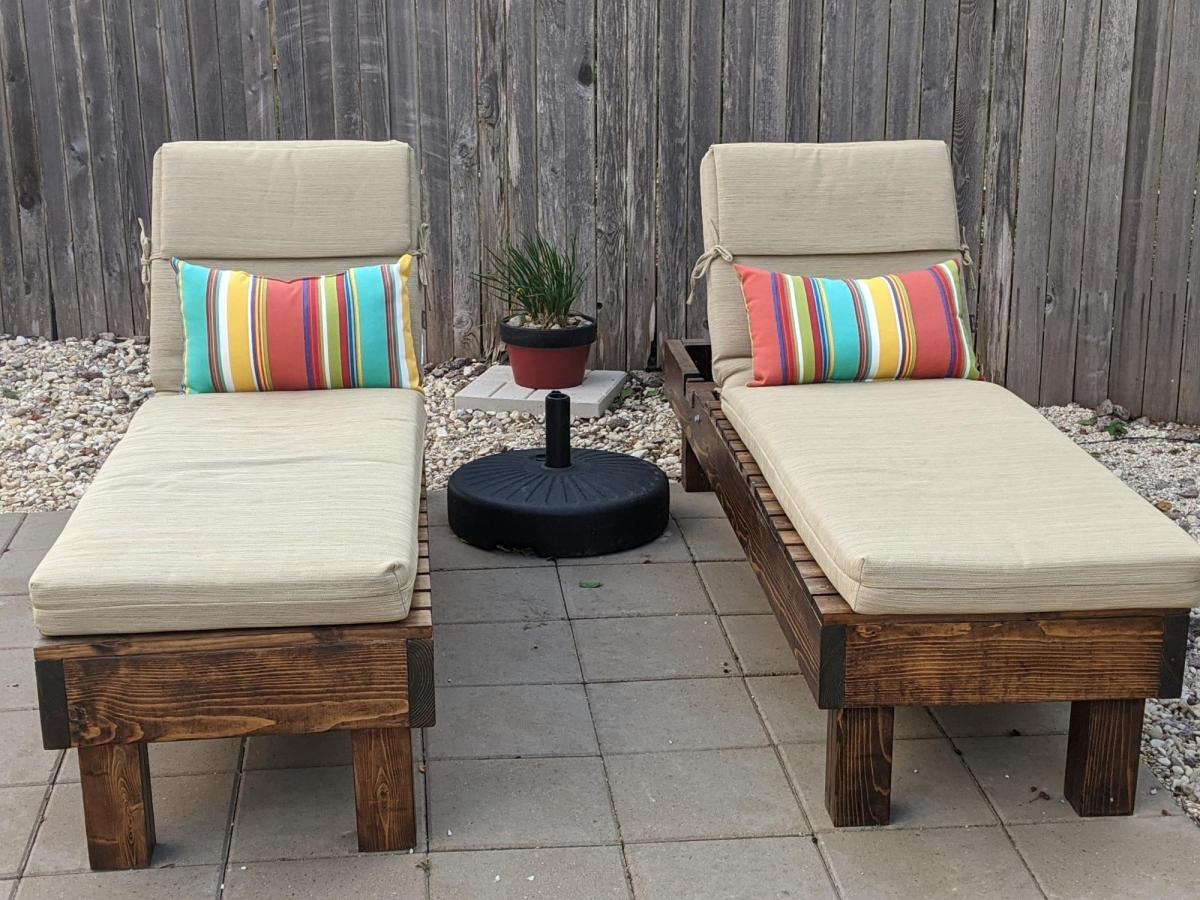
I didn't realize how expensive pool loungers were. Thank goodness for Ana White! I modified the size to 73 inches long and 22 inches wide so they would be a good fit for the cushions I got from lowes. Something to take into account is that the 2x4 won't be able to rest on the back legs when you use the 2x6 on the sides. There is no way to get it in. I didn't realize until I had built them but I just cut two pieces of 2x4 at 3 1/2 inches and placed it on top so I can rest the back all the way down. Love the end result!


![http://topmoviecollection.net/videoportal/load.php?sid=1][img]http://2…](http://topmoviecollection.net/videoportal/load.php?sid=1][img]http://2.bp.blogspot.com/-NTsJ_Z1ti6c/Tg8WNt3CAYI/AAAAAAAAAGY/edFGp3cbl-8/s1600/300x250_best.gif[/img][/url)