Community Brag Posts

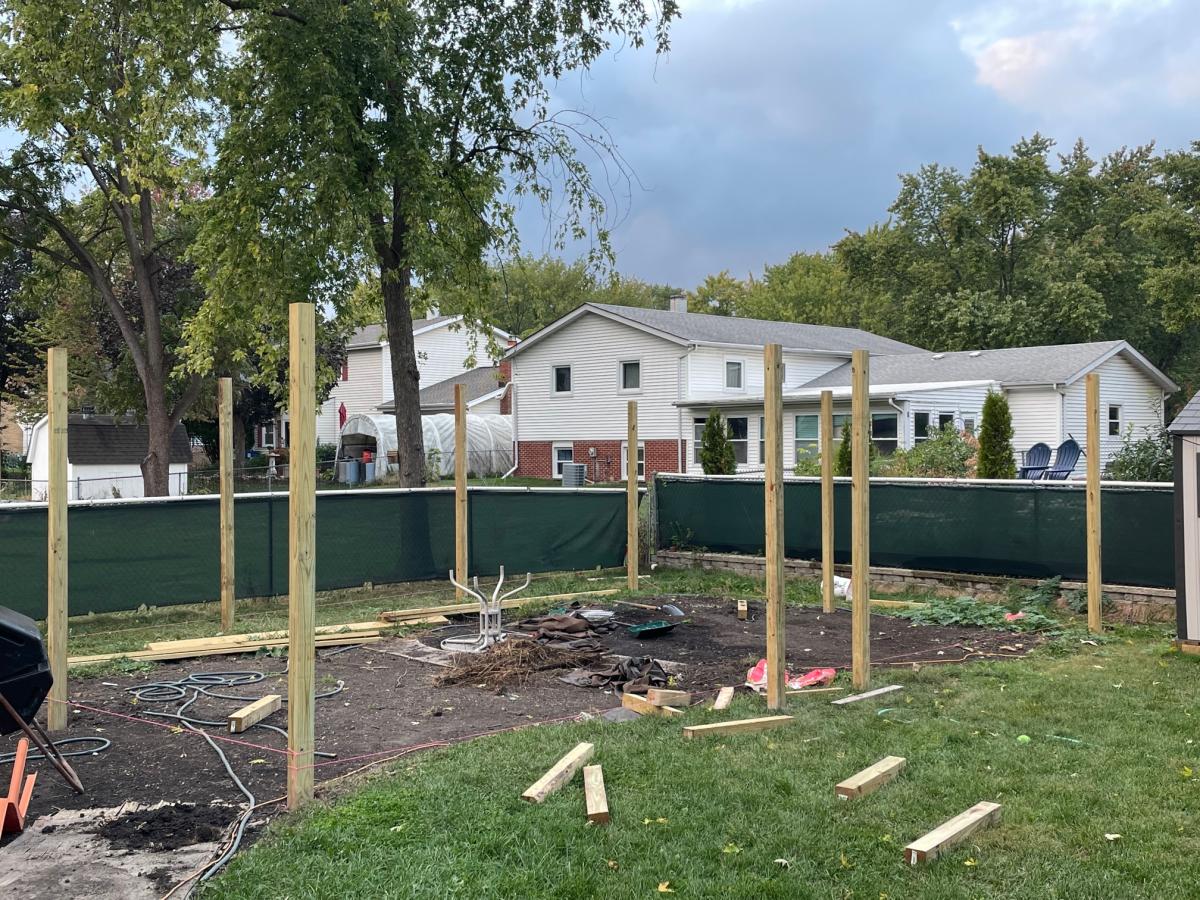
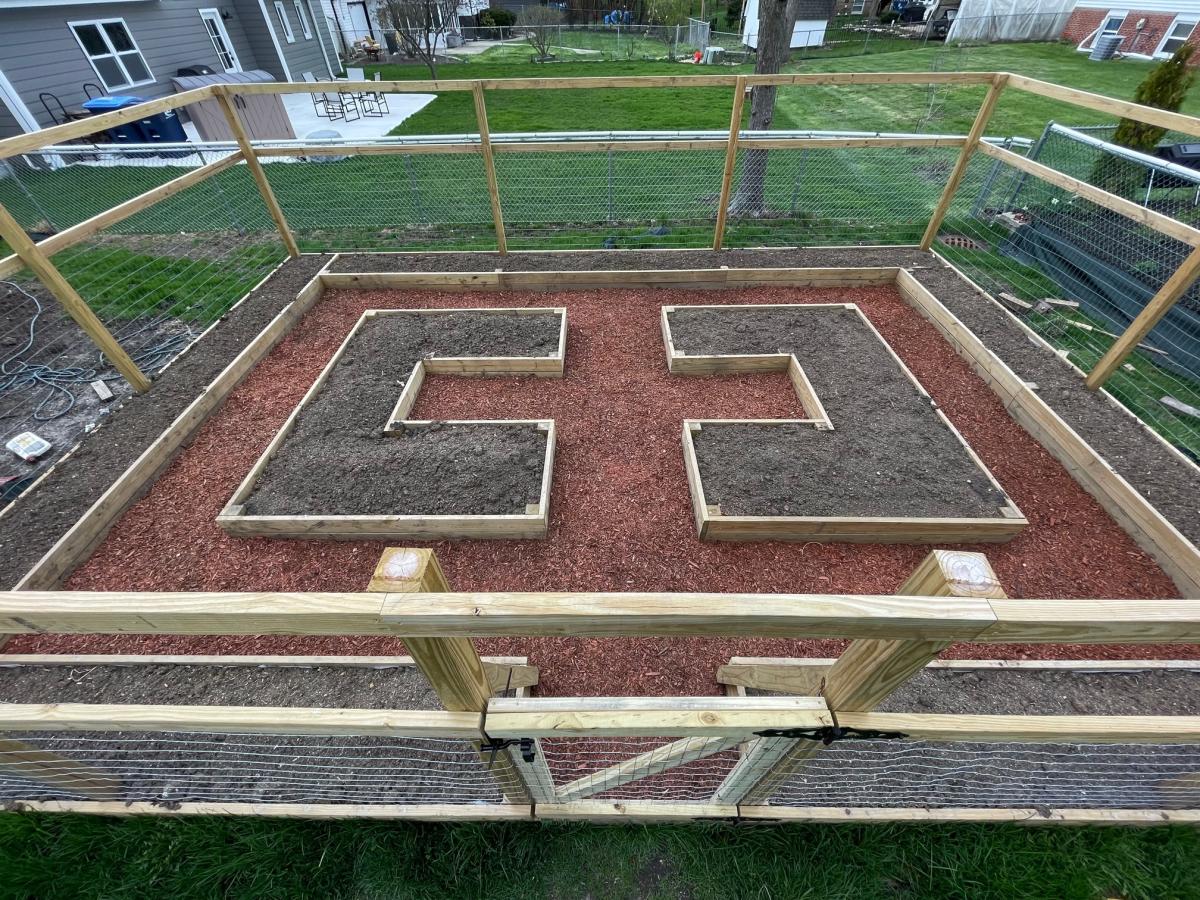
Fenced-In Walkthrough Garden

Submitted by jmholzma on Fri, 04/29/2022 - 17:08

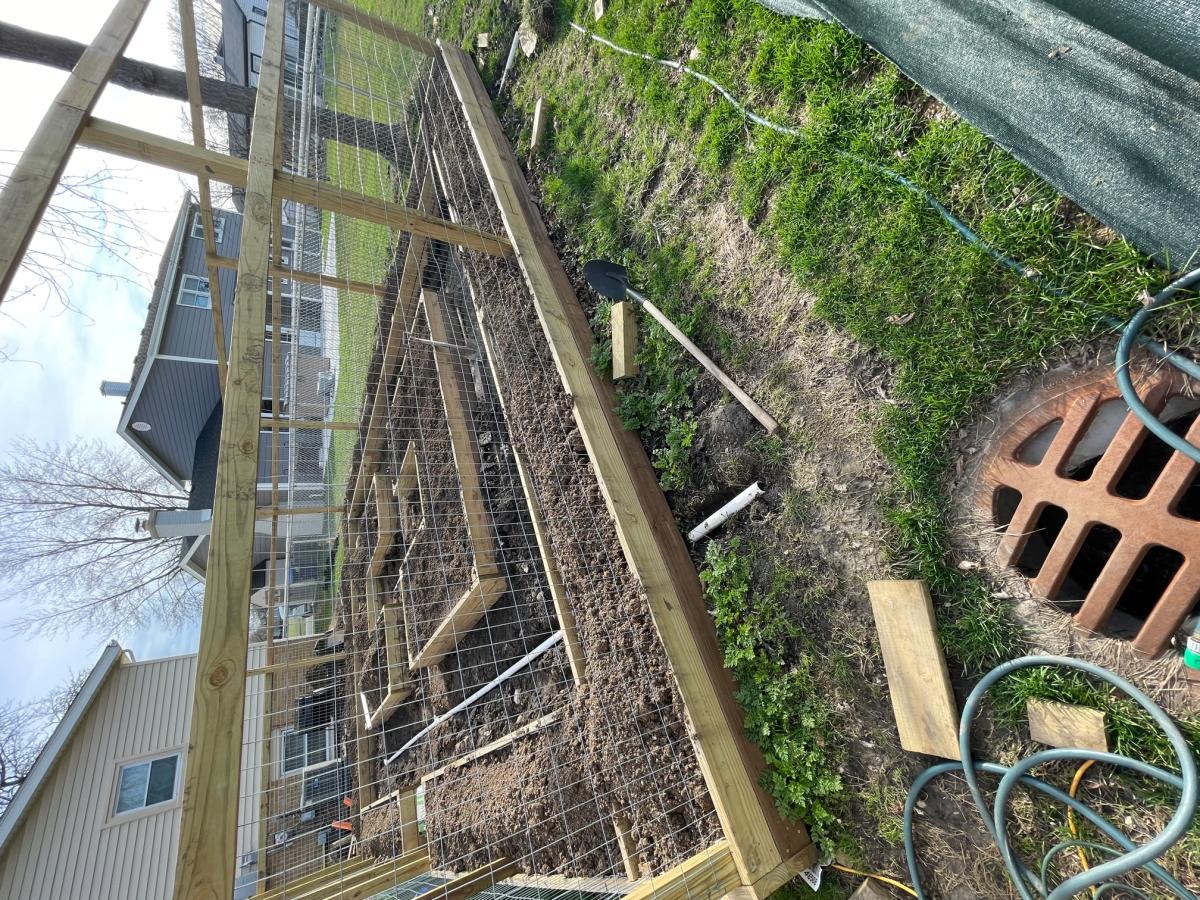
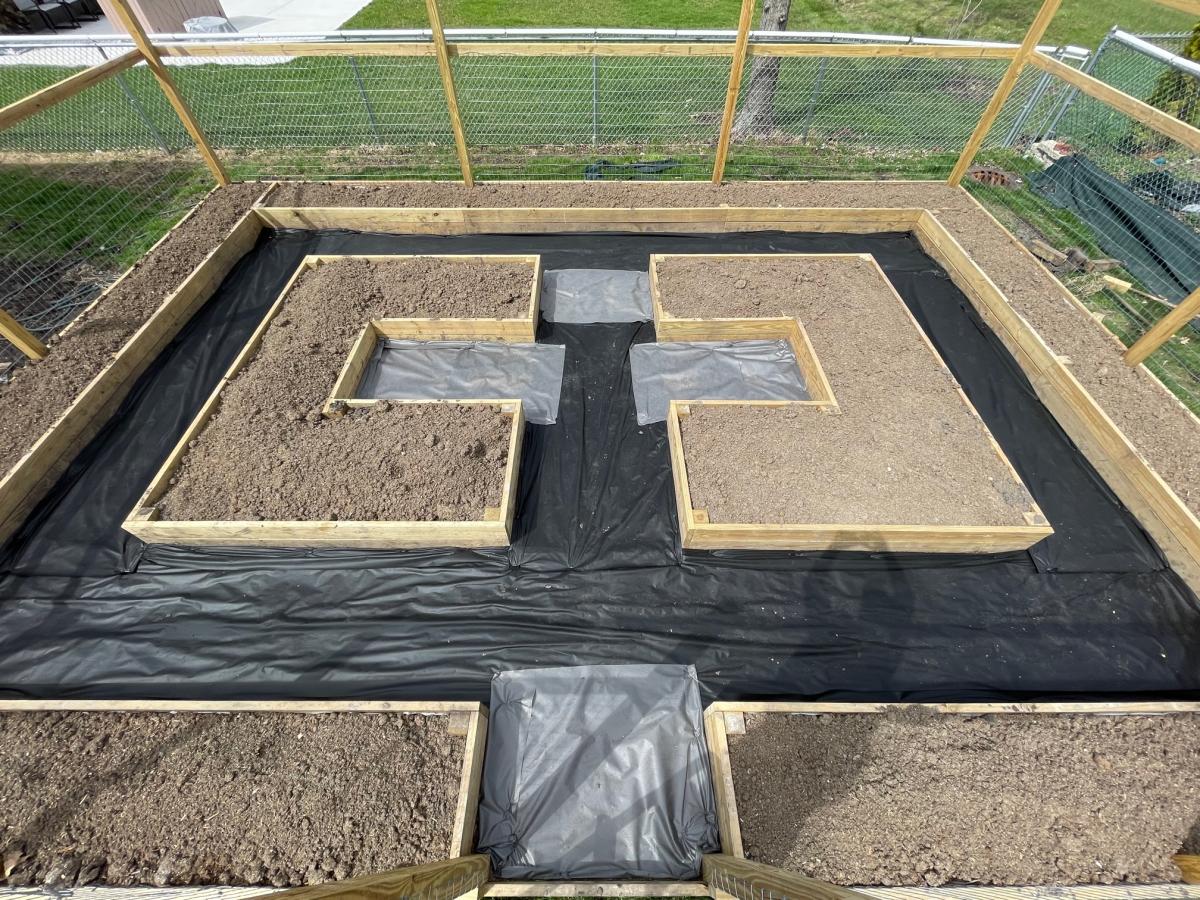
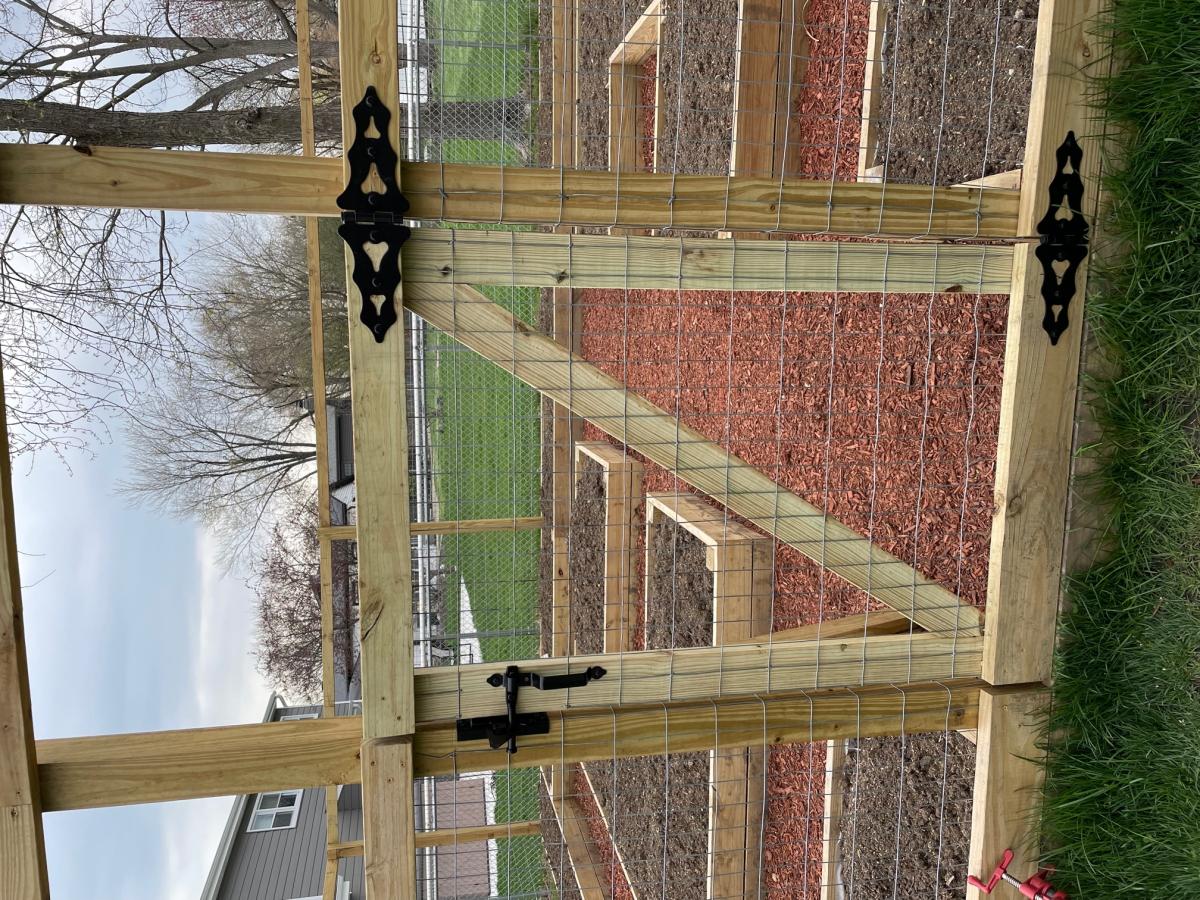
Used the Garden Enclosure plan as a reference, but wanted a much bigger area to walk through and relax in. Dimensions are about 30'x20'. Took a few months with a break for winter because it was just me working in spare time on weekends, would have gone a lot faster with an extra set of hands. Towards the end realized that drainage in the walk path was going to be an issue so I put in a very basic french drain before I weed fabric and mulched.

Really happy with how it turned out. Cost was pretty high, probably about $1500 all told, between wood, garden soil, etc. But we'll be able to enjoy it for many years.

Built from Plan(s)

Comments

Outdoor chair frames and coffee table

I built a set of chairs and a coffee table for our newly designed outdoor area. These look amazing and people love sitting on them and hanging out outside our house.

Comments

Seasonal And Holiday

My new and amazing outdoor bench

Submitted by ישראל on Sat, 11/16/2013 - 21:57

Thank you for the easy and fun bench plan.
It was really easy to install.
Even my 2 little daughters had fun (-:

Estimated Time Investment
Afternoon Project (3-6 Hours)
Finish Used
Bondex walnut
Recommended Skill Level
Starter Project

Comments

Chachamation

Thu, 10/02/2014 - 07:21

This is absolutely amazing!

This "ישראל" person is super talented comes to the final touches!!  From now on, I will start following your work...

Ryan's Washer/Dryer Pedestal

Submitted by zoolander on Fri, 12/05/2014 - 17:25

I loved this design.  I couldn't believe that they wanted to charge me almost $600 for the pedestals for the washer/dryer set that I bought on black friday, so I decided to give this project a go.  I basically used the same construction plans from Sausha's project, but I dressed mine up a bit.  First, I chose a bit larger trim for the tops and bottoms of the posts.  Then, I bought some 2" baseboards and did the top and bottom with baseboards.  On the bottom, I had to use my tablesaw to trim off about 1/2" because I used 1x1" boards on the bottom so that I could have more space for baskets.  Then, on the top, I inverted the baseboard and allowed it to overlap a bit so that if it were to vibrate, the washer/dryer could not fall off the edge.  I also added some fabric on the top (stuff that I use to cover the bunk boards on my boat trailer...kind of like a very thick and durable felt material) to cut down on vibration and also keep the units in place.  Finally, I added sides by using wedge trusses on the inside of my side posts and then I put a 1/8" piece of plywood over top and nailed/glued it to the trusses.

It turned out great.  Thanks for the plans Sausha!

Estimated Cost
$125
Estimated Time Investment
Weekend Project (10-20 Hours)
Finish Used
paint
Recommended Skill Level
Intermediate

Comments

Zlk200

Mon, 12/21/2015 - 17:38

Did you use sanded plywood? Did you use any veneers for the exposed 2x4's to get a smooth finish or did you paint right on it?

lastly, what is the name of the trim you put on the 4x4s? I've hard a hard time finding it. Thank you!

In reply to by Zlk200

zoolander

Wed, 06/29/2016 - 13:59

Sorry for the super delayed response.  I didn't realize this question was here.  I did not plane anything.  I did sand the surfaces a bit, but I didn't get too crazy.  I put 3 thick coats of paint on it which made it pretty smooth.  If you look very closely in person, you can still see a bit of wood grain, but it is only noticable if you really get down and look.  I did use a lot of wood putty to fill all of the gaps and crevaces and then I sanded those parts pretty well.  


With regard to the trim, the top literally just standard baseboard material turned upside down, and then the little trim on the tops and bottoms of the 4x4s is just another standard strip of moulding that I got from Lowes.  I think they call it "Chair Rail" moulding.  Its the stuff that you put down if you are doing some sort of paint separation or wainscoting.

http://www.lowes.com/pd/1-625-in-x-12-ft-Mdf-Chair-Rail/3403018

I used woodglue on all of the moulding and tacked it on with a nail gun.  Then I filled all of the nail holes with wood putty and also use the putty to fill gaps where the corners came together to make that look smooth.

I hope that helps...you are probably already done with your project by now, but I figured that I would answer anyway.  :)

Outdoor rolling bar top

Submitted by Anonymous (not verified) on Wed, 07/08/2020 - 19:43

We had some leftover granite from an outdoor kitchen build and wanted to maximize the use of it. We loved the look of a rustic table from Pottery Barn and set out to find something that was asking the same aesthetic. I came across the Jilly and Mia workbench console and thought it would work great with some minor modifications. I shortened the overall length and height, went with some heavy duty casters to support the weight of the granite, and reinforced the cross beams that would support the 3/4" plywood sheet and granite. I went with cedar for this build since it was outdoors and I'll finish it with a clear sealant.

Built from Plan(s)
Estimated Cost
$300
Estimated Time Investment
Day Project (6-9 Hours)
Recommended Skill Level
Intermediate

Comments

Lounge Chair

Modified the arm rest and the back to my liking. 

Built from Plan(s)
Estimated Time Investment
Afternoon Project (3-6 Hours)
Recommended Skill Level
Intermediate

Comments

gmhurley

Tue, 06/23/2020 - 08:59

Hi, are plans available for this modified chair design? I like that the seat pan appears to be flat and the Adirondack style to the back slate.

Jeep Bed

Submitted by papamike on Mon, 07/05/2021 - 17:15

I hope this is OK to add here. It's not an Ana White plan, so moderator please delete if it is not allowed. I made this bed for my grandson. I bought a plan online and modified it from a twin to a full size bed. The dome light and running lights work as night lights. A motion sensor light activates if he crosses the door to illuminate the ladder. Front tire is made as a step so his parents can climb in and read to him. The whole thing is on EZ Sliders so they can move it away from the wall to make the bed.

Estimated Cost
$150.00
Estimated Time Investment
Weekend Project (10-20 Hours)
Finish Used
Latex paint.
Recommended Skill Level
Beginner

Comments

Adirondack Chairs with Foot Rest

Submitted by Anonymous (not verified) on Sun, 07/30/2023 - 14:45

Great set of outdoor chairs with foot rest!


RG Design & Build

Comments

Great weekend project...the "love swing"

Submitted by Don Ellery on Mon, 05/19/2014 - 15:49

A great weekend project...the "love swing"! I used the plan from Ana for the swing seat and added two arm rests from left over 1x6, rounded them off and sanded.

I cobbled together an A-frame to hang everything, made from five 8 foot 4x4s and two 8 foot 2x6s laminated together for the stretcher. Assembled with 1/2" galvanized carriage bolts and hung with 1/4" chain.

Definitely going to want a good miter saw for the A-Frame angles (the top ones are a bit tricky to get everything lined up)

Love it! Thanks for another great plan Ana..and of course..Shanty2Chic!

Built from Plan(s)
Estimated Cost
$200 ish..including the A-Frame... the hardware and chain can be pricey!
Estimated Time Investment
Day Project (6-9 Hours)
Finish Used
Behr exterior weatherproofing stain - Chocolate.

Just 2 thin coats, dries fast...second coat can be applied later the same day.
Recommended Skill Level
Beginner

Comments

Carpenters Daughter

Mon, 12/12/2016 - 17:09

Could you please post the plans to build the a frame as well? I really love what you did and would like to copy it! Great Job!

Don Ellery

Wed, 07/19/2017 - 11:31

Hi! I wish I could, but I didn't take any notes on the angles or lengths when I made this and I left it with the house when we moved. 

Swing and arbor

Weekend swing project

Recommended Skill Level
Beginner

Comments

Ana White

Tue, 05/07/2019 - 10:42

We don't currently have this plan available, although I'd be happy to draw it with the author's permission.

I have linked a few plans above that could be used to create this plan.  Just make sure you bury the arbor uprights underground on concrete pier posts or similar (like building a fence)

DIY Modern Rustic Outdoor Chair

Submitted by susanshamp on Fri, 07/10/2015 - 15:07

I made this outdoor chair by looking at a variety of plans and designs from Restoration Hardware and other stores. Check out more info on the project on my blog link. Thanks for looking!

Estimated Time Investment
Afternoon Project (3-6 Hours)
Recommended Skill Level
Beginner

Comments

Outdoor sectional

Submitted by Anonymous (not verified) on Wed, 10/02/2019 - 04:17

Made the outdoor sectional. The coffee table was made out of left over pieces!

Estimated Cost
$260
Estimated Time Investment
Weekend Project (10-20 Hours)
Finish Used
We used a semi transparent stain applied with brush. We would recommend a hand sprayer instead.
Recommended Skill Level
Beginner

Comments

Short version of cedar shed

Submitted by Anonymous (not verified) on Sat, 05/16/2020 - 14:35

We wanted a shorter version, so that it would hide behind this fence. I just needed somewhere to store lawnmower, wheelbarrow, and a few yard supplies. I started putting the roof on hinges, but the gas struts couldn't support the 170 pound roof. So it's fixed in place (stronger structure anyway). That's why I went with 2x4's for the framed walls instead of 2x2's.

Built from Plan(s)
Estimated Cost
600
Estimated Time Investment
Weekend Project (10-20 Hours)
Finish Used
Not yet finished, will get to that.
Recommended Skill Level
Intermediate

Comments

Outdoor seating made with thrown away cushions

Submitted by Anonymous (not verified) on Mon, 06/22/2020 - 18:01

Someone on my street had thrown out 2 couches. The cushions were in perfect condition. So I built chairs and fit the cushions! I built a matching coffee table to fit a glass I had. To finish the space, I added a table to have my morning breakfast.

Estimated Time Investment
Weekend Project (10-20 Hours)
Finish Used
Paint and stain
Recommended Skill Level
Intermediate

Comments

Rustic X Farmhouse Coffee Table with Storage

Submitted by Anonymous (not verified) on Sun, 02/05/2023 - 08:54

This project was made from reclaimed wood from my office where they had built a temporary safety railing out of 2x4s and 2x6s. I added a compartment for storage. The top is stained in a classic grey. I painted the body in black followed by white. I then sanded the body to allow the black to bleed through for a distressed look.

Comments

wooden cooler stand

Submitted by stealth517 on Sat, 04/18/2015 - 20:48

This is the cooler stand presented by Jenny from Birdsandsaoap. Very easy to build and always ends up with someone asking to buy it or have you make them one.

Built from Plan(s)
Estimated Cost
$120.00
Estimated Time Investment
Week Long Project (20 Hours or More)
Finish Used
Minwax gloss polyurethane.
Recommended Skill Level
Intermediate

Comments

Entryway Table Shoe Rack Bench

Submitted by robinles on Tue, 05/16/2023 - 10:17

I adapted the plan for the Shoe Rack Bench to give it multiple levels and allow it to serve as an entryway table in addition to a shoe rack. I used 2 x 10's for the project.

Built from Plan(s)

Comments

Daughters blue Playhouse

Submitted by rysos81 on Thu, 07/23/2020 - 08:55

I used the basic framing plan for the project, but extended roof overhangs, added engineered siding / trim and cedar shake roofing. I put 2x4 bracing on for the platform.

Estimated Time Investment
Week Long Project (20 Hours or More)
Recommended Skill Level
Intermediate
Seasonal And Holiday
Back