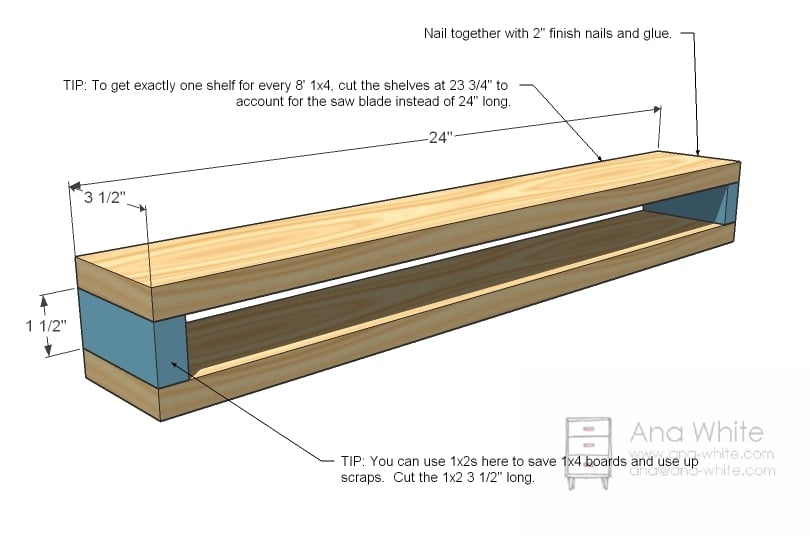
Community Brag Posts

Leaner mirror

Submitted by krochelle on Tue, 08/20/2013 - 08:18

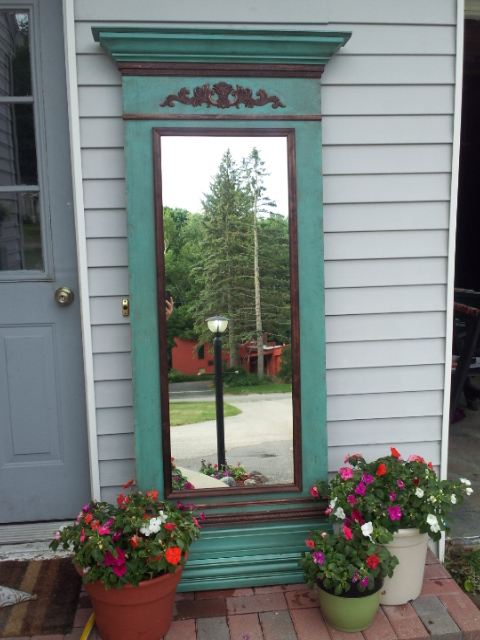
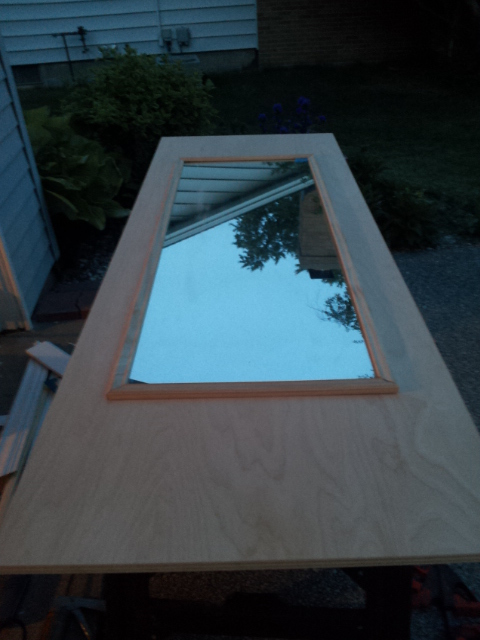
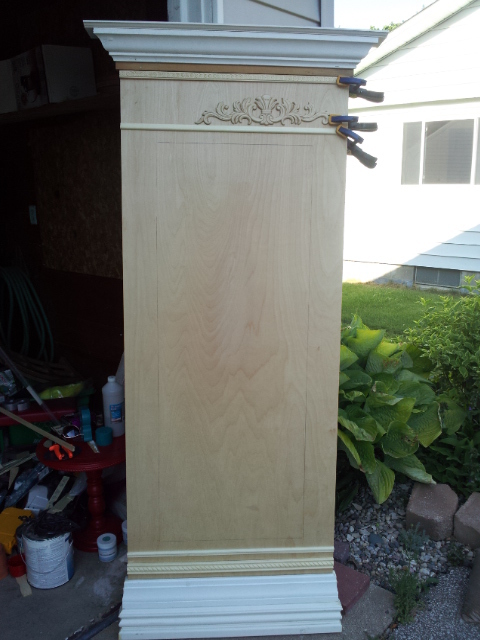
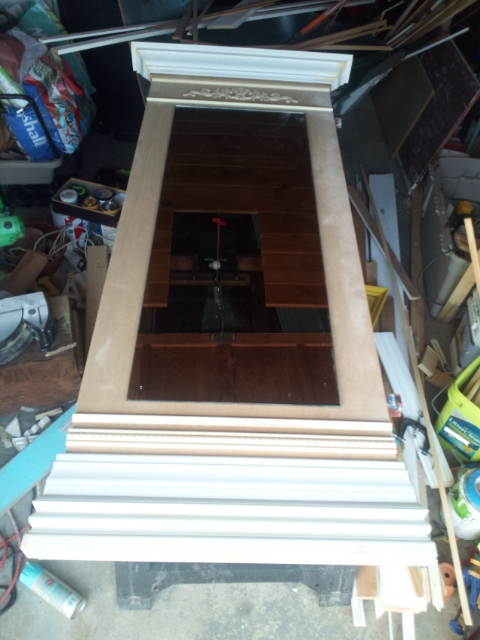
This was made as a present my mom's birthday. I found a good sized mirror at the thrift shop which was perfect for the project. I adhered it to some plywood, added trim around it, bulked up the top and bottom with multiple layers and types of trim and added some crown molding to the top. The finish is "A Day at the Jewellers" by Valspar with a Red Mahogany stain/glaze over top.

Estimated Time Investment
Day Project (6-9 Hours)
Finish Used
A Day at the Jeweller by Valspar with stain overtop
Recommended Skill Level
Starter Project

Ridge Media Console

Project was a bit difficult but extremely rewarding when completed!! I followed Ana White's advice......"take a break and always finish your project!!!"

Built from Plan(s)
Estimated Time Investment
Weekend Project (10-20 Hours)
Recommended Skill Level
Intermediate

Comments

Farmhouse style queen headboard

Here's a queen headboard we just completed for our guest bedroom.  

It only took an afternoon to build this simple yet stunning headboard, and then a little more time to paint, distress, and wax it.  

More information is available on our site at FamousArtisan.com

Estimated Cost
100
Estimated Time Investment
Afternoon Project (3-6 Hours)
Finish Used
Chalk paint and wax
Recommended Skill Level
Beginner

Library Coffee Table with Reclaimed Barn Wood Top

Submitted by wendywmp on Wed, 08/21/2013 - 19:42

Modified the plans to be only 3 drawers which saved on weight and hardware. Used reclaimed 100+ year old barn wood for the top, adding lots of character.

Estimated Time Investment
Week Long Project (20 Hours or More)
Finish Used
Cabinet: Minwax gel stain in Red Elm, and Winwax wipe-on satin poly. Top: West System epoxy to stabilize and fill 'defects', sanding sealer and wipe-on satin poly.
Recommended Skill Level
Intermediate

Comments

Rustic X

Submitted by Burrel on Sat, 10/03/2015 - 08:22

I built this for my daughters house warming gift.

Estimated Cost
125.00
Estimated Time Investment
Weekend Project (10-20 Hours)
Recommended Skill Level
Intermediate

DIY farm house table

Submitted by Anonymous (not verified) on Mon, 10/15/2018 - 21:41

Followed the farmhouse the design but with my ite dimensions and 4x4 legs. Also painted base and blue/gray to pop through when sanding eyese.

Estimated Cost
175
Estimated Time Investment
Weekend Project (10-20 Hours)
Recommended Skill Level
Intermediate

Bedroom Dresser Cubbies / Media Stand

Submitted by Debi G on Wed, 07/27/2011 - 14:08

This is inspired by pieces I've seen here, though I sketched it out on paper myself to make sure it would suit the limited space in our room. I built the simple piece to match our bed (made from Ana and her reader's plans, see my photos below).

Originally, I planned to include cabinet doors, but with the limited space we have, this is better for us.

For nightstands, I stained plain wooden crates I had in the basement. Still working on how to hide the cords.

The baskets under my bed are from Bed Bath Beyond. The baskets in the "dresser" are from Target.

Sorry about the poor photo quality.

Built from Plan(s)
Estimated Cost
Built from leftover materials (Baskets $5.99 each)
Estimated Time Investment
Afternoon Project (3-6 Hours)
Finish Used
Minwax Provincial (one coat) and one Minwax water-based poly coat.
Recommended Skill Level
Beginner

Comments

Debi G

Wed, 07/27/2011 - 14:09

I was trying to show that these pieces are a set, but instead the photos look pretty random.

Debi G

Sat, 12/10/2011 - 07:41

Sorry I haven't logged in in so long--the bed follows plans for the king Stratton, combined with the reclaimed wood headboard. The headboard is attached to the wall. We can slide the foot bench part out to hide presents behind, which is really handy (though heavy) to do.

Daun Family Coffee Table

Submitted by stevendaun on Sun, 08/25/2013 - 08:10

This was an excellent set of plans and the finished product looks great in our home.

Estimated Time Investment
Week Long Project (20 Hours or More)
Recommended Skill Level
Intermediate

simple stool

Submitted by vic b on Mon, 08/26/2013 - 19:27

I shortened the legs to 20 inches and left the lower rung off.
It lives in the playroom and is just the right height for our sons desk.

Built from Plan(s)
Estimated Time Investment
An Hour or Two (0-2 Hours)
Recommended Skill Level
Starter Project

Media and Storage unit

Submitted by jpurp on Sun, 10/11/2015 - 18:47

I followed the basic plans but adapted it to fit in my cabin.  The whole unit is 82" high by 126" wide.  I also put in more drawers and made the fronts in a shaker style. I used 2x4's that I ripped down to 2x2's and 3/4 inch birch plywood.  I trimmed out the birch with 1" pine boards. I sanded the whole unit, primed with an oil primer and painted 2 coats of latex from General Paint in Grayling.   I don't know how many hours I put into it.  A lot.  Probably around 80.  Mostly by myself.  My husband helped with getting the 4x8 sheets of plywood through the table saw and occaisonally when I needed a 3rd hand to pursuade some wood to do my bidding.  I love how it turned out.  Tons of much needed storage in my cabin.

Estimated Cost
Wood, screws, sandpaper, primer and paint. Approximately $600. I'm in BC Canada. Most things cost more.
Estimated Time Investment
Week Long Project (20 Hours or More)
Finish Used
Oil primer and latex paint from General Paint. Colour Grayling.
Recommended Skill Level
Intermediate

Comments

Modified Wide Cabin Dresser

Submitted by bcarter_1 on Tue, 10/30/2018 - 04:32

We modified these plans to make this, liked the sides.

Estimated Time Investment
Week Long Project (20 Hours or More)
Recommended Skill Level
Intermediate

Comments

Simple Oudoor Dining Table

Submitted by kmatt55 on Wed, 08/03/2011 - 17:15

I know, I know...Where are the legs? Unfortunately, I have to store this until December while our multi-family mountain house is being constructed. This way I can store it up against a wall and save a lot room in storage for more Ana White projects. FYI - The legs will be white 2x4's about 29.5 inches tall. For the top I used 1x4 cedar slats spaced 1/4 inch apart. As for the painted white frame, I used treated pine. Why spend money on nice cedar if I am just going to paint over it, right? The contrast of the white and natural cedar was appealing to me for some reason. I used Thompson's clear wood protector/water sealer on the slats to prolong the natural cedar. BTW, if you can build the simple outdoor bench you can definitely take on this project. The two are not very different. I'll have to take pictures of the finished table with legs when I haul these up to the Blue Ridge Parkway and upload them again. Thanks again Ana!

Built from Plan(s)
Estimated Cost
$100
Estimated Time Investment
Day Project (6-9 Hours)
Finish Used
Semi gloss white, Thompson clear wood protector/water sealer.
Recommended Skill Level
Intermediate

Comments

Casual 2x4 (sort of) Desk

Submitted by Sox on Thu, 08/29/2013 - 03:30

I had to a quick conversion from the original plans as we get metric wood sizes so decided to use the following:-
Desk frame: 44 x 94
Desk frame front: 44 x 69
Desk Top: 32 x 144
I drew up new plans to fit my 1500mm space I needed the desk to fill, with the new wood sizes.
The purchase of the Kreg Jig was my best investment as it made construction so easy.
I finished the desk off in Antique Oak after wanting to add a little Antique White to it, but got scared that I would mess it up!
Total cost for wood and finishing materials was R1,500.

Estimated Time Investment
Day Project (6-9 Hours)
Finish Used
Nova 18 - Novadye (Antique Oak)
Woodoc 10 Indoor Polywax Sealer (Velvet)
Recommended Skill Level
Beginner

Comments

Sox

Thu, 09/05/2013 - 08:39

Many thanks for the compliment. The design is based on the casual 2x4 desk on this site, however I made adjustments and redrew them due to the standard timber size I could get hold of and also a bit of personal preference. I have the plans in electronic format should you wish to have a copy.

Easy night stand!

Submitted by Medickep on Thu, 10/15/2015 - 08:33

I made this fast and easy table, I was using as a small night stand in a small bunk room at my work for a coworker.  I used scraps that I had and had him choose a paint I had on hand! Covered the top with polyacrylic to add some protection!

Estimated Cost
Free, since I used stuff on hand, otherwise 40-50???
Estimated Time Investment
Afternoon Project (3-6 Hours)
Finish Used
I used two coats of an old based primer and than two coats of paint, which was Renaissance Alkyd paint. 3-5 coats of polyacrylic on the top surface.
Recommended Skill Level
Beginner

Comments

Rustic barn style door

Submitted by Anonymous (not verified) on Fri, 08/05/2022 - 03:59

Using cedar fence slats, my son and I built this barn style hanging door for a space between two rooms in his partially finished basement. We planed each fence slat to achieve a smoother surface and to join the boards together. We finished it with a liberal amount of butcher block oil and beeswax to keep the wood from drying too quickly. We think it turned out beautifully!!

Comments

First Furniture Console

Submitted by cjohnston on Sun, 08/07/2011 - 14:10

This is my version of the Balin Console, presented by Ana White.

I used knotty pine for the wood and finished the piece first in two layers of walnut stain.

Over the stain, I painted two layers of Vast Sky blue by Sherwin Williams.

To finish it off, I used a polyurethane satin finish varnish--two coats.

Built from Plan(s)
Estimated Cost
$200.00
Estimated Time Investment
Week Long Project (20 Hours or More)
Finish Used
Stain the piece with a dark colored oil based stain--2 layers.

Rub a candle on the corners and edges where you plan to sand to give a distressed appearance.

Coat the piece with 2 layers of polyurethane paint.

Use fine grit sandpaper to sand edges to give a distressed vintage look. The candle wax applied to the stain will protect the wood from the sandpaper--sanding will only remove the paint layer and leave the stain layer intact.

Cover with two coats of a satin finish varnish to protect. Make sure there is plenty of drying time between the varnish layers--2 days +
Recommended Skill Level
Beginner

Comments

debandtom25

Fri, 08/12/2011 - 04:38

It's a very impressive looking piece. It would catch my eye if I saw it in someone's house. Great job!

windjamer812

Thu, 03/22/2012 - 23:25

You did a wonderful job on this project. It looks like it came straight from a 1930's country kitchen.

Cozy outdoor seating at last!

This project seemed to take forever, but it was so worth it! We finally have a great cozy outdoor space to gather around the fire pit comfortably. Thanks so much for the plans Ana!
I should mention I used 2x3's instead of 2x2's for all legs because pressure treated 2x2's here are only 1 1/4"??

Estimated Cost
$175 lumber & $225 cushions
Estimated Time Investment
Week Long Project (20 Hours or More)
Finish Used
Behr premium weatherproofing stain in Padre Brown
Recommended Skill Level
Intermediate

Comments

Reclaimed beauty

Submitted by mkrgolf on Thu, 10/22/2015 - 20:38

All wood used was reclaimed. Some tabletop pieces were warped, but added character to the table. Took about four 6-hour days with interruptions in between. I bought the stain from the Habitat store for $1.50 and the poly was left at the house we recently moved into. The stain was brushed on then rubbed in with a rag. I originally used about six coats of oil-based poly and when that didn't seem to work, I applied 2 coats of Polycrylic.

Estimated Cost
$20
Estimated Time Investment
Weekend Project (10-20 Hours)
Finish Used
Colonial maple stain with water-based satin poly.
Recommended Skill Level
Beginner

Grandy sliding console

Submitted by Brad Wills on Mon, 11/19/2018 - 14:51

Finally took the time to use a lot if my scrap pile.  This one is a bit of a beast to manhandle around the shop, but well worth the finished project!

Built from Plan(s)
Estimated Cost
150
Estimated Time Investment
Weekend Project (10-20 Hours)
Finish Used
Valspar dark walnut stain. Under Behr Flat white paint. Distressed then cleared with valspar poly.
Recommended Skill Level
Intermediate

My wife's new Craft table

Submitted by MattB on Tue, 08/09/2011 - 23:29

This is actually my third project from your site Ana.

I acctually decided to make this table ten inch wider since my wife has a loooooooot of crafts :)

This project took a little longer then I thought.
It was my own fault!!! I thought I would safe some time and get some of the wood cut buy the clerk at Home Depot. That turned out to be a really bad idea. Most of my cuts were uneven and even after I gave the clerk the exact measurements, a few of the boards were up to 2 inches too long. At the end I had to buy two more boards because I had to cut peaces away to have straight edges.
Lesson learned!!!

I love building wood furniture. And I already got my next plan from your site that I'm going to build.

Built from Plan(s)
Estimated Cost
$160
Estimated Time Investment
Weekend Project (10-20 Hours)
Finish Used
Valspar-Dove tail white(Eggshell)
Behr- Surfer(eggshell)
2 coats of clear Polyurethane Semi-Gloss
Recommended Skill Level
Beginner

Comments

Guest (not verified)

Wed, 09/07/2011 - 04:18

awesome job! im in the middle of making one of these at the moment. but just to be a tad different i have put a small cutout hole on the top, theres a little bin that sits on the shelf under it, so all i have to do when ive finished with all my paper cuts is swipe it down the hole! hehe how nifty. oh and where did your wife get the black cricut machine?? lol