
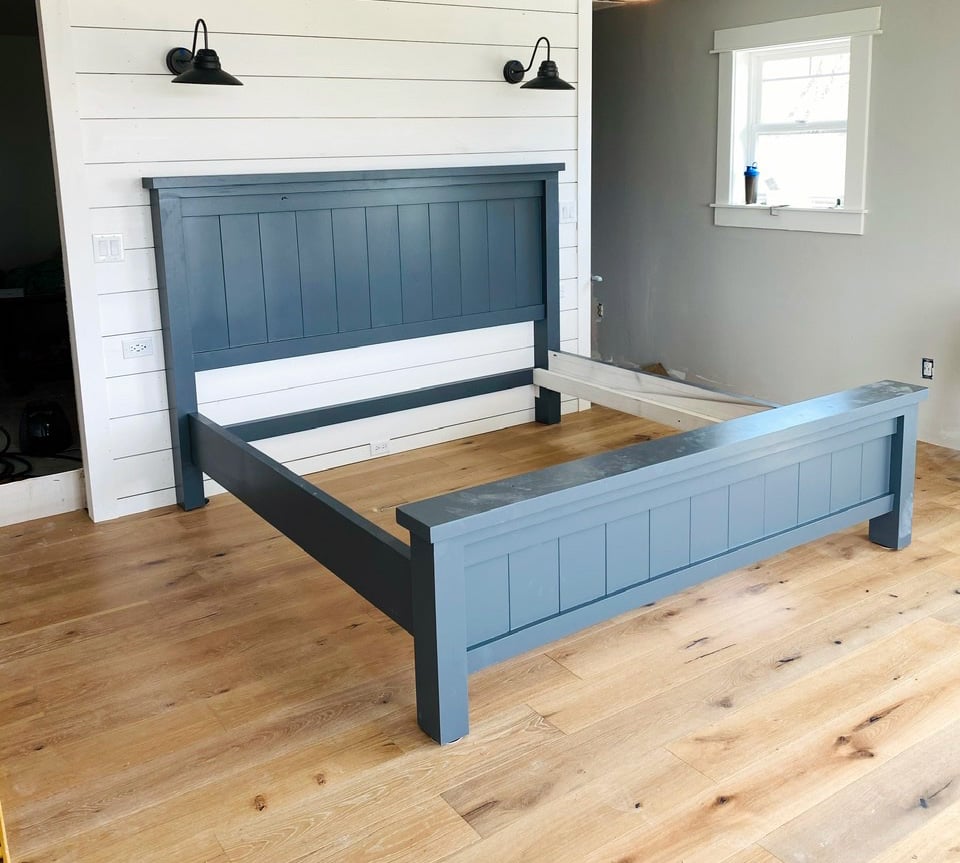

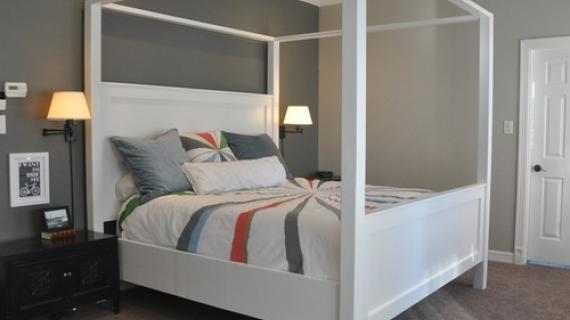
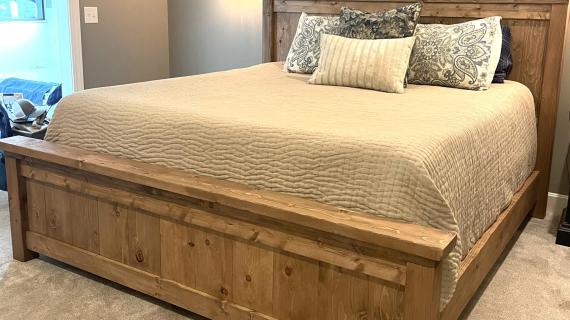
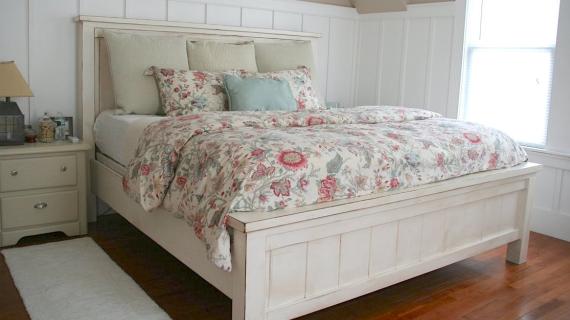
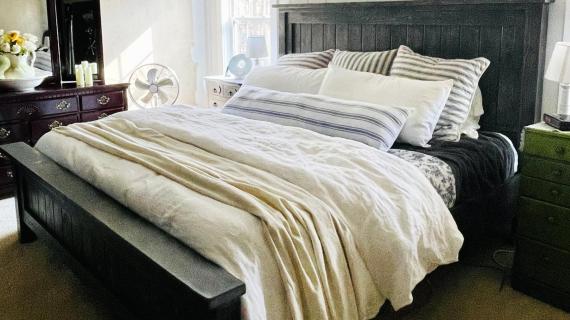
This stunning (and extra sturdy!) Farmhouse King Bed frame costs just a fraction to build vs buy. It's made of solid wood and you won't need a ton of tools to whip it out. You'll love the step by step diagrams, shopping list and cut list.
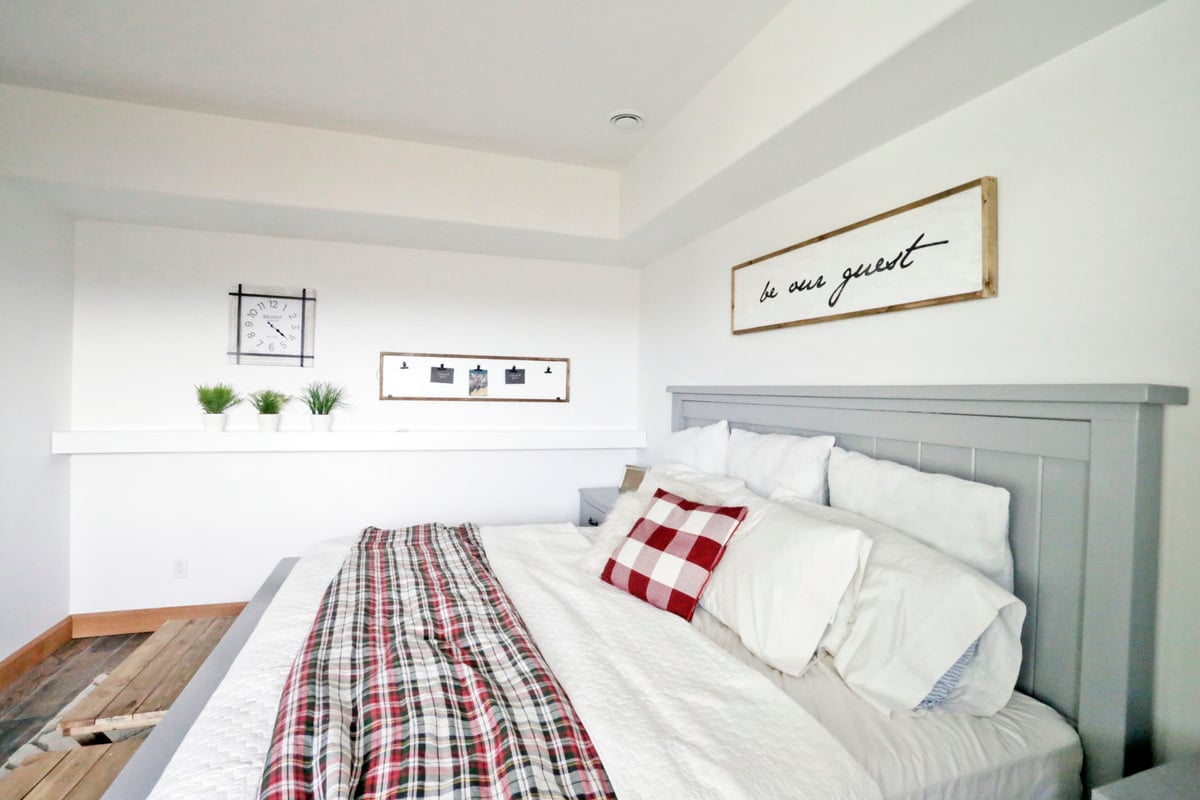
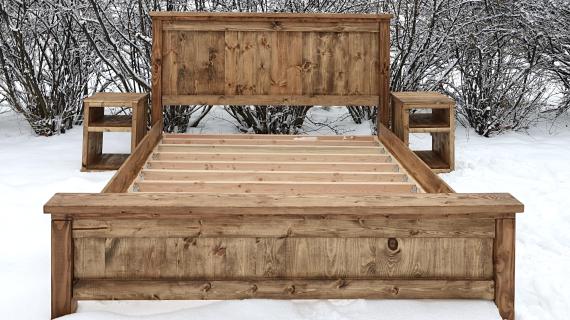
We also have Queen Farmhouse Bed Plans, and check out our full room build with this bed and matching nightstands.
The very first real project that I ever tackled all by myself was this EXACT Farmhouse Bed in King size.
I remember being stunned at how well the project turned out. And here we are, over a decade later, and it's still just as beautiful, just as sturdy, and I'm just as stunned.
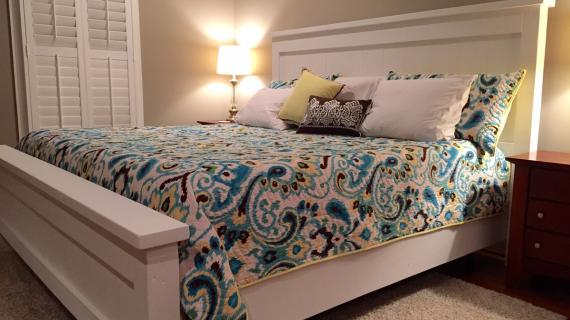
The farmhouse beds have been built thousands of times and is a reader favorite.
What Wood Do You Use
We use standard off the shelf lumber to build - just framing lumber and common boards. You can of course build with any type of wood, just make sure your material dimensions match dimensional lumber sizes (for example a 2x4 is actually 1-1/2" x 3-1/2").
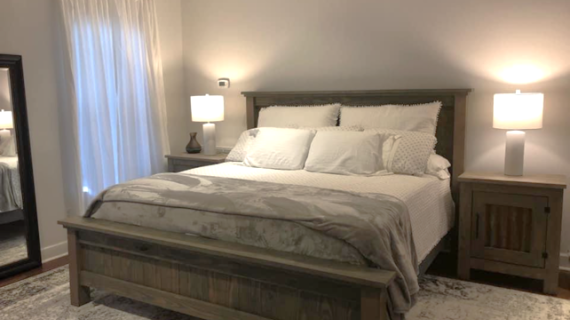
Matching Nightstands
This bed is quite substantial and deserves matching nightstands. I have put together nightstand plans that are designed to match - so you can get a full bedroom furniture set!

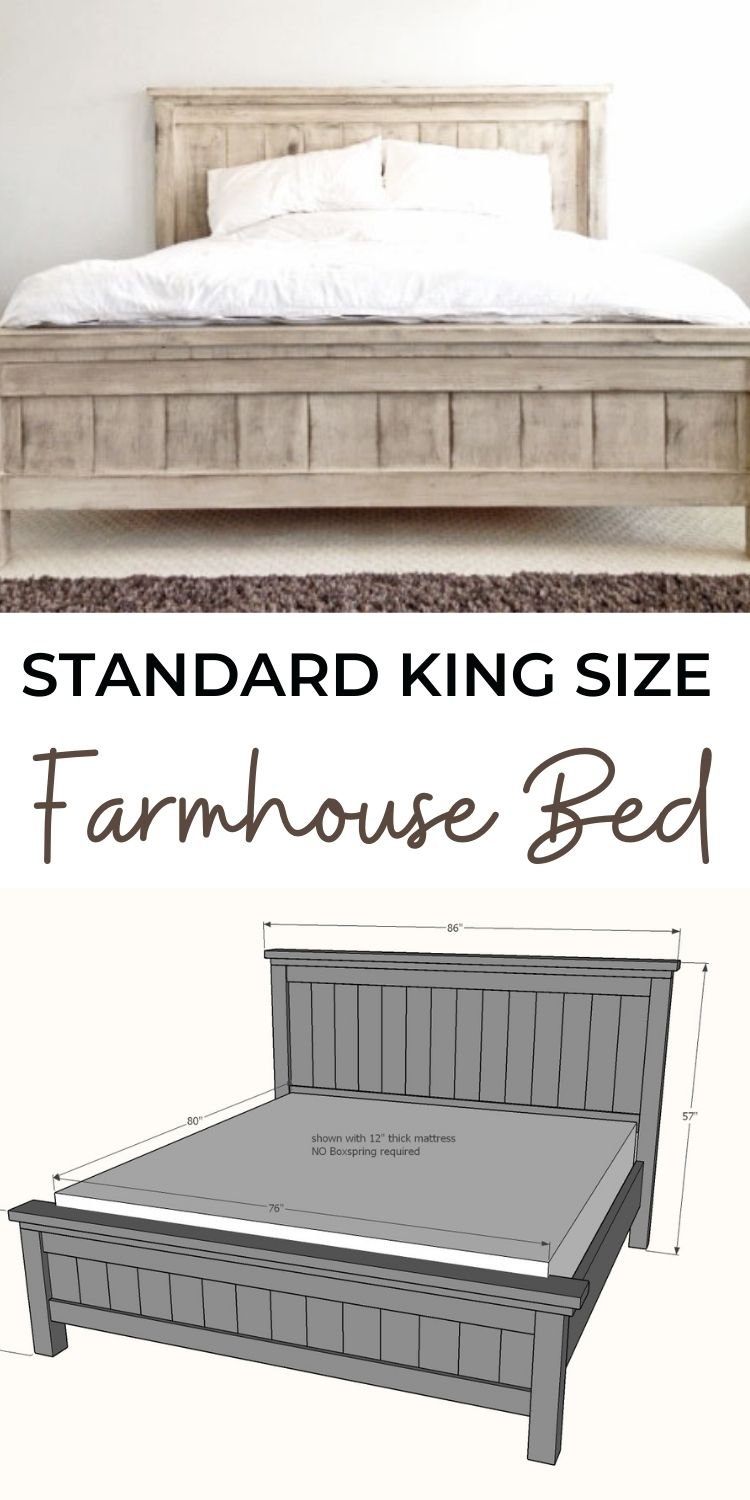
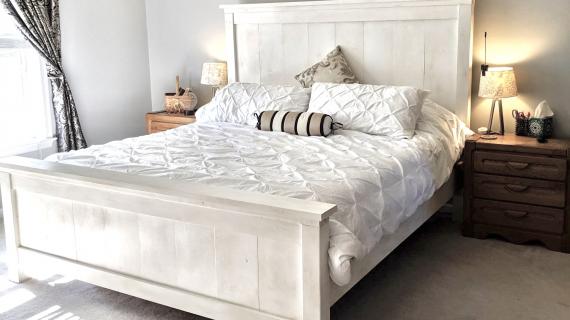
Updated Farmhouse King Bed Plans
We have updated these plans to be easier to build and not require pocket holes. You can still access the old plans here.
If you need a different sized farmhouse bed, check out all our farmhouse bed plans here.
Pin For Later!
Preparation
2 - 4x4, 8 feet long
1 - 2x2, 8 feet long
7 - 1x6, 8 feet long
4 - 1x4, 8 feet long
2 - 2x6, 8 feet long OR stud length
2 - 1x10 OR 2x10 @ 8 feet long
18* - 2x4, 8 feet long OR stud length
2 small L brackets (1-1/2" wings)
2 straight brackets (6" overall length)
150 - 1-1/4" brad nails
150 - 2-1/2" self tapping wood screws (try SPAX or similar)
*Includes 11 2x4s for the mattress slats. You can substitute 1x4s, 1x3s, ripped plywood etc for the slats if you have other materials on hand
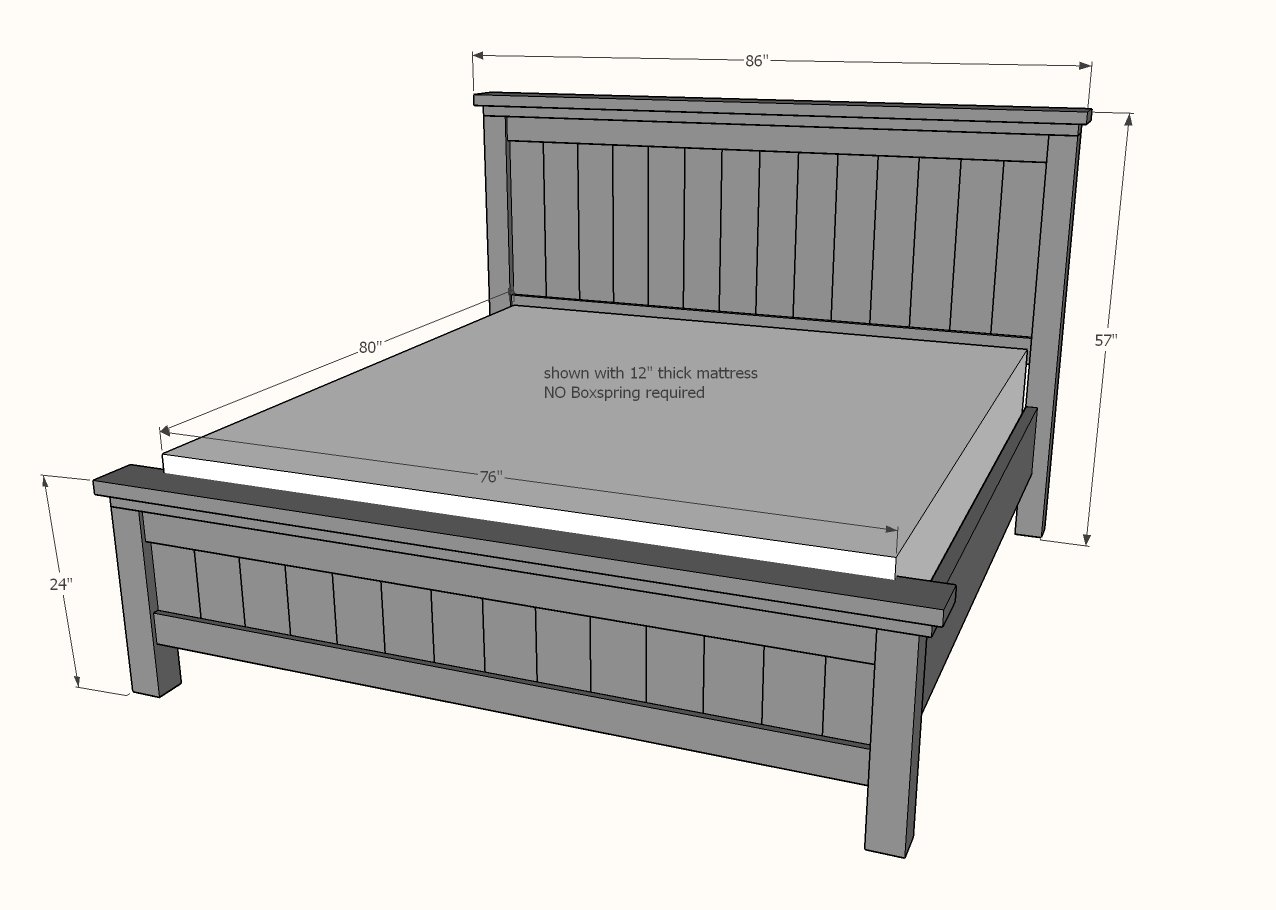
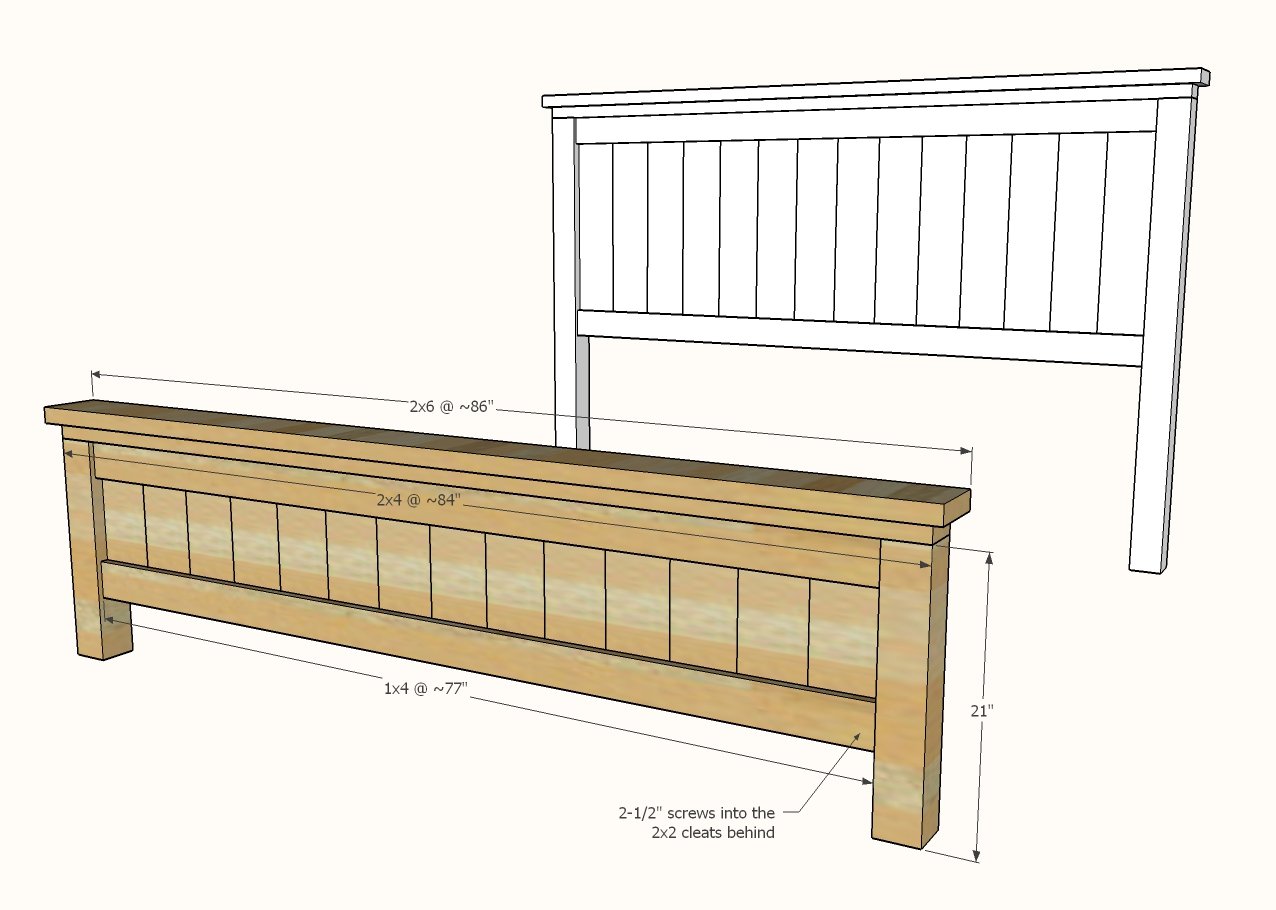
HEADBOARD CUT LIST
2 - 4x4 @ 54" - headboard legs
2 - 2x2 @ 30" - headboard cleats
14 - 1x6 @ 30" - headboard panel
2 - 1x4 @ about 77" - measure and cut to fit
1 - 2x4 @ about 84" - measure and cut to fit
1 - 2x6 @ about 86" - measure and cut to fit
FOOTBOARD CUT LIST
2 - 4x4 @ 21" - footboard legs
2 - 2x2 @ 8" - footboard cleats
2 - 2x2 @ 3" - footboard cleats
14 - 1x6 @ 15" - footboard panel
2 - 1x4 @ about 77" - measure and cut to fit
1 - 2x4 @ about 84" - measure and cut to fit
1 - 2x6 @ about 86" - measure and cut to fit
MATTRESS SUPPORT FRAME/SIDERAILS
4 - 2x4 @ 83-1/2" - mattress supports
1 - 2x4 @ ~77" - headboard tie in - cut to fit
4 - 2x4 @ 12-1/2" - center legs
2 - 1x10 or 2x10 @ 80"
11 - 2x4 @ ~77" cut to fit - mattress slats


Instructions
Step 1

Attach 2x2 cleats flush to the back of the legs, with 2-1/2" screws
NOTE: Pocket hole users can skip this step
Step 2
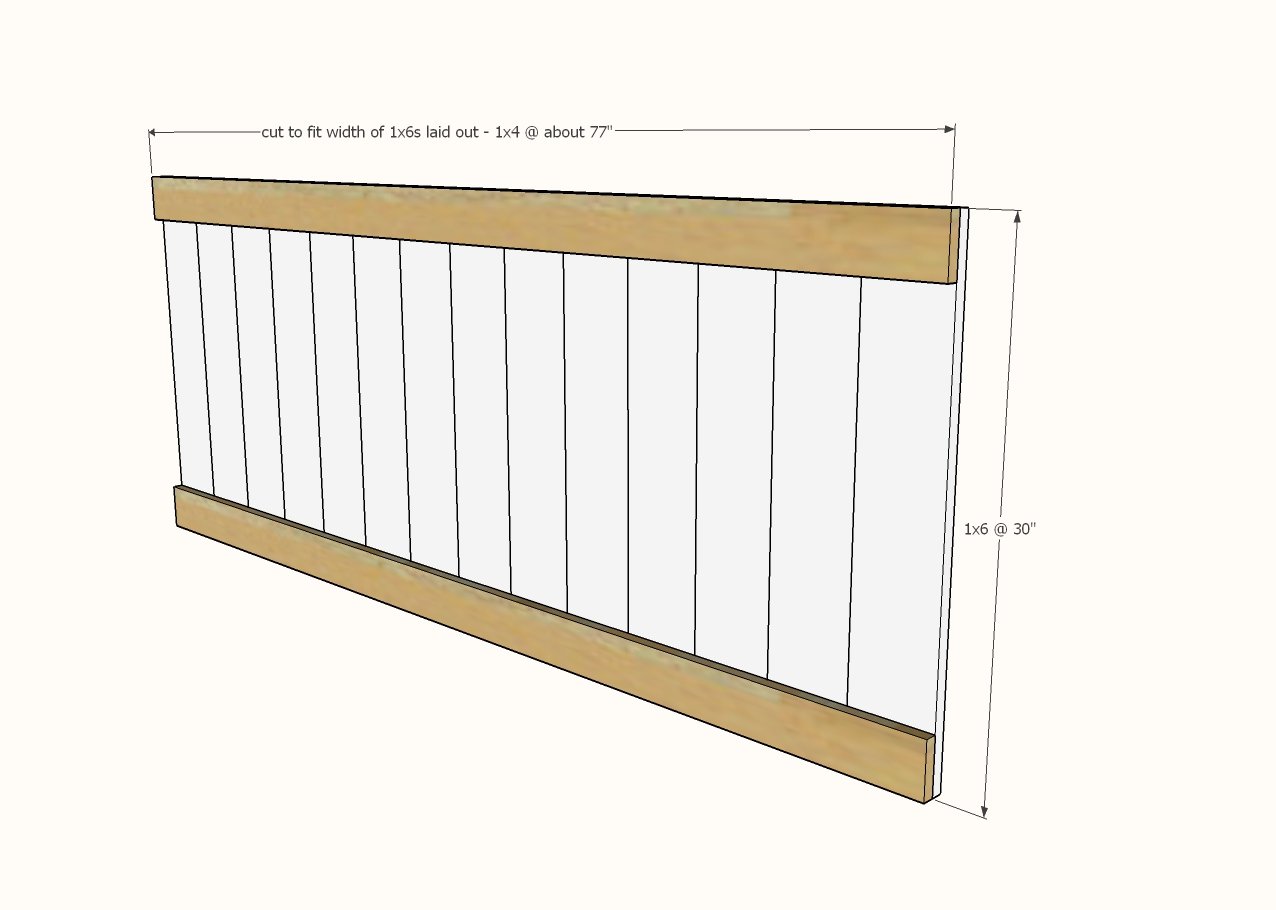
Layout the 1x6 headboard panels, and measure the overall width.
Cut 1x4 boards to this measurement.
Attach 1x6 boards to the 1x4s with glue and 1-1/4" brad nails from the back side to hide nail holes.
Make sure you apply glue between the 1x6 boards as you go.
Check to make sure that the panel is constructed square (NOT a parallelogram)
POCKET HOLE USERS: Attach 1x4s to the 4x4 legs with 3/4" pocket holes and 1-1/4" pocket hole screws. Then nail the 1x6s to the 1x4s inside the headboard panel.
Step 3
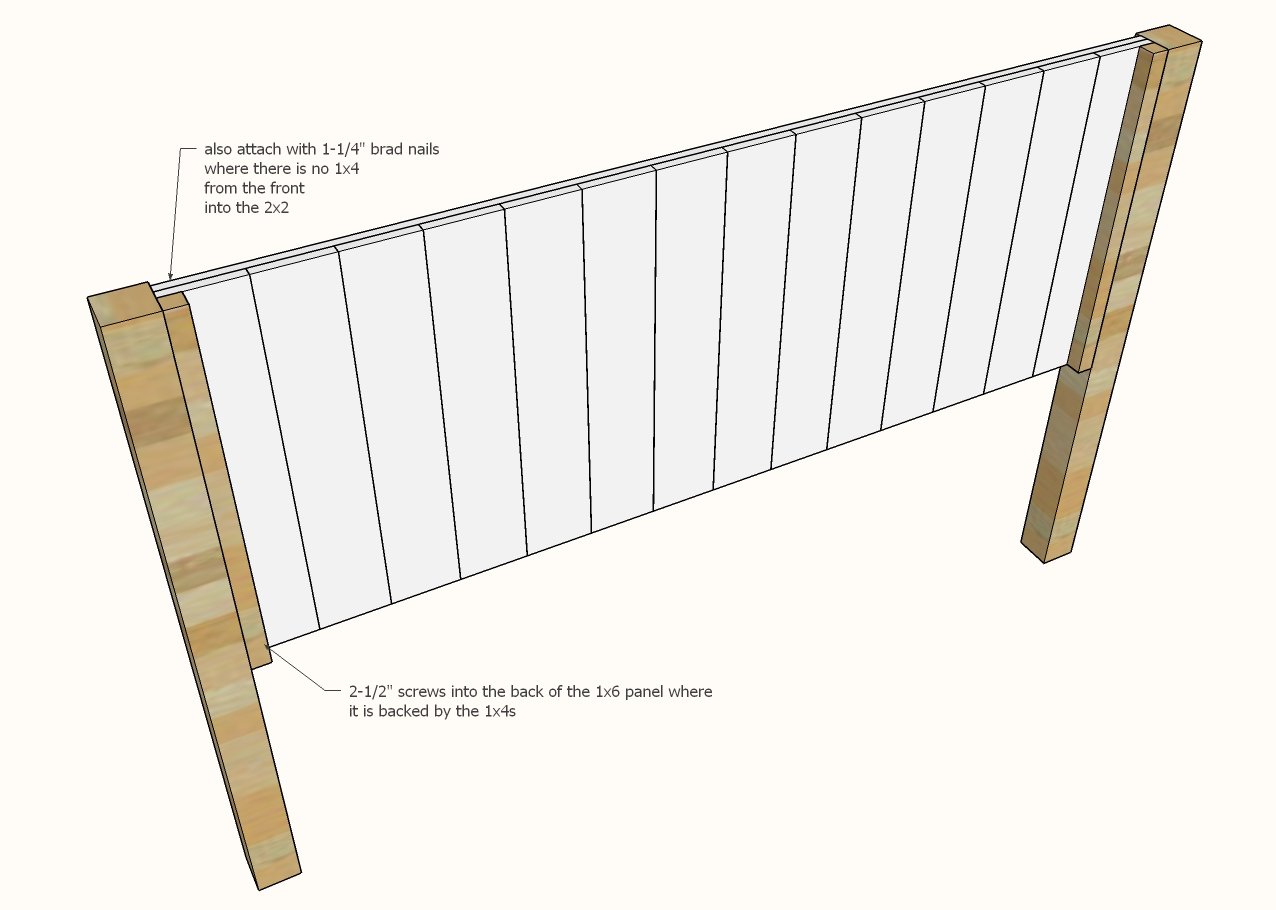
Attach panel to the 2x2 cleats with 2-1/2" screws and glue. Also attach with a few 1-1/4" nails through front side into the 2x2 cleat where there is no 1x4.
POCKET HOLE USERS can skip this step
Step 4
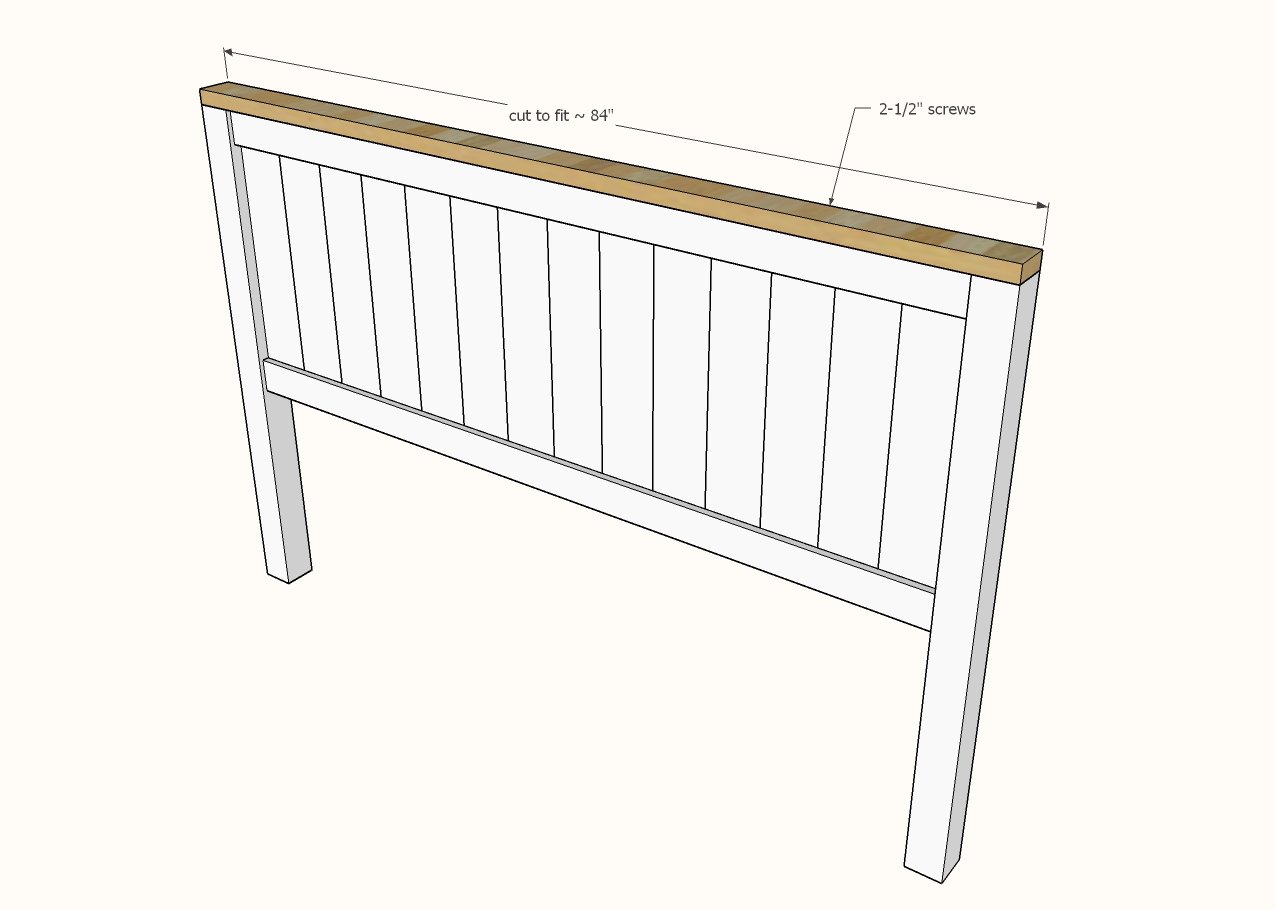
Measure the top overall width. Cut a 2x4 to this width. Attach with glue and screws to top of headboard.
Step 5
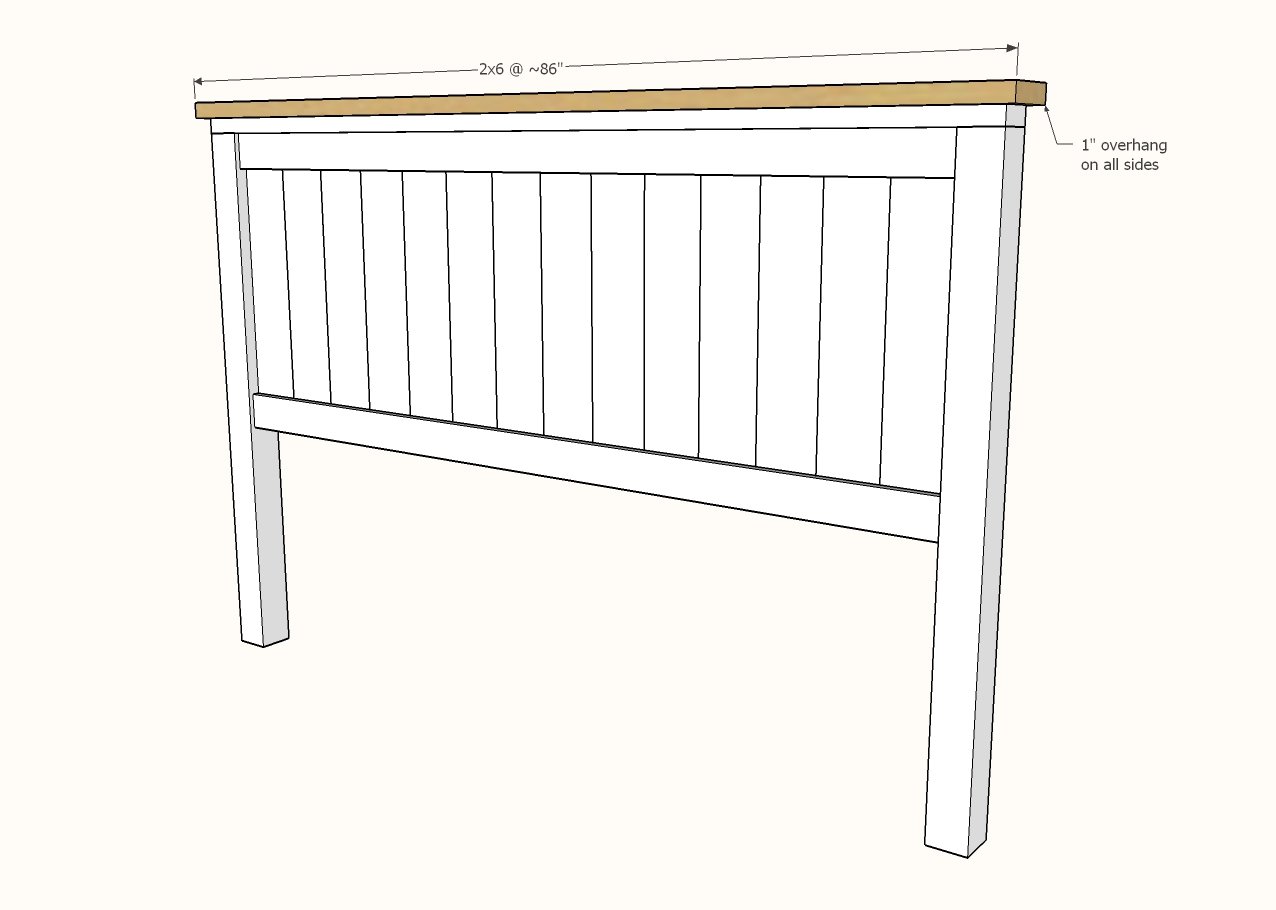
Cut a 2x6 2" longer than the 2x4.
Attach with 1" overhang on all sides with 2-1/2" screws and glue.
This completes the headboard build.
Step 6

The footboard is constructed the same as the headboard, with the exception of the 2x2 cleats on the back so that the siderail cleats can notch in.
If you have trouble with your smaller 2x2 splitting try predrilling holes.
Step 7
Finish construction of the footboard exactly as you did the headboard.
Step 8
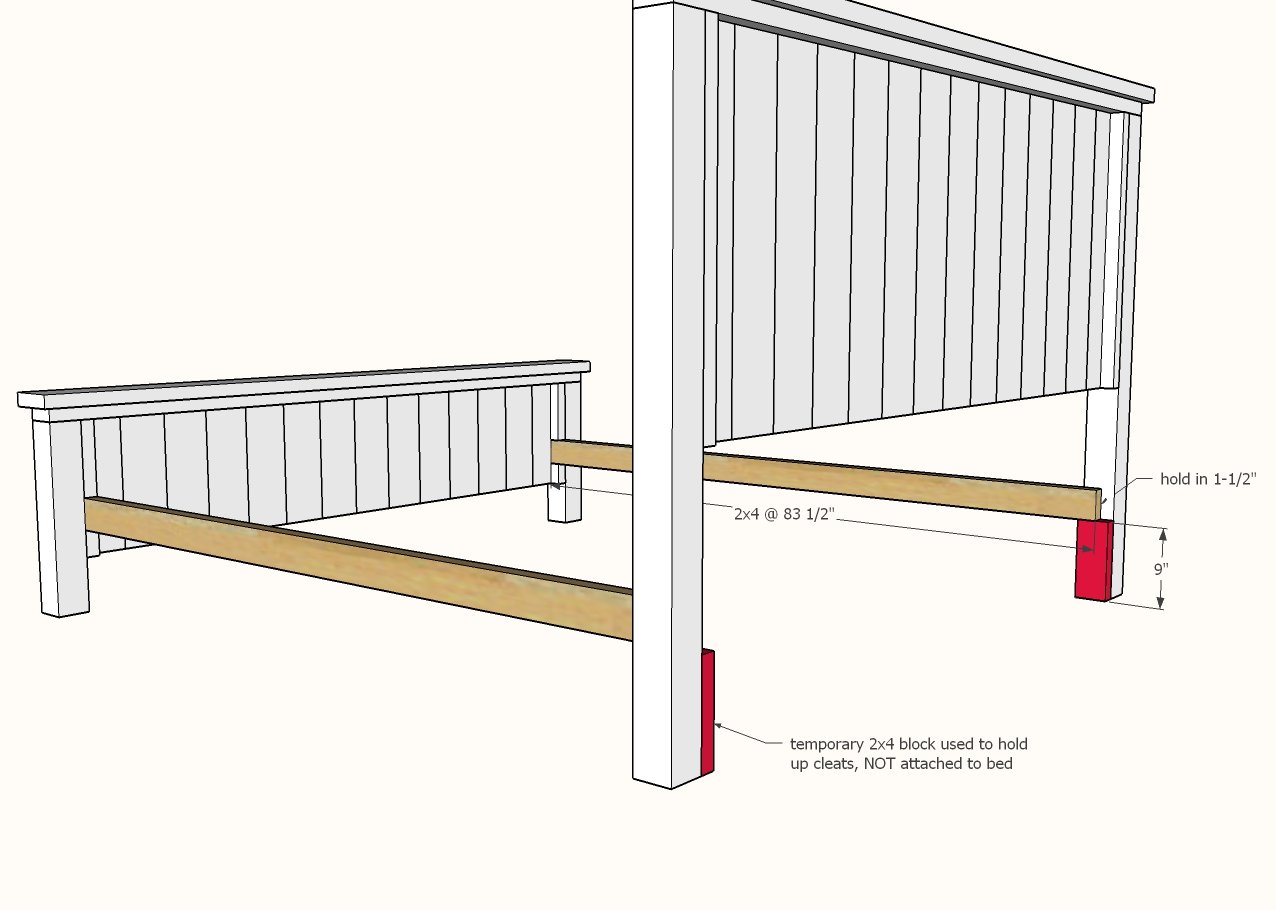
Attach siderail cleats inside the footboard and to the headboard legs. Use 2-1/2" screws to secure.
This completes the footboard.
Consider painting or staining your footboards and headboards and siderails now - then move all the pieces into the room for final assembly.
Step 9

Attach headboard support piece between the siderail cleats.
Step 10

Build the center legs - space the legs about 1/3 the way down - you don't have to be exact here.
Step 11
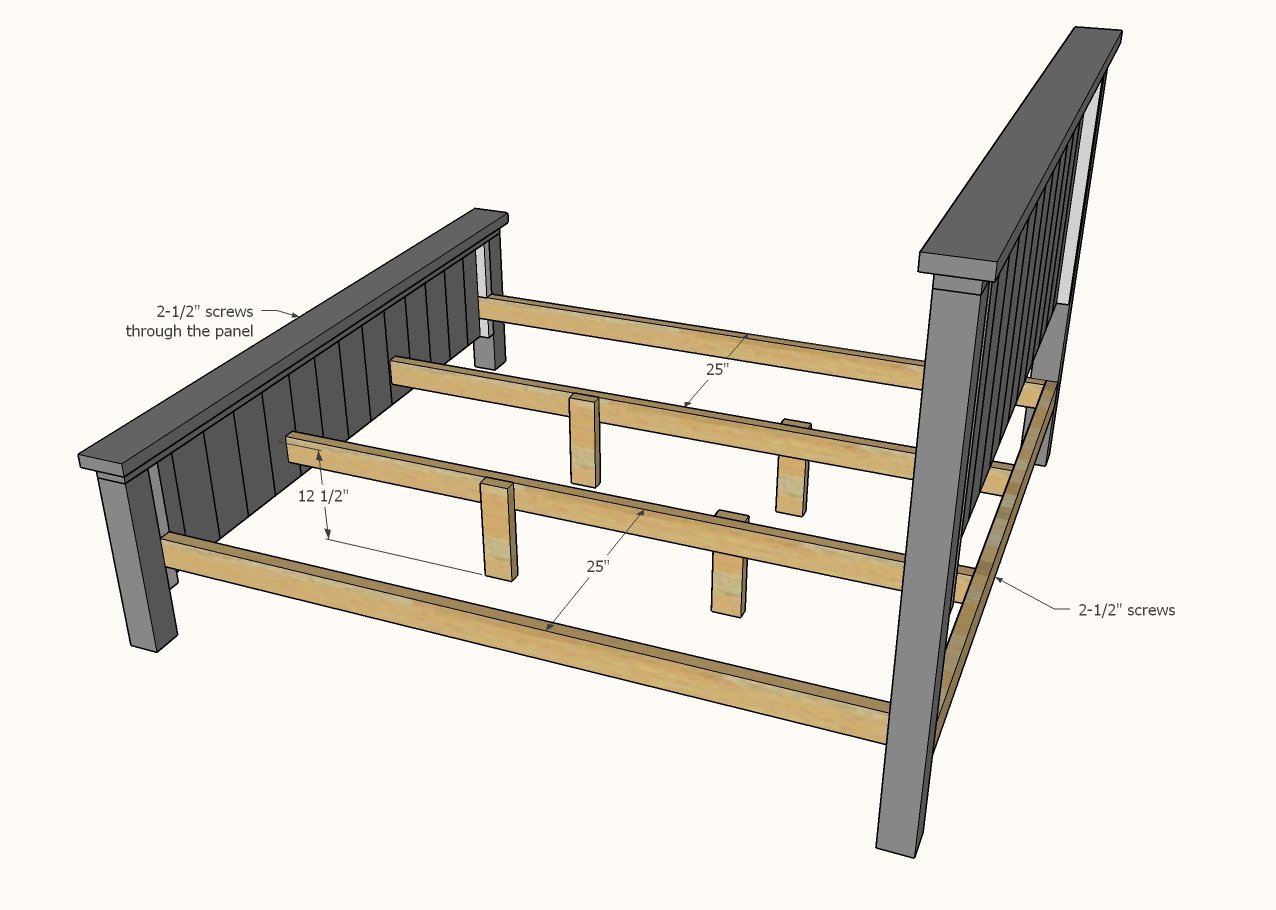
Attach the center legs inside the bed, splitting the spacing by about 1/3
Step 12

Attach siderails to the siderail cleats.
We recommend using brackets to attach siderails at the top to the headboard and footboard.
POCKET HOLE USERS: Drill a pocket hole at the top and attach.
Step 13

Cut slats and lay about 4" apart in the bed.
Screw down with 2-1/2" screws.


Comments
Julee (not verified)
Sat, 01/09/2010 - 14:44
absolutely gorgeous!!!
absolutely gorgeous!!!
Guest (not verified)
Sat, 12/31/2011 - 11:03
King bed plans
Why would you provide plans for a bed that is 80 inches wide when there are no beds made that are that size? Shouldn't you make the plans for a 76 inch wide king (standard) or for a 72 inch wide bed (California).
Rebecca Mitchell (not verified)
Fri, 07/20/2012 - 11:54
King Size Plans
My King sized bed is 76 by 80 but we prefer to have it the longer way, so I love these plans.
Tracy Goode
Fri, 12/19/2014 - 16:55
Why you would plan for 80 inches
You're forgetting that when you add the side rails, you're going to lose 4 inches, which would bring the size down to 76 inches, not 80 inches.
MonkeyRatt
Fri, 12/09/2016 - 11:30
You do not actually lose 4 inches
I realize I am replying to an old post, but since it is high on the list for everyone to see, I thought I should.
You do not actuallt lose anything when the side rails are added. The instructions state that add side rails, you follow the instructions for the Queen Size bed with an arch. When adding side rails per that plan, you are only adding wood that will be under the mattress or box to hold them up. The actual width of the space for the mattress will still be 80". I would assume this blan was designed to be used with a California king. If using a standard King Mattress you should adjust the plan. A standard King Mattress is 76" wide and 80" long.
rmls01
Fri, 02/08/2019 - 13:56
76" Wide suggestions
So what would suggest to do for a 76" wide bed?
Neal J
Sat, 10/05/2019 - 16:03
I realize that I'm…
I realize that I'm responding to an old post, but with all due respect, the person who wrote this post must not have been looking at the plans correctly.
The plans fit a standard king bed perfectly (76" wide x 80" long). I have made this bed in the queen and king size and have had no problems with the dimensions.
I was just reviewing the plans again because I'm going to build another one with built in storage.
blacourse
Sat, 10/10/2020 - 08:15
Agreed. No issues with size…
Agreed. No issues with size for STD King—fits perfect.
Jeralyn24
Fri, 04/16/2021 - 06:28
Did you end up building one…
Did you end up building one with storage? If so I would love to know how you added the storage to the bed. This look is what I want but storage would make it better for the room it will be in. Thanks.
steffany (not verified)
Sat, 01/09/2010 - 15:36
beautiful! I have sent
beautiful! I have sent several people your way since yesterday, and they are all as blown away as I am. Thank you for sharing.
Dianna (not verified)
Sat, 01/09/2010 - 16:54
I'm impressed! Great Work!
I'm impressed! Great Work!
Alexandria~~Th… (not verified)
Sat, 01/09/2010 - 17:55
I love, love, love your blog!
I love, love, love your blog! I stumbled upon you from The Graphics Fairy and love everything.
My husband better get ready because we're about to become carpenters!
sleepyhead des… (not verified)
Sat, 01/09/2010 - 18:18
Just amazing! I need a
Just amazing! I need a husband like you!
Hillary (not verified)
Sat, 01/09/2010 - 18:49
We are planning on upgrading
We are planning on upgrading to a king bed and I have been drooling over this bed since I found your blog! Thanks!
Proud Daddy (not verified)
Sat, 01/09/2010 - 19:34
Ana quick question are you
Ana quick question are you using the treated 4x4's from like a lowes or homedepot?
Funky Junk Interiors (not verified)
Sun, 01/10/2010 - 11:06
I LOVE this bed, Ana! But
I LOVE this bed, Ana! But then I love everything you do. Your style is so classic.
Thanks for being the incredible inspiration that you are. YOU are encouraging women to build. And to me, that is a very good thing.
Thanks for linking up yet again to SNS! Now go back and pick what print you'd like if you won and comment on it. I'd love to qualify you in the giveaway. ;)
FJ Donna
Ana White (not verified)
Sun, 01/10/2010 - 11:25
DO NOT USE TREATED
DO NOT USE TREATED LUMBER
Sorry for the caps, but I just do not want anyone to put toxins in their homes.
Untreated 4x4 Posts should be readily available at Home Depot or Lowes. In our stores, the 4x4 posts are in a weird location. Perhaps ask an associate for their location. They are also cheap, like $6 for an 8' post. The more "distressed" the better!
ericsodt
Sat, 03/06/2021 - 10:59
Oh how I wish lumber prices…
Oh how I wish lumber prices remained the same! That same post now costs $16 :(
I would guess that if people tried to build this during the pandemic, it would be at least 3 times the cost...
Proud Daddy (not verified)
Sun, 01/10/2010 - 11:47
Ana that's why I asked the
Ana that's why I asked the question. I wanted to make sure that wasn't the case. Some of the Lowes depending on where you are at don't have the untreated 4x4's, I am going to check out Home Depot to see if they have them. If not then I will stack 2x4's Thanks for the plans I had planned on building a bed similar to this but was going Wainscoting for the center of the head and foot boards but I actually like the way you are doing it much better and it will be a HECK of alot cheaper.
Ana White (not verified)
Sun, 01/10/2010 - 13:24
Proud Daddy,Thank you so much
Proud Daddy,
Thank you so much for asking the question in a comment. I have actually had tons of emails with the same question, and I wanted to make sure everyone saw it.
You are much appreciated!
Thank you!
Ana
Proud Daddy (not verified)
Sun, 01/10/2010 - 14:00
You are welcome. I am a
You are welcome. I am a fairly new woodworker about a year now and that was one of the things that I learned early on. I love the fact that you are using sketchup, I have been modeling some of my thoughts in that. It's a great program. Anyway.. Thanks for the plans and for finally getting my wife interested in woodworking she asked me this afternoon if she could build something. I just finished one of the Hyde end tables and we are going to build the coffee table I made a few changes to the table. I used pocket hole joinery and Used dowls to join the top to the base. I will shoot you over a pic after while. I am going to let her attack the coffee table if she is up to it.
Thanks,
Kevin
jdreier (not verified)
Mon, 01/11/2010 - 08:19
I love this bed! What is the
I love this bed! What is the ballpark on what it cost to make?
FleaMarketTrixie (not verified)
Thu, 01/14/2010 - 04:18
you are so talented, love all
you are so talented, love all your projects!!!
Katherine Klegin (not verified)
Tue, 01/19/2010 - 08:12
Hey there! SO excited to
Hey there! SO excited to start building this! My dad and I are going to make this our little project. Can you help me convert this to a california king though? I would like to include a frame and sideboards as well. You are so talented and I appreciate all of your hard work!
Kate (not verified)
Tue, 01/19/2010 - 12:45
Love, love, love this bed!Can
Love, love, love this bed!
Can you please clear something up for me though?
When looking at the (colored) plans for the king size bedframe, I can't get the measurements to add up. Can you please tell me what I am doing wrong?
(10) 8" Panels = 80"
(2) 3" End Pieces = 6"
(2) 4" Posts = 8"
The total of all these pieces is 94".
I don't understand how the plans show an overall width of 89".
HELP...what am I doing wrong!!!!
Thank you so much! I can't wait to make this bed! I'm obsessed! :)
Kate (not verified)
Tue, 01/19/2010 - 12:58
Ok, by reading some of the
Ok, by reading some of the other comments I think I saw my question answered!
The "actual" measurements are different that the "nominal" measurement.
That makes sense!
Thanks anyway!
Kara (not verified)
Sun, 01/24/2010 - 16:35
Just built the King this
Just built the King this weekend. I wanted to note a few errors in the plans. On the shopping list, it calls for (4)1x8x8ft which is 384 inches. The plan calls for 10 30 inch pieces and 10 15 inch pieces which is 450 inches so you actually need (5) 1x8x8ft.
Also when you stack the 10 30 inch pieces with the 2 3 inch pieces the 80 inch band board is too long. I added a 3rd 3 inch piece an it it fit perfectly. Overall, it came out great. Great site, can wait to build more.
Don Current (not verified)
Fri, 07/01/2011 - 07:20
Corrections to plan
I wish there was a way to move comments like these to the top of the list so people don't miss them. I found the same thing as you. You need an additional 1x8 for a total of (5). I also found that two 1x3's weren't enough, so I went with 1"x4"s to make up the width on mine in place of the 1"x3"s and that worked also. Best thing to do would be to measure what the 1x8's are actually running when you buy your lumber and then determine what size "filler" pieces you need.
Michelle D (not verified)
Mon, 12/31/2012 - 07:46
Thank you for this
Thank you for this comment...wish we would have read it before shopping. We are in the middle of making this bed as well and found that (4) 1x8x8 ft was not enough to cut the pieces required. I would appreciate the plan materials list being updated. We are running into some other snags but I think that is more due to the lumber width (as is noted in the plan) and it should still be fine. Love the plan and the look...hoping to have my own brag photo and full review when it's done :)
Laurie (not verified)
Fri, 01/29/2010 - 20:46
I am amazed by your blog.
I am amazed by your blog. Thanks for going to all this work for us!
I feel like this is the dumbest question--- do you need to sand and prime the wood before you paint it? Can you tell this is my first project?
Ana White (not verified)
Mon, 02/01/2010 - 17:26
Hi Laurie, not a dumb
Hi Laurie, not a dumb question at all. I don't give alot of information on finishing because there is no right or wrong method to finishing - in other words, you get what you want. I would recommend sanding first to remove any hard edges, wood putty, or soften edges. Depending on your desired finish, you can prime first. If you are trying to keep the wood showning through the paint, I would recommend not priming. My best recommendation is to try out a variety of different finishes before painting.
Whitney (not verified)
Sun, 02/14/2010 - 13:27
My husband and I just got
My husband and I just got home from the store with our wood for this project! I'm super excited, but confused on one thing. We bought our wood from the "shopping list" and when we got back, we realized the "cut list" has 1x3s. They were not on the shopping list, so I'm wondering if I'm missing something or if we need to go back to the store tomorrow?
Anonymous (not verified)
Fri, 02/19/2010 - 12:30
I have been looking over the
I have been looking over the plans thoroughly since I very much want to make this bed. I believe a standard king size is 76 wide and 80 long, the 80" length is the same as for a queen. Your plans are geared towards 80" wide and 60" long. Also I can't figure out how in the Queen if you have 60" of space you can fit two 2x10s and 57" joists into a 60" space. 57+4 = 61" or maybe I'm confused
Ana White (not verified)
Fri, 02/19/2010 - 13:41
Okay, let's see if I can
Okay, let's see if I can tackle this question. There was a typo, but only in reference, the king should in fact be 80" long. The width of a standard king is 76". I made my bed (shown in the picture) 80" wide because we turned our mattress 90 degrees to get the bed to fit better in the room. This plan calls for a headboard of 80" wide. You can build yours 76" wide by resizing your panel boards.
The "cleats" in reference to the queen size are each only 1 1/2" wide, as a 2x board does not measure 2" in width, but 1 1/2".
I hope this makes sense.
hsweeten
Thu, 01/02/2020 - 19:01
Farmhouse bed with box spring?
Ana,
My husband and I just recently stumbled upon this bed plan! In searching, I have read that there might be plans that Accommodate a box spring? Do those exist? Standard King size farmhouse bed with box spring??? Thank you, can’t wait to tackle some projects :)
Anonymous (not verified)
Fri, 02/19/2010 - 16:26
Thank you, that really makes
Thank you, that really makes sense, and I bet the bed being 80" long will feel roomier as well.
Anonymous (not verified)
Wed, 03/31/2010 - 06:12
Ana, we are going to make
Ana, we are going to make your bed this weekend, but would like to make the rails along with it. Could you put up the measurements for the King size rails and how you did it?
B (not verified)
Fri, 04/09/2010 - 06:48
First and foremost, I LOVE
First and foremost, I LOVE what you do. I stumbled upon your site about 2 weeks ago and have already built a bench that I found here last weekend. I have a question on the beds. Is there a way to make them so you can disassemble them easily for when you move or need to take them out of the room without having to unscrew the side boards?
Please, please please keep writing and inspiring your readers. Best. Site. Ever.
Twigs @ Twiggl… (not verified)
Mon, 06/14/2010 - 14:45
okay guys. i plan on making
okay guys. i plan on making this bed sometime this month. rough estimate of what it's going to cost me in material?
The Young Family (not verified)
Thu, 07/01/2010 - 04:29
It looks like all plans are
It looks like all plans are designed for no box spring. I can't seem to find what to build if we have box springs???
anonnymouse (not verified)
Wed, 09/15/2010 - 02:09
Could you post a shopping/cut
Could you post a shopping/cut list for a Kingsize bed NOT turned sideways (the mattress in the standard orientation)? My husband is 6'6" and can't fit on it sideways!
Thanks!
anonnymouse (not verified)
Wed, 09/15/2010 - 02:14
I would lower where you
I would lower where you attach the side rails 6-8 inches to accommodate a box spring- you also wouldn't need as many cross pieces underneath to support the mattress.
justinorr (not verified)
Sun, 09/19/2010 - 12:45
Just finished my king size
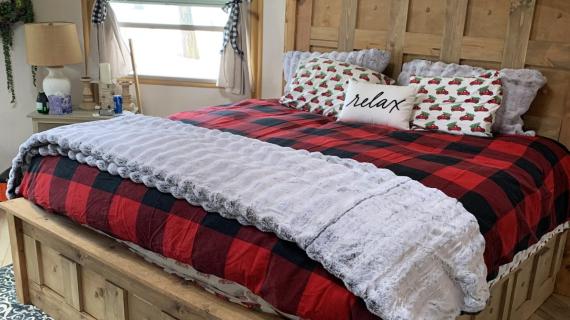
Just finished my king size farmhouse bed. It looks great! Thanks for the plans Ana. It can be seen in the photos section. (My Farmhouse Bed 1 and My Farmhouse Bed 2). It has the red and white plaid comforter. I used a flat black paint and attempted to distress. Also I found a good altenrative to the 1x8's is using a product called "Barn Siding" that I found at Lowe's. I think this will make the project cheaper and easier. On to night stands.....
Guest (not verified)
Mon, 05/09/2011 - 17:01
Barn Siding
Curious about the barn siding. Cannot find pictures of your finished product. Could you post a link?
Ginny Haines (not verified)
Sat, 10/02/2010 - 06:14
Please don't call this King
Please don't call this King Size if it is not the plans for the standard orientation of a king size bed! You suggested to a previous poster that they just need to re-size the head and foot-boards, but having plans, a buy list and a cut list would be much appreciated for REAL king size. Please reformat the plans for standard king size if you have some spare (ha!) time.
Christy Allen (not verified)
Sat, 10/16/2010 - 05:45
I LOVE this bed but do not
I LOVE this bed but do not have the skill to convert these measurements to a normal king size bed 76 w x 80 L. Could you please post these in a buying and cutting list.
Thanks soooo much.. I was just introduced to this site and it is phenomenal!
kyrsteno (not verified)
Thu, 10/28/2010 - 15:13
I just have a quick question-
I just have a quick question- how would you replace the individual panel peices, for a full panel peice?
Mags (not verified)
Sun, 10/31/2010 - 04:10
Why are you letting your
Why are you letting your daughter sleep in your bed with you?
ashlee (not verified)
Tue, 11/02/2010 - 16:31
because mags- cosleeping is
because mags- cosleeping is amazing, and one of the best things you can do to build and maintain a close family bond! children will move to their own beds when they feel secure enough in them to do so!!
ana..!!!! THANK YOU! loove it.
Parie (not verified)
Tue, 11/09/2010 - 17:23
Hi there! Your talents are
Hi there!
Your talents are incredible! I visit your blog often hoping that someday I will actually tackle one of the plans. I have a question...are the plans on this page for the 80x60 or 76x80. I have never attempted to build anything myself and I want to make sure I'm doing all the right measurements.
Thank you,
Paralee