Community Brag Posts

Swing Bed - Time to Relax!

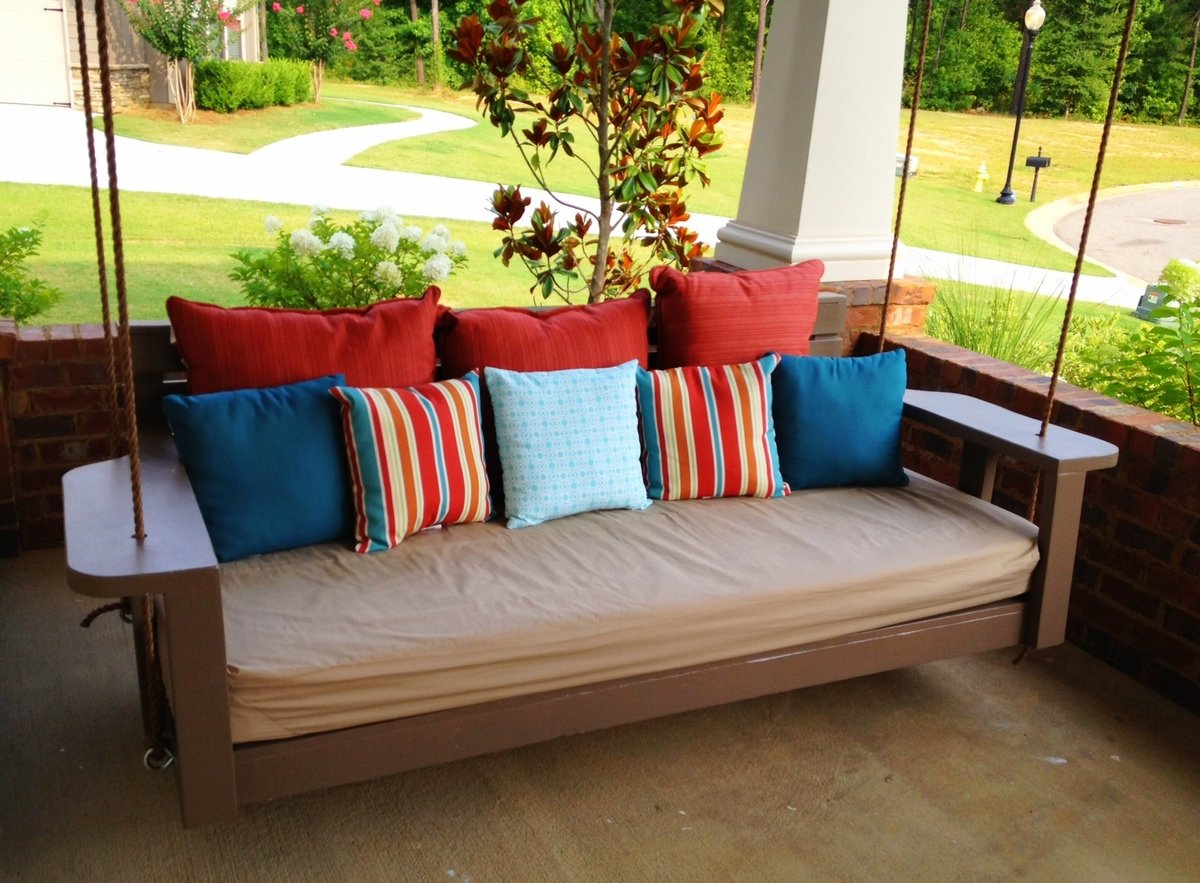
A few years ago our family vacationed in Watercolor, on the northwest Florida coast. We loved the house we stayed in so much when we returned home we put our house up for sale so we could build a home similar to the one we stayed in. One of the features we loved so much was the large covered front porch and most of all the swing bed it showcased. My wife spent every morning and night that week relaxing in that swing. I promised my wife then that I would make sure got her own swing. Thanks to Ana White, she was back in her (new) swing last night.

I began with the "Large Modern Porch Swing" plan and made some changes. I wanted to use a twin size mattress so I increased the size of the swing's base. Also, because the mattress was 6" I lifted the arms and back. The arms are the biggest and best change I think. I had seen someone else do similar arms, but I they used an 1x12 I think. I wanted a heavier look, so I used a 2x10.

Built from Plan(s)
Estimated Cost
$200
Estimated Time Investment
Weekend Project (10-20 Hours)
Finish Used
Glidden Paint - Monterrey Cliffs
Recommended Skill Level
Beginner

Comments

brookifer86

Mon, 07/02/2012 - 14:55

So...when should I stop by with margaritas?? This swing is awesome! So impressive. I'm going to have to keep it in mind for the home we're building. Great work

Kids Easy Bike Rack

A few weekends ago, I went into our tool house to get my bike out so I could ride to work, and I had to remove so many obstacles, that I was too late to ride to work, and as a result, boiling mad. Several of the objects I had to move out of my way were my kids bikes that don't have kick stands, which my kids just haphazardly dump on their sides on the floor of the shed.

I had had the idea to build a bike rack out of spare 2x4s for the kids' bikes for a while, but this incident cemented my resolve to finish it quickly.

I had some scrap 2x4s and 2x6 wood left over from another project, which I used to compose my bike rack. It has 4 slots for 4 bikes.

I did some light sanding to prevent splinters, but I did not apply any finish because of the way it was going to be used and it would not be exposed to the elements.

It took very little time to put together. If I had more claps, I could have done it more quickly.

If you are interested in making something that looks just like mine, stop by my blog to get the details.

Estimated Cost
$10 - $15
Estimated Time Investment
An Hour or Two (0-2 Hours)
Finish Used
None
Recommended Skill Level
Starter Project

Hanna Canopy Bed

This was a fun and relatively easy weekend project. Shaping the legs and getting the rounded header and footer were the only challenging parts. A good stretch project for the novice DIYer. 

Built from Plan(s)
Estimated Cost
$100
Estimated Time Investment
Weekend Project (10-20 Hours)
Finish Used
White paint/ primer combo. Three coats.
Recommended Skill Level
Intermediate

Simple Table

This table is very nice and so simple and inexpensive. Just choose your lumber selectively. I used prime 2x4's for higher quality.

Built from Plan(s)
Estimated Cost
$50.00
Estimated Time Investment
Afternoon Project (3-6 Hours)
Finish Used
Screen porch table.
Recommended Skill Level
Beginner

Modified Outside Table

Submitted by NRFitzJr on Thu, 07/05/2012 - 06:14

I'm just starting out. I built this from scrap wood I had laying around. I followed the plan except for the table top. Here I used a 2x6 that I cut on the miter saw, and used bowties to help give the middle more strength.

Estimated Time Investment
Afternoon Project (3-6 Hours)
Finish Used
Minwax Wood Finish, Provincial
Recommended Skill Level
Beginner

Bathroom Step Stool

My daughter needed a step stool to reach the sink in our bathroom. I simplified the jigsaw cuts for this design to accommodate my learning curve. :) I used leftover plywood for the sides and 1x6s for both steps because it was what I had on hand in my garage. It was fun to make and is something we use every day!

Built from Plan(s)
Estimated Cost
Free for me, made of scrap wood
Estimated Time Investment
Afternoon Project (3-6 Hours)
Finish Used
Olympic Semi-Gloss Latex in Victorian Pewter
Recommended Skill Level
Beginner

Bailey console table

Submitted by Anonymous (not verified) on Thu, 07/21/2016 - 13:05

Bailey Console table from the #igbuilderschallenge

built by Instagram: @sawdustandperfume 

built to be used in an buisness office that a former cattle rancher conducts buisness. 

Built from Plan(s)
Estimated Cost
Lumber was about $50 but I used scraps I already had as well.
Estimated Time Investment
Week Long Project (20 Hours or More)
Finish Used
I painted layers of different colors on the top and then sanded down to the wood again in most spots to get the barn look. I then used a dark stain called Jacob bean.
Recommended Skill Level
Intermediate

2x4 sectional outdoor sofa

Submitted by Anonymous (not verified) on Tue, 05/12/2020 - 08:10

My first Ana White project. My friend Shelley and I are RN's, and she got me hooked on woodworking. I started with cushions from Lowes ( in the sizes that you recommended)to see if I loved the sectional for a few years. I loved it so much I decided to have custom Sunbrella fabric ones made. Even though the custom ones were more expensive, it has been worth it. They go perfect with my California Mission style home. Now I want to add the armless one and make it a U-shape. I did add a piece at the bottom back of each sofa to hold the cushions in. The seat cushions would slide out the back when sitting on the sofa. I made the coffee table to match. Our family loves it!

Estimated Cost
building materials for sofa $250. Custom Sunbrella Fabric cushiosn $2000
Estimated Time Investment
Weekend Project (10-20 Hours)
Finish Used
Stained with Carrington Minwax and sealed with spray Shellac
Recommended Skill Level
Beginner

Comments

Built-in Bookshelves

Submitted by keribeth on Fri, 07/06/2012 - 14:55

These built-in bookshelves were my first project, and were loosely based on the Willy bookshelf plans, although I changed the dimensions, set them on a 2x4 base, and added trim to the sides and molding on top.

Built from Plan(s)
Estimated Cost
~$120 in lumber
Estimated Time Investment
Weekend Project (10-20 Hours)
Finish Used
Benjamin Moore white dove in advance
Recommended Skill Level
Starter Project

Comments

smoser

Sat, 08/11/2012 - 05:58

hello,

Just wondering how the sides and middle part are built. They look like thicker than 1/2 in.Is it a trim or a 1x2? or did you use some 2x4 too?
I am looking at building a bookcase too but i wanted something more massive than 1/2 in. like yours.
Thanks

Great job!! looks awesome

keribeth

Tue, 08/21/2012 - 05:31

I made the two bookshelves separately so I could move them in my house easier. Each has 1x12 sides (so 3/4" thick), and and that's 1x2 trim over the side and middle.

Thanks!

Spa Bench turned End Table

I was wanting long, skinny end tables for my couch and when I came upon the spa bench plan I knew it was perfect length and size for what I wanted. I only altered the plans by making it taller to fit my couch. This was my second build and I learned a lot through the process so these are not perfect but I love the imperfections. I also didn't like the first stain that I put on the tables and when I tried taking it off my sander made weird marks but it gave it a more rustic look which I ended up loving. (Which I could never recreate on purpose)

Built from Plan(s)
Estimated Time Investment
Afternoon Project (3-6 Hours)
Finish Used
Minwax Polyshade Antique Walnut sanded down and then 3 coats of Minwax Ebony which 2 coats of Minwax Fast-Drying Polyurethane Satin
Recommended Skill Level
Beginner

Bed Bridge Bookcase

Submitted by Anonymous (not verified) on Sat, 07/23/2016 - 19:06

I hacked three IKEA bookcases into this beautiful bed for my princess of a daughter who was getting her first apartment in Orlando, FL, because she got a full-time dream job with Disney. Full details at http://handydad.tv/ikea-hack-bed-bridge-bookcase/.

Estimated Cost
$390
Estimated Time Investment
Weekend Project (10-20 Hours)
Finish Used
White paint
Recommended Skill Level
Intermediate

Raised Small Dog Bowl Holder

Submitted by Anonymous (not verified) on Thu, 05/14/2020 - 16:24

This was one of my first wood working projects. It taught me so much and it also helped me to realize that I really do love wood working! I think in the future I'd probably paint the bottom more of a light grey color to cut down on the contrast between the stained top and the painted bottom. Overall, I love it and my Sadie pup will be happy to have some new bowls to eat out of!

Built from Plan(s)

Dry Can Storage - Holds 144 Cans!

Submitted by Anonymous (not verified) on Sun, 01/14/2024 - 18:27

can holder

can holder

144 can dry storage for a pantry. In Amarillo Texas.

Jeremy Racette

Comments

Miter Saw Cart

Submitted by solomonson on Sat, 07/07/2012 - 20:41

I saw Gina's post and this moved straight to the top of the to-build list. It's gotten my saw off the floor of my garage and provided a ton of storage for my other tools and bits. I also added another shelf after taking this picture. I modified this slightly: I made the wings 24" only, added a short back to provide more stability and reinforcement to the top shelf, added a diagonal support to the wings, and reinforced the top shelf from the sides with 3" dowels. I got my wood from a local lumberyard and the wheels from Blue.

Built from Plan(s)
Estimated Time Investment
Afternoon Project (3-6 Hours)
Finish Used
I sanded the heck out of everything. Other than that, nothing.
Recommended Skill Level
Beginner

Boost stool

Submitted by jandmhough on Thu, 04/24/2014 - 18:22

We built a toybox for our son and discovered that he isn't quite tall enough yet to really get into it. So, to remedy the problem I put together a stool for him. I modified the "simplest stool" plan to make it short and wide. Perfect as a little boost to get into the toybox. We also use it in the bathroom as a little step stool for the sink.

Built from Plan(s)
Estimated Cost
used scraps from the toybox (one 1x4 and one 2x2 if buying new) under $7
Estimated Time Investment
An Hour or Two (0-2 Hours)
Finish Used
Painted it with leftover chalkboard paint and covered with a clear coat to give it a finish like a regular paint.
Recommended Skill Level
Beginner

Miter Saw Modification

Submitted by Anonymous (not verified) on Mon, 07/25/2016 - 20:55

I followed the plans as listed pretty closely. I added a 2x4 under the main shelf for extra support, and used 2x4s instead of 2x2s at the bottom, so I could have something to attach the casters to. I also opted for 1x3 braces, rather than the hinges to hold up the sides. I need to add the fence and paint it white.

Built from Plan(s)
Estimated Cost
$80-100
Estimated Time Investment
Afternoon Project (3-6 Hours)
Finish Used
white paint (forthcoming)
Recommended Skill Level
Beginner

Farmhouse Coffee Table

Submitted by Anonymous (not verified) on Sun, 05/17/2020 - 20:03

This is my first time making this kind of project and it turn out amazing!!! Looking forward to built some end tables with this same design!!!

Estimated Cost
$70.00
Estimated Time Investment
Weekend Project (10-20 Hours)
Finish Used
White acrylic flat and red wood varnish and polyurethane

Bar Cabinet with Floating Shelves

Submitted by Anonymous (not verified) on Mon, 01/15/2024 - 18:36

I had never built cabinets before, but I’ve been wanting to learn how to, and this corner in our house had been screaming for a bar area for awhile. I’m quite happy with the result, given that I’m only one year into woodworking! Thank you, Ana, for all your inspiration!

Jaclyn Pietrafetta

Wood Plank Magnet Boards

Submitted by sraper2 on Mon, 07/09/2012 - 19:56

I actually got the idea from Shanty 2 Chic and I thought I would share my take on it here. It was super simply...I just kreg jig'd the boards together and built a frame to the size I wanted. I bought the aluminum from Lowe's and cut it down. I actually built 6 of these so I could give 5 away as thank you gifts. The price for all 6 was under $50 and I think only about $30 of that was the materials to make the boards. The rest was spend on the stuff I made for the boards.

Here is a link for their post! http://www.shanty-2-chic.com/2012/05/diy-12-magnetic-memo-board.html

Estimated Time Investment
An Hour or Two (0-2 Hours)
Recommended Skill Level
Starter Project

Stair Leg Flip Top Console Table

This build was quite easy. I didn't run into any issues. I went with stair balusters for the legs instead of the 2x2's that the design calls for, but the balusters ended up being 2x2 anyways so I didn't need to make any changes. My building costs were a bit pricier as I find there's a slight price difference for lumber here in Canada. The construction of the table itself took about an hour or so, however the finishing took much longer due to the painting, staining and then lacquering and waxing!
I decided to go with a more distressed/aged look for my finish, and I thought the glass knobs would look gorgeous. I also decided to line the inside storage area because it just looked a little bland to me! All-in-all I'm very happy with the outcome!

Estimated Cost
$60-$70
Estimated Time Investment
Weekend Project (10-20 Hours)
Finish Used
Chalk paint
Stain
Lacquer (table top)
Furniture wax (body of table)
Recommended Skill Level
Beginner
Back