Community Brag Posts
The Carb Cupboard
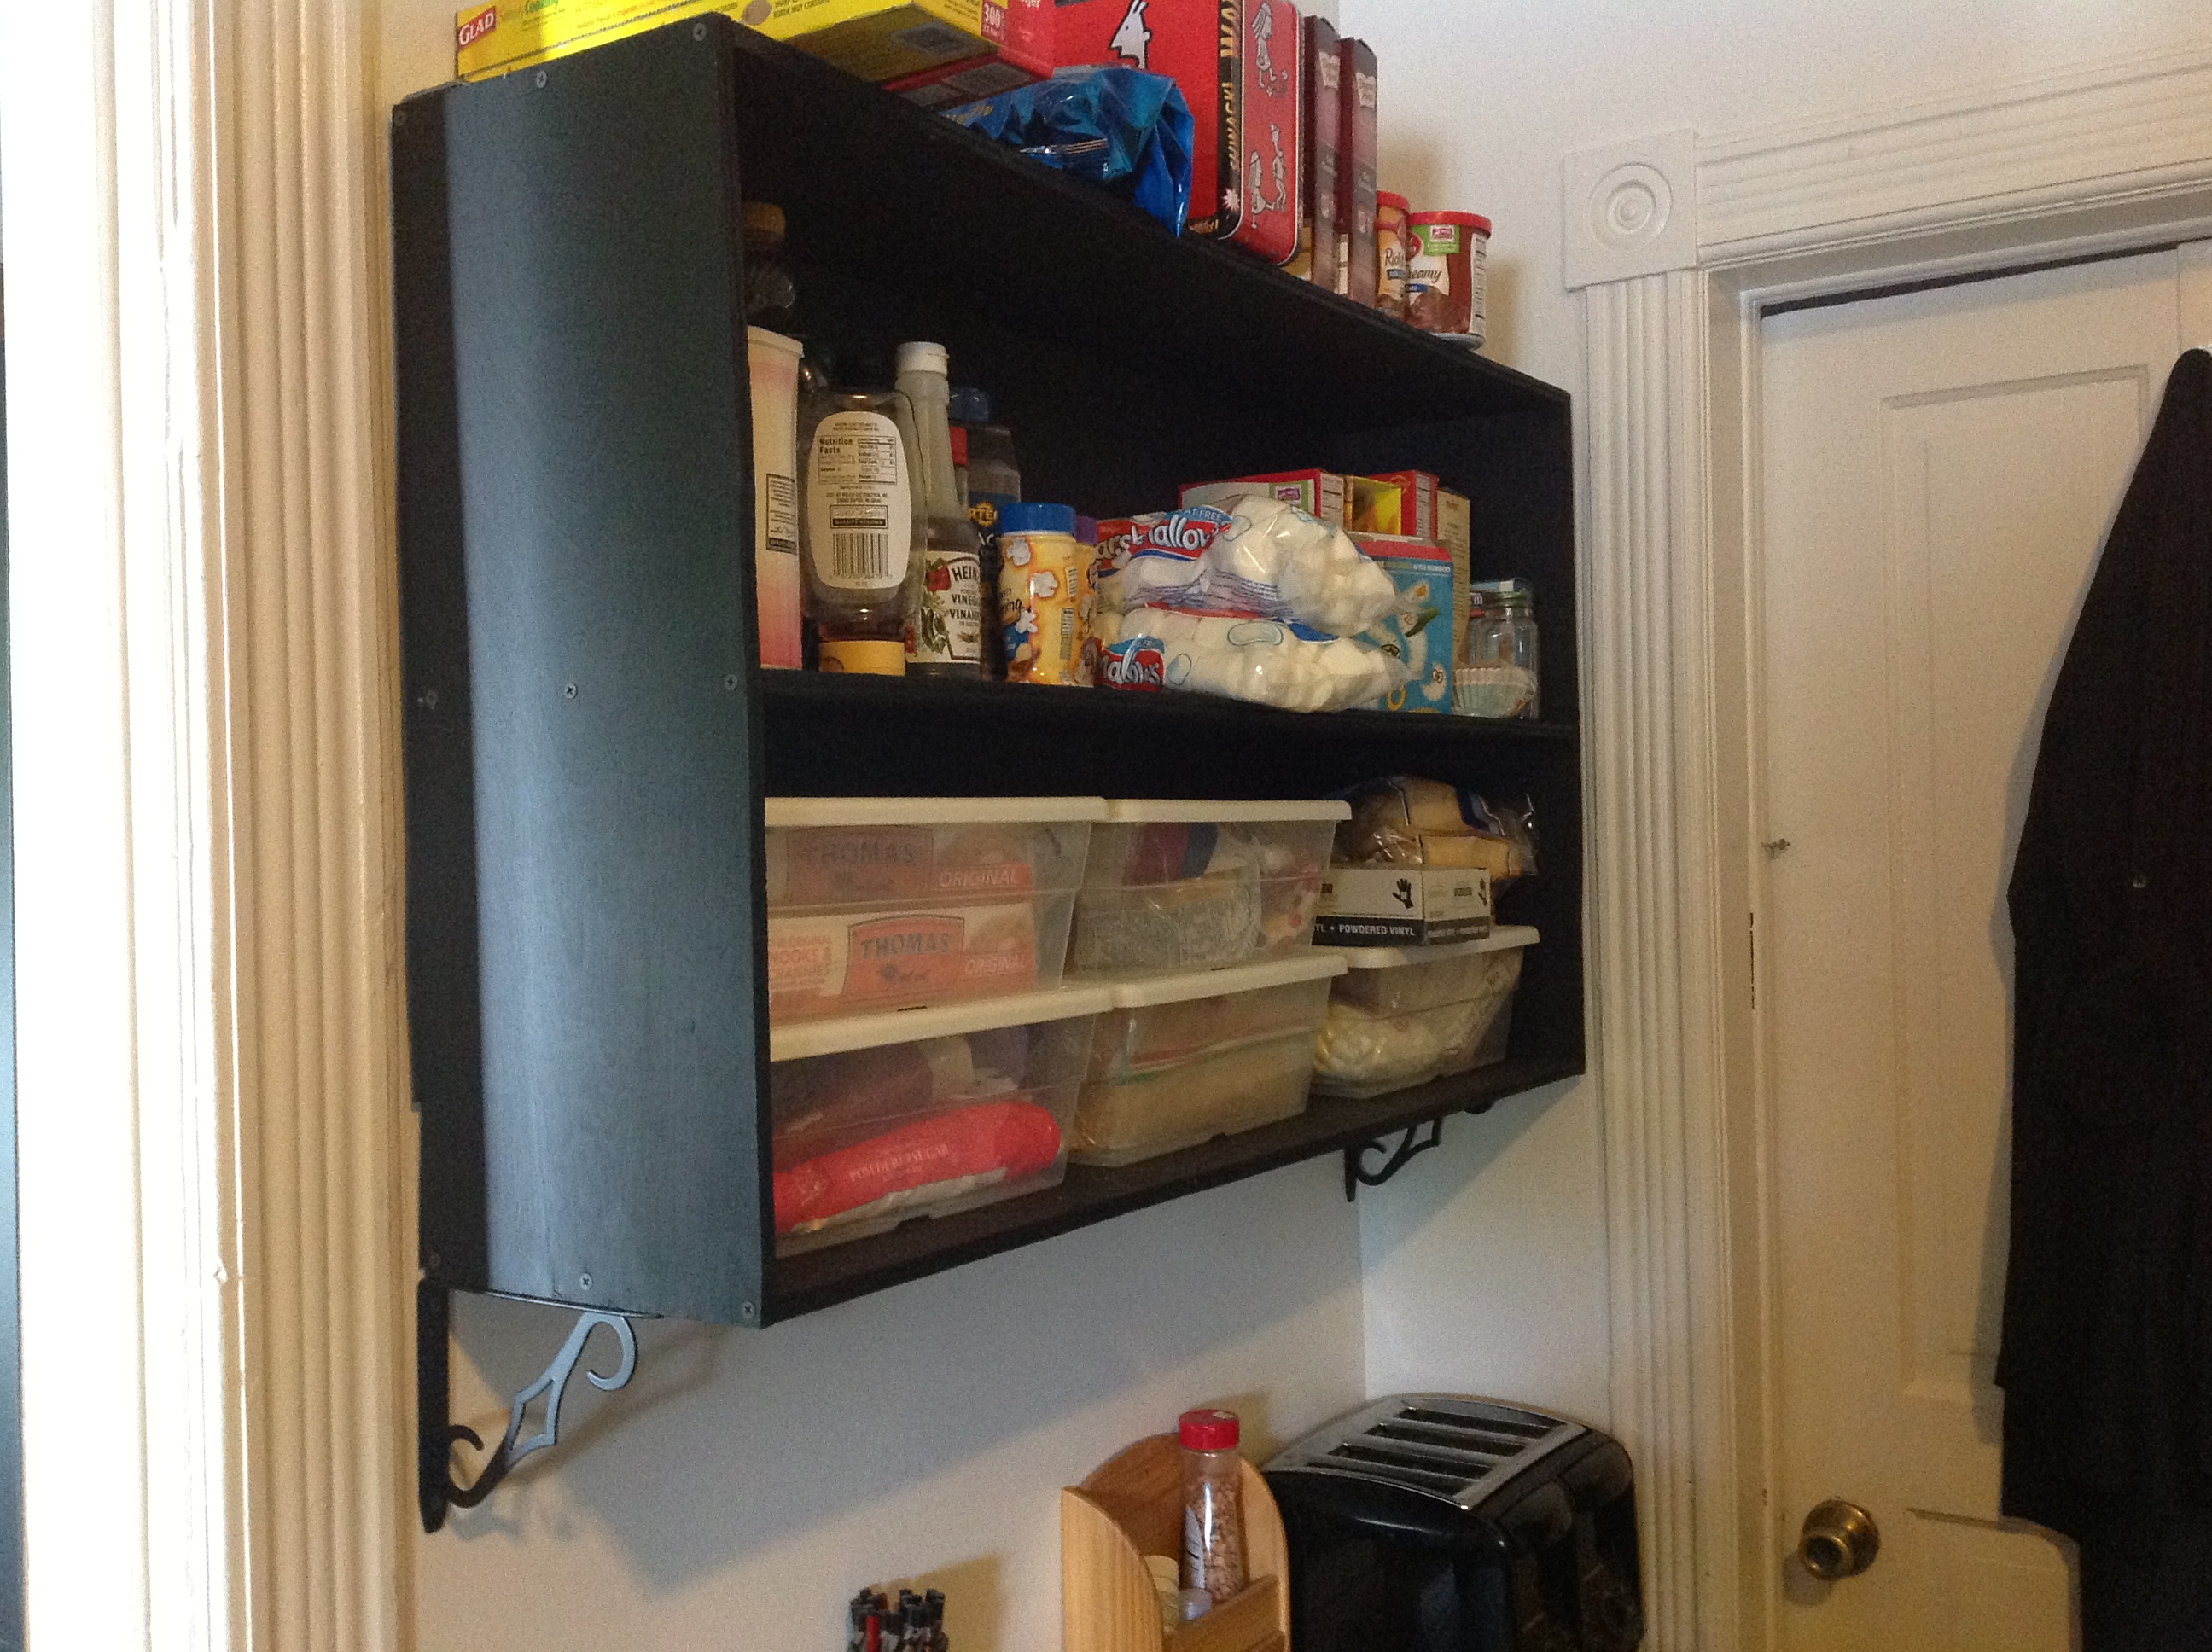
Anther creation of my own but this would easily be created from Ana's plans for this wall shelf. There isn’t much cupboard storage in our kitchen so when friends gave us a sideboard they didn’t have use for & it fit perfectly in one of our kitchen’s oddly spaced corners we were thrilled. It became our “Toasting Station” where the toaster & Panini grill are. I decided that we needed matching shelving to house our “Carbs” since it was much easier to make toast & sandwiches when the bread was right above the toasting implements.
Estimated Time Investment
Afternoon Project (3-6 Hours)
Finish Used
Valspar Flat Black Indorr/Outdoor Enamel
Recommended Skill Level
Beginner
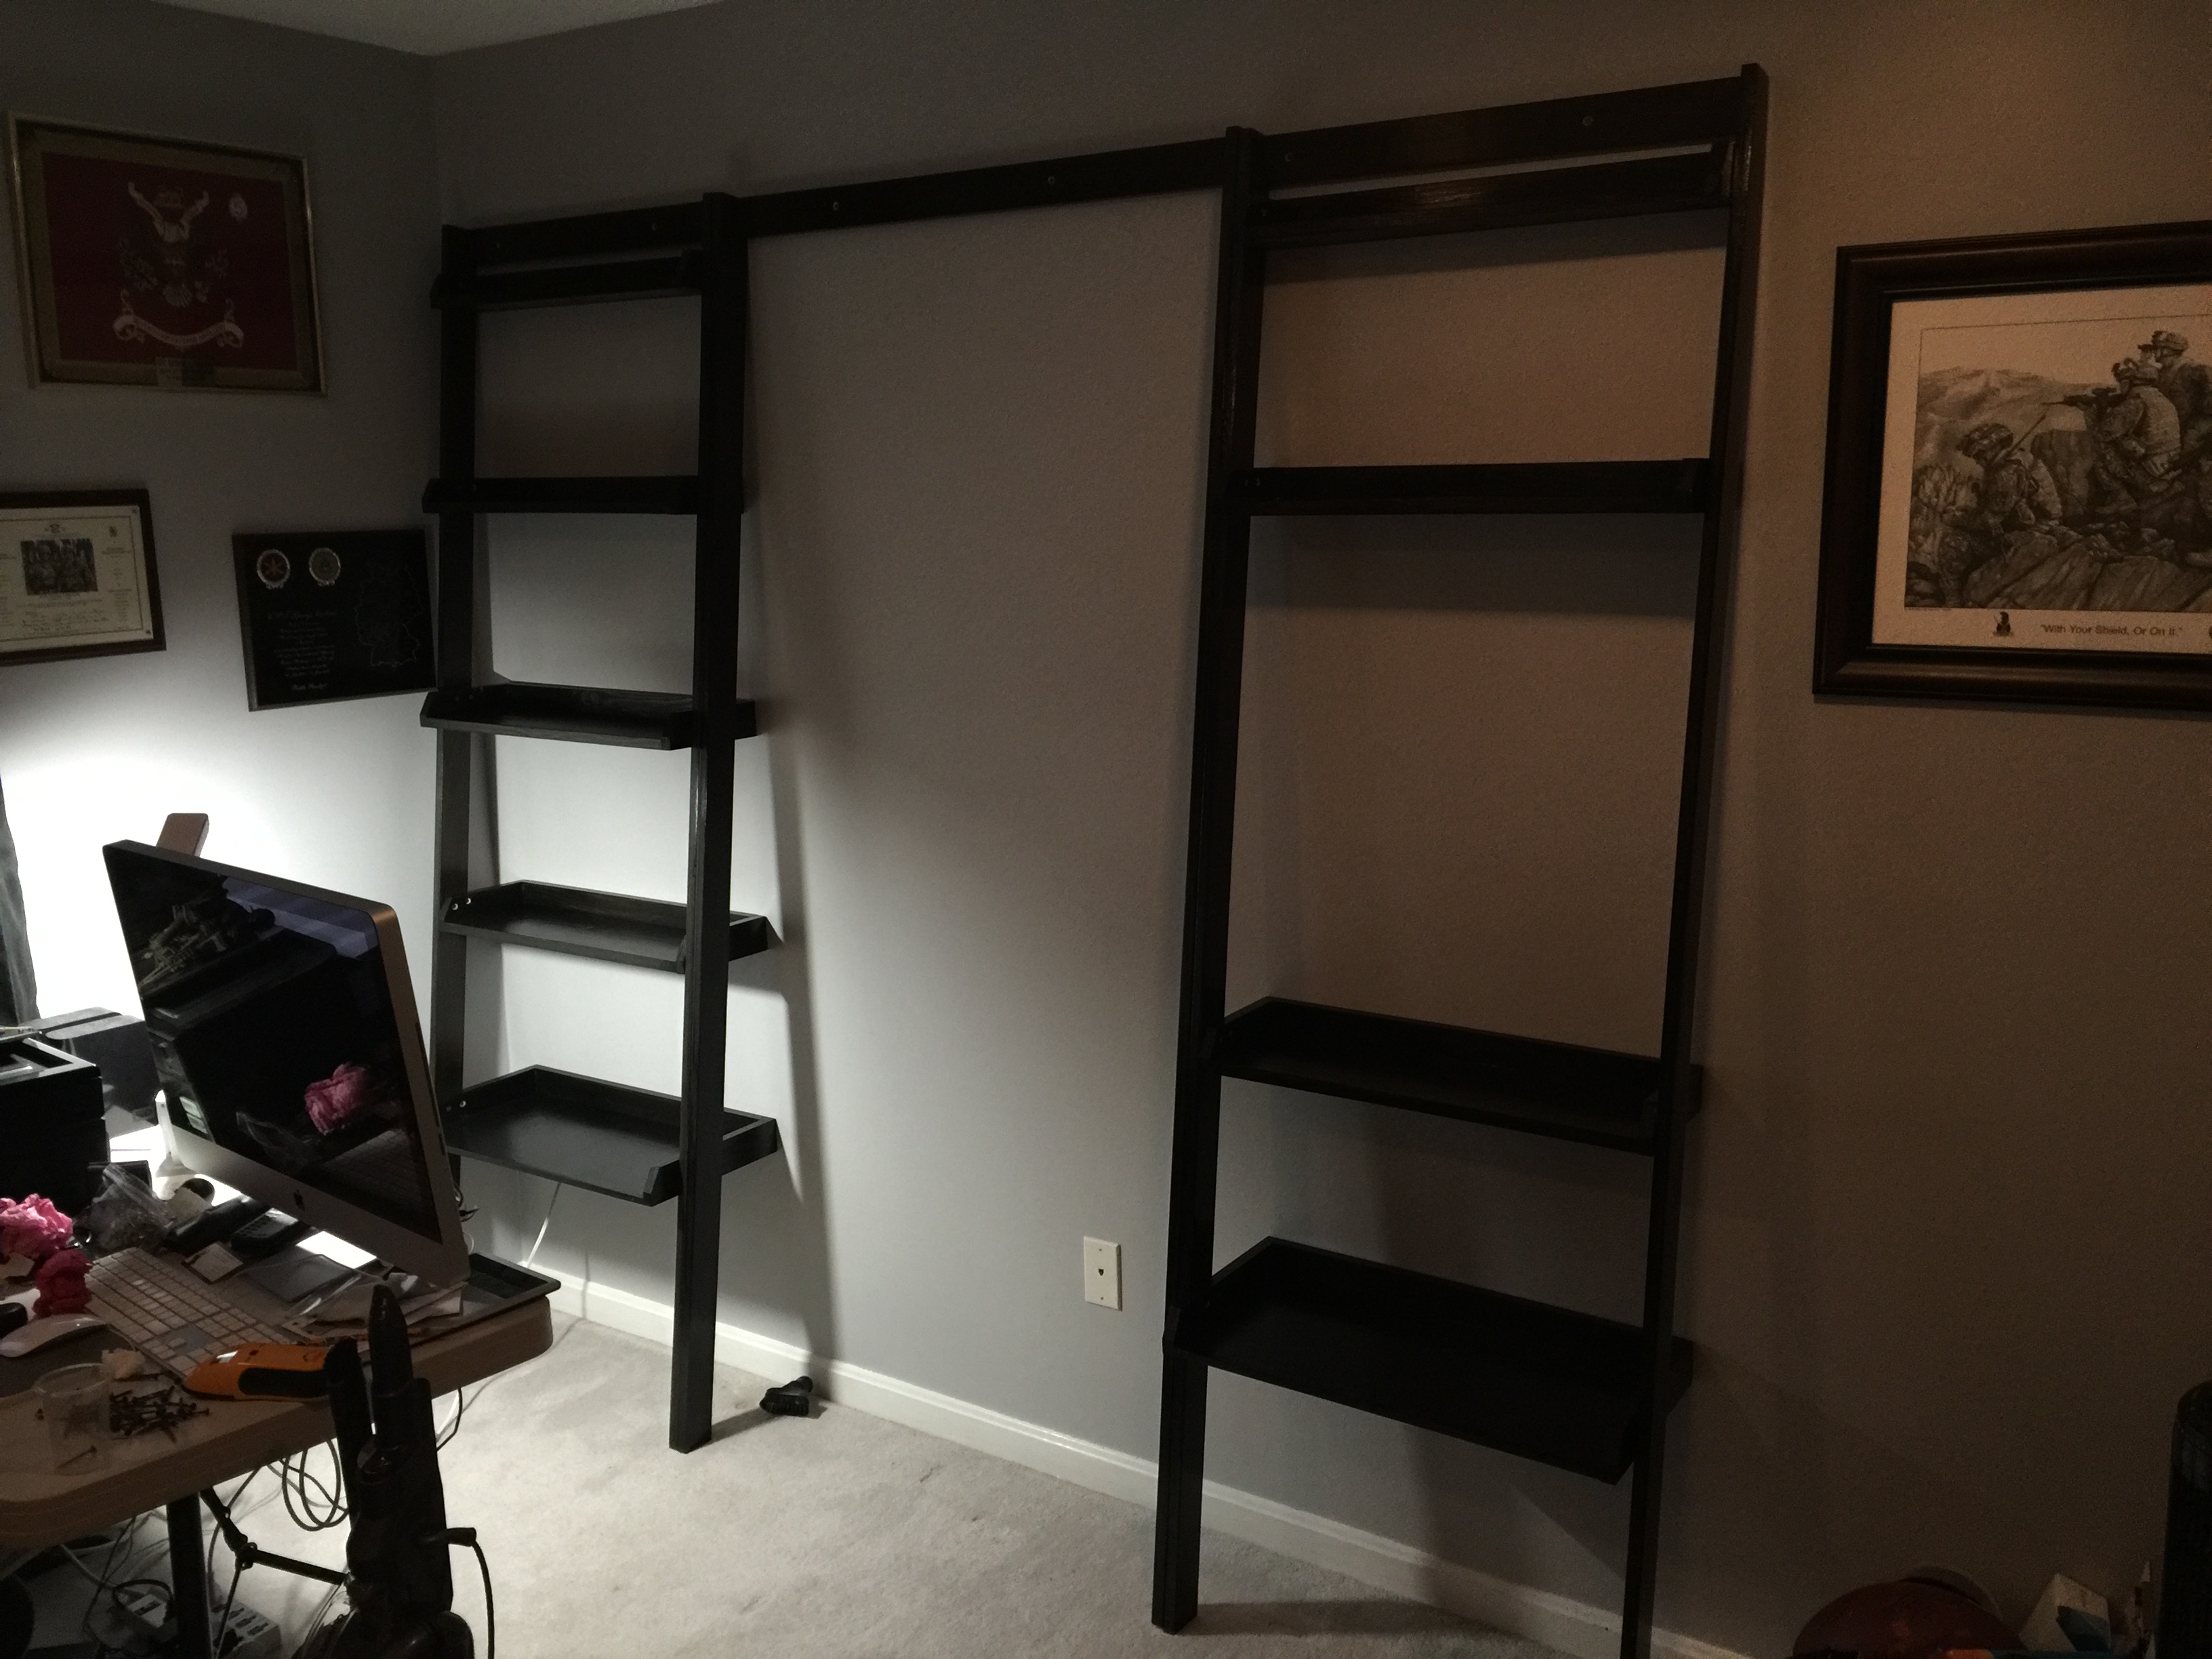
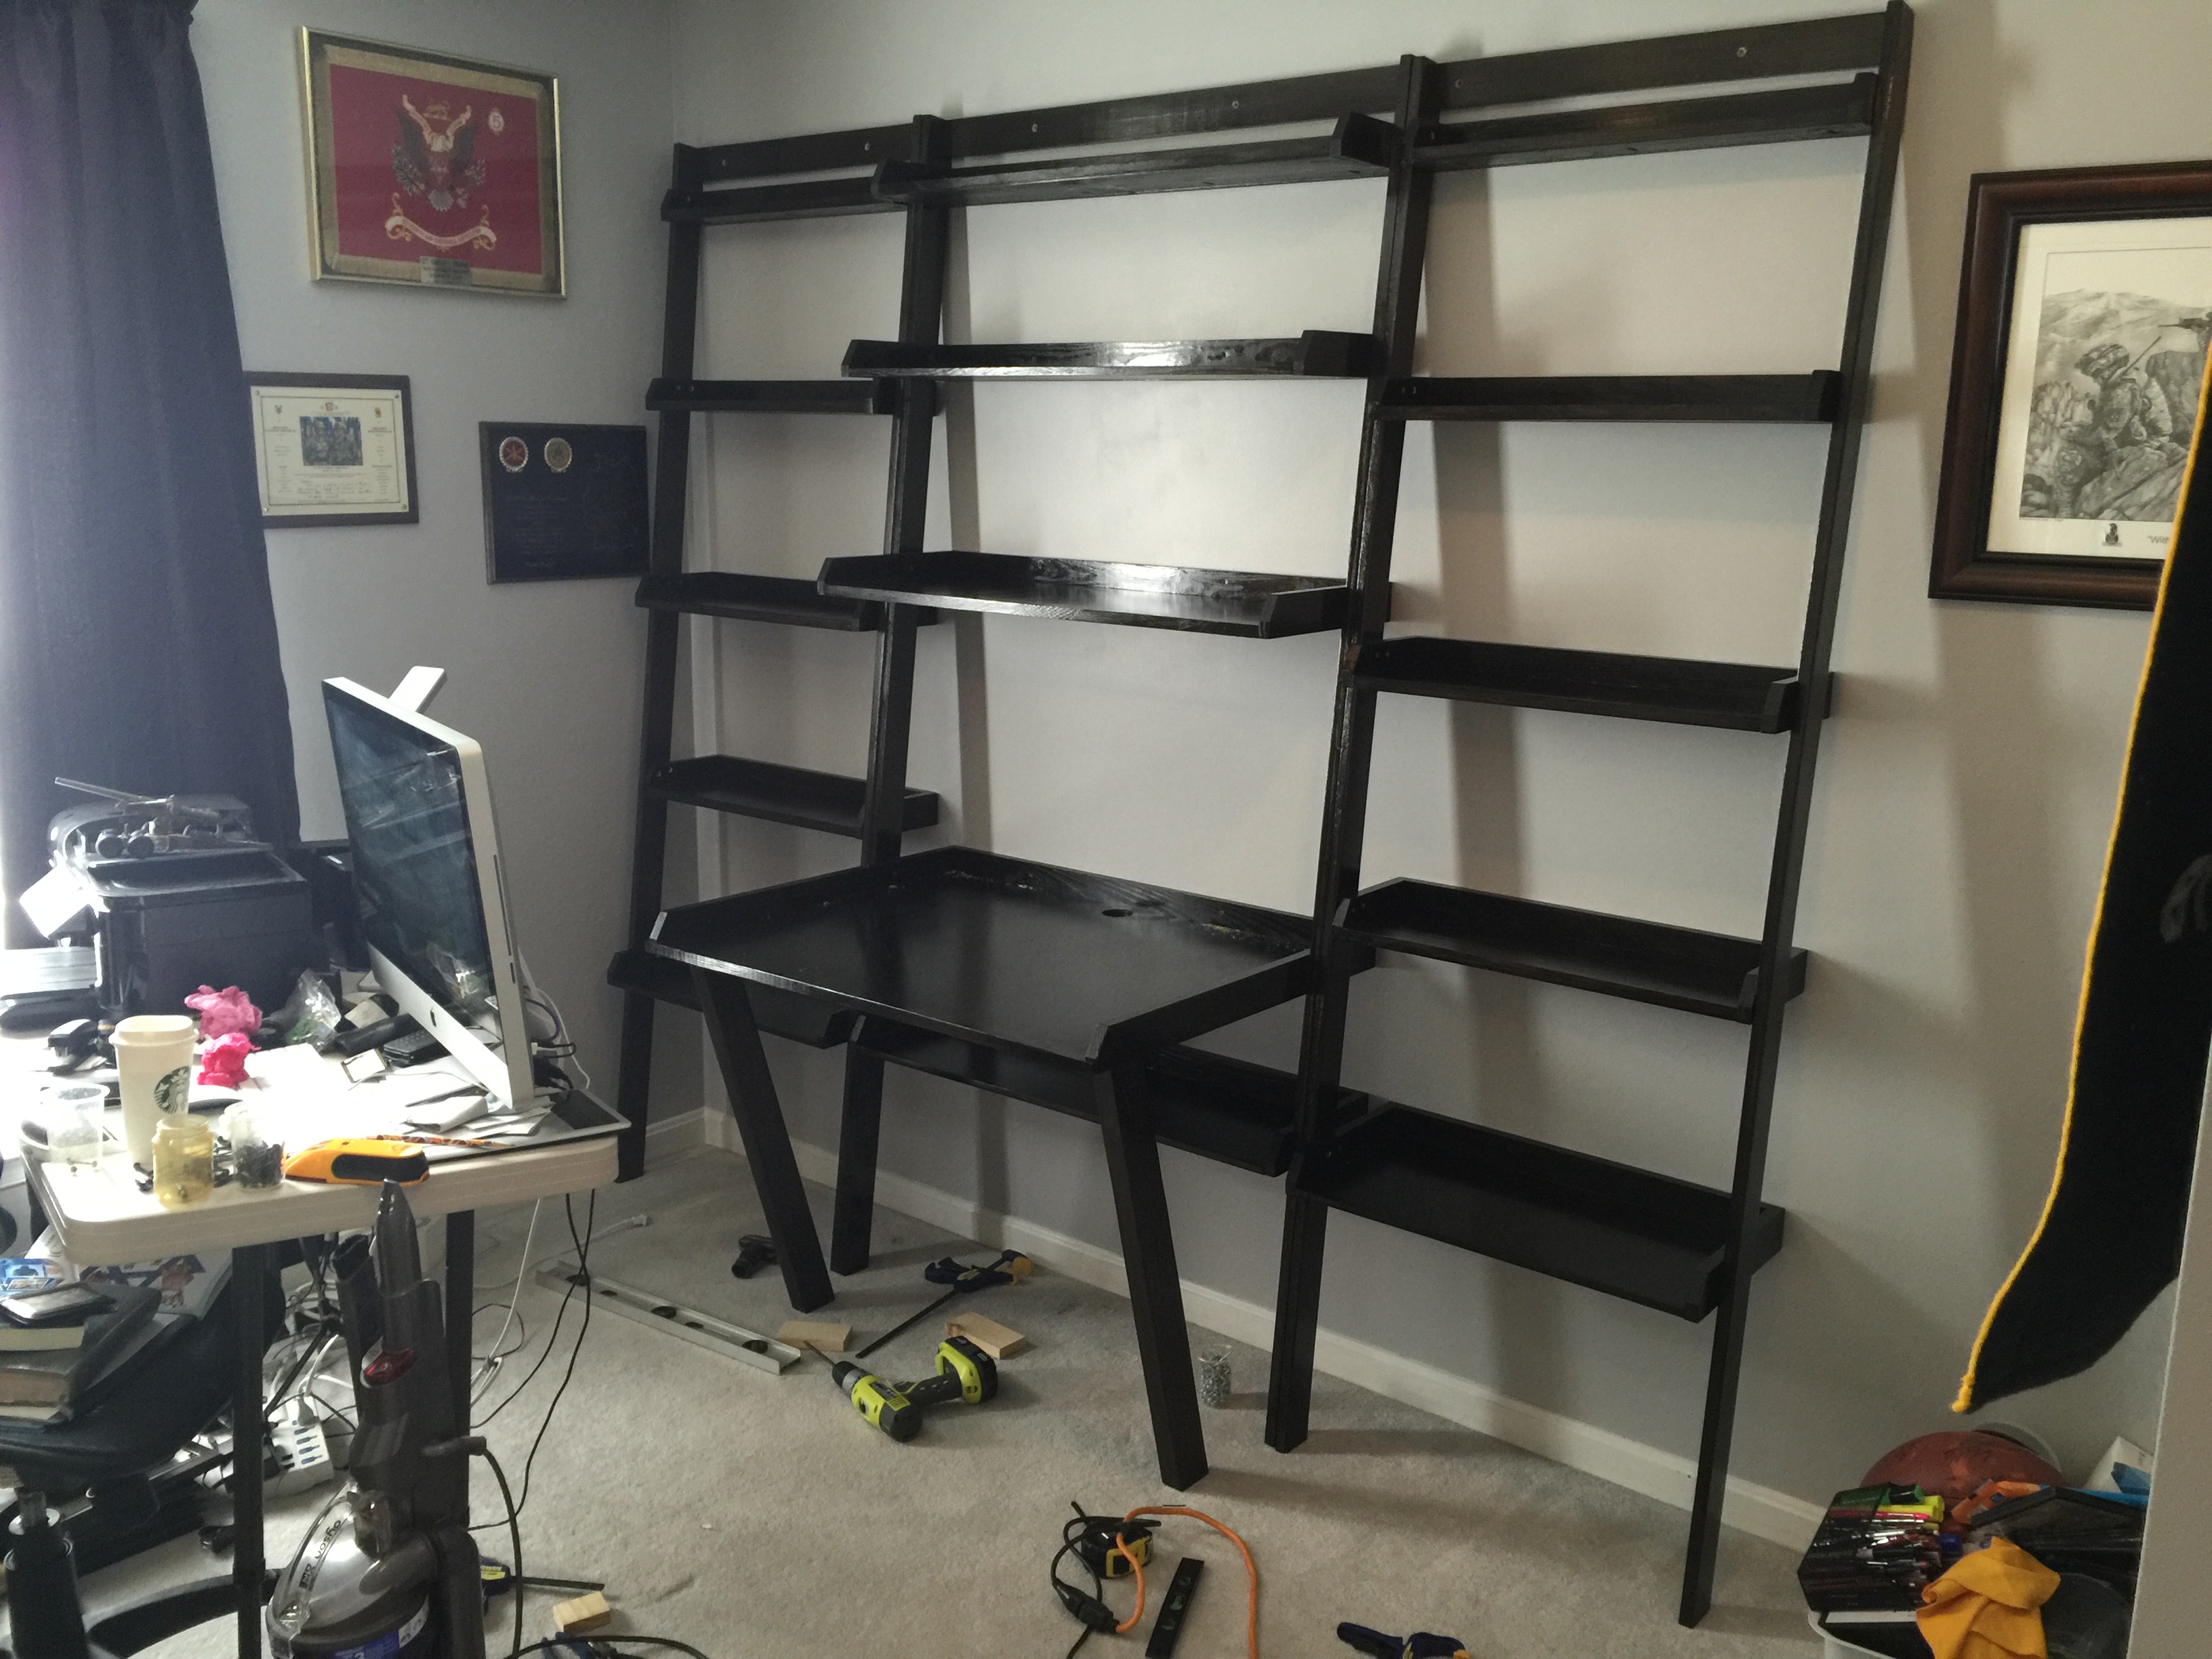
Leaning wall desk/bookshelf

Using only scraps from all my other projects, I modified Ana's plans to create this workspace in the house we just moved into. I changed the dimensions of the shelves to take advantage of the materials I had on hand. Additionally, though I have a lot of different things on the shelves in this picture, I'll be using the shelves more for books and reference materials, so I needed standard shelf sizes. Though this is a simple design, cutting some of the angles and installing the shelves was a bit tricky, therefore I think this is more of an intermedite project. I also added 2x4 legs to support my Mac. Can't have that tumbling to the ground!


Built from Plan(s)
Estimated Cost
I used all scraps and left over lumber from other projects to make this. My actual cost was $25.
Estimated Time Investment
Week Long Project (20 Hours or More)
Finish Used
I used an all-in-one Verathane stain+finish (ebony). I put on 3 coats, sanded with a fine grit sponge and put on one additional coat.
Recommended Skill Level
Intermediate
Simple Small Trestle Desk
This project was my first woodworking attempt ever! I had some assistance when it came to technique and how to use tools from my awesome uncle. I did shorten the length by 3 inches due to the space I had in my home, nothing else was changed. Overall I was able to complete the whole thing mostly on my own, I am so excited and love the way it turned out!
Built from Plan(s)
Estimated Time Investment
Day Project (6-9 Hours)
Finish Used
Clark + Kensington Paint
29B-2 Clouds Arising in eggshell finish
29B-2 Clouds Arising in eggshell finish
Recommended Skill Level
Beginner
Comments

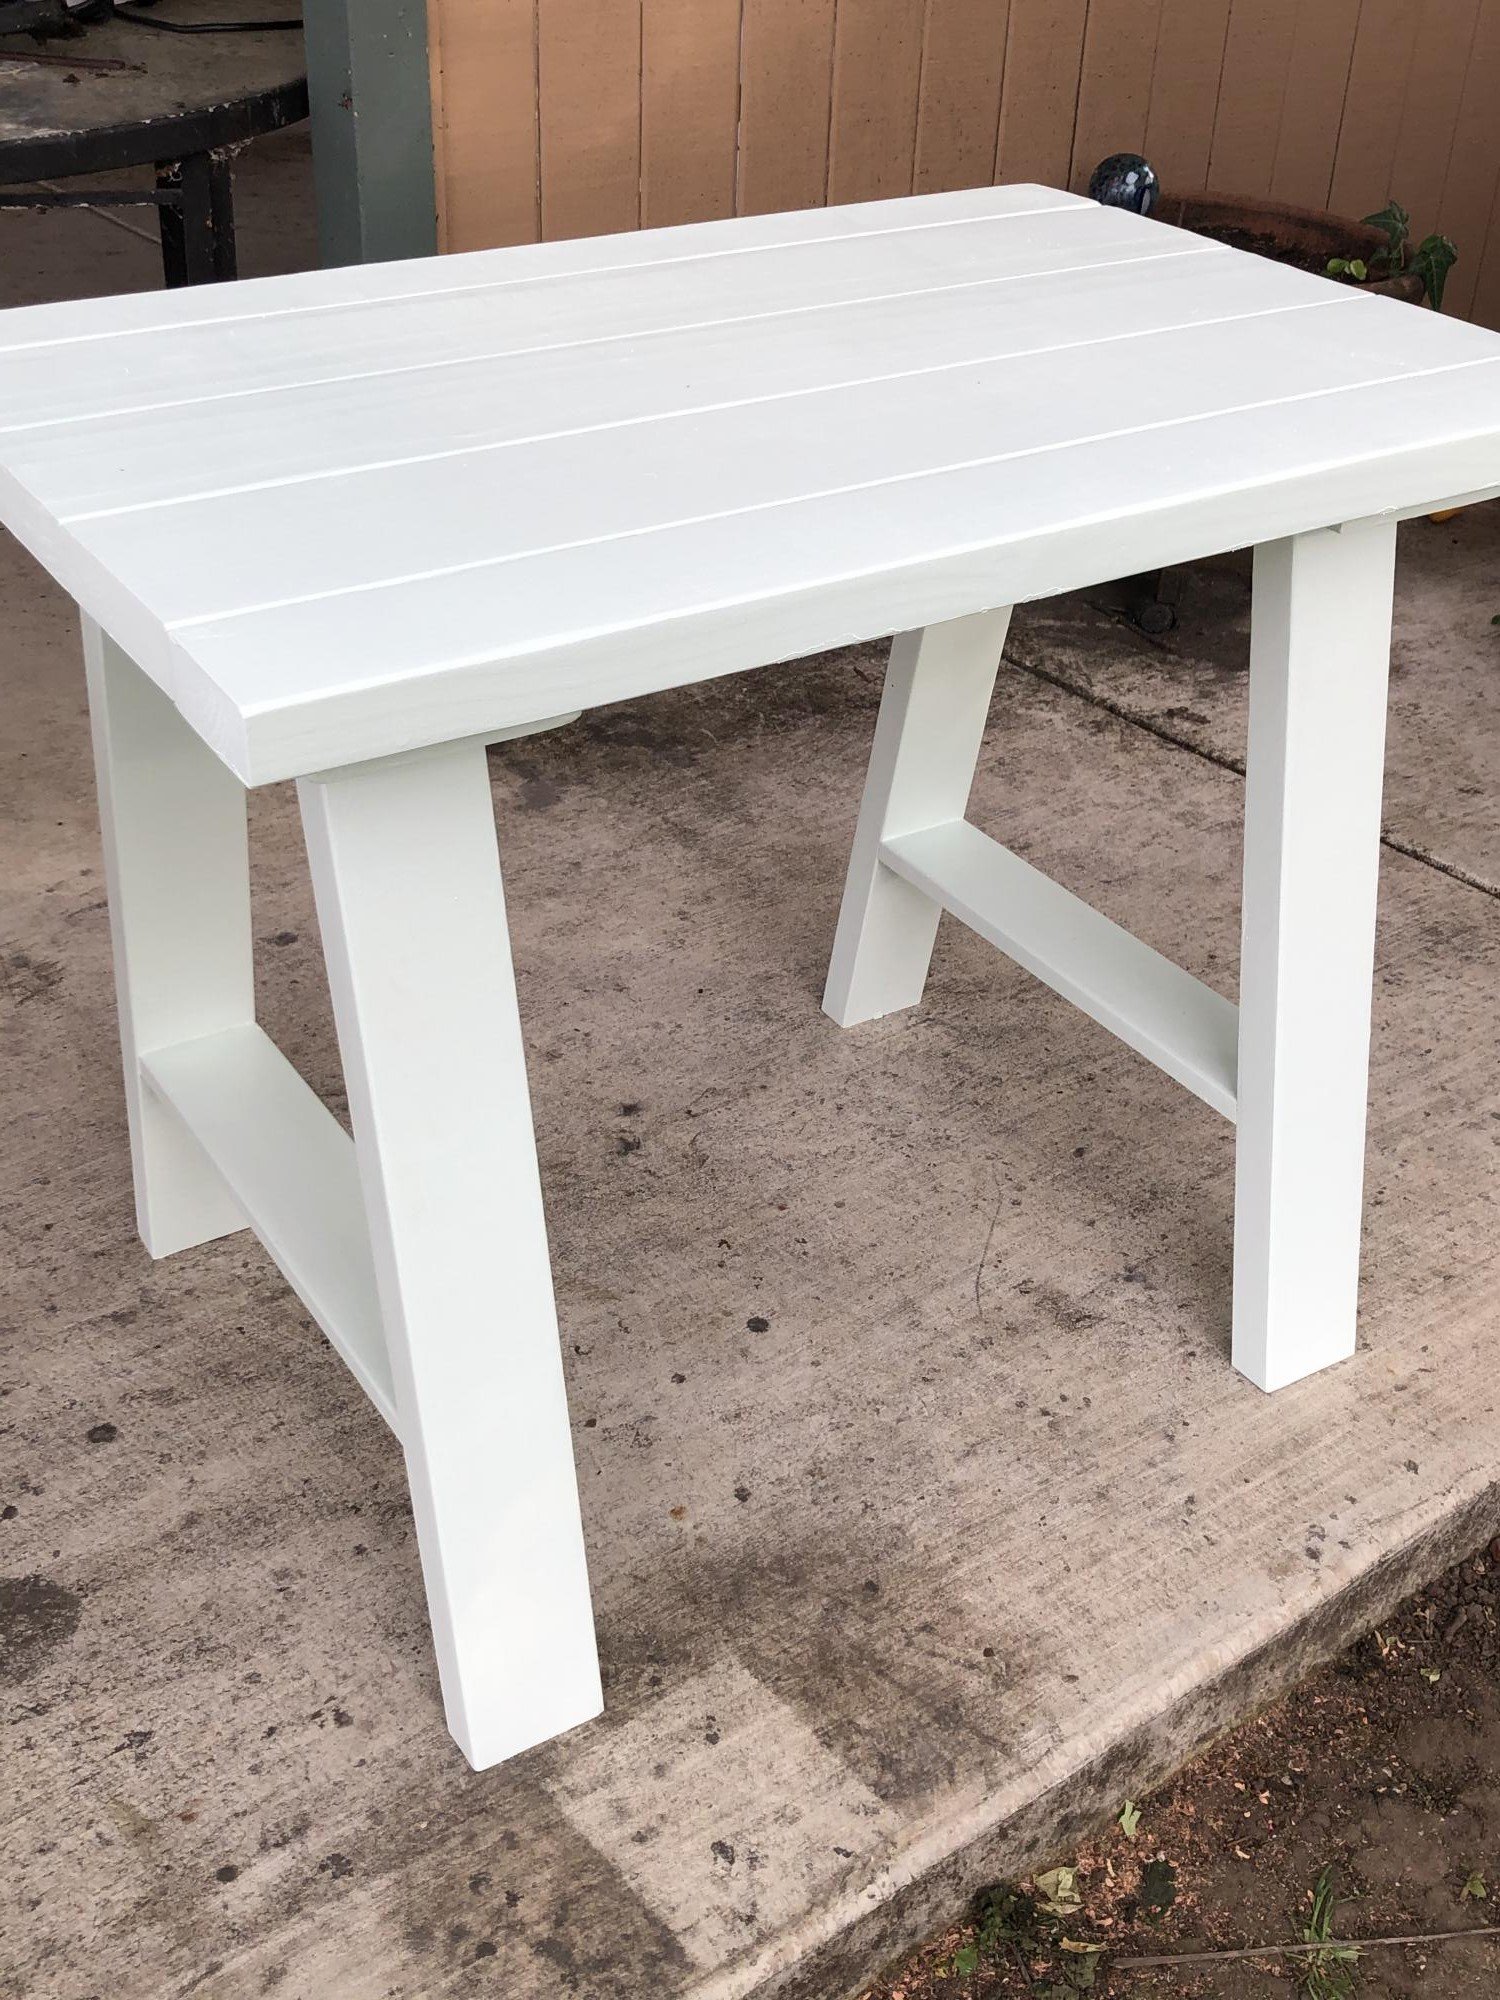
Tryed Side Table
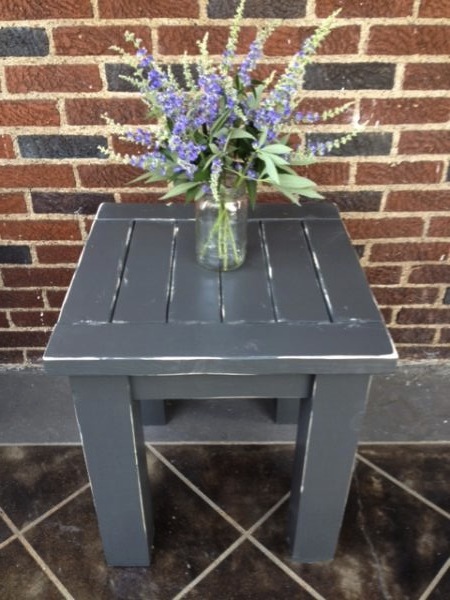
This was my first project using an Ana White plan. I thought the plans were easy to understand and follow which made the project go smooth. I am a fan of painted and distressed furniture so I went with that look for this project. After painting the tables I used a hand sander to scuff up the corners and then added "worm holes" using a hammer and nail.
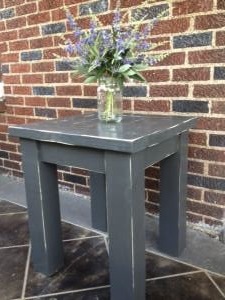
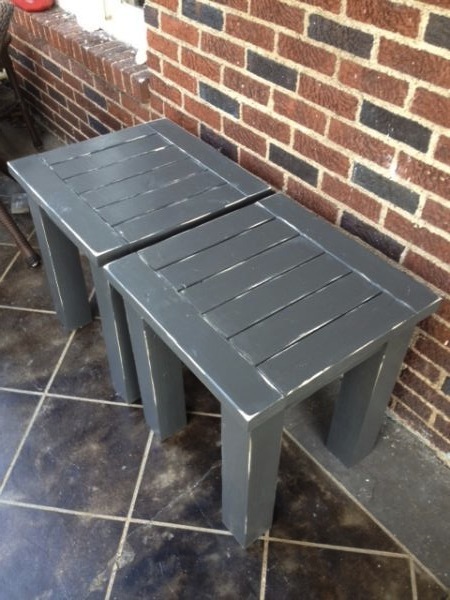
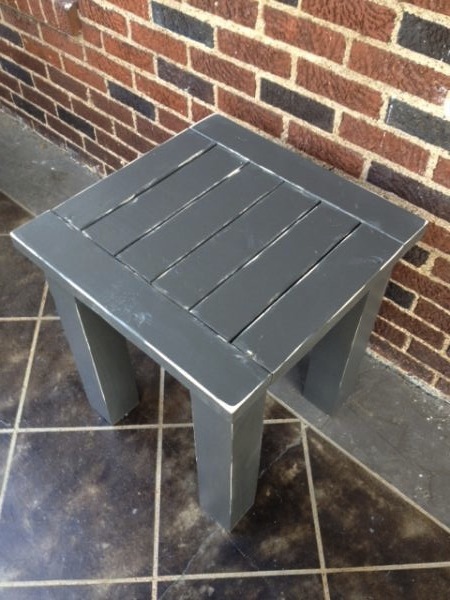
Estimated Cost
$20
Estimated Time Investment
An Hour or Two (0-2 Hours)
Finish Used
Paint
Recommended Skill Level
Beginner
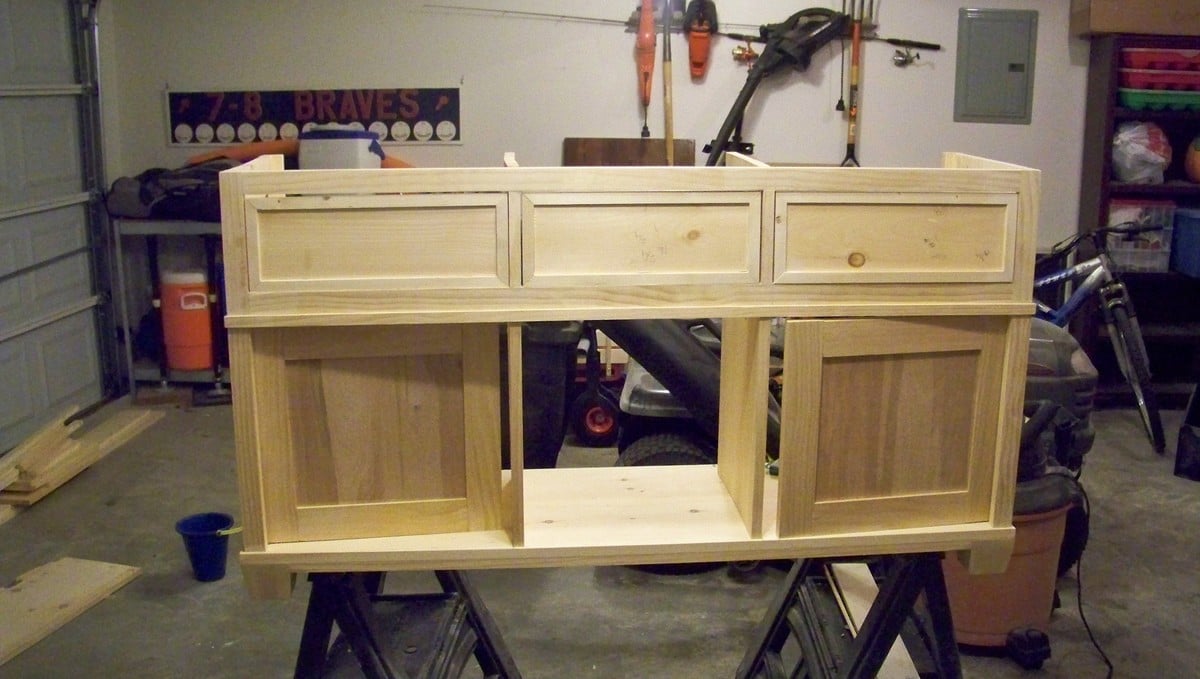
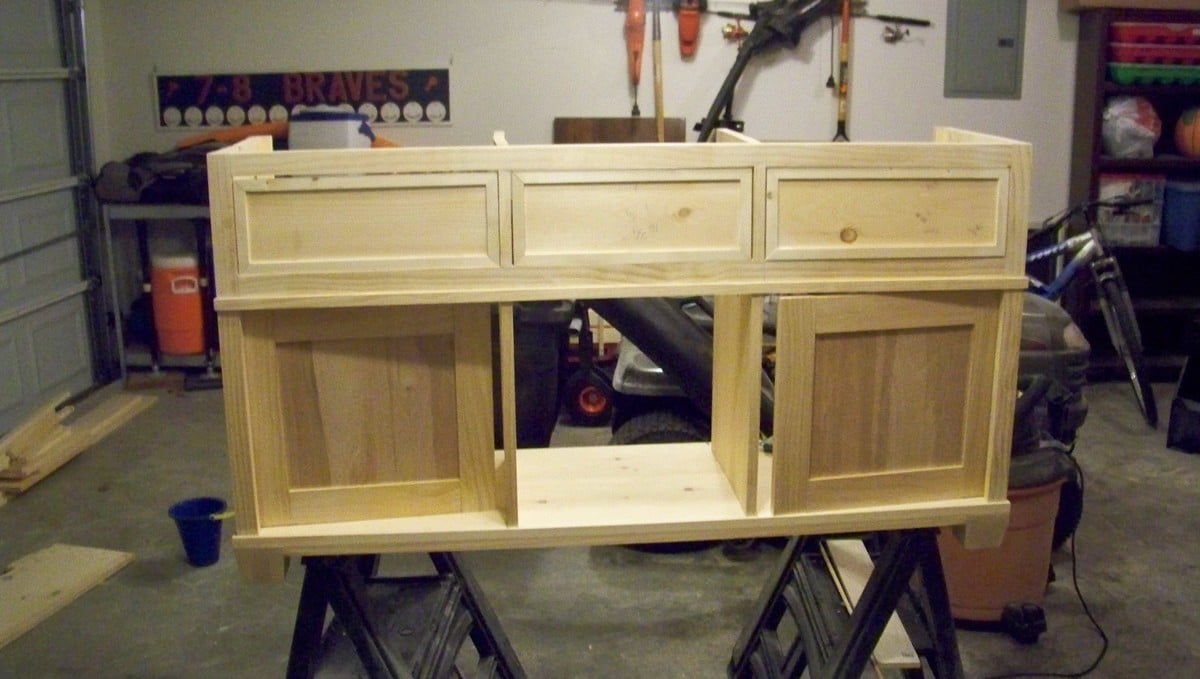
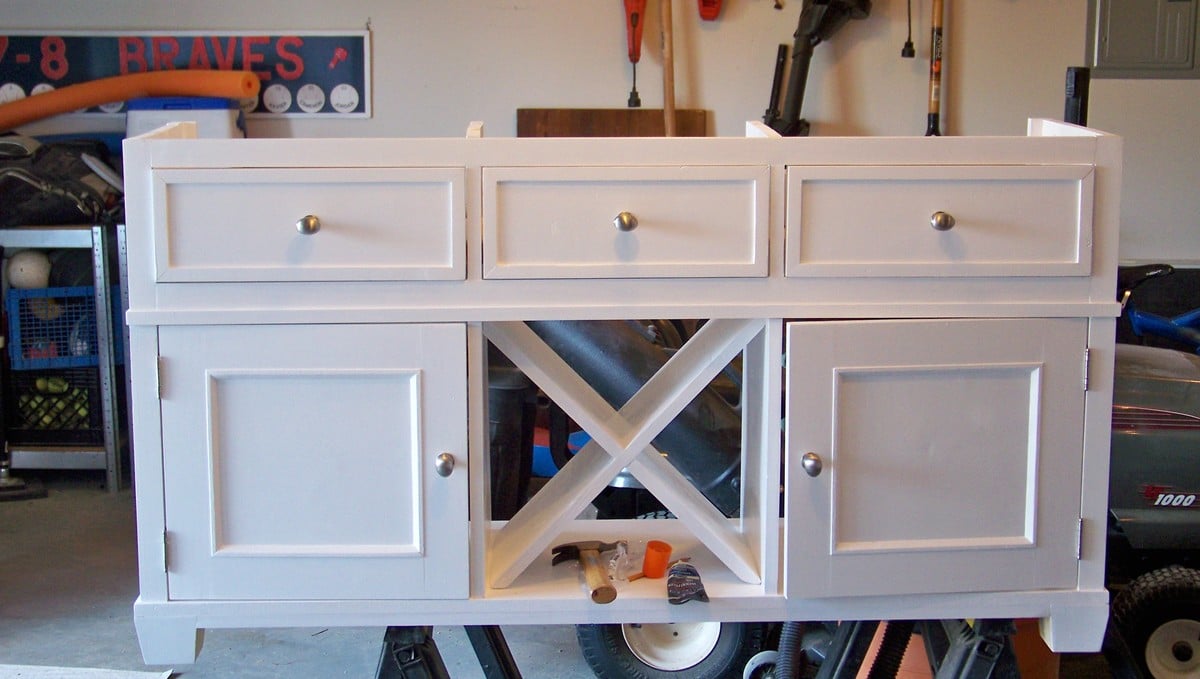
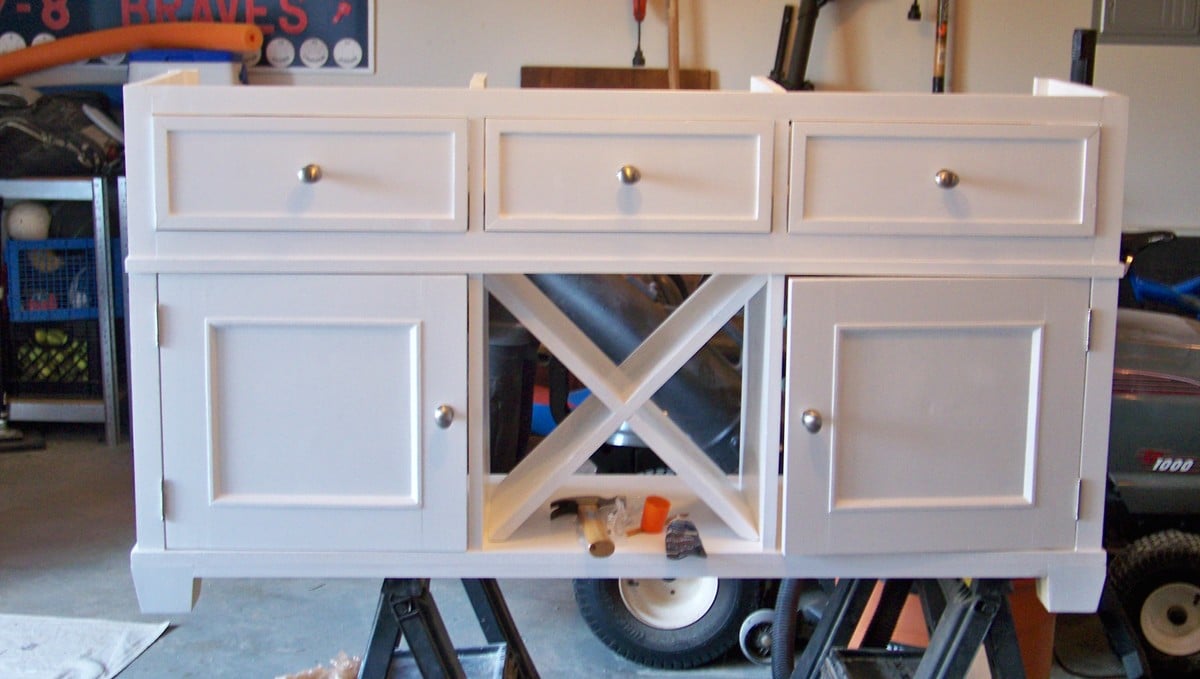
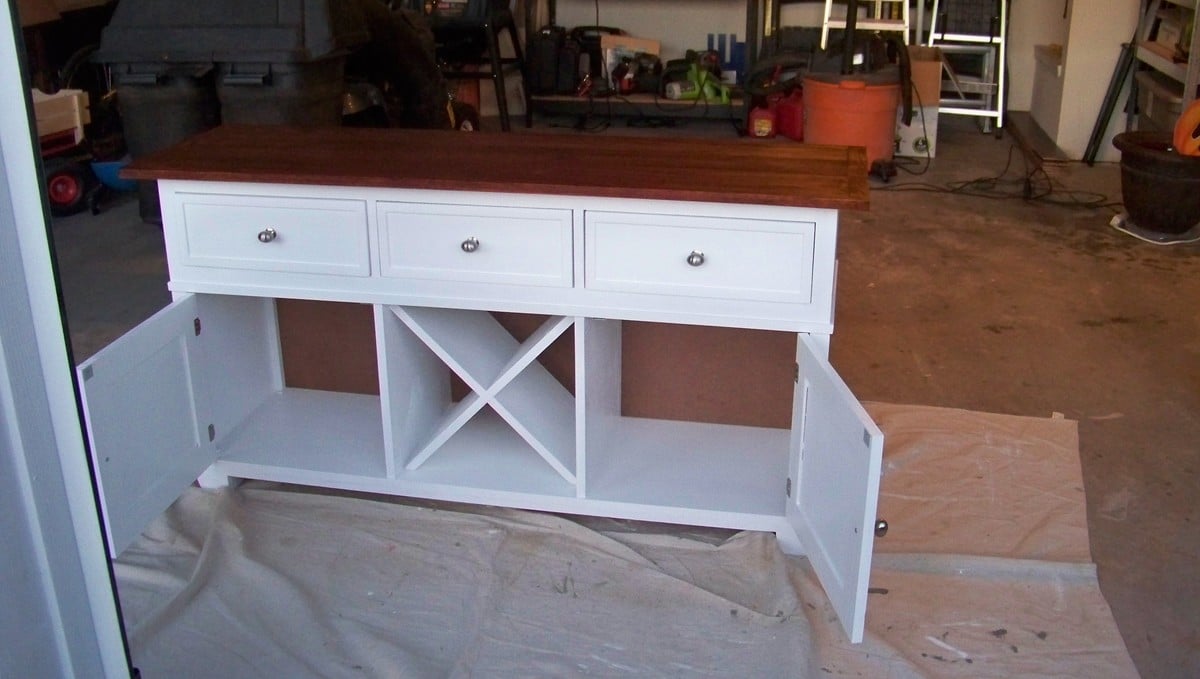
Ken's Salsa Console
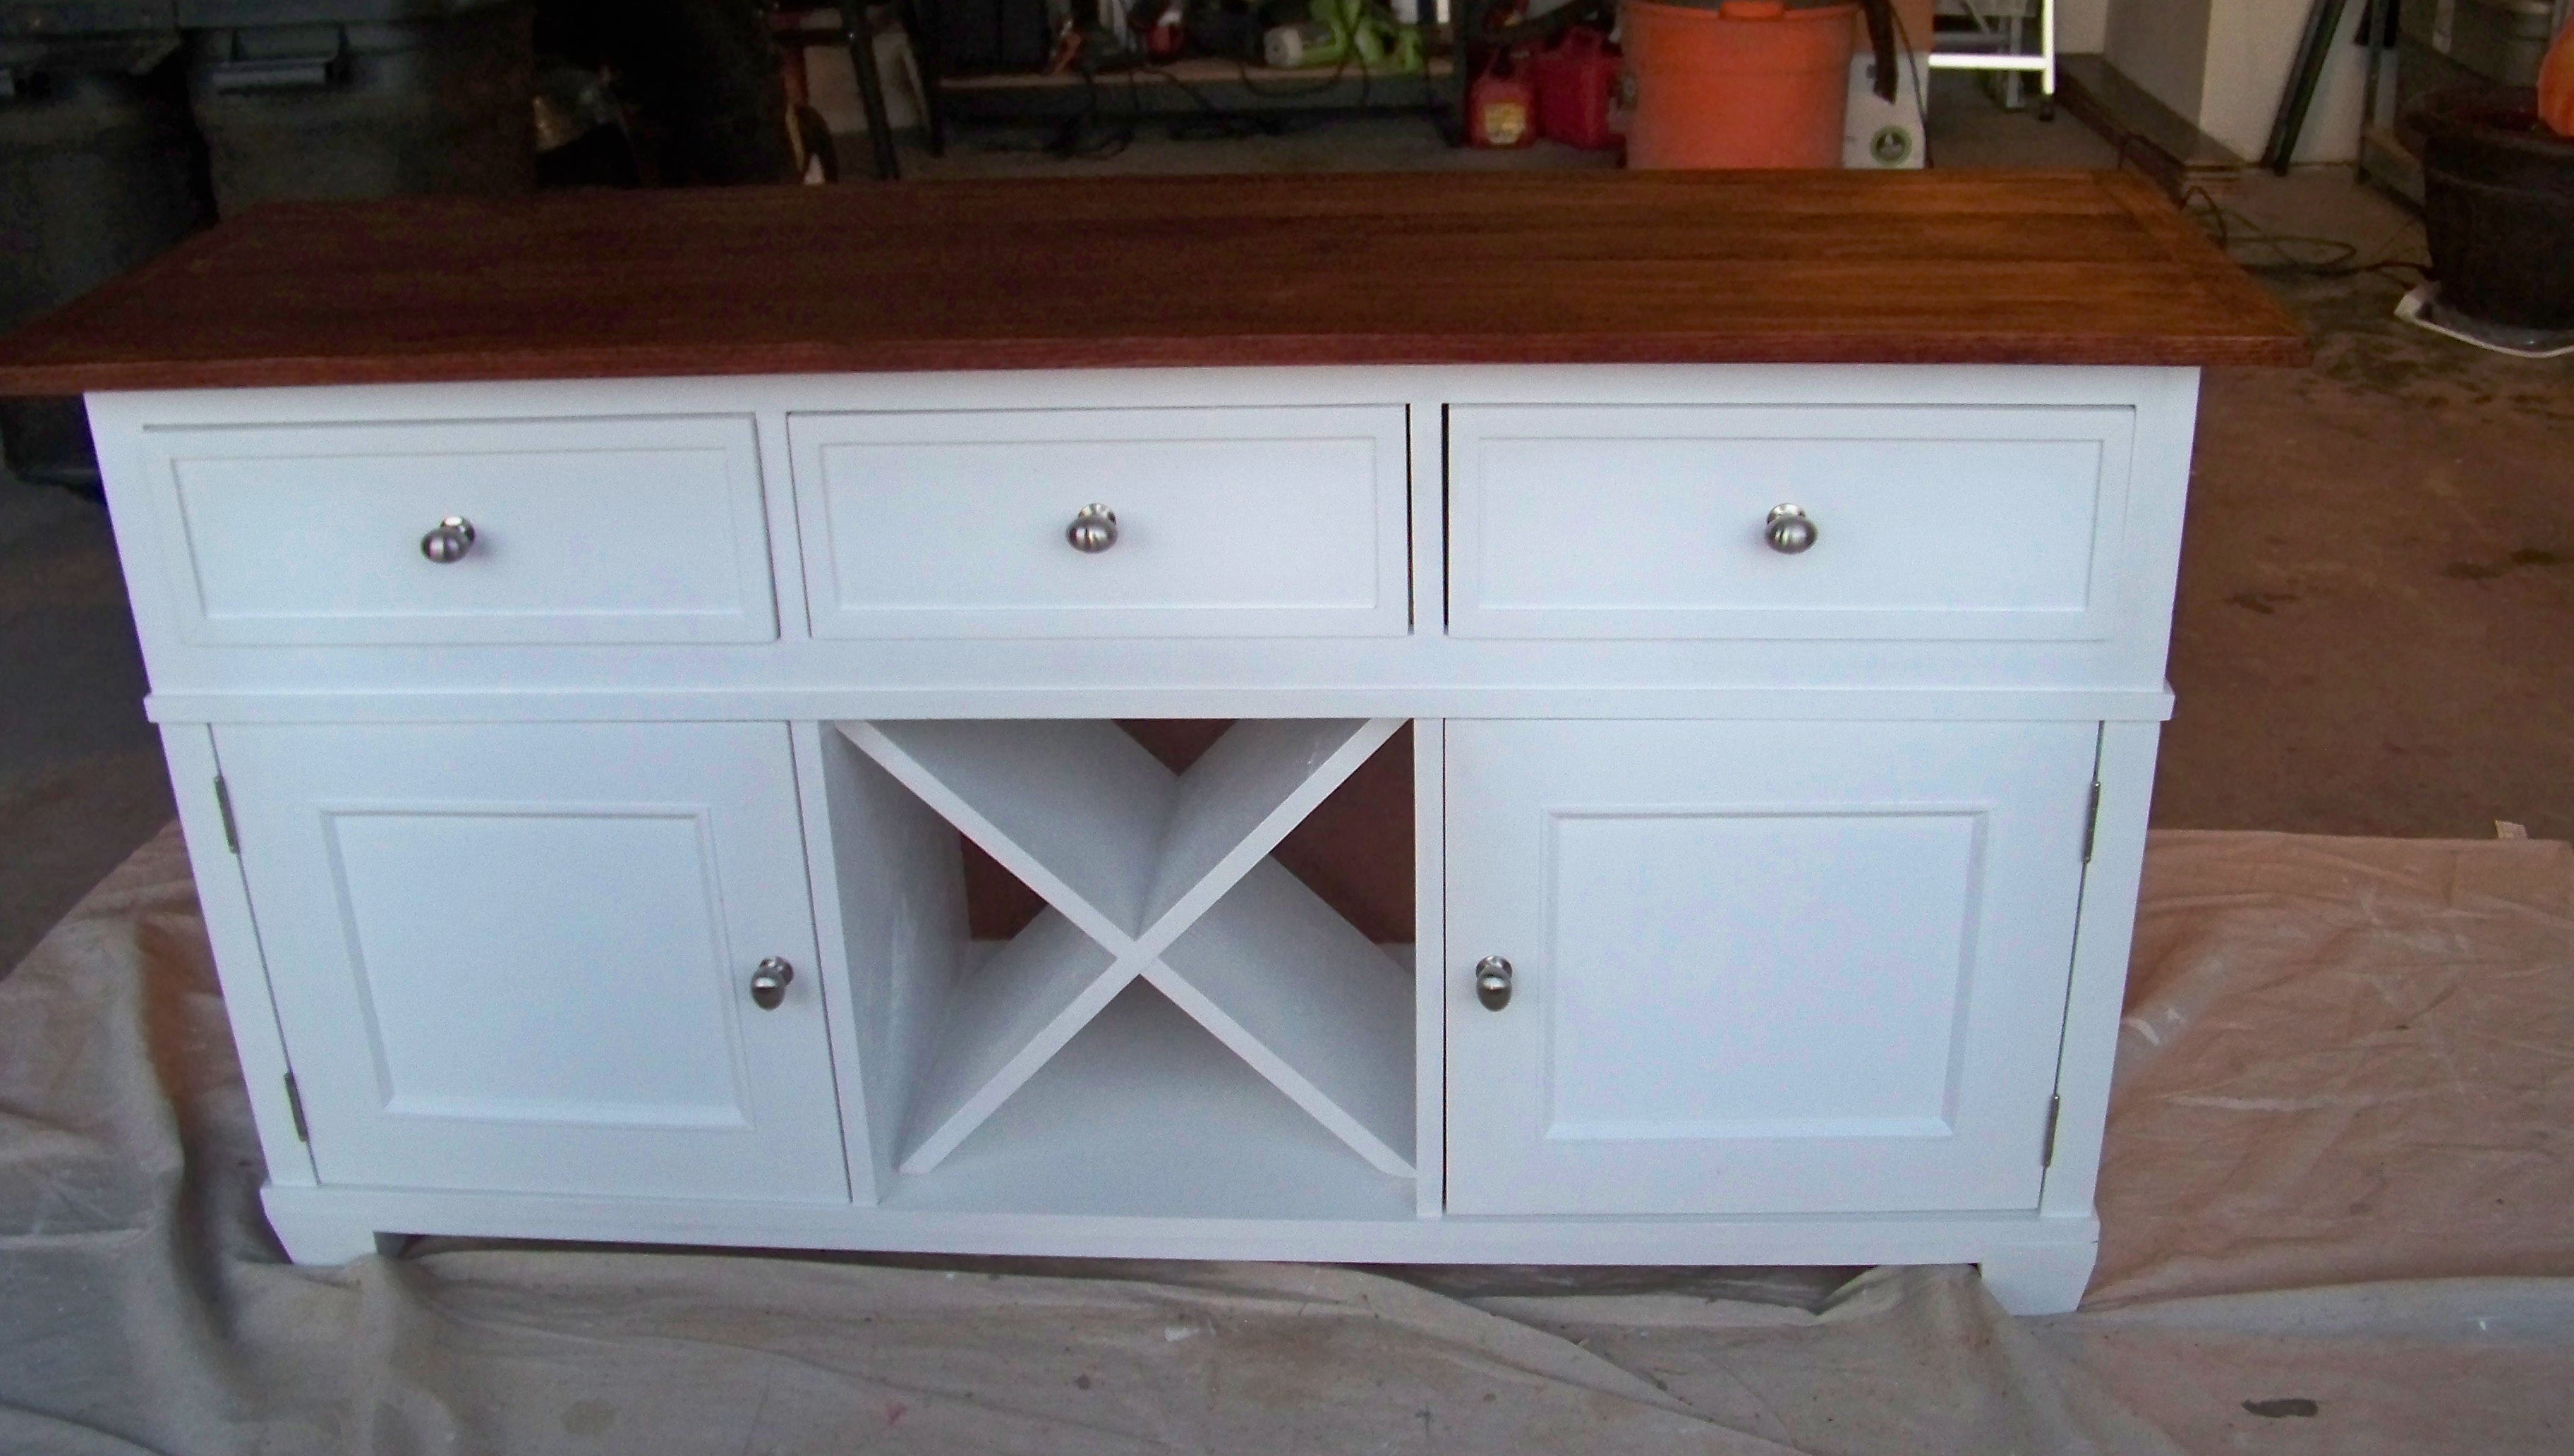
First Project...Used pine for the base and oak for the top to match home counter top.
Built from Plan(s)
Estimated Cost
$250
Estimated Time Investment
Week Long Project (20 Hours or More)
Recommended Skill Level
Beginner
Side Street goes Shabby Chic
We sanded, stained, painted, and distressed the wood before building. That was truly the most time consuming part. The plans were great and everything went together smoothly! We decided to take off the top 2 planks from the footboard, and used those as the side rail. We created the ladder from what we had on hand.

Built from Plan(s)
Estimated Time Investment
Weekend Project (10-20 Hours)
Finish Used
Stain- dark walnut
Paint- Paint left from our kitchen ceiling
Distressed with electric hand sander
Paint- Paint left from our kitchen ceiling
Distressed with electric hand sander
Recommended Skill Level
Beginner
Comments
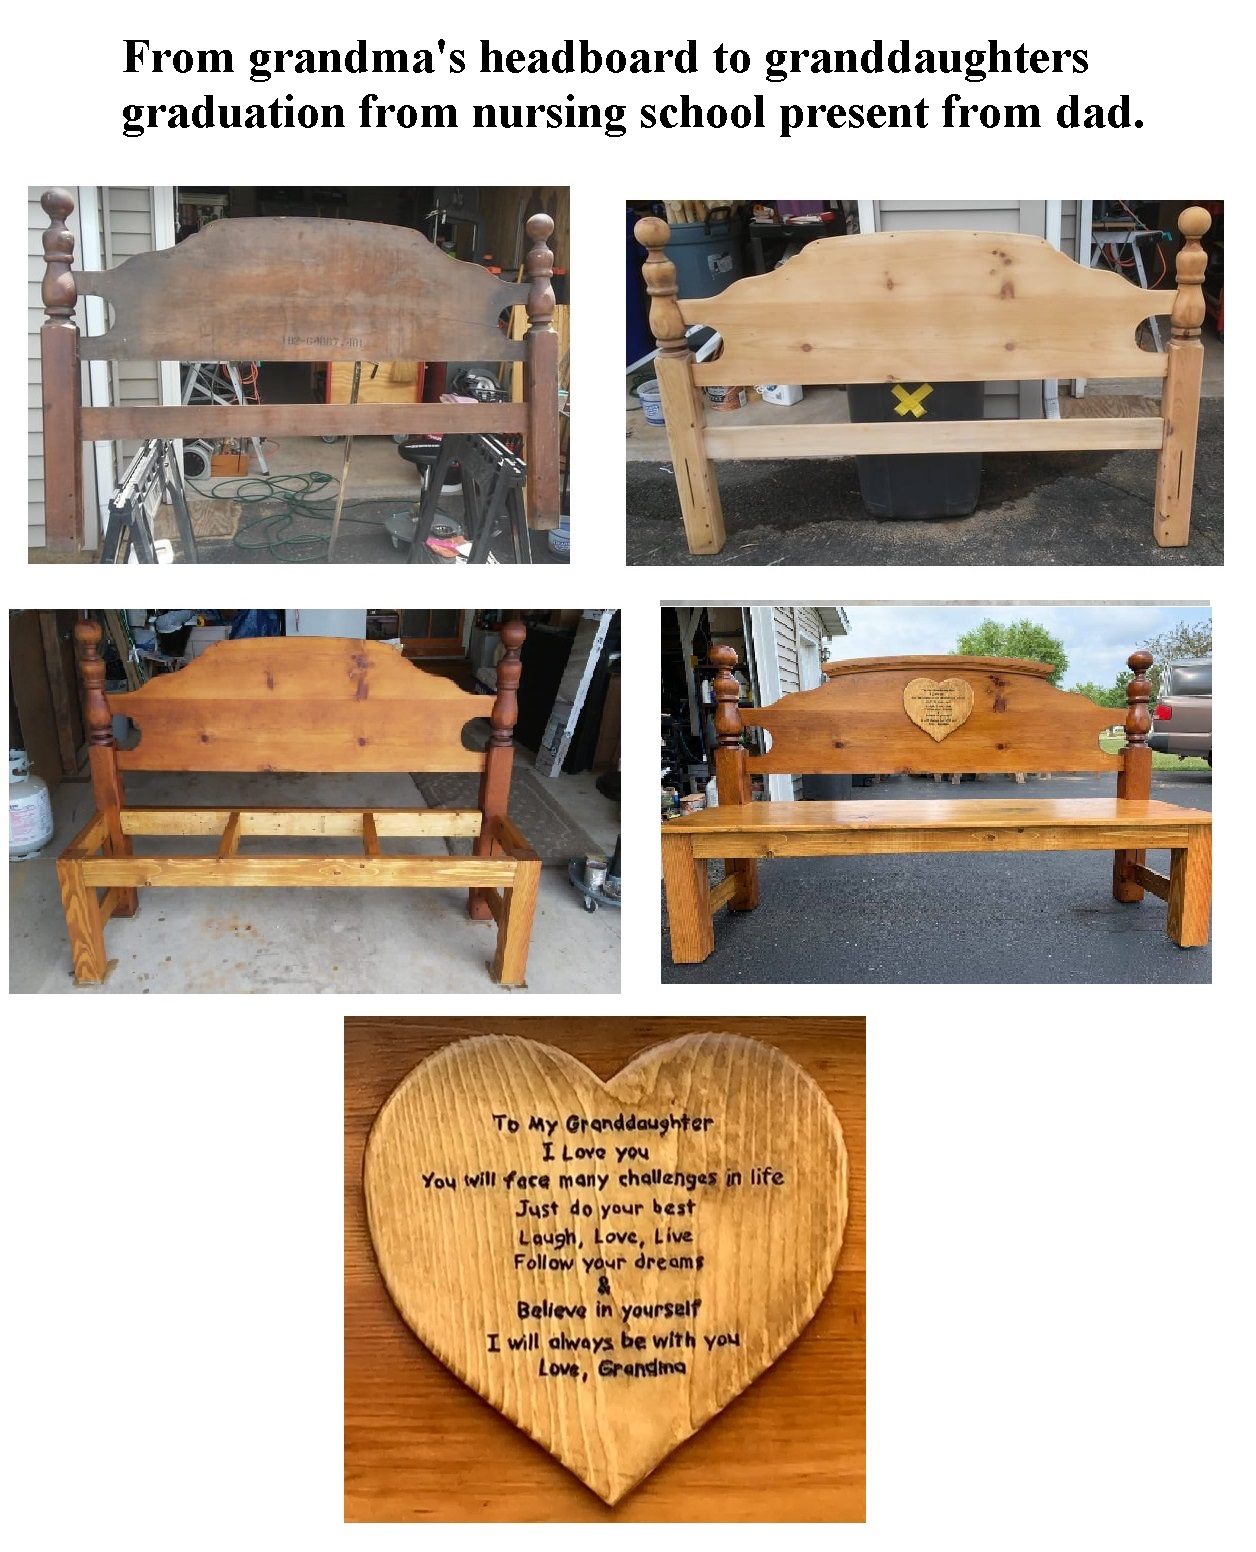
Christmas Figures made from Pallets
I chose to adjust the great design to have a free standing tree with backing and a live bark base. Fun project.
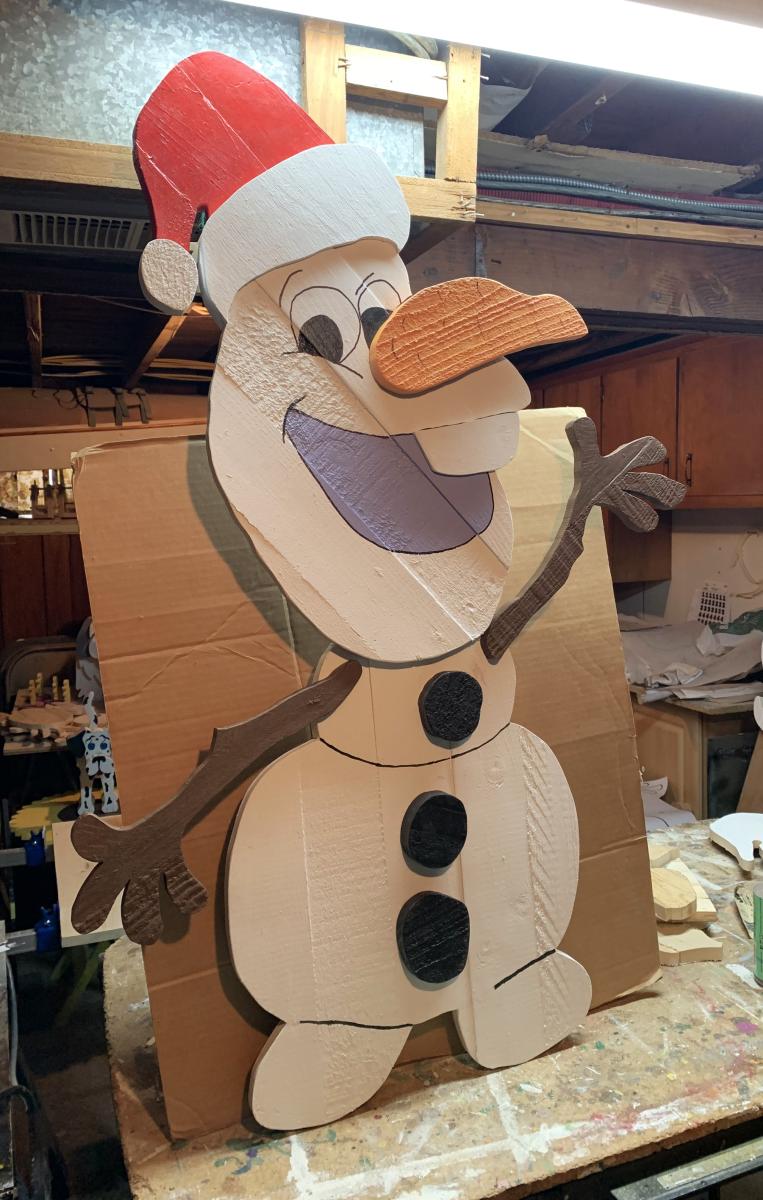
Seasonal And Holiday
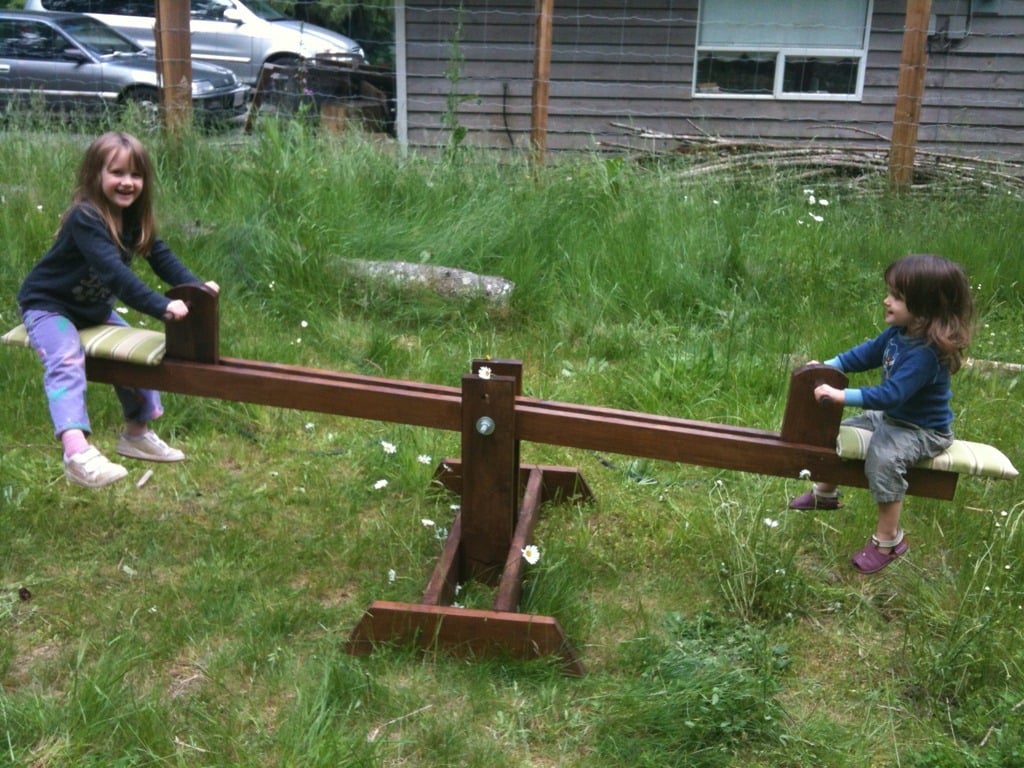
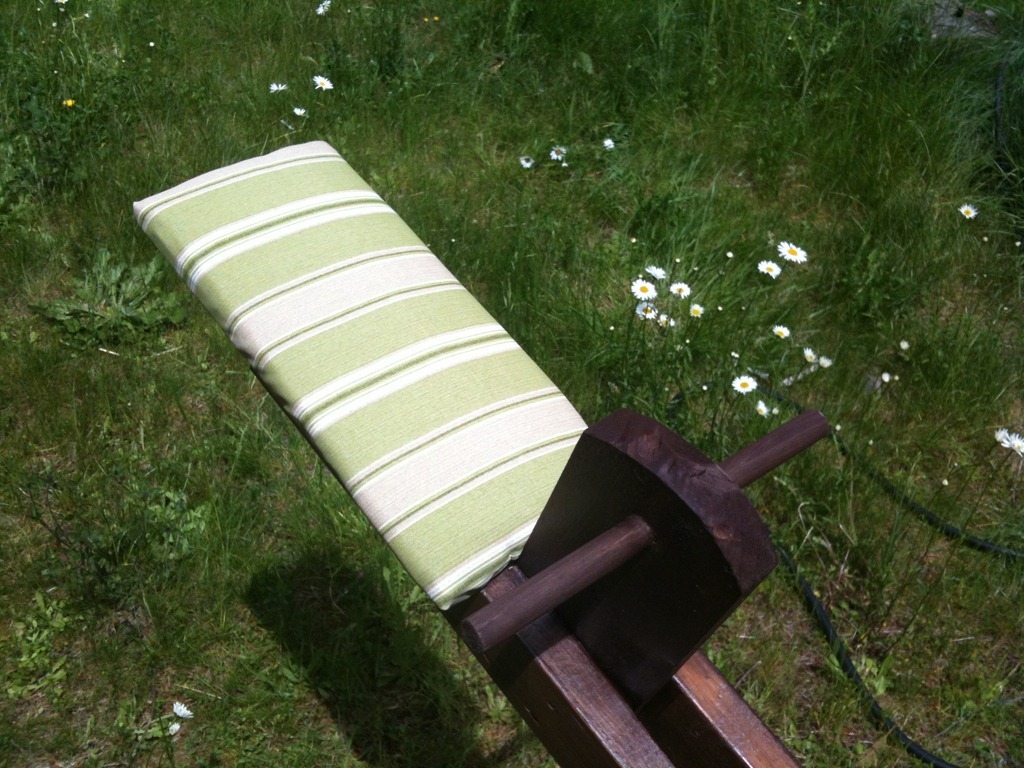
Seesaw
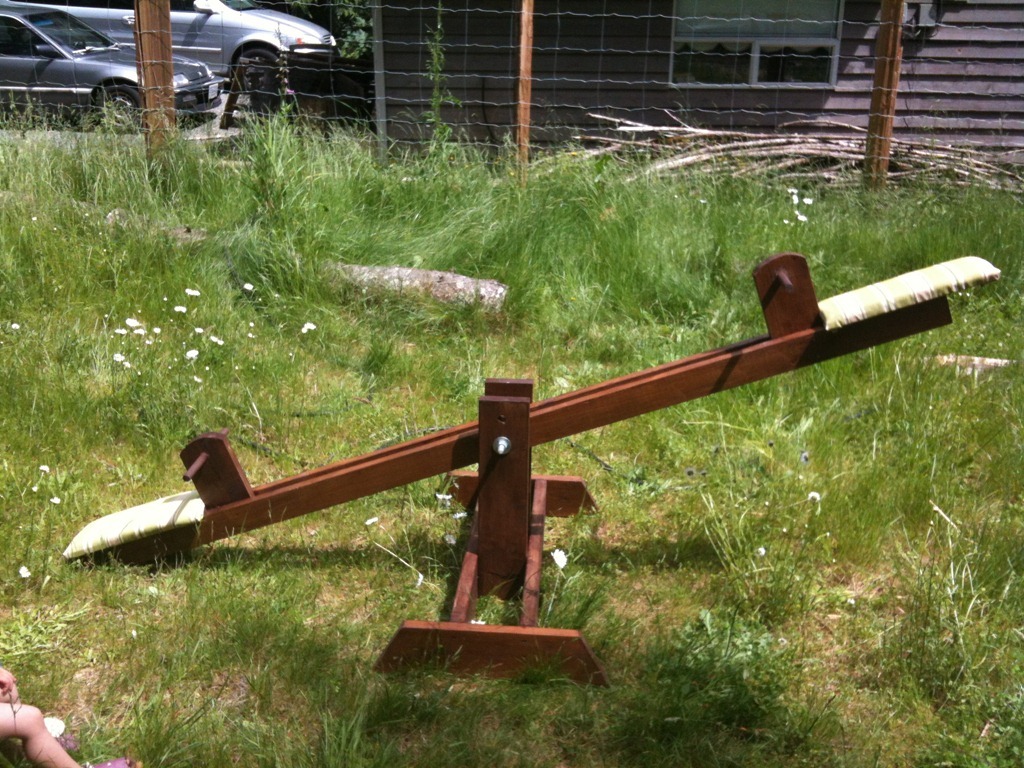
This was a pretty quick and easy project. My third one from this site, as well as being my third one ever. We rented a mitre saw to cut the wood (and cut wood for a few more projects we had on the go at the same time), and then it was just a matter of staining it and putting it together. The staining and waiting for it to dry actually took a couple of weeks, mostly because we don't have a lot of room to do that, so couldn't do it all at once, and it wouldn't stop raining. Once we actually had that done, drilling and assembling only took 2-3 hours at most. (Maybe even less, but hard to judge as I had two children helping the whole time.)
I've put a video of it in use on my blog as well. :)
Built from Plan(s)
Estimated Cost
$25
Estimated Time Investment
Afternoon Project (3-6 Hours)
Finish Used
Some of the wood was finished with Behr natural cedar that I had a sample can of, but I ran out and decided I didn't like how orange it ended up being. I bought a can of CIL walnut semi-transparent stain that was on sale for the rest, as well as putting it over the Behr on the ones I had already done.
Recommended Skill Level
Beginner
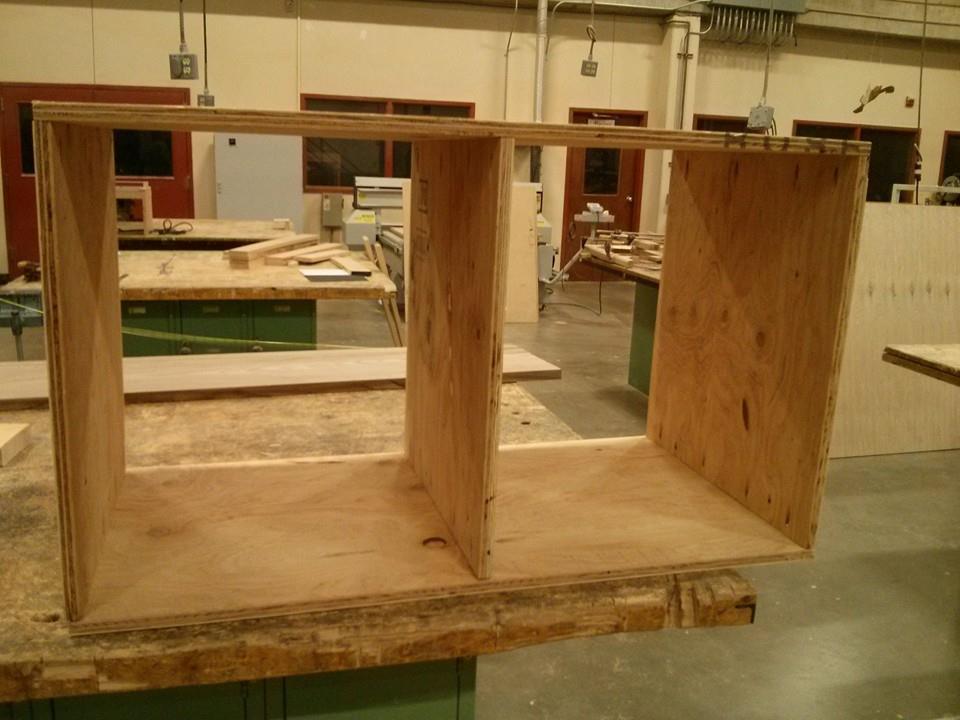
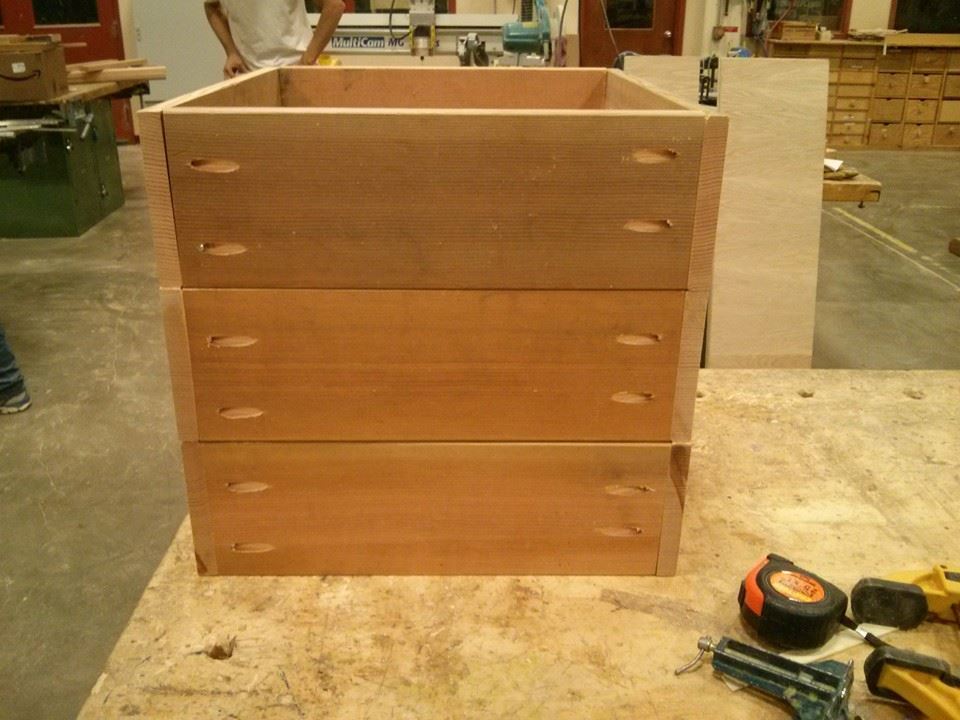
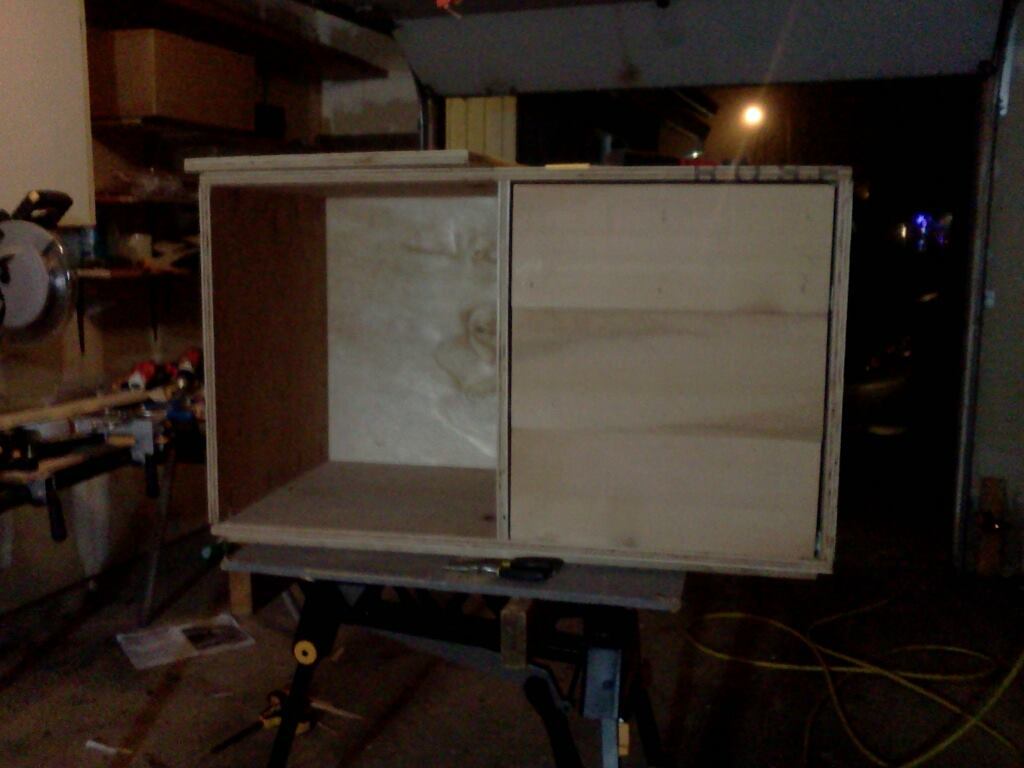
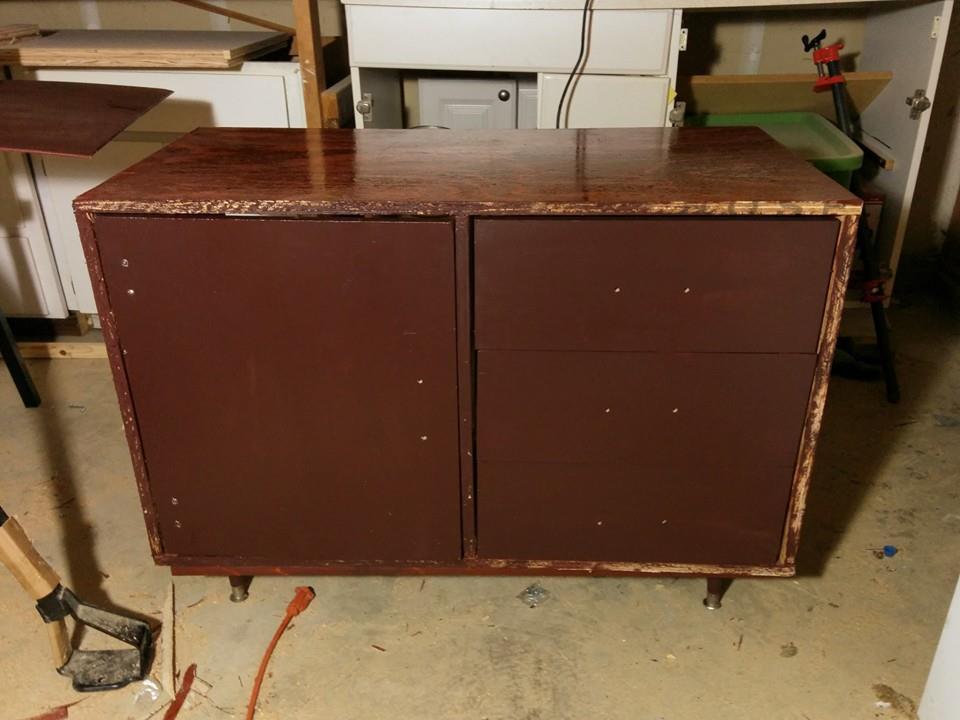
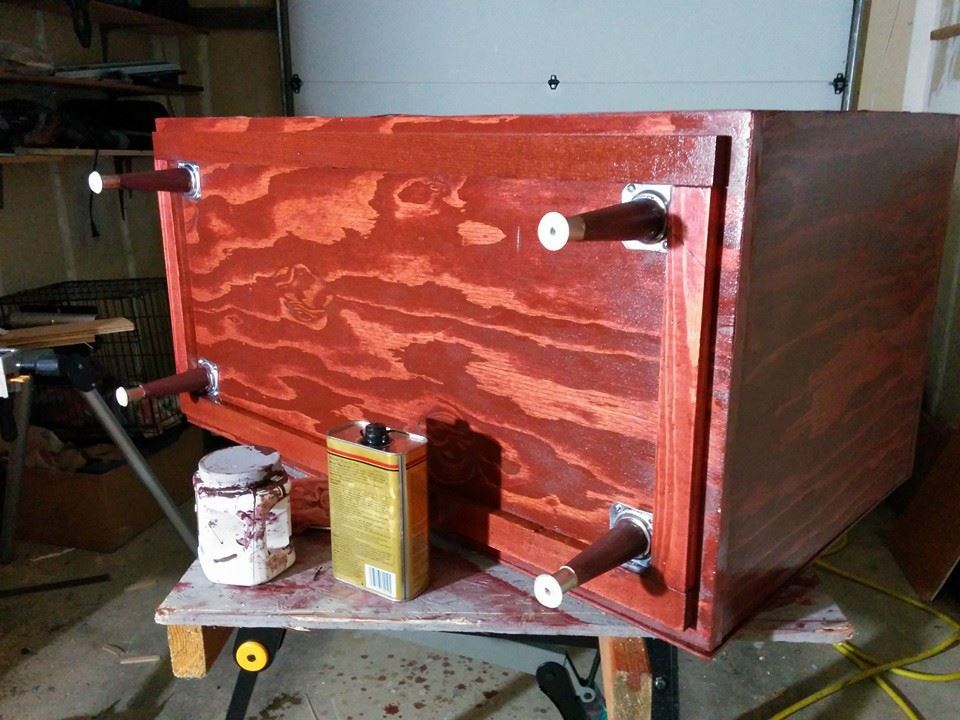
Atomic Credenza
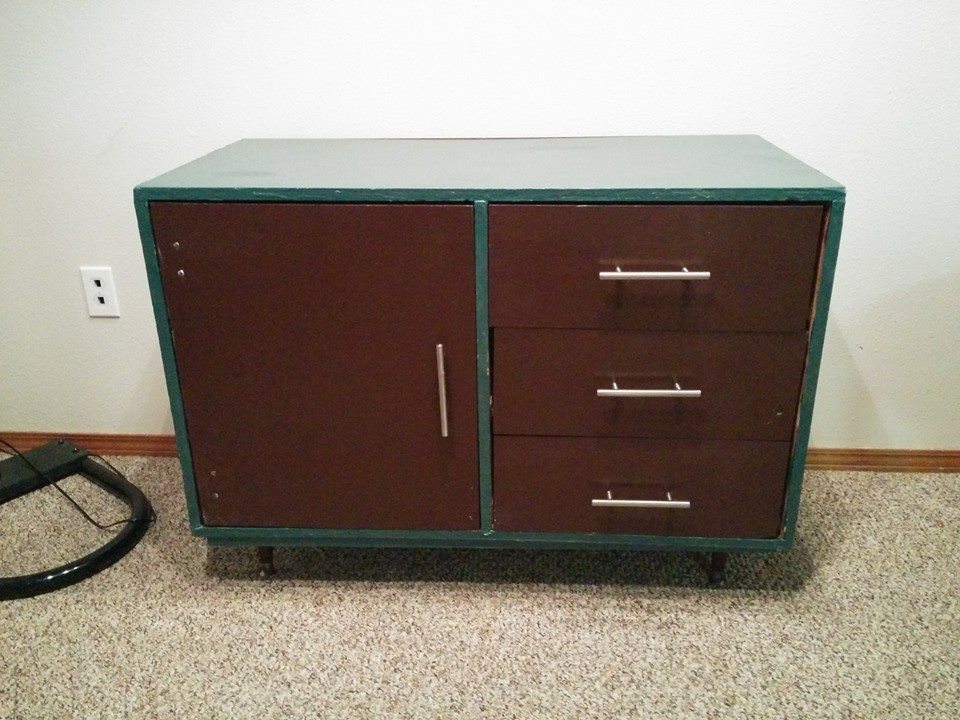
My neighbor loaned me a shop vac and a palm sander to refinish a table, and I fell down a rabbit hole. This is the Brooke Mid-century Console Table from this site. I need to touch up paint the front, and it's not perfect, but this was my first woodworking project. I think the hardest part was wrestling with the drawer slides; I think I had to remount them three or four times. There was plenty of swearing involved with the Euro hinge as well.
I took a "Woodworking: Your Own Projects" class at the local community college, but this project was almost entirely self-taught (although I had plenty of adult supervision while learning to use the saws.)
I bought most of the materials from Building Materials Resources, a local reclaimed building supply store. And then took about a million trips to the local big box home supply stores for "just one more thing."
I had originally stained the project with Minwax Sedona Red and put some wipe-on oil-based poly on it, but the drawer fronts came out blotchy because I had used wood putty over the brad holes, so I painted those and the door brown ("Polished Mahogany" SW2838.) Then the edgebanding that I had applied on the front and stained was peeling off and looking terrible, and I didn't want to redo it.
I gave up and scuff-sanded the whole thing and painted the rest of it blue ("Still Water" SW6223.) I then applied several coats of semi-gloss spray water-based polyurethane, sanding lightly inbetween coats. I finished it off with a coat of Howards Feed N Wax and 0000 steel wool.
One tip that I have is that you can buy enormous (quart sized!) paint samples at Sherwin Williams for about $5 apiece. I used a paint sample for the brown portions, and a "real" quart of paint for the blue portion, and I cannot tell the difference in quality.
Skills learned:
Drilling pilot holes (believe it or not)
How to use the Kreg jig
How to use a miter saw
How to use a circular saw
How to use a table saw
Applying edgebanding
Applying wood filler
Staining
Building drawer boxes
Installing drawer pulls
Installing drawer slides
Installing euro-hinges (and how to use a Forstner bit)
How to use a brad nailer
How to attach table legs
Probably some other stuff that I forgot
Built from Plan(s)
Estimated Time Investment
Week Long Project (20 Hours or More)
Finish Used
Paint + Spray semi-gloss water based Varathane
Recommended Skill Level
Starter Project
Stand Up Desk
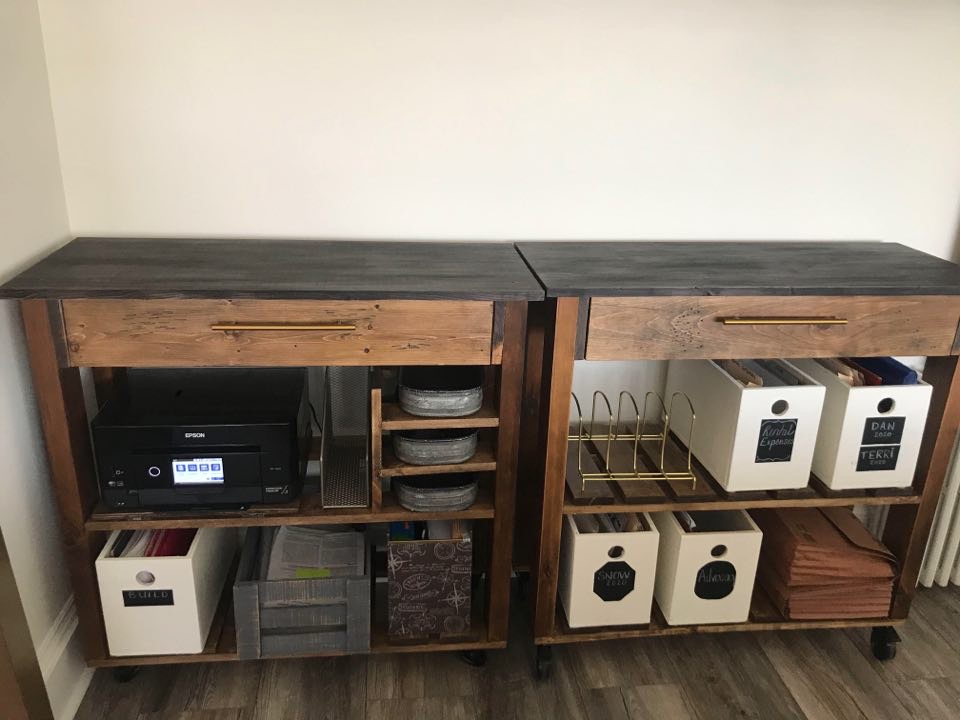
Anna's recent design for a stand up desk system with paper shredder inspired me. I have 2 side by side Stand Up desks on castors. I have customized to suite our needs.
Thank you Anna for teaching me to build, my "She Shed" has become my sacred space - Cheers from Canada
Built from Plan(s)
Estimated Cost
100
Estimated Time Investment
Weekend Project (10-20 Hours)
Finish Used
Old Masters Stain - Dark Walnut
Black Wax for desk top
Black Wax for desk top
Recommended Skill Level
Intermediate
Comments
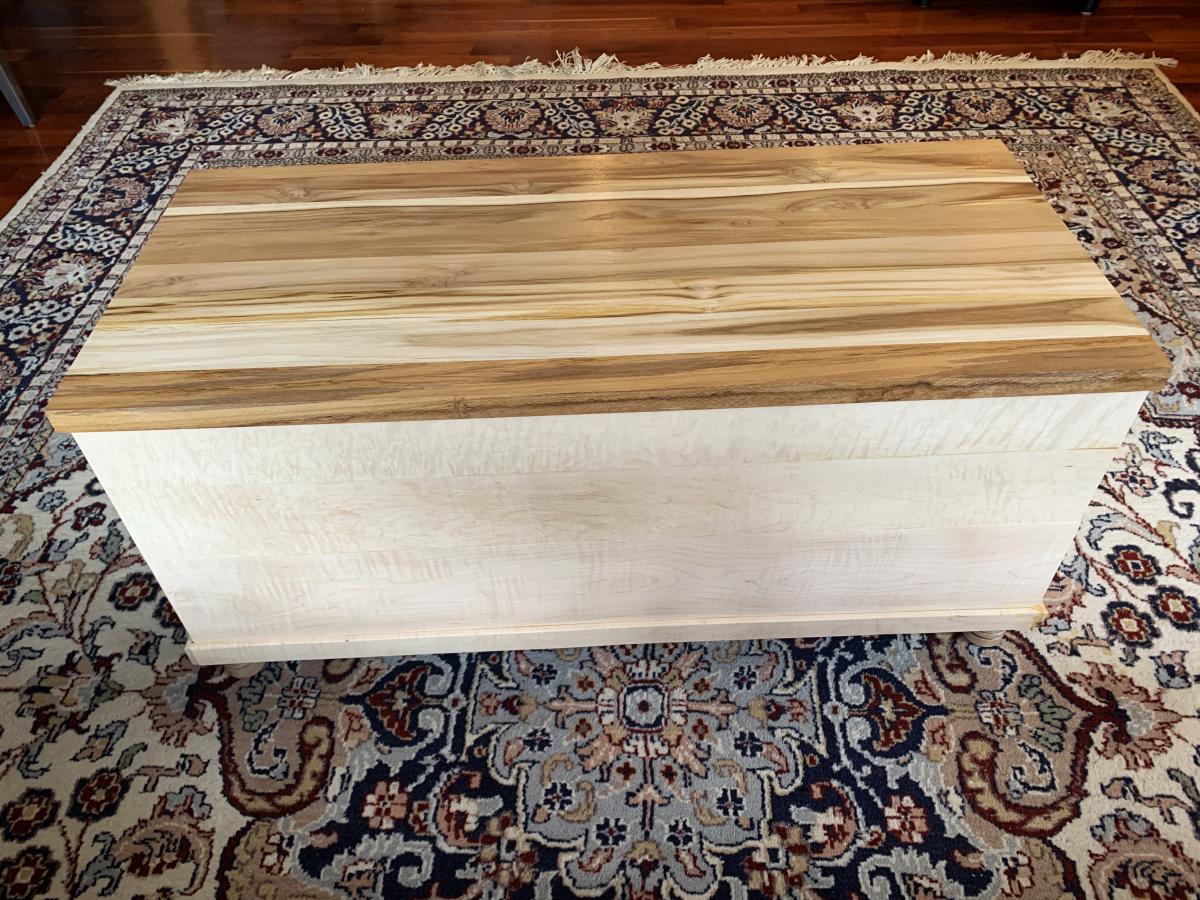
Maple Chest
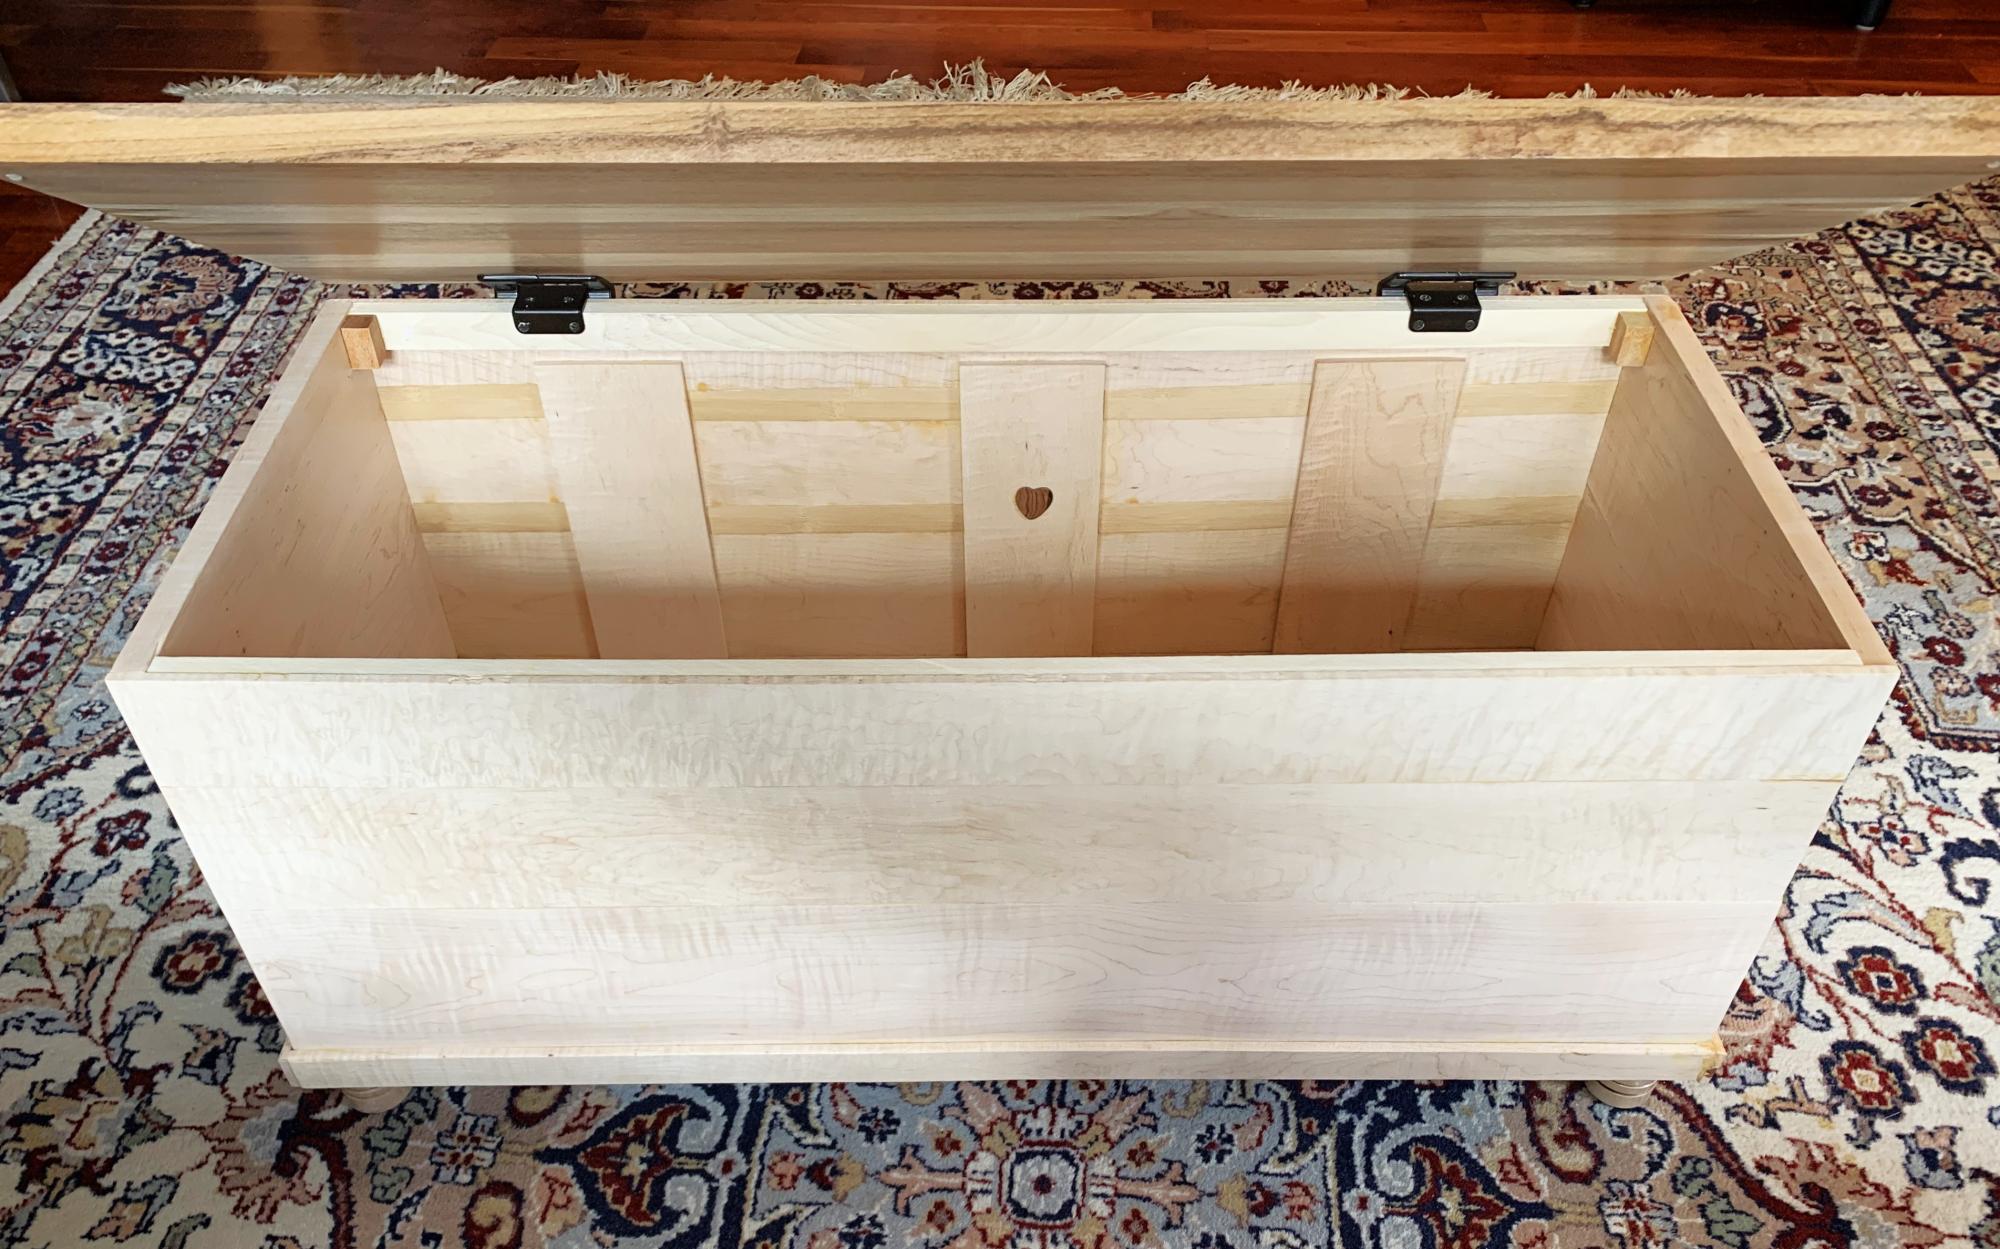
Curly maple blanket chest with teak top for daughter’s Christmas.
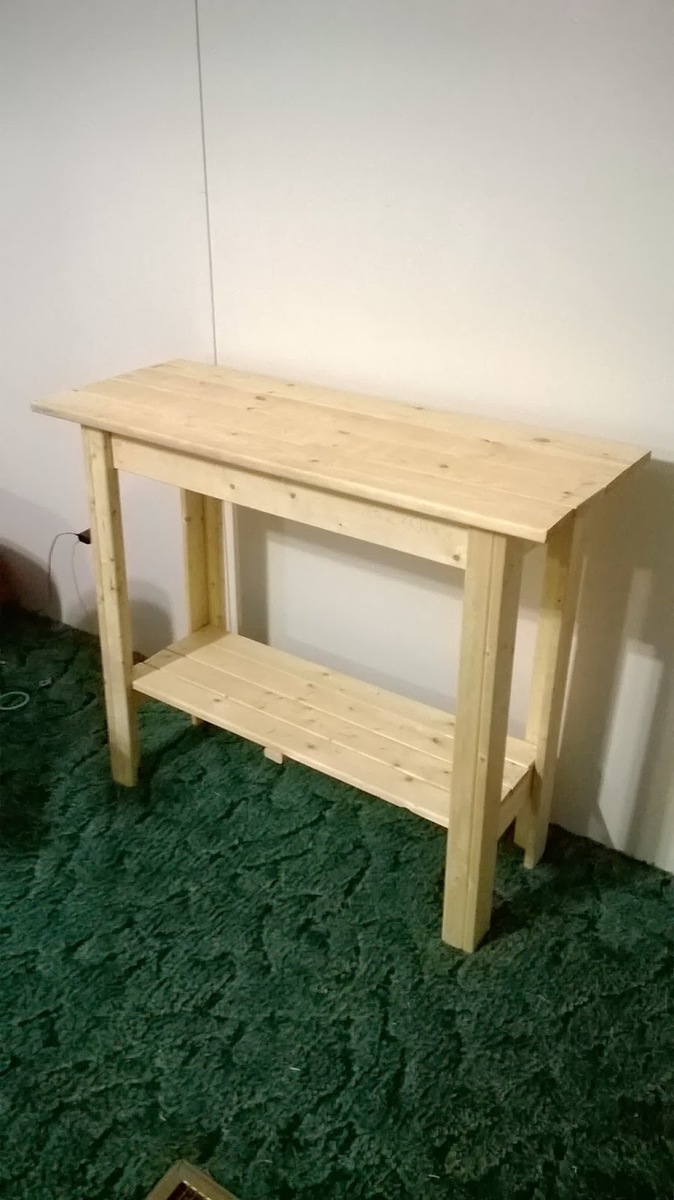
First Console table!
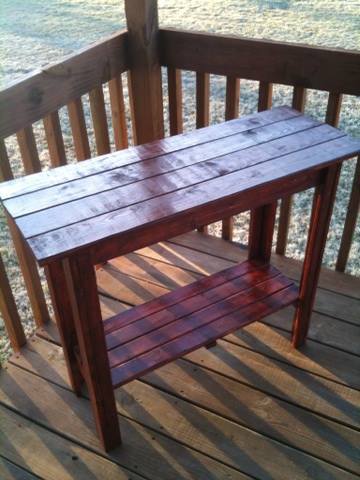
I started this project without a cutting table or any kind of shop set up. I used a burnt out tree as my makeshift cutting table. With only hand tools I used Ana Whites blueprints from her website to do this whole table, the directions were very easy to
follow and very helpful.
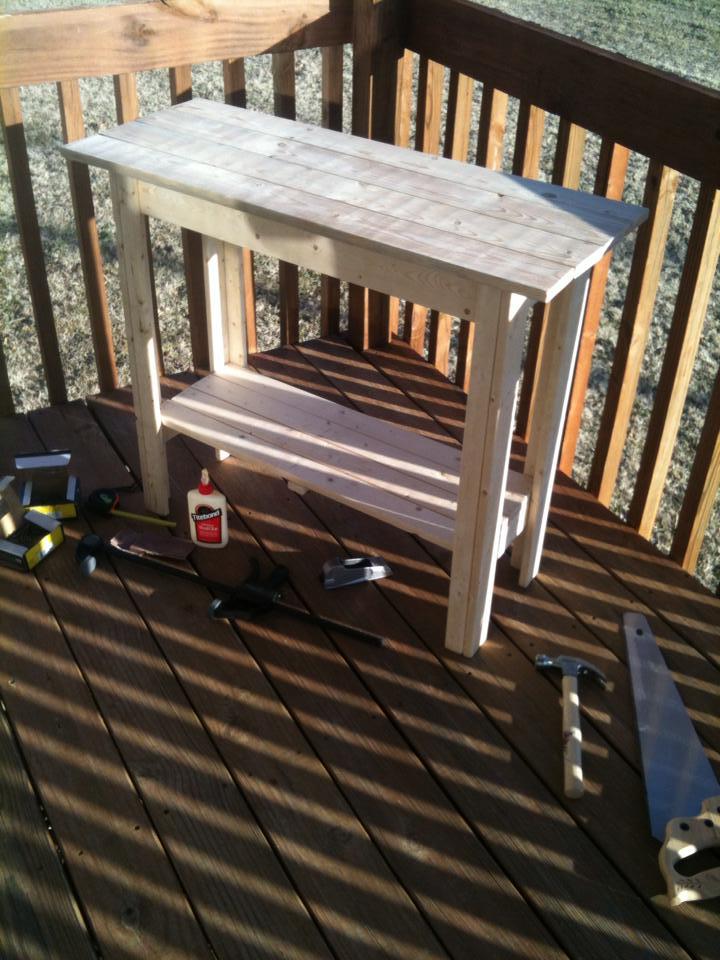
Estimated Time Investment
Afternoon Project (3-6 Hours)
Recommended Skill Level
Beginner
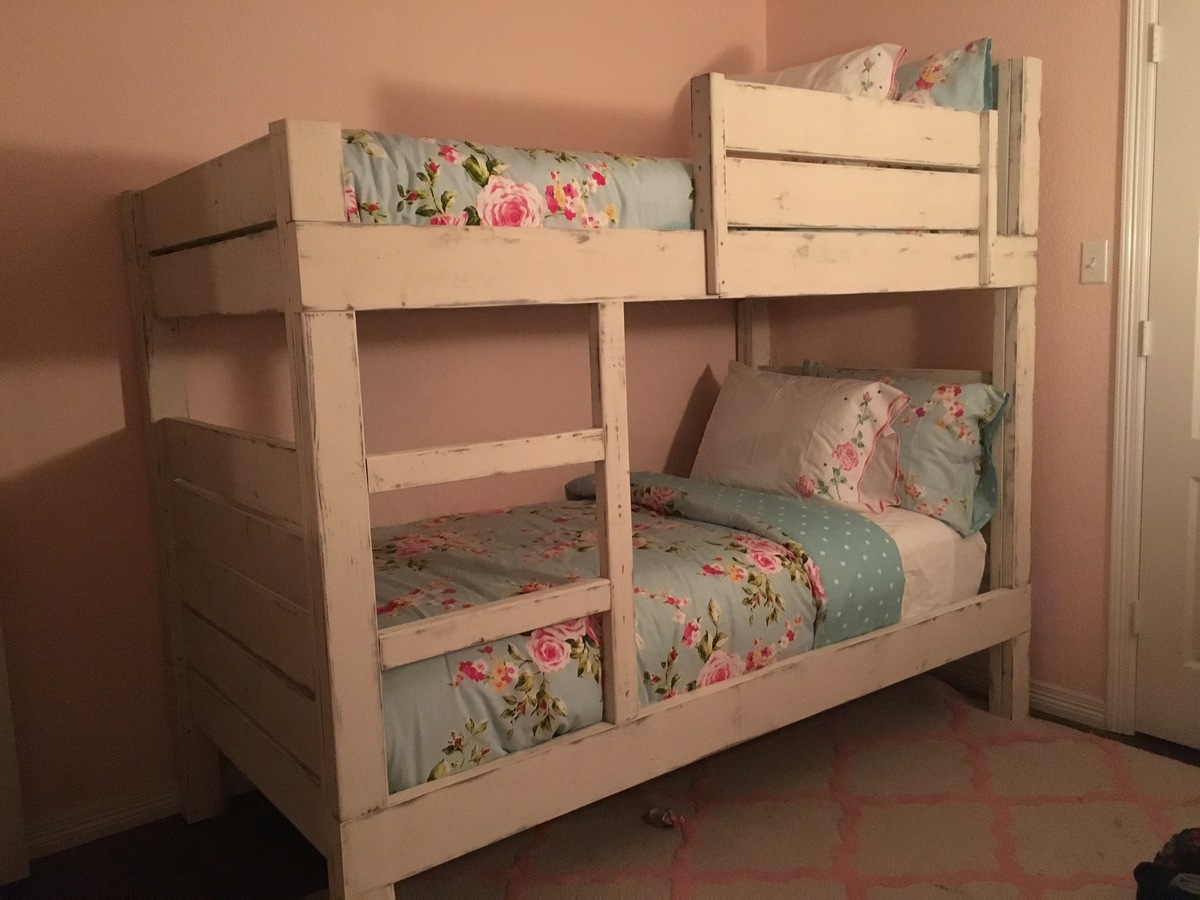
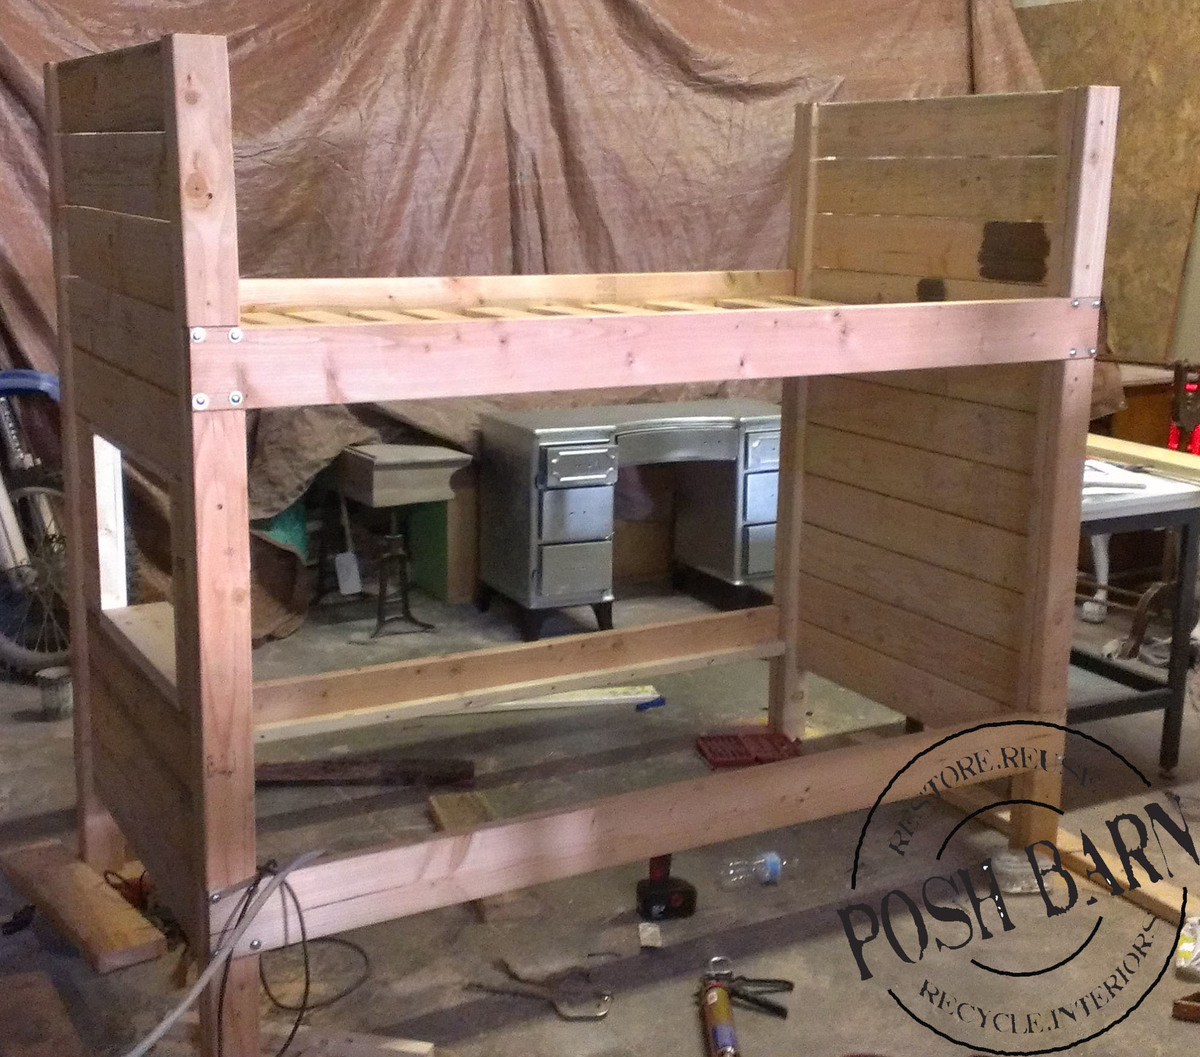
Variation of Simple Bunk Bed Plans

I used the Simple Bunk Bed plans as a rough guide for the sizing of this twin over twin bunk bed plans. Bed is made out of solid oak that I sourced locally for free and planed down the oak slabs. There are a number of variations, but the sizing helped tremendously in putting my plans together.
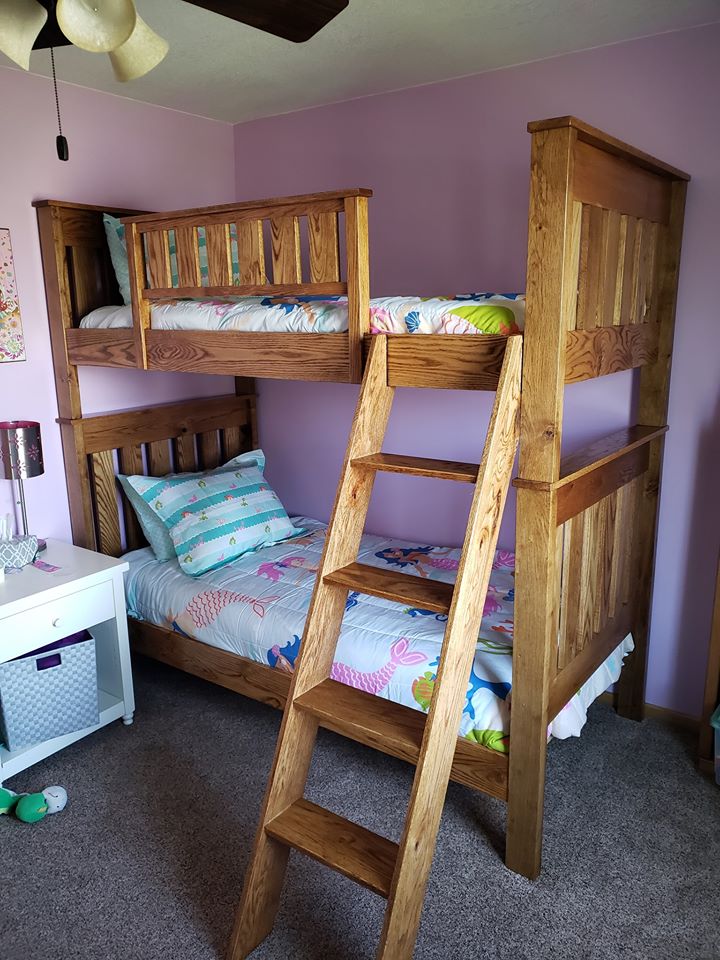
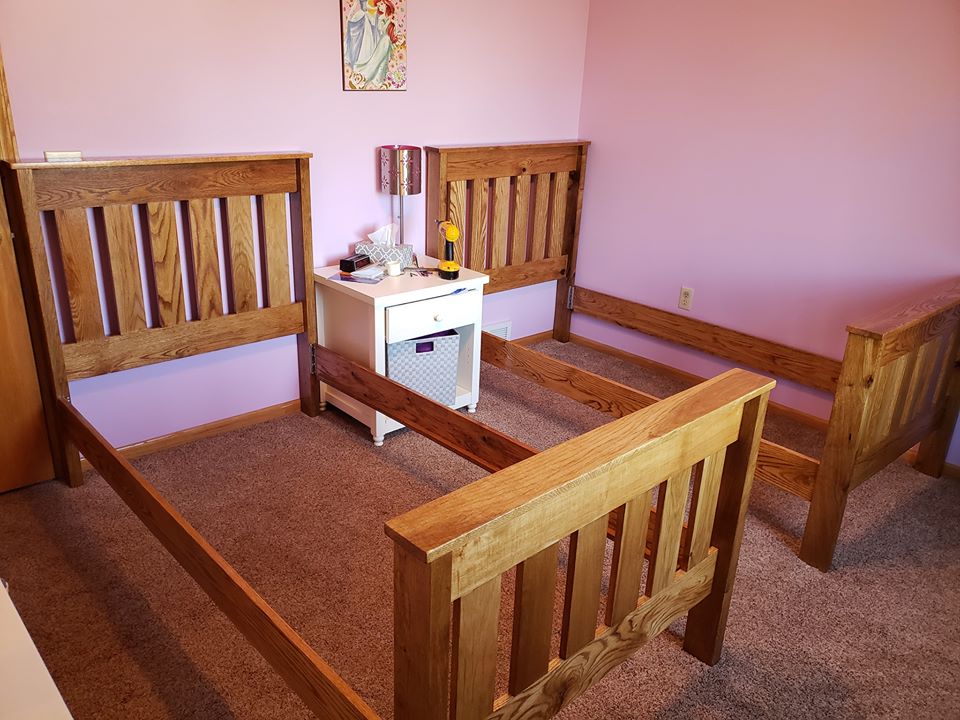
Built from Plan(s)
Estimated Time Investment
Week Long Project (20 Hours or More)
Finish Used
Minwax Golden Oak & Minwax Glossy Poly
Recommended Skill Level
Advanced
Custom Children's Chair

Child's chair. I used wormy maple
Built from Plan(s)
Love our Small Easy Rustic X-Bench!
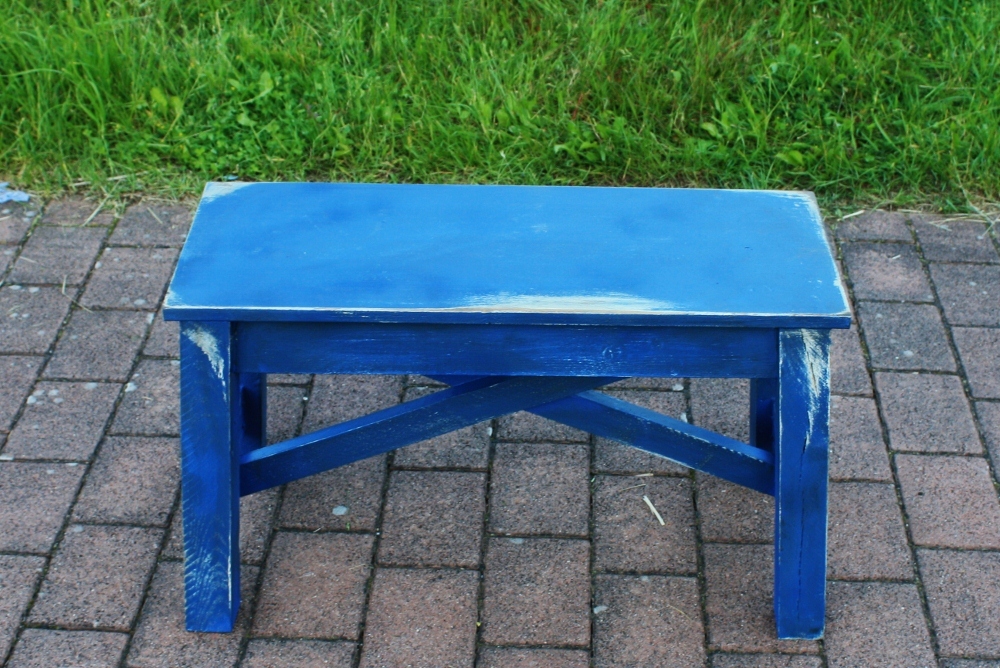
I have been redoing furniture for quite some time, but had never actually thought of making my own furniture, until I ran across Ana's blog. Now I am so addicted! My husband is very handy with his tools and can follow plans fairly easily (unlike me) so I definitely had to enlist his help with this project. We are stationed overseas in Germany so our project costs us a bit more than it would have if we were stateside, but still quite a bit cheaper than purchasing the similar one at Pottery Barn.Since it was our first project it did take us a bit longer than normal, but still easy enough to do. I absolutely love how this turned out and now my husband and I are ready for our next project of a rustic console table that we made our own plans for.


Built from Plan(s)
Estimated Cost
With the paint around $40
Estimated Time Investment
Day Project (6-9 Hours)
Finish Used
I first primed it and then painted it. Not sure what the actual paint color was because it was in German, but I would call it a country blue. I then distressed it and added some stain.
Recommended Skill Level
Beginner
Truss Table and Benches (Western Red Cedar)
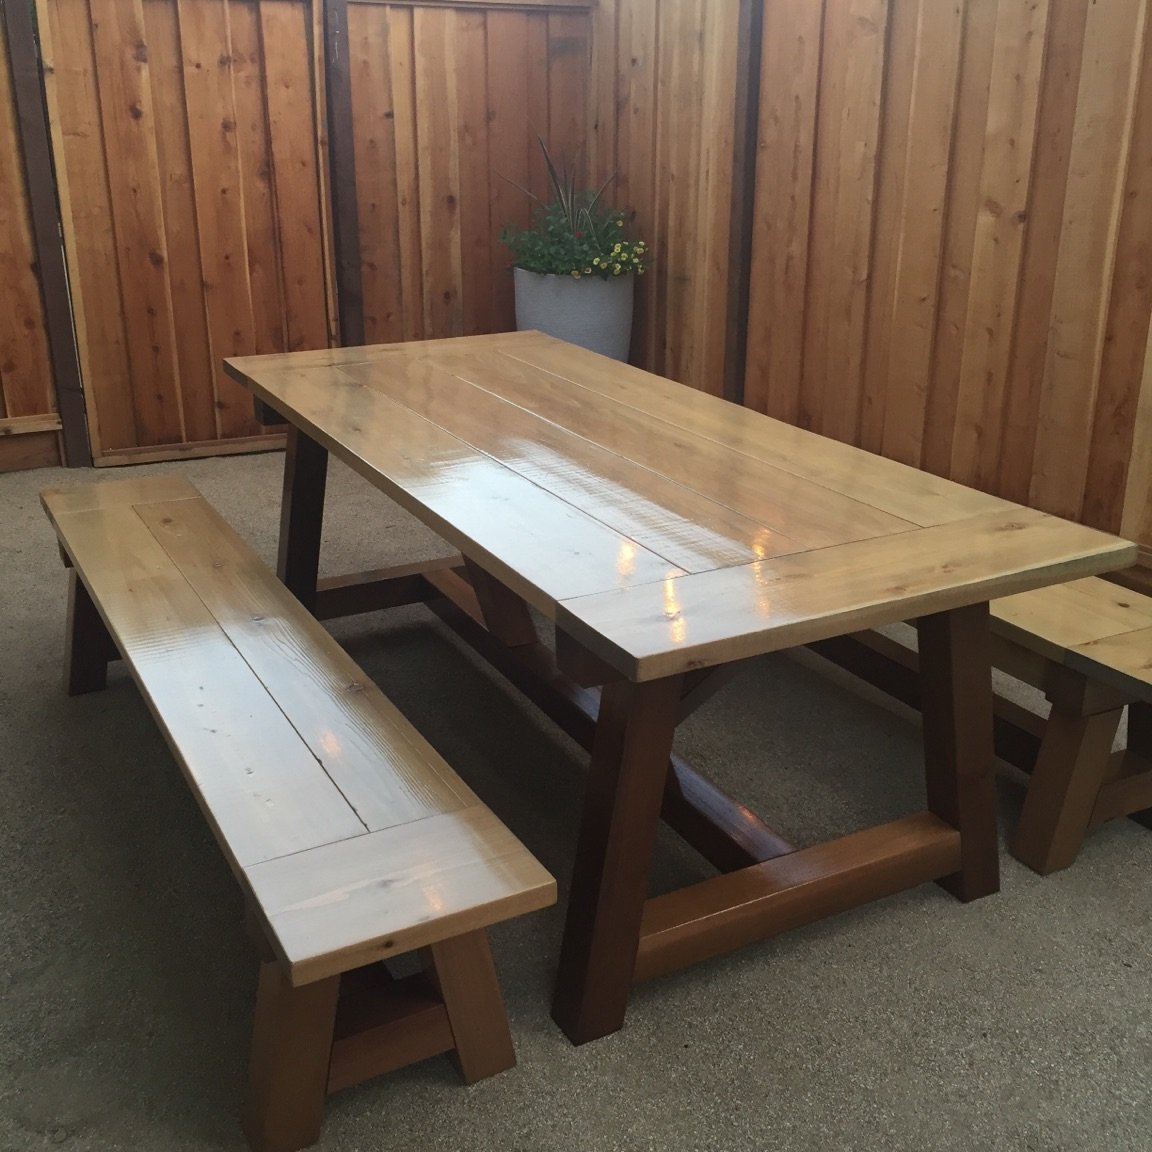
We built this outdoor table and benches using Western Red Cedar for a patio area outside our house. The cedar is pricier than doug fir or other woods, but is highly rot resistant and the best choice for an outdoor table. We used Ana White's 4x4 Truss Beam Table and Benches plans and Kreg blue kote screws since they are weatherproof. The breadboards were a little wobbly, so we reinforced them with black metal corner braces (http://www.truevalue.com/product/Hardware/Miscellaneous-Hardware/Corner…) and black coated exterior screws (http://www.homedepot.com/p/Everbilt-12-x-1-1-4-in-Phillips-Flat-Head-Wo…). These braces provide a cool architectural look and provide much needed support for the table ends, and especially the bench ends. We stained the Western Red Cedar with Minwax Weathered Oak and finished it with two coats of Man O War Spar Urethane in Satin finish. Hopefully it will stand up to the elements and last for years to come. Thanks for the plans Ana!
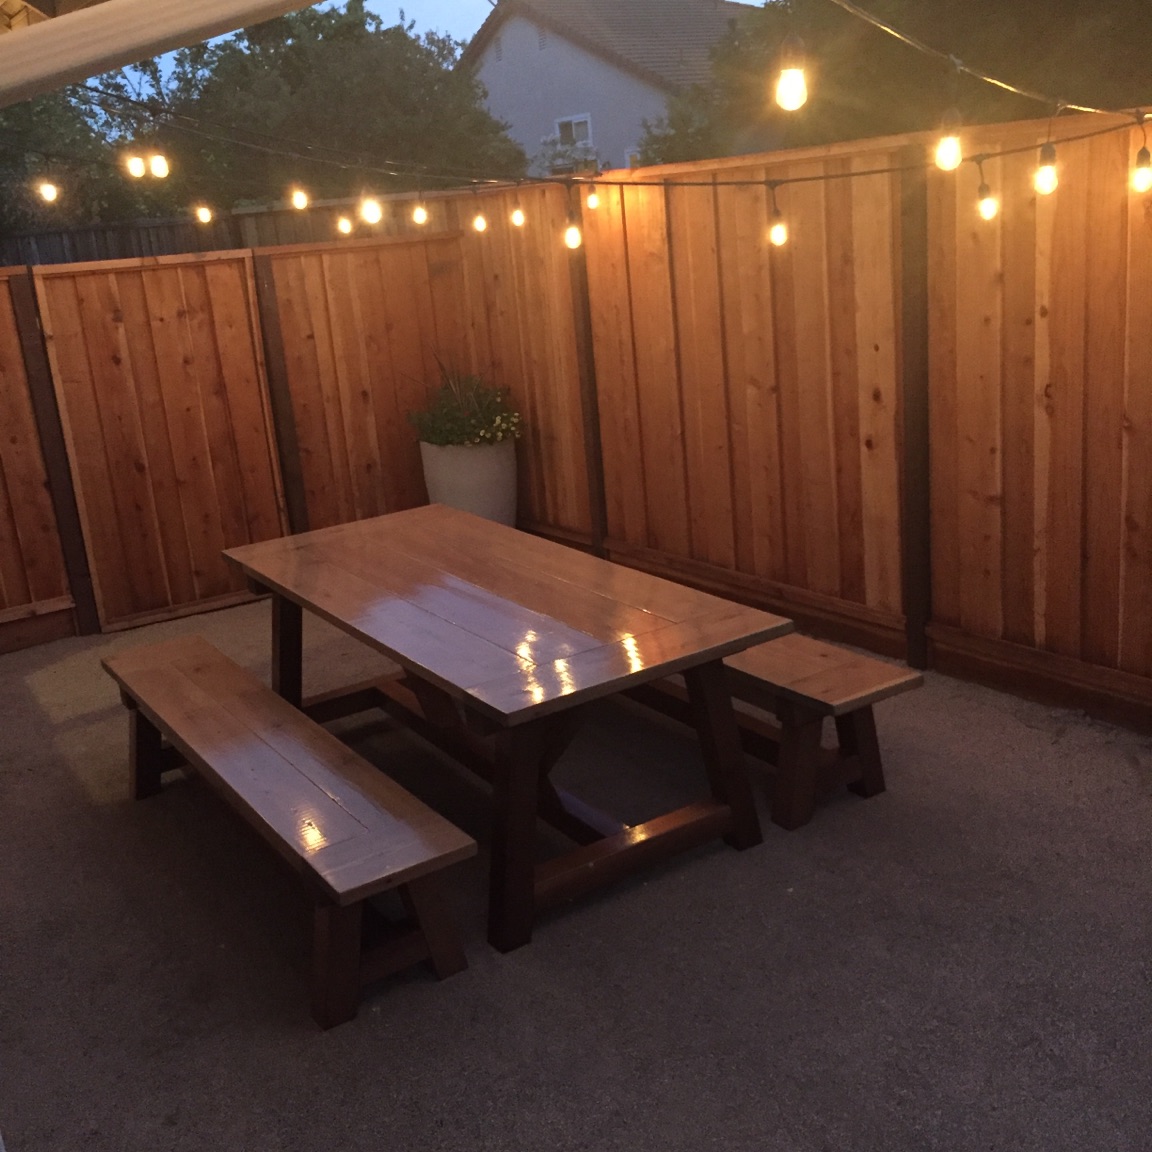
Built from Plan(s)
Estimated Cost
$600-$700
Estimated Time Investment
Week Long Project (20 Hours or More)
Finish Used
Minwax Weathered Oak (2 coats); Man O War Spar Urethane Satin (2 coats). Sanded with 400 grit sandpaper in between coats of urethane.
Recommended Skill Level
Beginner
My build of “House Bed Frame - Modern Tiny House Shape” for Ana-White

https://www.ana-white.com/woodworking-projects/house-bed-frame-modern-t…
As a high school teacher, I noticed Ana-White’s post for a contest to build a tiny house-shaped bed heading in to spring break; I entered and was selected. COVID-19 directed my teaching in a very different way and actually slowed down my woodworking while I have finished the project. Inspired by the Ana-White’s writings of making beautiful furniture with typical tools, this project is a perfect example of being able to build without the need for high-end shop machines. I followed the plans almost to the letter while keeping my mind open to slight improvement especially around the process of transportability. As a teacher, I emphasize that every writing is ready for editing and revision; with experience in woodworking, I approach building in a similar manner. My finished project below pictured below has some minor revisions planned for disassembly and reassembly in a minimal number of parts using only a screwdriver.
@anawhitediy
https://www.facebook.com/knockoffwood
Smart and stylish woodworking plans to make your home awesome.
#anawhite
smart.bio/anawhitediy
@SawDustDonLawler
https://www.facebook.com/HHH-Wood
@EduDonLawler
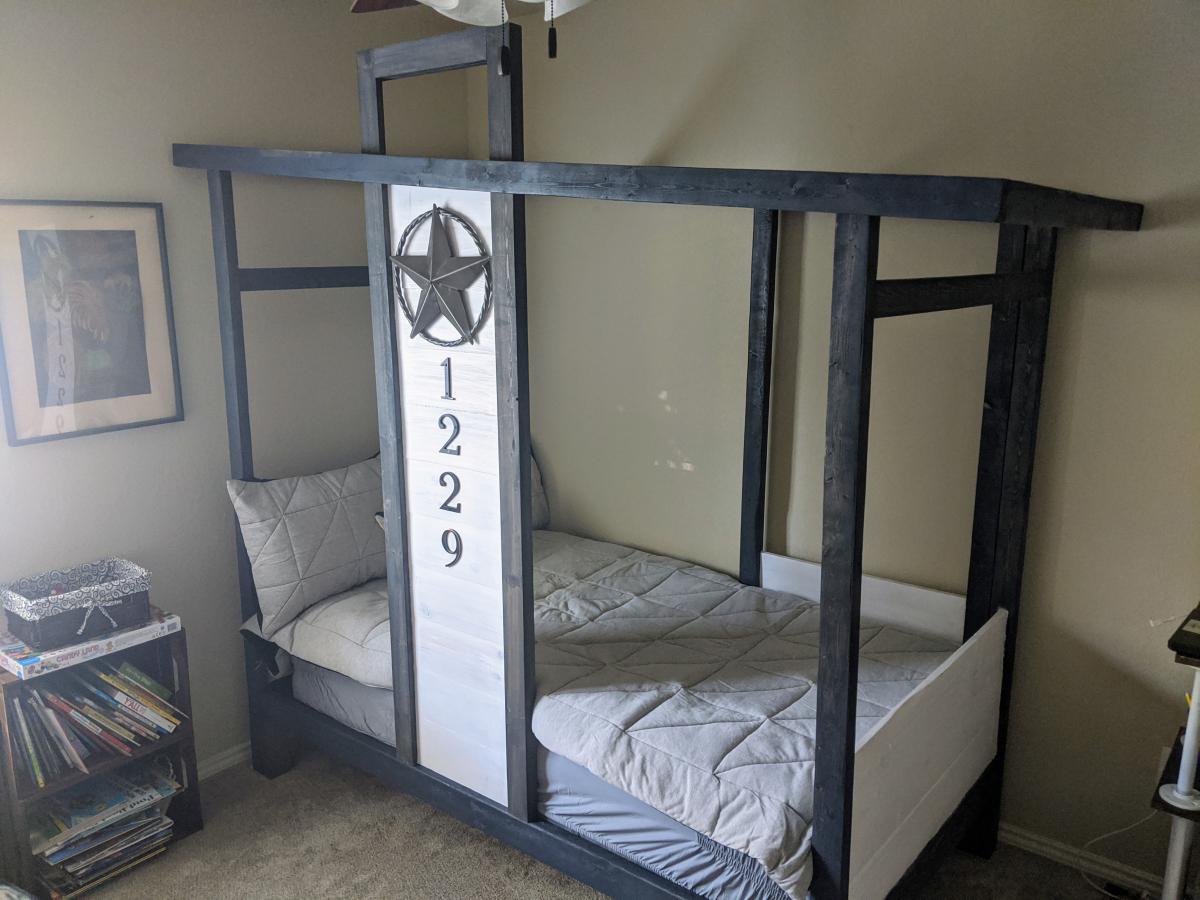
Estimated Cost
$160.00
Estimated Time Investment
Weekend Project (10-20 Hours)
Finish Used
The finish used on this project was Minwax Aged Barrel and Minwax Pure White.
Recommended Skill Level
Intermediate
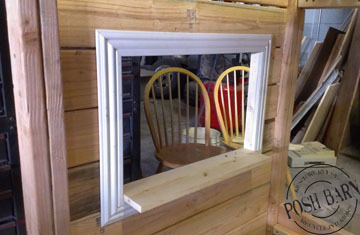
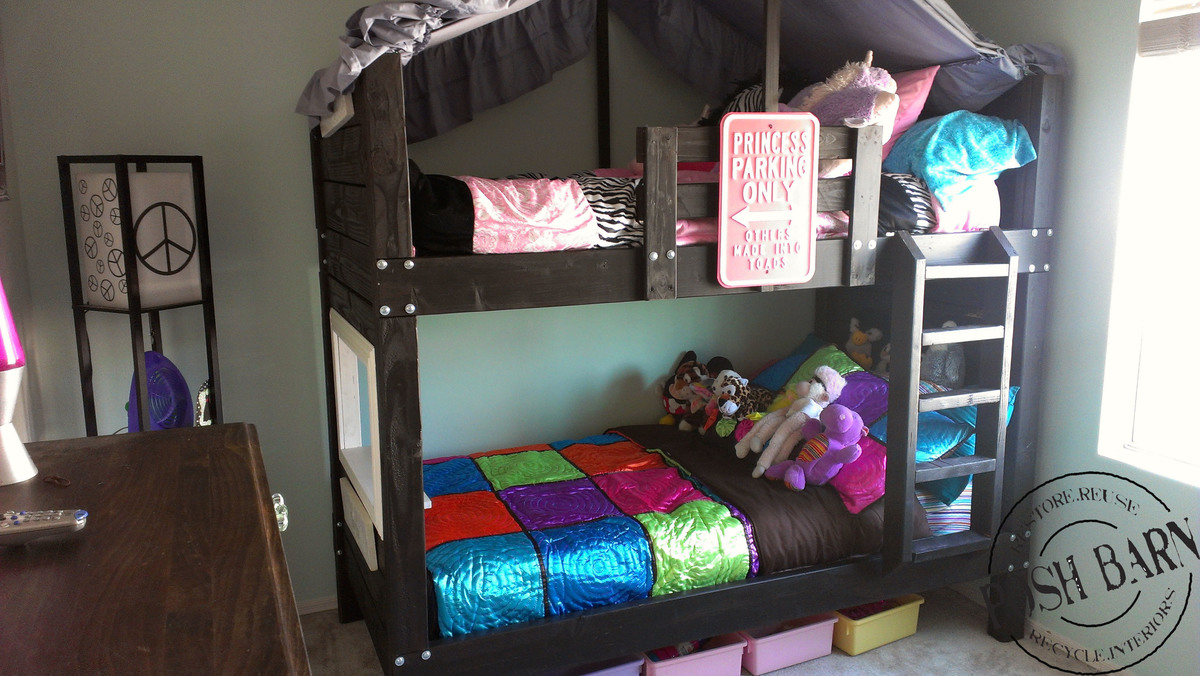
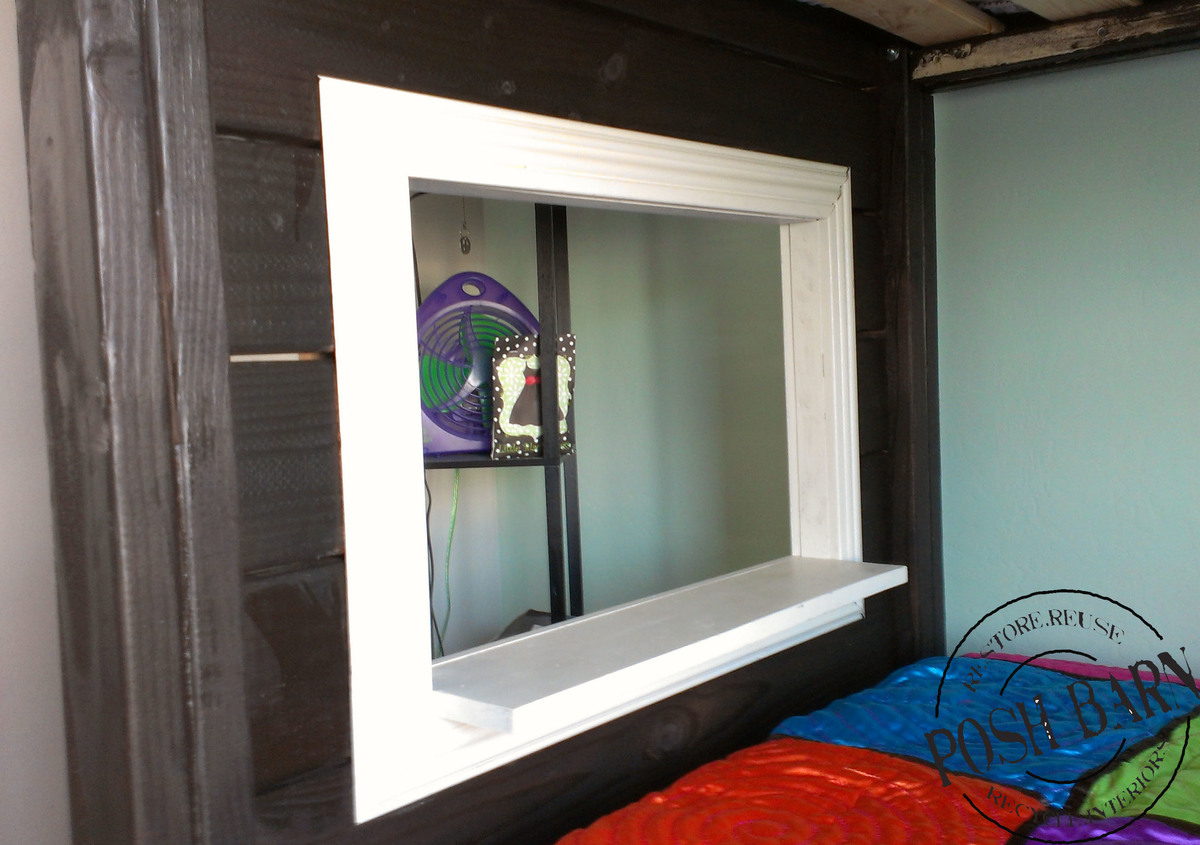
Bunk Bed

My girls wanted a bunk bed badly! I was shocked to see the prices shopping around at local furniture stores. So I made one :)
Bed is constructed with all pine wood and stained with Kona color stain. I added a few fun things like a window and a tent on top. These were really simple. Email me if you have any questions.

Built from Plan(s)
Estimated Cost
250.00
Estimated Time Investment
Week Long Project (20 Hours or More)
Finish Used
Stain color: Kona
Stain was sprayed on and a Matte finish poly for protection
Stain was sprayed on and a Matte finish poly for protection
Recommended Skill Level
Beginner