Community Brag Posts

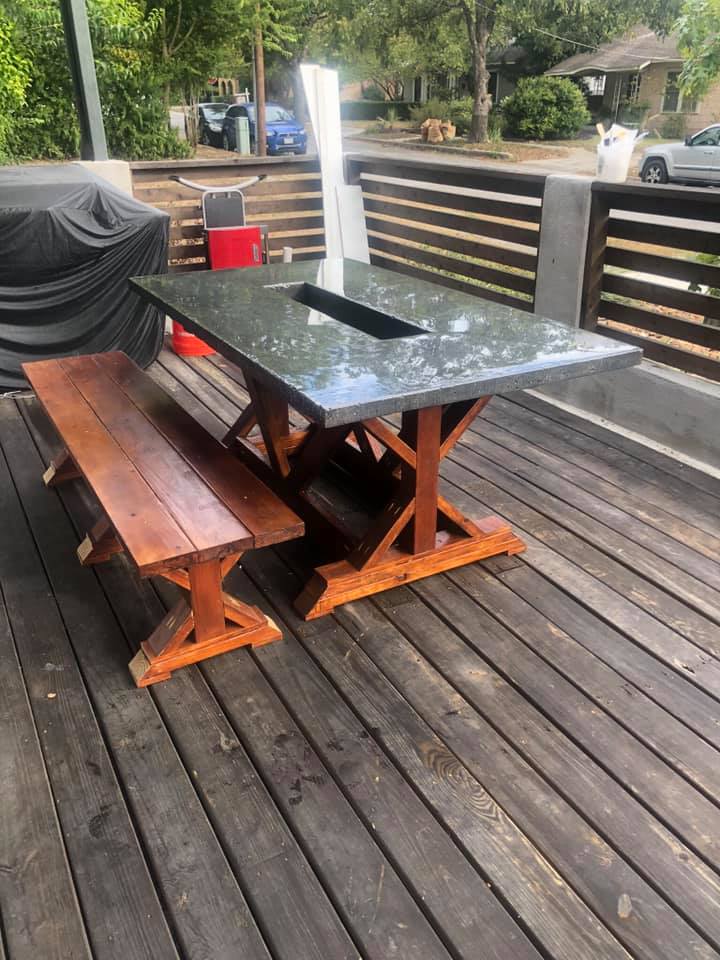
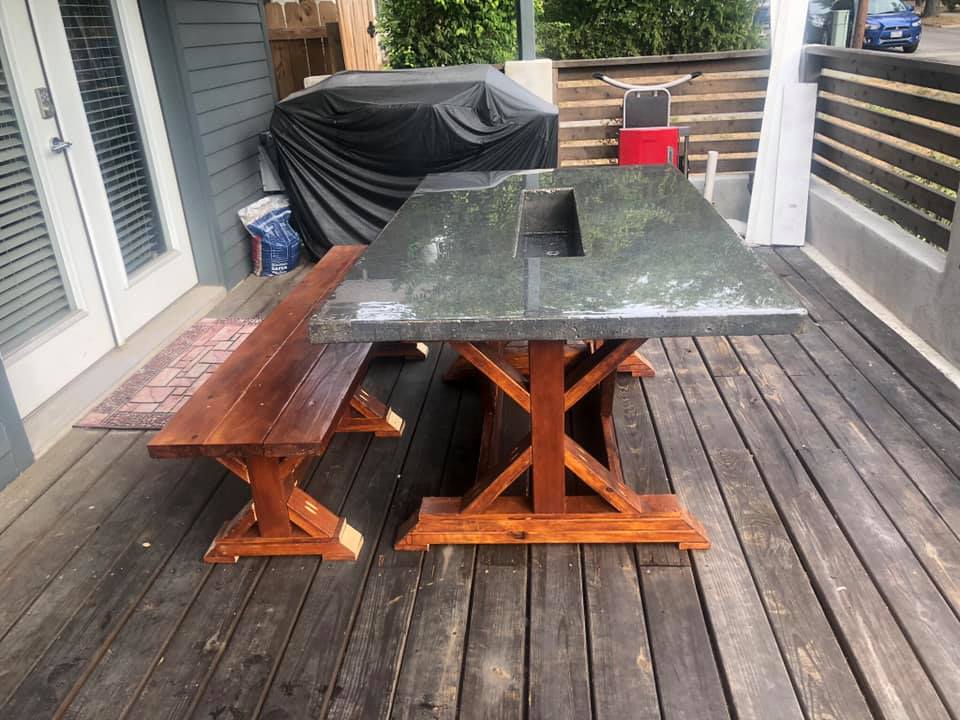
Cedar Fence Board Planter Box

Submitted by iowachap on Sat, 03/15/2014 - 19:40

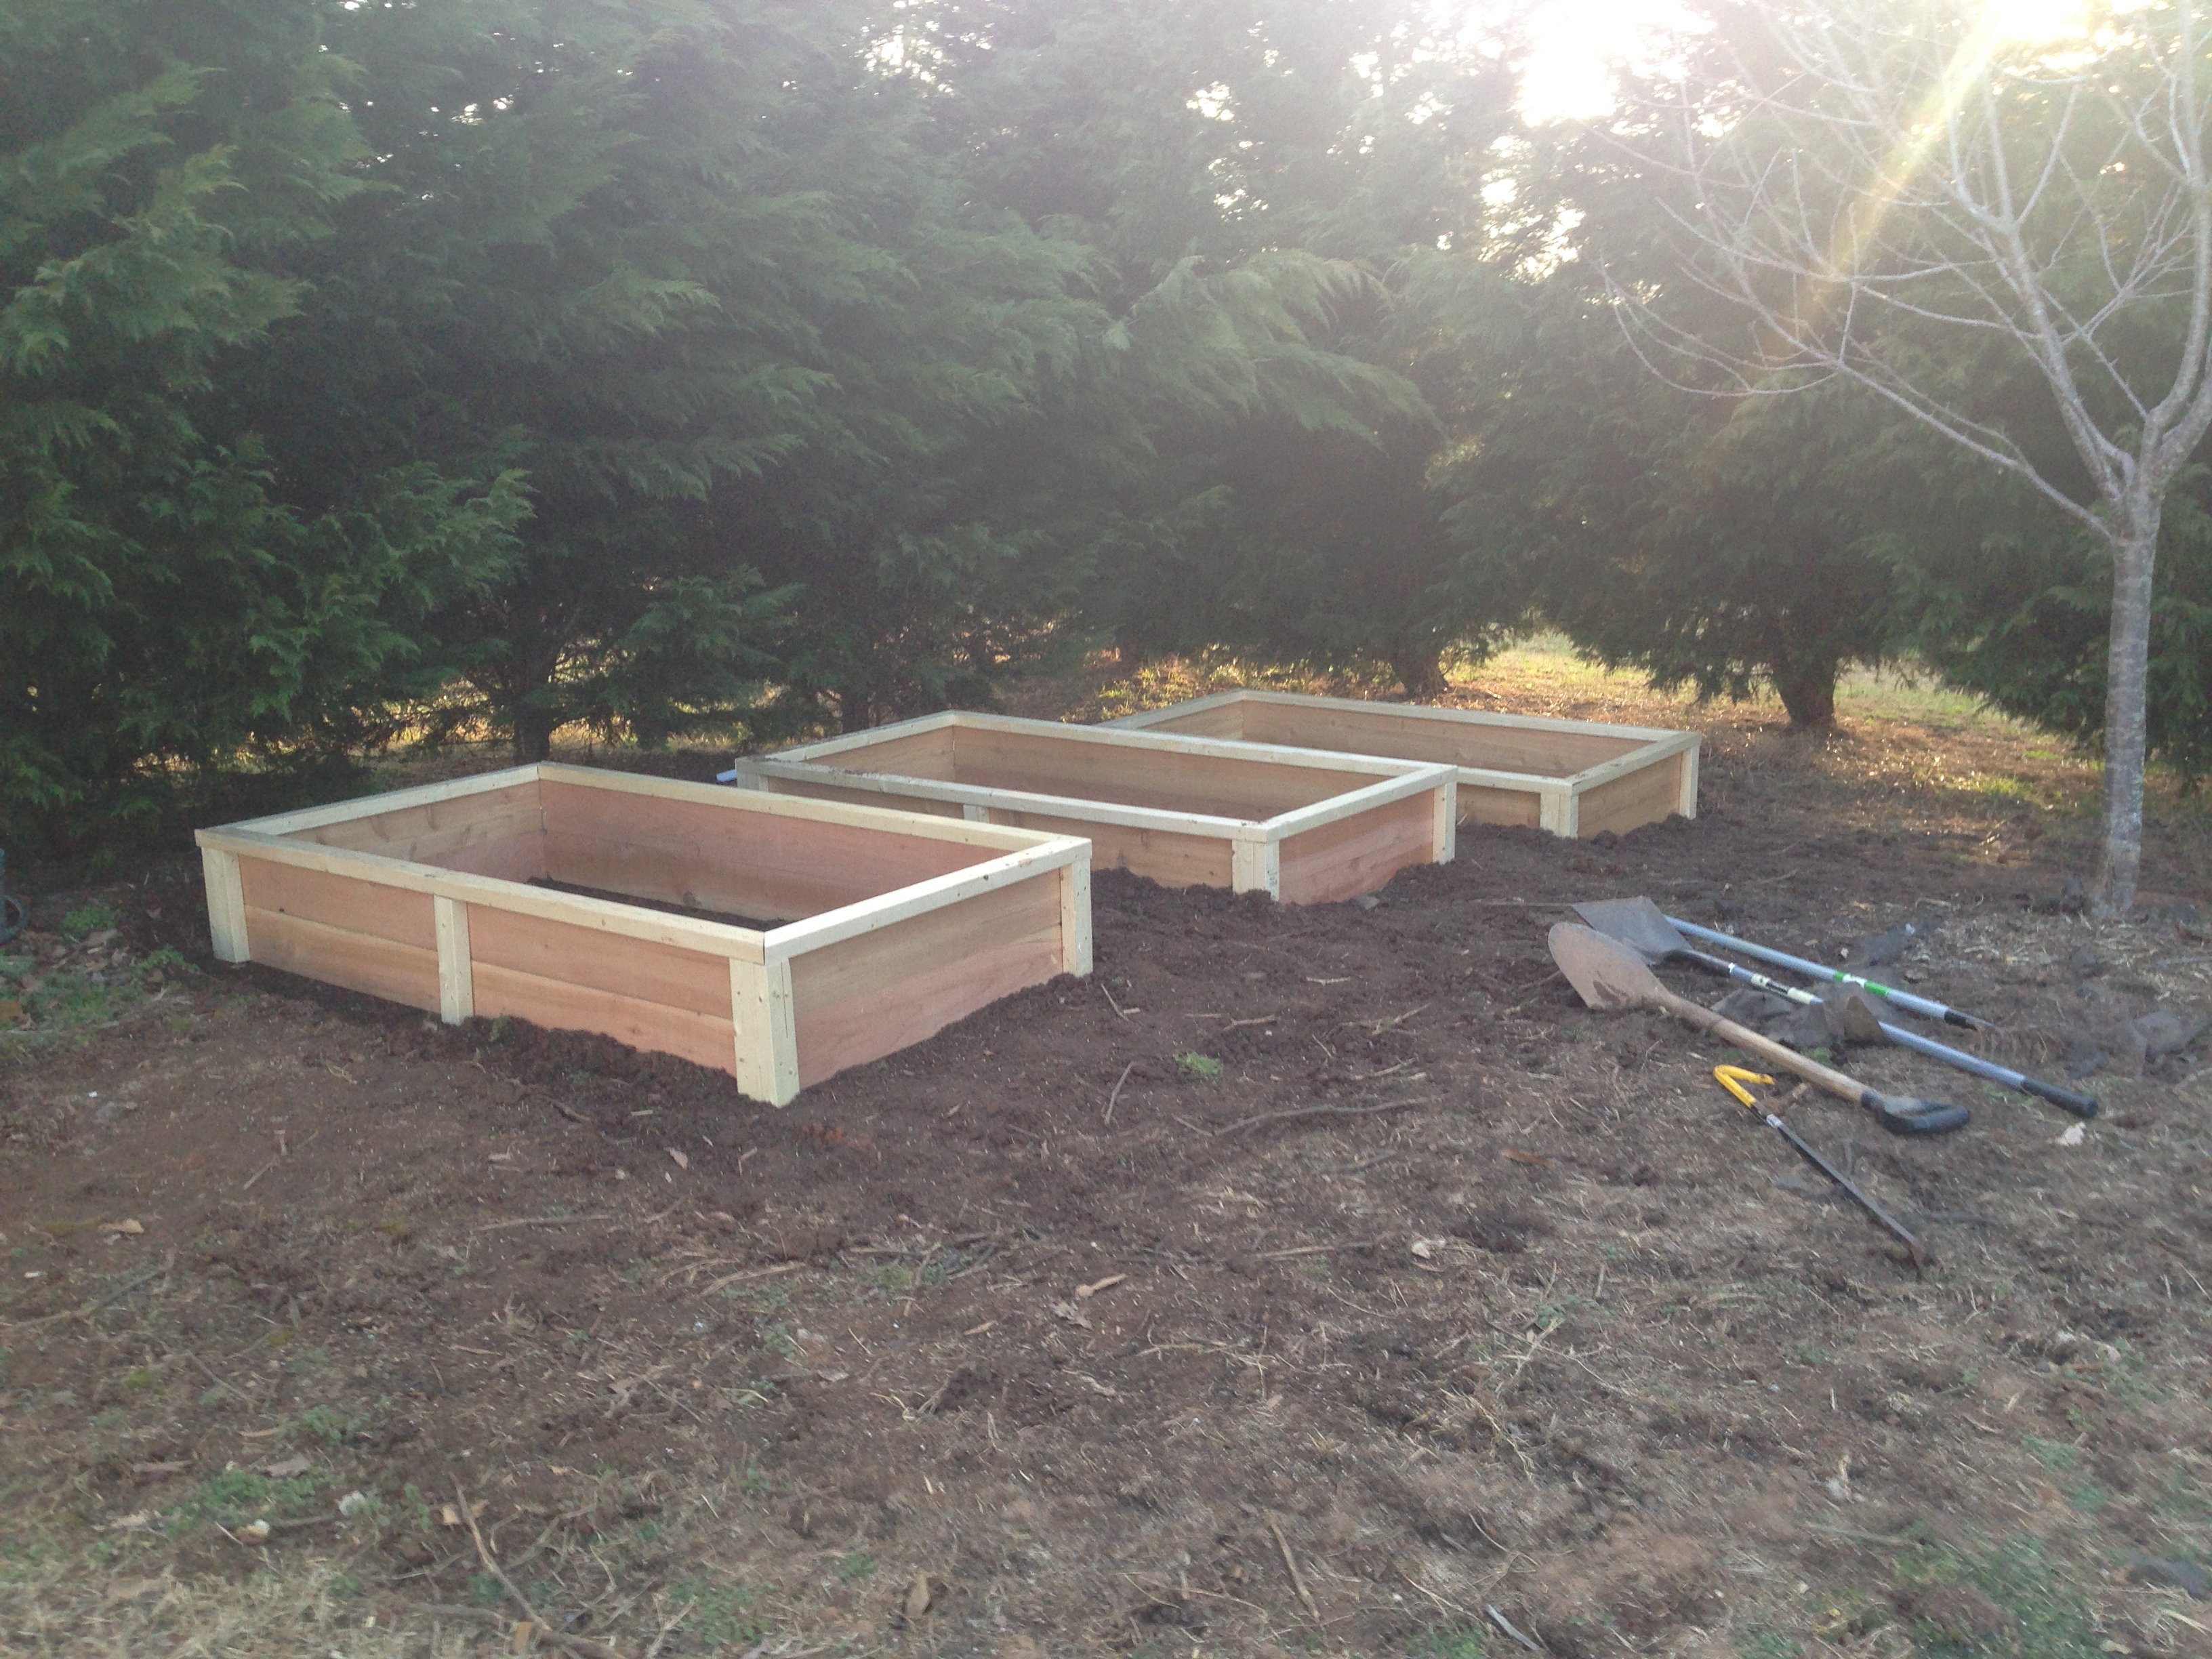
Using Ana's 10 dollar raised garden planter box idea, I made my own using the cedar fence boards and then used 2 x 3 x 8 studs for the L corner supports and mid center support along with top rail. This photo is the first 3, I will have a total of 6 boxes. Will post more as I progress.

Estimated Cost
20 to 25 dollars per box
Estimated Time Investment
Afternoon Project (3-6 Hours)
Finish Used
I used 6 fence boards, 2 for each side of the 6' long runs, and 1 for each short 3' section cut in half.

I got the 6' x 5 1/2 " x 5/8 " cedar fence boards at the orange box

I used 2 x 3 x 8 boards for the corners the middle support and the top rail. I got these at the blue box

I used 2 " and 2 1/2" exterior star bit screws.

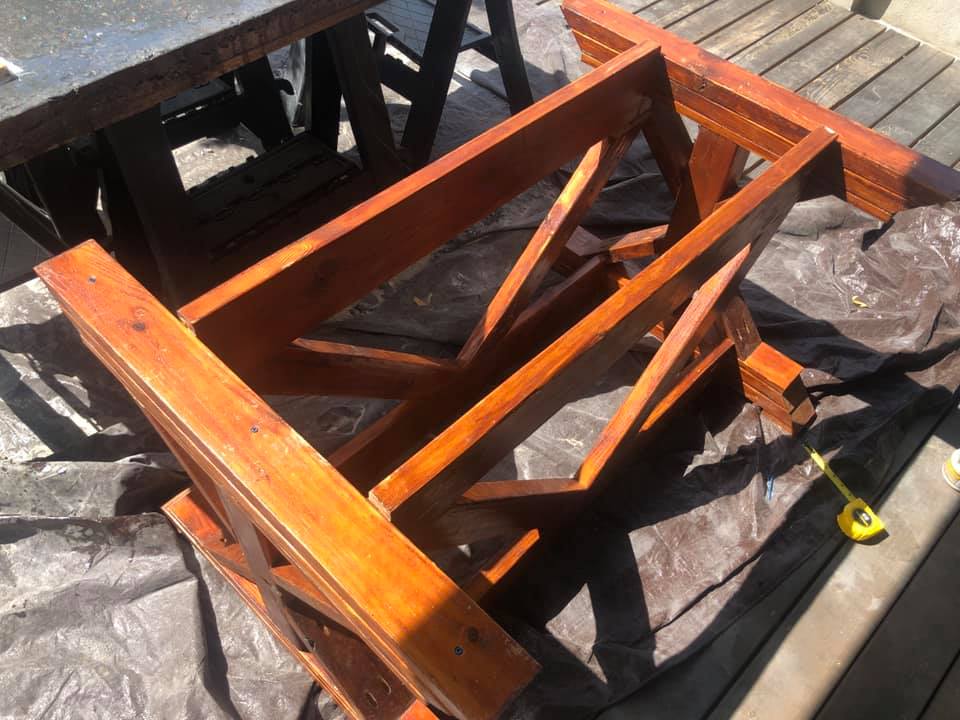
NOTE: I pre drilled holes in the fence boards and screwed all the boards to the L corner sections from the inside out, so the screws are on the inside of the box, they did not poke through the 2 x 3 boards.

Instead of trying to measure how far off the side of the board I needed to go to match the vertical 2 x 3 boards, I just cut 10 11 inch long 2 x3 sections, and then used the 2 1/2" screws and made 4 L corner pieces the shorter side I screwed the short 3 foot length fence boards too, once I had both my short sections screwed to the L corner sections, I then stood one up and screwed 2 of the 6' length boards to the L corner section. Then the other side.

Once all 4 walls were done, I would then measure 3' in the middle of the 6' long side runs, and put in an additional 2 x 3 x 11" again screwed from the inside of the box out.

Now that all the 2 x 3 x 11" L corners and side support sections were connected to the fence boards I then cut 76 1/4" 2 x3 boards one for each length run, and then 2 26" 2 x 3 sections that were all cut on 45 degree angle to complete the top rail.
Recommended Skill Level
Starter Project

Playhouse

We built this playhouse for our daughter's 6th birthday. She absolutely loves it! We were looking at purchasing one, but they were way out of our budget. Ana saved the day with these plans :).

Estimated Cost
$320.00
Estimated Time Investment
Weekend Project (10-20 Hours)
Finish Used
We painted the house with white Pittsburg Ultra Exterior Latex paint. The mailbox, door and shutters were all painted with Pink Viburnum Sherwin Williams Satin Exterior paint.
Recommended Skill Level
Intermediate
Seasonal And Holiday

Nesting Office Station

Submitted by Sb1212 on Tue, 07/14/2020 - 18:38

So loving this nesting office station❤️! We will have a sofa sleeper in the office as well. So we needed a desk that could be moved to the wall when the sofa sleeper is being used by guest. I saw a post from Ana for her Nesting Grill Station and I came up with the idea to make this nesting office station. The cabinet includes a file folder drawer (which is from Ana's mail boss plans), a regular drawer, cabinet doors with shelves. One of the shelves is a pull out shelf for the printer. I think it came together great! Design for nesting desk inspired by these plans: https://www.ana-white.com/woodworking-projects/nesting-grill-station https://www.ana-white.com/woodworking-projects/mail-boss

Estimated Time Investment
Weekend Project (10-20 Hours)
Finish Used
Minwax Golden Pecan
Valspar Signature Ultra White in satin
Recommended Skill Level
Intermediate

Comments

Sb1212

Sat, 10/03/2020 - 08:35

Hi, Thank you! Actually I didn't add wheels to the design since this will be in an office with thick carpeting. I added adjustable metal foot pads to the bottom of the desk.

Converted TV wall niche

Submitted by Vol4Life1 on Tue, 12/13/2016 - 05:35

We bought this house about a year ago and we finally got around to removing this pointless niche!  The center divider and bottom were removed.  The cabinet and hutch were assembled seperately.  


This is still a work of progress.  I am looking for a nice decorative molding face for the top.  If anyone has any suggestions please let me know!  We will most likely paint it white to match the fireplace mantle.

Estimated Cost
300
Estimated Time Investment
Week Long Project (20 Hours or More)
Finish Used
Paint
Recommended Skill Level
Intermediate

First Major Furniture Project

Submitted by dfraley22 on Tue, 09/16/2014 - 11:57

This was my first major furniture project. My daughter wanted a changing table and this looked like it would be a good choice.I made a few modifications; it's a little taller as my daughter and her husband are on the tall side, I also added a small rail to keep the changing pad from sliding off. Overall it was a great learning experience. I have built several outdoor pens and small houses for our chickens, but this was my first attempt at a piece of furniture. I think it turned out well, and my daughter and her husband are happy with it (and that is what matters).Of course I see the mistakes but I learned from them and now know what to do (or not to do) next time.  Plans are great, easy to follow ....thank you ANA!! Can't wait to try another plan.

Built from Plan(s)
Estimated Cost
about $150
Estimated Time Investment
Weekend Project (10-20 Hours)
Finish Used
Rustoleum - American Walnut, Weathered Gray, Wheat, Willow with a top of American Walnut, and Carrigton. 3 coats of polycrylic, and the frame is HGTV Home Cream from Sherwin Williams.
Recommended Skill Level
Intermediate

Shoe Dresser

I had this space in my mudroom that was a perfect spot to make a custom shoe dresser. I adjusted the plans I found on this website to custom make storage for shoes. Now this weird little space is functional.

Built from Plan(s)
Estimated Cost
80
Estimated Time Investment
Day Project (6-9 Hours)
Finish Used
Rustoleum chalk paint Serenity Blue, classic grey and special walnut Minwax
Recommended Skill Level
Intermediate

Comments

Outdoor Bar Height Table with Built-In Ice Trays

Submitted by RuthAU on Fri, 01/27/2017 - 22:11

This was my first furniture project and only my 2nd woodworking project, the previous one a cubby house over 20 years ago, so I was a bit nervous. I did lots of planning, research and designing before the first cut. I incorporated ideas from Ana projects as well as from other sites and learned how to use a drop saw, various sanders and the pocket hole jig.

We wanted a tall table because when sitting a a regular height table the view is blocked by the deck railing.

I decided to make it out of hardwood for durability in the Australian outdoors and also because we get sea air where we are. The hardwood (Blackbutt) was challenging to work with - extremely heavy and difficult to drill into, but the finished product is SO solid and will outlive us all. Due to the weight and density of the timber I overengineered as far as joining went, using more pocket holes than usual.

I saw the idea of the built in ice troughs years ago and was keen to incorporate them into my table. I also made the legs detachable so that the table top could be moved out onto the deck once it was finished and the legs added in situ. Once it was set up my husband put big screws into the legs just in case but it would really take an earthquake to move this thing.

I managed to build it over 3 weekends and finished it just in time for our family Christmas party but it only had 1 coat of stain on it at that stage. I finished it off later and we also decided that the ice trough covers would look good in a contrasting colour so did them in charcoal. If I made it again it would be a much quicker project as there was alot of 'firsts' and learning along the way.

The dimensions are:

2660mm long (about 8' 9")

1150mm wide (about 3' 9.5")

1165mm high (about 3' 10")

The legs are solid - 140 x 140mm (5.5")

It seats 10 - 12 comfortably and 14 at a squeeze.

We got the bar stools 2nd hand for an absolute steal - 12 for $200! They are handmade hardwood too and look great.

The timber was quite expensive but I was able to use the work account so got it at trade price. This would be a very expensive table to buy but all up it cost us about AU$1100.

This project was not exactly easy but I would class myself as a novice. With the right planning and preparation (plus stubbornness) anyone could do this :-)

Estimated Cost
About AU$1100
Estimated Time Investment
Week Long Project (20 Hours or More)
Finish Used
Intergrain Natural Stain - semi transparent - Redwood for the majority and Charcoal for the trough covers.
Recommended Skill Level
Beginner

Comments

Modified desk into makeup vanity

Submitted by jlfreck23 on Mon, 12/14/2020 - 19:22

I built this for my adult daughter’s Christmas present. I modified the plan to have three drawers instead of the cubby. I also tapered the bottom of the legs. I added a back piece to hold a mirror. I also added door knobs to the back for necklaces.

The top and the back board are both 4 boards glued and clamped together. I finished the edges of the top, drawer fronts, and the back board with an ogee router bit.

Estimated Cost
$140 (lumber is expensive right now)
Estimated Time Investment
Weekend Project (10-20 Hours)
Finish Used
Mahogany stain on the top and drawer faces. It is a golden oak stain for the base. Finished with a satin polyurethane.
Recommended Skill Level
Intermediate

Rolling Side Table

Submitted by Bradnag on Sat, 02/03/2018 - 13:04

I had a bunch of scrap 3/4" MDF, so I used that instead of wood. The result is still as sturdy but a bit heavier than if I'd have used pine, which has added to the table's stability. I added a cup holder, but otherwise kept to the base instructions with no extra mods. I put an extra thick layer of polycrylic on the top surface, to protect the MDF from absorbing any spills. This was just a test run, so I didn't bother filling any of the visable pocket holes. Given how cheap and easy this was to build, I imagine I'll end up making 2-3 more.

Estimated Cost
$10
Estimated Time Investment
An Hour or Two (0-2 Hours)
Finish Used
Dutch Boy primer+paint, Minwax Polycrylic
Recommended Skill Level
Beginner

Quad Bunkbeds

Submitted by Newfey on Thu, 07/18/2013 - 19:29

This is a set of bunk beds that I made for my daughter Alicia for their getaway home at Canadian Lakes, MI. Now their children can invite their friends and have a fun place to sleep.

Recommended Skill Level
Intermediate

Comments

JoanneS

Fri, 07/19/2013 - 02:37

Wow! This looks absolutely amazing! I like the light and shelf in each bunk too. Spectacular!

spiceylg

Fri, 07/19/2013 - 04:45

Newfey, these are awesome! I've seen pics of this type of bunk over the years, but never anybody attempting them as a DIY from a non-professional, unless you are one? Either way, they certainly look professionally done. Love, love, love!

In reply to by spiceylg

Newfey

Fri, 07/19/2013 - 07:56

I am not a professional by any means and have a limited tool supply. My daughter sent me a picture and asked if I could make them for her. It was a big project as their getaway home is 165 miles from where I live. It took quite a few weekends to complete.

kelleer

Fri, 07/19/2013 - 08:12

This is totally awesome. were there plans that you might have used as a base to go from or were you able to design it on your own?

In reply to by kelleer

Newfey

Fri, 07/19/2013 - 09:24

That was one of the problems, I had no plans, only the picture as a reference. It was a design as I went along and needless to say I gave a sigh of relief once that I saw the mattresses fit into their places.

Lasso the Moon

Fri, 07/19/2013 - 11:49

This is a dream room. They look so beautiful! How fun to have extra places for friends to stay the weekend.
Anna

momofour09

Fri, 08/30/2013 - 06:48

I've been viewing pictures of these style bunkbeds for a while. I'm almost certain I could come up with something but most definitely lose my sanity along the way. This would be great in my girls room and you did an awesome job!

meganhammon29

Sat, 07/25/2015 - 20:25

Ana I am looking to see if you have actual plans for a quad bunk bed? Also what about a quad corner bunk bed? We are trying to put our 4 girls in one large room and this would really help make it work!

Farmhouse Bed Mod

Submitted by adck9d on Thu, 05/12/2022 - 14:01

Took the Farmhouse bed model and incorporated a geometric headboard. This thing is heavy!

Comments

Wife's Kindergarten Classroom

Been a while since I had time to actually build anything worth posting about! My wife wanted some items for her Kindergarten classroom this year, so built several items, most inspired by the Farmhouse family.

Estimated Time Investment
Day Project (6-9 Hours)
Recommended Skill Level
Beginner

Comments

sido17

Thu, 07/18/2019 - 15:27

I would love the dimensions or plans for this. Would love to make it for my classroom.

dlee69

Tue, 07/30/2019 - 12:07

Hello

Can I please get the plans to the u shape table?

Thanks

Linguine

Mon, 08/19/2019 - 12:09

I am guessing the corner posts are 2 x 4s, the top is 2 x 10s.  It looks like the width is 6’ (looking at the floor carpet tiles being 24” square). So 2 - 2 x 10s side by side for the main part of the desk top and 2 - 2 x10s perpendicular on each side of the chair.  I guess the height is subject to choice and the length of each side would also be subject to choice or to the length of the 2 x 10s to be economical.


an educated guess would be 4 - 8’  2x10s for the top and 6 - 6’ 2 x 4s for the legs?  


Anyone else have any input here?  Open to suggestions.....

Pool Noodle Holder from DIY Planter Box

Submitted by Anonymous (not verified) on Sat, 06/04/2022 - 06:58

I modified the plans for the planter box to make a holder for Pool Noodles. I made it 40" tall and used 4-4" fence pickets and 1-5.5" fence pickets. I used a 4" spacer and the openings worked out perfect. I stained inside and out since it would show with 2 coats of the solid stain. It is perfect! Thank you so much for the inspiration and plans!

Comments

Rustic X Farmhouse Coffee Table with Storage

Submitted by Anonymous (not verified) on Sun, 02/05/2023 - 08:54

This project was made from reclaimed wood from my office where they had built a temporary safety railing out of 2x4s and 2x6s. I added a compartment for storage. The top is stained in a classic grey. I painted the body in black followed by white. I then sanded the body to allow the black to bleed through for a distressed look.

Comments

Laundry Pedestal

Submitted by jerfer on Mon, 12/26/2011 - 18:00

I modified Sausha's design, taking out the bottom shelf, adding a back brace, and putting fascia boards on. I also put in a 2x4 between the underframe and each back leg at a forty-five degree angle as braces. My legs are a bit different too. I used three 2x4's. The first leg piece goes from the plywood top to the ground. I put four screws between it and the frame. Then I took two 2x4's and placed them butted at a ninety degree angle around it flush with the frame above.

Estimated Time Investment
Weekend Project (10-20 Hours)
Finish Used
Mini-wax Bombay Mahogany
Recommended Skill Level
Beginner

Comments

moonhopping

Mon, 01/23/2012 - 13:08

I have been drooling over the original pedestal plans since they posted. When I showed them to my dad the first thing has said we could have more clearance without the bottom plat form. I am going to copy your plans this week end thank you very much.
I did want to ask do you have any vibration issue without the bottom plat form?

Thank you for sharing, great sketch –up!

Dave C (not verified)

Wed, 03/21/2012 - 14:00

Did you have any issues with machine vibration?

Fancy X Farmhouse table and bench

Submitted by Anonymous (not verified) on Wed, 10/16/2019 - 09:09

Used the fancy X farmhouse table plan with slight modifications. I decided to use a 4X4 vs two 2X4 as the main leg for the base. I thought it would provide more strength for my final product. Did the same on the bench. Then i moved the support and brace over and added an additional one to provide extra support for the concrete top and trough i made. All in all the base and the bench came out beautiful and am so over the moon with them both! It was my first project I have done (very ambitious I know) but now I am hooked!

Estimated Cost
350
Estimated Time Investment
Week Long Project (20 Hours or More)
Finish Used
Cabot Gold Pre-Tinted Sunlit Walnut Transparent Exterior Stain and Sealer
Recommended Skill Level
Intermediate

Dresser to Buffet

Submitted by tazO on Fri, 06/01/2012 - 06:07

I have been looking for a dresser to transform into a buffet. I posted on a facebook yard sale group and a wonderful woman offered me one she had been keeping in her garage for free.
Step one stripping a lot of old paint and sanding, sanding, and sanding some more. I found a stencil i like on etsy. Stenciled that design onto the top of my "buffet" with white paint and then when it was dry lightly sanded it. I then stained the entire top the color i wanted. 3 coats of varnish finish that off.
The next step was the bottom. The hardest part about that was getting all the old paint out of all the ins and outs of this piece. Once that was done, with the help of the husband, we removed all the rails and braces holding the bottom 2 sets of drawers. It was put together with interlocking pieces so taking it apart left some hold in the side and middle brace. My husband cut pieces to fit in there and were put in place with wood glue. Once dried they were sanded completely smooth. We used a 1/4" piece of luan for the back and 3/4 piece of pine for the bottom of the now open area. A little trim, 2 coats of white enamel and some new hardware for the drawers and tada a new buffet..lol.
Just got it in yesterday so I'm still decorating, but i love the way it turned out!

Estimated Cost
$40
Estimated Time Investment
Weekend Project (10-20 Hours)
Recommended Skill Level
Beginner

Comments

spiceylg

Fri, 06/01/2012 - 06:29

That came out really nice. Love the stencil touch, too! I am looking for a dresser to turn into a media console. Never thought about posting on FB. Great idea!

Storage sofa on steroids!

Submitted by Imadeit on Wed, 07/20/2016 - 12:59

First furniture project, first Kreg jig use.

Heavily adapted storage sofa plans.  Used existing day bed mattresses.  Made all wood surfaces finished with nice cladding, and all fabric portions removable and washable.

Added arms, and a back ledge.  Ledge is hinged to allow access to wall behind so I can get to the outlets.

Lots of work, but it is AWESOME.  Thanks for the inspiration Ana!

Built from Plan(s)
Estimated Cost
$700 including the fabric
Estimated Time Investment
Week Long Project (20 Hours or More)
Finish Used
Dark gray latex paint, and gel stain for the shelf.
Recommended Skill Level
Intermediate

Comments

WackyPup

Sun, 01/22/2017 - 13:37

This is almost exactly what I want to do! I have a dog who loves to rub on furniture and I don't want upholstery. Why did you make the back thicker? Is it just for added shelf space along the back? Thanks for posting the pictures. Very inspiring!

Imadeit

Mon, 02/20/2017 - 07:18

Sorry for the delay in seeing your question.  I haven't signed on to this site for a while.  You are correct thinking that I wanted to have shelf space along the back.  The sectional is the entire width of the wall and I knew that I would not be able to have end tables.  I wanted a way to have a lamp and a place to put drinks, etc.  As it turns out the arms of the sectional are great for holding my beverage.  The shelf holds my lamp and some baskets with general stuff like the remotes inside.  Thank you for the compliment.

sahorn01

Wed, 01/18/2023 - 09:28

Hi! I know this is a very old post but I would love try to make something similar to what you did in your storage sofa modifications - especially the wider frame and armrests. Any chance you wrote down your plans or have more pictures of your build? I also would love to understand how you made your upholstery/fabric removable. Did you follow any plan for making the cushions? Thanks in advance!

Kids Storage Bench

Submitted by ValBryant on Thu, 08/16/2012 - 09:10

After building a few things from plans I decided to come up with something on my own, and from scraps I made this bench for my son.

Built from Plan(s)
Estimated Cost
Scraps
Estimated Time Investment
An Hour or Two (0-2 Hours)
Finish Used
Dark Walnut
Recommended Skill Level
Starter Project
Back