Community Brag Posts

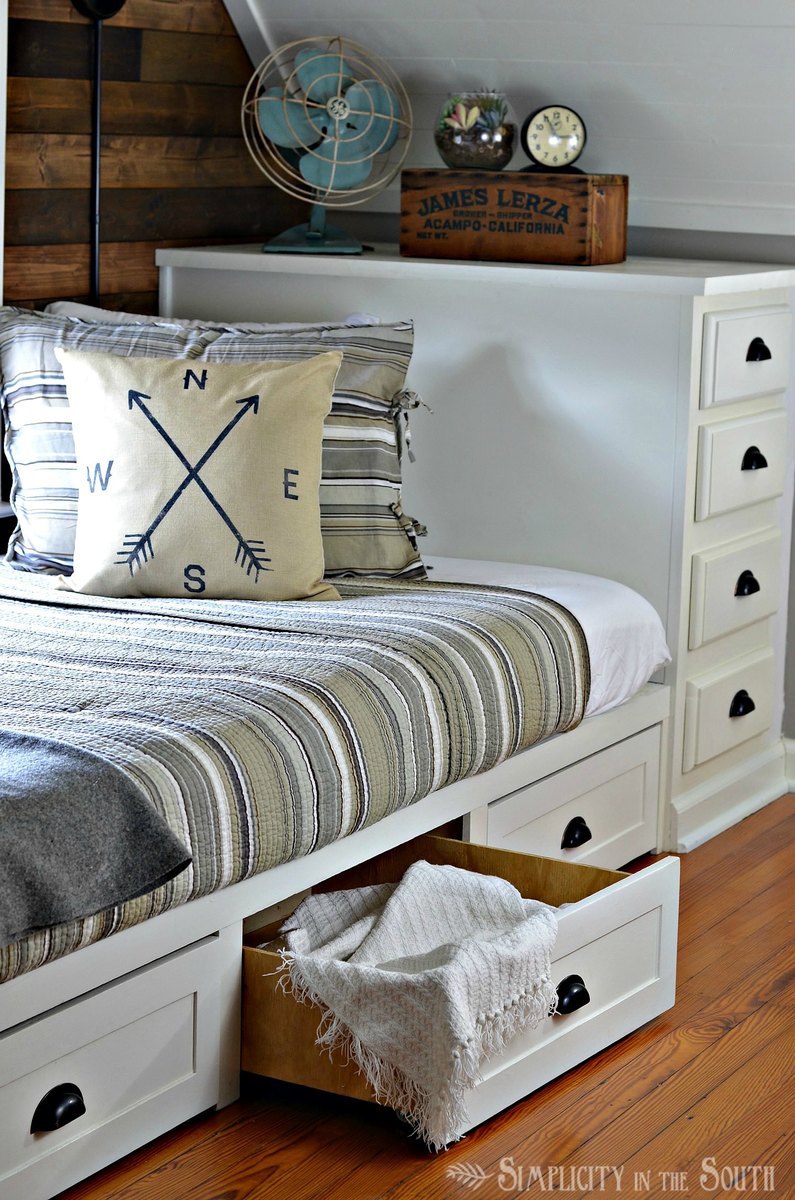
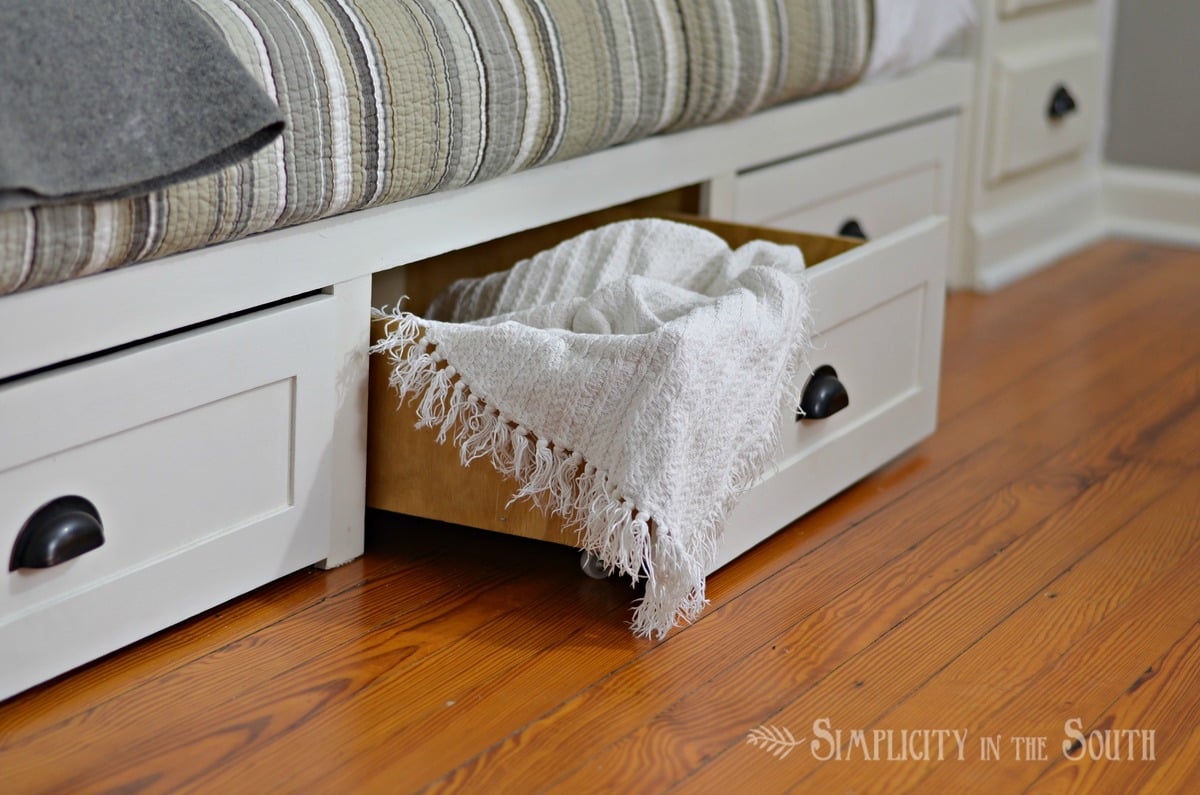
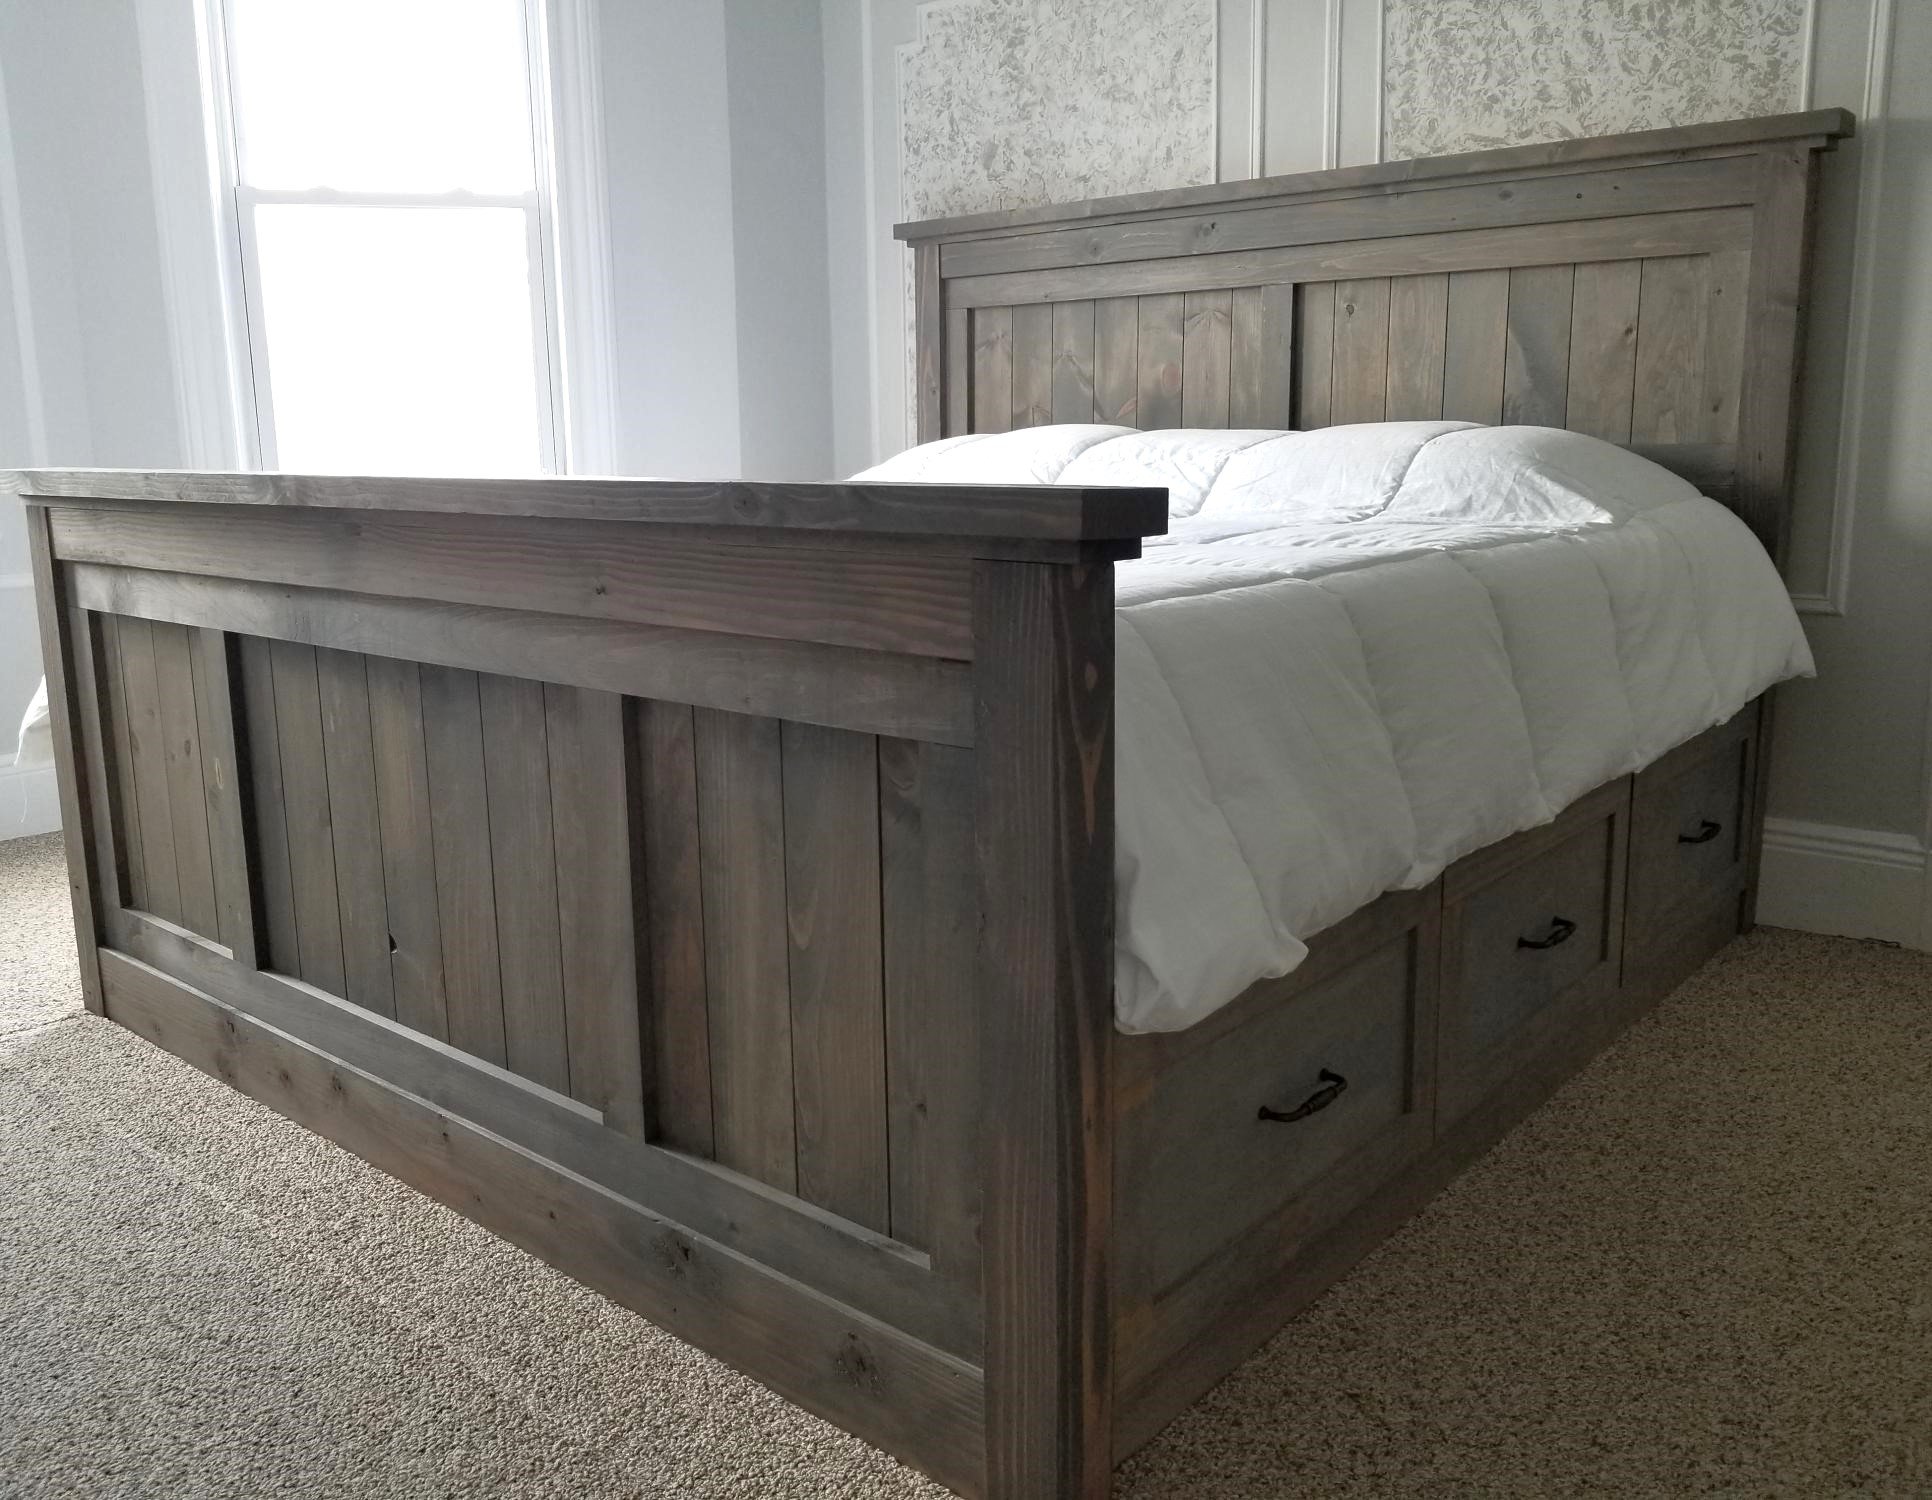
Built-In Bed with Trundle Drawers

Submitted by Anonymous (not verified) on Tue, 12/06/2016 - 18:05

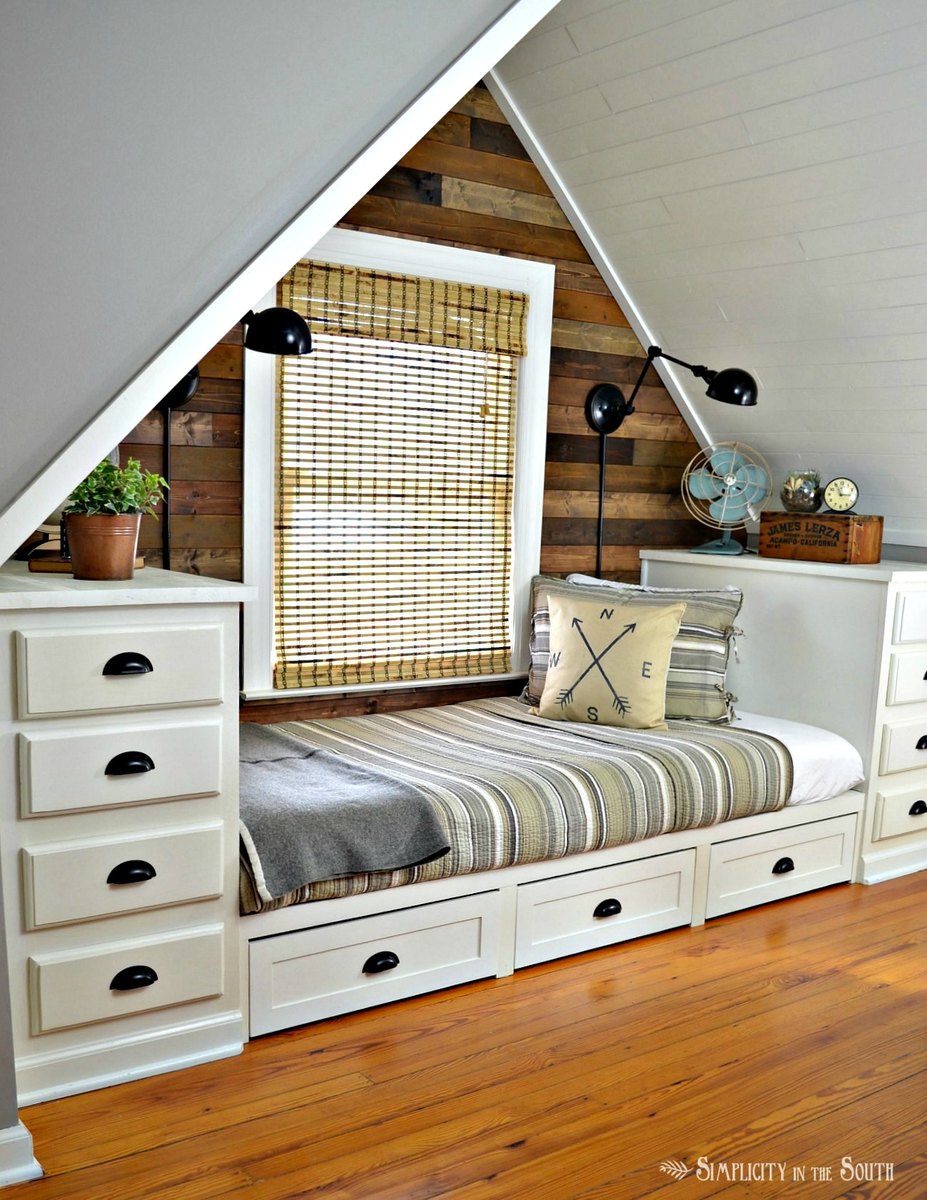
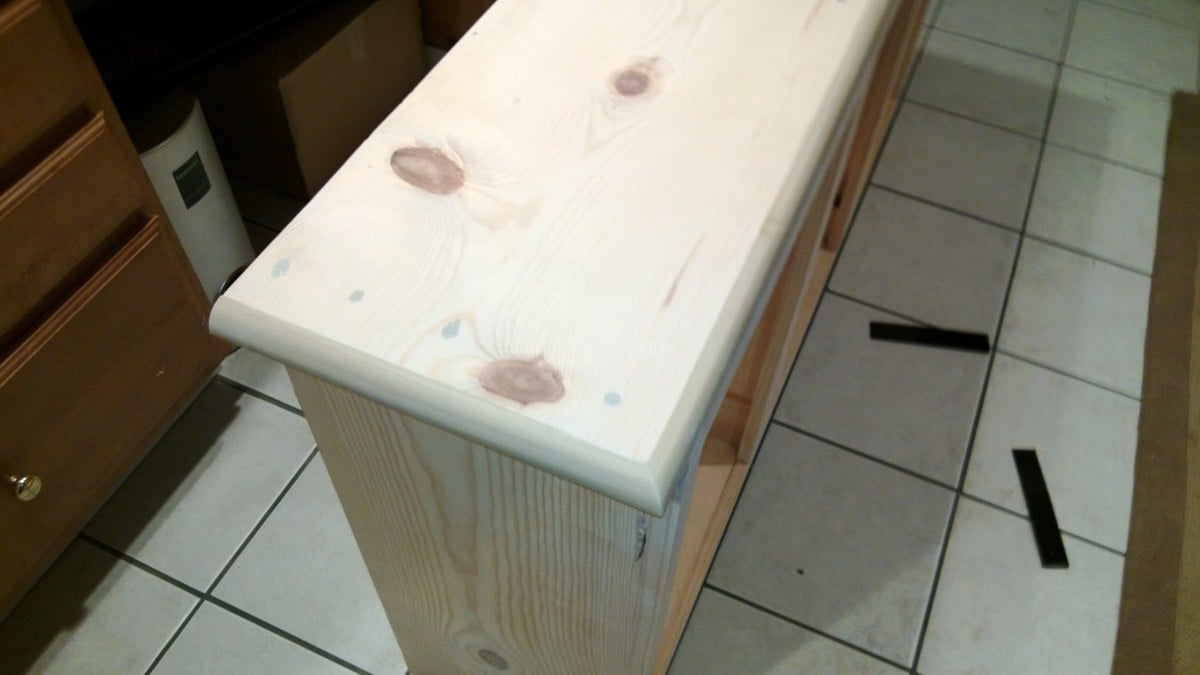
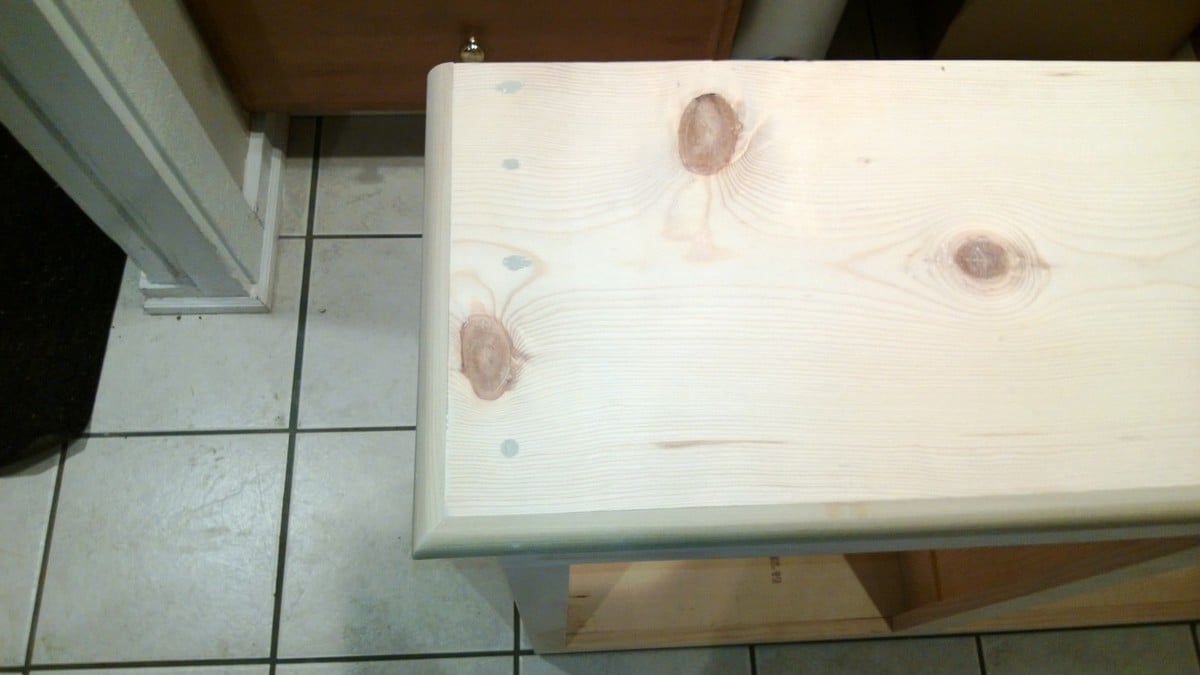
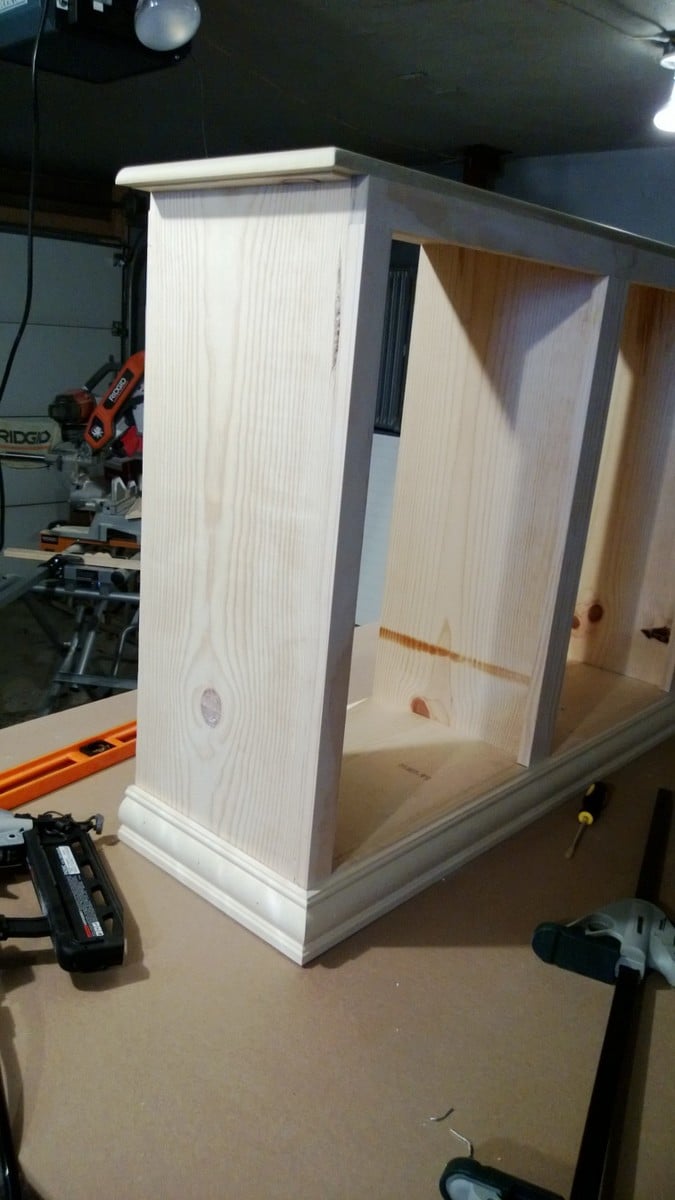
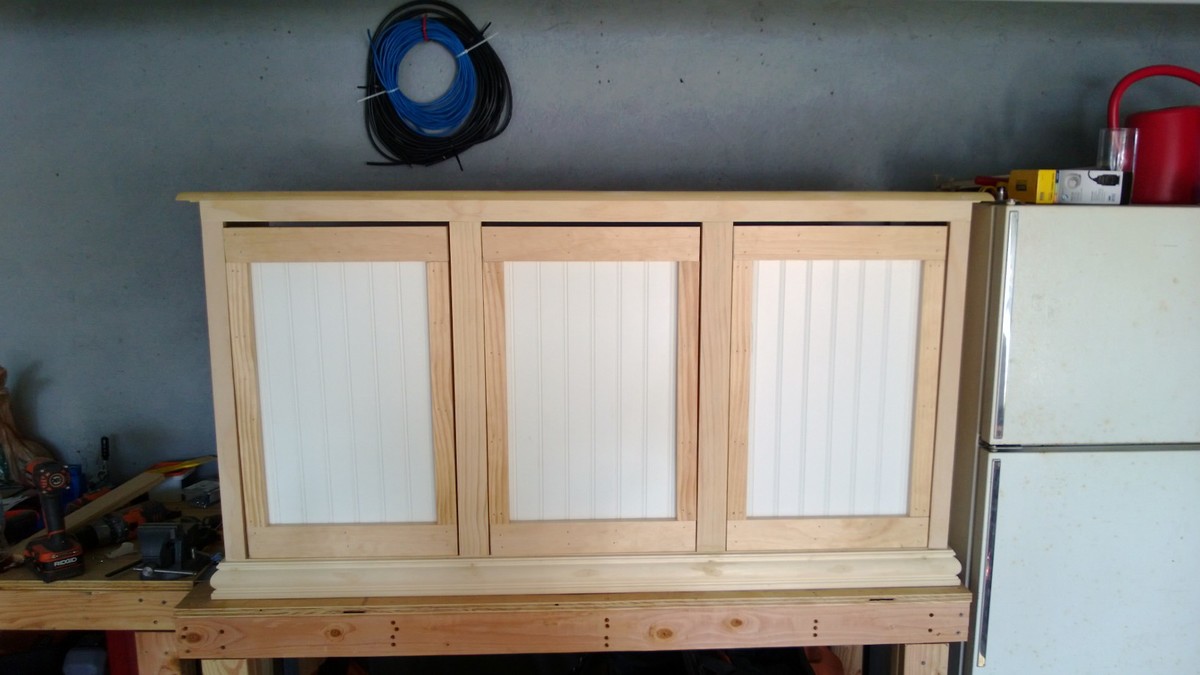
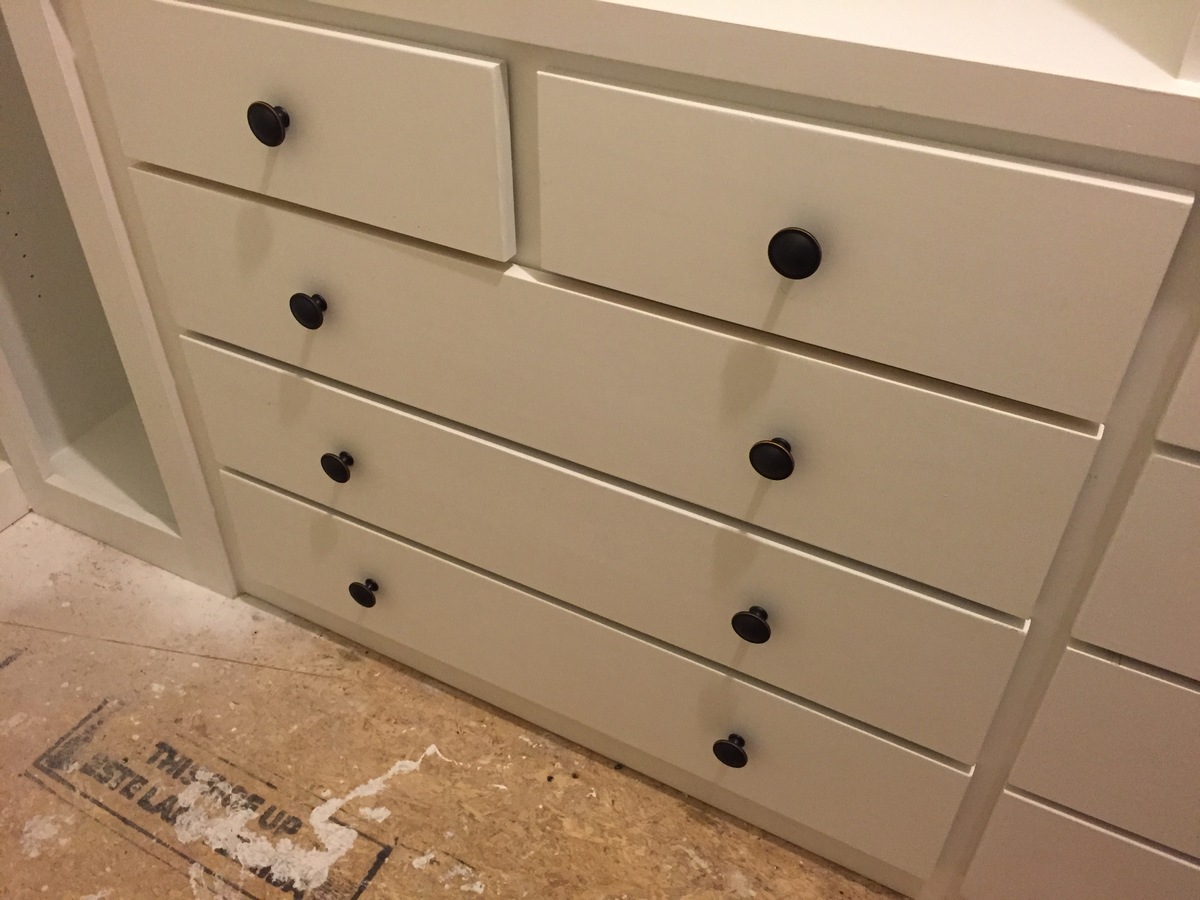
My oldest son's room is only 97 square feet. We needed to add the maximum amount of storage in the small, awkwardly-shaped room. My husband and I decided to make a built-in bed using a couple of stock cabinets to flank the bed. Using Ana White's plans, we made 3 rolling trundle drawers to go underneath. 

Estimated Cost
Cost for the trundle drawers, themselves, with the hardware was $14.00 per drawer. The total cost for the built-in bed, trundle drawers, and 2 cabinets that flank the bed was $480.
Estimated Time Investment
Weekend Project (10-20 Hours)
Finish Used
Painted
Recommended Skill Level
Intermediate

Comments

Three Bin Laundry Sorter

Submitted by Meyer1120 on Mon, 01/21/2013 - 21:10

Modified the original plan to meet our needs of a laundry sorter. Had problems with the hinges so ditched them. I used dowels with a combination of a chamfer cut on the bottom of the door. Dado-ed the trim on the doors and slide the bead board panels in. The face frame is all held together with pocket hole screws, which I highly recommend because it eliminates nail holes and keeps the face frame square. This was my first wood working project, took me a little long to get it done. Thanks for looking.

Modified January 28

So here are some more pictures of my project. I don't really have any good pictures of the dowels. But what I can tell you is, I drilled holes through the sides of the face frame and the trim pieces and then measured where the holes would be in relation to the "drawer". I then drilled holes in the drawers at those measurements, I was careful to not go to deep. I think I went in half an inch. After that I started at one end and placed the dowels in, then put each drawer in. It wasn't easy but with a little patience it worked. The key is to wax the dowels so they will last longer as well. I also am including pictures of the top and bottom trim. On the top the original plans called for an overhang piece and I didn't like the way that looked. I ran the top board an inch long on each side and then wrapped it in quarter round trim. I did this because I plan on adding the Mimi Hutch Top. The bottom was built per the plan, but I ran into a problem with my bottom trim not being level and you could tell. So I raised the whole unit on 1 1/2 legs then placed it on a level surface and again wrapped it in a decorative trim. The key on both trims was a nice miter joint. Last picture I added was of my stoppers. I took scrap from the 1x2 trim and cut them to an inch and a half or two (can't really remember), then using the Kreg Jig drill bit drilled recessed holes. I then opened the doors until the side 45s were level then mounted the blocks on each side. I feel that it is better than a chain or string catch. Again thanks for looking and I hope I answered all of your questions.

Estimated Time Investment
Week Long Project (20 Hours or More)
Finish Used
Primmer and paint
Recommended Skill Level
Intermediate

Comments

moosmani

Tue, 01/22/2013 - 11:29

Dowels! What a great idea! Would you mind sharing how you did it? Could you possibly add some pictures showing the dowels? You did a great job. It looks beautiful.

mullid1

Thu, 01/24/2013 - 09:27

I love what you have made! Could you post pictures of the top and the bottom trim? I'm very impressed that this is your first project!

mullid1

Tue, 01/29/2013 - 09:12

Thank you for the photos and new instructions! You're awesome!!!

VLT

Fri, 03/15/2013 - 12:05

This is lovely; I like the trim job you did. Is there a way to post the plans so we can all get to them. I cannot believe this was your first project!

Liz82

Sat, 11/16/2013 - 18:23

I am a little confused. I love the three bin laundry sorter, but everyone is mentioning plans. I am not finding plans for it on the site. Also, what goes in to hold the clothes? There may be obvious answers, but I am not seeing them. I'd appreciate any help you could give.

towering inferno

Tue, 12/02/2014 - 02:58

I've been thinking of working up one very similar to this, also with 3 bins, but I didn't want to use chain either.  Those stoppers will be ideal - do you put them on both sides or is one enough?  Thanks for the share!

Karahd

Sat, 01/24/2015 - 11:29

Hi-

Im not sure if you still have the plans to this awesome project, but if you do, would you be able to share them with me? Ive been looking to make something like this forever, but just couldnt find any help!

thanks,
karah
[email protected]

petemoore

Mon, 02/08/2016 - 07:46

hi im the same as everyone can you send me the build plans with dimensions etc

many thanks

virginie D.

Wed, 03/02/2016 - 14:49

Hi

It's exactely what i need. so amazing. Someone can send me the plan please? I'm so newbie to do tat all by myself without plans. Thanks you.

virginie D.

Wed, 03/02/2016 - 14:49

Hi

It's exactely what i need. so amazing. Someone can send me the plan please? I'm so newbie to do tat all by myself without plans. Thanks you.

ajbreaux

Mon, 05/02/2016 - 14:22

My wife loves this . if its possible could i get the plans and hopefully have time to build it to give to her for mothers day ? thanks 

Kimhubbell

Fri, 12/02/2016 - 11:01

I would also love to have the plans for the 3 bin sorter. I am barely an intermediate so more specifics would be a huge help! Thanks to anyone who could help.

lworthy

Mon, 07/10/2017 - 04:19

 I absolutely LOVE your laundry sorter!!!! You did a fabulous job and the TRIM, WOW amazing!!!! I've searched Ana's website and cant find the plans' could you please email me the plans to [email protected].  I started building my own furinture back in October 2016 and the reward is amazing... Keep up the good work.

Happy Building,

Lisa

woodmama

Tue, 01/16/2018 - 22:18

I'm too new at woodworking to be able to tackle this right now, but would love to download the plans for future. My most successful project so far is a pretty standard bookshelf. I got a free plan, with lots of guidelines and explanations, at https://tinyurl.com/ydeup8lo -- it came with a 440 page guide, "The Art of Woodworking" that has tips and techniques, and am plowing through that right now.

momto3

Wed, 02/28/2018 - 12:53

This is amazing.  I am very new to woodworking.  Could you send me the plans please?  I would be most appreciatative 

Ljohns

Wed, 03/11/2020 - 23:27

I would love to have the plans for the three bin laundry sorter to build for my laundry room. Are the plans available? Awesome work!

Rustic X coffee table with Minwax Classic Gray stain

Submitted by cariaw123 on Thu, 11/21/2013 - 07:54

This project was quick and painless. I recommend for a beginners project (but expect to get frustrated over building the x's into the side though). I stained our table with the Minwax Classic Gray stain and used the Minwax water-based polyurethane to seal it. I realize that the stain is difficult to see but it is a beautiful stain that has turned into my go-to stain. The stain is not too gray and you can see the natural color of the wood through it. The photo gives the impression a glossy finish. In reality, it is more matte.

Built from Plan(s)
Estimated Cost
$80-90
Estimated Time Investment
Afternoon Project (3-6 Hours)
Finish Used
Minwax Classic Gray stain with Minwax Water-based Polyurethane.
NOTE:The stain goes on pine and whitewood VERY differently. The pine pieces come out very dark with the stain being brushed on and immediately wiped off. For the whitewood, you can leave it on for 10 minutes and it'll reach a threshold for the amount of stain it will accept. I just sanded the darker pieces down a little bit to match the lighter pieces. (Does that make sense?)
Recommended Skill Level
Beginner

Shed Chicken Coop and Run

Submitted by mikesofka on Tue, 05/12/2020 - 09:27

I had such a fun time on this shed coop/run build! My wife and I have 5 children and it was fun involving them in building everything about this coop and run. They have a wonderful sense of accomplishment in looking at what they helped build.

A few notes, while this what a fairly straightforward build, there are a lot of little intricacies to be aware of. Such as:

• Make sure your chicken coop is about a foot off the ground. It's best to do that so critters such as rats and snakes don't make their home under the shed and potentially eat their way through the floor.

• It is highly advisable to dig a trench about a foot to a foot and a half deep around the coop and the run and attach chicken cage fencing from the bottom of the coop/run into the trench, and then taper the cage fencing outward. This will prohibit critters such as raccoons from trying to dig under the coop.

• When you attach the poultry netting to the outside of the chicken run, staple one side really well, then move to the other side and pull the netting fairly hard to make the netting as tight as possible. (Also, be careful when putting the netting across the top of the run to not fall off the ladder as I did and dangle there until one of your kids comes to help you! Ha! :D )

Thank you, Ana, for posting these plans! We are so excited to get our little chickies out into their new home as soon as their feathers come in!

Estimated Cost
$800
Estimated Time Investment
Week Long Project (20 Hours or More)
Recommended Skill Level
Intermediate

Finally finished my 2x4 modern adirondack chairs!

Submitted by Anonymous (not verified) on Fri, 08/28/2020 - 07:52

I finally finished my DIY Modern Adirondack Chairs! Frame made with 2x4 cedar lumber and seat and backs with 1x10 pine planks. Stained with Benjamin Moore Aborcoat silver grey semi-transparent stain with a clear coat. Used a free diy plan by Ana White with some slight modifications to make the chair back higher. Cost was a bit higher than expected but lumber has gotten more expensive during the Covid time.
Thanks Ana for the design and the YouTube video. I watched it at least 20 times!

Estimated Cost
About $100/chair
Estimated Time Investment
Weekend Project (10-20 Hours)
Finish Used
Benjamin Moore Arborcoat Silver-Grey semi-transparent again, Arborcoat Clearcoat
Recommended Skill Level
Beginner
Seasonal And Holiday

Outdoor Chaise Lounge with Steps for Hot Tub

I saw the lounger that Ana posted https://www.ana-white.com/woodworking-projects/modern-single-outdoor-ch… and thought it would be really nice to have that near the hot tub. Combine that with the need for some kind of platform for the kids to get in and out of the hot tub and voila! The Chaise Lounge with Steps for Hot Tub.

All I did was extend the 2x4 legs to 28" to give the lounger enough height to act as a platform. Raising it required an extra set of 2x4s lower down for lateral stability. The steps used a similar approach of 2x4s for the legs and cross supports with 1x4s for the tread.

Thanks for all the plans, Ana!

Estimated Time Investment
Day Project (6-9 Hours)
Finish Used
exterior prior with exterior latex paint (1 coat all over, 2 coats on the visible surfaces)
Recommended Skill Level
Beginner

Comments

Sandbox with Benches

Submitted by cscottrun on Mon, 04/13/2015 - 10:33

We altered the original plan by enlarging the sandbox (approx 5' x 6') which made for wider benches that can comfortably seat an adult.  The benches and back rests are three boards deep instead of two.  We added 2x12 supports under the benches for additional support, as well as another 2x4 support in the middle of the backrest.

Built from Plan(s)
Estimated Time Investment
Day Project (6-9 Hours)
Finish Used
None
Recommended Skill Level
Beginner

Comments

Seasonal And Holiday

Cedar Raised Garden Beds - 3 Tiers

Steps:

1) Cut the boards to the specs below or adjust to your space

2) Kreg Jig the cut boards along each of the sides (length wise and on the ends) for attaching and making a box.  

3) Make 3 separate boxes, don't assemble until you move to location.  I used 4x4 cedar posts in the corners of the base box to add stability.  I used 2x2 pine in the front corners of boxes 2 and 3 for stability.  Install these after the dirt has been added so you can hammer in as a stake, attach with screws on front and sides.  I created 2 stakes for boxes 2 and 3 and added to the front to prevent bowing when the dirt is added.

Box Dimensions:

1) (base) 70.5" L x 46 W x 4 cedar boards high

2) 70.5" L x 32 W x 2 cedar boards high

3) 70.5" L x 16 W x 2 cedar boards high

Estimated Time Investment
Day Project (6-9 Hours)
Recommended Skill Level
Beginner

Farmhouse storage bed w/drawers (king)

Submitted by Anonymous (not verified) on Fri, 03/10/2023 - 11:51

Seen this awesome plan on Anas site and had to build it in KING SIZE. The drawers are enormous, the bed is rock solid. I love it

Comments

4x4 truss beam table and bench

Submitted by Joagirard on Fri, 07/04/2014 - 20:24

We needed a big sturdy table for 8-12 persons for our big dinning room but didn't want to pay 3000$ for it. Then i found Ana-white's site and thought "why not!". It's my first project, i started whit the bench and then made the table. All buy myself, my husby doesn't even know how to use a saw. He help me carry it inside thought ;) The plans were realy easy to follow. Somebody stop me, i'm refurnishing my hole house, i can't stop! In 2 months i'v made 2 dinning tables, 2 patio tables, 1 coffe table, 5 benches. So if i can do it, you can too!

Estimated Cost
300$
Estimated Time Investment
Weekend Project (10-20 Hours)
Finish Used
1 coat of dark walnut varathane in gel applied with an old t-shirt followed by 2 coats of varathane professional finish in satin applied with soft brush. I sanded between the 2 finished coats.
Recommended Skill Level
Starter Project

First Project

Submitted by dragondad on Thu, 08/06/2020 - 11:34

Well, I started with one chair and finished with a full set. Not bad for a first timer. Definitely room to improve. Little tip if you're going to make this amazing set... raise the backs as they are too low with thicker cushions. I built a casing to go on top after the fact. Pretty happy with how it all turned out. Thanks Ana for the plans... now onto the next project!

Comments

Wishing Well Planter

Submitted by RobKelly3 on Sat, 03/16/2013 - 16:57

This is a wishing well I made for my sister for her wedding. It will be used during the wedding for people to drop "wish you well" cards into and afterward she can use it as a planter in her yard.
I followed ideas from multiple plans here on Ana-White.com, but I didn't follow any specific plan. Mostly I followed tips and instructions for cutting angles, drilling pocket holes and some finishing tips. This is the first "big" project I've done and I"m quite proud of it.

With everything, it measures 44.5 inches high. The well measures 21 inches across and 15 inches high. The roof measures 22.75 inches by 23.75 inches.

I hope y'all like it. I worked hard on this! :)

Thank you, Ana and everyone who contributes to this site. It's been so much fun and I've got lots of ideas for more stuff. If I was any good at all at Google Sketchup I'd put up the plans but I'm not. If anyone could help me with that, that would great. :)

Have a great day!

Estimated Cost
about $100
Estimated Time Investment
Weekend Project (10-20 Hours)
Finish Used
Olympic Maximum Stain and Sealant in One, Semi-Transparent, in Oxford Brown. Use 2inch stain brush. Used 100, 150, and 220 grit sandpaper before staining.
Recommended Skill Level
Intermediate

Comments

bellows86

Mon, 07/21/2014 - 20:04

Anyway you can please tell me the angle for the boards ont the walls. I reallly like your well, and would like to build this for my wife but im not sure on what angles to use thank you

Kitchen Benches

My version of the kitchen benches.

Estimated Cost
100
Estimated Time Investment
Day Project (6-9 Hours)
Finish Used
-Minwax Wood Finish Oil-Based Provincial Semi-Transparent Interior Stain
-White paint
Recommended Skill Level
Beginner

Comments

Cedar Slat Top Bench

Submitted by Anonymous (not verified) on Tue, 01/15/2019 - 21:48

I really enjoy making this bench. I build them out of cedar and vary from 4’-6’. My customers love them. Simple prep work consisting of planing all boards to same dimensions can save a lot of time in sanding. Building 3 more this week. 

Estimated Time Investment
An Hour or Two (0-2 Hours)
Recommended Skill Level
Beginner

Comments

Outdoor hangout using 2x4 and fence boards

Submitted by sylvialh on Sun, 06/16/2019 - 18:13

Bought enough lumber for one sofa but ended up using old fence boards for the  decking so had enough lumber to make the sectional and a shortened coffee table. 

Great way to save some cash even if u have to buy the fence posts. 

Added a reinforcing piece to the one armed sofa between the legs using a kreg jig to stabilize the legs a bit more. 

Waiting on my foam from Amazon to finish off this project!

Used inspiration from the beer/wine cooler patio table and made the middle of the table removable to add a buck underneath later. 

Note the 5 year old patio set, also an ana white project from back in the day!

Super quick build!

I did find that the measurements for customizing it for your cushion size seemed about 1.5 inches too big for all the depth pieces so I sized down but I haven't received my foam yet so maybe I'm wrong but Smth to think about. I didn't want my cushions to slide around so I took that into consideration when building. 

Estimated Cost
60$ CAD for the high density foam for each sofa (3x24x72) plus throw cushions for the back.

11 2x4x10 - cost varies depending on cedar or PT
Fence boards were reused

Outdoor Fabric to cover the foam
Estimated Time Investment
Afternoon Project (3-6 Hours)
Finish Used
None yet
Recommended Skill Level
Beginner

My new and amazing outdoor bench

Submitted by ישראל on Sat, 11/16/2013 - 21:57

Thank you for the easy and fun bench plan.
It was really easy to install.
Even my 2 little daughters had fun (-:

Estimated Time Investment
Afternoon Project (3-6 Hours)
Finish Used
Bondex walnut
Recommended Skill Level
Starter Project

Comments

Chachamation

Thu, 10/02/2014 - 07:21

This is absolutely amazing!

This "ישראל" person is super talented comes to the final touches!!  From now on, I will start following your work...

Pantry

Submitted by Anonymous (not verified) on Fri, 03/04/2016 - 19:17

I copied my design from another brag. 48" wide, 14" deep, and 76" tall.

Estimated Cost
$200
Finish Used
Jacobean stain
Satin polyurethane
Recommended Skill Level
Intermediate

Levi's play kitchen

Submitted by Ash Matson on Thu, 12/26/2019 - 11:17

We modified the plans a little we made the 2 pieces together instead of separate. We used a 2” hole saw to cut out the oven knobs, then drilled holes a tad bigger than the screw so they would still turn once attached. We also made the back splash taller to accommodate our faucet that had to attach on the back splash instead of the counter top. We used all pocket holes to attach everything it makes it look so much nicer but doesn’t need to be done that way. We bought vinyl circles for the burners on the stove. A dog bowl for the sink and a laundry room faucet for the faucet.

Links to products we used

Faucet - https://www.amazon.com/gp/product/B01KRCTHEA/ref=ppx_yo_dt_b_asin_title_o07_s00?ie=UTF8&psc=1

Oven hinges - https://www.amazon.com/gp/product/B004K7V8UU/ref=ppx_yo_dt_b_asin_title_o08_s00?ie=UTF8&psc=1

6 – 4 inch circles matte black Stove vinyl - https://www.etsy.com/listing/713062039/circle-circles-pack-set-vinyl-decal-car?ref=yr_purchases

Sink 56oz dog food bowl - https://www.amazon.com/gp/product/B00H6OXRN0/ref=ppx_yo_dt_b_asin_title_o01_s00?ie=UTF8&psc=1

Oven handle - https://www.lowes.com/pd/Sumner-Street-Home-Hardware-Vail-10-in-Center-to-Center-Matte-Black-Pull/1001368422

Estimated Cost
100.00
Estimated Time Investment
Weekend Project (10-20 Hours)
Recommended Skill Level
Beginner

Comments

Built in closet

Submitted by AndyH on Mon, 06/13/2016 - 19:14

Built in closet to replace builder grade wire wracking.  Closet is approximately 11 feet by 5 feet.  consists of two shoe racks with 7 shelves each.  6 large drawers and 4 small drawers.  Two hanger sections with storage  above them.  End wall has hanger for longer items and storage above and a cabinet with shelves.

Yet to finish the floor.

Estimated Cost
$1000
Estimated Time Investment
Week Long Project (20 Hours or More)
Finish Used
Sherwin Williams Extra White satin paint.
Recommended Skill Level
Intermediate