Community Brag Posts

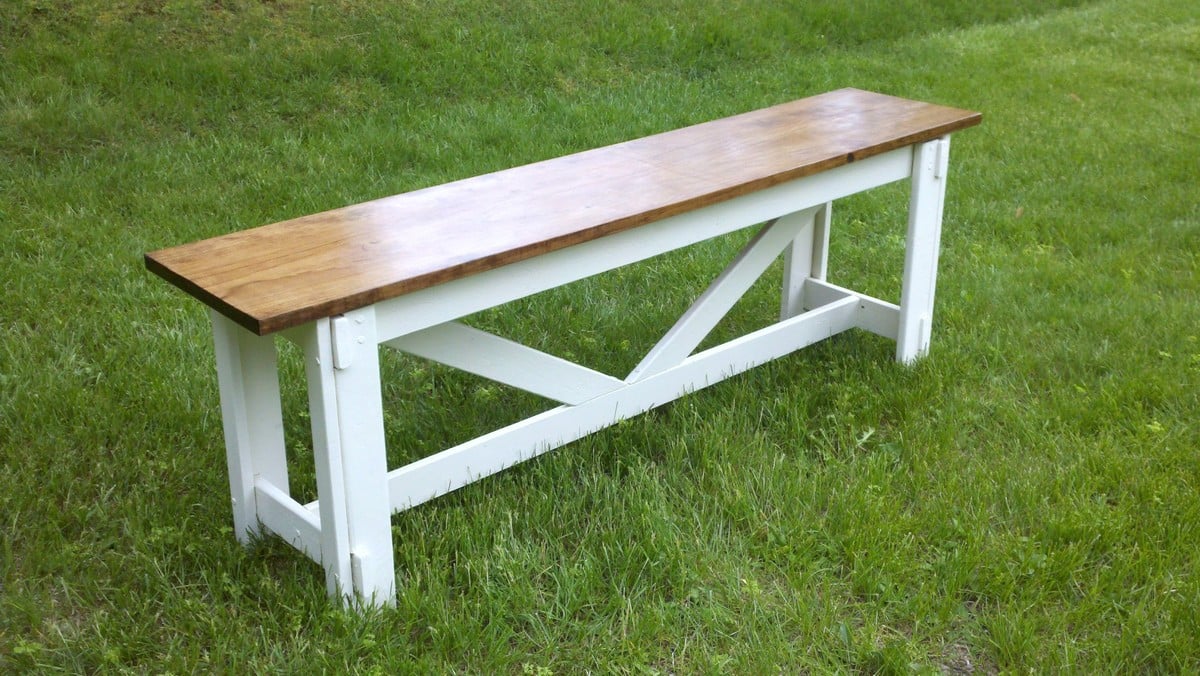
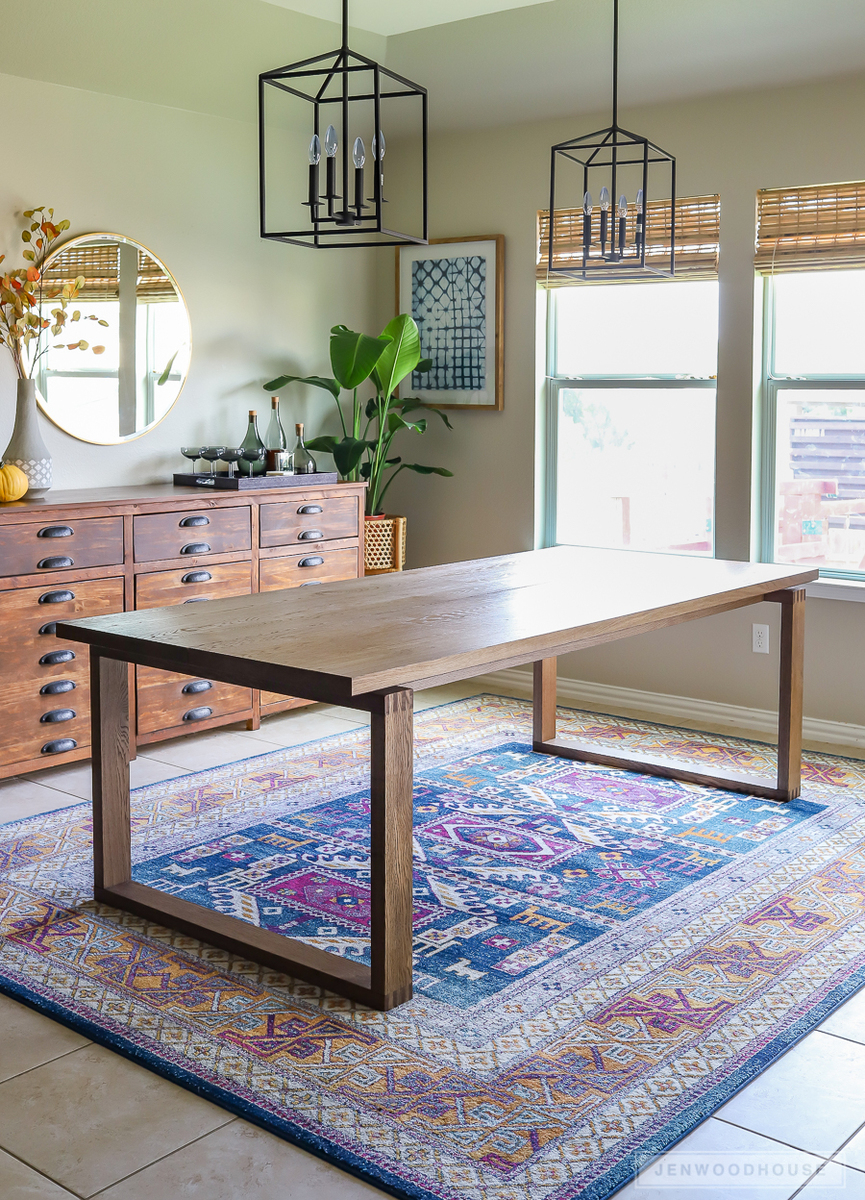
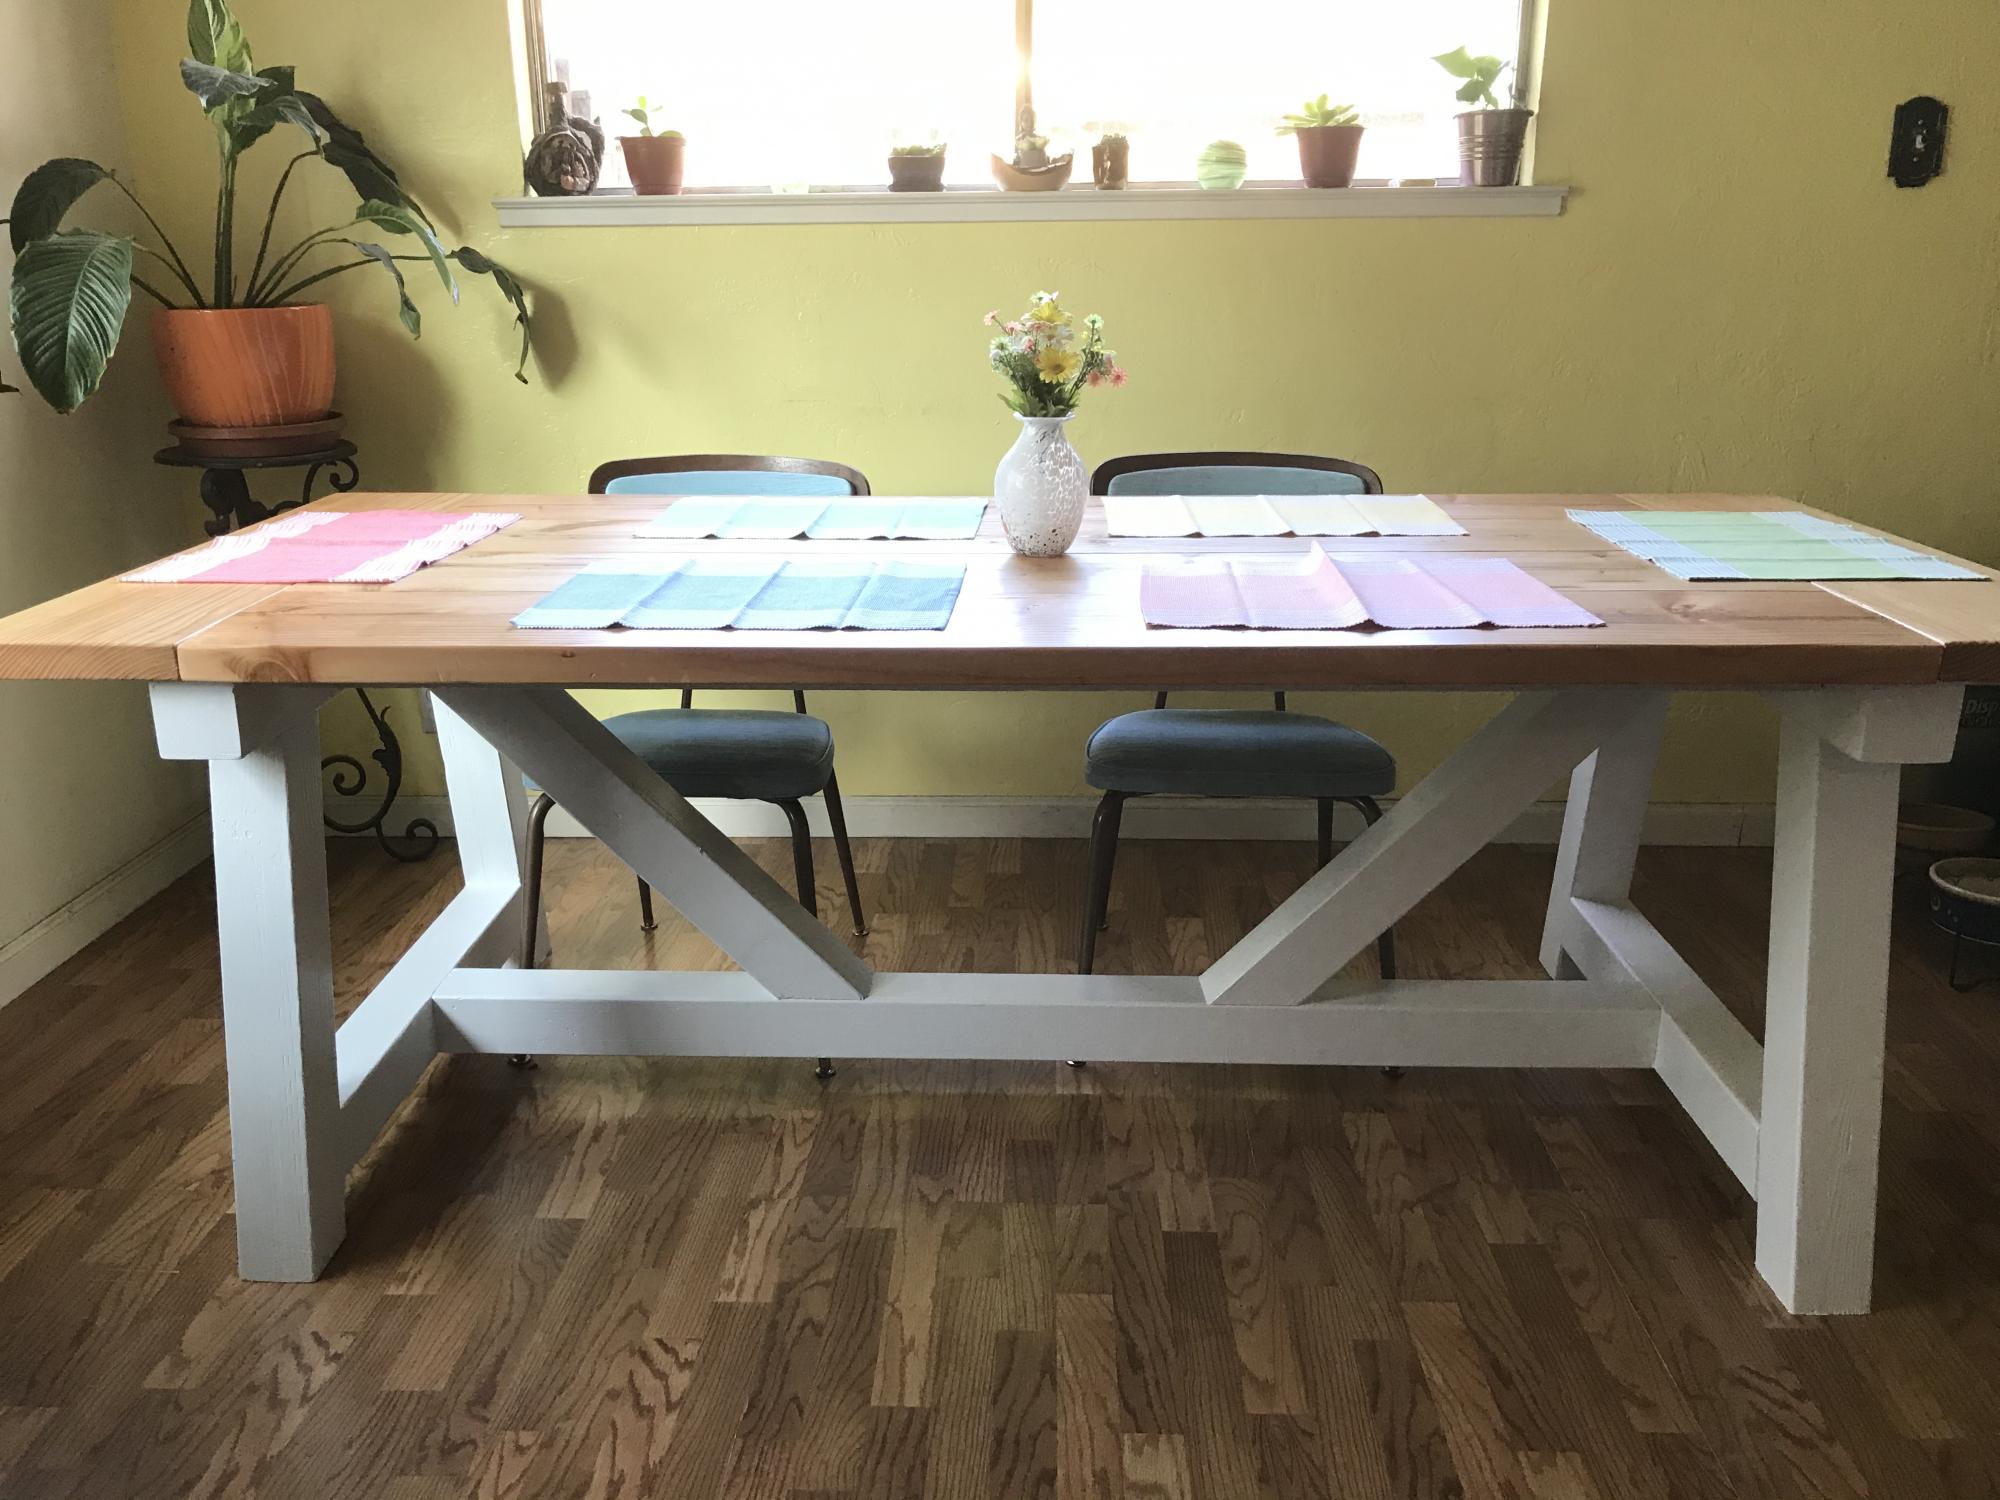
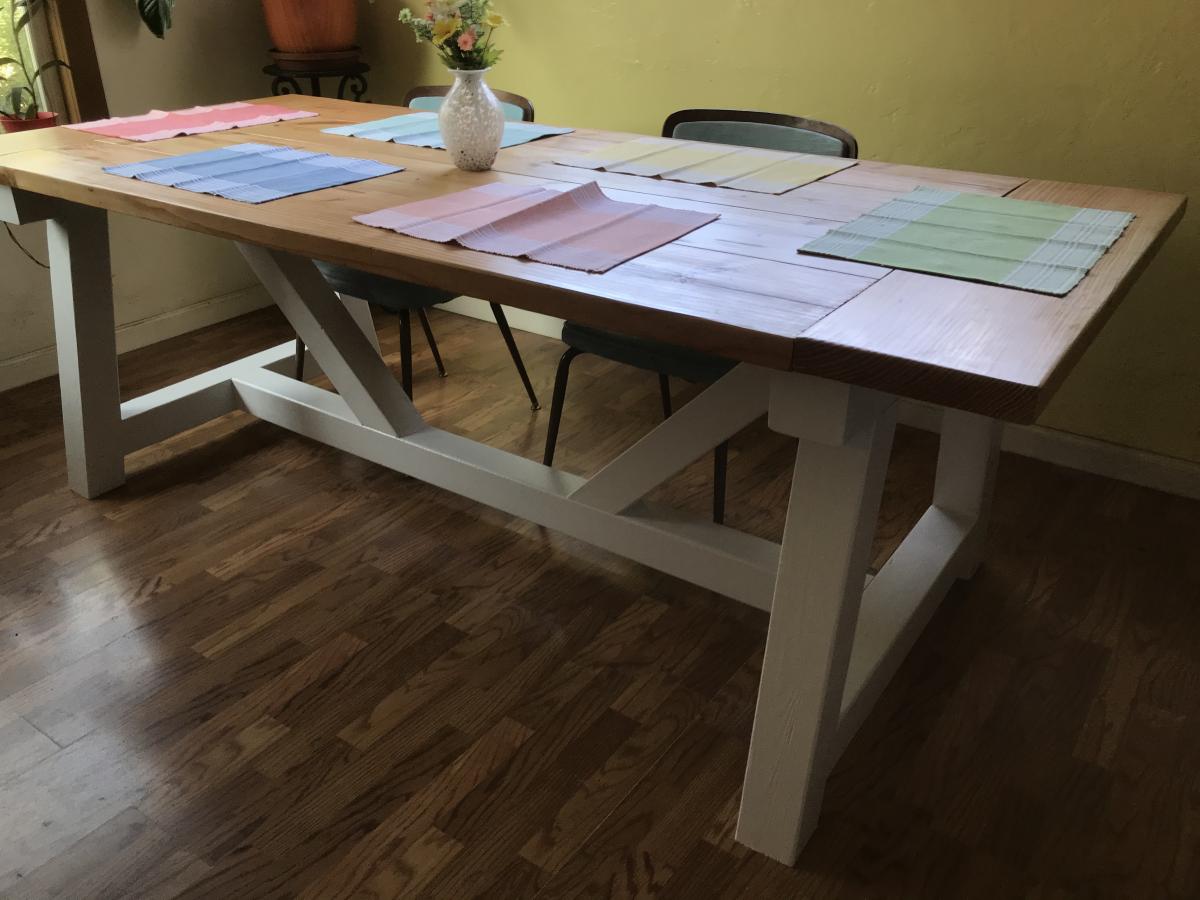
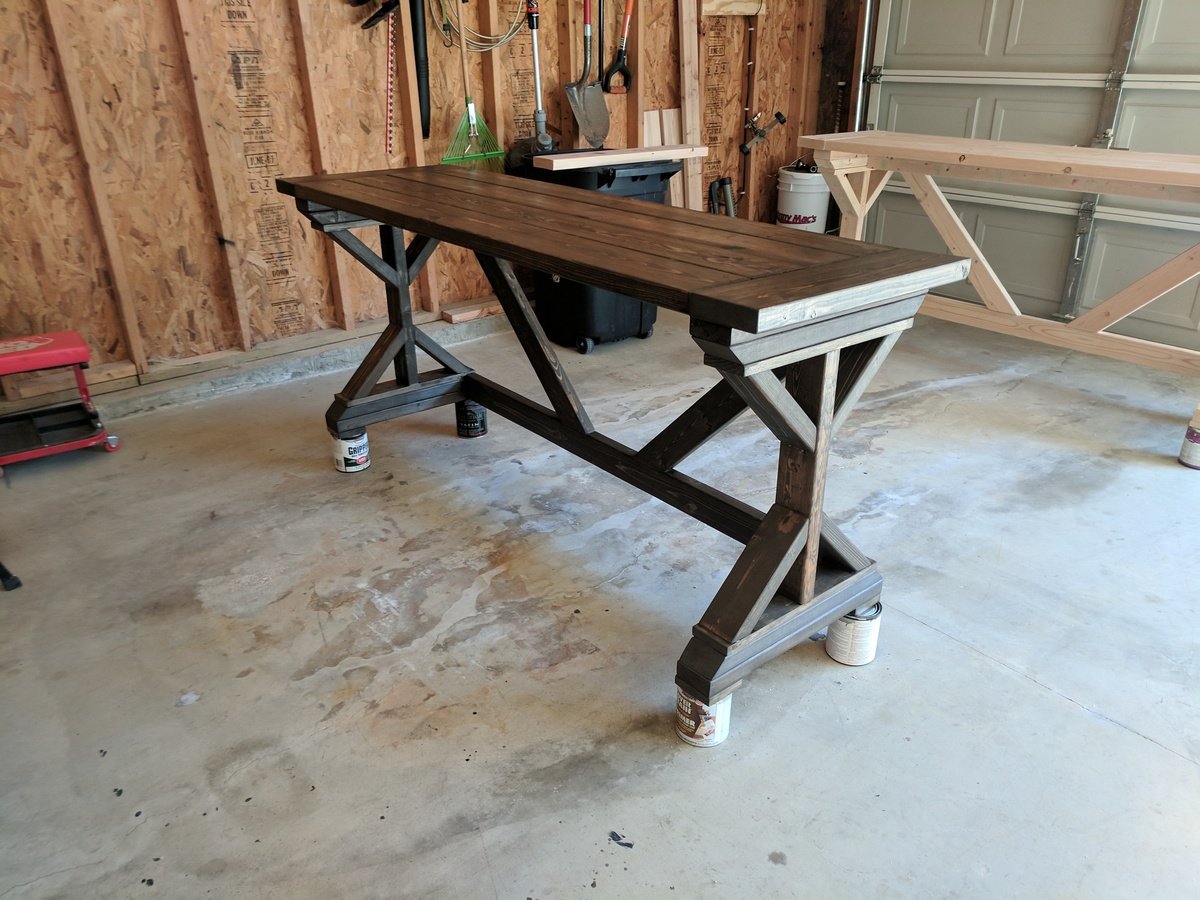
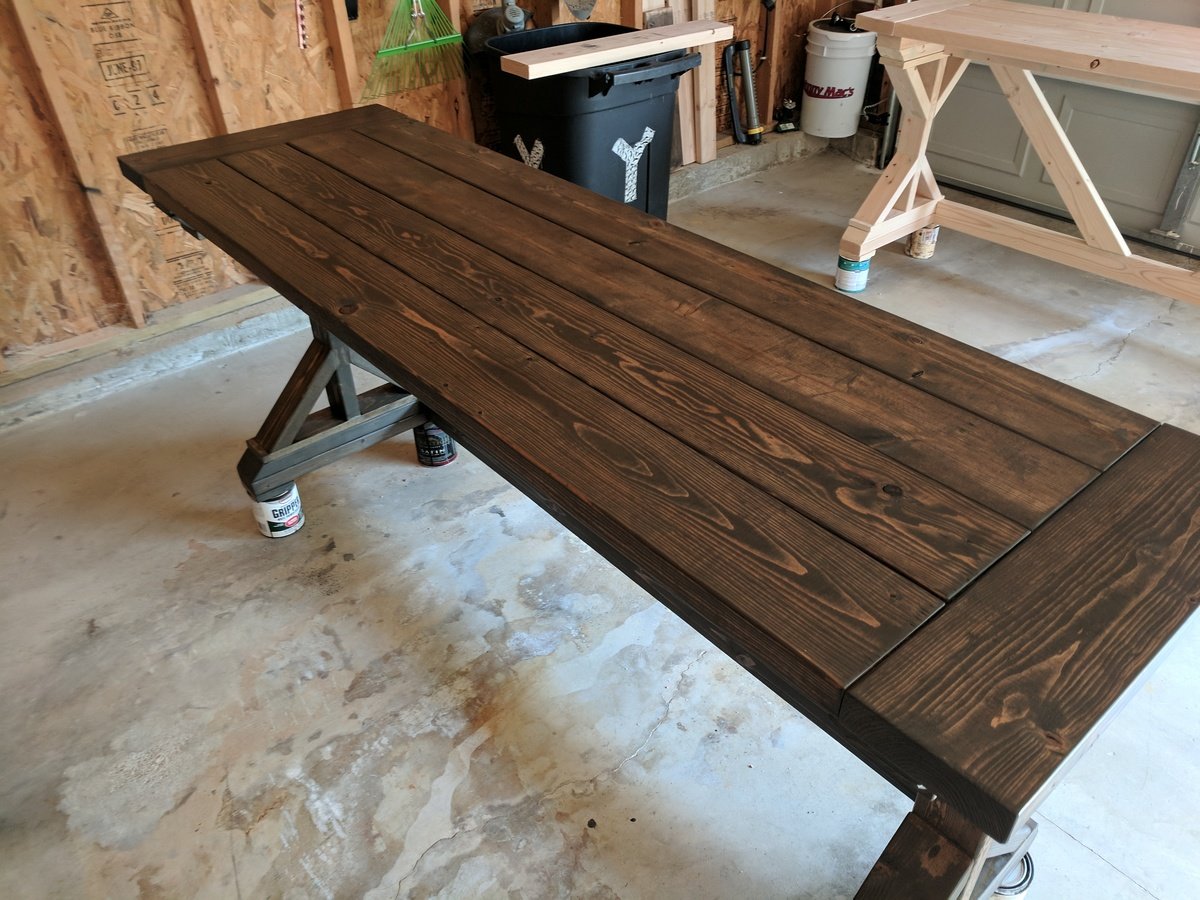
Farm table for my sister

Submitted by Anonymous (not verified) on Mon, 10/04/2021 - 14:09

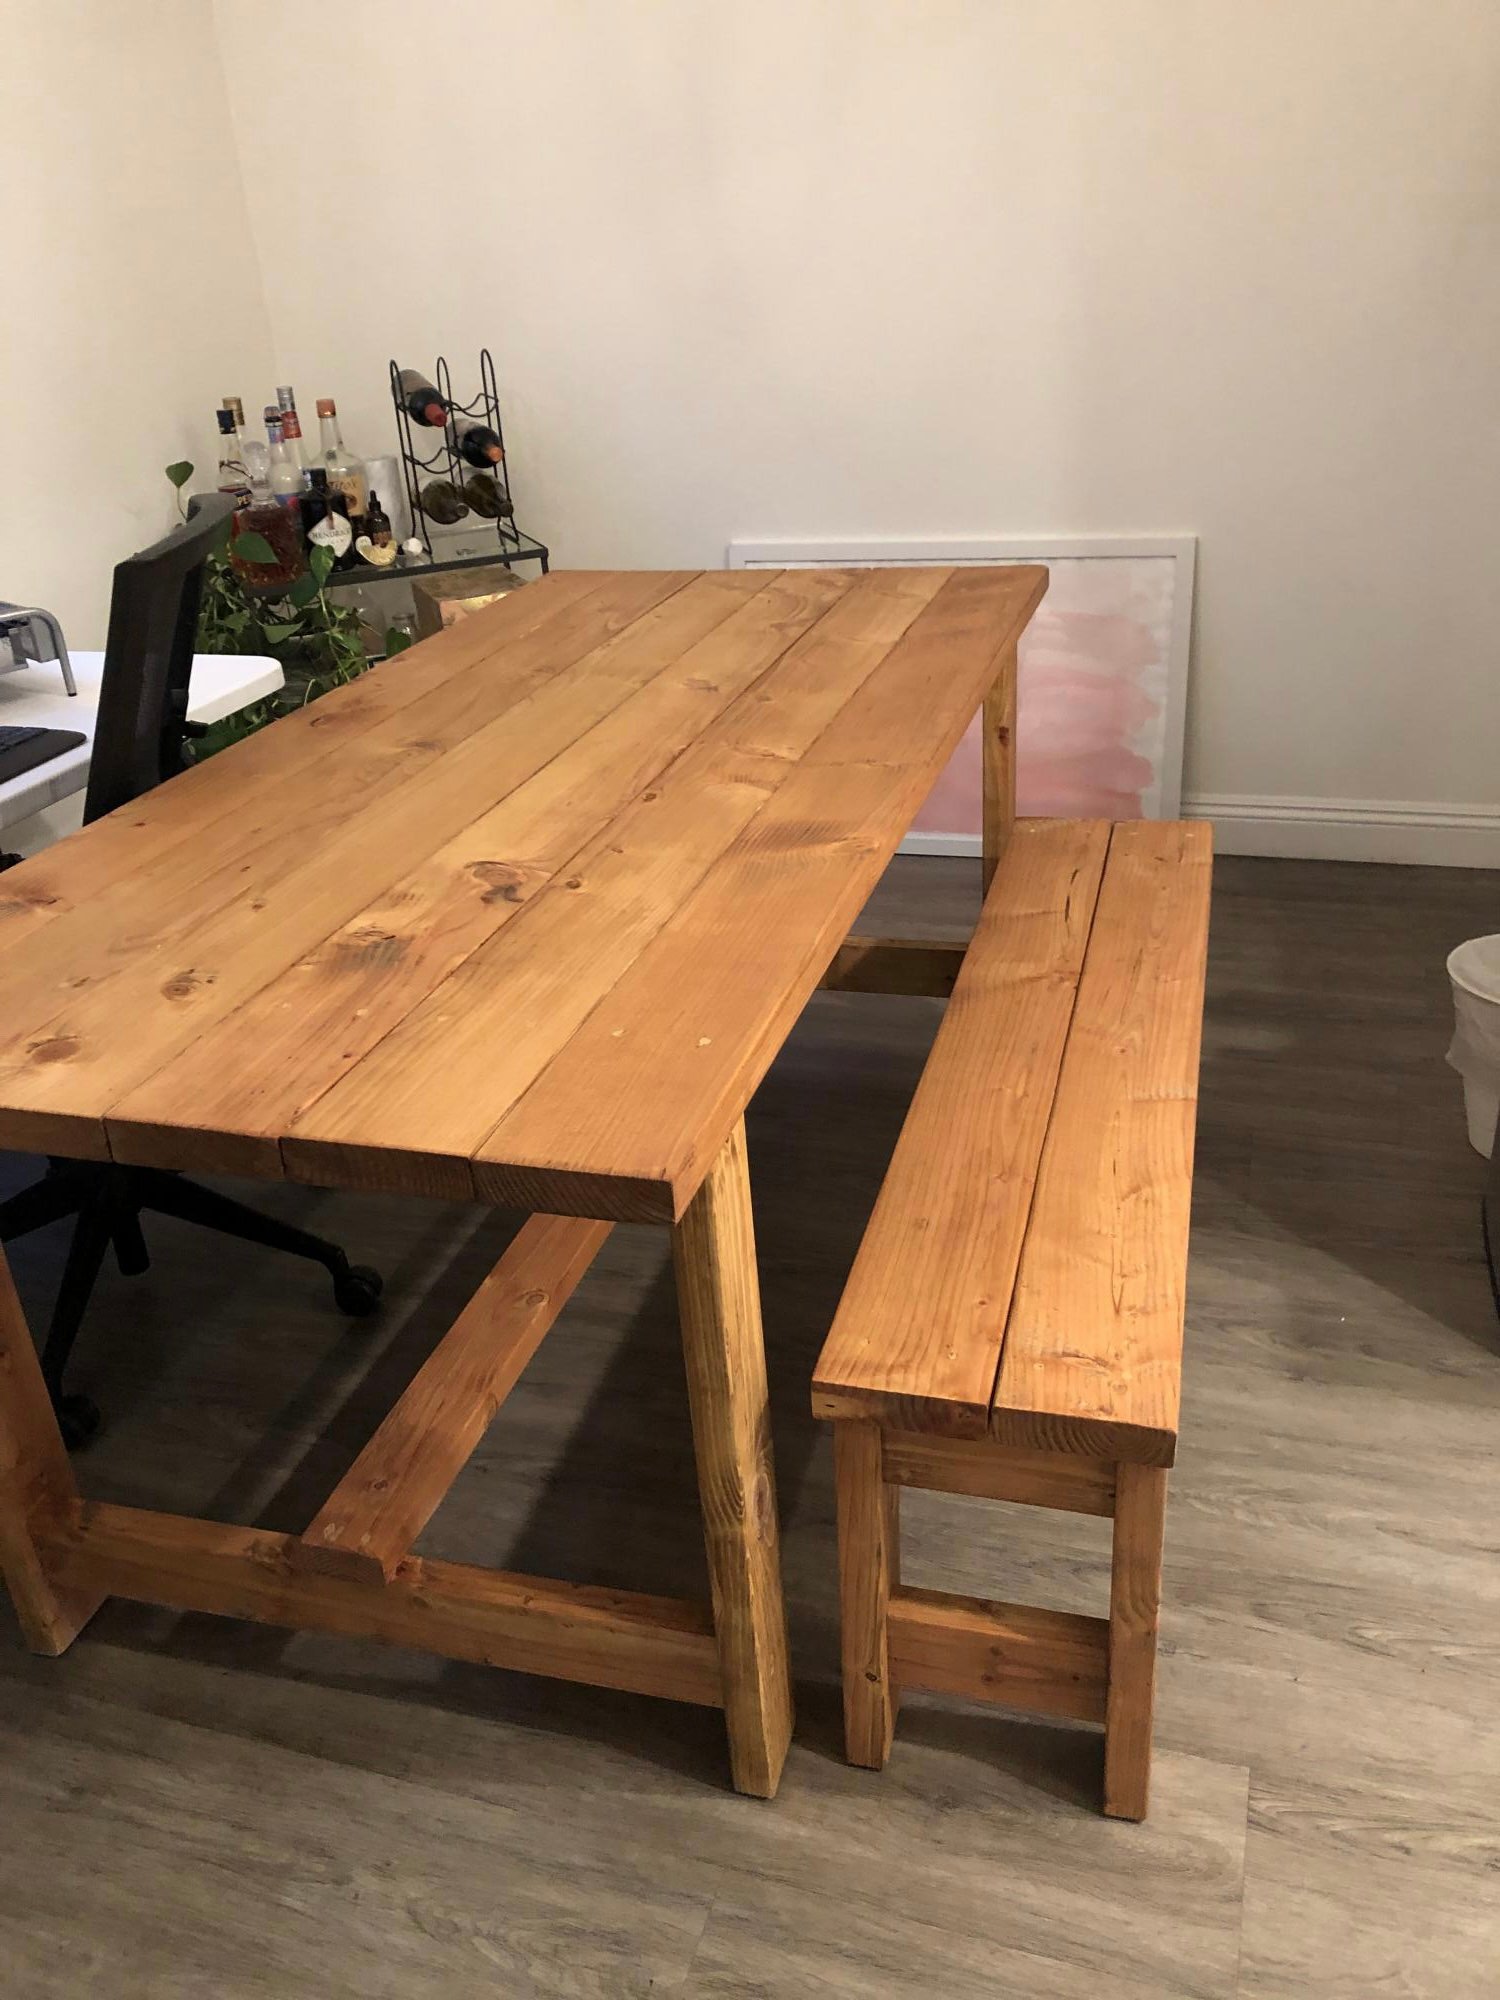
So my sister moved back to Southern California from New York. She found a great place but needed a table. I made one table and one bench. My sister then found two chairs for the other side. This is the second or third thing I have made/built from Ana’s site. Thank you for making me feel more manly with great instruction. I also built this pre Covid-19 when lumber was not so expensive.

Comments

Tapered plant box

Submitted by Anonymous (not verified) on Mon, 10/04/2021 - 18:20

I was looking for an inexpensive way to dress up my deck and when I saw your tapered plant boxes I knew that was the gem I needed. I used pickets from a fence we took down and some 1 inch wood strips. I am planning on making more to line the new fence.

Built from Plan(s)

Comments

Closet Door with Storage

Submitted by kristen on Sat, 03/12/2011 - 21:07

This was my first Ana White project, and I learned a lot from making it since I was also a novice woodworker. I am very happy with the end result, but it was probably a good thing that this went on the inside of a closet :) It gave me the confidence to go on and build something more difficult with the skills I built along with the storage.

The $30 estimate is only for the wood. Wood putty, sandpaper, screws, paint, etc. will make this more expensive, but you will use all of the extras on other projects since this one won't use those up.

The time involved is a guess--it has been a few months since I completed this. Someone with experience could probably do it faster and someone brand new to building might go slower. So I chose 3-6 hours, a nice in-between number.

Watch your caster size with carpet. That was my only snag with the instructions. Ana has hardwood floors that the casters roll on. I have carpet so I wanted larger wheels in order for smoother rolling. That added height to the caster also, so you want to modify the length of the sides of the storage unit to reflect the larger casters on carpet.

All in all a great plan and useful end result!

**UPDATE--January 30, 2012** We removed the casters from the bottom of this just yesterday and the door opens SO much easier. I would invest in some high quality casters and not the cheap ones I bought if you are going to use these. Without the casters I am only putting light things (stuffed animals) in this. If you are using it for heavier items, I would use the casters but make sure they readily turn. The casters I had did not want to turn as the door moved and they dragged on the carpet instead. Also, the overall height of your unit will depend on the height of your casters, so buy them first if you are going to use them. I still love this though!

Built from Plan(s)
Estimated Cost
$30
Estimated Time Investment
Afternoon Project (3-6 Hours)
Finish Used
White primer and white paint over that. I used the Zero VOC paint you can get at Lowes--I think it is Olympic brand.
Recommended Skill Level
Starter Project

Using Ana White’s Garage Cabinet Plans

Submitted by Anonymous (not verified) on Wed, 04/20/2022 - 09:23

Thank you so much for the two videos we watched of you and your husband explaining and demonstrating how to build garage shelves. We used your plans as a guide. We chose to add shaker style doors to create cabinet shelves. We absolutely love them. We are not handy as you can see we had a living room lamp for a work light and a lifetime table as a work bench. Thank you!
The Paulsons

Comments

Large Rustic X Bench

Submitted by hannahclou on Sun, 06/12/2011 - 14:11

For my second project I wanted to build something a little more difficult than a shelf.  The hubby showed me how to use our power tools and I was unstoppable.  I chose this great bench because it fit the feel of our house and I wanted an entryway spot to sit while putting on shoes. 
The finishing took much longer than it actually took to build the bench.  I thought it would be more difficult to get the precise angle measurements  to make the supports under the bench, but it was not bad at all.  I can 't believe I built this pretty bench!  I have the building fever now!

Estimated Cost
$12
Estimated Time Investment
Weekend Project (10-20 Hours)
Finish Used
Minwax Early American and Polycrylic for the top.
Antique White and Clear Gloss for underneath.
Recommended Skill Level
Intermediate

Comments

In reply to by mandylynn523

spiceylg

Thu, 08/18/2011 - 04:33

Hello. My hubby and I are in the process of building this bench. Basically just have to put the top on and finish the staining/painting. We are doing a black bottom and stained top. I have a hard time w/angles so my husband tackled that but I have to say, he had a hard time with it as well. Glad you had an easy time of it! Can I ask how you attached the top?

Storage Bin

I love this storage bin from plans at morelikehome.net, and it was easy to build, too! It's nice and big, about 21"W x 21"D x 18"H. I selected 3-6 hours as the time spent, but to say closer to six would be about right. I need a large work surface in my sewing room (I'll be building the storage table as well),and a place to store my "stuff".This should be a pretty good start!

Estimated Cost
About $20
Estimated Time Investment
Afternoon Project (3-6 Hours)
Finish Used
Two coats of Early American by Minwax, and one of Varathane's Diamond Finish topcoat, all applied with a rag.
Recommended Skill Level
Beginner

DIY Modern Box Joint Dining Table

Hi friends!

Jen Woodhouse from The House of Wood here. 

After sharing my new dining room, I got a lot of requests for plans for my dining table, so I’m thrilled to finally deliver. The box joints on the legs add just the right amount of detail to this dining table, don’t you think?

Be sure to tag me @jenwoodhouse if you share photos of your build on social media. I'd love to see it!

You can get all the details for this build on my website jenwoodhouse.com 

Estimated Time Investment
Afternoon Project (3-6 Hours)
Recommended Skill Level
Intermediate

WHAT ANA INSPIRES!!!

Submitted by redhead_61 on Fri, 08/26/2011 - 09:36

I had a friend doing a class for a church activity on refinishing furniture. I think she mentioned to our leaders that I build furniture so two weeks ago she emailed me to see if I would be willing to participate and take a little time to talk. I said of course, and then in my true fashion of loving a good get-together and having a tendency to overdo things, I said, "we could even do a little project too".

I went onto this site printed off 5 projects under $30 and let anyone that wanted sign up. I figured the easiest way to let people build a project in an hour and a half was to pre-cut and pre-drill everything (Thank you to my new Kreg jig that let me rock that part out no problem)

I ended up cutting and drilling for 26 orders!!! EEK! I was a little like a mad hatter running around helping people that had never even held a drill before (so please excuse the LACK of pictures, including none of me doing anything at all :( ) But I think it turned out awesome and everyone was so excited.

I just wanted to post this as a little tribute to Ana for all the amazingness that you are. Thank you for helping those scared to even start.

Estimated Cost
under $30
Estimated Time Investment
An Hour or Two (0-2 Hours)
Recommended Skill Level
Starter Project

Comments

ferbit

Fri, 08/26/2011 - 10:03

What a fun idea!!! Looks like everyone was having a fantastic time!

Ana White

Fri, 08/26/2011 - 11:26

Thank you so much for sharing this! I can remember when my little sister took woodshop in high school, and we all looked at her like "what is woodshop" and "why on earth would you ever want to take woodshop - woodworking is for retired men!". Not too many years later, I was wishing I had taken wood shop!

This is so amazing to see because you are teaching these beautiful and courageous young laddies skills they will use throughout their lifetime. Not to mention the confidence to tackle other traditionally male trades. And I'm willing to bet, their daughters will be using drills too!

I'm so honored to know you!

And might I add, those projects look GOOD!

romanweel

Sun, 02/03/2013 - 12:17

MAN! I want to do something like this! What a wonderful thing to do to bring all those ladies together! (And tell Miss Red Shirt, I want a T just like hers! "Be Kind"!) Way to rock it out, all of you!

Wine Rack

Submitted by Bredimi on Tue, 02/07/2012 - 15:35

I loved the Holman Entertaining Shleves from Pottery Barn, however, I didn't like the price. Taking the $10 ledge plans and modifying them, I set out to make my own. I used a 1 x 10 (bottom), 1 x 6 (back) and a 1 x 3 (front). They are 23 7/8 inches long to get the 3 shelves out of 6 foot boards. To get the holes to hold the top of the bottle, I used a 1 and 1/4 inch forstner bit. Since I had gift cards left from Christmas I splurged on the wood and bought the select pine.

Built from Plan(s)
Estimated Cost
I had gift cards, but my out of pocket expenses for the 3 shelves was $22.89
Estimated Time Investment
Afternoon Project (3-6 Hours)
Finish Used
I painted them Valspar Lincoln Cottage Black
Recommended Skill Level
Intermediate

Comments

babysteps

Tue, 01/14/2014 - 10:55

I love your adaptation of the original design. I have been looking for an example of someone who made this plan into a wider shelf. Has it held up well? I was worried about the stress on the joints when you make it deeper. Has yours handled the weight of the bottles?

First build using Farmhouse Truss Kitchen Table plans

Submitted by Anonymous (not verified) on Tue, 02/18/2020 - 01:24

I followed the basic plans but added a couple 12x2” metal supports for each breadboard. This was a must. I used Douglas fir for the entire project from Home Depot.

My 2 kids helped me put a few screws in, otherwise I did this myself. The wife really loved it and was a bit surprised coming back from her facial spot on Valentines Day. It turned out better than I could have hoped, especially considering this was my first real woodworking build.

Great plans and nuggets of advice from everyone else made this really fun and not so scary!

Built from Plan(s)
Estimated Cost
$200
Estimated Time Investment
Week Long Project (20 Hours or More)
Finish Used
Used 2 coats of all-purpose primer and 2 coats of classic white indoor paint. For the top, I just used 3 coats of Semi-gloss polyurethane(thinned out with mineral spirits), but I most likely will be adding 2 more and finishing with a satin polyurethane to get extra protection from the kids.
Recommended Skill Level
Beginner

Rustic X Coffee Table Woes

Submitted by mrcleland on Thu, 06/02/2016 - 05:56

I started this project a few months ago for a friend. The build went easy enough and was complete is less than a day. The only issue I had was with the X's. My miter saw doesnt cut past 55 degrees and it called for 60 degrees. I had to eye it and the X's turned out less than perfect. It did give me a compelling arguement to upgrade from my 10" to a 12" sliding saw (we will see how that pans out). The finishing was the real problem for me. Ive had issues in the past with not liking the final color and having to sand the whole project over and over until I finally just settle. I was hesitant on the vinegar and steel wool finish but went for it anyway. The top turned orange, almost like a fresh cedar color. I whitewashed it the following day and roughed it up with some light sanding. It looked great. I added poly and the top turned orange again. It was horrible. I had to sand it and start over. I then went with a weathered grey with a whitewashed top coat and it looked great but my friend wasnt a fan. I sanded AGAIN and tried another color. Third time was a charm and the sunbleached stain with whitewash came close to what we wanted to acheive. He likes it, I like it, and eveyone is happy!

Built from Plan(s)
Estimated Cost
60
Estimated Time Investment
Weekend Project (10-20 Hours)
Finish Used
Sunbleached Color Stain w/ a whitewash mixture (1/1 white paint and water)
Recommended Skill Level
Beginner

My city farm

My friend and I bought all of the materials for about $350. We started Friday afternoon and he worked most of Saturday on it. The plans were super helpful! My four little silkies are enjoying their new home. 

Estimated Time Investment
Weekend Project (10-20 Hours)
Finish Used
Sherwin Williams exterior paint in Alabaster. Lots of pumpkins and mums from Lowe's.
Recommended Skill Level
Intermediate

Comments

Seasonal And Holiday

Awesome! Thank you for the plans!!!

Submitted by Sherice on Tue, 07/15/2014 - 07:41

This is the second project I attempted and it was a huge undertaking for me, but it was fun and went well! I had planned to sew a cushion for it, but by the time I completed the project, I was DONE! So I bought some for now.

The only modifications I made were larger arm rests so I could put cup holders in them. The cup holders I made out of PVC 3" Male end and a 3" drain, which I glued together. I then scuffed the entire thing and painted them with acrylic paint (trying to get them to match the blue and green in the cushions) before spraying them with gloss sealant.

My family LOVES the new "swing bed". It weighs ALOT so I had to make sure to get proper hanging gear. It's obviously not hung yet when I took the pics tho.

Thank you for another beautiful project!

Built from Plan(s)
Estimated Time Investment
Weekend Project (10-20 Hours)
Finish Used
About seven layers of spar urethane, natural/clear, with sanding in between the layers.
Recommended Skill Level
Beginner

Just My Size Closet

Just My Size Closet!

Built this from Ana's plans with a few modifications.

Started with a big empty box after ripping the old stuff out and finished with this look.

Adjustable shelves and all !

Built from Plan(s)
Estimated Time Investment
Weekend Project (10-20 Hours)
Finish Used
Whatever white paint my wife bought !!
Recommended Skill Level
Beginner

Children's play cafe

Submitted by Markb25 on Fri, 04/23/2021 - 23:15

With another total lockdown happening here in Cyrpus, right at the same time as my Daughter will be on Easter holidays, I'm trying to knock up as much outdoor play kit as I can to keep her entertained and off the iPad.

The design of this was very simple, a 2x2 frame clad with T&G; the countertop, shelves, and roof are from marine grade baltic birch (the roof also has additional levels of water prof membranes, root barriers, etc to support the living roof).

Finish-wise, for the pinks and blues, I've used wood aqua by Kraft paints, and for the counter, shelves, and picnic bench, high protection wood stain in walnut by V33.

Estimated Cost
500
Estimated Time Investment
Weekend Project (10-20 Hours)
Finish Used
wood aqua by Kraft paints and high protection wood stain by V33.
Recommended Skill Level
Beginner

Comments

Ana White Admin

Sat, 04/24/2021 - 06:54

It's all in the details, looks like you're making a little girls dream come true! Thank you for sharing!

Worm Composter Bins with Cabinet

I made the worm composter from Ana's plan and built a cabinet out of old pallets. The stack of worm composters drawers slide in and out of the cabinet on a heavy duty drawer glide set. I used cedar fence board. For 3 bucks a board, it was worth the work to rip them down and sand them. The bottom drawer has a tray built out of old flashing and slopes towards a hose bib in order to collect the worm tea. I designed the drawer insert out of cardboard and cut it out of flashing, using a pop rivet gun to put it together, sealing the seams with flashing caulking. The drawer has a sheet of aluminum window screen under the top square of cedar.

Estimated Cost
50
Estimated Time Investment
Week Long Project (20 Hours or More)
Finish Used
Some free varnish from the County Drop and Swap recycle center
Recommended Skill Level
Intermediate

Guest bedroom with fancy king farmhouse bed, $10 ledges, wooden crate nightstands, and wine bottle lamps

Submitted by henryholub on Fri, 05/24/2013 - 08:03

This the recent remodel of our guest bedroom. Its a modified plan from a fancy farmhouse bed that allows room for tubs to be stored underneath, three of the ledges, and the nightstands are old wooden crates that have been sanded down, painted, and mounted to the wall. We decided to do vinyl stickers as the "headboard" and felt the birds on a wire made for a good look. The lamps we made from wine bottles with labels we liked using westinghouse lamp kits. Thank you Ana White for these plans and ideas!

Estimated Cost
$150
Estimated Time Investment
Week Long Project (20 Hours or More)
Finish Used
"mistint" paints. White for the bed, yellow for the nightstands and lower ledges, and an orange-red valspar paint for the 8 ft ledge.
Recommended Skill Level
Intermediate

Breadboard Ended Fancy X Desk!

Submitted by pnytail01 on Wed, 09/06/2017 - 07:59

I felt a little bold deviating from the plans when this was my first project.  But I saw another version of this desk with the breadboard ends, and I really appreciated the added craftsmanship this gave off.  Other than the top, I followed the plans to a T.  For the top, I made this from 2x6's with the 4 lengthwise pieces cut to 61" and the ends to 22" (I think I ended up trimming the ends down to match better, but 22 was a good starting point).  As for the finish, I layered stains starting with Minwax's Classic Grey followed by Minwax's Jacobean.  I made two of these desks to put in our home office.  If I think of it once the office is complete and decorated, I'll add another pic!

Built from Plan(s)
Estimated Cost
After lumber, stain, and hardware, I figure I spent about $75 for each desk.
Estimated Time Investment
Weekend Project (10-20 Hours)
Finish Used
1st Layer - Minwax Classic Grey
2nd Layer - Minwax Jacobean
Recommended Skill Level
Beginner

Garage Storage

Submitted by wabilinski on Mon, 09/28/2015 - 10:48

My wife was needing some extra storage in the garage for seasonal decor totes.

So, of course, I first go to Ana White's website. Voila, I found the perfect plans for the space I had to work with.

- The final product ended up being 72"Hx54"Lx21"W

- I used a counter sink bit to pre-drill screw holes so the heads would be slightly below the surface of the boards. This way the totes would not get caught on or damaged by the screws.

Estimated Cost
$90 for wood and screws
Estimated Time Investment
Day Project (6-9 Hours)
Finish Used
N/A - left unfinished
Recommended Skill Level
Beginner