Community Brag Posts

Workbench

Submitted by Ulrike on Sun, 06/21/2020 - 09:37

Built 2 of the workbenches for our garage. The plans made assembly very easy and quick. We had Home Depot cut the plywood to size.

Estimated Time Investment
Afternoon Project (3-6 Hours)

Comments

Modified Farmhouse X Desk

I modified the Farmhouse X Desk plan from Handmade Haven to add the shelving on both ends. I also have a Z on the end instead of the X as that was the way my husband preferred it (it is for him after all). The top is live edge wood which is tricky to work with since the thickness is different from board to board but I still like the way it turned out! The live edge top did add time to the build as well as staining and varnishing as opposed to painting the base.

Built from Plan(s)
Estimated Time Investment
Week Long Project (20 Hours or More)
Finish Used
Minwax Jacobean stain mixed with Special Walnut (had a little of both on hand) for the base and left the top natural. Both coated with Minwax oil modified water based polyurethane.
Recommended Skill Level
Intermediate

Comments

A More Traditional Modern Craft Table

Submitted by Anonymous (not verified) on Thu, 01/26/2017 - 18:37

This is my more traditional take on the modern craft table (I guess that means it isn't technically "modern"!).  We call it the "Lego Table" at our house.  I doubled up the ends like others have so that my two daughters can have their own sides.  My wife asked that the there be backs on the side shelves so that items aren't pushed off.   I also added trim around the tabletop and molding to give it a bit more traditional appearance.  Finally, I made the shelves adjustable.  

Built from Plan(s)
Estimated Time Investment
Week Long Project (20 Hours or More)
Recommended Skill Level
Intermediate

16" Cedar Patio Planter

Submitted by prelude on Fri, 03/05/2021 - 04:33

I created these 16" cedar patio planters using Ana's plans. I bought four 6' cedar pickets from Lowe's for $1.98 each or under $8 for the lot. I used the extra picket to cut our my 1x2s and 1x3s so the whole construction is made of cedar including the pieces to hold a potted plant. I used Behr's clear and cedar finish to complete the job in under 1 hour. Thanks Ana for the motivation.

Estimated Cost
$8
Estimated Time Investment
An Hour or Two (0-2 Hours)
Finish Used
Behr's clear and cedar exterior finish
Recommended Skill Level
Intermediate

Comments

Pool equipment fence refresh

Submitted by Anonymous (not verified) on Thu, 07/06/2017 - 21:00

We love this fence refresh from the previous owner's solution to enclosing the pool equipment and a/c unit! It was the first time we fastened something to our house - drilling through stucco in the process. That was a big deal for us diy-ers! We made the frame out of 4x4's (which ended up being the most challenging part to the whole thing), applied the horizontal fencing boards and then used one of those $15 fence hardware kits - it was a great project that has made a huge difference in our backyard. Yay!

Estimated Cost
$300
Estimated Time Investment
Weekend Project (10-20 Hours)
Recommended Skill Level
Intermediate

My first project

Loved how these plans were so easy to follow and certainly appreciate the accompanying video.

Comments

firewood shed

Submitted by brittanyj on Thu, 06/04/2015 - 10:25

Needed a place to store wood for the fireplace and firepit. This very nicely organizes what was before a huge dirty pile of wood scattered on the ground. Cedar pickets for the top, all is coated in exterior white stain. Holding up nicely so far.

Built from Plan(s)
Estimated Cost
$30
Estimated Time Investment
Afternoon Project (3-6 Hours)
Finish Used
exterior stain in Navajo white
Recommended Skill Level
Beginner

Pool Lounge Chairs

Submitted by Seth on Sun, 07/26/2015 - 16:25

This was a fun and easy project for our pool area.  We have high winds and our store bought chairs did not last.  These loungers are sure to fare a bit better.

Estimated Cost
$60
Estimated Time Investment
Weekend Project (10-20 Hours)
Finish Used
Minwax Jacobean. We added three coats of gloss poly.
Recommended Skill Level
Beginner

Mini vanity for a mini bathroom

Submitted by Anonymous (not verified) on Sat, 04/23/2022 - 04:54

We are setting up a small bathroom In our dry cabin. We will have a water container on the sink top and a bucket collecting grey water below. None of the commercial vanities had the right combination of price/sturdiness/shelf configuration/style I was looking for, so I made my own!

Modifications:
-no top
-lower shelf
-used 1x2 (not 2x2) on front shelf support to maximize shelf space
-wider and deeper than plans to fit sink top just right! It took a lot of math and trial and error on plank width combinations.
-added a door, which turned out to be the hardest part for me

Comments

Garden outhouse with composting toilet

Submitted by Anonymous (not verified) on Sat, 07/16/2022 - 17:48

The cool thing about Ana White plans is they are straightforward to modify to use materials you have on hand. Everything but the frame is either leftovers or from the barn.

Built from Plan(s)

Comments

Rustic X Bookshelf--Short

I've loved the Rustic X series from the first plan (the console table) but none of them were things I needed for my home. So when I saw the Rustic X Tall Bookshelf I was thrilled since I have been needing a cookbook shelf in my kitchen, and had been trying to design my own using some form of the X construction. I still needed to customize it, but it was much easier to do from the existing plan. I made it half the height since I wanted it to be flush with my counter, and also wanted it narrower. I had leftover 1 x 12s from another project so I used those, and decided to make two Xs instead of one because of the narrower width. I cut the X's to fit, and used wood glue and 2" nails to secure them from the bottom. Perfect fit for my space!

Built from Plan(s)
Estimated Cost
$25 in new wood, plus leftovers for shelves
Estimated Time Investment
Weekend Project (10-20 Hours)
Finish Used
I used a technique for oxidizing wood which I read about at The Friendly Home. Hillary does a great detailed tutorial (http://thefriendlyhome.blogspot.ca/2012/07/how-to-oxidize-wood.html) on how to use tea, vinegar and steel wool to give new wood an aged weathered look. Cheap and beautiful! I will absolutely do it again! But it was a bit lighter than I wanted, so I used Minwax Polyshades in Tudor to darken them up and seal the wood.
Recommended Skill Level
Beginner

Comments

8x10 Shed - Built by Julia Eliopoulos

I made your 8x10 shed! Turned out so well, thank you for the amazing plans.

Julia Eliopoulos

Built from Plan(s)

Comments

Chicken Coop with run

Submitted by Anonymous (not verified) on Sun, 01/31/2016 - 19:36

It took a while to come together and made several modifications but it is a great coop and was a major selling point of the house when we were relocated.  I had added a main tray under the roosts and a door to srape the poop out.  This made keeping the coop clean very easy.  

Built from Plan(s)
Estimated Cost
$800
Estimated Time Investment
Week Long Project (20 Hours or More)
Finish Used
Chicken Coop
Recommended Skill Level
Intermediate

Princess Castle Loft Bed

We used the plans from this site to build this for our daughter. We did however make the bed part a bit more sturdy to ensure that no one would get hurt and to make sure it could support any weight. We added 4 2x4s across the bed like rafters and screwed the slats on top of them.

Estimated Cost
$350
Estimated Time Investment
Week Long Project (20 Hours or More)
Finish Used
Paint
Recommended Skill Level
Intermediate

Comments

Camp Loft Bed

Submitted by MommaBlue on Tue, 10/08/2019 - 10:58

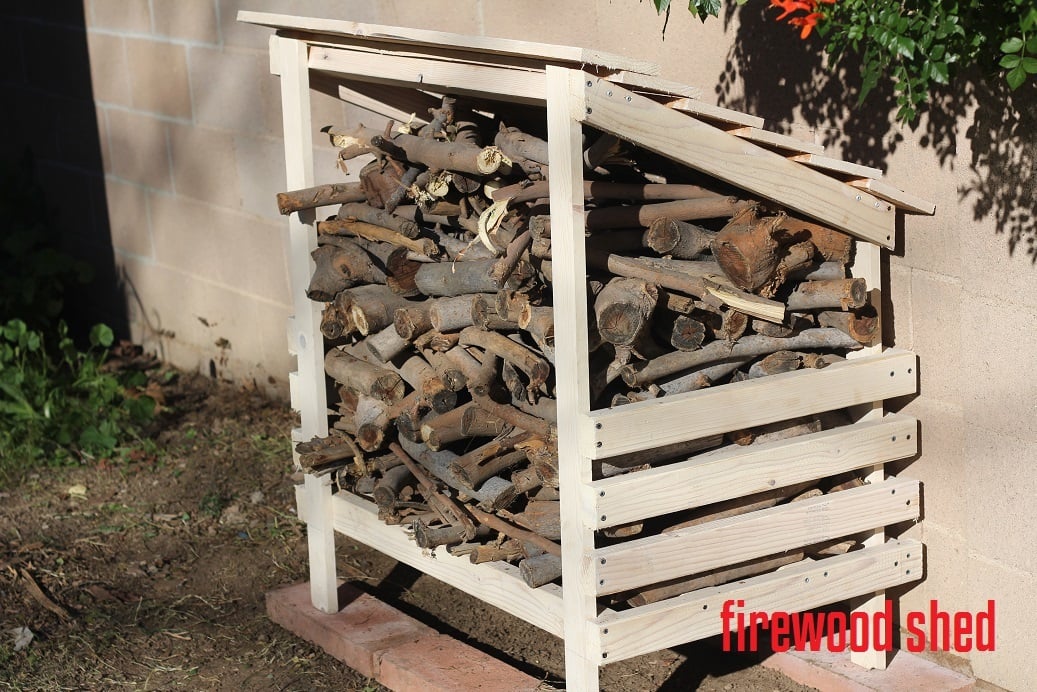
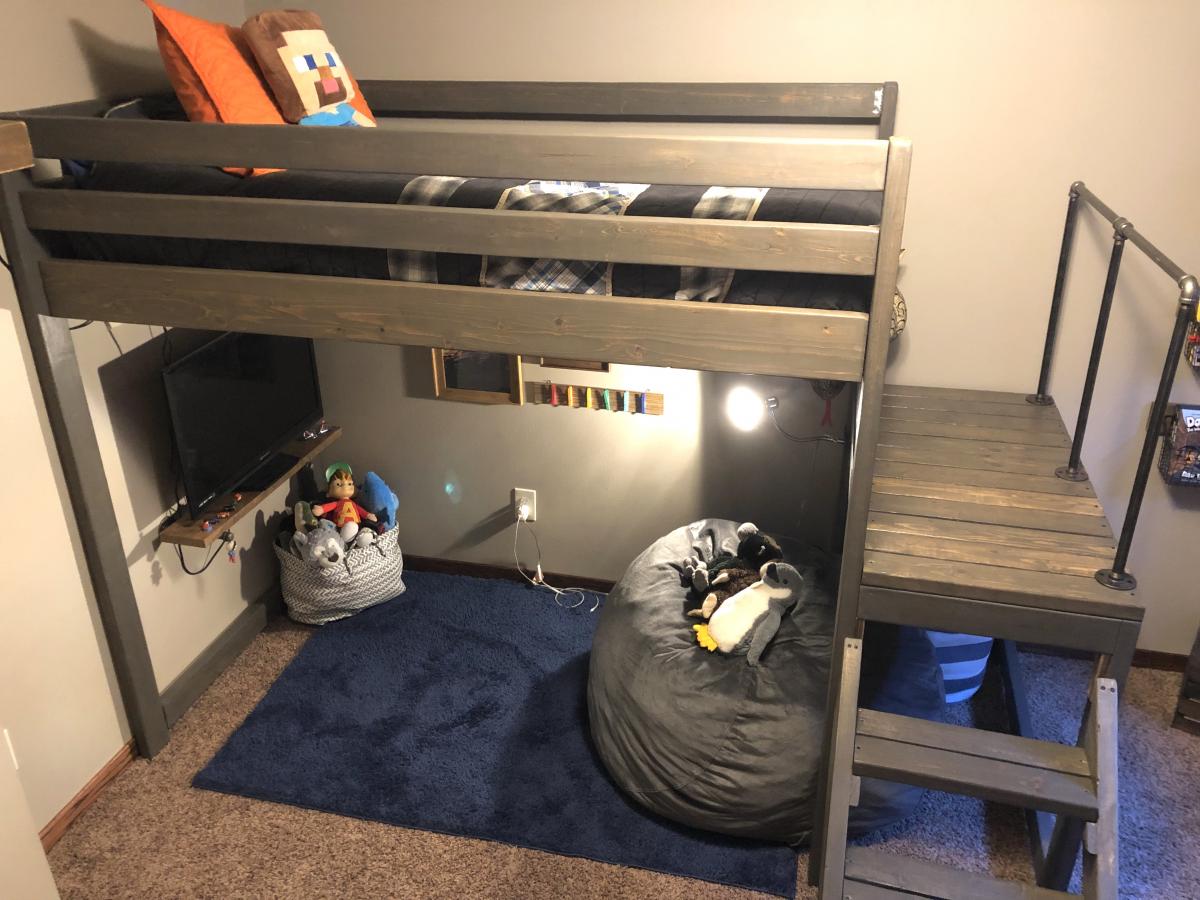
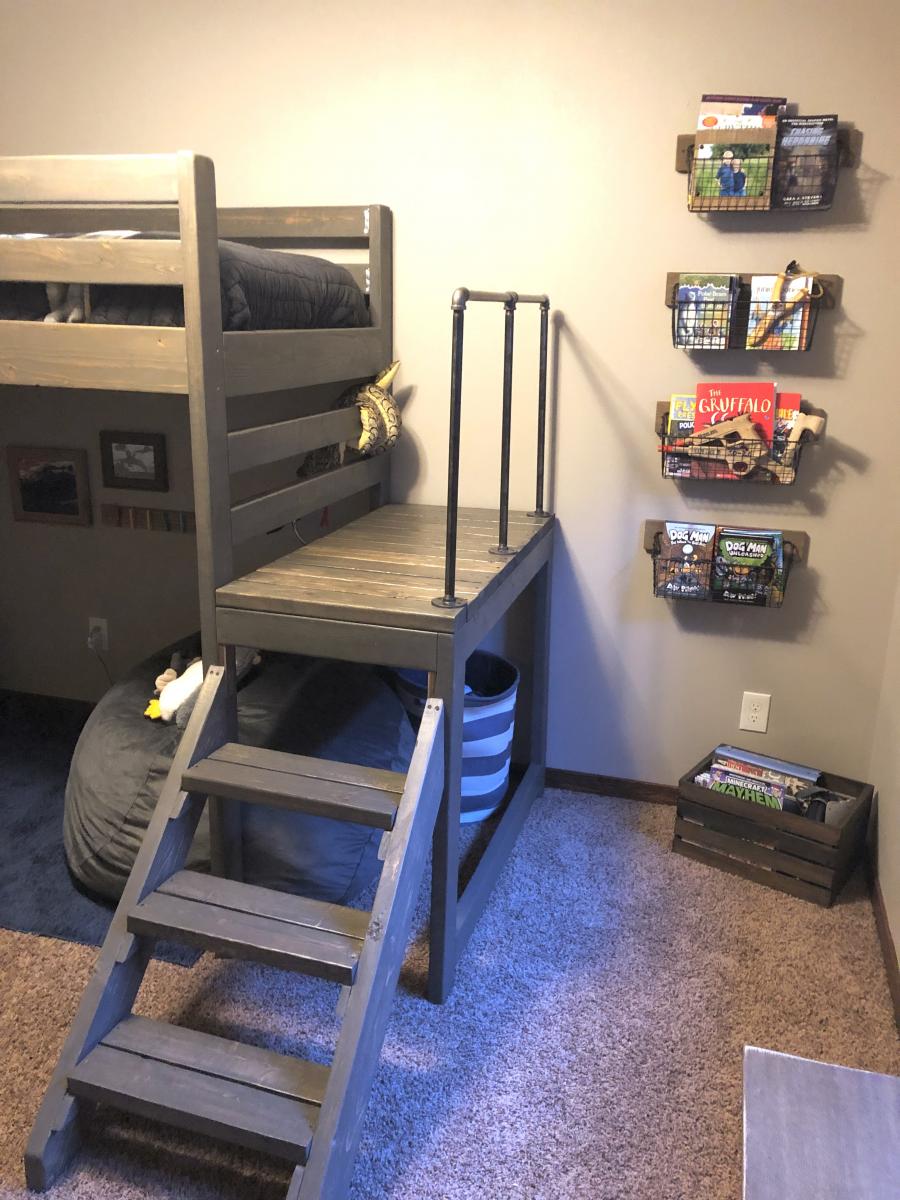
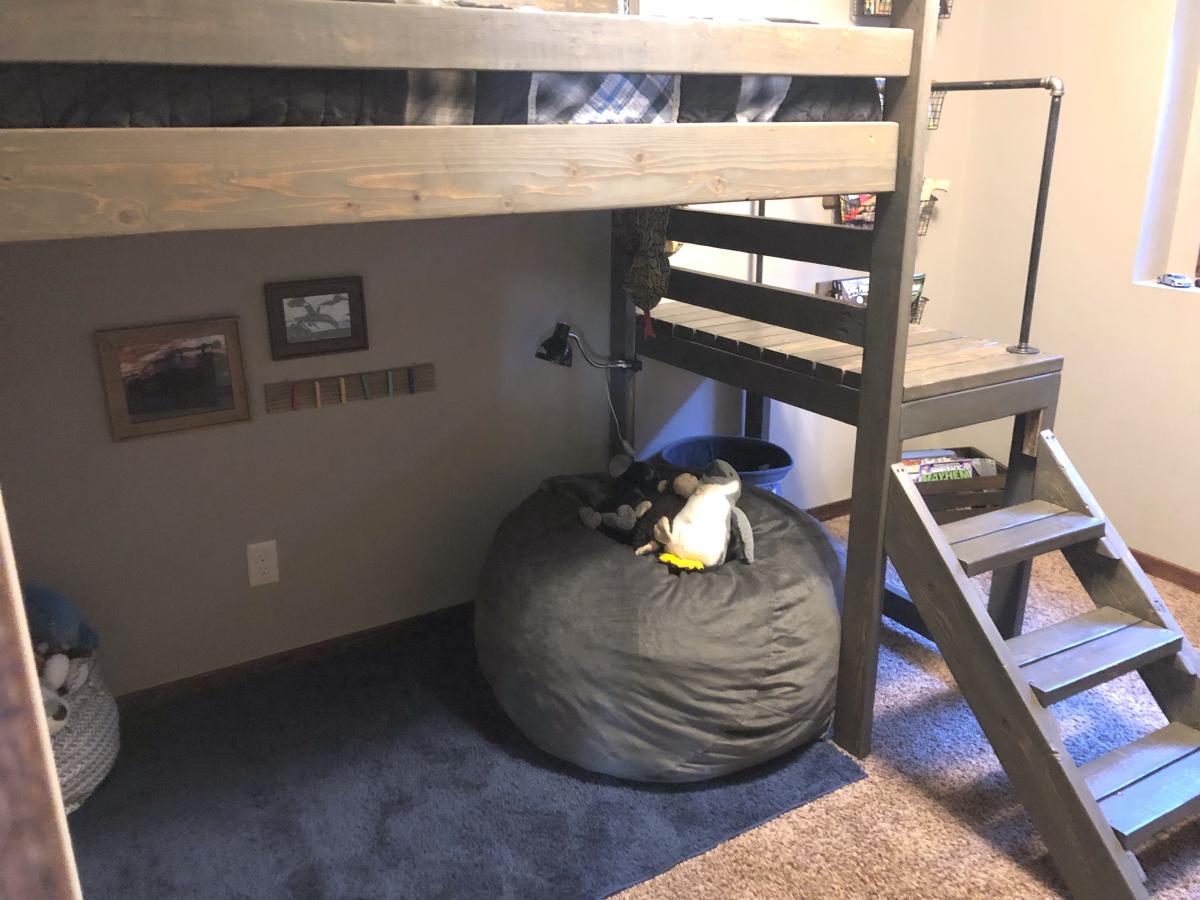
I built this bed for my 8 year old son's room "face lift." His only request was to have a place to hang out, but being his room was so small, that was a struggle! The loft bed allowed us to make a cozy little hangout - the poor guy can't get rid of his siblings now!

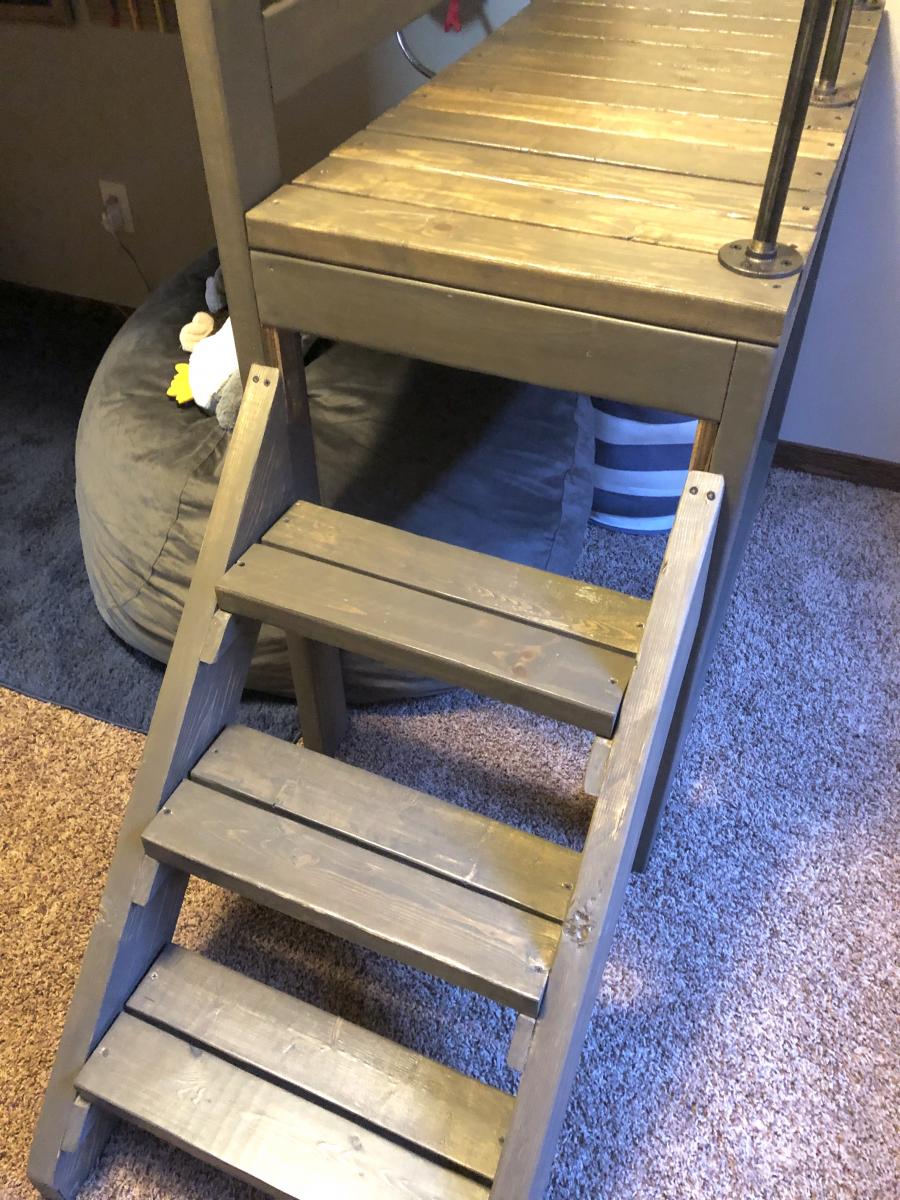
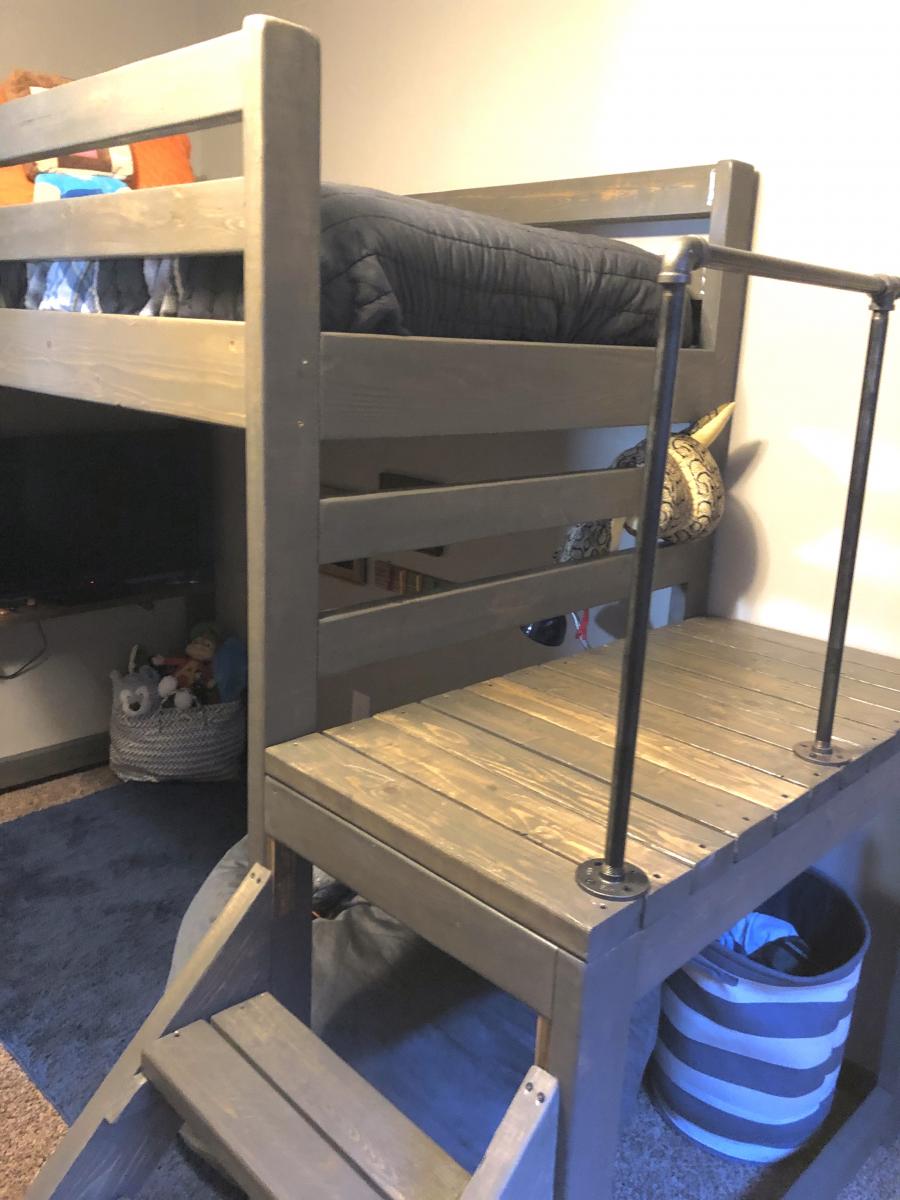
I added a few extra inches to the height of the Camp Loft plan, I also added the pipe hand rail for additional safety and give his room a little older boy vibe! It was a very easy build, the staining/sealing took the longest. The stairs make it much easier to change sheets and getting up and down for those of us who aren't 8 year olds :).

Estimated Time Investment
Day Project (6-9 Hours)
Finish Used
I used a mixture of Varathane Weathered Gray and Minwax Special Walnut. It is about 3/4 Gray and 1/4 Walnut.
Recommended Skill Level
Beginner

Jelly Cupboard(s)

Submitted by bbomer on Fri, 12/27/2013 - 09:48

I have built several of these Jelly Cupboards since the plans came out. Everyone really likes them, and they are super fast and easy to build. The last one had glass doors that turned out pretty well. I like to use plywood beadboard on the back to give it a little more character. I also like to use 'hardware cloth' for the mesh type doors (found at farm stores). It usually has openings about 1/8" or less but not as tight as screen, which looks perfect.

Edit: For hardware part numbers and sources please see: http://grvland.com/wordpress/2012/02/07/jelly-cupboard-project/

Built from Plan(s)
Estimated Cost
$50-$100
Estimated Time Investment
Weekend Project (10-20 Hours)
Finish Used
Black Walnut Danish Oil, Wax Free Shellac, Latex Paint (dark), more latex paint (light), sand back, Water-based Poly
Recommended Skill Level
Beginner

Comments

romanweel

Tue, 12/31/2013 - 00:51

Really lovely work! I scoured a couple of those pretty butterfly hinges by pure luck a while back, and I know where to find more...but those strap hinges! Where did you get them? I can't seem to find them for a decent price (Ohio).

bbomer

Tue, 12/31/2013 - 07:15

The strap hinges are from Acorn Manufacturing. I had to order them because I could not find anything like them locally. For some reason I can not post links in the comments, but the sources are linked on my blog, grvland dot com (no spaces and a . obviously). Just search there for Jelly Cupboard and you will find the source links in the earlier of the two posts. I will also see if I can add a direct link above.

Wood Star Serving Tray

Submitted by LampAtFeet on Sat, 12/07/2019 - 13:41

I followed the plans for the Wood Star Serving Tray. I thought it was a little tricky cutting all the angles to the correct length. One tip I would suggest is to mark which end has the 24 degree cuts, since you'll be attaching these joints first. Any gaps in the joints can be filled with wood filler, then sanded smooth. I would say this is an Intermediate level project due to the angles and trying to attach them without the nails popping through the other board. Would be fun doing a set of 3 and painting them red, white & blue for the 4th of July. Thanks for the plans, Ana!

Estimated Time Investment
Afternoon Project (3-6 Hours)
Finish Used
Stained with Varathane Briarsmoke, then a light layer of Dark Walnut to help give it an aged look. Sealer on top.
Recommended Skill Level
Intermediate

Comments

DIY Shed Chicken Coop 6x8

Submitted by Anonymous (not verified) on Thu, 05/19/2016 - 19:50

 The project was used using the same plans but I extended the floor to be 6 feet wide vice 4 feet the additional 2 feet provided the perfect amount space I wanted. I also added an extra windows  to get cross ventilation.    I also insulated the coop and put paneling on the walls and lenolium on the floors.  I dropped the back wall sheeting 1.5 inches for additional airflow since the shed doesn't have a ridge vent.   The plans are easy to follow and easily adaptable.   

Built from Plan(s)
Estimated Cost
$700. You may think that is a lot but you will learn a lot. Coops we were looking at were $1,200. This coop was less expensive and bigger and better plus you can say you built that.
Estimated Time Investment
Week Long Project (20 Hours or More)
Finish Used
T1-11 with home depot behr exterior paint.
Recommended Skill Level
Beginner

Comments