Community Brag Posts

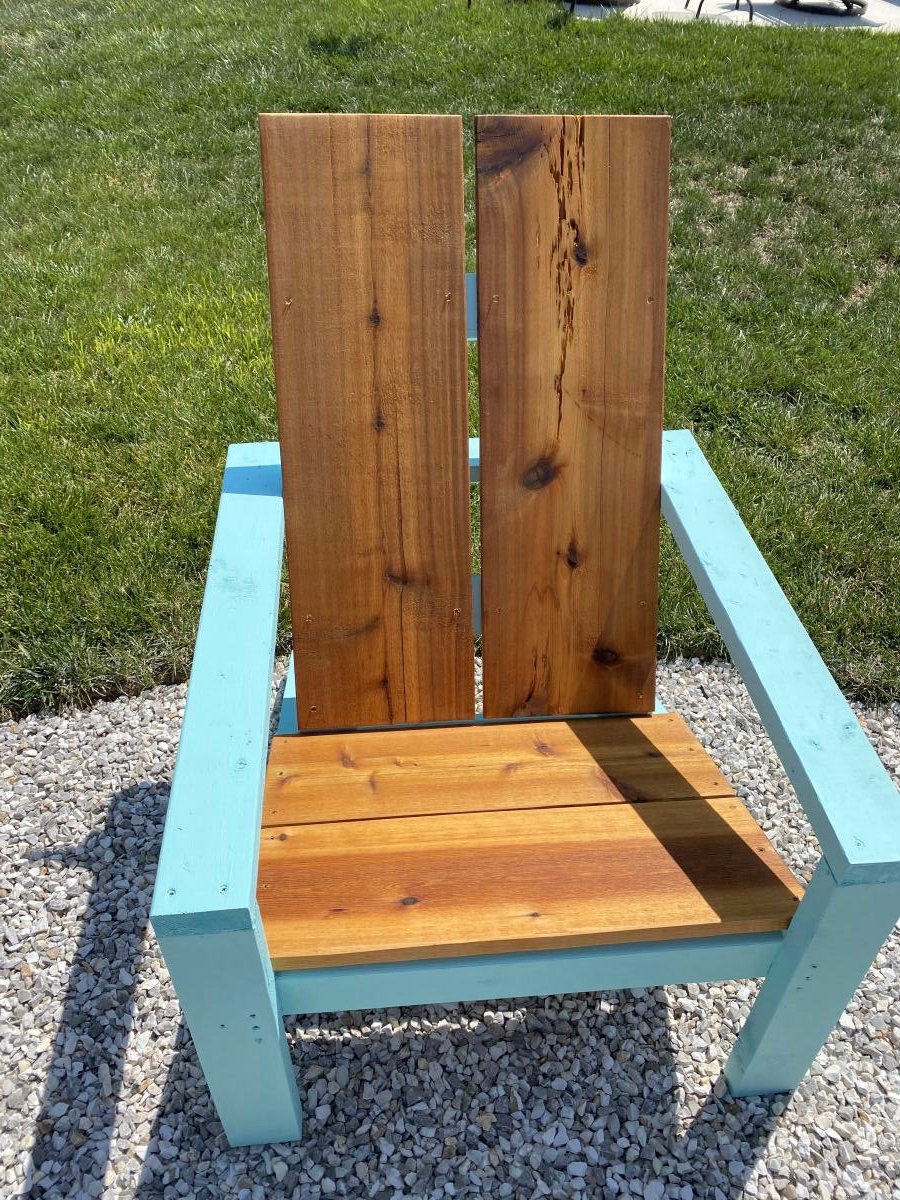
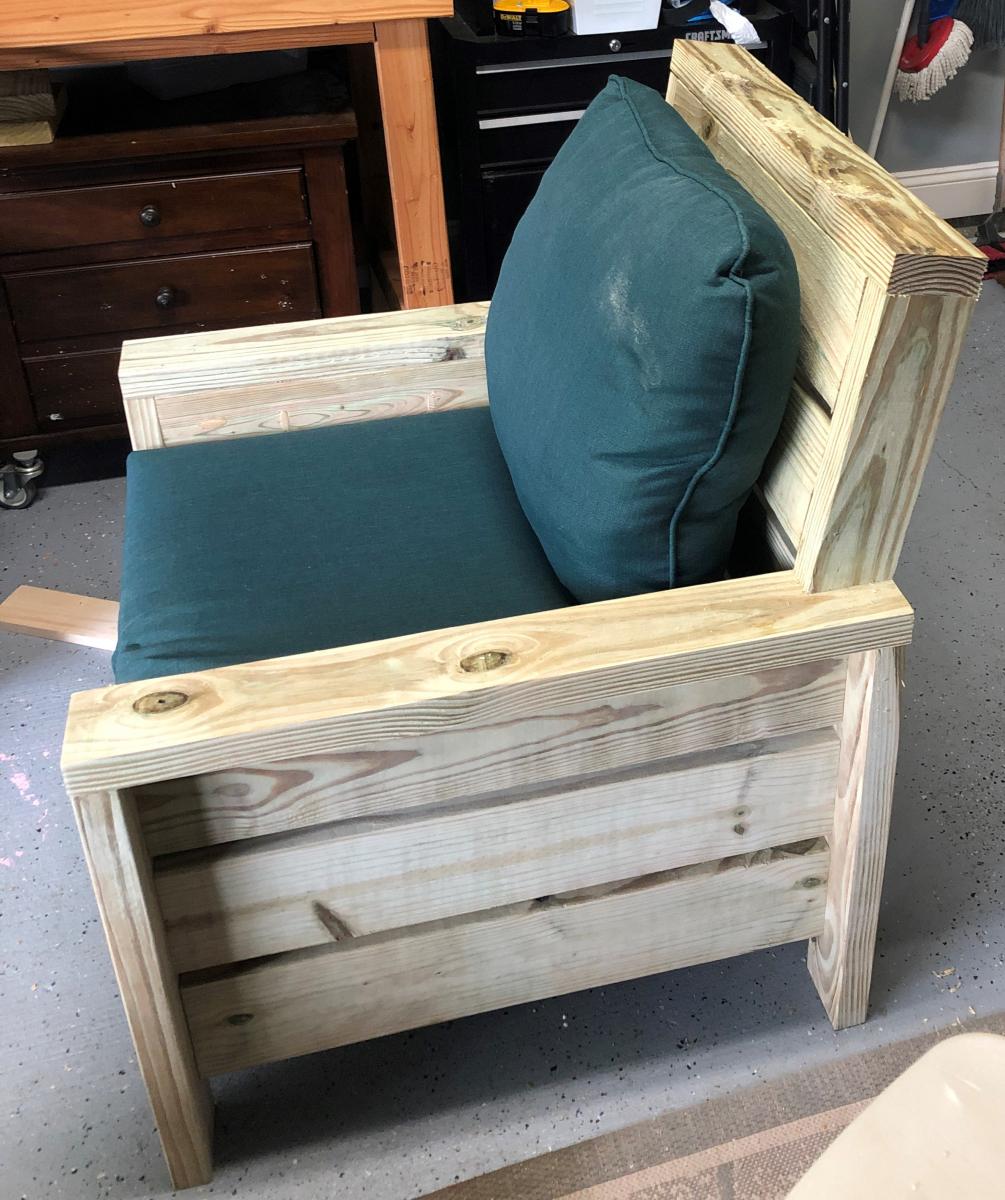
DIY Wood Outdoor Chair with Deep Seat Cushion
Using just basic tools, I was able to build this super comfy outdoor chair for the fraction of the cost. With a couple of modifications, Ana White's design plan made for a perfect fit for the new deep seat cushions I had found on fb marketplace.
Built from Plan(s)
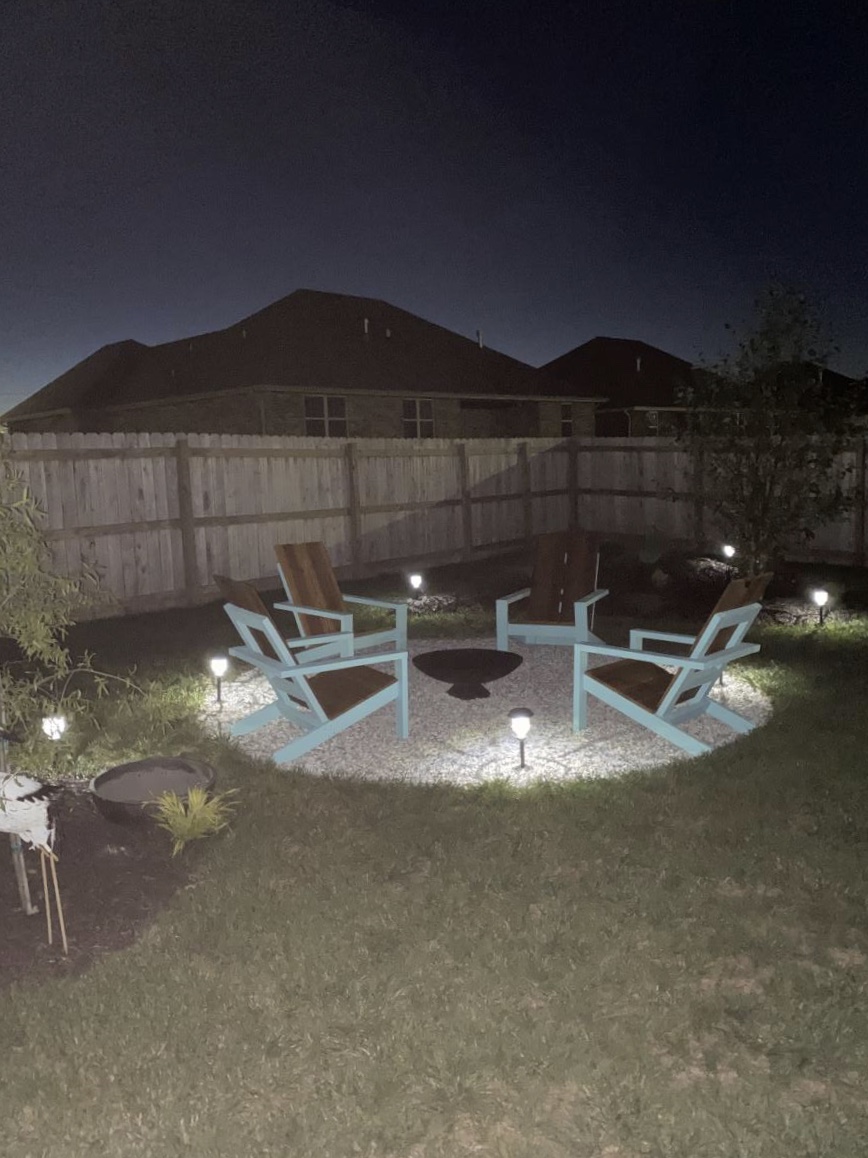
Modern Adirondack Chair, Super Sized
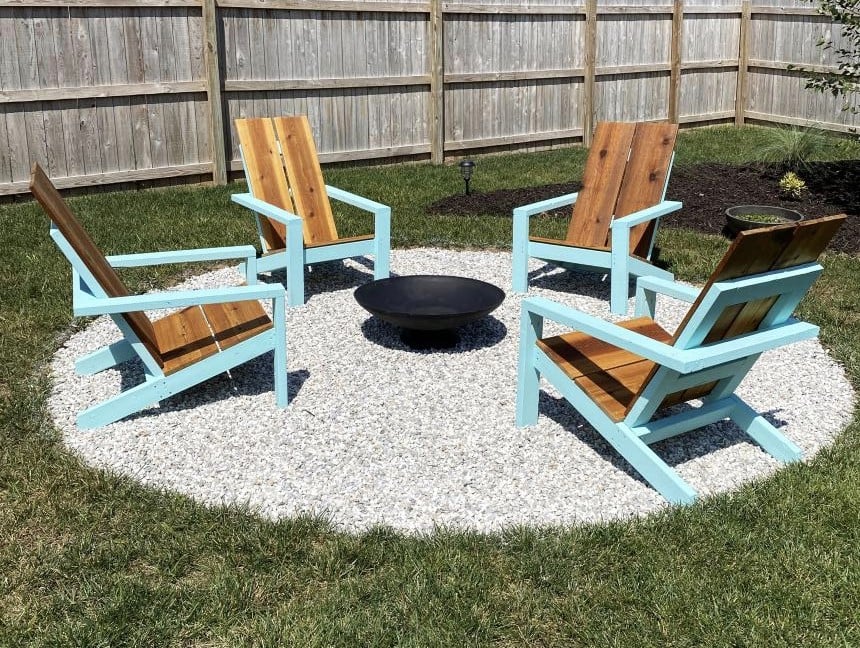
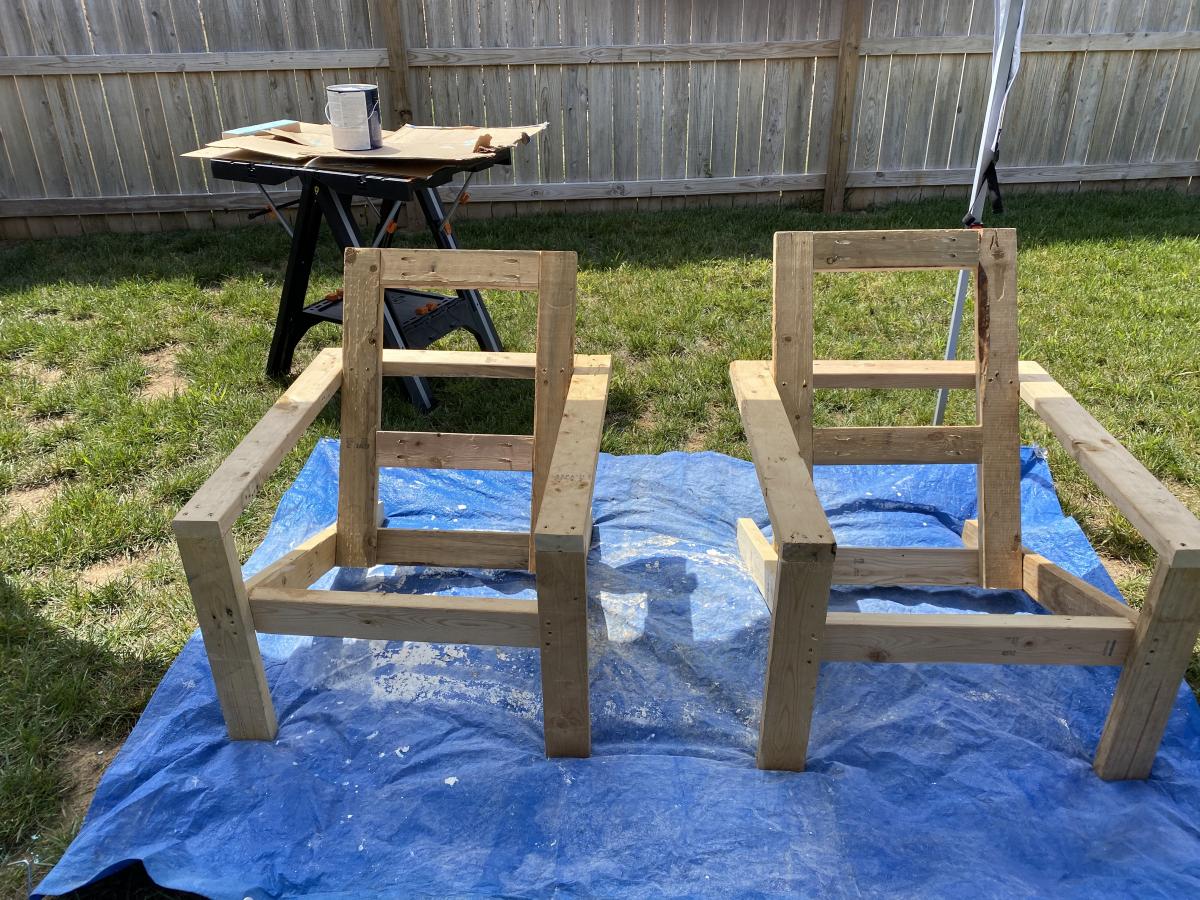
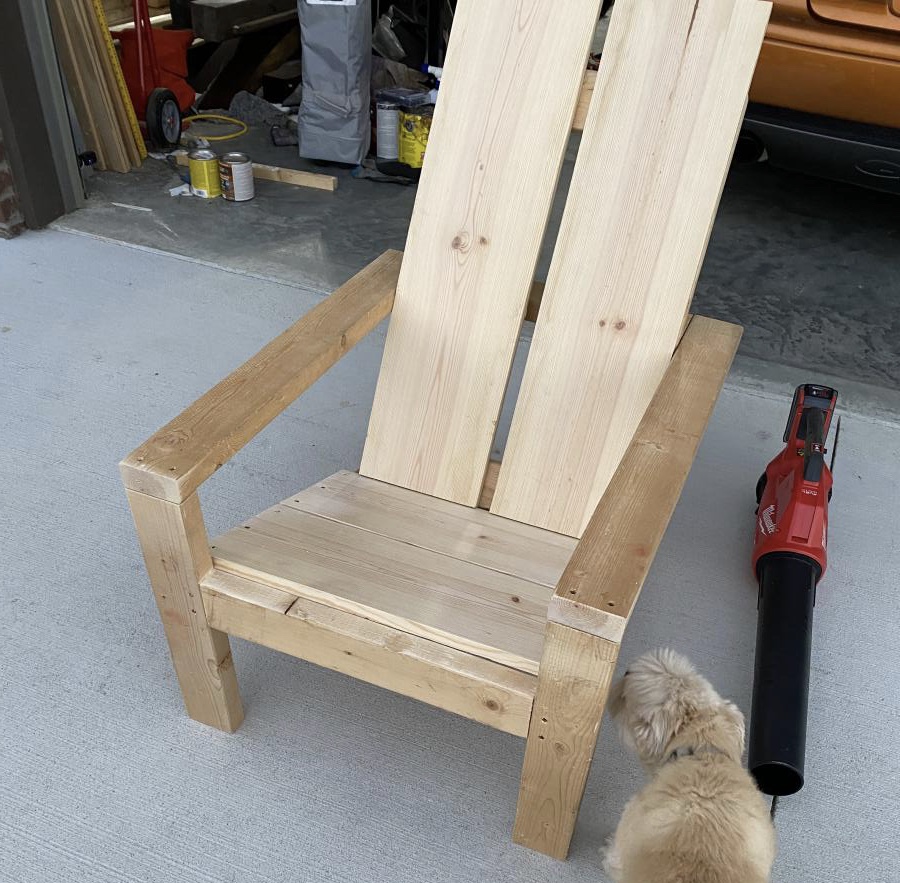
Am a big fan of Ana's work, and have used several of her plans in prior builds including the more traditional Adirondack chairs. Those stayed with my old house, and I wanted something different for my new house. Really liked her Modern Adirondack design with the floating arm rest. However, plans are like recipes to me--a guideline. I wanted the back boards to run up and down, and I am a bit more robust than the lovely and petite Ms. White, so they would need to be wider after I built the first one at 19 1/2" wide per plan. The next three I made 22" wide and that worked well without throwing off the geometry and angles of the other parts. Since I ran the backboards up and down, I needed some cross beams for stability and to give an attachment point for the middle of the boards. Cut some 2x4s at 15" wide, drilled pocket holes in both ends, and attached in between the back supports with the pockets facing up to be hidden by the back boards. All of the 2x4s were leftover cut-offs from the houses being built in my neighborhood. Since the frames were free, I splurged and went with cedar boards for the backs and bottoms. With the wider frames, I had to use 1x12s ripped down to 10 3/4" to get the right look (about a board's width in between). Needed some color, so I painted the frames Teal Seaglass from Menards. Cedar was stained with a natural deck stain from Sherwin Williams. I experimented with salt paint (mixing unsanded grout with the paint) to give a heavily textured and weathered finish but this was unecessary--the wood was distressed enough and I am a terrible painter. It also toned down the color so I skipped that step and just went with 2 coats of plain paint. It looks like outdoor furniture should up close. As always, am pleased with Ana's plans. Thank you for doing all the hard work!

Built from Plan(s)
Estimated Cost
about $200 for all 4 chairs due to cedar and paint
Estimated Time Investment
Weekend Project (10-20 Hours)
Finish Used
Paint - Pittsburgh matte exterior with Dutch Boy coloring Teal Seaglass
Stain - Sherwin Williams Superdeck stain, Natural finish
Stain - Sherwin Williams Superdeck stain, Natural finish
Recommended Skill Level
Starter Project
Comments

Fri, 08/21/2020 - 16:59
I absolutely love how the…
I absolutely love how the back was done!! Thank you so much for sharing!
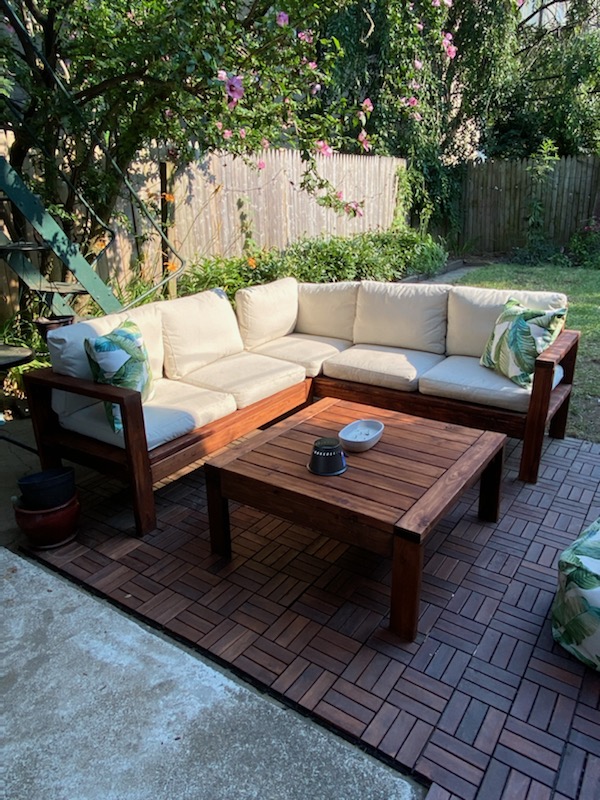
2x4 full outdoor patio set
Used the plans for the 2x4 outdoor sofa. Modified the dimensions to better fit my personal needs. Made the coffee table a square instead of the rectangle plans posted here
Built from Plan(s)
Estimated Cost
$1200
Estimated Time Investment
Week Long Project (20 Hours or More)
Recommended Skill Level
Beginner
Comments
Wed, 07/07/2021 - 10:16
Fantastic!
That is amazing, love the square table for the space! Thank you for sharing:)
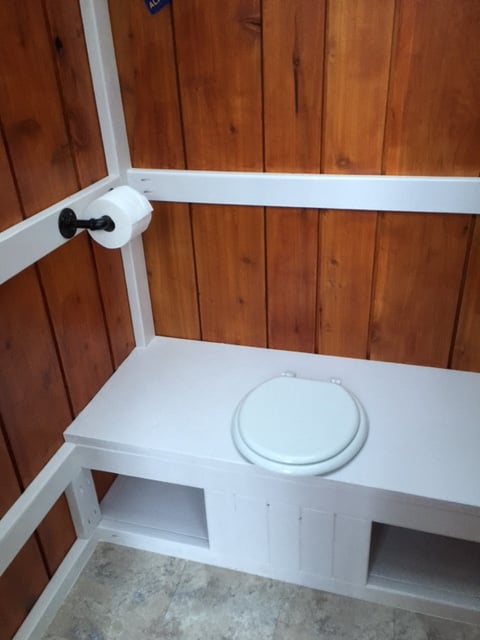
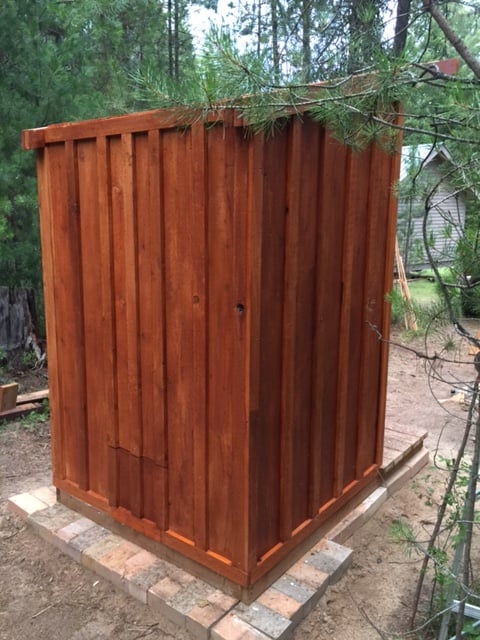
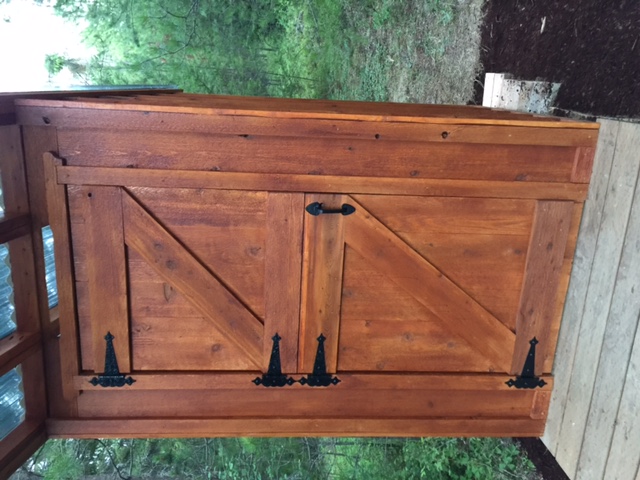
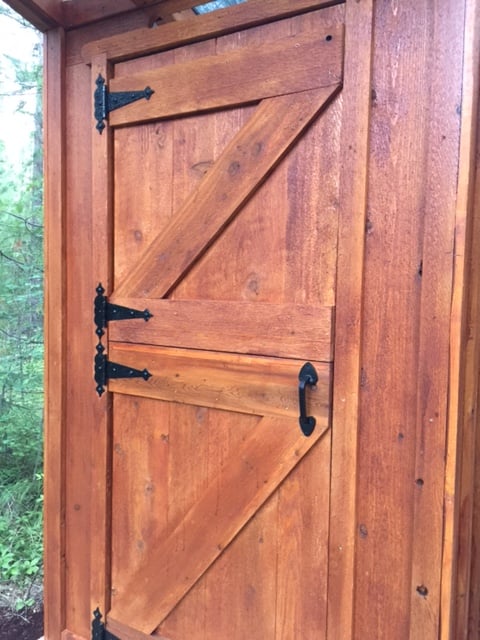
Our Pacific Northwest Privy

We have a small rustic cabin that needed a clean, functional outhouse. We followed Ana's plans, but with a few modifications to include a Solar gray polycarbonate roof to let in light. We also decided on cedar board & batten for the siding. We look forward to many years of use.

Built from Plan(s)
Estimated Cost
$800
Estimated Time Investment
Week Long Project (20 Hours or More)
Finish Used
Behr - Cedar naturaltone Weatherproofing. All boards were cut to size and then stained with 3 coats.
Recommended Skill Level
Advanced
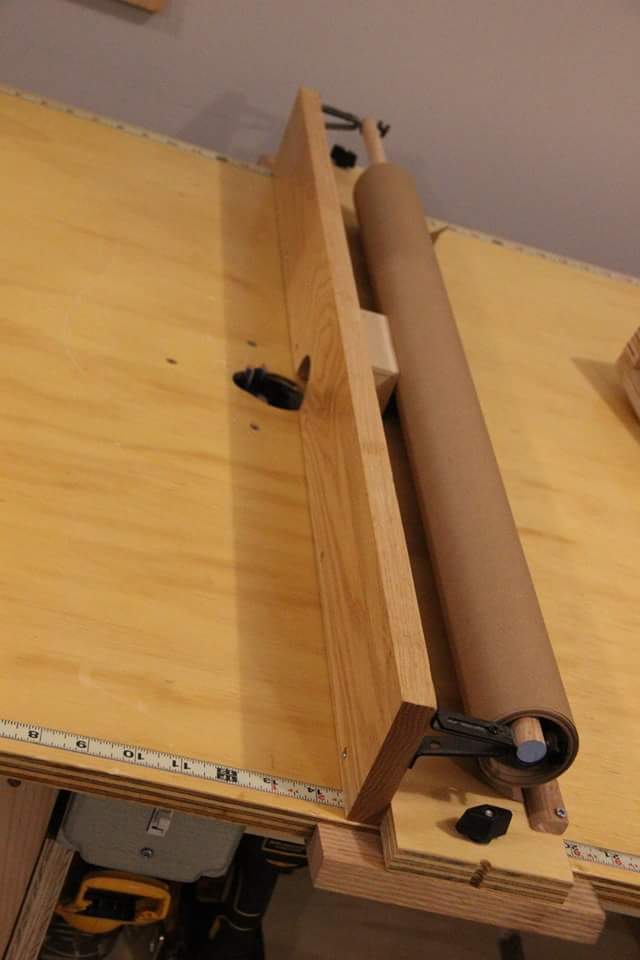
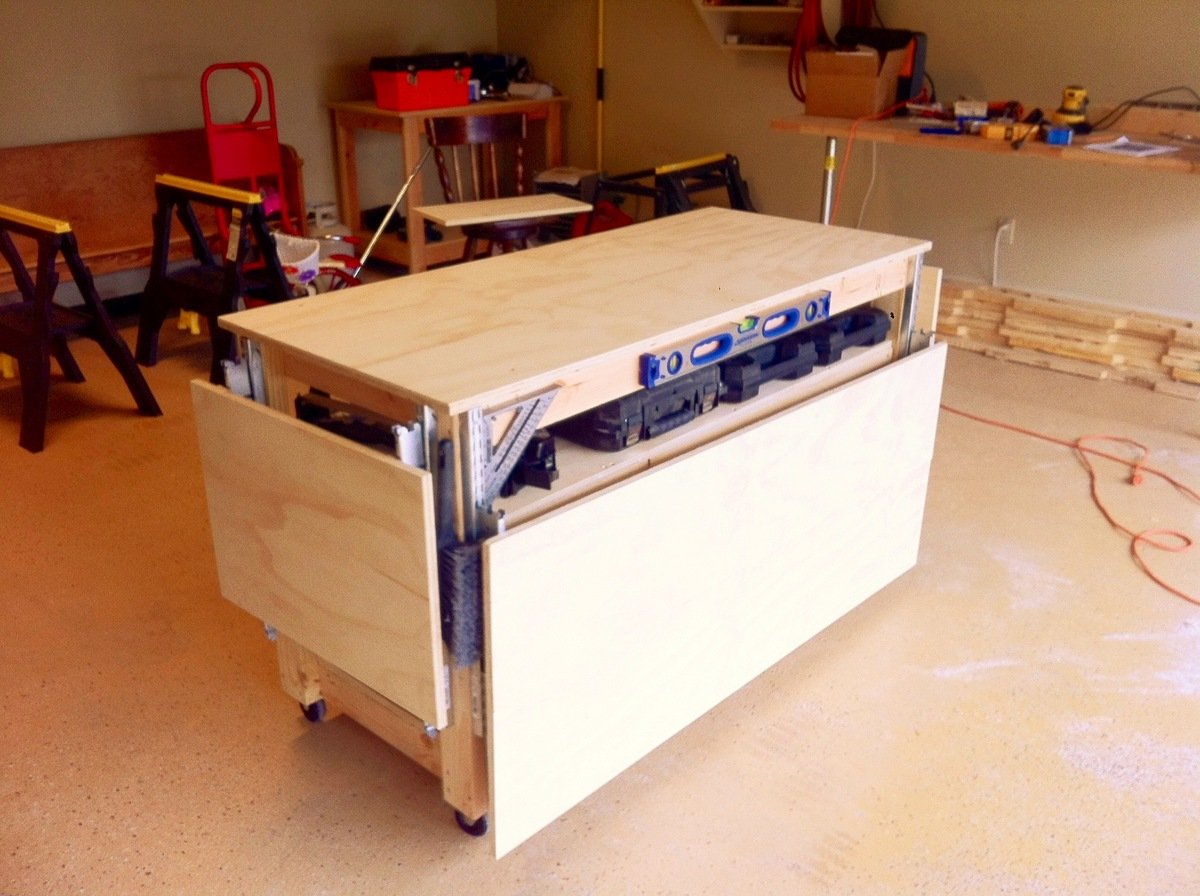
Do-It-All Mobile Workbench
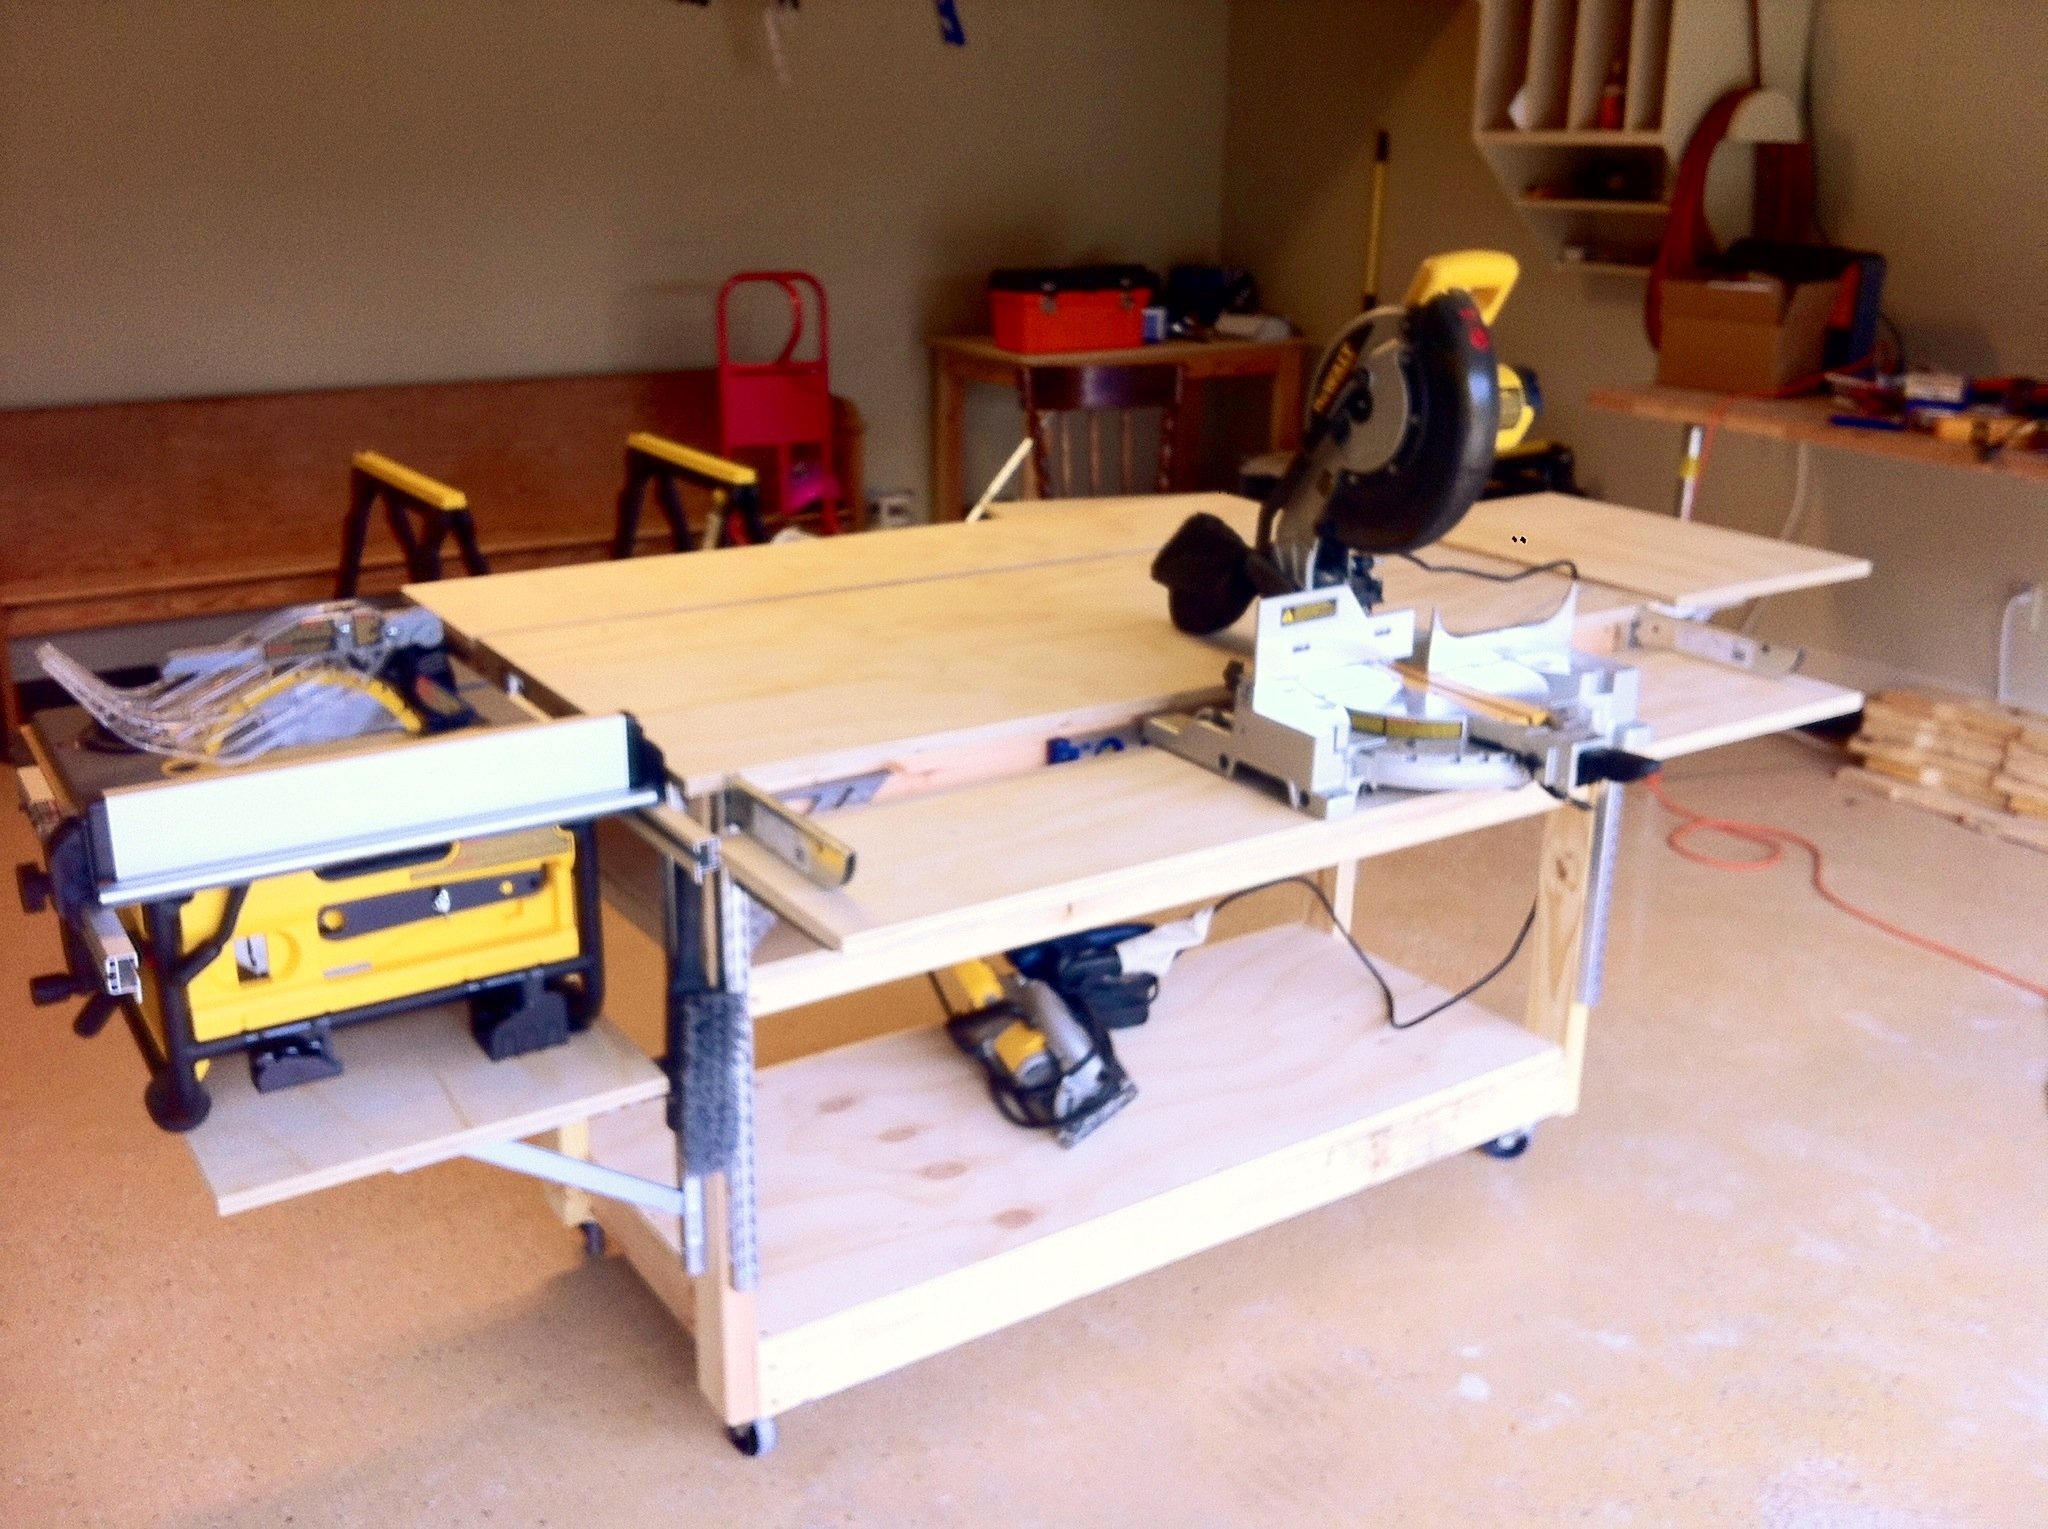
The need for a proper workbench in my garage/shop is a must, but. So is space! I already have a fold down workbench I’ve made with ¾ inch pipe & a door, but. I just need something that can handle all my tools. So, I stumbled upon these plans from the Family Handyman & couldn’t find a reason why this wouldn’t work in my shop. It has room for storage, can easily accommodate my tools & most importantly fold up to store. Easy to build too! Make sure you read all the plans first as some of the materials could be pricey, but well worth it. Technically it’s taken 2 months to build this bench, as I operate on a firefighter/teacher’s budget & during the holiday season no doubt. I ordered all the shelf standards & brackets through Amazon, $210.00 for those alone, but they hold so much weight to support your tools I figure it’s worth it. The rest materials (wood, screws) were purchased at Home Depot for around $150.00. The plans called for ¾ inch ply & it was $45.00 per sheet. However they did have a smaller thickness for $22.00 per sheet & was only a 1/32 inch thinner. I plan on topping all my surfaces with some ¼ inch tempered hardboard later on so I knew it would work. That also left me adjusting my screw size to mount my brackets. Due to the reduction in thickness of the plywood all my #8-1 inch screws needed to be adjusted to ¾ inch so to not screw through the ply. I also hit the molding isle to nab some pieces to use as furring strips to use under the shelves before attaching the brackets. This way I can sand each strip to match before mounting to make sure it lined up flat with the center top. One more thing; where it says “drill 1/8 inch hole in brackets make sure you use 1/8 inch pop rivets. I barrowed a pop rivet gun & was handed some rivets as well. Popped two & they had to be trashed because the rivet size turned out to be 5/32. So I stepped up in drill bit size & it all worked out. As I said, I’ll be topping it with some ¼ inch hardboard. I also plan to run it’s own electrical with an outlet on each post. I hope you all enjoy & this can help!


Estimated Cost
$350.00
Estimated Time Investment
Weekend Project (10-20 Hours)
Recommended Skill Level
Beginner
Comments
Thu, 11/29/2012 - 07:03
That is awesome!
This is by far the best workbench I have ever seen!!! Thanks for sharing. And excellent choice of table saw and miter saw.
In reply to That is awesome! by Rusty Cottage
Thu, 11/29/2012 - 14:59
Small rip saw
If I had it to do over I'd had gotten the contractor grade portable saw from Dewalt. The smaller version I have is the same 10" saw, but. It's maximum rip capasity is only 16. The other will at least rip a sheet of ply in 1/2.
Thanks for the kind words on the bench! I hope everyone that may find this valuable will. The plans came out of a 2005 issue & were hard to find on the internet.
Thu, 07/04/2013 - 18:28
Need Plans
I love this work bench and would love to build it but i cant find them. Could you post them or email them to me please. uniquetrio2000 [at] gmail [dot] com
Thu, 10/23/2014 - 09:04
Work Bench Plans
After some searching, found the plans at http://us.readersdigest.com/images/offer/fh/project_plans/pdf/FH05DJA_W…. Hope that helps. This is on my list of things to make very soon.
Wed, 10/22/2014 - 13:31
Standards & Brackets for Bench
I bought all the standards and brackets at Menards for $87.58 and this price included tax and shipping.
Mon, 12/10/2018 - 16:55
Do it all workbench plans
Thanks for sharing! Good job! Any chance you'd share palns? No luck on inet or with provided link. Thanks!
Wed, 08/07/2019 - 12:48
perfect workbench
This is the perfect workbench that I’d like to build. Could I get the plans for it?
Thu, 03/12/2020 - 12:46
Were you able to locate the…
Were you able to locate the plans?
The link in this thread doesn’t seem to be active.
Sun, 07/12/2020 - 17:59
I found the PDF download for…
I found the PDF download for these plans, here is the link:
https://docplayer.net/28130746-Do-it-all-mobile-workbench.html
The only place where I could find them, FH doesn't have them online any more.

Tue, 12/08/2020 - 17:57
Future Instructable?
Great build. I would love to see an instructable on this. :) Thank you for sharing..
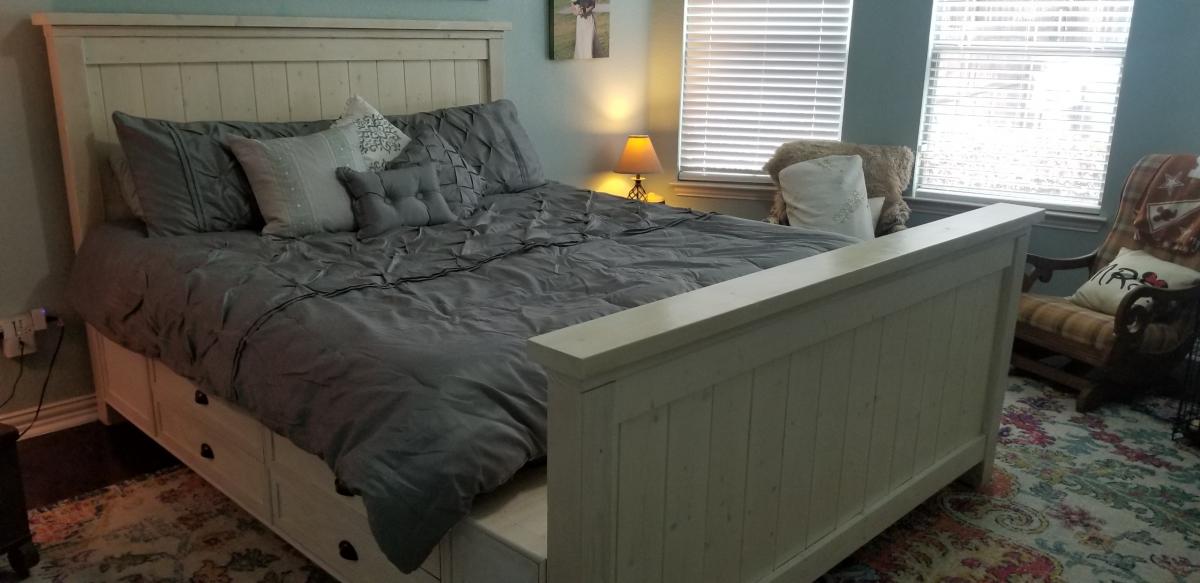
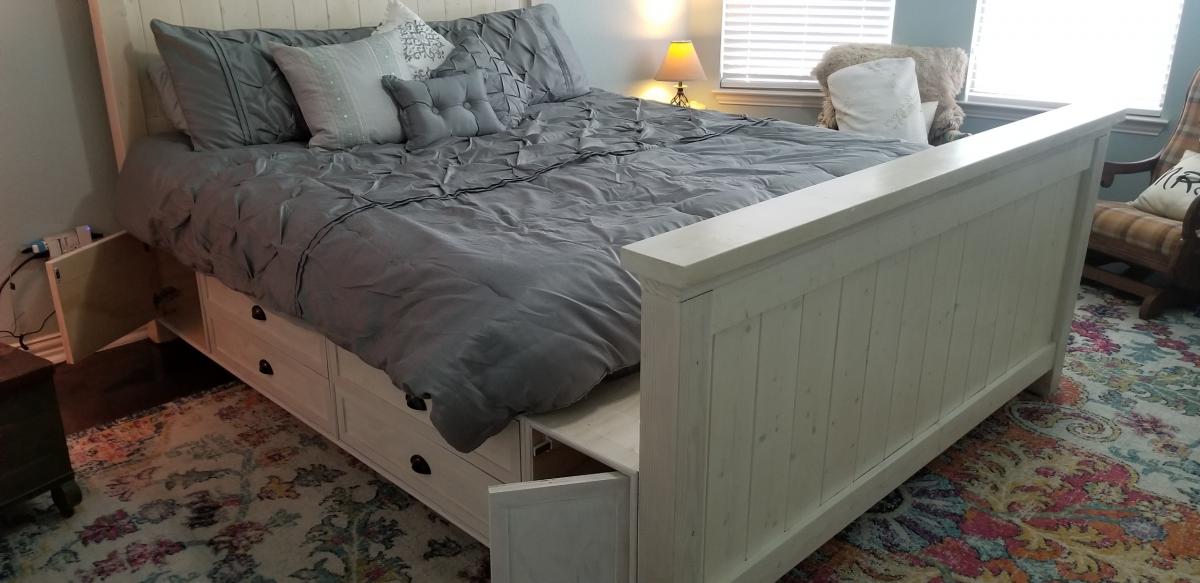
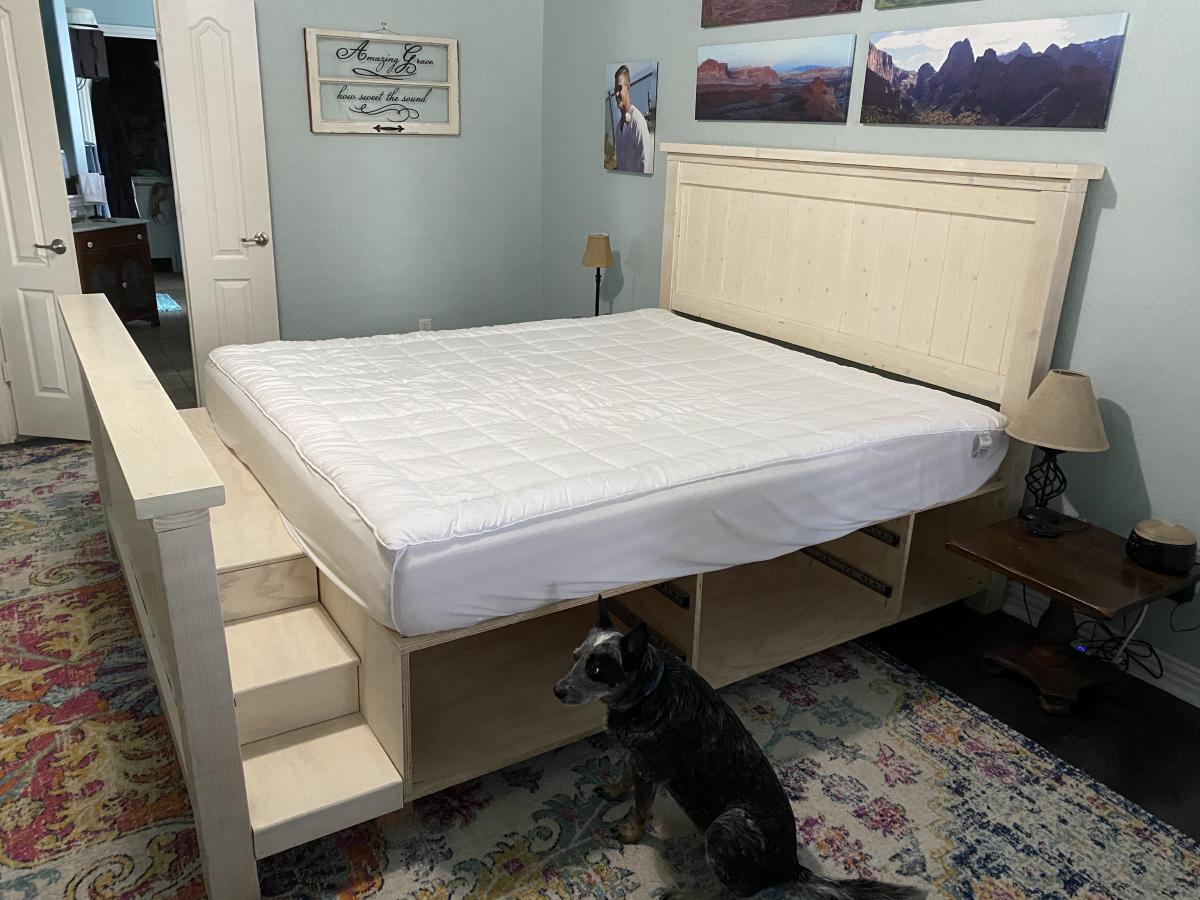
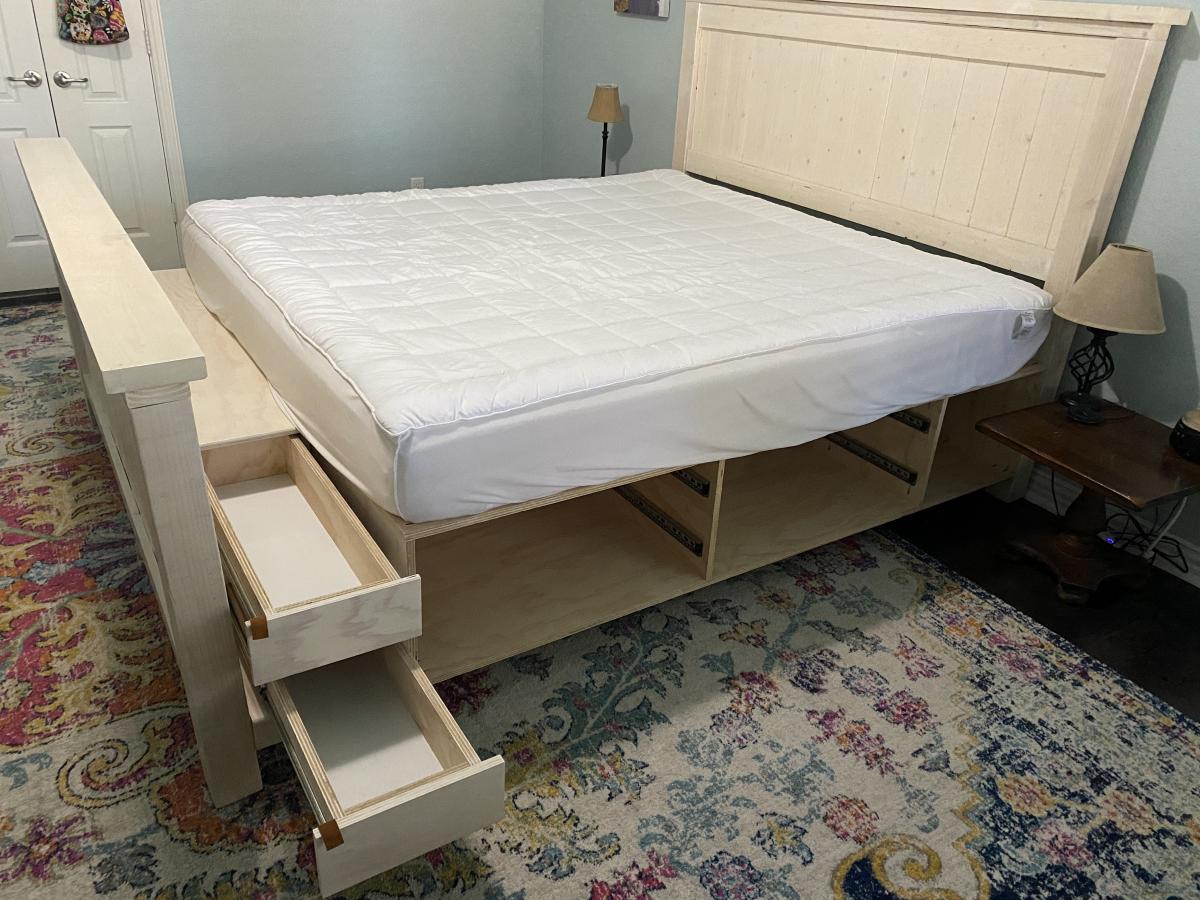
King Size Farmhouse Bed with Dog Stairs and Storage
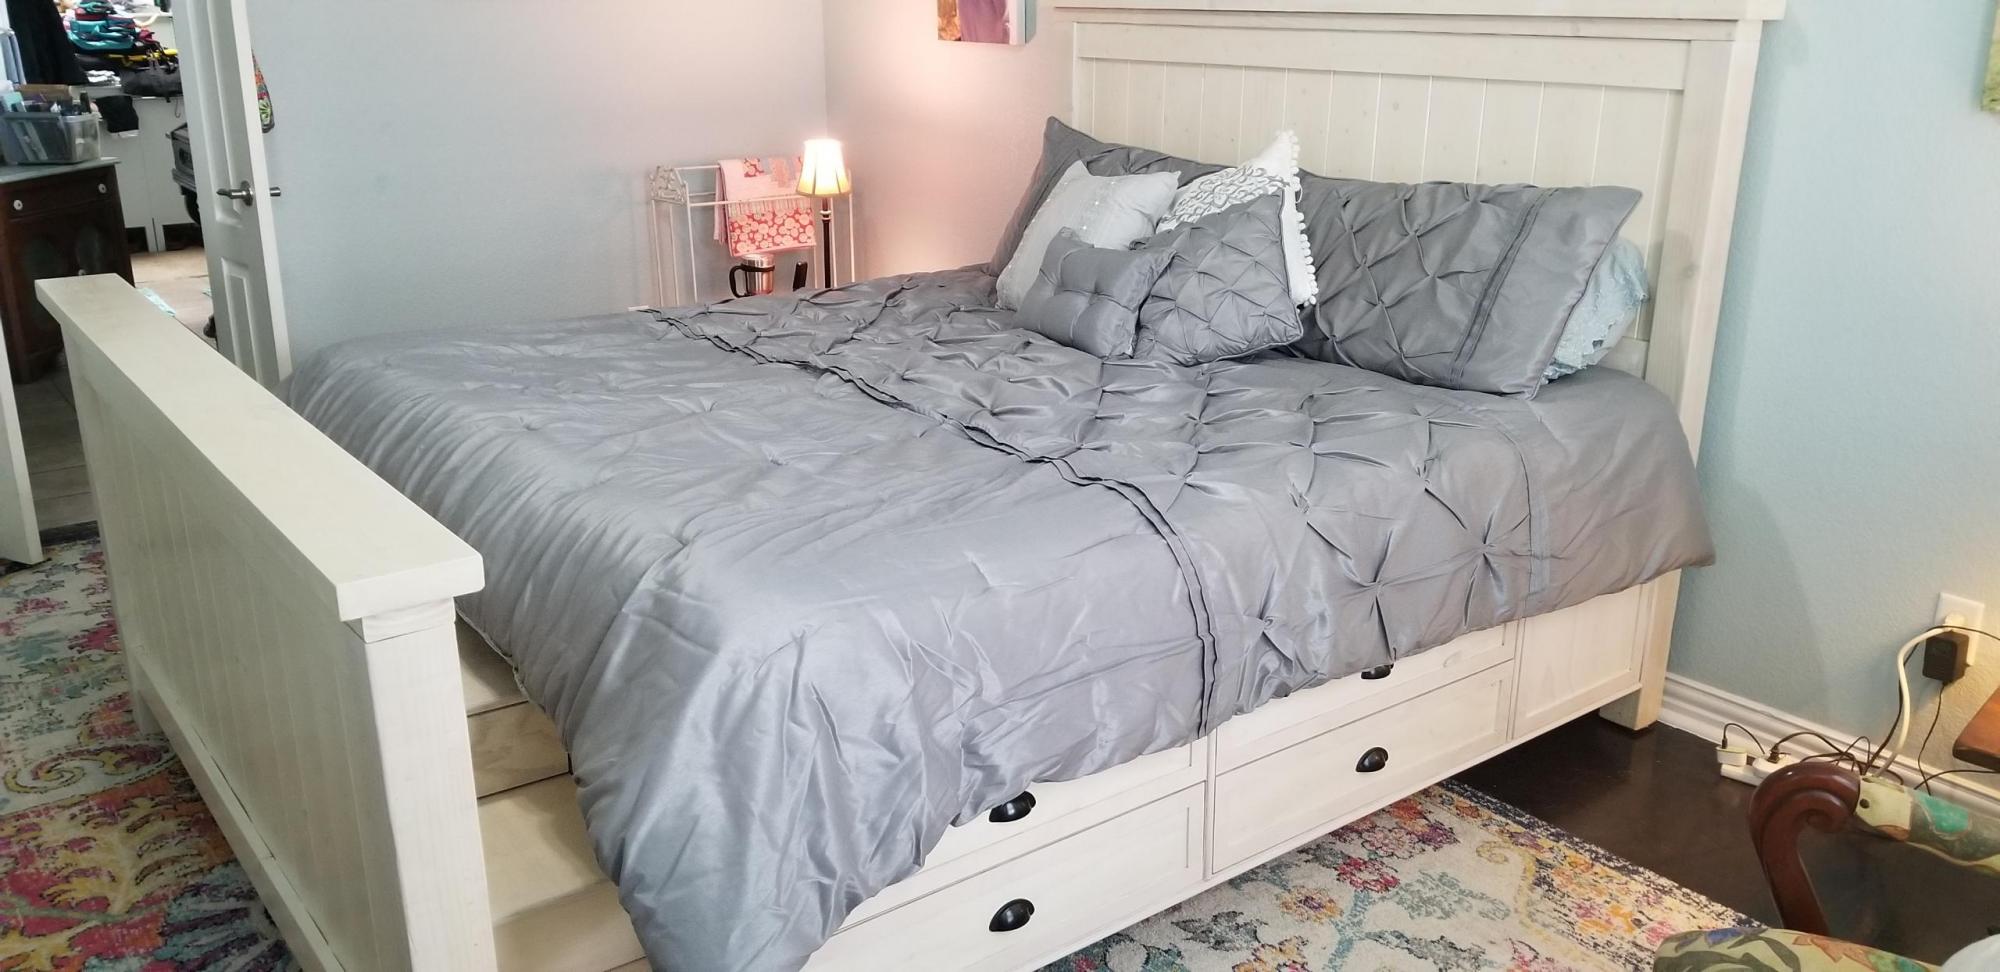
We have a frosty faced blind girl and an aging tri-pawed that we wanted to be able to continue snuggling with us so we adapted the Farmhouse Bed with Storage to make it a king size. We made the drawer boxes deeper which allowed us to get rid of our dresser to create more space in our room. And we added a flight of stairs for the pups.

Built from Plan(s)
Estimated Time Investment
Weekend Project (10-20 Hours)
Finish Used
General Finishes White Wash with Arm R Seal Oil Based Satin Finish top coat. (If you want the white wash to be more white and less amber, use water based.)
Recommended Skill Level
Intermediate
Comments
Fri, 12/30/2022 - 07:53
This is exactly what I’m…
This is exactly what I’m looking for! Perfect for our dogs. Although, I wonder if a ramp would work or if it would be too steep? Hmmm
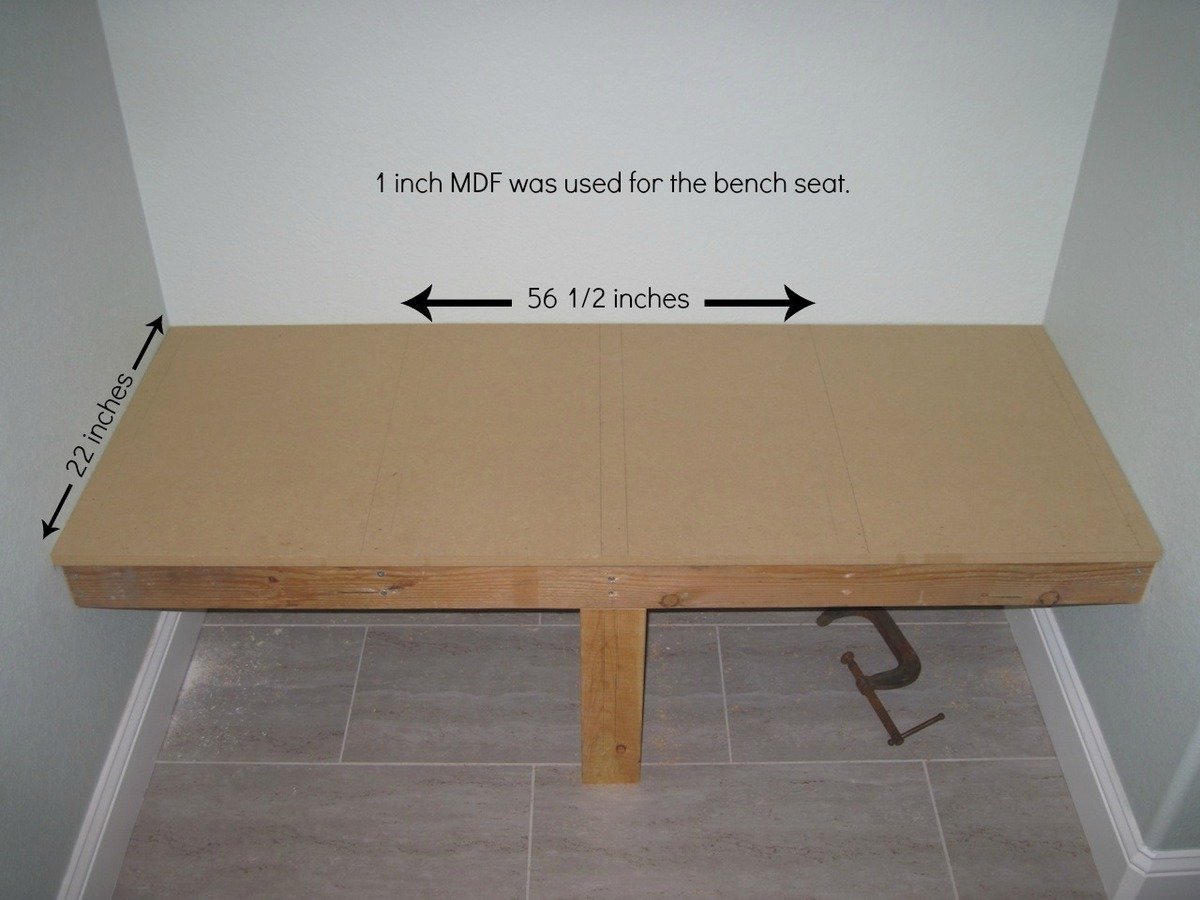
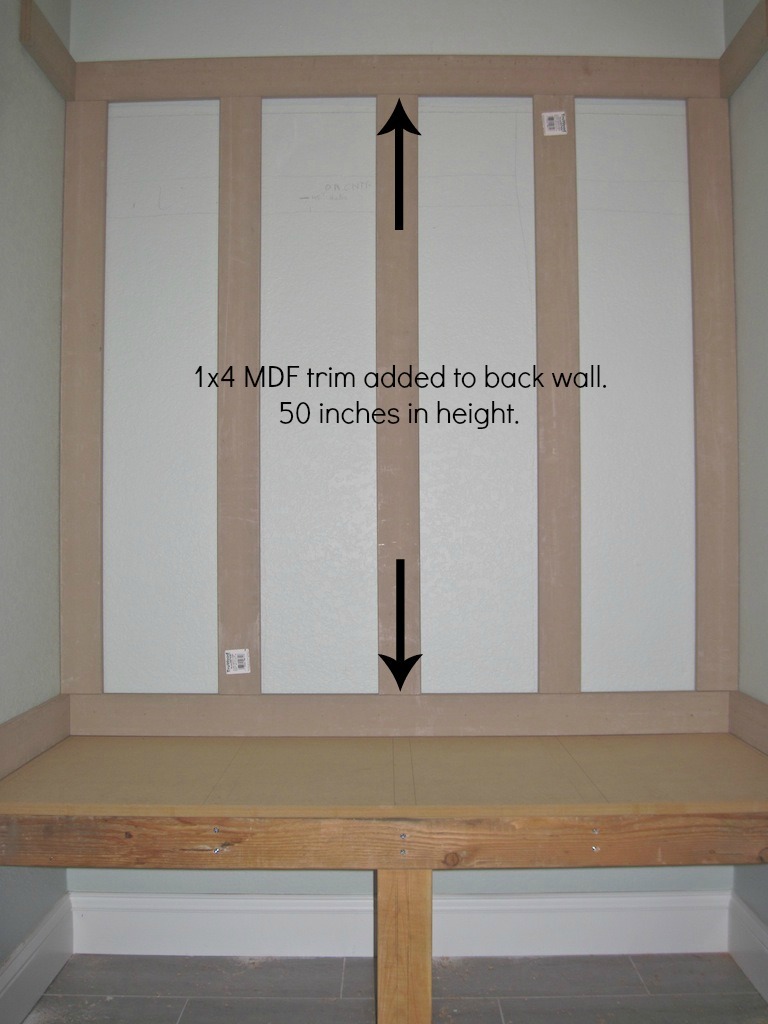
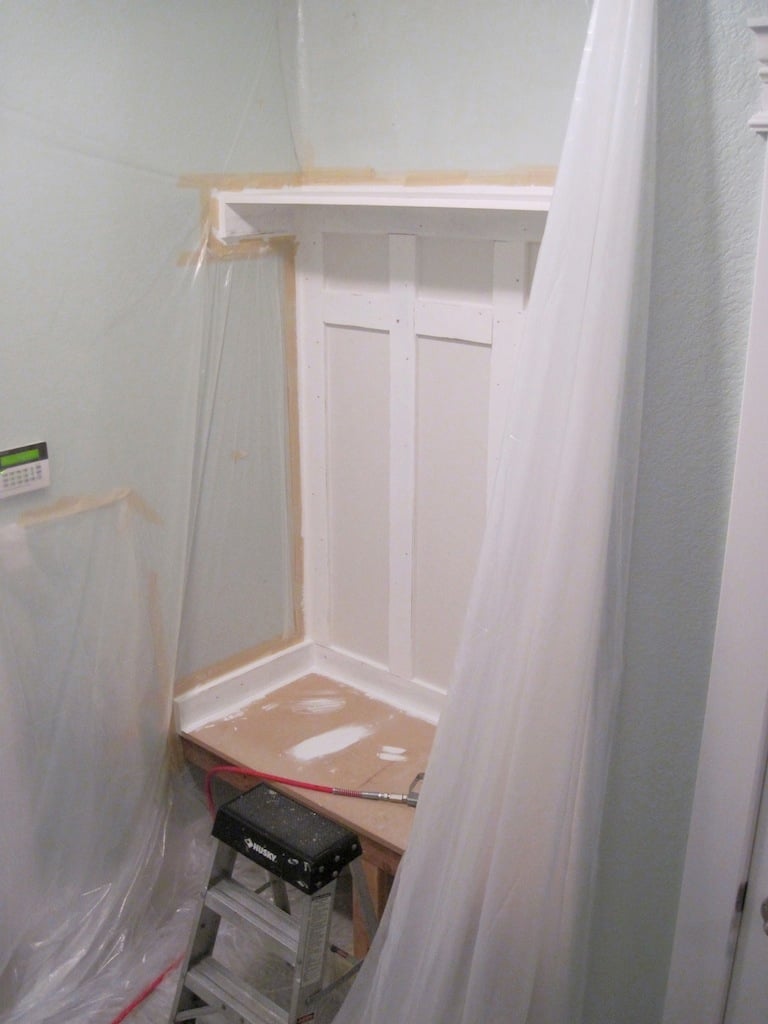
Mudroom Bench
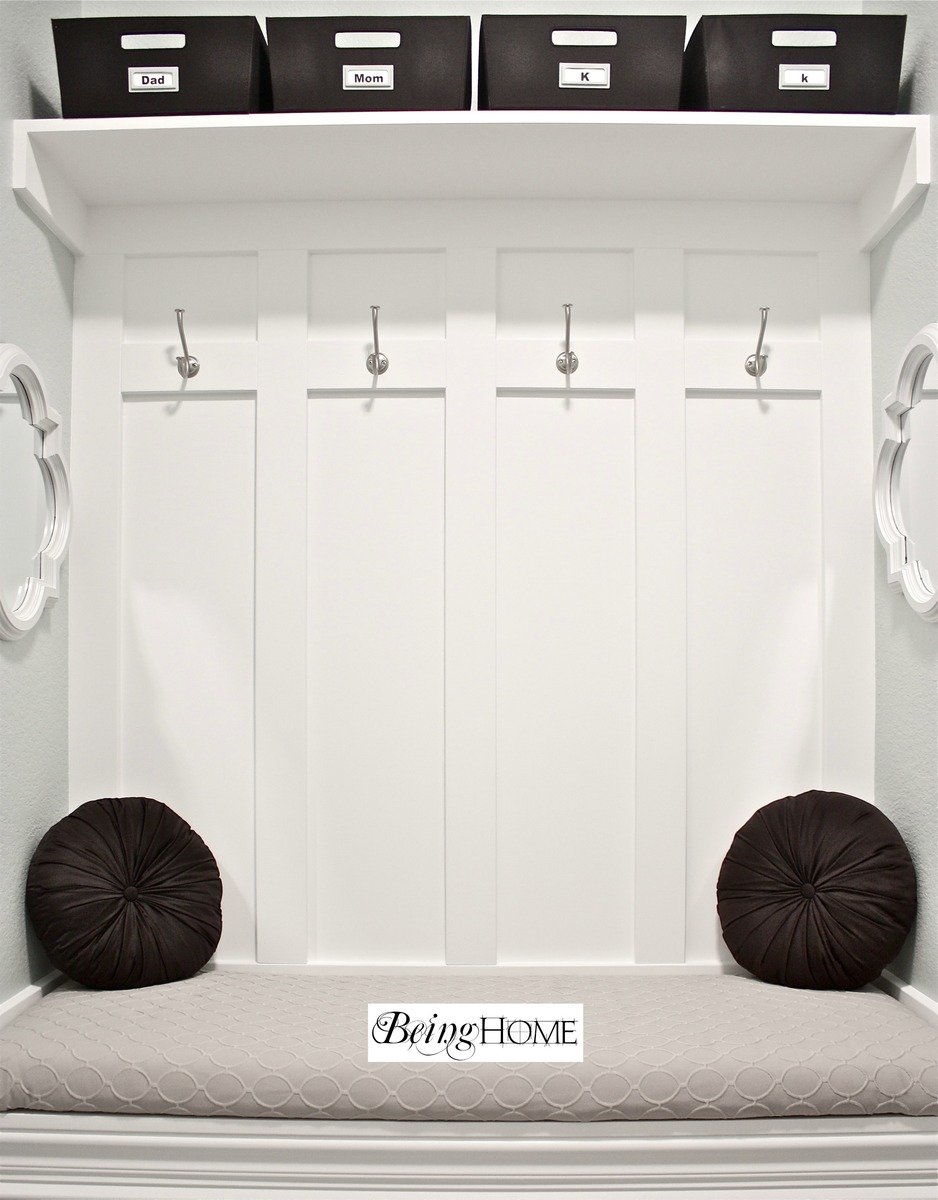
With much needed seating in the mudroom, an unused space (nook) was used to build a mudroom bench and shelf. No plans were used. I basically looked on-line and mentally drew up an idea of how I wanted the final product to look.
There were some setbacks such as not like the knock down textured walls (after partially painting the bench). I ended up covering the textured walls with hardboard and repainted.
A bench cushion was made for added comfort and style.
Complete tutorial for the bench is here and the bench cushion tutorial is here.
Thank you.
Julie

Built from Plan(s)
Estimated Time Investment
Weekend Project (10-20 Hours)
Finish Used
Behr Ultra (paint and primer in one) in ultra white finish.
Recommended Skill Level
Beginner
Comments
Thu, 05/16/2013 - 13:48
Mudroom Bench
Thank you so much for the idea and plan. I used it to turn an extra laundry room that we have off of our garage into a much needed mudroom. The most challenging project I have ever done before is hanging blinds. But with your help and some from the Home Depot employees, I did it! Our family is more than happy with it. Thanks!!!
Pet Stairs
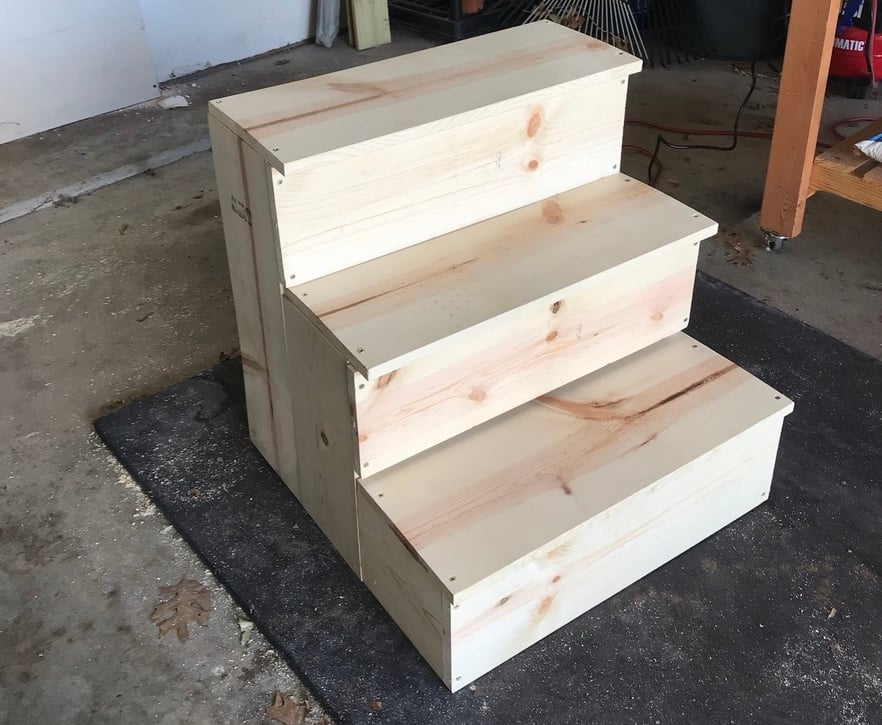
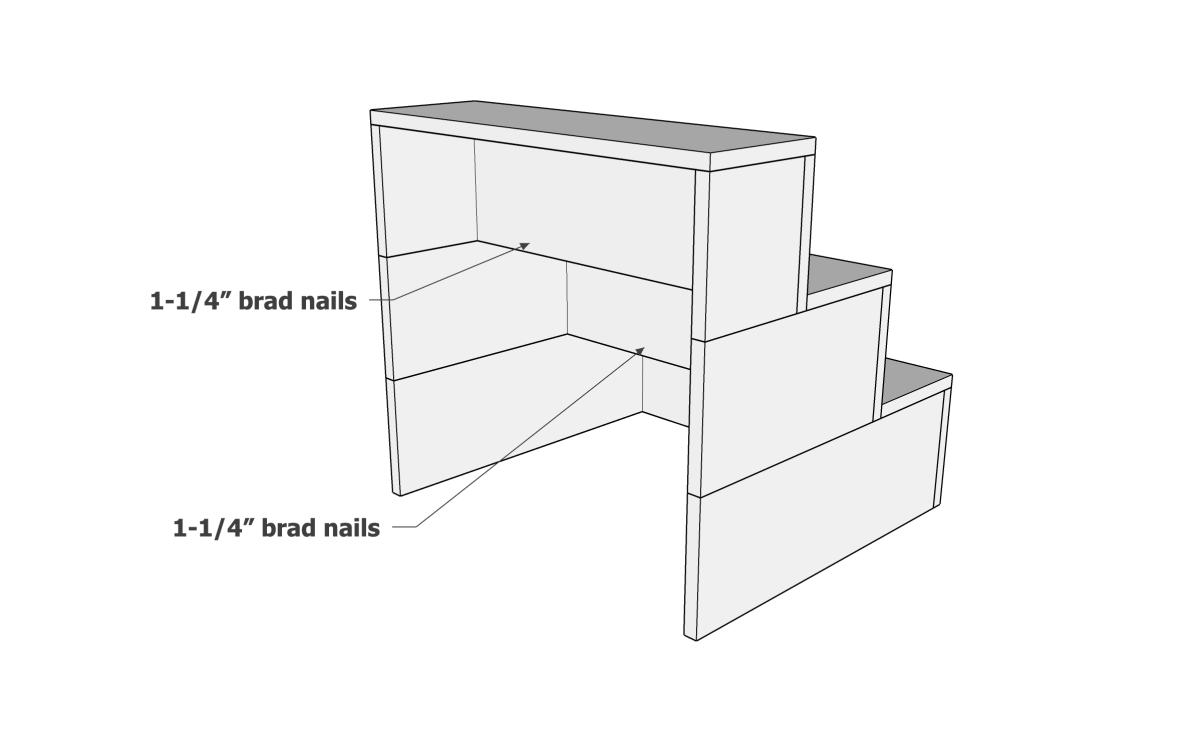
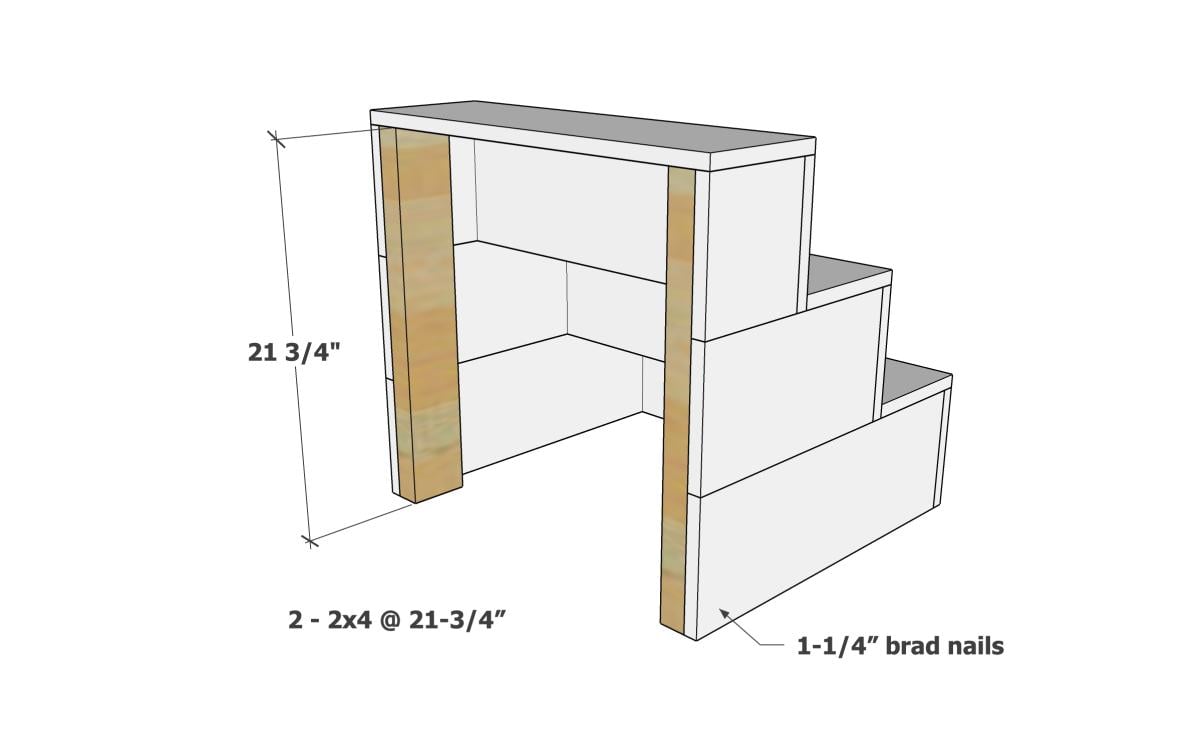
I needed sturdy stairs for my 2 60lb dogs. My bed is 33 inches from floor to top of mattress. So, this is my very first project completed by myself! Custom size pet stairs 24inx24inx24
Estimated Cost
$40-50
Estimated Time Investment
Afternoon Project (3-6 Hours)
Finish Used
Minwax polyshades Espresso gloss (3 coats)
Recommended Skill Level
Starter Project
Comments
Barbecue/BBQ Quick Built-in
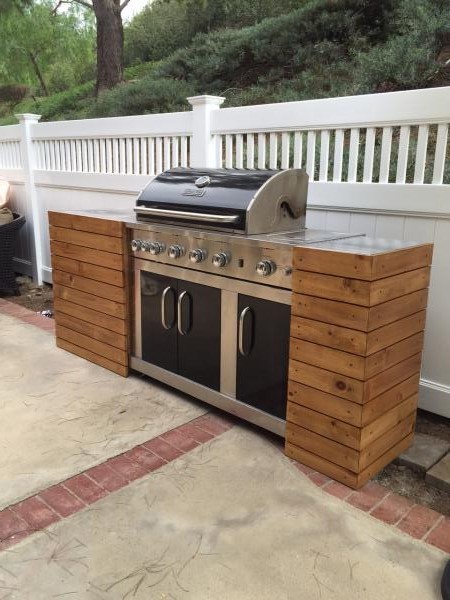
This was just a standard BBQ with an attached folding table. I used a combo of Ana's plans to add a little character and style to the BBQ and it made a huge difference in not only the BBQ, but also the backyard.

Estimated Time Investment
Weekend Project (10-20 Hours)
Finish Used
Golden Oak
Recommended Skill Level
Beginner
Comments
Mon, 05/23/2016 - 12:29
BBQ Built In
Hello: Very interested in which plans you used to build the BBQ Built In. Thank you.
Wed, 06/08/2016 - 09:22
BARBECUE/BBQ QUICK BUILT-IN
Hello dbryant1977, please share the plans. Also, what's brand/model of BBQ? Very nice.
Thu, 04/09/2020 - 18:27
This is my guess on the…
This is my guess on the plans used! https://www.ana-white.com/woodworking-projects/diy-grill-island-featuri…
Fri, 08/30/2019 - 09:50
Are there plans for this…
Are there plans for this project or at least some pictures from while you were building it?
Thu, 04/09/2020 - 18:27
This is my guess on the…
This is my guess on the plans used! https://www.ana-white.com/woodworking-projects/diy-grill-island-featuri…
Wed, 04/22/2020 - 15:52
Can you provide us with the…
Can you provide us with the plans for this? I would love to build one.

Mon, 03/04/2024 - 14:49
Can you provide us with the plans for this?
Hello: Very interested in which plans you used to build the BBQ Built In. Thank you.
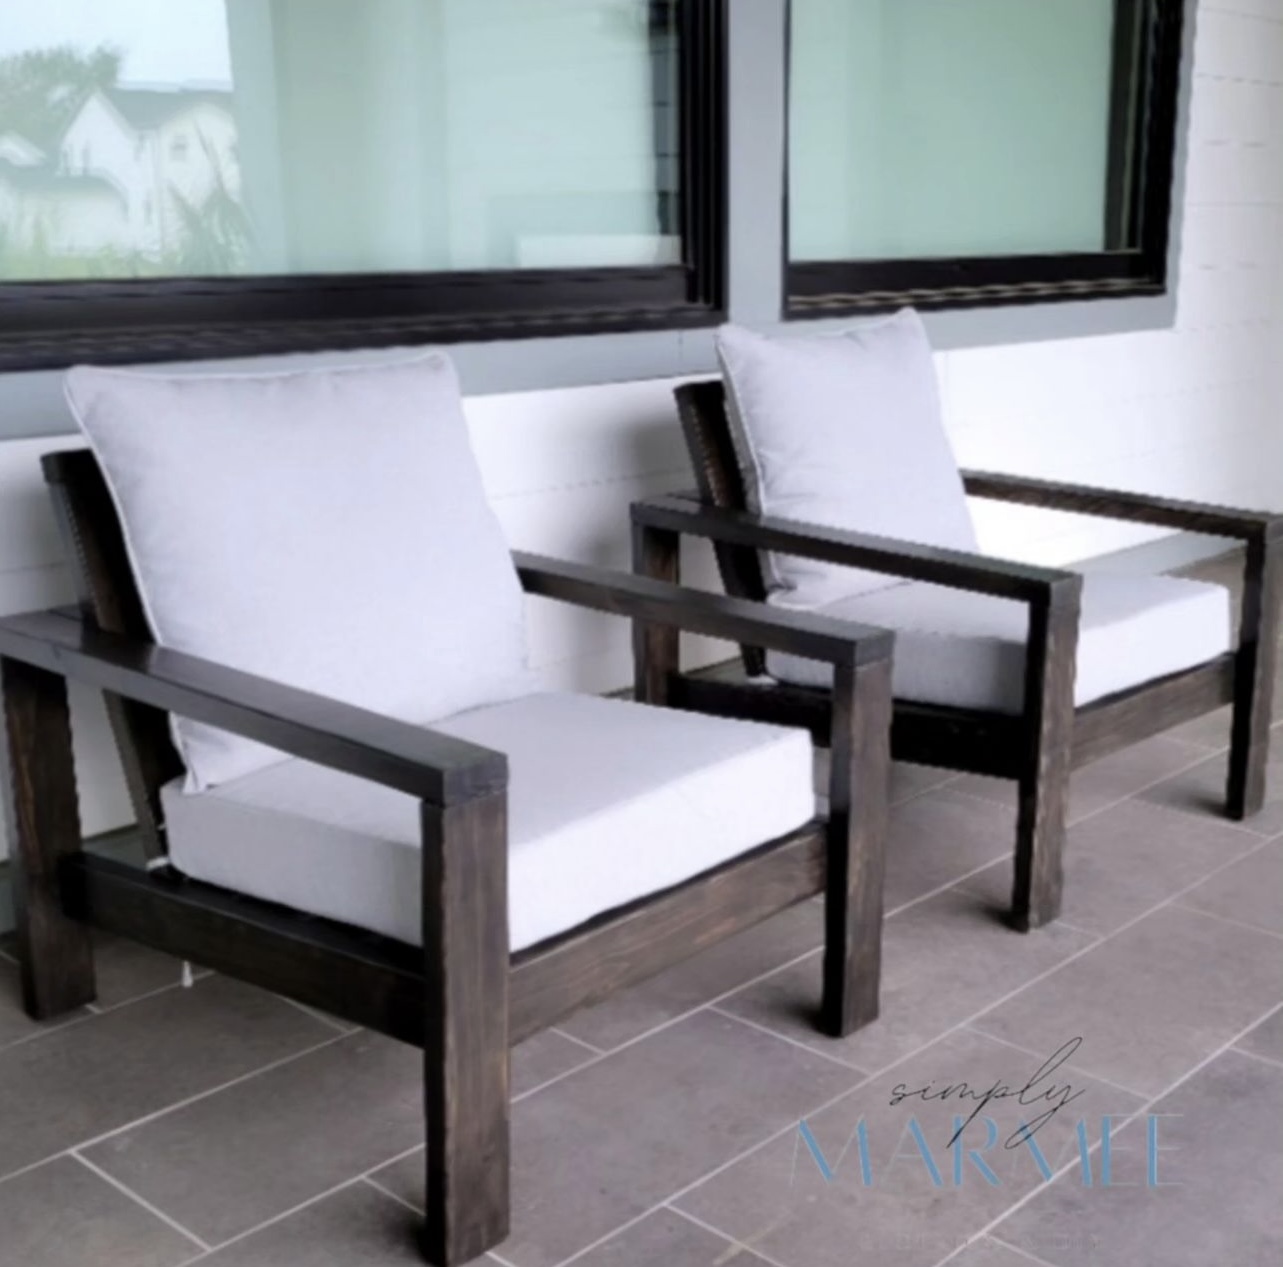
Modern Outdoor Chair with Backrest
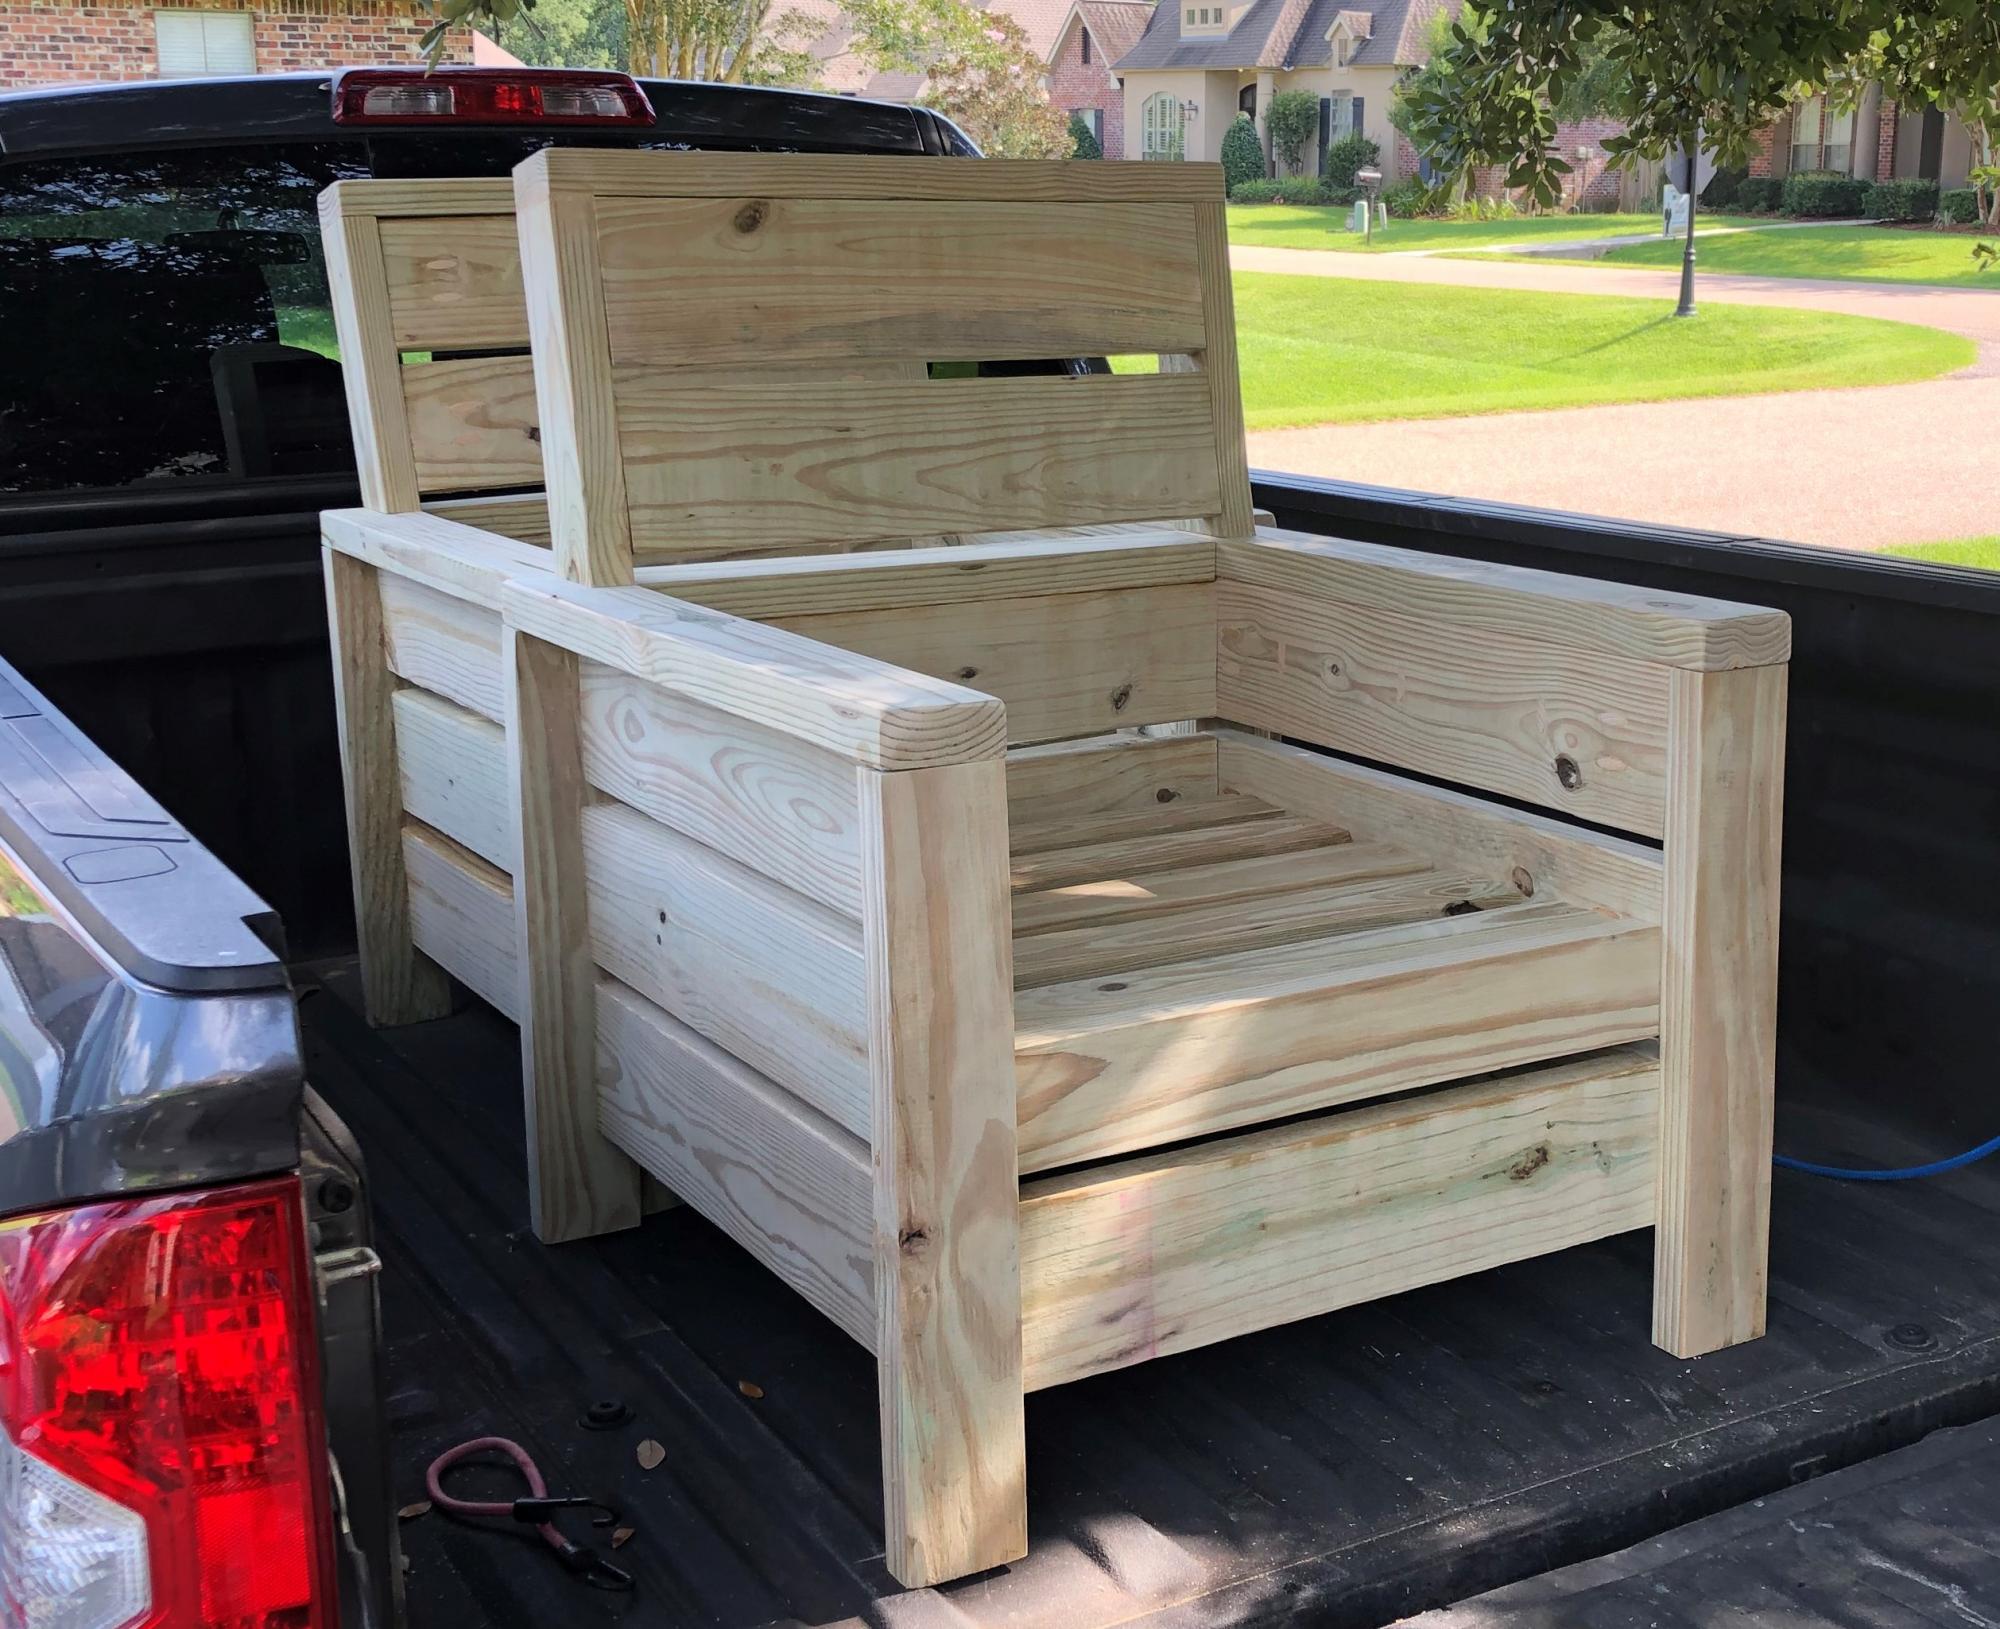
Per request of my wife, I opted to add a backrest to the chair. I feel as though my backrest design keeps with the style of the original build. I accomplished this by cutting the 2x4 vertical arms of the backrest at 13 inches with a 10 deg miter cut at the base. This allows you to keep with the 3/4" on the 2x6 backrest slats. I finished it off with a 2x4 top plate. I'd also note that I made slight modifications to the plans to accommodate 24" cushions.
Built from Plan(s)
Estimated Cost
$100
Estimated Time Investment
Afternoon Project (3-6 Hours)
Finish Used
sanded to a 220 grit
Recommended Skill Level
Intermediate
Wood Closet Shelving
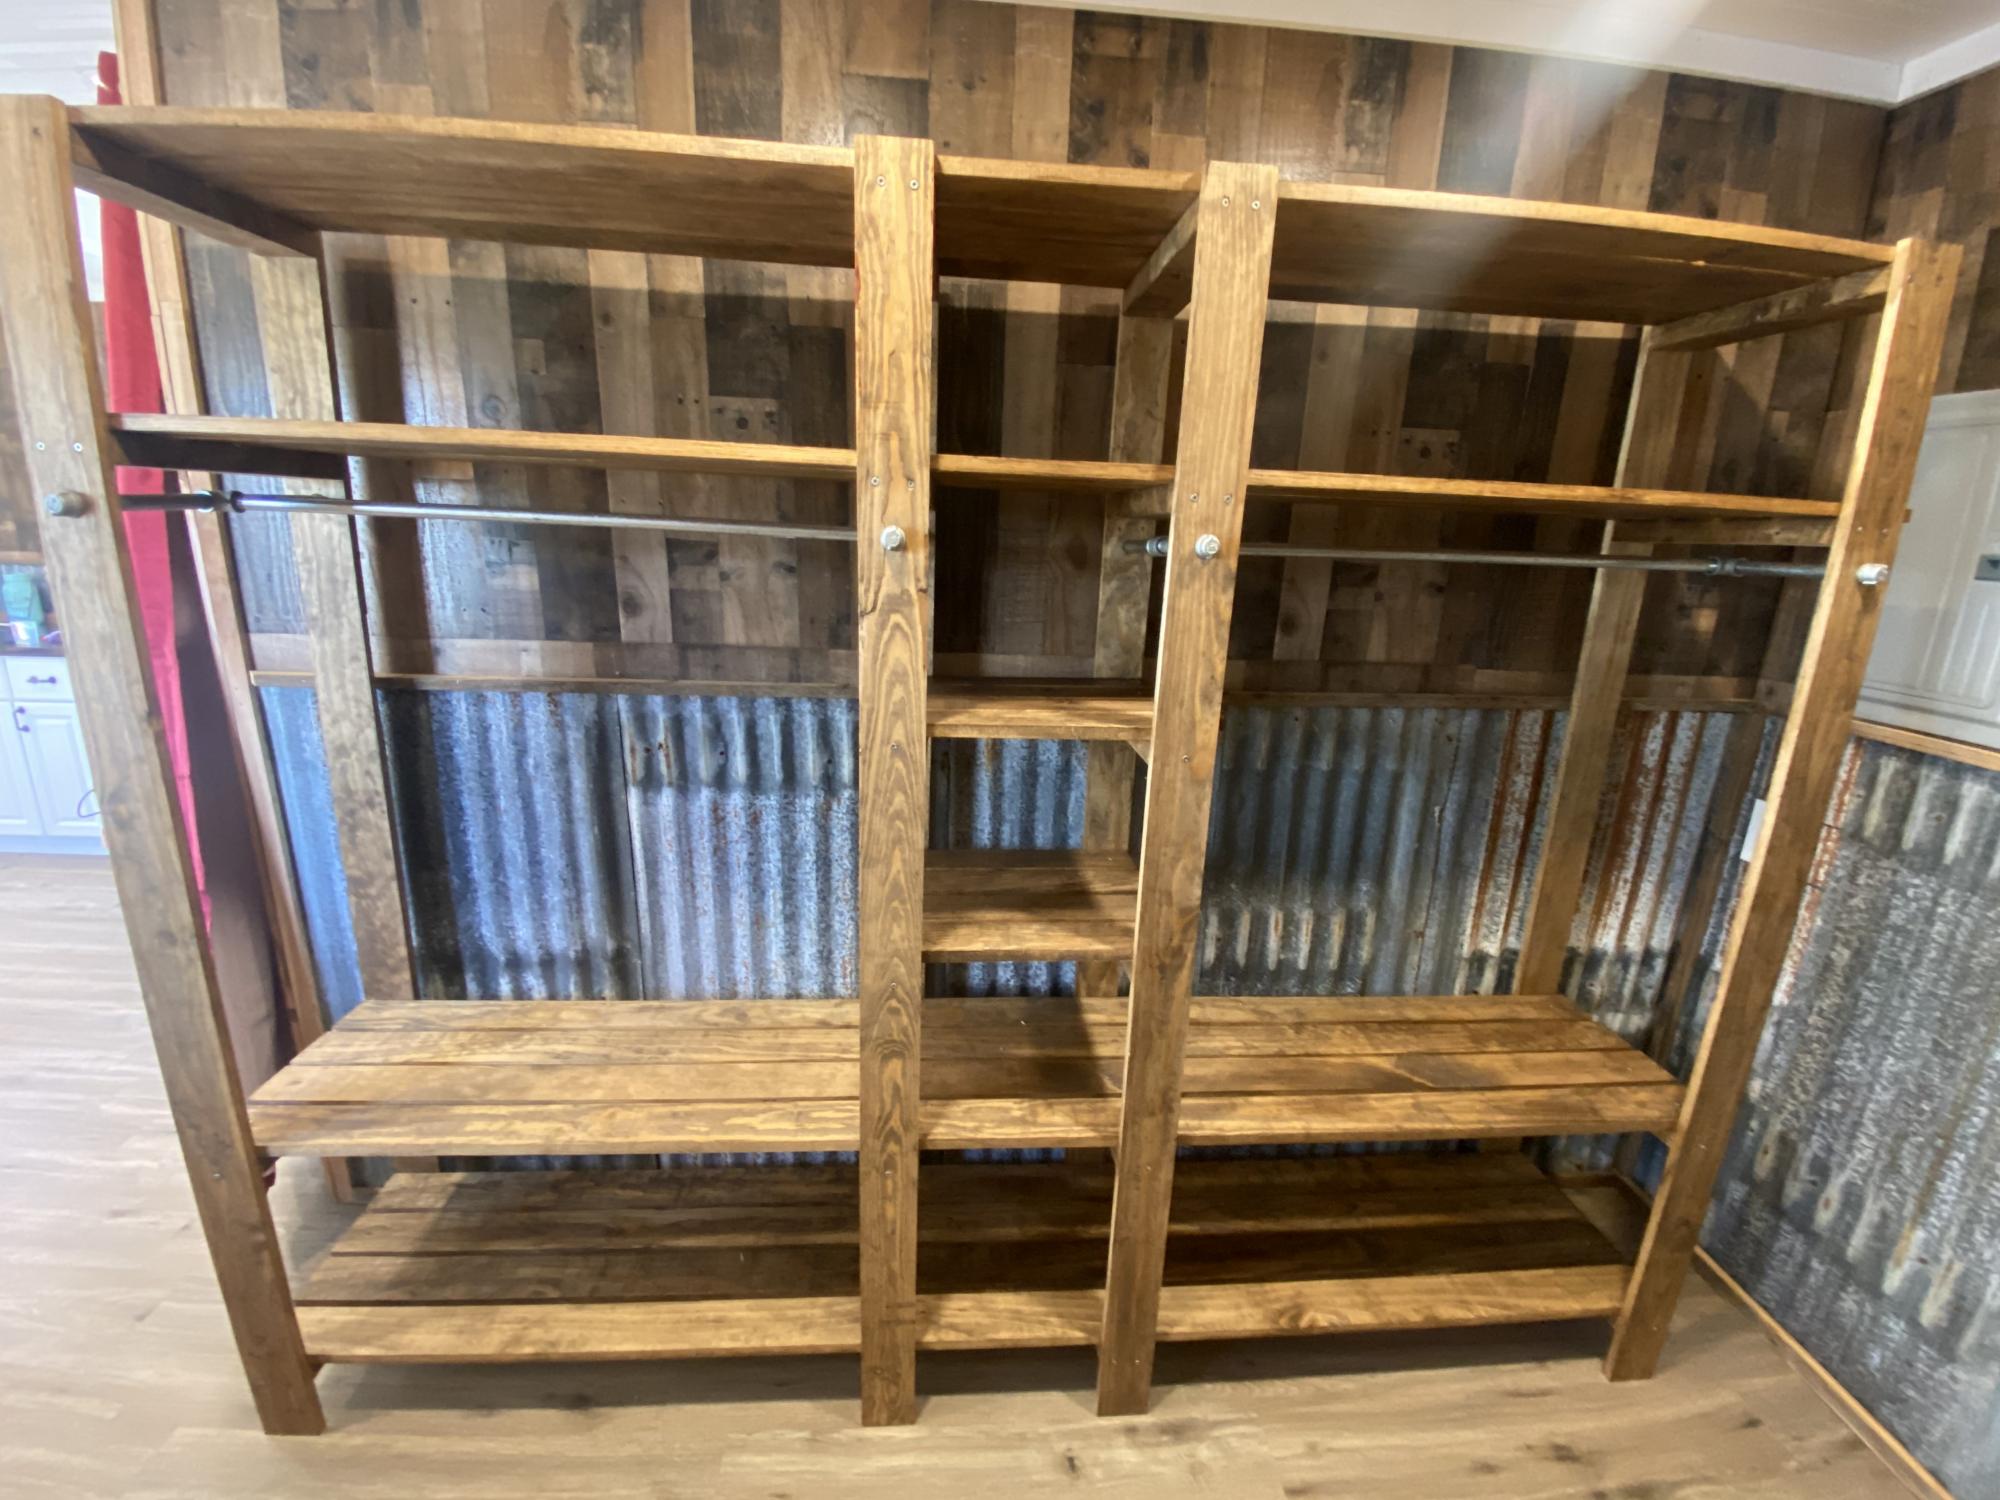
This plan turned out perfect!! Such a great idea, thank you for the inspiration!
Built from Plan(s)
Estimated Time Investment
Day Project (6-9 Hours)
Finish Used
Minwax Golden Oak
Recommended Skill Level
Beginner
Comments
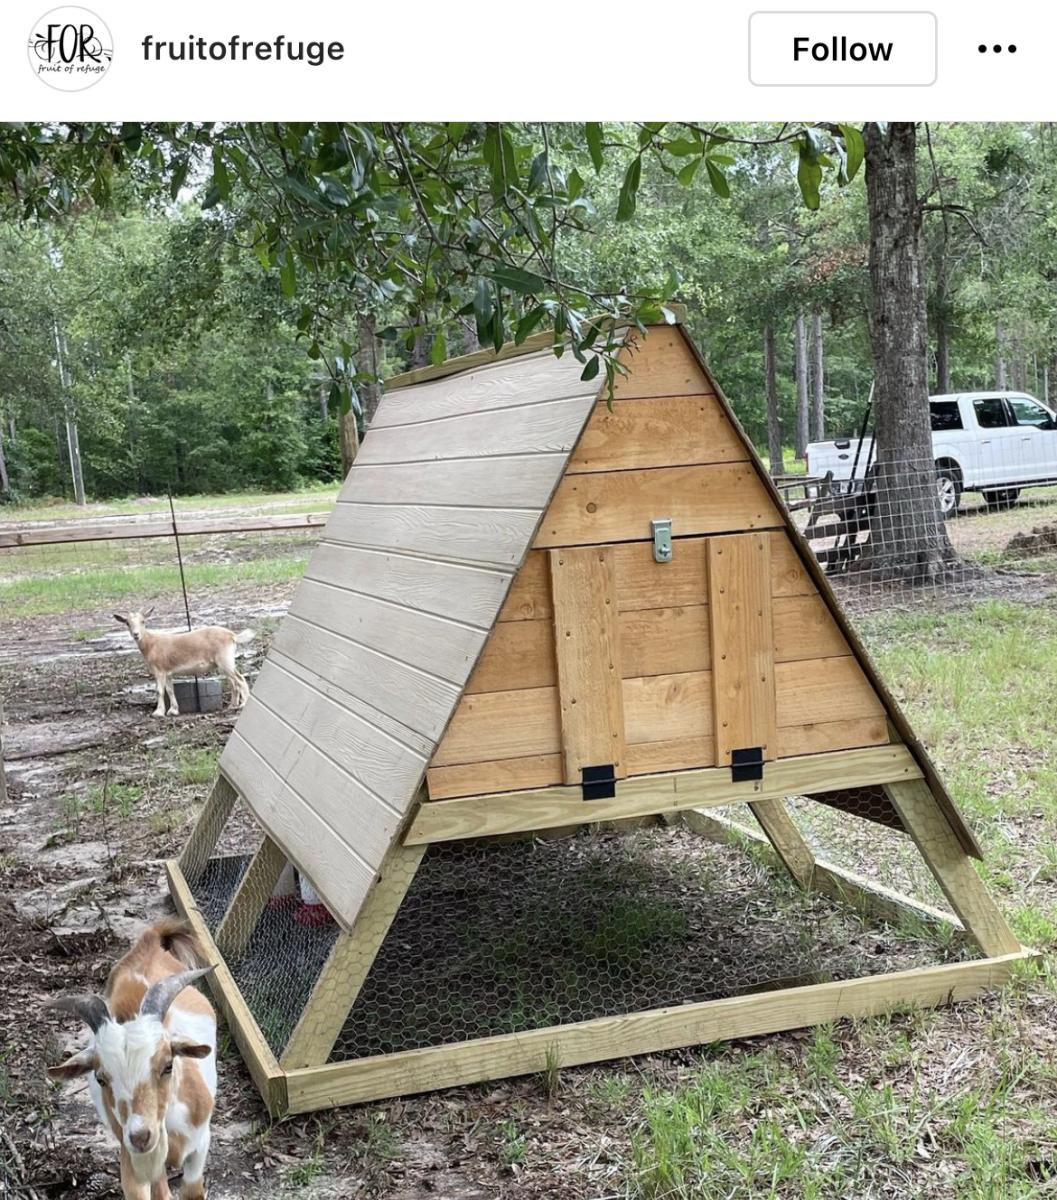
Chicken Coop

Great for a small flock of 5 or less.


Built from Plan(s)
Comments
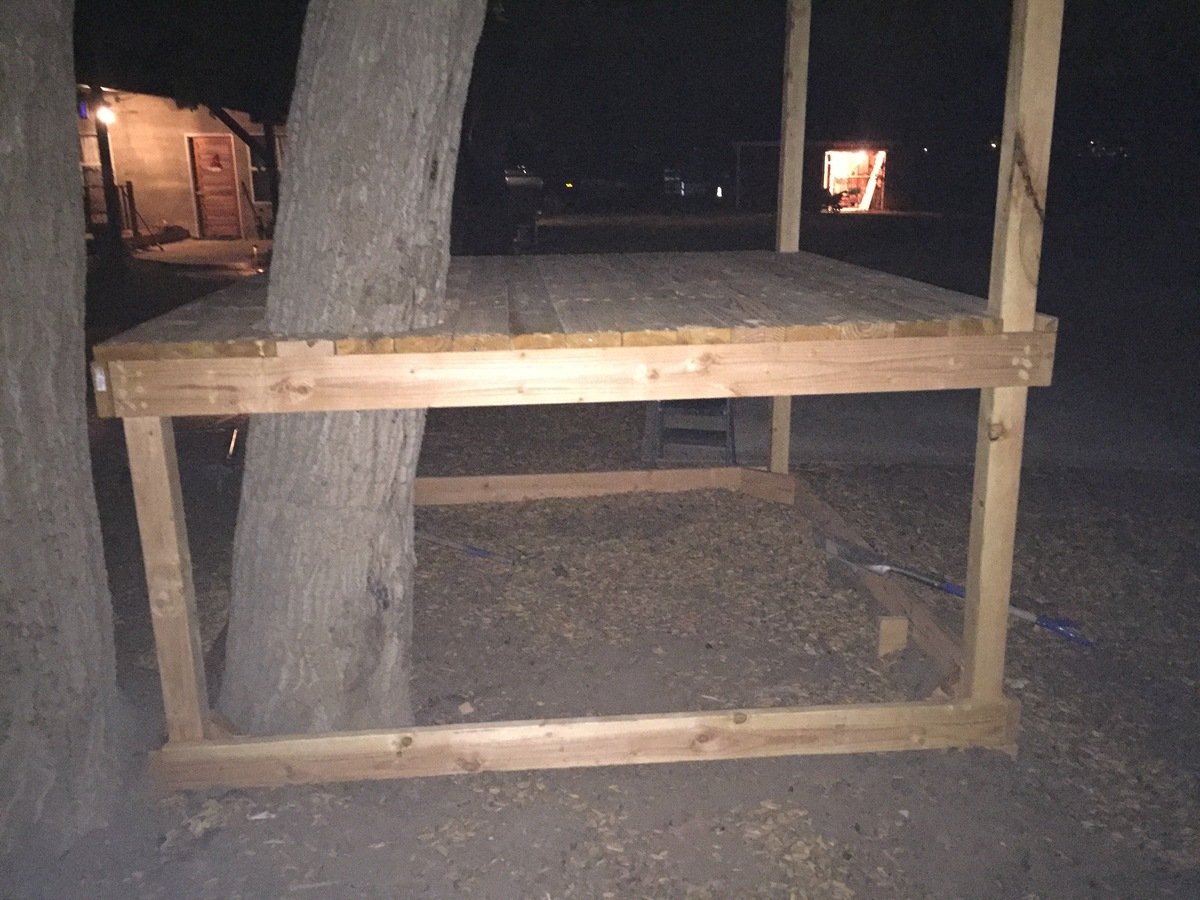
Treehouse/Playhouse

Thank you! You've helped me look like a true carpenter who knows what he's doing! My whole family is impressed with my woodwork lately, and now I'm addicted. I've done your seesaw, bar table and stools plus the treehouse in 2 weeks. Thank you for sharing your plans!
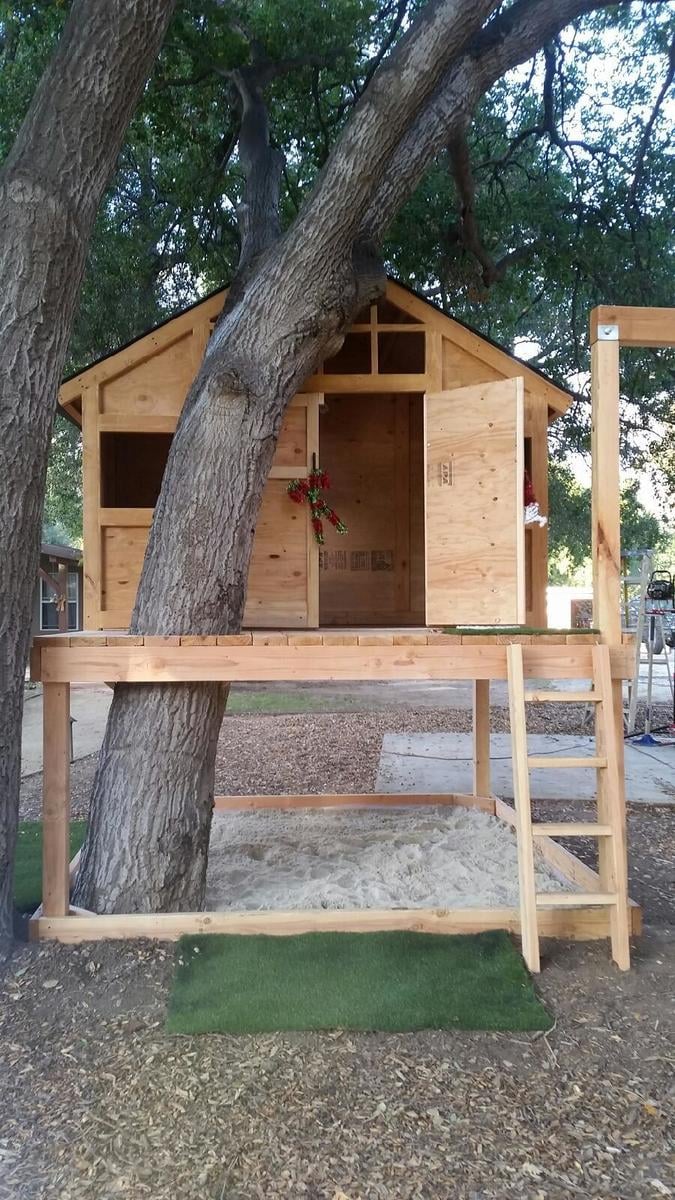
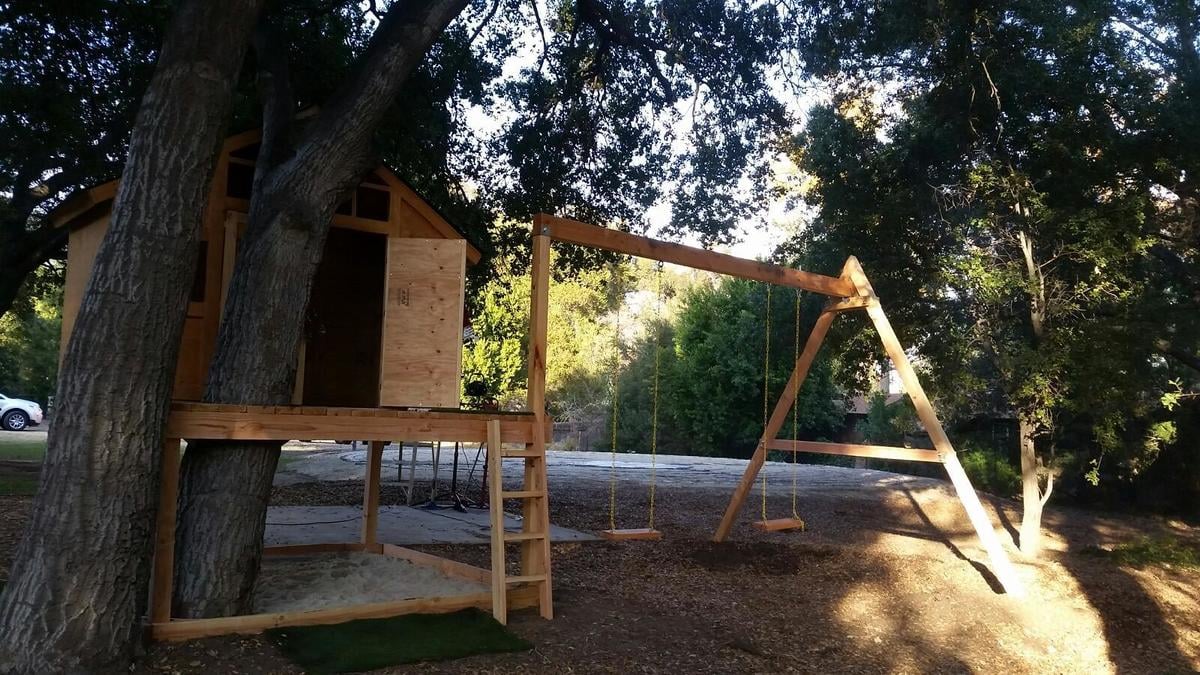
Built from Plan(s)
Estimated Cost
$500.00
Estimated Time Investment
Week Long Project (20 Hours or More)
Finish Used
Spar urethane
Recommended Skill Level
Beginner
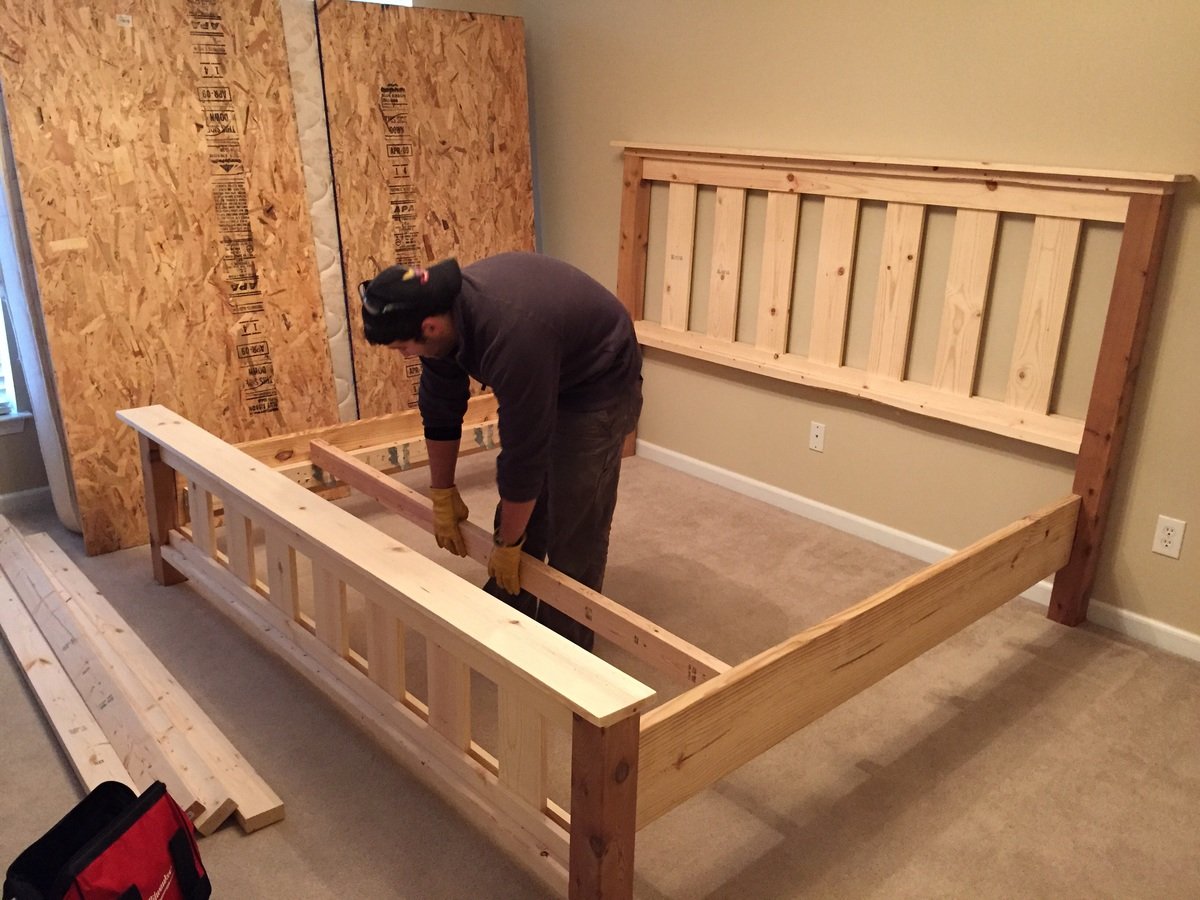
Farmhouse Storage Bed With Hidden Drawer

Ana, thanks for these plans! They inspired me to make my first bed build. I also want to thank all of you that added brag posts! They gave me ideas for some of the modifications that I made. I did this build by mixing your Queen Farmhouse and Queen Farmhouse Storage bed plans. I also added a number of modifications to suit my own preferences. The drawer boxes I changed by building a faceplate (I didn't want the plywood ends exposed), and by increasing in depth to maximize some additional storage. Since I increased the drawer sizes, I went with the euro roller bearing slides. I increased the foot-board height to be slightly higher than the mattress. I also designed the footboard to have a removable inner section with hidden latches on the inside. I did this because I wanted to make use of the "dead space" between the drawer boxes. I then used this space to house a hidden drawer, that is approx six feet deep (I couldn't help myself-I love hidden drawers  ). Because I added the hidden drawer, I changed the opptional center support to 4X4 blockes that were pocket screwed under the center of the boxes. I ended up using birch plywood and fir for this build. For my first bed build I'm fairly happy with how it came out. Thanks again!


Estimated Cost
I didn't keep exact track of the cost of this bed, but I think it was about $800.
Estimated Time Investment
Week Long Project (20 Hours or More)
Finish Used
I haven't got there yet, but I am planning on putting a mahogany stain and then a polyurethane. All
Recommended Skill Level
Intermediate
Comments

Thu, 12/11/2014 - 07:41
Seriously?!
This is your first build and you did all of those awesome modifications?! Really impressive and it looks perfect! Congrats and welcome to the community!

In reply to Seriously?! by spiceylg
Sun, 12/14/2014 - 06:03
Thanks!
Thanks for the compliments! It was a fun learning experience. Making all the modifications definitely slowed down the build, but also made it more rewarding!
Fri, 12/12/2014 - 13:18
4x4s
I just started my bed (mostly out of Baltic Birch) and am wondering where you were able to find such nice 4x4s. Your bed is gorgeous! No luck here. I bought redwood, but really wanted fir for the sharper edges. It's my first project, too. I also bought same drawer slides, but the soft close. Didn't want the slam. I figure building it will be the easy part compared to procuring nice 4x4s! Hope you can help!
Sun, 12/14/2014 - 06:01
4x4's
Thanks! The 4x4s I found at a place called Better Living Building Supply. They had a pretty nice assortment of fir, including the 4x4s, so that is why I chose it for the build. Finding the 4x4s slowed down my start on the build. Our local Lowes only had them in treated pine.
Sat, 09/05/2015 - 20:47
Going to attempt but have questions.
Thank you for the pictures, the bed turned out Awesome. I was wondering about the latching system for the foot of the bed. Do you think a piano hinge on the lower would work too? Also on the center drawer did you use rollers or is it just friction? Can't wait to start the build.
Thanks

Mon, 02/15/2016 - 14:11
AWESOME!!!!!!
This is excellent!!! I really like this, so much in fact that the wife is going to have to get used to it too. lol But really, GREAT work! Any chance you could post a pic and or comment about how you attached that removeable end? i think this is the best part! Cheers!
Wed, 10/24/2018 - 23:21
work of art !!!!
How can I get / purchase the plans for the construction of the bed ?
Tue, 12/10/2019 - 08:42
Do you have the build plans?
Beekeeper, Awesome build!!! Have you posted your altered plans anywhere? I'm very interested in your build, I was wondering about some aspects of it and how you approached it. Plans would clear it up instead of bothering you with all my questions.

Mon, 11/16/2020 - 15:42
Bed turned out awesome. I…
Bed turned out awesome. I was wondering if you have the plans for the bed with a list of supplies it took to make this bed. I so want this bed it's just what we are needing
Great job
Easy Build Fence Picket Planters
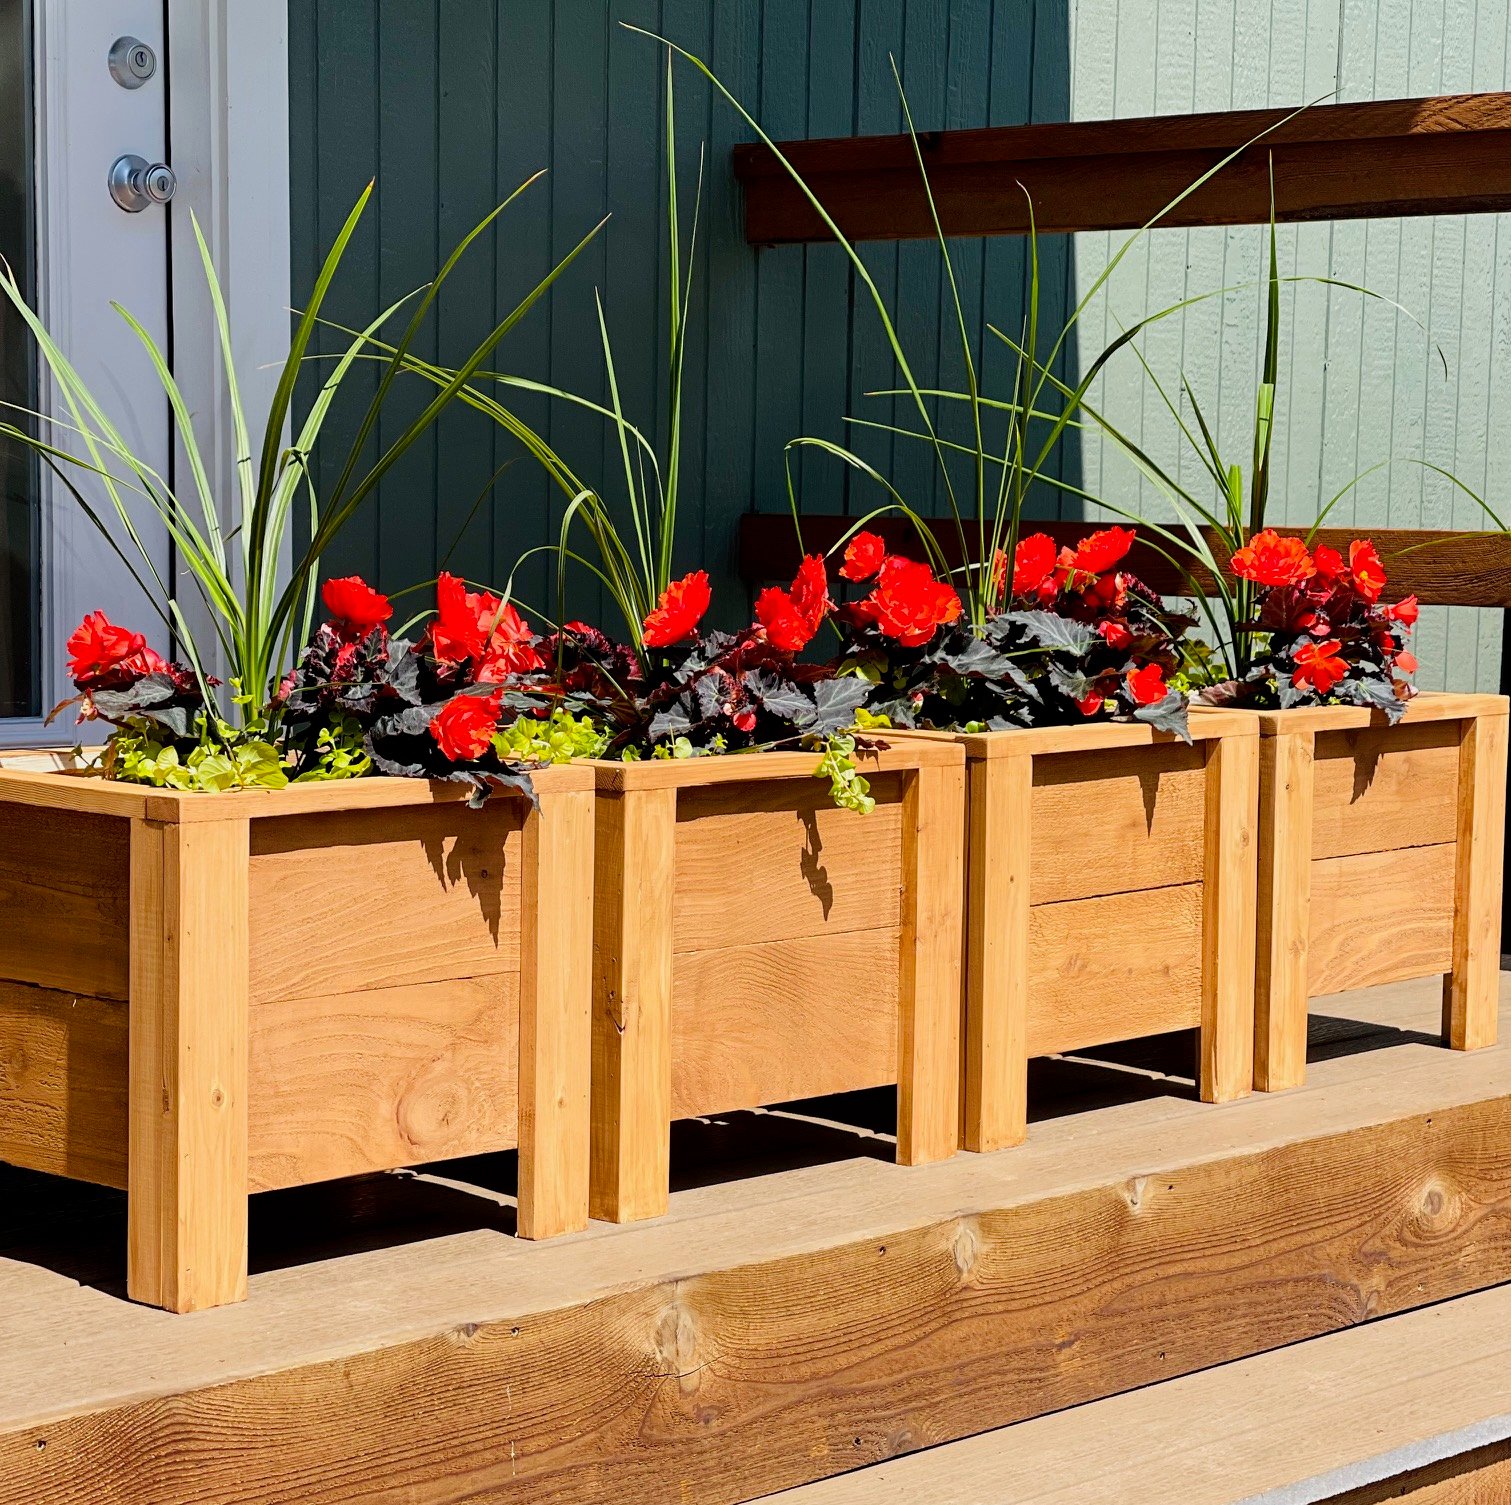
I've been wanting to build this plan for quite some time! Took me about 2 hours to build and 1 hour to finish. Giving these as gifts for Mother's Day! Total cost was about $15 per planter. I scaled down the design after I found the plants I wanted to put in them. Ana has the best and easiest plans!
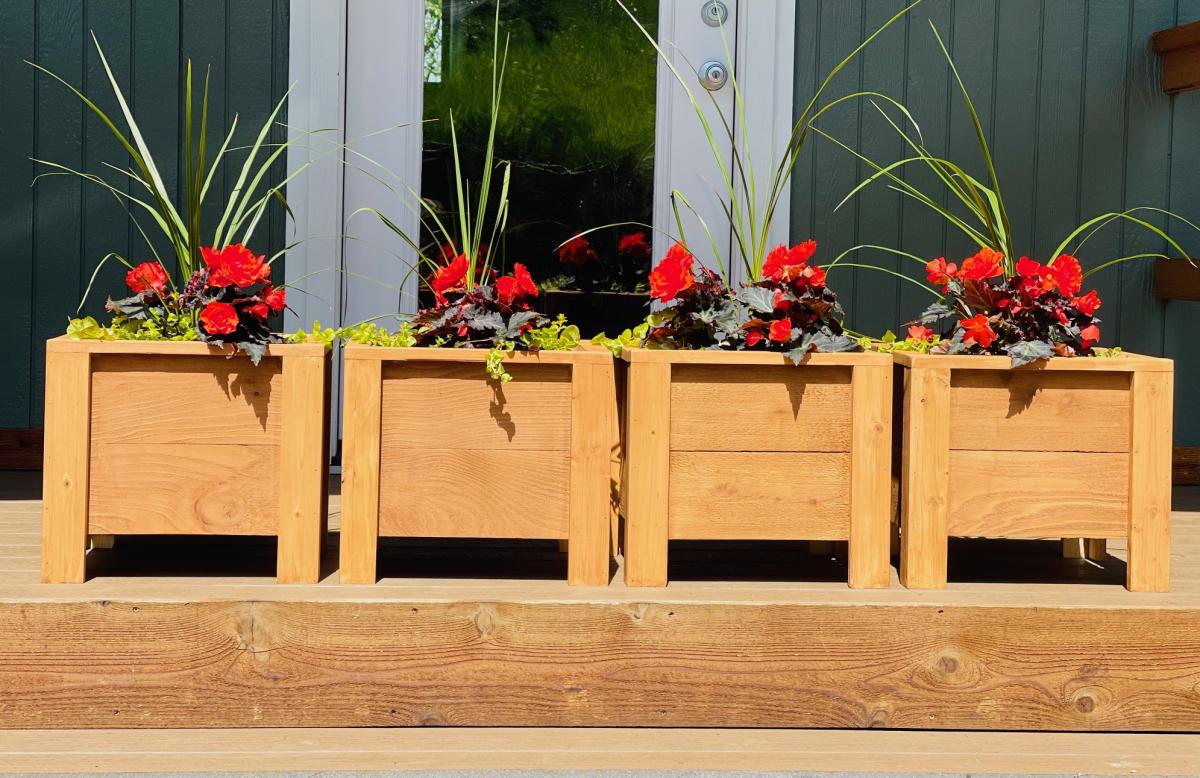

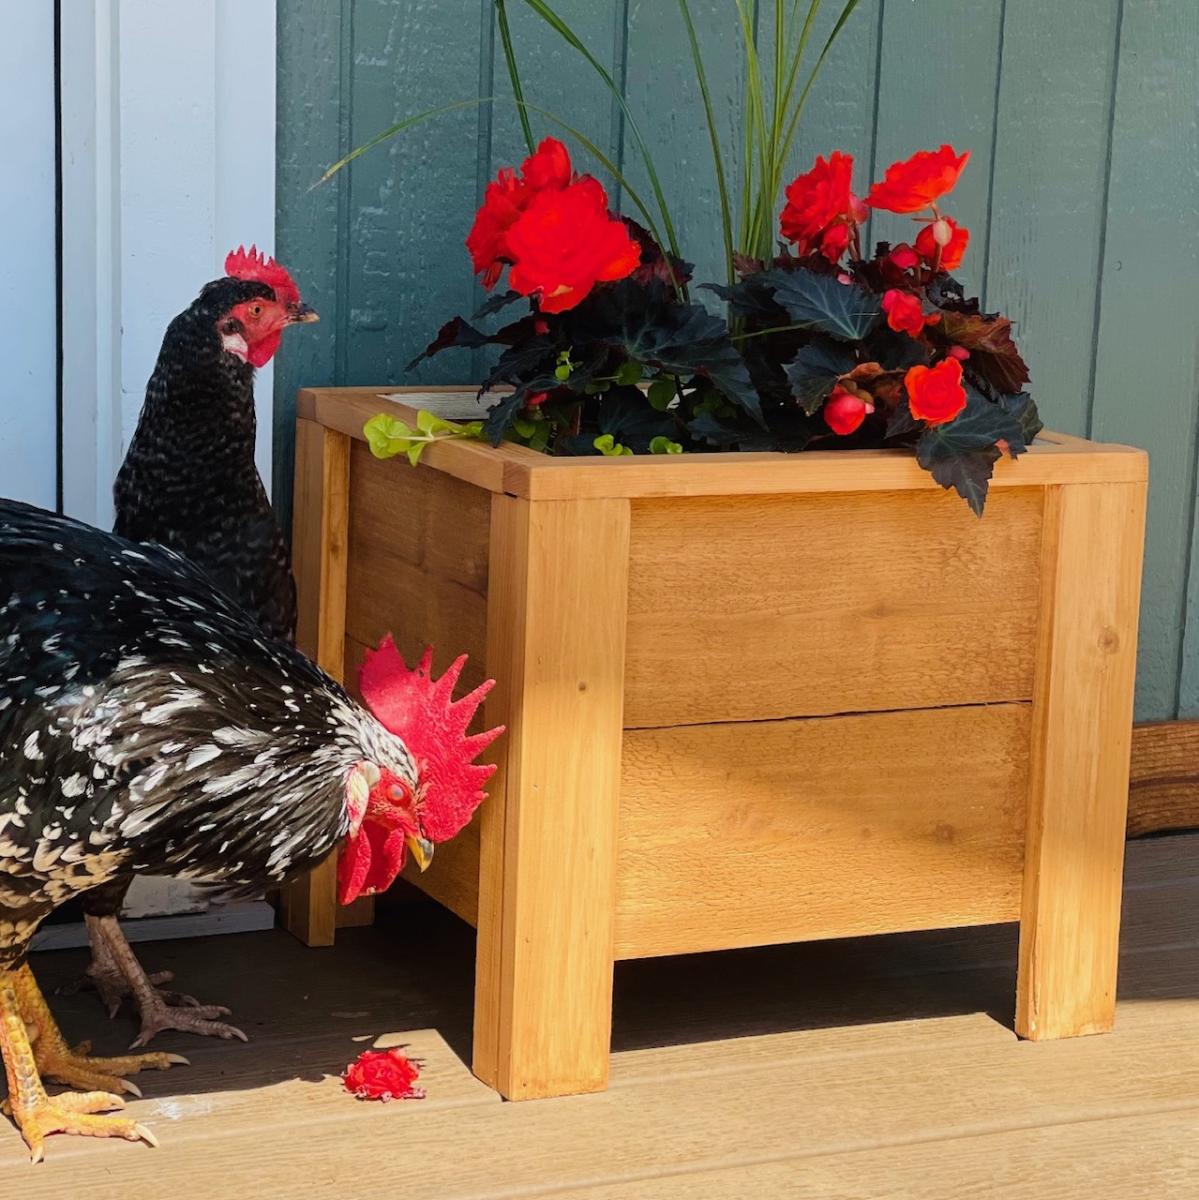
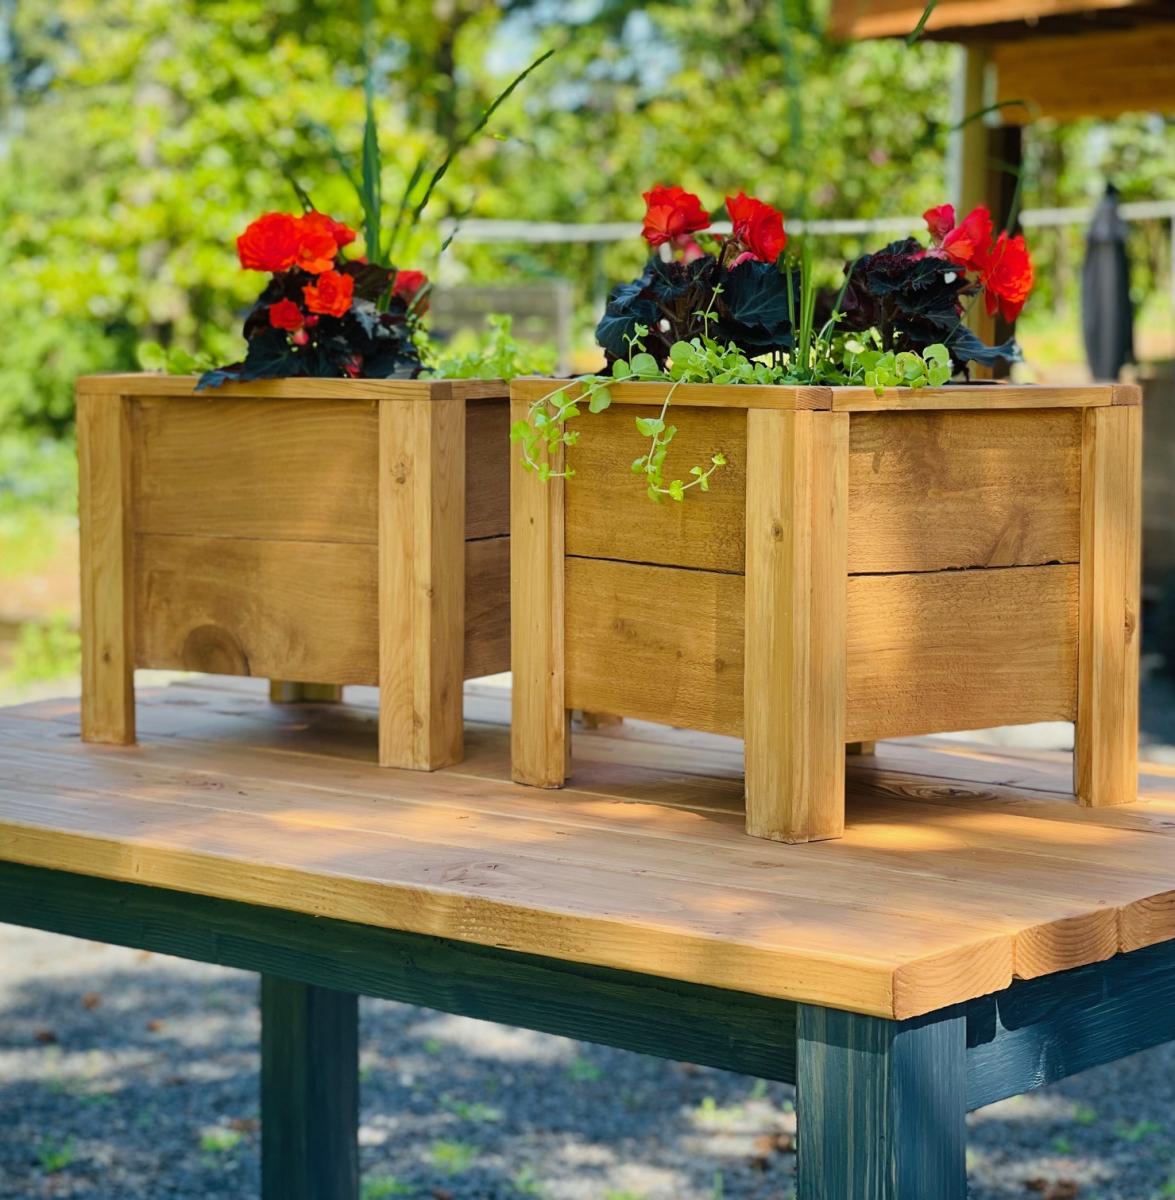
Built from Plan(s)
Shoe Dresser
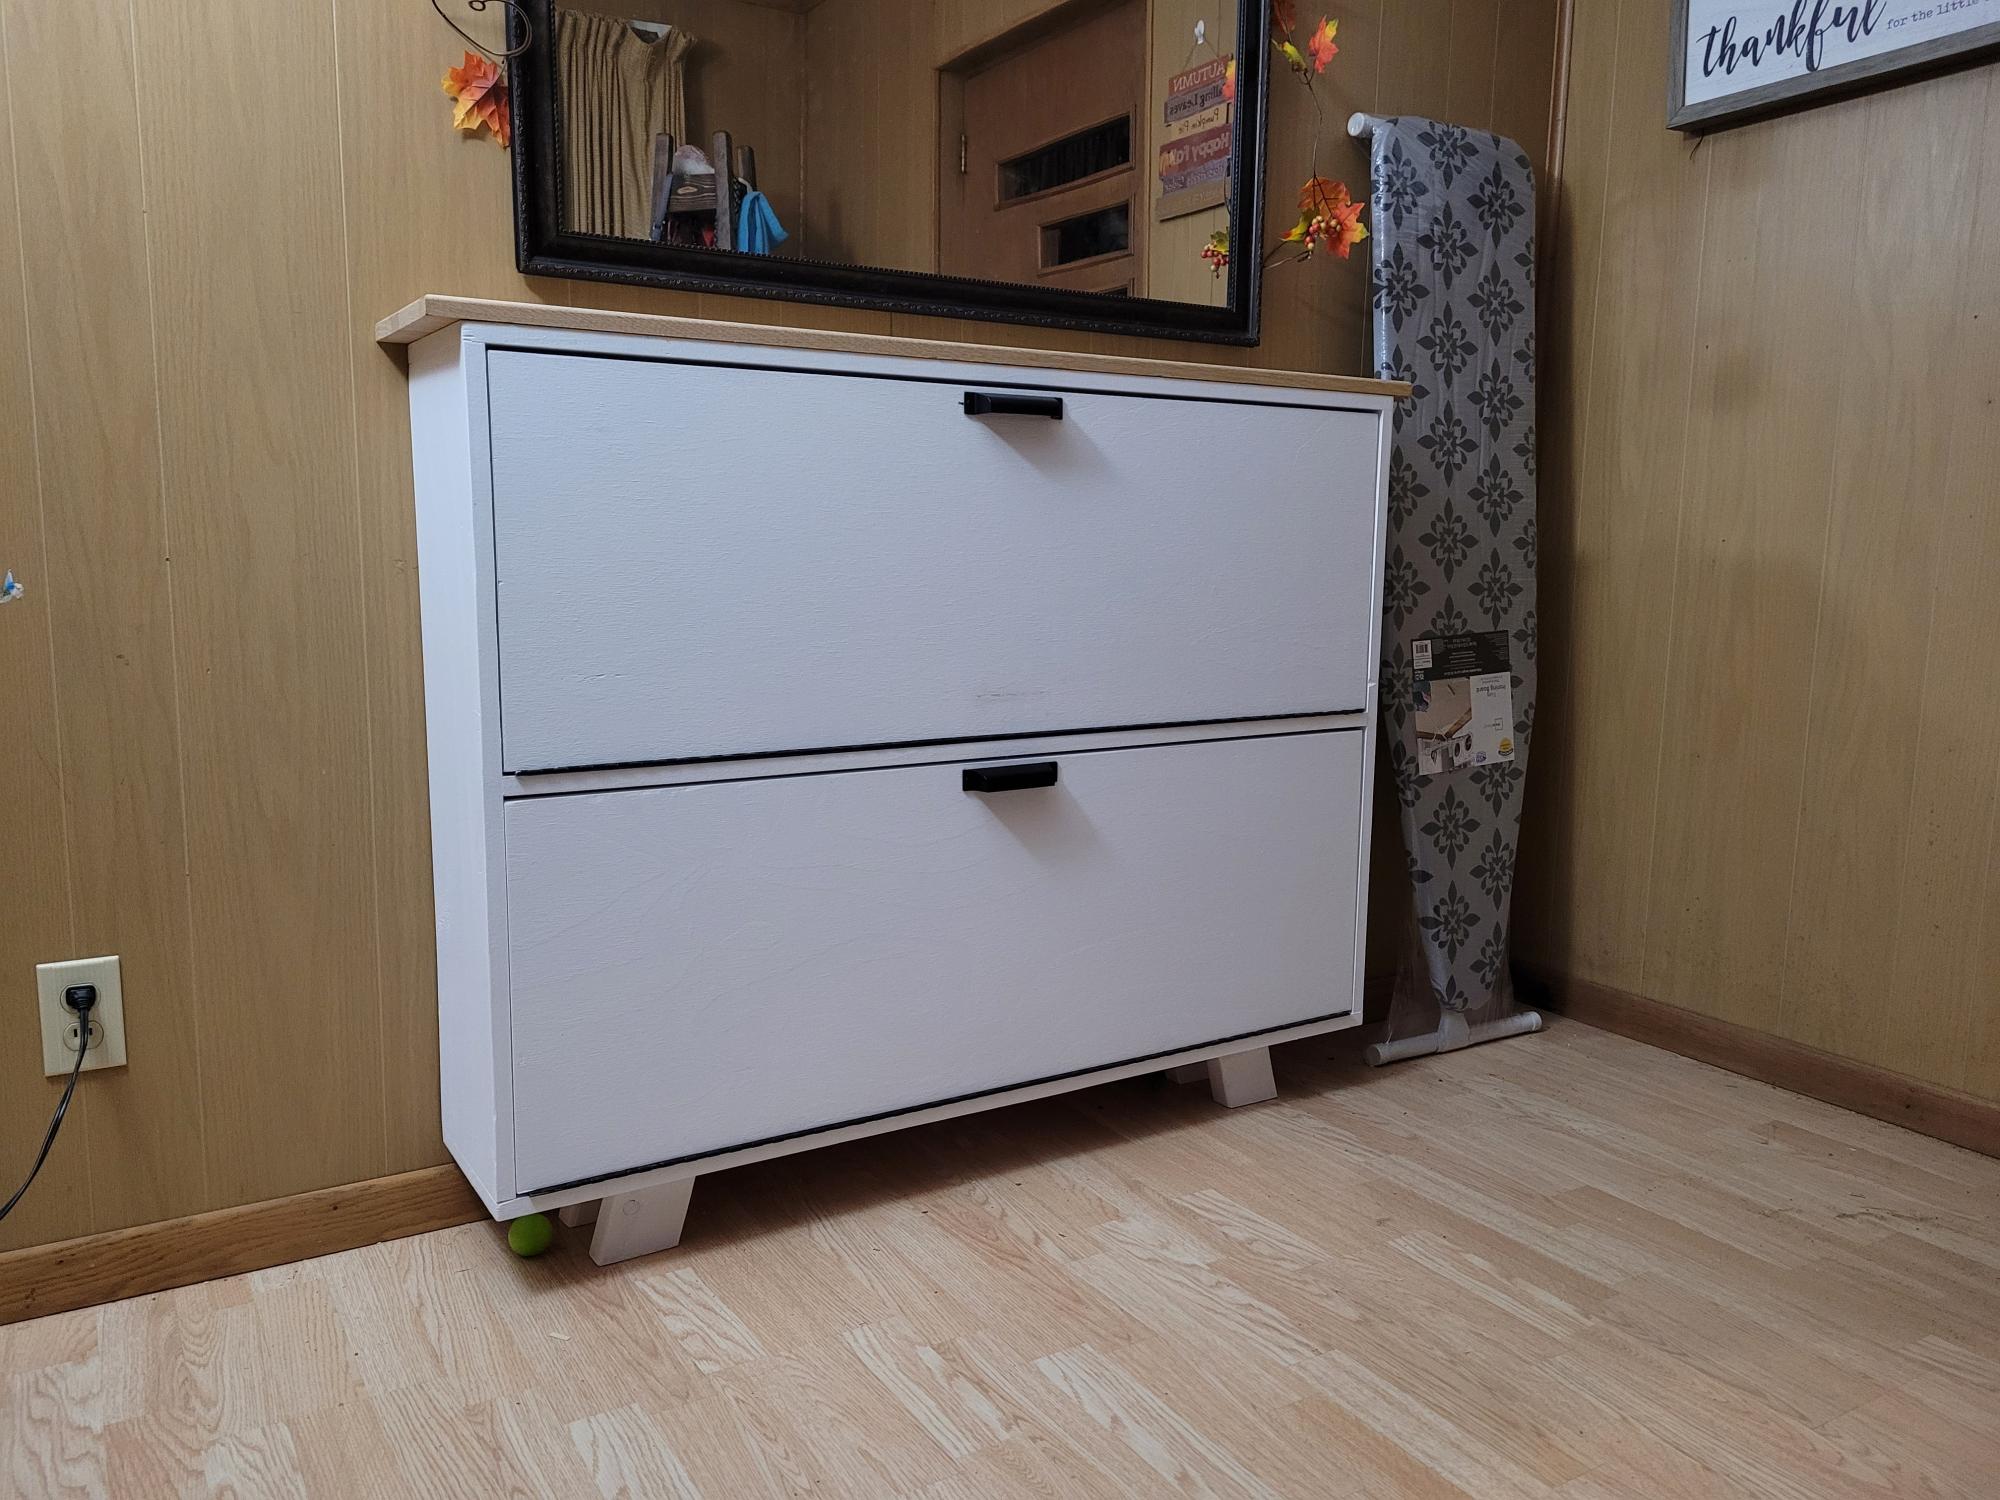
I've been wanting to make this for so long! I still have a couple blemishes to touch up but I'm super pleased with how this turned out. Easy construction and tons of customization options! THANK YOU ANA!!!
Built from Plan(s)
Estimated Cost
$150.00
Estimated Time Investment
Weekend Project (10-20 Hours)
Finish Used
Minwax Polycrylic. Semi-gloss.
Recommended Skill Level
Intermediate
Comments
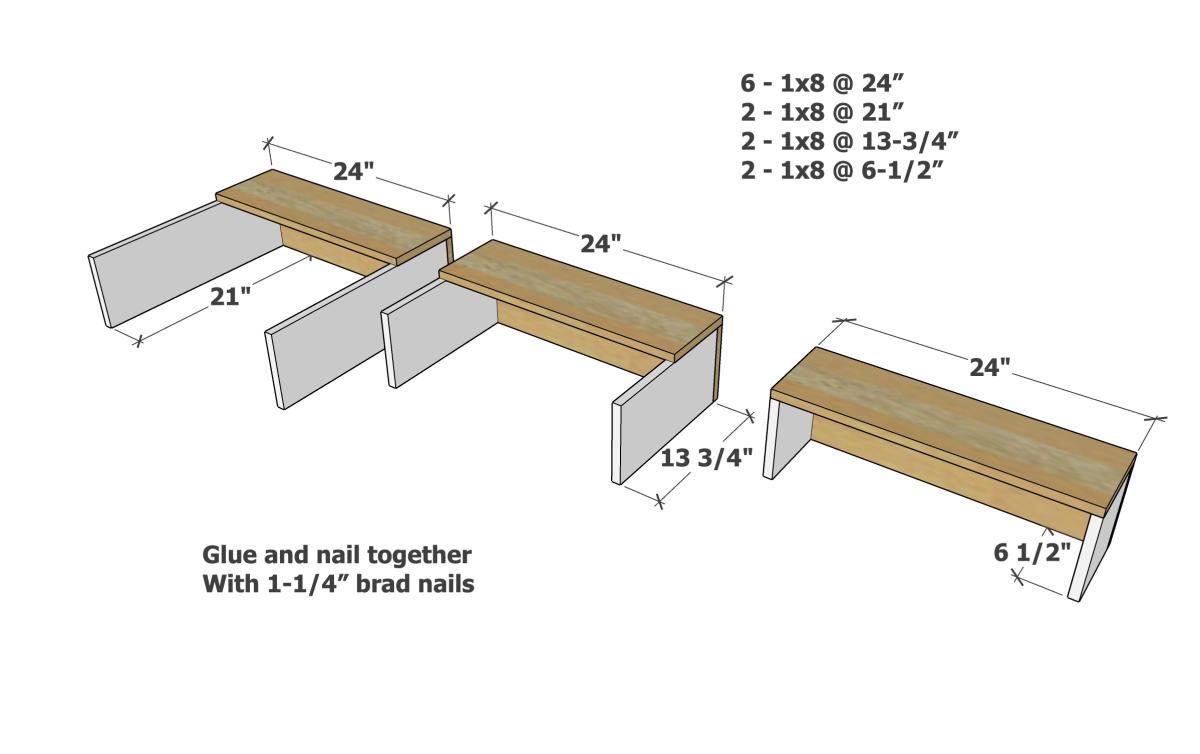
My new and amazing outdoor bench

Thank you for the easy and fun bench plan.
It was really easy to install.
Even my 2 little daughters had fun (-:
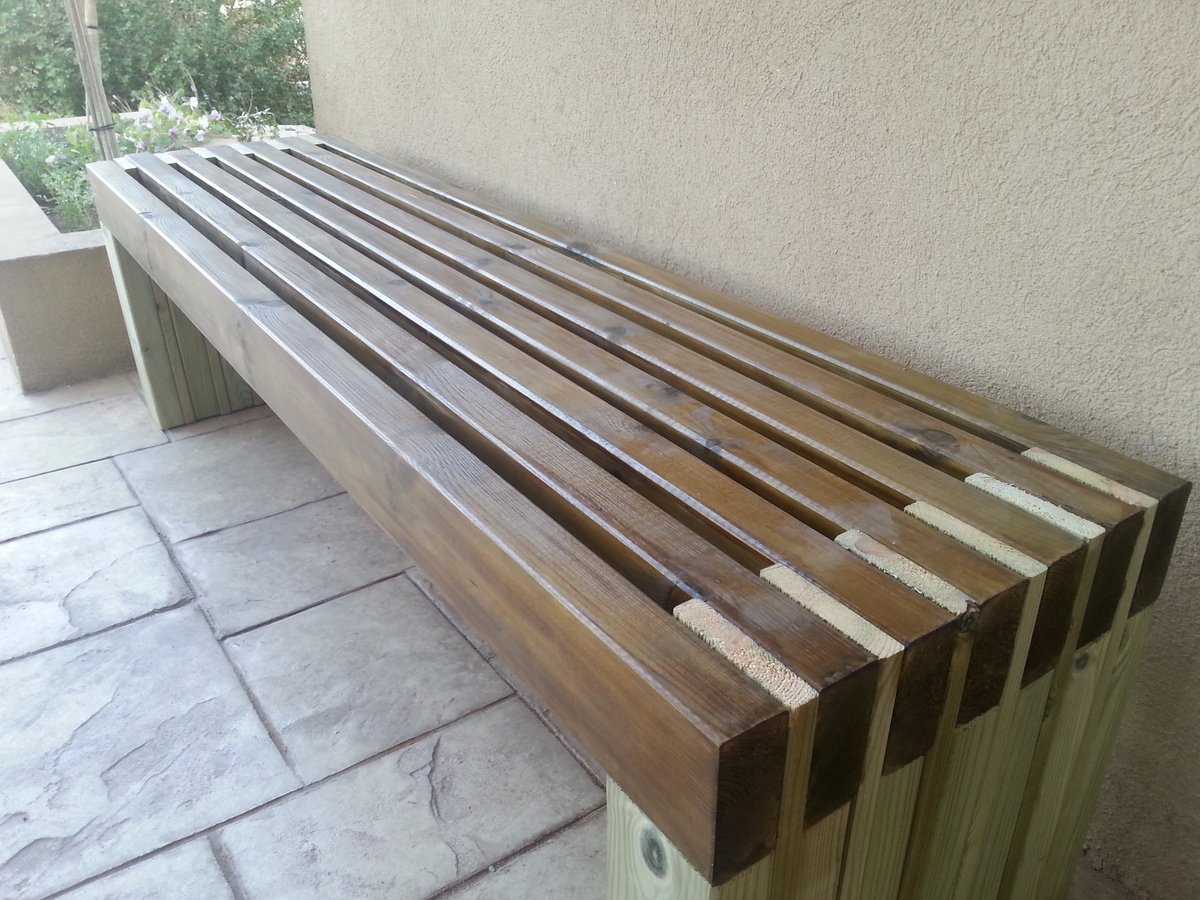
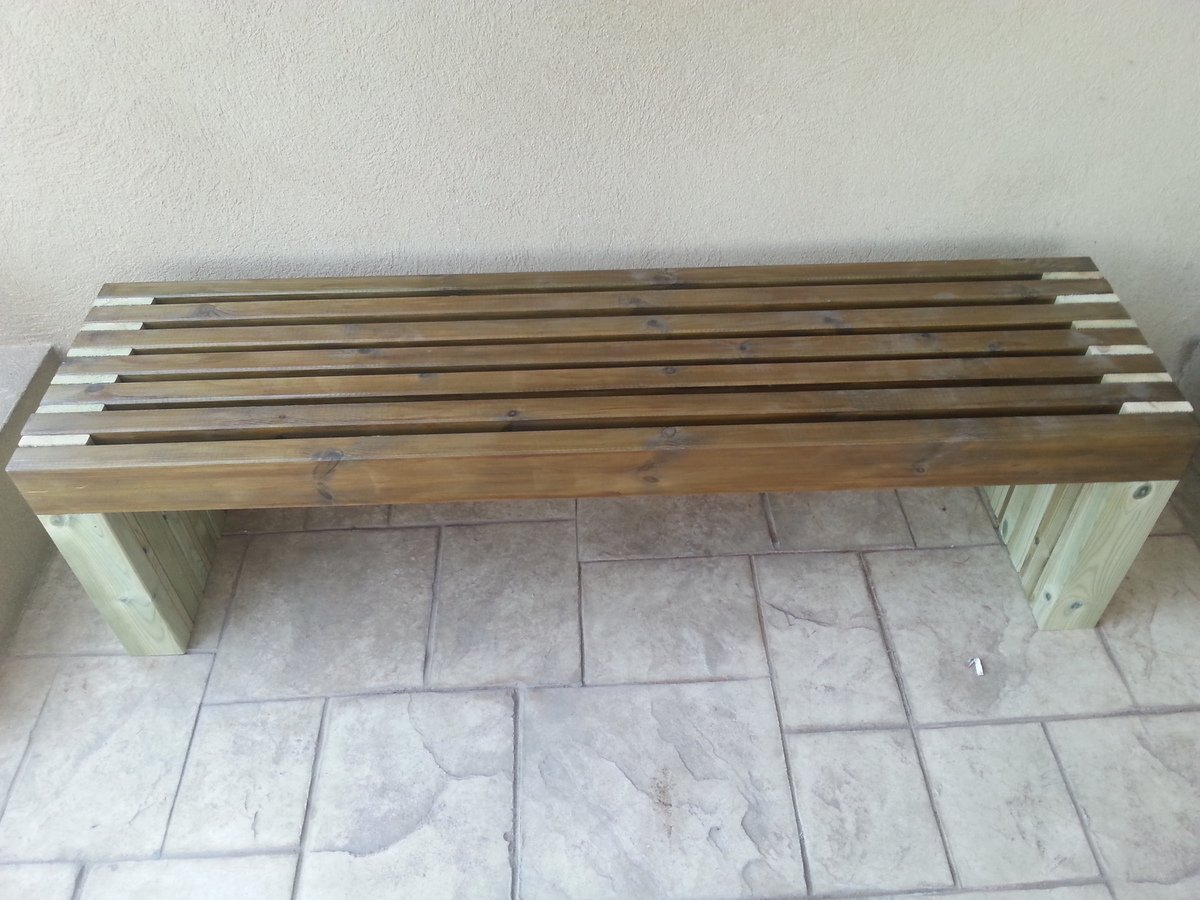
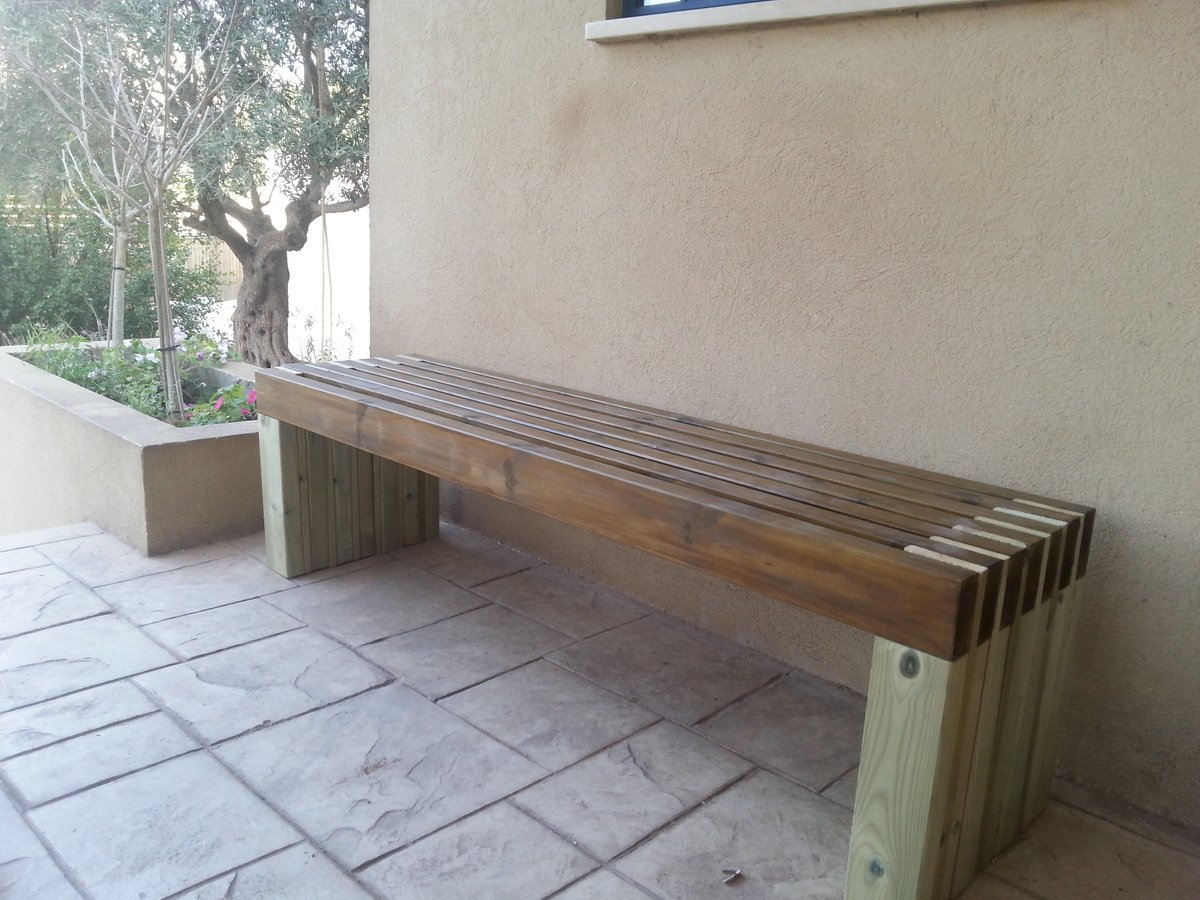
Built from Plan(s)
Estimated Time Investment
Afternoon Project (3-6 Hours)
Finish Used
Bondex walnut
Recommended Skill Level
Starter Project
Comments

Thu, 04/24/2014 - 08:06
Love the finish!
I love the finish you did on the bench. Thanks for sharing!
Farmhouse bed
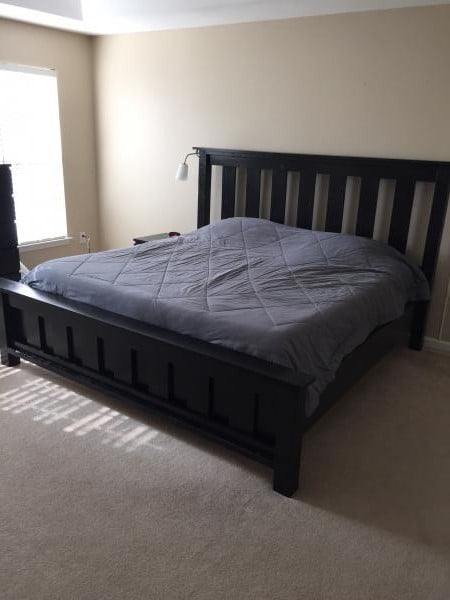
The project went relatively well. Had to readjust in order to fit our king. I used 2x4s and 2x4 joist hangers to support the mattres.
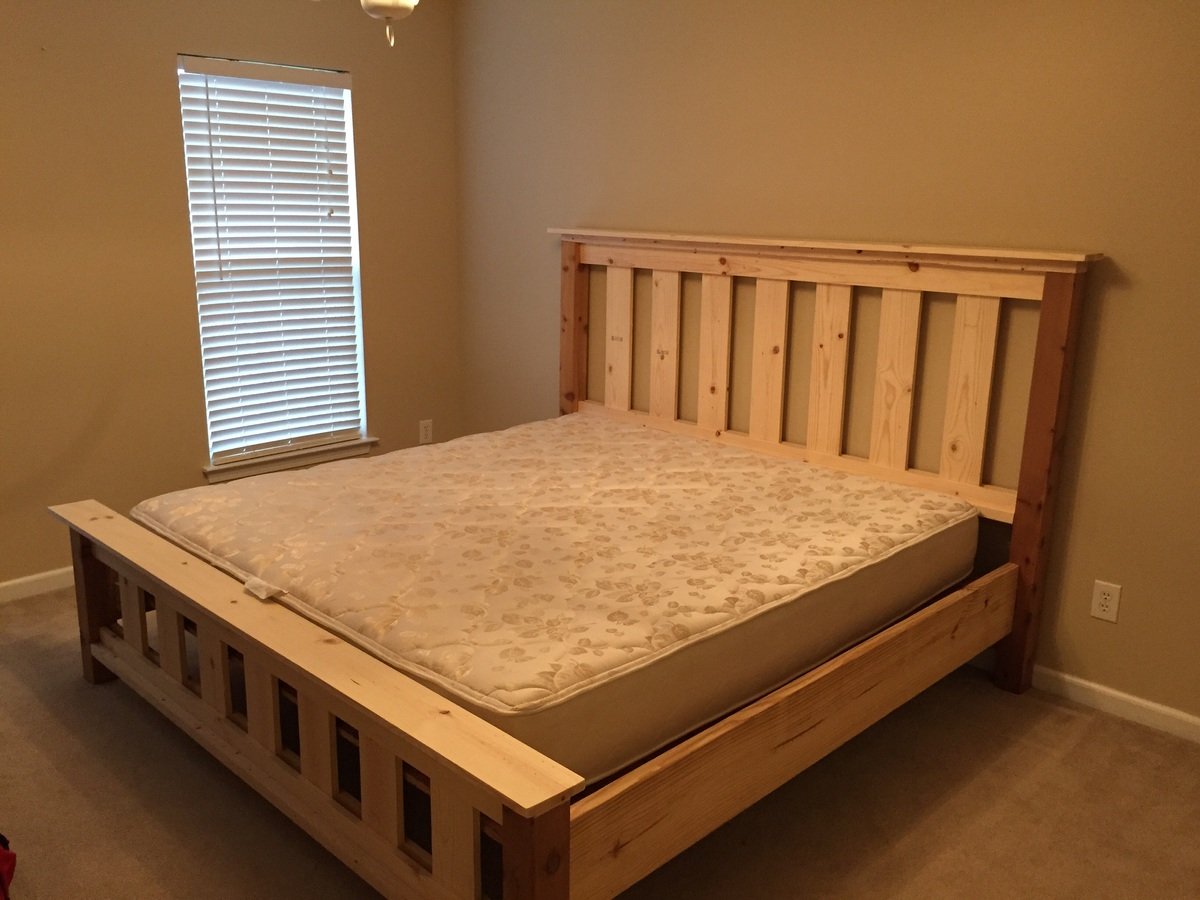
Built from Plan(s)
Estimated Cost
300.00
Estimated Time Investment
Week Long Project (20 Hours or More)
Finish Used
Rustoleum ebony stain and satin polyurethane.
Recommended Skill Level
Beginner
Fireplace Mantle with Drawers and Hidden Storage
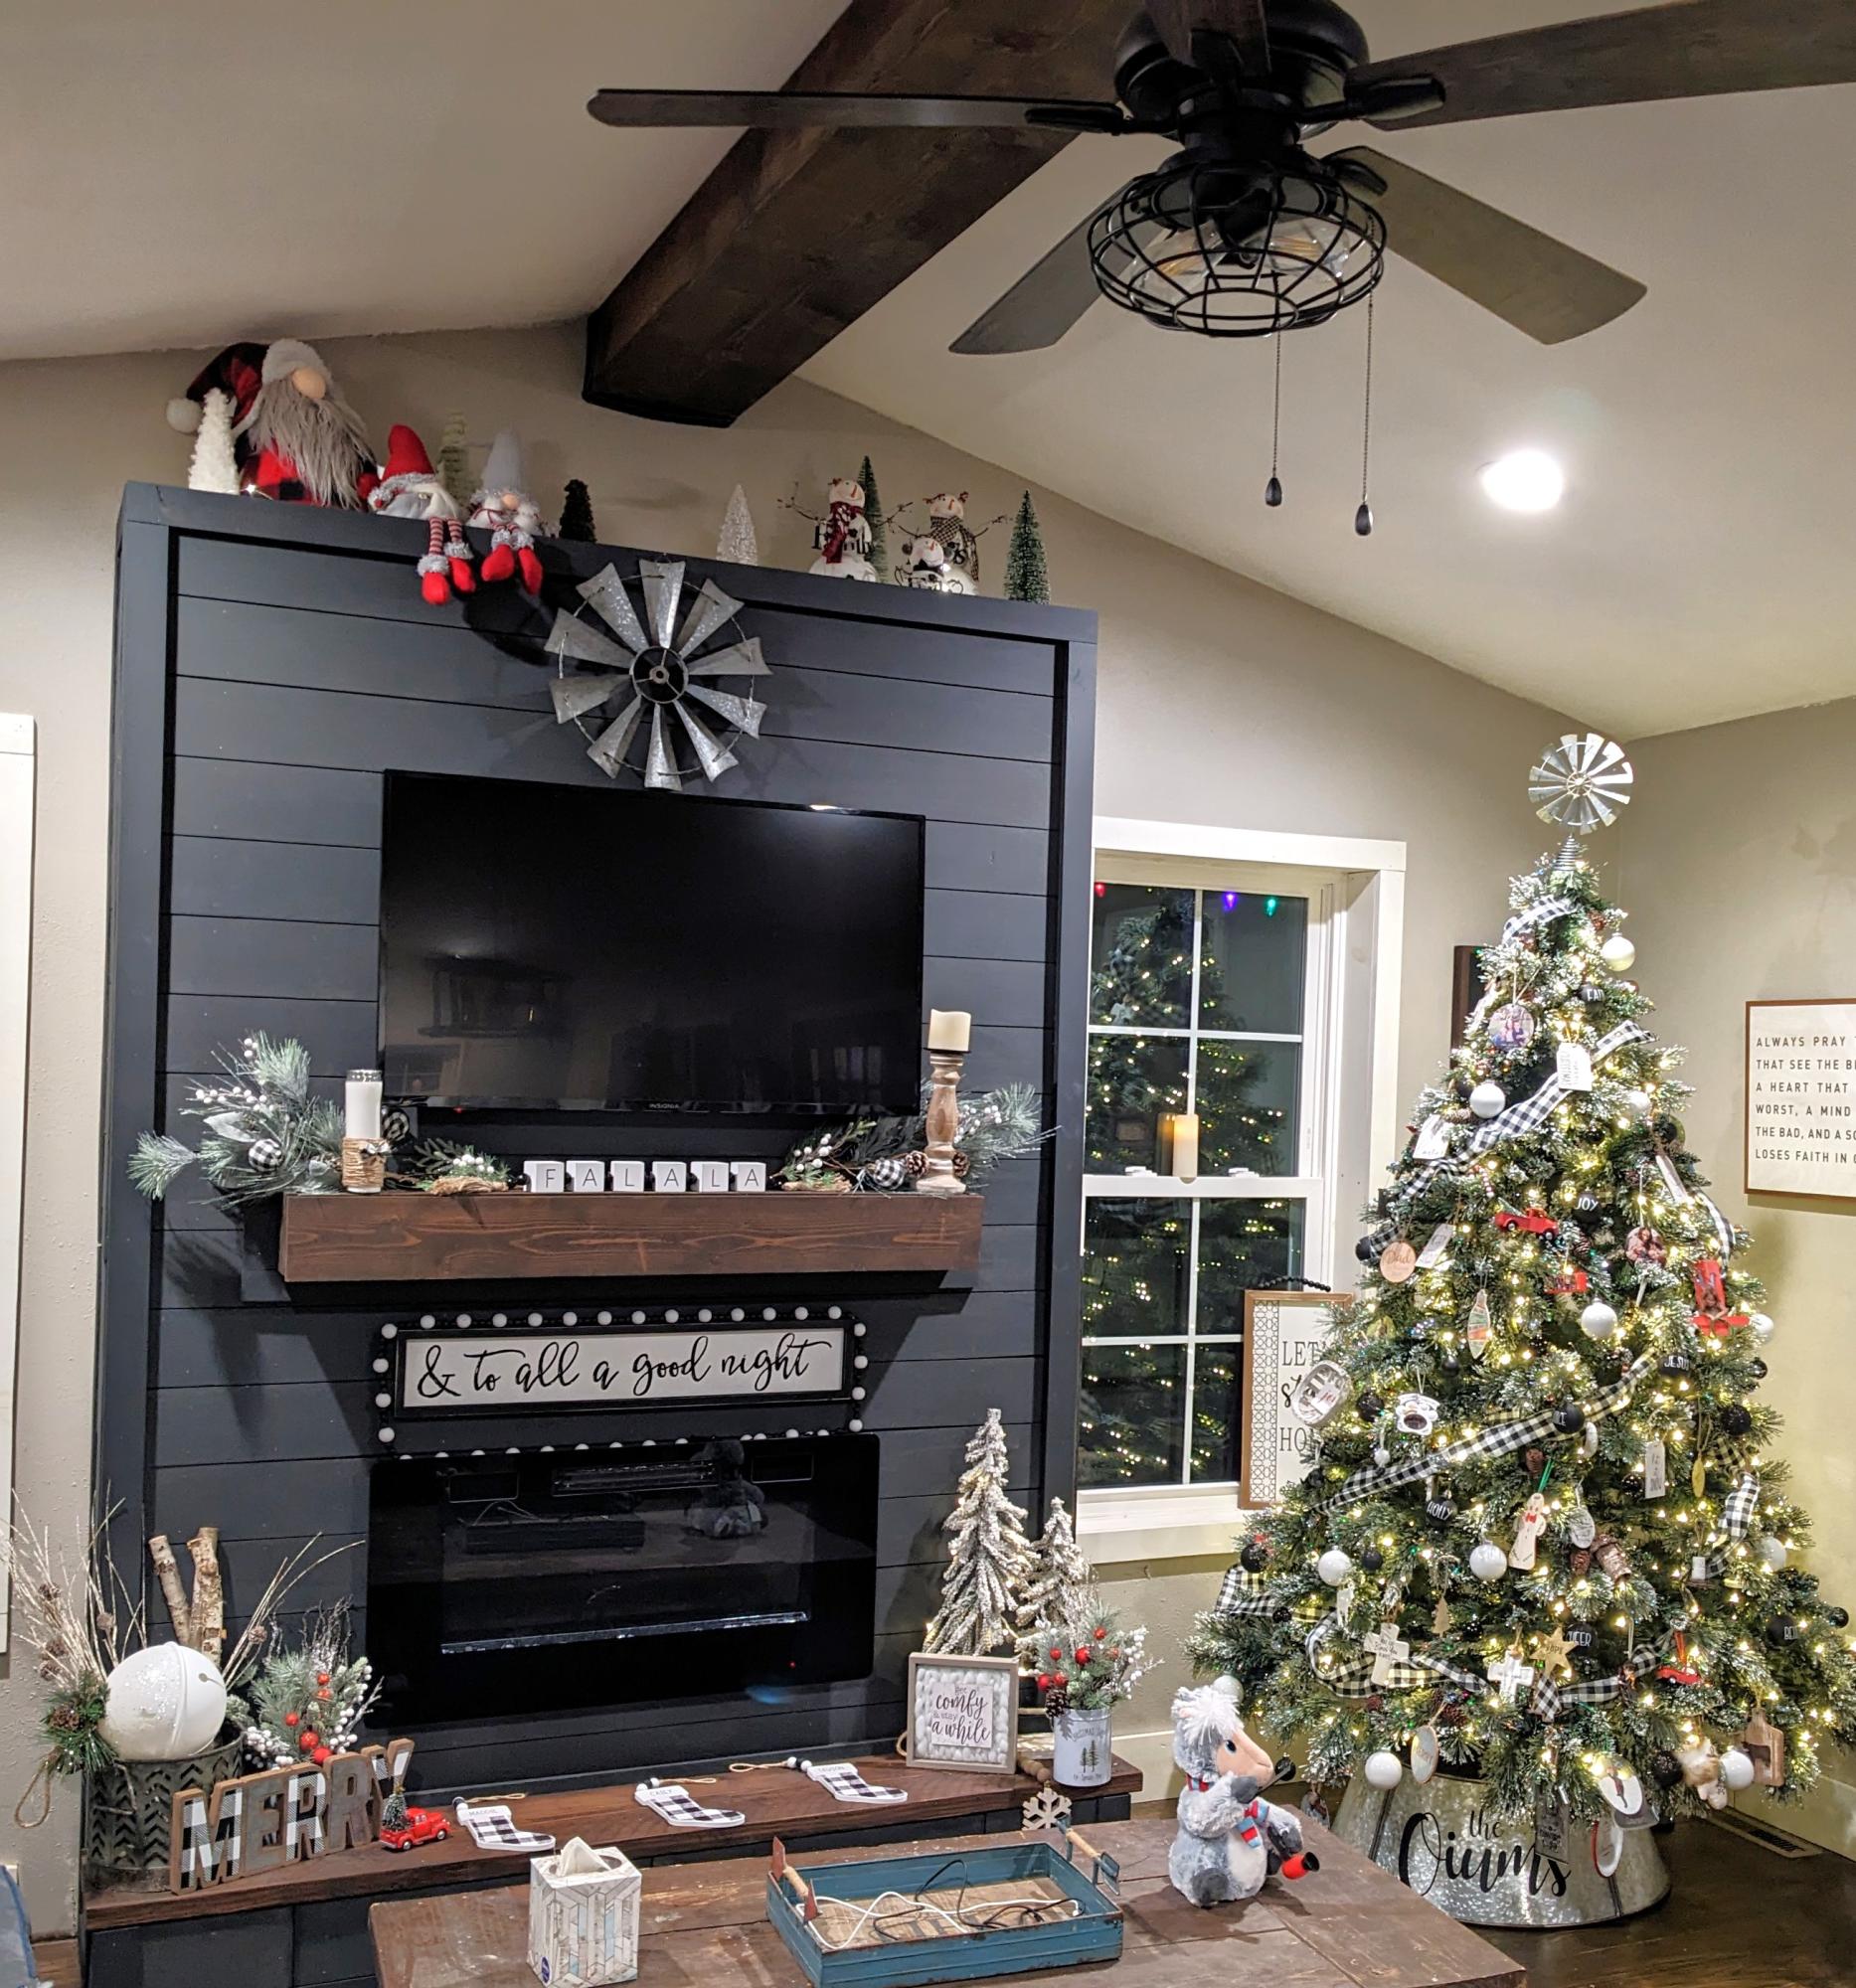
Modified plans to include game storage drawers, a flip open mantle for DVD player and hidden charging port, and hidden cupboards on both sides for DVD storage. I scoured the Internet for months before drawing this up to fit my space and tackling all on my own! I love it and all of my other Ana White inspired projects!
Casey O.
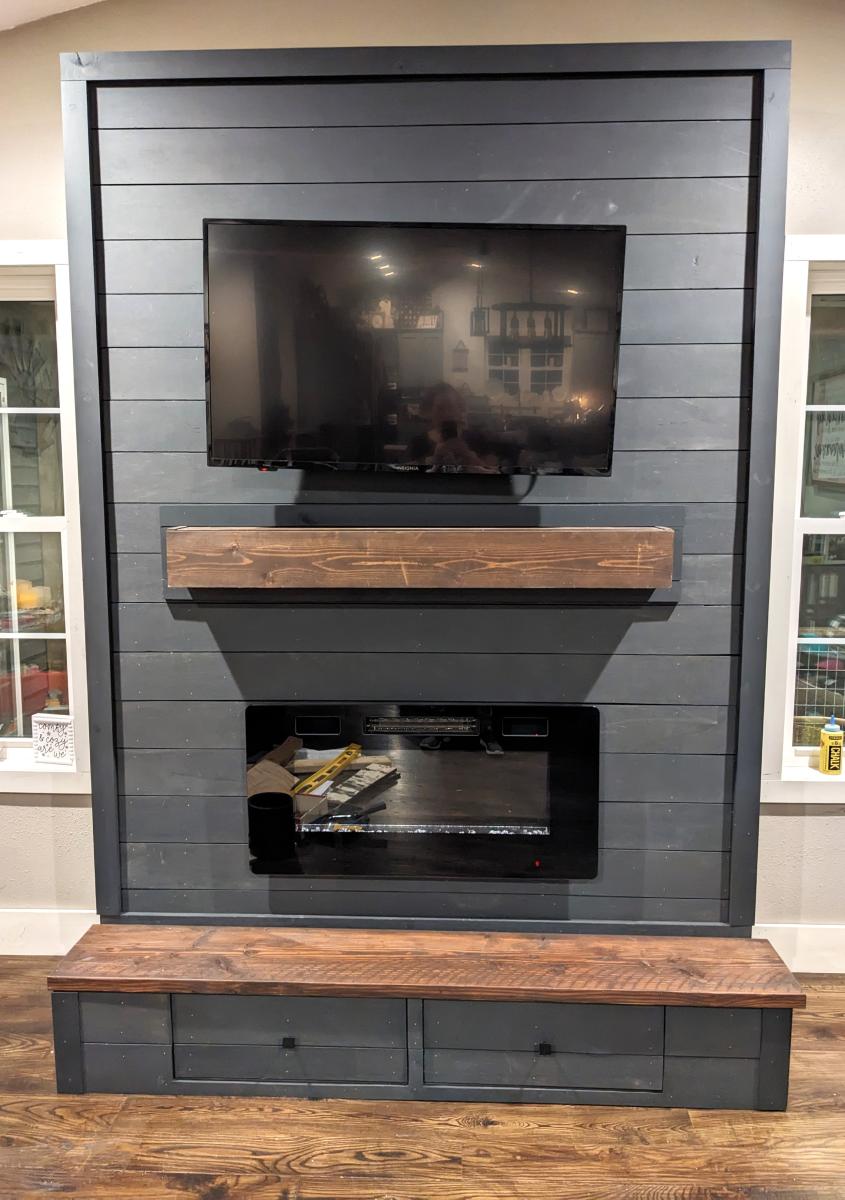
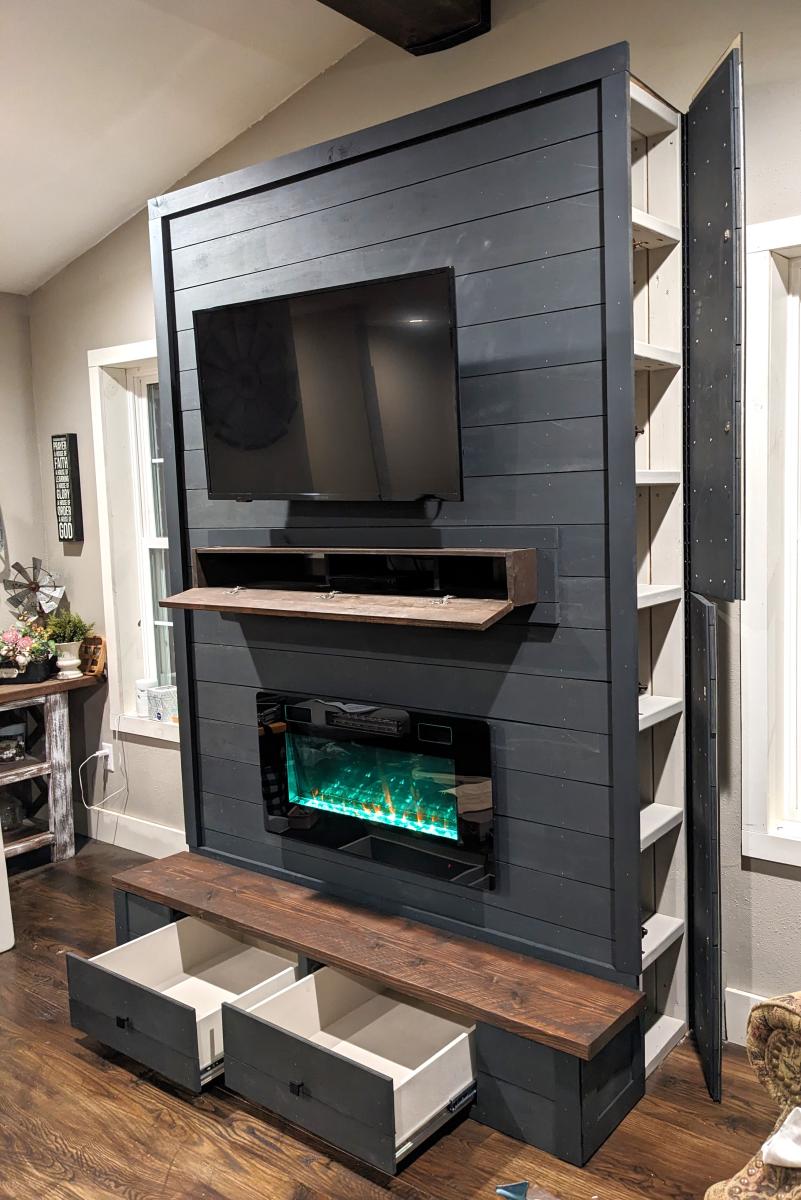
Built from Plan(s)
Seasonal And Holiday
Fancy Jewelry Box built by my daughter and me
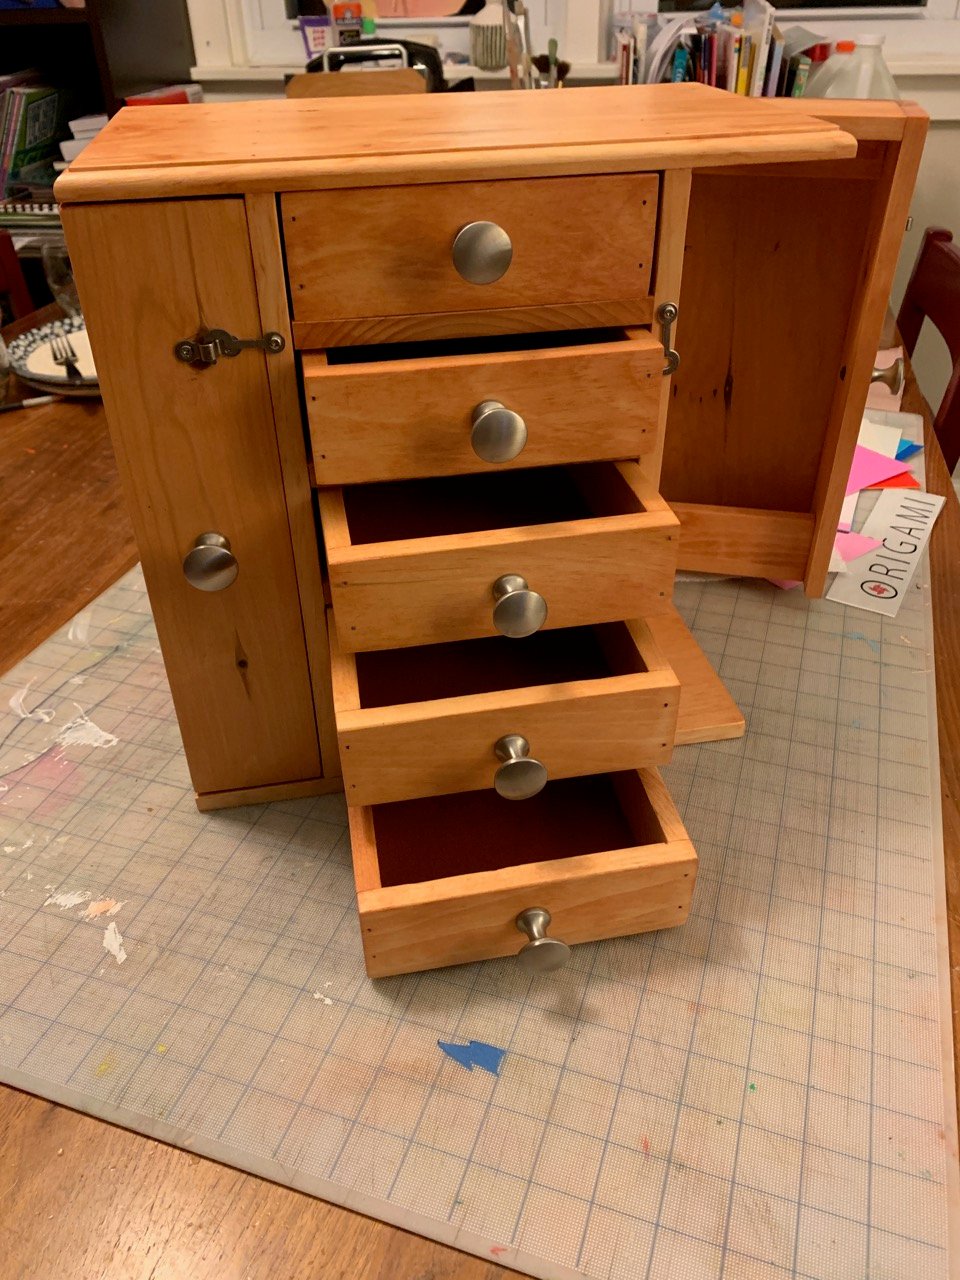
My 10 year old daughter is always creating. She recently decided that she wanted to do a woodworking project with me. We started by searching online for a design that looked doable and came up with the Fancy Jewelry Box from the Ana White website.
We decided that using the full thickness of 1x stock gave the piece a bit more of a clunky look than we were after. And since I have a thickness plainer, we milled our stock down to just under 1/2”. But that meant that we had to rework many of the measurements on the plan. This also made the drawers deeper and wider. Which is nice. A happy mistake happened when, while rough cutting the individual pieces before milling them down, I inadvertently cut the pieces between the drawers too narrow. We ended up turning them 90 degrees which allowed them to fit. This is why you see the end grain on those pieces. But we like it.
We also altered the plan a bit so that the edges of the plywood on the faces of the drawers and doors do not show. We added a nice border to the top of the box with a curved router bit. We lined the drawers with felt and then added some dividers here and there using some scraps of oak which we sawed thin with a bandsaw.
The original plan was to paint the box, as opposed to staining it. It wasn't until after I had nailed on the top and the drawer fronts that my daughter decided she wanted to stain it. That's why you can see those nail holes!
We had such fun making this Jewelry box.
Built from Plan(s)
Estimated Cost
I don't remember. Not much.
Estimated Time Investment
Week Long Project (20 Hours or More)
Finish Used
Stain and water based polyurethane. We used 2 coats of poly "sanding" it between coats with fine steel wool.
Recommended Skill Level
Beginner
Comments

Sat, 09/07/2019 - 13:43
Fantastic Jewelry Box!
You did a fantastic job on the jewelry box! It's absolutely gorgeous!
Comments
ZenithWoodWorking
Tue, 02/26/2019 - 19:20
Plans?
Mark, do you have plans for that ultimate workbench?
mrbrucks
Sat, 08/01/2020 - 08:27
Love The Look
That's a nice build. I would love to know if you do have plans for this workbench?
simonster
Sat, 10/24/2020 - 22:27
great build
Would love plans for this too if available. Looks awesome!
dugmik
Tue, 03/23/2021 - 20:00
Are there plans for this? I…
Are there plans for this? I love it!!