
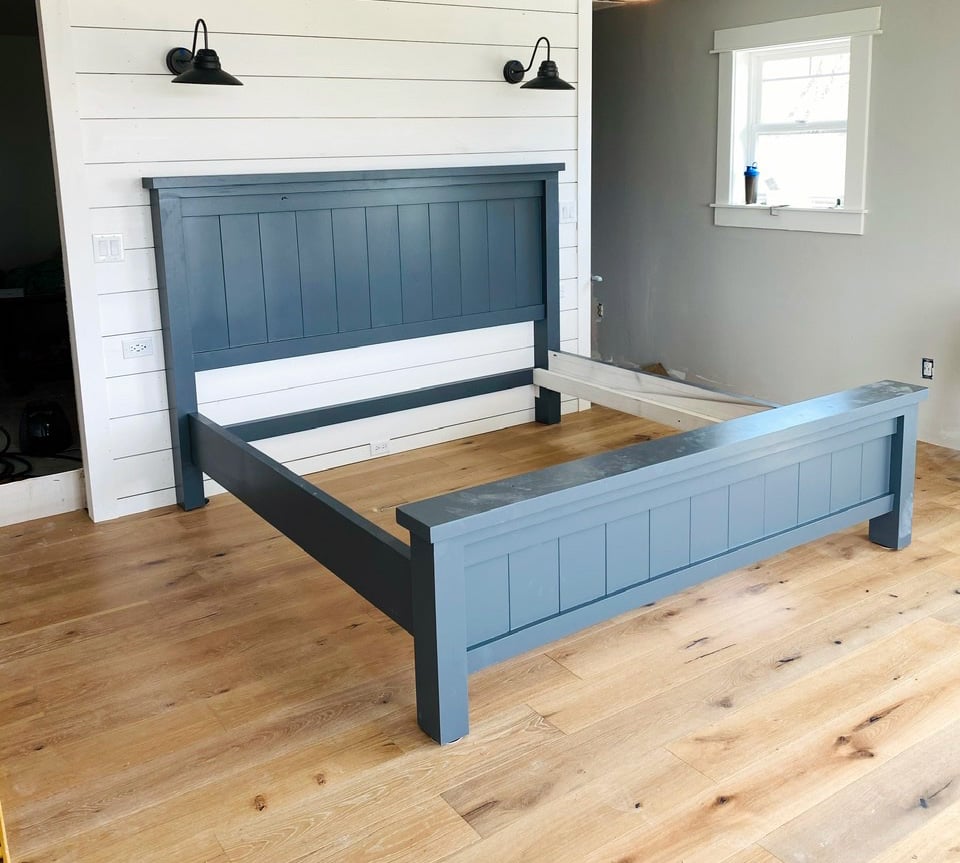

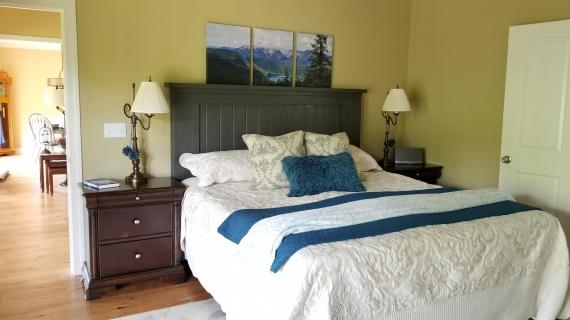
This stunning (and extra sturdy!) Farmhouse King Bed frame costs just a fraction to build vs buy. It's made of solid wood and you won't need a ton of tools to whip it out. You'll love the step by step diagrams, shopping list and cut list.
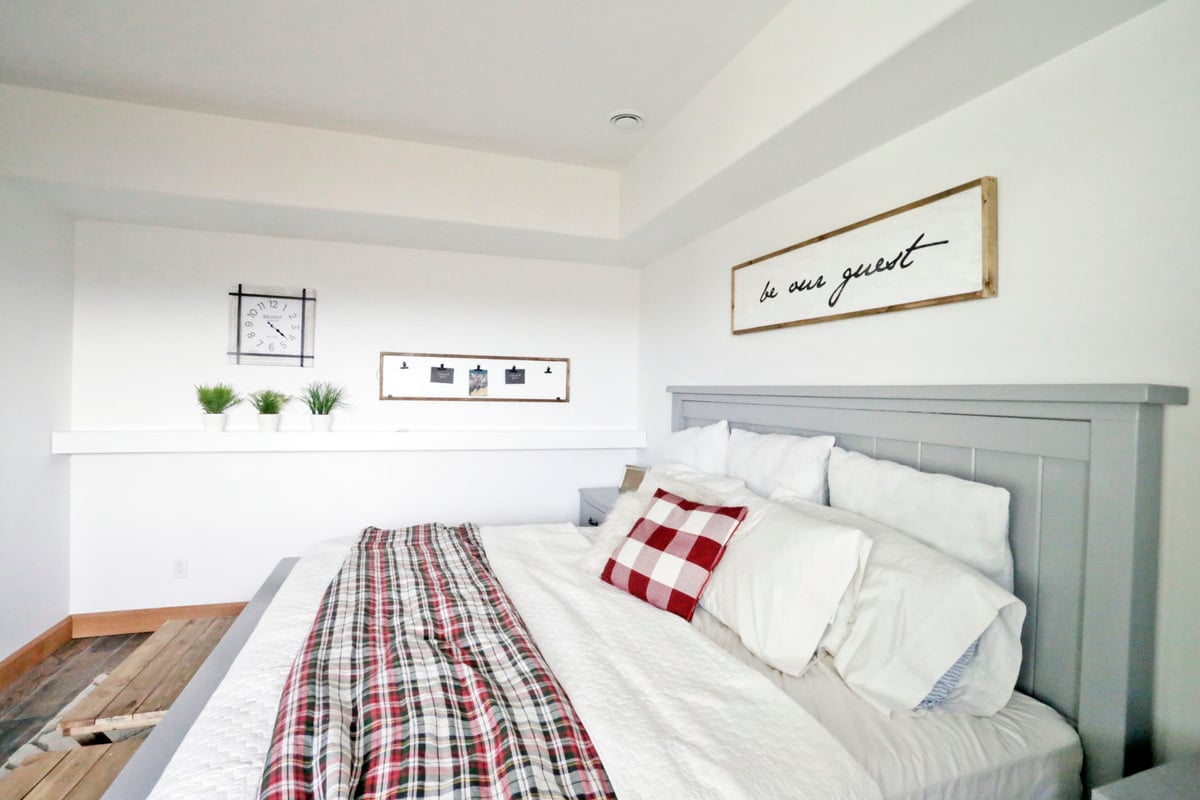
We also have Queen Farmhouse Bed Plans, and check out our full room build with this bed and matching nightstands.
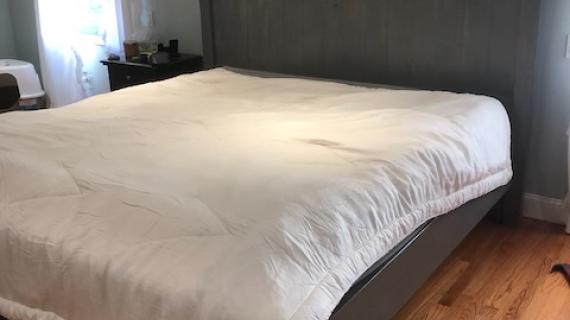
The very first real project that I ever tackled all by myself was this EXACT Farmhouse Bed in King size.
I remember being stunned at how well the project turned out. And here we are, over a decade later, and it's still just as beautiful, just as sturdy, and I'm just as stunned.
The farmhouse beds have been built thousands of times and is a reader favorite.
What Wood Do You Use
We use standard off the shelf lumber to build - just framing lumber and common boards. You can of course build with any type of wood, just make sure your material dimensions match dimensional lumber sizes (for example a 2x4 is actually 1-1/2" x 3-1/2").
Matching Nightstands
This bed is quite substantial and deserves matching nightstands. I have put together nightstand plans that are designed to match - so you can get a full bedroom furniture set!

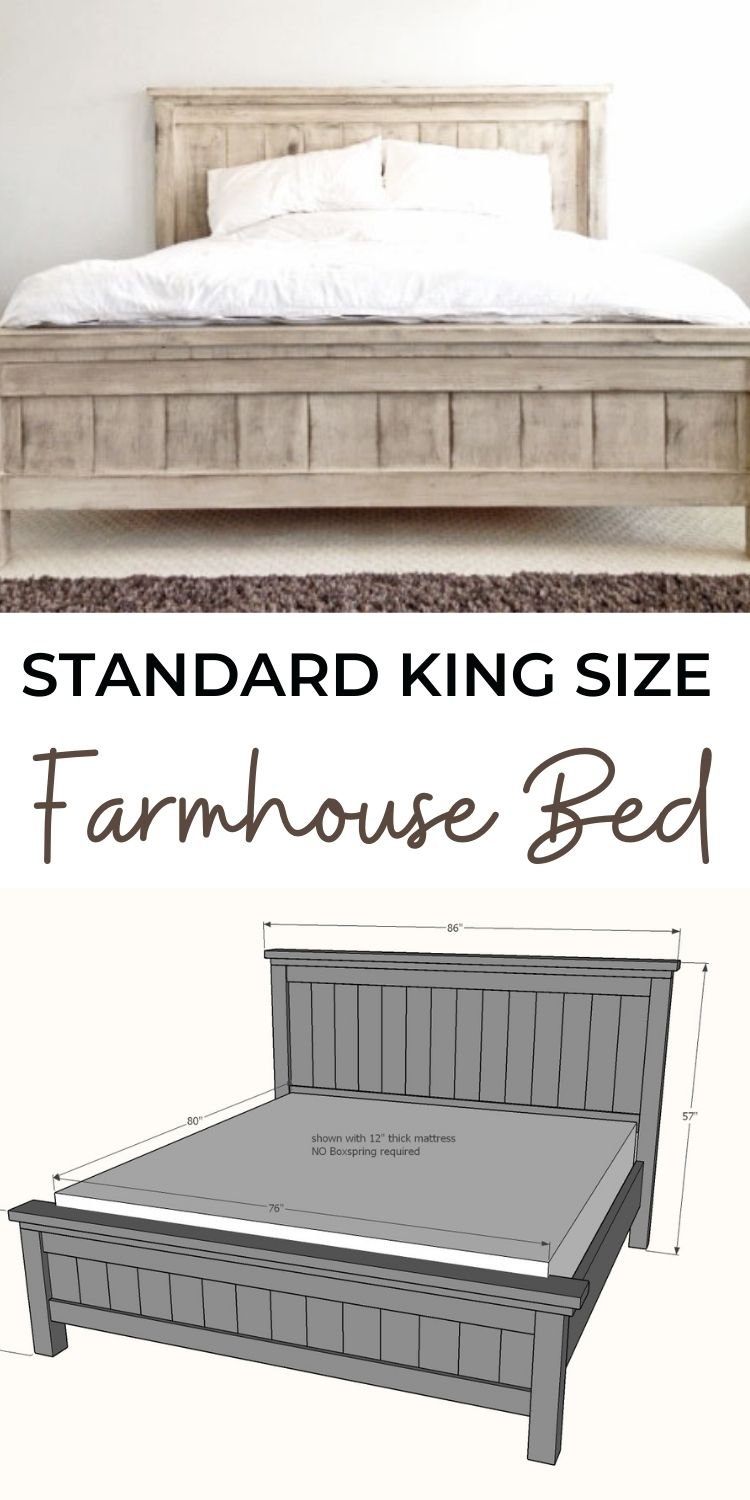
Updated Farmhouse King Bed Plans
We have updated these plans to be easier to build and not require pocket holes. You can still access the old plans here.
If you need a different sized farmhouse bed, check out all our farmhouse bed plans here.
Pin For Later!
Preparation
2 - 4x4, 8 feet long
1 - 2x2, 8 feet long
7 - 1x6, 8 feet long
4 - 1x4, 8 feet long
2 - 2x6, 8 feet long OR stud length
2 - 1x10 OR 2x10 @ 8 feet long
18* - 2x4, 8 feet long OR stud length
2 small L brackets (1-1/2" wings)
2 straight brackets (6" overall length)
150 - 1-1/4" brad nails
150 - 2-1/2" self tapping wood screws (try SPAX or similar)
*Includes 11 2x4s for the mattress slats. You can substitute 1x4s, 1x3s, ripped plywood etc for the slats if you have other materials on hand
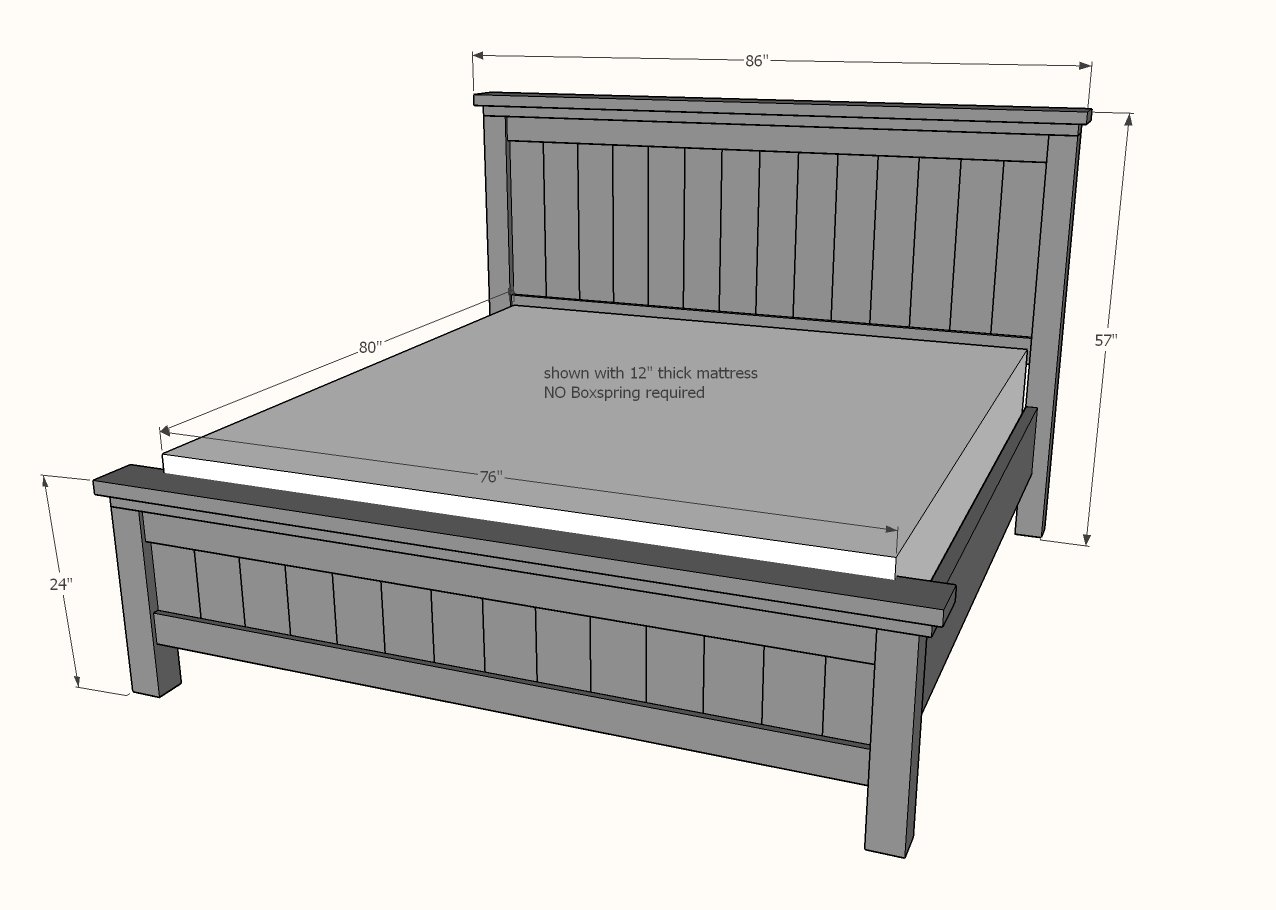
HEADBOARD CUT LIST
2 - 4x4 @ 54" - headboard legs
2 - 2x2 @ 30" - headboard cleats
14 - 1x6 @ 30" - headboard panel
2 - 1x4 @ about 77" - measure and cut to fit
1 - 2x4 @ about 84" - measure and cut to fit
1 - 2x6 @ about 86" - measure and cut to fit
FOOTBOARD CUT LIST
2 - 4x4 @ 21" - footboard legs
2 - 2x2 @ 8" - footboard cleats
2 - 2x2 @ 3" - footboard cleats
14 - 1x6 @ 15" - footboard panel
2 - 1x4 @ about 77" - measure and cut to fit
1 - 2x4 @ about 84" - measure and cut to fit
1 - 2x6 @ about 86" - measure and cut to fit
MATTRESS SUPPORT FRAME/SIDERAILS
4 - 2x4 @ 83-1/2" - mattress supports
1 - 2x4 @ ~77" - headboard tie in - cut to fit
4 - 2x4 @ 12-1/2" - center legs
2 - 1x10 or 2x10 @ 80"
11 - 2x4 @ ~77" cut to fit - mattress slats


Instructions
Step 1

Attach 2x2 cleats flush to the back of the legs, with 2-1/2" screws
NOTE: Pocket hole users can skip this step
Step 2
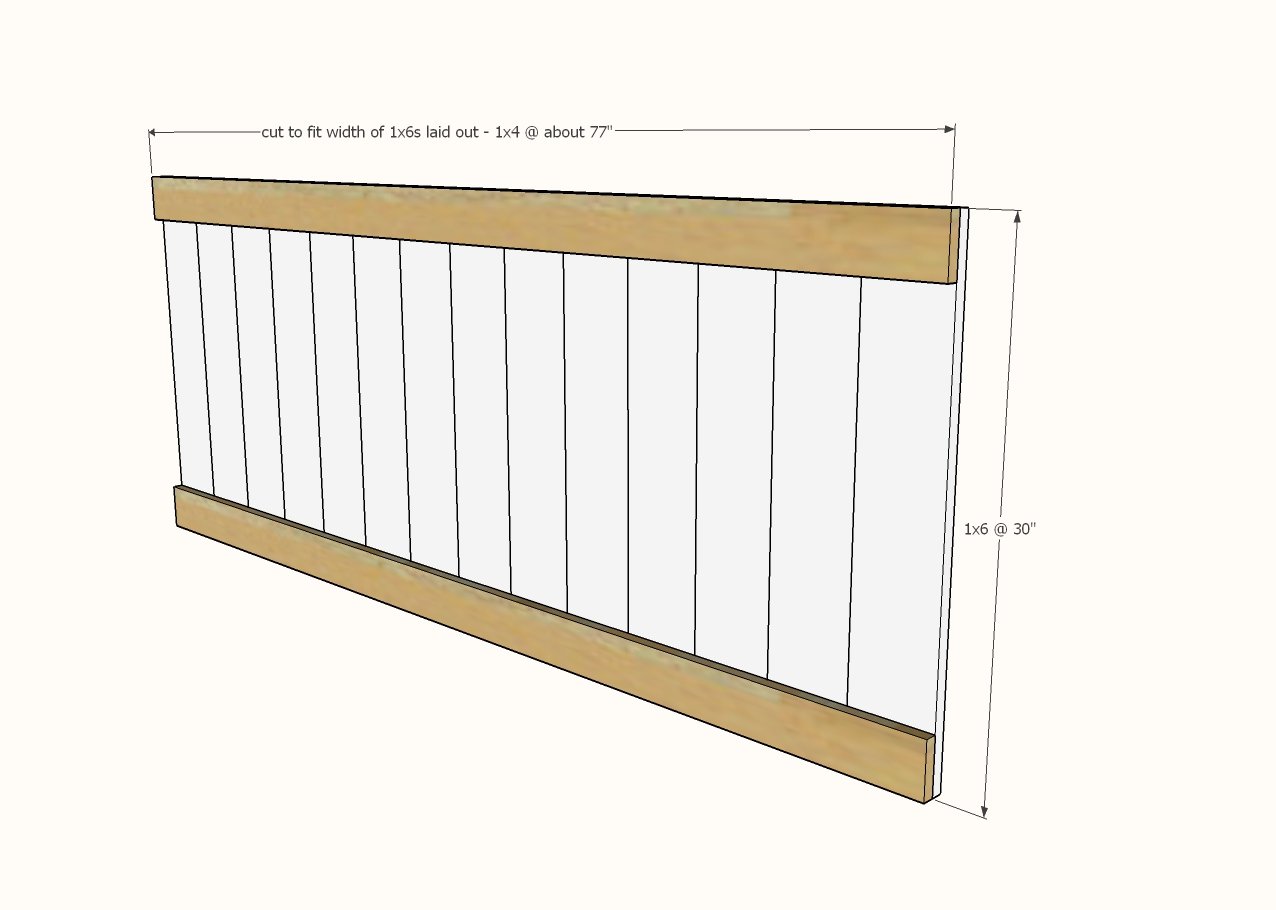
Layout the 1x6 headboard panels, and measure the overall width.
Cut 1x4 boards to this measurement.
Attach 1x6 boards to the 1x4s with glue and 1-1/4" brad nails from the back side to hide nail holes.
Make sure you apply glue between the 1x6 boards as you go.
Check to make sure that the panel is constructed square (NOT a parallelogram)
POCKET HOLE USERS: Attach 1x4s to the 4x4 legs with 3/4" pocket holes and 1-1/4" pocket hole screws. Then nail the 1x6s to the 1x4s inside the headboard panel.
Step 3
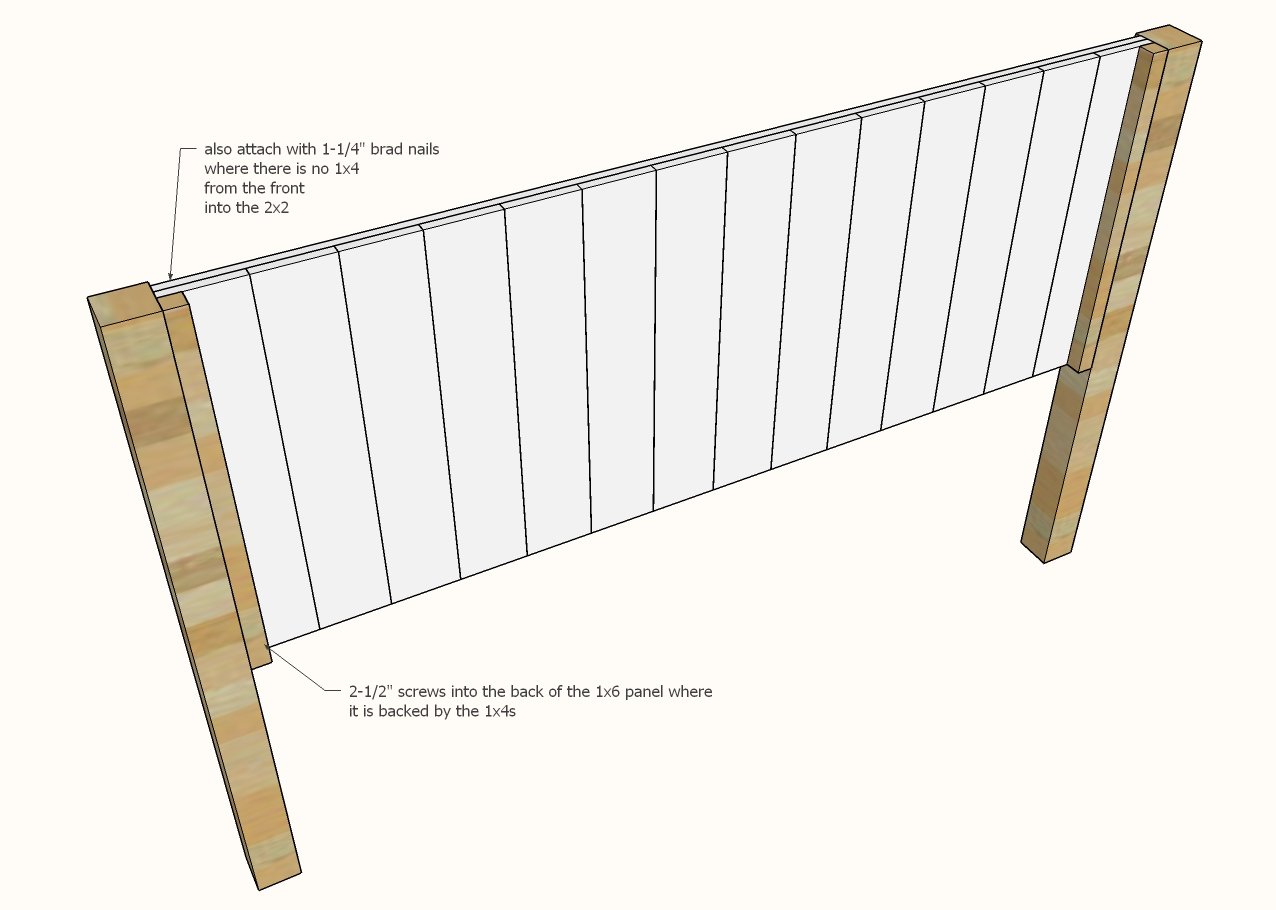
Attach panel to the 2x2 cleats with 2-1/2" screws and glue. Also attach with a few 1-1/4" nails through front side into the 2x2 cleat where there is no 1x4.
POCKET HOLE USERS can skip this step
Step 4
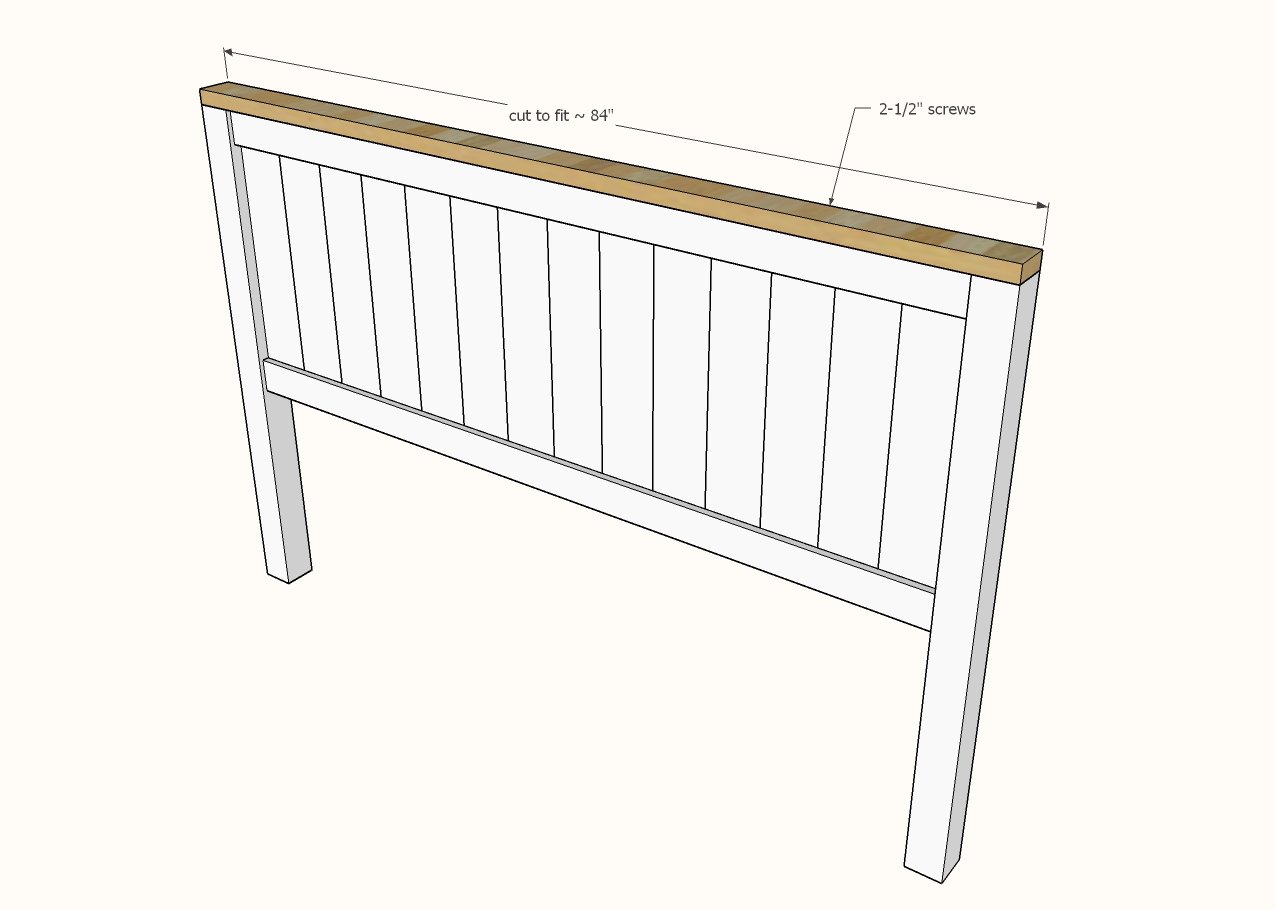
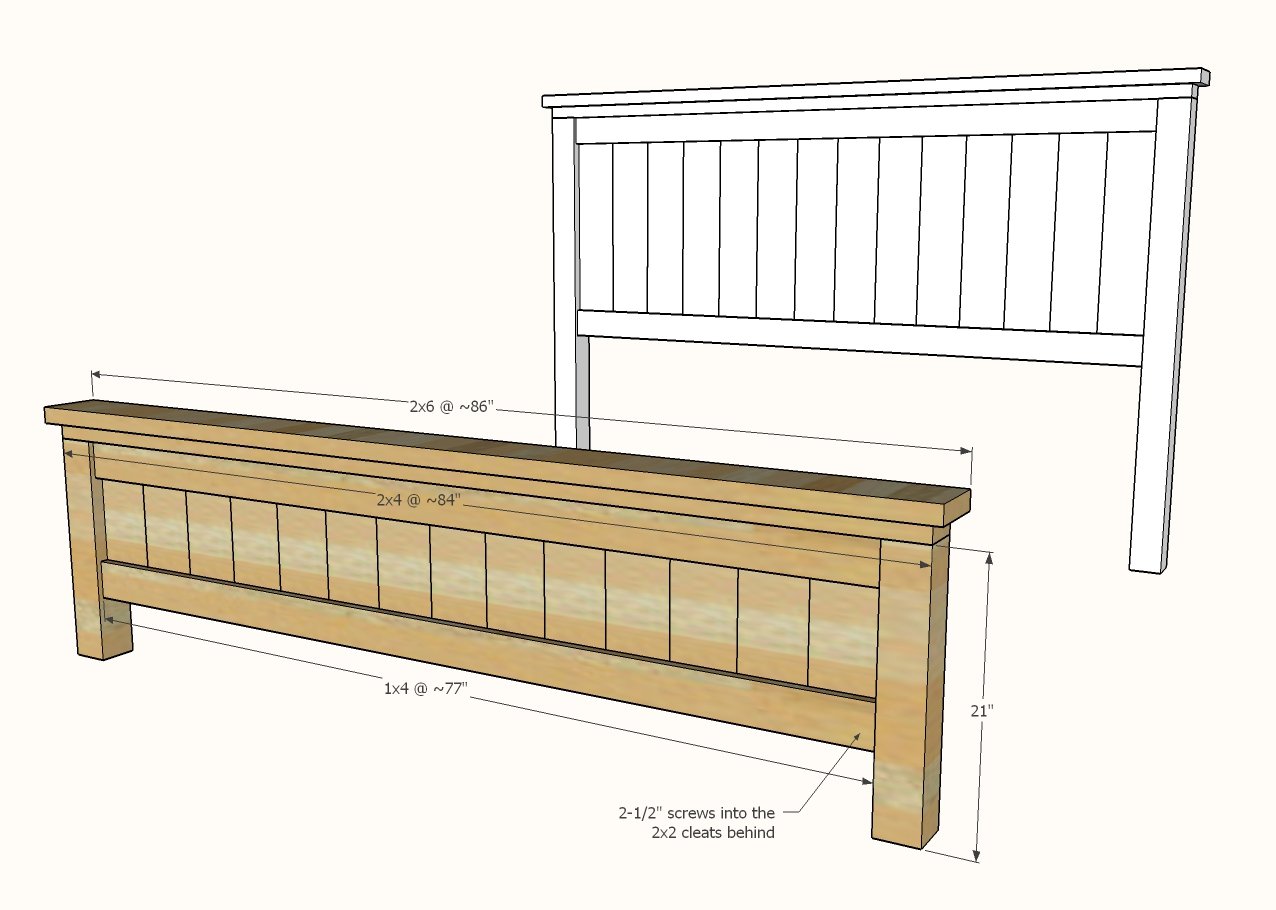
Measure the top overall width. Cut a 2x4 to this width. Attach with glue and screws to top of headboard.
Step 5
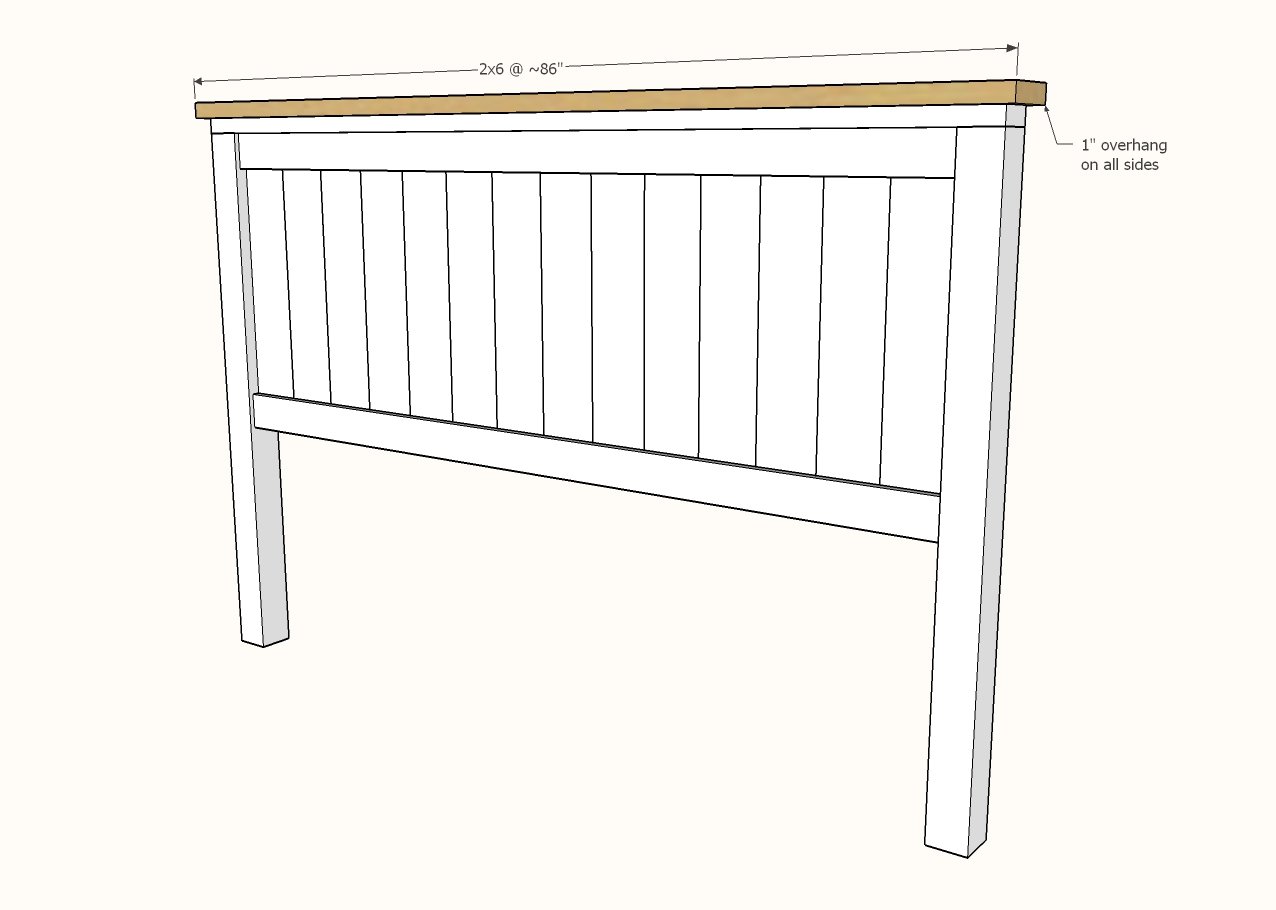
Cut a 2x6 2" longer than the 2x4.
Attach with 1" overhang on all sides with 2-1/2" screws and glue.
This completes the headboard build.
Step 6

The footboard is constructed the same as the headboard, with the exception of the 2x2 cleats on the back so that the siderail cleats can notch in.
If you have trouble with your smaller 2x2 splitting try predrilling holes.
Step 7
Finish construction of the footboard exactly as you did the headboard.
Step 8
Attach siderail cleats inside the footboard and to the headboard legs. Use 2-1/2" screws to secure.
This completes the footboard.
Consider painting or staining your footboards and headboards and siderails now - then move all the pieces into the room for final assembly.
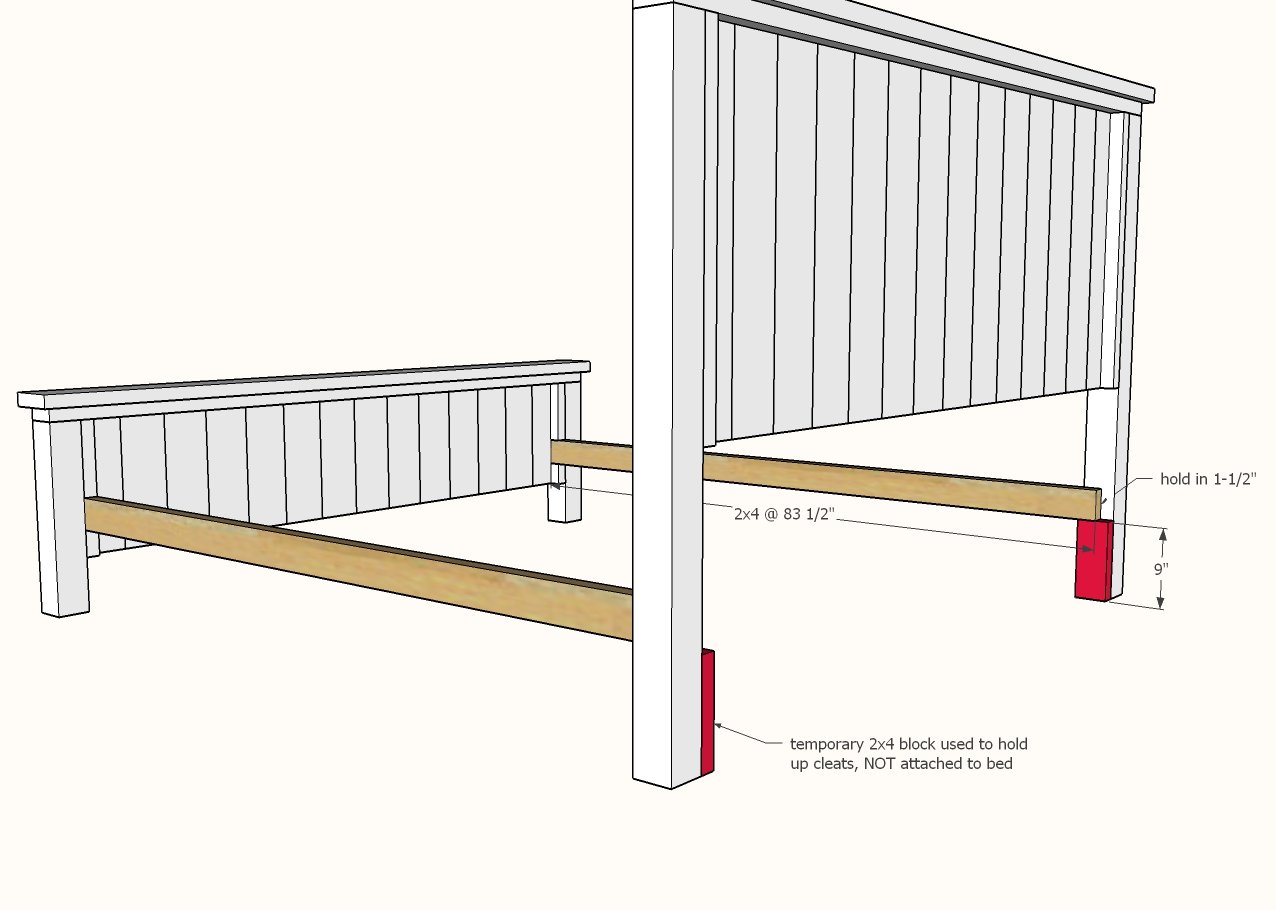
Step 9

Attach headboard support piece between the siderail cleats.
Step 10

Build the center legs - space the legs about 1/3 the way down - you don't have to be exact here.
Step 11
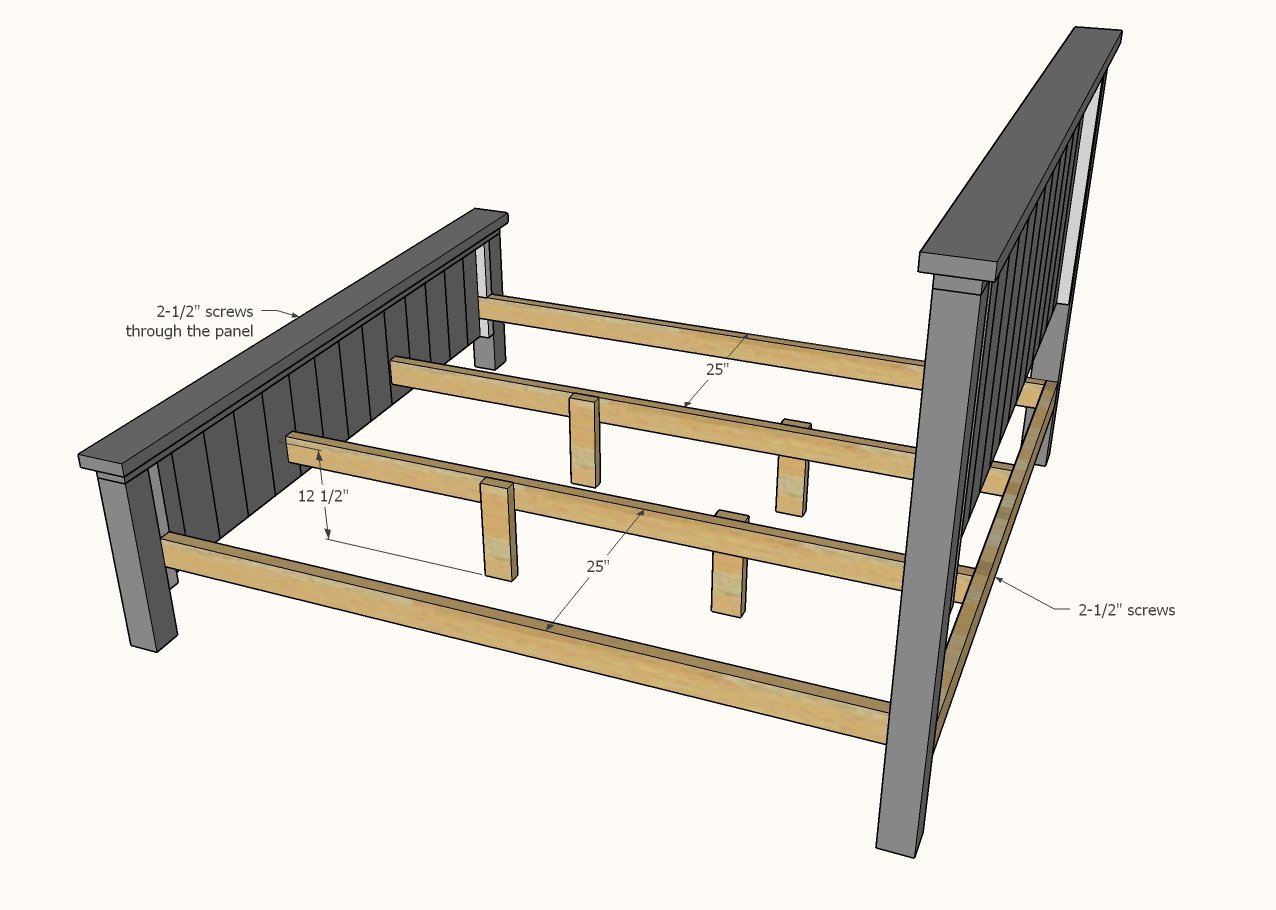
Attach the center legs inside the bed, splitting the spacing by about 1/3
Step 12

Attach siderails to the siderail cleats.
We recommend using brackets to attach siderails at the top to the headboard and footboard.
POCKET HOLE USERS: Drill a pocket hole at the top and attach.
Step 13

Cut slats and lay about 4" apart in the bed.
Screw down with 2-1/2" screws.


Comments
boettg33
Sat, 10/31/2020 - 04:09
Sleep Number Mattress?
Ana
We have an older Sleep Number mattress that has a plastic base. First question is do you know if this bed would work with this mattress? Second question would be if we could eliminate the plastic base by putting down a sheet of some type over the center legs?
Thank you
Jason
boettg33
Sat, 11/07/2020 - 06:42
X-mas Mods
Please let me know about my questions above. If you don't know, I'm going to go ahead with the build and make modifications to suit removing the plastic base of the Sleep Number bed. Most likely I'll put down a thin sheet of product over the legs center legs to support the top mattress.
I'm going to build this for my wife for X-mas. Throughout the build process I am going to document with pictures and comments on Instagram, @zen2185.RI. The build process will not be posted until after X-mas. You will get full credit for the design and I'll put links to the design and your wonderful site.
krista227
Mon, 12/28/2020 - 19:53
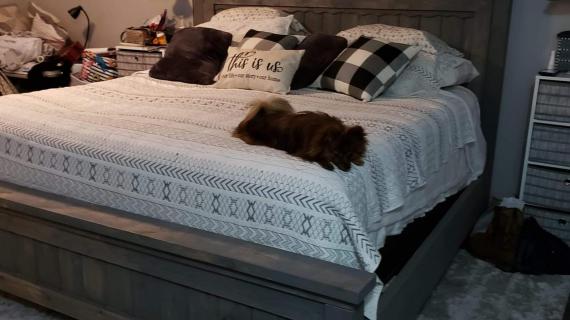
Paint name???
What is the name of the grey paint used???
Jeffml2218
Thu, 12/31/2020 - 11:36
Box spring
What if i want to use my box spring?? Will it still fit?
ajgarner
Mon, 01/18/2021 - 19:54
Stain
What color stain do you use
dlejeune71
Sat, 01/23/2021 - 11:08
Finish on bed?
Do you have the instructions o. How to finish the bed the way you have it. Paint/stain? How do you do this?
RFM
Tue, 01/26/2021 - 09:04
Help!
There are no major disassembly points. Because of that it has to be constructed in the room where it will be used and that is where it stays.
Anyone have a workaround so it can be disassembled and moved like a normal bed?
amberkalvin
Sun, 01/31/2021 - 21:58
I too was curious of the…
I too was curious of the size but that's mainly because I built the headboard and that's it. Bed already had a freestanding frame and we wanted the farmhouse look with our new king bed. I believe I left one of the slats out to make it 5 3/4" narrower and it was perfect.
samfisher329
Sun, 02/14/2021 - 17:41
First build EVER and it was EASY!
Just built this as my FIRST wood project I’ve EVER done. And let me say this plan makes everything incredibly easy. One thing I learned is that having a Brad nailer made life a ton easier. I learned a lot and I can’t even begin to explain how beautiful out bed turned out right in time to surprise my wife for Valentine’s Day!
kenandcath3@ya…
Thu, 04/01/2021 - 18:08
Headboard alone?
What modifications would be needed to build just the headboard ( we don’t need footboard or side rails)...
AdamFink
Thu, 04/15/2021 - 18:46
Metal rail adjustments
So I've noticed when building this bed for others, it's too wide to attach metal rails to. Just curious is their a plan to alter it to fit metal rails? Or do I just split some if the inserts on headboard and footboard to adjust? If so can anyone tell me about how much?
maxbutler93
Sun, 07/11/2021 - 11:23
Please help
Hi, please help.
I would love to build this king sized bed frame. I keep reading comments about how the cut-list and the photos are designed for a king mattress turned 90 degrees (80 in left to right and 76 in head to toe) which I would actually prefer. However, as I'm looking over the plans, it appears that the plans are designed for a king size bed in the standard orientation (80 in head to toe and 76 in left to right.) Have these plans been updated or am I just missing something? Any information would be greatly appreciated! Thank you!
cfoley
Wed, 11/24/2021 - 14:19
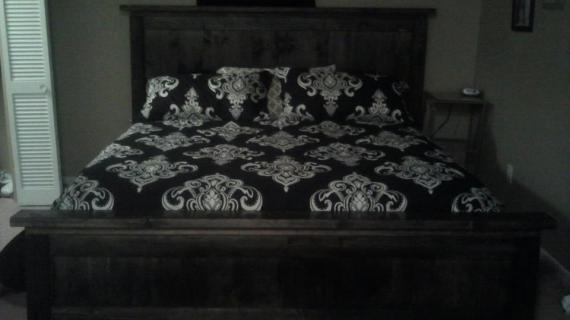
Paint color
Hi Ana,
I was wondering if you remember what type of paint and the color you used for the black version of this bed?
steveb5004
Mon, 01/03/2022 - 08:06
Love it, but made a couple modifications
I just finished building this bed and my wife and I absolutely love it. Thanks for providing the plans. I did just a few minor additional things that gave me a little more peace of mind:
-I made the temporary siderail cleats permanent by screwing them to the headboard posts. That should eliminate any chance of the siderails or the headboard tie-in board ever falling off. The cleats will never be seen and I was able to use scraps.
-I added a horizontal support underneath the two mattress supports in the middle of the bed (the two with legs attached to them) where they screw into the footboard. I just used a 2x2 that I screwed and glued to the backside of the footboard. Just like the siderail cleats, it is completely hidden, will make the bed stronger and I was able to use scraps.
-on those same two mattress supports in the middle of the bed, I connected the bottom of the feet with a board that sits on the floor. I think that will eliminate any chance of the support legs "curling" and not touching the ground.
Thanks again for posting. We love the bed and it was a fun build.
4myfurniture
Thu, 01/06/2022 - 10:34
Ana, I have built the…
Ana,
I have built the farmhouse king size headboard twice and each time it comes out wider than 76 1/2 inches wide. The lumber I use is the sizes that you recommend the 1x6's are actually 5 1/2" wide. I was wondering if I get one of the mod adapter headboard plates to add to the bedframe would that work? The bedframe is exactly 76 1/2" wide. The headboard is 84" wide from post to post.
Thanks,
Julie in Alabama
WaldoHdz
Sun, 02/06/2022 - 12:47
Is it possible to use a…
Is it possible to use a finish nail 16 gauge instead of the 18 gauge?
thurmesw
Sun, 02/13/2022 - 18:50
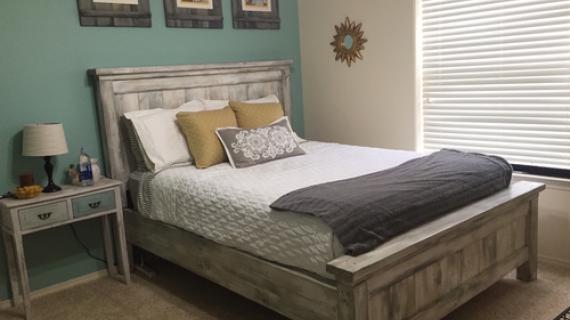
Color
Do you by chance have the color you used for the teal bed
Texan59
Sat, 04/02/2022 - 17:28
Farmhouse king bed frame!
Started working on this kind size bed a few days ago. Lumber prices be damned! Wife has wanted this every since she laid eyes on your first pictures. So far so good all cuts and measurement are spot on. I did make one change, I went with 1x8 T&G instead of the 1x6 T&G. 12 pieces put it right at 78 inches removed one tongue and it was right on. Like the width better. My plan for a finish is a classic white washed.