Community Brag Posts

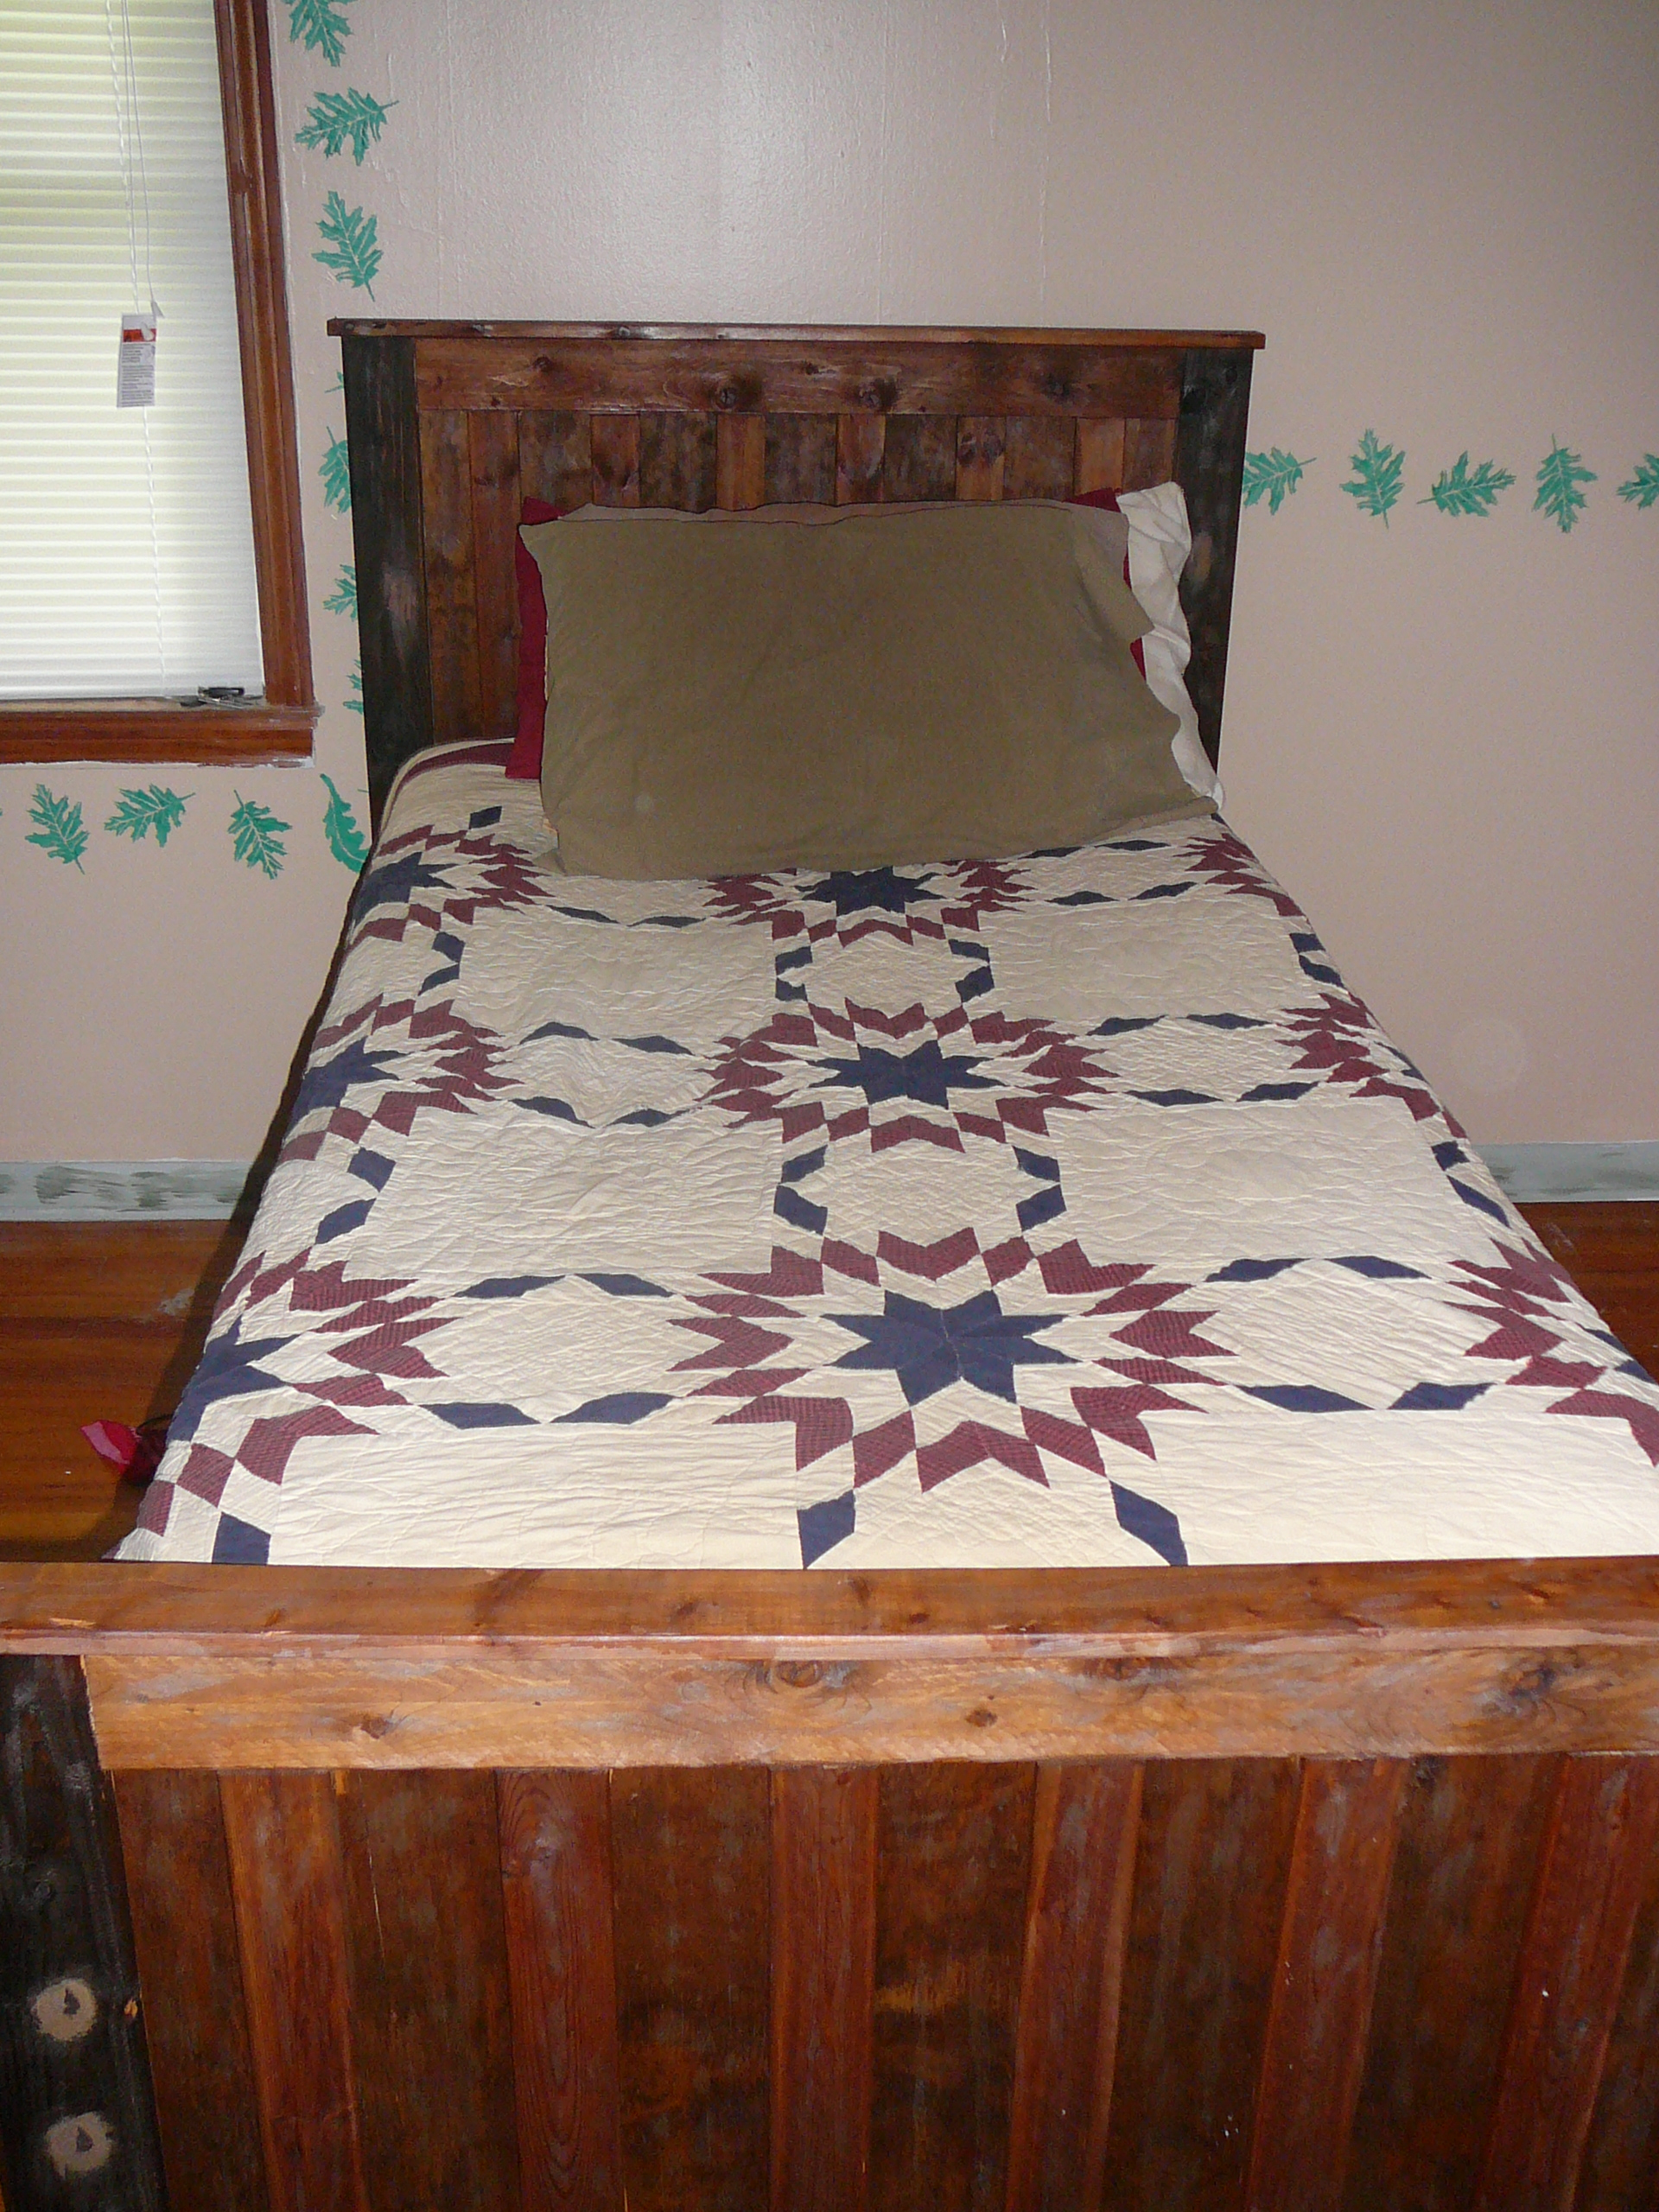
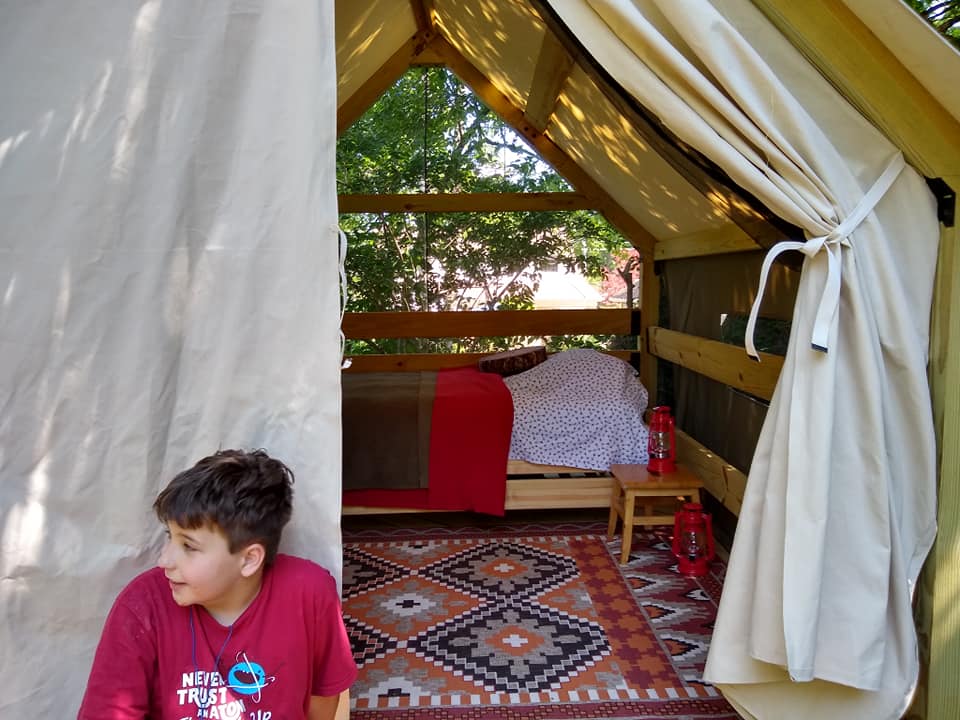
Outdoor Cedar Day Bed

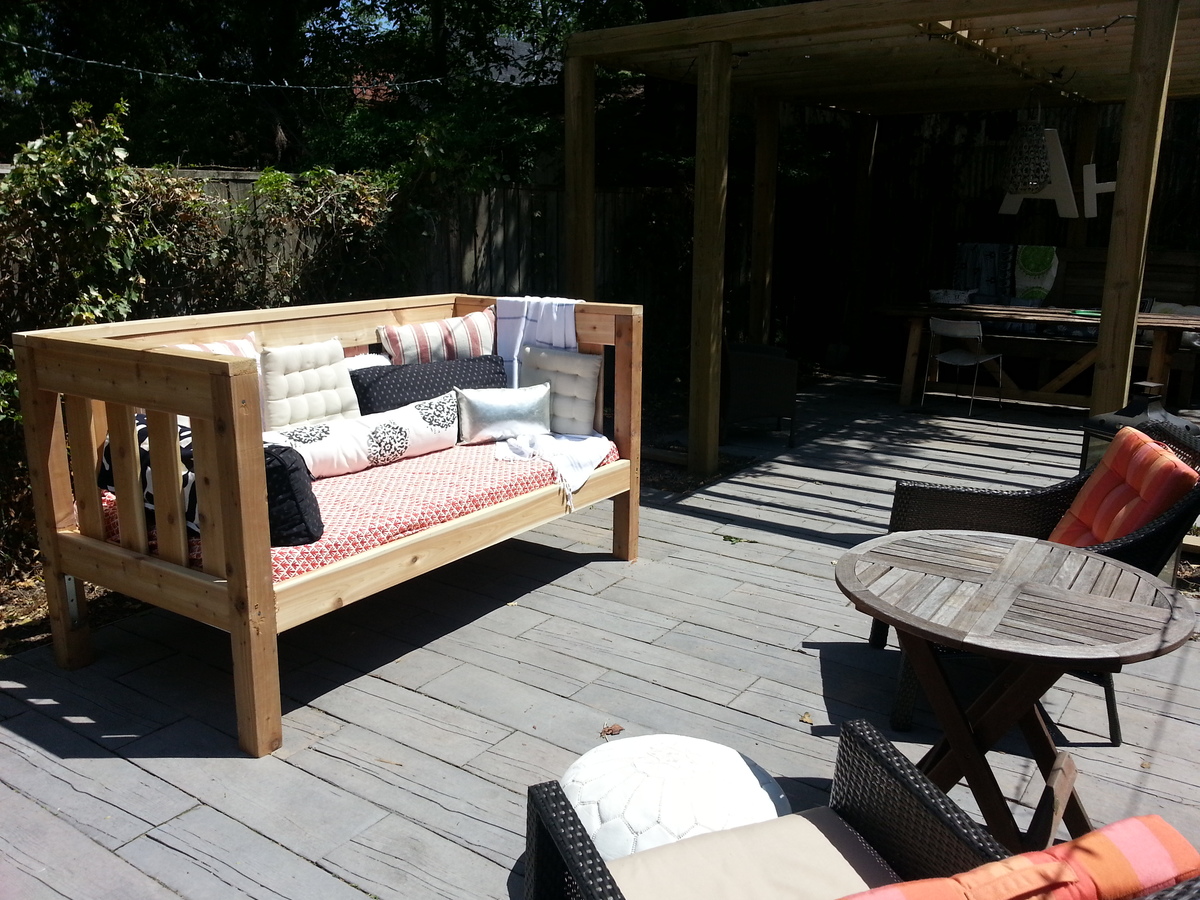
Modified from the plans for the simple day bed - link - http://ana-white.com/2009/12/plans-simple-daybed.html

Another visit from my friend Lisa and her miter saw - this time we were joined by my daughter Claudia. We changed the height of your indoor day bed from 31" posts to 44" posts in order to have enough height for people to lean back.

We used cedar so this can be left outside year round (I'm in Toronto, Canada). The lightweight foam single mattress can easily be removed.

Thanks for the plans!

Estimated Cost
@$350.
Estimated Time Investment
Afternoon Project (3-6 Hours)
Finish Used
none
Recommended Skill Level
Beginner

Rustic Console

Submitted by Anonymous (not verified) on Sun, 08/28/2016 - 16:58

My first project.

Built from Plan(s)
Estimated Time Investment
Week Long Project (20 Hours or More)
Finish Used
Dark Walnut
Recommended Skill Level
Starter Project

Kentwood bed

Submitted by Christine on Mon, 08/06/2012 - 09:42

These are the first pieces of furniture I have ever built. The first bed was a project for my daughter and me only, but we let the guys help on the second bed. I copied the finish described by the blog. Everyone was real doubtful that it would work, but it turned out great. My sons love their new beds!

Built from Plan(s)
Estimated Cost
$135.00 for 2 beds
Estimated Time Investment
Weekend Project (10-20 Hours)
Finish Used
breakfast tea and a solution of vinegar and steel wool. Tear up the steel wool and cover with vinegar. Place a lid on your container and put it in storage while you build the bed. It will need 2 or 3 days to sit before it is ready to be used.
Recommended Skill Level
Beginner

Large Modified Outdoor Cedar Table

Submitted by pbmahaffey on Wed, 08/08/2012 - 16:05

We finished the deck this summer and wanted a large table to put on it. I saw the different versions of the outdoor Ana built. This one seats eight and has a tile inlay. For now...chairs from Walmart provide seating.

Estimated Cost
$300
Estimated Time Investment
Weekend Project (10-20 Hours)
Finish Used
Behr Semi-Transparent Stain
Recommended Skill Level
Intermediate

Comments

Entry Console

Submitted by Anonymous (not verified) on Sun, 09/04/2016 - 10:52

I liked the look of the spacers on the bottom shelf, but decided to leave them out since I just wanted to be done with this project :) I modified the plans to only have one shelf, as well as feet on the bottom (instead of having the piece go completely to the floor). As a result of adding the feet, the bottom is framed with 1x2s instead of 1x4s. I needed to purchase 6 1x2s to do that (but only needed 3 1x4s). I attempted to miter the cuts on those pieces...wood filler came to the rescue in the end. This was a lot of fun to make!

Estimated Cost
Approximately $200
Estimated Time Investment
Weekend Project (10-20 Hours)
Finish Used
Varathane Early American. Brush on one coat, let sit for 5 minutes, then wipe off excess and blend together for an even finish. Follow with 3 coats of poly (I used Miniwax water-based satin finish), sanding between each coat.
Recommended Skill Level
Intermediate

Beginner Farm House Table

Submitted by Anonymous (not verified) on Tue, 06/16/2020 - 06:15

We made a 6'ft version of the beginner plans. We initially made the table 1" higher than the plans originally called for so that there'd be more room under the apron but that turned out to be just too high to comfortably dine at, so at the end of the project I shaved off an inch on each of the legs.

Some issues we had with this table is Pine is rather easy to warp and during the staining and poly process 3 of the top boards warped too heavily for the table maintain a fat surface. I ended up buy 3 new 2x6's and doing the sanding staining process all over again. We also modded the plans so have a notch to fit the bottom cross beam in. This was our first wood working project ever it turned out really nice. We used the Dutch oil, Dark Walnut on the pine for anyone interested.

I'm giving a high estimate on both time and money due to mess ups and just being completely and utterly new at this stuff.

Estimated Cost
200
Estimated Time Investment
Week Long Project (20 Hours or More)
Finish Used
Dutch wood oil - Dark Walnut
3 layers of Polyurethane
Recommended Skill Level
Starter Project

Two Toy Boxes from Plywood

Submitted by cat34c2000 on Sat, 08/11/2012 - 22:04

I am in process of making these for my new twin nephews. By reducing the width of the toy box by 1/2", I was able to fit two of the open top toy boxes on one sheet of cabinet grade plywood ($30).

For Two Toy Boxes cut plywood to the following dimensions (see photo for layout):

2 - 32 x 15 1/2 pieces (bottoms)
4 - 33 1/2 x 15 1/2 (front and back)
4 - 15 1/2 x 15 1/2 (sides)

My local Home Depot does not charge for cutting the plywood and the person that was assisting me made absolutely perfect cuts and helped direct me to the cabinet grade plywood (which was located away from the plywood aisle), thus saving me an extra $15.

Boxes took approximately 2-3 hours each to build, another hour to sand and fill screw holes, and several hours to paint.

Photo is of Dexter's toy box. Dante's looks very similar. My 2 year old niece enjoyed taking a nap inside of the boxes as well.

Make sure to purchase non-toxic paint.... I believe one of my nephews may be part beaver!

Built from Plan(s)
Estimated Cost
less than $20 each + Paint
Estimated Time Investment
Weekend Project (10-20 Hours)
Finish Used
Sherwin Williams Paint in a chocolate brown for the outside of the box. Inside was leftover paint from another project. Lettering paint was off the mis-mixed shelf at home depot.
Recommended Skill Level
Beginner

Taylors Coffee Table

I've made several of Ana's pieces, but this is my first brag post.

I actually made this for one of my husband's co-workers, but now I want to make one for myself.

I don't know the actual amount of hours it took, but like any project, the sanding was the most tedious part!

This one was built with 4 2x6, and 2 2x4 boards on top, as the friend wanted it a little wider than the original plan. I modified the other dimensions accordingly.

The wheels used in the Shanty2Chic build post were too large for my 4x4 posts. The wheel plates were too wide. They measured about 3.75" and my 4x4's were only 3.5". Also, speaking of the 4x4's, I used untreated Douglas Fir, purchased from my local Lowes. I typically shop at Home Depot, but they did not carry any untreated 4x4's.

The wheels I used were the same style by Everbilt, but the next size down, the 2" wheels. However, their overall height was 3", and so the height of the table ended up being perfect anyhow!

I finished the table in Minwax English Chestnut and used the Minwax rub on satin polyurethane.

I put the time as a week long, primarily because of sanding and finishing. But, I think that if you devoted your time to it, you could do it in a weekend.

OH! Also, Ana doesn't mention it in the plans, but the Shanty Chics do... put the plywood shelf in BEFORE adding the second side. I had to remove pieces which were already glued, and it made that step a bit annoying!

Otherwise, all was well. Enjoy!

Built from Plan(s)
Estimated Time Investment
Week Long Project (20 Hours or More)
Finish Used
Minwax English Chestnut stain
Minwax Rub On polyurethane Satin finish
Recommended Skill Level
Intermediate

Coat Rack

I built this coat rack a couple of years ago for our house when our little girl ripped the one we had out of the wall trying to get her coat off the hook lol. I was actually able to reuse the hooks from the cheap little coat rack that we had bought from the home store. It attached into the wall using drywall anchors so it wasn’t all that secure to begin with. I set out to make one that would look a lot nicer and have some room for storage. The design I came up with works great for  storing all our coats and hats, but also the cubby storage at the top is great for storing keys and gloves and whatever else you may need to store.

Estimated Cost
$150
Recommended Skill Level
Intermediate

Cabana turned Galmper

Submitted by JeannaF on Wed, 06/17/2020 - 19:16

I stumbled across the Cabana design and just fell in love.
Once I decided I was making in tough, I needed to customize it a bit to meet our needs.
1. Needed to be able to sleep in it (so Mosquito proof)
2. If I am sleeping in it I want
a. Privacy
b. Possible rain protection ( I like a dry bed)
3.Need to be able to have a guest

So, We made it a bit larger 9x10
Added screens all around and under floor boards, Zipper entrance in front.
Made Canvas side panels (attach with velcro)
Made front and back canvas panels/doorways.
Chose two stacking twin beds that can be snapped together for a couple or left apart for two guests.

Just for fun, we used timber framing ties (Simpson Strong) instead of the joist hangers and end caps...this gives is big beefy bolt heads and black metal straps across the beams. They do the same thing but give it a more rugged look.

My 12 year old has slept in it for two weeks already and plans to not come in until the snows come this winter!

Thanks so much for the great inspiration and general plan to get us started.

Built from Plan(s)
Estimated Cost
$300 for all the Tent Canvas and about $500 in other materials.
Estimated Time Investment
Week Long Project (20 Hours or More)
Finish Used
Canvas
Recommended Skill Level
Advanced

Mobile Workbench with Drawers

Submitted by Anonymous (not verified) on Fri, 03/22/2024 - 08:08

I recently had a workshop built and I have been trying to now work on the furniture for it. My first project was this workbench inspired by the plans "garage workshop workbench". I added drawers on each side and will probably end up adding a shelf in the open area as well after letting my kids finish decorating the top. It's already a nice addition and I may build a smaller version for my garage. I added casters and have the option to roll the table around or have it stationary.

Tonie

raised garden bed

Submitted by abbpim on Wed, 08/15/2012 - 10:13

I built this a couple months ago and I'm finally getting around to posting a brag post. This is the second woodworking project I've ever done and my first year gardening! I almost spent over a hundred dollars on one of these raised garden beds and then I saw Ana White's plans and I am so grateful! Hopefully my tomatoes will be ripe soon, but one thing is for sure... this raised garden bed paid for itself with the amount of veggies I'm getting from it! I have big gardening plans for next year! Sorry my second pic is sideways... can't figure it out!

Estimated Cost
$20
Estimated Time Investment
Afternoon Project (3-6 Hours)
Finish Used
none... I've heard finish chemicals can seep through into the plant roots and then into the veggies.
Recommended Skill Level
Starter Project

Wedding Gift for my Brother

Submitted by mkwsrt4 on Thu, 06/05/2014 - 03:03

This is the 2nd Rustic X Coffee table I built. This I built as a wedding gift for my Brother and His wife. Instead of the X posts on the ends I opted for a column design on the end. It was actually a little more time consuming but I think it looks great.

Built from Plan(s)
Estimated Time Investment
Weekend Project (10-20 Hours)
Finish Used
I sanded the table and used a coat of pre-stain. I then used a light stain, and I applied 2 coats. I used two coats of polyurethane sanding after the first coat.
Recommended Skill Level
Beginner

Modern Storage Benches

I built these modern storage benches for some friends of ours. They needed some space to store their little girls toys. They planned to use some wicker baskets they had. I took the measurements for the baskets and built the storage spaces around it. 

Estimated Time Investment
Week Long Project (20 Hours or More)
Recommended Skill Level
Intermediate

Modern Loveseat with Slight Modification

Thanks so much for this plan. I modified it slightly by using 2x6 For the arms so I could cut out a hole for a glass or bottle. I also added an additional 2x4 underneath to keep the glass from falling through.

I spent a lot of time sanding and putting the first finishing coat on each piece prior to assembly to make final finishing easier. Extended elapsed time but I think it made actual time shorter.

Estimated Cost
$150
Estimated Time Investment
Week Long Project (20 Hours or More)
Finish Used
Coat 1: 70% Teak Oil 30% Cabot Gold Sunlit Walnut
Coat 2: Cabot Gold Sunlit Walnut
Recommended Skill Level
Intermediate
Back