Community Brag Posts
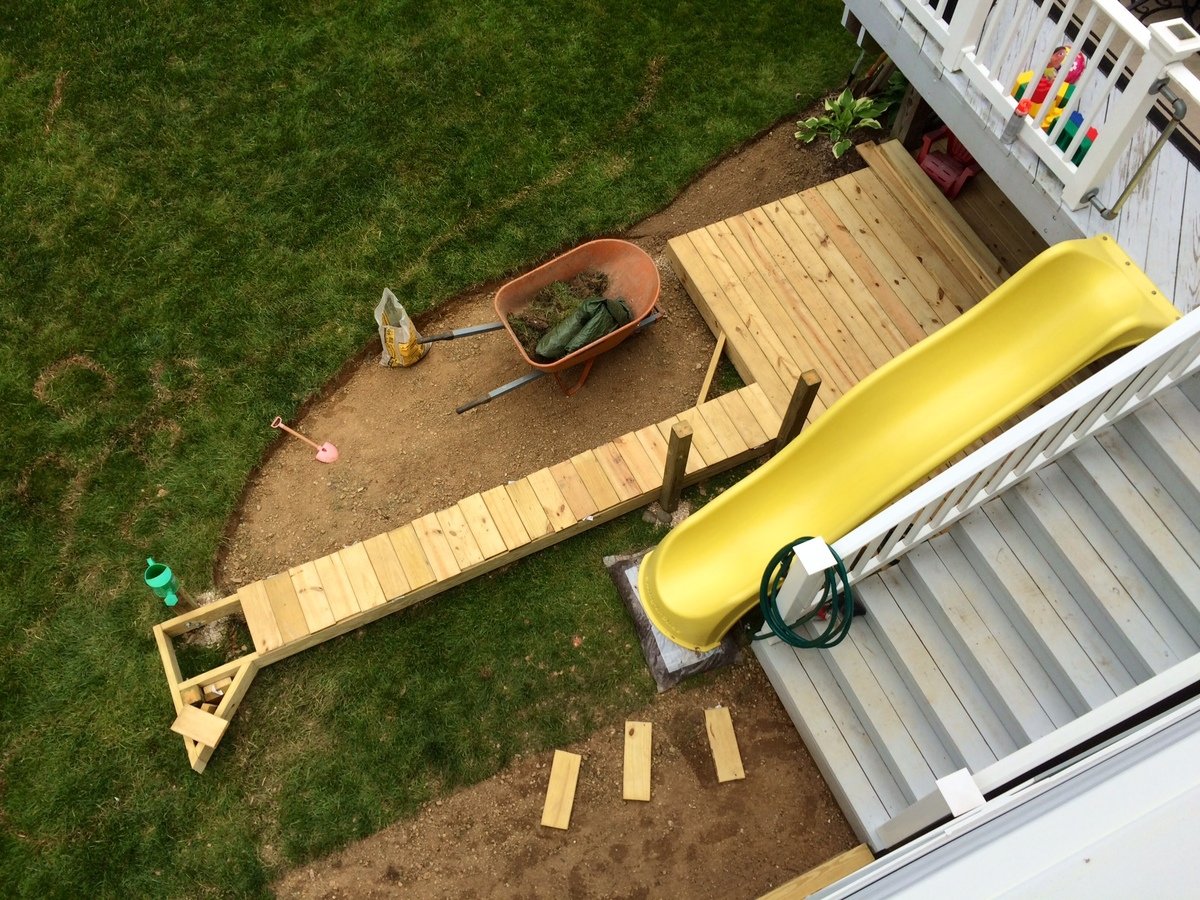
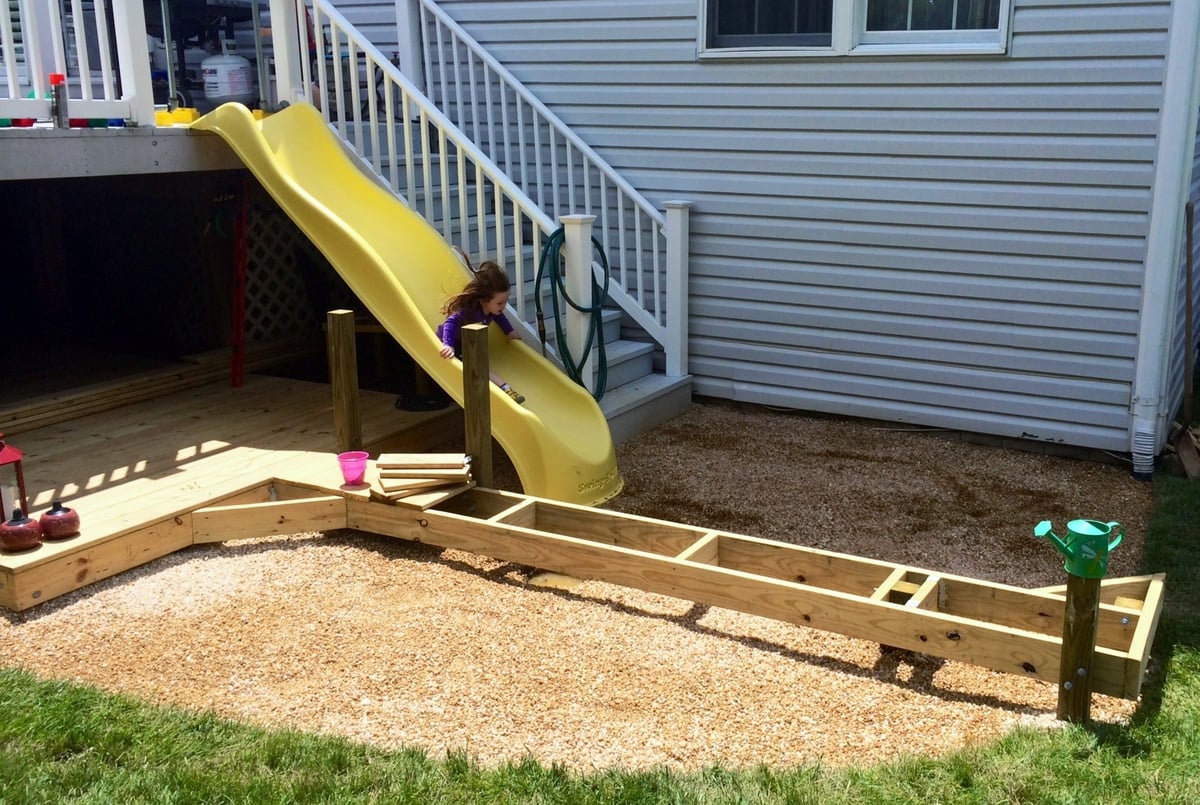
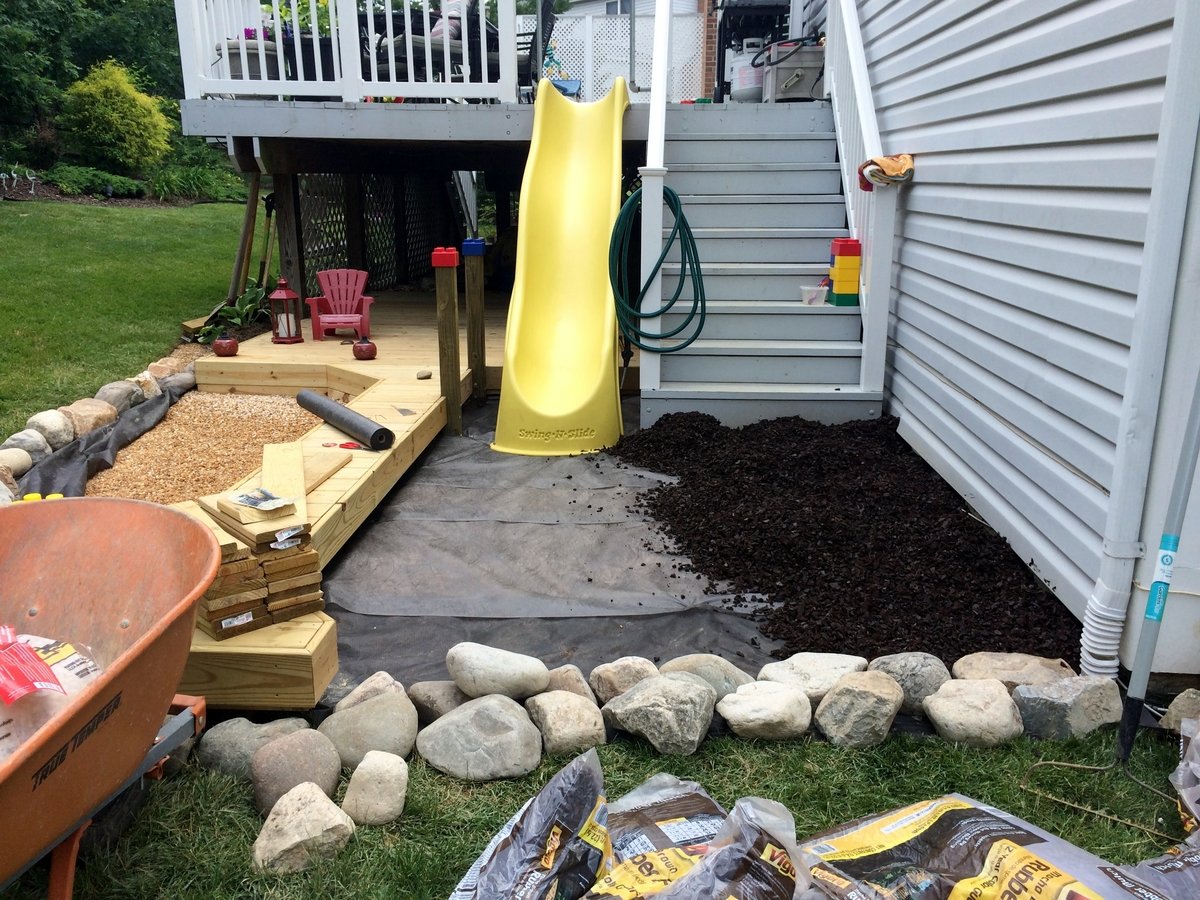
Backyard Bliss!
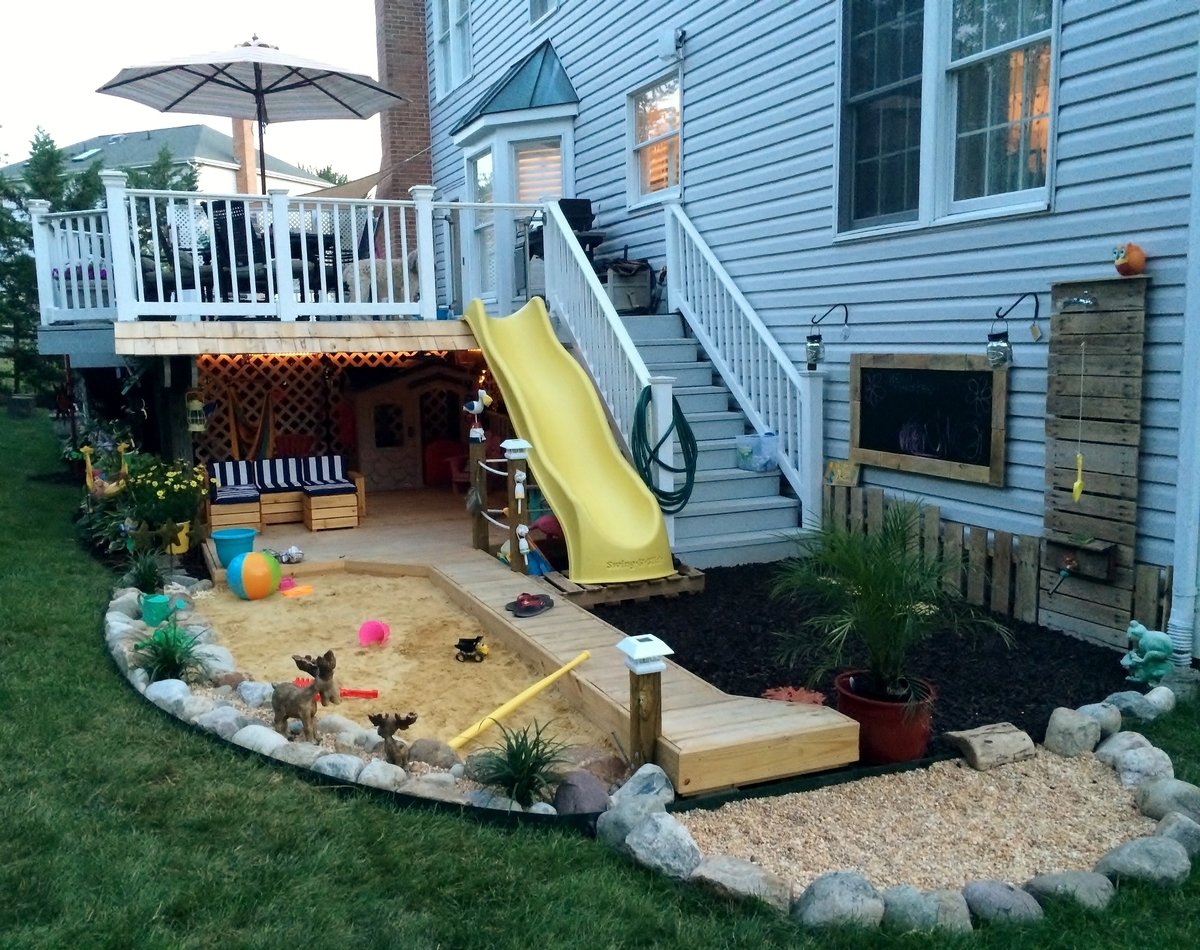
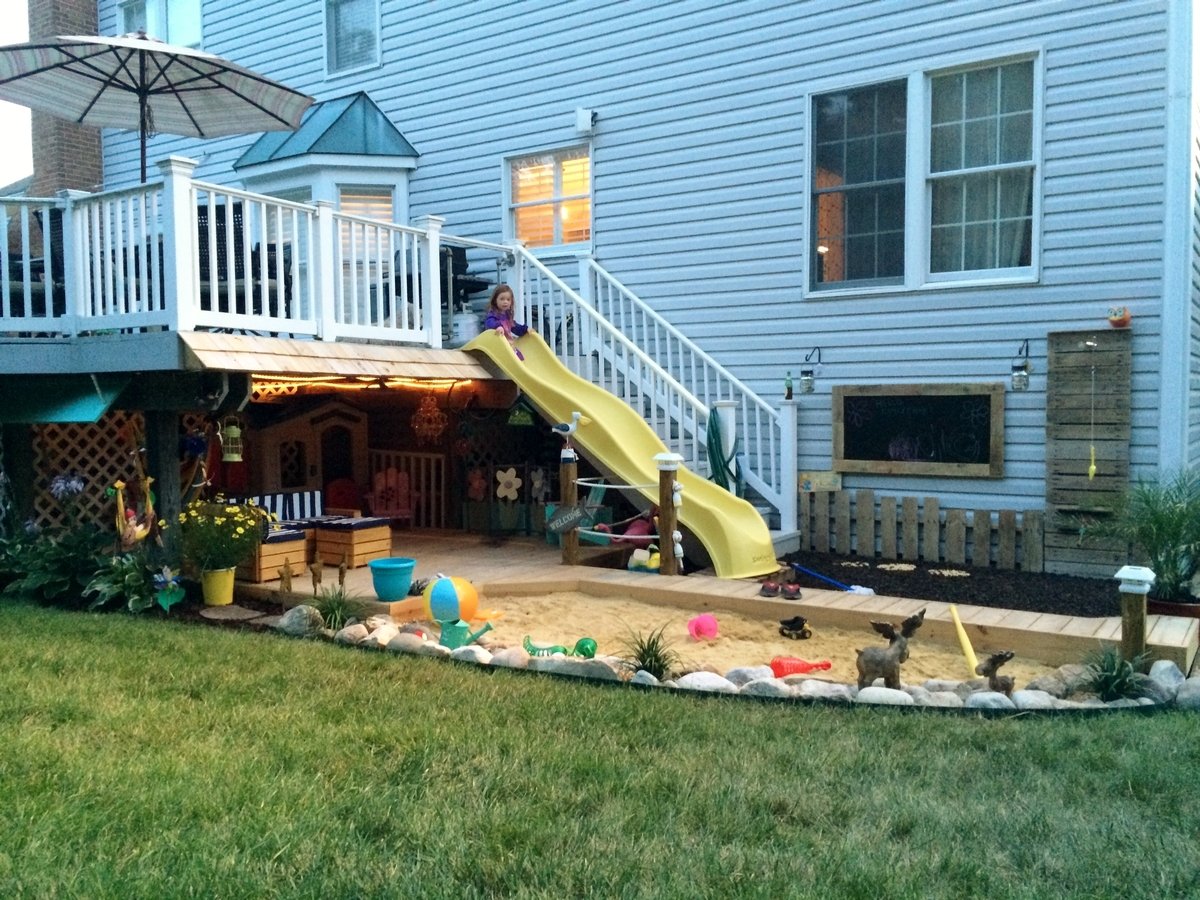
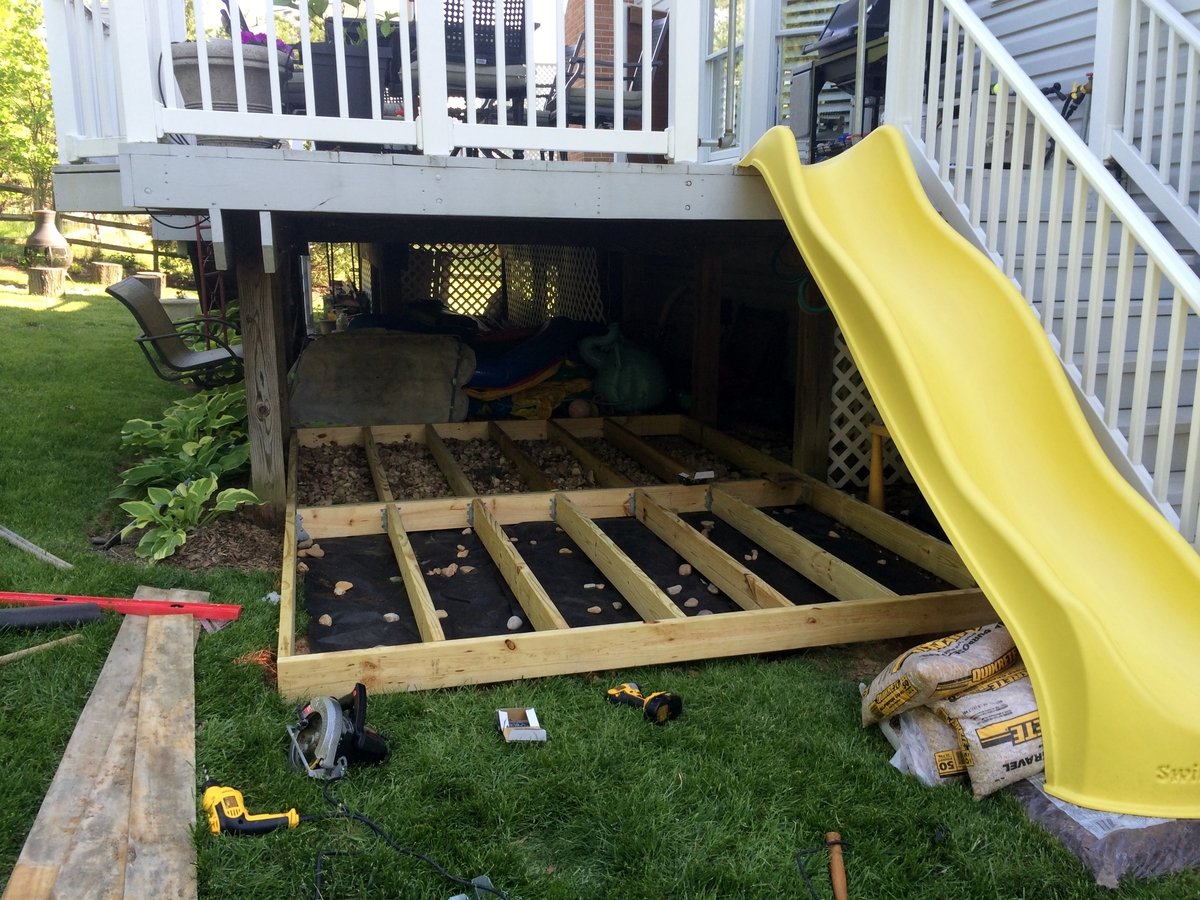
I built this outdoor play area for my kids this past summer. The area under that portion of the deck was always messy and muddy and so I wanted to make use of it. I built the deck and anchored it with lag bolts to the deck supports. On the one side I used rubber mulch and on the other there is play sand. I dug holes in various locations and filled with gravel to allow for drainage under the sand and mulch. For the awning I used plain cedar shingles. I added a shower that is just regular 1/2" metal pipe with a hose adaptor. The shower wall and fence are just old pallets that I had for a while, cut to size, which was pretty much random but they came out great. I added a misting system under the awning that works great, the kids love the cool mist on the hot days. Overall, a heavy job ripping up the grass, moving the wood, gravel, stones, sand and mulch, but a fun deck build and even better experience doing this with my kids by my side!
Estimated Time Investment
Week Long Project (20 Hours or More)
Recommended Skill Level
Intermediate
Comments
Tue, 01/13/2015 - 09:37
What an amazing use for a
What an amazing use for a weird outdoor space ! You are genius !
Wed, 01/14/2015 - 06:21
Just. Plain. Awesome.
I love it! I'm now trying to convince my husband to let me add a slide to the deck. Who wouldn't love that?!

Modern Dorm Mini Refrigerator Microwave Cabinet
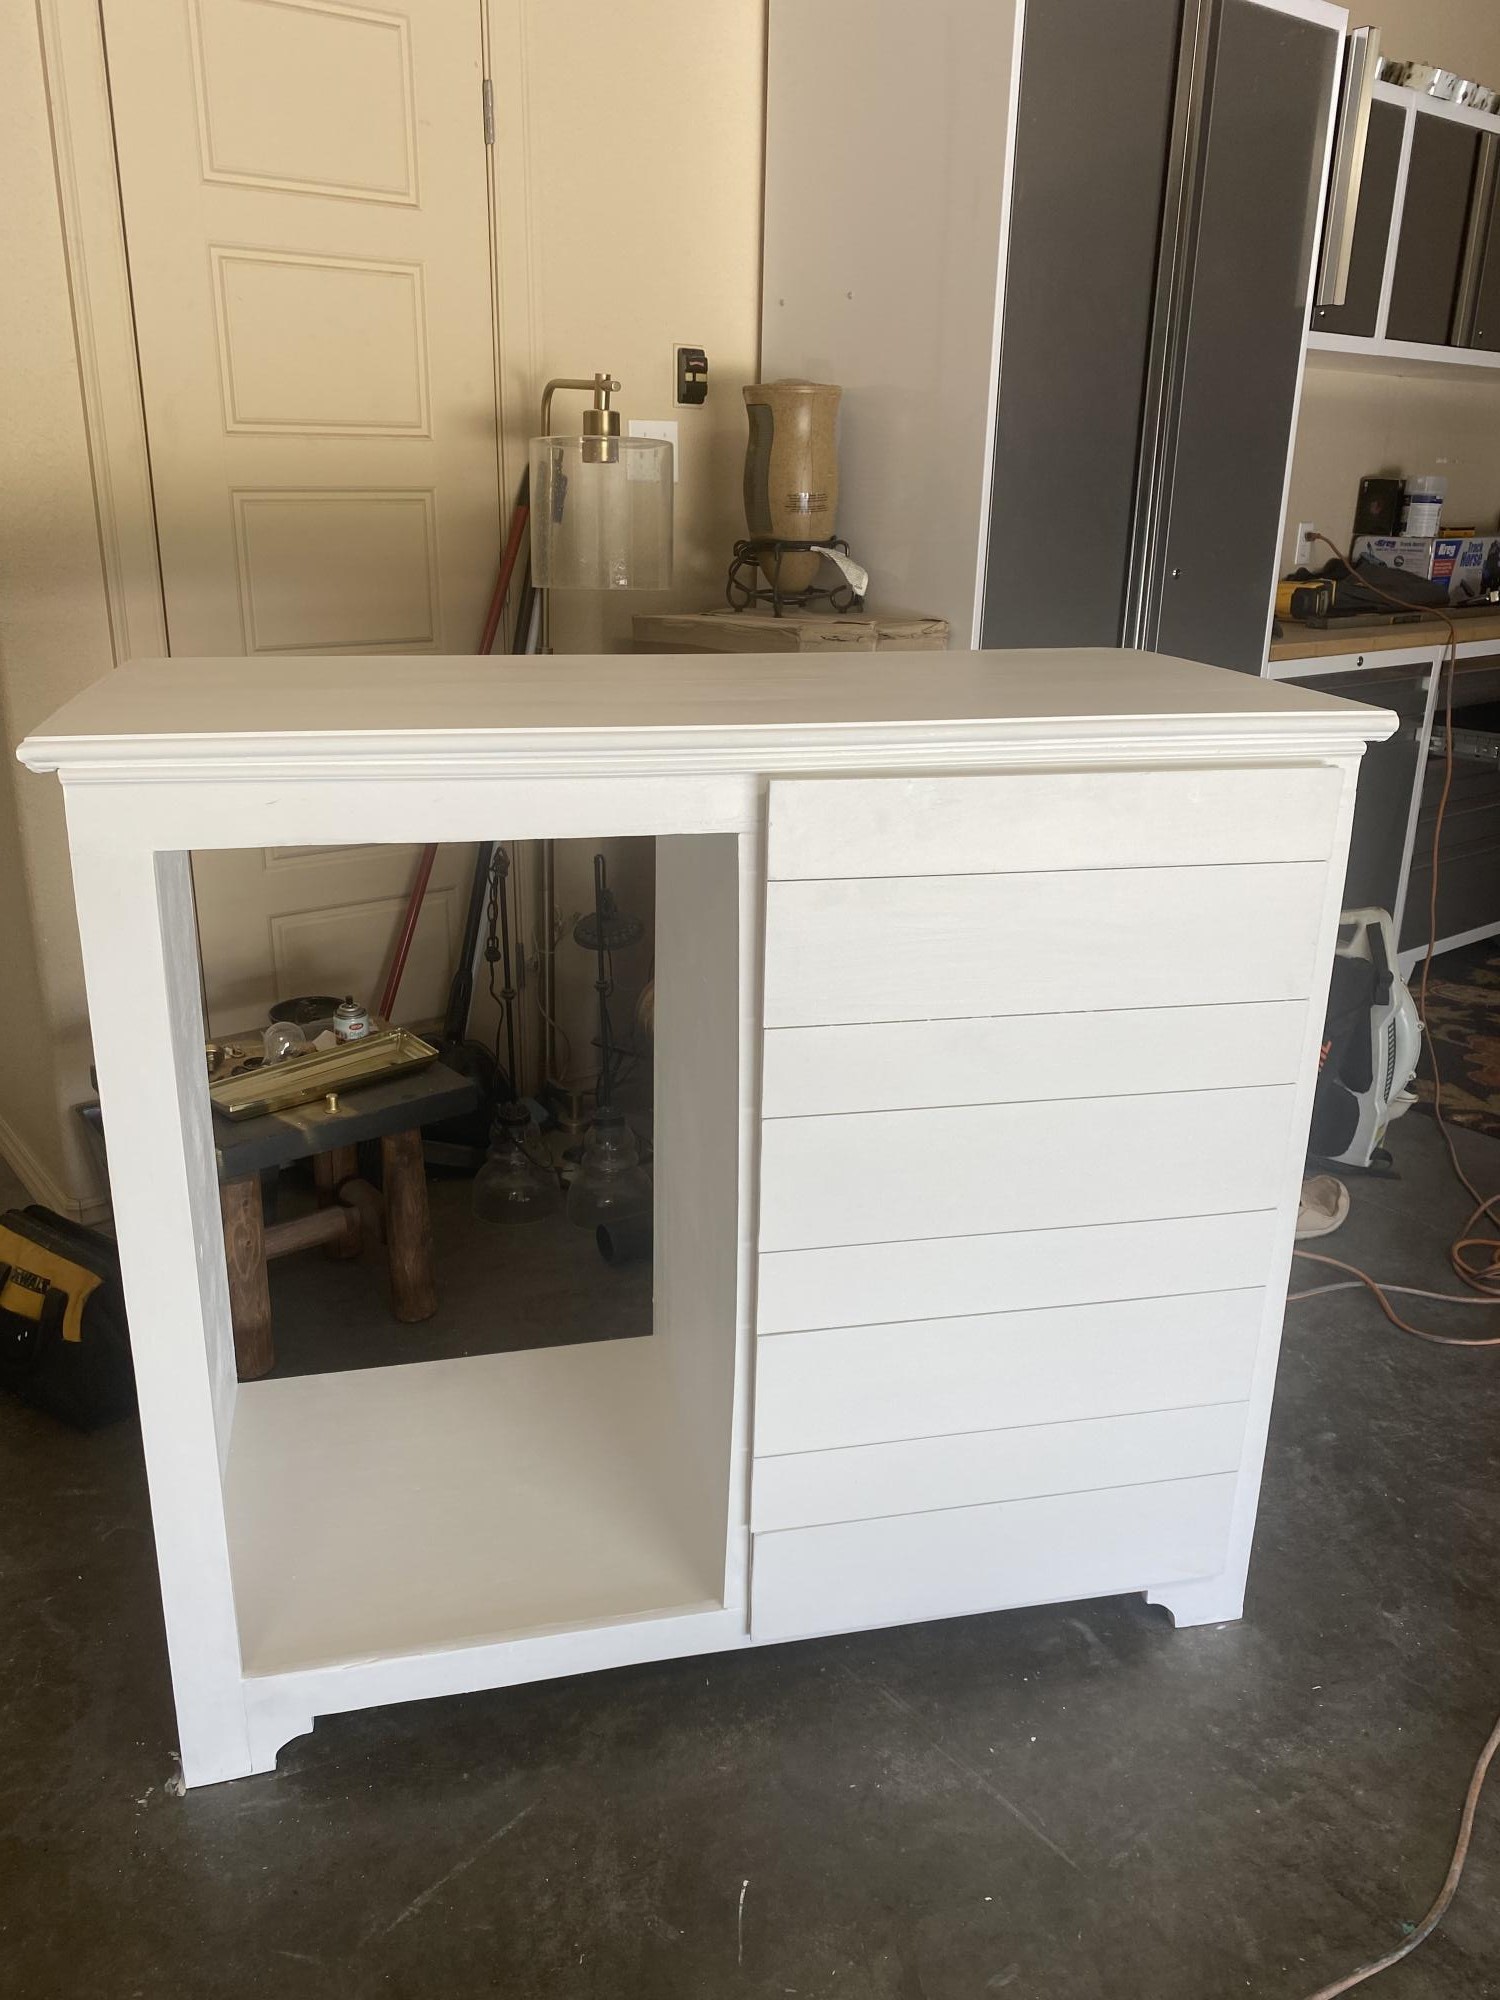
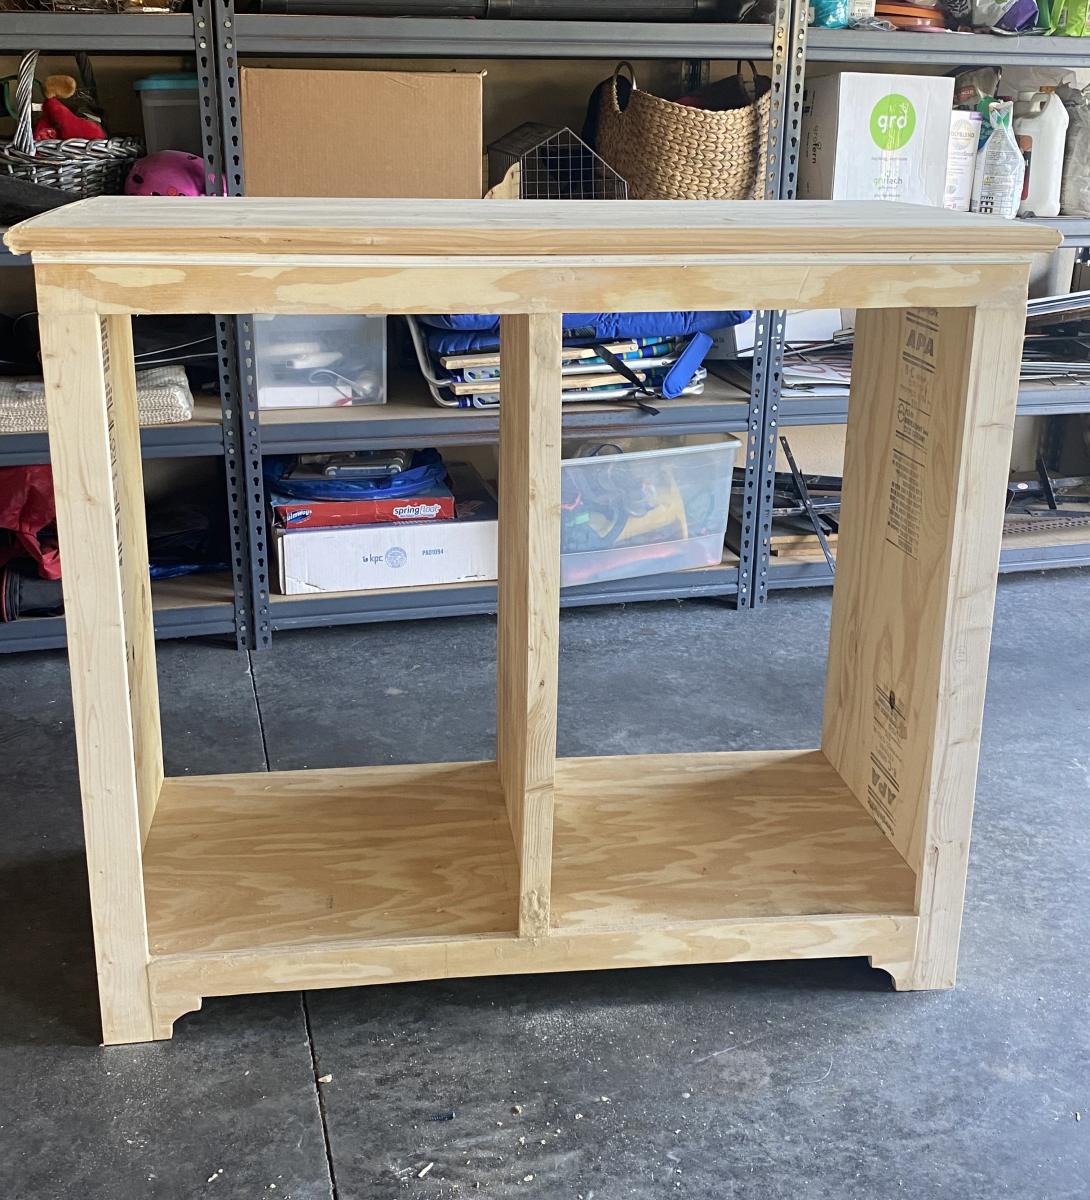
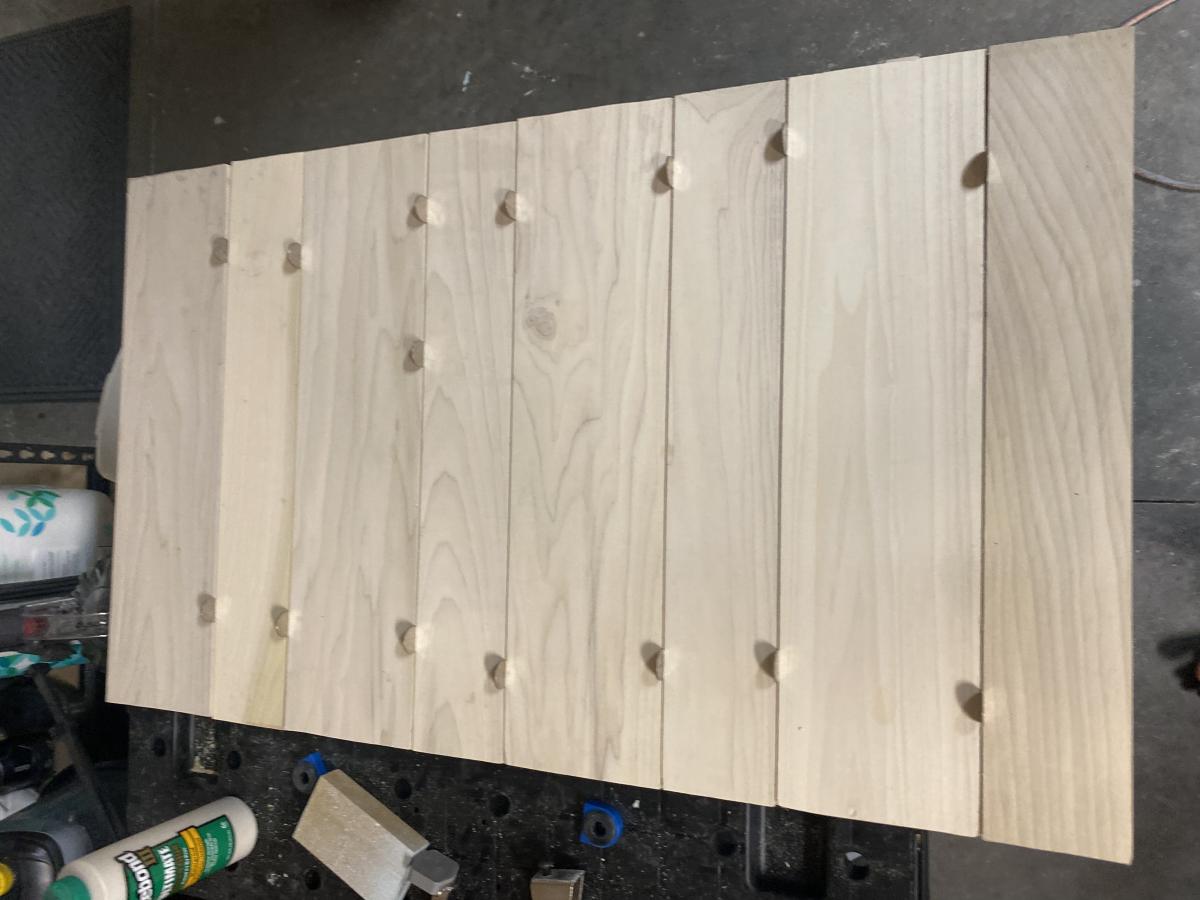
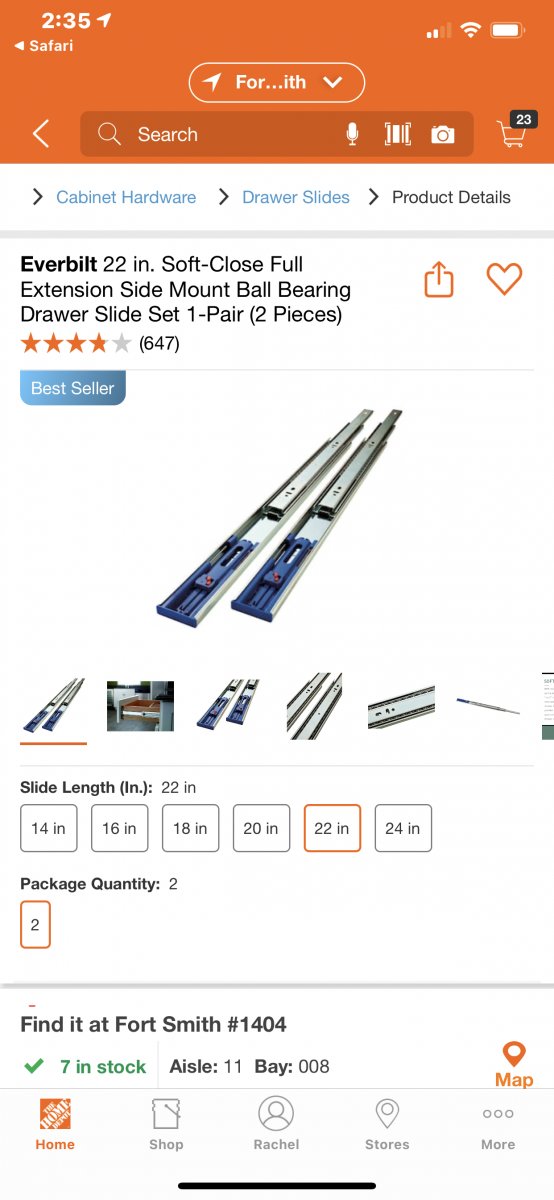
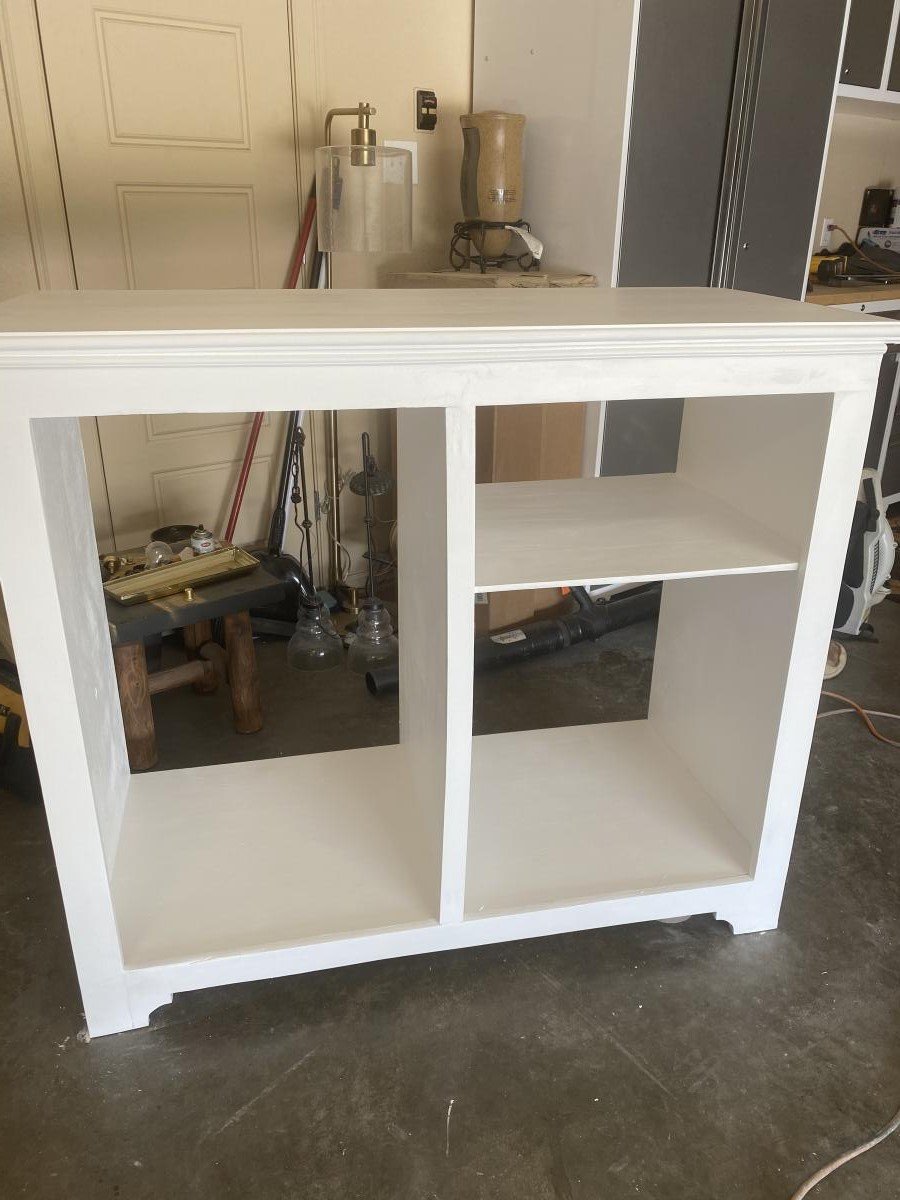
I changed plan to make deeper. I also modified the bottom trim and top. I put a ball bearing soft door drawer guide on modern door so it can slide back and forth. I feel we need more modern plans on here but with a bit of creativity and using plans you can make anything. I have never built anything before. I love General Finishes Milk Paint in Snow White and I brushed rolled it on (sanded between 3 coats). It’s basically self leveling and leaves a nice matte finish. Used door glide in picture bought from homedepot in the 24 inch and that’s how wide door was and it was 36” tall. Door glide I only used one on top of the door not on bottom as well. Door piece of fiberboard with just strips glued on and quarters spacing them correct.
Built from Plan(s)
Estimated Cost
$200
Estimated Time Investment
Weekend Project (10-20 Hours)
Finish Used
Dorm mini refrigerator microwave cabinet
Recommended Skill Level
Starter Project
Comments
Chicken Coop with Run
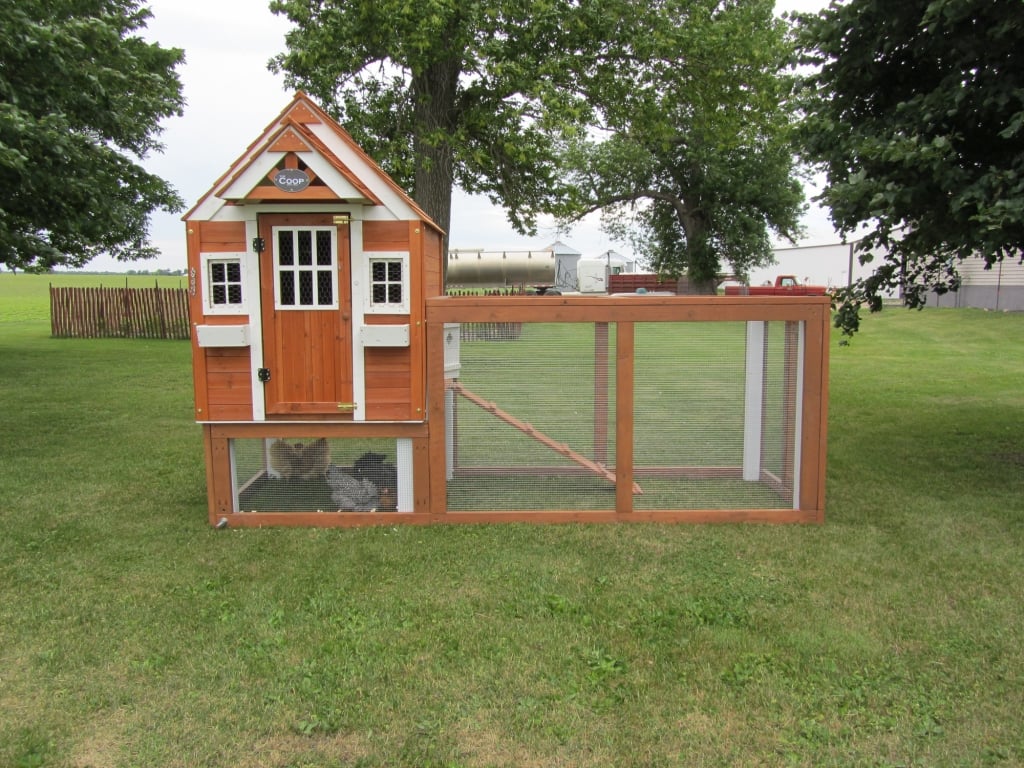
My husband and I live on a small hobby farm and are growing/raising a lot of our own food. We decided to venture into working with chickens. We wanted to start out small so we got 6 chickens and needed a home for them. We found a kids play house one day while shopping and got the idea of modifying it into a chicken coop with a run. We took off with this idea and with quite a bit of modification and some extra building materials we were able to raise it up in the air and attach a run so our chickens would have a nice home to protect them from preditors and the emements and not to mention one that looks good in our yard!
Built from Plan(s)
Estimated Time Investment
Weekend Project (10-20 Hours)
Finish Used
Cedar deck stain and white outdoor house paint
Recommended Skill Level
Beginner
Comments

In reply to OMG! by benfoldsfivealive
Wed, 05/27/2015 - 18:42
Building chicken coop doesn't
Building chicken coop doesn't have to be expensive. Just get the easy-to-follow plan from this:
http://bit.ly/how-to-build-cheap-chicken-coop
Fri, 06/17/2011 - 21:26
Looks awesome! I just spent
Looks awesome! I just spent the evening building a coop for 4 hens of my own!
Tue, 02/21/2012 - 19:08
Fab little coop!
Are the plans available? I have Black Copper Marans and Lavender Ameraucanas and I really need to separate the LAs from the BCMs and this would be perfect!
Sun, 02/26/2012 - 18:00
Where are the plans?
When I click the link to get the plans for the standard coop, they are not there. Do you know where I can find the original plans? Thanks.
Tue, 02/28/2012 - 10:20
Yes - would love the plans
Yes - would love the plans please!!!
It's gorgeous - great job!
Sat, 06/02/2012 - 15:22
No Plans.....
Sorry guys there are no plans for this coop. My husband and i just "winged it" and built it without any plans.
It is a play house that we found at Mills Fleet Farm and we modified it to make it a chicken coop. We put together the play house based on instructions from the box (with a few of our own modifications to make the window on the ground etc.) added some chicken wire to the doors and bay window, added some 4x4 "stilts" and a floor to get the house in the air, and constructed a frame around it with 2x4's and wire fencing to make the run
Sorry I dont have any plans to give you guys!
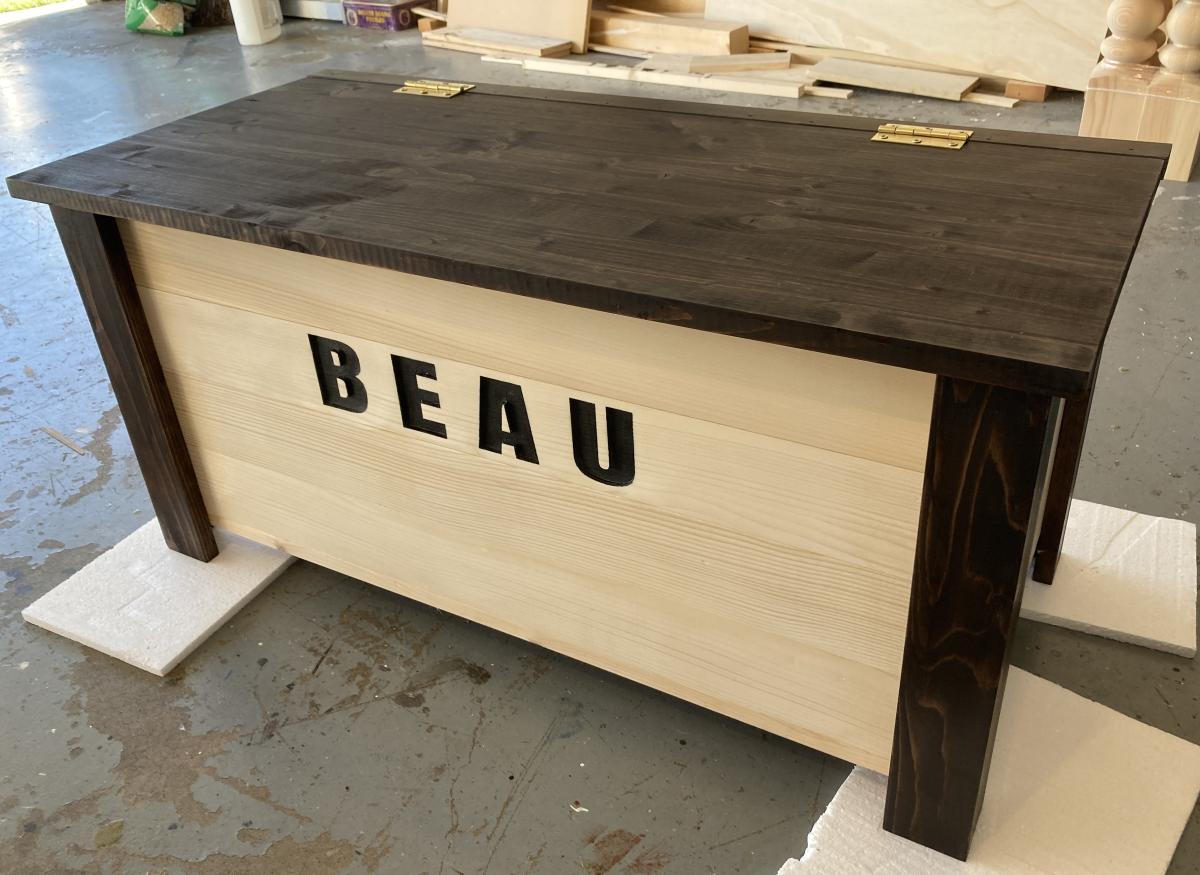
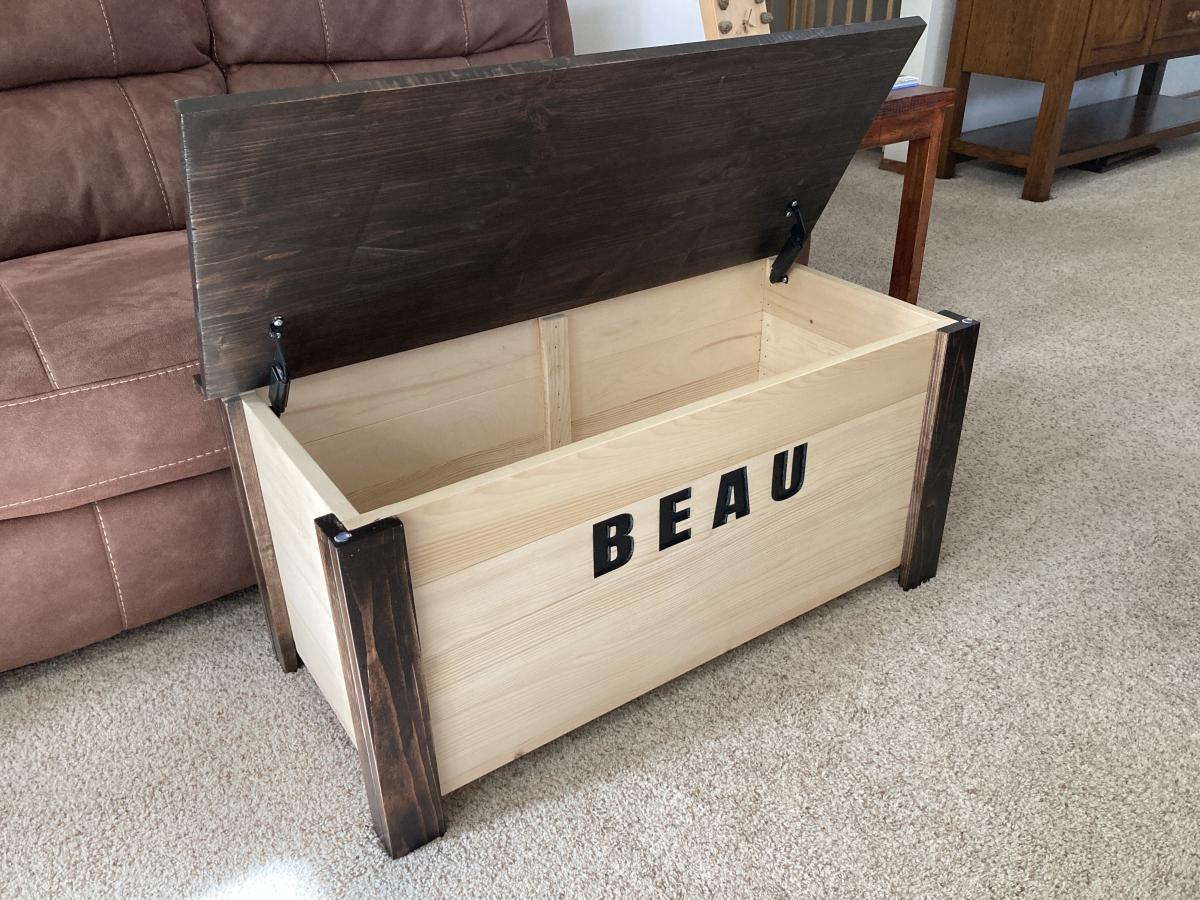
Farmhouse Toy Box
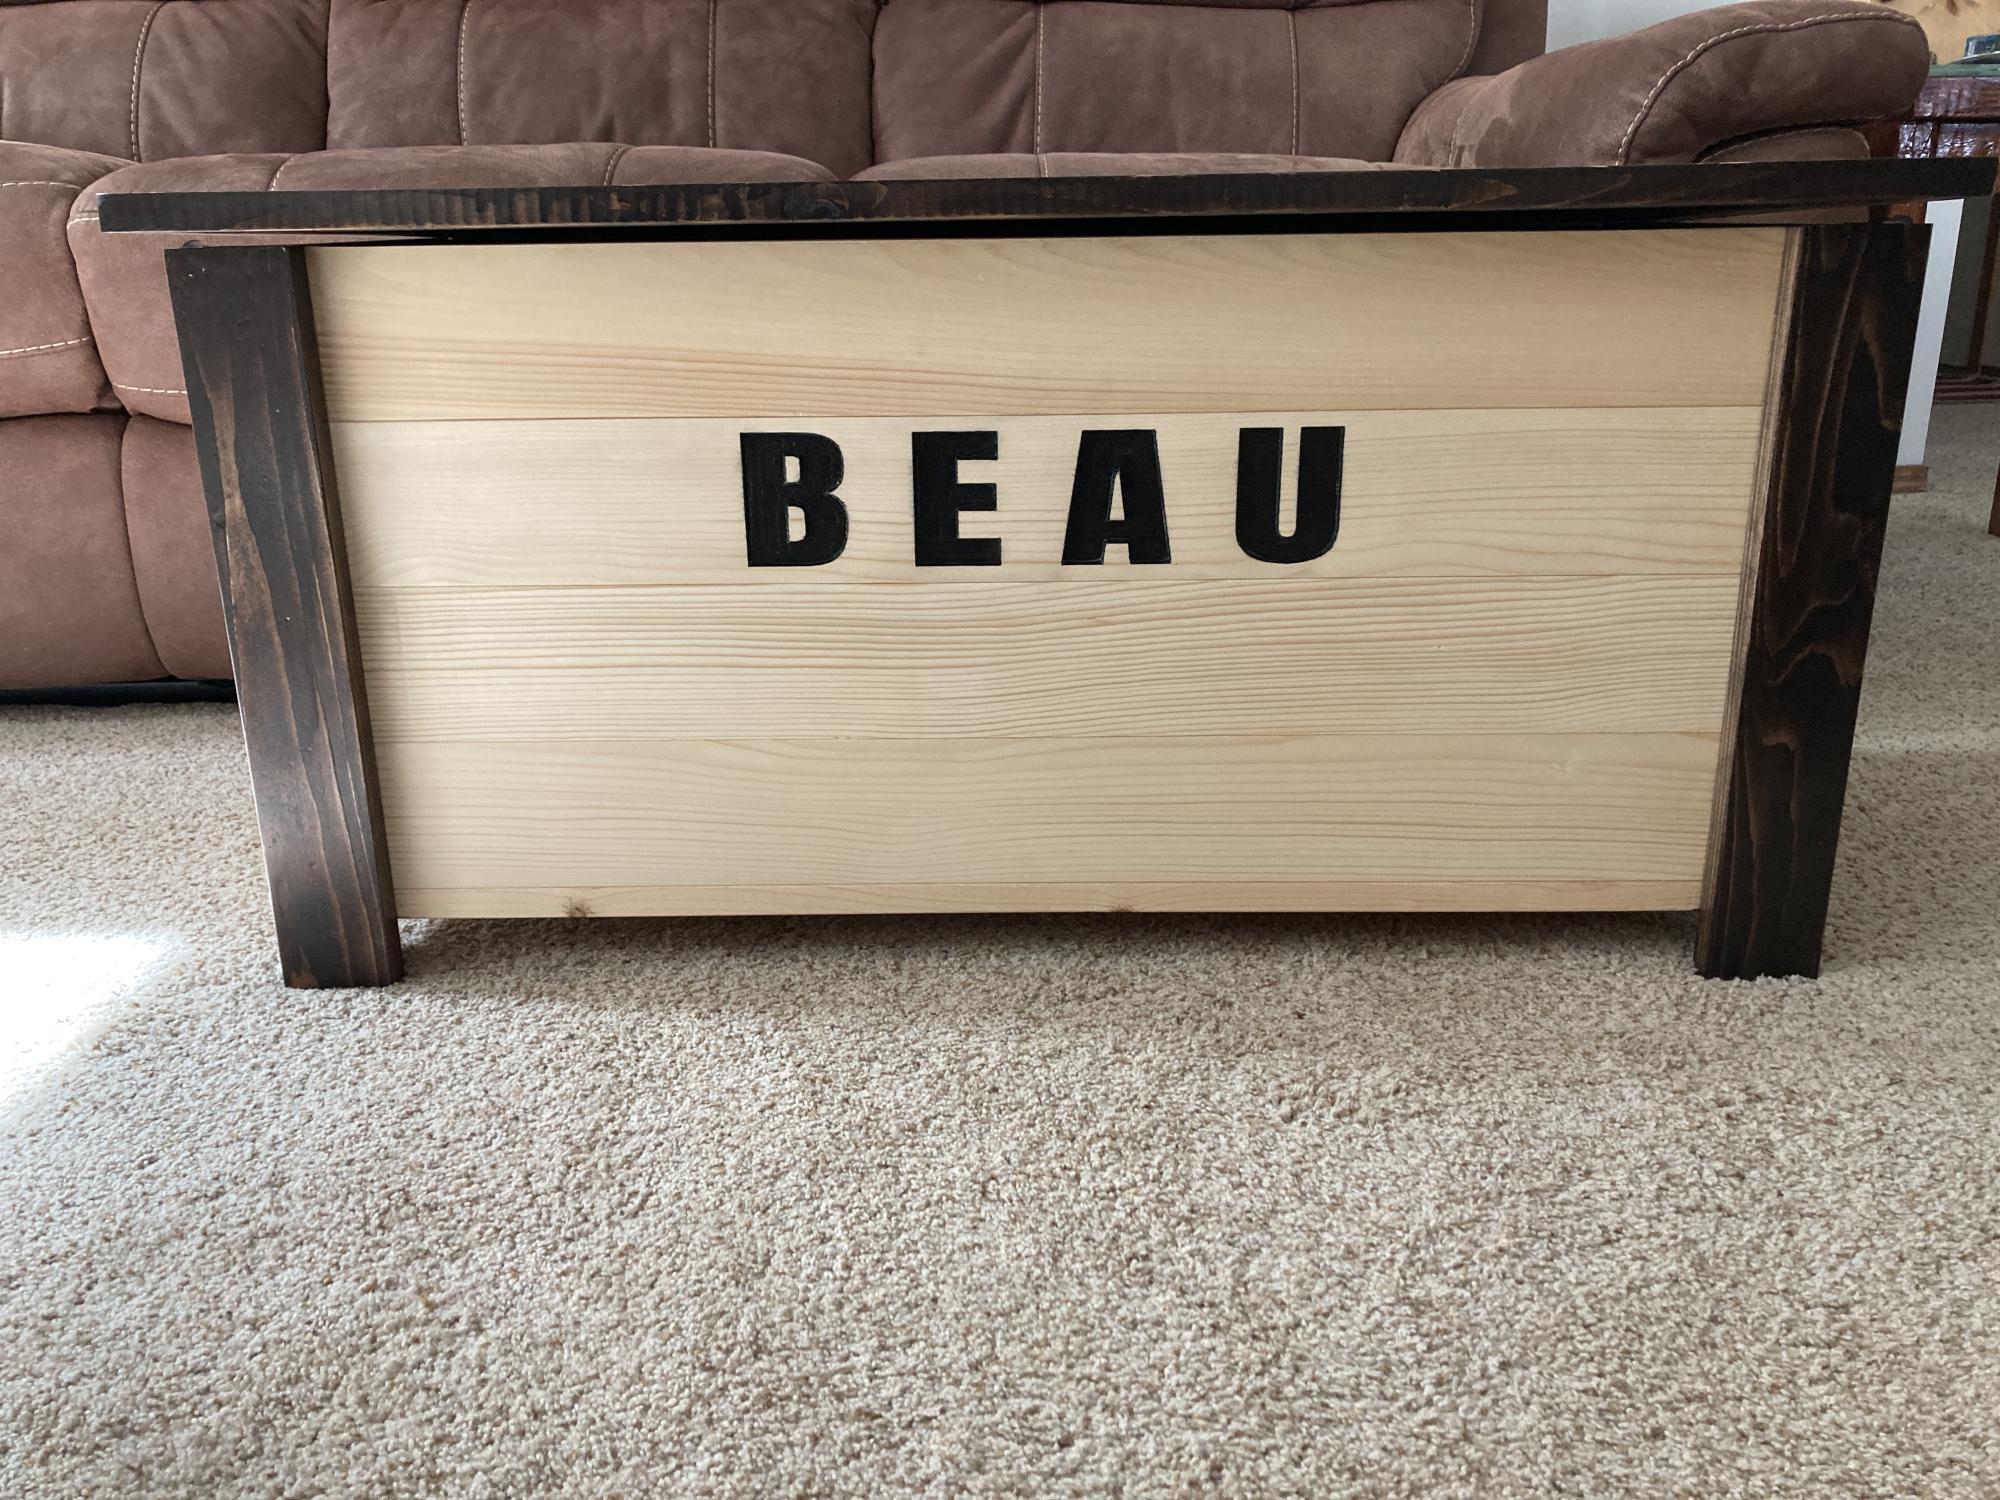
My second build from Ana's toy box plan. I had my son use his CNC machine to carve boy's name into the front. Depth of the letters is about 0.25". Looks really good.
Built from Plan(s)
Comments
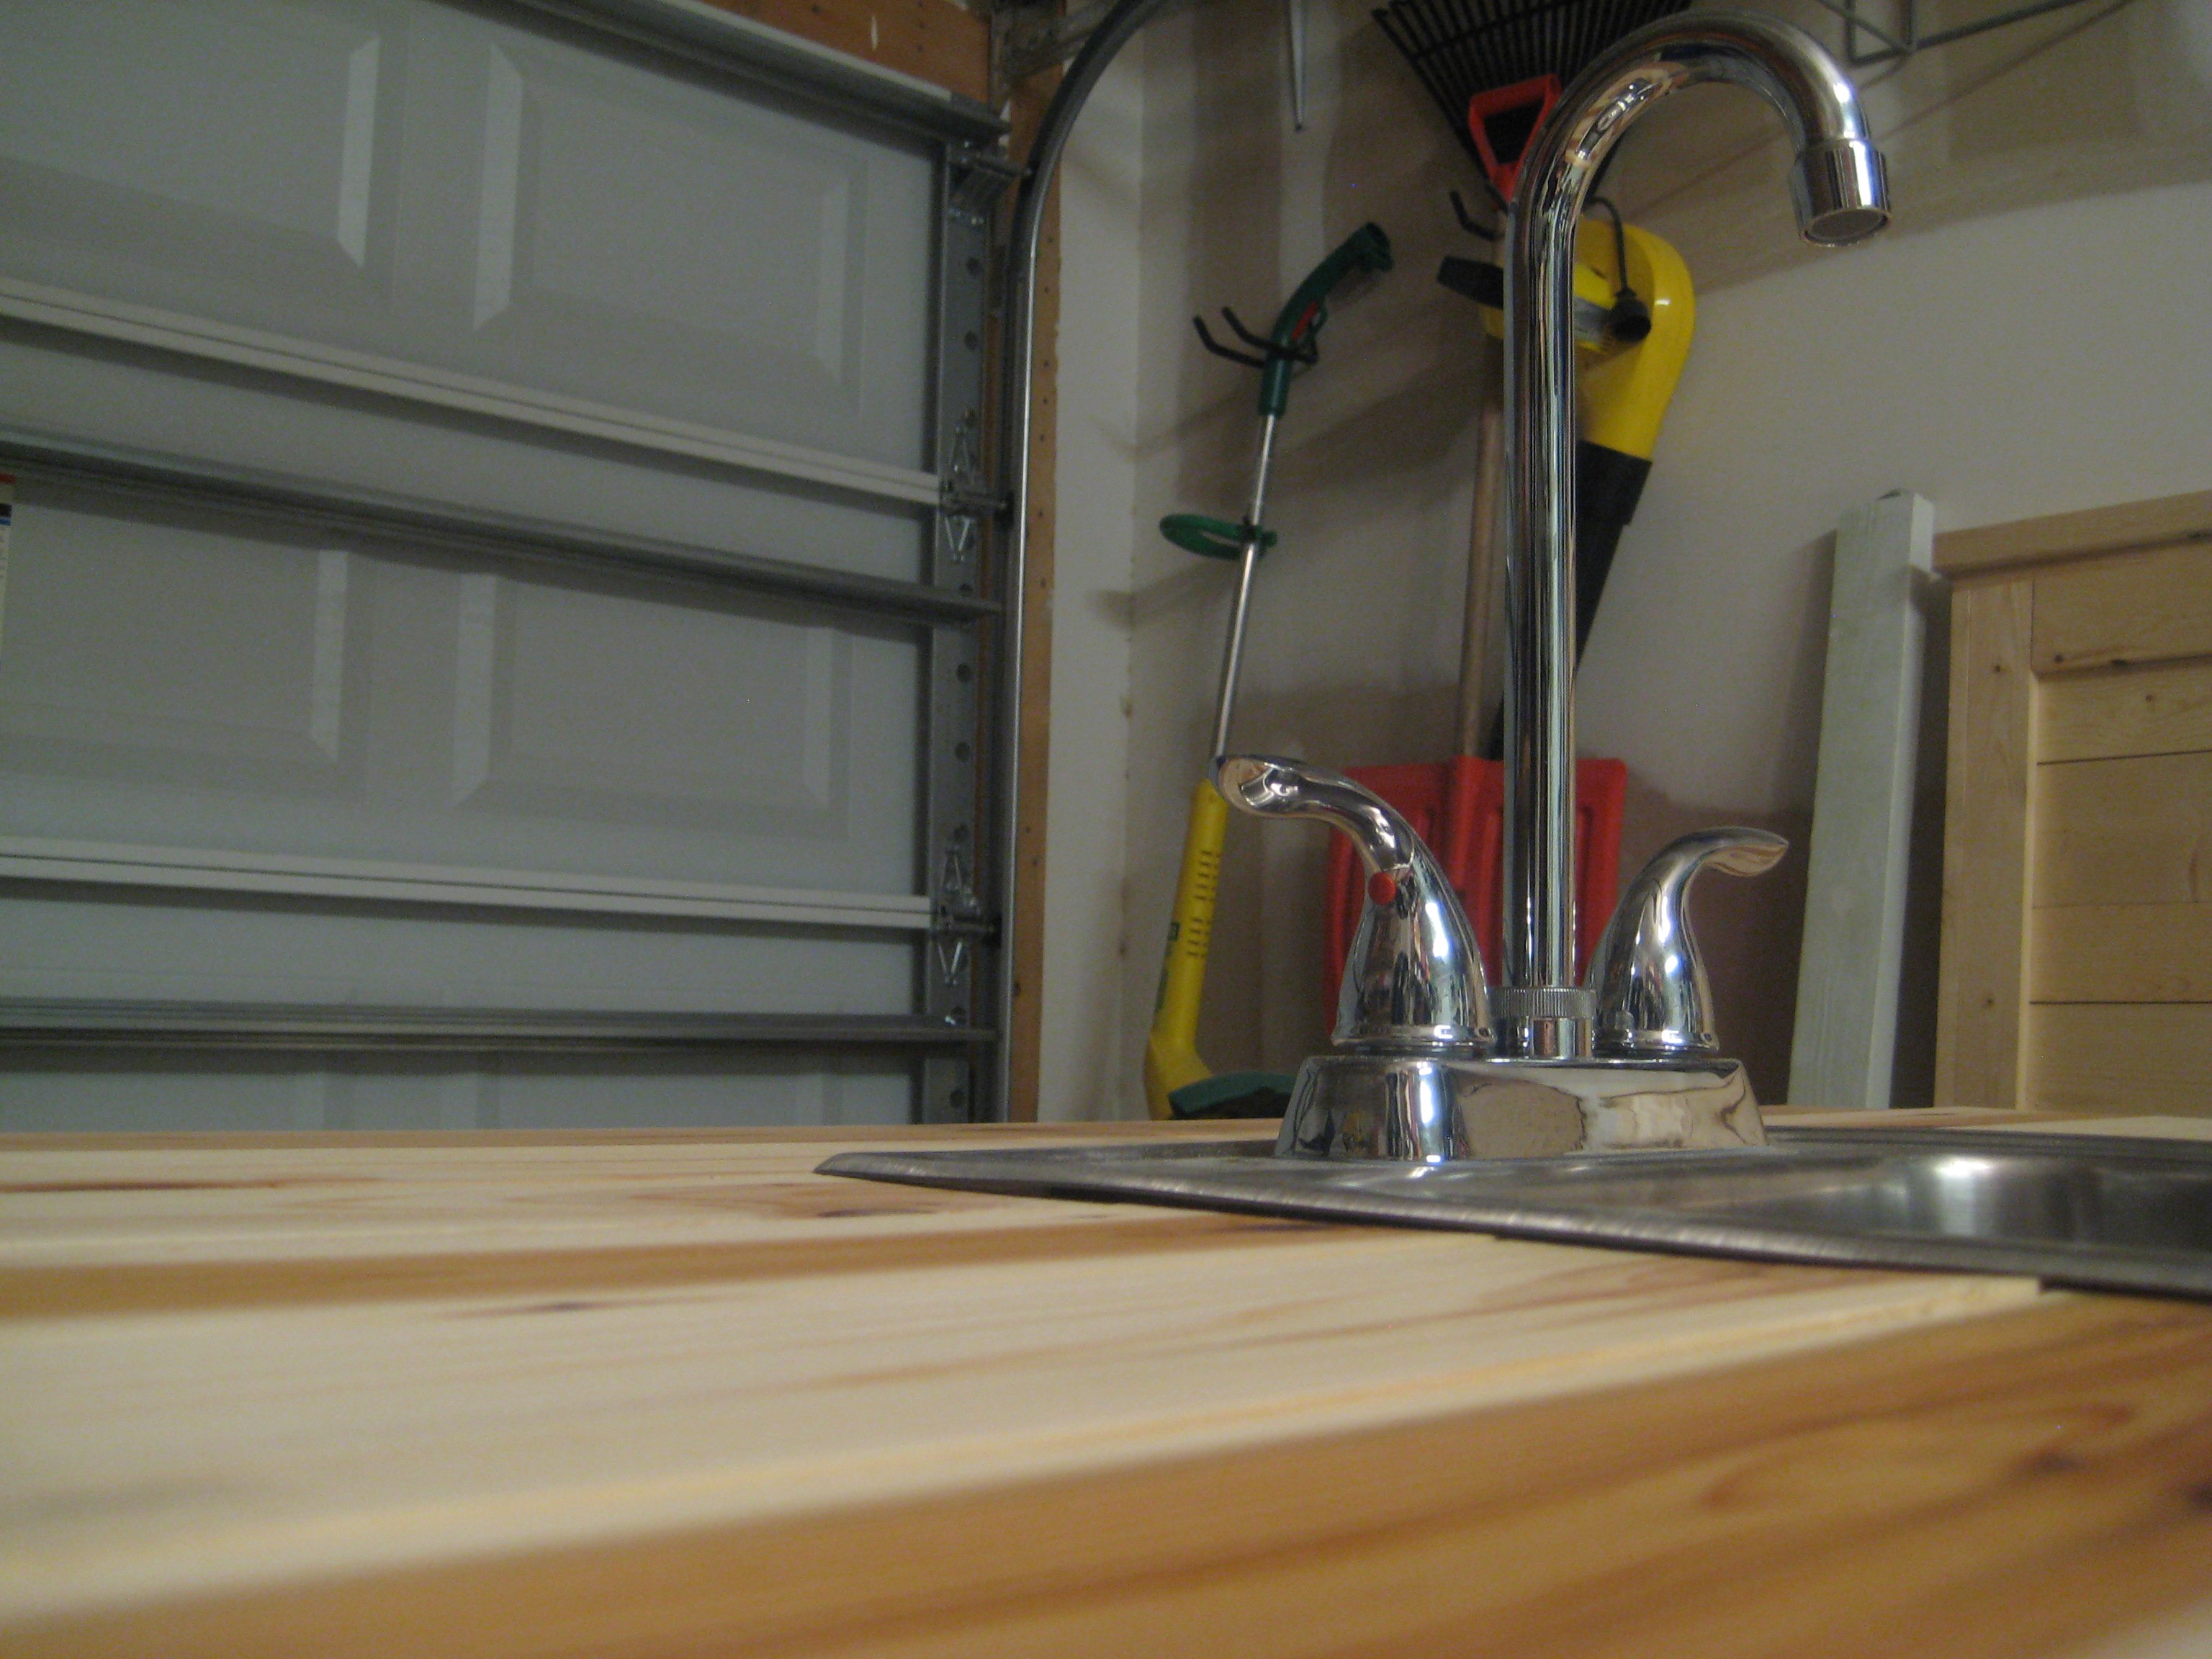
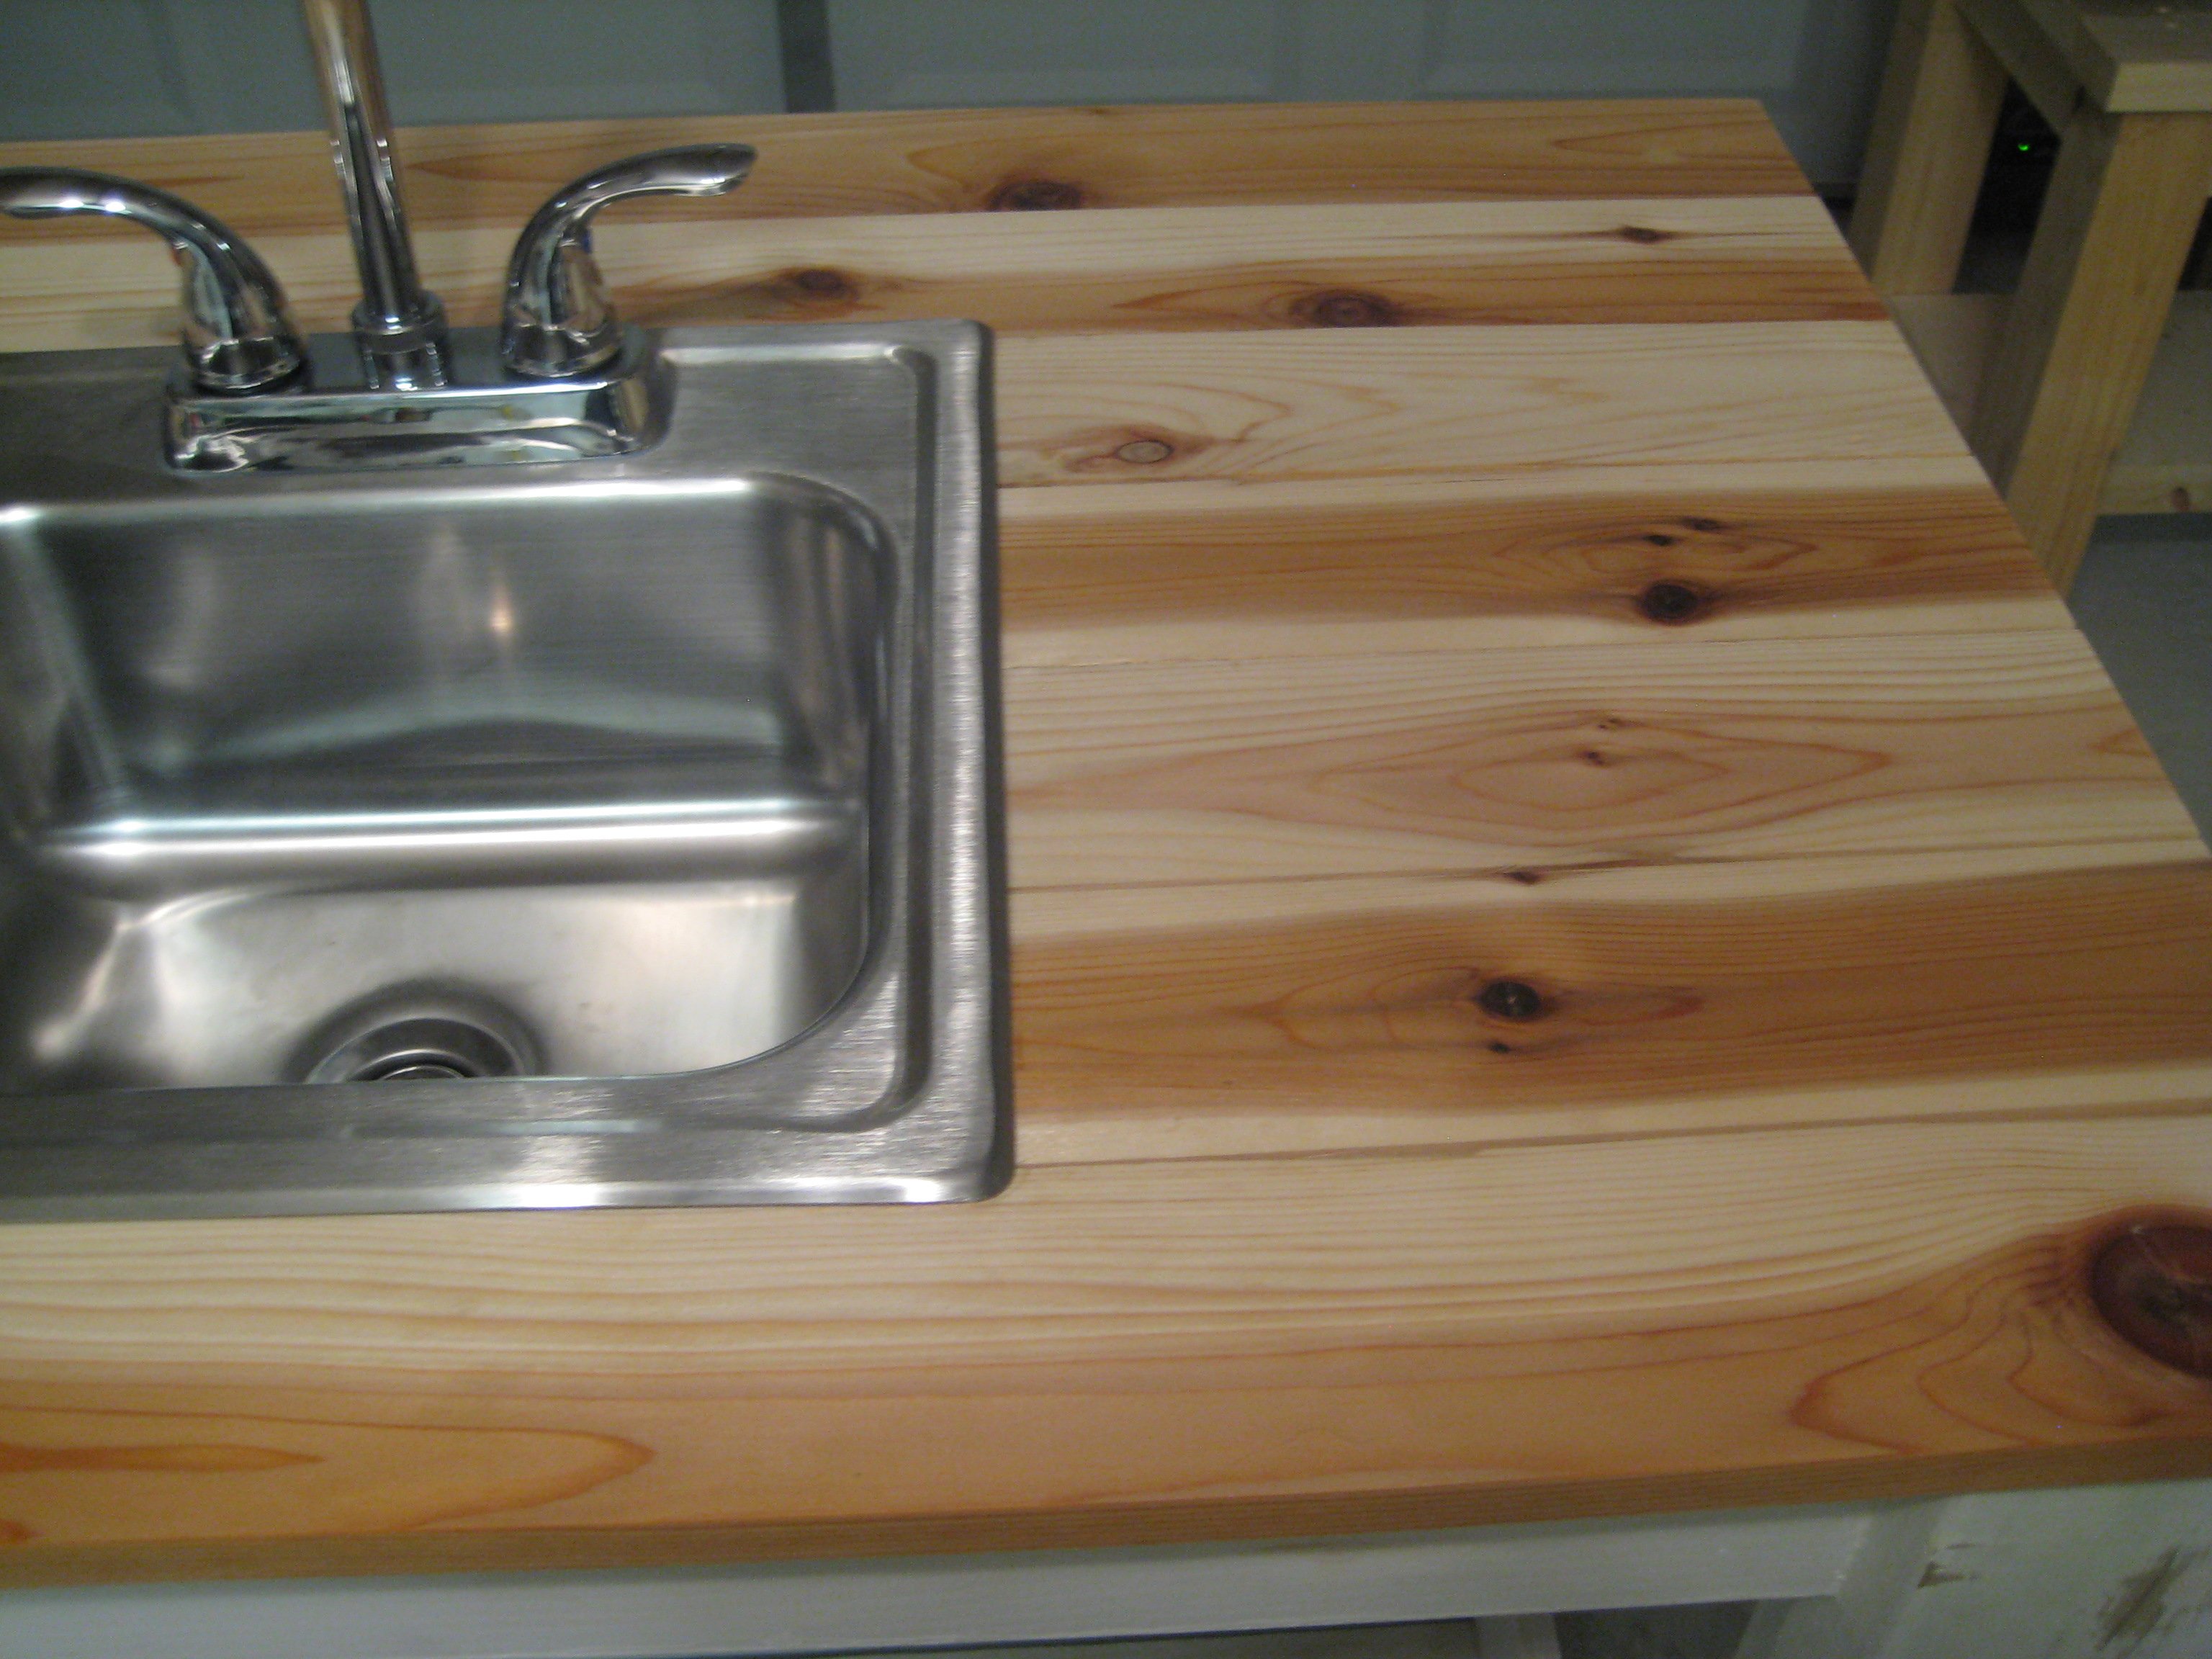
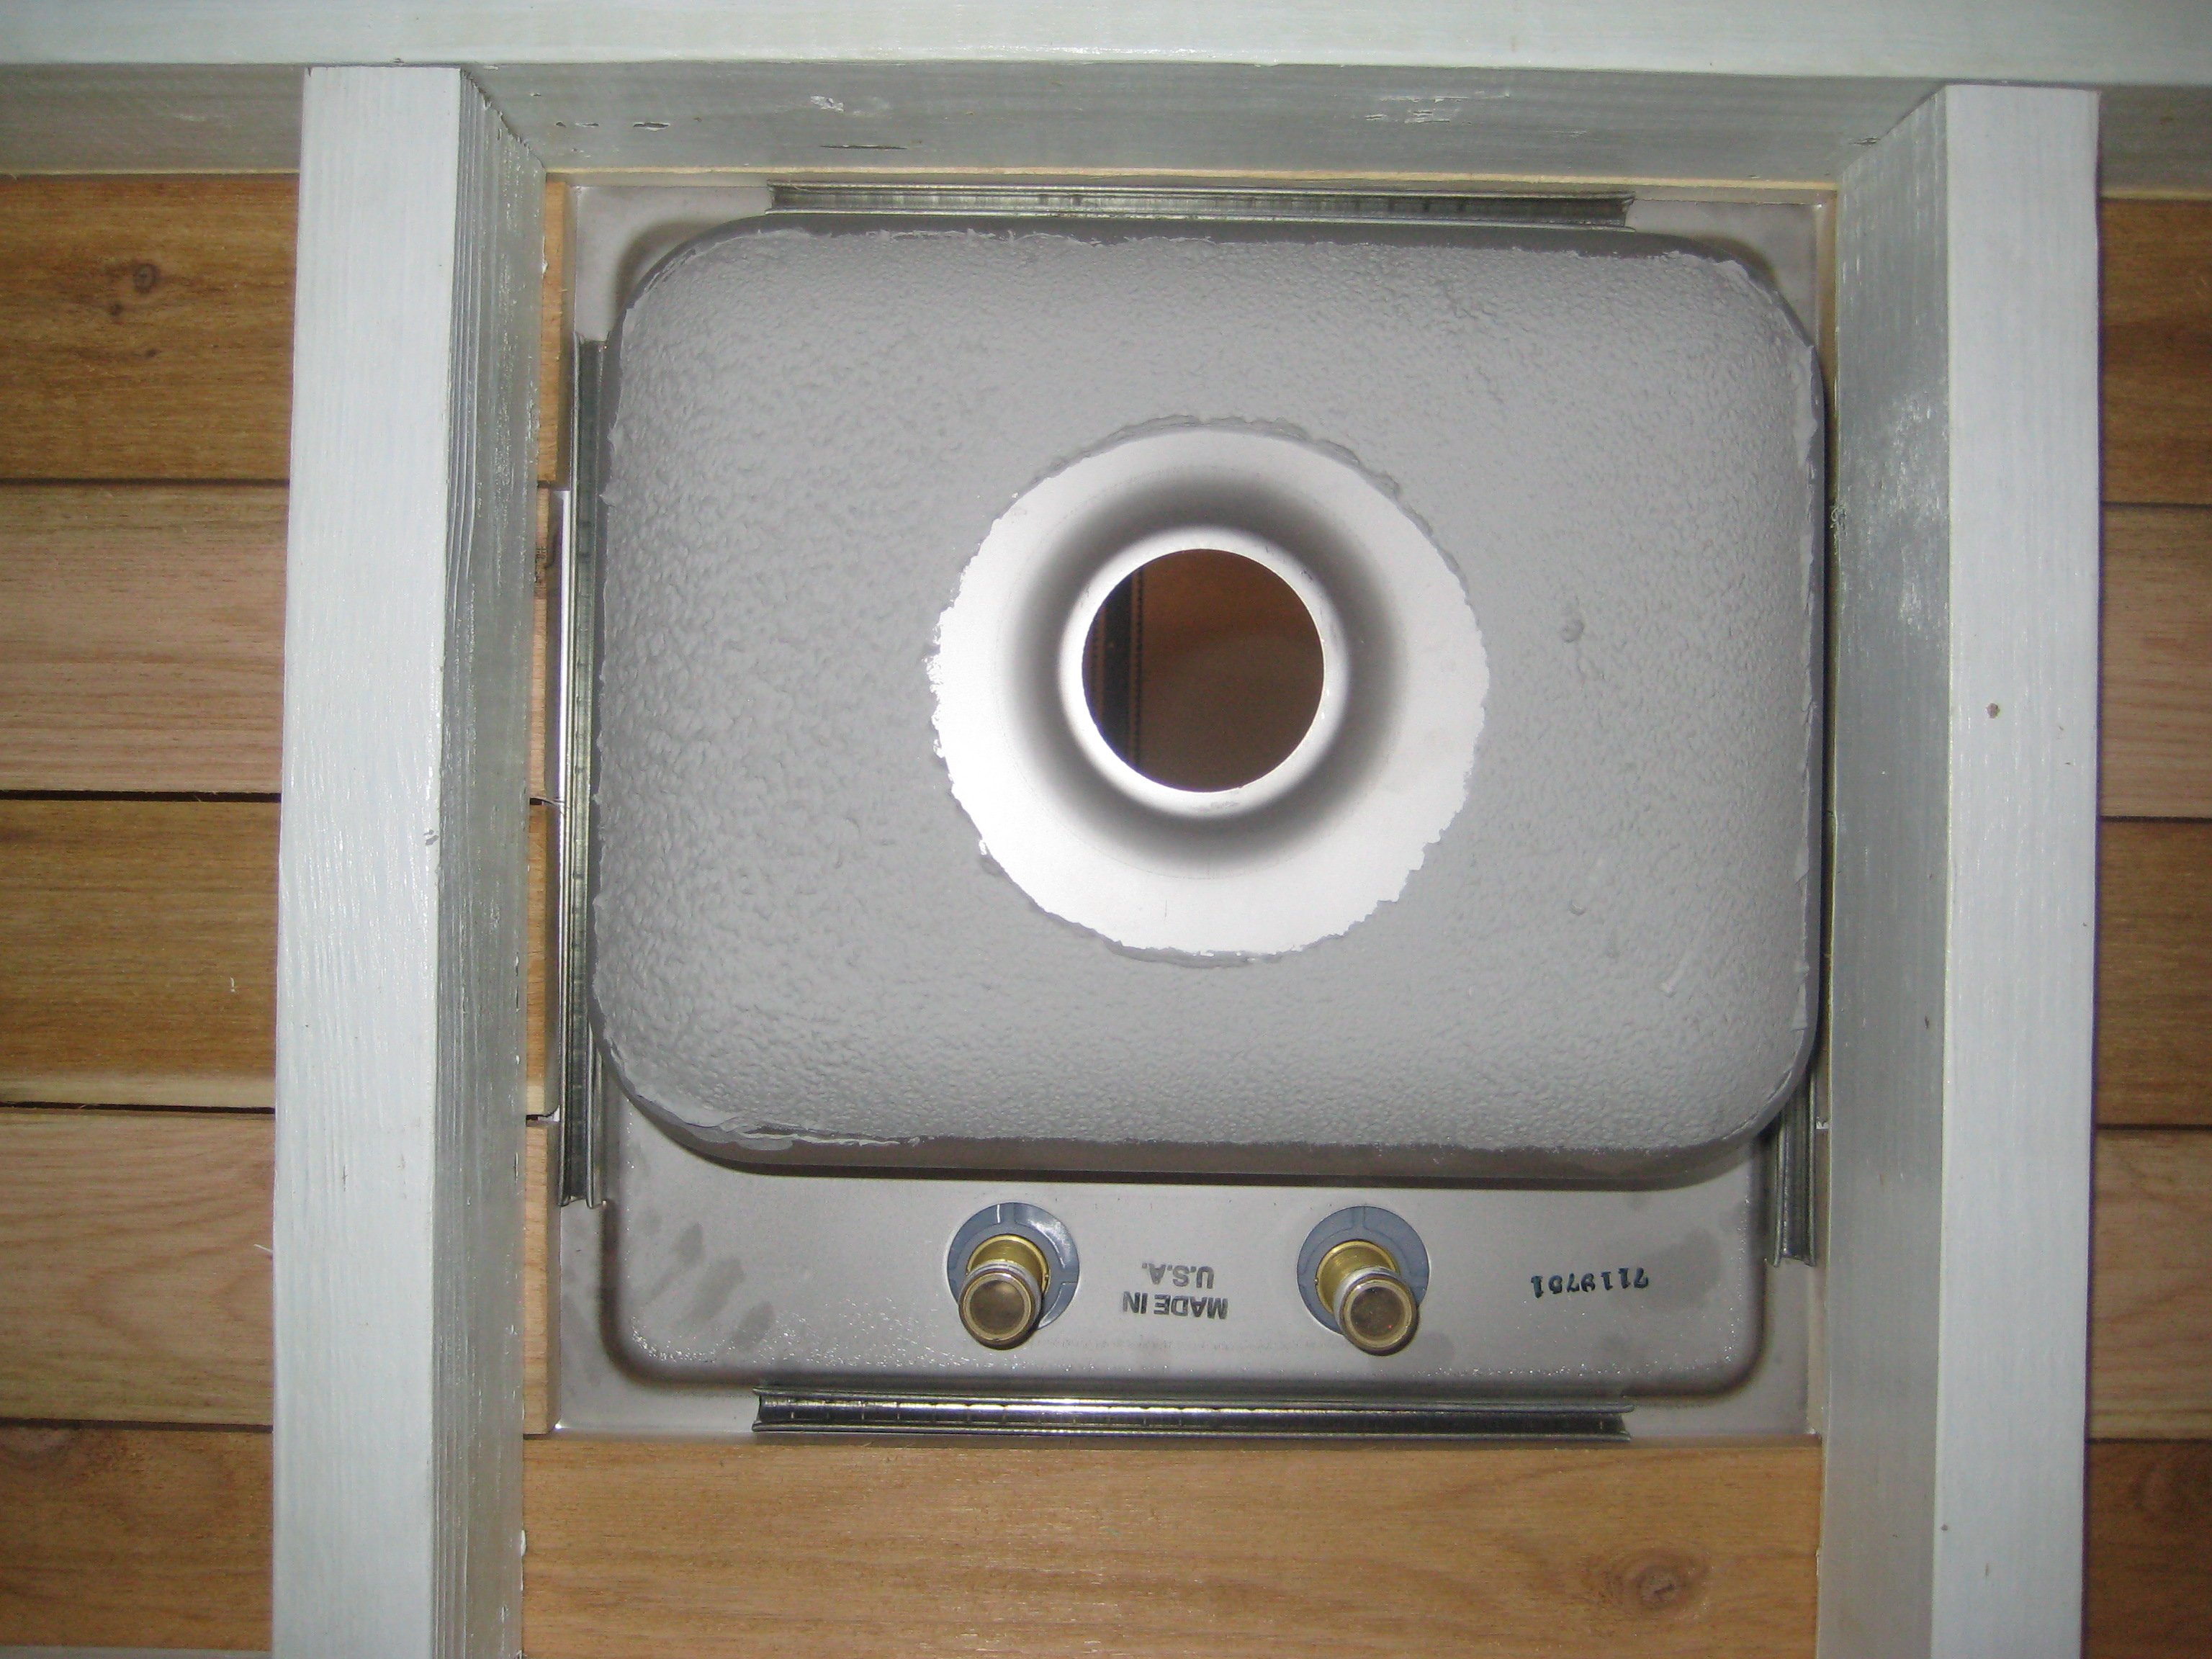
My Simple Outdoor Sink

I finally completed the last piece to my customized simple two-toned outdoor collection...an outdoor kitchen sink!!! It still needs a couple of touch ups... but more on that later. This is by far my favorite and easiest project to date. We plan on using this as a grill caddie/garden station. This will eventually go onto a 24x12 deck up against our kitchen window (The indoor and outdoor sink will be against each others backs). I decided to go with the Sturdy Workbench plans for the base mainly because of the weight. We wanted something that's going to be difficult to move since it will be hooked up to outdoor plumbing. I used treated 2x4's for the base, cedar 1x4's for the top. I bought the bar sink for about $70. I also used a Kreg Jig to screw in the cedar slats from underneath so the screws won't be visible from the top. FYI - Wait a couple of weeks before you paint soaking wet treated wood. The green chemical from the 2x4 is starting to leak through my white paint. I'll have to go and prime/paint it again when it finally dries. Other than that, it came out 10 times better than I could ever imagine.

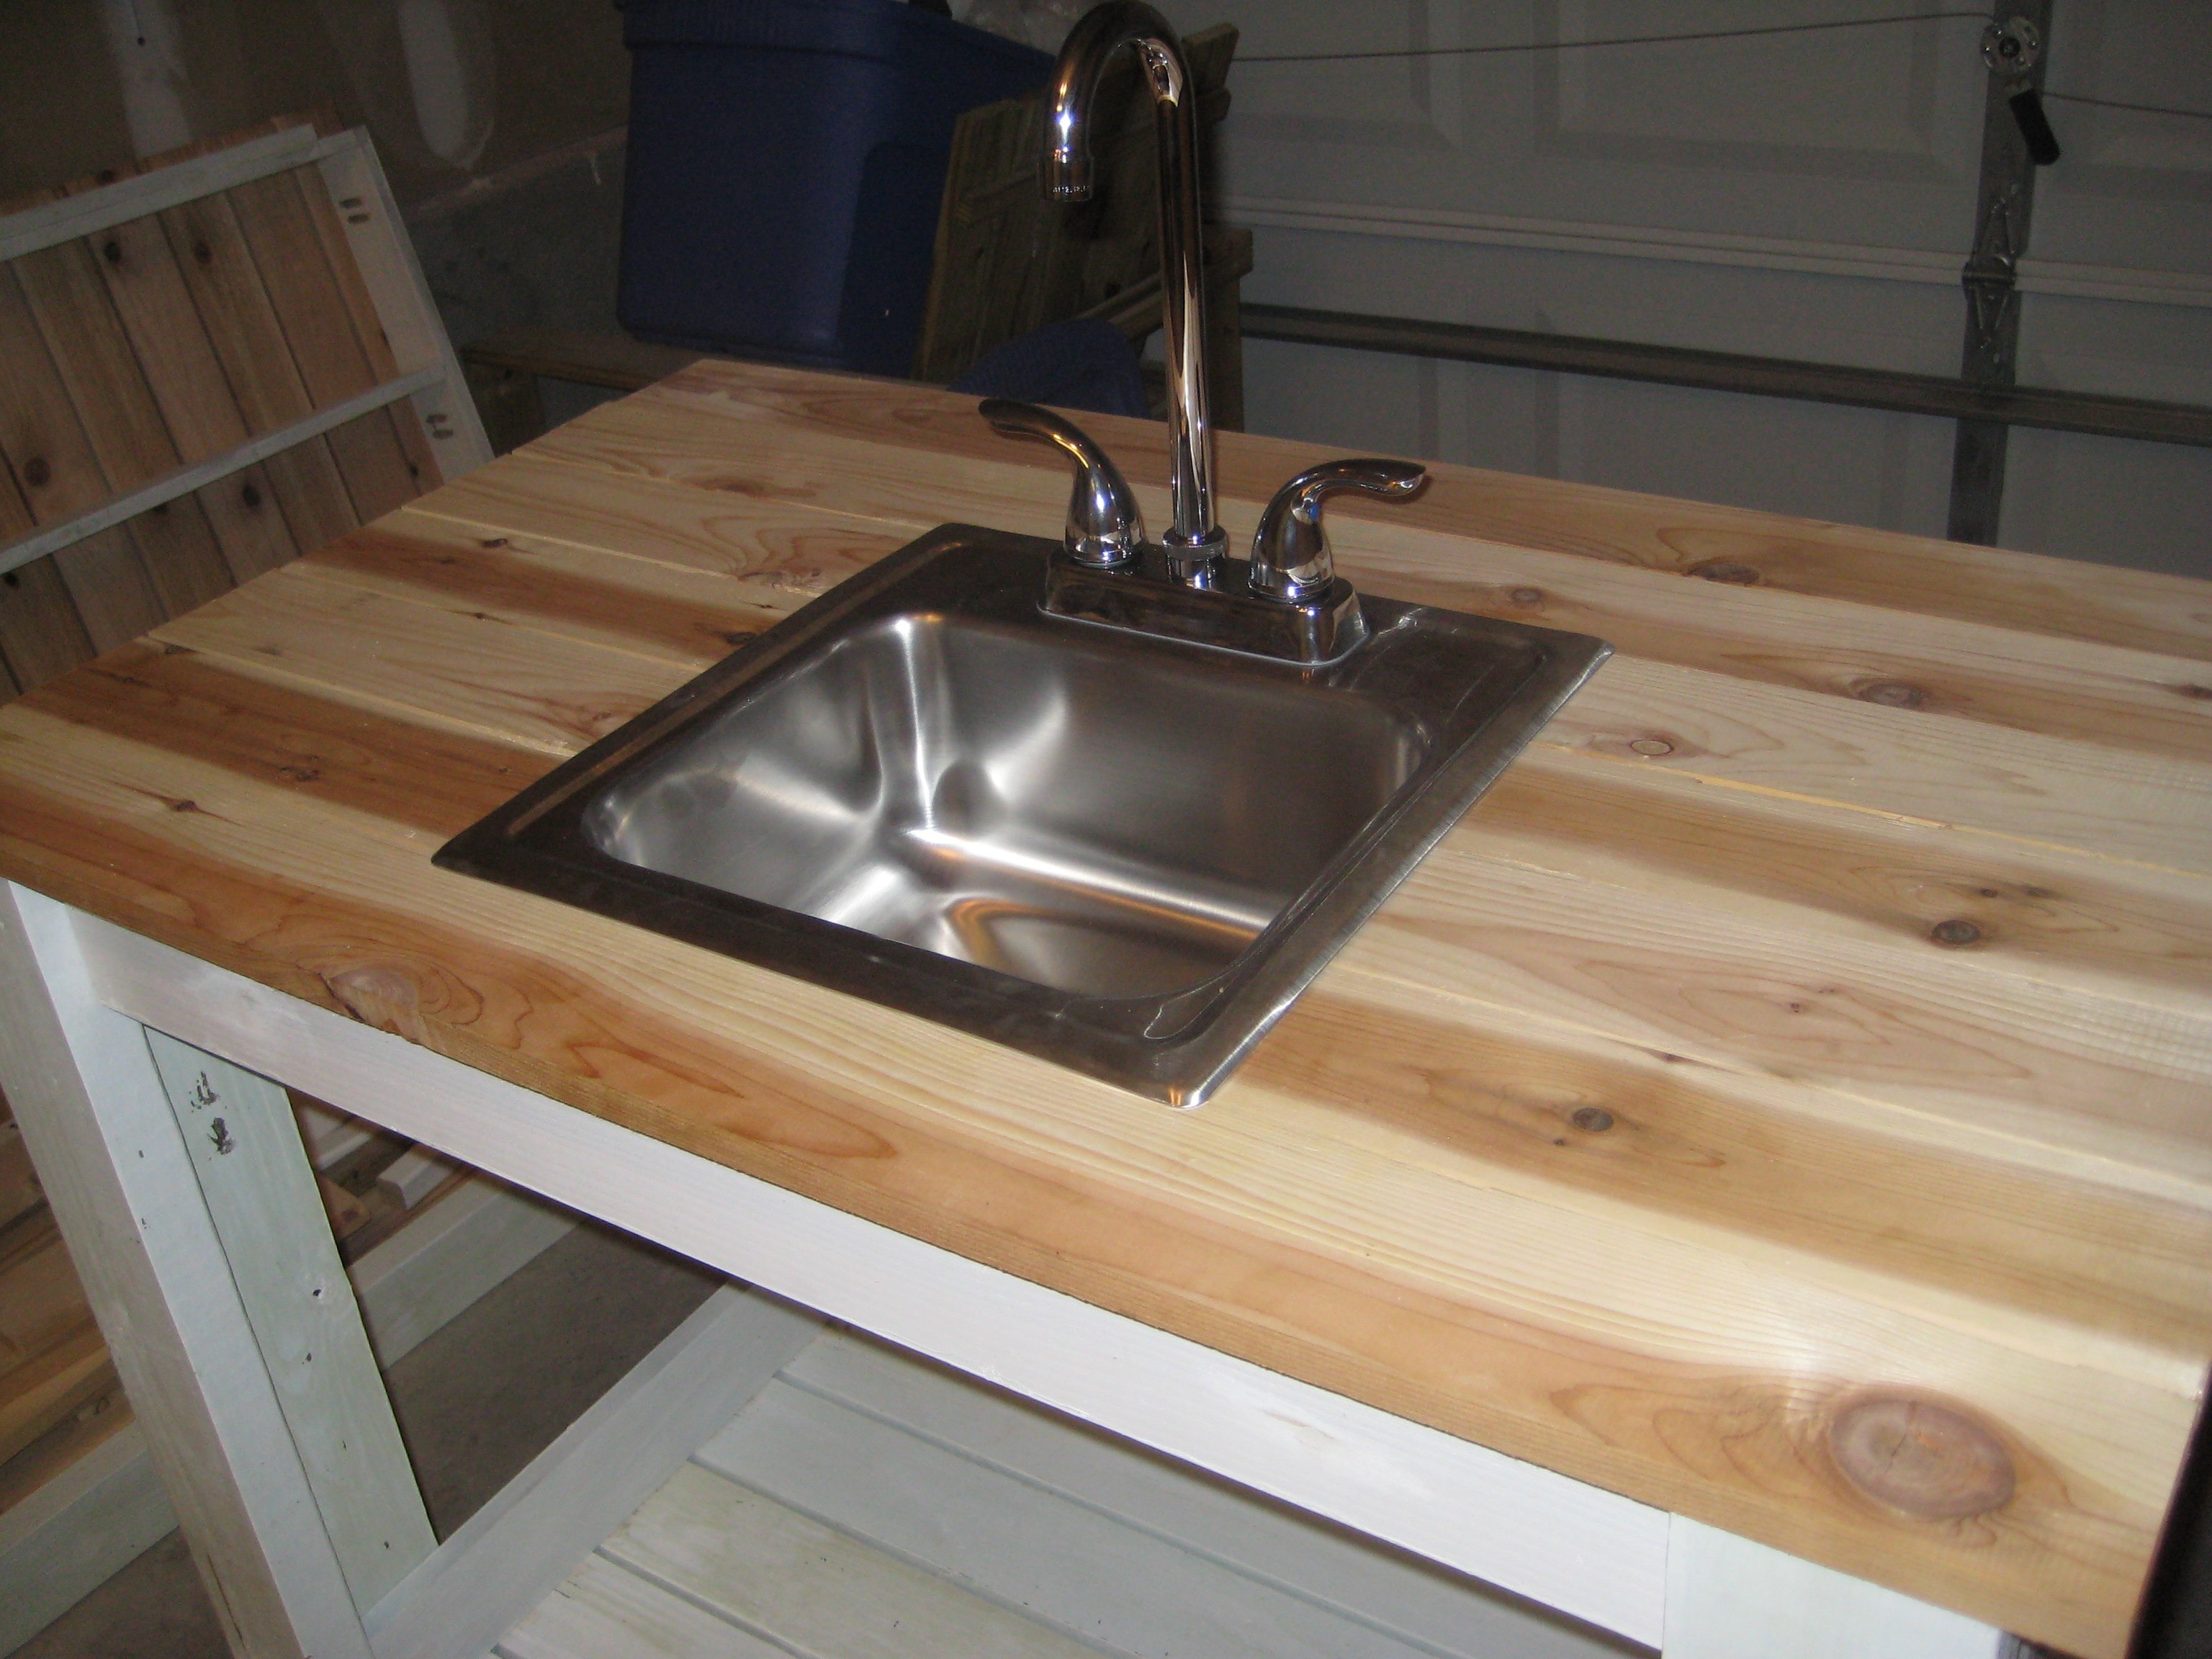
Built from Plan(s)
Estimated Cost
$120 ($70 for sink and hardware)
Estimated Time Investment
Weekend Project (10-20 Hours)
Finish Used
Thompson's Water Sealer, semi-gloss exterior white paint.
Recommended Skill Level
Beginner
Comments

Chicken Coop with run

It took a while to come together and made several modifications but it is a great coop and was a major selling point of the house when we were relocated. I had added a main tray under the roosts and a door to srape the poop out. This made keeping the coop clean very easy.

Built from Plan(s)
Estimated Cost
$800
Estimated Time Investment
Week Long Project (20 Hours or More)
Finish Used
Chicken Coop
Recommended Skill Level
Intermediate
Sturdy Workbench Sink
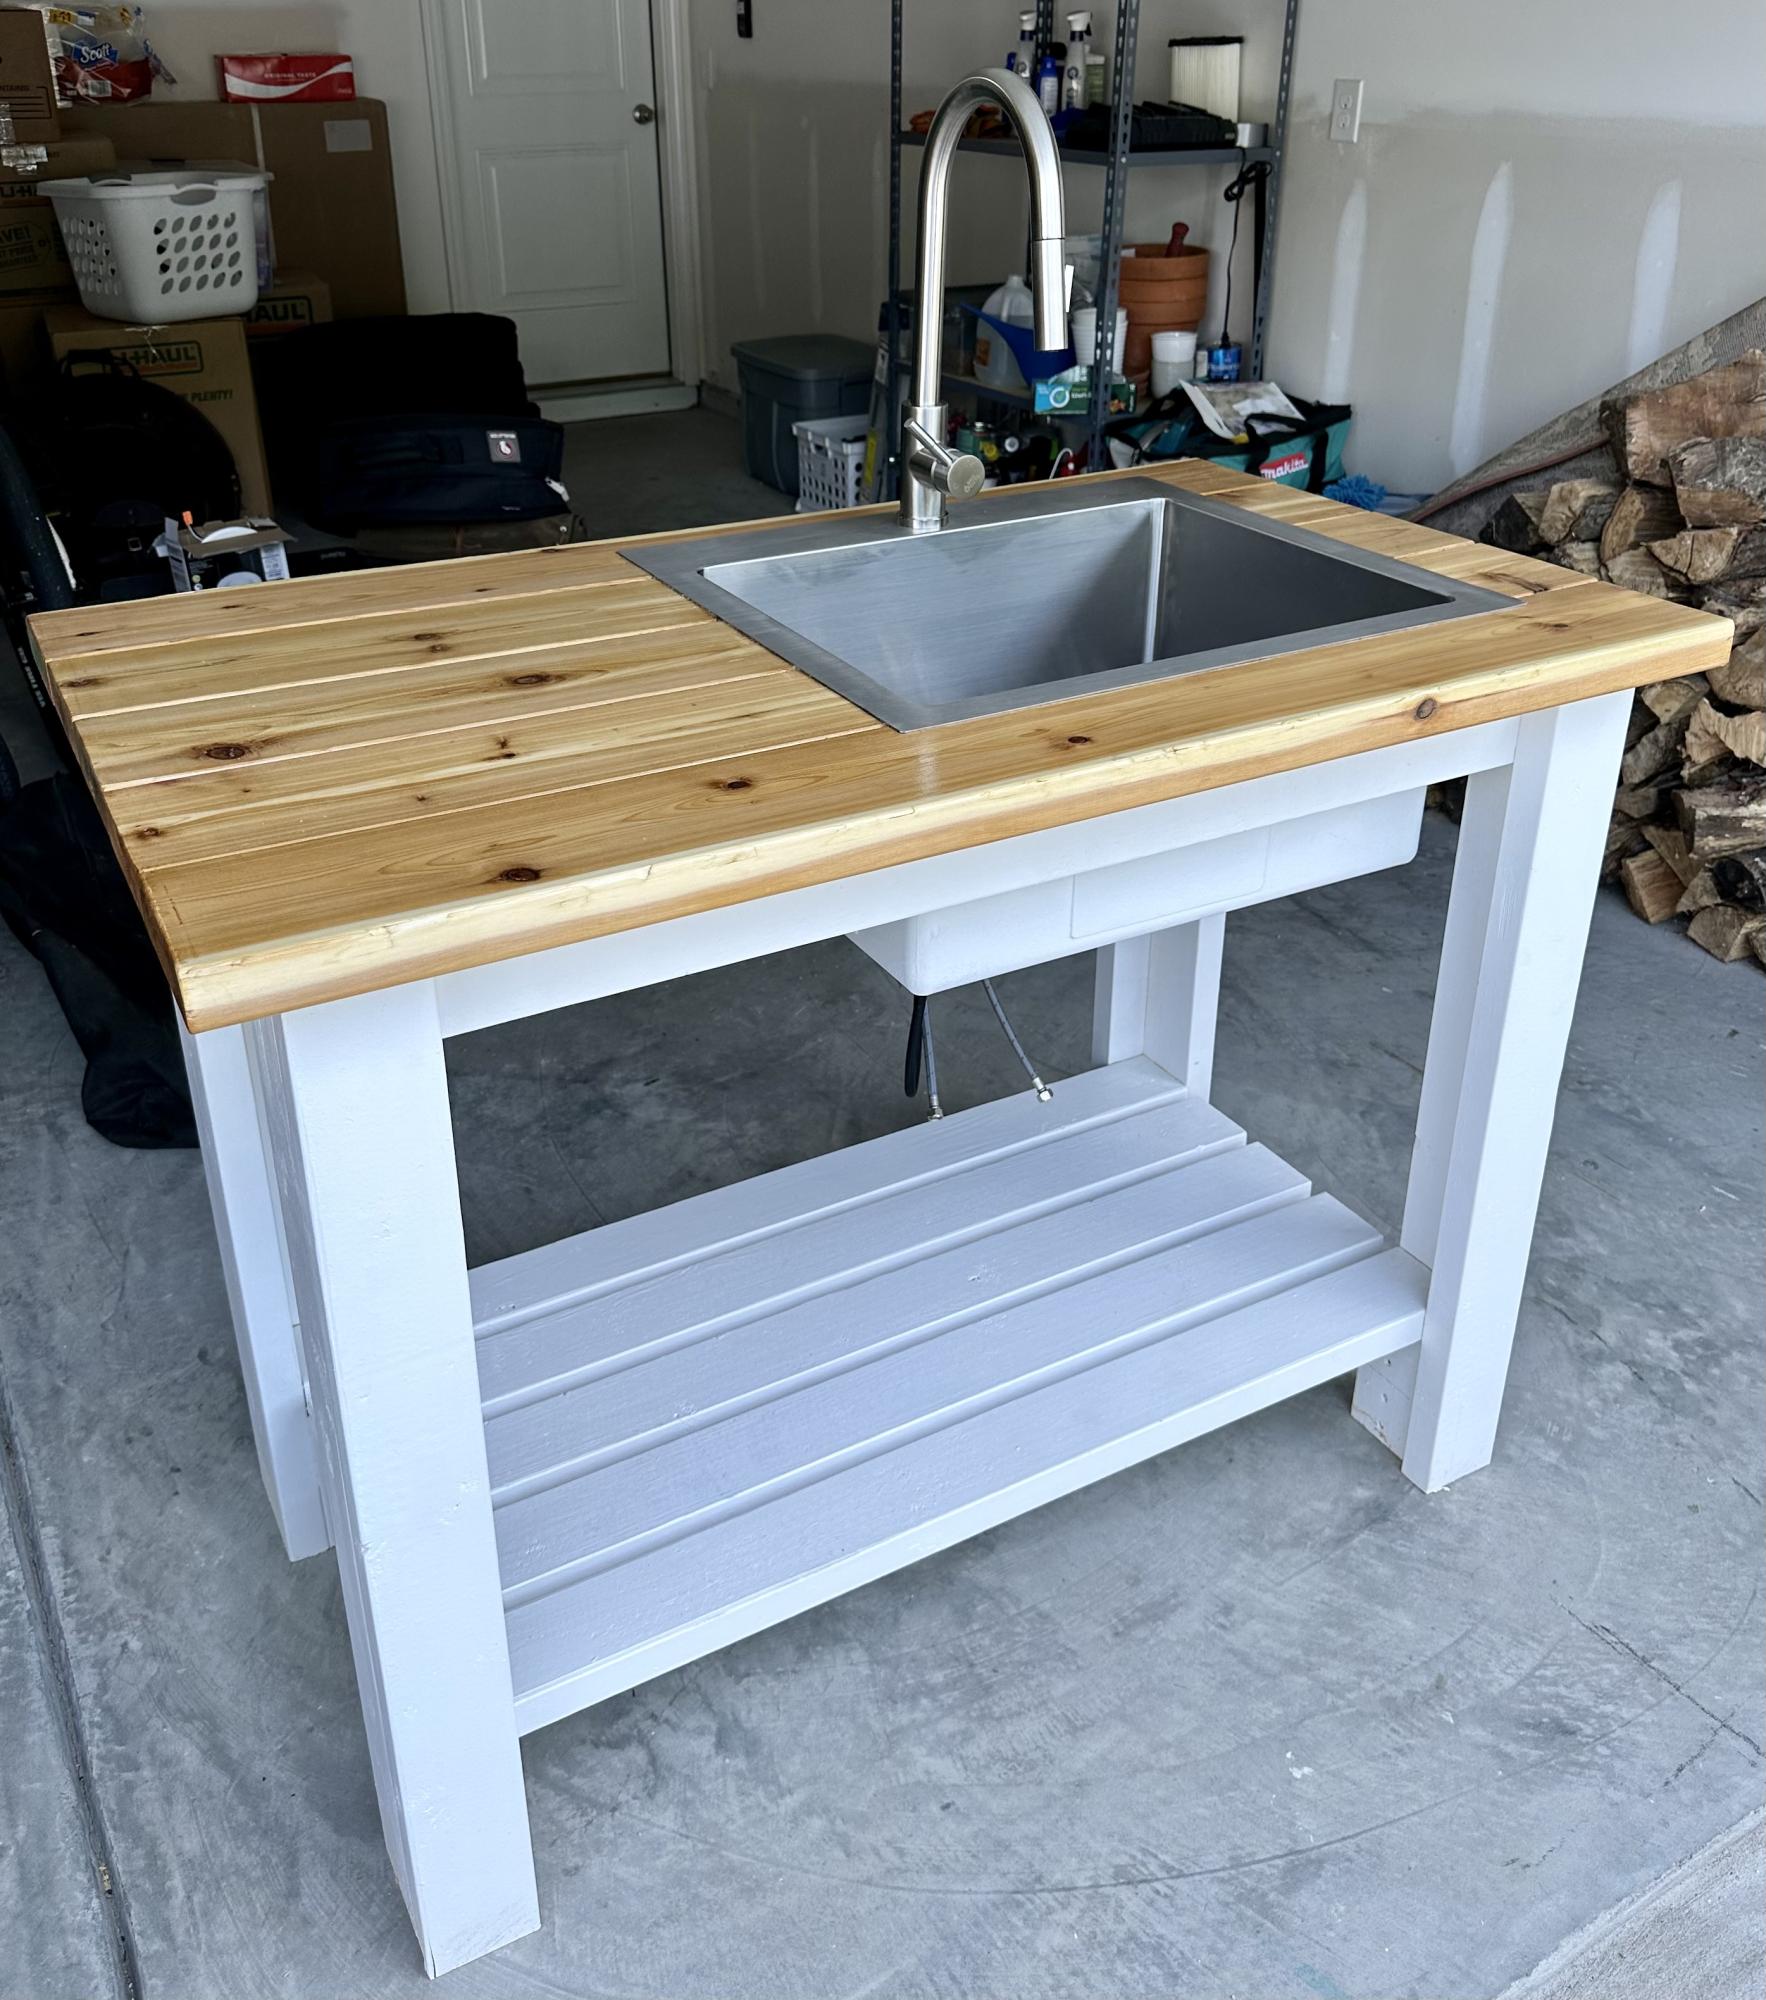
Used sturdy workbench plans with 2x6 cedar top for outdoor sink. Turned out much better than I expected!!
Built from Plan(s)
Comments
Tue, 05/02/2023 - 07:09
This is so great!
Way to go, it is beautiful and functional! Thanks for sharing.
How to Make a Farmhouse Coat Rack
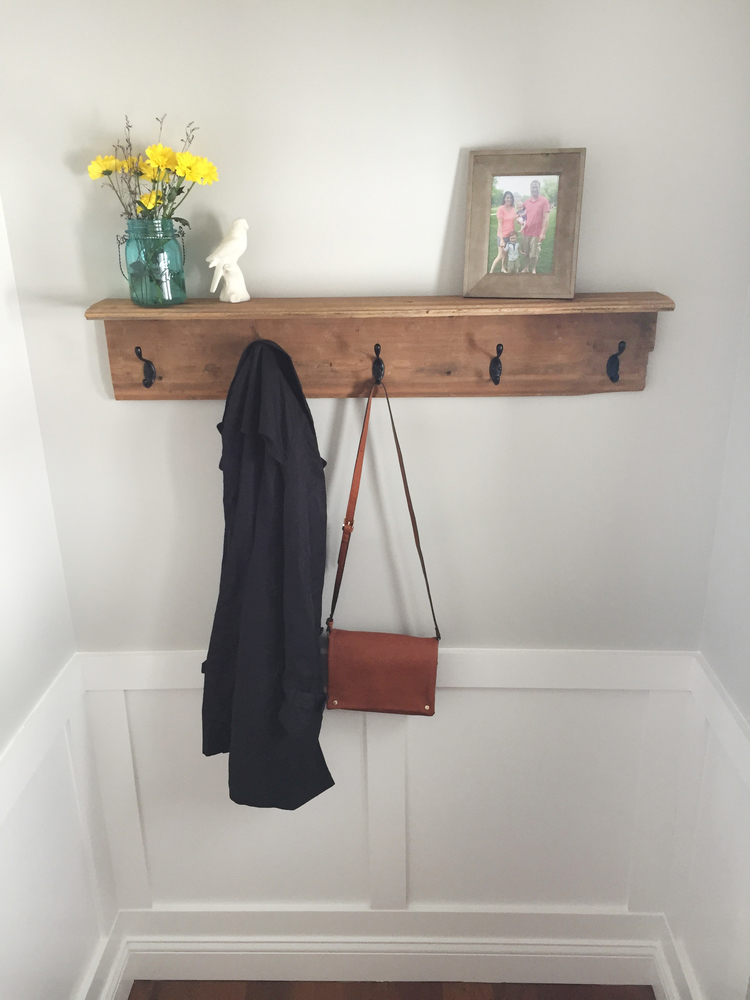
This past summer I was blessed with an opportunity to get some really old wood out of a barn that was built before the civil war. The barn sat on a 1000 acre farm.
Estimated Cost
$100
Estimated Time Investment
An Hour or Two (0-2 Hours)
Finish Used
None
Recommended Skill Level
Beginner
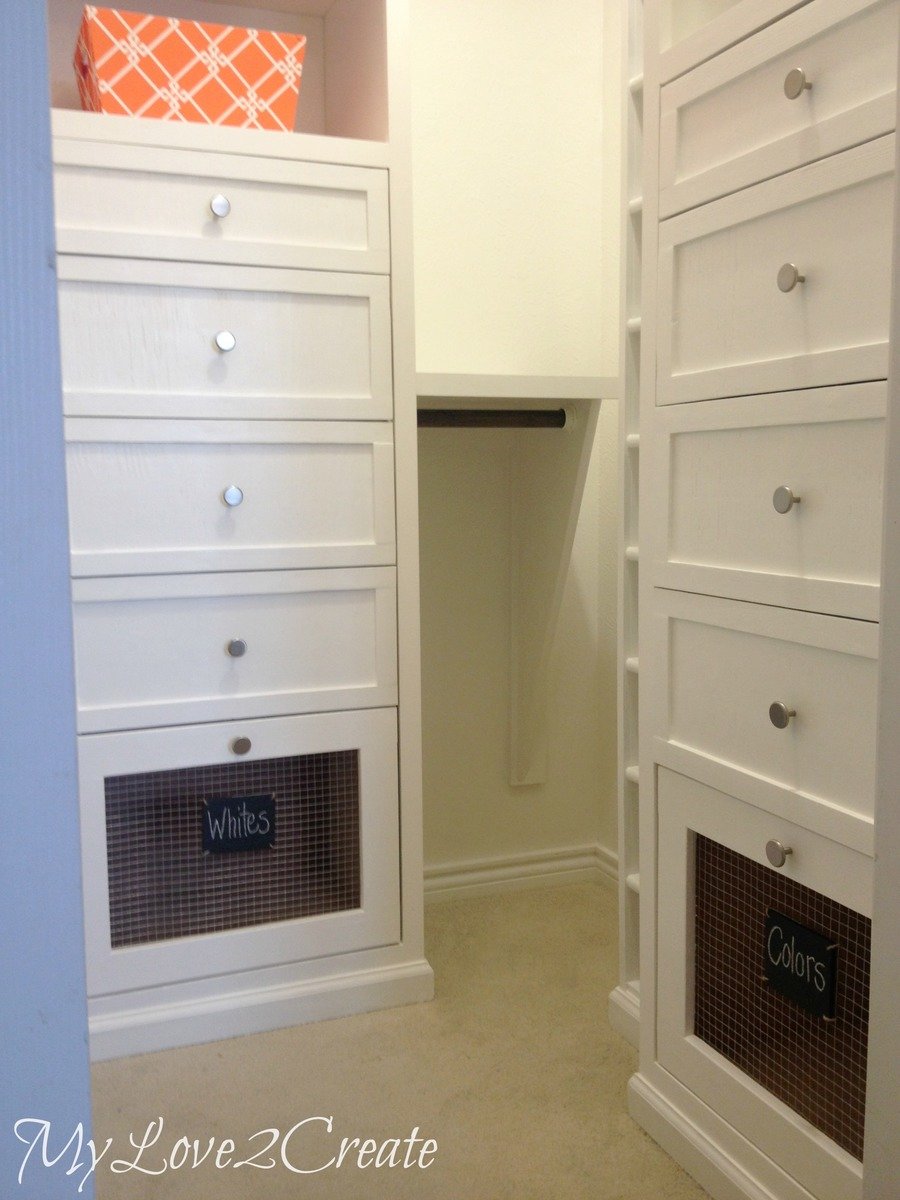
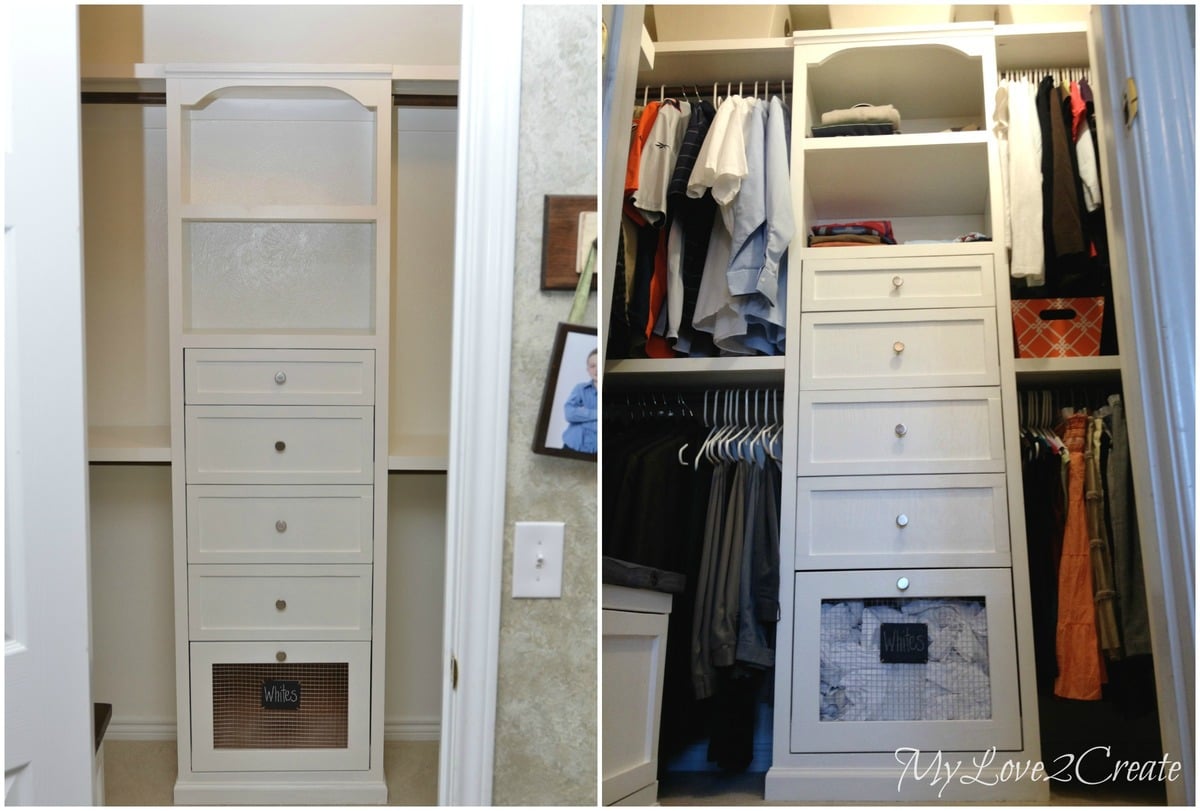
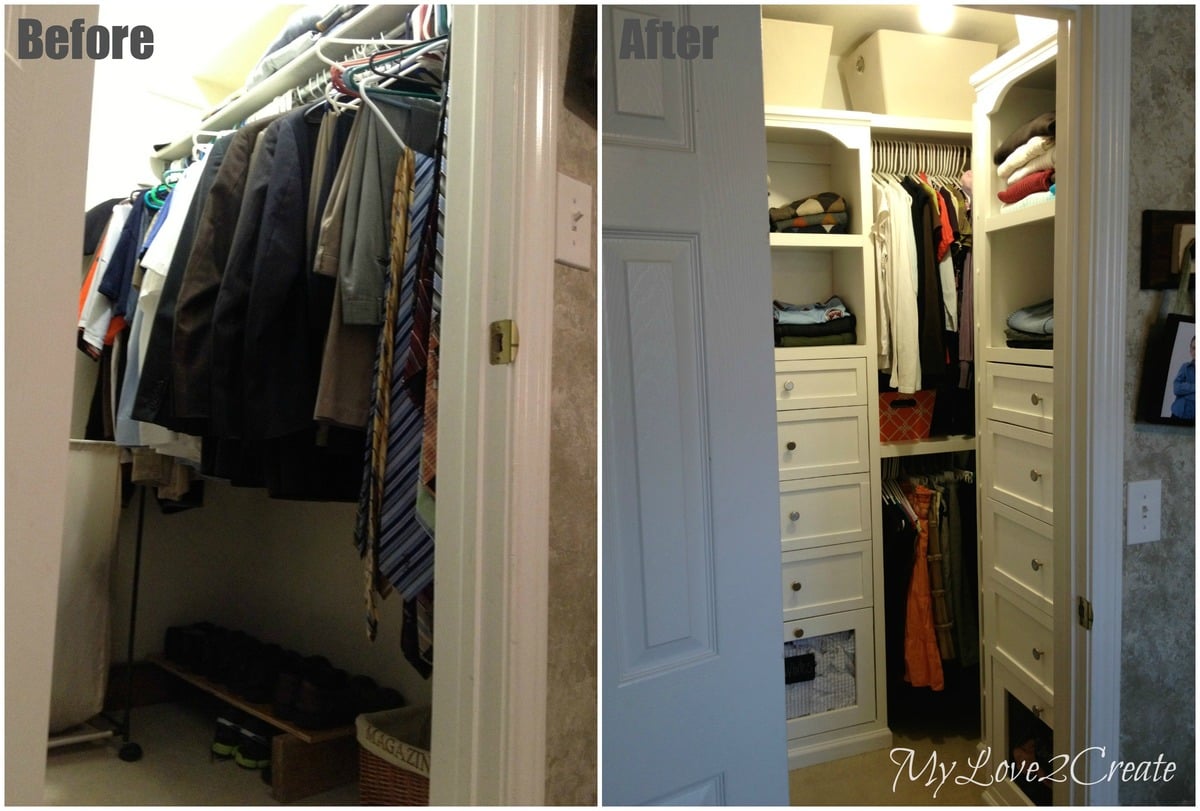
The Two Towers, Master closet Makeover
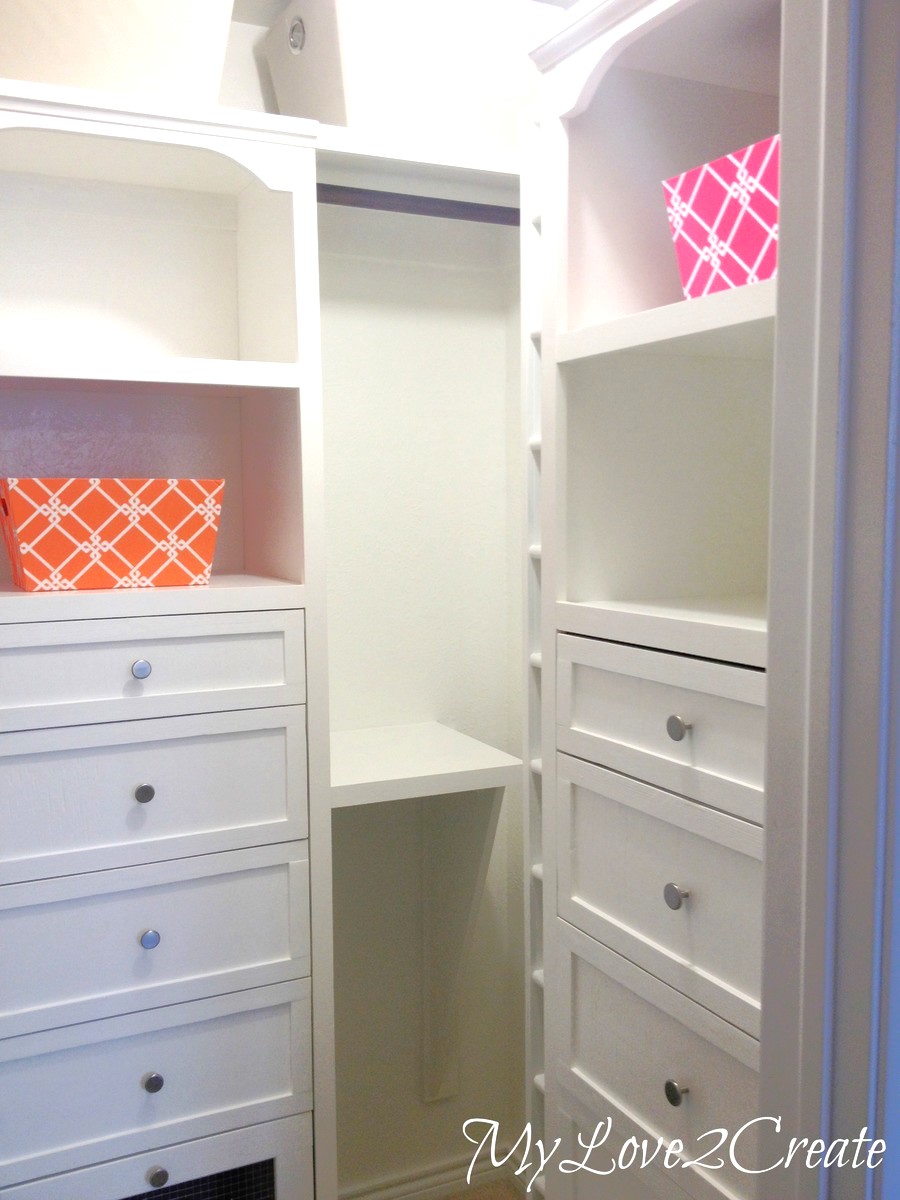
I have been wanting to makeover my master closet for a long time! I finally decided to just give it a try, I looked at several options and finally decided to base my closet around Ana's master closet tower she made for the momplex. I loved the plan and knowing I would need two towers I set to work designing with two towers in mind. I LOVE how it turned out and the tower plans were awesome! I also used the drawer plans for the tower and added the amount I needed, that is the best part about DIY! Thanks so much Ana for all your amazing plans they gave me the jump start I needed to get this project done! For details on the rest of my closet makeover please check out my blog post. If you go to my reveal post on my blog, near the bottom it has all the links to my building posts.

Built from Plan(s)
Estimated Cost
Around $150 for the two towers, not including the drawers which I used scrap wood for
Estimated Time Investment
Week Long Project (20 Hours or More)
Finish Used
I used a white Bher paint that was from the oops section.
Recommended Skill Level
Intermediate
Comments
Sat, 02/15/2014 - 11:42
I love this. I love the price
I love this. I love the price also. I redid my closet and chose not to use the towers, but after seeing yours I plan on doing my other closets using this one. While doing research on closet organizers, the price was nothing like yours. This is really good quality for $150. Great job...

In reply to I love this. I love the price by freefromburdens
Sat, 02/15/2014 - 12:48
Thank you so much!!
It really was a great price, please note that without using a lot of my scraps I could not have done it, for so cheap. All of my drawers were made with scrap/reclaimed wood I had collected, and reusing wood from my old closet. The price of $150 was just for the two towers (drawers not included) and not all the other builds in my closet. I just don't want you to think that you could do it for that price if you had to buy all the wood. If you click on my blog post link I do a break down of all my costs (again not including what I had on hand) and for everything in the whole closet including the bins it was just over $300, that I personally spent. I was lucky to have so much scrap/reclaimed wood, it saved me a ton of money! Thanks again!
Sat, 02/15/2014 - 15:50
Thank you for replying back.
Thank you for replying back. I went to your blog and saw the break down. Still a good price. Good job...
Modern Park Bench
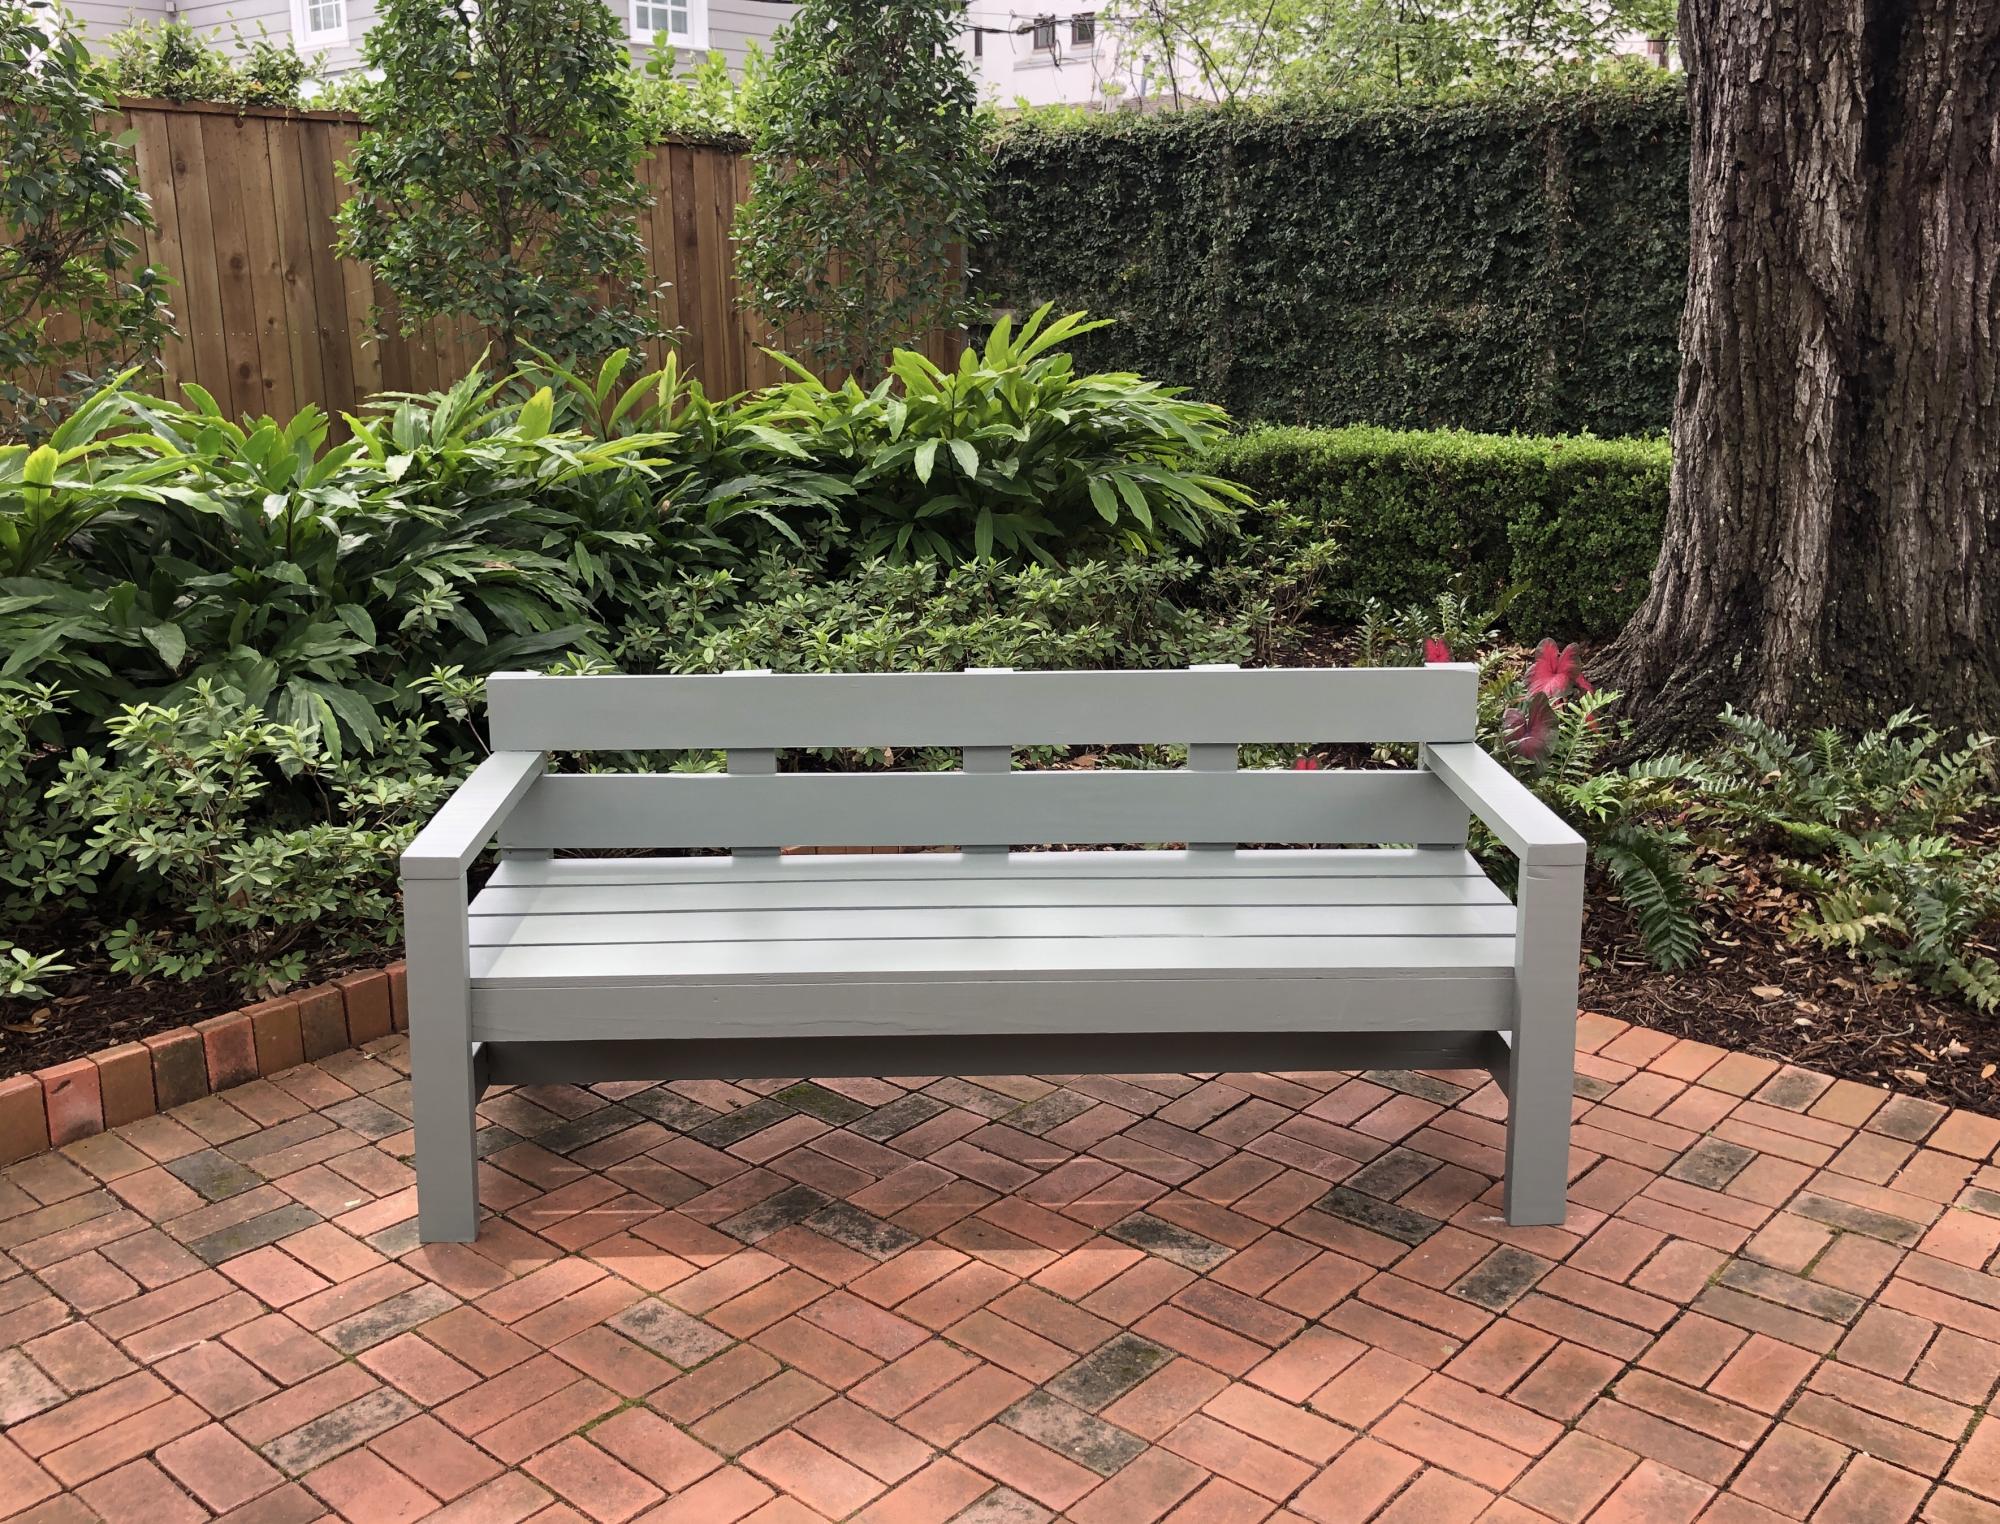
This was one of my first projects. I just used a circular saw but a mitre saw would be better. I’ll look for one soon. It was rewarding, fun and we love how it looks on our back patio.
Built from Plan(s)
Estimated Cost
$200
Estimated Time Investment
Weekend Project (10-20 Hours)
Finish Used
I primed the pieces with Sherwin-Williams exterior latex primer before assembly then painted with Sherwin-Williams Resiliance exterior latex. We chose “Retreat” as our color.
Recommended Skill Level
Beginner
kid stackable chair
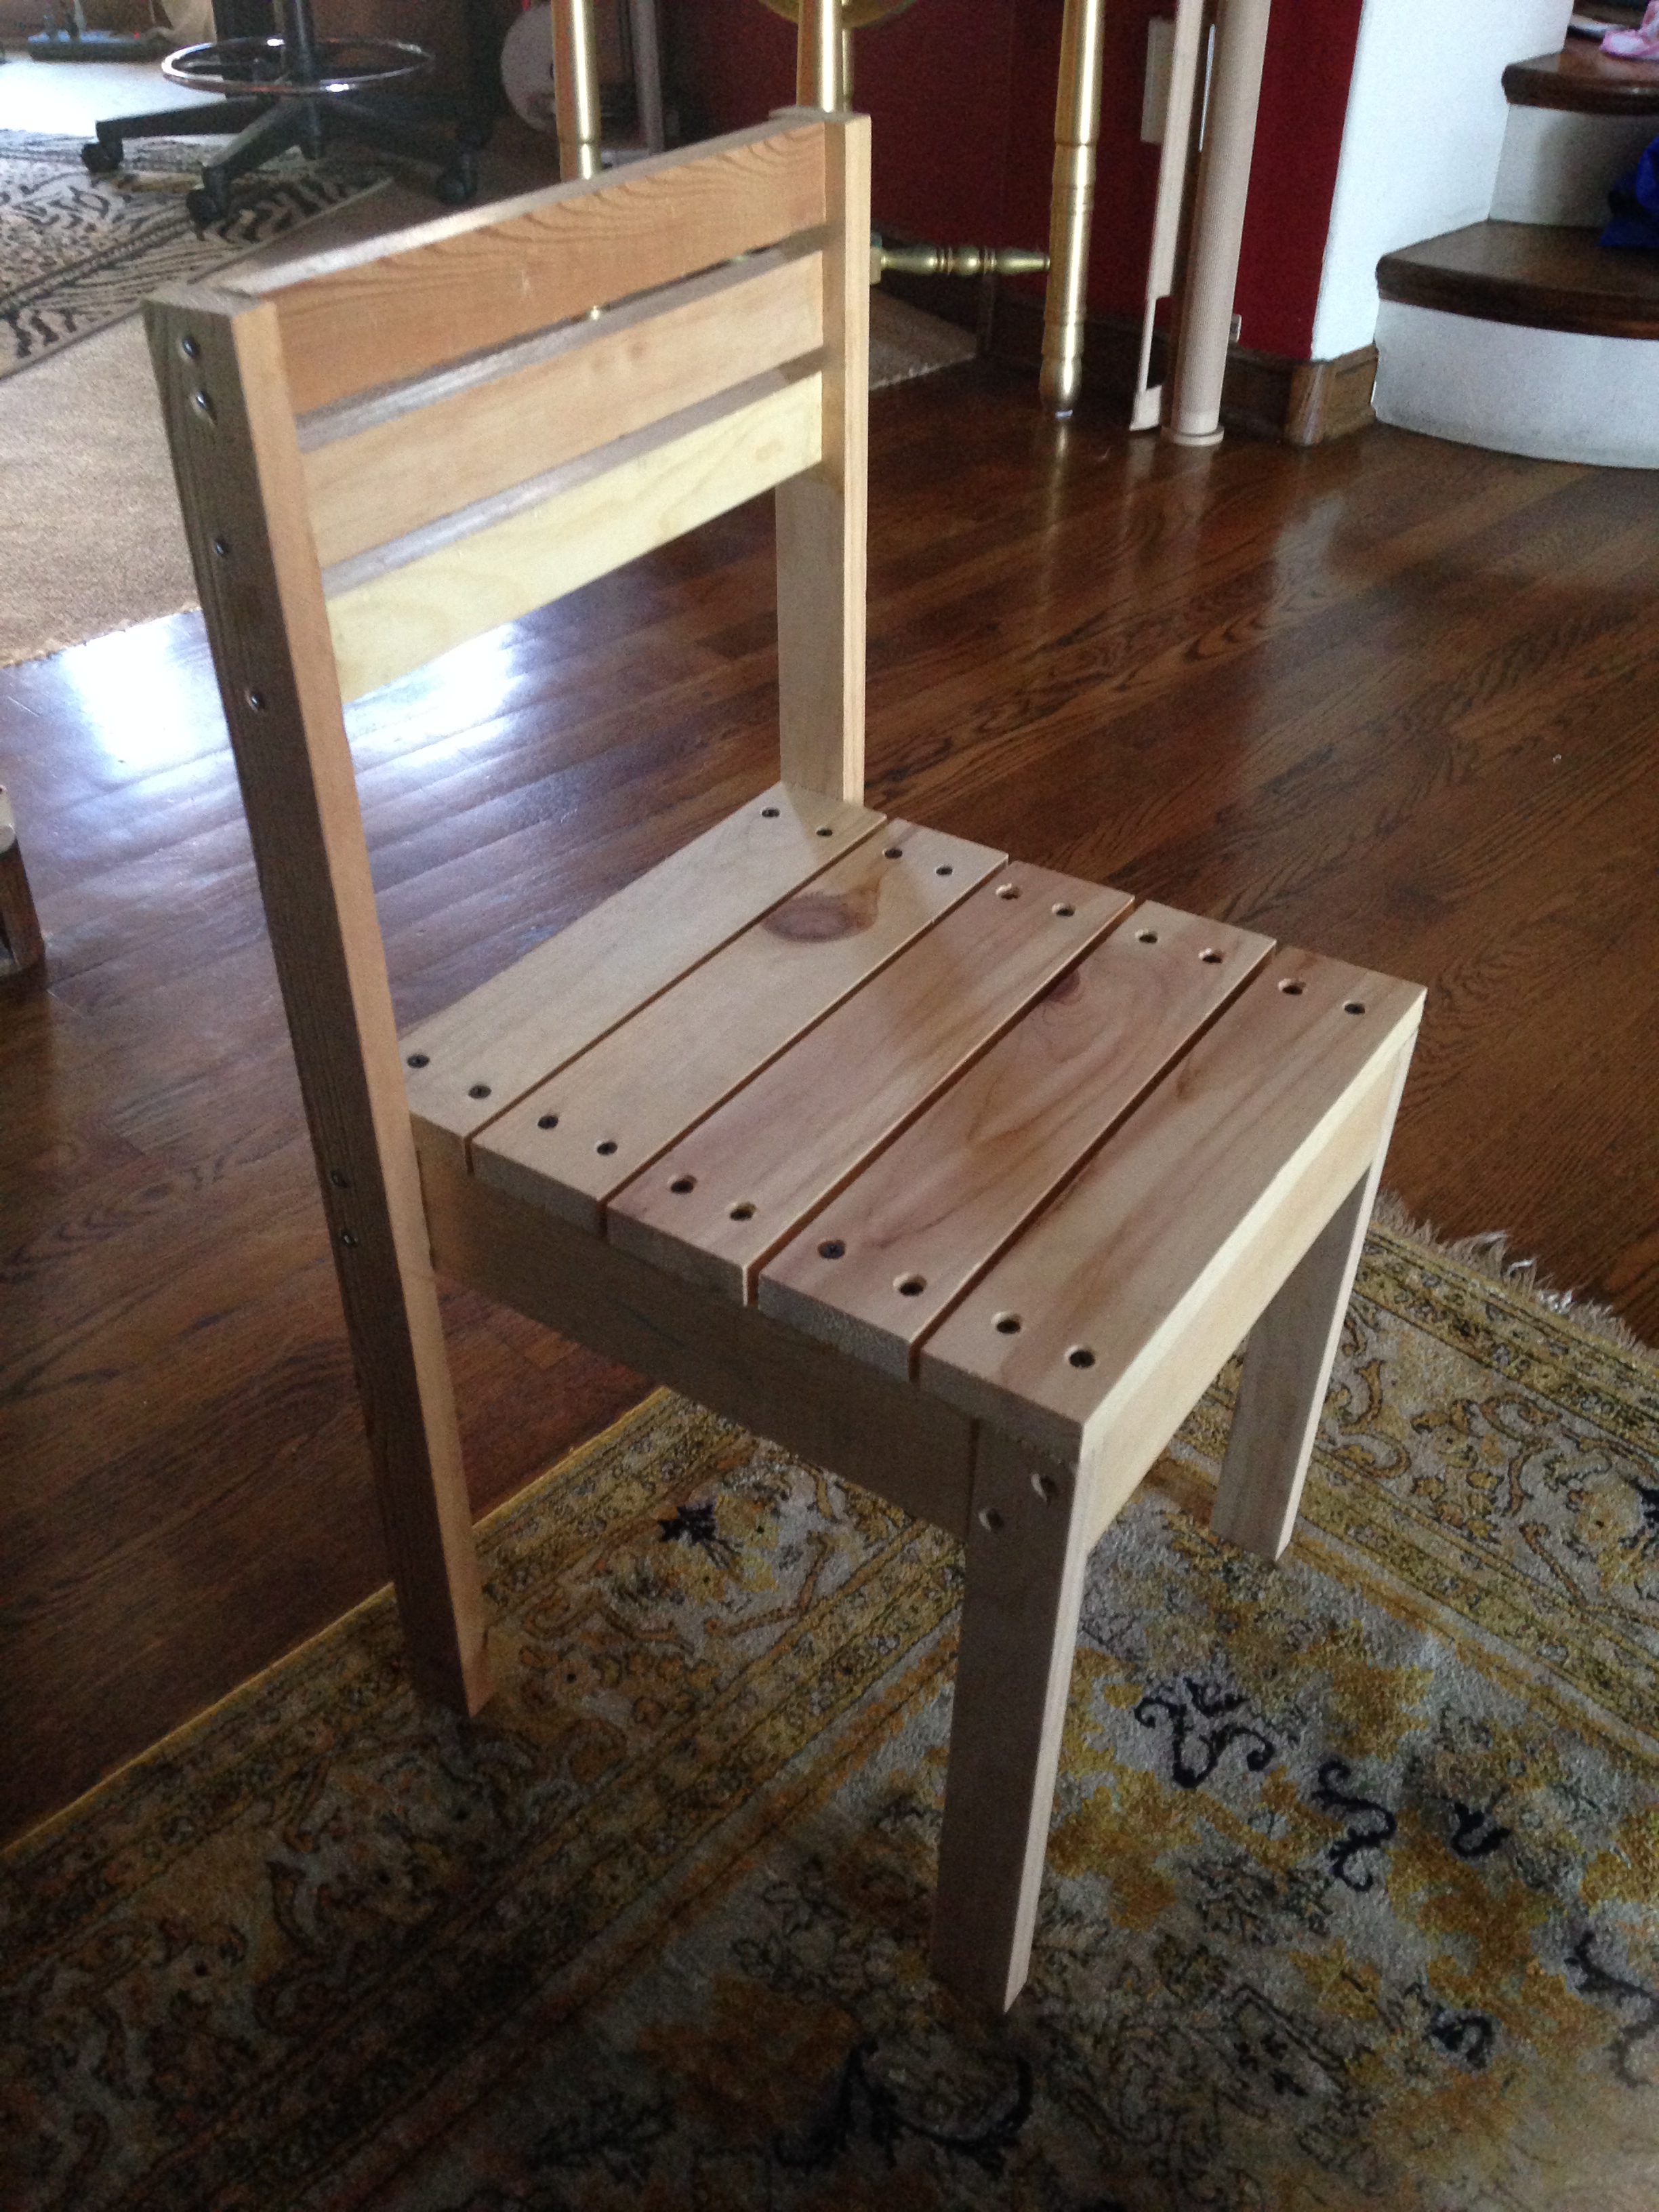
easy
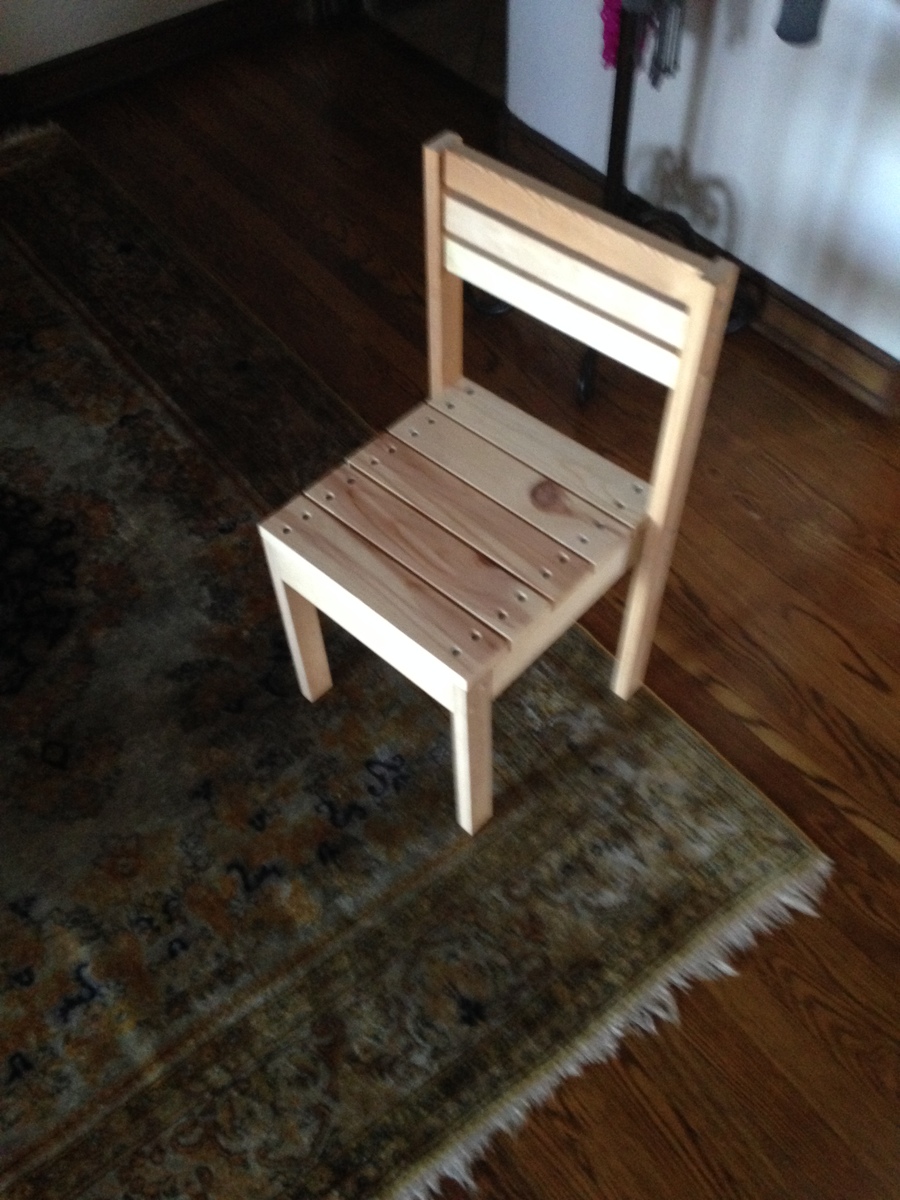
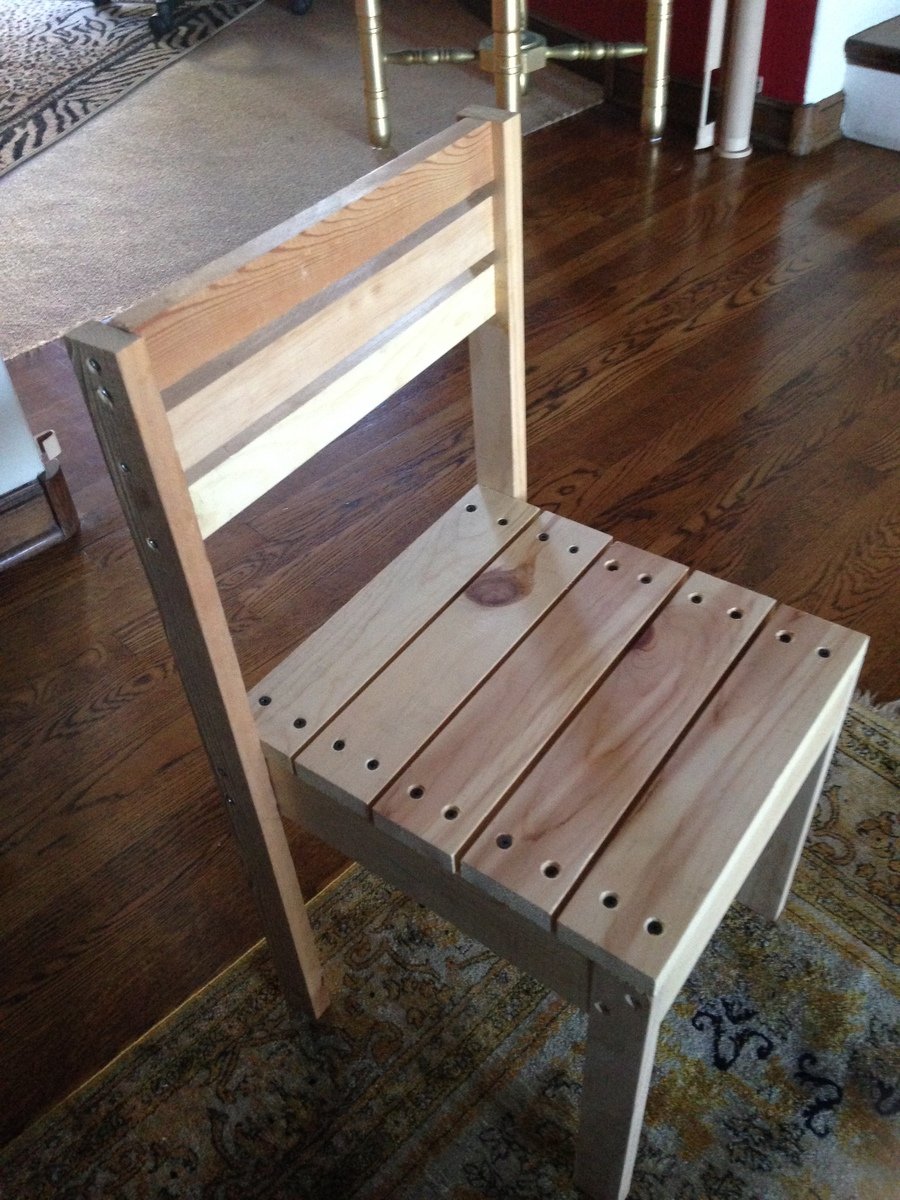
Built from Plan(s)
Estimated Cost
15
Estimated Time Investment
Afternoon Project (3-6 Hours)
Finish Used
none, just sanded really well
Recommended Skill Level
Starter Project
Cedar Planter for Pole Beans

Increased width of box to 46" by using 8 fence boards instead of 3. put base at 12" down, lined box with landscaping fabric to hold dirt. Created trellis with 1x2 boards with 10" long corner braces, spaced screws 6" apart around edges and weaved cotton thread to create the trellis. Used 12" scraps of 2x2 to create a "slot" inside the center of the planter to support the trellis. Added container mix and green pole beans started in egg cartons earlier in the spring.
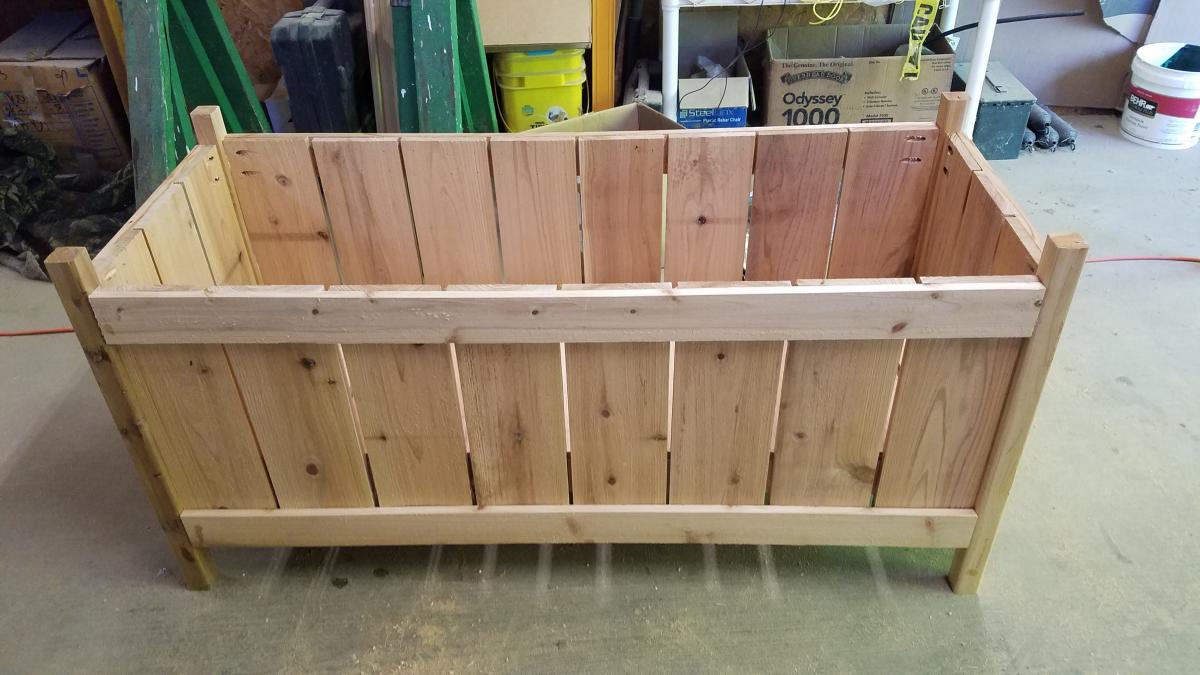
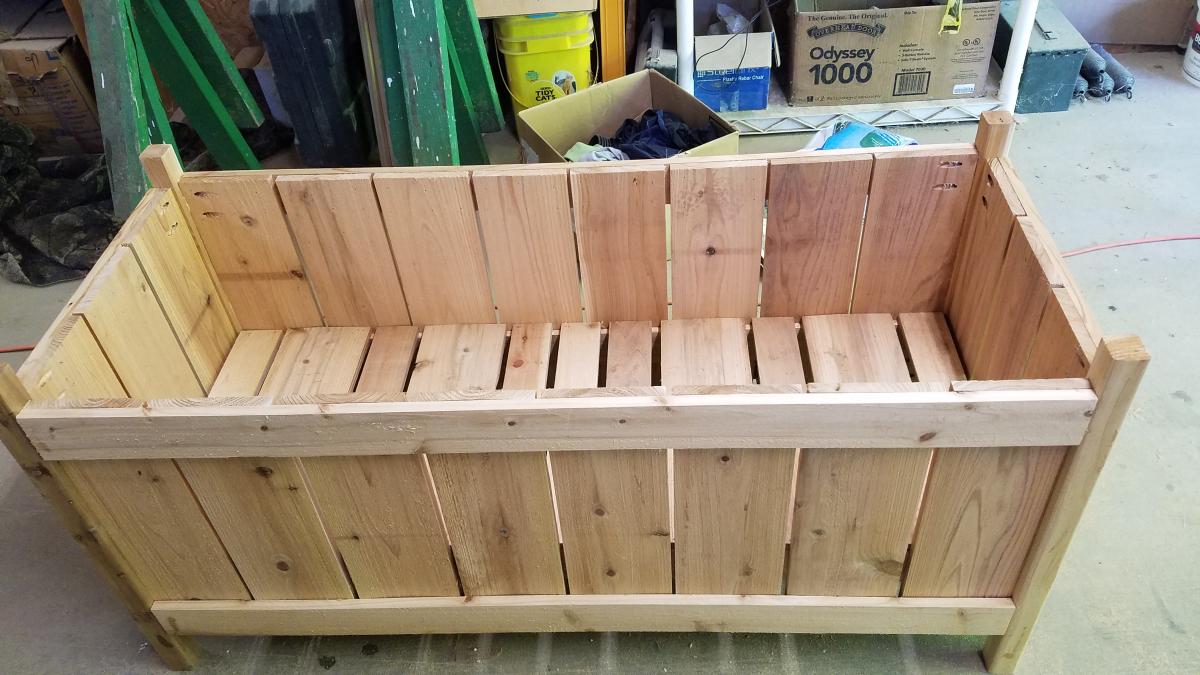
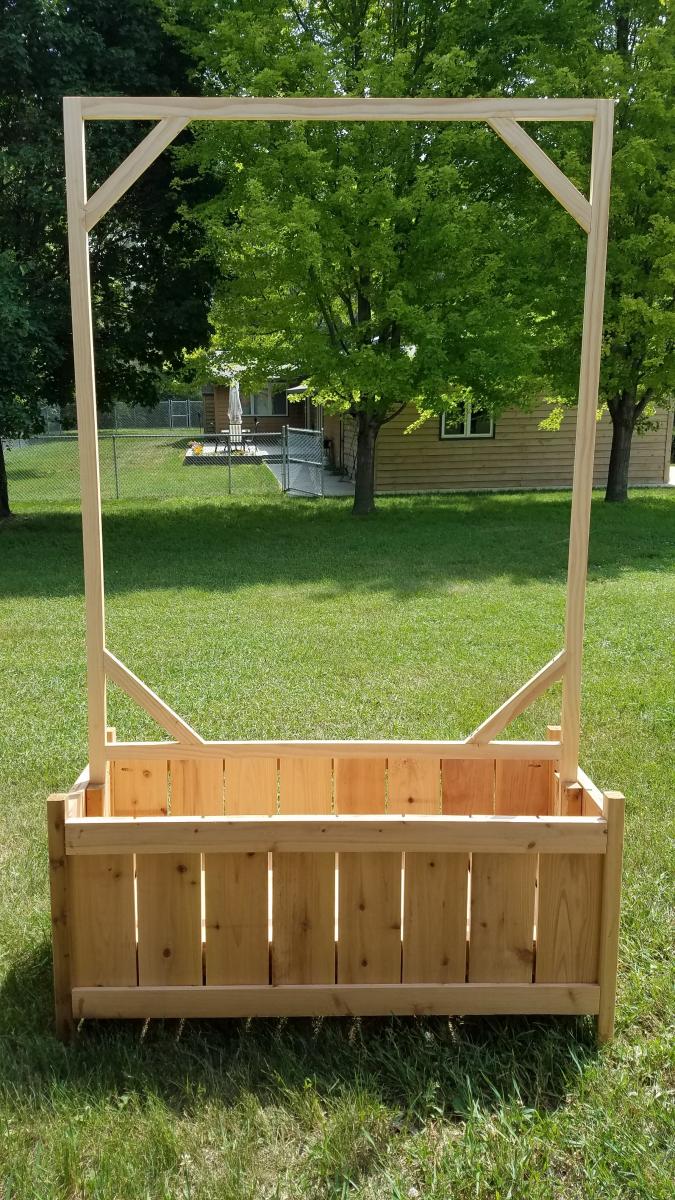
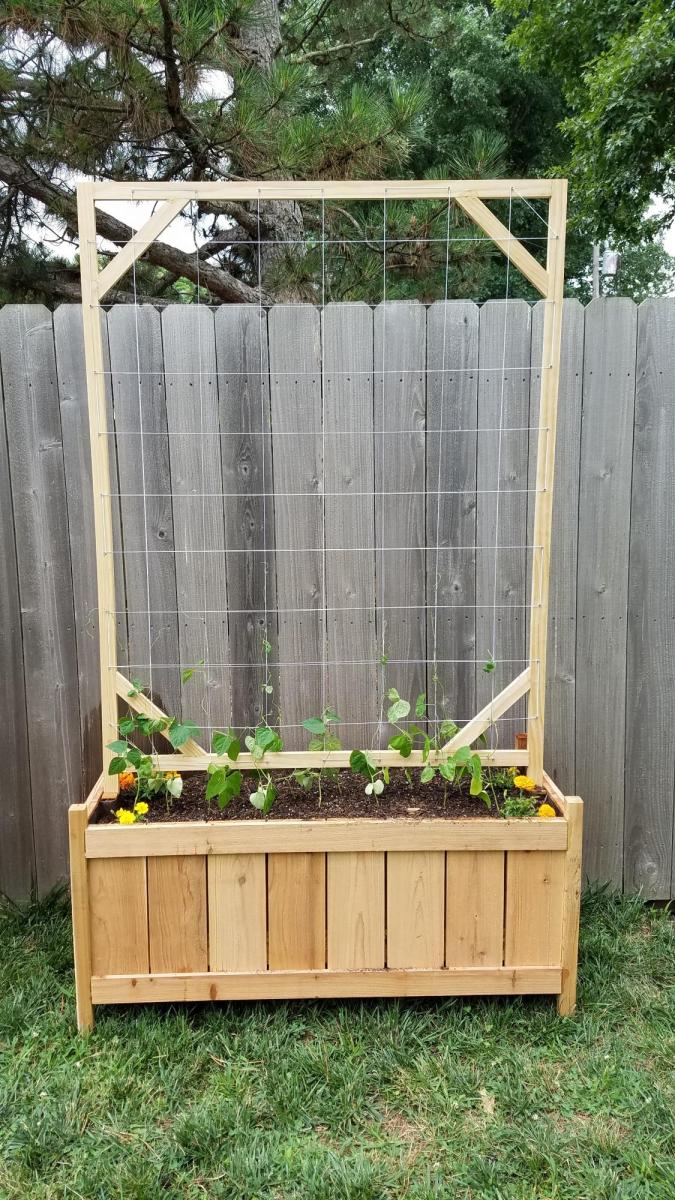
Built from Plan(s)
Estimated Cost
$35
Estimated Time Investment
Day Project (6-9 Hours)
Finish Used
None
Recommended Skill Level
Intermediate
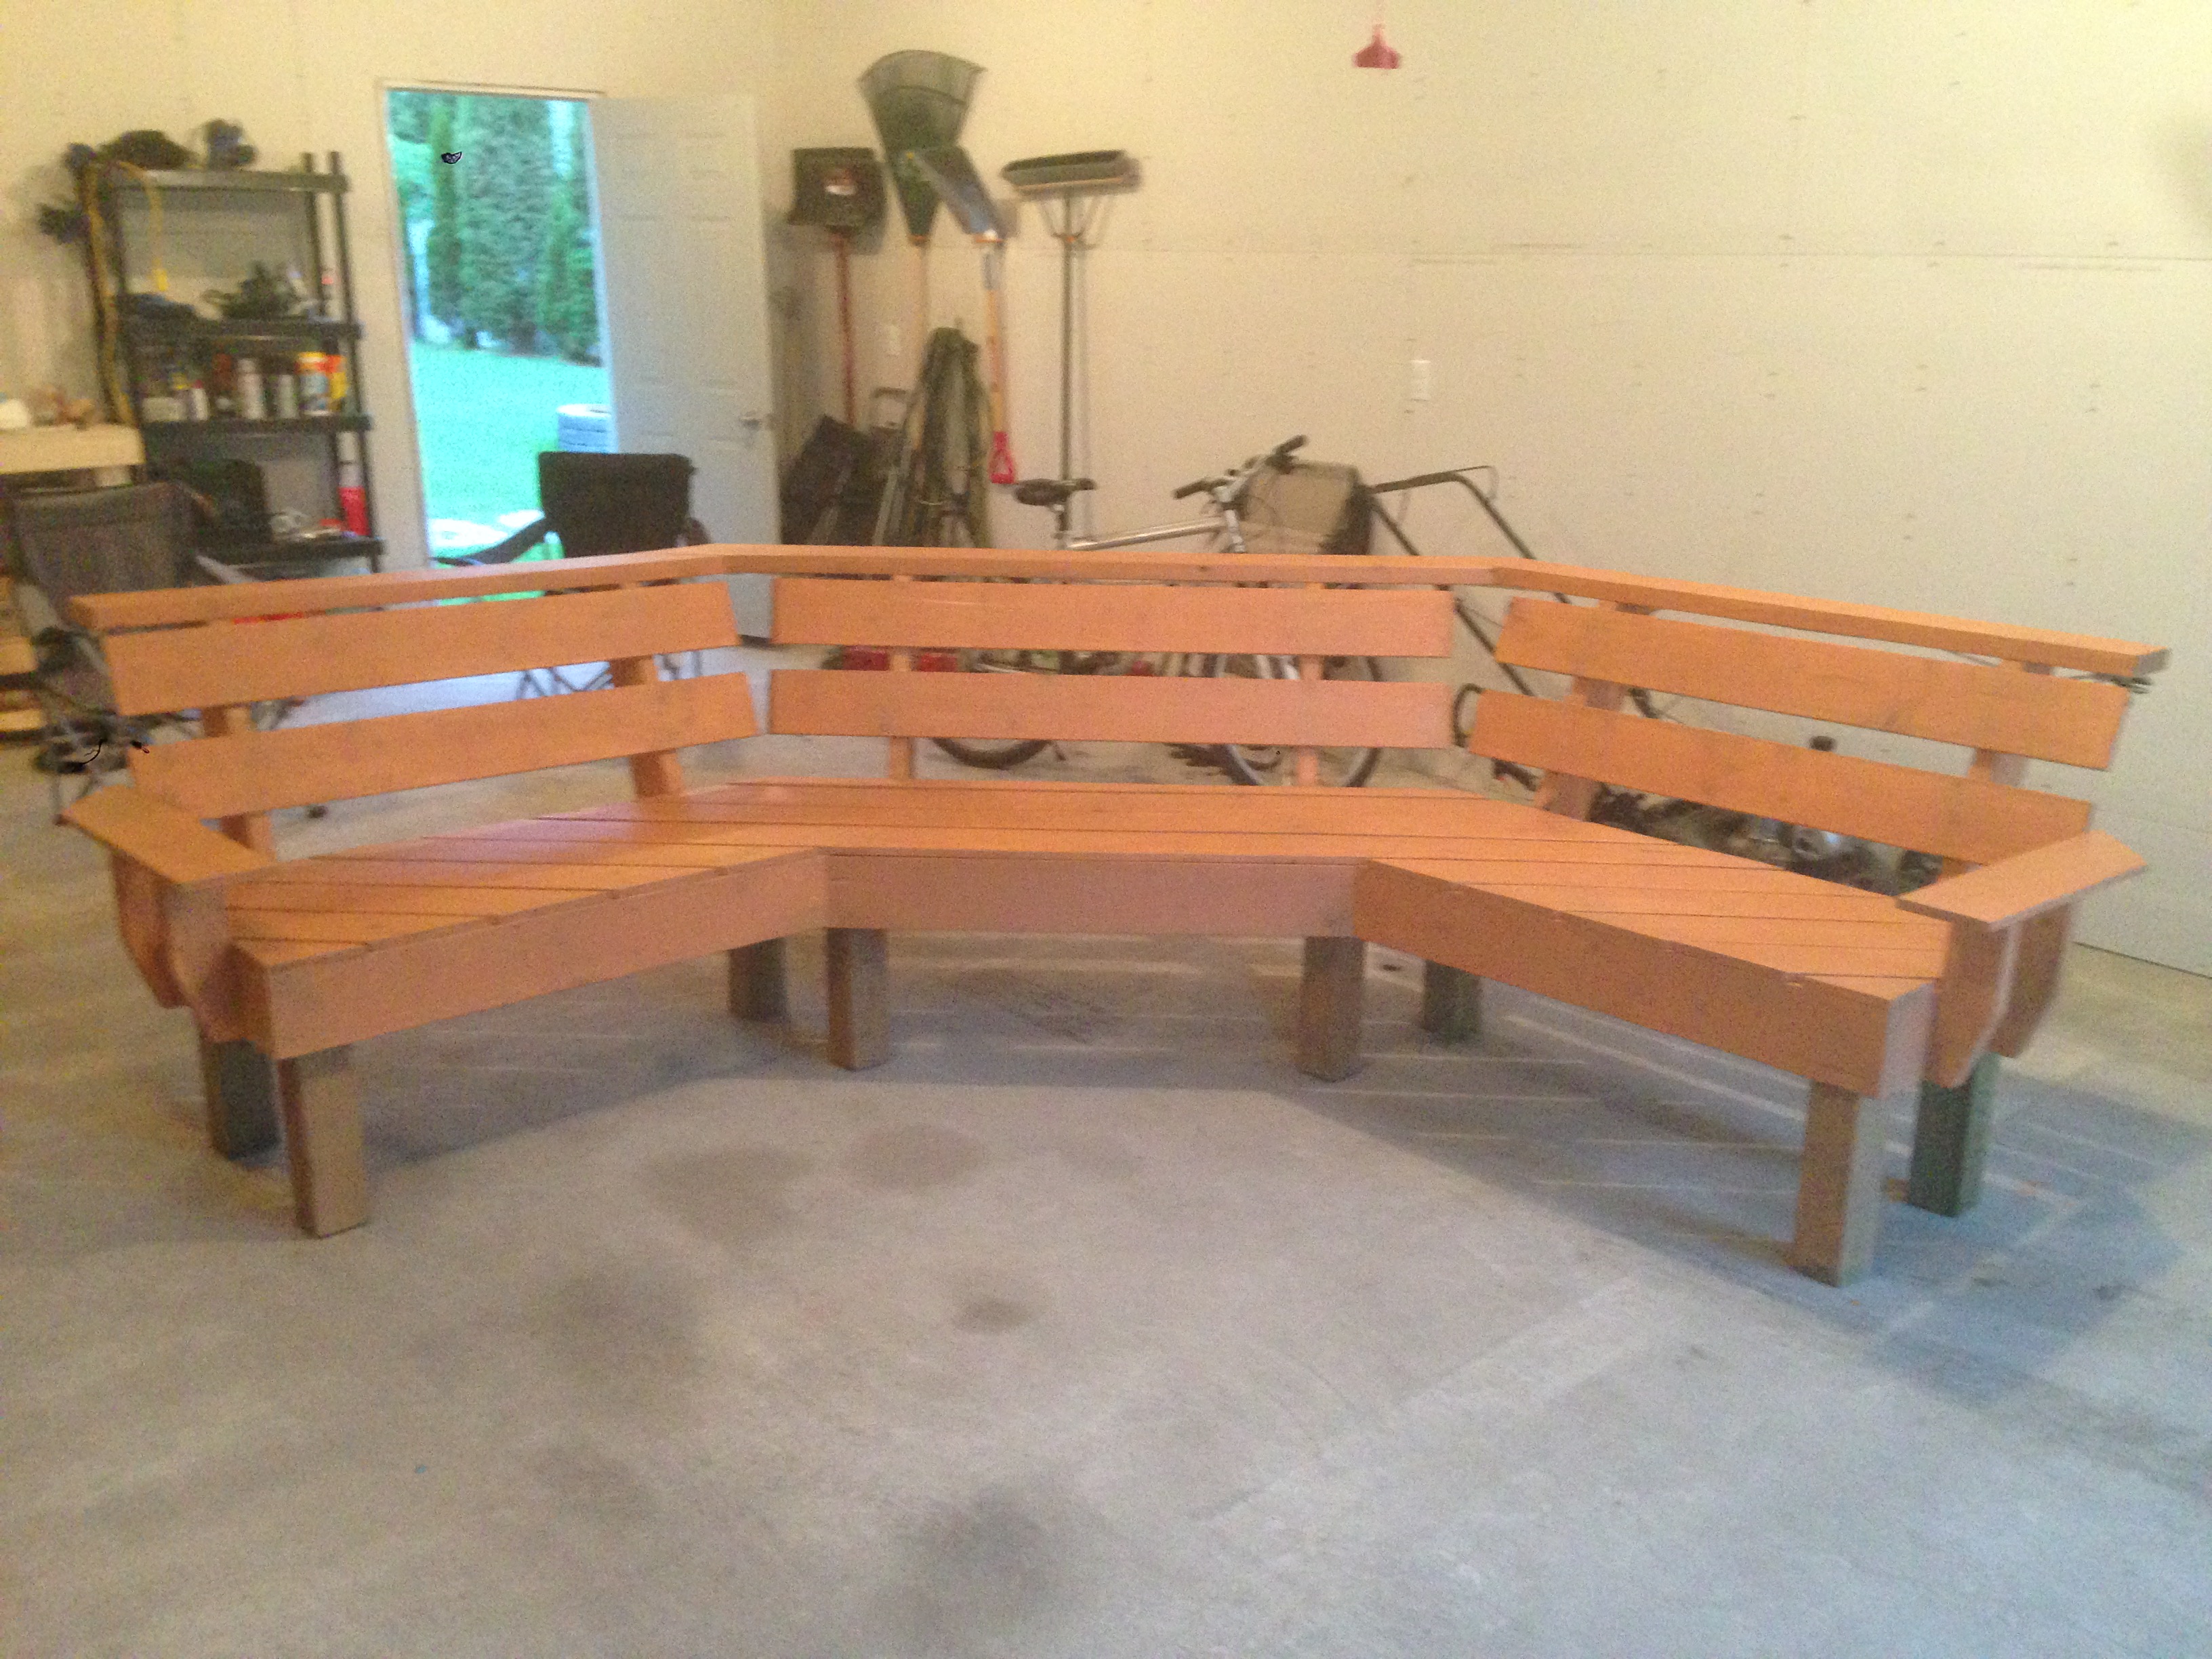
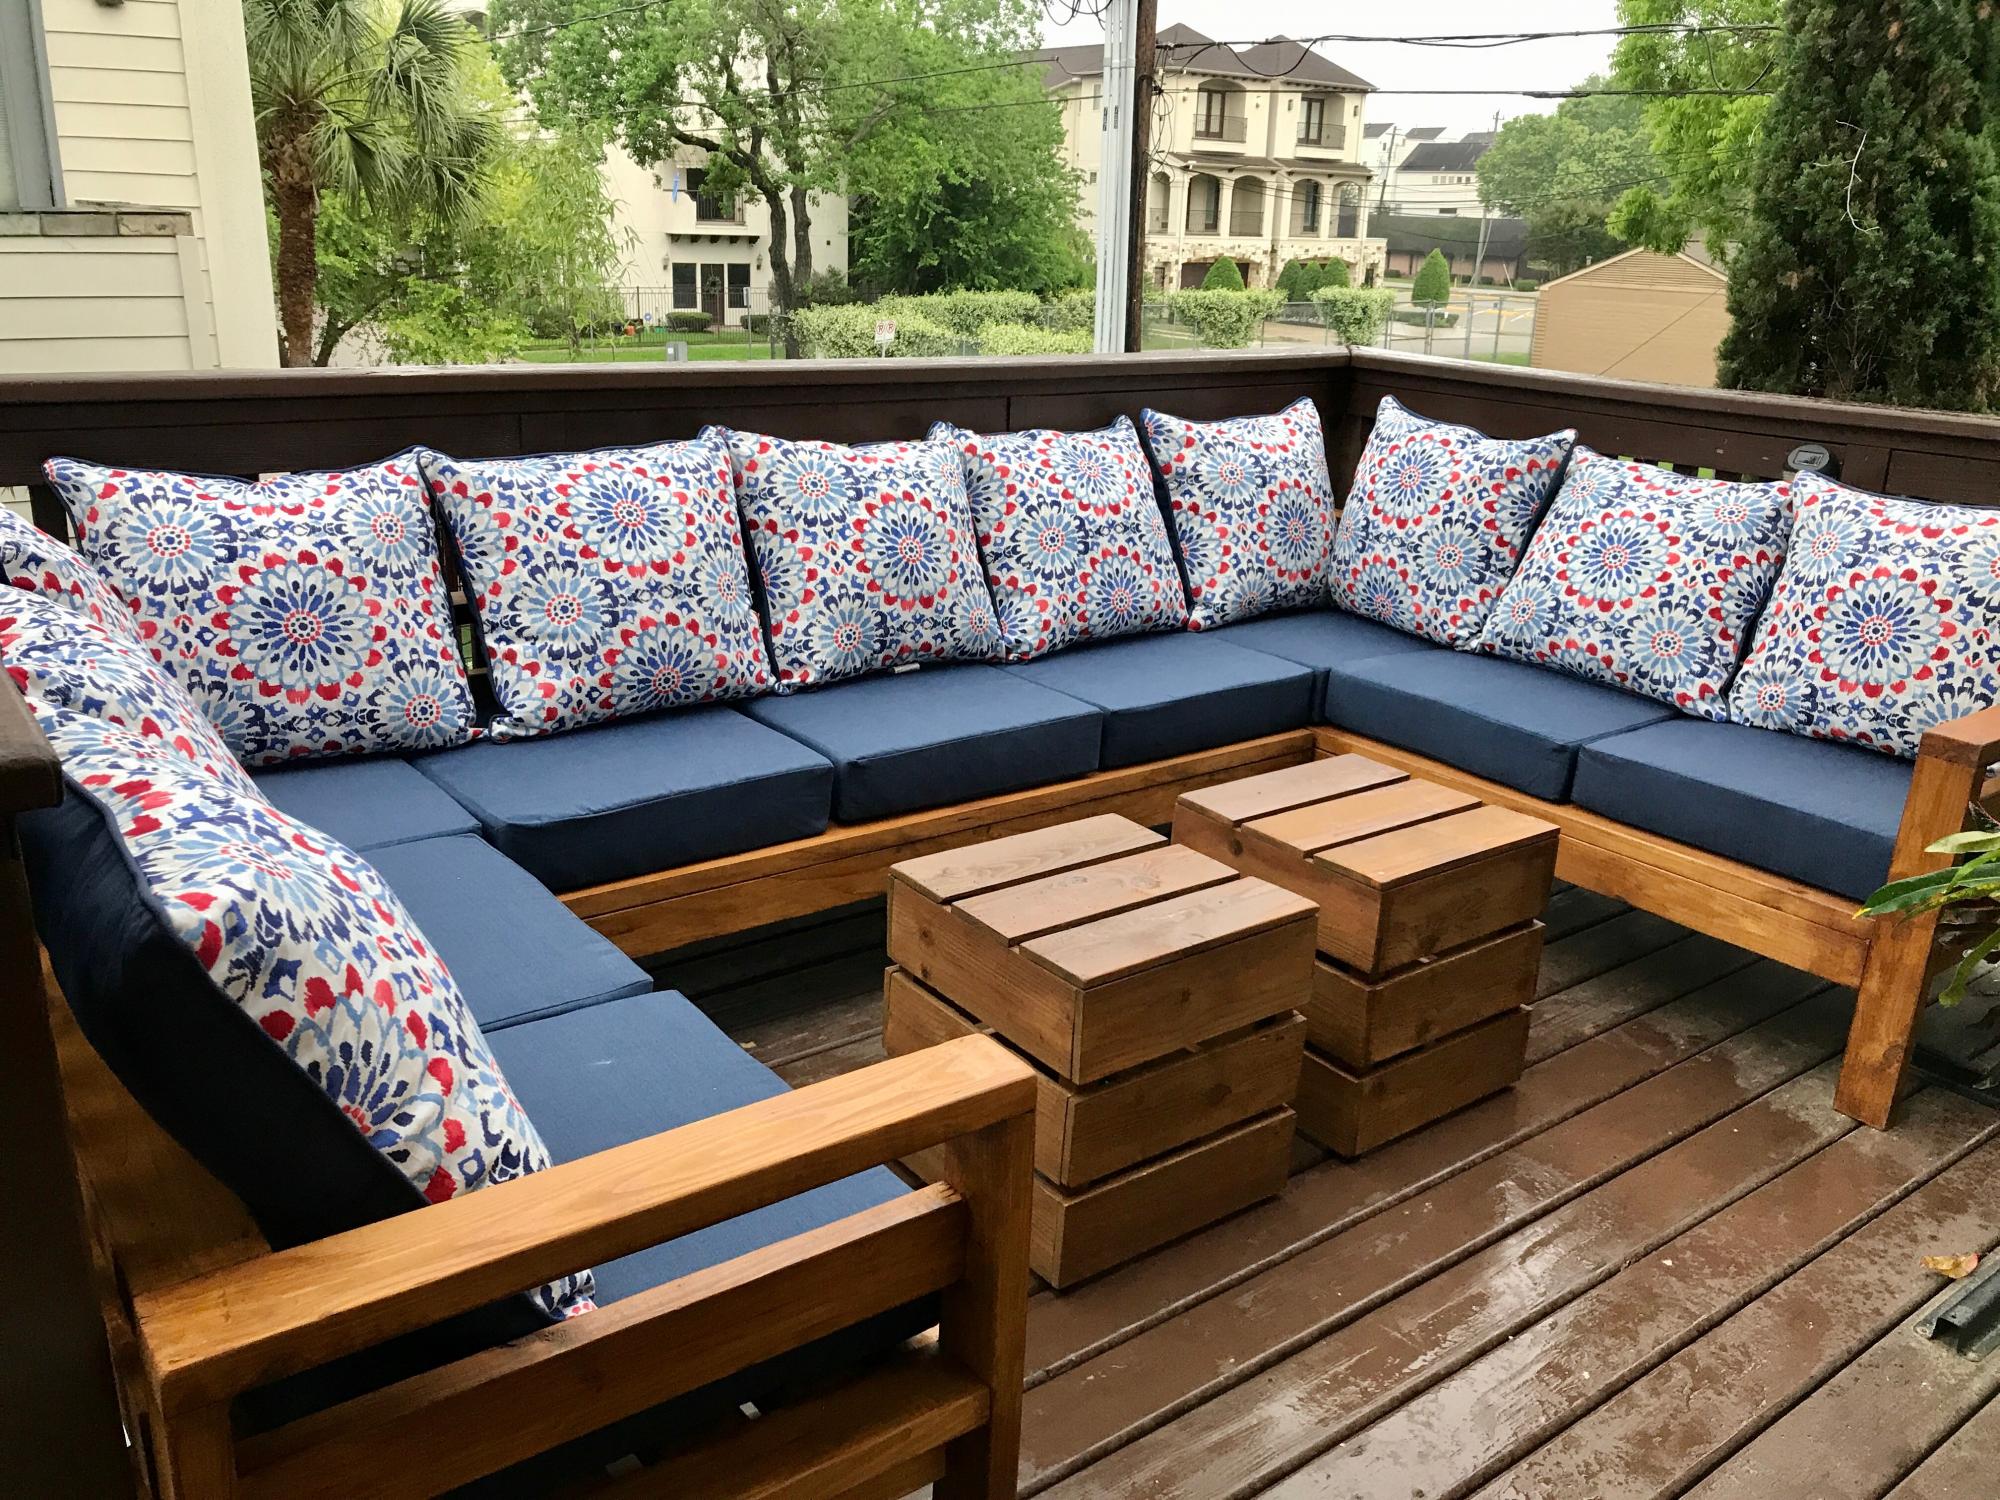
Simple Modern Outdoor Sectional
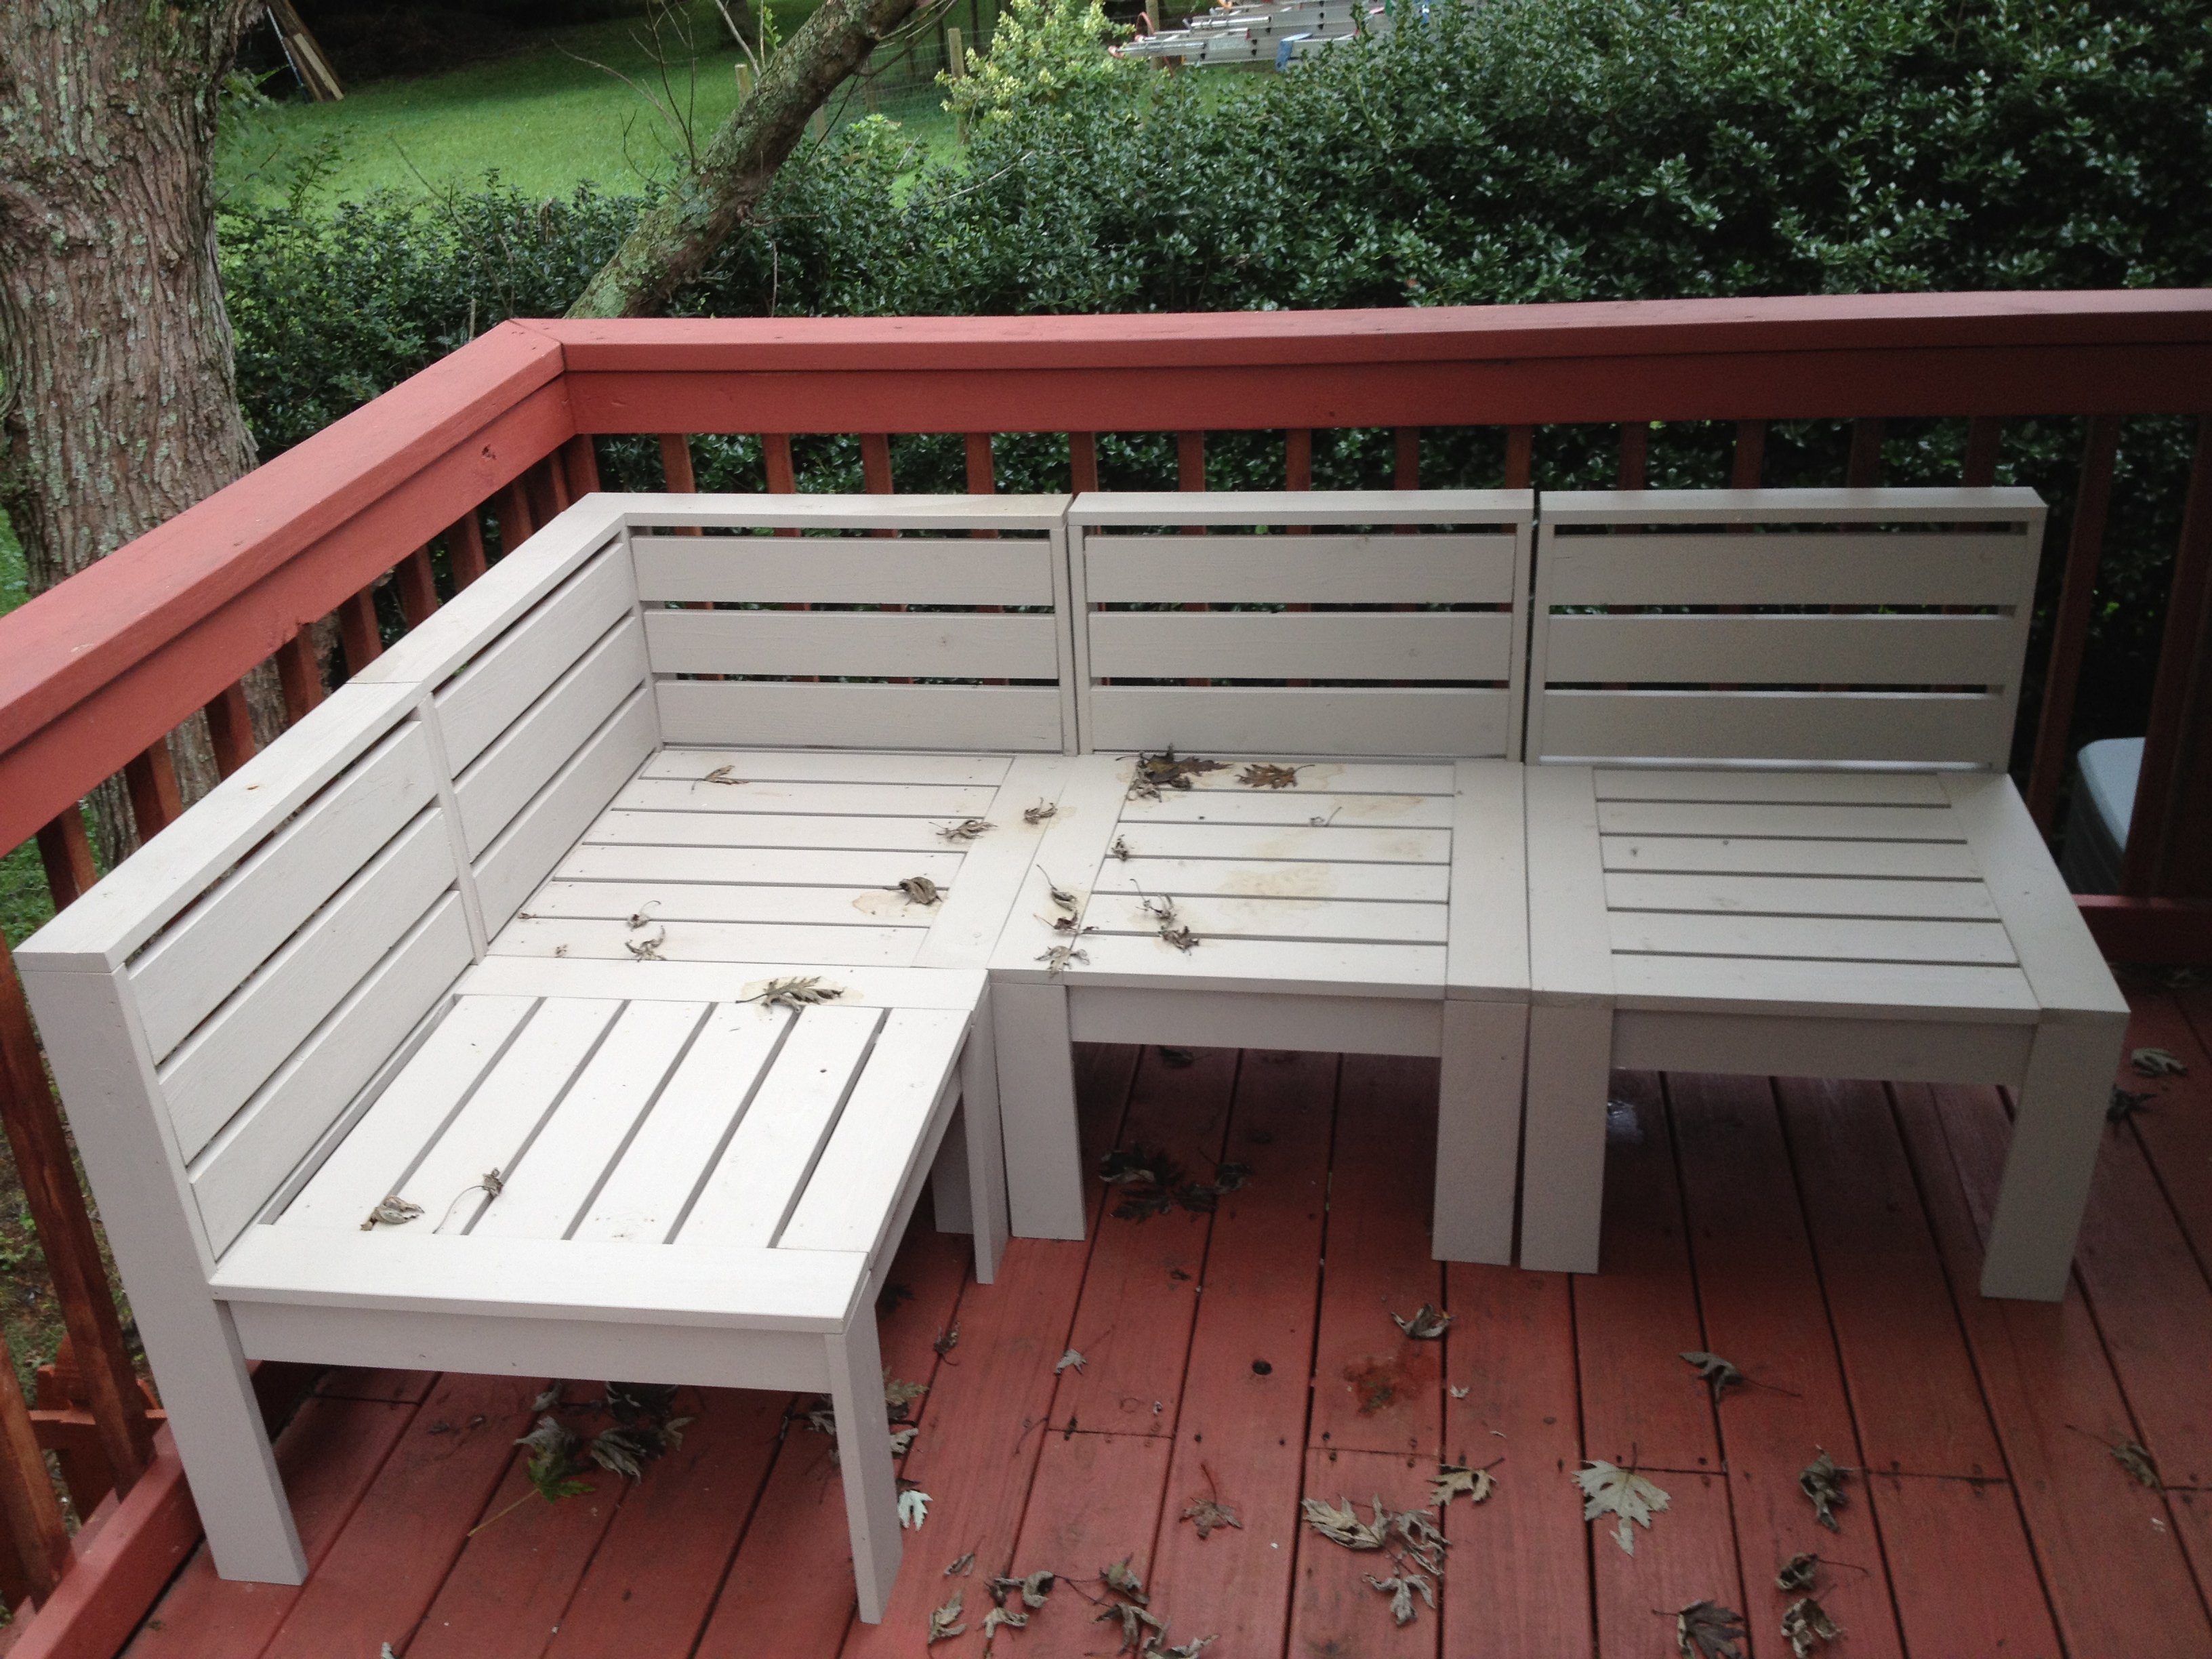
This project my husband and I started together. We live in a very damp and rainy area where cushions would just be more of a pain than a comfort outside.
We decided to add slats on the back so the sectional would stand alone without cushions.
Well, after the first corner piece, I got busy and every day my husband would add another piece to it.
I did do much of the sanding and painting. We sanded and painted these before assembly, made life tons easier.
It was white pine with out exterior house paint color. We really love them!
Thank you Ana!!!
Built from Plan(s)
Estimated Cost
$170
Estimated Time Investment
Weekend Project (10-20 Hours)
Finish Used
Behr Exterior Paint and primer in one.
Recommended Skill Level
Beginner
Curved Bench
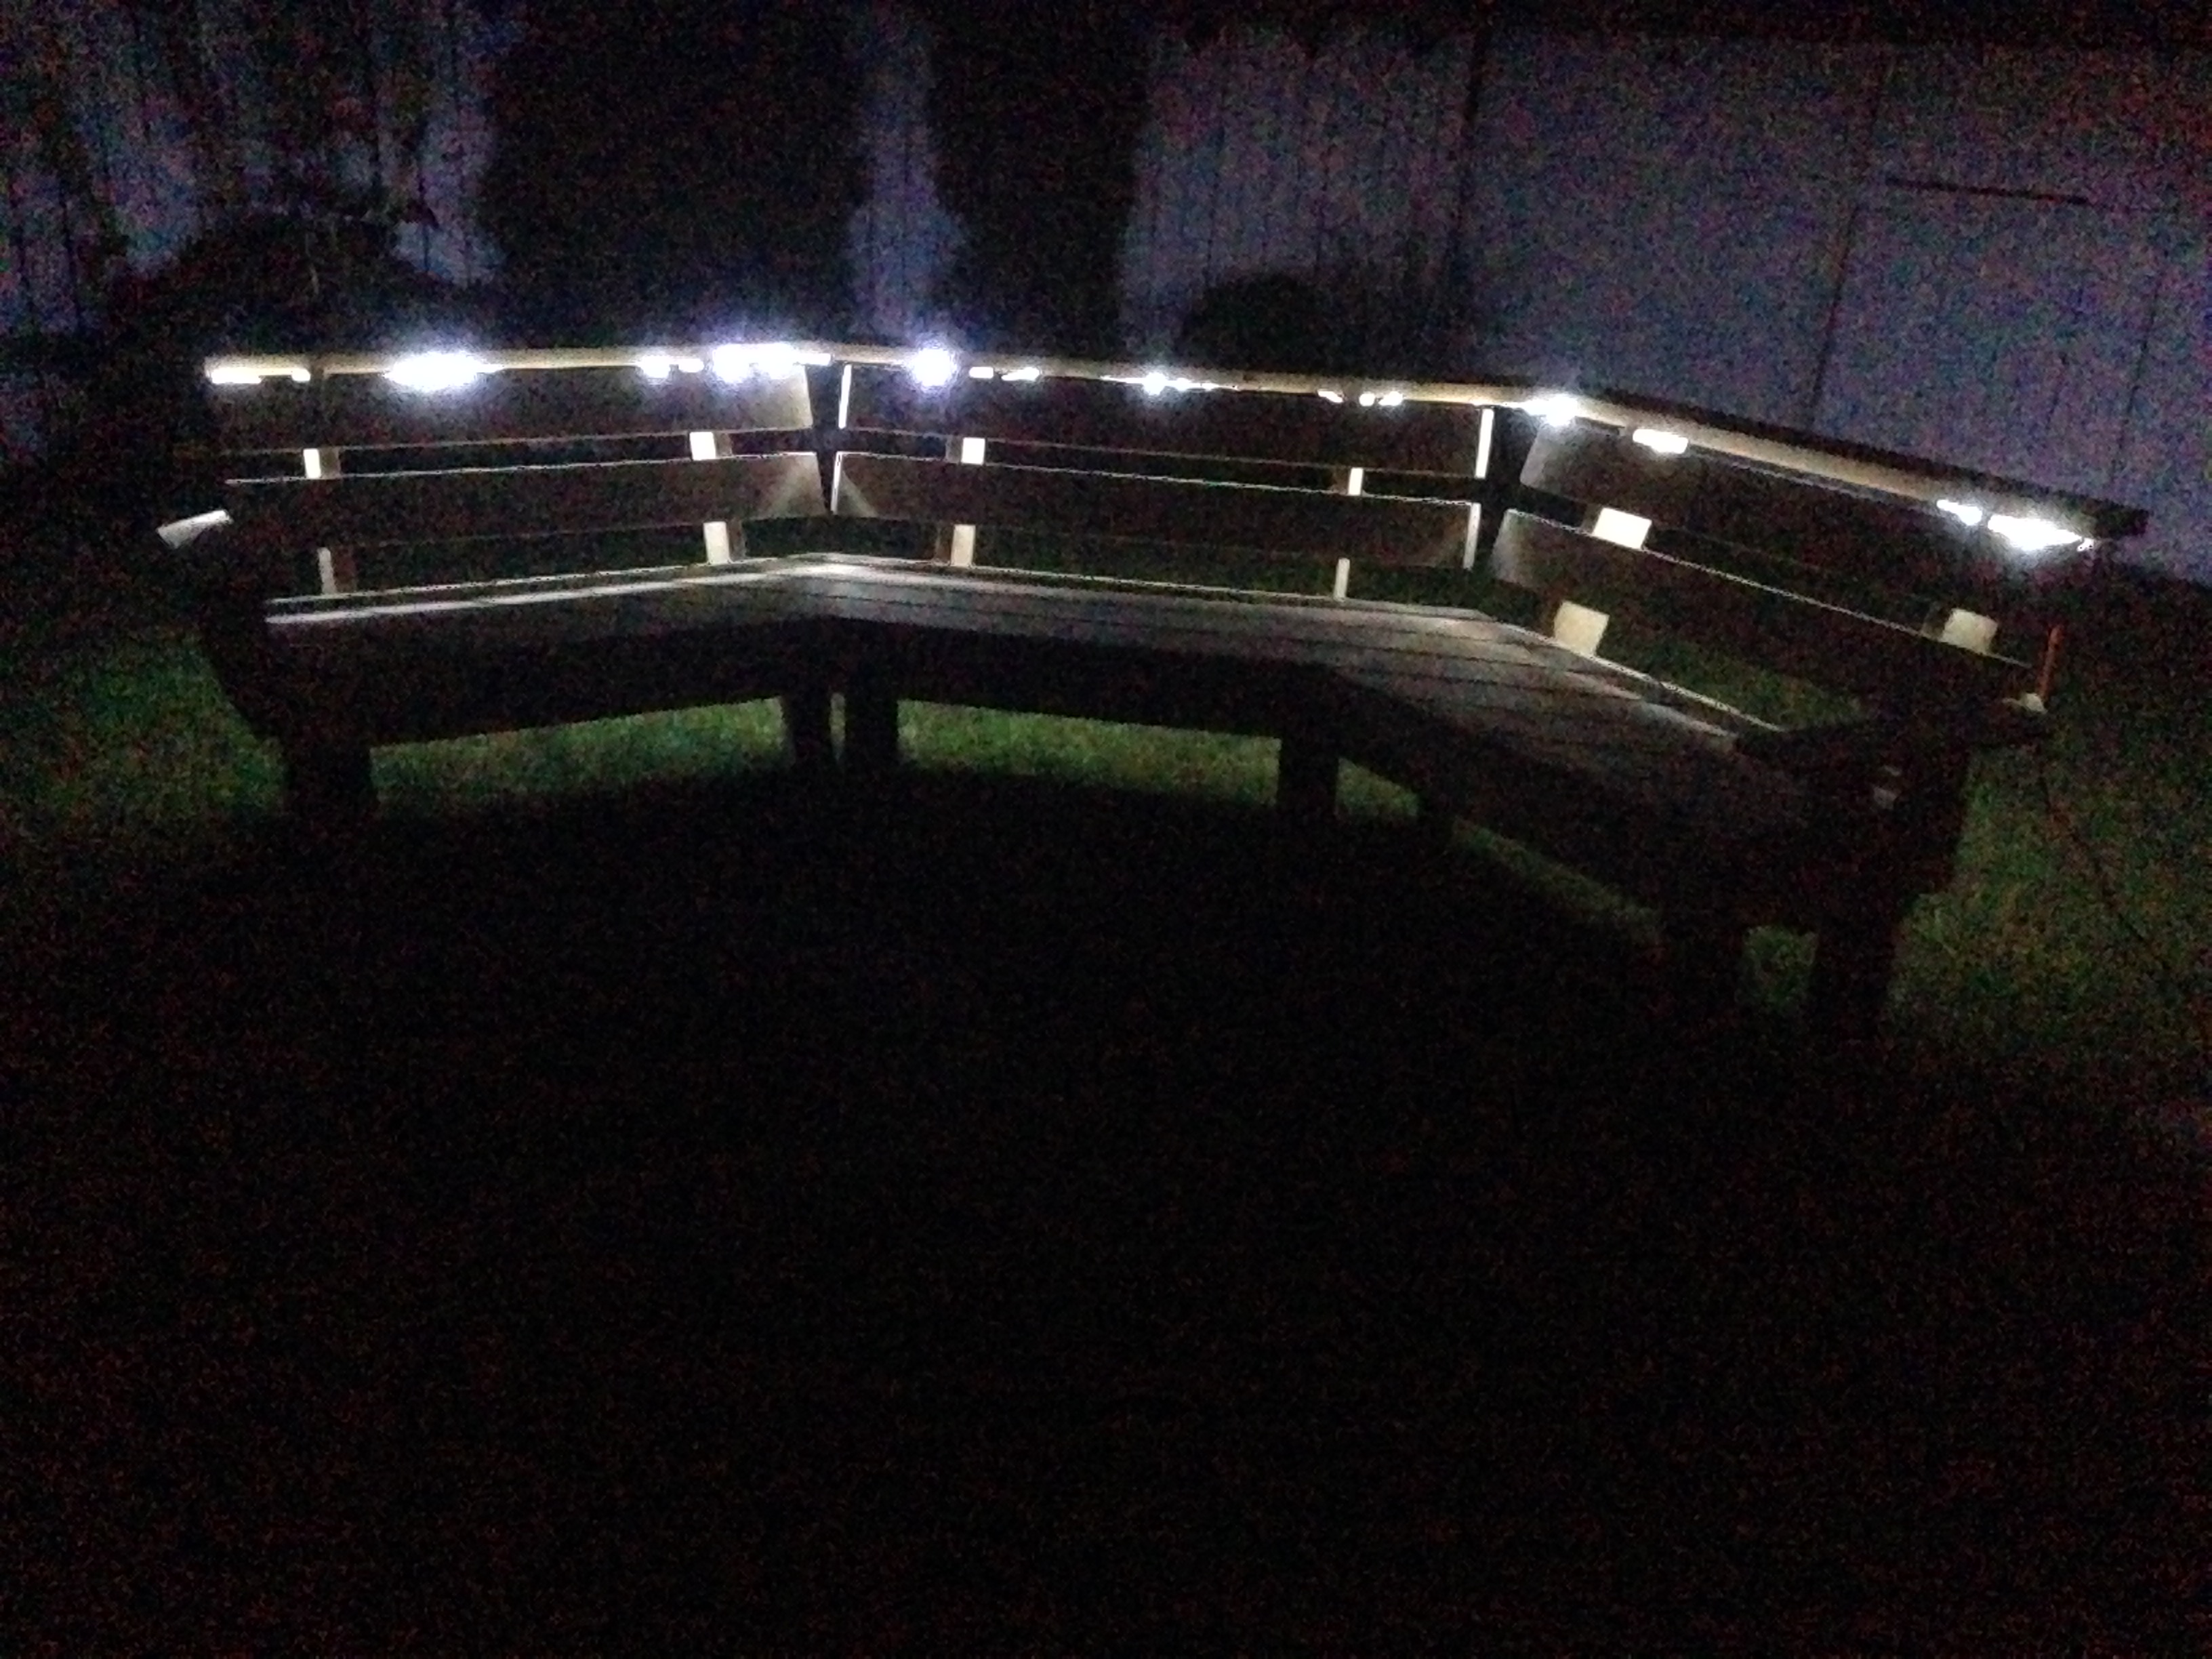
I followed your idea but i think my bench is a touch smaller. I decided to add arm rests on each end, I kept the top beverage ledge or "Bever-ledge" as I call it and ofcourse I added rope lighting along the underside. This was my first ever DIY project.
Built from Plan(s)
Estimated Cost
150
Estimated Time Investment
Weekend Project (10-20 Hours)
Finish Used
I used a Cedar Tone semi-transparent finish which turned out a little more orange than i though but it still looks good!
Recommended Skill Level
Intermediate
Large Fireplace Built-in - Built by Kristy

Entire wall fireplace built-in!


Built from Plan(s)
Rustic 3 X Hall Tree with 3 Hooks
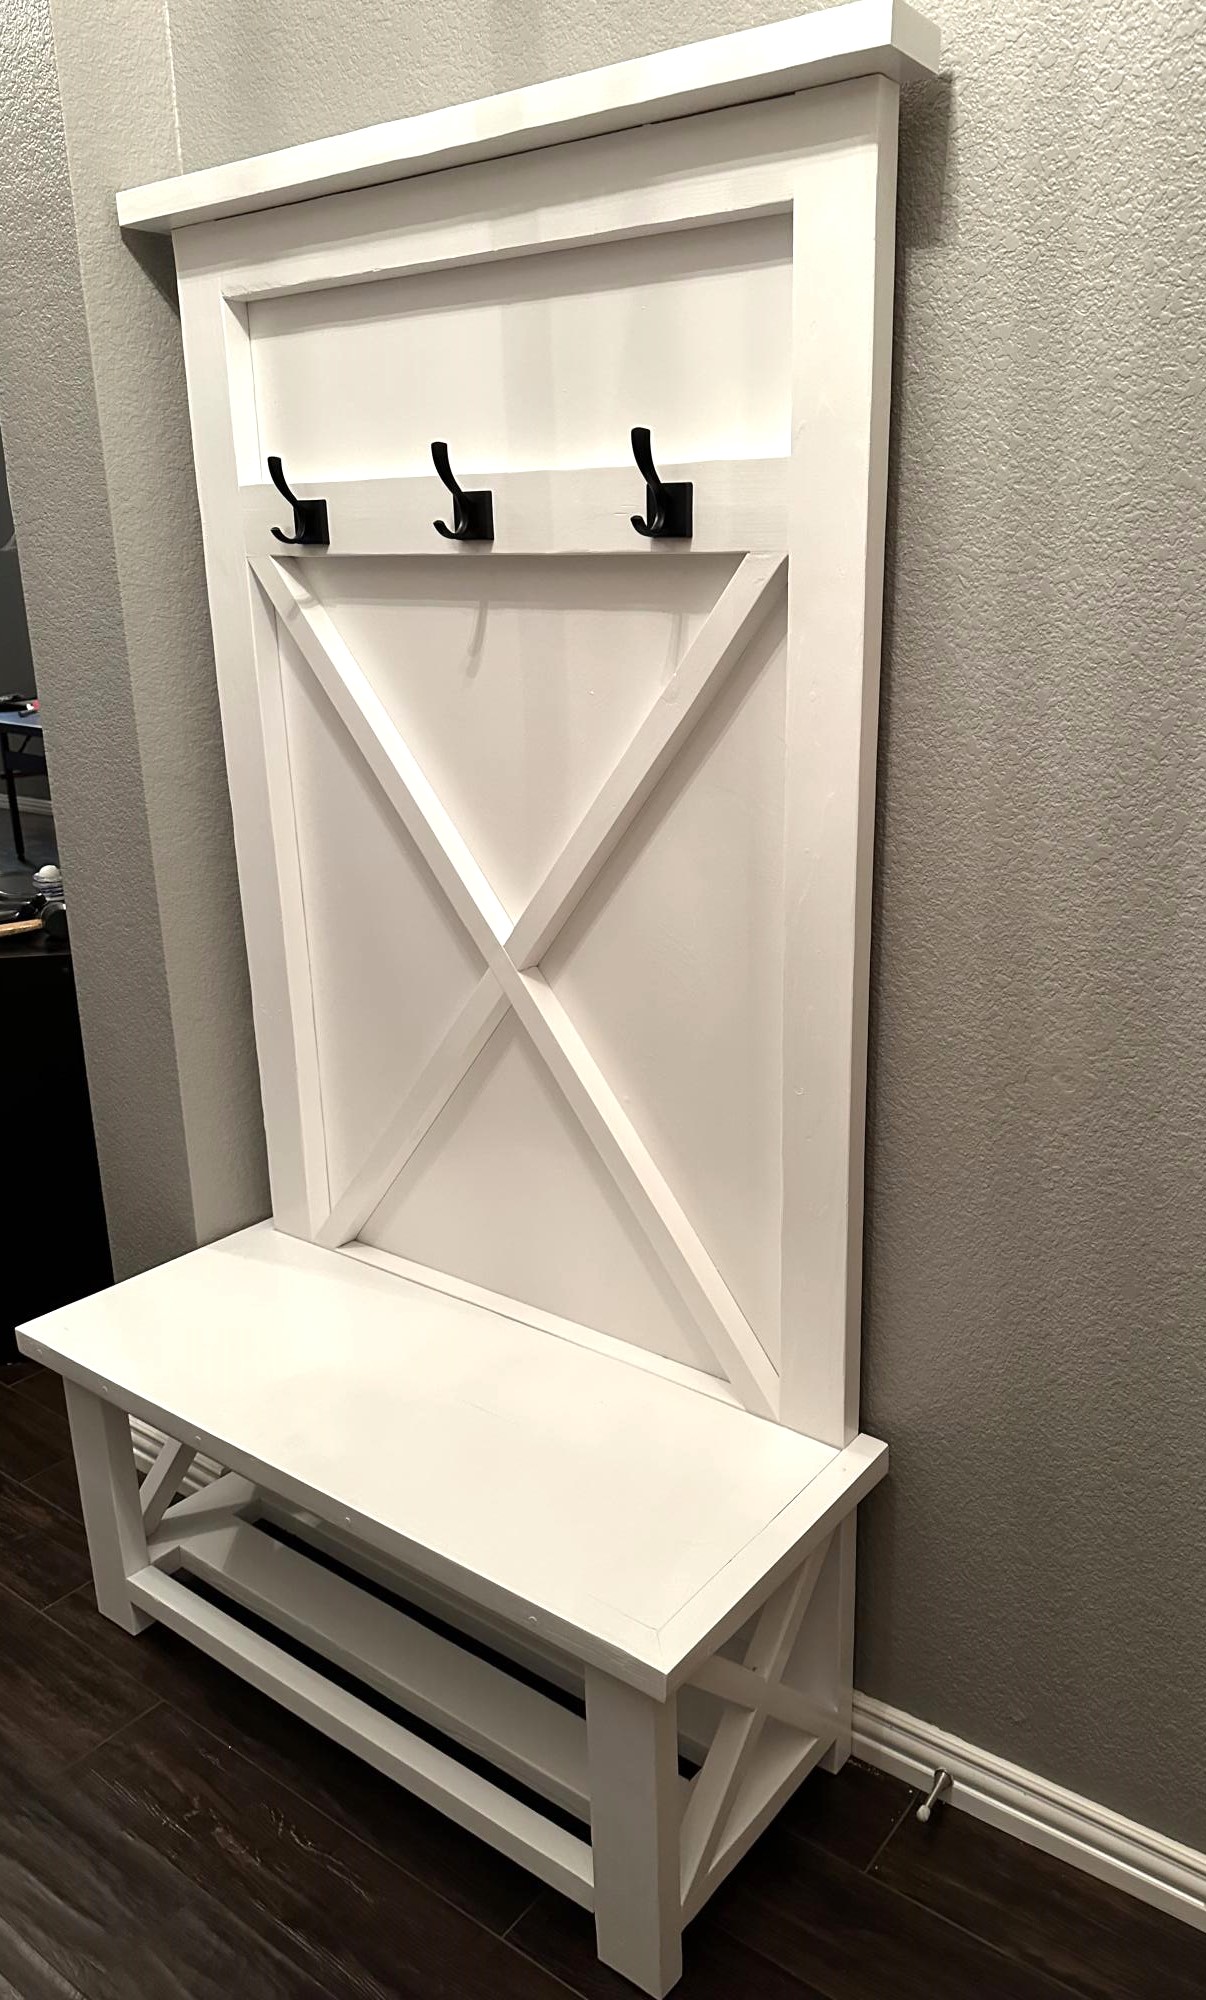
I started with the Rustic X Hall Tree plan and modified it to 43" width to fix the space. All X's are half laps cut on the miter saw.
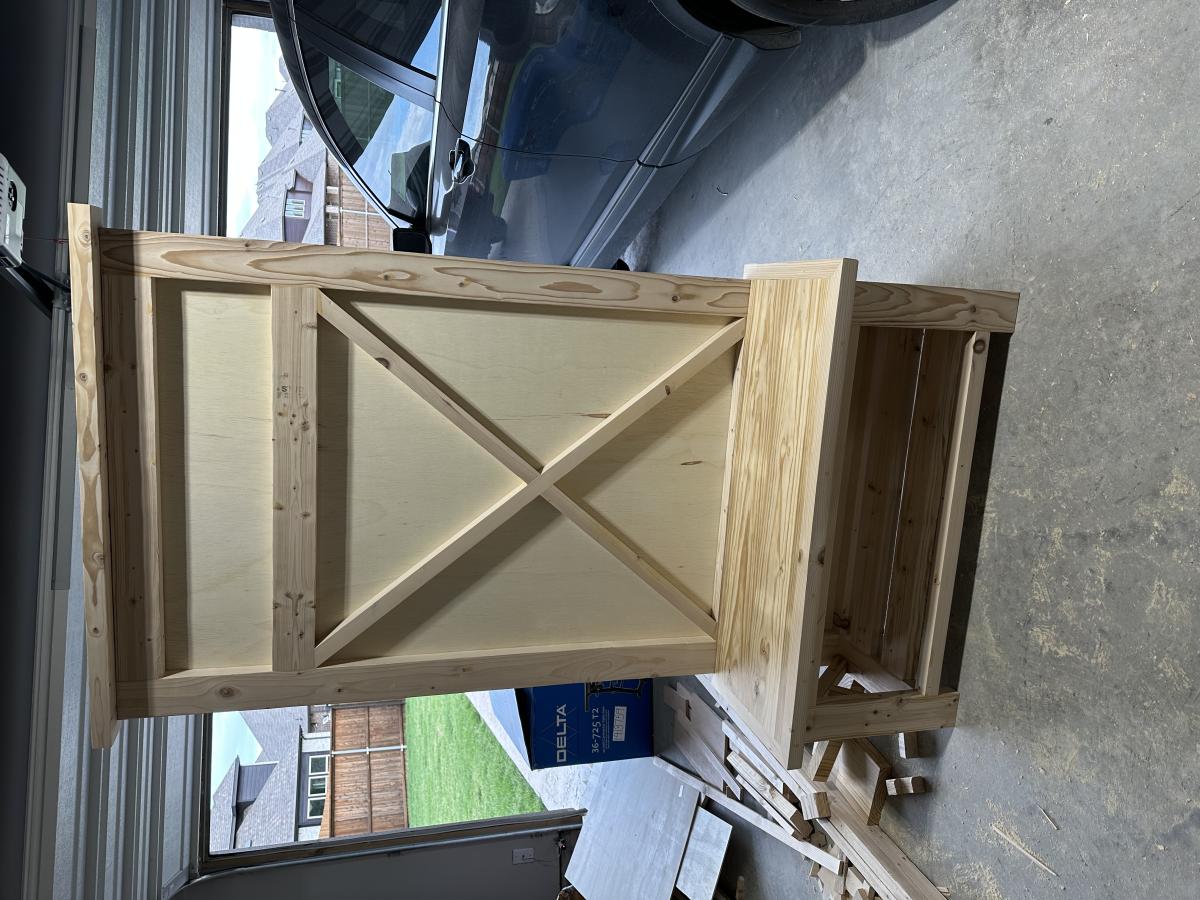
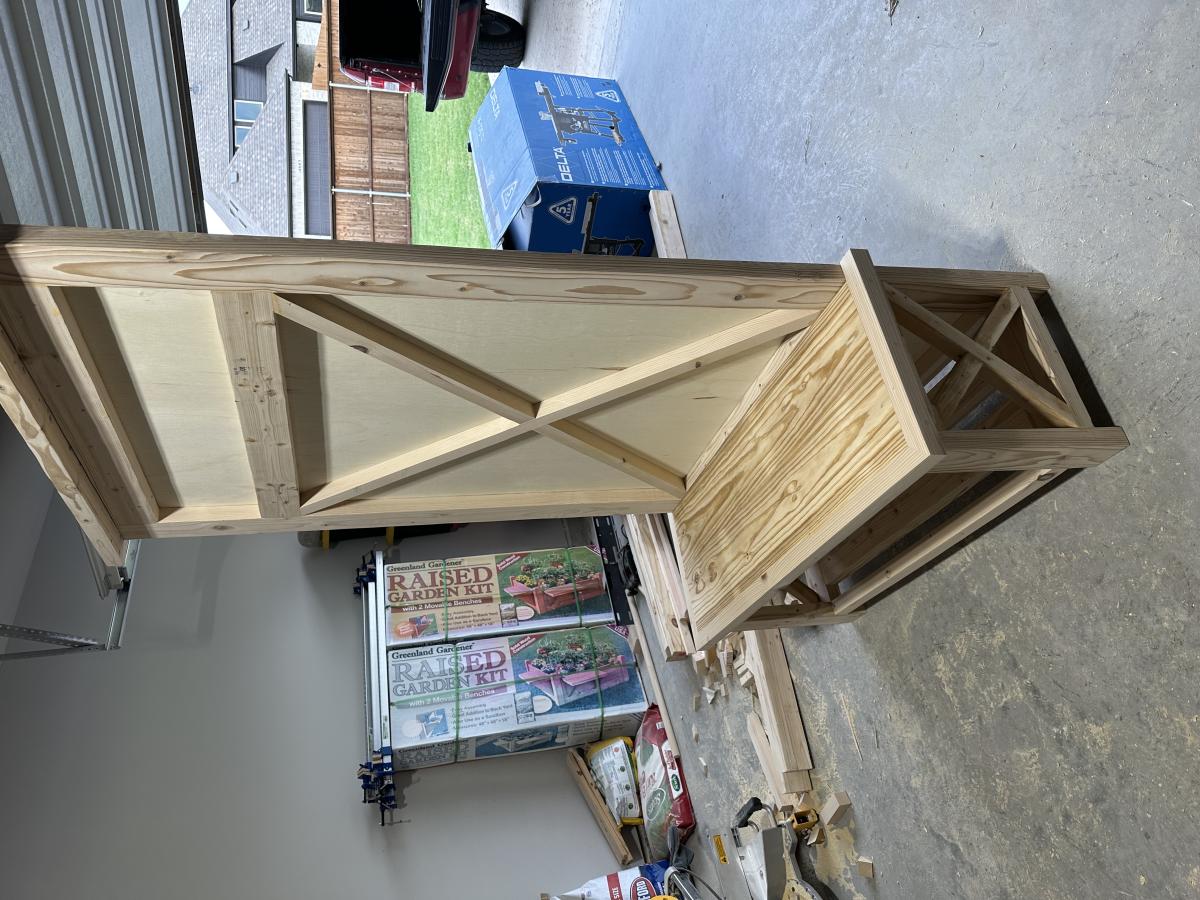
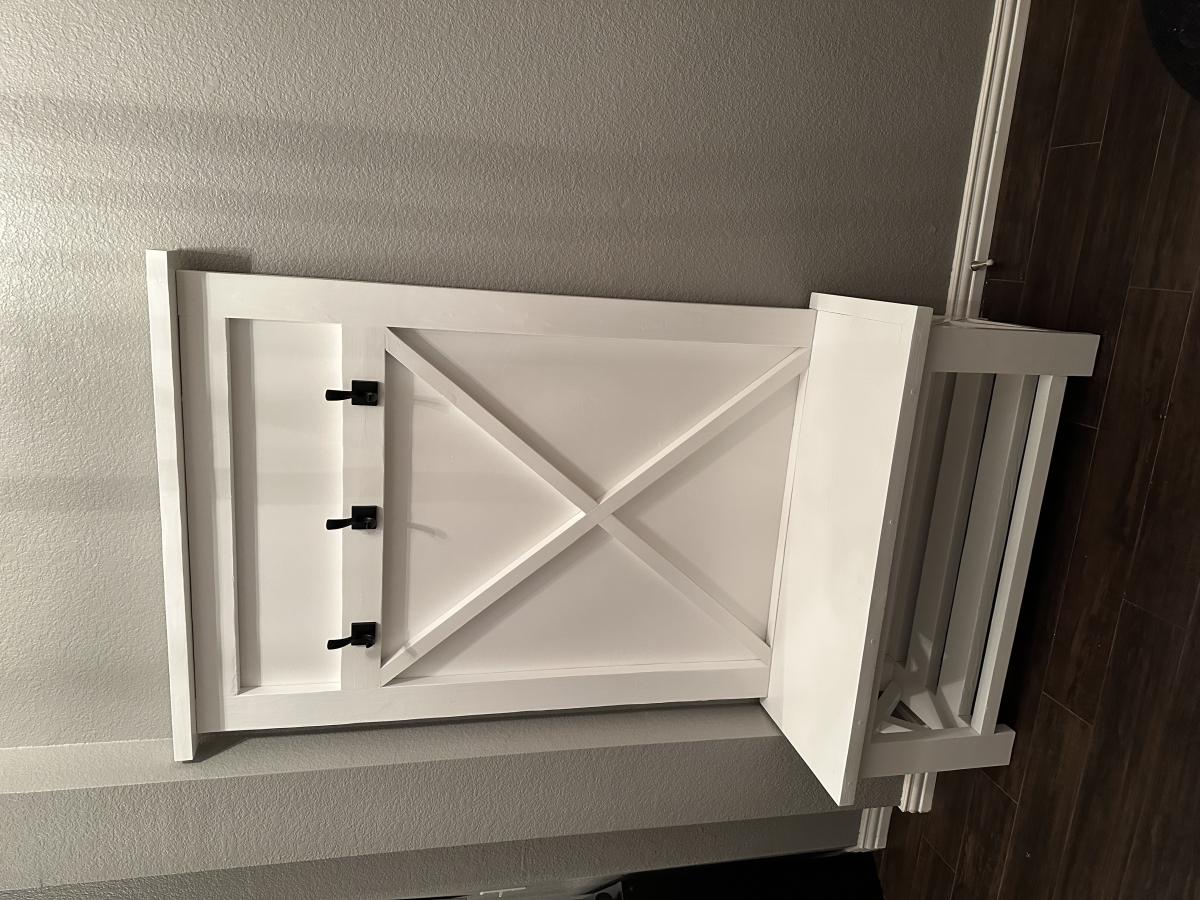
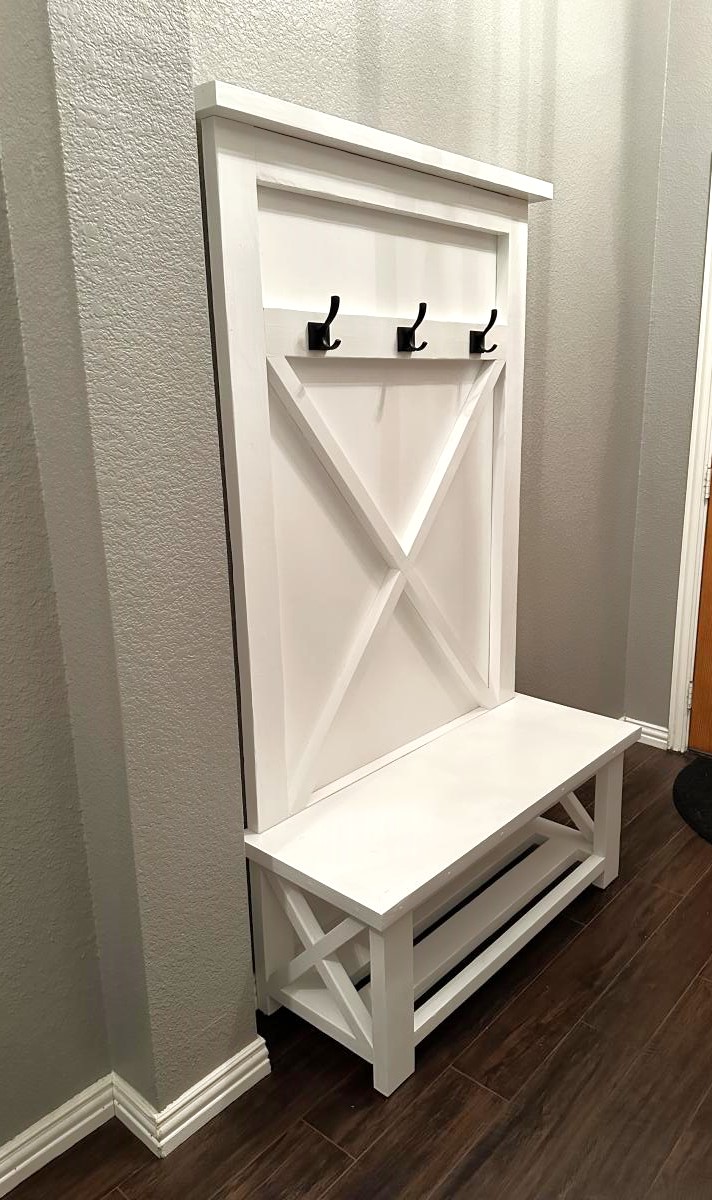
Built from Plan(s)
Comments
Fri, 05/26/2023 - 19:38
Love the added details!
Thank you for sharing! If you uploaded a brag post of 2 end tables, I was working on fixing the sideways photo and accidentally deleted it. If that was yours please reupload!:) Sorry!
DIY Teter Totter
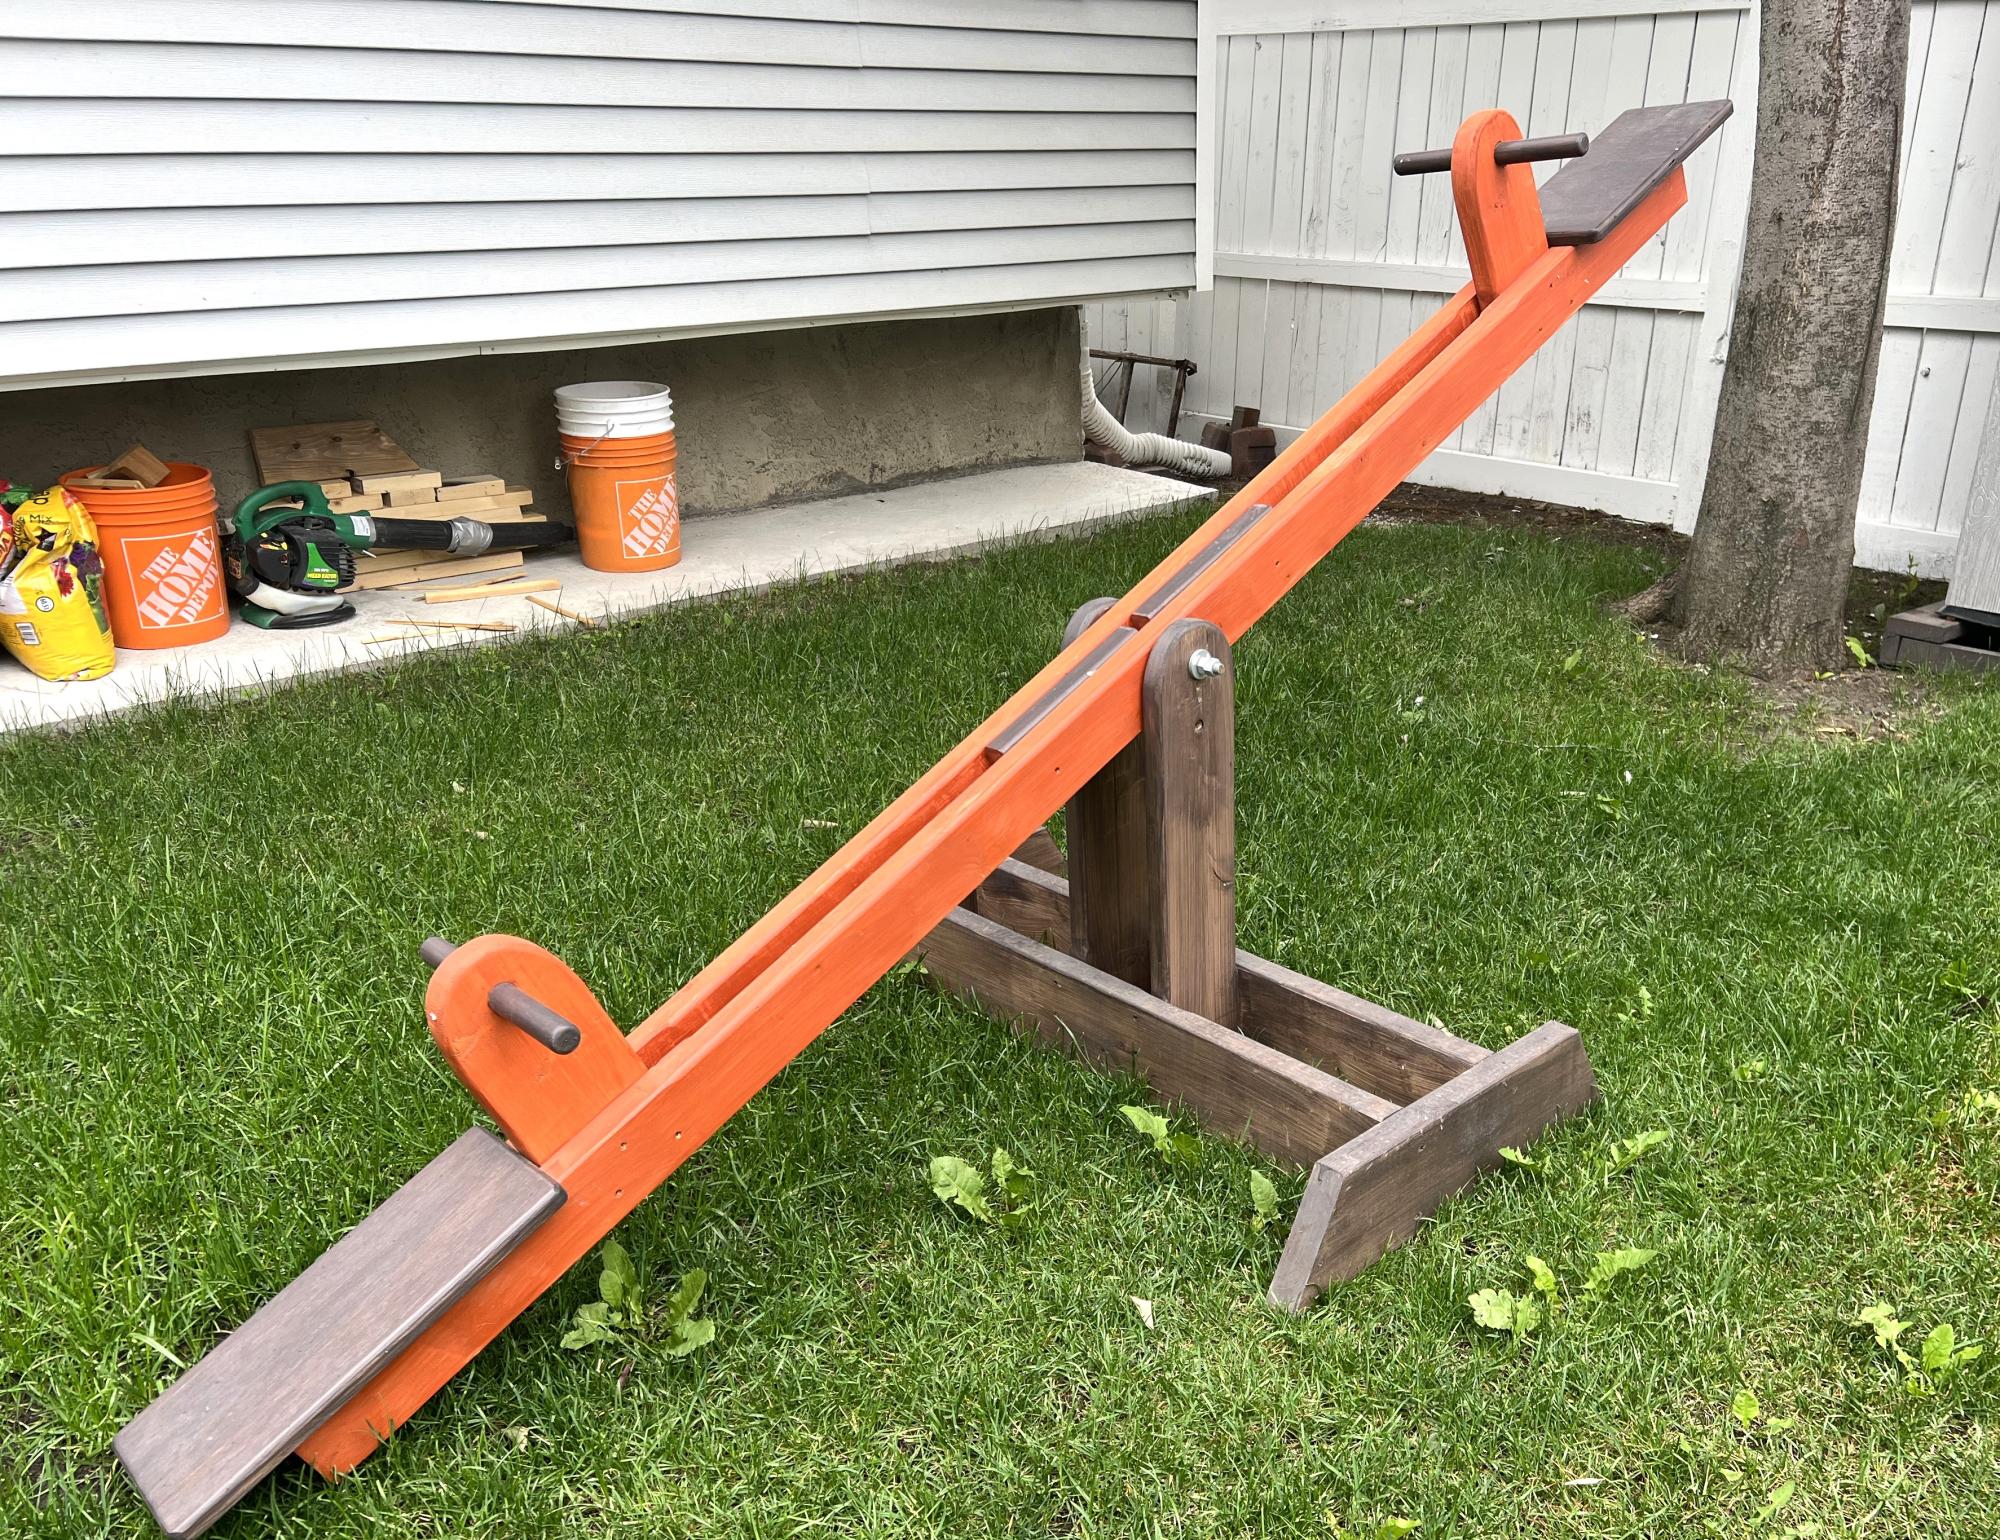
See Saw based in brag posts i saw here in Ana White website
Simple project
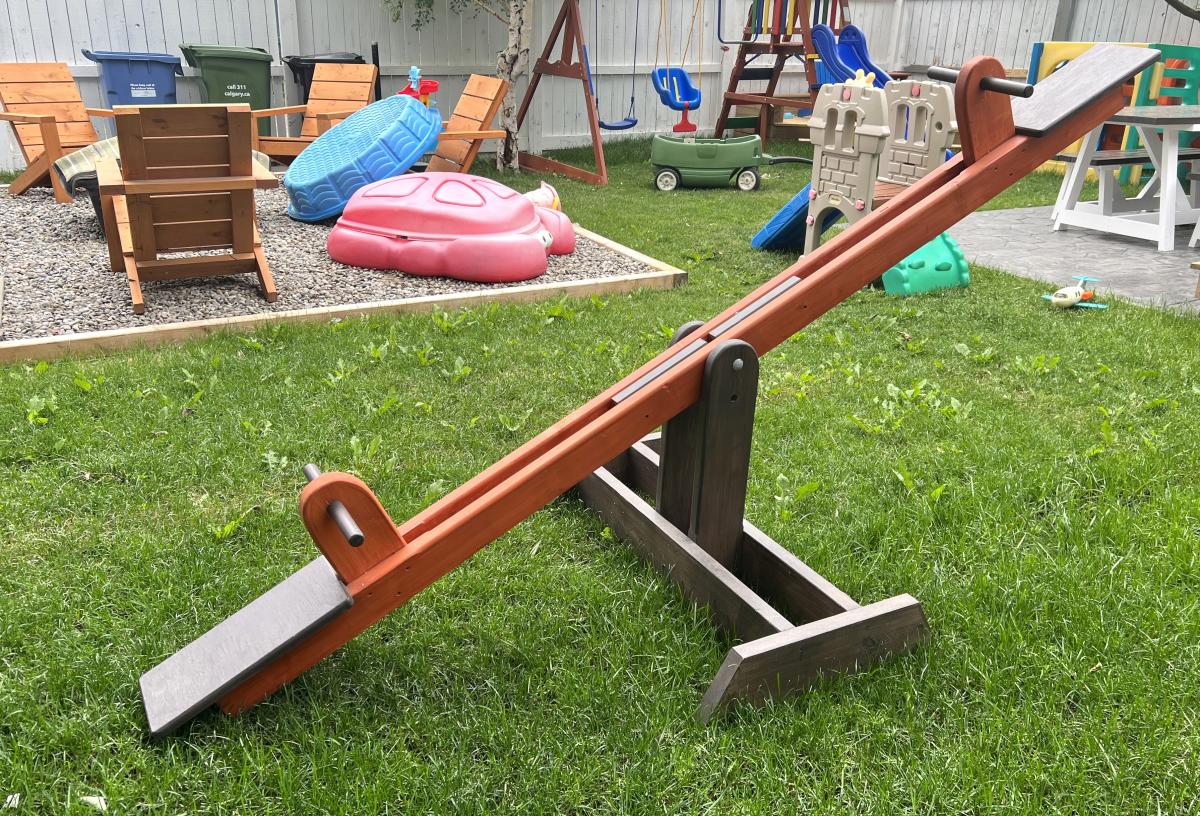
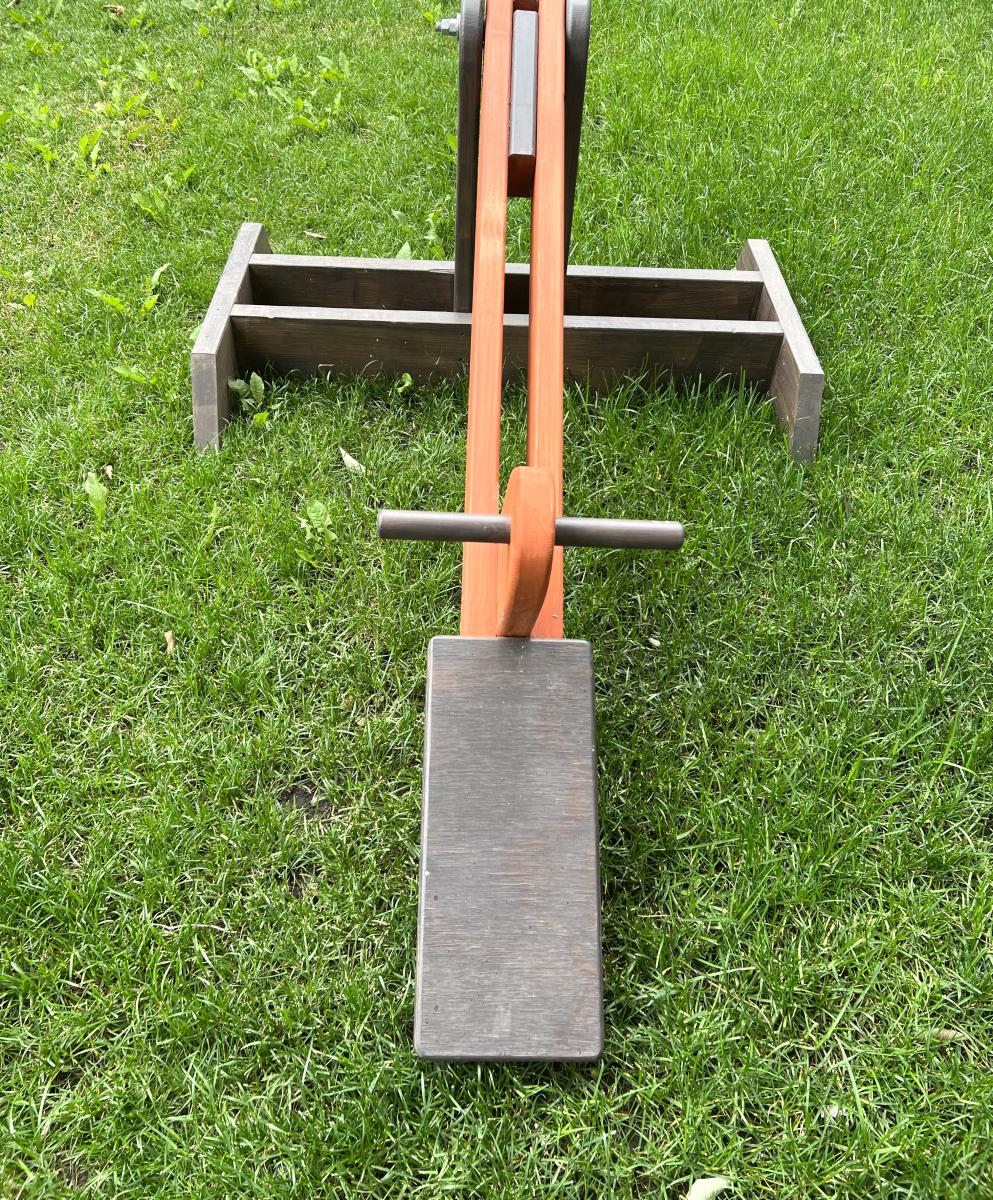
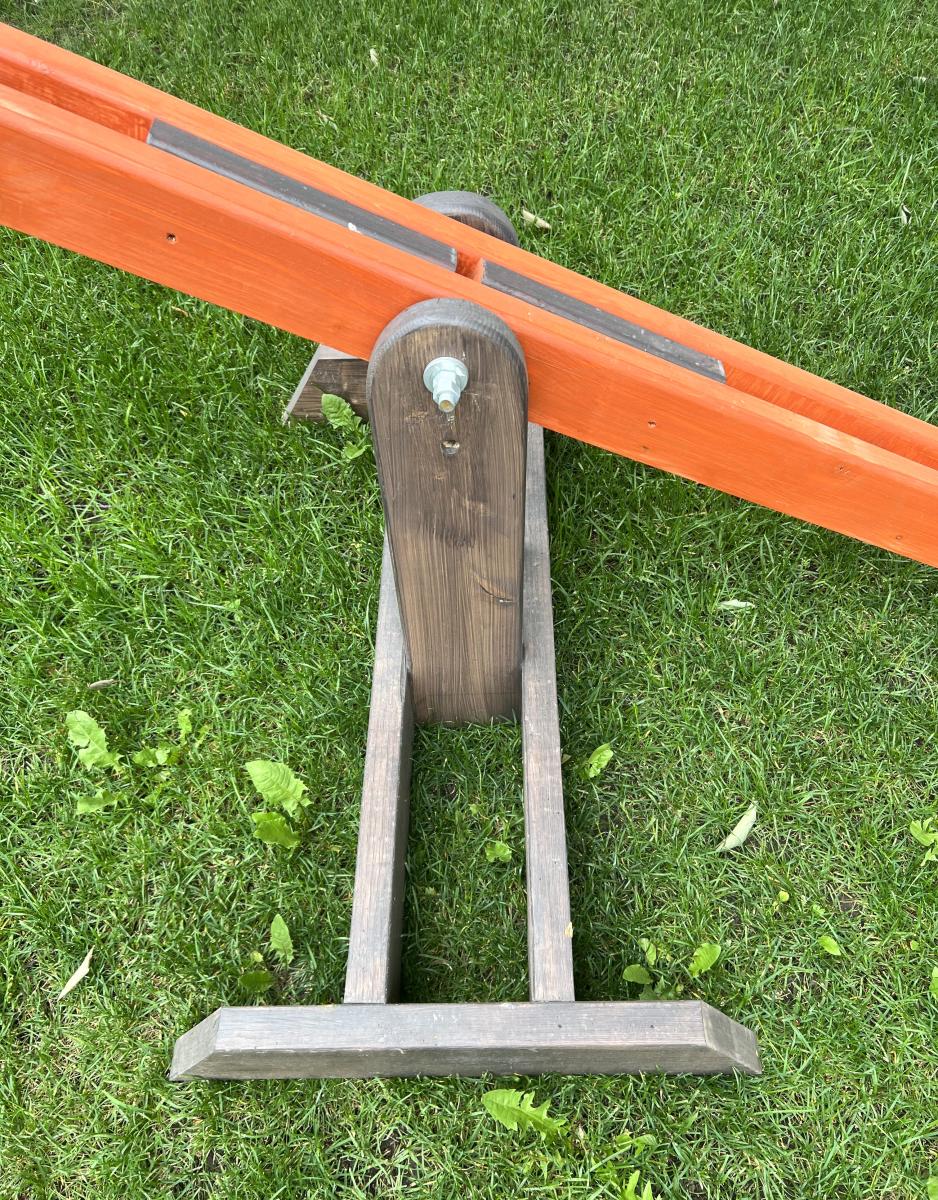
Built from Plan(s)
Farmhouse King Bed Frame
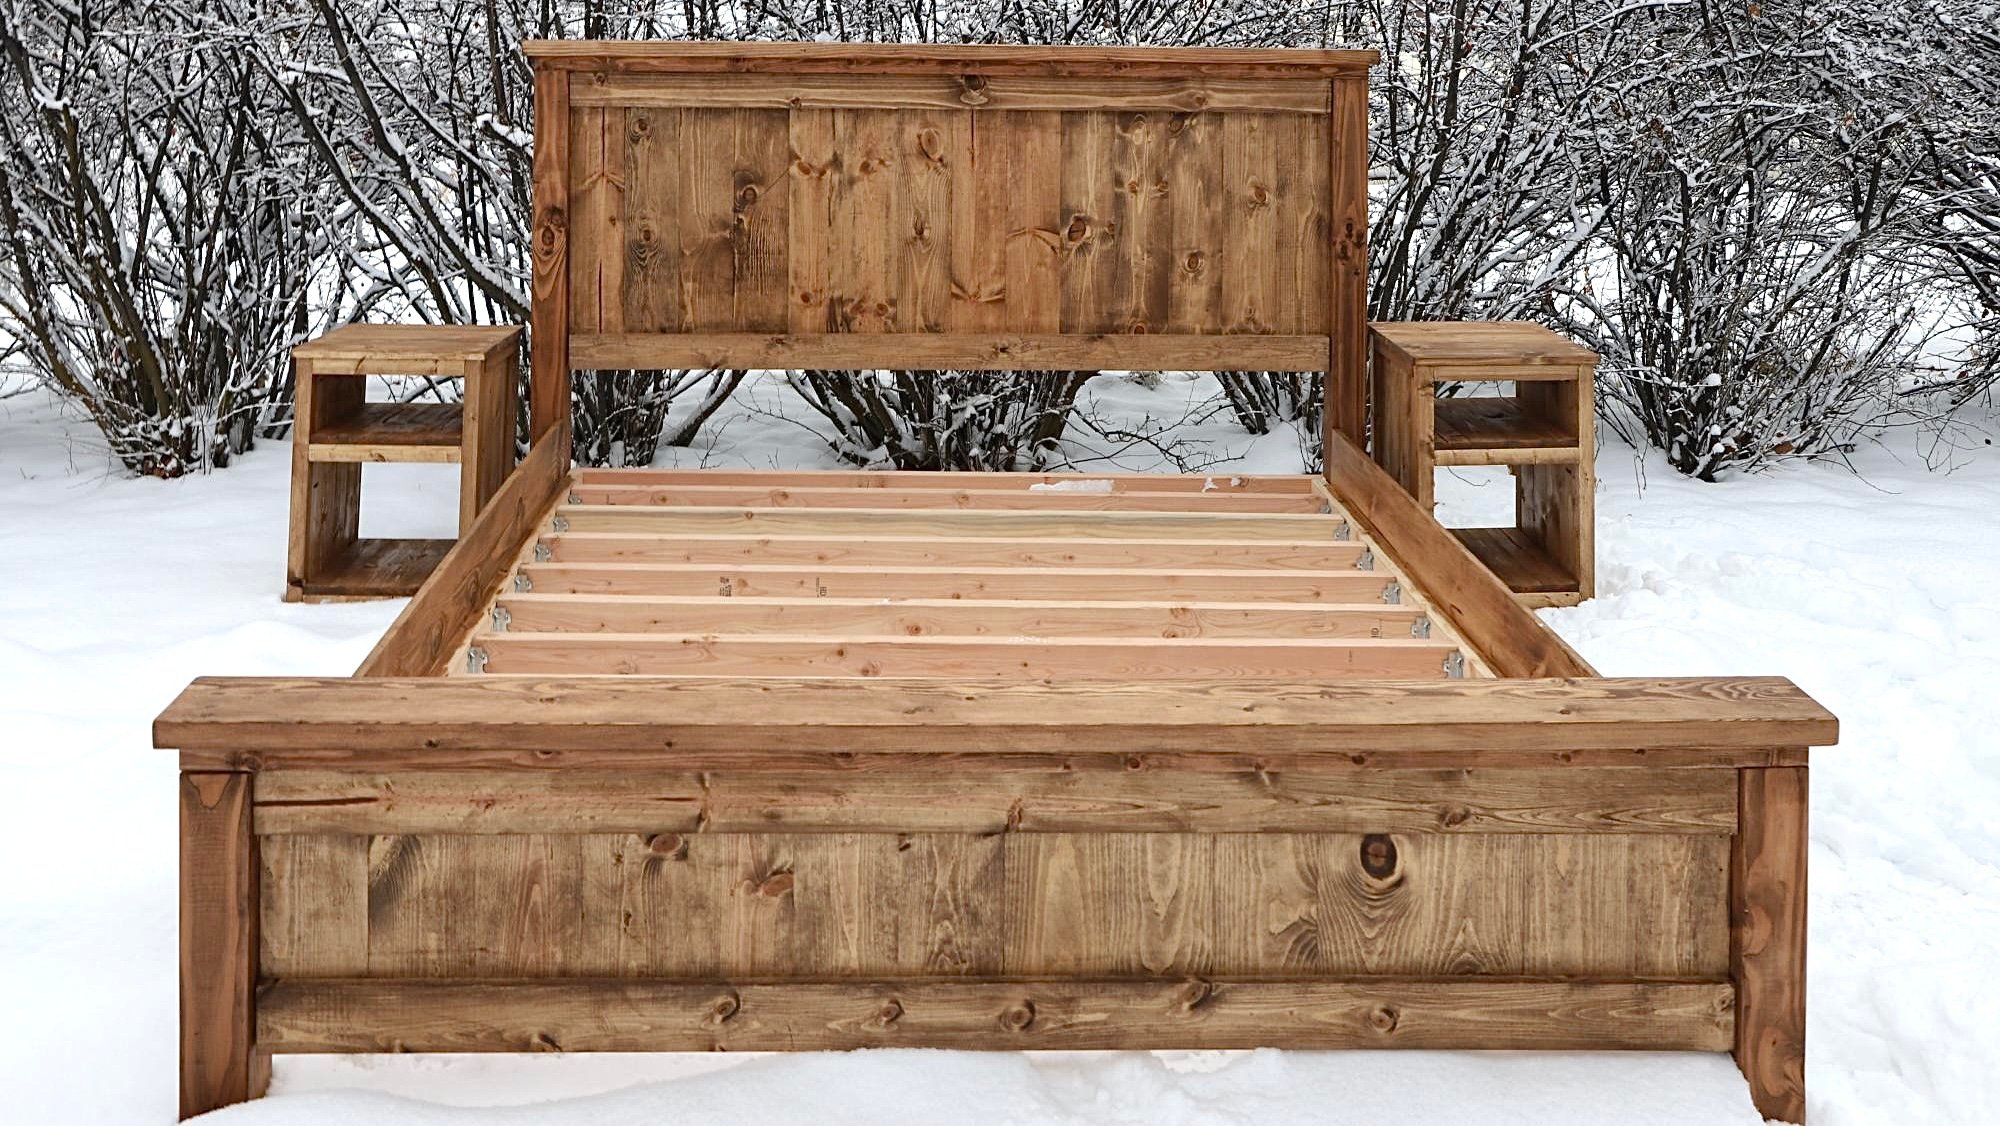
Since developing a love for woodworking I’ve began building things for other people. This particular bed frame I built for a couple who are rebuilding their home after it unfortunately burned down. It’s a beautiful farmhouse home out in the country, and this bed frame fits perfectly in their new home.
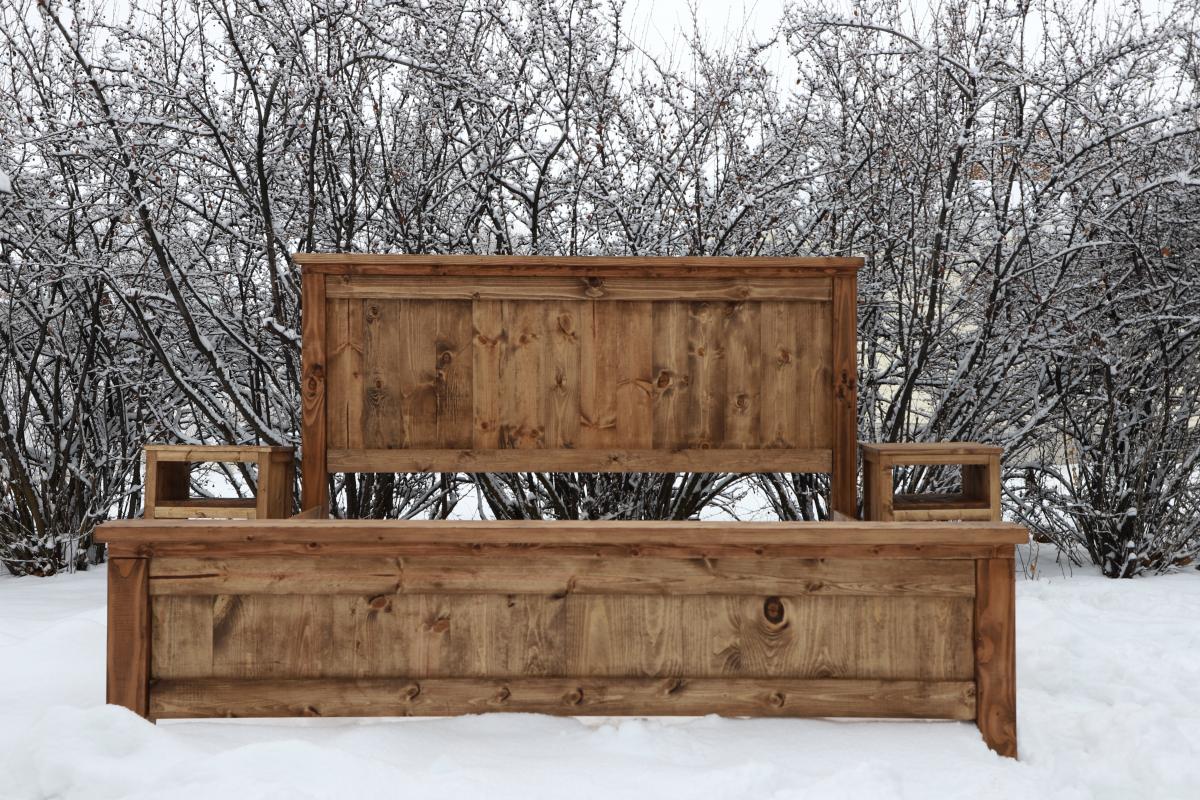
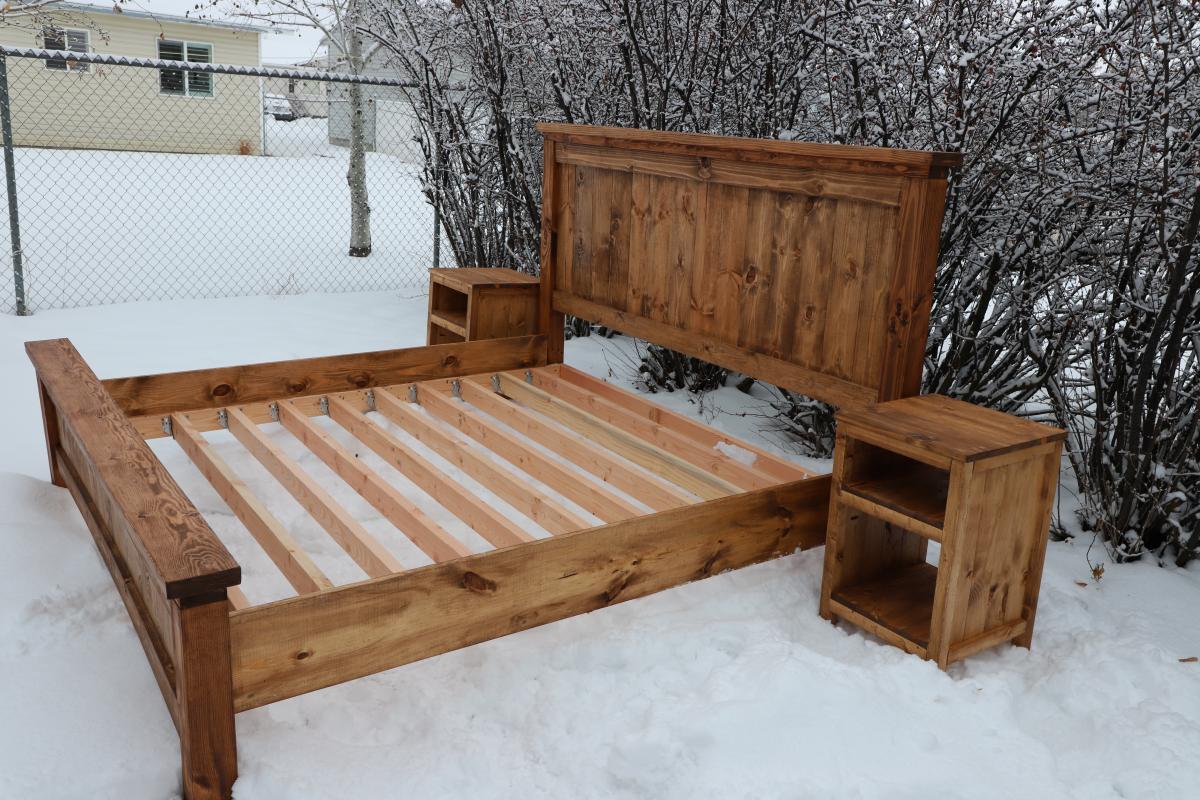
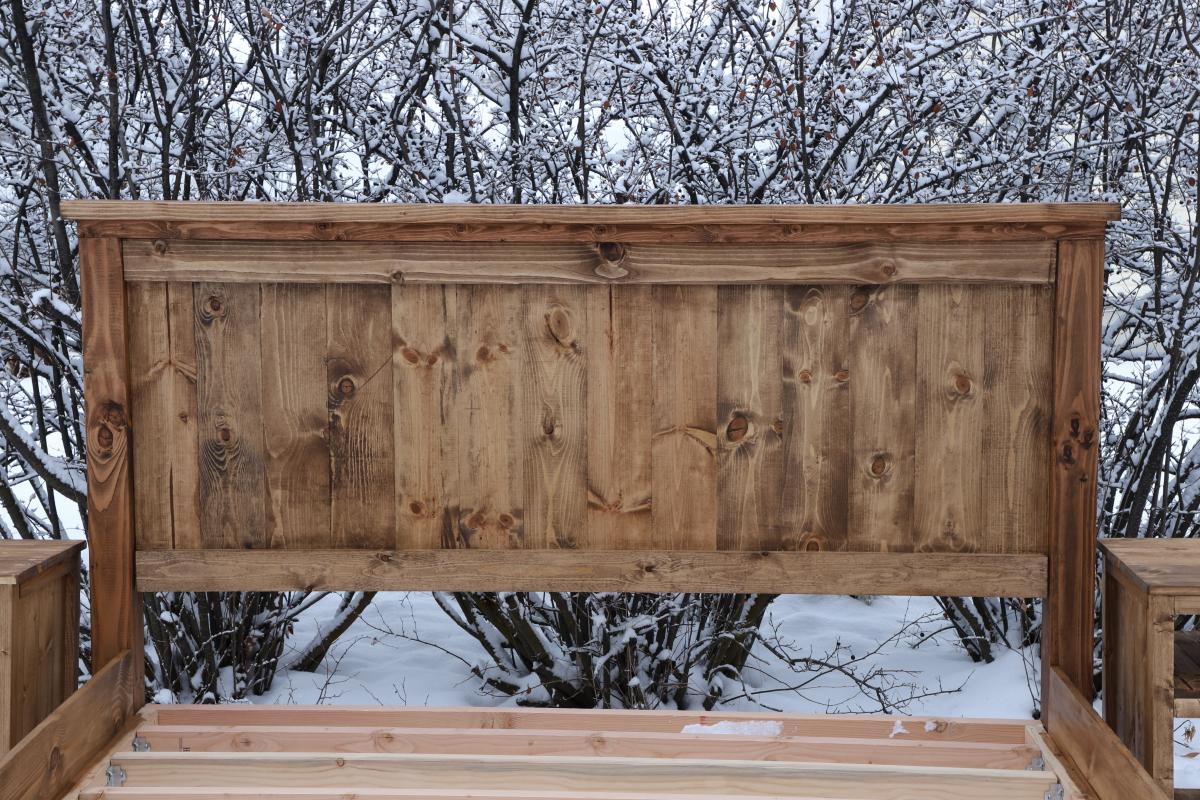
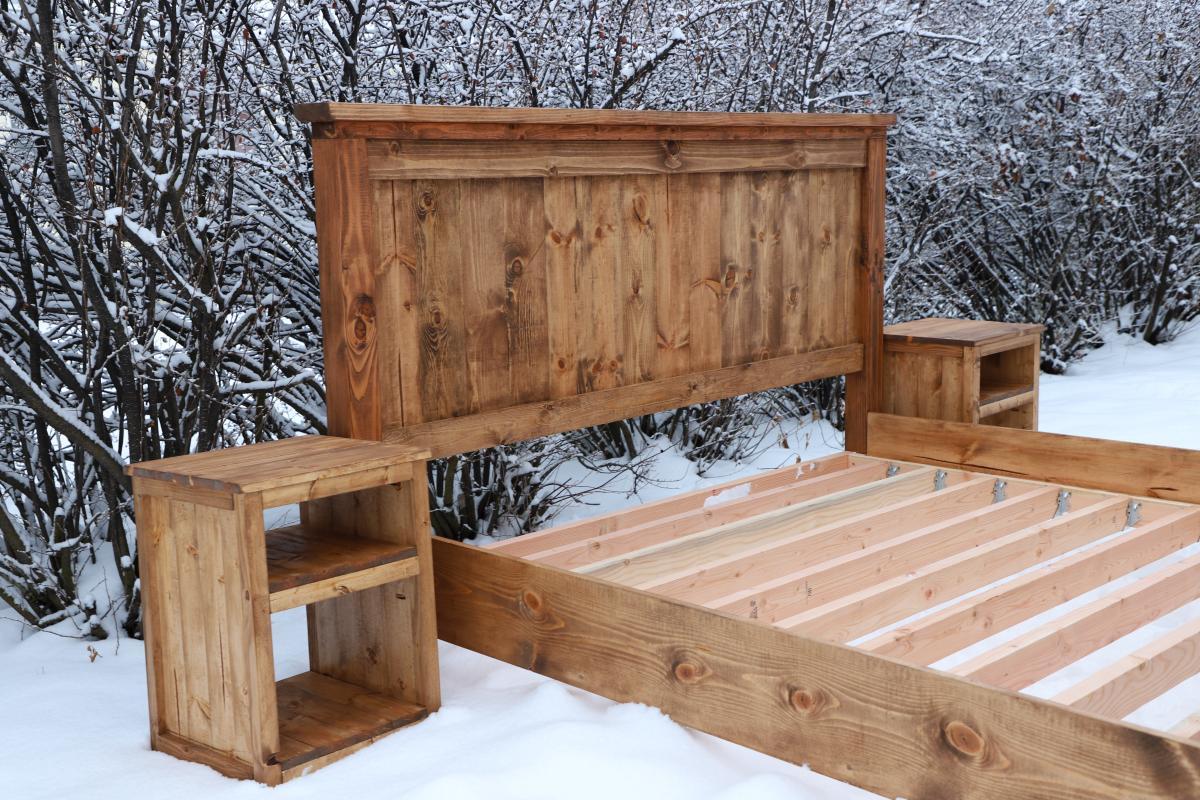
Built from Plan(s)
Estimated Cost
$250
Estimated Time Investment
Weekend Project (10-20 Hours)
Finish Used
I used minwax pre-stain to prepare the wood. I then stained it using special walnut by Varathane (got it from The Home Depot). Finally, I finished it using a clear satin polyurethane by Minwax.
Recommended Skill Level
Beginner
Pottery Barn Printer's Long Low Media Suite
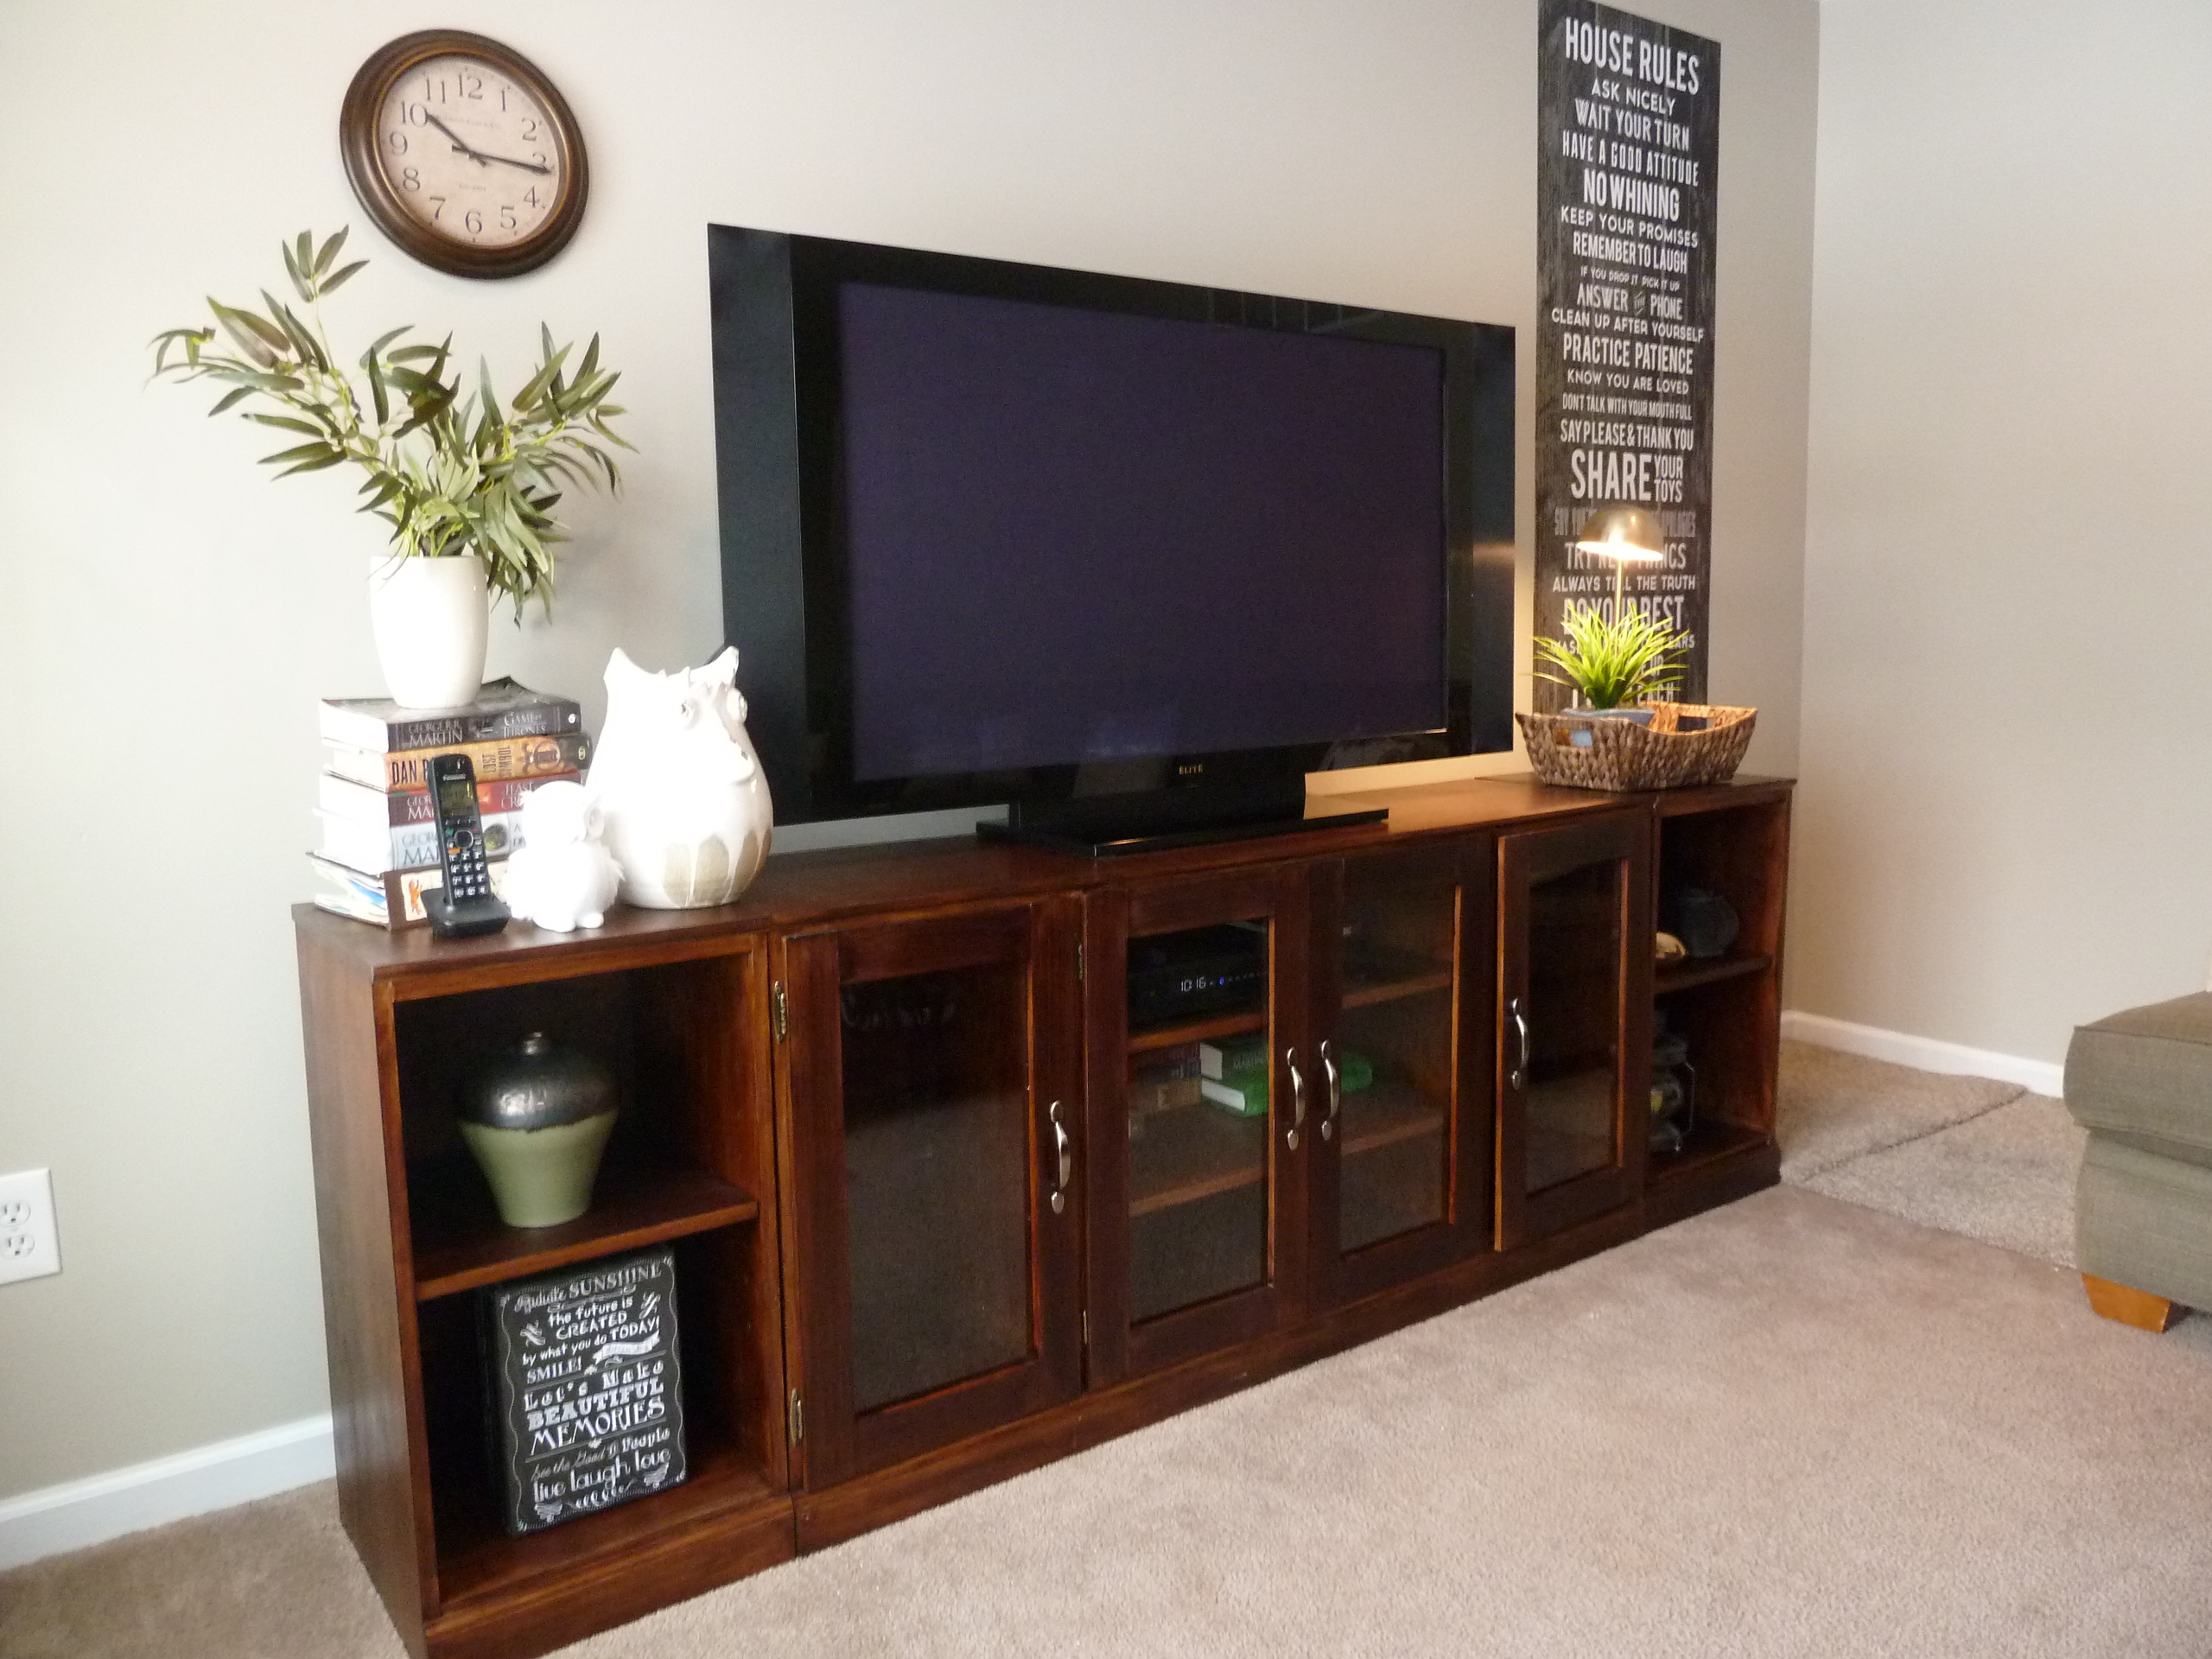
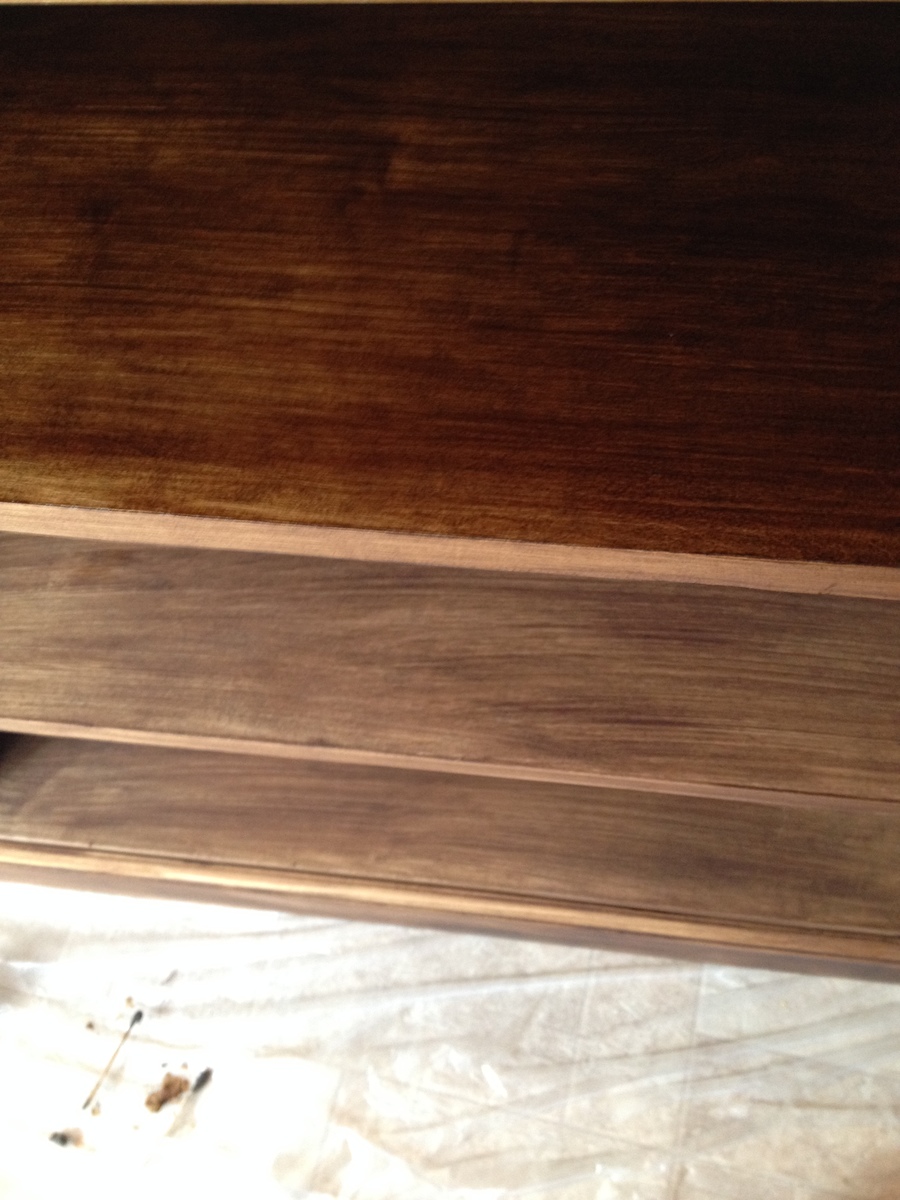
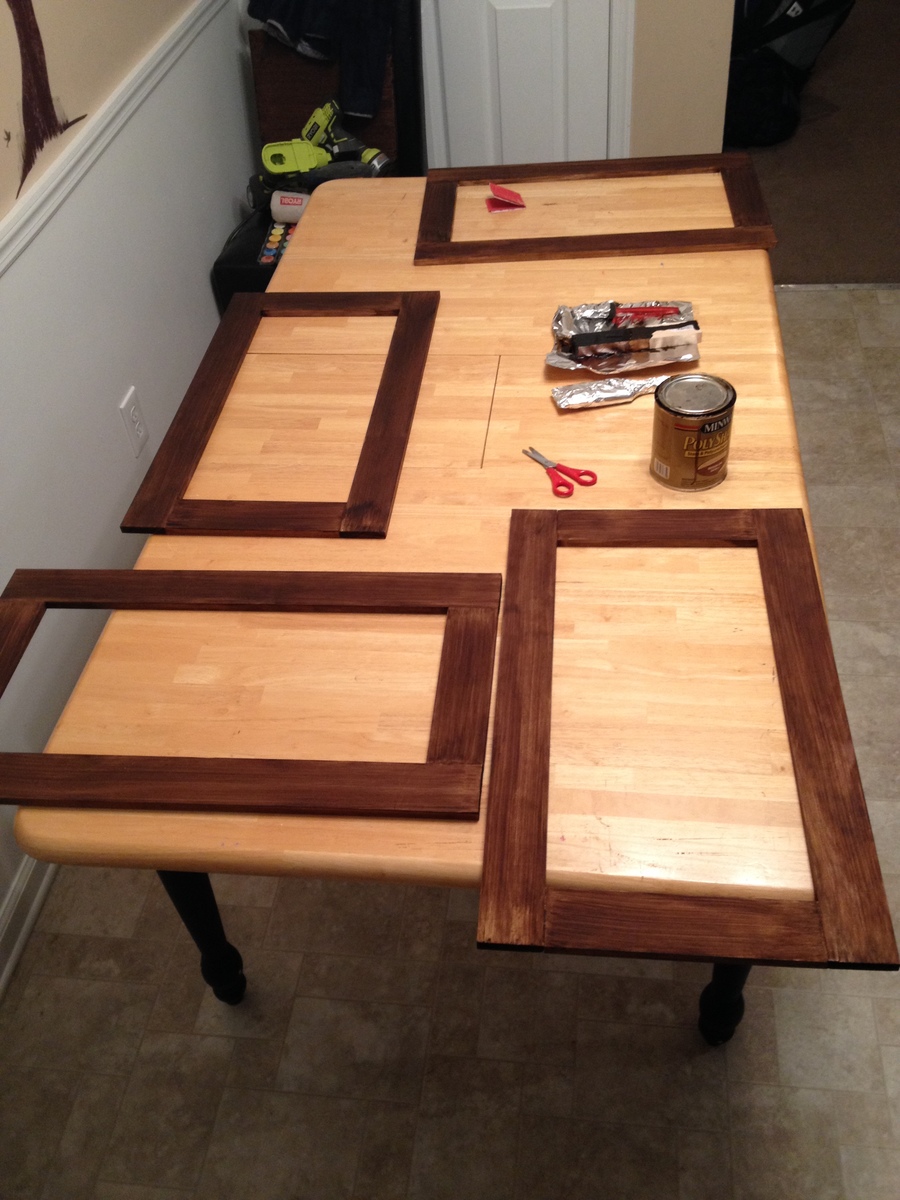
I feel in love with the Pottery Barn Media Suite and new immediately I wanted to build it. I couldn't justify paying close to $2,000 on an entertainment center. I knew Ana would have the plans to help me out. I modified the plans a little bit and instead of building 6 cabinets, I decided to make the inner 4 cabinets one piece, and the 2 outer cabinets removable. This will give me options for when I have to place the Christmas Tree or if we move and cannot fit this huge piece. I also wanted to have as much strength in the middle for our plasma TV. It's about 4 years old and isn't as light at the new TV's are. I loved every minute of building this project and couldn't be more happier! Feel free to search PB website to compare their media suite to my version (savings of $1,700). Feel free to ask any questions!
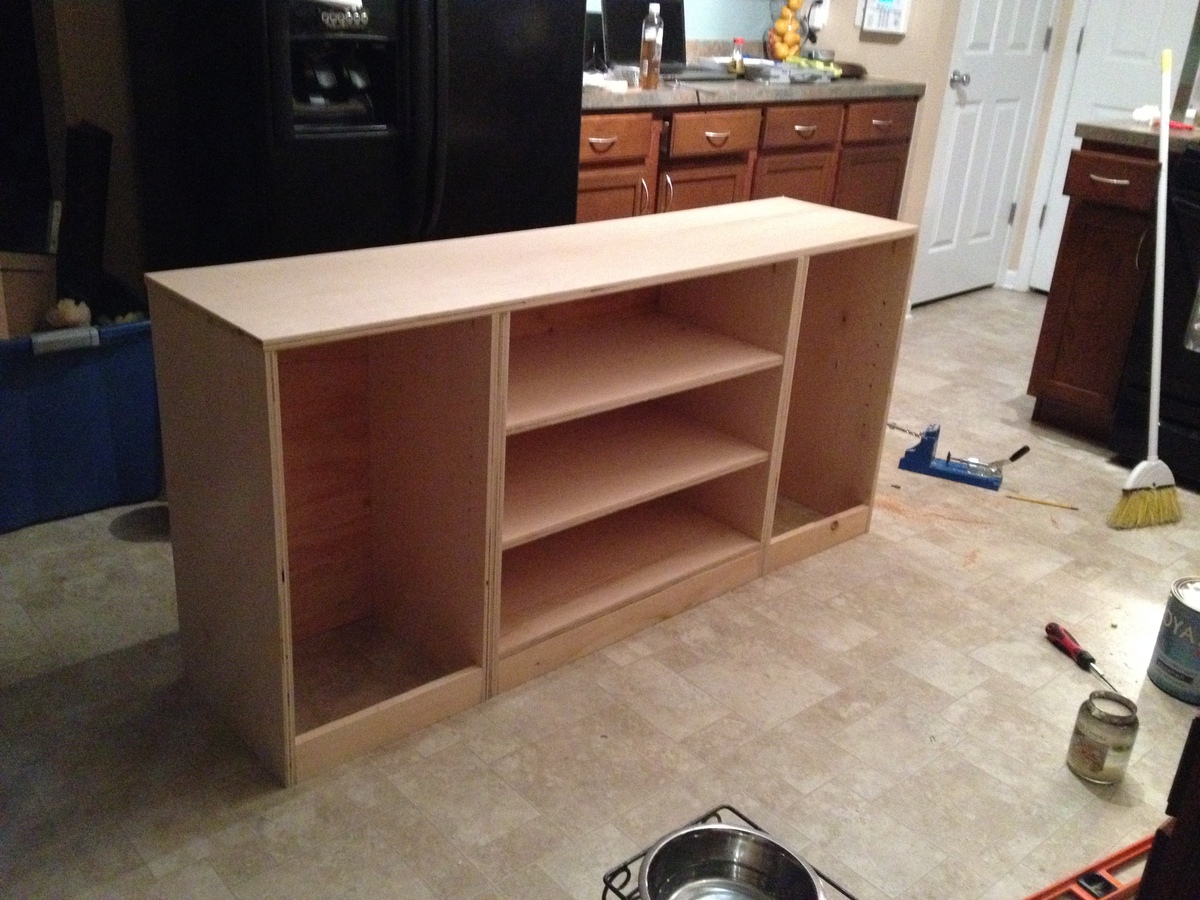
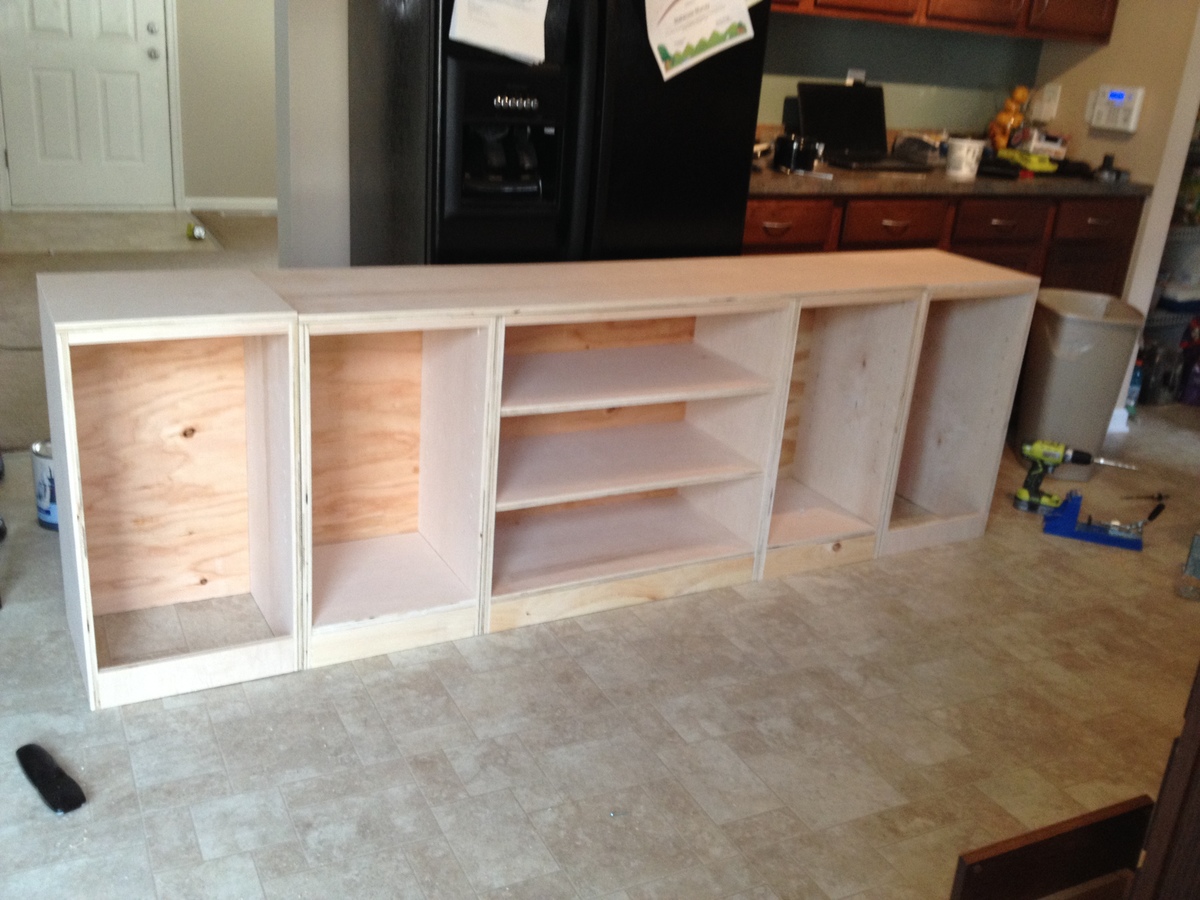
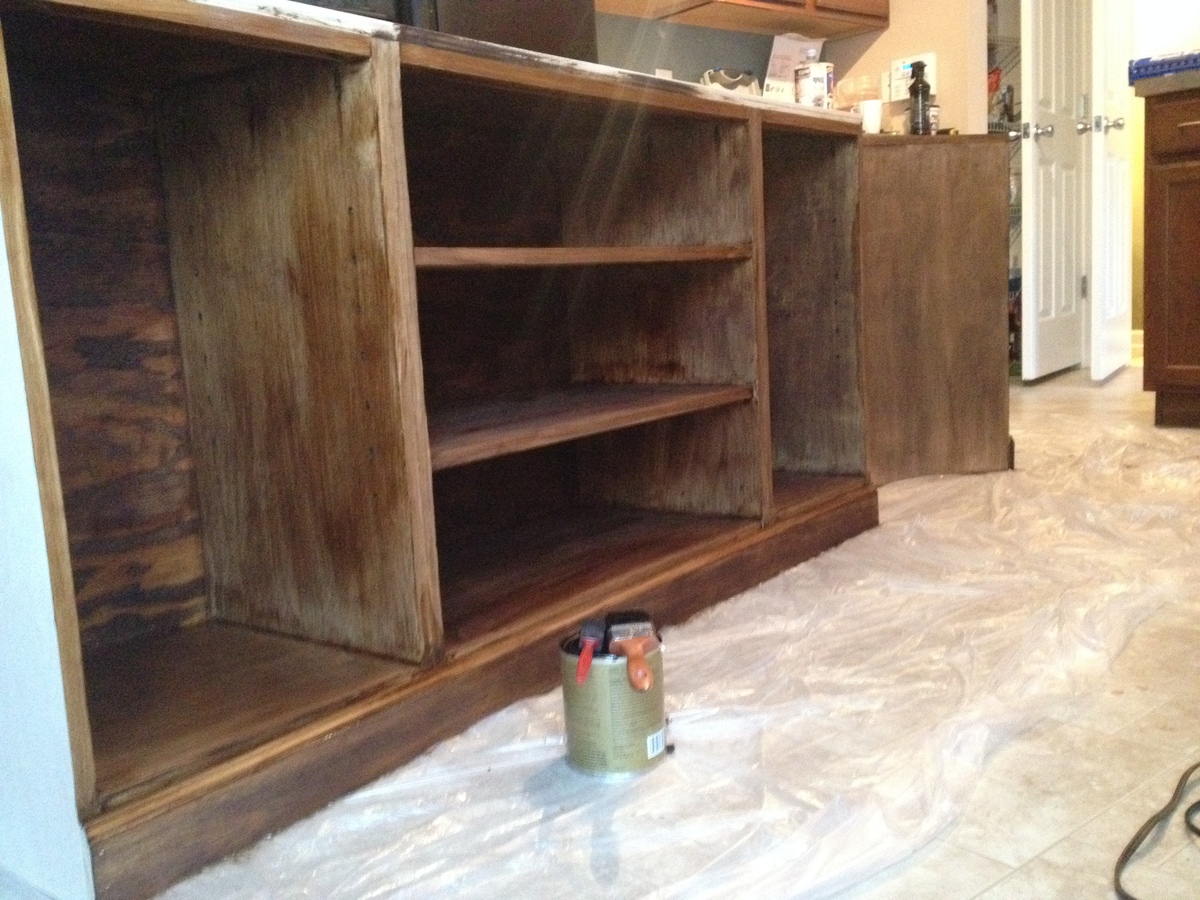
Built from Plan(s)
Estimated Cost
$325
Estimated Time Investment
Week Long Project (20 Hours or More)
Recommended Skill Level
Intermediate
Comments
Wed, 07/08/2015 - 08:35
Few questions
Love how you did yours Christina
I too would like to make one larger unit rather than say 6 of the individual cabinets. Looking at your pictures, it looks like you still made them individually but I'm assuming you attached them (screwed) together? Is that the case? Did you have any issues with the main piece and two ends being different heights when finished?
Am wanting to make a total length of around 104". Means I'll have to tweak some measurements.. In addition, I would like to have one side be a lift top so we can put in a record player and simply lift the top face to access. That wont be too big of a deal.
How did you find the doors were to make? No big deal? i've been curious how the dimensions all play out with the hinges and doors opening etc.
Sat, 01/30/2016 - 13:58
Instructions
I cannot find these instructions anywhere! The PDF does not include the instructions :(

In reply to Instructions by LBlakesley87
Sat, 01/30/2016 - 14:42
This is a brag post (a
This is a brag post (a beautiful one, might I add!!). The links to the instructions are included above. Here's to the main base http://www.ana-white.com/2010/08/plans/open-base-basic-collection
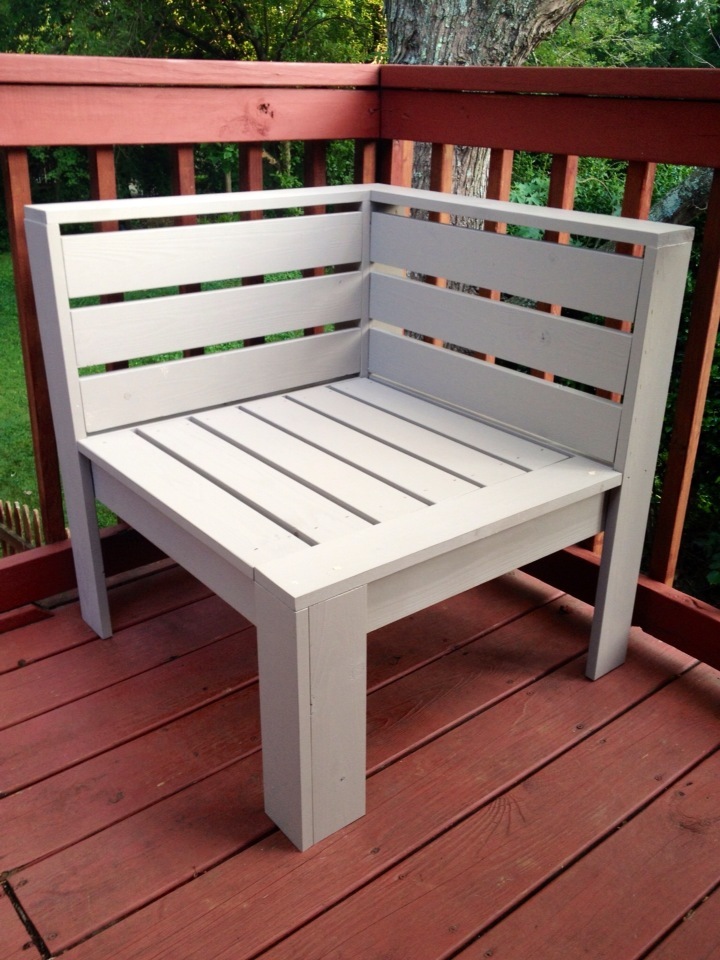
2x4 Outdoor Sectional Sofa
Great Plan! Loved how easy it was to build and how little the cost was.
Built from Plan(s)
Estimated Cost
$200
Estimated Time Investment
Afternoon Project (3-6 Hours)
Finish Used
Outdoor deck stain by Valspar in Canyon Brown
Recommended Skill Level
Beginner
Comments
Tue, 07/28/2020 - 09:52
Joints - Deck Screws or Pocket Holes.
Did you use decking screws or pocket holes for the visible portion of the couch?
Sun, 08/01/2021 - 18:40
Joining method?
Looks amazing! What method did you use (pocket holes, dowels, deck screws, etc) to join the visible portions like the arms?