Community Brag Posts

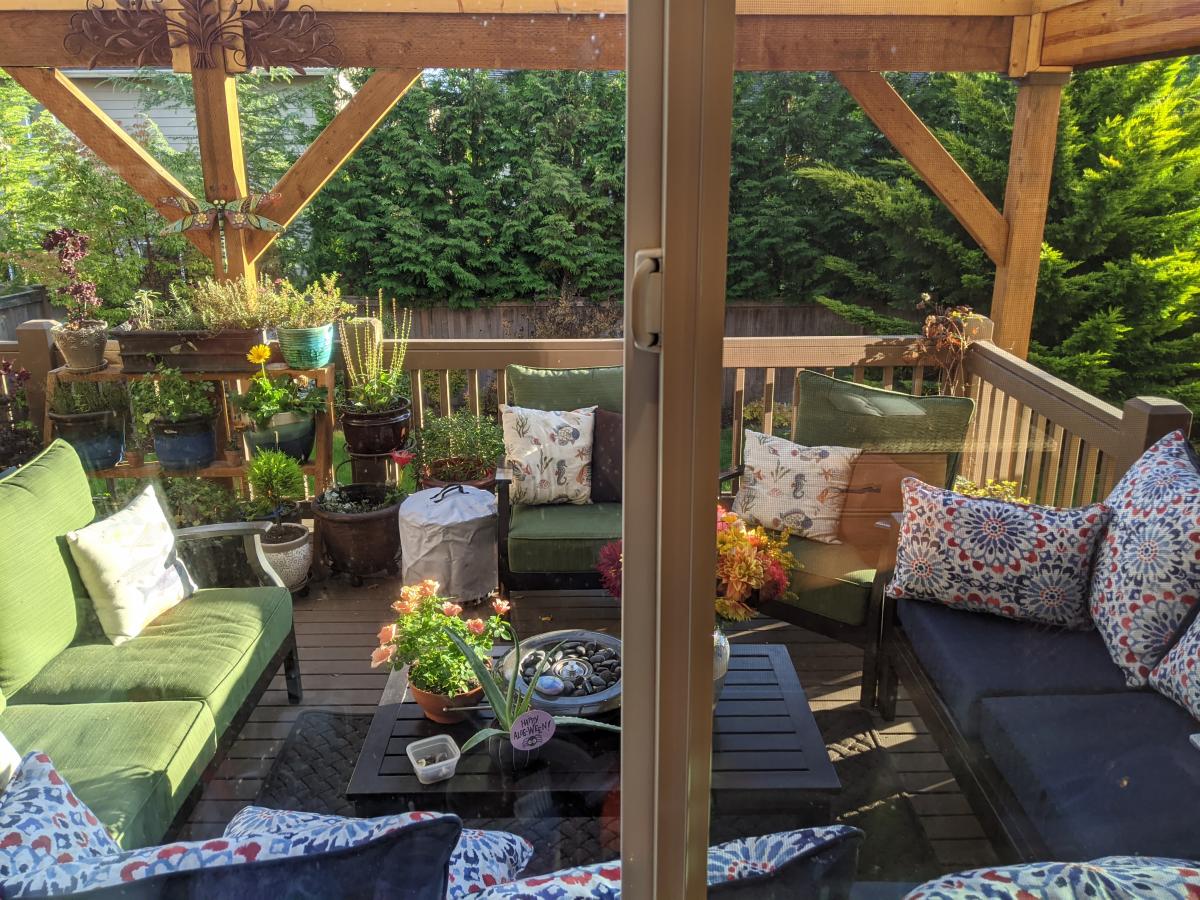
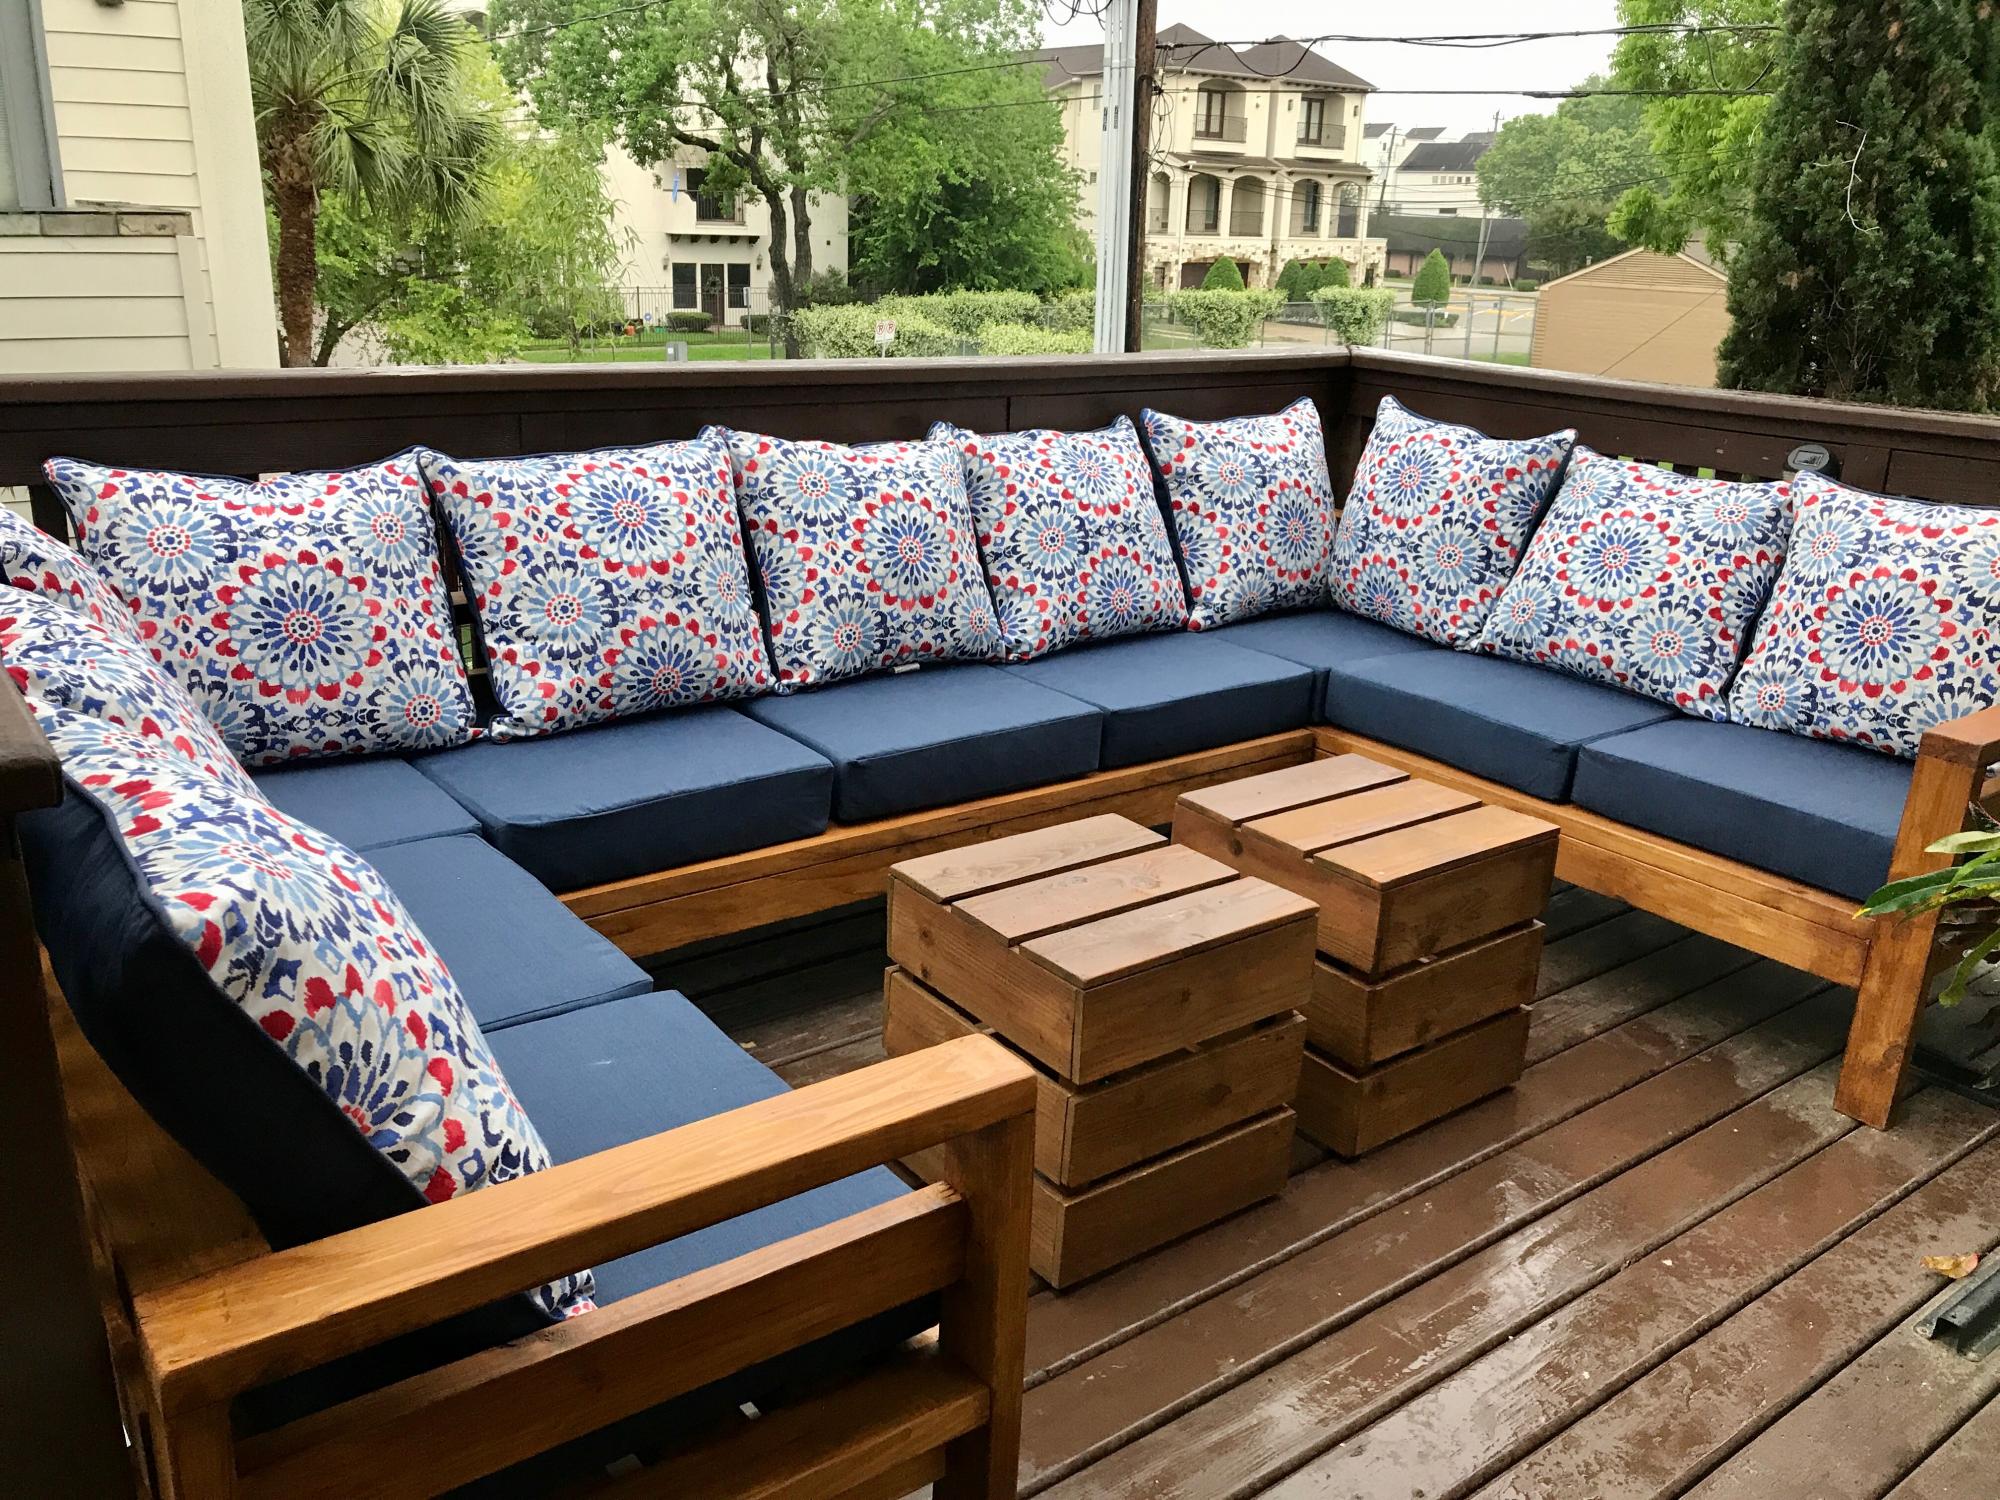
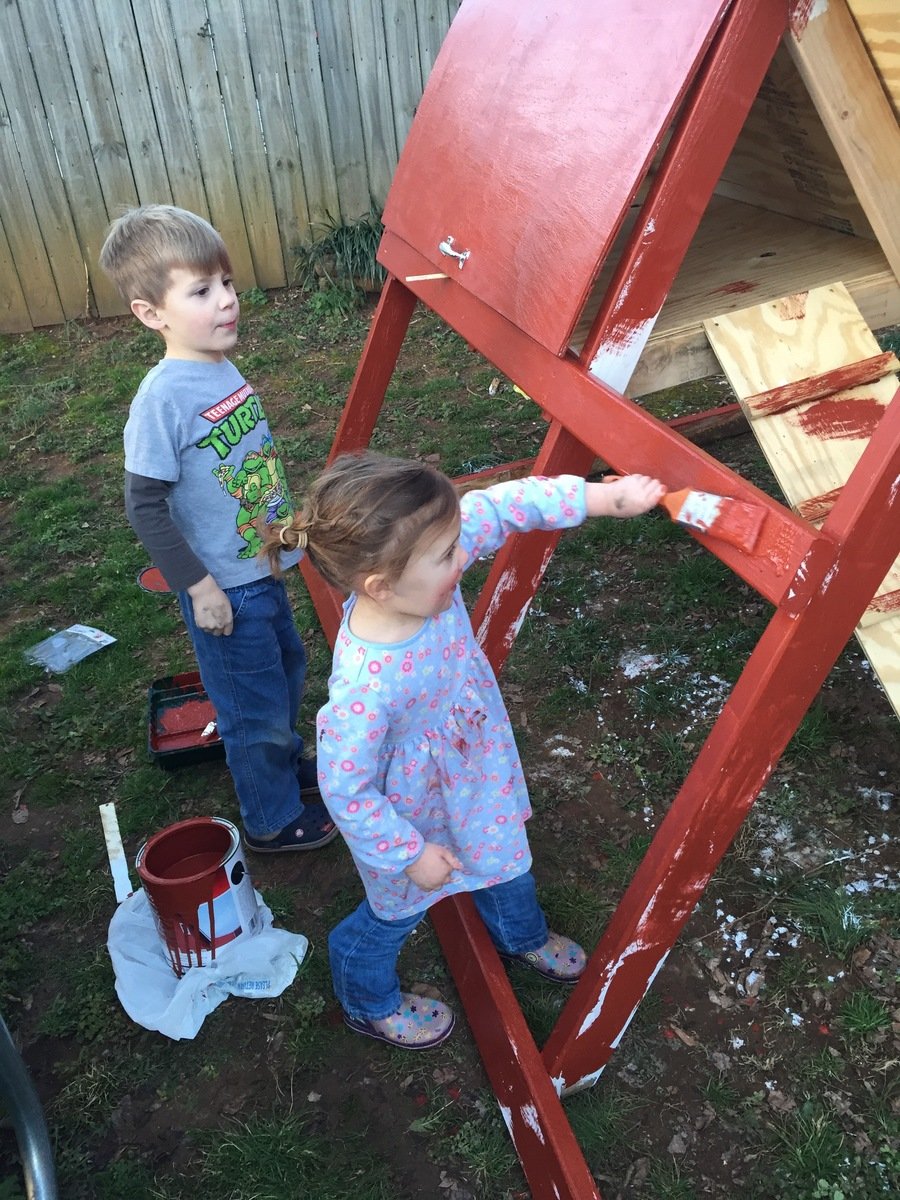
Outdoor Sectional - Love It !

Submitted by Anonymous (not verified) on Sun, 10/18/2020 - 06:11

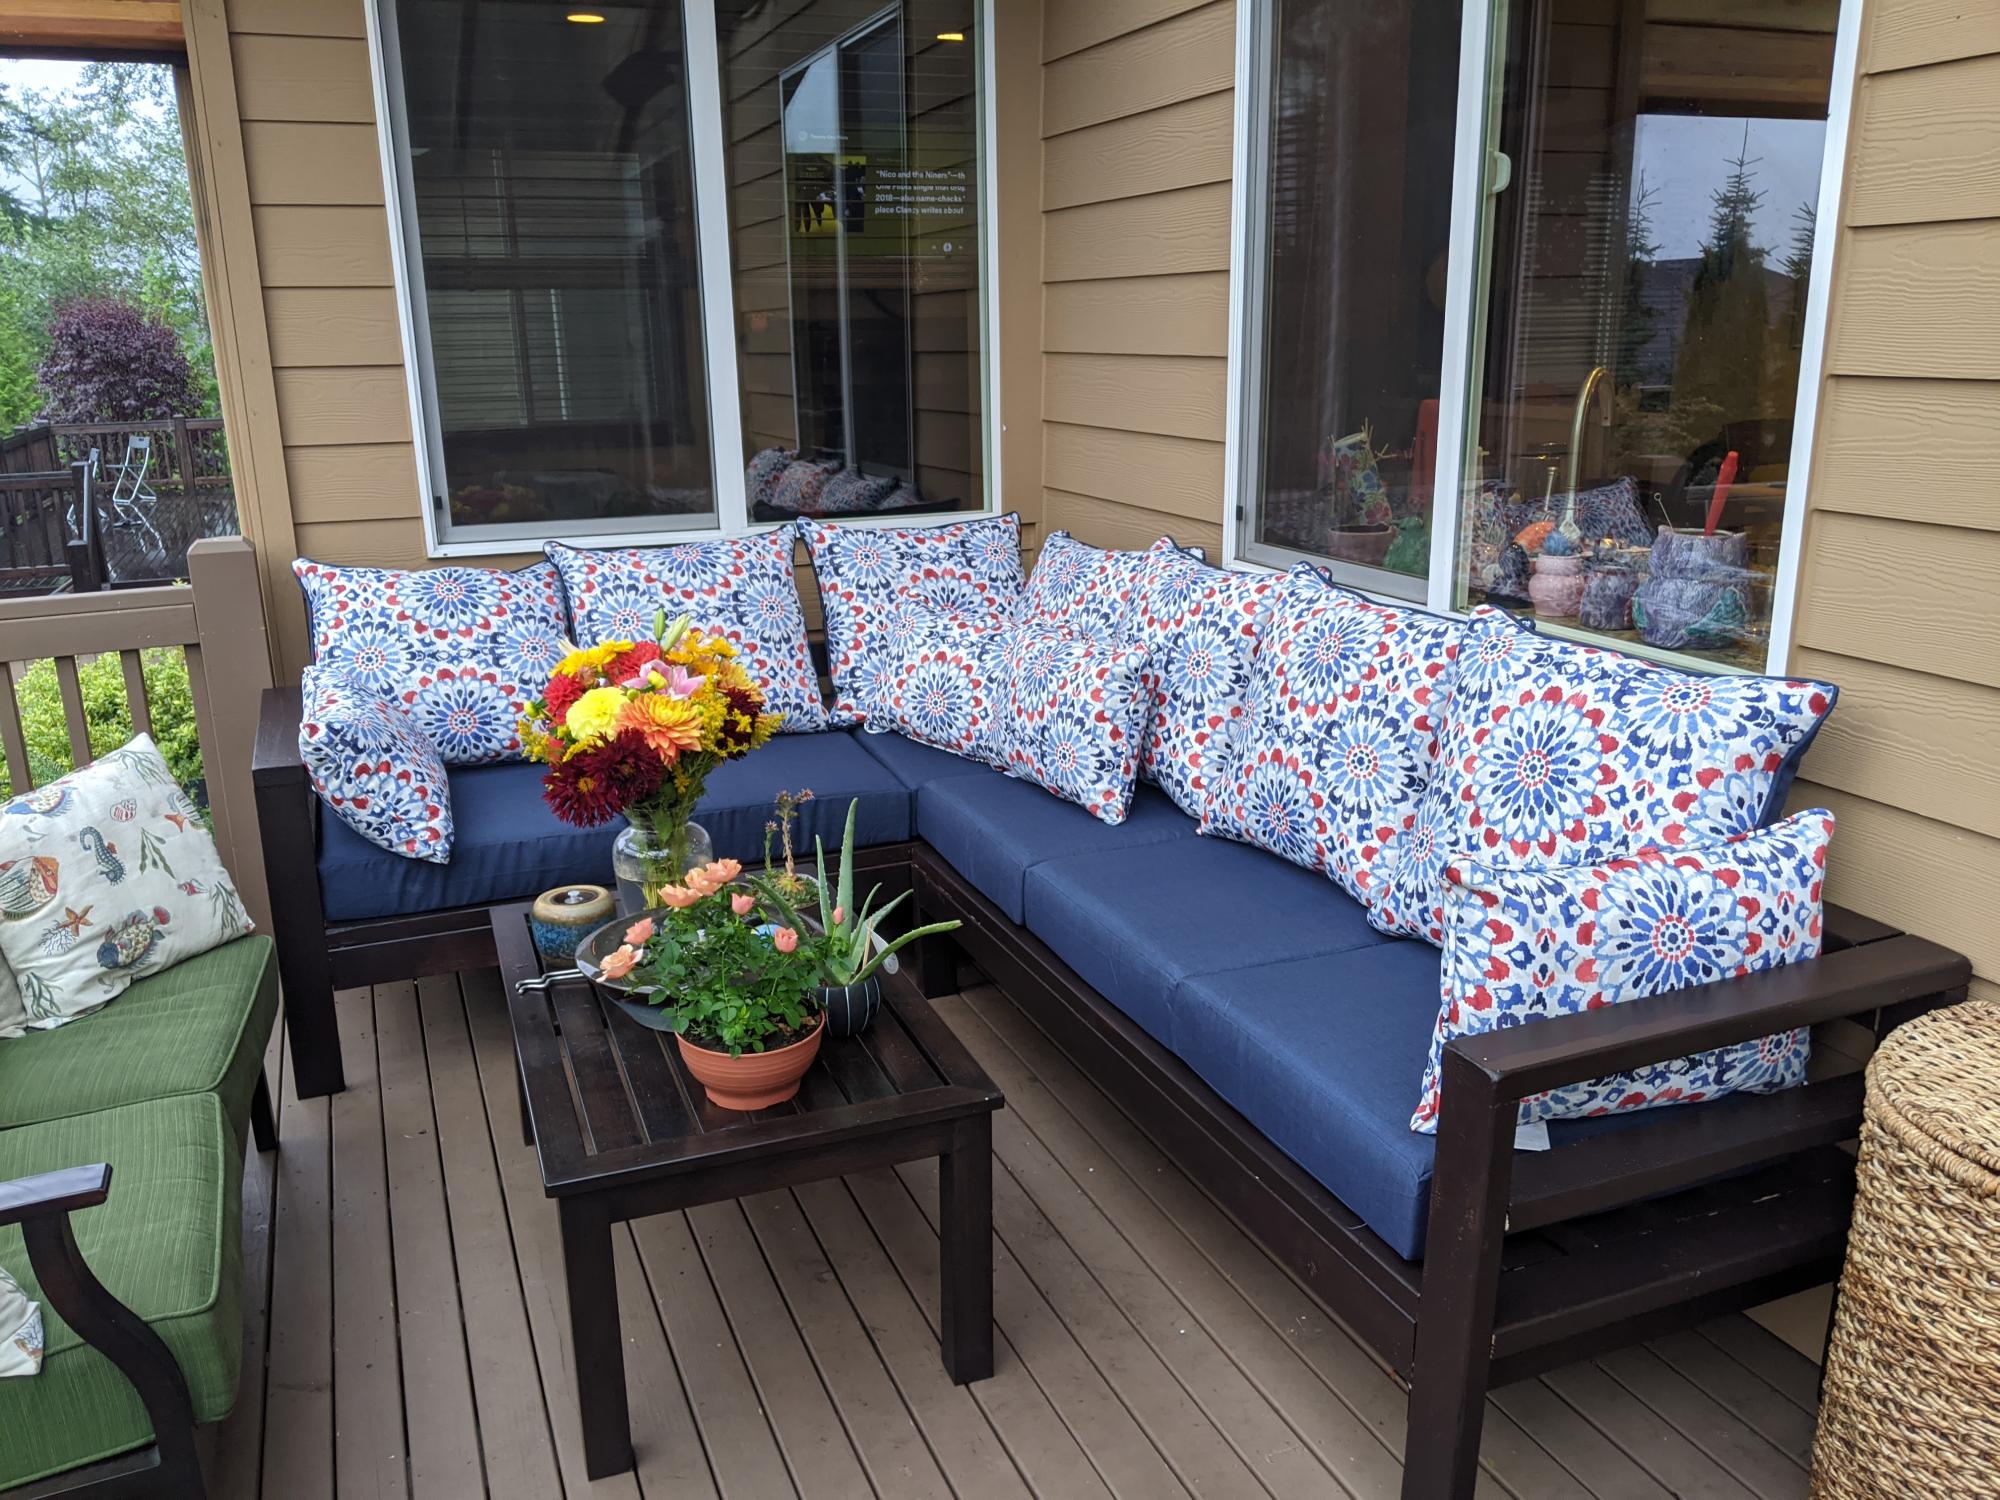
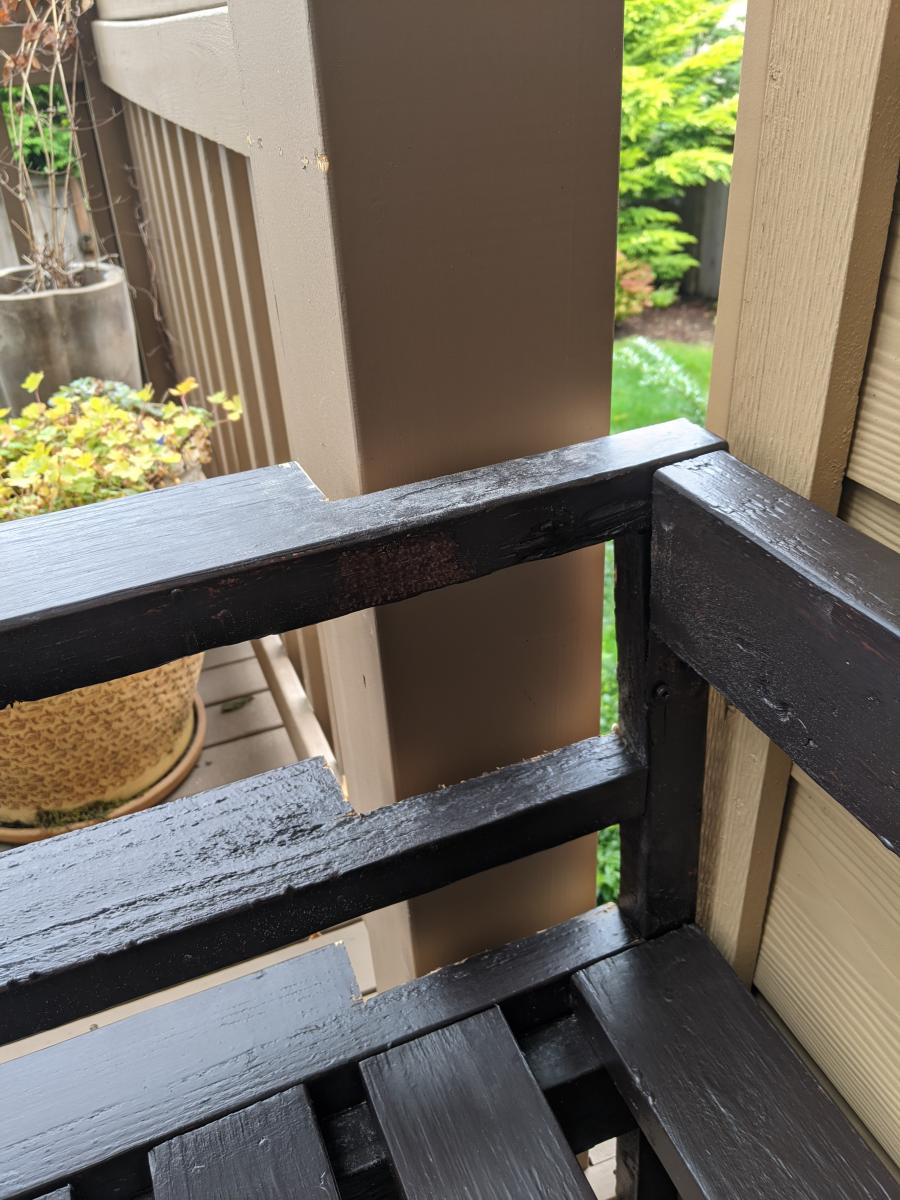
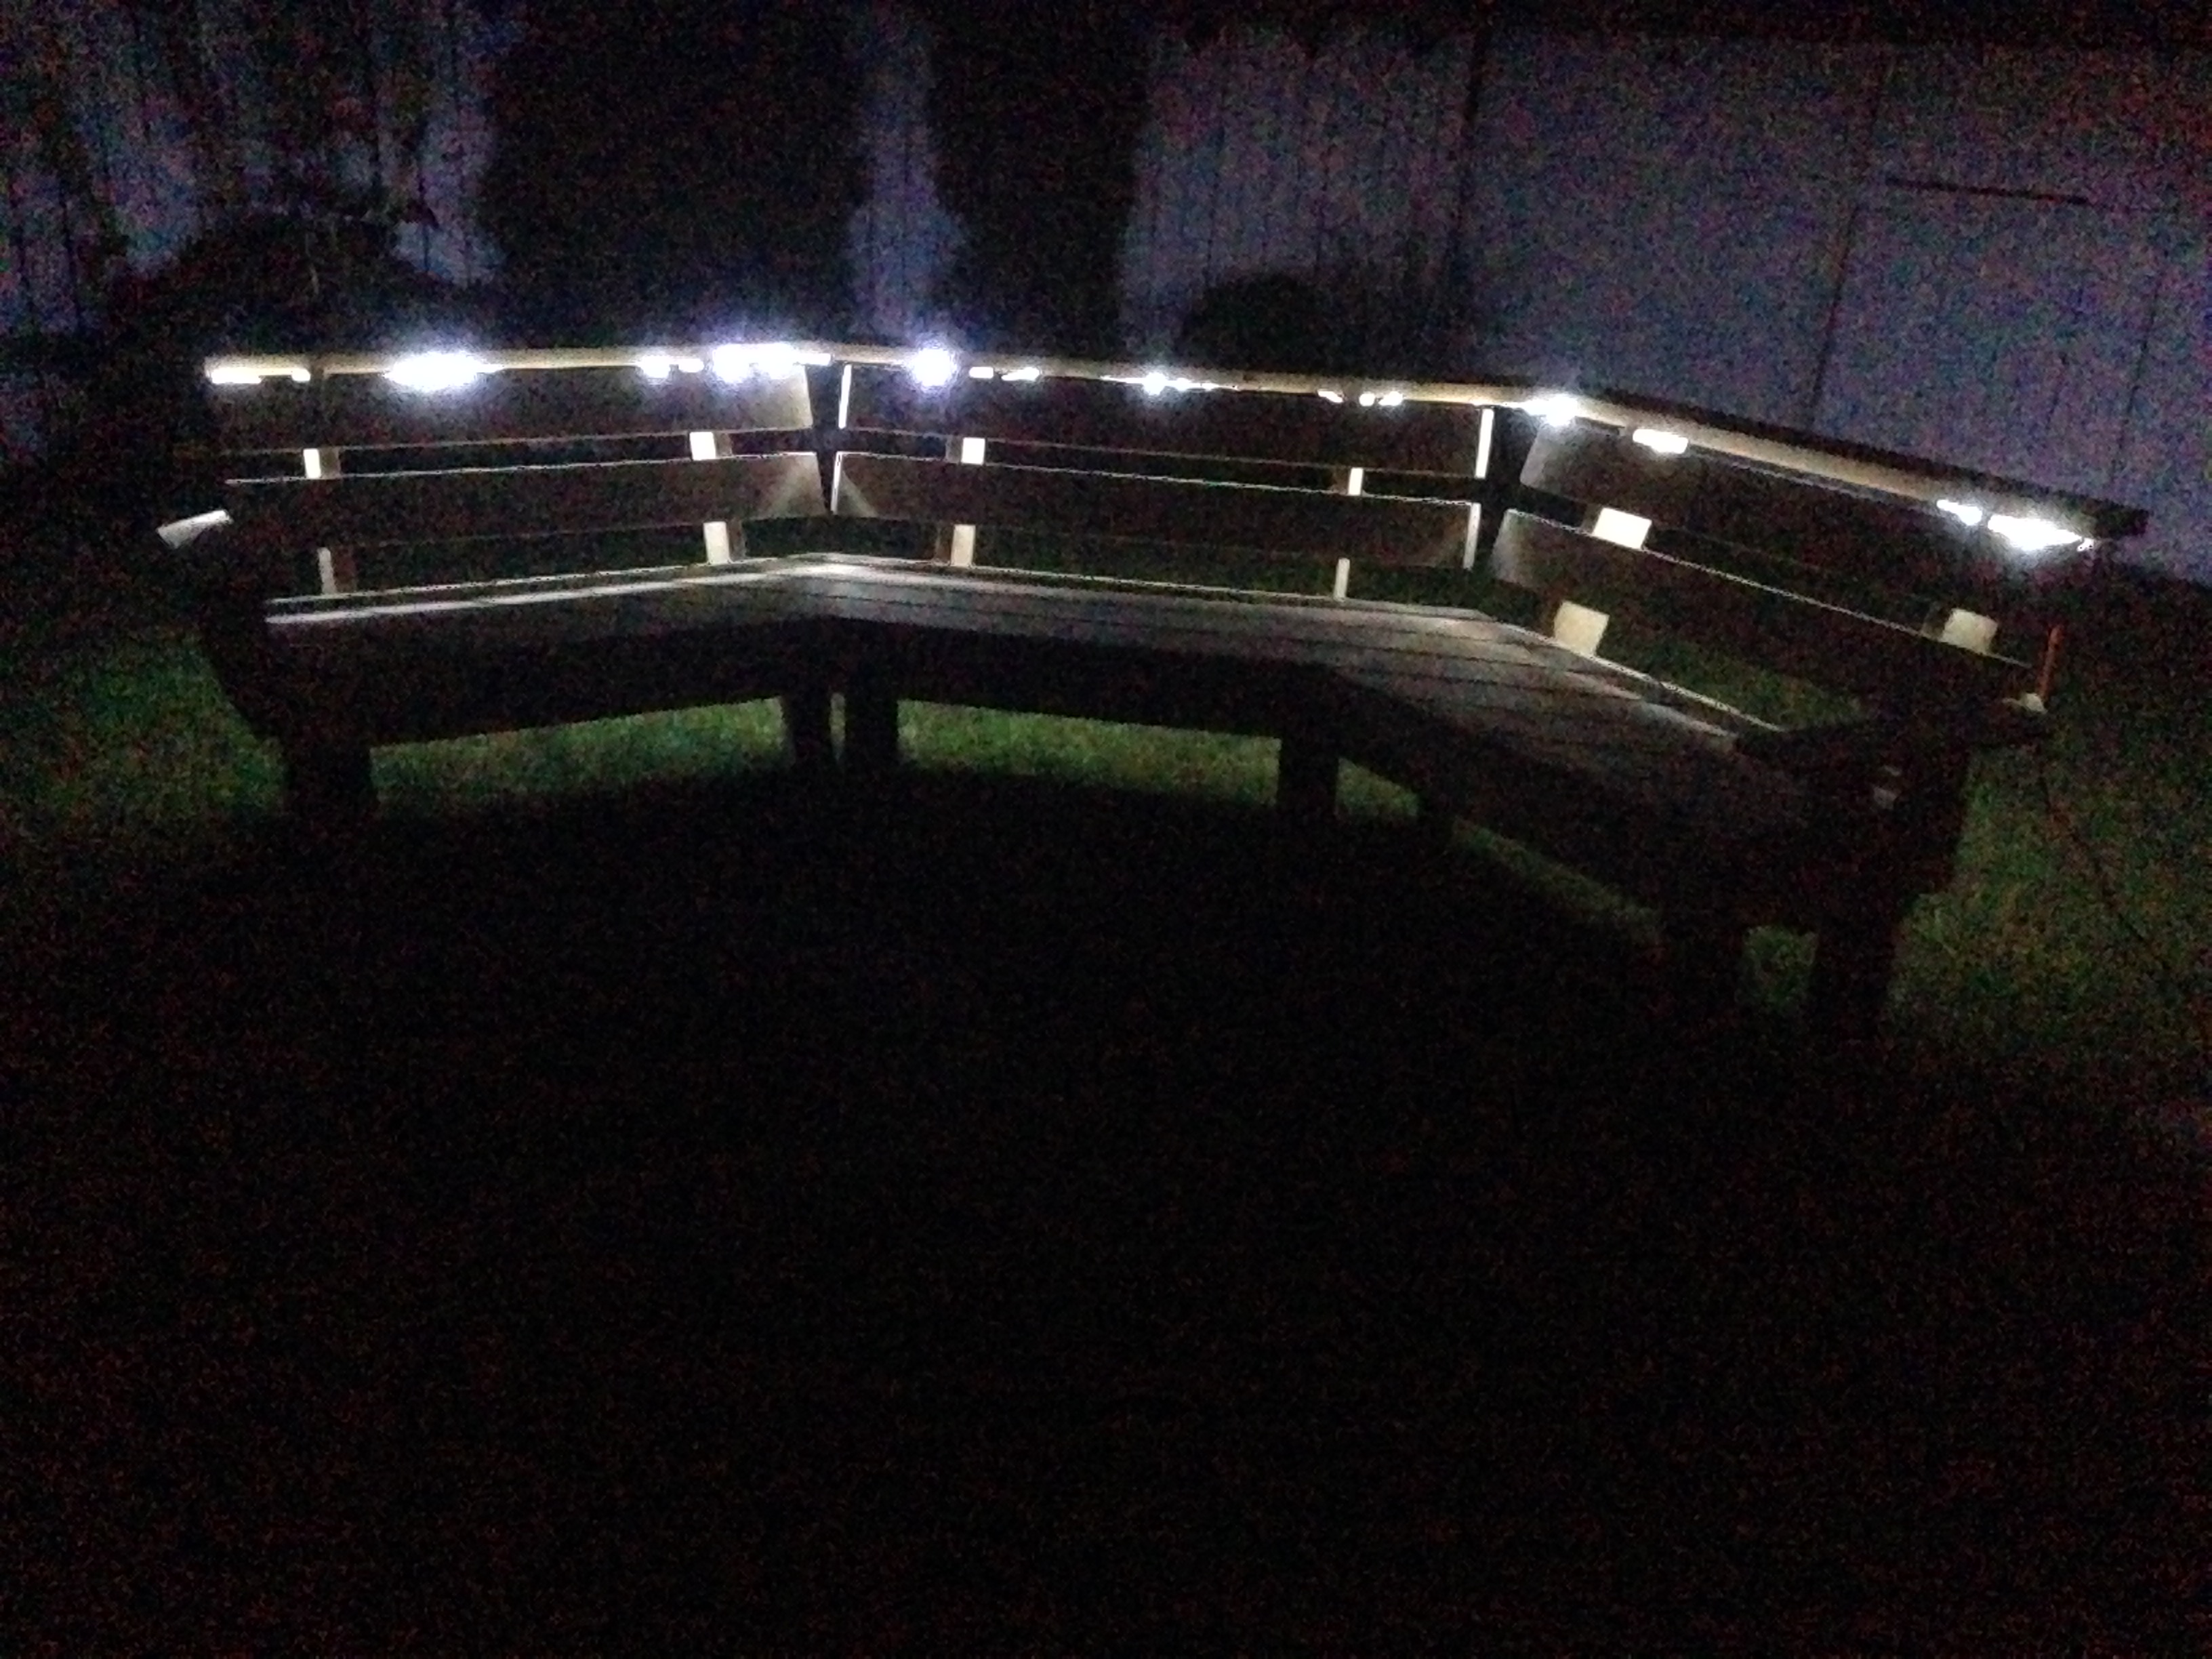
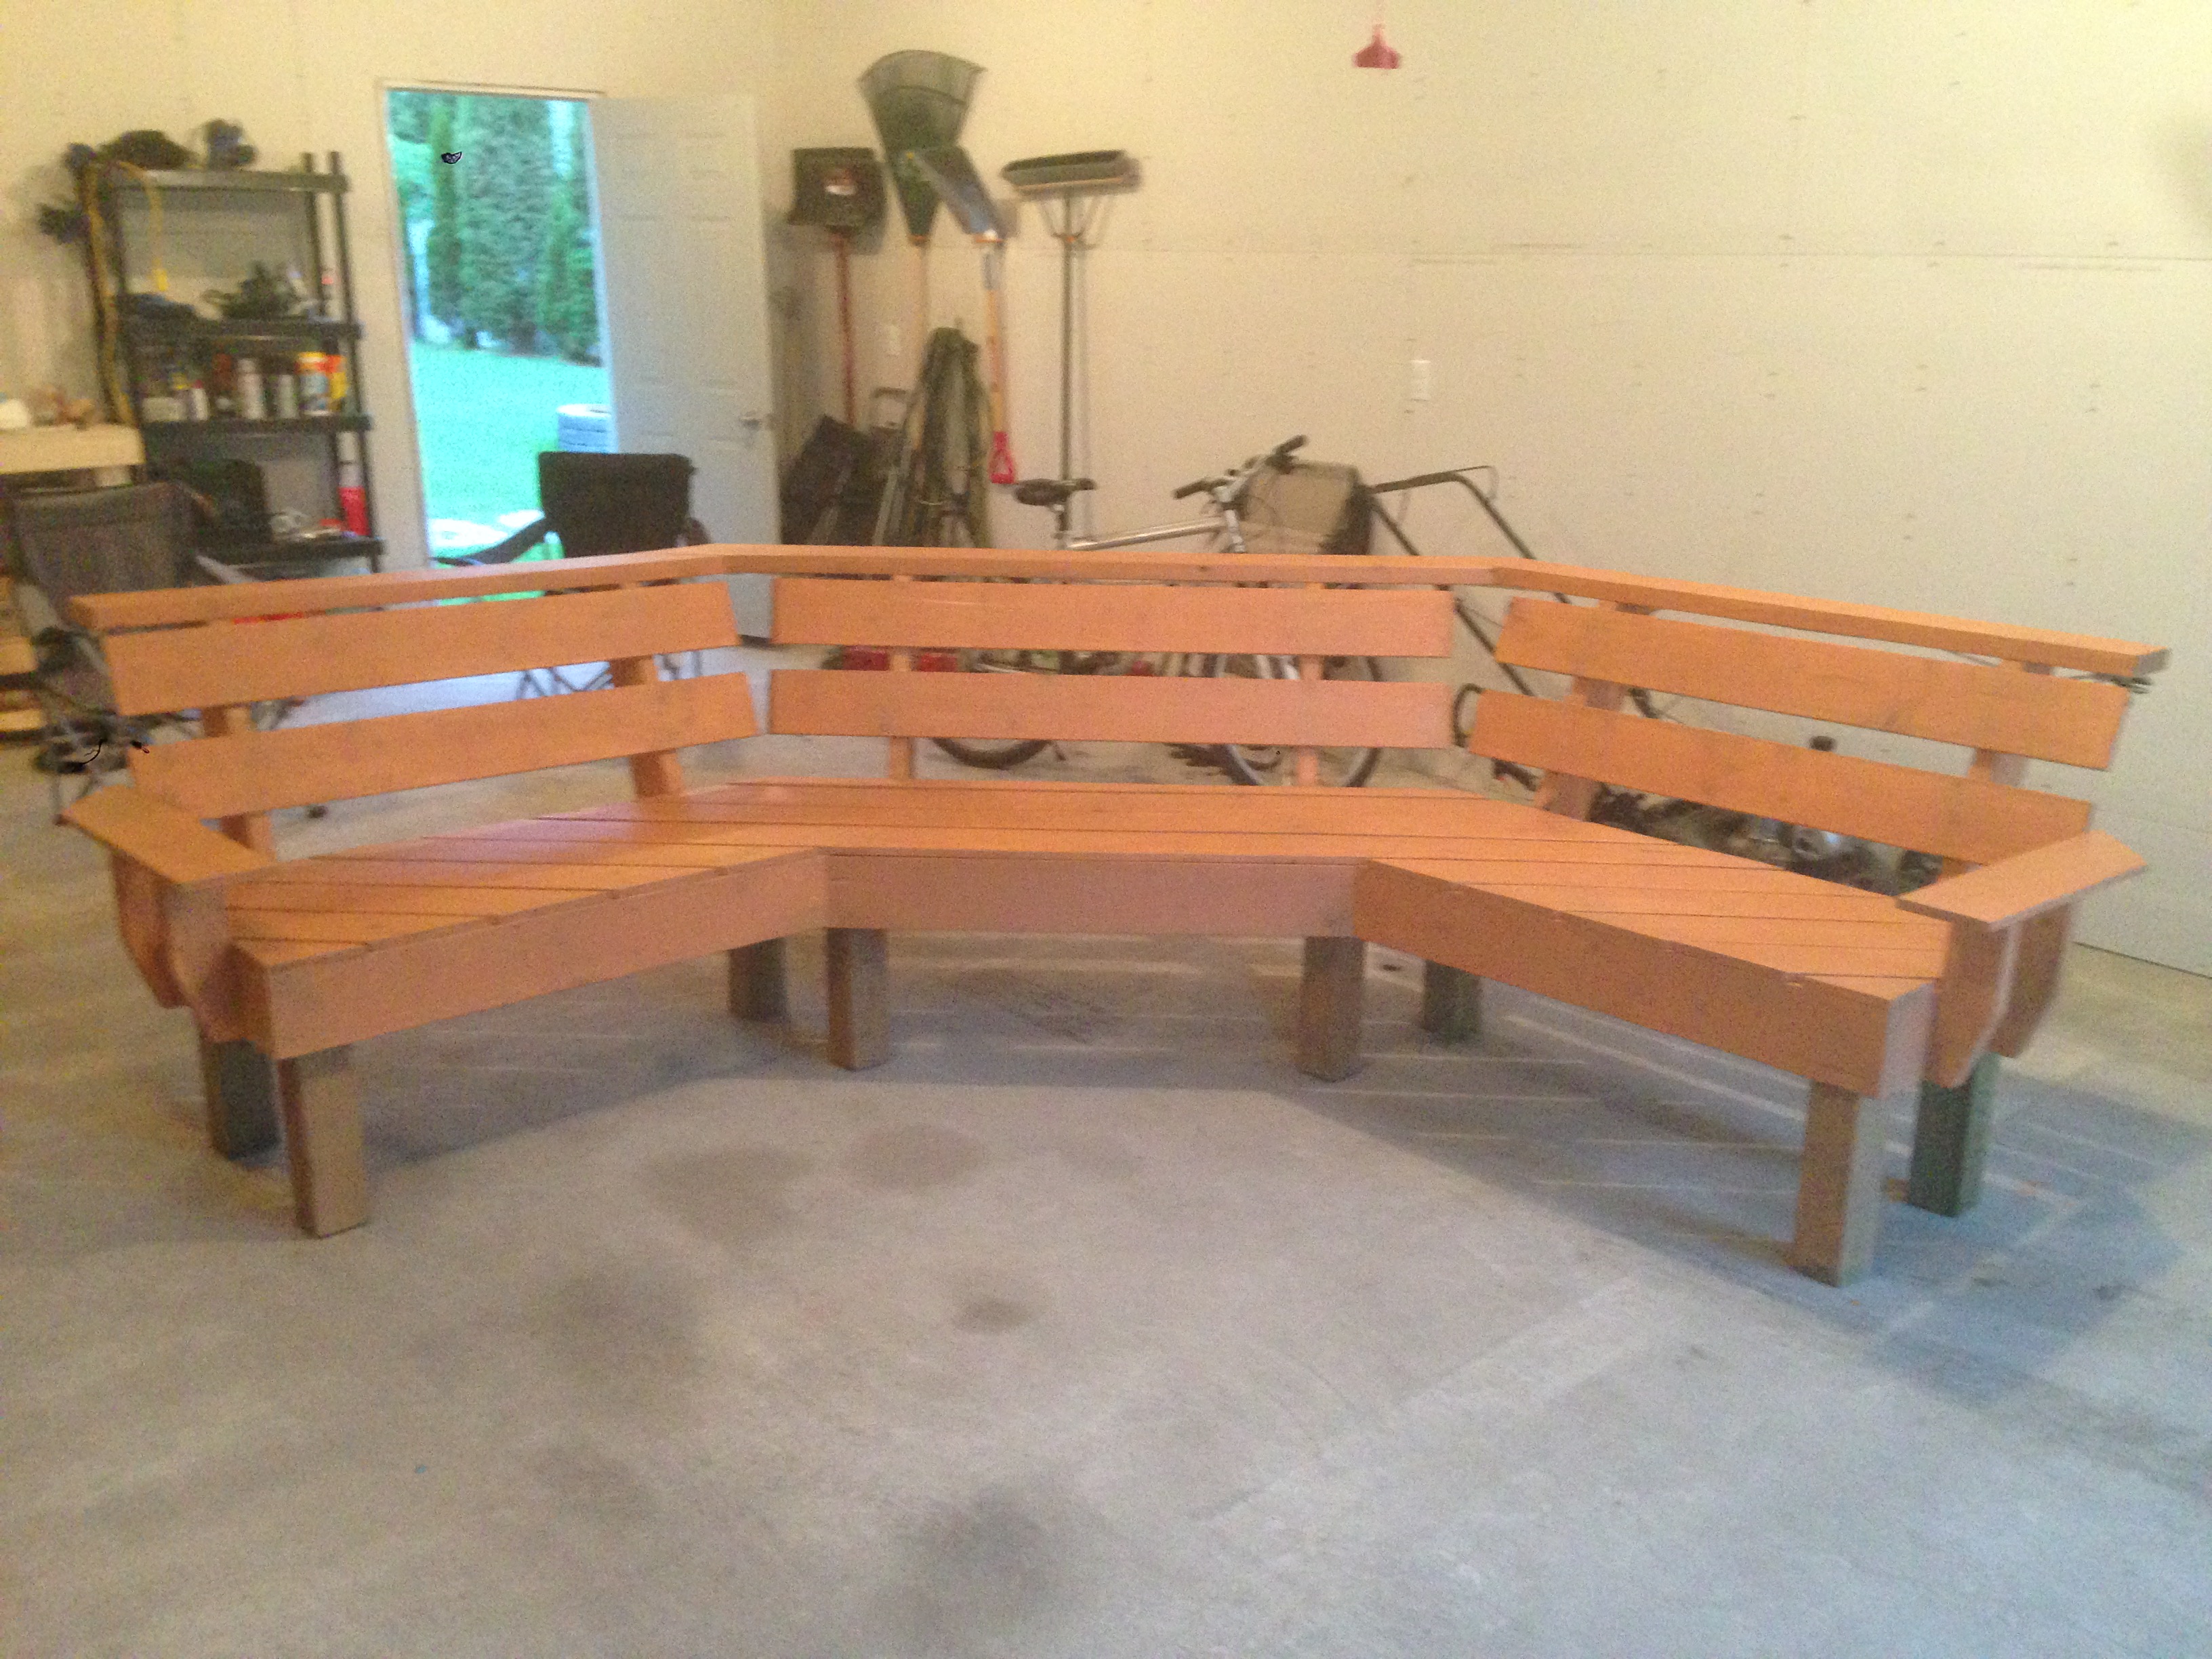
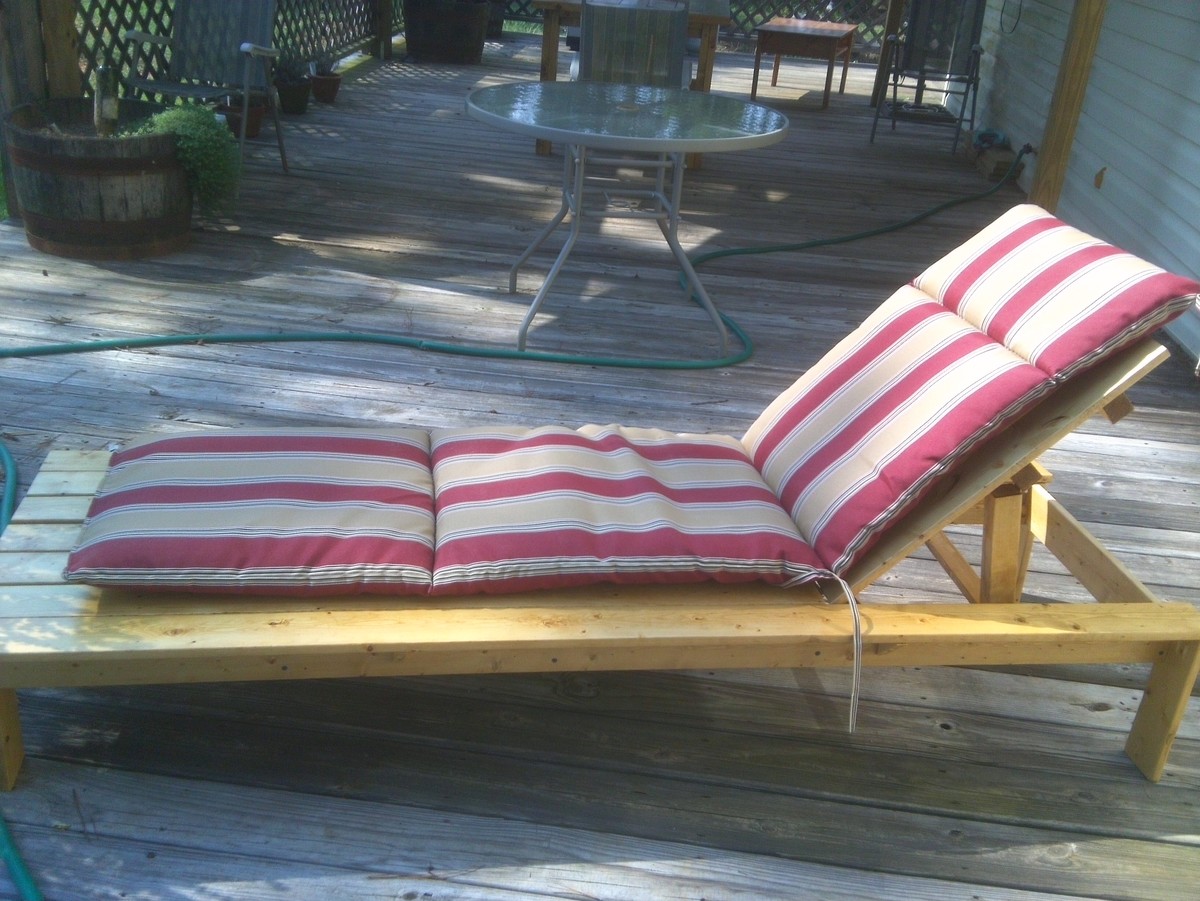
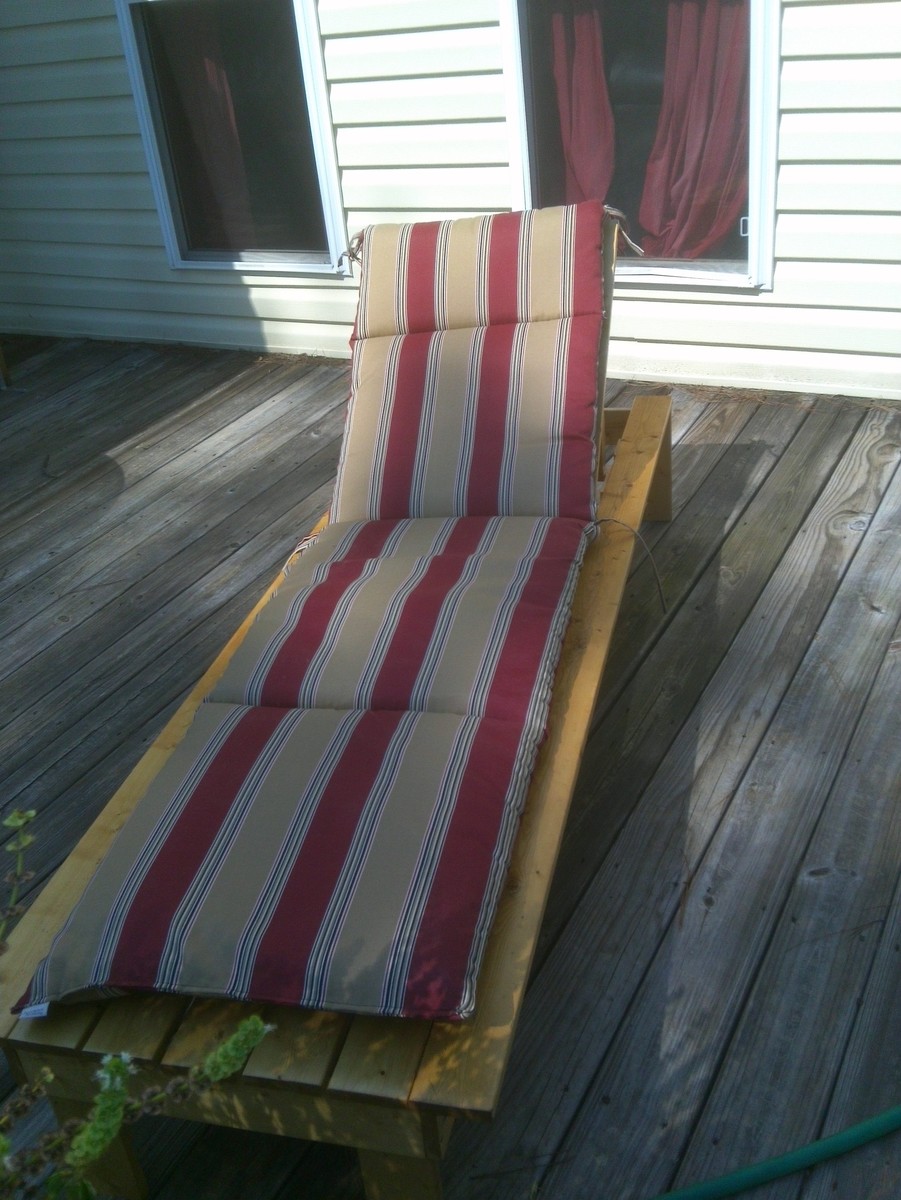
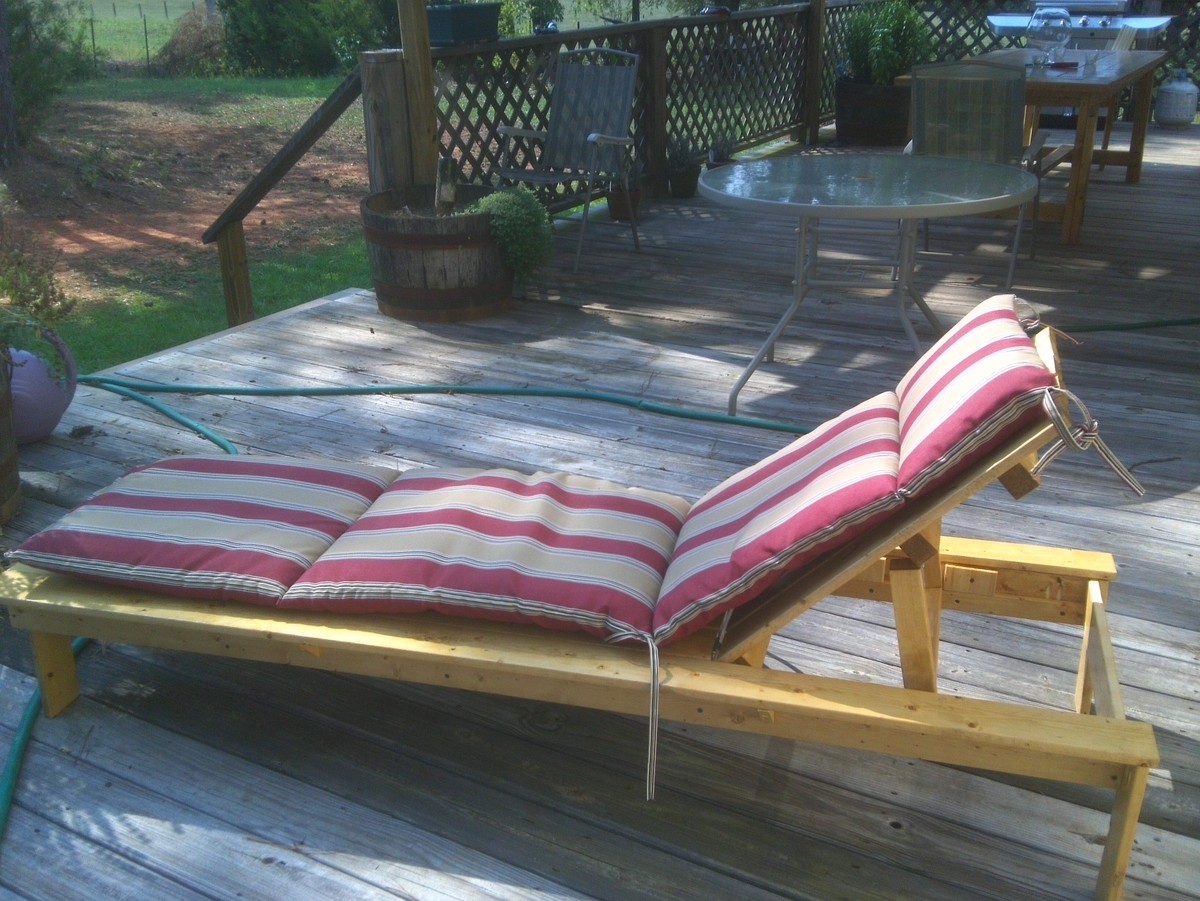
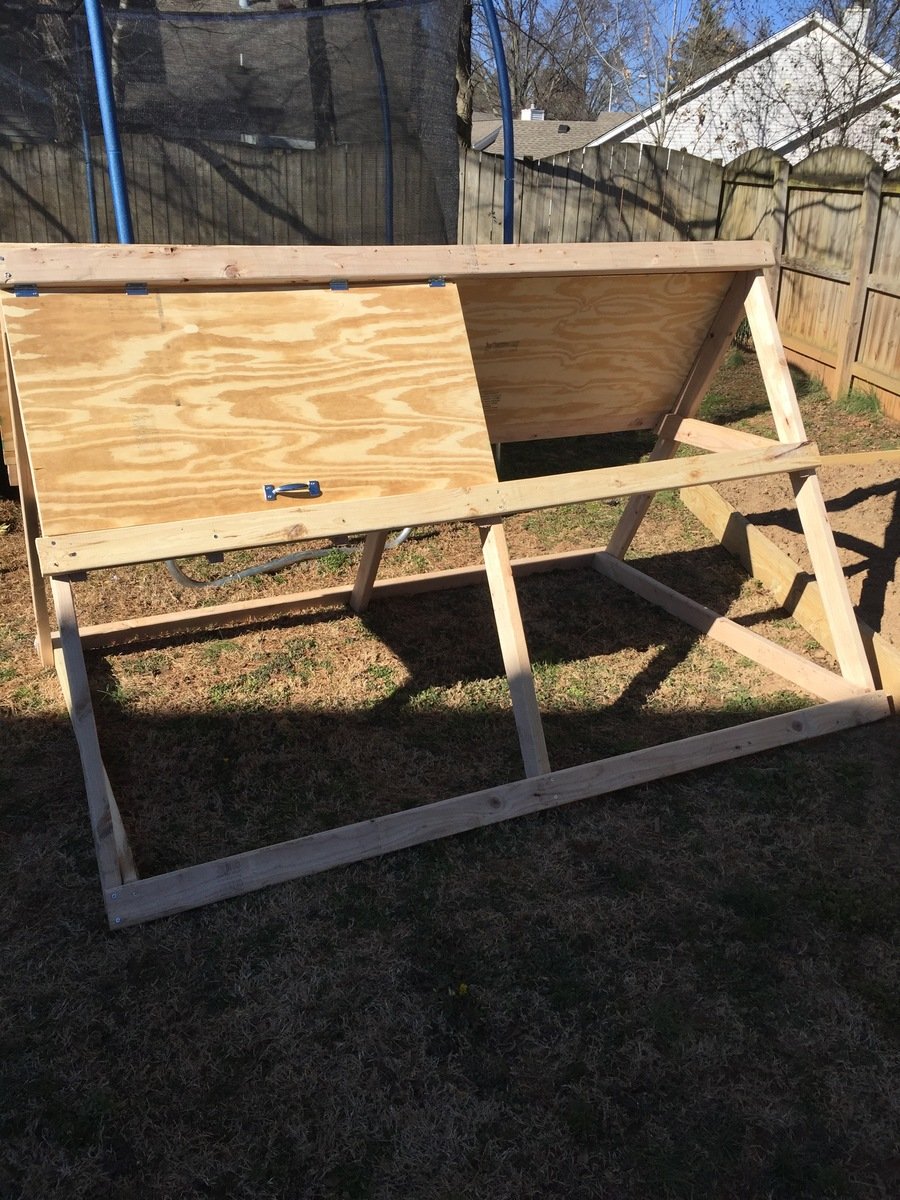
Great experience building this sectional, although would recommend pre-drilling the holes where practical to avoid splitting. It only happened to me a few times on #2 douglas fir, but I would have preferred to avoid it. As you can see from the picture, I didn't account for the siding taking up the space, and was expecting a perfect fit. Easily fixed with a bit of saw work, and now it's really custom fit for the space. :-)

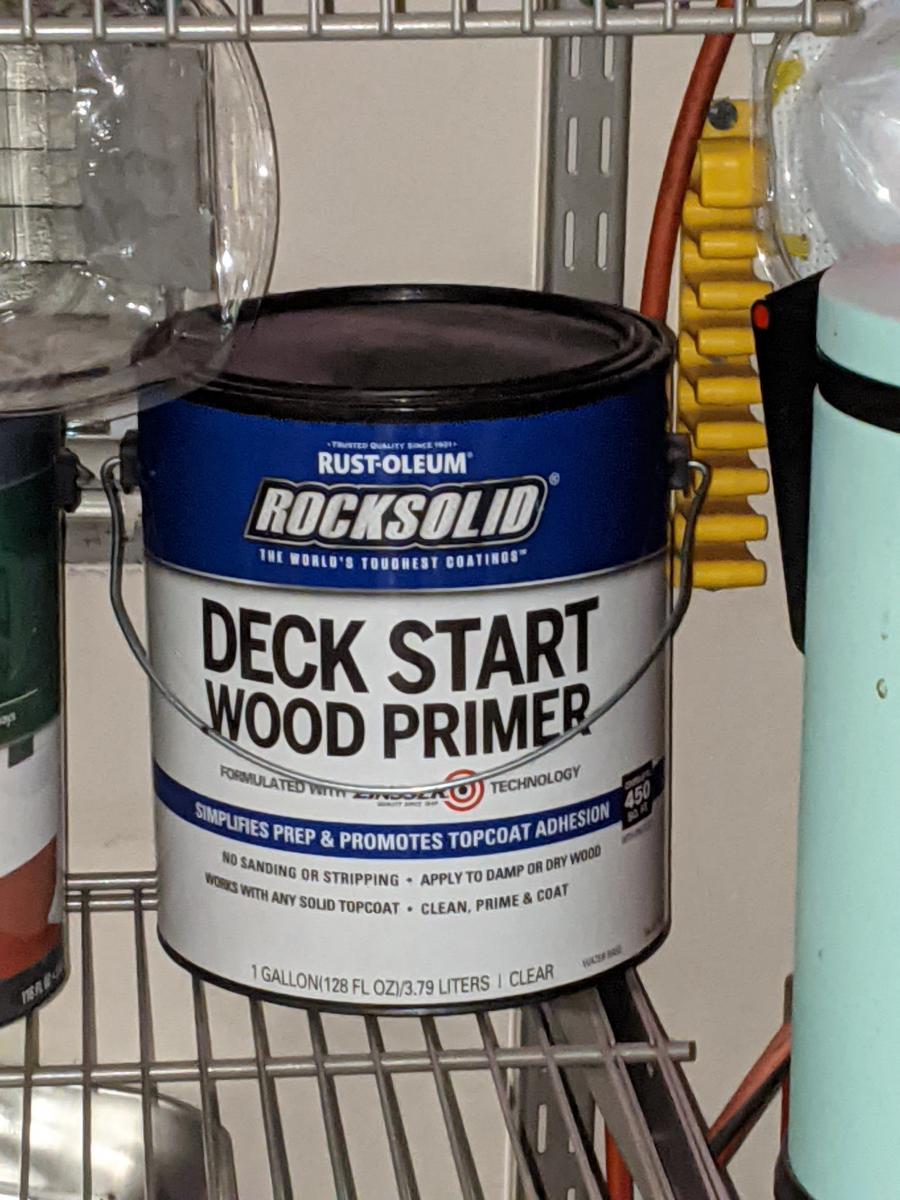
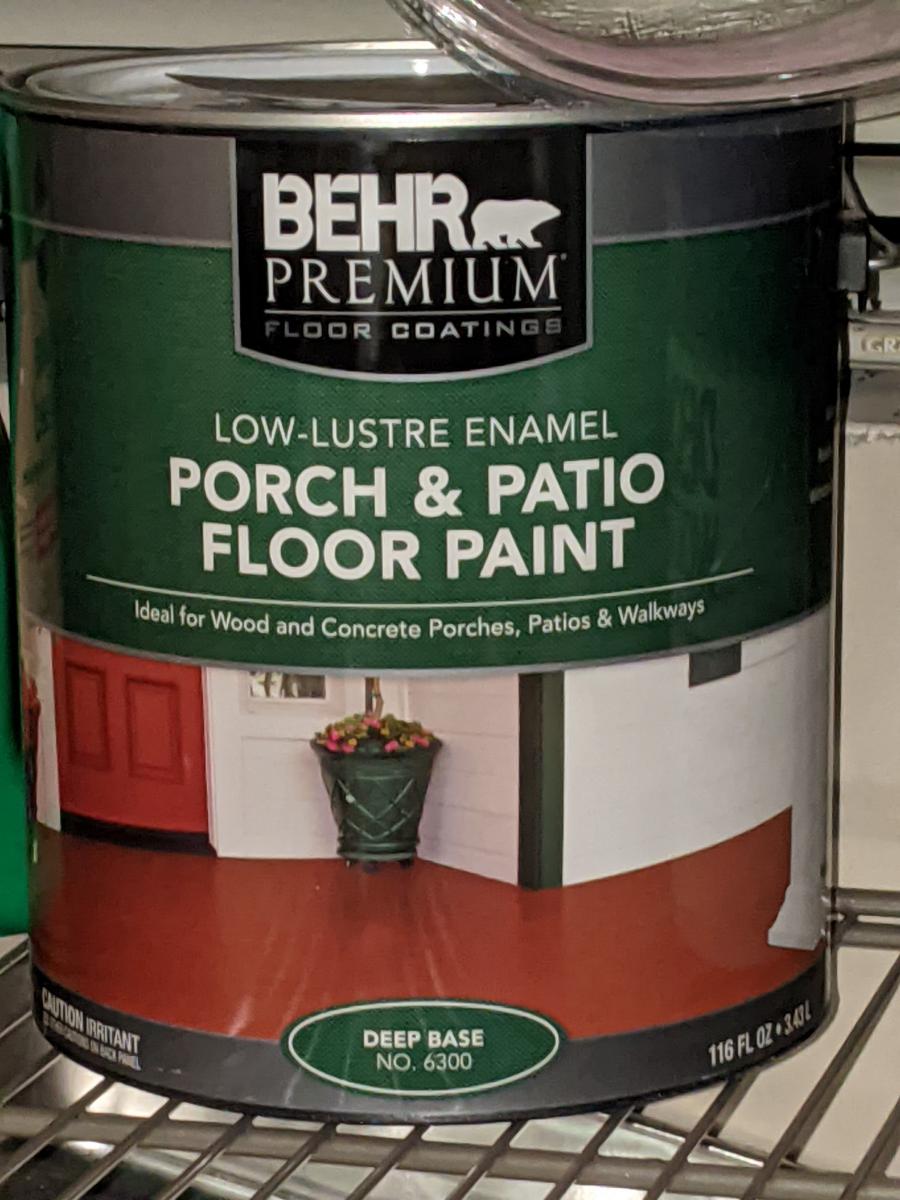
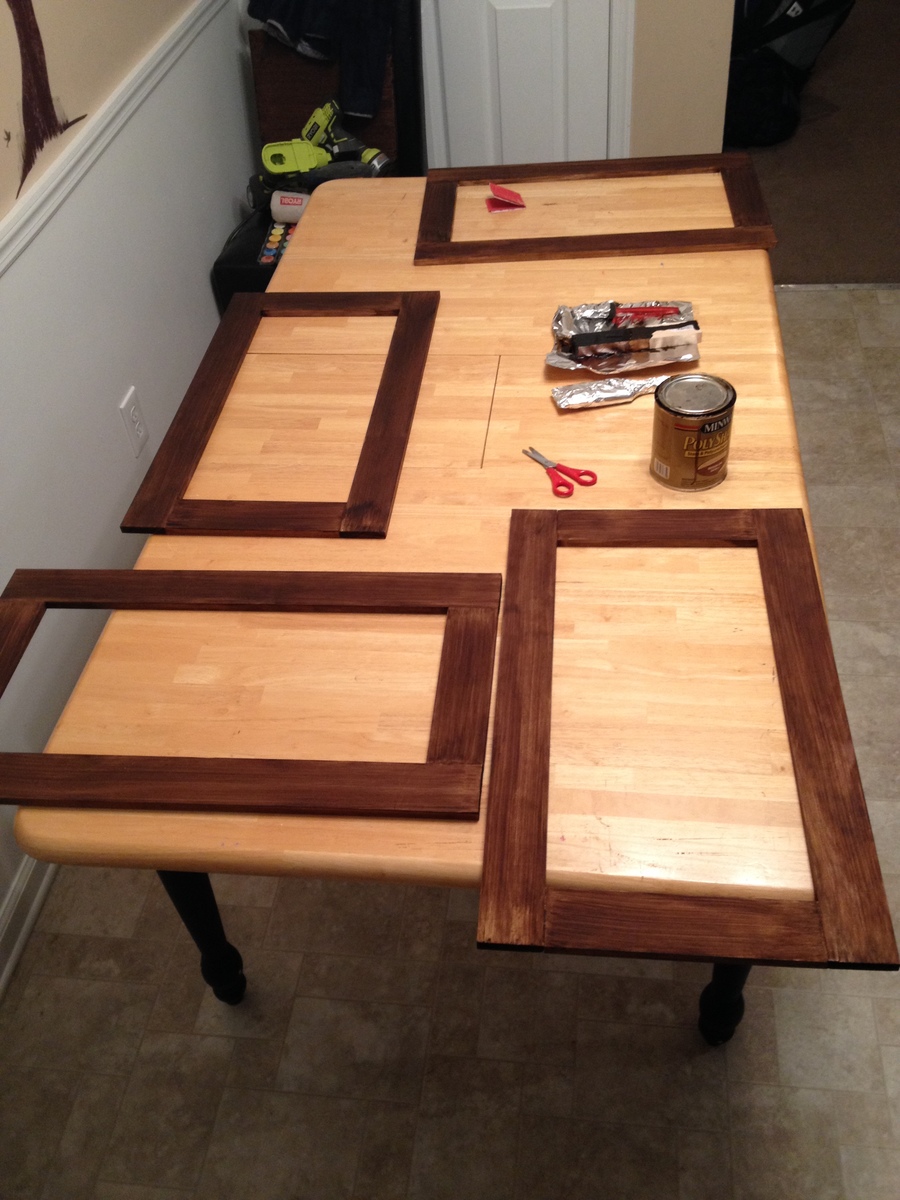
I've added the details of the finish we used, and really happy with how it turned out, with the exception of my garage workshop lighting not revealing the spots I need to touch up now that it is in the natural light.

And of course, this is a terrific time to purchase couch cushions at the end of the season. Lots of great sales, and we found these at Target for $47 per top/bottom set.

Estimated Cost
$600
Estimated Time Investment
Week Long Project (20 Hours or More)
Finish Used
Rustoleum Rock Solid Deck Start Wood Primer followed by Behr Premium Porch and Patio Floor Paint. This gave a really matte finish that looks a lot like the metal patio furniture we will have next to it, and Home Depot was able to tint this for us. We also added a mildew and moss inhibitor to the paint at the store for a couple extra bucks since we live in the PNW. The extra time needed to get multiple coats on for full coverage was totally worth it.
Recommended Skill Level
Beginner

Farmhouse Indoor Playhouse - I May have gone a little overboard...

Submitted by Anonymous (not verified) on Fri, 01/08/2021 - 19:38

Thanks for your amazing Farmhouse Indoor Playhouse plans!
So easy to follow your directions! I may have gone a little overboard.
I used some scrap wood from recent Renos and wood from an old boxspring my parents had.
The kitchen was originally from Ikea with some updates.
The shrubs are silk plants from Ikea and scrap wood.
The only real cost was Paint $30 ish.

Built from Plan(s)
Estimated Cost
50
Estimated Time Investment
Weekend Project (10-20 Hours)
Recommended Skill Level
Beginner

Comments

Seasonal And Holiday

Curved Bench

Submitted by stevez8420 on Sat, 08/08/2015 - 13:41

I followed your idea but i think my bench is a touch smaller. I decided to add arm rests on each end, I kept the top beverage ledge or "Bever-ledge" as I call it and ofcourse I added rope lighting along the underside. This was my first ever DIY project.

Estimated Cost
150
Estimated Time Investment
Weekend Project (10-20 Hours)
Finish Used
I used a Cedar Tone semi-transparent finish which turned out a little more orange than i though but it still looks good!
Recommended Skill Level
Intermediate

Rustic 3 X Hall Tree with 3 Hooks

Submitted by Anonymous (not verified) on Fri, 05/26/2023 - 07:42

I started with the Rustic X Hall Tree plan and modified it to 43" width to fix the space. All X's are half laps cut on the miter saw.

Built from Plan(s)

Comments

Ana White Admin

Fri, 05/26/2023 - 19:38

Thank you for sharing! If you uploaded a brag post of 2 end tables, I was working on fixing the sideways photo and accidentally deleted it. If that was yours please reupload!:) Sorry!

Farmhouse King Bed Frame

Since developing a love for woodworking I’ve began building things for other people. This particular bed frame I built for a couple who are rebuilding their home after it unfortunately burned down. It’s a beautiful farmhouse home out in the country, and this bed frame fits perfectly in their new home.

Estimated Cost
$250
Estimated Time Investment
Weekend Project (10-20 Hours)
Finish Used
I used minwax pre-stain to prepare the wood. I then stained it using special walnut by Varathane (got it from The Home Depot). Finally, I finished it using a clear satin polyurethane by Minwax.
Recommended Skill Level
Beginner

Pottery Barn Printer's Long Low Media Suite

I feel in love with the Pottery Barn Media Suite and new immediately I wanted to build it. I couldn't justify paying close to $2,000 on an entertainment center. I knew Ana would have the plans to help me out. I modified the plans a little bit and instead of building 6 cabinets, I decided to make the inner 4 cabinets one piece, and the 2 outer cabinets removable. This will give me options for when I have to place the Christmas Tree or if we move and cannot fit this huge piece. I also wanted to have as much strength in the middle for our plasma TV. It's about 4 years old and isn't as light at the new TV's are. I loved every minute of building this project and couldn't be more happier! Feel free to search PB website to compare their media suite to my version (savings of $1,700). Feel free to ask any questions!

Estimated Cost
$325
Estimated Time Investment
Week Long Project (20 Hours or More)
Recommended Skill Level
Intermediate

Comments

ctufano

Wed, 07/08/2015 - 08:35

Love how you did yours Christina

I too would like to make one larger unit rather than say 6 of the individual cabinets. Looking at your pictures, it looks like you still made them individually but I'm assuming you attached them (screwed) together? Is that the case? Did you have any issues with the main piece and two ends being different heights when finished?

Am wanting to make a total length of around 104". Means I'll have to tweak some measurements.. In addition, I would like to have one side be a lift top so we can put in a record player and simply lift the top face to access. That wont be too big of a deal.

How did you find the doors were to make? No big deal? i've been curious how the dimensions all play out with the hinges and doors opening etc.

2x4 Outdoor Sectional Sofa

Submitted by lknolan2 on Sat, 04/18/2020 - 20:19

Great Plan! Loved how easy it was to build and how little the cost was.

Estimated Cost
$200
Estimated Time Investment
Afternoon Project (3-6 Hours)
Finish Used
Outdoor deck stain by Valspar in Canyon Brown
Recommended Skill Level
Beginner

Comments

jwood4

Sun, 08/01/2021 - 18:40

Looks amazing! What method did you use (pocket holes, dowels, deck screws, etc) to join the visible portions like the arms?

Seasonal And Holiday

Adjusted Counter Height Farmhouse Table

Submitted by rahurtado on Mon, 05/04/2020 - 23:26

I liked the look of the “counter height table” and adjusted the height to make it a table for an office. I used 4x4s for the legs and oak for the top.
I used a biscuit joiner to join the top, a Dremel tool to carve grooves in the frame so I could attach the top with figure 8 fasteners (allows wood to move as it expands and contracts).

Recommended Skill Level
Intermediate

$1.18 Bird Feeder

Submitted by jaime19861 on Mon, 05/26/2014 - 11:11

I have been trying to attract more birds. I built and put up some more birdhouses, added a bird bath, and wanted to add some more feeders. I found this quick and easy plan and I had to build it.

This took me less than an hour to build. I bought my picket from Menards when it was on sale for $1.18. That's not a bad price for a bird feeder!

You can see the steps I took to build this on my blog.
http://jaimeofalltrades.blogspot.com/2014/05/make-bird-feeder-for-under…

Built from Plan(s)
Estimated Cost
2.00
Estimated Time Investment
An Hour or Two (0-2 Hours)
Recommended Skill Level
Starter Project

Comments

jessehawks

Sun, 03/01/2020 - 17:05

I can tell just from looking at this wood it was treated with a copper based chemical (note the green/blue blotches) while cedar is a good natural resistant wood these can sometimes be treated a well check for those greenish blotches around the Heartwood lines, chemical won't penetrate the tree sap in the wood and builds up along these lines. *I've worked in the pressure treated industry as a chemical tech for 3 years, and industry as a whole for more than 7.

Modified Simple Rolling Bar Cart

I honestly think Ana is a mind reader. Whenever I need plans for a particular piece of furniture, they magically appear on her site. Of course if she was a true mind reader, everything will be exactly as I need it requiring no modifications. That's what makes her plans so amazing. I can build bigger and better because I've learned to modify her plans to fit my current needs.

This Cart was no exception. I had to make mine a few inches deeper and change the height of the legs and it was a piece of cake. I put this together in less than 2 hours and finishing was easy too.

I did a blog post all about what I did differently including how I constructed a towel bar instead of the pipe. Check it out at www.thepursuitofhandyness.com

Built from Plan(s)
Estimated Cost
$25 Depending upon the type of casters used
Estimated Time Investment
Afternoon Project (3-6 Hours)
Finish Used
Oil Based Primer & Rustoleum Painters Touch Spray Paint in Paprika Satin
Recommended Skill Level
Starter Project

Modified Garage Shelf (w/ Workbench)

Submitted by Anonymous (not verified) on Thu, 06/08/2017 - 11:15

Great plans allow for versatility and easy customization. Put the whole thing together in a day w/ one other person. My set up is 16' long - 5' on the side shelves and 6' for the workbench. Added a pegboard and fluorescent light under the top middle shelves. I'm also designing a slim drawer to go under the workbencheck area. Thanks a bunch!

Estimated Cost
~$150 including pegboard.
Estimated Time Investment
Afternoon Project (3-6 Hours)
Finish Used
Will stain dark in the future
Recommended Skill Level
Starter Project

Comments

Kitchen set

Submitted by ShannonB on Wed, 03/09/2011 - 06:48

My husband I built this kitchen set for my daughter's 2nd birthday. She just loves it. For the sink I used the same plans as the stove and changed them a little. There is not enough room below but we used the Cute Play Pie Hutch plan too. The double door fridge we use as a pantry. I can't find the plans for the fridge but we used Ana's plans for that too.

Estimated Cost
Under 200.00
Estimated Time Investment
Week Long Project (20 Hours or More)
Finish Used
White semi gloss paint and Pink semi gloss paint. We primed it before we painted it.
Recommended Skill Level
Starter Project

Best Lounger Ever

Submitted by teeninyg on Sun, 08/21/2011 - 13:37

This was my second project from the site. I wanted somewhere to read my book on the back deck. This chair is perfect. When I get tired of reading I can lay it down and take a nap. It is very sturdy and easy to put together. I do recommend using pocket holes to assemble it. I found it much easier.

Estimated Cost
$70.00
Estimated Time Investment
Day Project (6-9 Hours)
Finish Used
I sanded the seat and sides of the chair. Then stained it with oak and finished it with polyurethane.
Recommended Skill Level
Beginner

Mini console table

Submitted by Mikegarrod on Sun, 02/21/2016 - 21:50

First table built by us. I think it turned out pretty good! Custom built to avoid baseboard heater. 

Built from Plan(s)
Estimated Cost
$30-50 depending on if you need stain or not.
Estimated Time Investment
Afternoon Project (3-6 Hours)
Finish Used
Minwax stain, water based paint and Minwax Polycrilic.
Recommended Skill Level
Beginner

Comments

kg112677

Tue, 06/28/2016 - 19:09

The plans catalog link does not work. Can you please repost these plans? Thanks

Dunnie

Sun, 01/15/2017 - 21:24

I am in desperate need of instructions for

this mini console table.  I can't find them anywhere. I won't be able to modify other plans, lol I need it all planned  out.

theUgly_bear

Tue, 01/17/2017 - 12:35

i plan on making this next week, so i can update you with the plans, the only thing i am doing different is the way i am doing my cross in the back. 

stay tuned 

theUgly_bear

Tue, 01/17/2017 - 12:35

i plan on making this next week, so i can update you with the plans, the only thing i am doing different is the way i am doing my cross in the back. 

stay tuned 

Mrs.tash

Sat, 02/04/2017 - 13:12

This is beautiful and simple! Great job!

You costum built it to fit the baseboard, were the original plans Ana White's? Can you link it or tell me the name to find it?

I'm new to the site and not navigating very well. I'm trying to save plans for a console similar to this to my profile/account and looking for the little "save to plans" to easily find this again

Herb Planter

Submitted by Anonymous (not verified) on Mon, 06/20/2016 - 14:42

Modified the dimensions to make a good sized planter for patio herb garden :)

Built from Plan(s)
Estimated Cost
~$50 for lumber and supplies
Estimated Time Investment
Day Project (6-9 Hours)
Finish Used
Minwax polyshades in classic black satin applied, then distressed with sander
Recommended Skill Level
Beginner

Farmhouse Storage Bed - Twin

Submitted by Abby721 on Mon, 04/20/2020 - 13:26

Modified to have storage boxes on only one side since it was being placed next to a wall.

Estimated Cost
150
Estimated Time Investment
Weekend Project (10-20 Hours)
Finish Used
Custom white color paint to match trim.
Recommended Skill Level
Intermediate

Comments

DIY LP Vinyl Record Storage Box with Wheels

I have to say, there is something about listening to music on vinyl that just gives me the warm fuzzies! A little bit of crackle, fuzz and hum.. physically having to flip over the record to get to the next side, & listening to an album start to finish just has a nostalgic feel to me and I love it.

We’ve started quite the collection of LP’s and quickly found we needed some good storage for them. Since vinyl isn’t exactly the most popular form for listening to music, I just had to make my own.

I knew it had to have 3 things.. size to fit, wheels and easy of searching through records.

I had some scrap poplar plywood lying around, and just had to purchase some casters and furring strips to frame out the box. I even had an extra cabinet handle laying around to use.

I made it 12 inches wide by 16 inches deep, framed it out shaker style with furring strips and then stained it.. added casters and a handle ;)

Estimated Cost
$18
Estimated Time Investment
Afternoon Project (3-6 Hours)
Finish Used
minwax dark walnut stain and 2 coats of matte finish polycrylic
Recommended Skill Level
Intermediate

Comments

yurra-bazain

Tue, 07/09/2013 - 10:59

I love how you appreciate vinyls and gives things you have on hand new purpose. This storage box is nicely done.

I looked at your blog and went straight to the Upcycle tab, since that's where my interest lies too. I love seeing a "pile of useless" restored to use. =D

Back