Community Brag Posts

Garden Tool Storage Rack

Submitted by kwildman on Tue, 04/28/2020 - 20:45

This isn't an Ana White plan but I've learned so much from this site that I designed and built this garden tool rack. Its pine 2x4 construction. I love it!

It is 84" tall x 72" long x 26 wide (opening) and 48"wide for garden tool hangers.

Estimated Cost
100
Estimated Time Investment
Afternoon Project (3-6 Hours)
Finish Used
No finish
Recommended Skill Level
Beginner

Comments

Rustic Queen Sized Wall Bed

Submitted by ldo2626 on Wed, 06/25/2014 - 09:09

Expecting our second child, my wife and I decided to do away with our guest bedroom and combine it with our office. The only problem was our queen bed took up way too much space and it didn't get enough use to justify the sacrifice. We looked at the wall bed options available for purchase and decided they were way too blah and very expensive. I then found the "A MURPHY BED YOU CAN BUILD, AND AFFORD TO BUILD" post on Ana's website (thanks for the inspiration)! 

 Using cheap pine boards, plywood, door hinges, vinyl upholstery and stain I constructed the wall bed you see here. It really wasn't that difficult but facing it took the most time. To give the boards a more rustic look I used a utility knife to shave off the edges/corners and stained them with the Minwax American Walnut water based stain and the Minwax White Wash Pickling. When this started we thought we were going to have to settle for something unattractive and less than desirable. Seeing it in our office now, we love our new bed and actually think it makes the room look much better!  I didn't keep track of costs, but it couldn't have been more than $150.


Estimated Cost
I didn't keep track of costs, but it couldn't have been more than $150.
Estimated Time Investment
Weekend Project (10-20 Hours)
Finish Used
Minwax American Walnut water based stain and Minwax White Wash Pickling
Recommended Skill Level
Beginner

Comments

jwm816

Tue, 07/08/2014 - 08:08

Looks great! May I ask what the final outside dimensions were? Curious to see if this would work for me.

Thanks!

ldo2626

Wed, 08/06/2014 - 09:23

I would have to measure it when I get home... at work currently. Looking back, I think the best approach is to take the measurements from the plan, find the difference between standard mattress and queen mattress dimensions (check wikipedia for standard sizes), then add that difference back to the plan. I cut it real close on mine and could use a little more space. It would be nice to make it a bit deeper and with some head room to store comforters and pillows.

lopixy

Sun, 11/30/2014 - 18:10

I love this!  Could you give more details about how you did the facing?  Are the pine boards just nailed onto the plywood? 

chefrgk

Sun, 12/28/2014 - 12:59

I am dying to get started on this wall bed project. I keep getting this message when trying to open the Plans.

The page you are looking for is temporarily unavailable.
Please try again later.
can someone help me find them.

chefrgk

Sun, 12/28/2014 - 12:59

I am dying to get started on this wall bed project. I keep getting this message when trying to open the Plans.

The page you are looking for is temporarily unavailable.
Please try again later.
can someone help me find them.

nicolanala

Tue, 08/09/2016 - 15:24

Hi. I would love to try this. Looking to build in the next month before parents in law come over. Is there any working links to the plans??

josheli

Thu, 01/25/2018 - 13:06

click on the bed picture above and it will take you to the plans


Pretty Wood Boxes!

Submitted by cassiet717 on Fri, 08/02/2013 - 18:42

My brother and his fiancee just bought their first house, and these sweet little boxes were the perfect housewarming gift! I used the recommended cedar picket, and found some old reins at a flea market for the handles. Piece of cake to build, super inexpensive, but absolutely adorable!

Estimated Cost
$3 per box (including handles)
Estimated Time Investment
An Hour or Two (0-2 Hours)
Finish Used
Minwax Pre-Stain Wood Conditioner, Minwax Stain in Walnut
Recommended Skill Level
Starter Project

Extra Tall Bar Stool

Submitted by Anonymous (not verified) on Tue, 02/16/2016 - 15:30

Shortened by 4". Changed all 1" to 2" and used 2x4 instead of 2x2! Used 2x6 for the seat. Used pocket holes and screws. Love them!

Built from Plan(s)
Estimated Cost
I bought rough sawn wood from a mill at 100 ft for $100... total with finishes about $30 each.
Estimated Time Investment
Afternoon Project (3-6 Hours)
Finish Used
Minwax ebony stain (quickly removed with cloth) and polcrylic semi gloss (3 coats)
Recommended Skill Level
Beginner

Christmas Tree Shelf

After building myself a Christmas Tree shelf for 2019, friends and family wanted me to build them one for 2020. Three people wanted a smaller tree so I scaled down the plans and used 1x4's ripped to 3 inches. I also included cup hooks (3 or 4) and an aluminum french cleat hanger I found on Amazon for about $5 each when you buy three.

Built from Plan(s)
Estimated Cost
$10-$15
Estimated Time Investment
Afternoon Project (3-6 Hours)
Finish Used
Various stains. Including mahogany, pecan, oak, special walnut, and white. Three clients wanted theirs unfinished.
For a top coat I used spray lacquer on one of white-washed trees and clear Krylon on another. No top coat was applied to the other trees.
Recommended Skill Level
Beginner

Comments

Seasonal And Holiday

6'x6' Box

Submitted by Anonymous (not verified) on Wed, 04/20/2016 - 19:22

I found these plans online and was just waiting for the kids' grandpa to come out and build it. Could be built in one afternoon (depending on how many trips to your local Home Depot, and availability of the correct tools)
Modifications from original plan:
6x6 instead of 4x4
Brackets to hold patio umbrella for shade
Added seat gussets for additional support
Added "wooden flange" around bottom of box to run lawnmower on
One additional center back support on each bench
One centered handle (instead of a handle on each end)
Stapled landscape weed barrier fabric onto the bottom
Sanded all exposed edges

Materials:
4@2x10x8'
12@1x6x6'
2@2x6x12'
8 hinges
2 handles
3 1/2" decking screws (for attaching 2"x boards)
1 5/8" decking screws (for attaching 1"x boards)
2+ 1 1/4" 2-hole straps for metal conduit (for attaching patio umbrella*)
*Our patio umbrella pole was 1 1/2" diameter, but 1 1/2" straps had too much play, so we used 1 1/4" straps and misc flat washers to adjust the snugness to the pole
Cut lengths:
2@2x10 cut to 72" (long sides of the box)
2@2x10 cut to 69" (short sides of the box)
Cut one each of the following out of a 12 footer:
2@2x6 cut to 75" (long side "flange")
2@2x6 cut to 64" (short side "flange")
No cuts were made to the 12 1x6's
Used one leftover 2' from the 2x8x10's ripped in half cut to 11.5" for arm rests
Used two leftover 2' sections from the 2x8x10's ripped in half cut to 21" for back supports
Used the last 2' cutoff to make two seat gussets (cut about 9 1/2" off and then ripped it at 45 degrees)
Used the remaining piece (ripped in half length-ways) to attach to the center of the backrest for additional support and as the attachment point for our handles
We decided to do one handle in the center of the backrest so one reasonably strong adult could open the lid
The bottom "flange" was assembled with the box upside down. Basically a 2x6 screwed to the bottom edge of the box allowing 1 1/2" overhang all the way around
After making cuts, but before assembly, we recommend using a quarter-sheet pad sander (or similar) with 60 grit paper to break all of the edges and round over any ends or corners that will be in contact with sandbox users
Followed other general assembly instructions

Built from Plan(s)
Estimated Cost
$300 with umbrella and sand
Estimated Time Investment
Day Project (6-9 Hours)
Finish Used
We live in a very arid climate (Utah) so we chose not to varnish or paint this project
Recommended Skill Level
Beginner

Freestanding Garage Shelves

Submitted by Jeanna on Mon, 04/27/2020 - 08:07

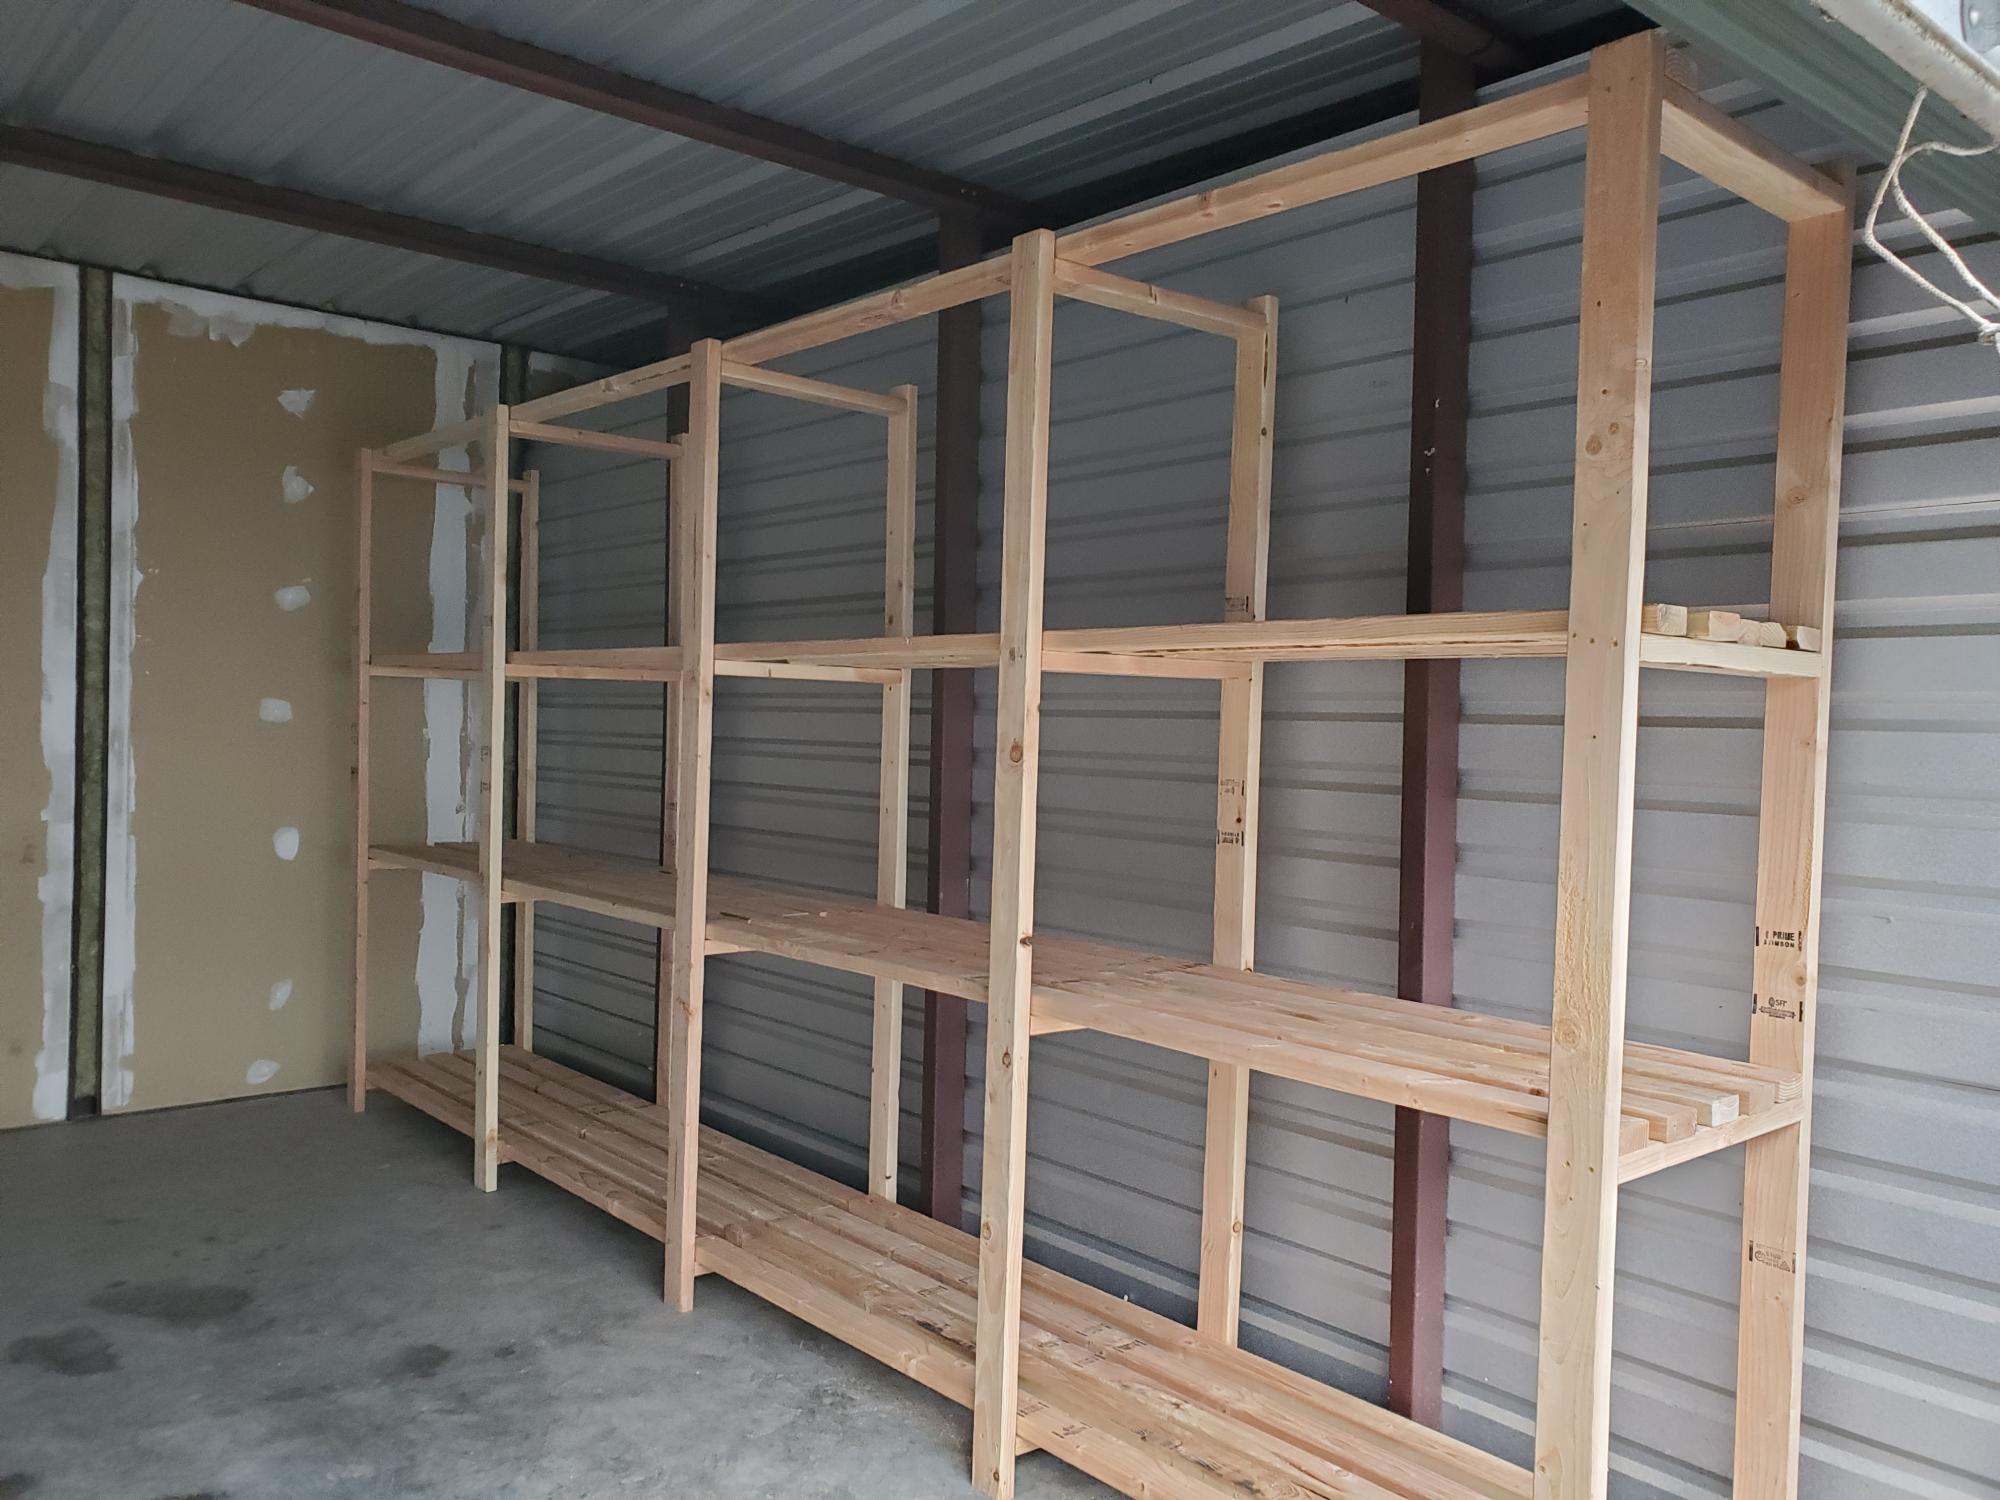
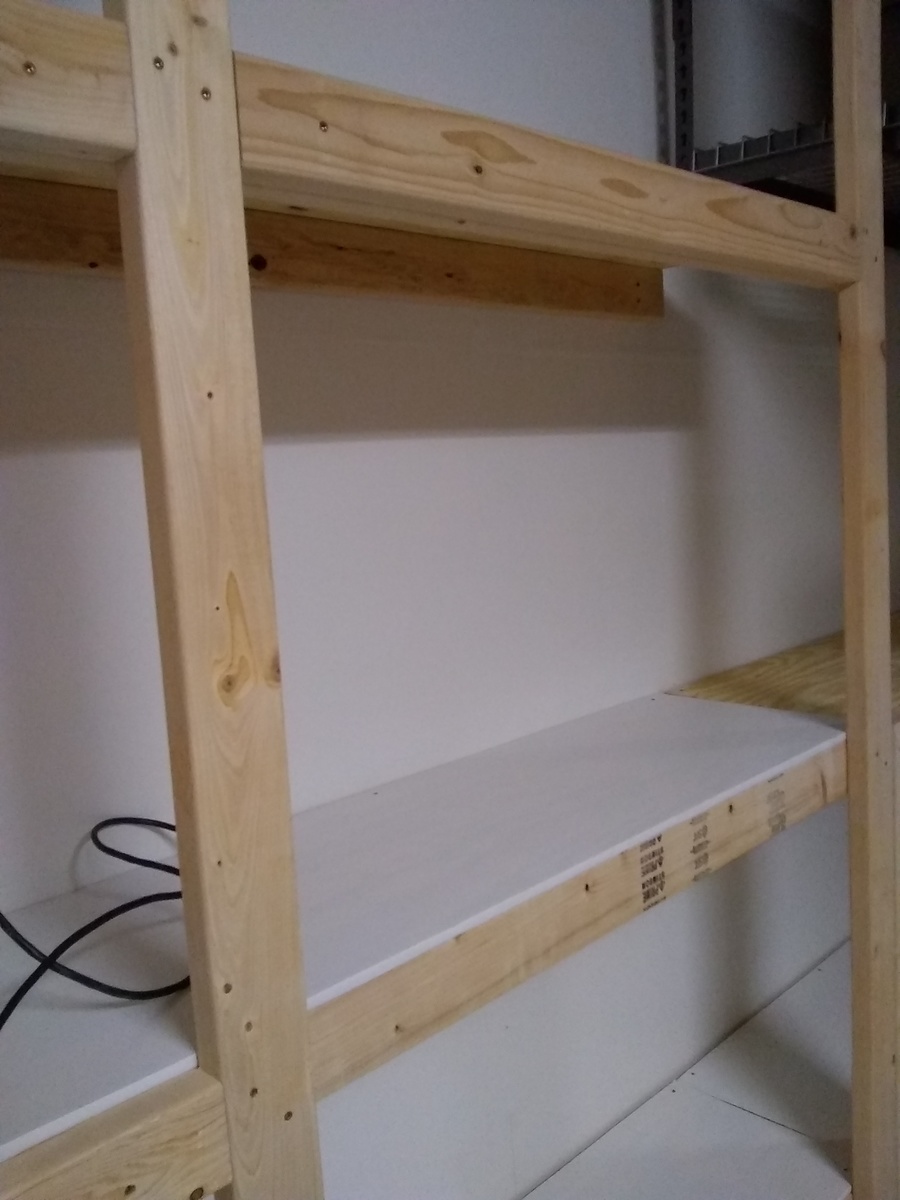
This was our first real DIY from scratch project. We somehow made it a bit too tall and so have not put the top shelf planks on. Over all we are pretty happy with it. This was in a rental storage unit. We plan to give it another go in our garage too.

Estimated Time Investment
An Hour or Two (0-2 Hours)
Finish Used
None
Recommended Skill Level
Beginner

Mudroom Lockers

Submitted by rendall28 on Sun, 03/21/2021 - 11:03

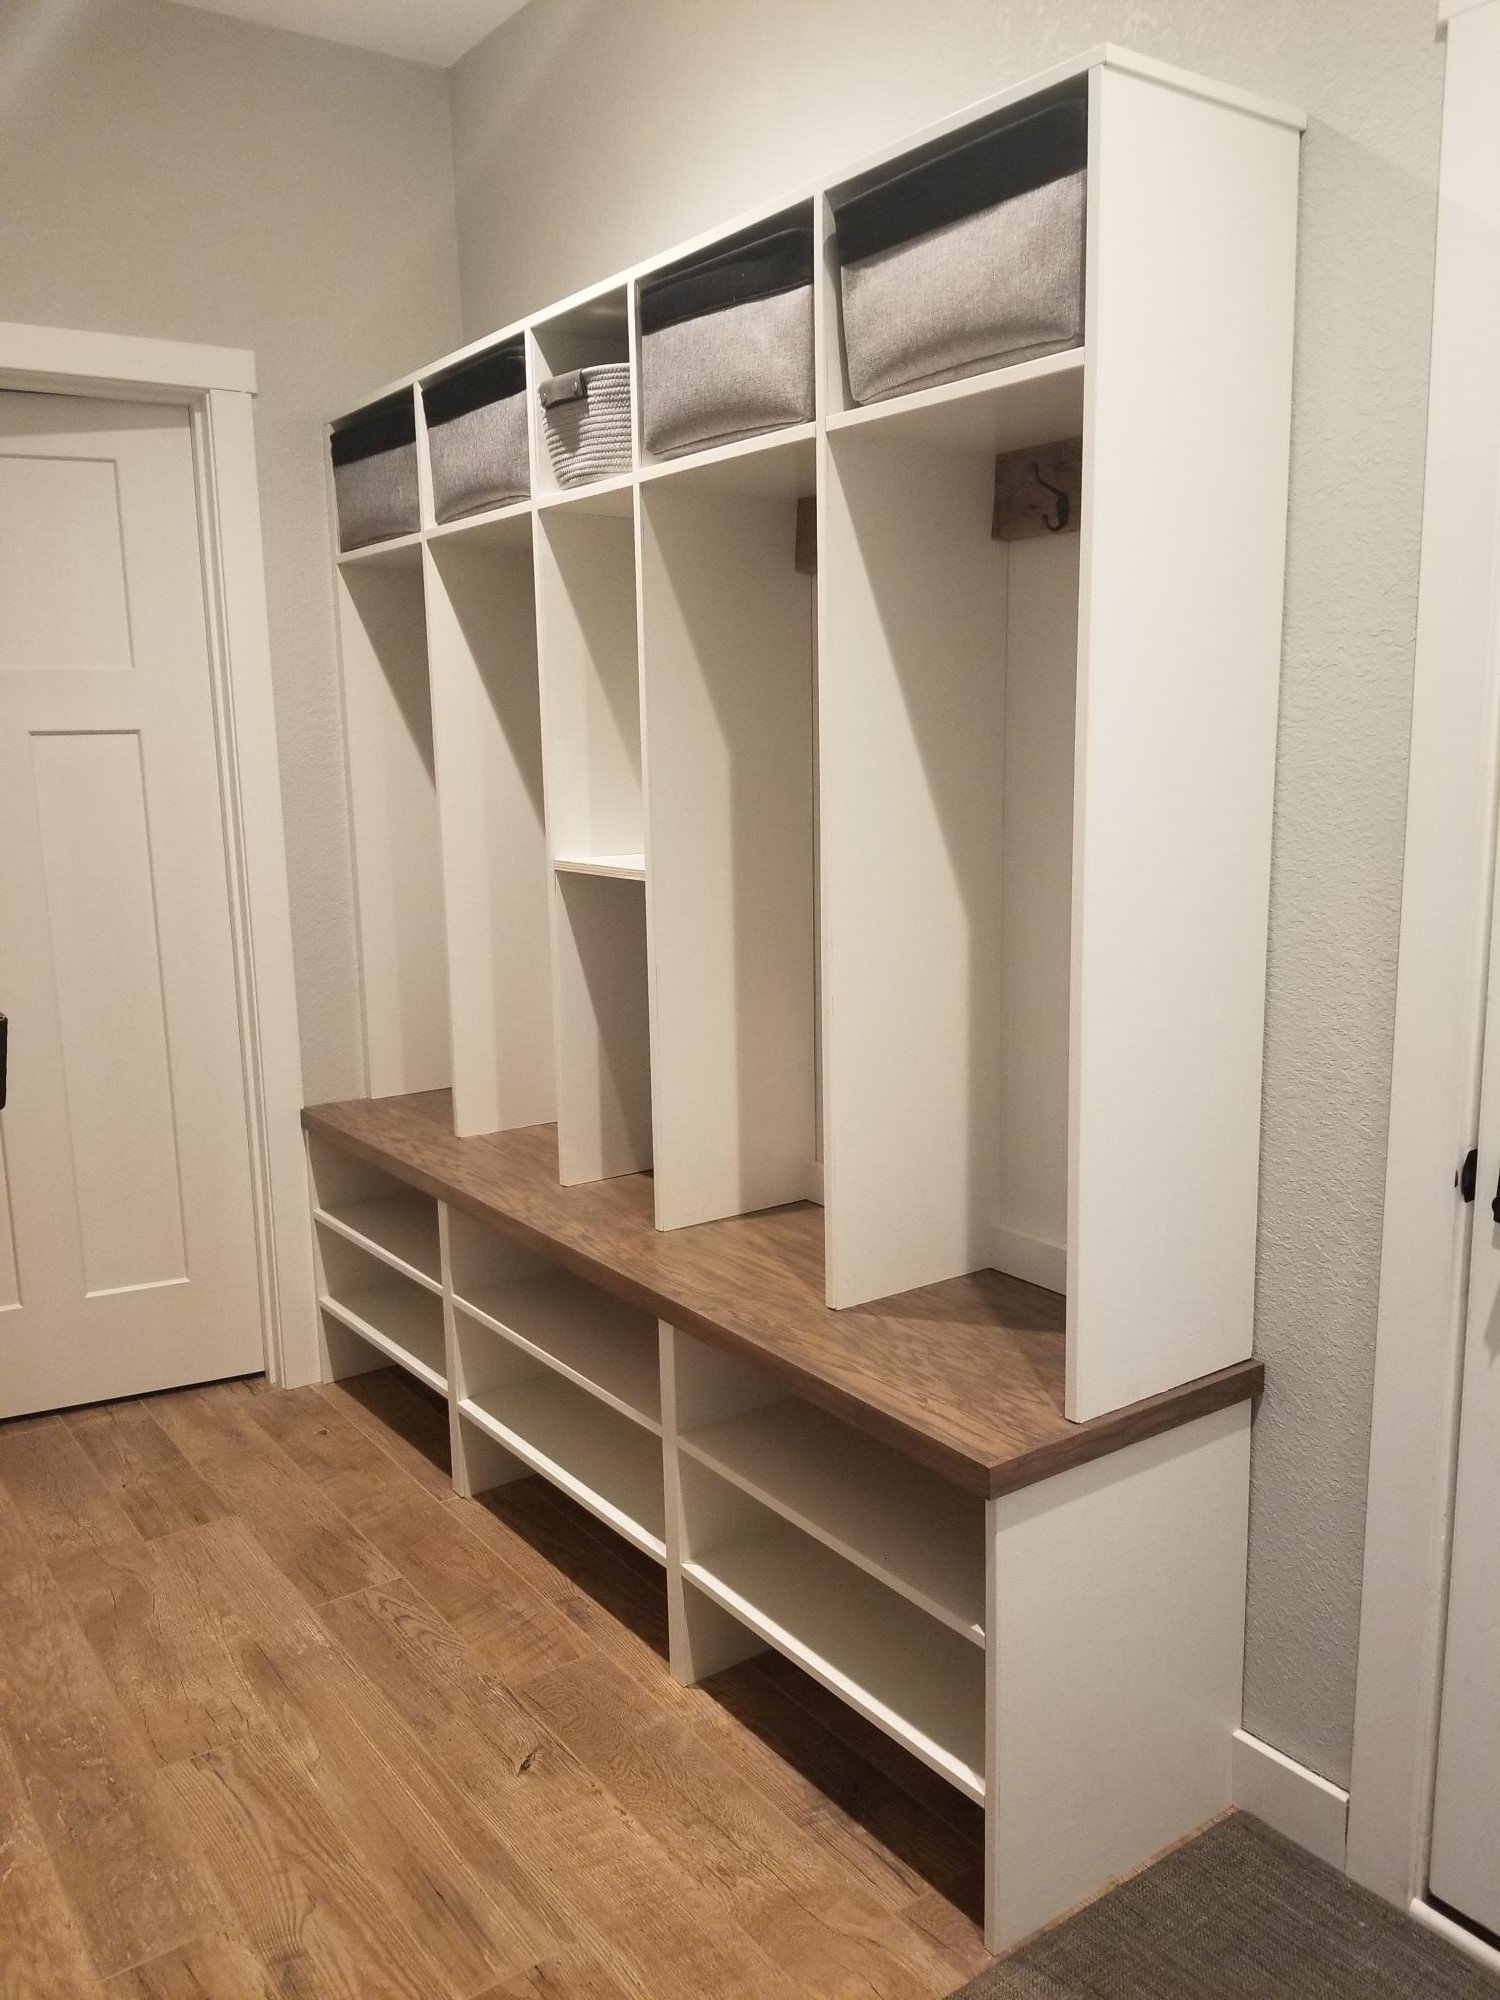
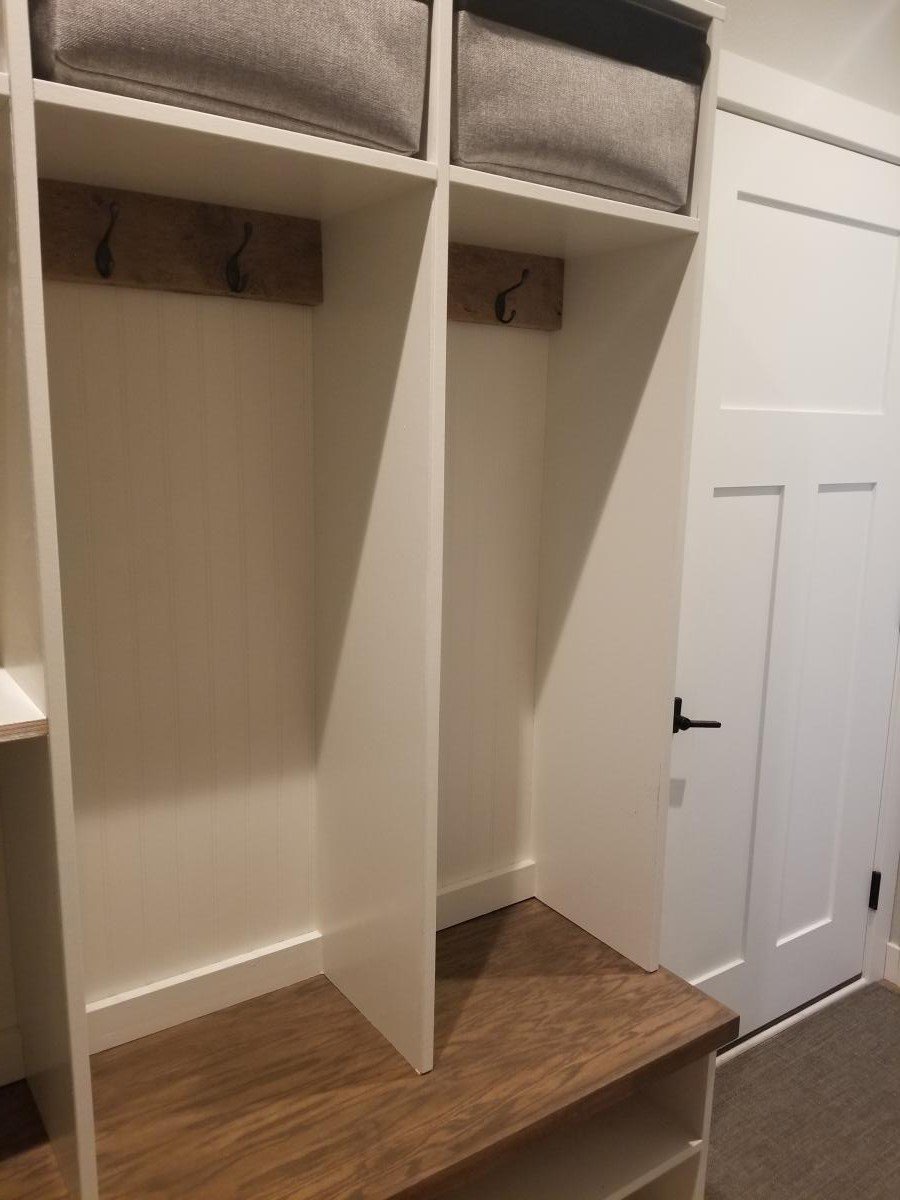
I began by first making 3 cubes of shoe shelves out of 3/4 oak plywood. After assembling I coated with joint compound and sanded smooth to get rid of grooves and grain. The hutch was assembled in 2 sections. I used a router to slide the shelves in so there were no screws visible. I applied primer/paint/ poly in these 5 large sections. The sections were then but in place in my mudroom and connected for installation. The bench top was custom measured to fit as the walls were not perfectly square. The bench top was stained/poly before the hutch was set into place. Paneling was attached to the back of the hutch unit before lifting in place. Barnwood was also installed where the hooks were attached for an added detail. I used 3/4 x 1/4 trim to finish the sides of the plywood and trimmed down mulion for the 1.5 inch sections needed for the bench trim and sides connecting to the wall to hide gaps left from un square walls.

Estimated Cost
350
Estimated Time Investment
Week Long Project (20 Hours or More)
Finish Used
White: 2 coats of primer, 2 coats of paint, 2 coats of Minwax water based Polycrylic Clear Satin. Custom colormatch paint to match our woodwork for the color.

Bench top: stain Briarsmoke with 2 coats of Minwax water based Polyacrylic Clear Satin.
Recommended Skill Level
Intermediate

Garage shelves with doors

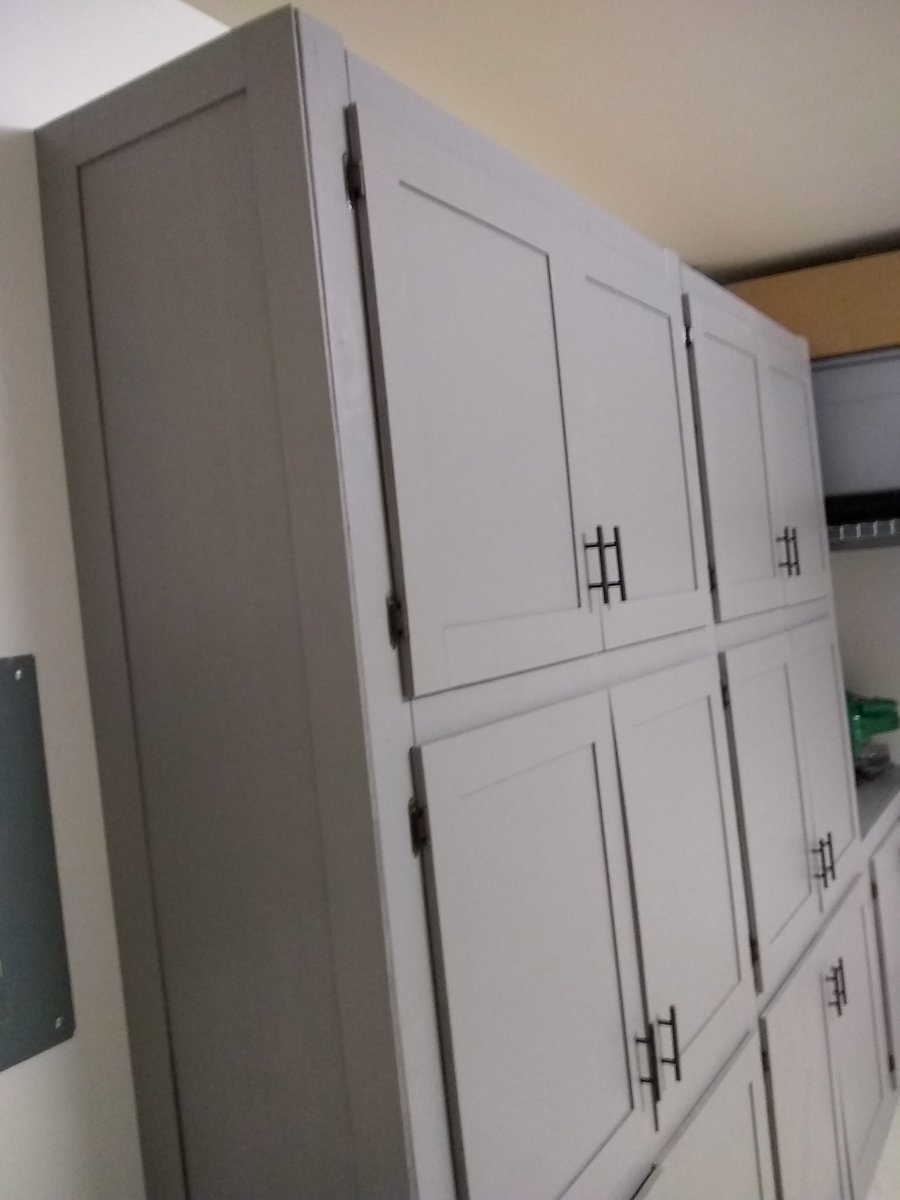
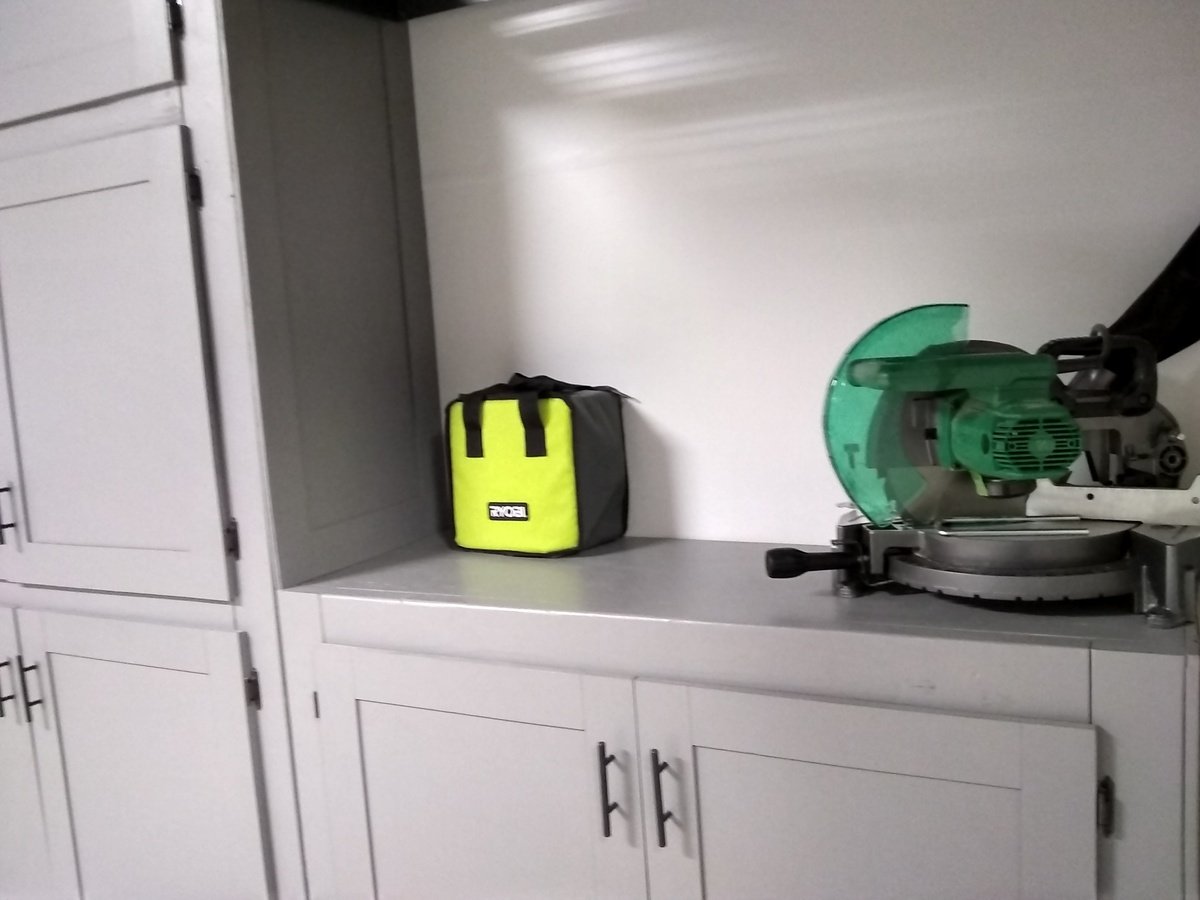
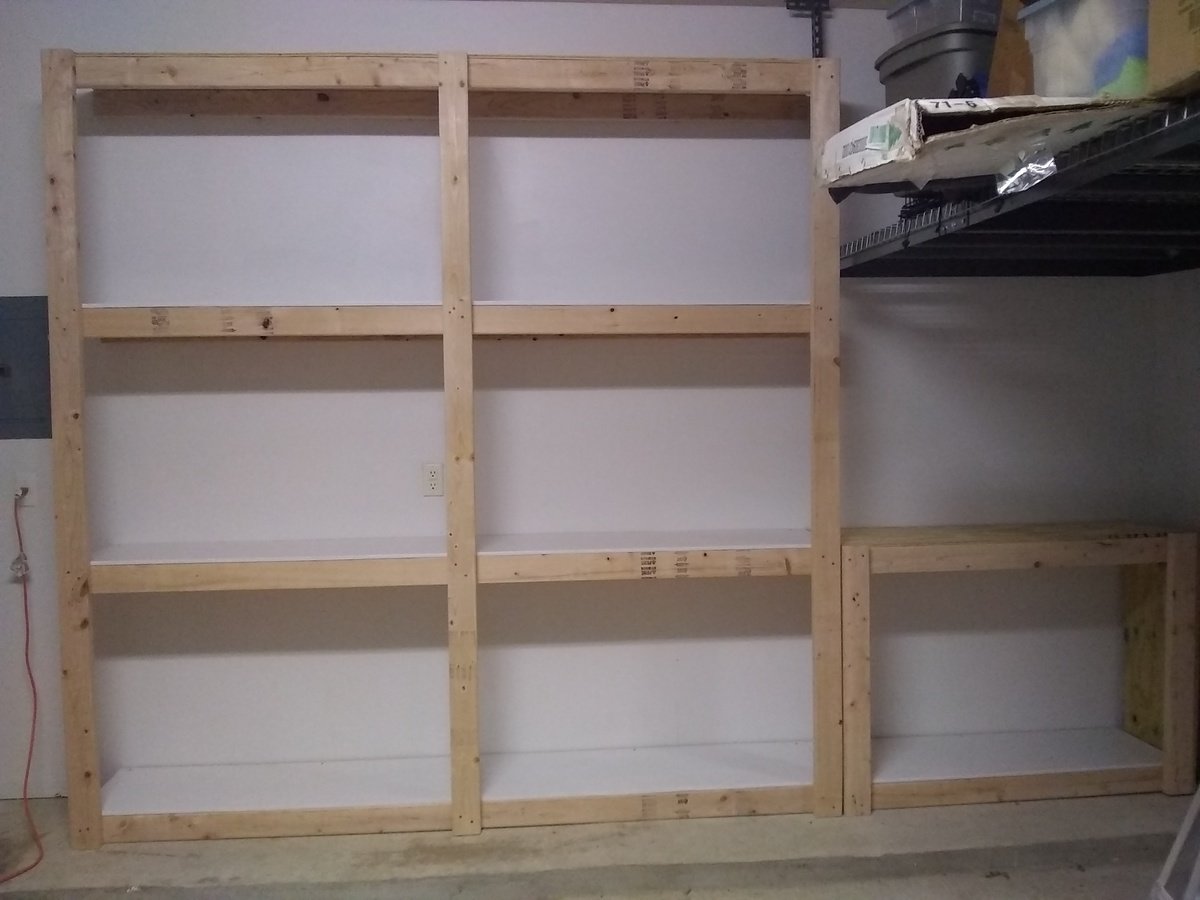
Submitted by CarolinaL on Thu, 01/11/2018 - 03:59

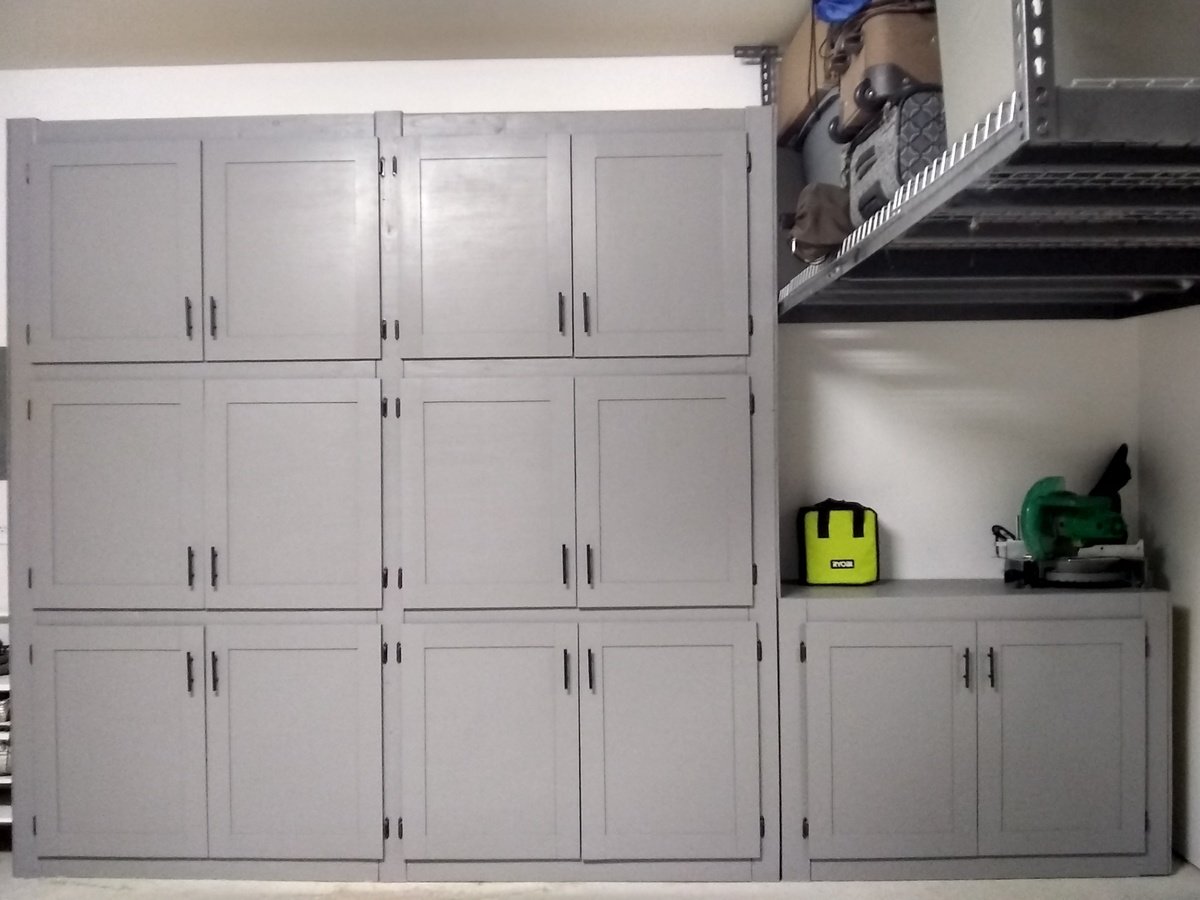
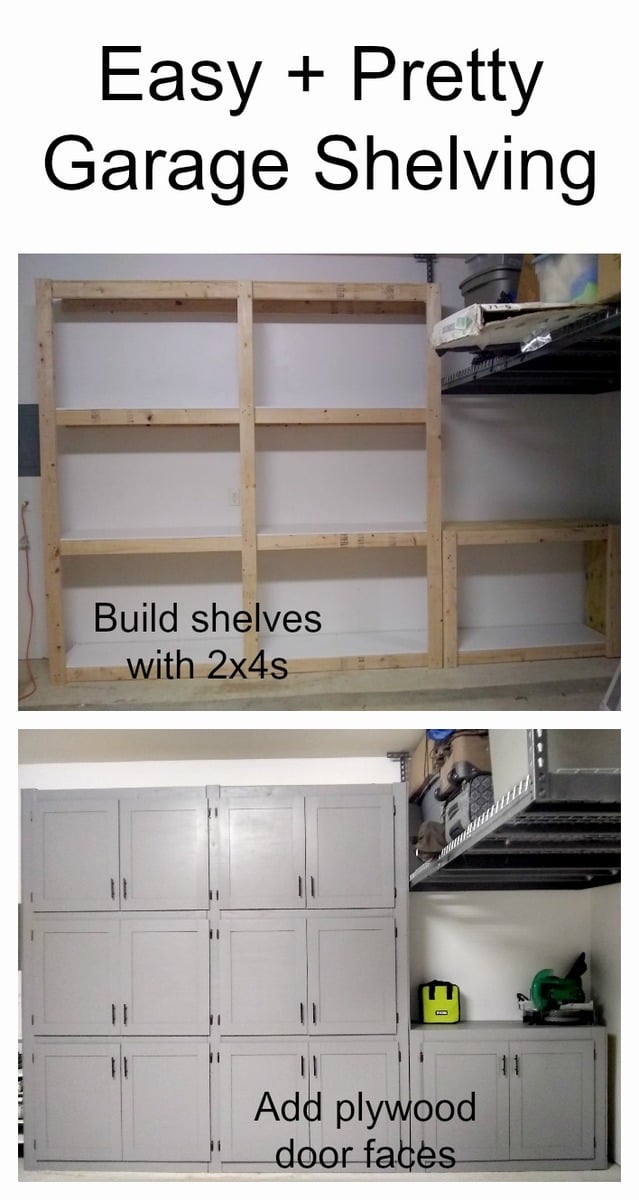
I have been wanting garage cabinets for a long time but couldn't afford them. When I saw these shelves I knew it would be easy to add side panels and create doors for the sections. The size is 8'x8' with the 4'x3' under the ceiling rack. I put a 2"x4" in the middle to divide each section, measured and cut doors from 5mm lauran plywood. I also cut the stiles and rails from the same material to give it interest but mainly to make it thicker to avoid warping as much as possible. I added 2"x4" to create a facing for the doors to rest on. Also used overlay hinges to simplify the hanging as much as possible. I was able to follow the design plan and the only thing I did was add a shelf at the bottom. The cleats were definitely not necessary, it's very sturdy. 

Making the doors

The first thing is to learn how to measure for cabinet doors. There are plenty of sites and YouTube videos showing how to correctly measure. If you are doing the same type of doors like I have, with no middle divider, then be sure to pay attention how to correctly measure for those instead of a single door.

The easiest way to make the doors will be getting 1/2 in sanded plywood and use a table saw to cut each door to size. Skip the shaker style trim and put the hardware on and be done. Make sure the hinges will be able to hold the weight of the door.

Unfortunately, I didn't have a table saw but I did have a router and a jig saw, and found a great video on YouTube on how to use a router to cut straight edges without a table saw. I measured out one door and used that outline to cut two identical doors. It turned out that each section was slightly a different width so I had to do two at a time. However, if you have a circular saw you can rig it to make a table saw and make a guide to rip the doors. It all depends on what tools you have available to you.  

I have a compact plunge saw and was able to cut the 3 inch strips for the shaker style with it. Honestly, that was the most tedious part and most time consuming by far. That also had to do with the fact that because the plywood is only 5mm thick I cut strips for both the front and the back to make it over 1/2 inch thick to help minimize warping and give the hinges something to grab.  

I used the miter saw to cut the stiles and rails to size and a 23 gauge nailer with 1/2 nails and glue to get them on the door. I glued and nailed the front and the back of each side at the same time because the nails are a bit longer than two pieces of plywood. I then turned it over and nailed the other side. The great thing about using a 23 gauge is that I didn't have to fill any holes because they are so small you can hardly see them at all. 

The last thing is to use your sander to ensure all of the pieces are even. I used a 60 grit and then followed it with a 220 where needed. 

If you want to avoid cutting the strips but still want to have the shaker style, Home Depot sells 1/4 thick Polystyrene flat moulding that will add vertially no weight to the door but the cost can easily add up if you have a lot of doors.

Lastly, if you are wondering why I got such thin plywood that ended up creating more work. The reason is because I wanted to save money on hardware and I didn't trust the inexpensive hinges I got off eBay would hold a heavy door for many years.
 

Estimated Cost
About $300 not including some tools I needed to buy anyway.
Estimated Time Investment
Week Long Project (20 Hours or More)
Finish Used
Interior satin
Recommended Skill Level
Beginner

Comments

Simple Square Cedar Outdoor Dining Table

Submitted by Finns-Dad on Mon, 03/12/2012 - 17:58

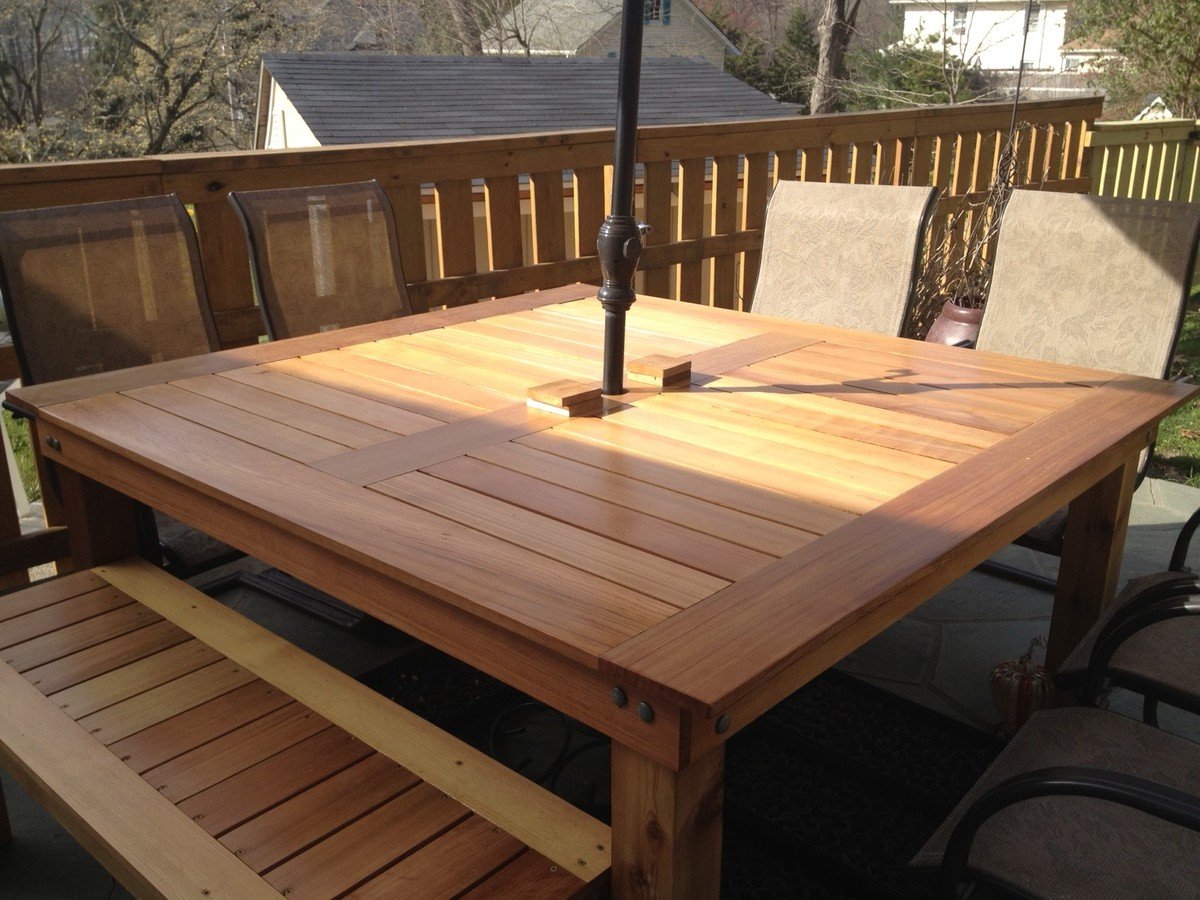
I've been planning on building a patio table for this coming spring and summer, but didn't know where to begin. I found Ana's wonderful site and now I don't know where to stop! So many great ideas.
After seeing ewood's great table I decided to make one similar. I made my square table based on Ana's and ewood's basic designs. Thank you both. I also made a bench based on Ana's design.

Built from Plan(s)
Estimated Cost
300--475
Estimated Time Investment
Weekend Project (10-20 Hours)
Finish Used
Semigloss Spar Urethane
Recommended Skill Level
Beginner

Comments

7CsShepherds (not verified)

Thu, 03/29/2012 - 07:37

I have a family of 7 (soon to be 8, I hope), and was trying to figure out how to fit us all on the rectangular table. This is the solution! I can simply make 4 benches to go with it! Thanks for the idea and the picture!

Guest (not verified)

Mon, 04/09/2012 - 07:24

Love this table and your modifications to ewood's table. I was wondering what size are the legs on your table - I can't tell if they are 4x4s...which is sort of what I'd like to have on mine. And they are under mounted, which I love because I want to make ours with the ability to remove the legs for reduced storage space in the winter. If you could would you mind putting a few close up photos of how the outside corner came out and the underside of the corners. It would be much appreciated.

K_W (not verified)

Mon, 04/09/2012 - 07:27

Love this table and your modifications to ewood's table. I was wondering what size are the legs on your table - I can't tell if they are 4x4s...which is sort of what I'd like to have on mine. And they are under mounted, which I love because I want to make ours with the ability to remove the legs for reduced storage space in the winter. If you could would you mind putting a few close up photos of how the outside corner came out and the underside of the corners. It would be much appreciated.

In reply to by K_W (not verified)

Finns-Dad

Sat, 04/14/2012 - 13:35

Hi - sorry it took a little while to get back to you. Yes the legs are 4x4's. I used knotted cedar 4x4's for the legs and made them 29" tall. I wanted to be able to disassemble the table and put it away for winter, so I attached the legs using carriage bolts, 2 per side (4 total per leg). I drilled holes using a pilot bit, then used a spatter bit to make the larger holes for the carriage bolt.

I didn't bother to counter sink them, but if I made another I think I would try that to make a more polished look. The legs are sturdy, the table doesn't wobble at all, but I am sure that someone with more furniture building experience might have a different/better idea.

I've added a couple more photos showing the corners, outside and underneath. I've also added my very basic plans that I used to make the table, one of these days I will study Ana's post of how to use sketch-up, until then this is what I worked with.

Joni

Wed, 06/06/2012 - 09:26

Can you tell me what size (width) boards you used on the frame pieces of the table, and what size on the inner boards? From your diagrams, it looks like the frame is made of 1x4s, but the inner pieces look smaller. Thank you !!!

Your table is absolutely beautiful. It looks like a very high-end piece of furniture. One of my favorite things is how the carriage bolts are installed -- I wouldn't change a thing on them!

In reply to by Joni

Finns-Dad

Tue, 07/30/2013 - 16:36

Sorry it took so long to reply - I didn't see your post. So far the table is holding up well.

You're right, the top is made from 1x4's, including the inlaid slats. To support the top, I cut 1x4's down to 1x3's so they remain hidden by the side 1x4's of the frame.

Aussie Paul (not verified)

Tue, 10/16/2012 - 18:02

Love the table - looks absolutely fantastic! I have been looking for a decent square outdoor table for ages and this one certainly fits the bill.

Can you please add a photo of the underside of the table and advise how you fastened inner boards on table top. Thanks.

In reply to by Aussie Paul (not verified)

Finns-Dad

Tue, 07/30/2013 - 16:40

I added a new photo of the bottom. Hopefully this will help show how I attached the top. I have a number of additional photo's I can send to you if you like - this site limits the number of photos I can add.

Everything is attached from the bottom to hide the screws. I used a kreg jig and it helped so much - i really recommend it.

Belmo

Wed, 08/14/2013 - 12:35

I love the look of this table, man - I think I'm gonna steal some ideas from this.

I have a question about your top, though. The slats look to be 1x4s, which I can understand, but the edges seem to be a bigger size.

Did you use 1x6 boards for the edges? 1x8s? Something else?

Thanks for your help.

Finns-Dad

Mon, 09/02/2013 - 11:03

Thank you - please take any ideas from it that you can. That is what I love that about Ana's site. You can take these great ideas and make them fit your own style...

You're right - the table top is made of 1x4's and 1x6's. When i put the top together I made the frame first. Then I added the exterior 1x6's. Next I added the center 1x6. Lastly I cut each 1x4 to size and added them.

livingston.140

Sat, 05/17/2014 - 07:15

This is an amazing table, it is beautiful! I am somewhat new to wood working and was wondering if there was a material list? I plan on creating this in AutoCAD first, so I have a visual to work off of. Also what did you use for spacing in between the boards or what was the allowance of space.

Thanks again, your work is beautiful!

leitaf

Wed, 04/22/2020 - 20:37

In looking at the plans and the underside of the table, there are some measurements missing that make it a little hard to decipher. It would be good to know the lumber sizes e.g. 1x4x8 etc. the underneath side seems to have some additional boards that don’t seem to be in the drawing. I was just wondering if it might be possible to get some additional details?

@njhorseplayer

Sun, 05/24/2020 - 08:05

This is a beautiful table and I'm going to try and replicate in a rectangular version. Primary question I have is what length screws you used to affix the framing pieces underneath to the top side so that the wood doesn't split and that the screws don't pop thru the top. Any help you can provide would be appreciated, if even you still look at this page. Thanks in advance!

Teeter Totter

This is one of the cheapest projects for my kids I have ever completed!! And the most rewarding. I think everyone of my neighbors has been on the teeter totter...including adults :) My kids just love it and I am thinking of making a few for my nephews for Christmas. I was able to find all the wood I needed in my scrap pile. I had the PVC pipe and bolt already also so all I had to make a trip to the store for was the foam for the seats. My son helped me build this in an hour. I liked the unfinished look so I just sprayed it with a little Thompson Water Seal. Thank you Ana White!!

Built from Plan(s)
Estimated Cost
$0 Lumber (scrap wood) $5 Foam padding
Estimated Time Investment
An Hour or Two (0-2 Hours)
Finish Used
Thompson Water Seal
Recommended Skill Level
Starter Project

Comments

Seasonal And Holiday

Simple Play Kitchen

Submitted by Anonymous (not verified) on Sun, 06/04/2023 - 13:03

I made this play kitchen as a Christmas present for my kids, and it’s been a big hit! It’s built mostly from leftover hardwood plywood, and a couple of 1x12 pine boards. The oven knobs and faucet were cut from redwood scraps and attached with 1/2” dowels to freely rotate. The vertical surfaces were painted with leftover house paint and sealed with water-based polycrylic. It was a fun build, and I learned some new skills (like installing hinges)! Thanks for the plans!

Comments

2x4 sectional outdoor sofa

Submitted by Anonymous (not verified) on Tue, 05/12/2020 - 08:10

My first Ana White project. My friend Shelley and I are RN's, and she got me hooked on woodworking. I started with cushions from Lowes ( in the sizes that you recommended)to see if I loved the sectional for a few years. I loved it so much I decided to have custom Sunbrella fabric ones made. Even though the custom ones were more expensive, it has been worth it. They go perfect with my California Mission style home. Now I want to add the armless one and make it a U-shape. I did add a piece at the bottom back of each sofa to hold the cushions in. The seat cushions would slide out the back when sitting on the sofa. I made the coffee table to match. Our family loves it!
Estimated Cost
building materials for sofa $250. Custom Sunbrella Fabric cushiosn $2000
Estimated Time Investment
Weekend Project (10-20 Hours)
Finish Used
Stained with Carrington Minwax and sealed with spray Shellac
Recommended Skill Level
Beginner

Comments

2x4 outdoor couch

Submitted by Anonymous (not verified) on Sat, 07/18/2020 - 18:46

I used cedar and added the extra boards so the cushions would stay put. We also made the arms 2x6 boards so we wouldn’t need end tables for the couch. The plans were super easy to follow. I mostly used pocket holes so the screws wouldn’t be visible. Love how it came out! Thank you for the plans, Ana!!

Built from Plan(s)
Estimated Time Investment
Day Project (6-9 Hours)
Finish Used
Nothing yet. Deciding on whether to let it grey on its own
Recommended Skill Level
Beginner

Garden Tool Shed (based on plans for Small Outdoor Shed)

Submitted by aceecee on Tue, 09/22/2020 - 14:07

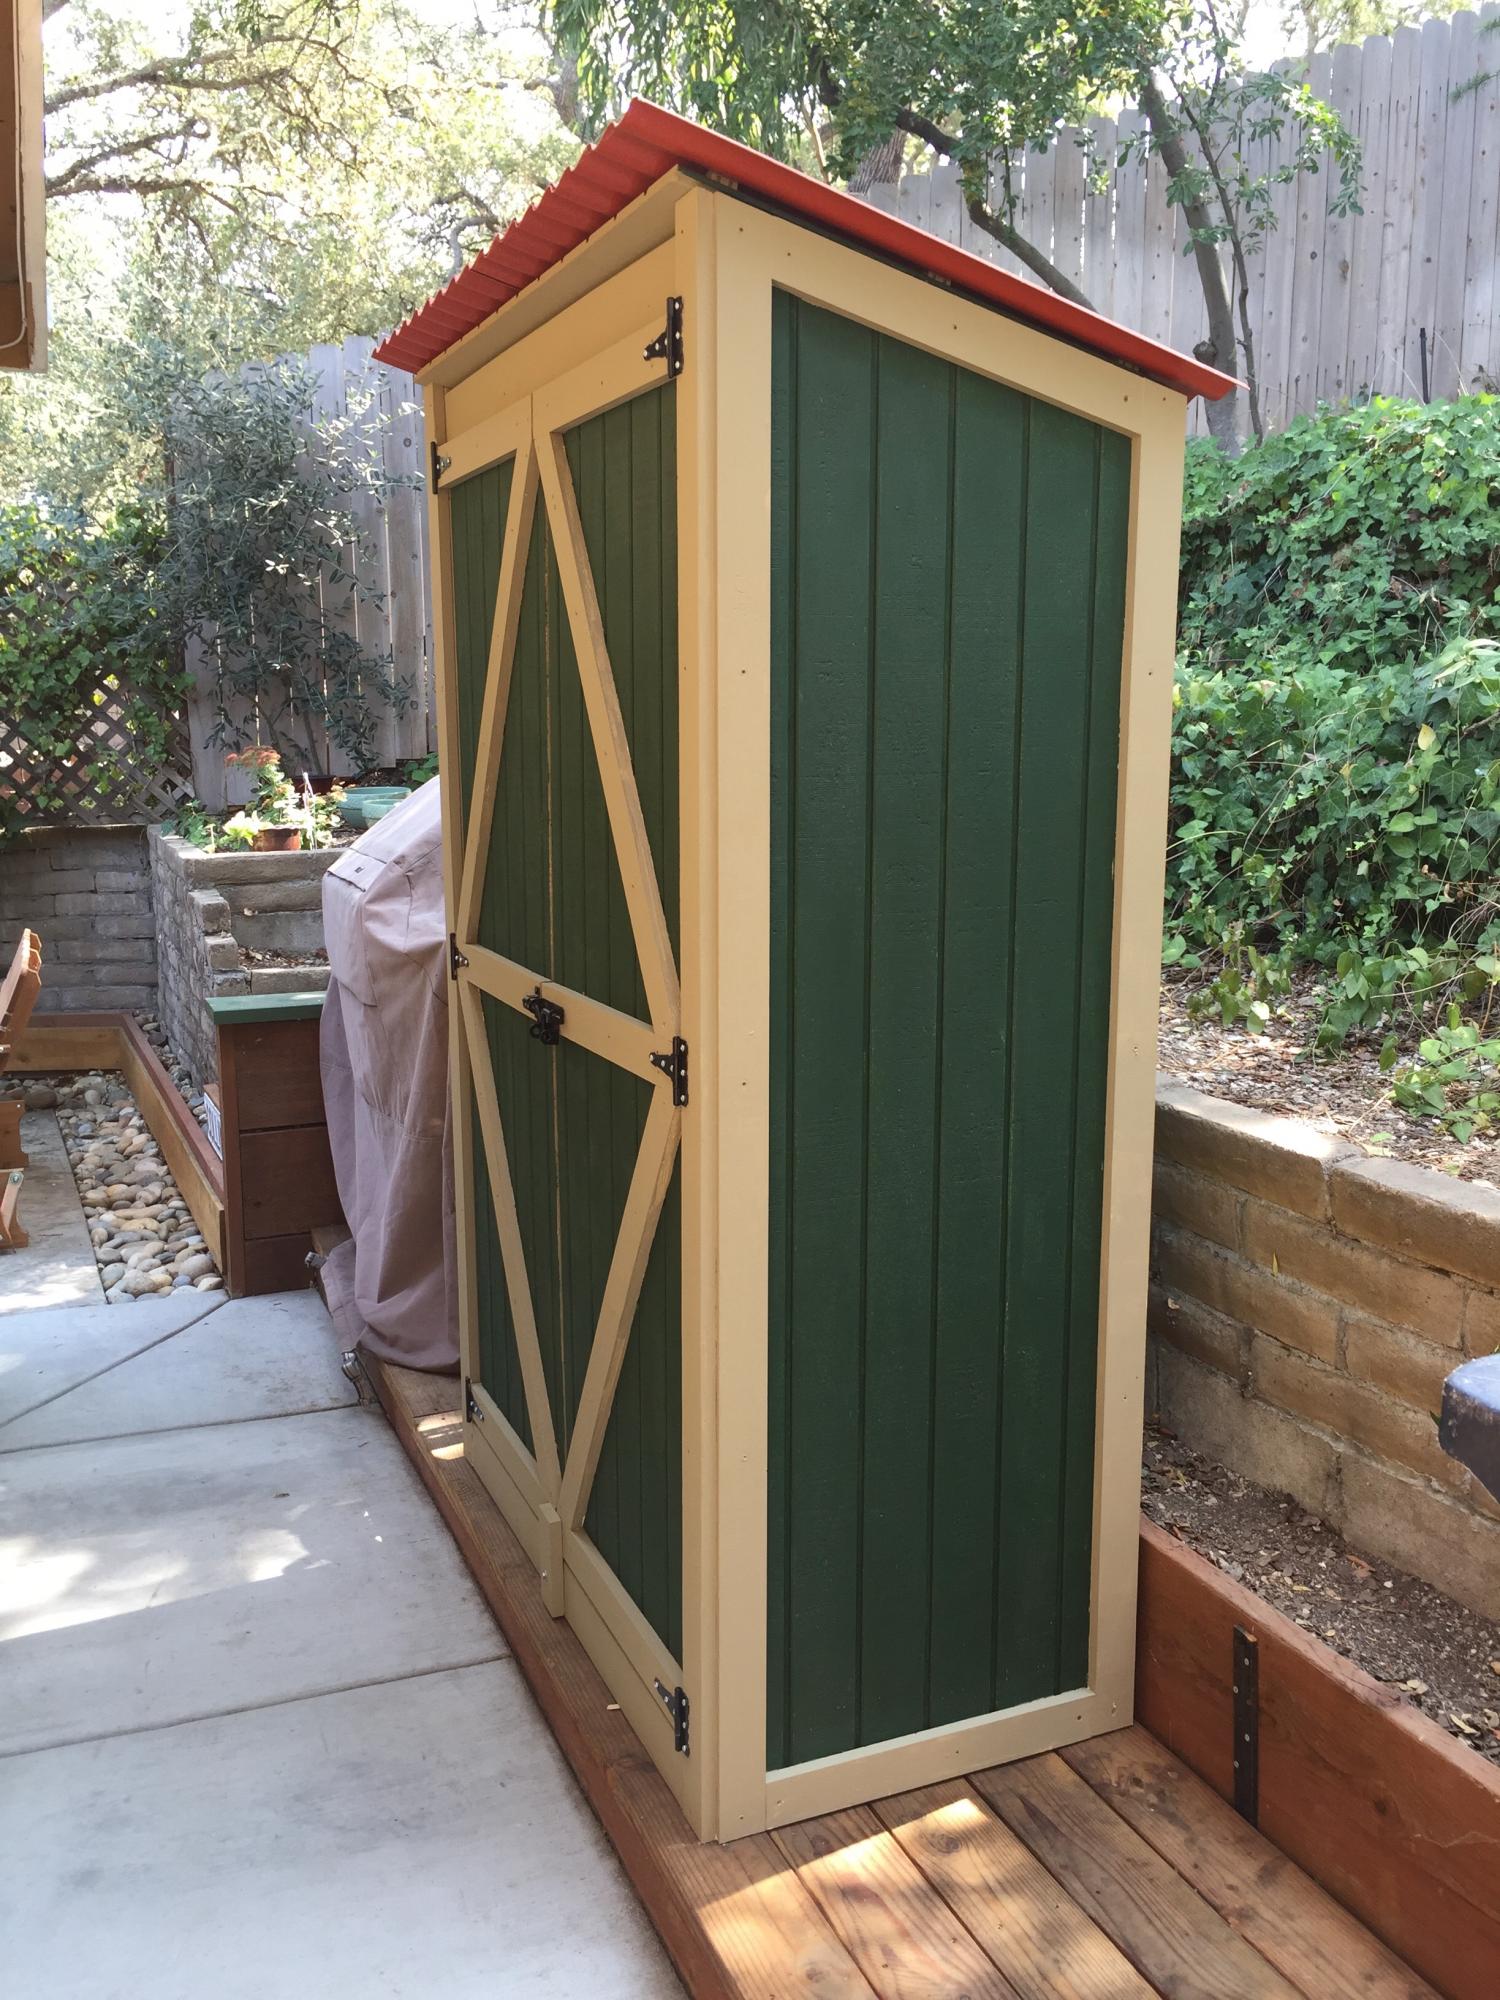
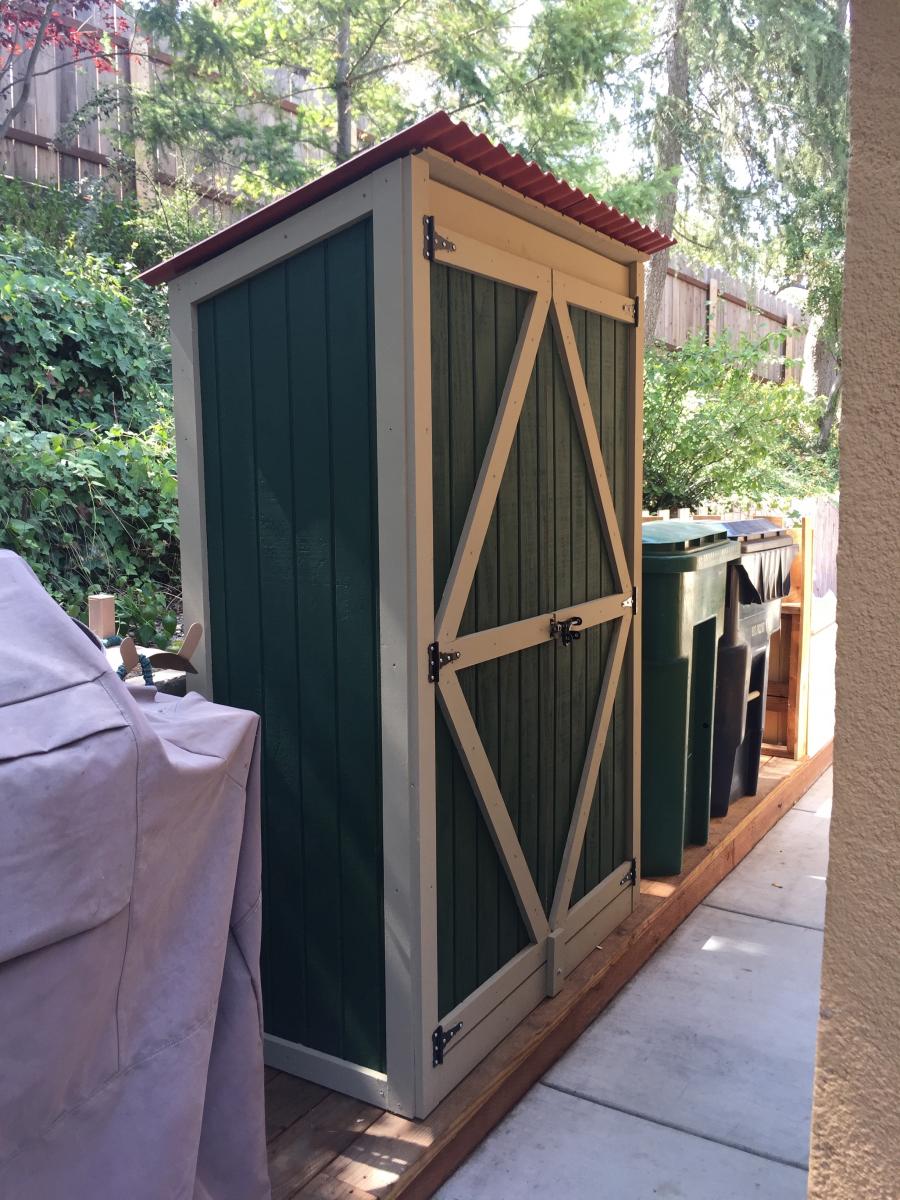
My husband and I built a garden tool shed using your plans for a "Small Outdoor Shed or Closet." We needed exactly this size for our available space. (THANK YOU! The video was really helpful and the plans were very detailed.) We are not handy at ALL, and are definitely beginners when it comes to woodworking. But, when the person who was supposed to build it for us was delayed, we thought we could try it, or at least START.

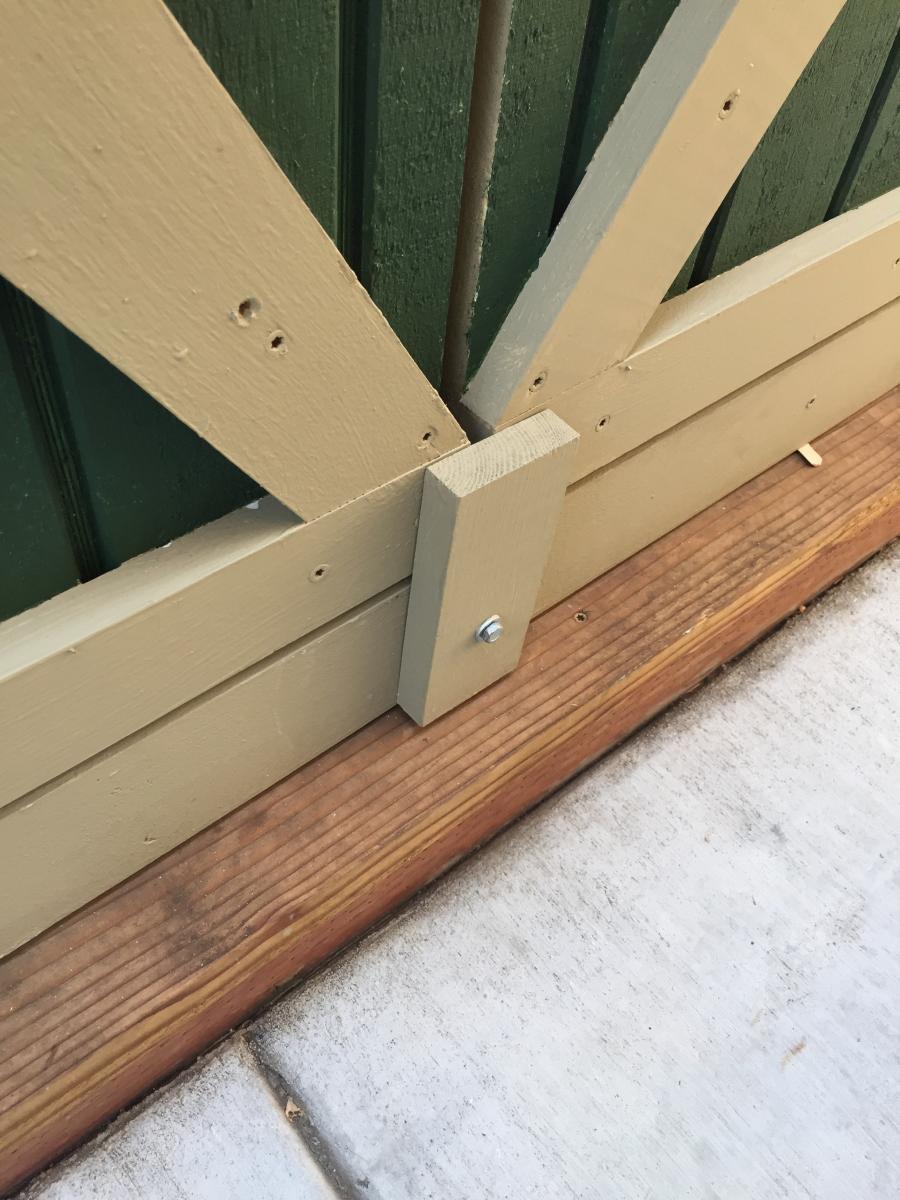
We bought a lower-end Kreg pocket jig and a secondhand mitre saw, and set to work, using T1-11 siding. We ended up building the entire shed ourselves, and were very surprised at the end result (and proud too!). The hardest part was building the doors, since we weren't really sure how to construct them to keep them from bowing. We ended up putting trim all around the edges of the T1-11 plywood doors, inside and out. (We were too far into building them when we realized we probably should have done it differently.) We also couldn't figure out how to get the double doors to stay tightly shut, but ended up using a rotating block (see picture) at the bottom and it works great, especially given that one of the doors had a slight bow at the bottom.

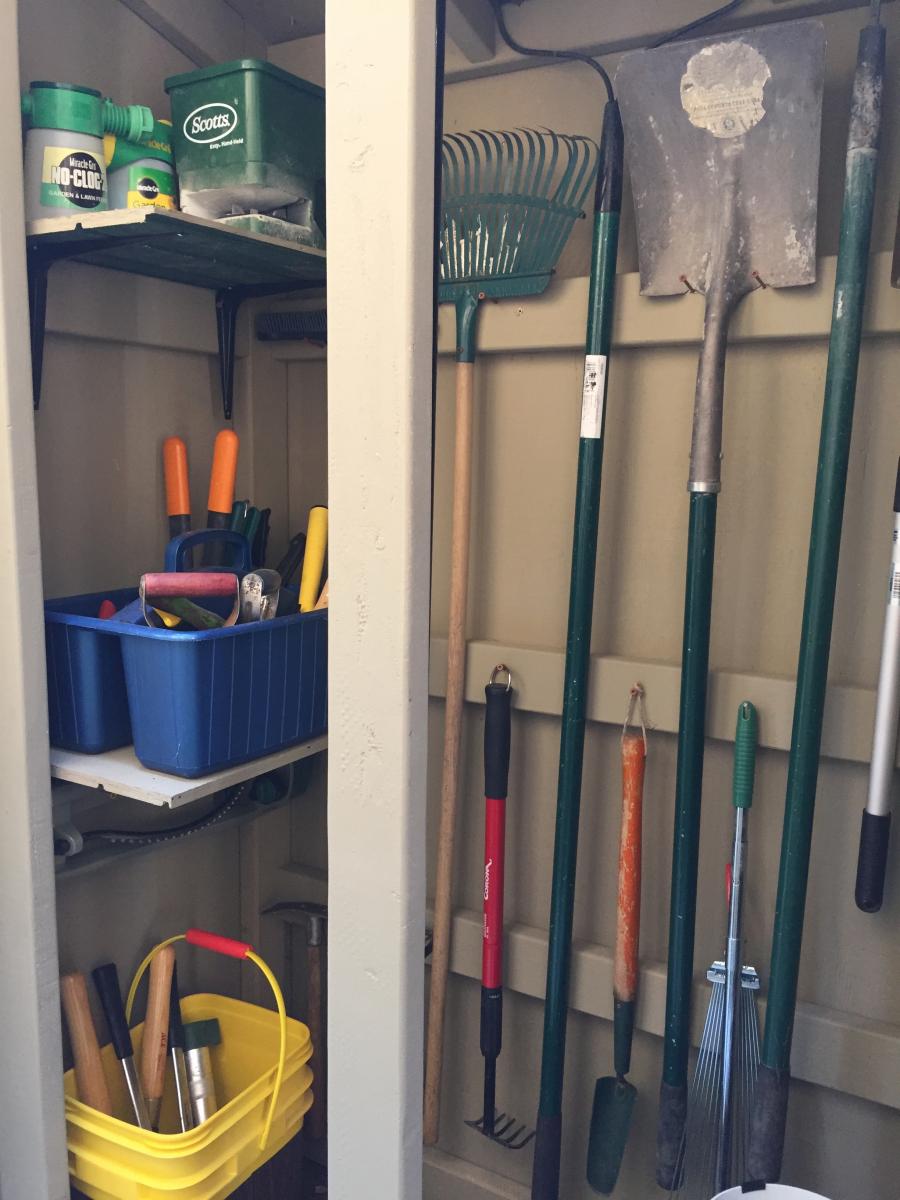
I think the only ways in which we deviated from the plan were that we added trim, an additional 2x4 up high across the back of the shed (for hanging long-handled tools), and two interior shelves on the left (from leftover siding). We used colored corrugated polycarbonate sheeting over the roof instead of asphalt shingles. (Unfortunately you have to use specific screws for the sheeting and one length was too short and the other too long and protrudes through the roofing slightly, into the interior. But we like the pop of color the sheeting adds, and REALLY didn't want to do shingles for such a small area, nor did we know how to do shingles.)

My final suggestions would be that a mitre saw and pocket jig are REALLY helpful and using star head screws is easier. I would also suggest that you paint everything (prime and color coat) before assembly and just touch up afterwards, especially if you use a lot of trim as we did. We primed and painted the siding but just primed the trim, and it was a real pain to put the color coat on all that 1x3 trim after construction.

This plan is listed as an "intermediate" project and I think that's probably a correct designation. As beginners, it just took BOTH of us to figure it all out (we work really well together) and to build it, and it took a much longer time than it would for someone with more experience.

Estimated Cost
I think we probably spent between $300 and $400 on lumber, hardware and paint, not counting buying the secondhand mitre saw and the Kreg jig.
Estimated Time Investment
Week Long Project (20 Hours or More)
Finish Used
Primed and painted, green and tan. (We bought the green and had the tan on hand.)
Recommended Skill Level
Intermediate

Comments

laurawelsh

Tue, 10/06/2020 - 15:56

Well done! I love this! Can I ask what dimension your garden tool shed is? And how did you decide on the new roof size/angle? I have a similar space and am contemplating something similar. Thanks!!

laurawelsh

Tue, 10/06/2020 - 15:56

Well done! I love this! Can I ask what dimension your garden tool shed is? And how did you decide on the new roof size/angle? I have a similar space and am contemplating something similar. Thanks!!

Simple Stackable Compost Bin from Pallets Collars

Submitted by mtairymd on Sat, 06/06/2015 - 13:48

Build Instructions:
http://www.instructables.com/id/Simple-Stackable-Compost-Bin-from-Palle…

How it works:
https://www.youtube.com/watch?v=Tgtd88kKIn0

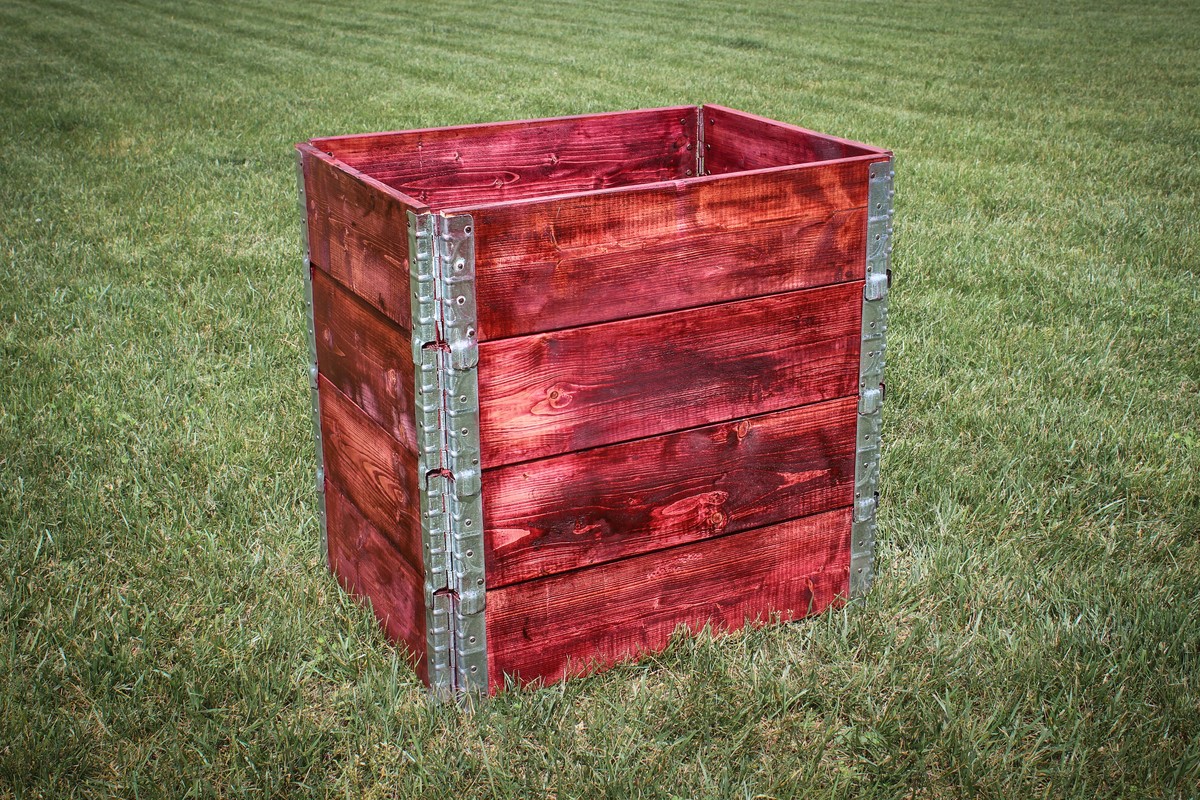
With one single unit as opposed to two or three bins, the space needed for composting is minimized. Each tier stacks on top of the other, latching together to make the bin. This setup makes it easy to turn and rotate the compost, since moving the collars is simple. Just remove the top collar and place in a new location adjacent to the original bin location. Turn the compost into the new location and stack the collars until finished. This is a great alternative to having multiple compost bins next to each other.

Estimated Cost
Free
Estimated Time Investment
An Hour or Two (0-2 Hours)
Finish Used
Cabernet colored stain from Varathane and a polyurethane from Minwax.
Recommended Skill Level
Beginner

Modern Adirondack Chair

Submitted by Anonymous (not verified) on Sat, 08/13/2022 - 20:12

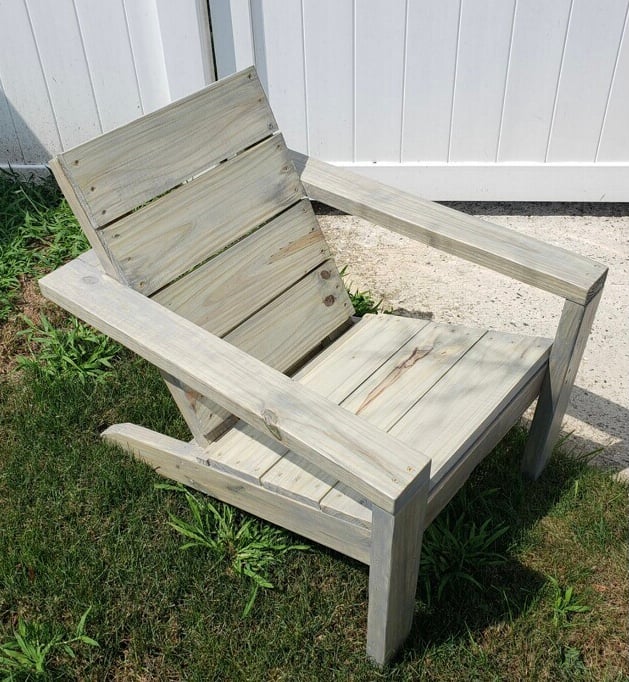
I made this with 1x6 since Home Depot didn’t have any 1x10 treated wood. All the wood I used is treated. I also used the exterior screws and put on a gray poly mixed stain for a little extra protection. I of course messed up the angles twice on the feet, but they just look like I gave them extra decoration now lol. Everybody loves this chair!

Comments

Freestanding closet

Submitted by Anonymous (not verified) on Fri, 09/11/2020 - 20:11

I’ve been searching for a free standing closet for so long!! I stumbled across these plans a few months ago and asked my hubby and brother if they would be up for a little project and boy, did they ever do an amazing job!! I am so happy with this. We ended up making ours a little bit shorter to fit in our room and adjusting some of the other plans. The rods were cut a little short, but everything still worked out beautifully. Thank you for these plans! <3

Built from Plan(s)
Estimated Cost
$250
Estimated Time Investment
Week Long Project (20 Hours or More)
Finish Used
MINWAX weathered oak, MINWAX one coat polyurethane.
We stained outside and the smell definitely lingered a few days once it was inside. I’d recommend staining with a less smelly stain, maybe water based?
We sanded down the rough edges and then finished it off with the protective layer.

Comments

Small island with storage and two stools

Submitted by Anonymous (not verified) on Mon, 09/14/2020 - 12:07

I had a friend who was interested in a small island with two stools that looked like this offered by a fancy home interior store. The reviews weren't all that great, even for the half off sale price. They needed something small to fit their space that would basically serve as a dining area for her and her husband. It is build out of spruce and whitewood lumber. White paint and dark walnut stain, with poly on top. The legs are two 2x4s glued together , then ripped each side to square it off making it an actual 3" x 3". The stools came from Ana's farmhouse counter stool plan. The island I just went with overall demensions and built it from there. Pocket hole screws and finish nails.

Built from Plan(s)
Estimated Cost
140
Estimated Time Investment
Day Project (6-9 Hours)
Finish Used
Valspar Dark Walnut stain, water based poly
Behr ultra white paint
Recommended Skill Level
Intermediate

Comments

Farmhouse Storage Bed With Hidden Drawer

Submitted by Beekeeper on Wed, 12/10/2014 - 17:35

Ana, thanks for these plans! They inspired me to make my first bed build. I also want to thank all of you that added brag posts! They gave me ideas for some of the modifications that I made. I did this build by mixing your Queen Farmhouse and Queen Farmhouse Storage bed plans. I also added a number of modifications to suit my own preferences. The drawer boxes I changed by building a faceplate (I didn't want the plywood ends exposed), and by increasing in depth to maximize some additional storage. Since I increased the drawer sizes, I went with the euro roller bearing slides. I increased the foot-board height to be slightly higher than the mattress. I also designed the footboard to have a removable inner section with hidden latches on the inside. I did this because I wanted to make use of the "dead space" between the drawer boxes. I then used this space to house a hidden drawer, that is approx six feet deep (I couldn't help myself-I love hidden drawers wink). Because I added the hidden drawer, I changed the opptional center support to 4X4 blockes that were pocket screwed under the center of the boxes. I ended up using birch plywood and fir for this build. For my first bed build I'm fairly happy with how it came out. Thanks again!

Estimated Cost
I didn't keep exact track of the cost of this bed, but I think it was about $800.
Estimated Time Investment
Week Long Project (20 Hours or More)
Finish Used
I haven't got there yet, but I am planning on putting a mahogany stain and then a polyurethane. All
Recommended Skill Level
Intermediate

Comments

spiceylg

Thu, 12/11/2014 - 07:41

This is your first build and you did all of those awesome modifications?! Really impressive and it looks perfect! Congrats and welcome to the community!

In reply to by spiceylg

Beekeeper

Sun, 12/14/2014 - 06:03

Thanks for the compliments! It was a fun learning experience. Making all the modifications definitely slowed down the build, but also made it more rewarding!

beckbg

Fri, 12/12/2014 - 13:18

I just started my bed (mostly out of Baltic Birch) and am wondering where you were able to find such nice 4x4s. Your bed is gorgeous! No luck here. I bought redwood, but really wanted fir for the sharper edges. It's my first project, too. I also bought same drawer slides, but the soft close. Didn't want the slam. I figure building it will be the easy part compared to procuring nice 4x4s! Hope you can help!

In reply to by beckbg

Beekeeper

Sun, 12/14/2014 - 06:01

Thanks! The 4x4s I found at a place called Better Living Building Supply. They had a pretty nice assortment of fir, including the 4x4s, so that is why I chose it for the build. Finding the 4x4s slowed down my start on the build. Our local Lowes only had them in treated pine.

athingvall

Sat, 09/05/2015 - 20:47

Thank you for the pictures, the bed turned out Awesome.  I was wondering about the latching system for the foot of the bed.  Do you think a piano hinge on the lower would work too?  Also on the center drawer did you use rollers or is it just friction?  Can't wait to start the build.

Thanks

Codding58

Mon, 02/15/2016 - 14:11

This is excellent!!!   I really like this, so much in fact that the wife is going to have to get used to it too. lol   But really, GREAT work!    Any chance you could post a pic and or comment about how you attached that removeable end?    i think this is the best part!    Cheers!

Kmaynard19

Tue, 12/10/2019 - 08:42

Beekeeper,  Awesome build!!!  Have you posted your altered plans anywhere?  I'm very interested in your build, I was wondering about some aspects of it and how you approached it.  Plans would clear it up instead of bothering you with all my questions.

NinjaPinky

Sat, 06/20/2020 - 09:06

I, like many others, have been wondering if you'd share your plans for this modification. It just looks so great!

tammis50401

Mon, 11/16/2020 - 15:42

Bed turned out awesome. I was wondering if you have the plans for the bed with a list of supplies it took to make this bed. I so want this bed it's just what we are needing

Great job