Community Brag Posts

Back to school 2015

I was just thinking "Where can I put their backpacks and folders this year so we don't lose/forget so many things this year?" Thanks Ana! Modified the plans to make use of my scrap pile. I ordered the vinyls off Etsy from, The Vinyl Things in Life, she custom made them to my dimensions and I love the pop of color! Sorry I can't get better pictures, our entry is tiny.

Estimated Cost
$20, for hooks and vinyl. Wood was from the scrap pile.
Estimated Time Investment
An Hour or Two (0-2 Hours)
Finish Used
Dark walnut stain. Topcoat Polywhey in satin.
Recommended Skill Level
Starter Project

Rustic X console table

Submitted by AUPatrick on Mon, 07/16/2018 - 09:30

My 14 year old son wanted a piece of furniture to put under his TV.  We made it 20 inches less in length but kept the other dimensions the same as the plans.  I made the cuts for him, but he did all of the work putting it together, sanding and staining.  He loves the outcome and it only took us about 6-8 hours over the course of two days.

Thanks for the plans!

Built from Plan(s)
Estimated Cost
$80-$100
Estimated Time Investment
Day Project (6-9 Hours)
Finish Used
Jacoby for the legs and Early American for the remainder
Recommended Skill Level
Beginner

Happy Mother's day

Submitted by Anonymous (not verified) on Sun, 05/08/2022 - 08:21

My sons and I decided to tackle a project for mom this year, and the farmhouse coffee table was a great project. Tweaked the design slightly with offset full length cross pieces and a distressed paint finish on the base. Great plans, fun project with the kids, and mom loved it!

Comments

Whitney's Play Kitchen

I used Ana's plans for the play stove, fridge and sink. I LOVED Crafting Chick's take on it so I copied her great accessories. I found my knobs at Walmart and my hooks at Hobby Lobby. I also found the fabric at Hobby Lobby. I used 3/4" hardwood plywood, but if I could do it again I would have used MDF. It's much smoother! I still love it though! Oh... So do the kids ;-)) You can read more details at http://www.shanty-2-chic.com/2011/07/play-kitchen-reveal.html.

Estimated Cost
$150
Estimated Time Investment
Weekend Project (10-20 Hours)
Finish Used
2 coats of Valspar Arctic Edge.
Recommended Skill Level
Beginner

Comments

Guest (not verified)

Thu, 12/22/2011 - 16:05

Hi! We are building this kitchen right now and can not figure out how to mount the hinges!
Not sure what kind of hinges you used? we bought some regular door hinges but they are only able to mount to the outside of the doors. please help. thanks!

Narrow end table

My kids (11 & 12) made these in about 3 days. We have to work during my 2 yr olds nap time so I would say 6-8 hrs total. We always have a lot of scrap wood lying around so this was a great way to use it up. Unfortunately, sometimes when using scrap wood, it is not always the exact measurements that you need but some plan reworking and measuring as you go can fix that. On this particular plan, the only thing we changed was the thickness of the top and a little fudging on the drawer box. We also used our router to round over some or the edges and we made our own drawer tracks along the bottom w/ scrap furring strips. Honestly, those studs you see in the picture, did most of the work and since their skill set usually involves a reference to the newest video game out, I would say this was defiantly a simple project! ;-)

Built from Plan(s)
Estimated Cost
$20 each If you had to buy all new wood
Estimated Time Investment
Afternoon Project (3-6 Hours)
Finish Used
Valspar paint in emerald and varathane brand stain in early American
Recommended Skill Level
Beginner

Comments

spiceylg

Wed, 08/14/2013 - 04:46

I love that your kids built these, what a sense of accomplishment! Tell them they did a great job!

Coffee Table

Submitted by melehes on Thu, 08/02/2018 - 12:38

Burned wood finish with stain and lots of coats of poly for protection and shine

Built from Plan(s)
Estimated Cost
$100
Estimated Time Investment
Weekend Project (10-20 Hours)
Recommended Skill Level
Beginner

X Book Caddy

Submitted by carongirls on Fri, 08/16/2013 - 06:30

SImple and easy to make. I had leftover wood so all I had to buy was 1x2"s. I'd say the total cost was $15. It's sturdy and holds a lot of books.

Built from Plan(s)
Estimated Time Investment
Day Project (6-9 Hours)
Recommended Skill Level
Beginner

Twin Farmhouse Bed with Jeremiah 29:13 carved into headboard

This is the second farmhouse bed that i've built from these plans.  I made a slight modification to shorten the headboard for this bed. Overall, it was a fun and enjoyable project. 


Built from Plan(s)
Estimated Cost
$160
Estimated Time Investment
Day Project (6-9 Hours)
Finish Used
Walnut, and spray lacquer
Recommended Skill Level
Beginner

Modern Farmhouse Bed with changes

Submitted by alleysrats on Tue, 08/21/2018 - 19:25

I needed a bed frame to go around my adjustable mattress and cheapest I found for pre-fabricated was greater than $200 and I thought why not go on Ana’s site and see if I could build one cheaper and I found this design.  I did everything in the instructions but build the platform as I was only getting it as a frame around the base that I already had.   I ended up using carsiding as it was cheaper than 1x6’s I also did not use pocket holes I just used regular screws that I countersunk and it gives it a bit of a more rustic look   I did have to adjust a few things as the side rails the 2x4 toppers went over too much on the adjustable portion of the bed and I didn’t allot for additional width on the head and footboard so I had to remove them -  to me it presents a little bit of a cleaner line I figure I can always go back with a 2 x 2 if I want a capped look.  The weathered recommended product turned it to a grayish purple hue no matter how much I sanded it -  it grew on me but definitely not the same color probably different tannins in the wood I was able to find not sure.  


The build took about two days total I built it all on my own the bed hardware was tricky though after failing to find anything local I ordered bed rail hardware off of Amazon for 12 bucks it’s a lot easier and your able to connect the side rails to the head and footboard on your own.


Total cost with the bed hardware probably about $130 if I took off the stuff I wasted it may be closer to $115.

Built from Plan(s)
Estimated Cost
$120
Estimated Time Investment
Weekend Project (10-20 Hours)
Finish Used
Varathane Weathered
Recommended Skill Level
Beginner

Bathroom Vanity

Submitted by jazberg on Fri, 07/15/2011 - 13:04

We remodeled our basement and added a master bathroom. The vanity space we had needed a custom vanity. We saw the Balin Console Table here and thought it would work nicely. It does! The four 12x12 drawers hold everything we need to use and keep discrete and the storage space underneath works nicely for extras that need to be away but quickly accessed.

Built from Plan(s)
Estimated Cost
$150
Estimated Time Investment
Weekend Project (10-20 Hours)
Finish Used
Black Stain, several coats of poly.
Recommended Skill Level
Intermediate

Comments

In reply to by dananryan

jazberg

Fri, 07/15/2011 - 23:16

We had to make some changes, especially in its depth as it needed to hold a sink. It came out at 31 3/4" tall, 57" wide and 20" deep. We also added a shelf at the bottom. Thanks for the compliment!

briggsy13

Wed, 08/10/2011 - 12:41

It looks like you have a glass top on this vanity? Or maybe its just the finish? I am very interested in doing this build for our bathroom remodel. I too would like the shelf for extra storage, and advice on how you added that?

I'm going to have to shorten it some as we only have like 53 inches for the vanity. Might just make it 48 inches which is still a plenty big vanity and just make 3 drawers instead of 4.

It looks awesome!!! Great work!

Guest (not verified)

Sat, 08/13/2011 - 14:04

Yes, it has a glass top. We had the glass guy cut it to size and sand the edges and put a sealing sticky tape around the edges to make it safe and water proof. We also had to have a hole drilled in the middle for the drain and I put a bead of clear caulk to water seal that spot.

The shelf was easy. Just a couple of ledger pieces nailed with a nail gun (or screwed if you pre-drill) to the legs on each side (from back to front). Then glued the ply wood for the shelf on to the ledgers. I then measured and cut facing to cover the plywood edge and add stiffness to the plywood. I just glued and clamped those on. You may have to cut out a slot in the shelf if your drain pipes are low on the wall (I had to).

Careful is you're going to do three drawers. You'll have a drain pipe going down the middle of the vanity! I had to offset the inside drawers so that they would not hit the drain pipe. I offset them about an inch on both sides (one offset to the left, the other to the right). You can't tell from the front as I sized all four drawer faces the same. If you do three drawers, that middle drawer might need to be less deep (6" verses 12 or more) or you might just make it a false drawer...one that doesn't open at all. Either way, the four drawers (12x12x10) are plenty large enough for our needs. if I had just two drawers i would make them deeper. Good luck! Share a picture with us when you're done!

Desk Accessory Sets from Scrap Wood

Submitted by JoanneS on Mon, 08/19/2013 - 18:06

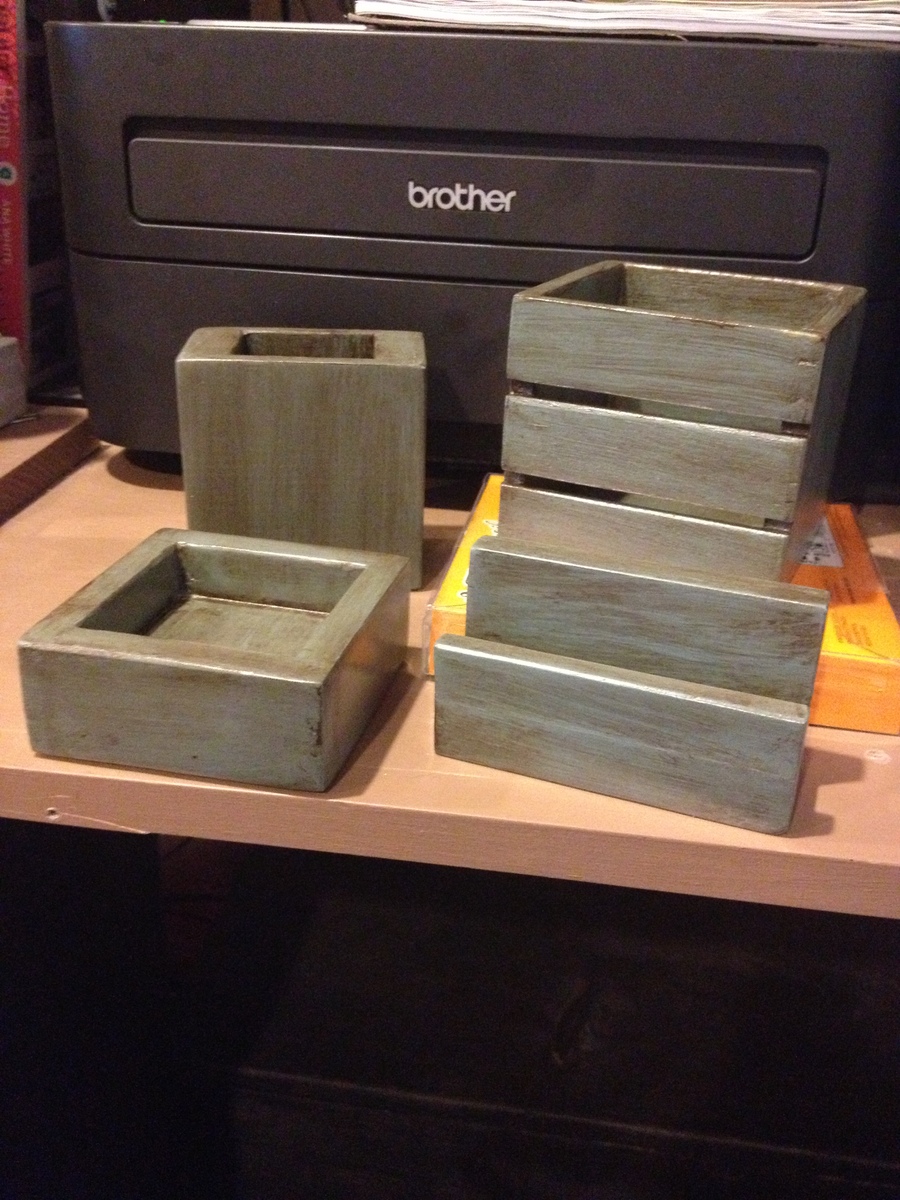
These were the inspiration pieces for the 1-Board cedar desk accessory set plan. These were made entirely of scrap wood. These sets are all painted, they will be gifts for the girls at work.

The wood for these is some 3/8" plywood (crate and pencil cup sides), 1x2 (bottom of business card holder and ends of pencil cup), some 1/2" x 1 1/2" craft board (sides of paper clip trays, business card holder), 3/4" plywood (bottoms of paper clip trays), some small squares of Wainscoat paneling (sides of gray pencil cup), some 1/4" plywood (bottom of pencil cup), some 1" strips of some old painted lauan (old project, pulled apart and the wood is being repurposed) and a couple of little pieces of 1/2" x 3/4" S4S (fronts of business card holders).

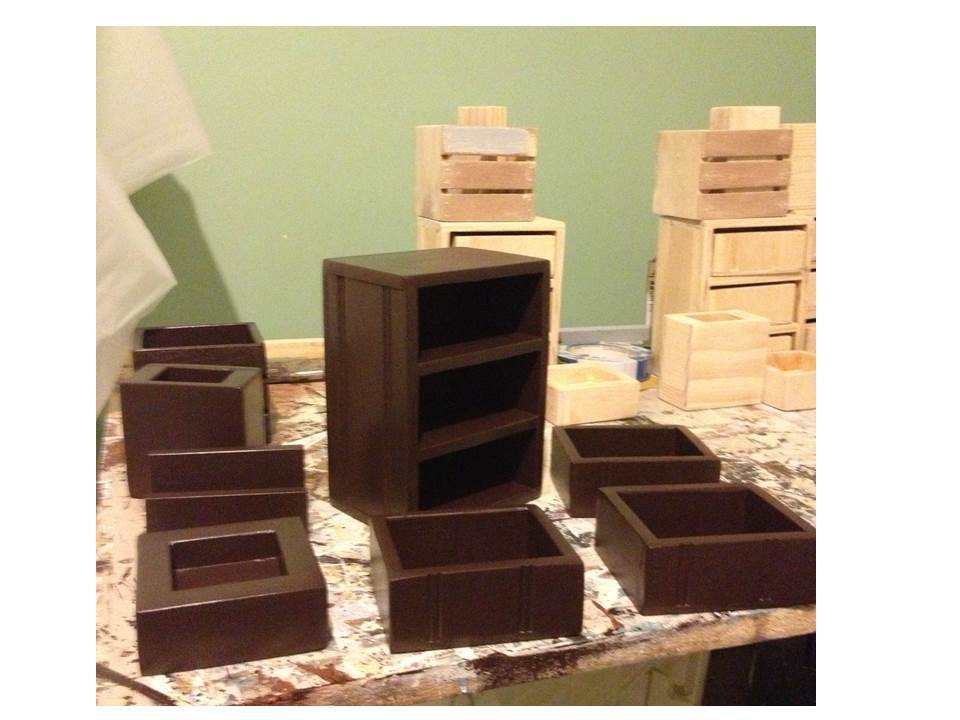
You can see the mishmash of different materials in the shot of an unfinished set, and also the stack of them waiting in the wings on my work table (it's starting to look like a Jackson Pollock painting :) heehee)

All the paints and materials were left overs from other projects. I hadn't decided on the finishes yet while I was building. These would be even easier to make if I had finished all the pieces first!

It was fun building these, it's great to be able to take something that may have gone in the bin, and make it into something lovely. I'm hoping the girls like these!

I've got a cube drawer plan in the works (a 1-board cedar with 2 drawers, and also have measurements for a 3-drawer from 3/8" thick craft board and 1/4" plywood, like the one on the table). I'll get to those soon.

Estimated Cost
0 - all scrap and left over finishes
Estimated Time Investment
Afternoon Project (3-6 Hours)
Finish Used
The gray set received 1 coat of white primer, 1 coat of gray (Ace Royal in Greek Column), then was distressed with 100-grit sandpaper, and given a coat of Minwax's crystal clear polycrylic in satin.

The blue set received 2 coats of Clark & Kensington paint tinted to Benjamin Moore's Blue Echo, and glazed with Minwax Express Color in Walnut. This set received a top coat of Minwax Oil Modified water based poly (I have lots of that left over from last year's island build).

The one on the table is receiving 3 coats of Benjamin Moore Aura in Wenge.
Recommended Skill Level
Beginner

Comments

Linda7

Mon, 08/19/2013 - 20:40

Thanks for sharing your pictures and plans for the desk accessories and trinket box. What great ideas for inexpensive gifts for people on you list!

JoanneS

Tue, 08/20/2013 - 15:09

Thanks Linda! I've absolutely had a ball planning and working on these! I'm so glad you like them! :)

yurra-bazain

Fri, 08/30/2013 - 17:57

I love when something is functional and adorable (and affordable to boot)! This is great; I am sure you'll have very many happy recipients of these cute desk accessories!

JoanneS

Thu, 08/22/2013 - 13:25

Yvonne, thank you for the nice comment! :) I'm working toward my goal of finding things to make from all the left-over wood in my garage. I didn't realize how much had accumulated. Really I am having a ball doing this! I did go buy some more cedar pickets though, I'm going to work on the 1-board cube plan this weekend. :)

Rustic X Console Table With Twigging

Submitted by markman57 on Mon, 09/21/2015 - 08:44

Followed the original plan but substituted branches from an oak tree for the X brace to give it a more "Adirondack" look.  Geneously sprayed the branches with a clear polyurethane coating to seal the bark.

Built from Plan(s)
Estimated Time Investment
Week Long Project (20 Hours or More)
Finish Used
Zar Golden Oak oil based finish
Recommended Skill Level
Intermediate

Wooden Play Toy Grill

Submitted by zeuss0101 on Sat, 09/15/2018 - 17:35

Enjoyed building this with my son.  Thank you Ana.

Estimated Cost
About $25
Estimated Time Investment
Afternoon Project (3-6 Hours)
Recommended Skill Level
Intermediate

Camp Loft Bed with Stair, Junior Height

Submitted by Anonymous (not verified) on Wed, 06/08/2022 - 15:46

Pretty straightforward project. I didn't end up making the base due to lack of space and time. The hardest part for me was staining as depending on the medium semi-transparent etc... and how you apply it brush or gun etc... can change how it turns out. I used dark walnut i believe and only 1 coat and to me it was plenty rich. pretty sure it was semi transparent. I like how it's a loft bed and gives kid more sqft for their room. it is somewhat shaky but not horrible probably due to lack of base. I will probably add some cross members for support.

Comments

Master Bedroom

Submitted by fanofana on Tue, 08/20/2013 - 14:09

After living in the basement with our young children for the first few years after moving into our new home, we were ready to claim the master bedroom on the main level. We made it a winter project and re-did the whole room (good-bye lavender walls). We made the headboard from Ana's "Reclaimed Headboard" plans and one of the night stands from the "Kentwood Nightstand" plans! We love the final look and saved ourselves a TON of cash in the process.

Estimated Time Investment
Week Long Project (20 Hours or More)
Finish Used
I went for an aged look by painting them, stripping most of the paint off leaving a little white, then used a vinegar/steel wool solution to get the aged effect. The technique I used can be found at the following link http://beingbrook.com/rustic-headboard-aged-wood/
Recommended Skill Level
Beginner

Potting bench from recycled materials

Submitted by Anonymous (not verified) on Wed, 06/22/2022 - 07:42

I used recycled materials for my potting table. The boards for the front and back legs I found from a factory's dumpster. Side aprons are from boards I saved when we took down a wall in our home. The boards were a part of the wall's frame. All the boards for the worktop, back wall and the lower shelf came from the dumpster of a company selling plastic sewer pipes. They used to be frames holding together the bunches of pipes during transport from factory to the store. And lastly, the board for the little shelf used to be part of the structure holding up the tarp over a freight truck's freight space.

I've only built raised beds and crude shelves for seedlings up until this project. This was my first more complex project. And the first with which I had to follow a plan. Due to my materials being differently sized than in the project plan, I had to make some adjustments along the way. My husband helped me to make sense of the instructions and also helped when I needed another pair of hands to keep parts still while drilling.

The biggest setback during the project was the board for the small shelf splintering while drilling it into place. It splintered even though we pre-drilled holes for the screws to go into especially to prevent splintering. I made another board and that one we secured in place with small corner braces which worked better.

Thank you Ana for the project plan. Here in Finland potting tables like these are not common and they are not sold anywhere. I've dreamt of one for 15 years and now, finally, I made my dream home true with your help.

Best wishes,
Aija

Comments

Corner Cabinet Storage Shelf

Submitted by sssmile14 on Sun, 07/24/2011 - 19:32

We built this corner cabinet shelf in three days (only because it is over 100 degrees here, so we had to wait until 9:00 at night to work on it) for our office space. We love, love, love it and can't believe how nice my corner cabinet turned out. Only our second building project ever. :)


Built from Plan(s)
Estimated Cost
80.00
Estimated Time Investment
Afternoon Project (3-6 Hours)
Finish Used
Kilz Satin Paint- Black
Recommended Skill Level
Starter Project

Comments

kellerkb

Mon, 06/03/2013 - 21:20

Hello, I would appreciate help finding the plans for this project! Thanks!

cerberus456

Tue, 08/02/2016 - 14:54

I do cedar. Thank you very much for the drawings. This site is to become one of my favorites.

Greetings from Xalapa Veracruz Mexico