Community Brag Posts

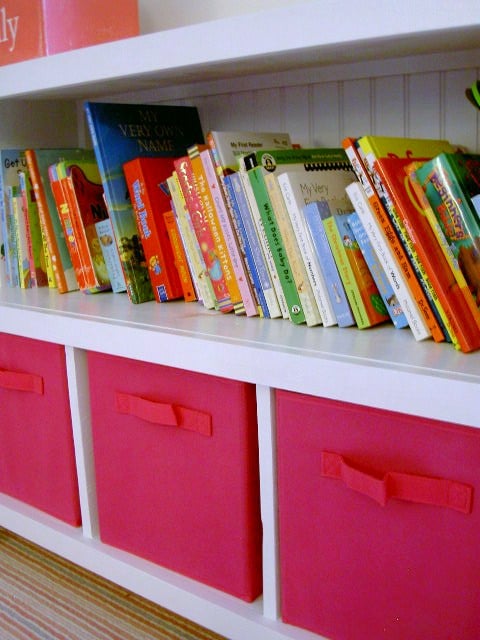
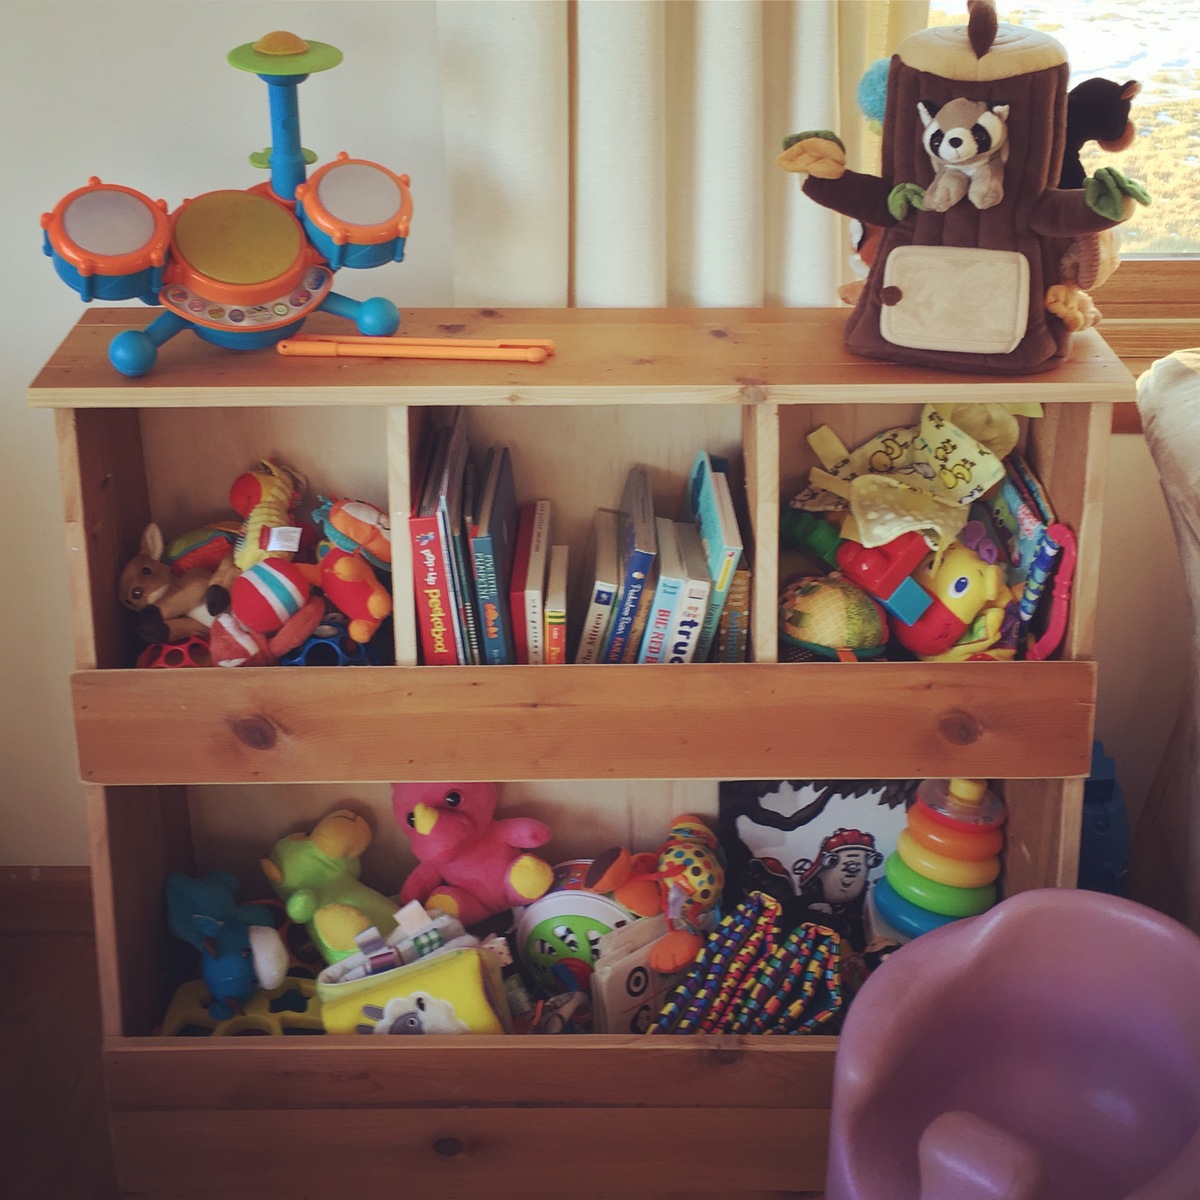
bookshelves
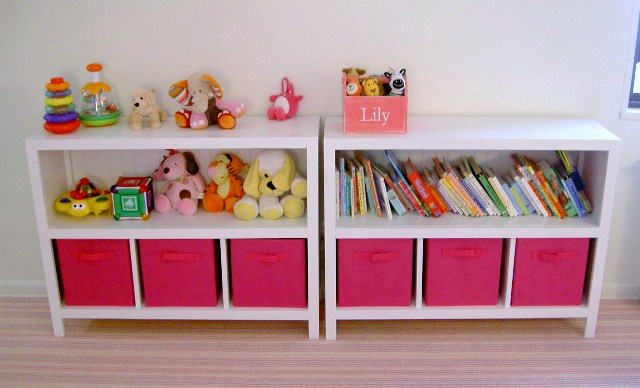
cube bookshelves modified to have one open shelf and 3 cube slots


Built from Plan(s)
Estimated Cost
$50 per shelf
Estimated Time Investment
Day Project (6-9 Hours)
Finish Used
1. one coat primer
2. two coats semi-gloss white
2. two coats semi-gloss white
Recommended Skill Level
Beginner
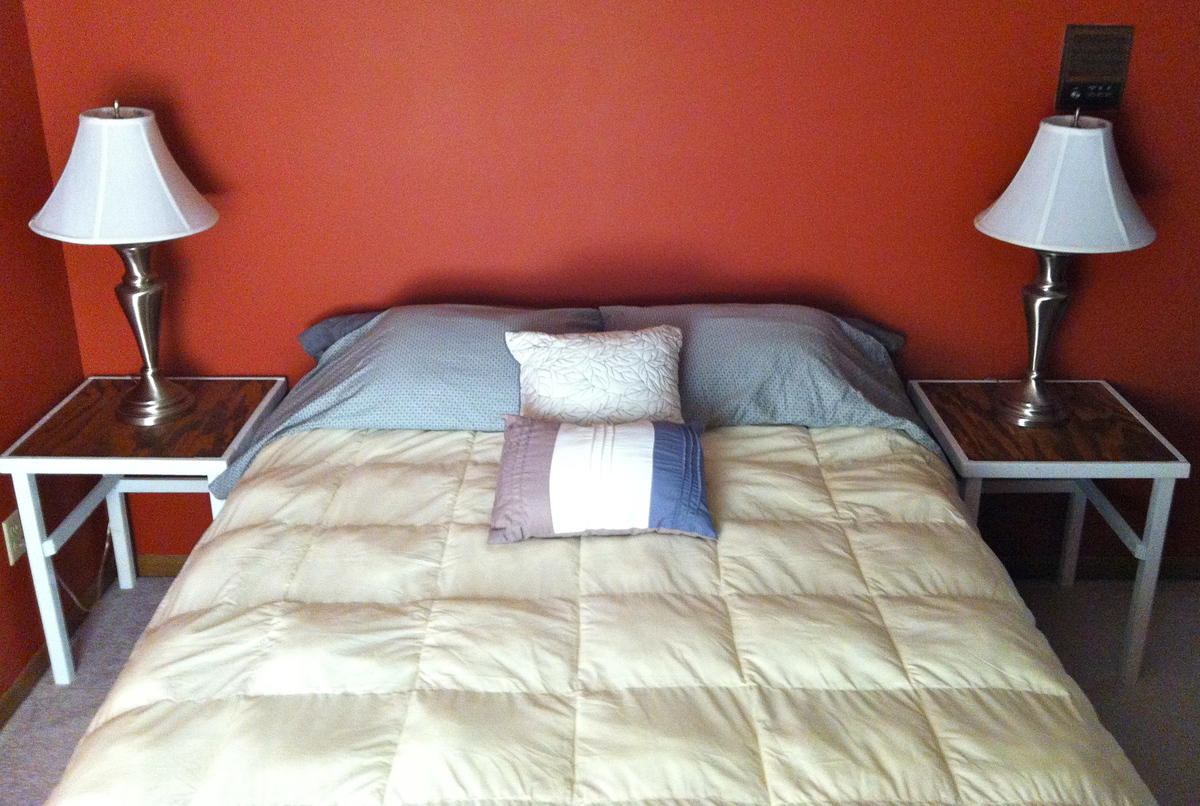
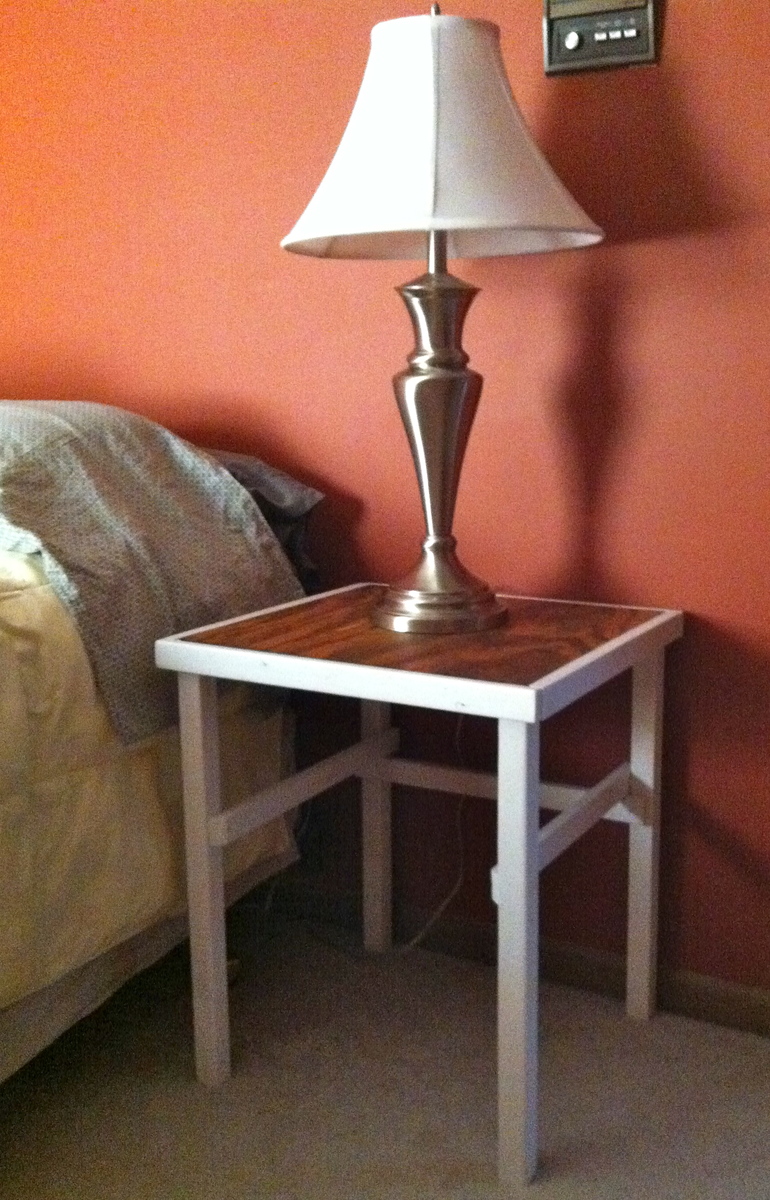
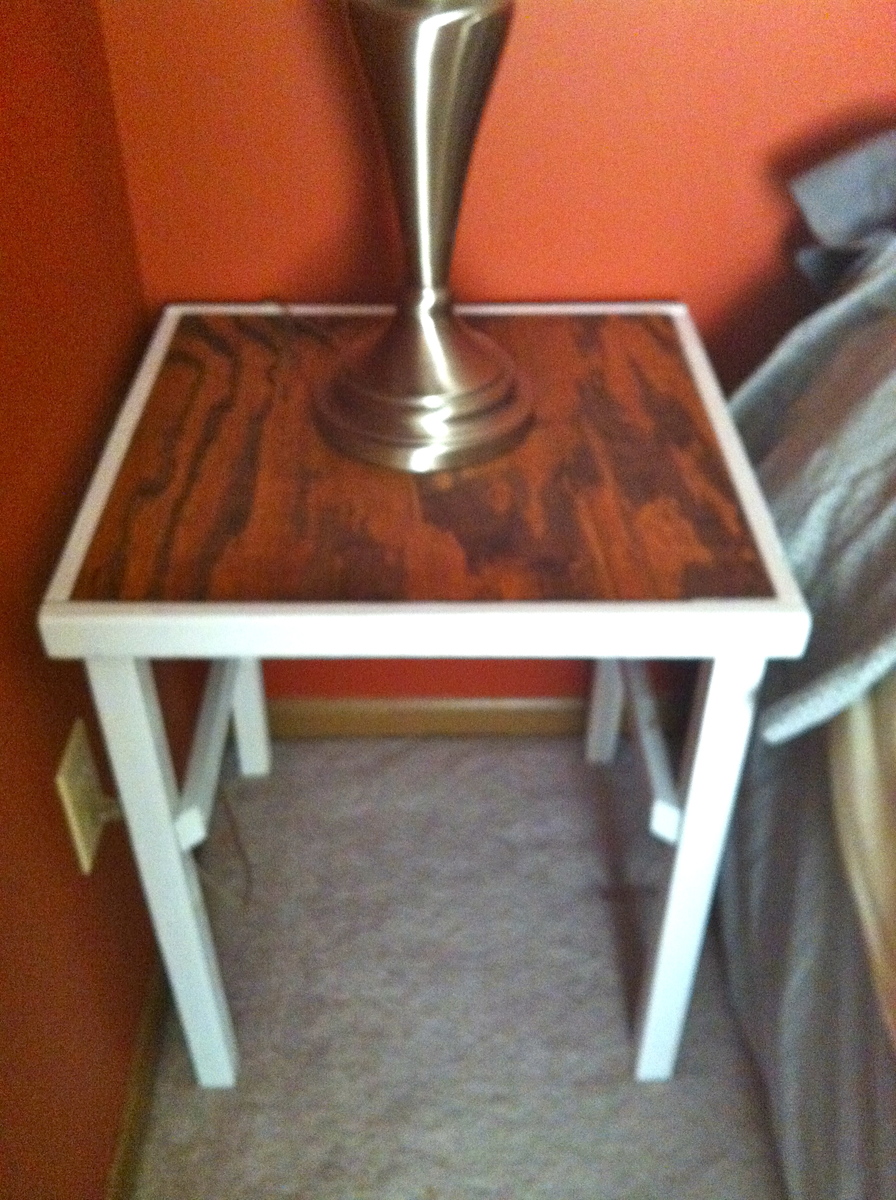
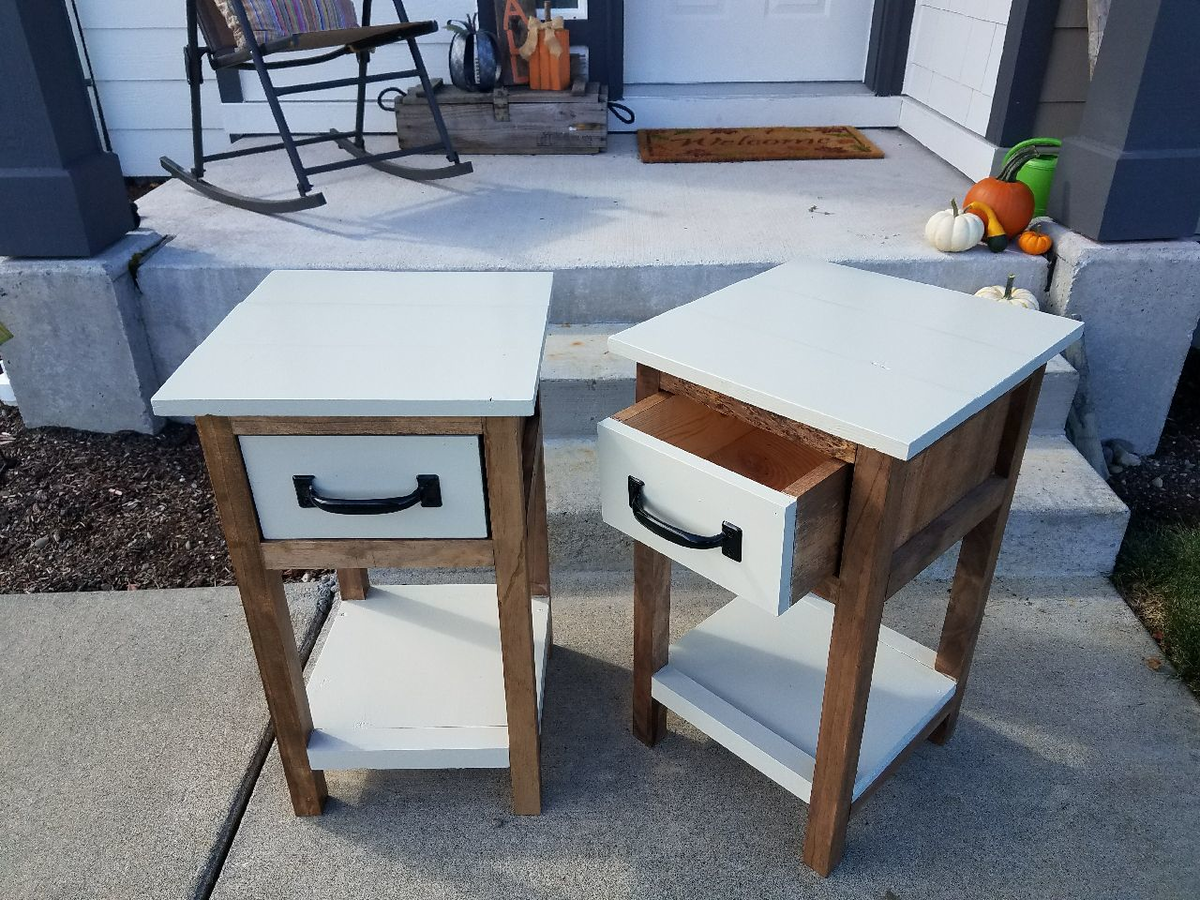
Simple, Low-Cost Nightstands

Our guest bedroom has been utterly neglected and stark. When I found a pair of lamps at Goodwill recently, I knew it was time to make bedside tables.
These were created on the fly, without even a sketch or a trip to the lumber yard, though I had to select a plan title for this post.
I took a plywood scrap, cut it in half, framed it with 1x2 furring strips, added 2x2 legs, and then used more furring strips to stabilize the legs.
They were assembled quickly, and then I faced choices about how to finish them. I ended up using Minwax Provincial for the tops, then taping them off with trash bags and spray painting the rest.
They're plain, but versatile enough for whatever I end up doing to decorate the guest room in the future. I plan to stick baskets underneath them, when I find a good deal.
Next up will be a headboard for the bed.
Built from Plan(s)
Estimated Cost
Two cans of spray paint + scraps (probably about $24 worth all together?)
Estimated Time Investment
An Hour or Two (0-2 Hours)
Finish Used
Minwax Provincial, white satin spray paint + primer (Valspar)
Recommended Skill Level
Starter Project
Comments

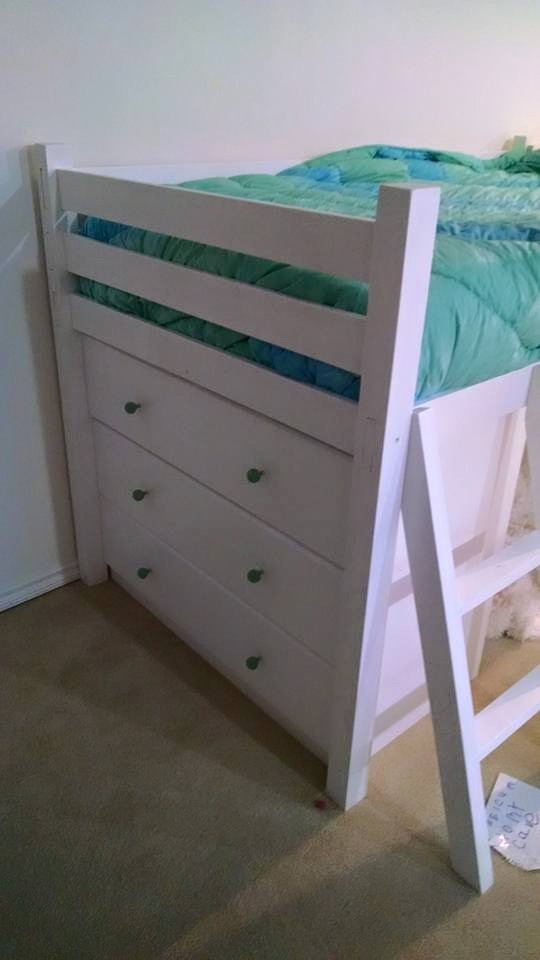
Small Loft Bed with Dressers
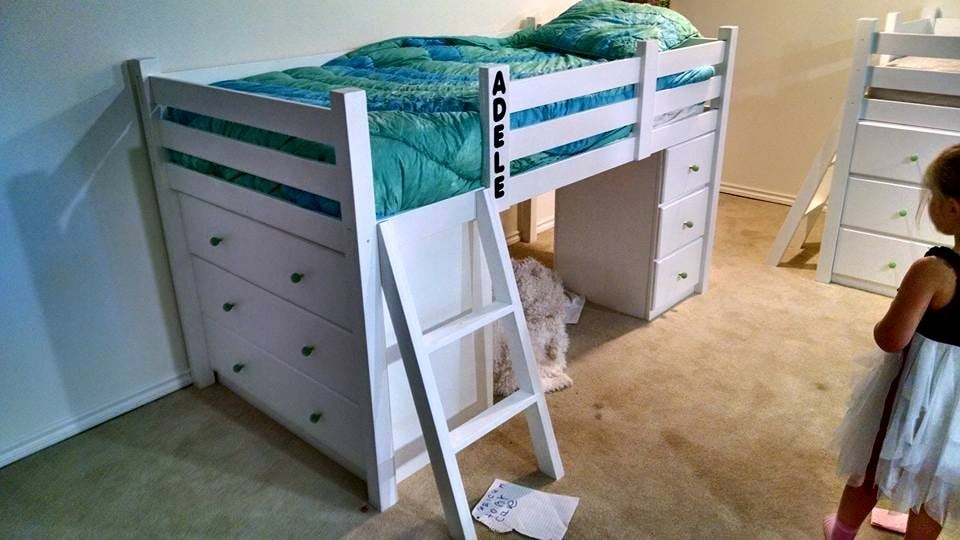
This took about a week to complete. I modify the original plan to include "built in" dressers and a night stand type of dresser. The night stand has shelves built on the side. Two beds were built of different configurations.
Built from Plan(s)
Estimated Cost
Cost about $400 per bed.
Estimated Time Investment
Week Long Project (20 Hours or More)
Finish Used
Painted with a high gloss white.
Recommended Skill Level
Intermediate
Comments
Fri, 12/08/2017 - 16:23
Wonderful Job!
You really did an excellent job! These would be perfect for my twin daughters!
Awesome Toy Box
My dad and I built this toybox for my son on a weekend afternoon. We were able to use some tongue and groove boards that my dad had pulled off a job site. We glued them together to get the width we needed then cut them to size according to the directions. Its not perfect, and I think I might paint it this spring, but my dad and I made it for my son and I think that is pretty awesome!
Built from Plan(s)
Estimated Cost
$10 for glue and nails. Wood was free!
Estimated Time Investment
Afternoon Project (3-6 Hours)
Recommended Skill Level
Beginner
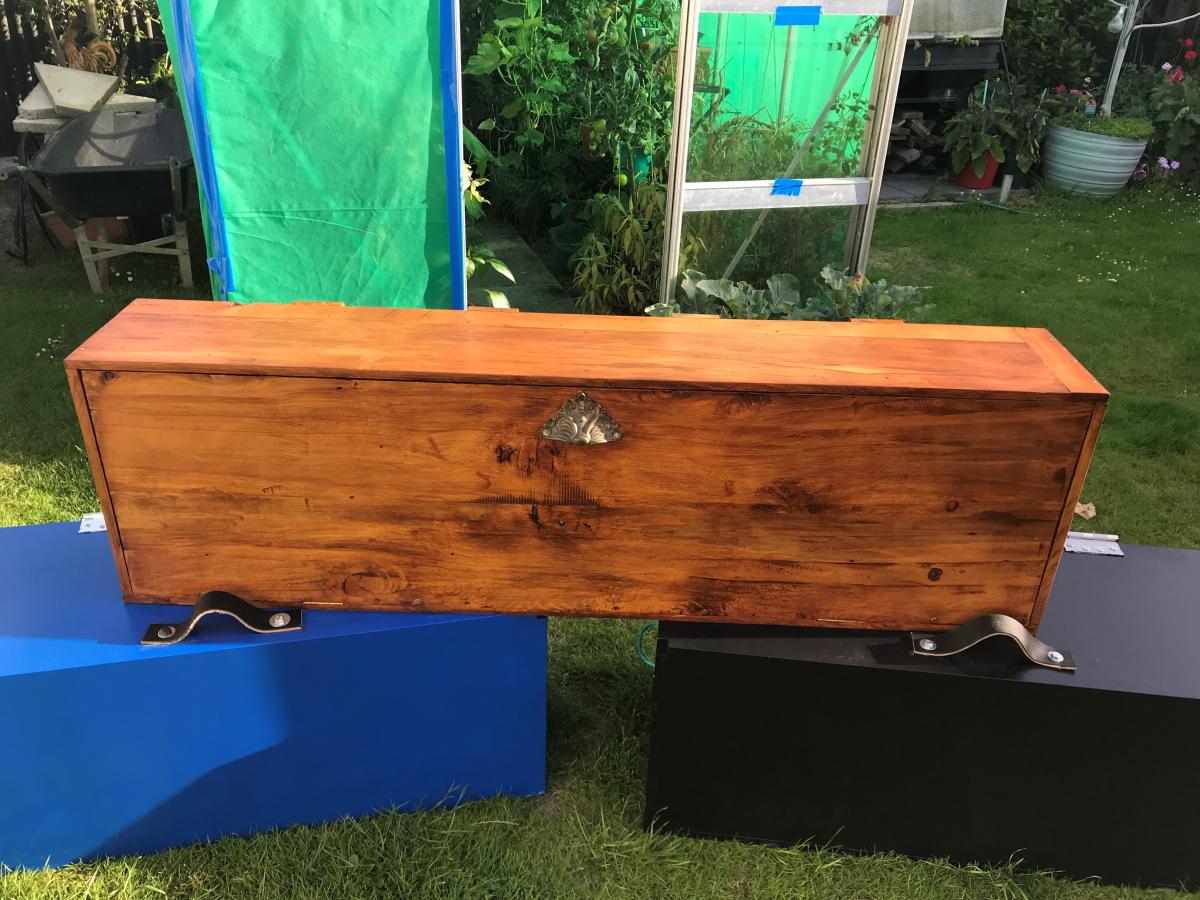
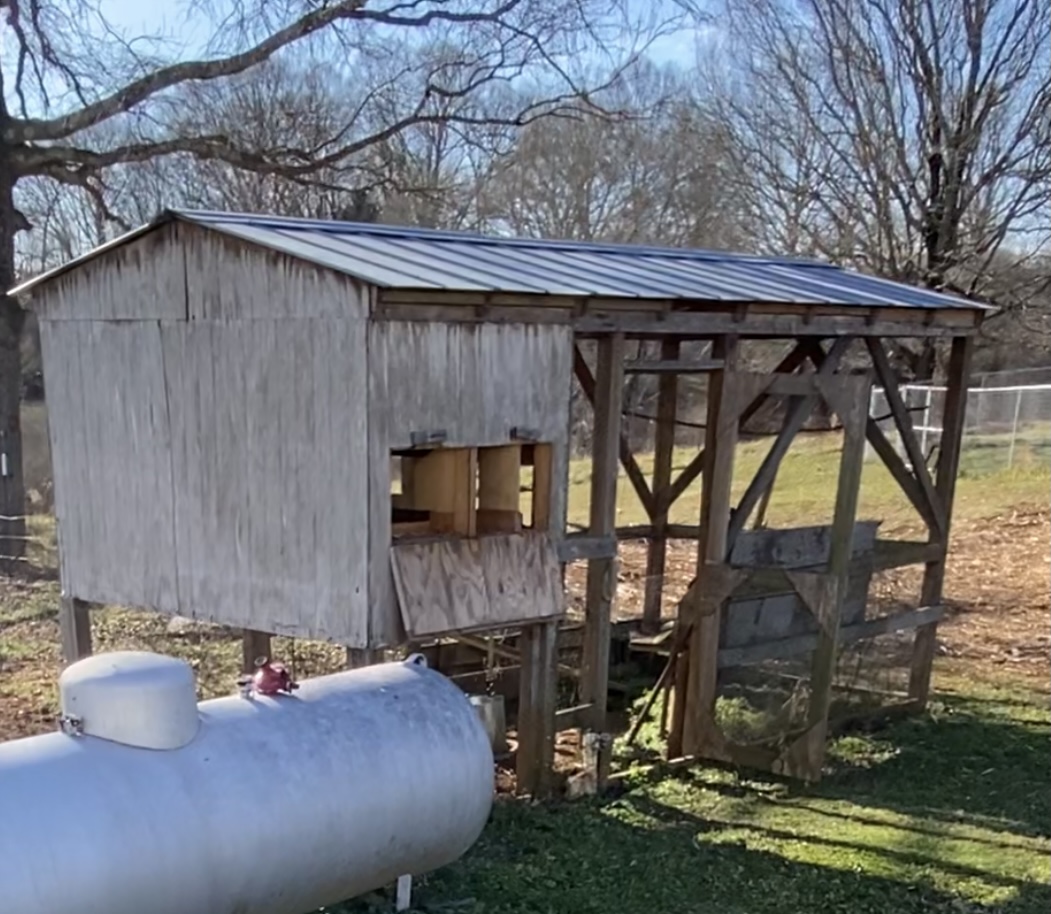
Chicken Coop to Greenhouse
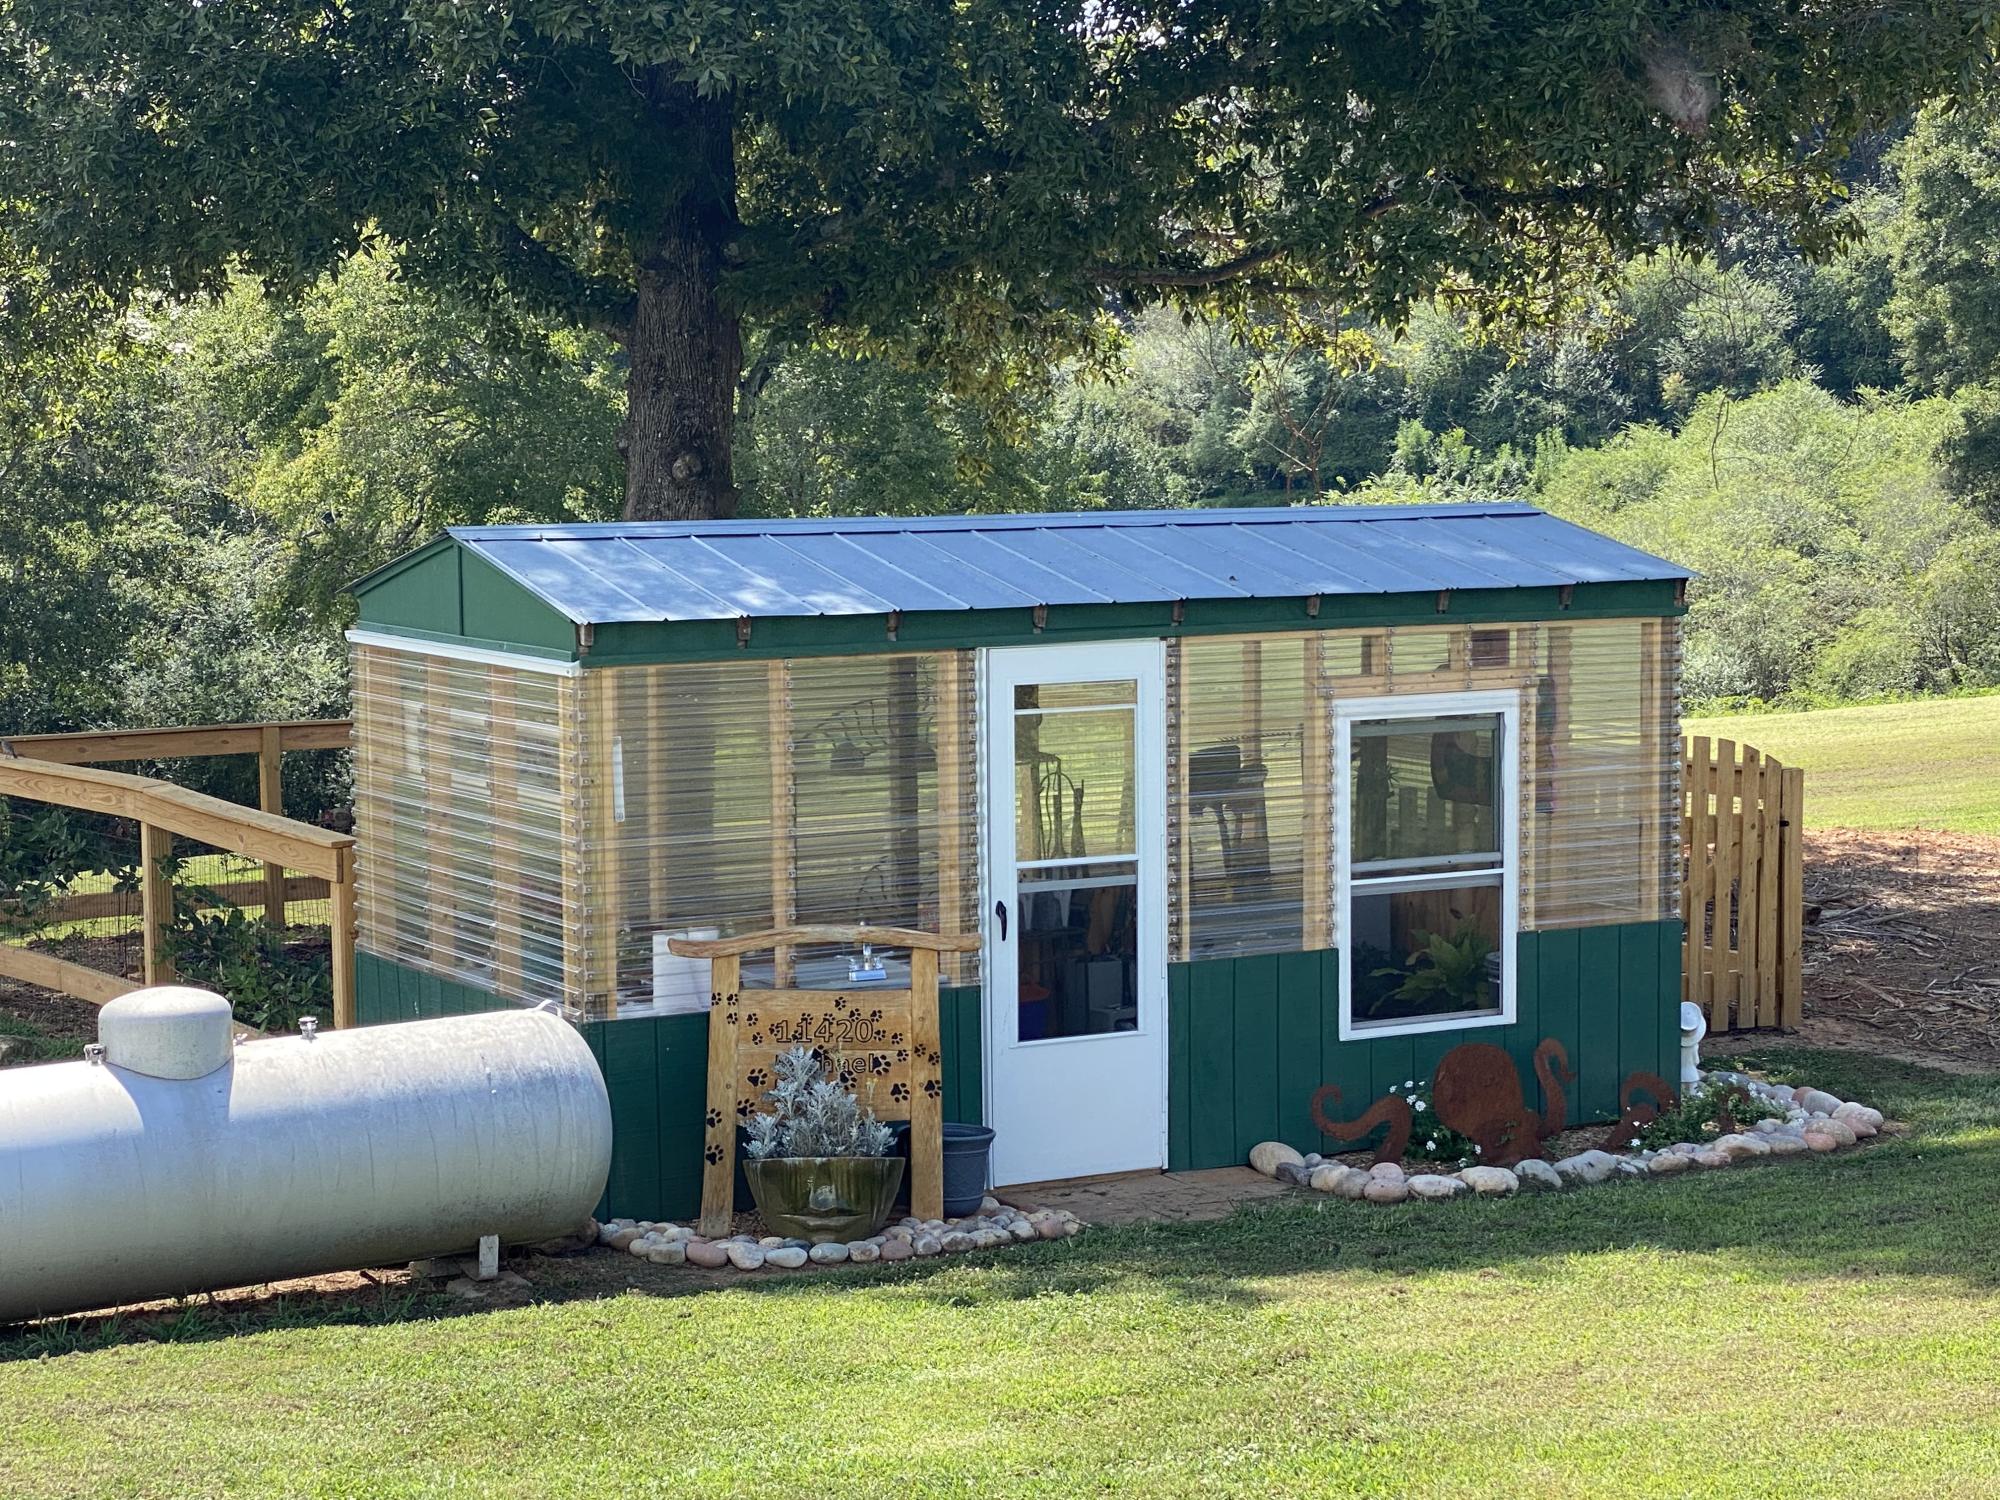
Using a couple of the Ana White Plans and YouTube videos, converted a run-down, Carpenter Bee infested chicken coop into a functional greenhouse with running water and electricity.
Comments
Rustic Pine Table
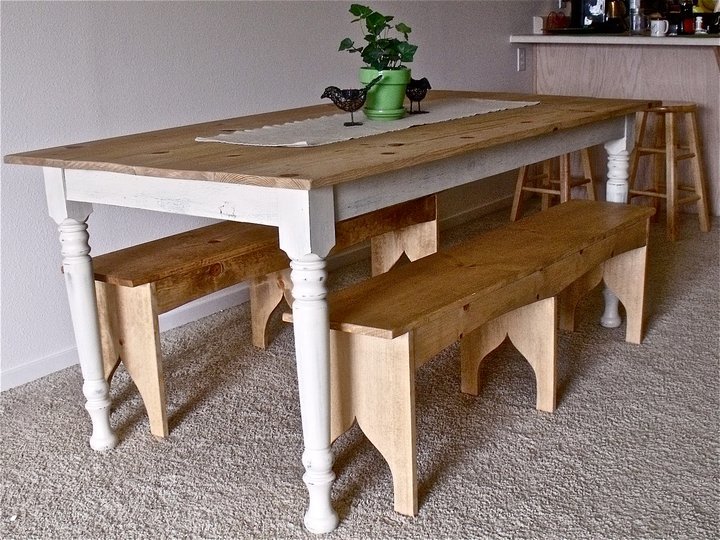
Very easy to make, and not too expensive. I'm not that great with a lathe. I tried it a couple times but not too good. So I buy my table legs online through osborne wood company. These legs however, came from an old table that I got for free from an antique store. The rest of the table got cut up and used for 2 night stands, and this is what I used the legs for. I used pocket holes to attach everything. Support the middle with cross supports and there you have it. The benches are just 1x12x8's cut into shape and supported by 2 1x4's on either side.

Estimated Cost
$200
Estimated Time Investment
Weekend Project (10-20 Hours)
Recommended Skill Level
Intermediate
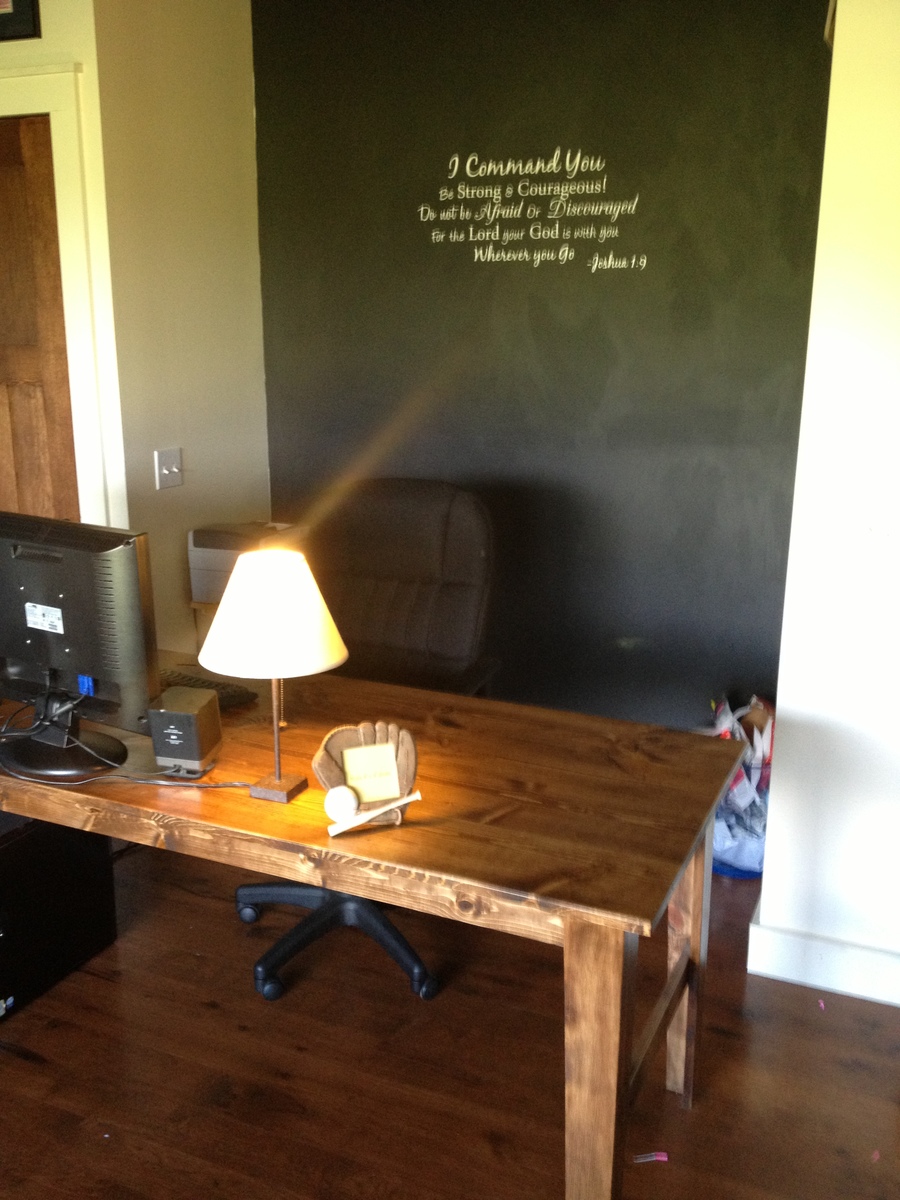
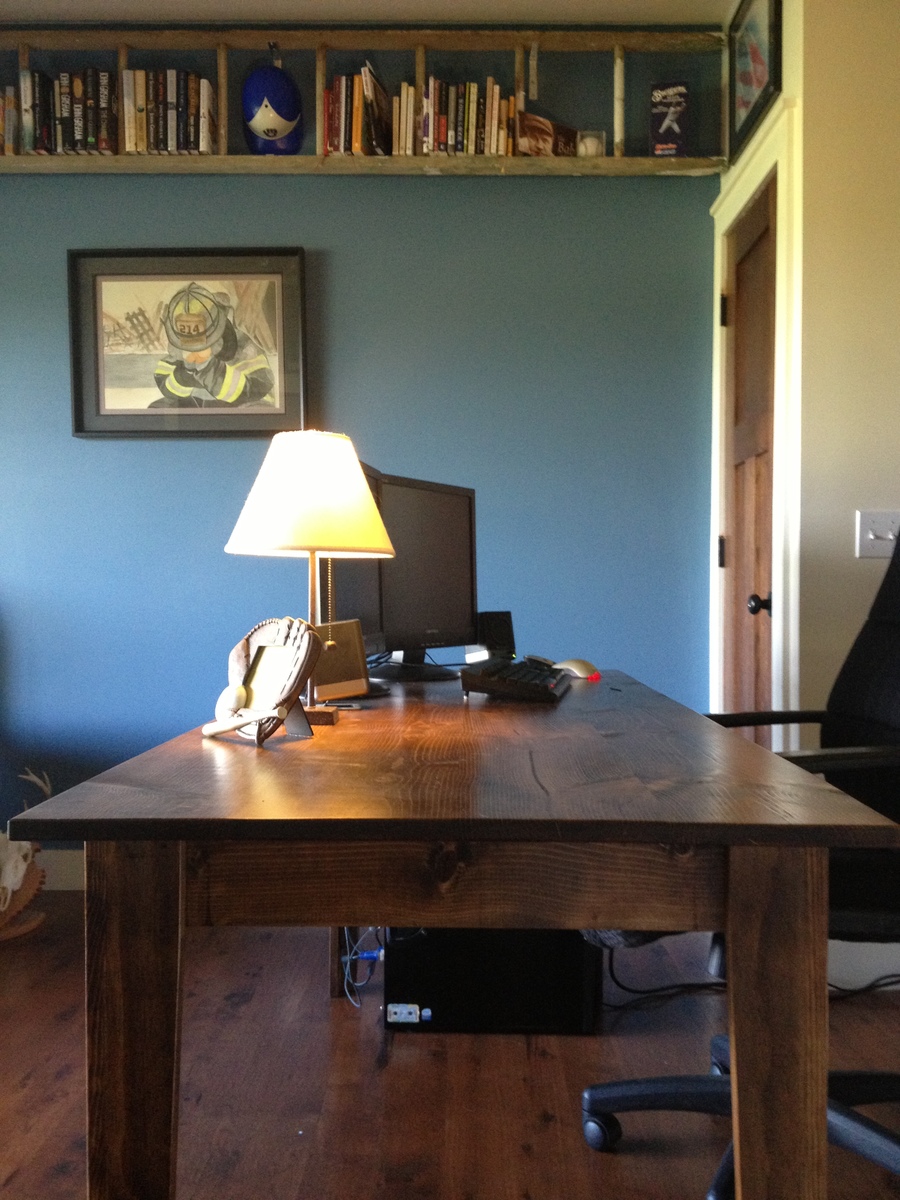
Narrow Farmhouse Table - Pine
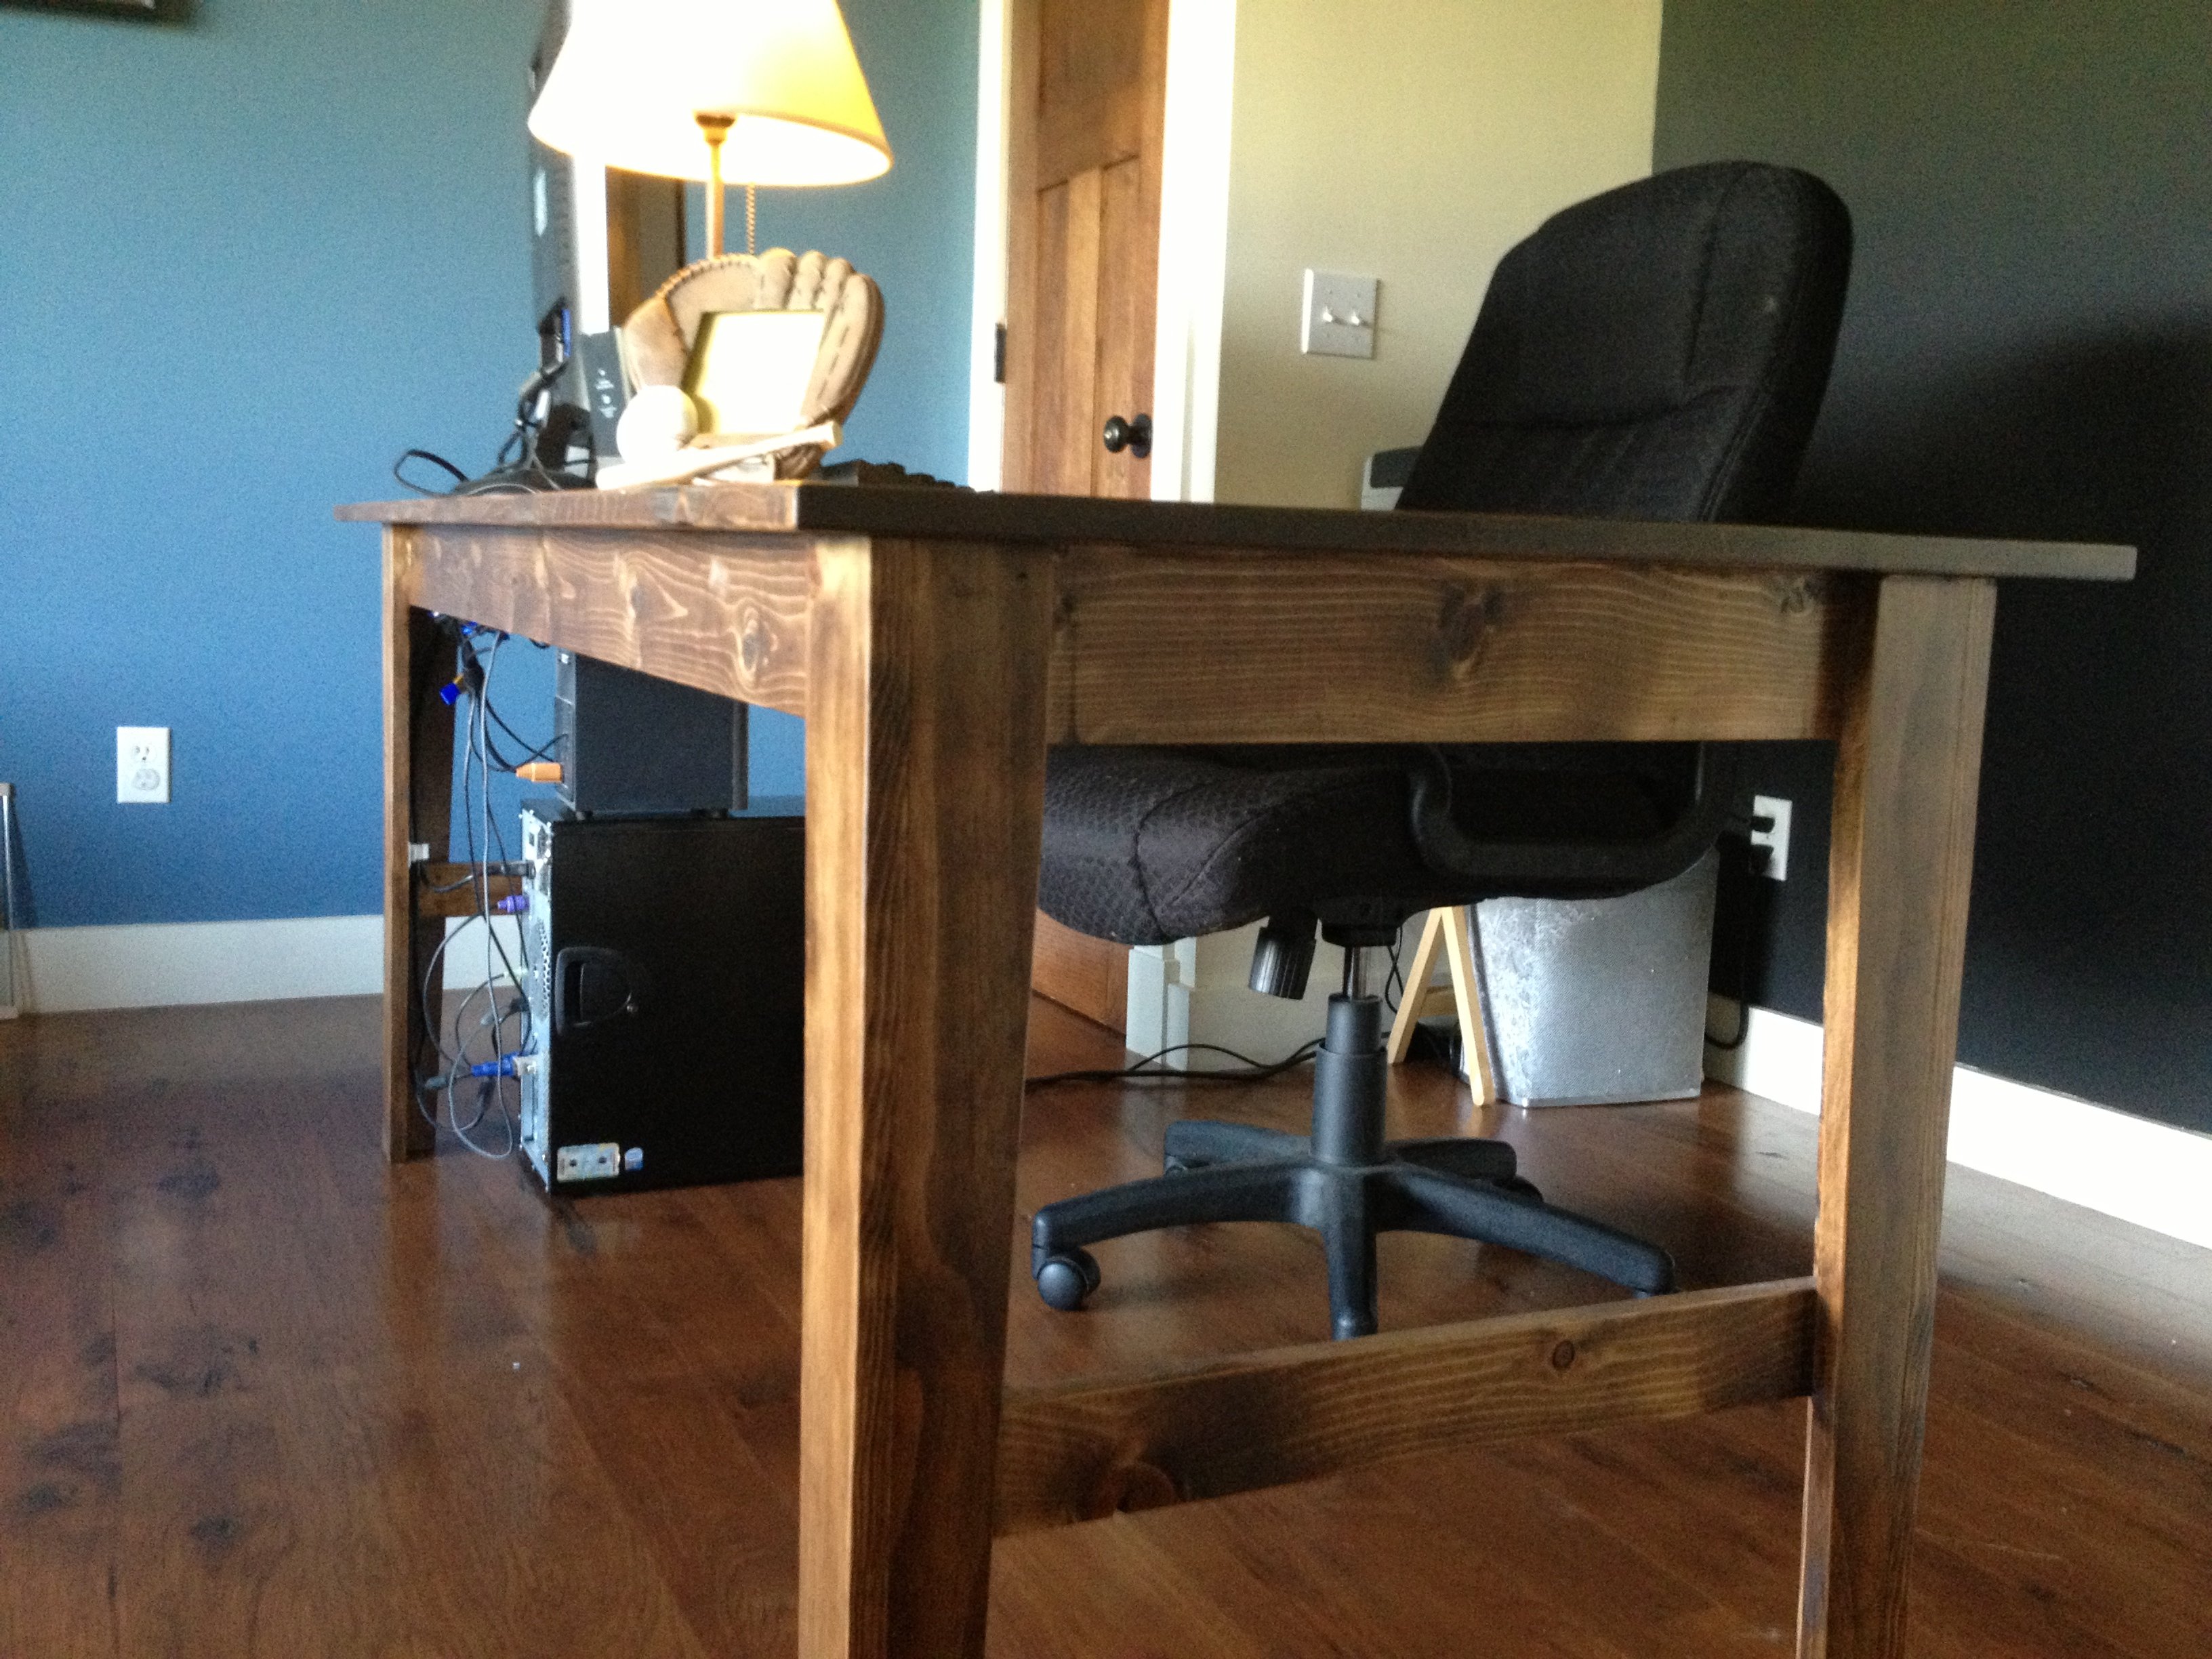
I had fun with this one. I was in a race to complete 4 major things before entertaining a group of 30 people in our home. My wife was searching Craigslist for existing pieces. I love to build things so I had to intervene. This pine desk/table was preceded by craftsman wainscoting, the hutch and buffet on this site, and a large framed mirror.
I went by the plan pretty much exactly. I made it 6 feet long. I used middle grade pine from Menard's, glue, brad nails, and screws. My finish process was min-wax wood conditioner, min-wax special walnut stain, and a per-catalyzed lacquer satin clear coat.
Total buy, build, sand, finish was around 8 hours.
I would love to build for you. To your exact specifications. Message me.
Built from Plan(s)
Estimated Cost
$60
Estimated Time Investment
Day Project (6-9 Hours)
Finish Used
My finish process was min-wax wood conditioner, min-wax special walnut stain, and two coats of pre-catalyzed lacquer satin clear coat with 320 paper between coats.
Recommended Skill Level
Beginner
Comments
Mon, 12/30/2013 - 16:22
How did you attain such a
How did you attain such a smooth surface on the desk top? Worried about gaps between boards interfering with writing surface but yours looks great. What's your secret.
Red Oak Top - Coffee Table

Built this from Ana's plans over a weekend and spent a few nights painting/staining/finishing. We decided to use a true quarter sawn red oak for the top. This is not a cheap wood (~$180) for the top alone, but I wanted it to be solid and thick. It is extremely hard so you will not want to use this if you don't have the necessary tools, like a table saw. It is usually purchased rough cut, which means the width can range in size by inches. You will need the table saw with a sharp blade in order to cut it down to matching widths. For the stain we used a General Finishers gel stain in Java from Woodcraft. That was followed with a General Finishers Gel topcoat. This is an excellent topcoat as we have 0 scratches in almost 6 months of regular use. My wife painted the base in a Cream Puff color from Behr I believe with a dark stain glaze, followed by a wax coat. This is a solid table that cost a fraction of what this would be in the stores. Most of our friends think we bought it! Thanks Ana!


Built from Plan(s)
Estimated Cost
$400
Estimated Time Investment
Weekend Project (10-20 Hours)
Finish Used
General Finishers Java for top with General Finisher Gel topcoat finish. Cream Puff by Behr with stain glaze and wax on base.
Recommended Skill Level
Intermediate
Comments
Mon, 09/14/2015 - 09:02
Bautiful work!! The colors
Bautiful work!! The colors you picked are great! This has gone on my list of projects, it actually cut line hahahaha I have two questions, where did you get the sofa and the area rug? That rug is perfect for my bedroom! The colors are just perfect!
Tue, 01/26/2016 - 07:42
Sorry for the late reply! The
Sorry for the late reply! The sofa is from Norwalk Furniture and the rug from rugsusa.com
Mon, 01/25/2016 - 15:01
I'm sorry for the late reply
I'm sorry for the late reply on this! The sofa is from Norwalk Furniture and the rug from rugsusa.com.
Apothecary
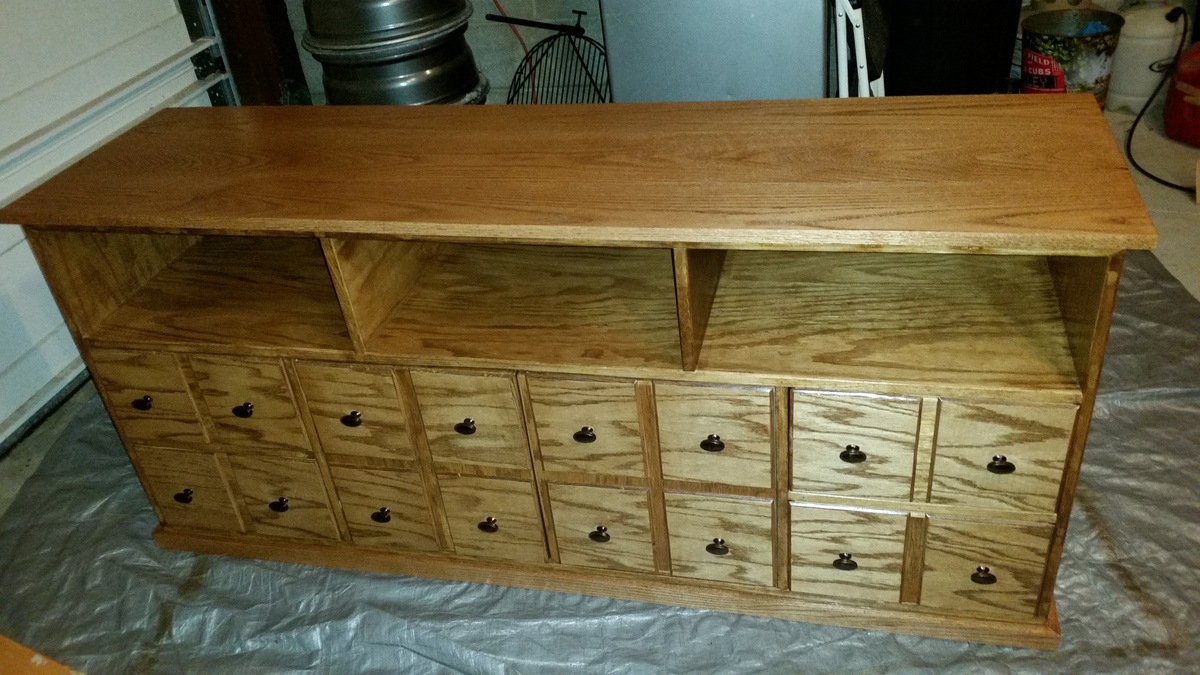
Thank you so much for the plans! My wife is extremely happy with the results and so am I. I am in the process of adapting these plans to make a matching end table. Once again, thank you!
Estimated Cost
250-300
Estimated Time Investment
Week Long Project (20 Hours or More)
Finish Used
3 coats of Minwax Early American and several (lost count) applications fof Minwax Polycrylic
Recommended Skill Level
Intermediate
Two Story 18" or American Girl Dollhouse
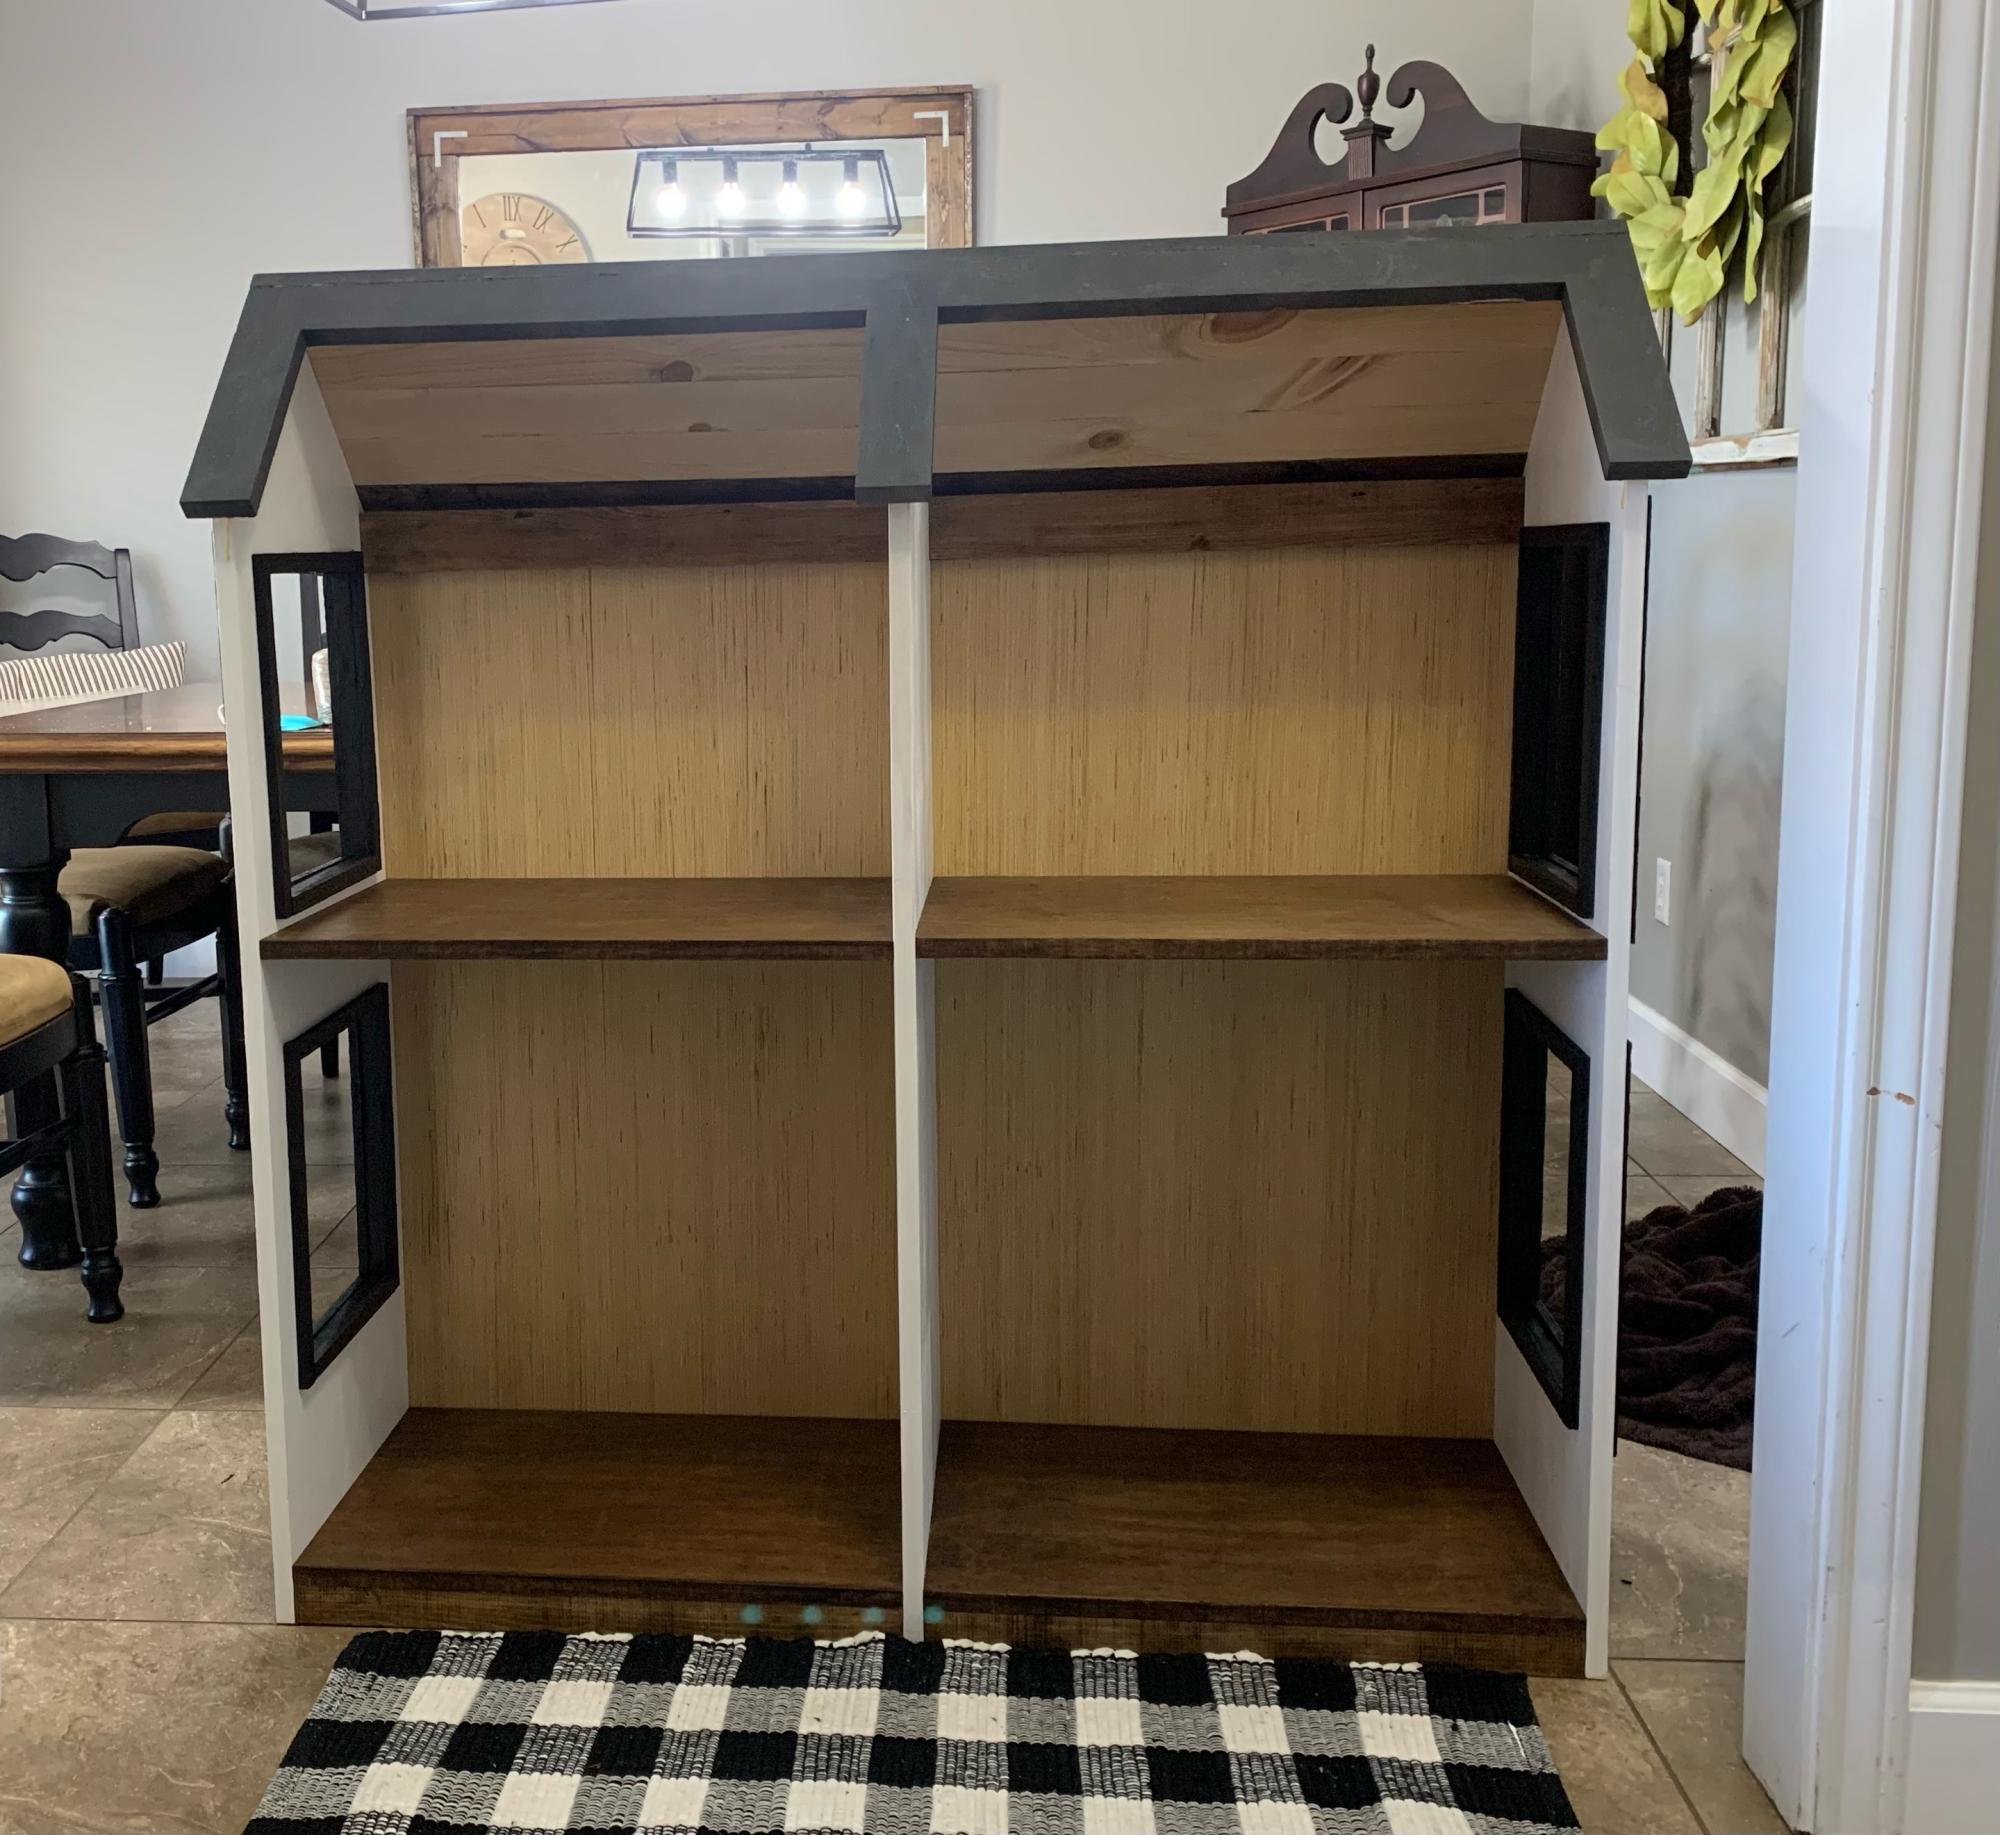
My husband and I made this for our 7 year old granddaughter's birthday. She loved it!! As always, your plans are step by step and easy to follow. Thank you!!!
Built from Plan(s)
Comments
Sat, 02/26/2022 - 10:25
Beautiful dollhouse!
A gift that will be treasured for years! Thank you for sharing:)
Joss & Emit's Train Table :)
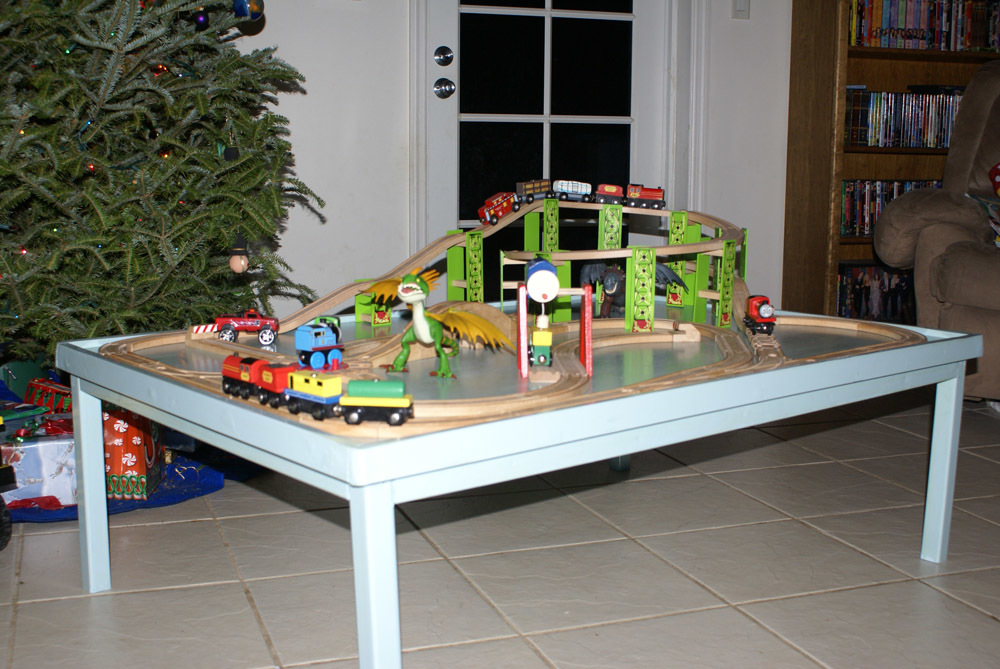
This was my very first "Ana project"! It was a special Christmas treat for my boys and their expanding train collection. This table has had many, many hours of entertainment and enjoyment. It is a great beginner project and has very easy plans to follow! I didn't do the storage carts at the time. I may go back and do them later though...for now they like playing under the table as well. My obsession began :)
Built from Plan(s)
Estimated Cost
$50 (island living cost more)
Estimated Time Investment
Day Project (6-9 Hours)
Finish Used
Flat interior paint (2 coats) with two coats of poly.
Recommended Skill Level
Starter Project
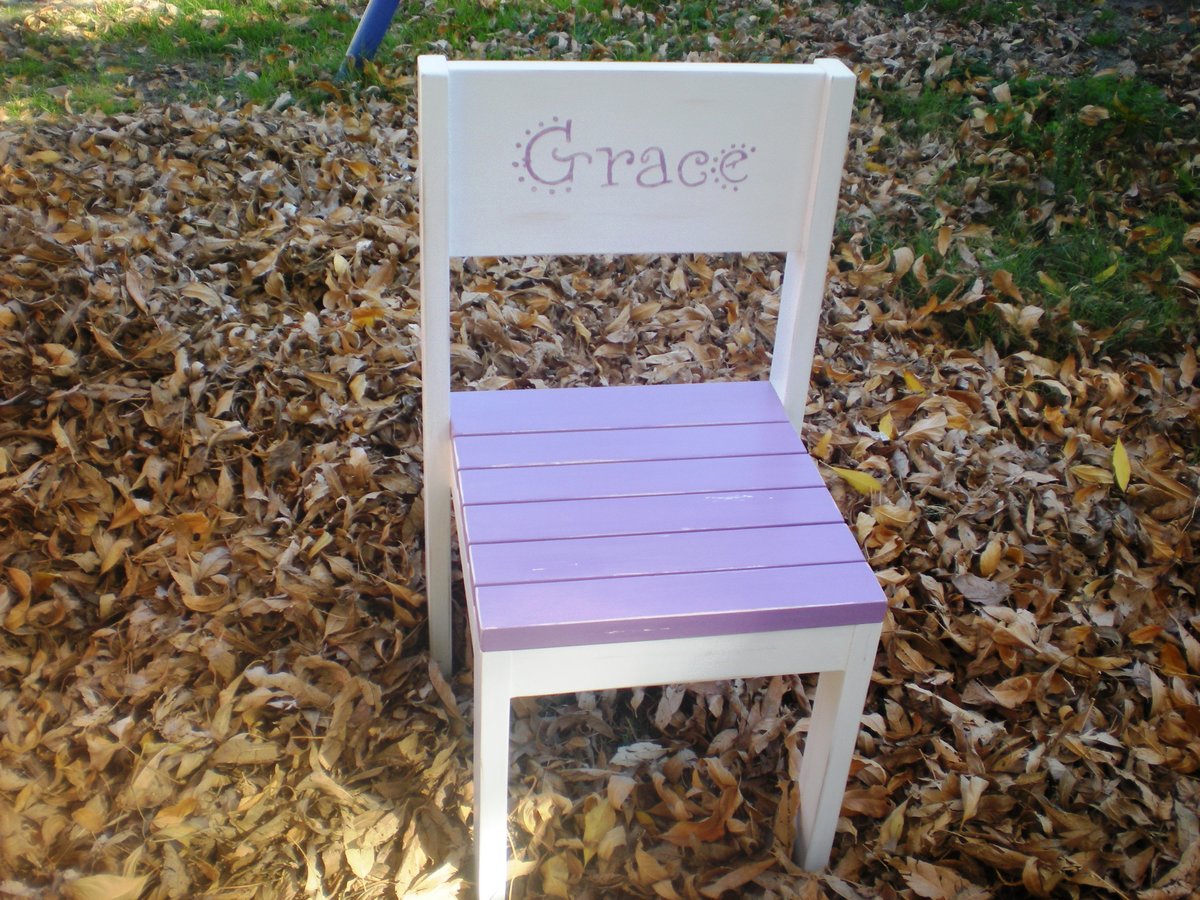
Smaller size stackable chairs
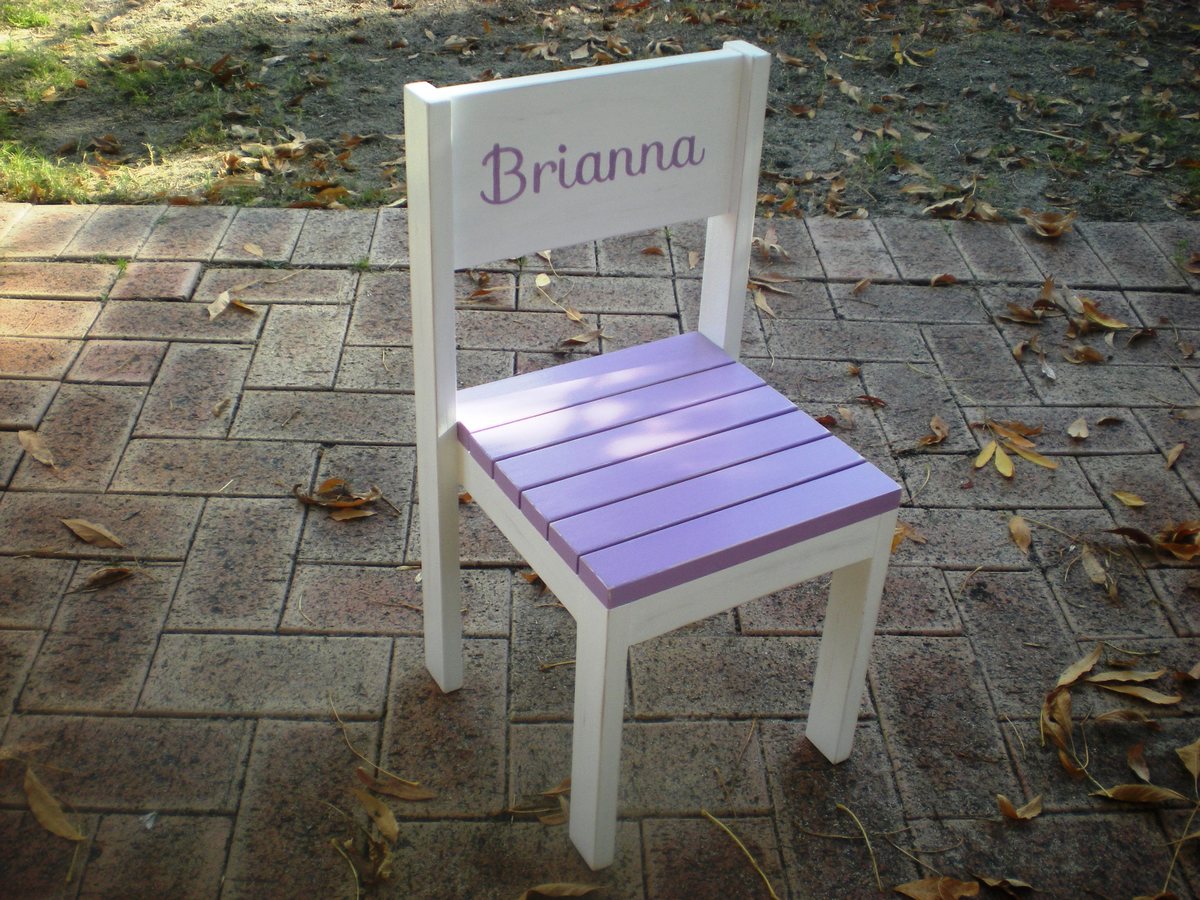
Two little girls we know recently celebrated their 1st birthdays, 4 months apart. I thought chairs would make perfect gifts. I finally got around to finishing both chairs around the time of the second girl's birthday. The other one was rather belated. The parents didn't know I was making it so it was still a nice surprise. My own 1 year old rather enjoyed testing them out.
I've previously made one of these full size chairs for my 8yo. but for these I changed the measurements to be smaller and easier for a one year old to sit on. I made the seat 28cm high and adjusted all the other measurements to suit. I enjoy using Sketchup so resizing the plan was a good excuse to use it again (I used an old ikea chair we had on hand as a guide for the sizing.)
I primed and painted the wood used for the slats before I cut it to size. This was so much easier than trying to paint in between them. Filling the screw holes was a bit of a chore and I'm not totally happy how some of them were still rather visible under the paint. A bit more practice needed I guess. Finishing took quite a while because of all the drying time. Chose to distress them to help disguise any bumps and marks they're likely to sustain. I discovered there is a fine line between distressing and distressing too much.
Really happy with how they turned out. Thanks for the fantastic plans!
Built from Plan(s)
Estimated Cost
$5 (not including leftover timber, I already had paint, screws etc.
Estimated Time Investment
Weekend Project (10-20 Hours)
Finish Used
1 coat primer, 2-3 coats semi-gloss white for the frame, 2 coats Dulux low sheen paint for the slats (it was a mixture of two purple shades I had on hand), lightly distressed it and then a couple of coats of Cabots Cabothane water-based poly.
Recommended Skill Level
Beginner
Comments
Mon, 09/02/2013 - 06:43
Love the name on the chair
Great job on the chair! What did you use to het the name on there so perfect!!
Thanks,
Sun, 09/22/2013 - 21:12
Thanks, I printed out the
Thanks, I printed out the name in the size & font that I wanted and traced over it using a ballpoint pen/dull pencil which leaves a slight indent. Then paint the outlines and fill it in. There's a great tutorial over at http://thatsmyletter.blogspot.com.au/2012/08/h-is-for-handpainted.html
Sun, 10/12/2014 - 18:30
Love the use of the 1x6
Love the use of the 1x6 instead of slatted for the back and the addition of the name takes it to a whole new level. So glad I saw this before making them for my littles. Btw, love the font you used for Brianna, so pretty. Well done!
Mon, 11/03/2014 - 16:14
Beautiful work on the chair!
Beautiful work on the chair! What type of paint finish did you use?
Thanks!
Chalkboard Produce Crate
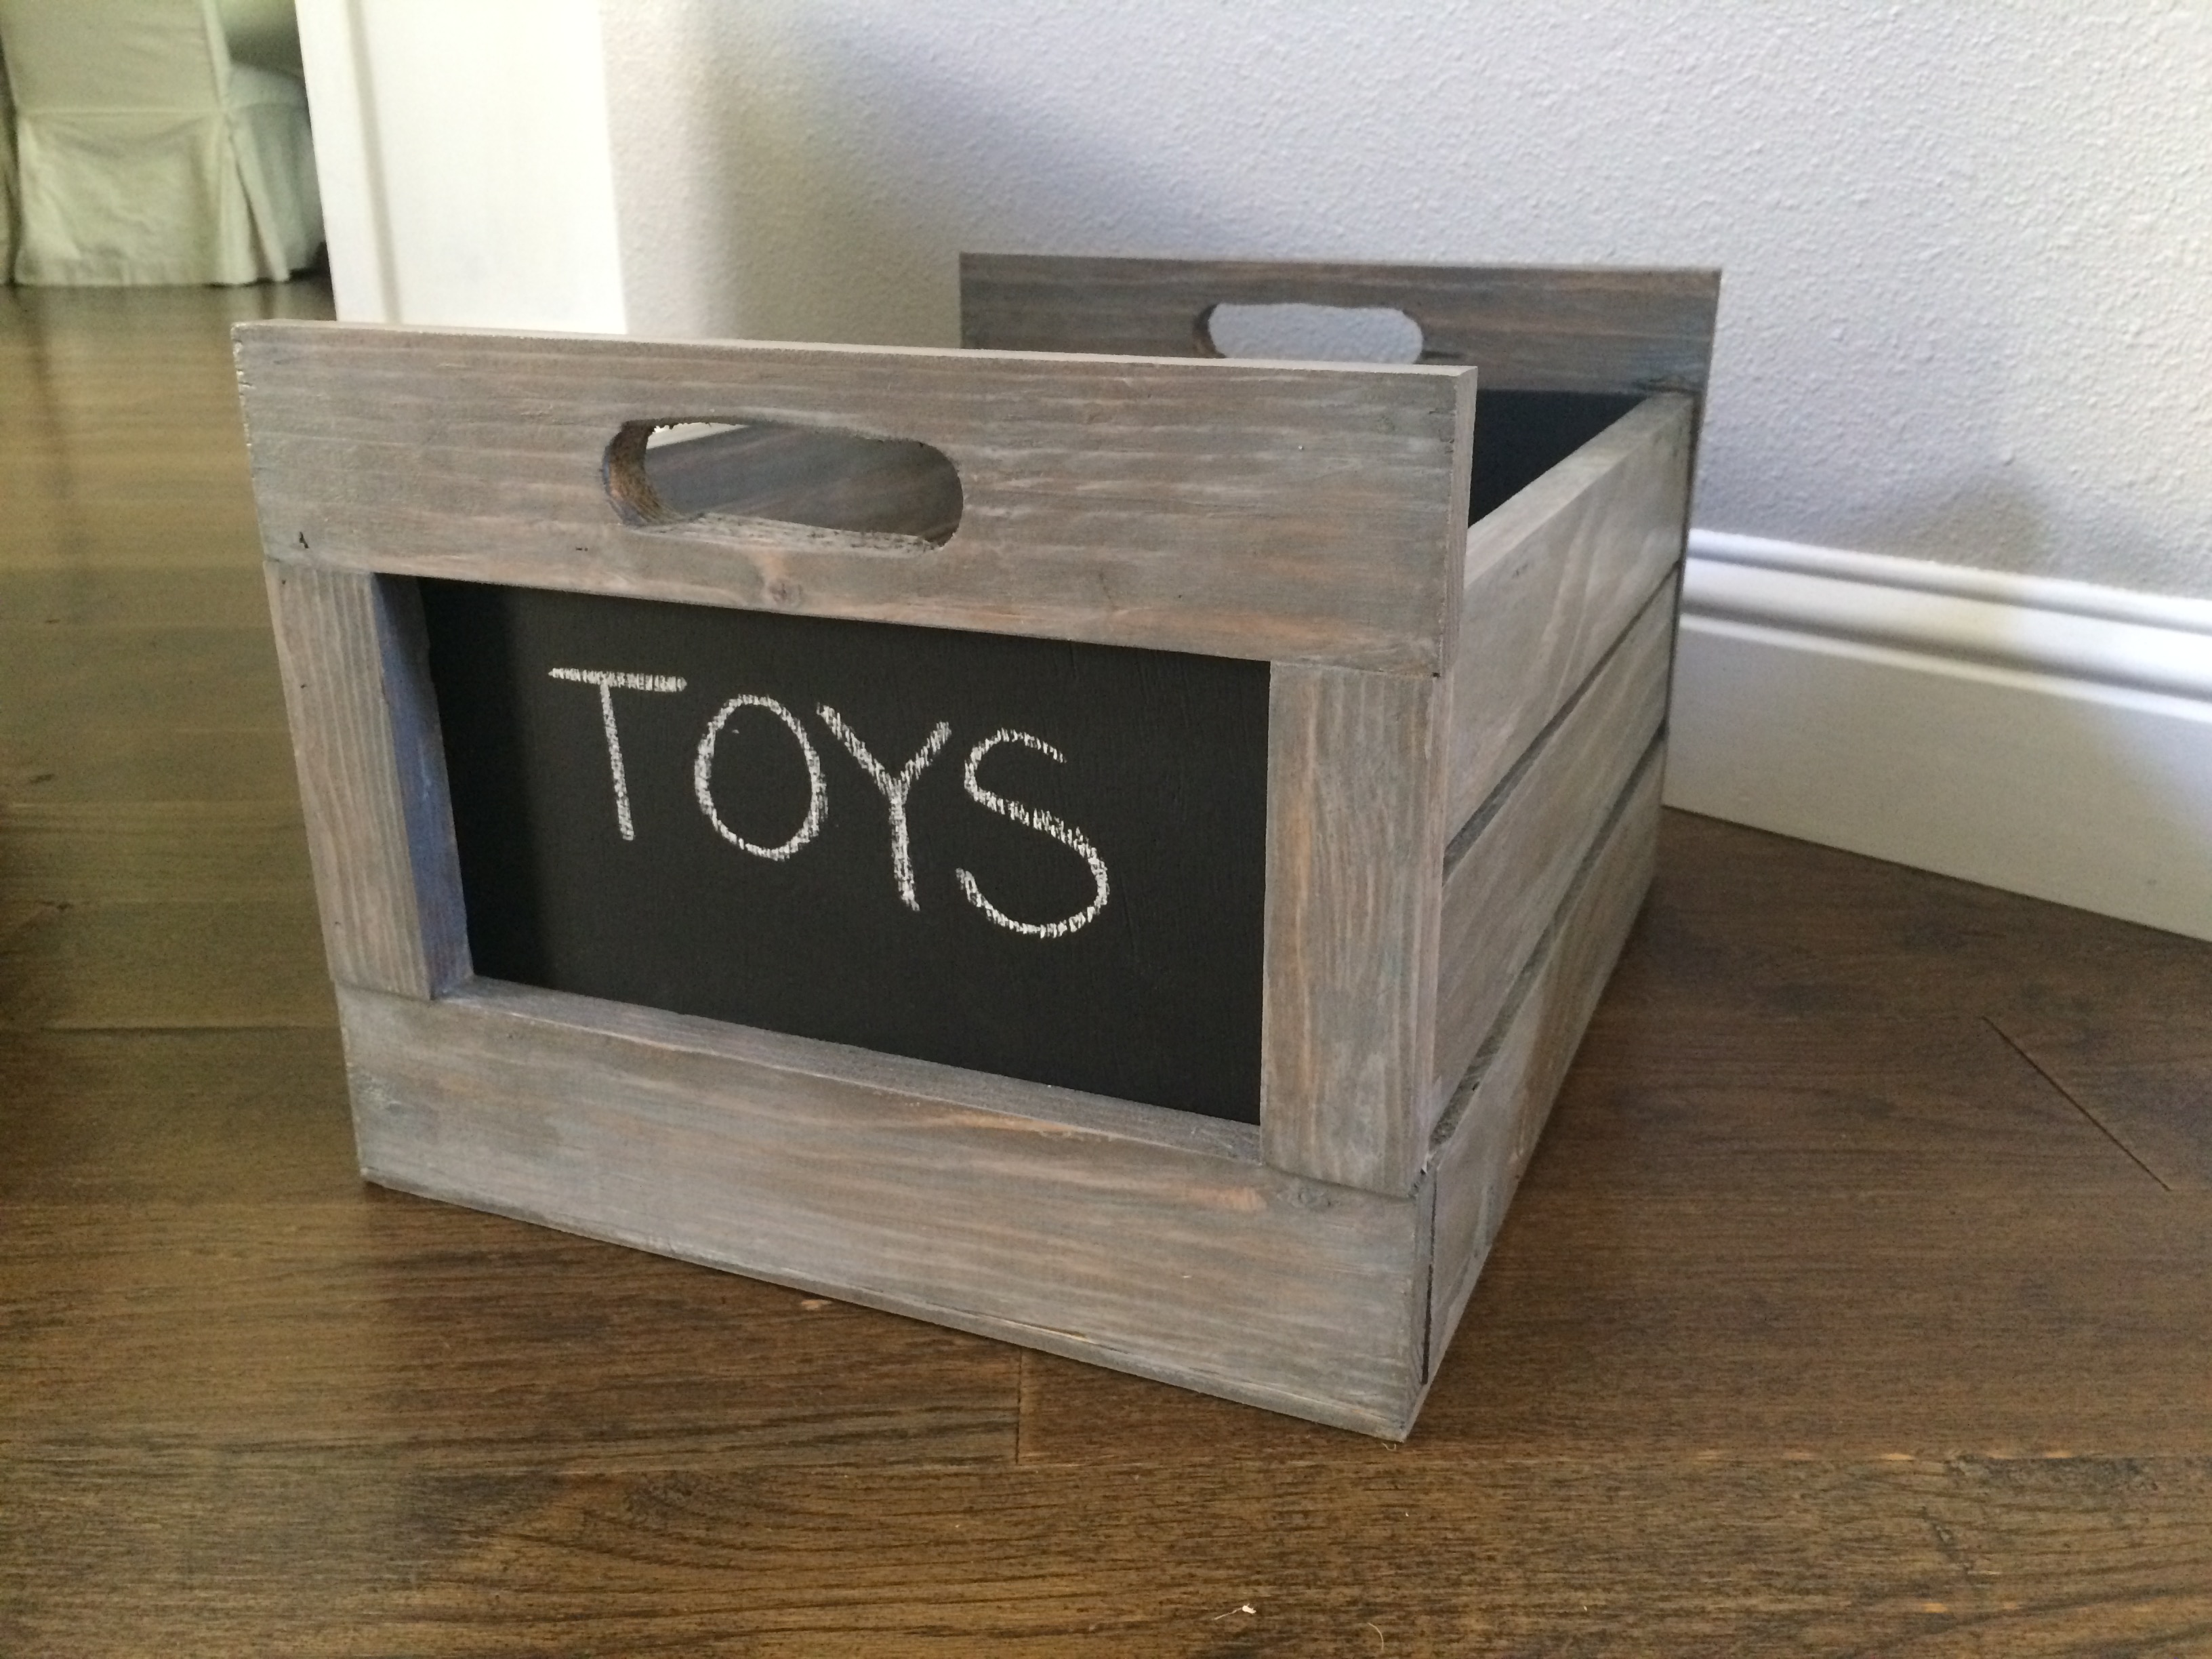
This was my first woodworking project.
Built from Plan(s)
Estimated Cost
$20
Estimated Time Investment
Afternoon Project (3-6 Hours)
Finish Used
First dark walnut stain, then weathered grey stain, then minwax whitewashing pickling.
Recommended Skill Level
Starter Project
Mini farmhouse night stand
Super easy, super fun
Built from Plan(s)
Estimated Time Investment
An Hour or Two (0-2 Hours)
Recommended Skill Level
Starter Project
Accent Table

When I saw this table I knew it would be perfect for this space! I was so excited I copied "Sweet T" Table and added a faux handle (which is now my husband's new favorite word) I primed and painted it and then put a coat of poly on it. Was a fun project
Estimated Cost
30.00
Estimated Time Investment
An Hour or Two (0-2 Hours)
Finish Used
prime,paint & polly
Recommended Skill Level
Beginner
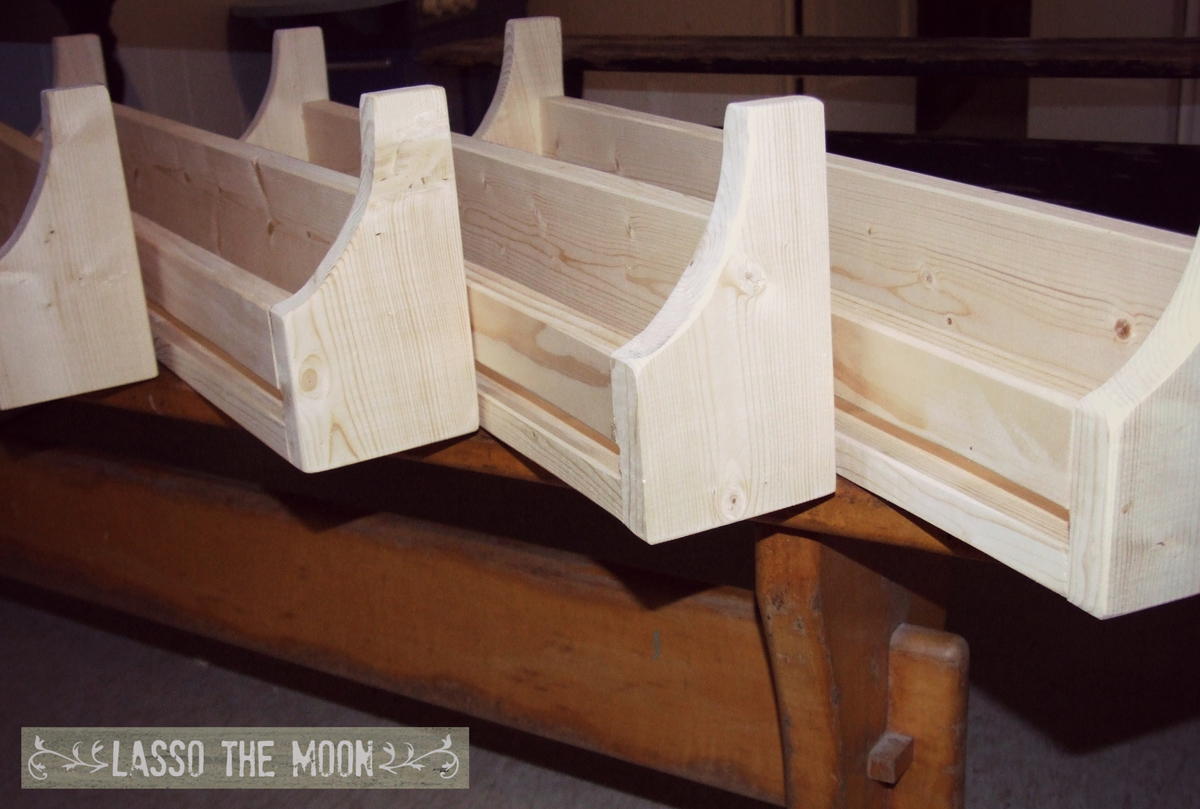
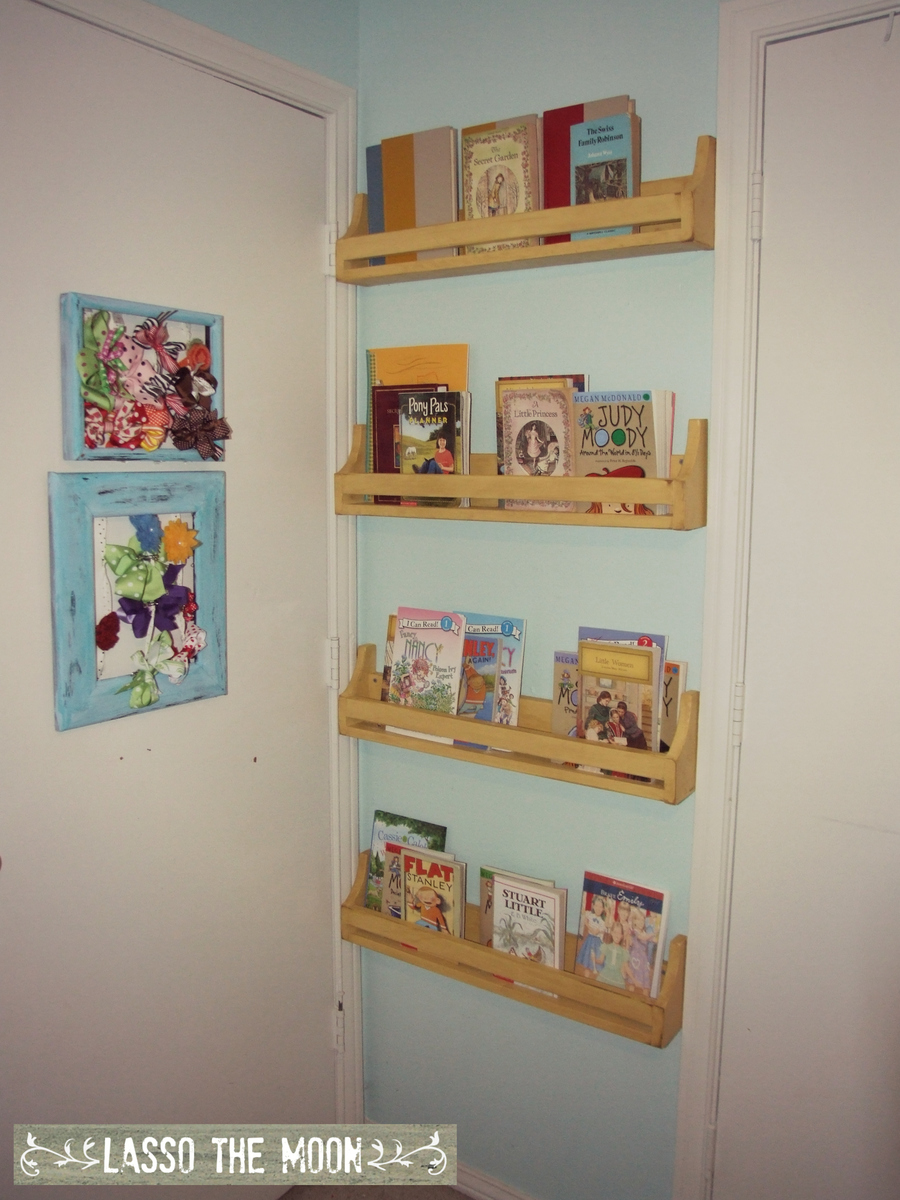
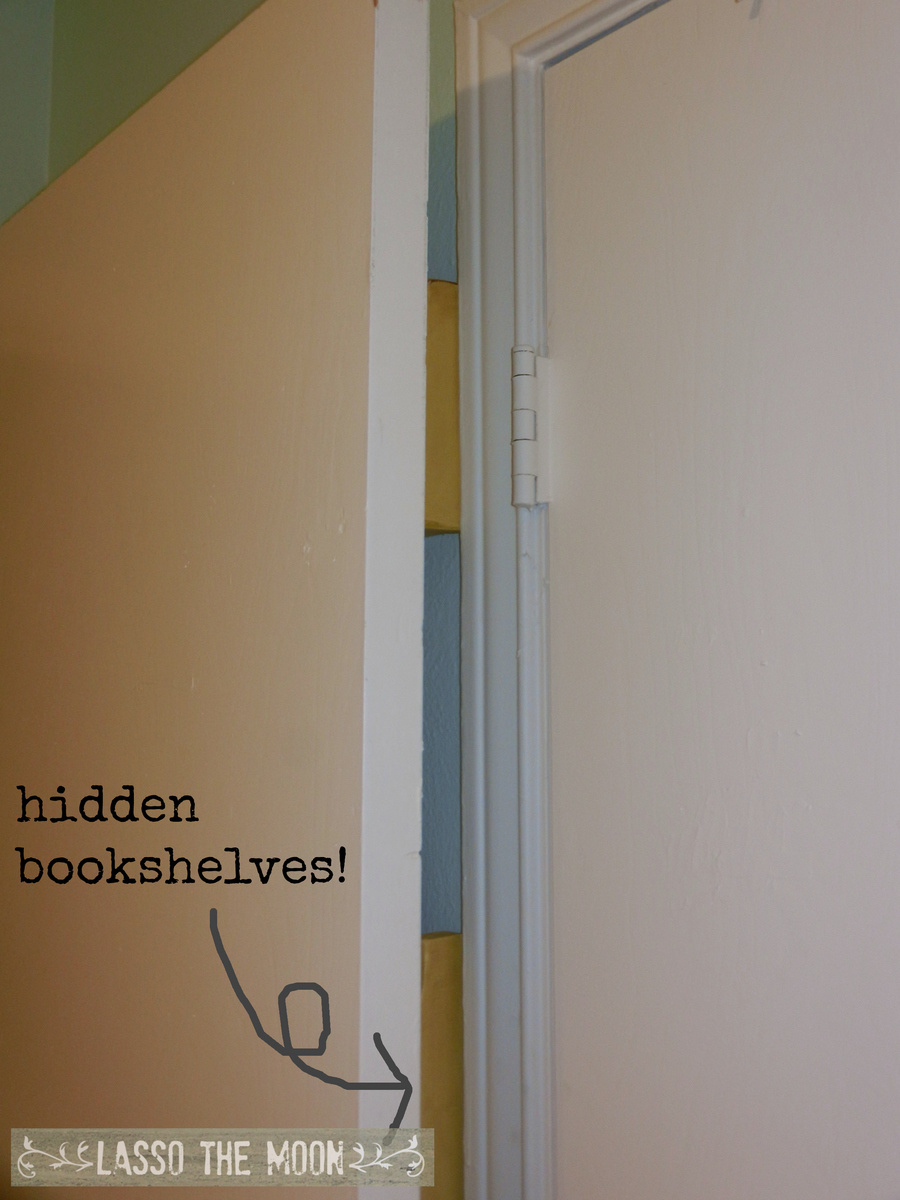
Emma's Secret Library Shelves
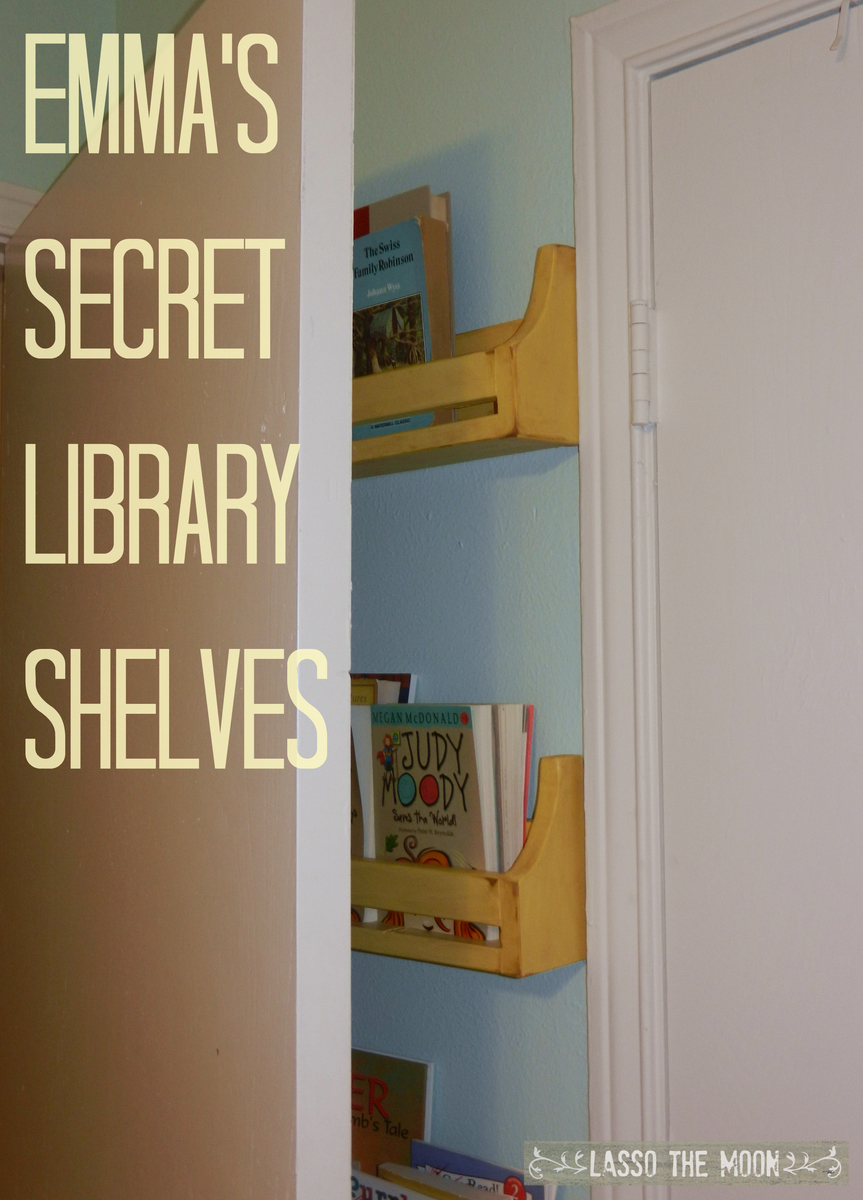
These shelves were absolutely perfect for hiding behind my daughter's bedroom door. Space is tight in her little room, and that 27-inch stretch of wall was not being utilized.
These shelves were so simple and took no time at all. I think total cutting and assembly time was about an hour for all four.
I put them together using pocket holes, so the order of assembly was a bit different than the original plan. I screwed the sides to the bottom, then added the front beam, and attached the back last, using pocket holes and filling them with spackle.
I can't wait to find more nooks and crannies to build creative storage from plans on this site.
THANKS!
Anna
More pics and details on the blog post:
http://lassothemoon.typepad.com/lasso_the_moon/2013/07/emmas-secret-lib…

Built from Plan(s)
Estimated Cost
30
Estimated Time Investment
An Hour or Two (0-2 Hours)
Finish Used
behr paint in "Honey Bear" yellow. sanded at the corners, then rubbed with "early american" wood stain
Recommended Skill Level
Starter Project
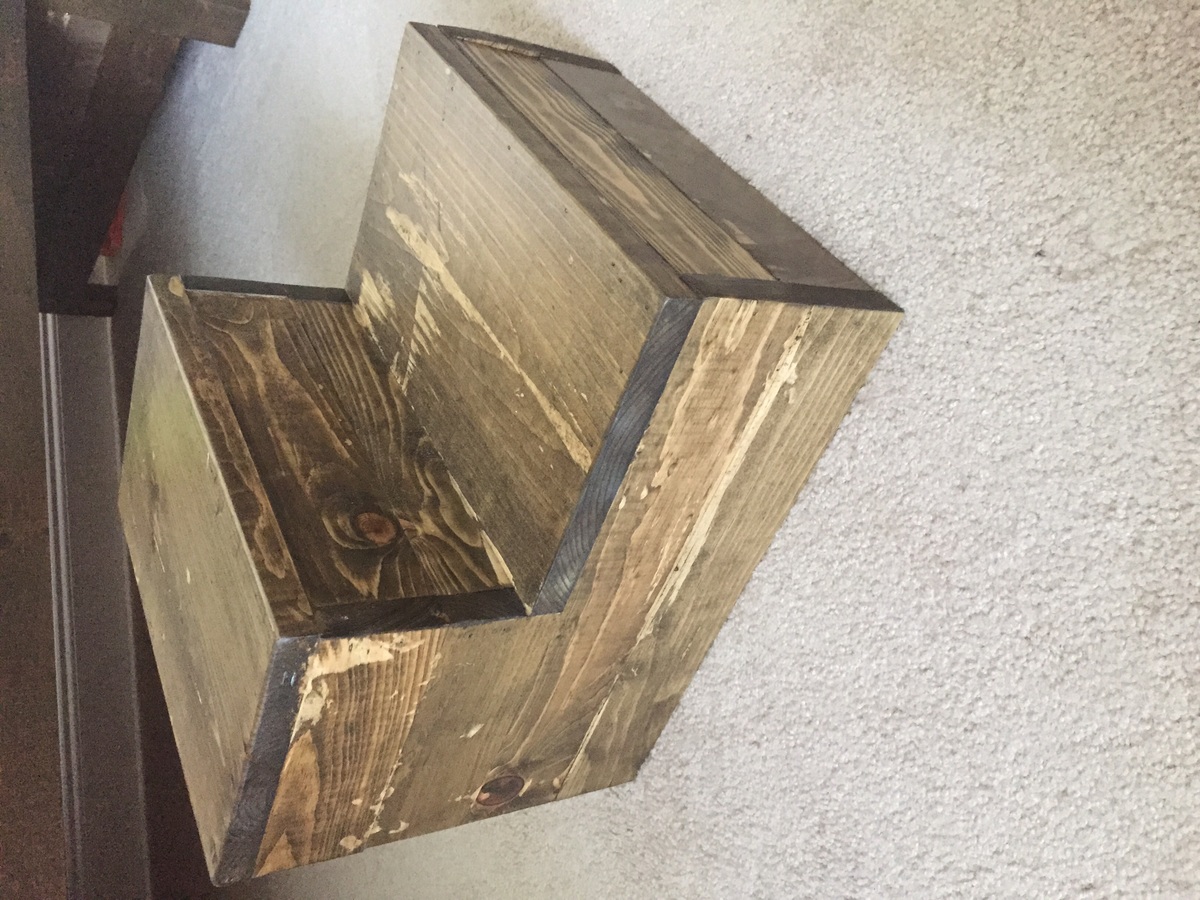
Big boy bed and steps
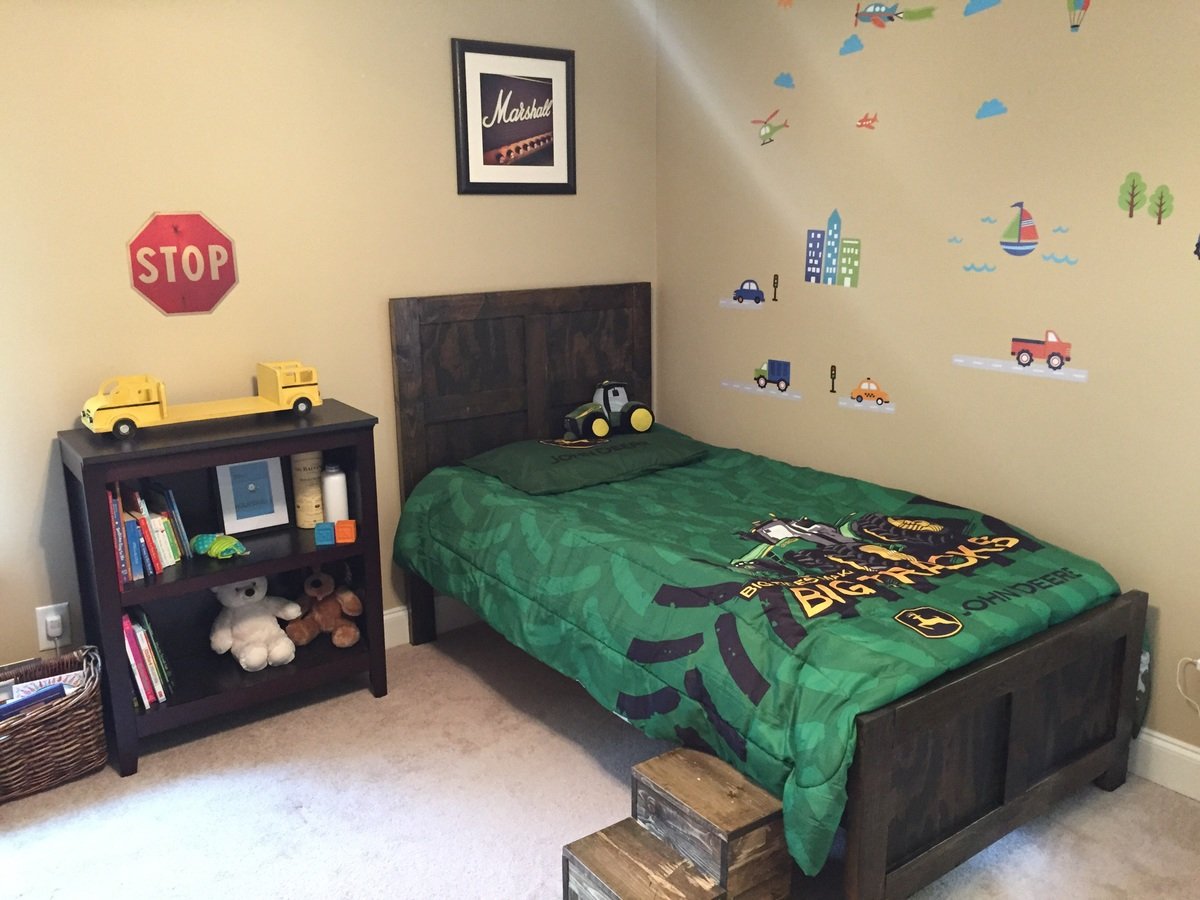
We wanted to transition our two year old out of the crib and skip the toddler bed and this worked perfectly.
I made the cuts over a lunch hour and assembled in one night.
If you have never used a pocket jig, just practice on a piece of scrap. Also make sure you consider how you will attach the rails before beginning. Depending on what you use you may want to make the headboard more narrow to accommodate for the rails not being flush with the insides of the posts.
I made steps out of the scraps from the outer rails and the slats. Our little guy loves it!
Built from Plan(s)
Estimated Cost
$80
Estimated Time Investment
Afternoon Project (3-6 Hours)
Finish Used
The same gallon of stain we use on everything. :)
Recommended Skill Level
Beginner
Farmhouse King Headboard/Barn Door

I found a barn door headboard in a rustic furniture store years ago. They wanted $2700 for a Queen size....no thank you! I followed the plans for the Farmhouse King Bed and added cross pieces for barn door look using instructions from the Brookstone Headboard. I cut the legs at 56” to add some height and I set the bottom of the back panel at 18” above the floor to make sure no gap is seen with our thinner, memory foam mattress. I couldn’t be happier with our headboard and the total cost, including screws & stain, was about $150! Boom! Thank you Ana White for sharing plans! I’m working on the Mini Farmhouse Bedside Table now & feel like I can build anything! I would highly recommend Power Pro Premium Interior screws (no splitting or stripped heads, no pre-drilling & they counter-sink great in soft wood). For the 4x4 posts I used GRK UberGrade R4 multi-purpose 4” screws, which had the same quality, all from Lowe’s.
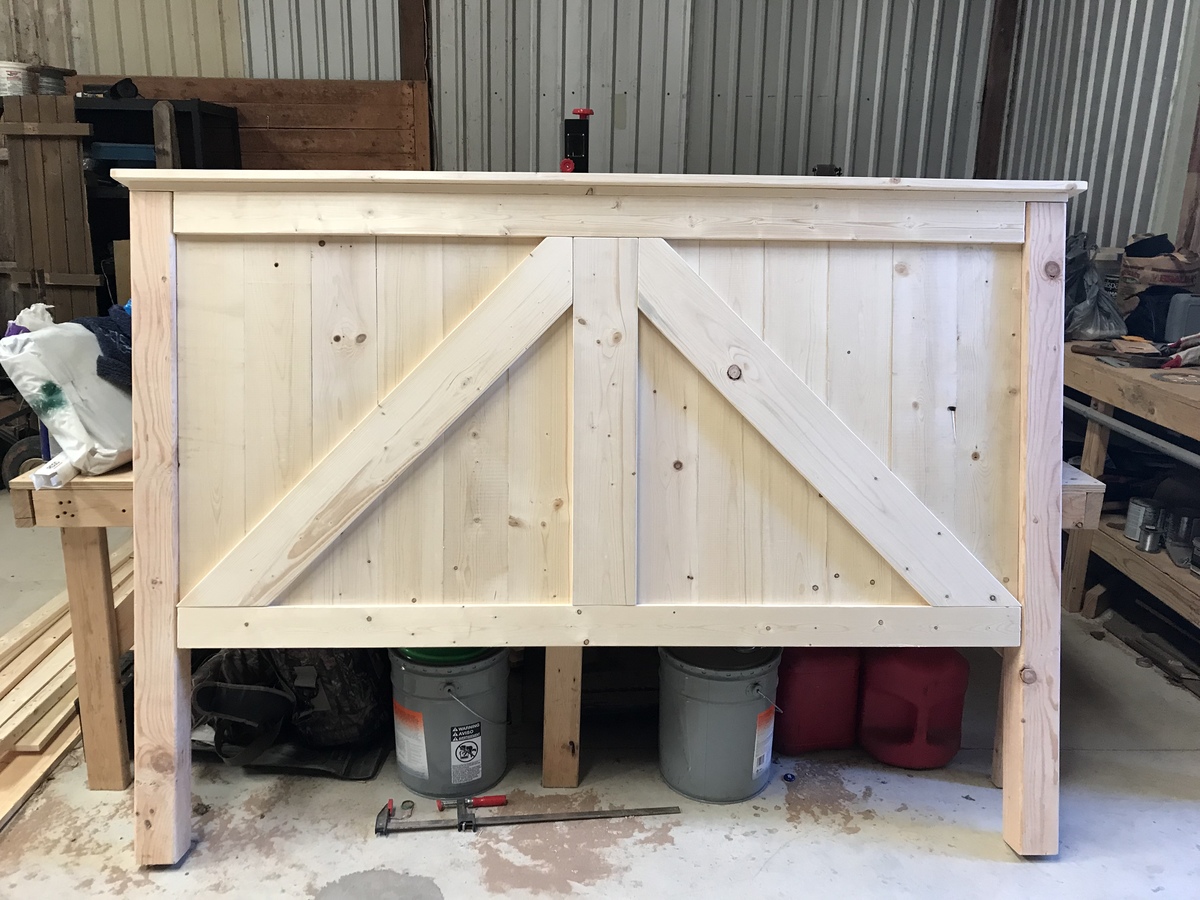
Built from Plan(s)
Estimated Cost
$150
Estimated Time Investment
Weekend Project (10-20 Hours)
Finish Used
I used wood conditioner, as recommended. Then 2 coats of Minwax Special Walnut with light sanding in between. I chose 2 coats of clear satin polyurethane, lightly sanding in between for a great rustic finish that’s not too glossy. I did beat up the wood and sanded off all square edges prior to applying any finish.
Recommended Skill Level
Beginner
These Chairs

Love these chairs!!!
Comments
New Platform birthday bed for the hubby!

Don't mind all the mismatched furniture in the room, isn't the master always the last to get paid attention to?
My husband had a birthday on Monday and I had drawn up the plans for this a couple months ago hoping to surprise him. Building it then didn't happen....Day of his birthday rolls around and I looked at the clock at about 11, thinking what could I really surprise him with but didn't want to break the budget. I thought to myself, "I could probably get that built by the time he gets home" And I DID!!!
I sandwiched together two 2x4's puttied and painted to make the chunky leg here.
FYI- My husband is really into selling things on craigslist right now so he told me to see what I could sell it for. I sold this within a few hours for $135. That is a pretty amazing profit while still being way more affordable than any store!!! I LOVE that.

Estimated Cost
$55
Estimated Time Investment
Afternoon Project (3-6 Hours)
Finish Used
2 coats primer, 2 coats semigloss white
Recommended Skill Level
Starter Project