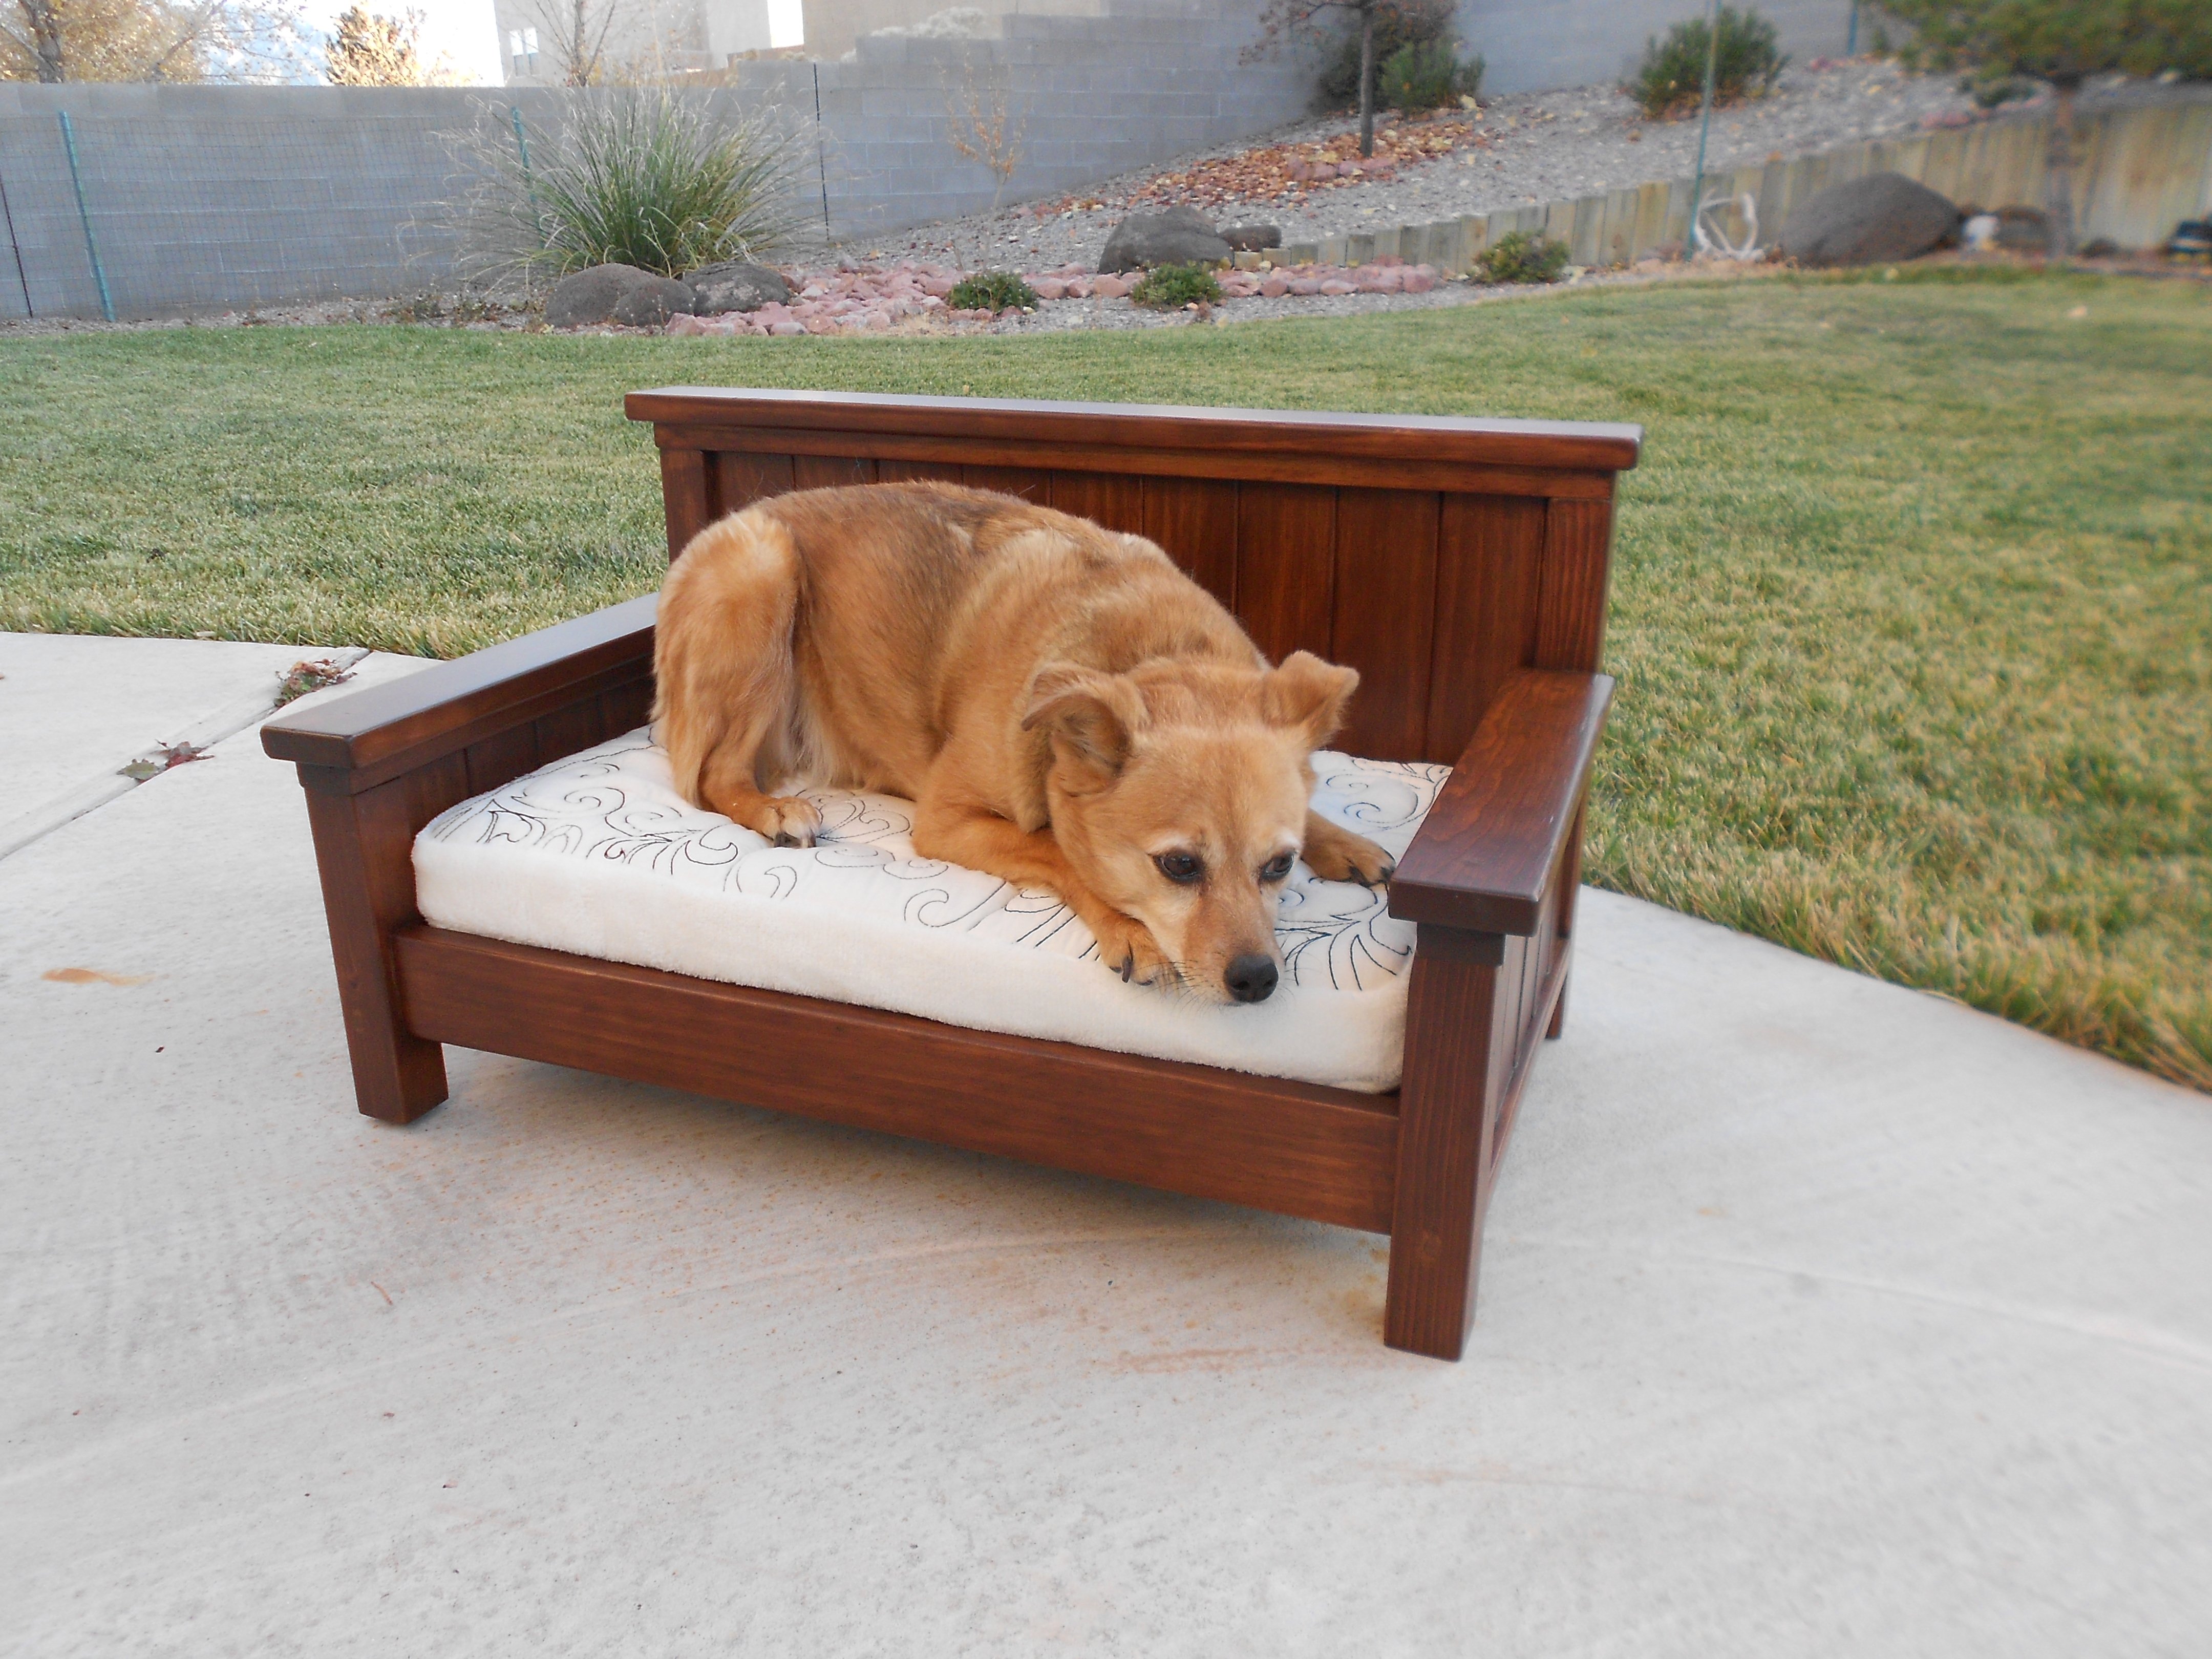
Retro Play Kitchen
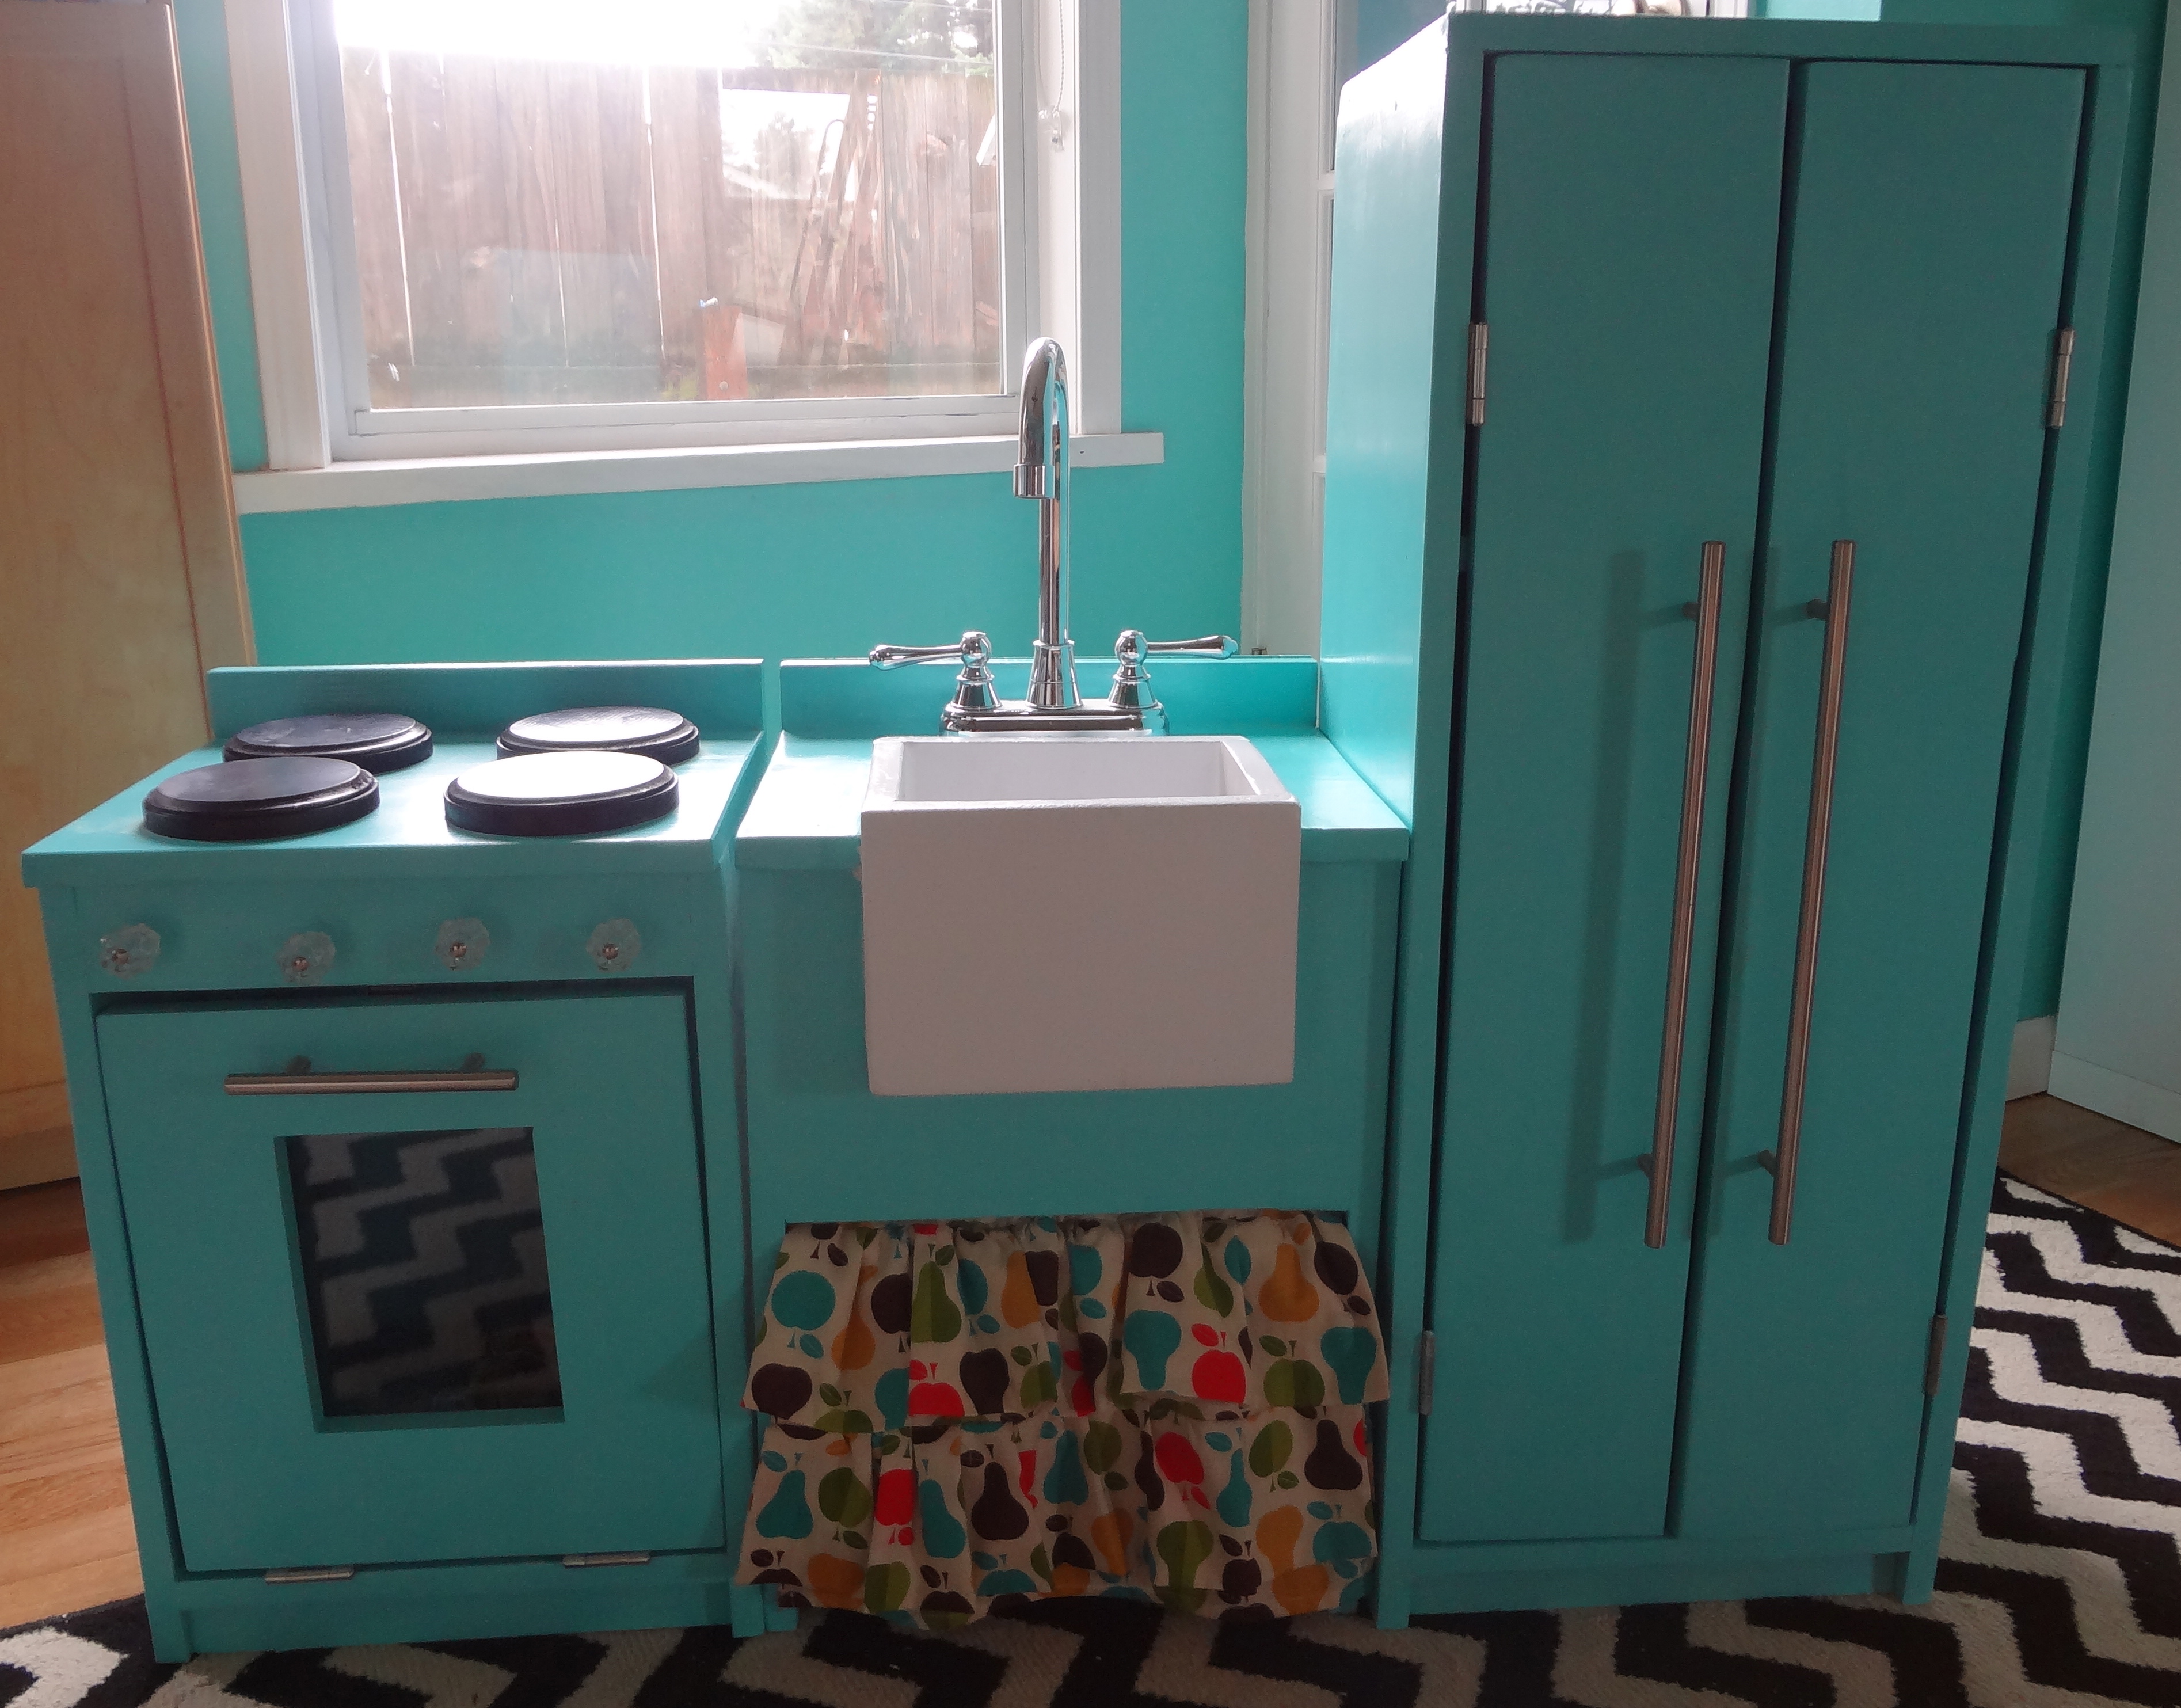
I made this from the Simple Play Kitchen Plan. I recently purchased Ana's book, and it inspired me to finally build something on my own. I am proud to say I got it done within a few weekends, with minimal issues.
First project, so fun!
This is a hope chest I made for my step daughter this Christmas it is made intirely out of pallet wood except for the frame which I used 1by4 by 8 pine board
I took on the challenge of teaching myself how to make these chairs and use my Ryobi tools. I had sawdust everywhere and loved it, thank you Ana
This is a century old red oak fireplace mantel I bought off of Craigslist. It came out of a home in Louisville, KY. It was in bad shape as you can see in the photos. I stripped it and replaced the veneer that needed it. I had to modify it a bit to install it to my mother-in-laws brick fireplace. The mirror is mercury glass and beveled. I did add some red oak rope trim which I beveled to give a more formal look. I countersunk some holes along the sides that I covered with some red oak trim. This allowed me to attach studs to the brick and then attach the mantel to the studs. The very top shelf was rotted so I found some beautiful spalted red oak and rebuilt this. The former onlay on the front was beyond repair and I found the current salvaged onlay on Ebay for around $10. I am really happy with how it turned out.
These mini farmhouse tables are great examples of a creative way to personalize plans. They both cheer for thier college team! And as fall in the south is here, college football is king. Please go to www.ourhomemadefamily.com for my thoughts on how the finish is the personality of all my custom builds.
I reduced the length by 12 inches to accomodate my space, and I ripped the boards on the table saw so they would be more flush when I assembled the tabletop. Otherwise, I followed the plan exactly. Distressed tabletop before staining.
Desk was built per the plans. The only adjustment made was to the width to fit the space. Desk was easy to build and looks great! I added Gator Hide to the top to provide water resistance.
This was made from a plan I found on this site. It was made out of scrap from another project so I had to adapt the plans based on the wood I had.
Ana's simplest console inspired my first build. I decided to make it a bit wider like one I saw on Shanty 2 Chic's website, and this is what I came up with. So excited about my first build - can't wait for the next!
This project took us four days. The biggest job that took us awhile was sanding and painting.
I’ve been searching for a free standing closet for so long!! I stumbled across these plans a few months ago and asked my hubby and brother if they would be up for a little project and boy, did they ever do an amazing job!! I am so happy with this. We ended up making ours a little bit shorter to fit in our room and adjusting some of the other plans. The rods were cut a little short, but everything still worked out beautifully. Thank you for these plans! <3
Sat, 09/12/2020 - 11:14
Thanks for sharing, we chose this as our Brag Post of the Day on Facebook!
I started with the standard laundry basket dresser but went with shelves. I thought that the baskets would last liner this way. The baskets used are from IKEA and sit on felt runners to keep the noise down.
We built this farmhouse table for my Mom's house, to create a space big enough for our growing family to gather at holidays and birthdays. We added to the size- the final dimensions were 82″ (long) x42″ (wide) x 30″(tall). It is a huge, chunky table! My parents prefer natural finishes, so we gave the natural wood several protective coats of polycrylic.
I had a friend who was interested in a small island with two stools that looked like this offered by a fancy home interior store. The reviews weren't all that great, even for the half off sale price. They needed something small to fit their space that would basically serve as a dining area for her and her husband. It is build out of spruce and whitewood lumber. White paint and dark walnut stain, with poly on top. The legs are two 2x4s glued together , then ripped each side to square it off making it an actual 3" x 3". The stools came from Ana's farmhouse counter stool plan. The island I just went with overall demensions and built it from there. Pocket hole screws and finish nails.
Since making a twin size daybed still seems intimidating to me, I decided to get some practice by making a small version for our dog. I modified the doll farmhouse bed making it a bit larger and in daybed style. We'll see if our doggie takes to it. If not, it will be a toddler couch!
Wed, 12/05/2012 - 07:07
I built the big farmhouse storage bed and nightstands in my bedroom and my dog needs her own little farmhouse bed now. I've been trying to decide how I want to do it... You've just decided for me. Thanks!
Wed, 12/05/2012 - 09:00
I love this!!! I think I might steal this idea and make one of these for my nephews as a little couch. About how much did you spend on lumber?
Wed, 12/05/2012 - 21:10
Thank you everyone! I believe I spent about $25 to $30 on lumber. I have the lumber receipt and it came to $44 but I had a lot left over.
Wed, 12/05/2012 - 20:52
I pretty much just followed the plans, except making it taller and wider by adding more slats and making everything taller. The finished dimensions turned out to be approximately 26 ½” x 16 ½”. I kind of made it up as I went, but I did take some notes. Here is the first part of my altered cut list:
9 ea – 1x3 @ 8” tall (headboard panel slats)
10 ea (5 for each side) – 1x3 @ 5 ¼” tall (side arm panels slats)
2 ea – 2x2 @ 8” tall (side arm legs)
2 ea – 2x2 @ 13 ½” tall (headboard legs)
For the rest of the cut list, I didn’t take notes. I just cut the lengths to fit my new dimensions. I hope this helps. If you’d like more measurements just let me know and I can measure the actual bed.
Wed, 12/05/2012 - 10:07
This looks beautiful. Where did you get the cushion from? How big is the cushion?
Wed, 12/05/2012 - 20:21
Thank you! I made the cushion with foam and batting. I got the foam piece from the fabric store. It was 2" thick, 22"x22" square. It was on sale, but I don't remember how much I paid. I cut it down to 22" x 12” to fit the inside of the bed. A regular handsaw worked great for cutting the foam. Super easy, but messy. I wrapped it in batting so it finished a little bigger, 23” x 13”. I bought one pillow sham from Walmart because I liked the design and cut it apart to make the cushion top. The rest is from one of those cheap fuzzy blankets.
Wed, 12/05/2012 - 10:30
That finish is beautiful! Can you tell me how you did it?
Wed, 12/05/2012 - 21:08
Thank you! I have much to learn about finishing. I first used regular stain. I think the color was gunstock. It turned out so not what I was going for. It was too orange. So then I stained it again with Minwax Hickory Gel Stain. Better, but the wood putty still showed and looked terrible. So I resorted to Minwax Bombay Mahogany Poly Shades which I found difficult to work with, but it did a fantastic job of covering over the wood putty filled holes. I think I used either 2 or 3 coats of the Poly Shades. I’m sure I could have skipped the first two stains and could have had the same result!
Mon, 12/17/2012 - 19:30
Fantastic bed!! I've been shopping for a dog bed. This is 100 times better than anything in the store. I may have to borrow you're idea :)
I built everything above my couch using scraps from my garage. The "family" and hearts were cut out of a scrap piece of 1x12. The frames were made using my worst 1x2 and 1x3s. I sprayed them with stain and then paint and finished them by sanding them down.
DIY Farmhouse Table
Desk for my sis, build on out of state visit. Left raw for her to finish. The X was a character builder as I only had my circular saw and my first time but decent enough lol
Thu, 09/17/2020 - 10:52
Are you going to paint or stain? Can't wait to see the finished project!:)
Fri, 09/18/2020 - 09:51
Looks awesome, can't wait to see how she finishes it!
my first project and I am thrilled with the results. This was a Christmas gift for my daughter and son in law. I wanted something a bit rustic looking so I used inexpensive 'whitewood' and one light coat of stain (Cabernet) that I wiped off right away, then sanded the edges down. I loved using some of the tools my dad has given me.
Comments
busybeeshell
Sat, 11/24/2012 - 13:26
The idea for the apron sink I
The idea for the apron sink I borrowed from this blog. http://www.catdmoore.com/2010/vintage-inspired-play-kitchen/