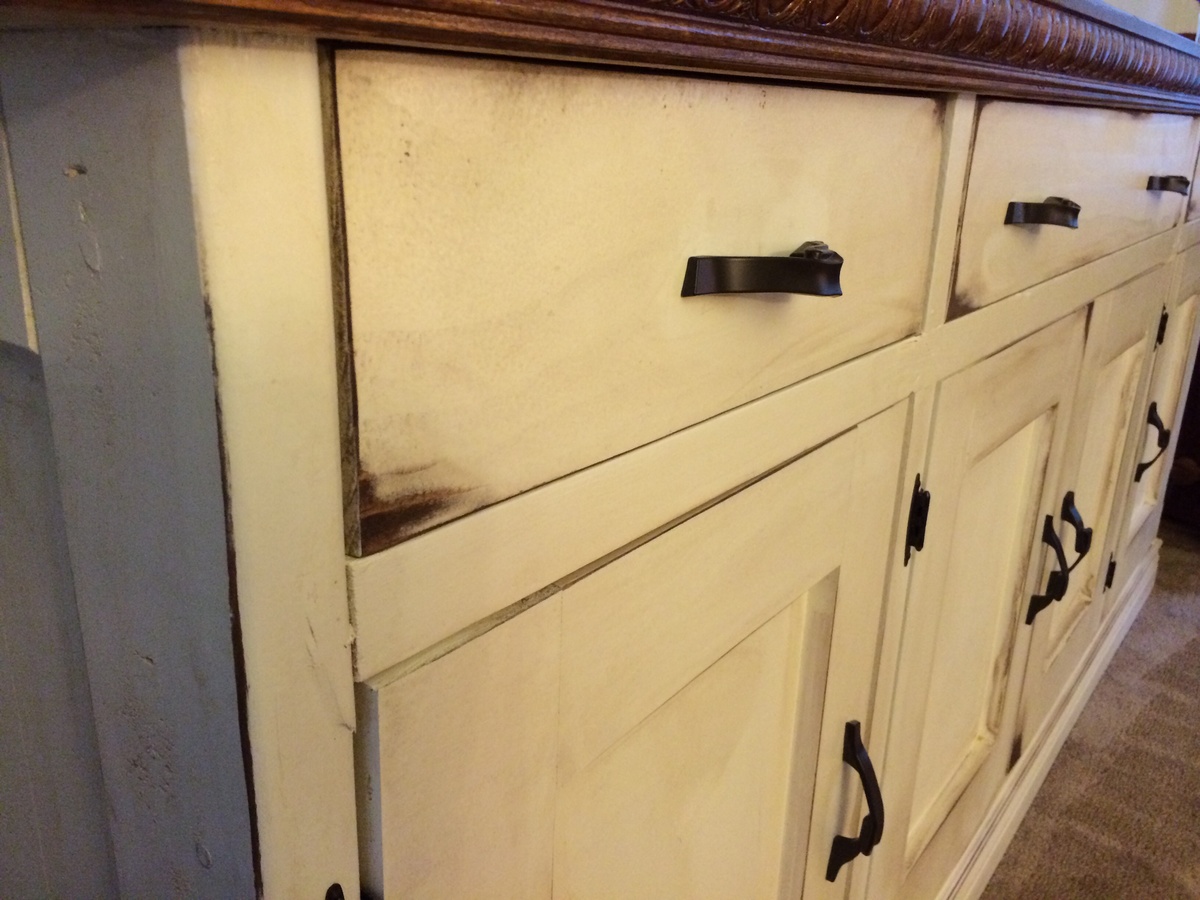
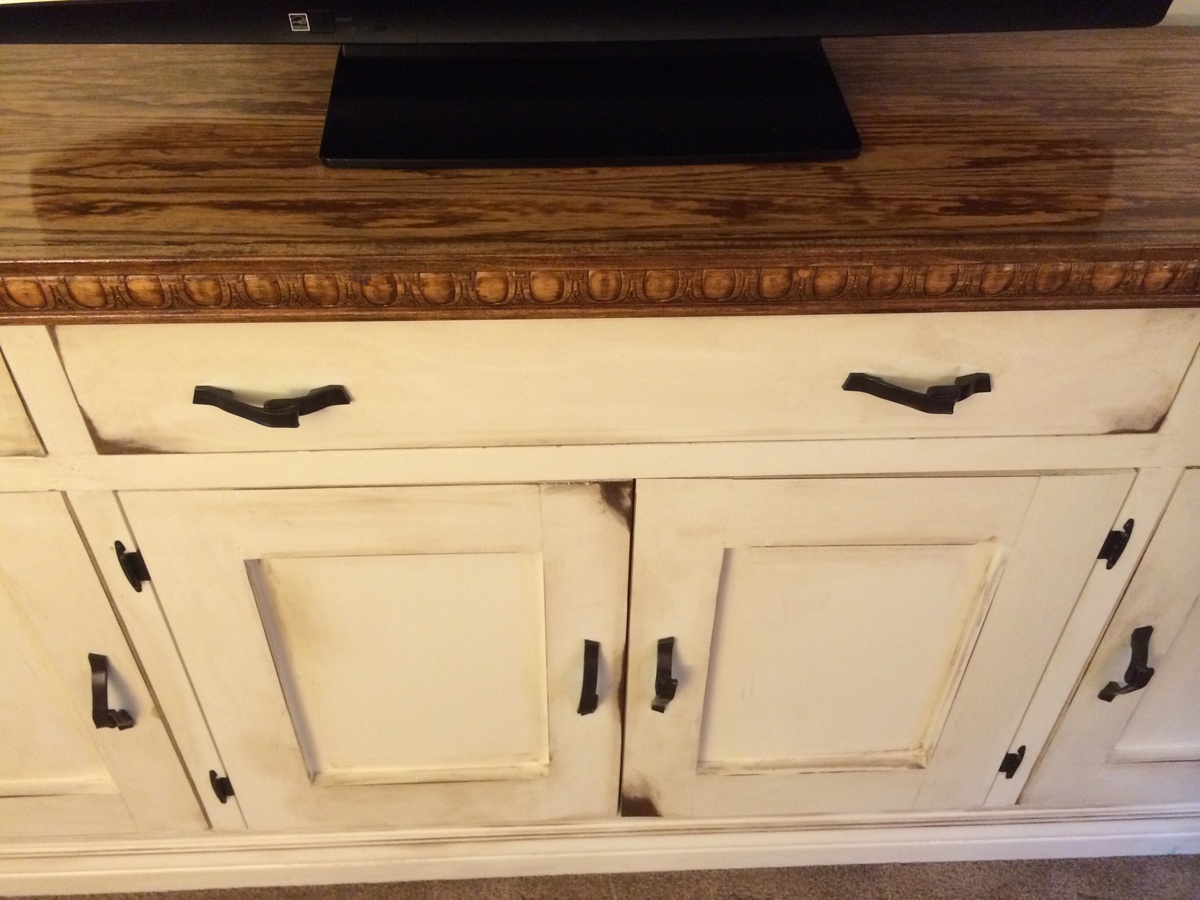
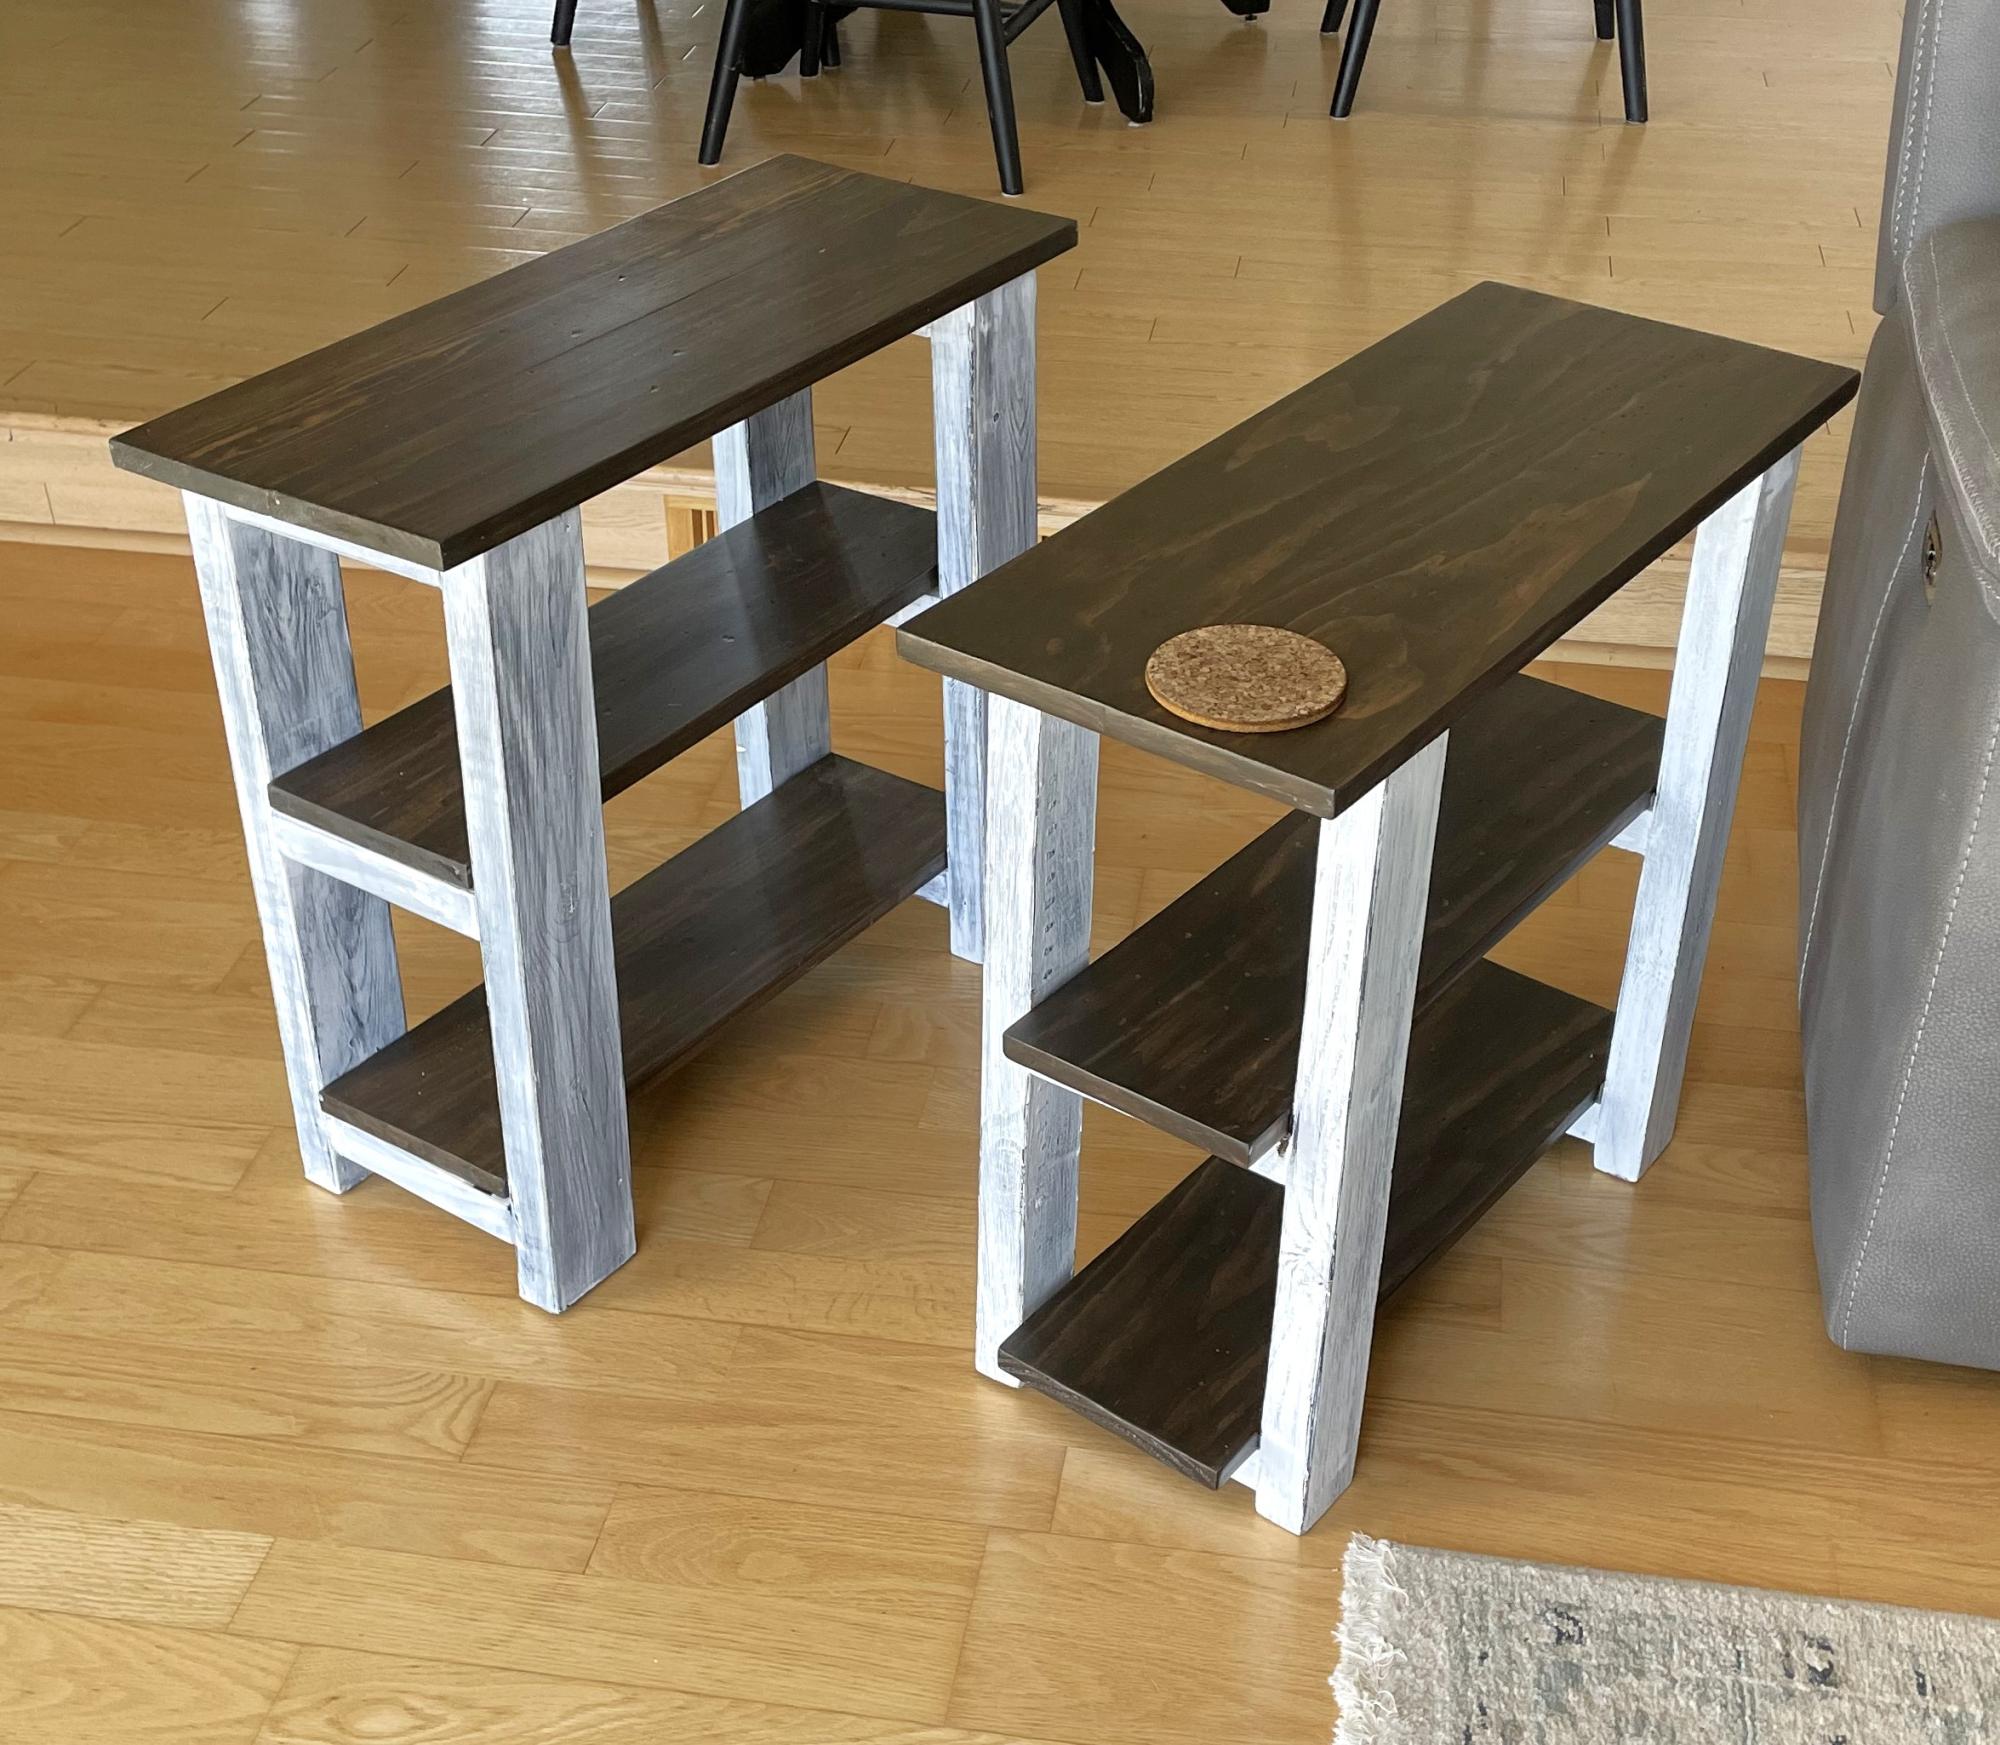
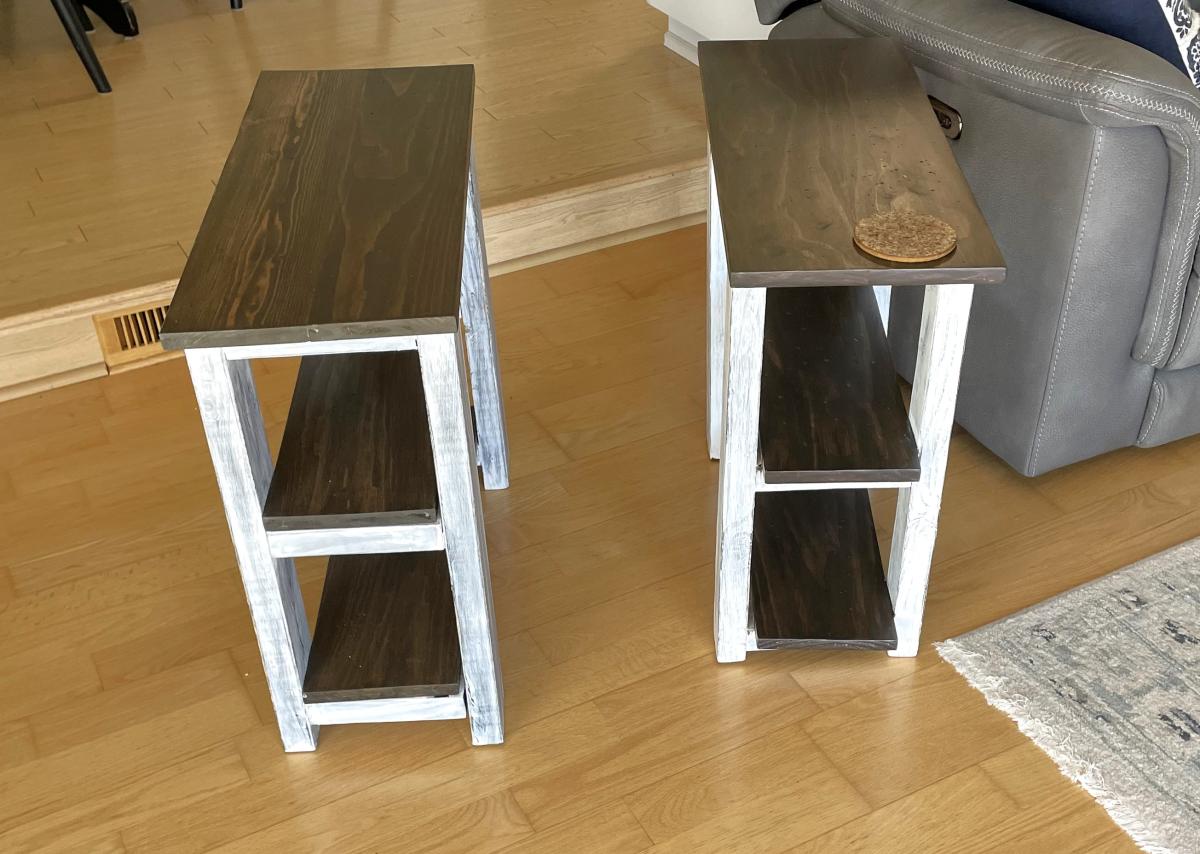
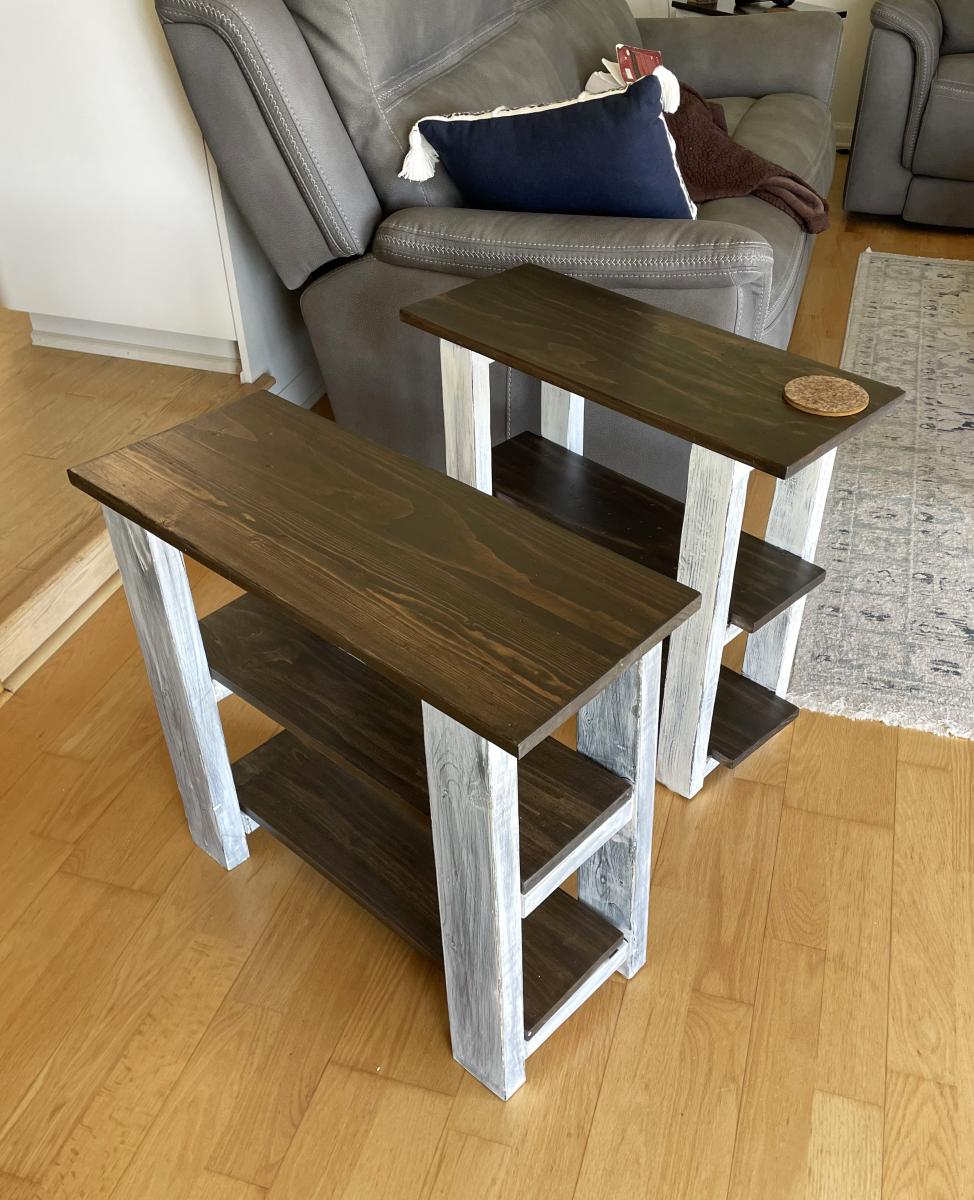
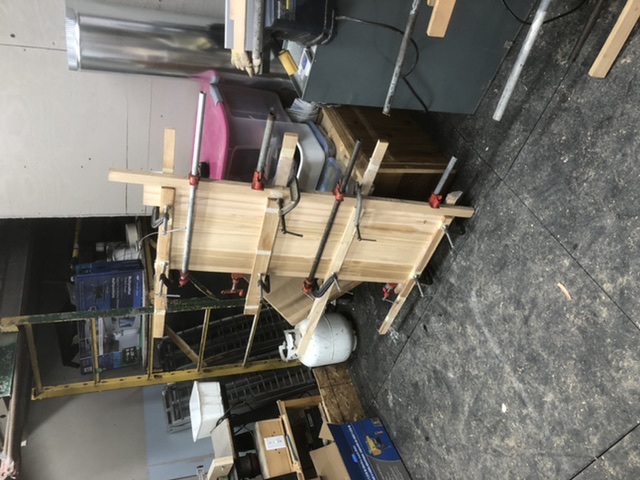
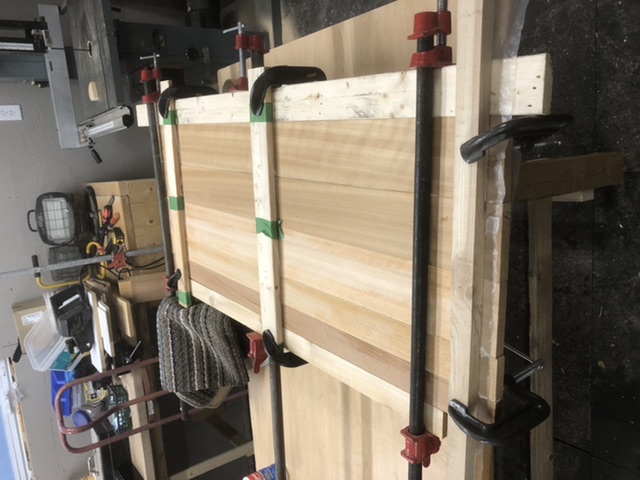
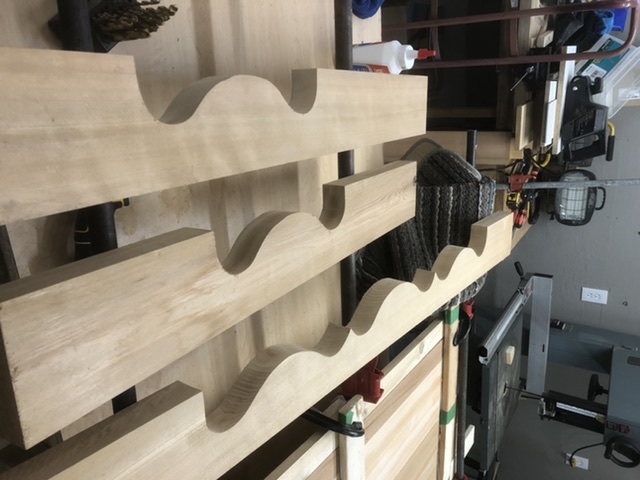
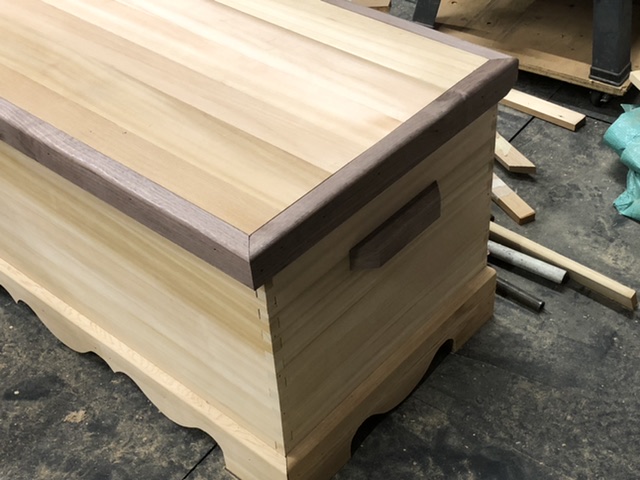
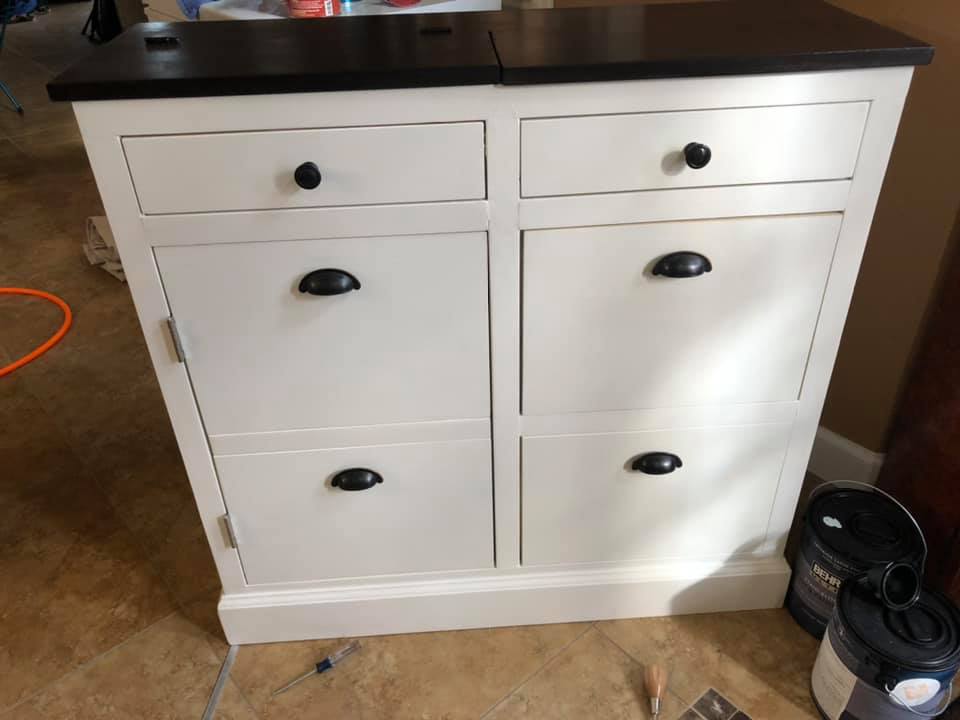
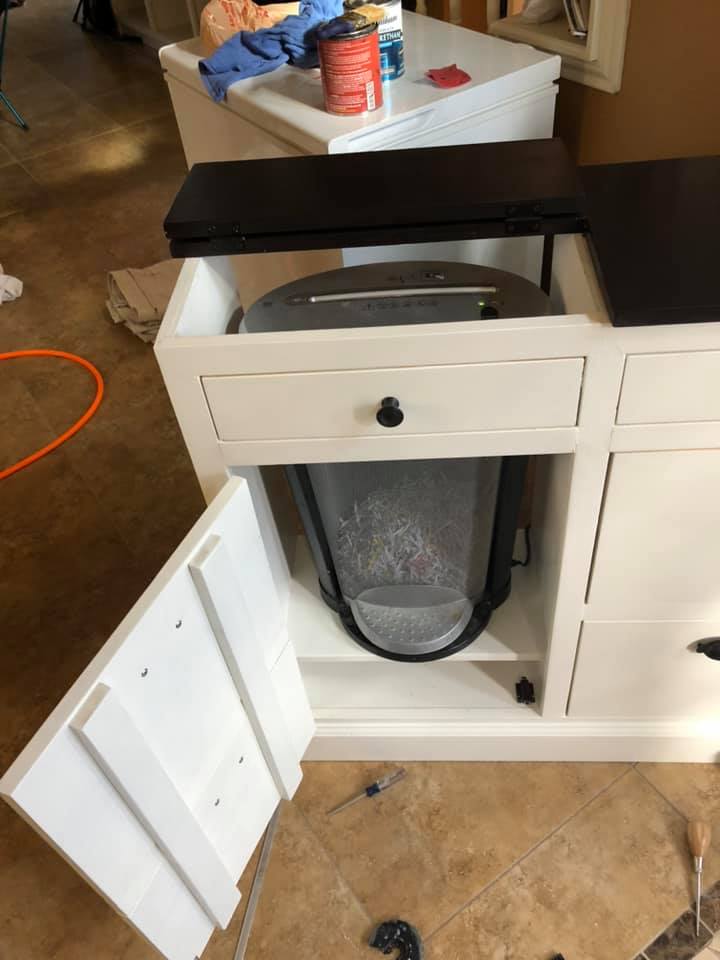
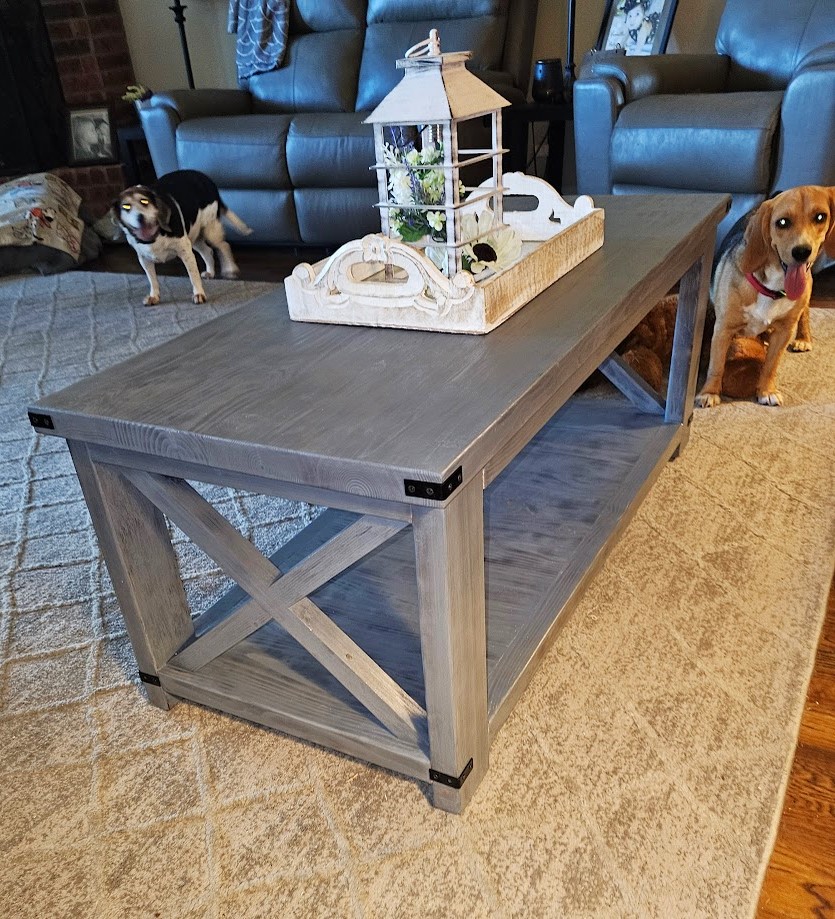
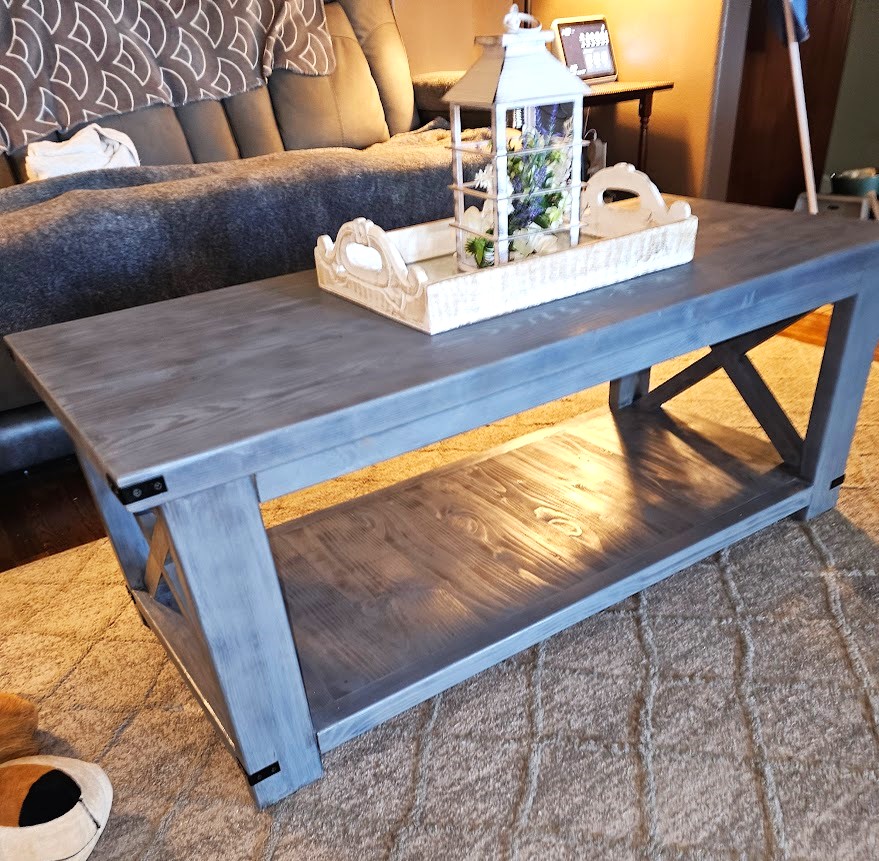
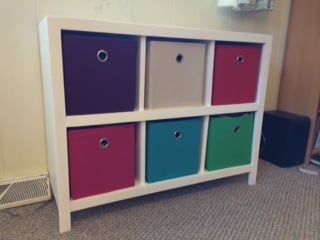
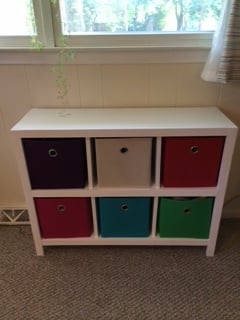
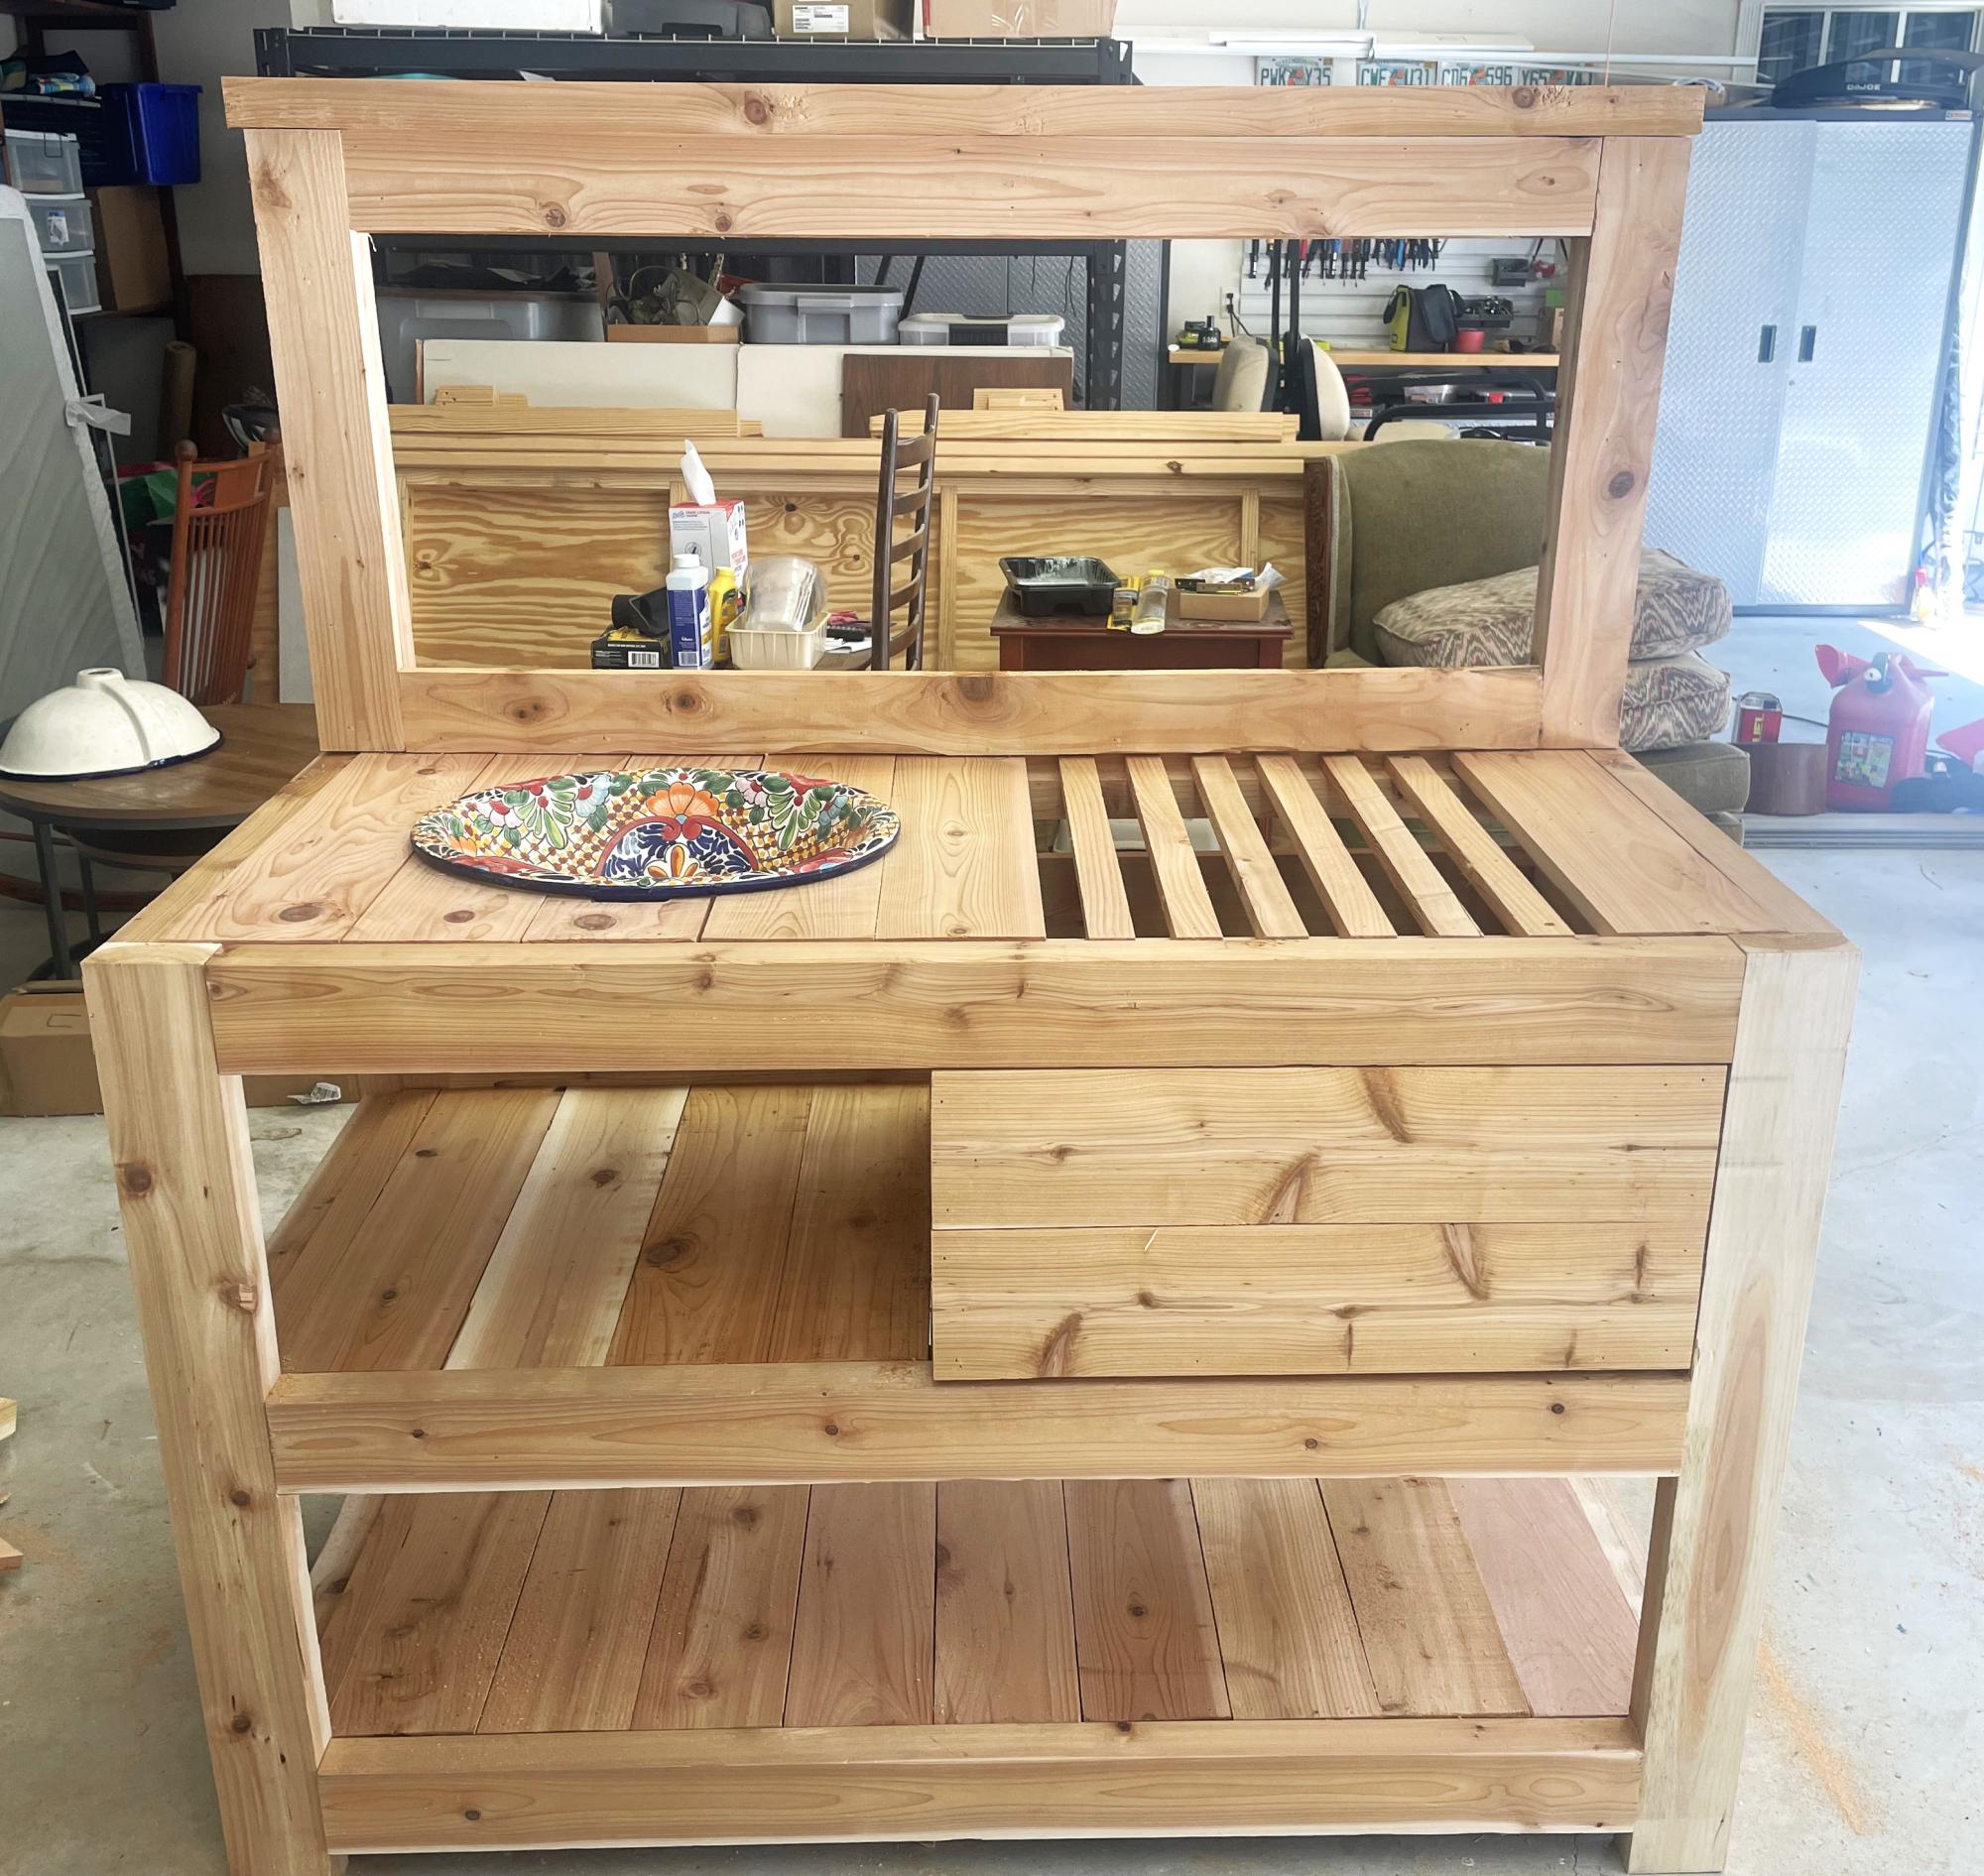
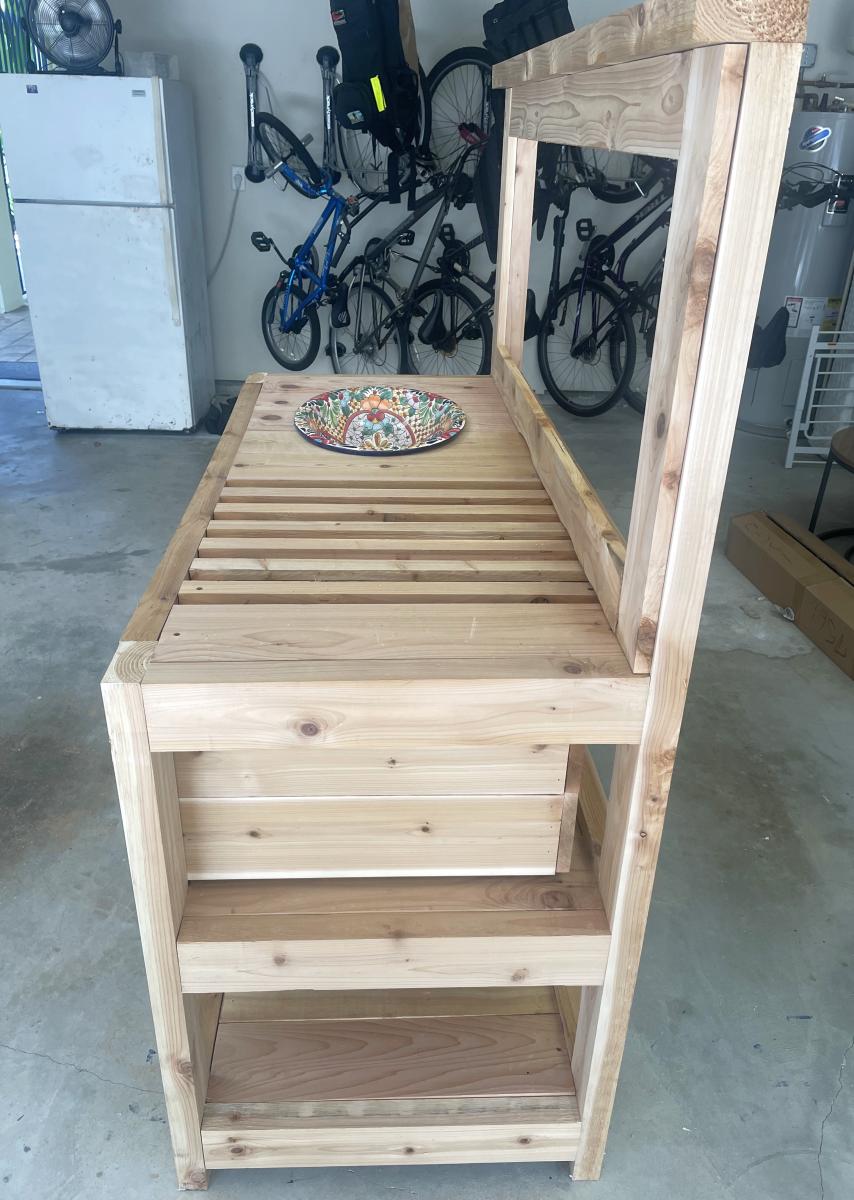
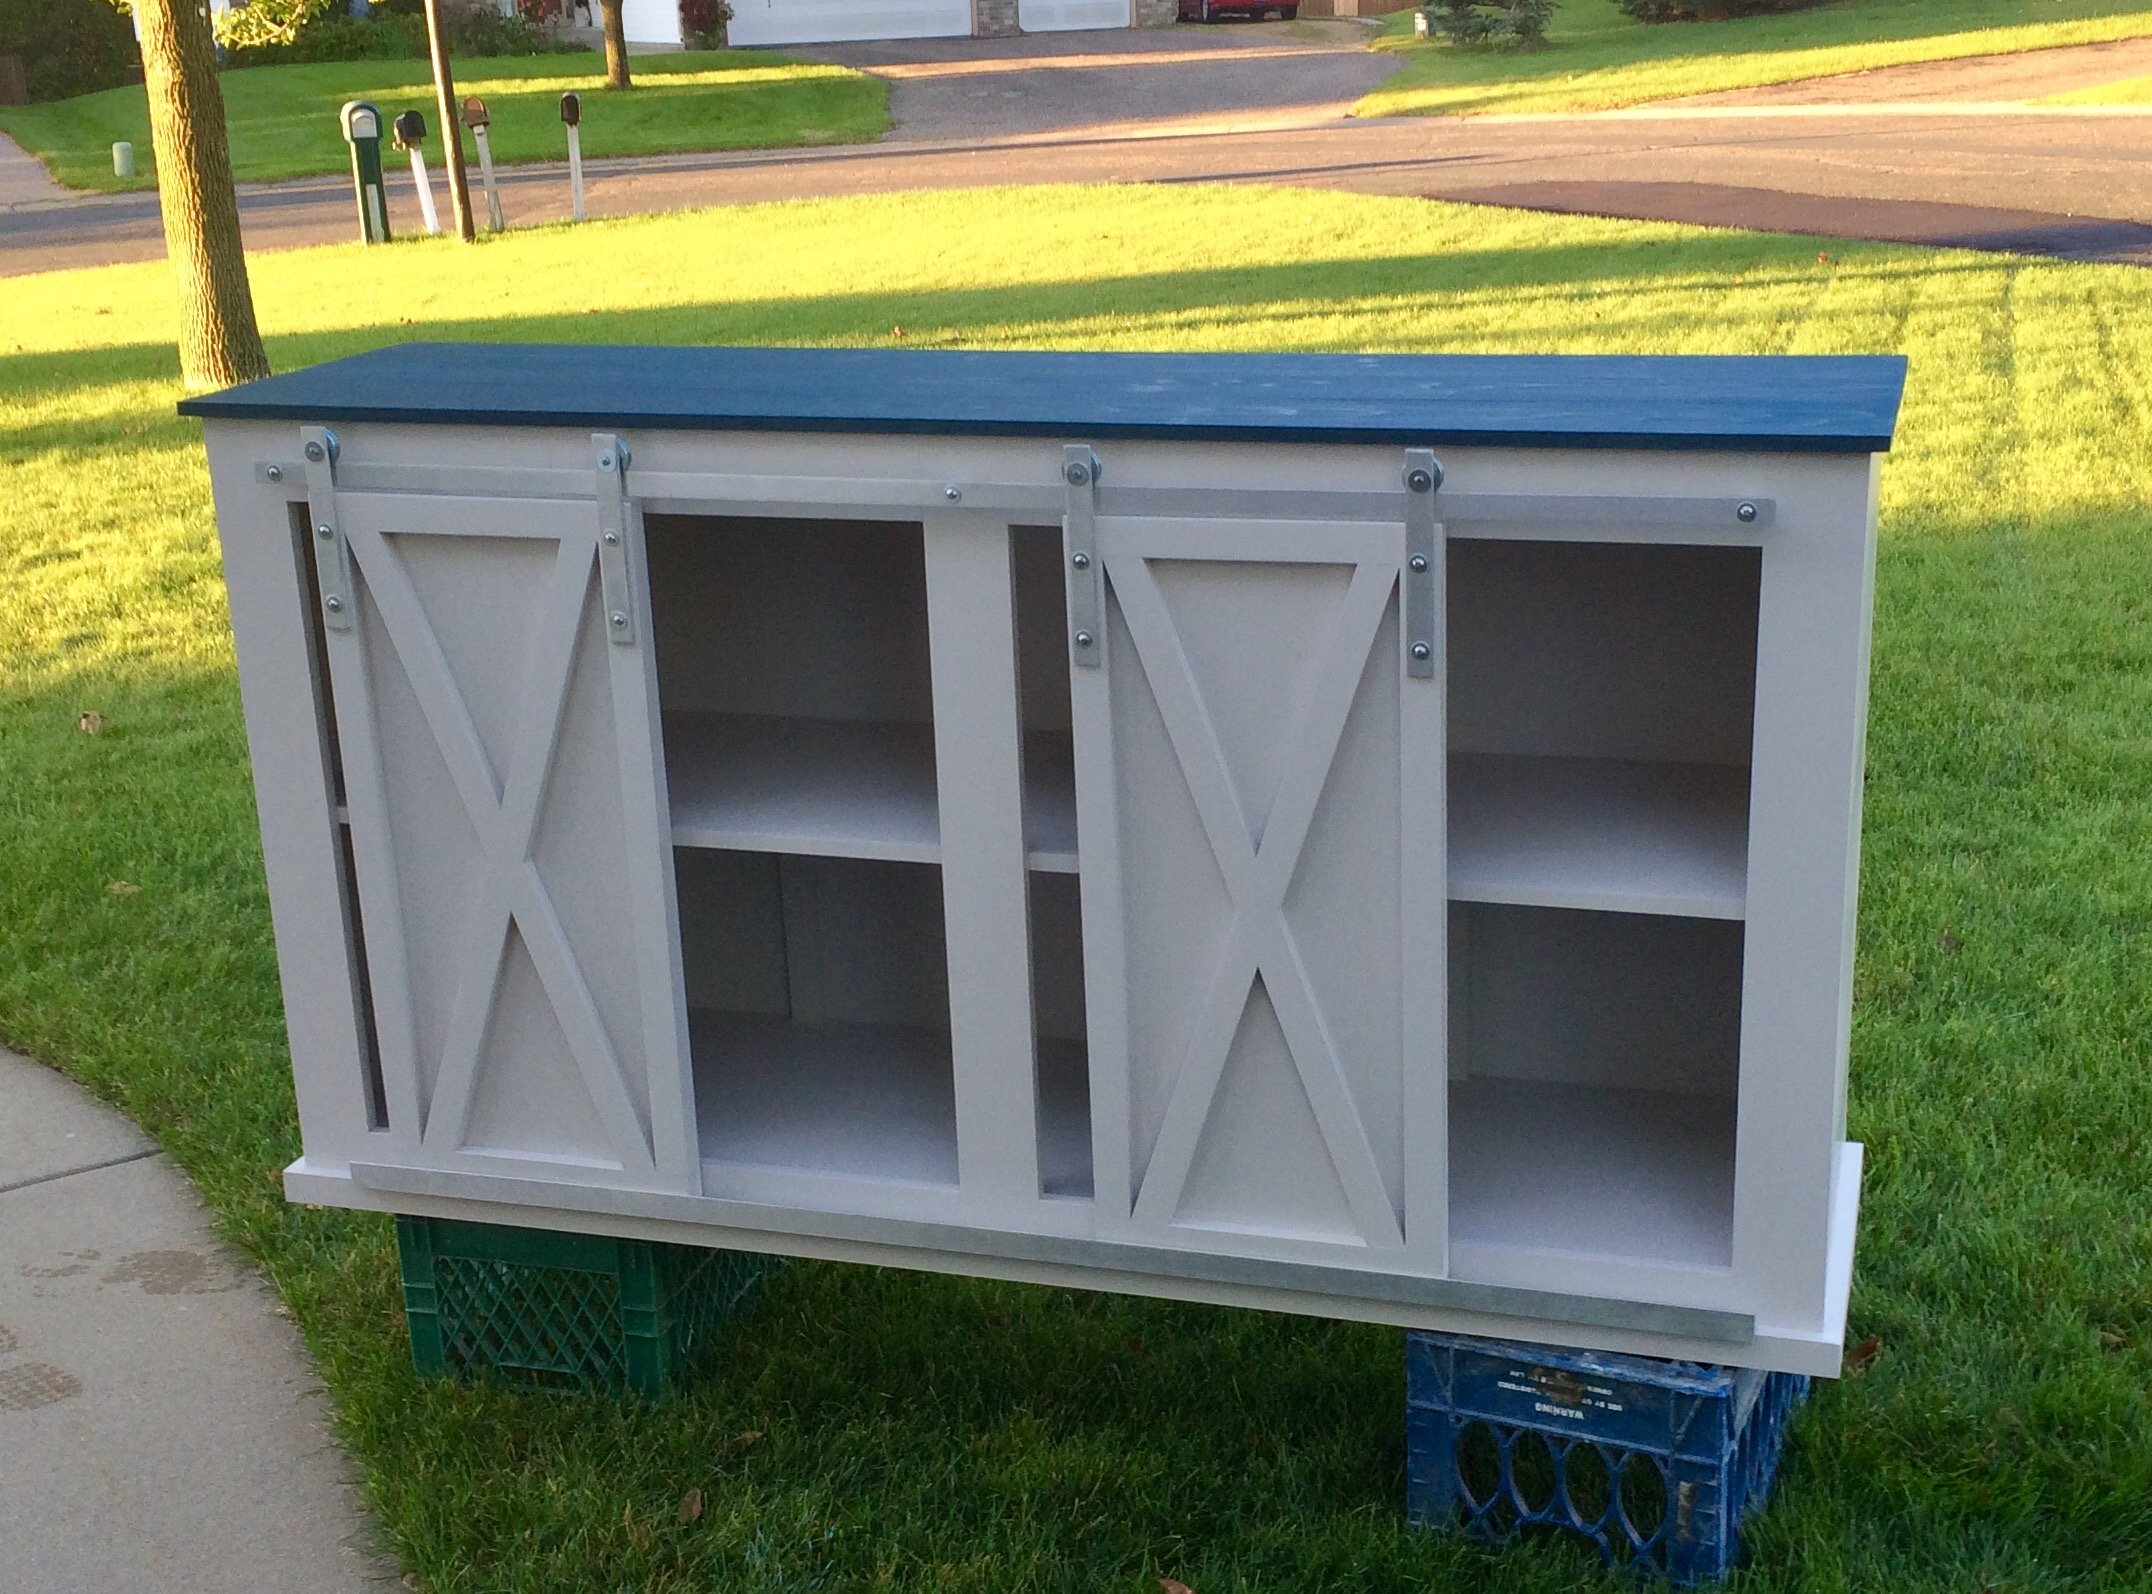
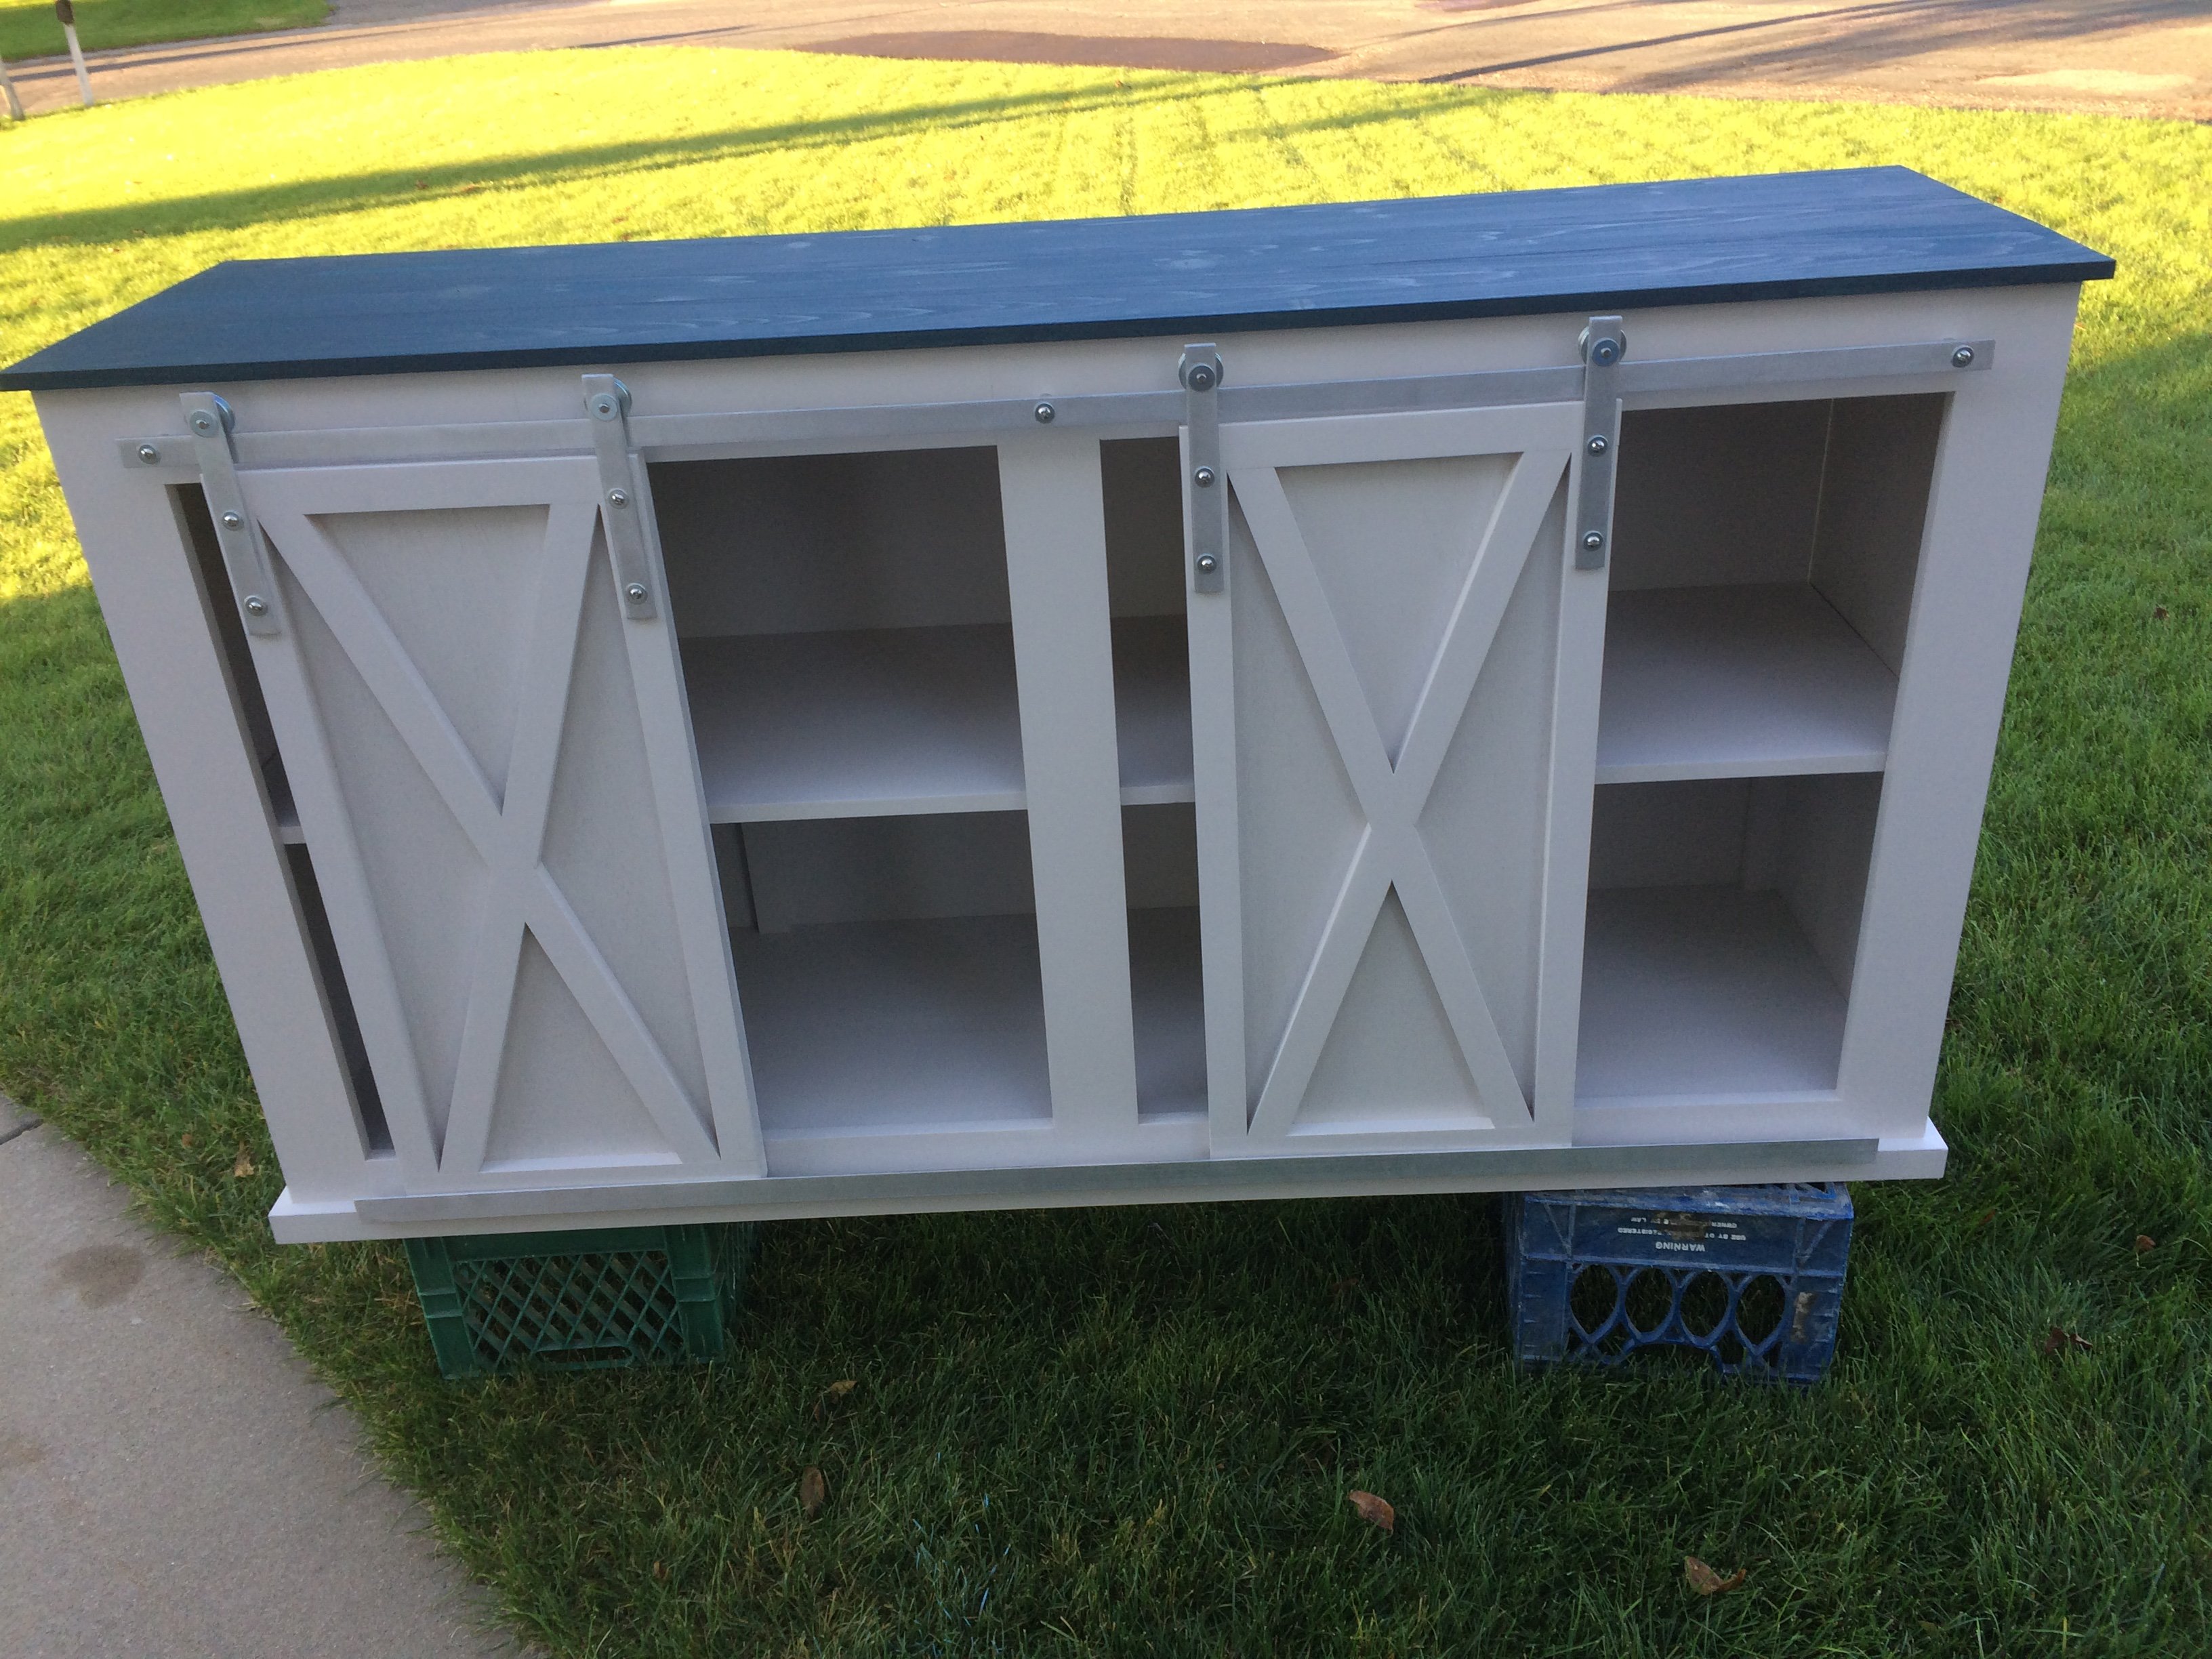
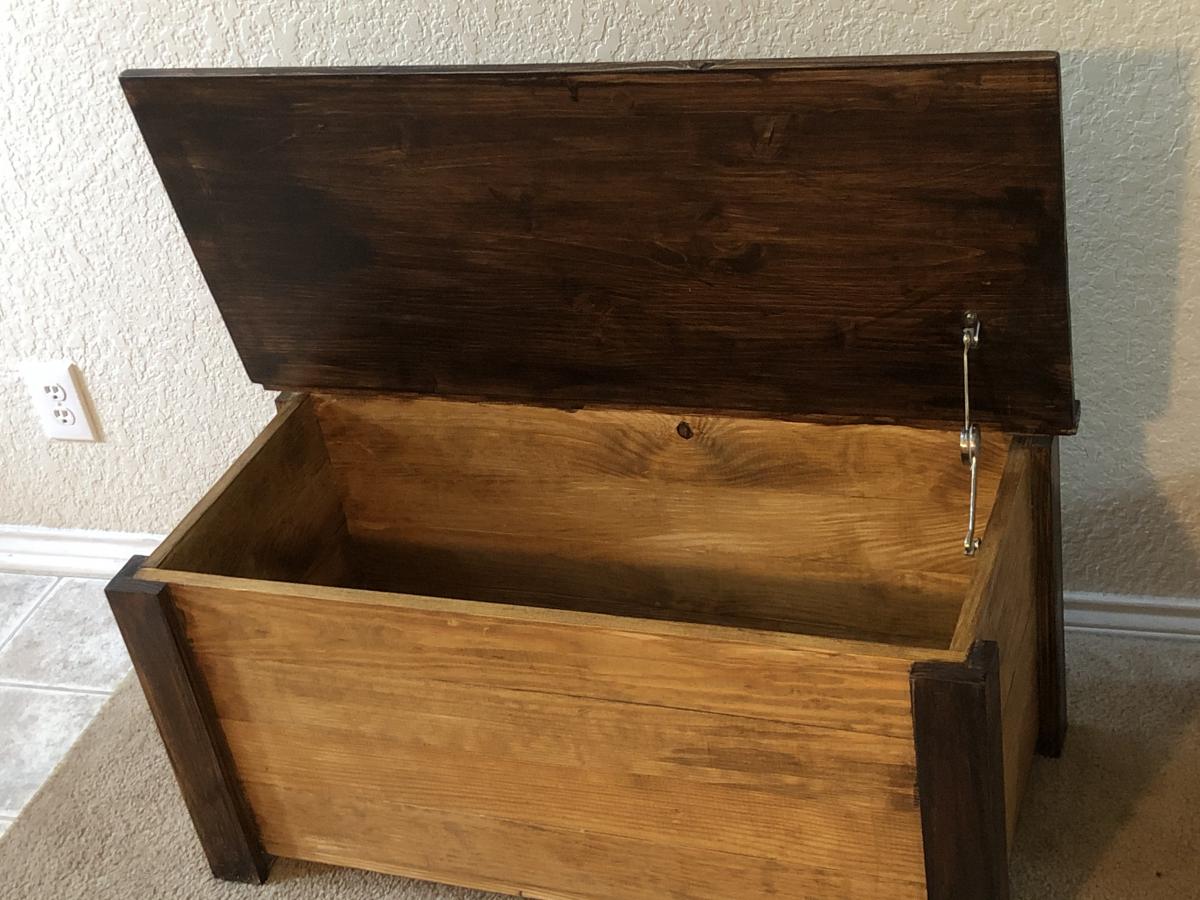
Community Brag Posts

Distressed console

Submitted by dmather82 on Sat, 06/21/2014 - 17:33

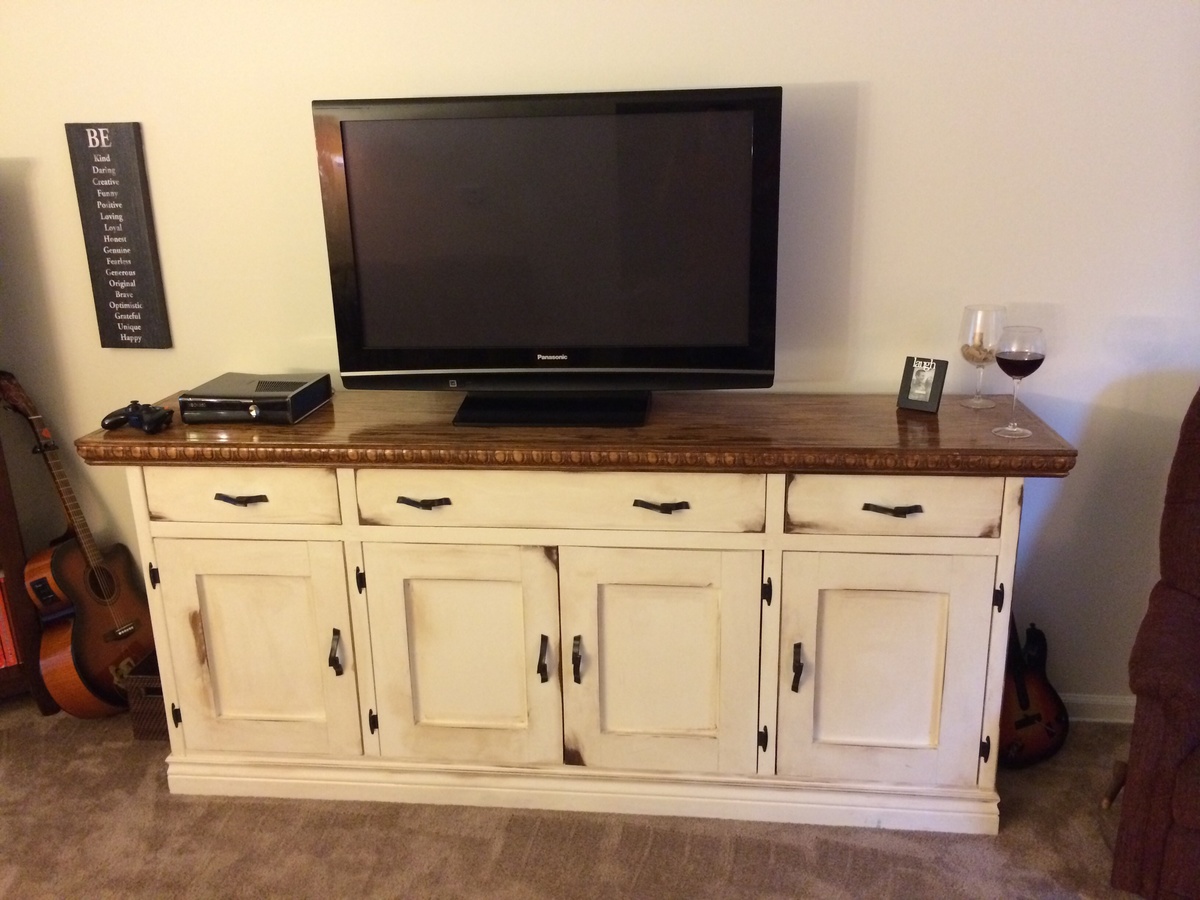
This project was nearly the emotional equivalent of pure hell. I began this as a buffet for someone who decided midway that they no longer wanted it. Secretly I was happy because I fell in love with it. The problem was it was started in late fall and this winter in ohio was more Ana's norm than ours. My I heated garage created a warped piece and an untenable workspace for a few months. I'm pretty happy all and all.

Built from Plan(s)
Estimated Cost
$600-$700
Estimated Time Investment
Week Long Project (20 Hours or More)
Finish Used
Antique white pine distressed and stained over with rustoleum cherry and walnut. The top is some crazy mix of stains and finishes.
Recommended Skill Level
Advanced

Comments

My first woodworking project

Submitted by Anonymous (not verified) on Wed, 09/21/2016 - 11:38

Our Australian Shepard will no longer be digging the trash out all over the floor!  I did change the plans up a bit because I wanted a hangover off the sides as well as the front. And we used bead board instead of the solid panel. Thanks for the great plans Ana!

Estimated Time Investment
Weekend Project (10-20 Hours)
Finish Used
2 coats of extreme and primer and 2 coats of White paint. I lightly sanded in between each coat. I applied the primer and first coat of pai t qith a roller and the final coat was applied with a paint brush.
Recommended Skill Level
Beginner

Comments

Coop and run for Six

Submitted by Anonymous (not verified) on Sat, 09/24/2016 - 08:10

We wanted our chickens to have plenty of room for when we ere not home and could not let them free range in the yard.  One of the six was a rooster-- and long story-- but we don't have him any more-- so 5 chickens now enjoy this coop/run.  It cost about $300 in supplies.  It is 16 feet long.

Built from Plan(s)
Estimated Cost
$300
Estimated Time Investment
Weekend Project (10-20 Hours)
Finish Used
unfinished
Recommended Skill Level
Intermediate

Comments

Cedar chest with black walnut

Submitted by mike - c on Sun, 07/05/2020 - 11:32

My first furniture project. My daughters birthday gift. Made my own patterns and sized as I went. With the materials I had. A few learning mistakes but it’s personal and she loves it. The sides and bottom are 3/4 stock but the top and the base is all 1 1/2 stock.

The Cadar was all ripped from 2” stock and planed to suit. The black walnut was rough, resawn and planed to suit.

Was a many Saturday winter project as my shop is at my camp, had to heat up with the wood furnace each weekend , especially for gluing and finishing.

Estimated Cost
$50 worth of hardware, had the wood.
Estimated Time Investment
Week Long Project (20 Hours or More)
Finish Used
Natural stain and spar varnish
Recommended Skill Level
Intermediate

Mission Style Side Table

Submitted by Anonymous (not verified) on Mon, 04/29/2024 - 09:36

Red oak mission-style side table with deer footprint inlays, golden oak stain.

Bob Zink

twin farmhouse beds

Our girls had made do with hand me down room furniture and decor( youngest 2, out of 5 girls). It was time to give them a space they love. I have never built anything other than slight upcycle projects. Slightly modifying this or that , never just starting with lumber and a plan. They picked the farmhouse beds and my husband was gone for 3 weeks backpacking, so off to buy lumber. Not as easy NO ONE HAS UNTREATED 4x4 posts!!!!! i called 3 counties, almost cried, to order was 3 weeks, or just cant get them. Finally found a cedar and cypress mill 1 hr away. Hopped in the car and off i went to load up.I had 2 beds to do so the second one went faster. What i learned?
1. even after predrilling you will do best hand screwing screws. Cypress was really hard in places and a stripped screw equals stress.( just like there is no crying in baseball, there is also no crying in carpentry)
2. the 2x4 that is under the 2x6 on headboard and footboard should be cut AFTER you assemble the 1x6 and 1x4 base. Much easier than making cuts with a circular saw on 1x6
3. your hands will feel like they were run over after day 1 of sanding, it will pass and get better.
4. perfect is not possible. It probably not even preferable. You want perfect? That is a machine
The room still needs some special touches, lamps, nicknacks, etc. cannot paint , rental. so sad. oh well

Built from Plan(s)
Estimated Cost
$300( for both)
Estimated Time Investment
Week Long Project (20 Hours or More)
Finish Used
Paint and then hand rubbed wax
Recommended Skill Level
Beginner

Comments

sgilly

Fri, 08/31/2012 - 09:55

Your girls must be so happy to have these cute beds. And, proud of their mama who made them!

In reply to by sgilly

sambenedetto7@…

Fri, 08/31/2012 - 10:09

Really hard to find common ground for a 15 yr old and 12 1/2 yr old. Tried to go for sophisticated beach side cottage. Dark wood bookcase and side tables , jute rug, cotton quilt coverlets....also i did add six inches to the height for added storage. Lots of girls equal lots of shoes

Playroom Tents

Submitted by macymoon on Thu, 06/26/2014 - 10:34

I built these fun and easy tents for our playroom. They are perfect for reading, or for an indoor camping trip.

Built from Plan(s)
Estimated Cost
Under $10 per tent
Estimated Time Investment
Afternoon Project (3-6 Hours)
Finish Used
No stain. Just light sanding.
Recommended Skill Level
Starter Project

A different take on the Brandy storage bed.

Submitted by Anonymous (not verified) on Mon, 09/26/2016 - 12:25

Made this storage bed but altered it some.  Still a queen size bed, changed the depth of the side boxes to accomate a suitcase so we could get luggage out of the way.  Built this for our cabin in Maine.

Estimated Cost
150-200
Estimated Time Investment
Weekend Project (10-20 Hours)
Finish Used
Lowe's chalk paint and antiquing wax.
Recommended Skill Level
Intermediate

Comments

Mail Boss

Submitted by Drspear98 on Mon, 07/06/2020 - 16:38

After scouring the internet for a piece of furniture that could hide my shredder and act as a filing cabinet, I decided to look here, and lo and behold, Ana had posted this project the week before. It was literally an answer to prayers!

I had a lot of leftover plywood that I cut to size to build this project. The drawer slides were the most expensive part of this project. It was pretty tough and I made a lot of mistakes, but I am very happy with it. It was just what I was looking for. Installing the drawers was the hardest part of this project. I made the shredder compartment to fit my specific shredder, and it barely fits. I already had drawer pulls and paint.

Built from Plan(s)
Estimated Cost
$50 (I had a lot of wood and hardware on-hand)
Estimated Time Investment
Weekend Project (10-20 Hours)
Finish Used
dark chocolate milk paint on top, antique white latex paint; polyurethane finish
Recommended Skill Level
Intermediate

Comments

Rustic Wood Coffe Table

Submitted by Anonymous (not verified) on Fri, 05/03/2024 - 14:00

Farmhouse Coffee Table with a bit of Rustic "X" Coffee Table. Thank you so much for the plans. This was a nice build. I opted for pocket holes and panel glue up so for me, it wasn't a one day build. :)

WRH

Built from Plan(s)

small shed

so i put this storage shed on the outside wall of my garage and then i put my dust collector inside it and cut a hole for the pipe to into the garage. It's nice and out of the way now. I adjusted the size a bit to make it fit more of my outside tools like the trimmer and blower. Its not in the picture but I also extended the roof about 30 inches over the side to park the lawn mower under it. If I were to do it again I'd make it even bigger.

Built from Plan(s)
Estimated Time Investment
Weekend Project (10-20 Hours)
Recommended Skill Level
Beginner

Second Build - Six Cube Storage Units

Submitted by seiseman on Sun, 06/29/2014 - 12:17

Very excited to have finished my second build! My daughter was so excited about these shelves, too. She even helped pick up her play area so we could get a nice picture. I only have a small wagon, so all the big cuts were done at Home Depot. Best part of this project: with the cuts completed in-store, this project took about the same amount of time to put together as a similar IKEA shelf, only no Allen wrenches were involved.

Built from Plan(s)
Estimated Cost
$80 and some leftover paint
Estimated Time Investment
Afternoon Project (3-6 Hours)
Finish Used
White paint
Recommended Skill Level
Beginner

My city farm

My friend and I bought all of the materials for about $350. We started Friday afternoon and he worked most of Saturday on it. The plans were super helpful! My four little silkies are enjoying their new home. 

Estimated Time Investment
Weekend Project (10-20 Hours)
Finish Used
Sherwin Williams exterior paint in Alabaster. Lots of pumpkins and mums from Lowe's.
Recommended Skill Level
Intermediate

Comments

Seasonal And Holiday

Outdoor chairs

Submitted by carlablock on Tue, 07/07/2020 - 10:14

My first project. Good learning experience and they turned out great!

Comments

Completely Free Workbench!

Submitted by MrsVwal on Tue, 09/04/2012 - 07:31

2 wood pallets, 1 2x4 from an old wall teardown, and an old door we were going to pitch = 1 free workbench!

(used the extra pallet wood to make the decor sign. I wanted to make it girly. :) )

Built from Plan(s)
Estimated Cost
$0
Estimated Time Investment
Day Project (6-9 Hours)
Recommended Skill Level
Beginner

Tailgate Bench

Submitted by K Brown on Wed, 07/02/2014 - 14:38

I want to give a big THANK YOU!! to Ana. I found your website a few years ago when I wanted to move my toddler to a big girl bed. Since then I have built several things but this is the first that I have shared on the site. Long story short this is a bench that I made for my father in law for Father's Day. It was a pretty simple build that I believe came together pretty well. Next, a tailgate bench for my own dad for Father's Day. Luckily he doesn't mind that it will be late.

Built from Plan(s)
Estimated Time Investment
Weekend Project (10-20 Hours)
Finish Used
Behr Premium Weatherproofing Stain in Valise
Recommended Skill Level
Beginner

Grandy sliding door console

Submitted by dkarinen on Wed, 10/05/2016 - 18:01

This was a perfect build for my brother's farmhouse style home. The build itself wasn't too difficult but getting to doors to slide properly was definitely challenging. We had originally spray painted the hardware oil rubbed bronze but found the it kept rubbing off when we slid the doors so we ended sanding everything back down to the original color.

We also bought multiple pulleys based on the tutorial we found but they really didn't work great. We finally found these 1.5 inch pulleys (http://store.riggingcentral.com/15-in-2-in-25-in-3-in-35-in-sheaves-p36…) and used (2) 5/16 bolt nuts inside the pulley to center the cleaves pins and secure. 


Built from Plan(s)
Estimated Time Investment
Week Long Project (20 Hours or More)
Finish Used
Behr Burnished Clay paint and Atlantic stain
Recommended Skill Level
Intermediate

Farmhouse Toy Box

Submitted by Samwise73 on Wed, 07/08/2020 - 17:13

Worked the farmhouse style toy box with two colors of stain. Try and square this up BEFORE you add all the sides. I made that rookie mistake and was 1/8” off; not a huge deal overall but it made for a super snug fit when I put the bottom board in. Overall, super sturdy and I like how it turned out.

Built from Plan(s)
Back