Community Brag Posts

Storage Bed

Submitted by Anonymous (not verified) on Tue, 07/26/2016 - 06:01

Over the winter we decided to upgrade our daughter's bed from a single to a double.  We wanted her to be involved in the concept and design.  Here is what we came up with!  

More builds/projects/tool info can be found at my YouTube page.  Would love to have you stop by!

http://www.Youtube.com/ericgreaves

Estimated Time Investment
Week Long Project (20 Hours or More)
Finish Used
Semi Gloss White Paint
Recommended Skill Level
Intermediate

Raised Planter / Jardiniere

Submitted by WoodON on Sun, 05/17/2020 - 23:11

Not much to say apart that some internal measures were different (!?) and that I used treated wood and covered everything with recyclable plastic.

Oh yeah, of course.... Thank you Ana!!

Built from Plan(s)
Estimated Cost
31$ CAD
Estimated Time Investment
An Hour or Two (0-2 Hours)
Finish Used
None
Recommended Skill Level
Beginner

Custom Garage Shelves

Submitted by Anonymous (not verified) on Tue, 01/16/2024 - 17:19

I just finished shelves on both sides of my garage using your video.  I built a coat rack and boot rack.  I also made space for tall items like tools and ladders near the garage door.  I had to also build in a gun safe, freezer and my work bench.  Everything came together and now I have everything in bins on shelves. 

Gary Hoffman

Entry Console

My entry was filled with a huge armoir/bar, that made the entire house feel cramped...So, I moved it and replaced it with this beauty!

I wanted a shelf, so I used a 1x12 trimmed with 1x2's for this.
I modified and went with 5 drawers instead of 4...I have 5 boys, this way they each get a drawer for their stuff.
I also alternated finishes on the top boards to create a striped look.

Notice something missing? The hardware for the drawers! I cannot make up my mind on which ones to buy. ;) Any suggestions would be greatly appreciated!

I like the straight lines of this piece, so I want the pulls/knobs to be somewhat contemporary.

Built from Plan(s)
Estimated Time Investment
Day Project (6-9 Hours)
Finish Used
for the top- alternating stripes of natural and early american by Rustoleum
everything else- early american stain by Rustoleum
followed by 2 coats of satin poly
Recommended Skill Level
Beginner

Comments

Farm Table

Submitted by mrcoolcom on Mon, 04/28/2014 - 06:21

Was so easy with ANA instructions and the results were an a amazing accomplishment!

Estimated Cost
175
Estimated Time Investment
Day Project (6-9 Hours)
Finish Used
White wash pickling wood stain
Recommended Skill Level
Intermediate

Comments

First project!

Submitted by ranlim on Thu, 07/28/2016 - 14:33

First wood- building project I have ever attempted. It seemed crooked for most the time i was building it, which stressed me out and somehow it all worked out in the end! Very sturdy and think it would definitely sell for more than i paid for. Proud of it!

Estimated Cost
$20
Estimated Time Investment
Day Project (6-9 Hours)
Finish Used
Haven't finished yet. Not sure if i should stain or paint. Waiting to move into our new place to decide which way to go
Recommended Skill Level
Beginner

Coffee Tablr

Submitted by Anonymous (not verified) on Wed, 05/20/2020 - 10:45

Fun project. Really enjoyed this one

Estimated Cost
$50.
Estimated Time Investment
Afternoon Project (3-6 Hours)
Finish Used
Minwax Pre-Stain and Min-Wax Early American Stain then added a thompsons water seal.
Recommended Skill Level
Starter Project

Big Crate Shoe Box (A Test in Bri-wax)

Submitted by Joni on Fri, 07/13/2012 - 11:03

I needed a large box to use at the base of my stairs for shoe storage, so this is it! I made 2 compartments, and put handles on the side for easy moving. Being solid wood, this thing is heavy and a lot larger than it looks.

I wanted to do Bri-wax as a test on a smaller project before possibly messing up a larger one. Bri-wax advised me to wait a week to let the stain 'cure' prior to using the product. The stain was beautiful prior to using Bri-wax, but didn't look nearly as good when the wax took off some of the stain and kind of changed the color. I love the look of the Bri-wax finish, but probably won't be using it again (unless the finish has been cured for a long time). Bri-wax also told me not to use it over varnish or poly, as it would damage that surface. I would be interested in hearing from you guys who have used it successfully on top of other finishes.

Finish Used
Mixture of Minwax Water-based stain in American Walnut & Ebony, followed by Bri-Wax in Light Brown and Tudor Brown (3 coats)
Recommended Skill Level
Beginner

Comments

American Herit…

Sat, 07/14/2012 - 21:00

Hello Joni,
I've used Briwax over a clear, satin poly finish without any damage, though typically, I apply a 100% Briwax finish on the majority of my pieces as I prefer the natural finish and find it's complimentary to the reclaimed wood I use.
Simply a personal preference.
Looking at your other projects want to commend you on your table too. Nice color distinction and accents. Very nice!

Mike

Sweet Pea Garden Bunk Bed

Submitted by Beth Allen on Wed, 04/30/2014 - 12:01

My dad built this for my daughter.

Recommended Skill Level
Intermediate

Comments

Hexagon Picnic Table

Submitted by JohnNH on Tue, 08/02/2016 - 06:20

Thanks for the plans.  My little brother from Big Brothers Big Sisters and I made this table and had lots of fun doing so.  We made a few modifications which might be useful to others:

1.  We modified the center joints (at the lower and table level) so that one 2x4 could continue across the entire diameter of the table for greater strength (see pictures for details).

2.  As recommended we extended the seats out 4".  This made it very comfortable to get in and out.

3.  We started the center with 2 pieces of 2x6 rather than 6 with the thought being that this would help strengthen the center of the table.  (see pictures for details).

4.  We added a stiffener at the center 6-way joint on the lower level to help really strengthen that center joint.  This was made out of 2 pieces of 2x6 as shown in the pictures.


Thanks,

John


Built from Plan(s)
Estimated Cost
$80
Estimated Time Investment
Weekend Project (10-20 Hours)
Finish Used
Semi-transparent Redwood Stain
Recommended Skill Level
Intermediate

Reclaimed Wood Endtable

I found a place on the Naval base here that is a storage for broken pallets and other wood scraps. I picked up a variety of pieces and decided to make an endtable. My sizes of boards are all different than the ones in the plan, but the overall look is about the same. I created my own 2x2s by cutting 2x4s in half. All of the wood was free and I used Kiwi brown shoe polish for the finish. My drawers are actually a door with hinges. I have two shelves on the inside.

Estimated Cost
Free
Estimated Time Investment
Afternoon Project (3-6 Hours)
Finish Used
Kiwi Brown Shoe Polish
Recommended Skill Level
Beginner

Wooden Rustic Cooler

Submitted by markowycz on Mon, 05/05/2014 - 04:47

I saw this project posted online and thought it would be a nice improvement to our patio since we just added fire pit benches this would be a great addition instead of dragging the old plastic cooler out every time we entertained.

Once I got all the cuts done it was like putting together a big puzzle. For the most part I did this one my own on the floor of the garage. If you have the space I would suggest doing all the screwing together atop a table and off the floor.

I was very happy with the outcome and I look forward to finding more projects here to add to our backyard.

Estimated Time Investment
Weekend Project (10-20 Hours)
Finish Used
I used some sandpaper, then primer and I actually used spray paint because I had alot left over from previous projects.
Recommended Skill Level
Intermediate

Comments

Barn Door Console Table

Submitted by Anonymous (not verified) on Thu, 08/04/2016 - 09:57

I used Ana's plans for this entertainment center. I wanted tour pride my husband so I built it while my he was out of town. When he got back into town and settled in to watch television I heard him say "oh wow.....where did you buy this, it's gorgeous"! He thought I had bought it.


thanks Ana for providing easy to follow plans!

Built from Plan(s)
Estimated Cost
125.00
Estimated Time Investment
Weekend Project (10-20 Hours)
Finish Used
Golden oak stain and rub on urethane
Recommended Skill Level
Beginner

My First Big Build - A Workbench

I have been wanting to build a workbench but just hadn't decided on a plan. I stumbled across one here and decided to go for it. It was easy to build, easy to follow the plans. I had fun building it and I'm super happy with out well it came out. This is my first big project and it's only my 3rd thing I've made.

The only deviation from the plan that I did was that I used 3/4" plywood for both shelves instead of just one. And I only did this so that I wouldn't have to buy a second piece of plywood. And I used 3" screws on the whole thing.
Also... I cut 3" off the height so that I could add wheels and it be the same height.

$18 - 2"x4"s
$ 7 - screws
$24 - Plywood
So about $49

The wheels... well... if you go to Lowes... I spent $30 including the bolts. Then I went to Harbor Freight and got some different ones for under $20. So I'd shop around on that. Or... you don't need them if you don't want them.

Built from Plan(s)
Estimated Cost
$50
Estimated Time Investment
Afternoon Project (3-6 Hours)
Finish Used
Just leaving it as it is for now.
Recommended Skill Level
Beginner

Farmhouse Style Vanity Base with Slatted Shelf

Submitted by ellemm on Thu, 05/08/2014 - 21:06

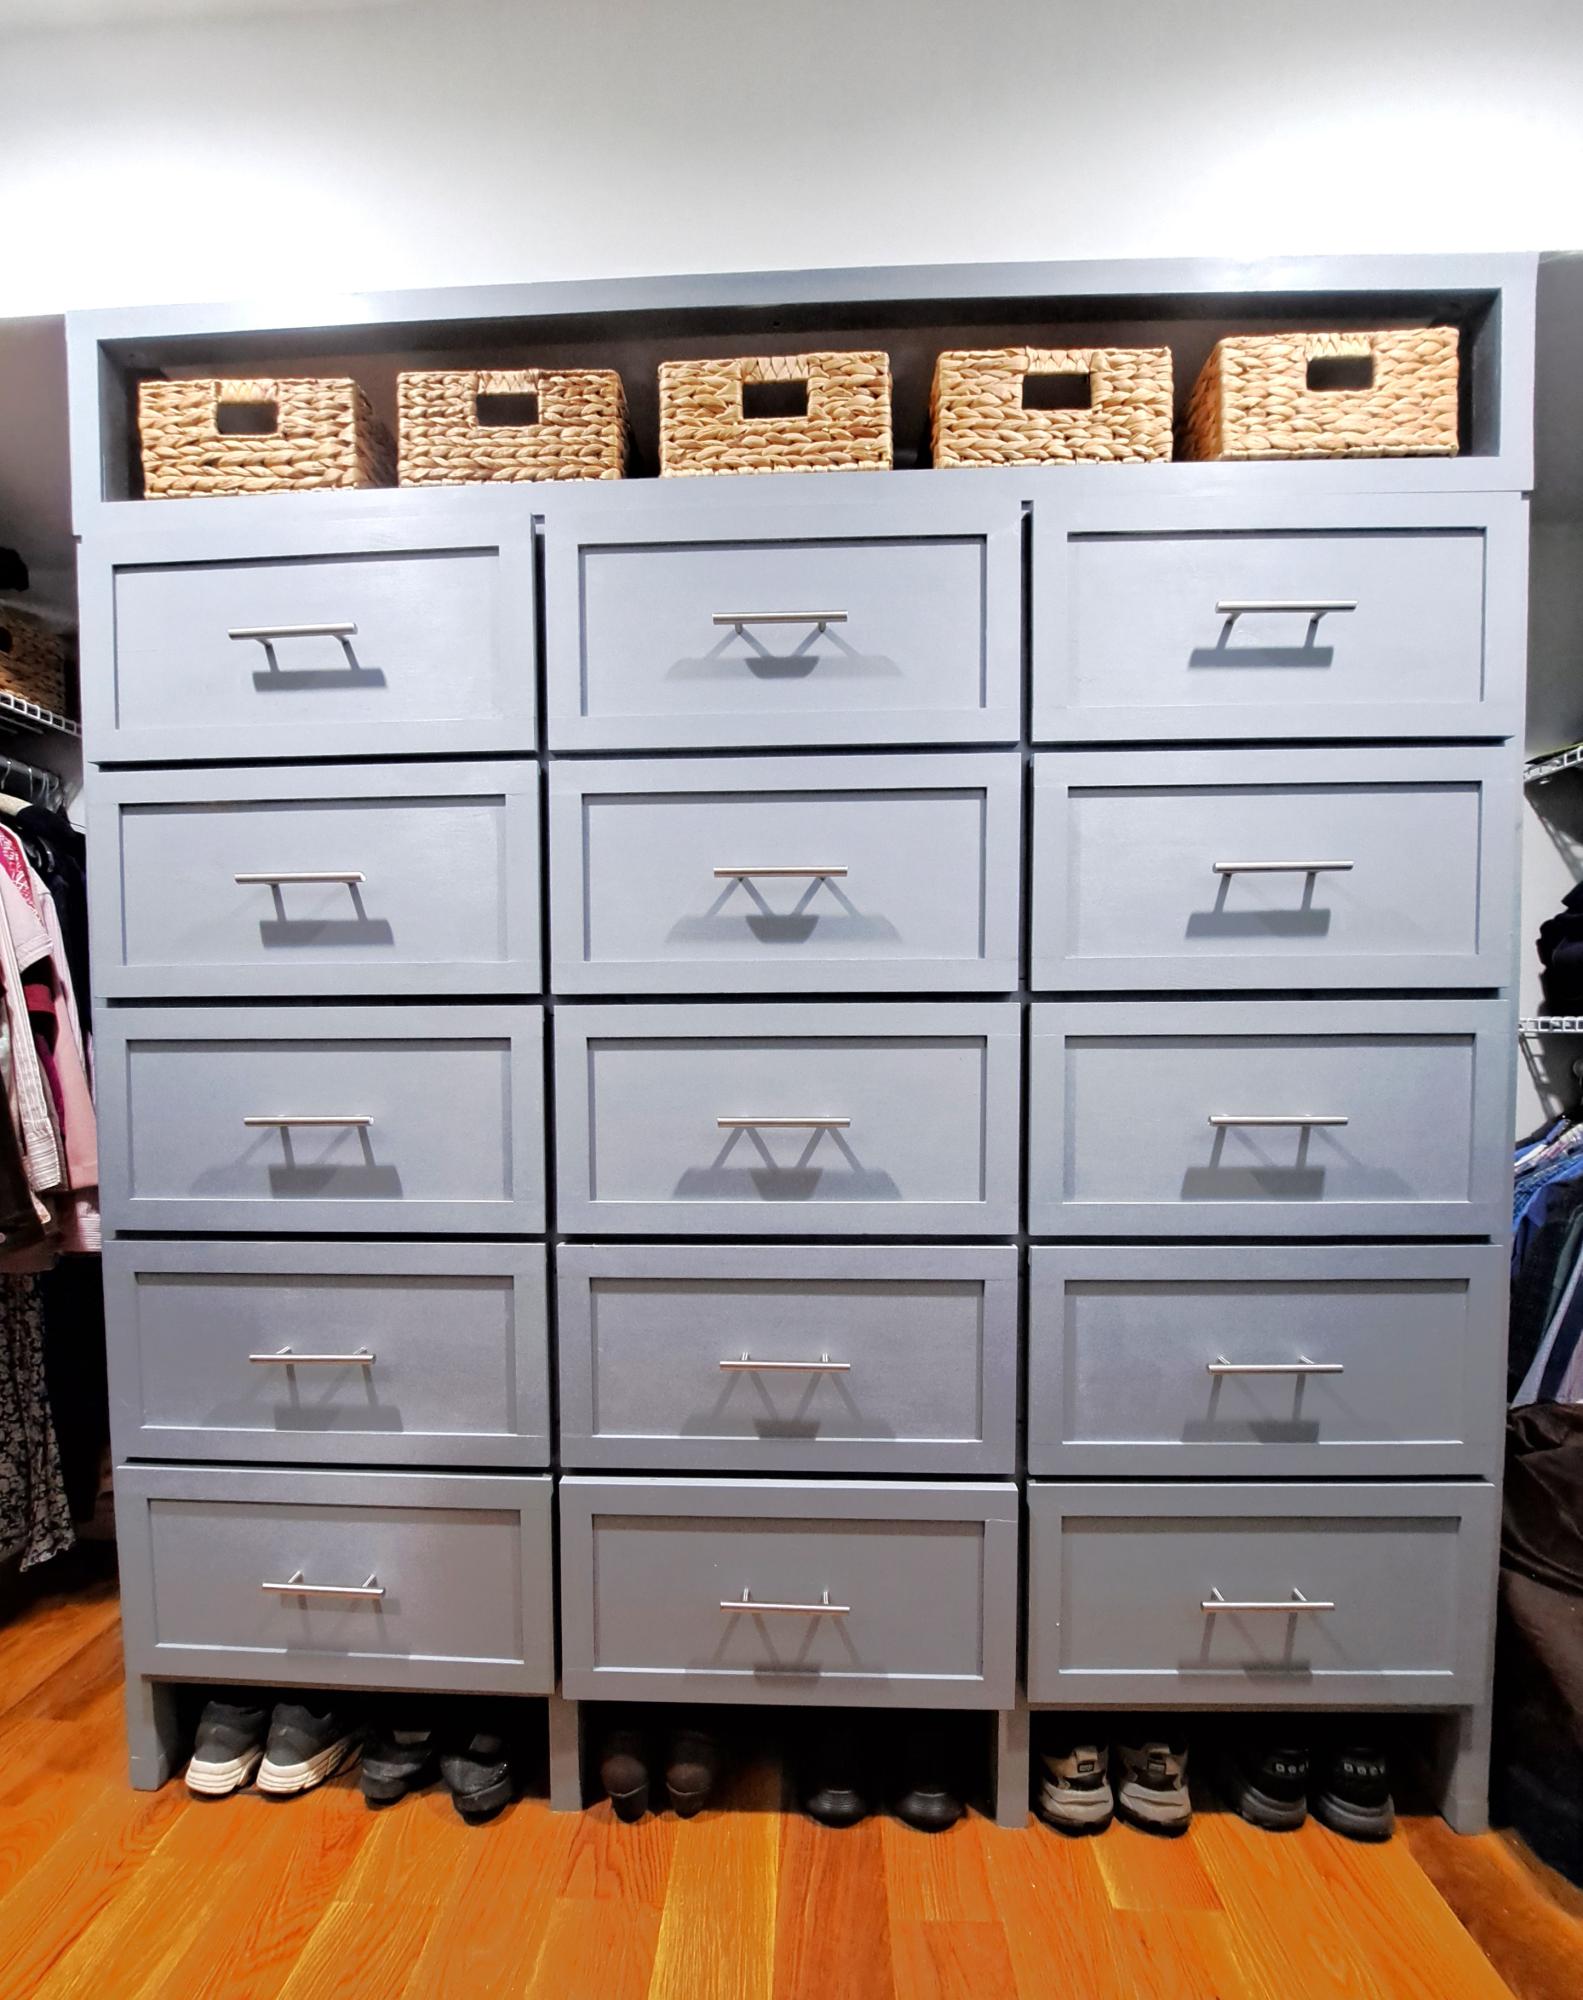
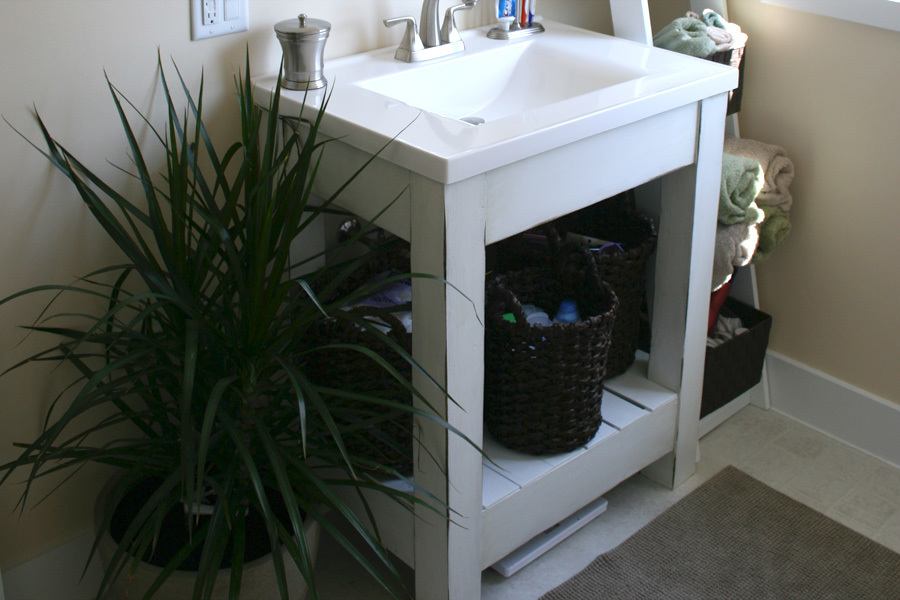
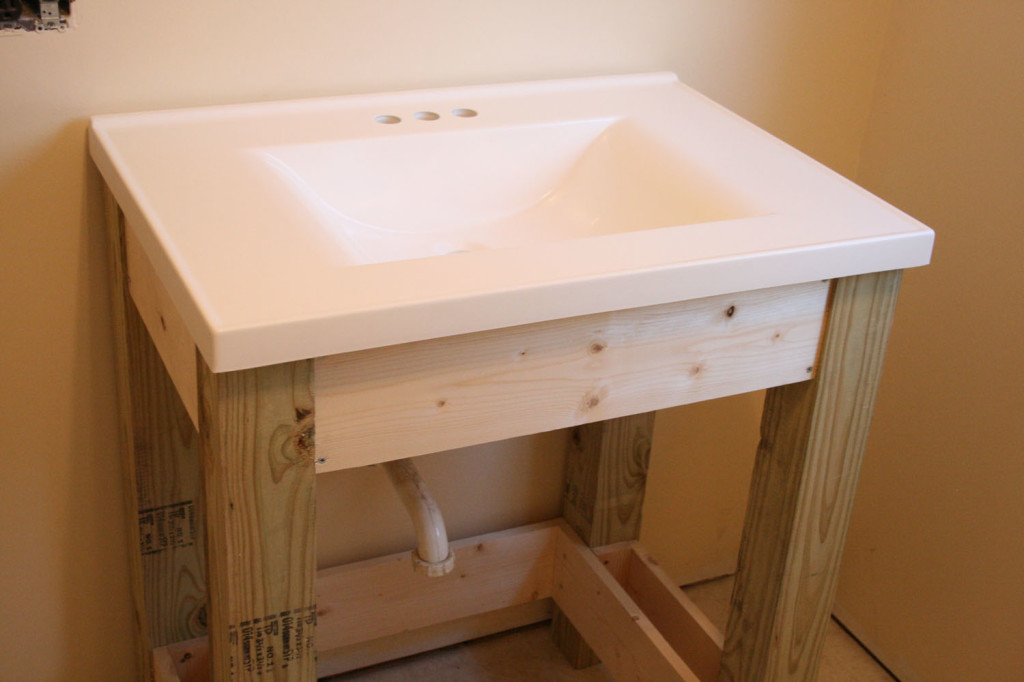
Our first build! After finding a vanity top we loved for our DIY bathroom renovation, my husband and I went in search of a chunky, open base with simple lines and a shelf on the bottom. Nothing at the store appealed to us, and I had been talking about all the projects I wanted to build from Ana's site for weeks, so we decided to try the Simple Open Farmhouse Style Vanity. We would just add a shelf to the bottom and omit the top!

This was a really easy plan to scale for our sink, and because we were not doing the top we could make all the necessary cuts with a chop saw.

The only purchases we had to make for the base were screws, slats and a 12-foot-long 4×4 that the guy at the store cut into four 36″ pieces for me. It’s pressure-treated lumber meant for outdoor use, but it was on sale and they didn’t have any other 4x4s. The rest of the materials were 1x4s and 2″ screws that we already had on hand.

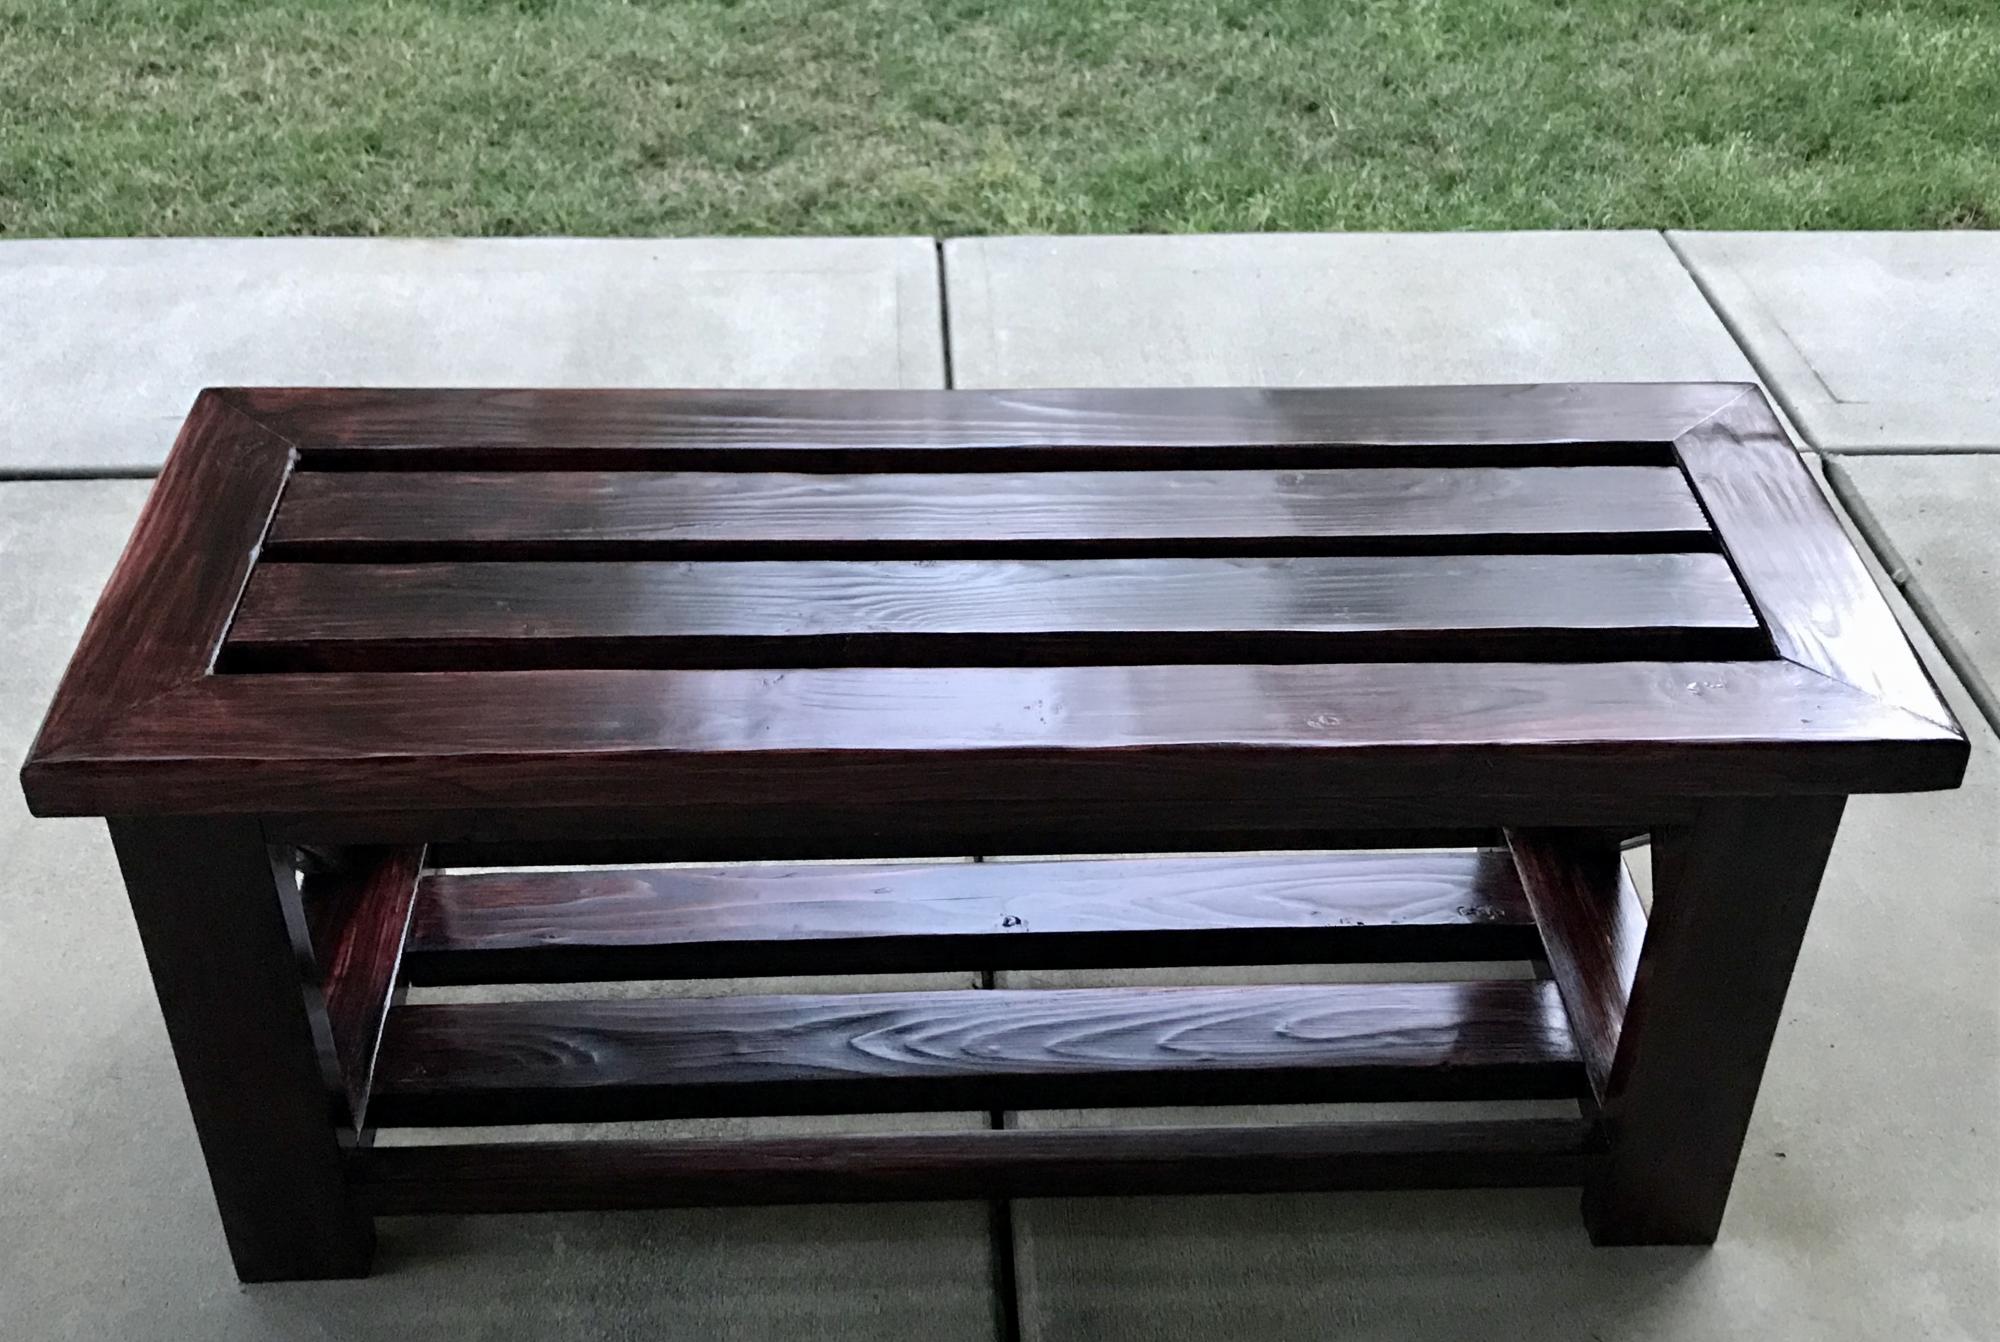
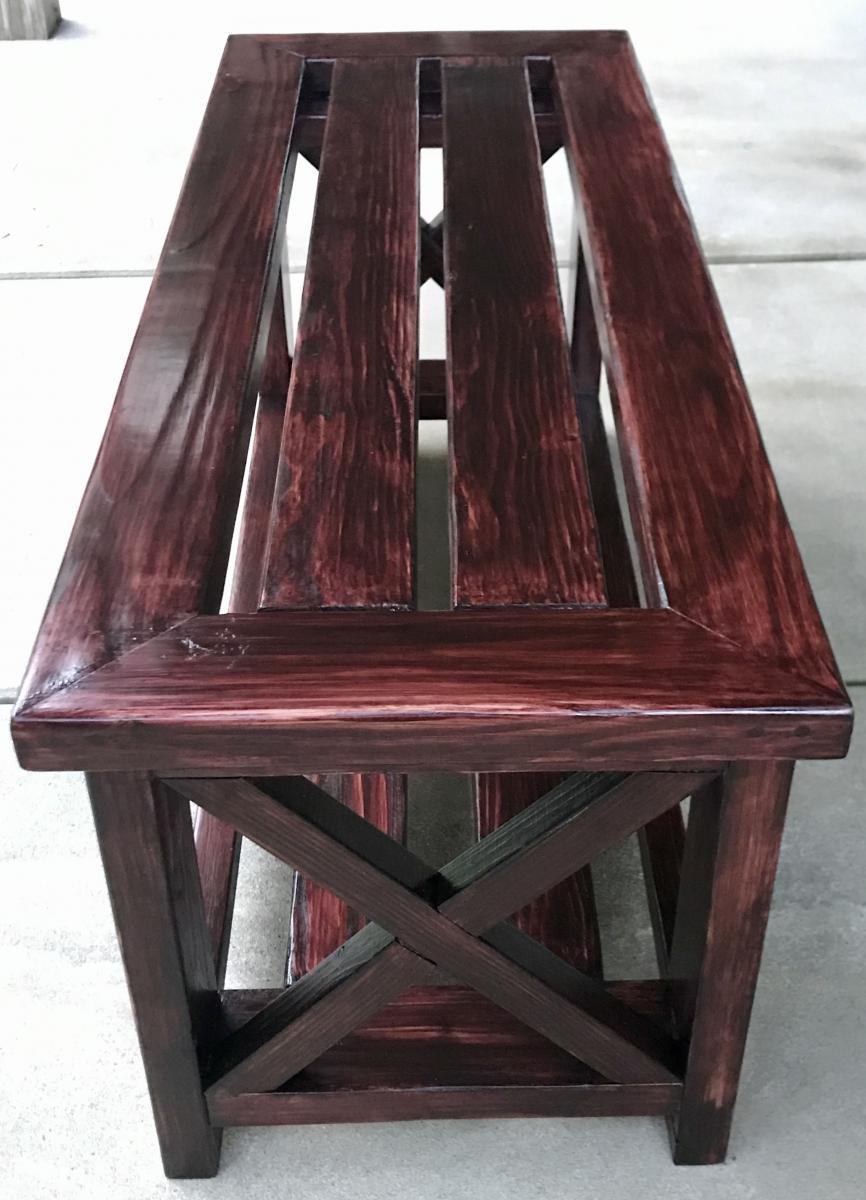
For the bottom shelf, we just duplicated the spacers, aprons and skirts from the top, and placed wide slats over that. They look crooked in the photo because they haven't been glued on yet, and using the baskets makes them shift around!

With the vanity top in place the counter height is a little over 37 inches. We are tall people, so this is a tall sink! Perfect for our first build. Thanks Ana!

Estimated Cost
Under $20
Estimated Time Investment
Afternoon Project (3-6 Hours)
Finish Used
I finished this with a very dark stain followed by two coats of white latex semi-gloss, then sanded back the edges to give it a distressed look. I covered it with three coats of polyurethane, which gave it a slightly off-white cast, which I wanted. Polycrilic would have been a better choice if I wanted it to remain bright white.

In figuring out how to finish the vanity, I looked at several of Ana's finish options, wanting a distressed white finish. The closest process to what I did is in the "Authentic Vintage Distressed Finish with Minwax Stain" post!
Recommended Skill Level
Beginner

Comments

PVR cabinet

Submitted by Doug B on Tue, 08/09/2016 - 19:16

I built this PVR/DVD cabinet by combining my stained glass hobby with my woodworking.

The stained glass door works well as the remotes operate through the glass, I left the rear of the cabinet open for wiring but also to allow any heat to escape.

I used some brushed finish cedar that a neighbor gave to me but used dressed ply on the interior, any wood of choice would work.

Estimated Time Investment
Weekend Project (10-20 Hours)
Finish Used
Washed white paint.
Recommended Skill Level
Beginner

Hall Entry Bench

Submitted by atlayank on Mon, 05/25/2020 - 17:33

My first piece of furniture using the plans as guidance. Needed something to organize the shoes that accumulated at the front door.

Estimated Cost
40
Estimated Time Investment
Day Project (6-9 Hours)
Finish Used
Varathane that was a stain and poly in one. Mahogany was the color with a gloss finish.
Recommended Skill Level
Beginner
Back