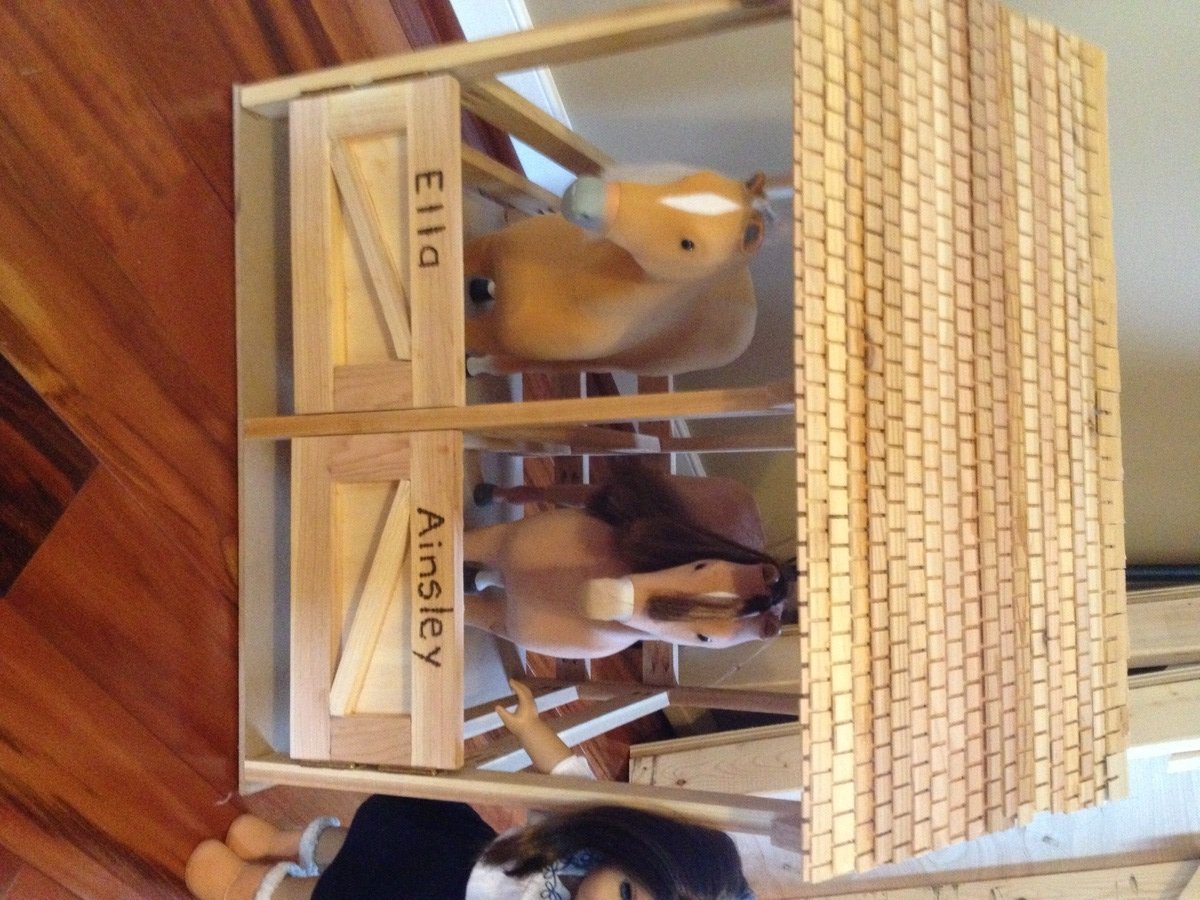
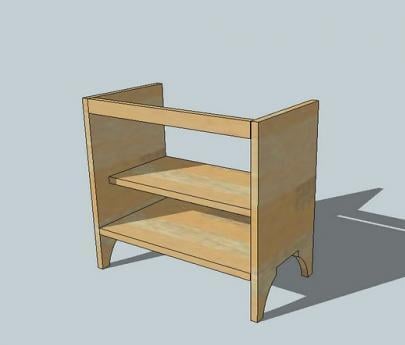
Community Brag Posts

Doll bed factory

Submitted by sgilly on Mon, 02/20/2012 - 15:22

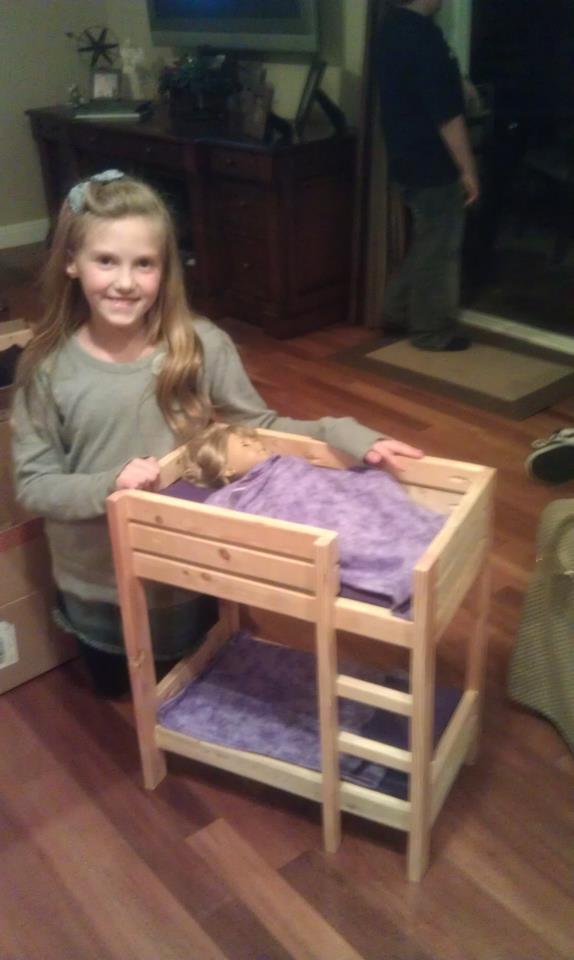
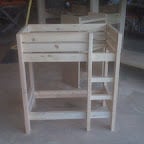
I fell in love with the darling bunk bed built by so many of Ana's readers. Since seeing it I've made several for my granddaughter, neighbors, and friends. What I've learned is that although they're cute, they take almost as much time as a full sized bed!

Estimated Cost
$20-30 (less if I used scraps!), another $10 for bedding materials
Estimated Time Investment
Afternoon Project (3-6 Hours)
Finish Used
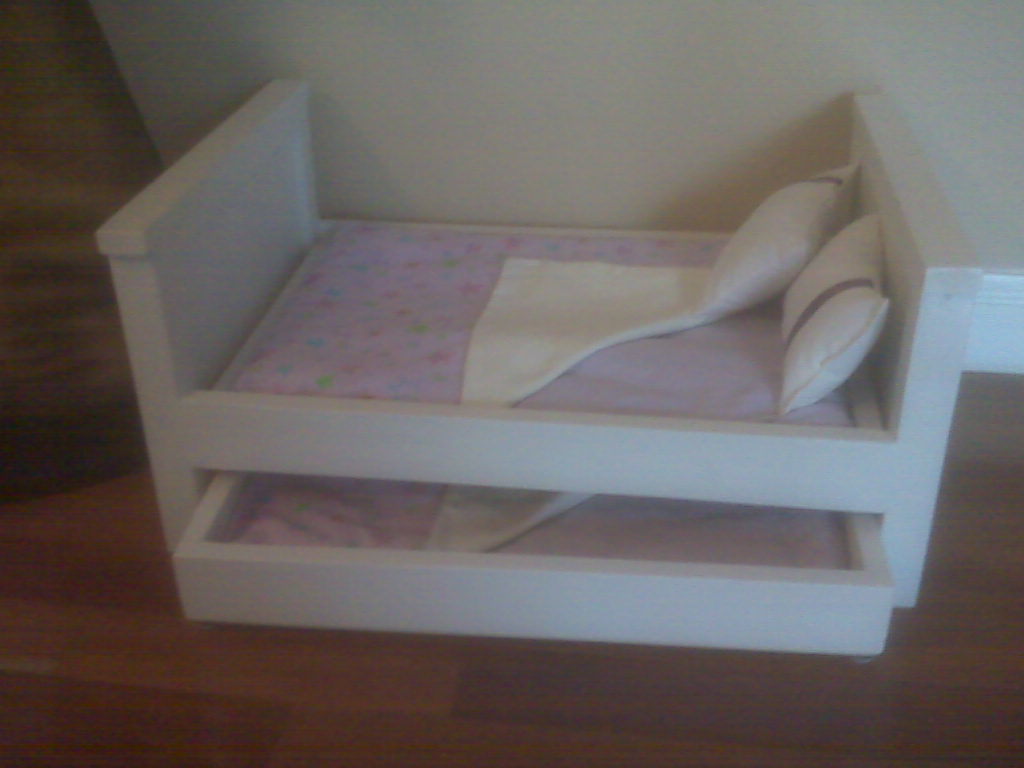
I left most of the bunks natural. Filled, sanded and sprayed with 2 coats of clear poly. Others were painted white (after filling and sanding).
Recommended Skill Level
Beginner

Comments

Nora E. McClure (not verified)

Mon, 02/20/2012 - 18:54

I love the beds. My child wants one so badly. I like yours better then the one American Girl makes.

sgilly02 (not verified)

Fri, 02/24/2012 - 20:48

That's a sweet thing to say. Evidently, others feel the same; I can't make enough of them! They're really pretty easy to make, I hope you try your hand at it!

Andrea Franklin (not verified)

Mon, 05/28/2012 - 17:27

Hi, I see you've made the Ana-White doll cradle from this post. The link to the pattern for the doll cradle appears to be missing as it is a dead link now. Do you know how I might obtain the pattern? Thanks so much

Rustic Kitchen Island with Maple Cutting Board Top!

Submitted by bcanoel on Thu, 12/26/2013 - 14:54

We constructed the Rustic Kitchen Island with a few modifications. My dad, president of the Norm Abrams fan club, built fantastic drawers using rabbet joints and fashioned a maple cutting board top. We also chamferred the edge of the top and the leg ends, very easy and adds a beautiful touch. We finished the cutting board top with "Salad Bowl Finish" which facilitates food prep.

This was a Christmas present for my boyfriend, he is in love with it! I watched him play with it like a little kid for hours after opening it. Thank you, Ana, for your great plans! (Also, Santa brought me your book for Christmas so I will be sharing many more completed projects!)

This was my very first project in the workshop. I was able to complete most of it on my own, which is why I rated it a "beginner" project. However, construction of the drawers using rabbet joints and prepping the maple for the top were considerably more difficult.

Estimated Time Investment
Week Long Project (20 Hours or More)
Finish Used
Bottom & Drawers: Golden Pecan, Minwax (2 coats on pine)
Top: Salad Bowl Finish, General Finishers (3 coats)
Recommended Skill Level
Beginner

56x34

Submitted by Anonymous (not verified) on Mon, 03/07/2016 - 08:43

Love it. 

Estimated Time Investment
Weekend Project (10-20 Hours)
Finish Used
Minwax dark walnut stain and polycrylic.
Recommended Skill Level
Beginner

Refreshment center console with barn door

Submitted by calcowoods on Sat, 10/19/2019 - 07:10

My wife and I built this Refreshment Console as a birthday present for our daughter. She had previously purchased a beverage refrigerator and wanted us to adapt it inspired by your barn door console project. Thus, we modified your plan to accommodate the height of the refrigerator. Also, she wanted three shelves with a closed back on the right side of the cabinet. Simply plan adjustments were all that was needed.

Using your plans, material list and excellent video we were able to construct the barn door rails and hangers using 1 ½ inch fender washers which sandwiched three 1-inch fender washers.  The metal bar was sized to fit the top of the cabinet and connected to the top trim board using spacers, washers and bolts.  As we decided to place a middle support for the bar, we added a t-nut into a center plywood partition so that we could use the same bolts, spacers and washers to support the rail.   

As we were following a rustic theme, we decided to add the X Braces to the barn door and used a project panel board as the top. The barn door is guided at the bottom using a simple U shaped metal bracket that we lined with felt for a smooth glide.

Estimated Cost
$100
Estimated Time Investment
Weekend Project (10-20 Hours)
Finish Used
Top, barn Door and Bottom Trim treated with one coat of Varathane Aged Wood Accelerator using a rag to create a rustic brown look.
Cabinet carcass and surrounding trim painted with one coat of Behr Premium Plus Ultra Satin Finish Metropolis Grey.
Entire cabinet finished using MinWax Paste Finishing Wax Natural applied with a rag and buffed for a durable finish.
Recommended Skill Level
Intermediate

Magazine Boxes

Submitted by AshleyC on Fri, 02/24/2012 - 20:48

This project took us about a day. We made 15. Other then an incident where my boyfriend almost shot my father in the foot with a nail gun (accidently of course lol) it went pretty well. Way better then the paper and mismatched ones that I had before!!

Built from Plan(s)
Estimated Cost
About $30
Estimated Time Investment
Day Project (6-9 Hours)
Recommended Skill Level
Beginner

American Girl Doll Horse Stable

My two dauirlghters wanted a stable to protect their beloved American Girl Doll Horses.

Estimated Time Investment
Weekend Project (10-20 Hours)
Finish Used
None
Recommended Skill Level
Intermediate

Comments

tazmama

Sun, 10/18/2015 - 19:55

Hello Scott, 

The links provided for the AG horse stable does not work or exist. I probablly cannot create one like you did because I don't have wood working tools but if you have the pics available somewhere I may be able to do a rough version for my daughter. It pains me to buy a horse she wants knowing she won't use it much but it's on her xmas list! :) 

Christina

Bathroom Cabinet

Submitted by Anonymous (not verified) on Sat, 03/12/2016 - 06:31

My niece had an area in her master bathroom that she wanted to make into a closet.   Since she is very interested in woodworking I was happy to assist her on her first project.  It was a challenge as one wall was out of plum by 1.5 inches but we managed to successfully address the problem. 

The project turned out very nice and now my niece has a large closet with lots of storage space.  But we also created a monster as she has definitely caught the woodworking bug!  Her birthday is coming up soon and all she wants are tools!

Estimated Cost
350.00
Estimated Time Investment
Week Long Project (20 Hours or More)
Finish Used
Interior white paint ... to be applied.
Recommended Skill Level
Intermediate

Comments

Farmhouse table

Submitted by Jorge Gari on Tue, 10/22/2019 - 15:15

I just finished this table for our new house at the beach; I did a small modification  at the moment of fixing the breadboards;  besides the pocket holes I also used dowels for extra strength. If someone sits on the front of the table it could be a problem.

Another detail I included,is a simple way to clamp the diagonal pieces, much more firmly than with tape.

I am quite happy with the results, I will now finish the table with lacquer.

Estimated Time Investment
Week Long Project (20 Hours or More)
Finish Used
Lacquer

I Built an Outdoor Sofa Set!

I have been wanting outdoor seating by my pool forever but couldn't afford anything I liked. When I came across Ana White's plans for the outdoor sectional I knew I had to build two. They are just what I was wanting and cost under $200. It took my brother & I one afternoon to buy the supplies and put it all together. Since this furniture is outdoors 24/7, I had to caulk the seams & paint the whole thing. That process took two days. The biggest expense was of course the cushions from Home Depot that Ana White recommends for this sectional. I have to admit, they are well worth every penny. They look amazing! Can't wait to spruce them up with some throw pillows.

Built from Plan(s)

Outdoor Sectional

Submitted by Boogiemy on Tue, 02/28/2012 - 05:54

We built this sectional for approximately $700. The wood and supplies cost about $200. The cushions were the most expensive, about $500. We wanted 24 inch wide and 5 inch thick cushions that were well made. I ended up ordering them online from Wal-Mart. The project could have taken about one day, but due to work and kids, it took us about a week.

Estimated Cost
$700
Estimated Time Investment
Day Project (6-9 Hours)
Finish Used
Cabot Australian Timber oil in honey teak
Recommended Skill Level
Beginner

Comments

Corona Coffee Table

I first saw this table on the Shanty 2 Chic website and when I saw that it was based on a plan from Ana, I knew we had to build it. I asked my husband David to get started on it right away.

It turned out perfectly!!!

Built from Plan(s)
Estimated Cost
250
Estimated Time Investment
Weekend Project (10-20 Hours)
Finish Used
To finish the table, we started with Minwax Pre-Stain Conditioner, and followed it with Minwax Golden Pecan, Minwax in Golden Oak and finally Minwax Polyacrylic.
Recommended Skill Level
Intermediate

Rustic X-Entryway Table

Submitted by LN2014 on Mon, 03/14/2016 - 21:29

Handmade rustic entryway table. Stained with Varathane Stain and made from 2x4s & 2x6s Canadian white pine

Estimated Cost
$25
Estimated Time Investment
Day Project (6-9 Hours)
Finish Used
Varathane Ash Stain.
Varathane Polyurethane Satin
Recommended Skill Level
Intermediate

Comments

paveltrudel

Mon, 04/11/2016 - 05:30

Hi,

I really love your entryway table. Do you have a plan that we can use with dimensions and cut list?

Thank you

Tkkl07

Mon, 07/11/2016 - 06:38

This table is beautiful!  Are there any plans?  The link doesn't show the plans or the cut list. Thanks! 

elaina_tanaka

Sat, 08/06/2016 - 19:56

This table is beautiful!  Would you be able to share the plans for this?  Thank you!


Brian Famous

Sat, 03/17/2018 - 19:38

I modified the design slightly, by adding feet and a 1x4 board accent (that makes it easier to build).  I'm assuming the overall height is 29.5" and the length is 48".   If you want these to be different, feel free to reach out to me and I can help you adjust. 

You can find the plans here: http://famousartisan.com/diy-x-base-sofa-table-plans-or-entry-table/

Brian Famous

Sat, 03/17/2018 - 19:39

I modified the design slightly, by adding feet and a 1x4 board accent (that makes it easier to build).  I'm assuming the overall height is 29.5" and the length is 48".   If you want these to be different, feel free to reach out to me and I can help you adjust. 

You can find the plans here: http://famousartisan.com/diy-x-base-sofa-table-plans-or-entry-table/

First Farmhouse Kitchen Table & Floating Shelves

Submitted by Anonymous (not verified) on Mon, 10/28/2019 - 13:40

Been loving our Ana White plans!! The table and shelves turned out exactly how we wanted them to & they were SO much cheaper than paying for lesser quality furniture store finds. We’ve received so many compliments!

Estimated Cost
$230
Estimated Time Investment
Week Long Project (20 Hours or More)
Finish Used
Stained the table top in Kona by Varathane. Painted the legs and shelves dark brown and white to create a weathered look.

Dresser

I originally wanted the Hudson Dresser from Pottery Barn but I wanted it a little more feminine. I also really liked the Madison Dresser plans posted on this website so I combined the two and this is what I got. It took me a weekend to build and a week to stain (a layer of stain after work a day). I got the drawer pulls from World Market and I got the bunn feet on ebay. I'm overall very pleased with it.

Built from Plan(s)
Estimated Cost
$225
Estimated Time Investment
Weekend Project (10-20 Hours)
Finish Used
Polyshades 2-in-1 Bombay Mahogany (three coats with sanding with 220 grit sandpaper in between coats)
Recommended Skill Level
Intermediate

Comments

debandtom25

Thu, 03/08/2012 - 10:03

I need to redo my whole living room and I want to have a nice piece to put the TV on top. I LOVE the feet and drawers of this piece and I might just have to steal some inspiration.

Mario Castle Bunk

Submitted by jlholmes80 on Wed, 01/01/2014 - 00:30

So my son needed a bunk bed and we came upon the sweet pea bed. It was too girly for him so we decided to go with a theme that would be timeless, something he wouldn't mind having when he is 18 (or older, he is 10 now). What is better than Mario! (We are a house full of gamers, my 17 year old is super jealous of this bed lol). The build was fairly easy and the plans were straight forward enough, the time consuming part was the painting (without all the painting we could have probably build this in a long weekend). We changed a few things, like not arching the top windows, adding the 4 inch 2x4 squares to the top to give the castle look and stairs are made to look like stairs from the side so we stepped out the banister instead of angling it.

Estimated Cost
500
Estimated Time Investment
Week Long Project (20 Hours or More)
Finish Used
Paint colors were all Behr paint+ primer (mostly eggshell or flat):
New Brick, Black, Polar Bear White, Green Crush, Green Acres, Lemon Zest, Windjammer, and French Silver. Some of the colors (like pinkish tone on the stairs) we created on our own mixing the New Brick and the Polar Bear.

Polyurethane. I mixed regular oil based polyurethane (gloss) with mineral spirits (50/50) and wiped it on. It was remarkably simple and gave it a nice seal/finish. Last coat I used Satin Polyurethane because I didn't want the gloss finish. I opted not to sand between coats because this is a kids bed and I wasn't looking for that "perfect" finish, just wanted some added protection.
Recommended Skill Level
Intermediate

Comments

Mrswhetstone1

Wed, 01/01/2014 - 06:11

This is the coolest bed I have ever seen! I wish I could make this for my youngest. I could probably build it, but I 'm pretty sure it would go downhill when I started painting it. You did an amazing job and your son is a very lucky boy!

jlholmes80

Wed, 01/01/2014 - 16:10

You can totally do it! I am a horrible painter (I'm too impatient) and you can't tell with this because of how forgiving the design ends up being. There is so much going on it's hard to pinpoint the mistakes. :)

jlholmes80

Wed, 01/01/2014 - 16:07

Thanks so much! This was the first thing we ever built (although my husband did a lot of building stuff in his youth we have never done anything together and I was a total beginner) so we are very happy with it. :D I appreciate all the kind words.

amercpina

Fri, 05/03/2019 - 22:00

We are super excited to build this for our 9 year old son. To make this a Full size bed am I correct in thinking that I only need to alter the side panels by adding 15inches? I am paranoid about building it and the mattress not fitting. Thanks so much!

Clara inspired kid's table

Child sized table. Used a 24" project-style top (all-in-one), 1x2s for the supports, and 2x2s for the legs.

Built from Plan(s)
Estimated Cost
$30
Estimated Time Investment
Day Project (6-9 Hours)
Finish Used
Minwax Penetrating Stain and Minwax Polyurethane for the top
White cabinet paint for the legs and supports
Recommended Skill Level
Beginner

Entry/Console Table

Submitted by Robinwood on Mon, 03/05/2012 - 22:35

A friend needed an entry table, so I went with the Cheap and Easy Console plan and found the baskets at Ross. I modified to include lower shelf and did a single board top because I was trying to avoid buying more wood.

Estimated Time Investment
Afternoon Project (3-6 Hours)
Recommended Skill Level
Beginner

Baby boy misunderstands the concept of the 'Man Crate'

Submitted by aclohesy on Thu, 01/02/2014 - 08:43

Men come in crates - who knew?

My crate is a gift for a friend, to be filled with manly foodstuffs, but in the mean time, the little 'un loved trying it out.

I didn't follow the plans rigidly, but I absolutely loved the idea and was inspired by all the great photos on this site. Mine looks the same from above and below, but the front and back side slats are attached to the lid while the left and right ones are attached to the box. Also, everything uses the same 18mm ply (what I had available!) which means you can easily lift it using the side slats, but lift the lid off with the front and back slats.

Enjoyed this project - will more than likely make others in the future. Maybe even spend a bit of time on the finish next time - the 'rough 'n' ready' look works well enough for this kind of project though, so it plays to my strengths!

Built from Plan(s)
Estimated Cost
15 GBP (approx 25 USD)
Estimated Time Investment
An Hour or Two (0-2 Hours)
Finish Used
None on the wood. Briefly sanded, but no power tools used other than drill driver.

'Man Crate' lettering added with a sharpie and a template.
Recommended Skill Level
Beginner

Comments

JoanneS

Thu, 01/02/2014 - 11:04

Your man crate looks great! You can definitely say your little guy has "man tested" it as well! (super cute pictures with him, by the way) The idea of using the top side trims for handles is super! Thanks for sharing this build! :)
Joanne

BeaxBuilt

Tue, 02/04/2014 - 21:37

I love the boy :) I love this idea too. Will have to build it for my dads next gift.

Back