Community Brag Posts

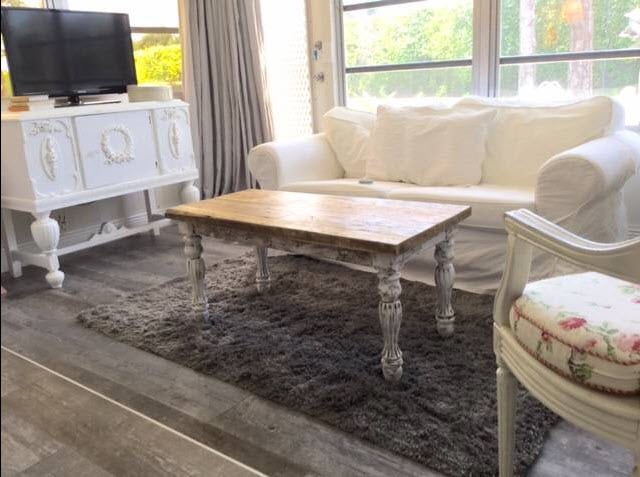
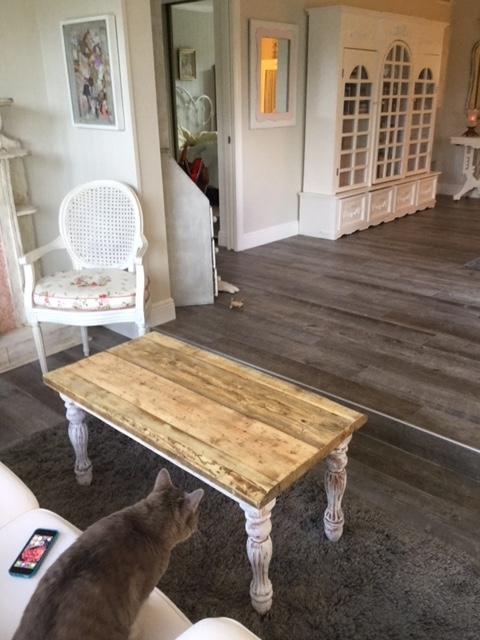
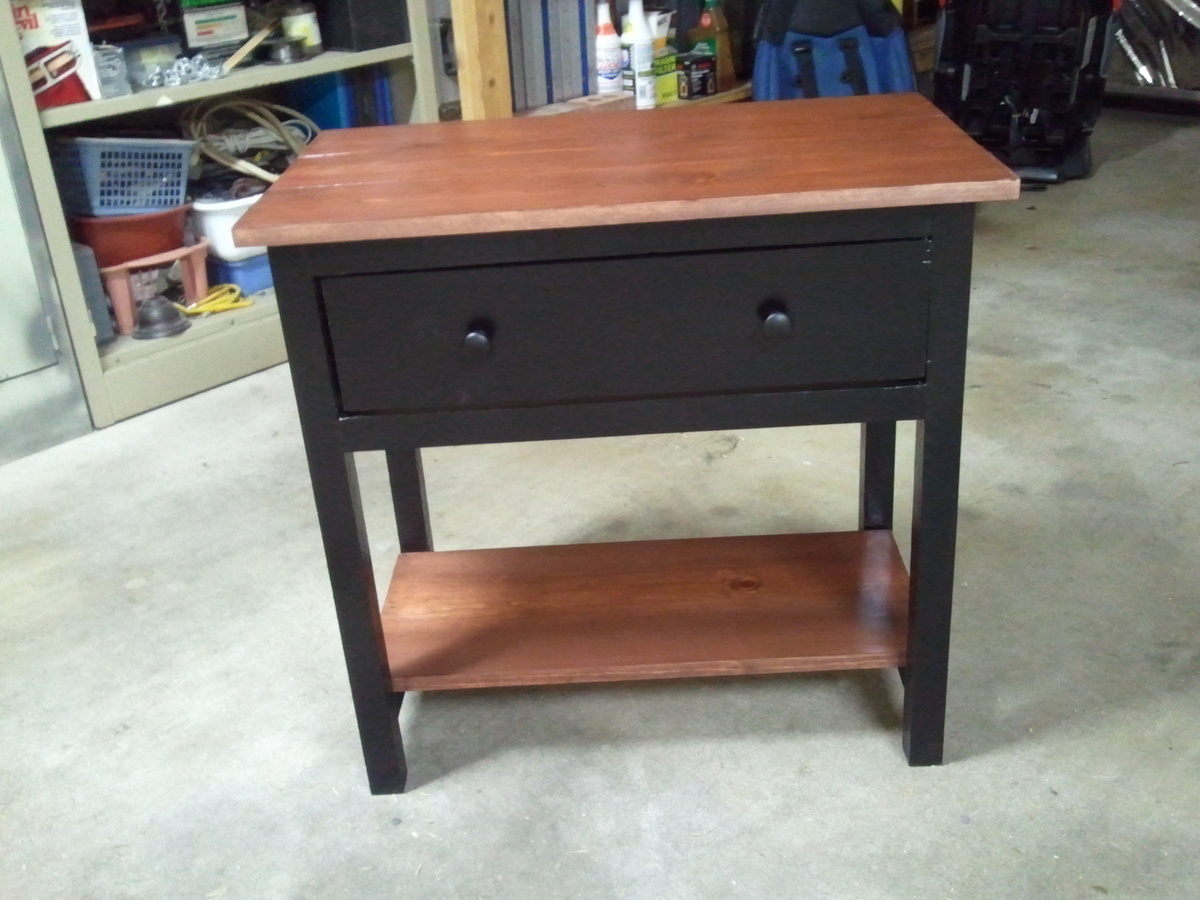
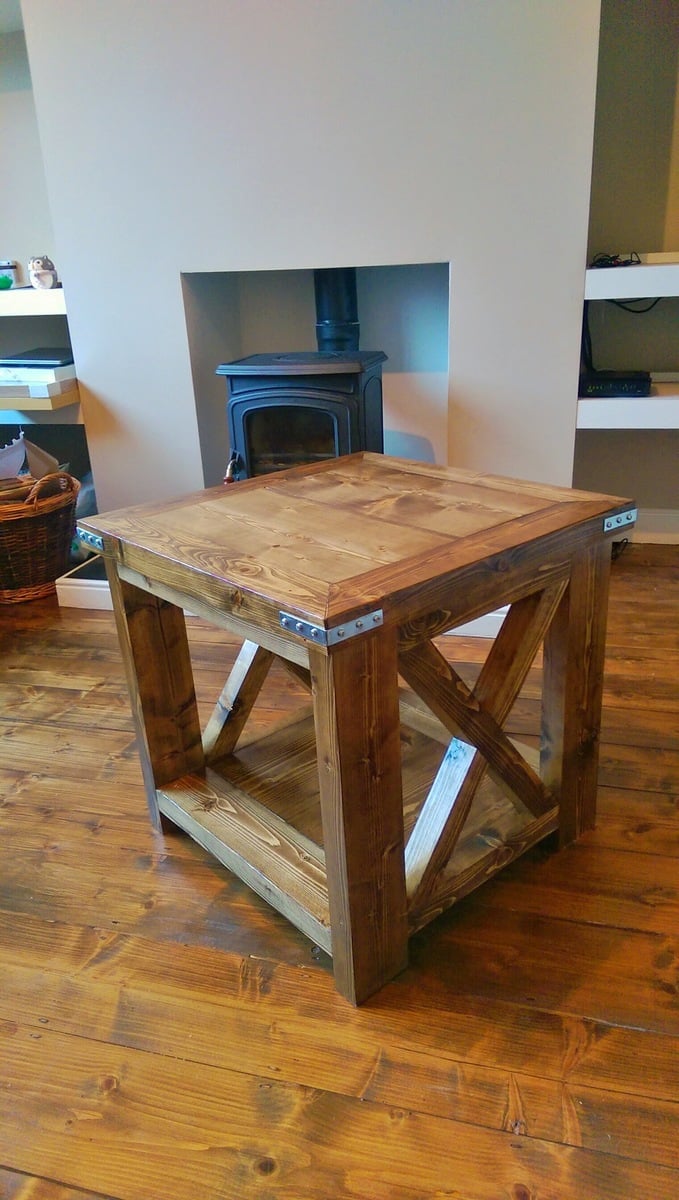
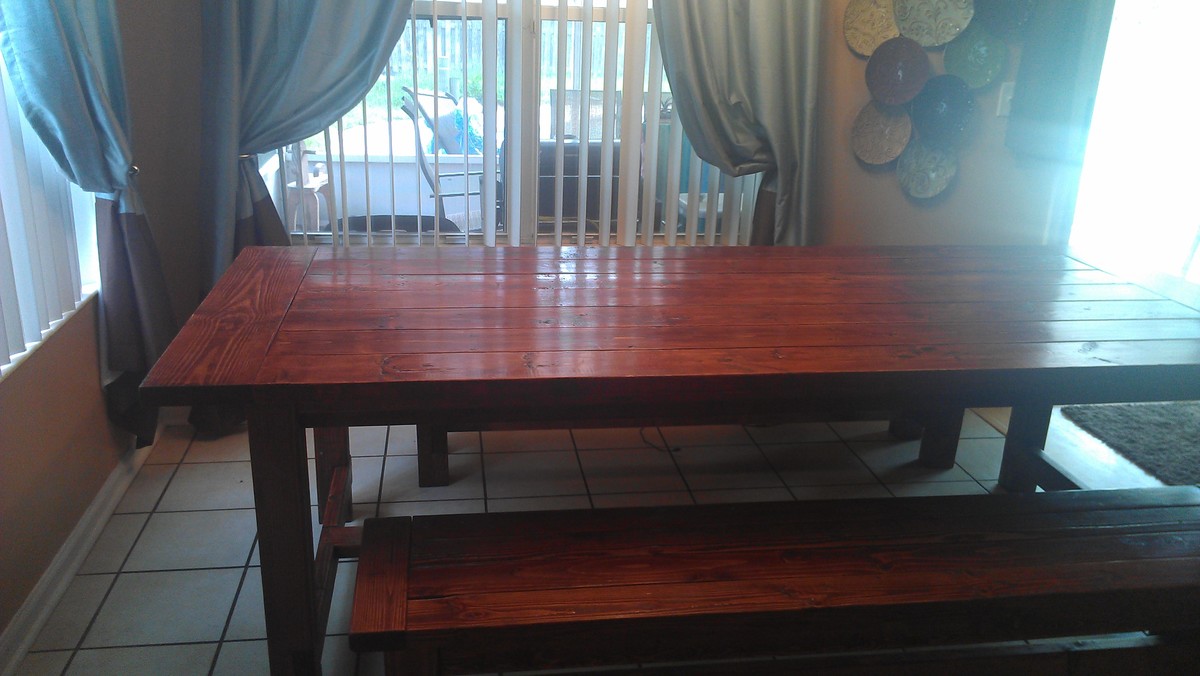
A rustic coffee table for my mum

Submitted by sagey on Sun, 05/03/2015 - 21:59

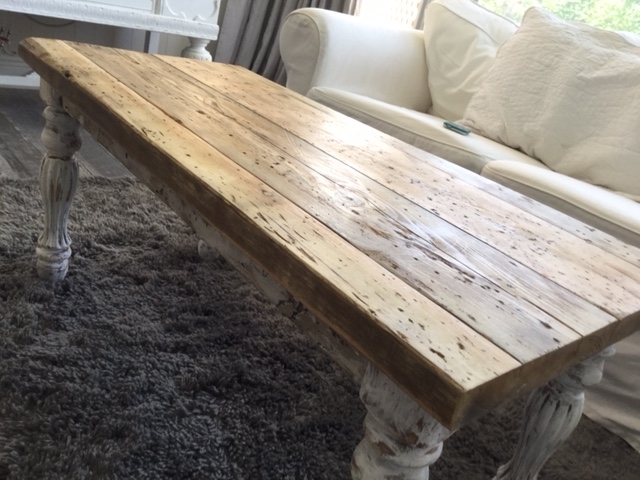
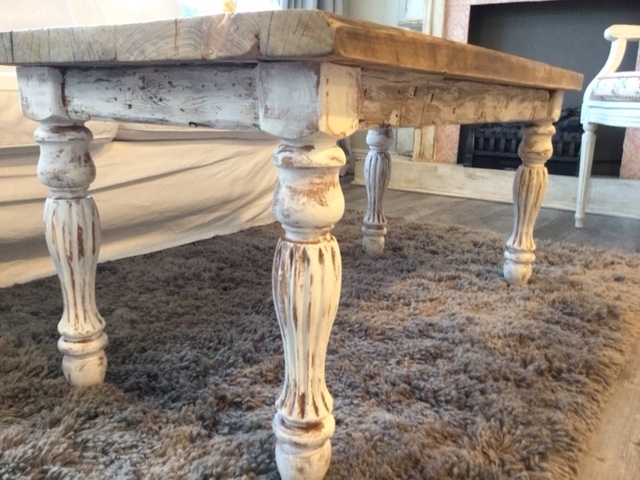
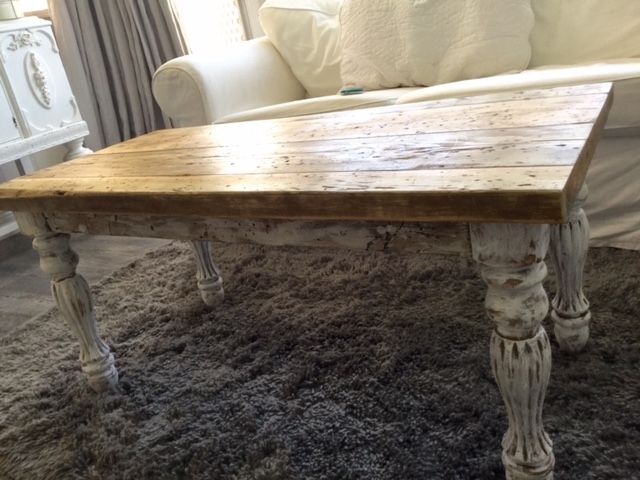
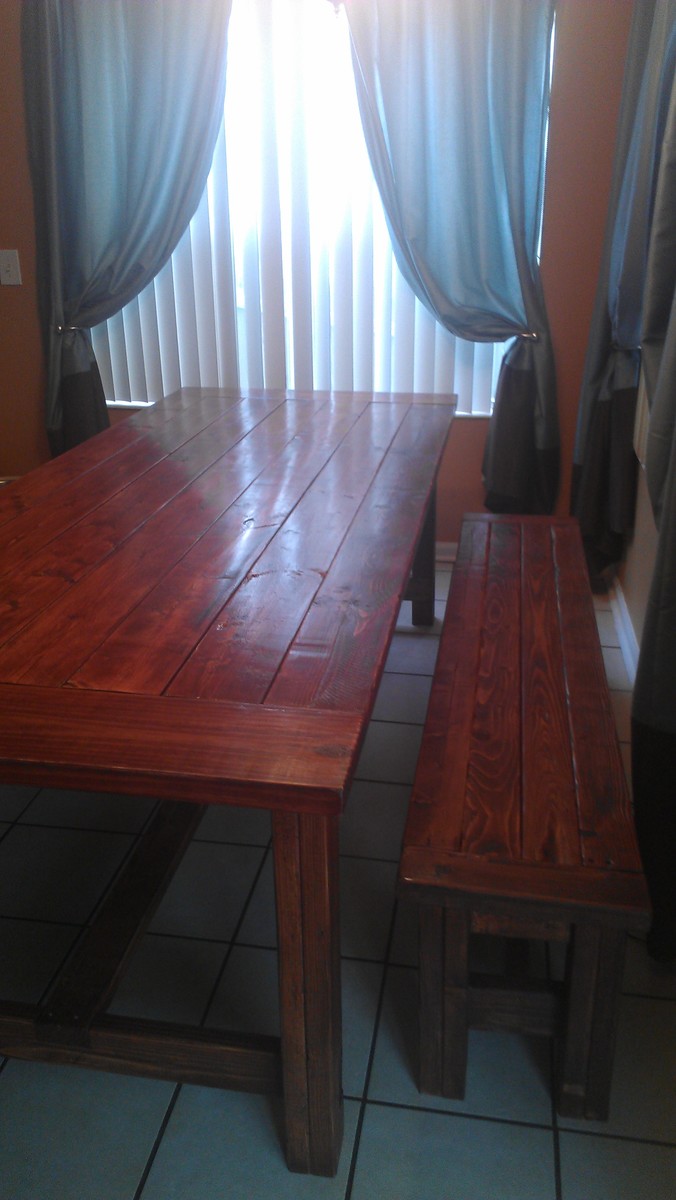
This is a turned leg coffee table that i built for my mum. the top is reclaimed and the legs were found on a cheap craigslist side table!

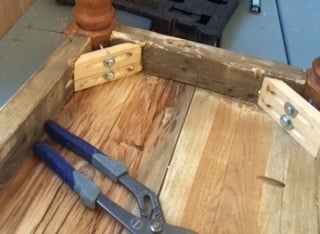
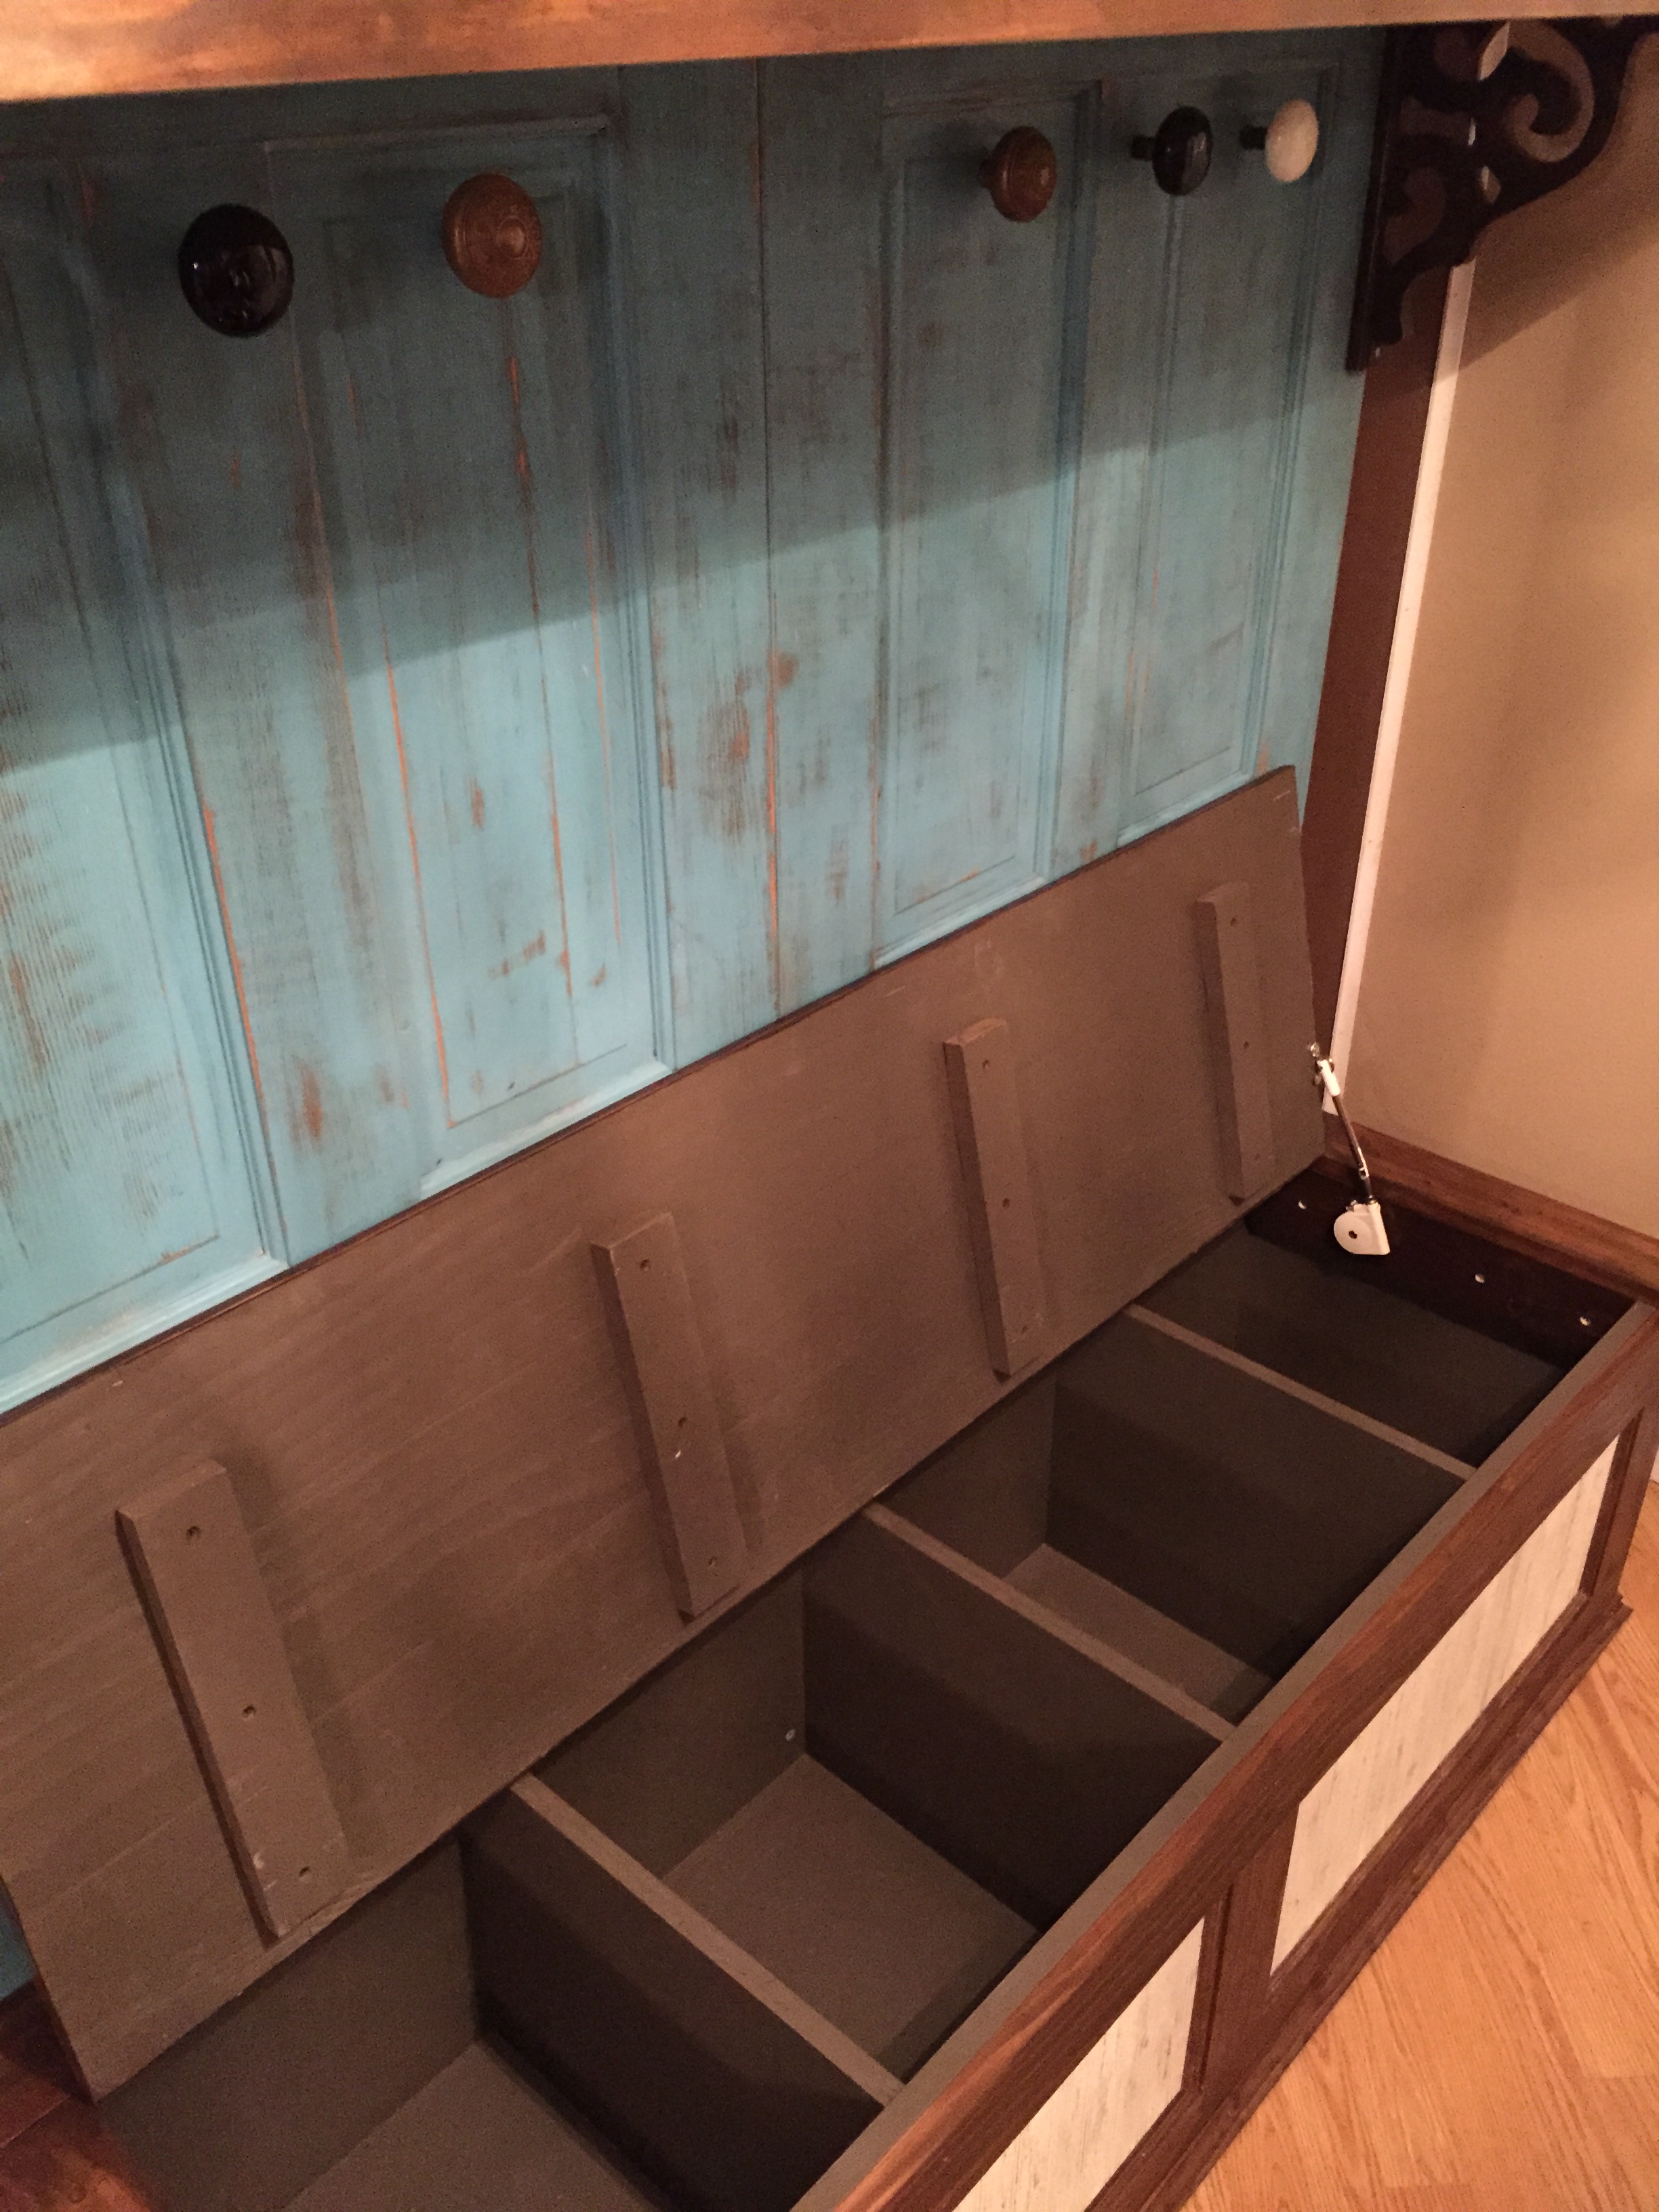
I used corner brackets to secure the legs so they could be taken on and off...as i needed to ship the table in the mail.

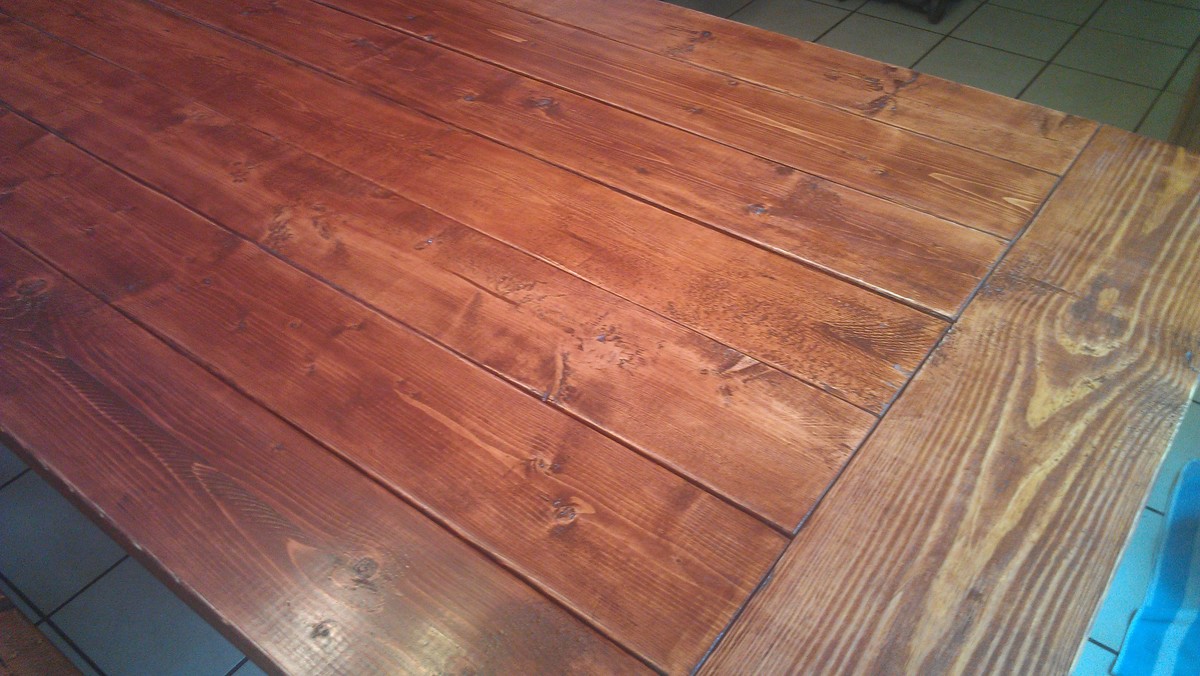
The boards on top were already distressed but i used a gooey month long festering vinegar and steel wool concoction to add even more interesting layers.

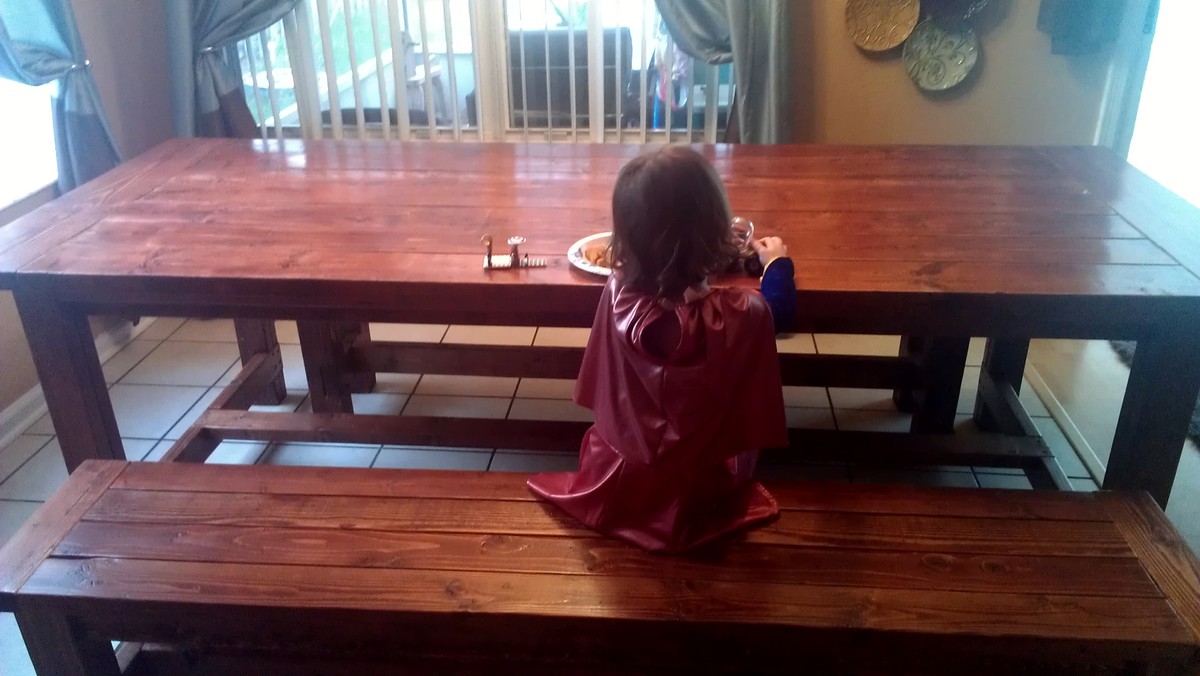
I am so happy with the table and my mother is in love with it!!!!

Thanx again for the great plan and resource that helped me build it!

Estimated Cost
wood free
legs 35.00
Estimated Time Investment
Week Long Project (20 Hours or More)
Finish Used
top= oxidizing solution vinegar and steel wool steeped for over a month.
wax finish
legs chalk paint
Recommended Skill Level
Beginner

Comments

Farmhouse Table & Bench

Submitted by Anonymous (not verified) on Sun, 10/10/2021 - 17:48

Absolutely love how this table & matching bench turned out! We made them rustic looking before staining with Jocabean stain. Our customers went crazy over it ❤️

Built from Plan(s)

Comments

My very first build and I love it

Submitted by kimewest on Tue, 06/04/2013 - 20:47

This is my first try at building! Well, I have built above ground gardens but never furniture. Seeing what everyone has done on this site encouraged me to give it a try too. I'm so glad I did and it turned out exactly as I wanted. Now, I have several other projects that I'm excited to start. This could get addicting.

I needed a side table for my office and wanted it to match the decor. I have all black picture frames and accessories and needed the wood to look very similar to what was on the couch. I had planned on painting the bottom shelf but really liked it plain so decided to stain it as well.

Built from Plan(s)
Estimated Cost
About $60 but would have been less if I'd done this before
Estimated Time Investment
Weekend Project (10-20 Hours)
Finish Used
High gloss black paint and Minwax Rosewood stain. I finished with a glossy polyurethane.
Recommended Skill Level
Starter Project

Hall Tree

After 10 years of kicking around back packs and shoes that are always in the way, my wife decided she would like a Hall Tree for our foyer. For the last year or so I have been gathering ideas from the internet and putting plans together in “Sketchup”. I wanted to re-purpose some old doors and door knobs and was fortunate to find them at local auctions and antique malls. I’ll have to say that finding a pair of matching solid wood doors was the hardest thing to do. I was lucky to find a pair at an antique mall, and only paid $36 for both. The porcelain door knobs are used for hanging our jackets and coats. I found several of these at an auction. I used a piano hinge for the bench and installed a soft close hinge made by “Sugatsune” which I found on “Amazon’s” website


 Not cheap but well worth eliminating the dreadful slamming sound of the bench door. I had never distressed anything, but this and my wallet received plenty during the build. I’d have to say the best part of the build was working with my little cookie monster. She was always wanting to help, and I’m gonna let her because you all know as well as I that those days won’t last forever. Not a professional by any means, but Thanks for looking.

Built from Plan(s)
Estimated Time Investment
Week Long Project (20 Hours or More)
Finish Used
Dark Walnut Stain, Antique White and Turquoise Latex
Recommended Skill Level
Intermediate

Comments

adeath

Thu, 05/07/2015 - 11:31

This is really fantastic. I love the doors as a design element. I may just have to head out this weekend and find some matching doors.

c_loughridge

Mon, 05/18/2015 - 05:10

Thanks Ana. Also thank you for all you do to keep this site up and going....really appreciate all the great plans and ideas.

Safejosh

Thu, 11/17/2016 - 11:37

I would love to build this but, I could not find the plans for this size of a bench to match the back piece. Could someone please assist? Thank you.

Farmhouse bed - twin size

Submitted by Teazle33 on Wed, 09/20/2017 - 19:30

This is the first bed I have built. It turned out better than I expected. The plans were great and easy to follow. I completed the bed from start to finish in two days. The steps I made from leftover material. 

Built from Plan(s)
Estimated Cost
200
Estimated Time Investment
Weekend Project (10-20 Hours)
Finish Used
Dark walnut stain
Recommended Skill Level
Beginner

Modern Farmhouse Tables

Submitted by Anonymous (not verified) on Sat, 10/16/2021 - 09:43

I made the coffee table, an end table and I modified the console table to add another shelf because I have too much stuff lol! These are my first wood projects and I am happy how they turned out 🥰

Comments

Factory Cart: How Low can you go?

Submitted by chjaway2 on Wed, 03/23/2011 - 08:15

The Factory cart was really easy to put together.

I used a pocket-hole jig to eliminate any screw heads on the exterior.
The wood I had was already distressed somewhat, but I figured that would add to the 'old' look when ultimately completed.
The most difficult part of this project was finding casters that I liked and that I could afford (those suckers are expensive!)  I'm still not 100% sold on the ones I purchased, but will keep my eyes open when out & about for replacements!
The plans posted on Ana-White.com could NOT have been easier to follow.
However, I should like to stress that this coffee table is EXTREMELY low to the ground.  One of the first lines on the plan page reads:  "This coffee table sits lower than traditional coffee tables." = understatement of the year!  (my fault, I should have compared the posted dimensions with an existing coffee table to get an idea before hand) 

The plans will make a awesome factory cart height factory cart, but a nearly-uncomfortable height coffee table (As is).  In the attached photo, you'll note a foot-rest in the upper left corner as compared to the finished factory cart.
 --again, the build was super easy & a LOT of fun because I intended the finish to look worn, I didn't have worry about scratching up the wood during the build.  In fact, the kids are looking forward to helping me distress it later!  I'll just have to increase the height of the sides to make it usable as a coffee table in our home.

Built from Plan(s)
Estimated Cost
$40
Estimated Time Investment
Afternoon Project (3-6 Hours)
Finish Used
(Will) Paint, distress & stain
Recommended Skill Level
Beginner

Wide Cabin Dresser

Submitted by mebohn on Fri, 06/07/2013 - 05:46

I This project is definitely the most difficult I've ever built. I've done lot of drawer slides before, but for some reason this one was the hardest. I think the culprit was squaring, which was mysterious to me bc I'm careful to take a square constantly. Could've been bowed boards, too. But, after some patience and forcing the boards to do what the should, it worked. I did rip down 2x4's for strength b/c our stores do not carry the upgraded 2x2's and furring strips would just not have been strong enough for a dresser. My son is very happy to finally have a place for his clothes. Thanks Ana for these plans!

Estimated Time Investment
Afternoon Project (3-6 Hours)
Finish Used
Steel Wool and vinegar, Rustoleum ultimate poly in matte
Recommended Skill Level
Advanced

Comments

spiceylg

Fri, 06/07/2013 - 08:26

Your efforts were worth it. This came out beautiful. Looks professional.

Rustic x end table

Submitted by ayoung82 on Sun, 05/10/2015 - 13:43

I had to redesign the top because my wood was too narrow and warped to make it as per the plan, and I'm too cheap to go and buy some more. I think it worked out OK. I enjoyed making this piece and I'm trying to develop my accuracy in wood working. My patience for the "finishing" element is improving, but I'm still a Sand-a-phobe.

Built from Plan(s)
Estimated Cost
€40
Estimated Time Investment
Weekend Project (10-20 Hours)
Finish Used
Satin Poly & Medium Maple Stain
Recommended Skill Level
Intermediate

Hall Tree Bench DIY

Submitted by jimmysingh on Wed, 10/11/2017 - 08:13

Modified From Ana's Fancy-hall-tree bench plan.

Built from Plan(s)
Estimated Cost
$150
Estimated Time Investment
Day Project (6-9 Hours)
Finish Used
White primer one coat, paint two coats, gloss water based polyurethane one coat
Recommended Skill Level
Intermediate

DIY Learning Tower / Kitchen Helper

Our little one may be happily playing independently but the second I go to make dinner she demands to be held and refuses to be put down, making cooking impossible. To help keep her occupied but still involved I've been eyeing a learning tower / kitchen helper on Amazon for months now, but at $200 it just wasn't in our budget. My sister-in-law had made a learning tower from a plan by Ana White and suggested I try to make one too. I was unsure at first, I've never made anything more complicated than a birdhouse, but I decided to give it a go!

Please see my blog post for additional photos and lessons learned during this project.

Built from Plan(s)

Photo Gallery Ledges

I was always a fan of the gallery wall, but not having a big empty space in any of my main rooms I didn't think I could have one.  However, once I finally got my stairway and upper hallway painted, I realized the wall needed something and the gallery ledges would be perfect!  Save the old plaster walls from being bashed with picture hanging nails too!
I build them out've 1x3's and a small 1/4 round for the front edge instead of a 1x2.
I made 2 3' long and 2 4' long and staggered them on the walls, as the walls are at a slight angle to each other.
I decided to paint them the same colour as the walls so they would blend in and the picture frames would stand out.  All the frames are varying wood stain colours that go with the trim in the house.

I love having a place to put all the pictures I never find time to put up!

Built from Plan(s)
Estimated Cost
$24 for all 4
Estimated Time Investment
An Hour or Two (0-2 Hours)
Finish Used
Paint. Home Hardware 'Burnt Sugar'
Recommended Skill Level
Starter Project

Farmhouse Bunkbeds with Stairs

Submitted by Yodannos on Sun, 06/09/2013 - 13:19

We have a rental unit and decided to fill one room with 2 sets of bunk beds. One is a twin over a full. The other is a full over full. Due to a duct running through one corner, and limited amount of space, I decided to build a set of stairs on the 17" gap. I used the simple bunk bed plans, but modified it to the style of the farmhouse. Also, I changed several of the heights of the foot/head boards. The full over full will have a ladder coming off the end and is in progress.

Estimated Cost
$450
Estimated Time Investment
Week Long Project (20 Hours or More)
Finish Used
Minwax Ebony Stain. Satin Polyeurethene.
Recommended Skill Level
Intermediate

Farmhouse Queen Bed and Headboard

Thank You Ana-White for the amazing plans for this beautiful farmhouse queen bed! Not bad for the first try!

Built from Plan(s)
Estimated Cost
$150
Estimated Time Investment
Weekend Project (10-20 Hours)
Recommended Skill Level
Beginner

Comments

DIY Rustic Console Table

Submitted by Anonymous (not verified) on Mon, 10/23/2017 - 10:09

Built by Wndy D Keever-Keefe

"This was my very first build ever. Totally inspired by Ana White, I happened upon her site one day about 4 years ago and have since built lots of her plans."

Built from Plan(s)
Recommended Skill Level
Beginner

Modified mudroom bench - hall bench

Submitted by Anonymous (not verified) on Fri, 11/05/2021 - 09:18

Dear Ana White.,
First, I am a fan of your woodworkingand I follow you on YT. I like your approach to projects, making it simple and easy but still making very fine pieces that both are nice looking at and good for use.
My former neighbor needed a bench in the hallway of her new apartment; with the desired measures (roughly) 5’x19-20”x18” (150x50x45 cm). And then I saw your mudroom bench on YouTube which inspired me building my own bench according to the general ideas from yours’. So, I made like a frame with 2x3”, then I let the plywood sides proceed down to the floor, leaving a space between the carcass and the floor of 15 cm (6”), for shoes. Three drawers and using a scrap bit as space block for the drawer slides it was not that hard to get them in place. The top sheet is a slab of massive oak that are sold as “shelf material” at our local store (Bauhaus, possibly the Swedish equivalent for home Depot?).
I think it turned out pretty well, and I am grateful for your work, inspiring me and making my own woodworking easier.
Best//Göran Redmo Tyresö, Stockholm Sweden

Built from Plan(s)

Comments

Craft Table Build

Submitted by cathytn2 on Thu, 03/31/2011 - 05:28

I emailed my husband the plans for this desk on a Friday night and said we HAVE to make this desk this weekend.  I can't believe he actually went for it!  Well it turned into about 3 weekends and some nights of painting.  We also had some issues getting straight and square plywood and boards with knots in them.  He also added some extra holes in the sides for me to adjust the shelves.  We used an oil based white paint to finish the desk and looks nice and clean and shiny.  I can't wait to get started on our next project!  Please check out my blog for more details and photos and information on materials used, etc. (kitcats-studio.blogspot.com/2011/craft-table-made-from-plans.html
PS - {I had one more coat of paint on the drawers to finish so ignore the bare fronts of the drawers.}

Estimated Cost
$150
Estimated Time Investment
Weekend Project (10-20 Hours)
Finish Used
We primed everything using Zissner and then used an oil based white paint (about $15/gallon) from Lowe's for the finish. The trick to doing this is a WELL ventilated area, and a good brush. Although we're kind of lazy about cleaning up from oil based paint (it's a chore) so we got a medium cost brush (about $5) and threw it away when we were done with it. I used general handles from Lowes and the color on the inside of the drawers is Valspar Turquoise Tint 5006-10B.
Recommended Skill Level
Beginner

Farmhouse Table and benches

This is the first furniture building project that my husband and I have completed. It took us about 5 weekends to complete it- including finishing.

We started with the benches as recommended in some of the comments and ended up buying a pocket hole jig and redoing the tops of the benches before completing the table.

The stain is Minwax Red Chestnut and there are three coats of Minwax Fast Drying Polyurethane on it. We're so happy with it and can't wait to start the next project!

Estimated Cost
about $200
Estimated Time Investment
Week Long Project (20 Hours or More)
Finish Used
Minwax Red Chestnut stain- one coat
Minway Fast Drying Polyurethane in Semi Gloss
Recommended Skill Level
Beginner

Built for my sister

Submitted by Diesel911 on Wed, 05/13/2015 - 11:45

Built for my sister. Because she liked mine so much :) I also built her an apothecary console to use as a side board in the dining room

Built from Plan(s)
Recommended Skill Level
Intermediate

Comments