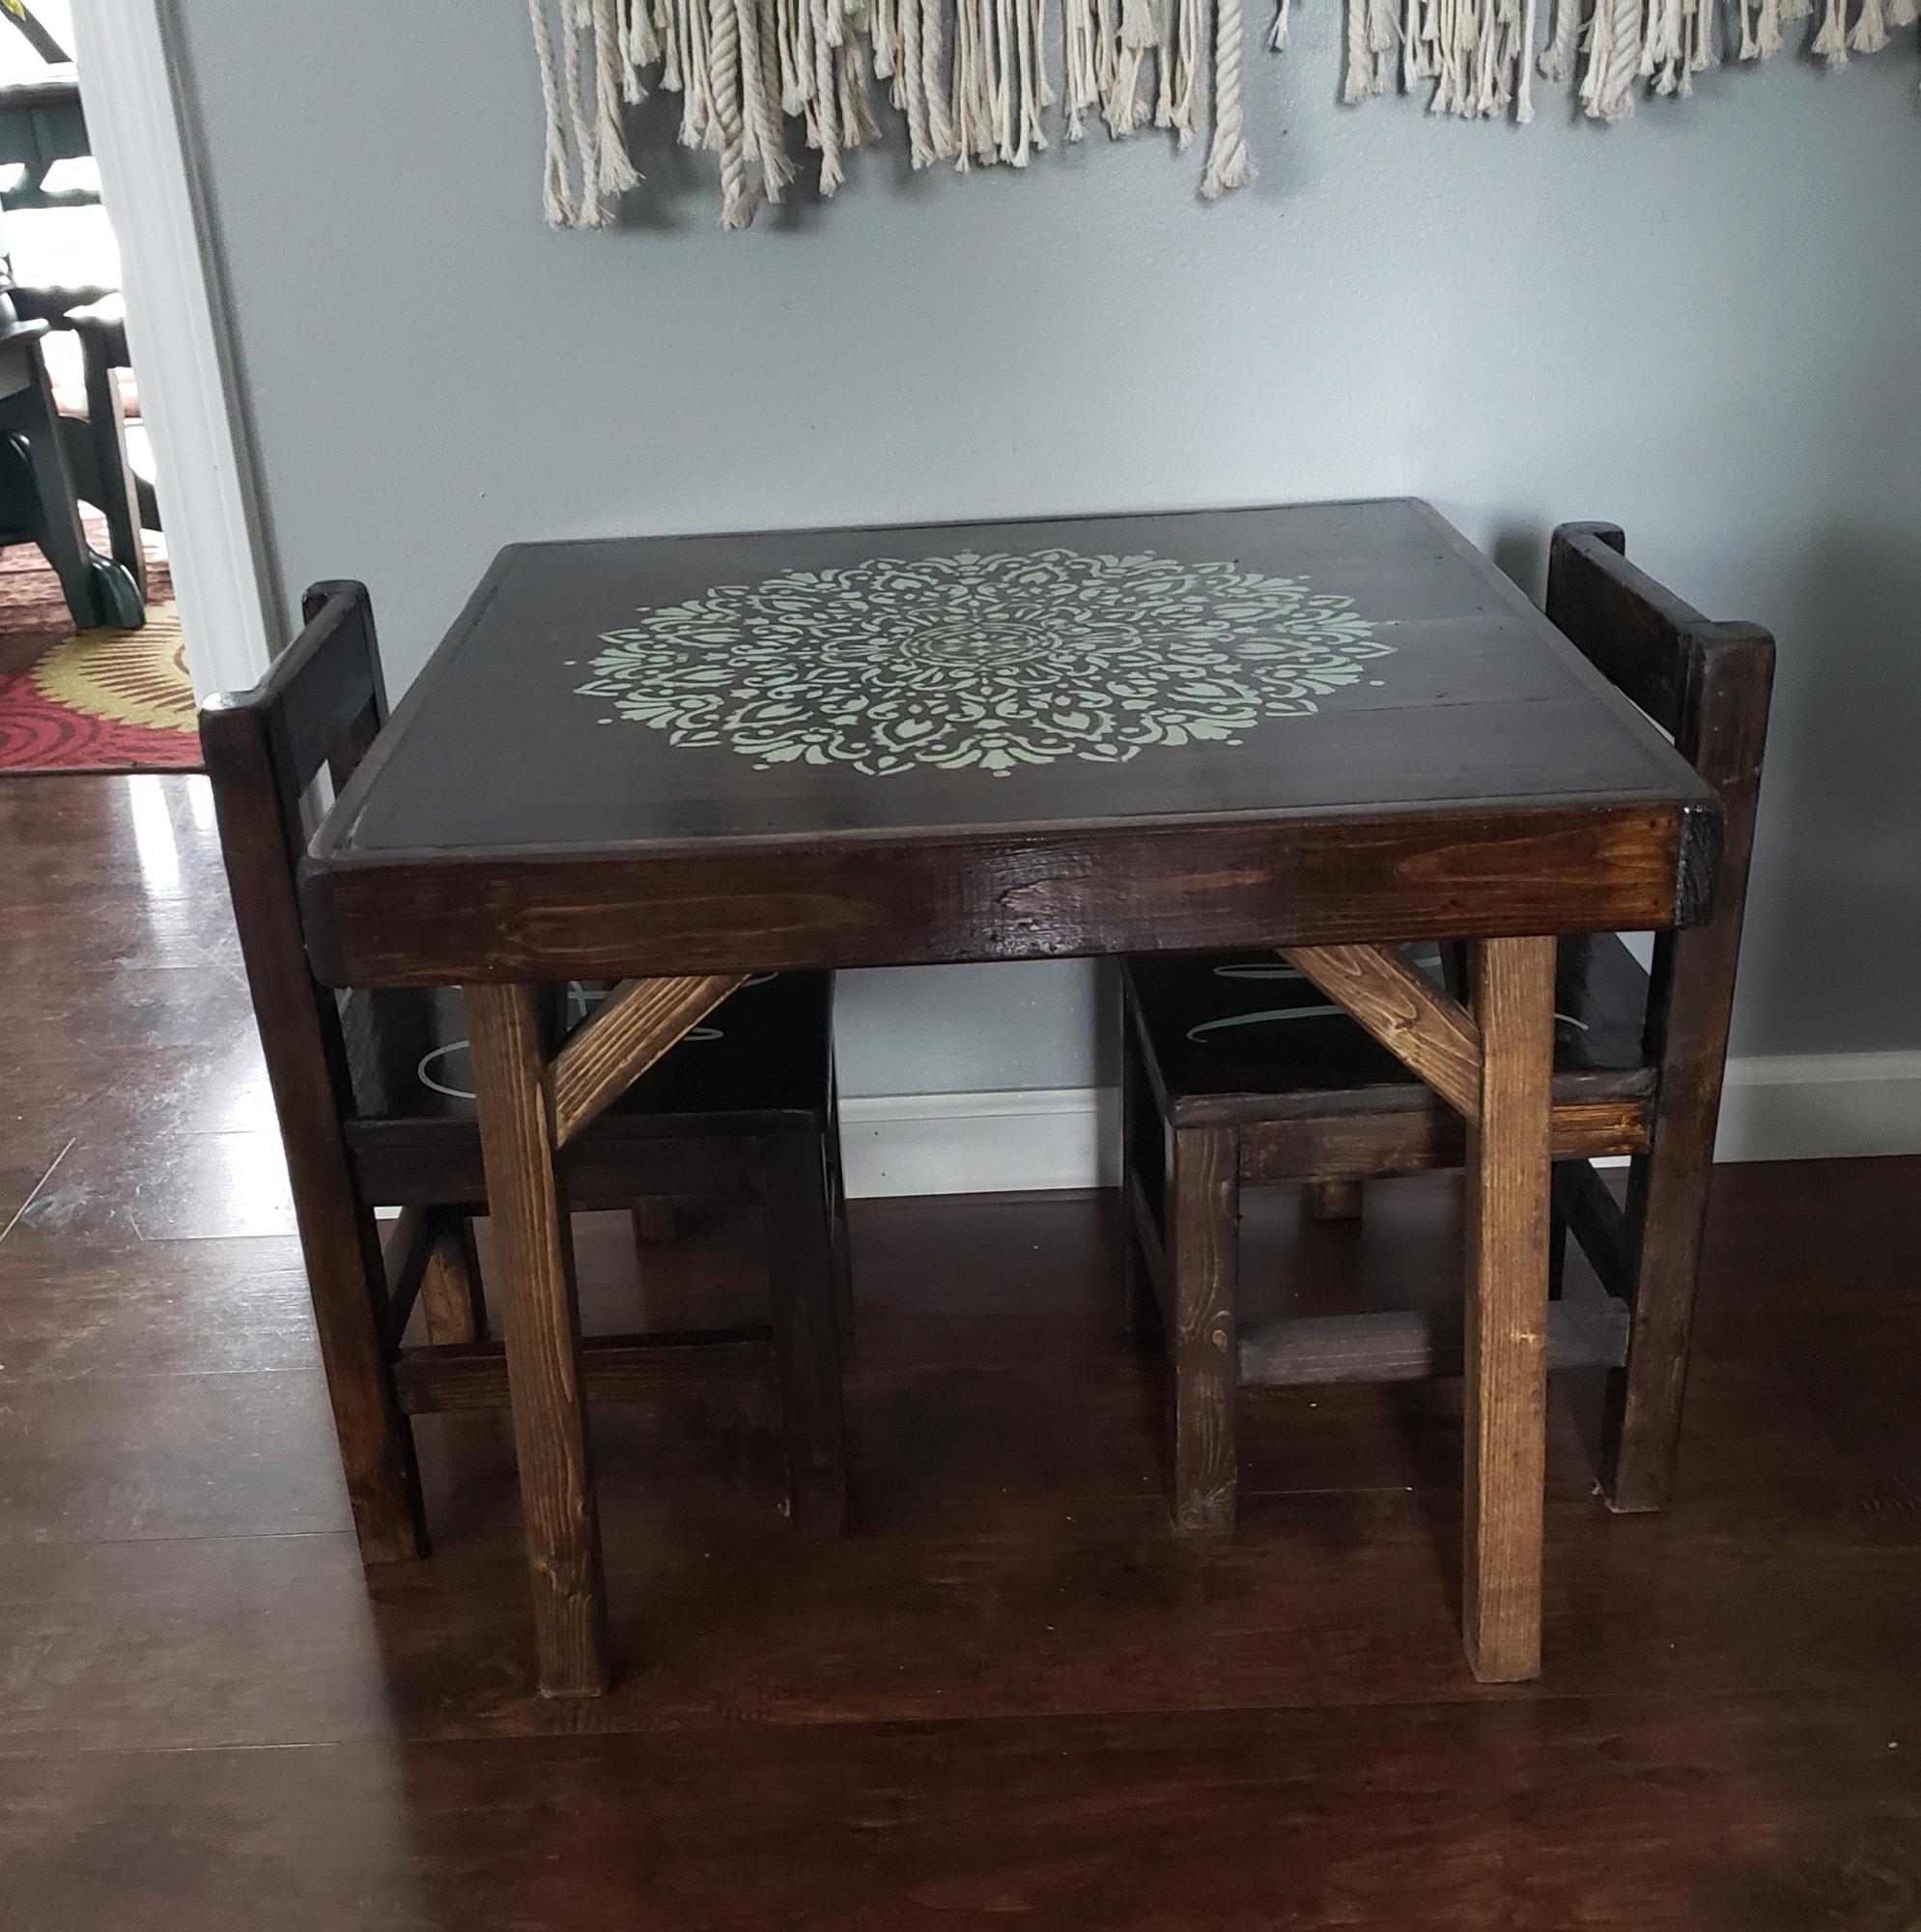
Community Brag Posts
My version of the Mom's Lego Table
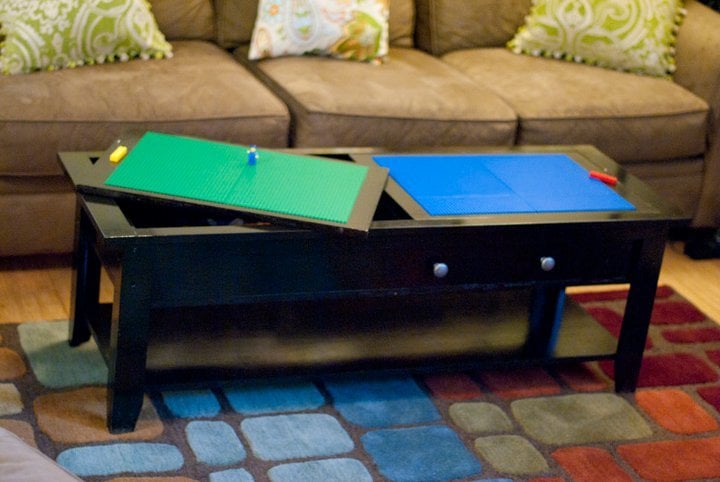
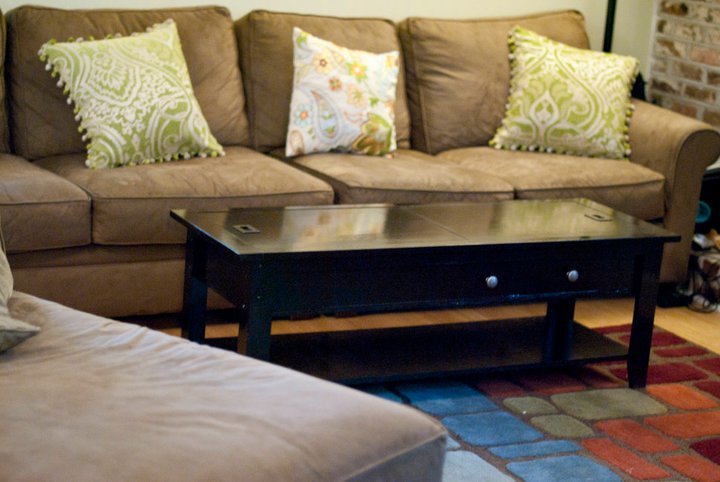
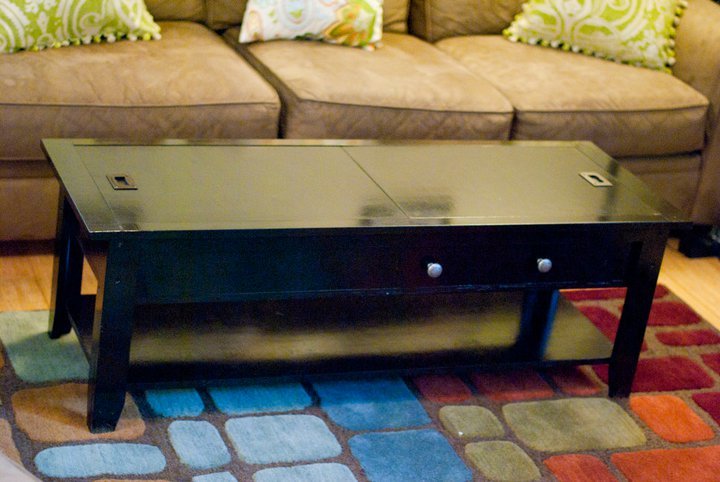
This is my second woodworking project. I picked up this hobby with some spare time and with my tools that were collecting dust after I completed most of my home renovations. Cost: $80 wood ($35 just on plywood) $35 hardware (2 recessed handles and 2 drawer pulls) $20 finishing products $40 lego baseplates On the lego baseplate side, I stained but only poly'd just enough so that the border around the plates would be covered. Baseplates had to be cut in order to get the custom size I wanted. The "play area" on one side of the table is 20 inches x 13.75 inches. Each side of the table is made with three 10x10 inch plates. Two 10x10s are side by side. The other 10x10 was cut with a razor to make it into two 10 x 3.75 inch pieces. I cut the plates so that I always had a "smooth edge" on three sides. I affixed the baseplates with epoxy. Simply butting up the baseplates does not work as the gap between plates is too small. To get the proper size, hold the baseplates together with lego pieces. Wipe any excess epoxy with mineral spirits. (Note: I tried liquid nails first on a test piece. The glue heats up after application and slightly warped the lego baseplate. Not recommended). The "mom side" of the coffee table has two recessed handles. The handles on the "lego side" are made with lego bricks. I drilled a tiny hole in the lego bricks. I threaded 50 lb fishing line through the lego brick to the hidden recessed area of the "mom's side handle" and tied off the line in there. Project took me over a month of time (probably 20-25 hours of labor). It could have and should have taken less, but I'm a newbie and am very cautious with my work.
Built from Plan(s)
Estimated Cost
$175
Estimated Time Investment
Week Long Project (20 Hours or More)
Finish Used
Brushed on Minwax wood pre-stain (1 application) Minwax Kona (3 applications) followed by 2 applications of Minwax Clear Gloss Poly (400 grit sanding and wiping down with a damp cloth to pick up leftovers), followed by 3 applications of Minwax Satin Gloss Poly (600 grit sanding, and wiping up any dust).
Recommended Skill Level
Beginner
Comments

Thu, 09/01/2011 - 08:26
Off topic: RUG
I am in LOVE with the area rug in this photo. Where can I get one???
Thu, 09/01/2011 - 11:35
Rug was bought from Zulily.
Rug was bought from Zulily. Its not available at the moment.
But google this:
Surya Oasis OAS-1000
In the picture, that's the 8x11 foot rug.

Sun, 08/20/2017 - 07:16
Thanks for details!
Thanks for the detail on how to cut and glue the lego plates. I like the recessed handles you used. Do you remember where you got them. Looks great!
Chevron kids table

Chevron kids table
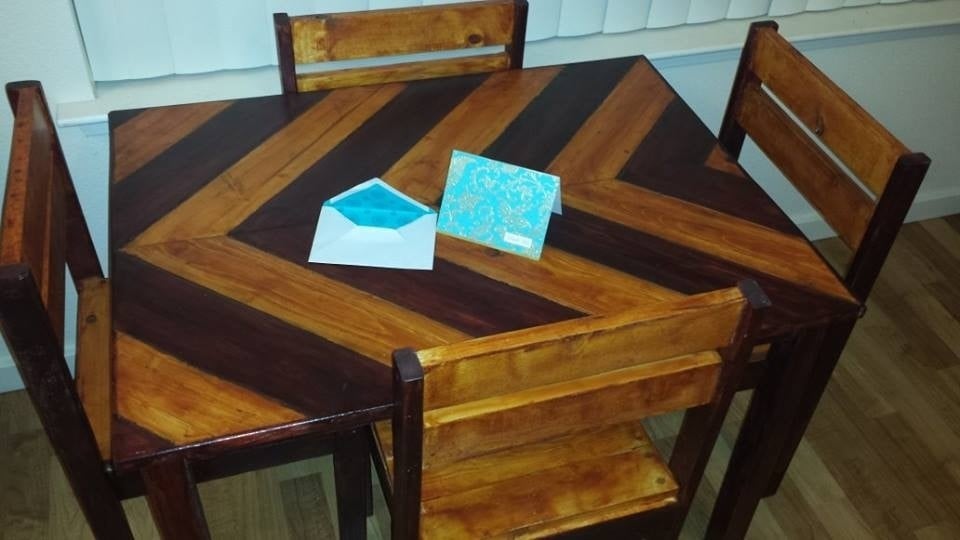
Built from Plan(s)
Estimated Time Investment
Afternoon Project (3-6 Hours)
Finish Used
Cabot red oak and golden
Recommended Skill Level
Beginner
Comments

Mon, 09/23/2013 - 08:57
Thank you for the compliment
Thank you for the compliment and the advise!!! Thought I did ..
Fri, 09/27/2013 - 07:12
link is broken
I tried clicking on your blog link and it doesn't work.... Love the table though:-)
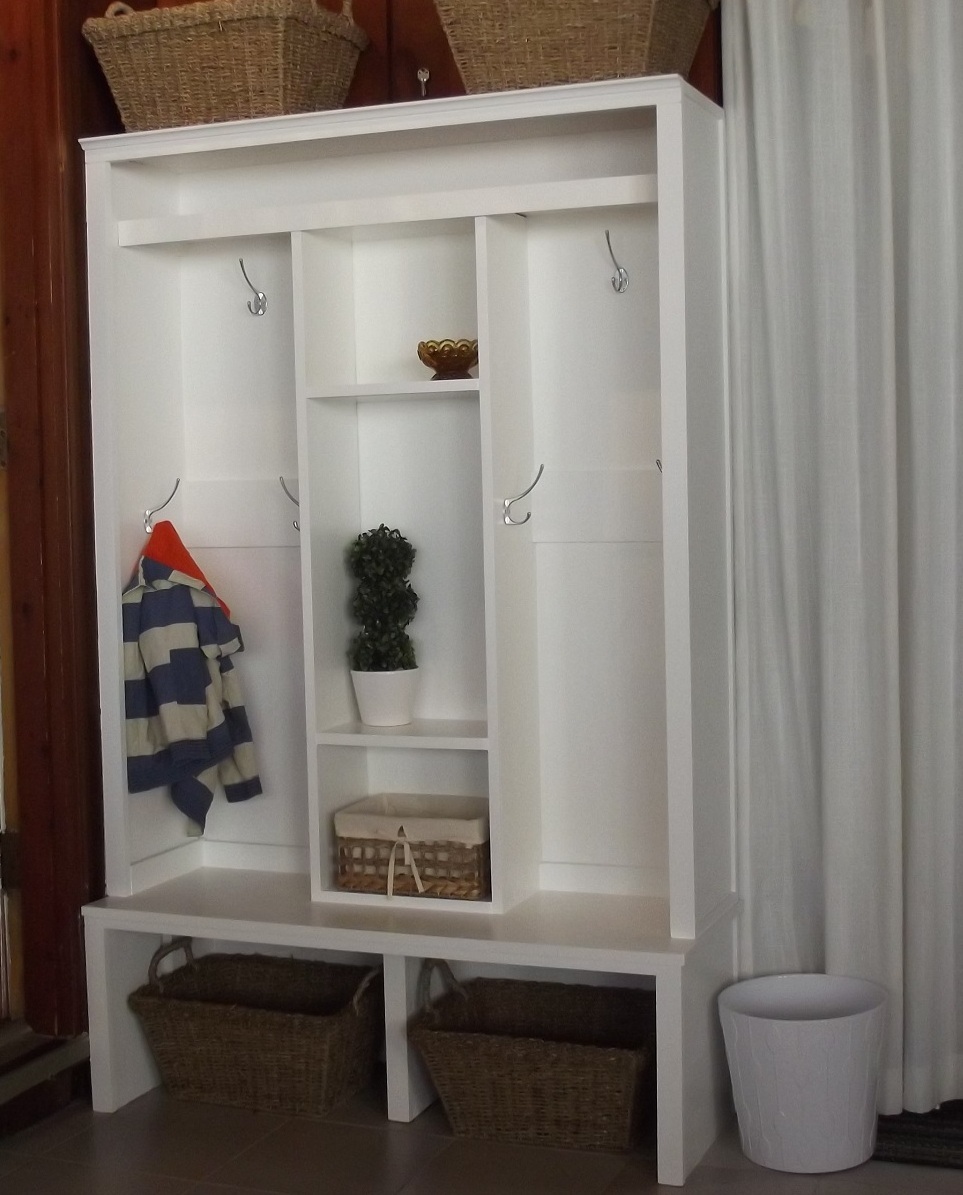
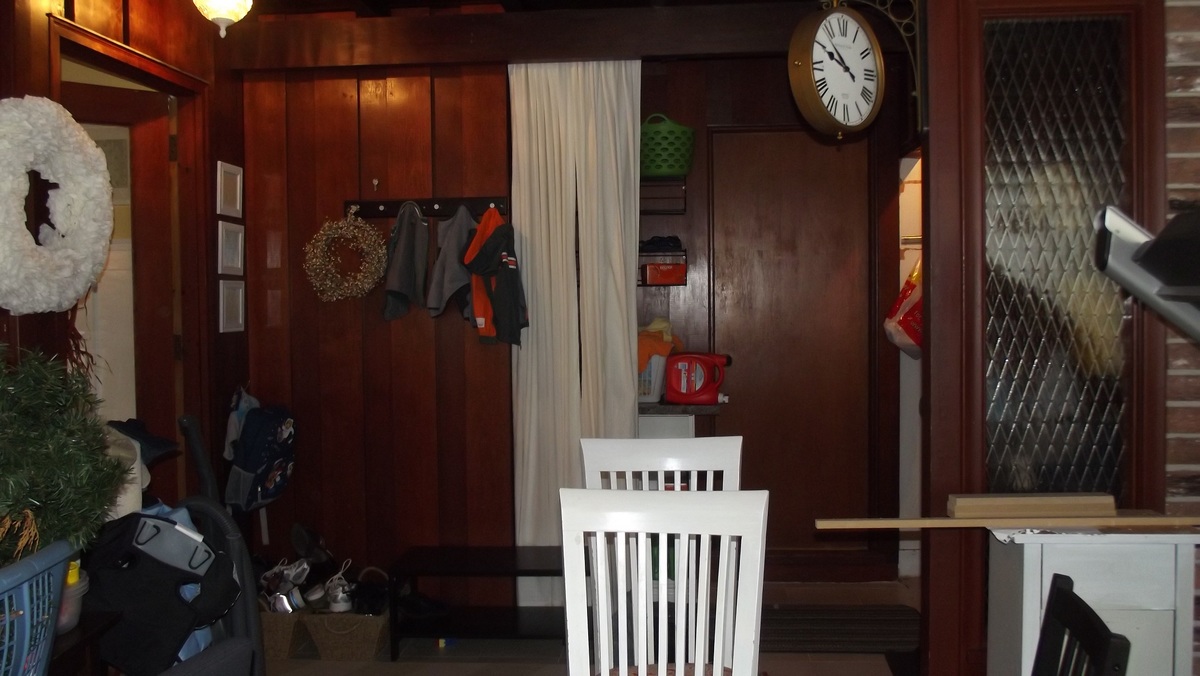
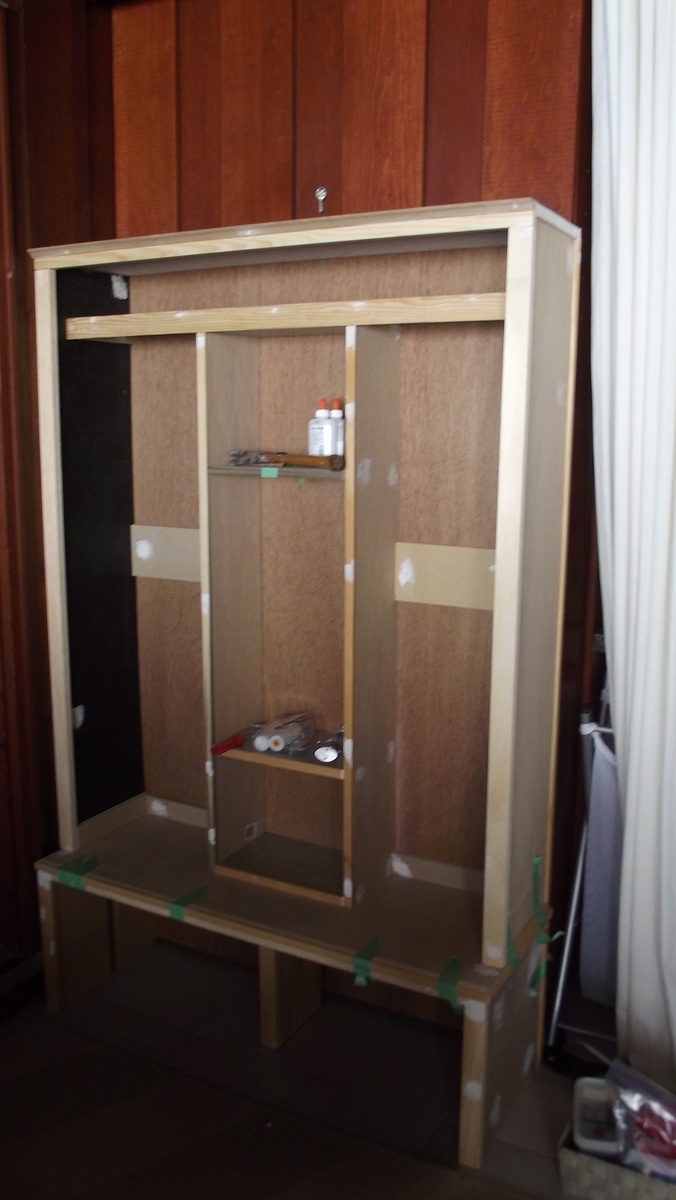
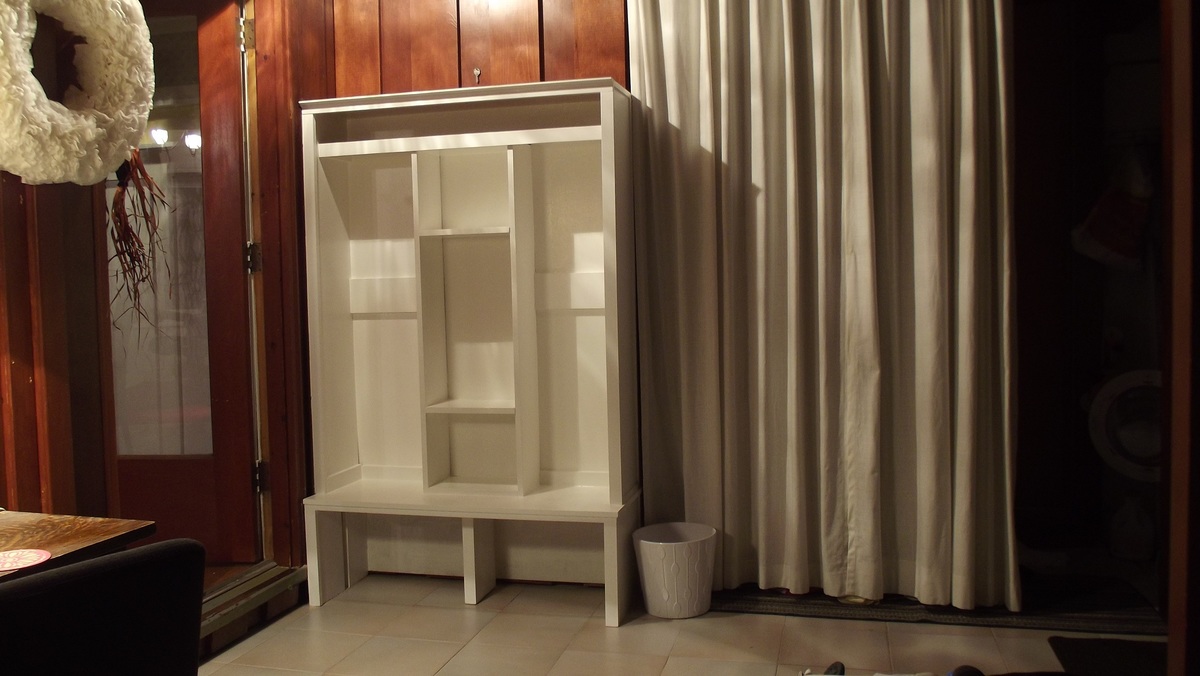
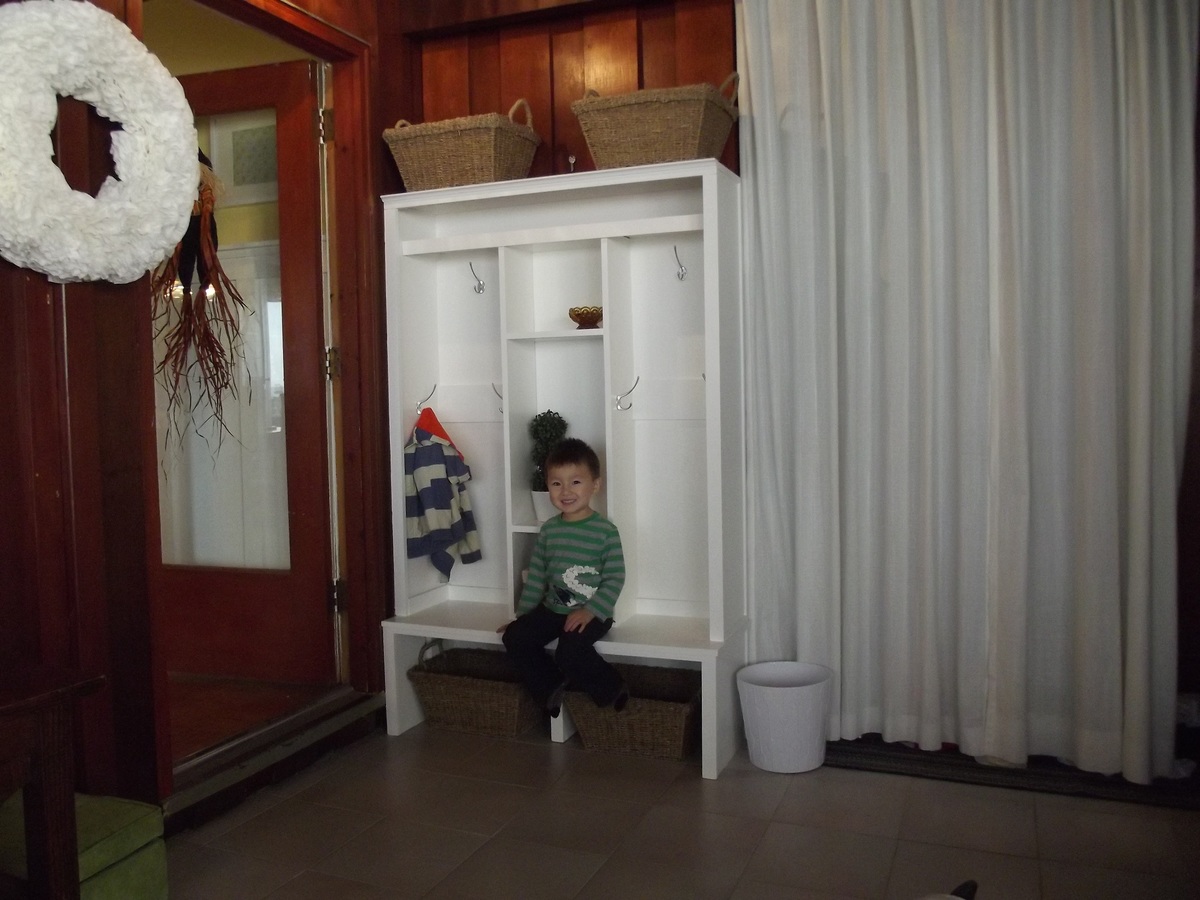
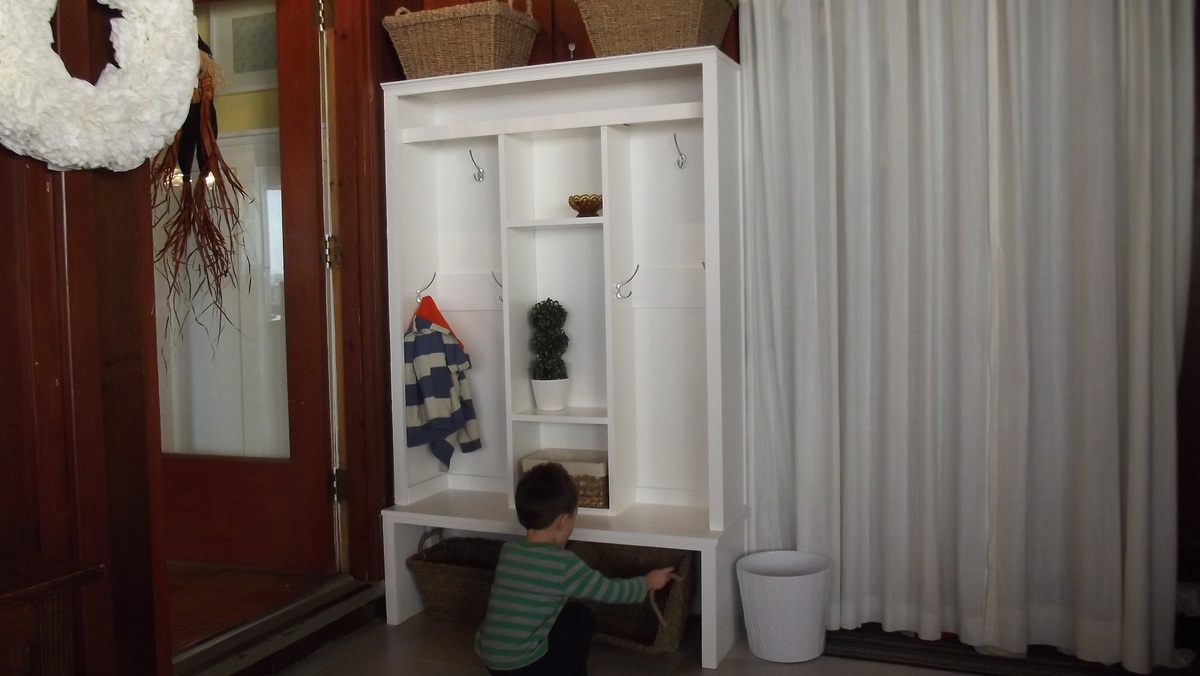
Hall tree
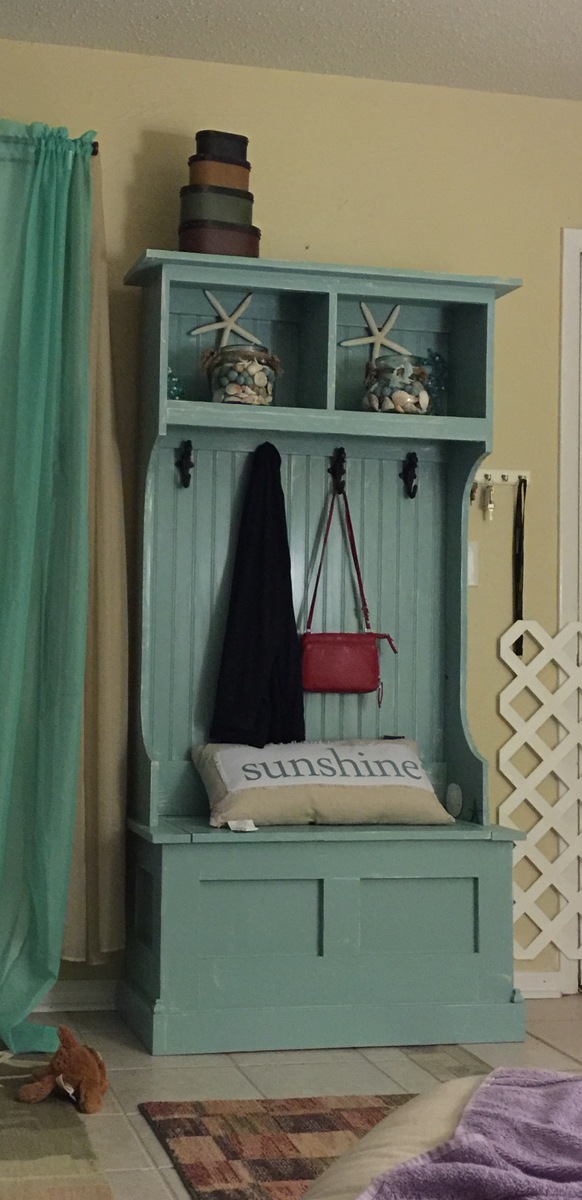
We had a great time building this
We did the bottom half one weekday, and the top piece another day. Primer, painting, and sanding in all took us 6 days.
It look fantastic
Recommended Skill Level
Intermediate
Comments
Thu, 12/03/2015 - 10:18
Fantastic!
Thanks for sharing your awesome project, posted to our Facebook page today!
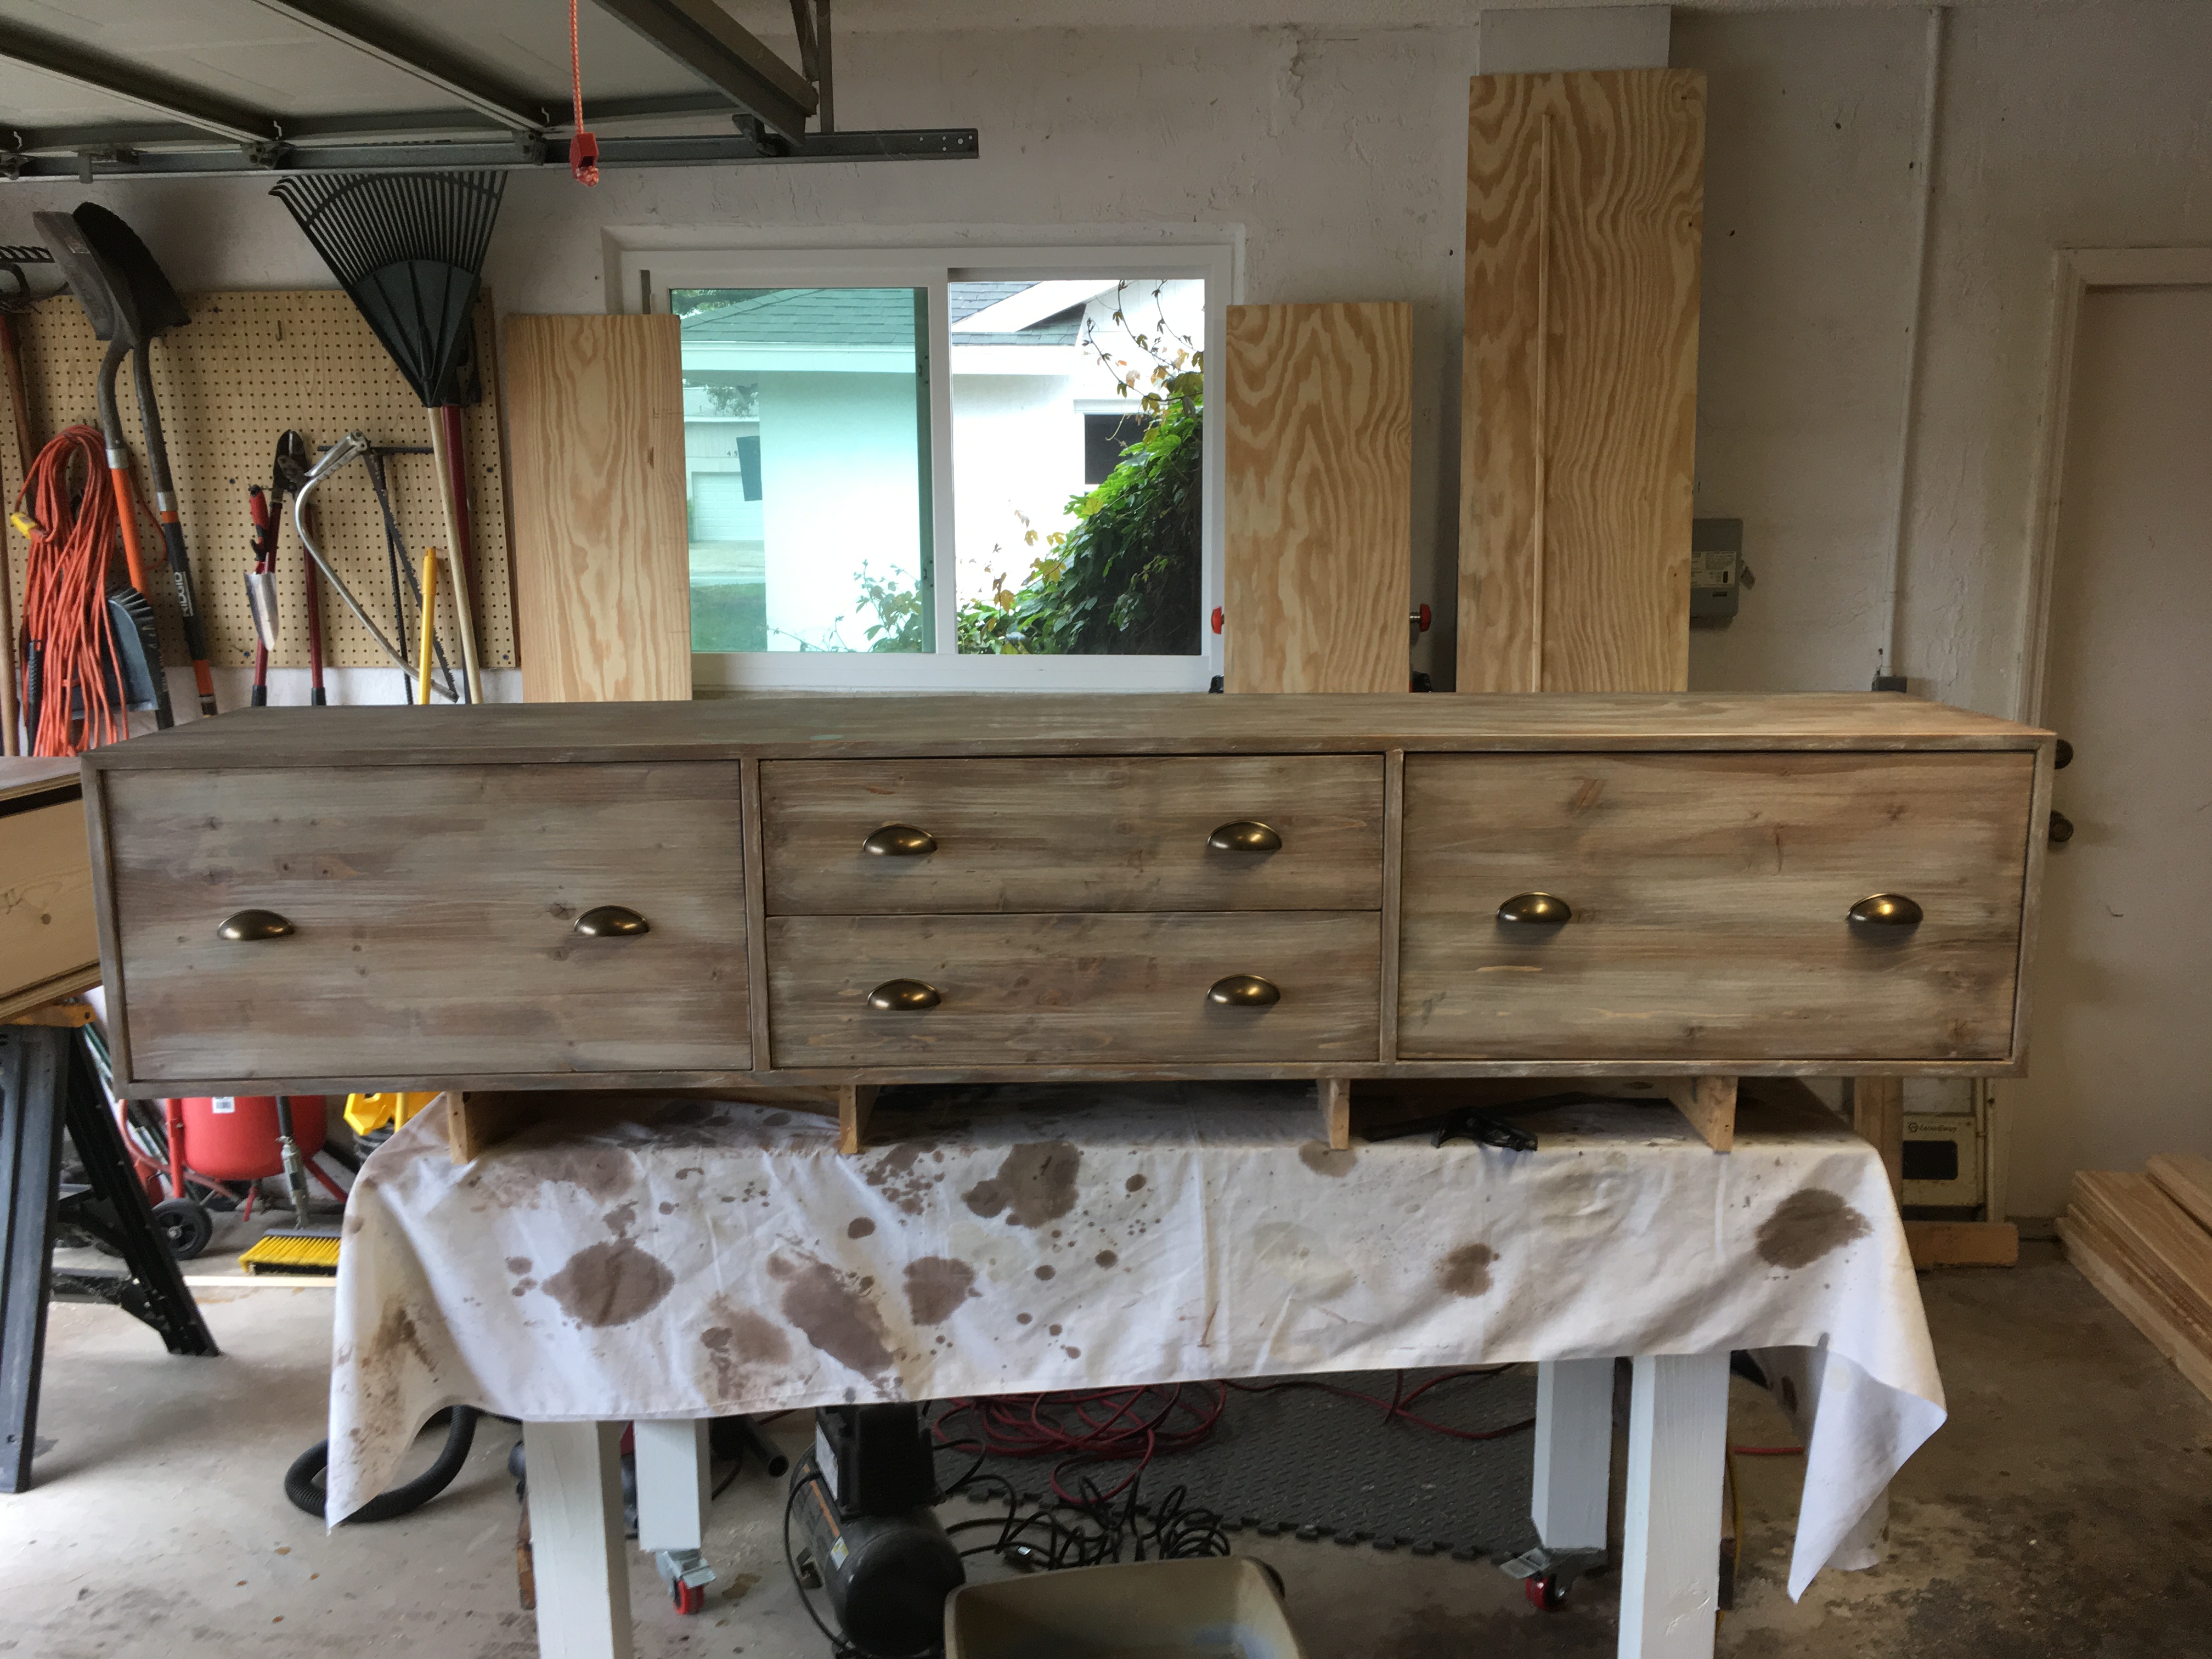
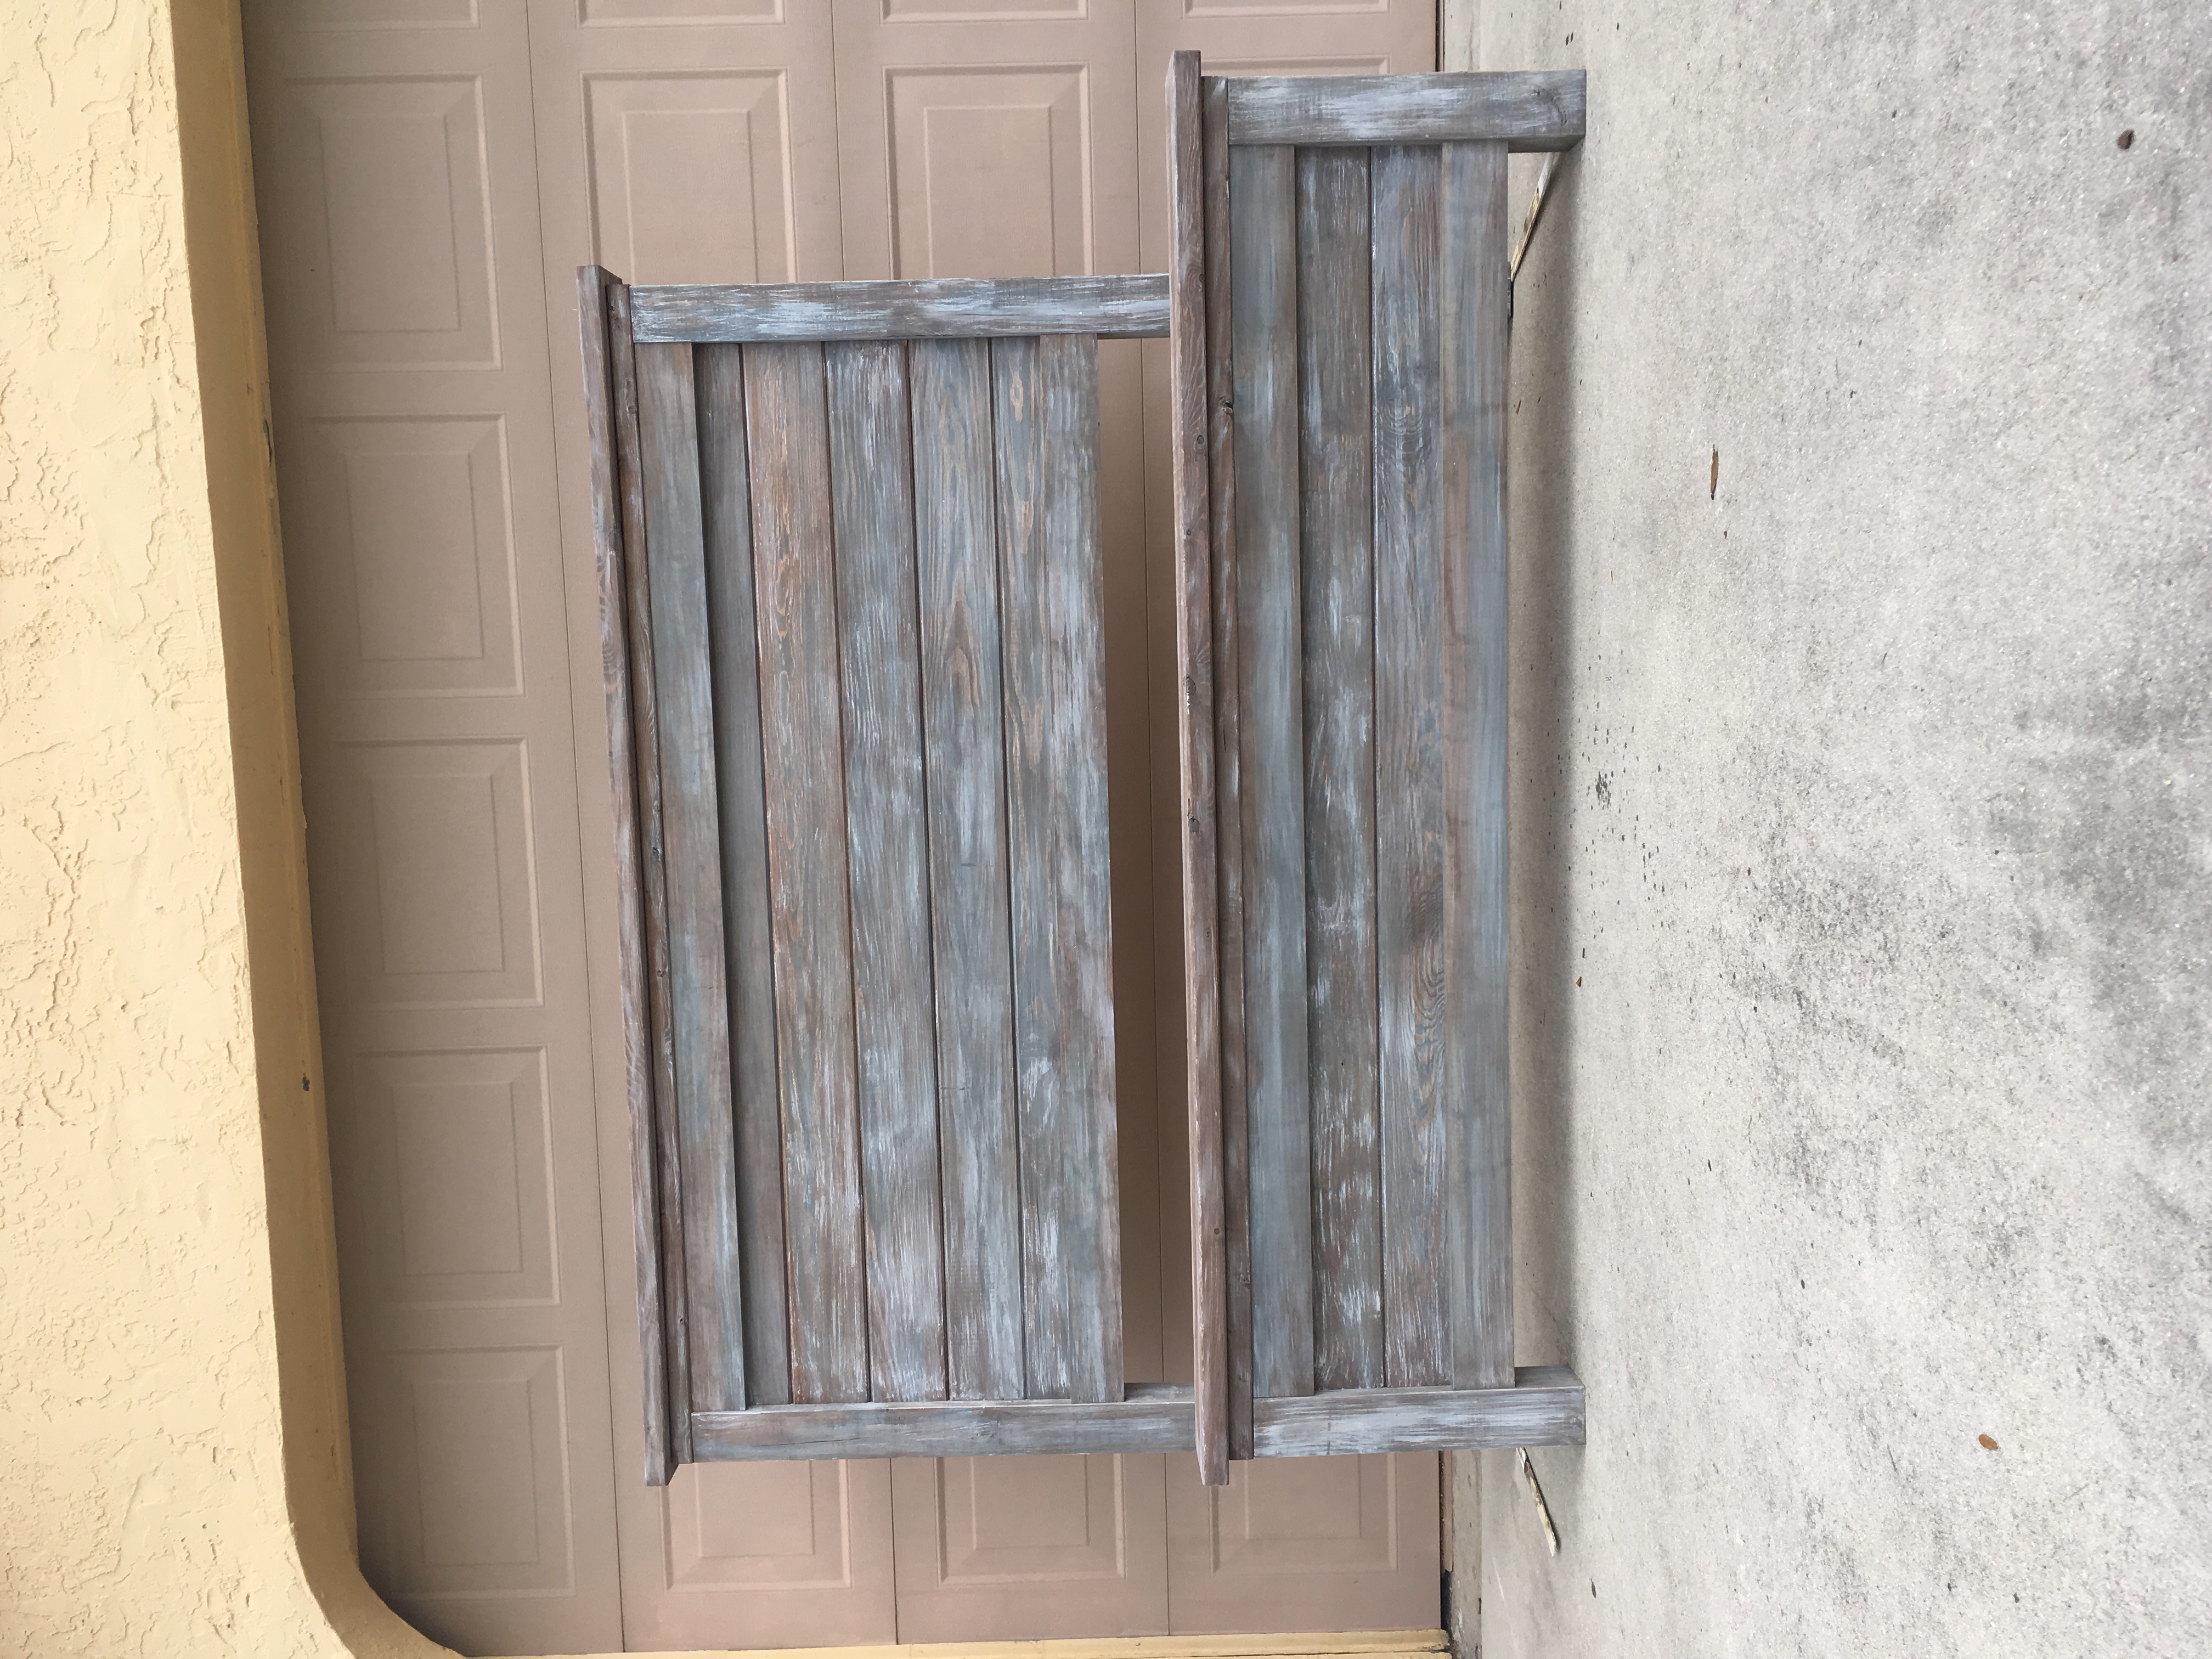
Farm House Bed w/Drawers
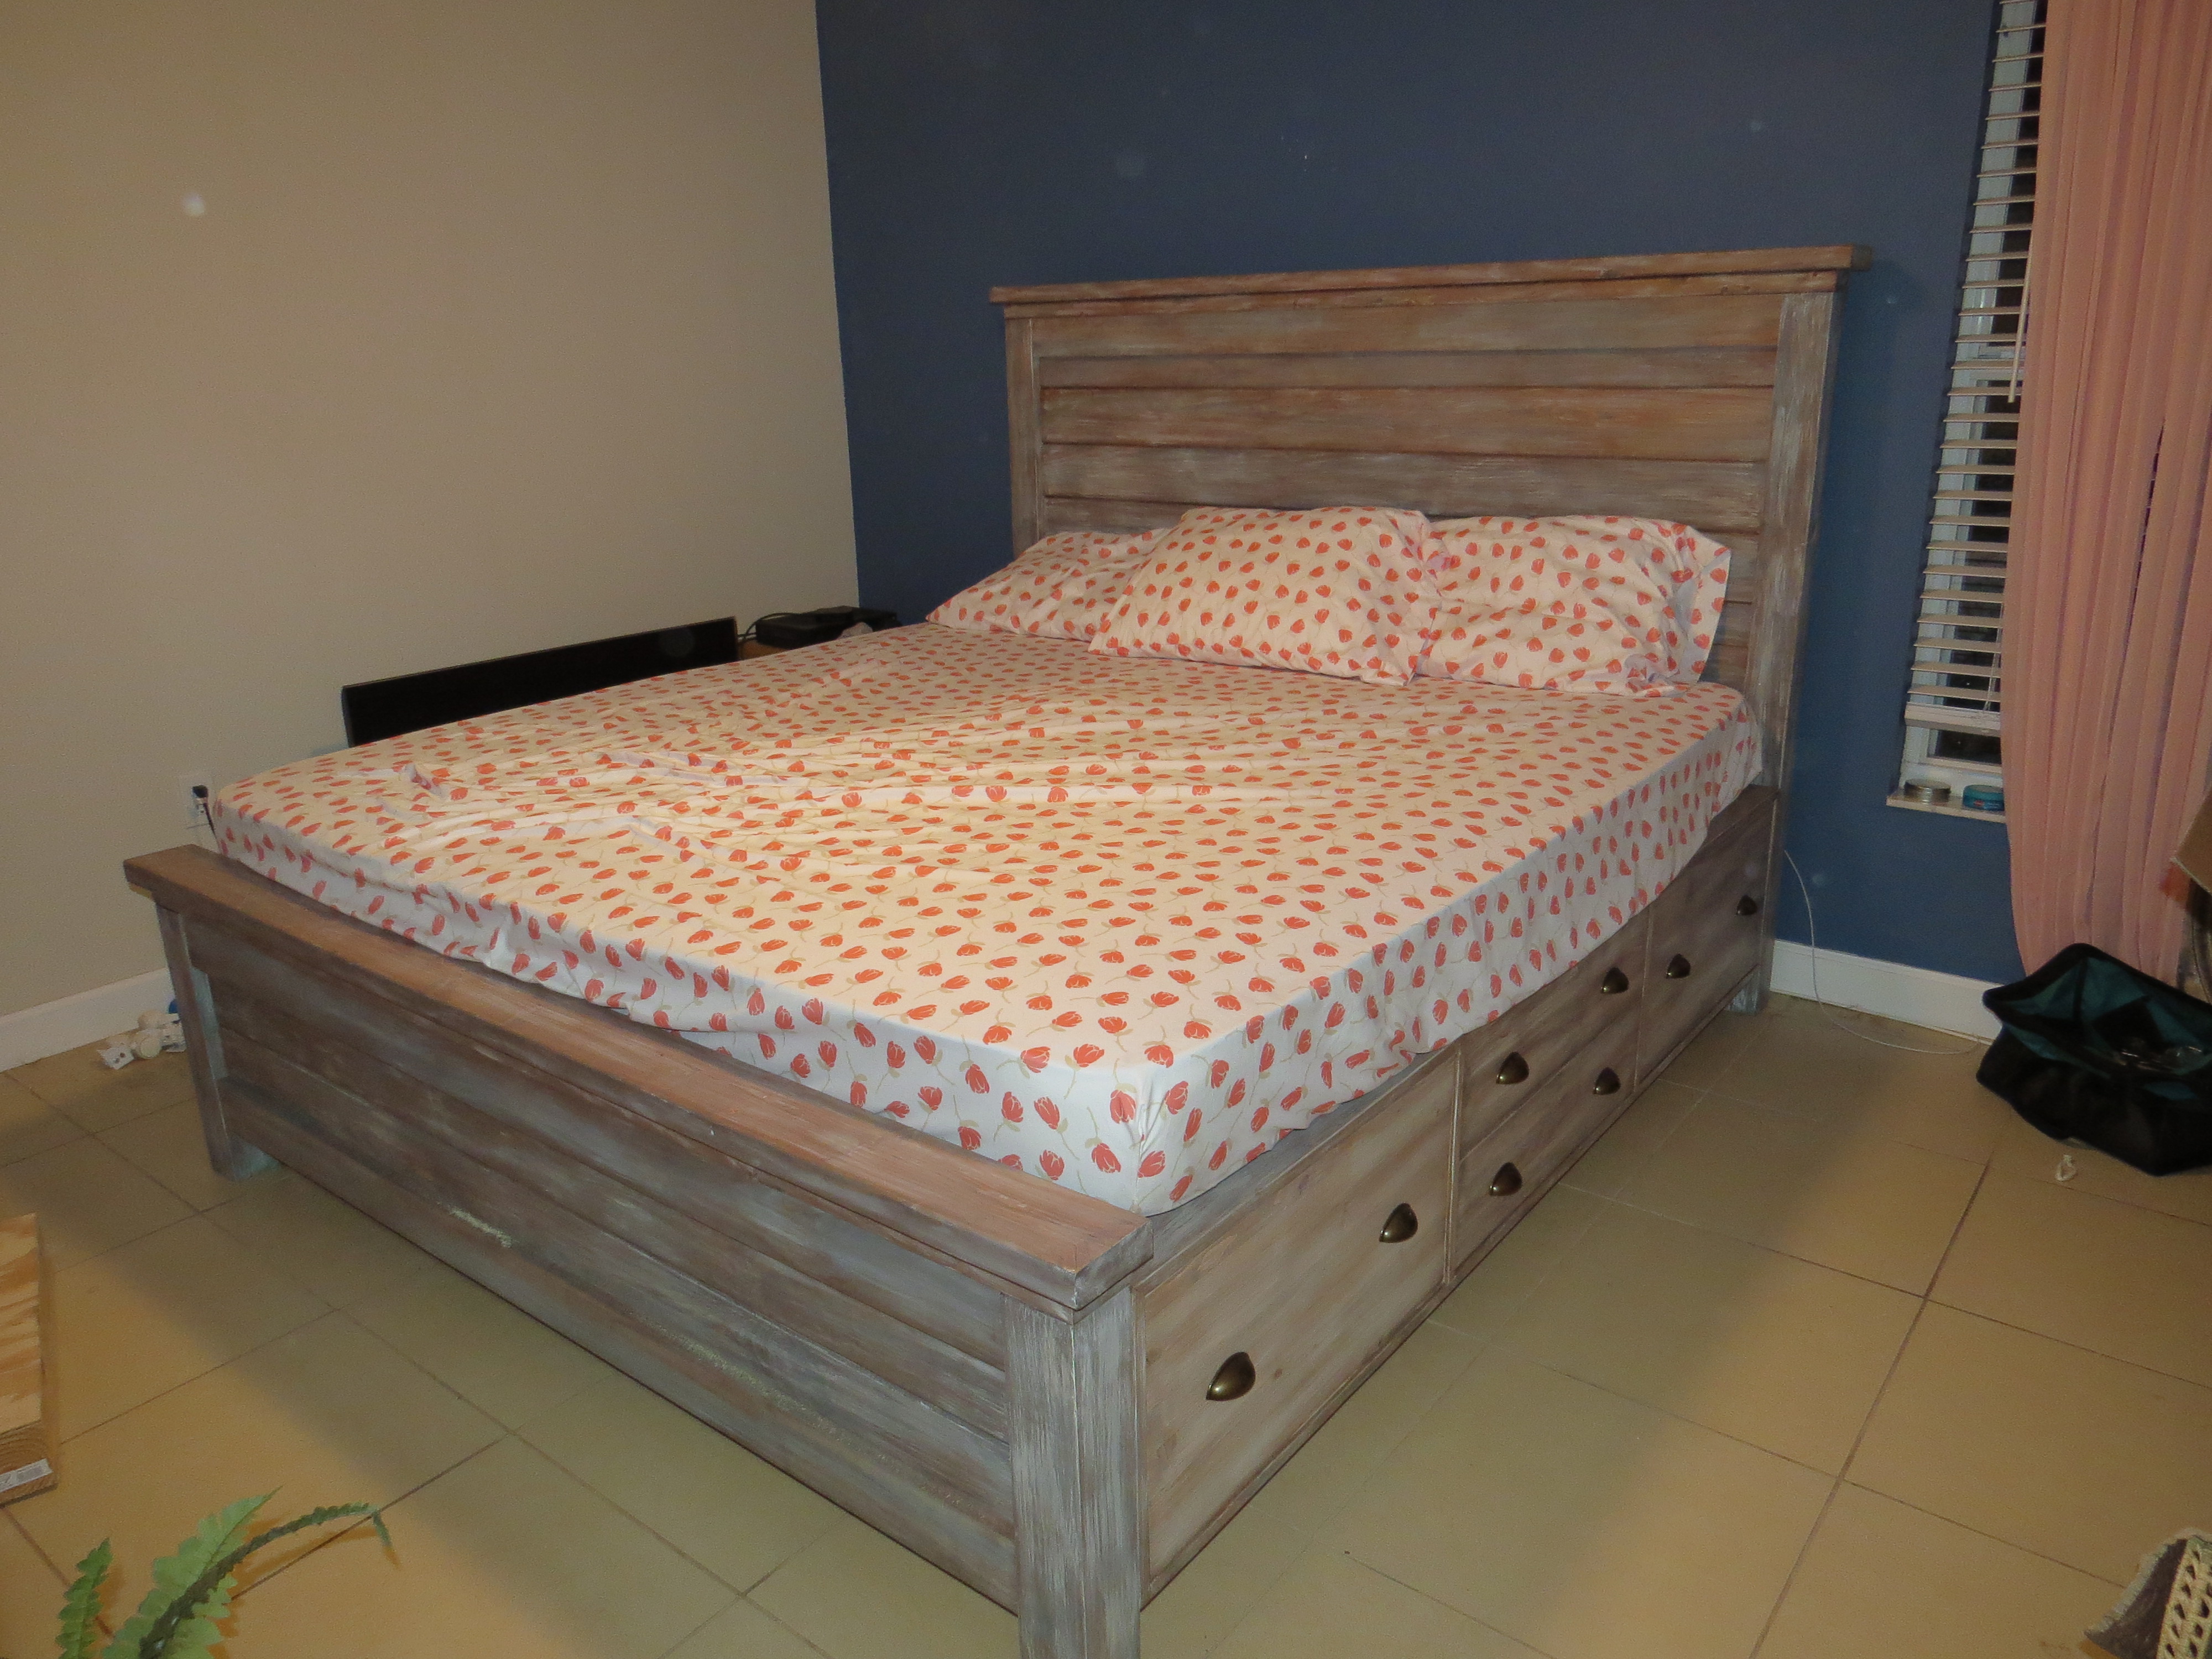
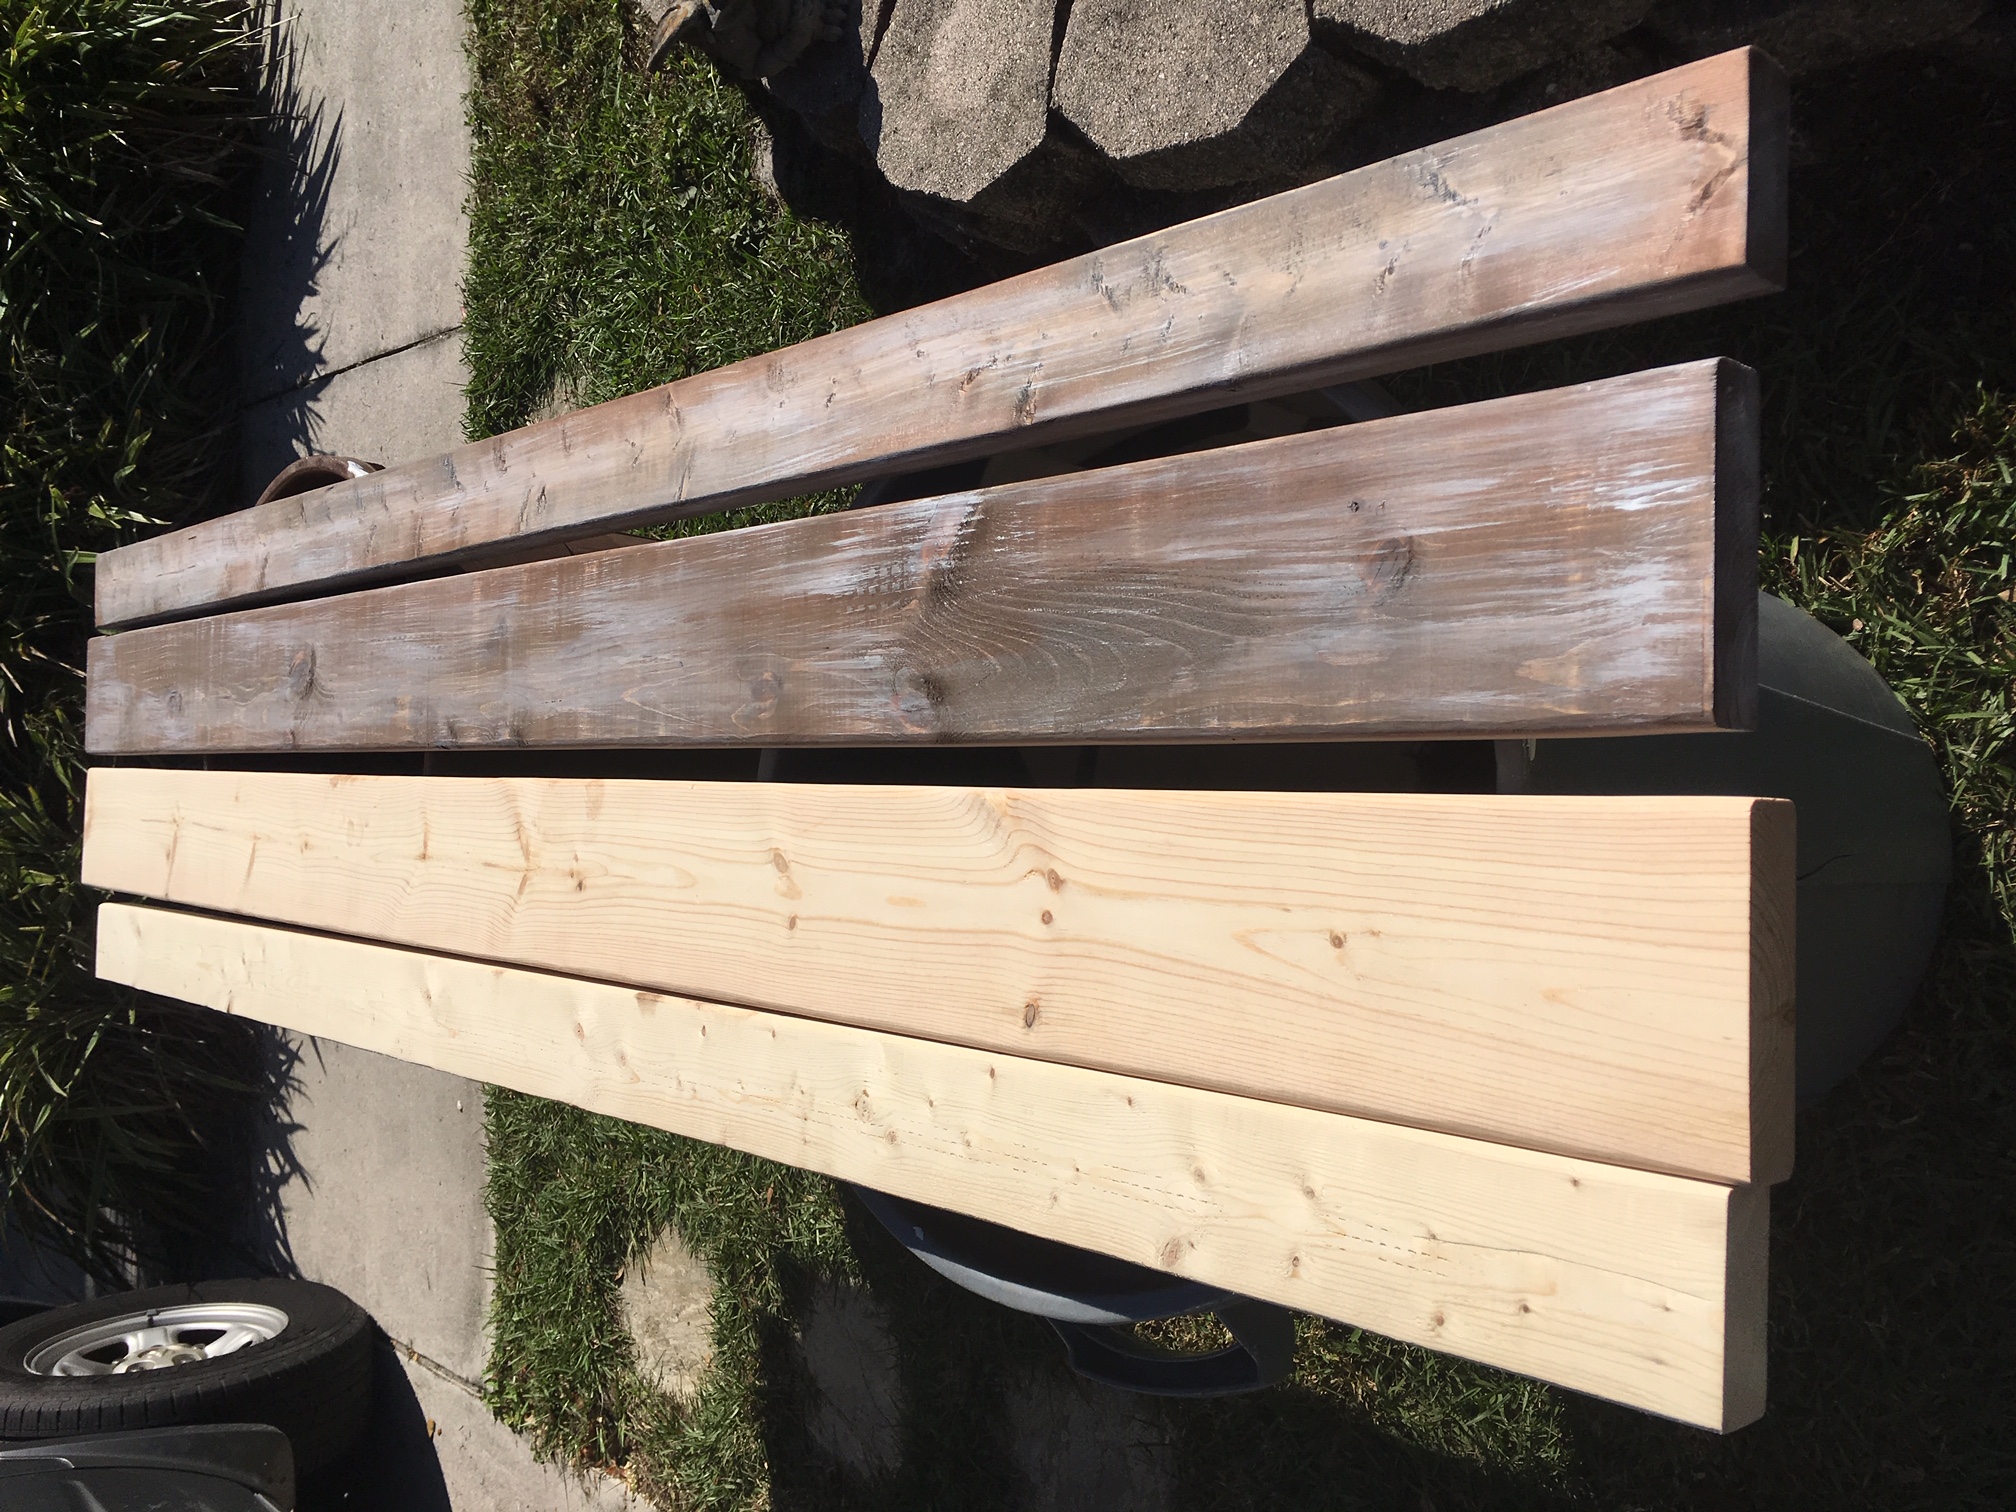
Used the farm house bed plans from here with a few modifications. Instead of plywood for the headboard and footboard, I used tongue and grove 1x6 planks. I used edge glued spruce planks from Lowes for the drawer fronts and I invested a bit more on the drawer slides and opted for the full opening type. Also, rather than 3 large drawers on either side, I opted to put 2 smaller drawers in the center. I felt the shallower drawers would be more useful for smaller items (socks and underwear). I also used a 3/4" molding to hid the ends of the plywood drawer boxes. The weathered finish was created using a video I found on YouTube (https://www.youtube.com/watch?v=k7Via9Lz4Pw). My upgrades increased the overall price, but it was still under $600 and should last a lifetime.
Built from Plan(s)
Estimated Cost
$600
Estimated Time Investment
Week Long Project (20 Hours or More)
Finish Used
Multiple products - follow YouTube tutorial. https://www.youtube.com/watch?v=k7Via9Lz4Pw
Recommended Skill Level
Intermediate
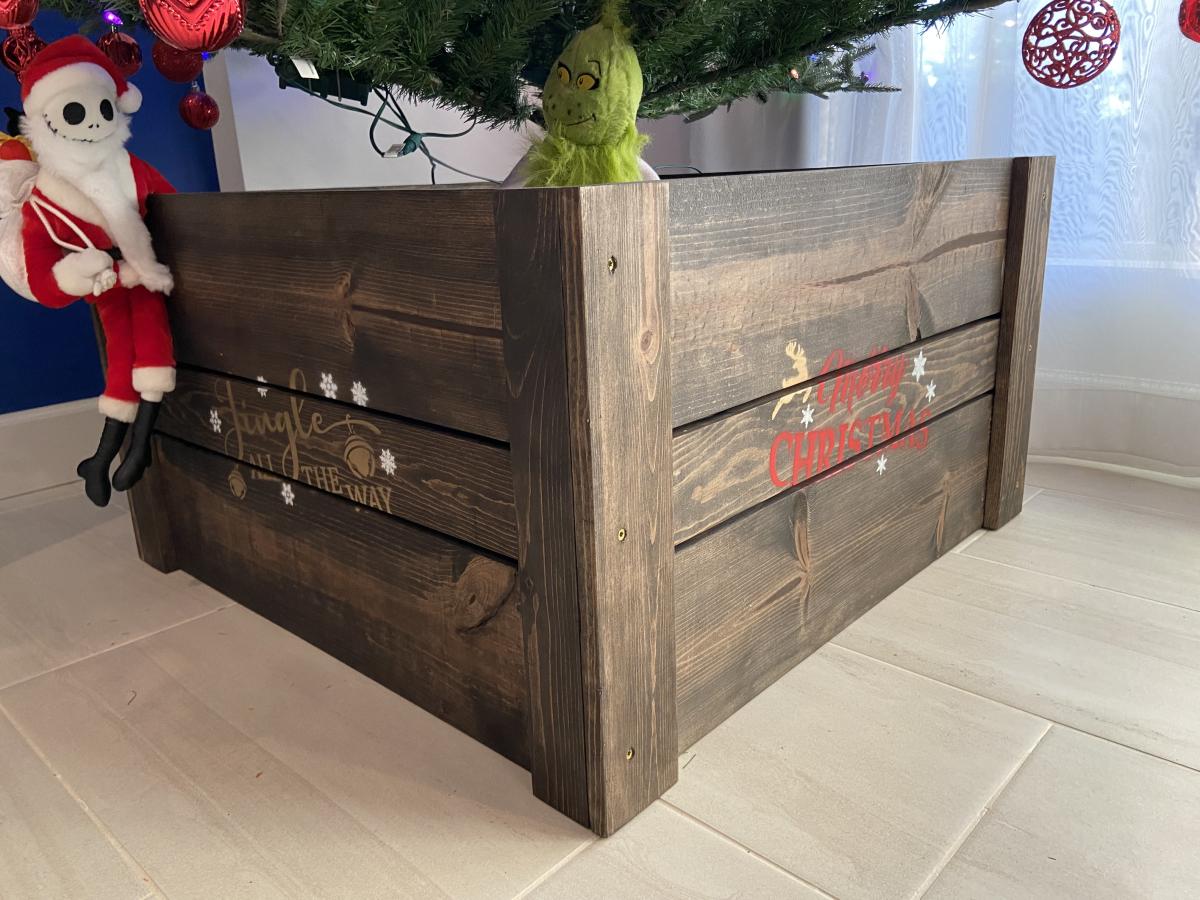
Christmas tree box
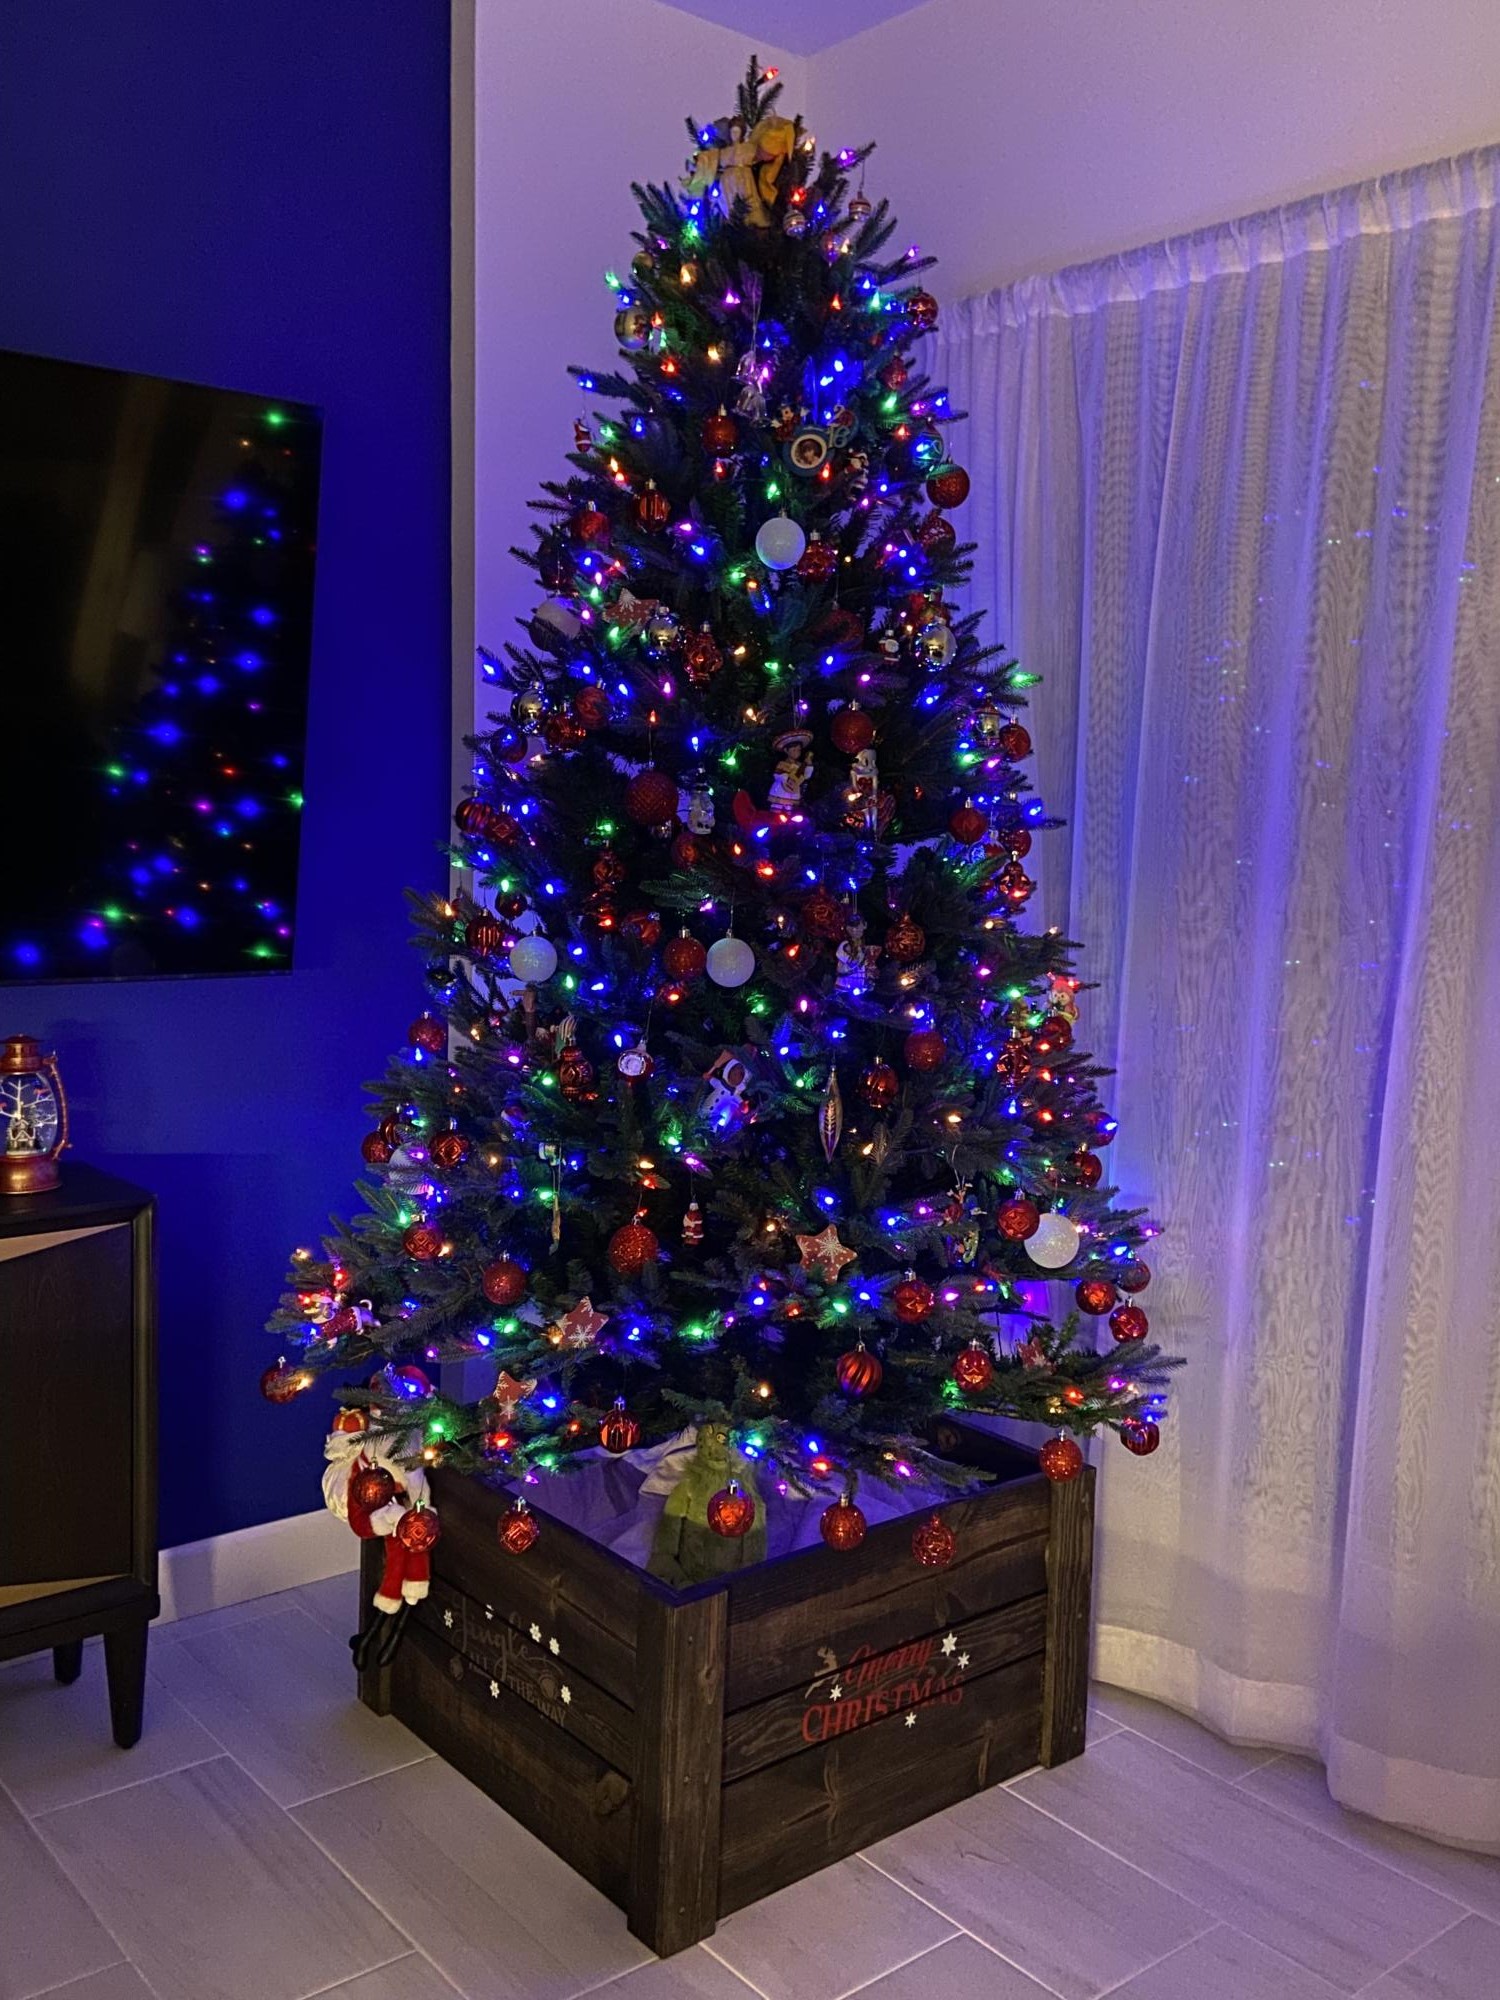
I made this plan at my wifes’s request. I added a platform on the inside for our artificial tree and stencils on the outside of each side. Plan was relatively easy. We love the look. Bonus, made the tree taller. George from Arizona.

Built from Plan(s)
Comments
Sun, 11/27/2022 - 10:59
Great tree box!
Love the stain choice and the added stenciling, thanks for sharing!
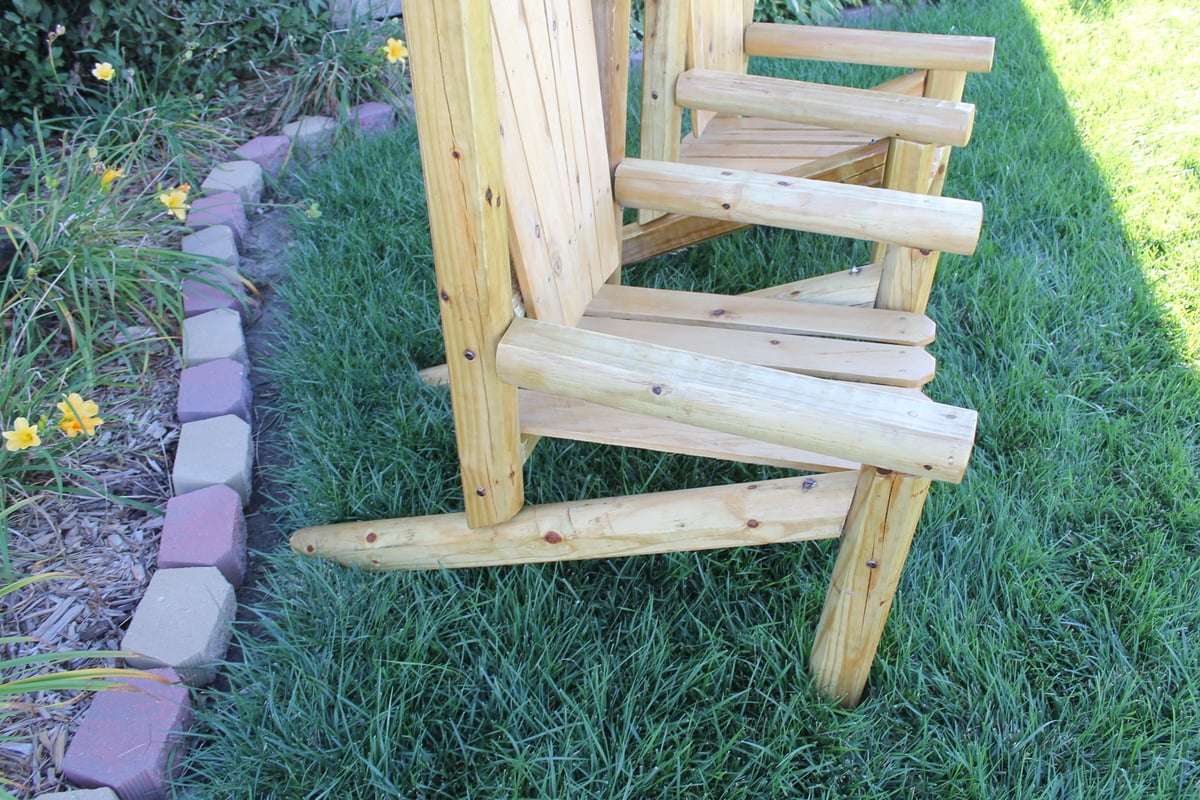
Chair
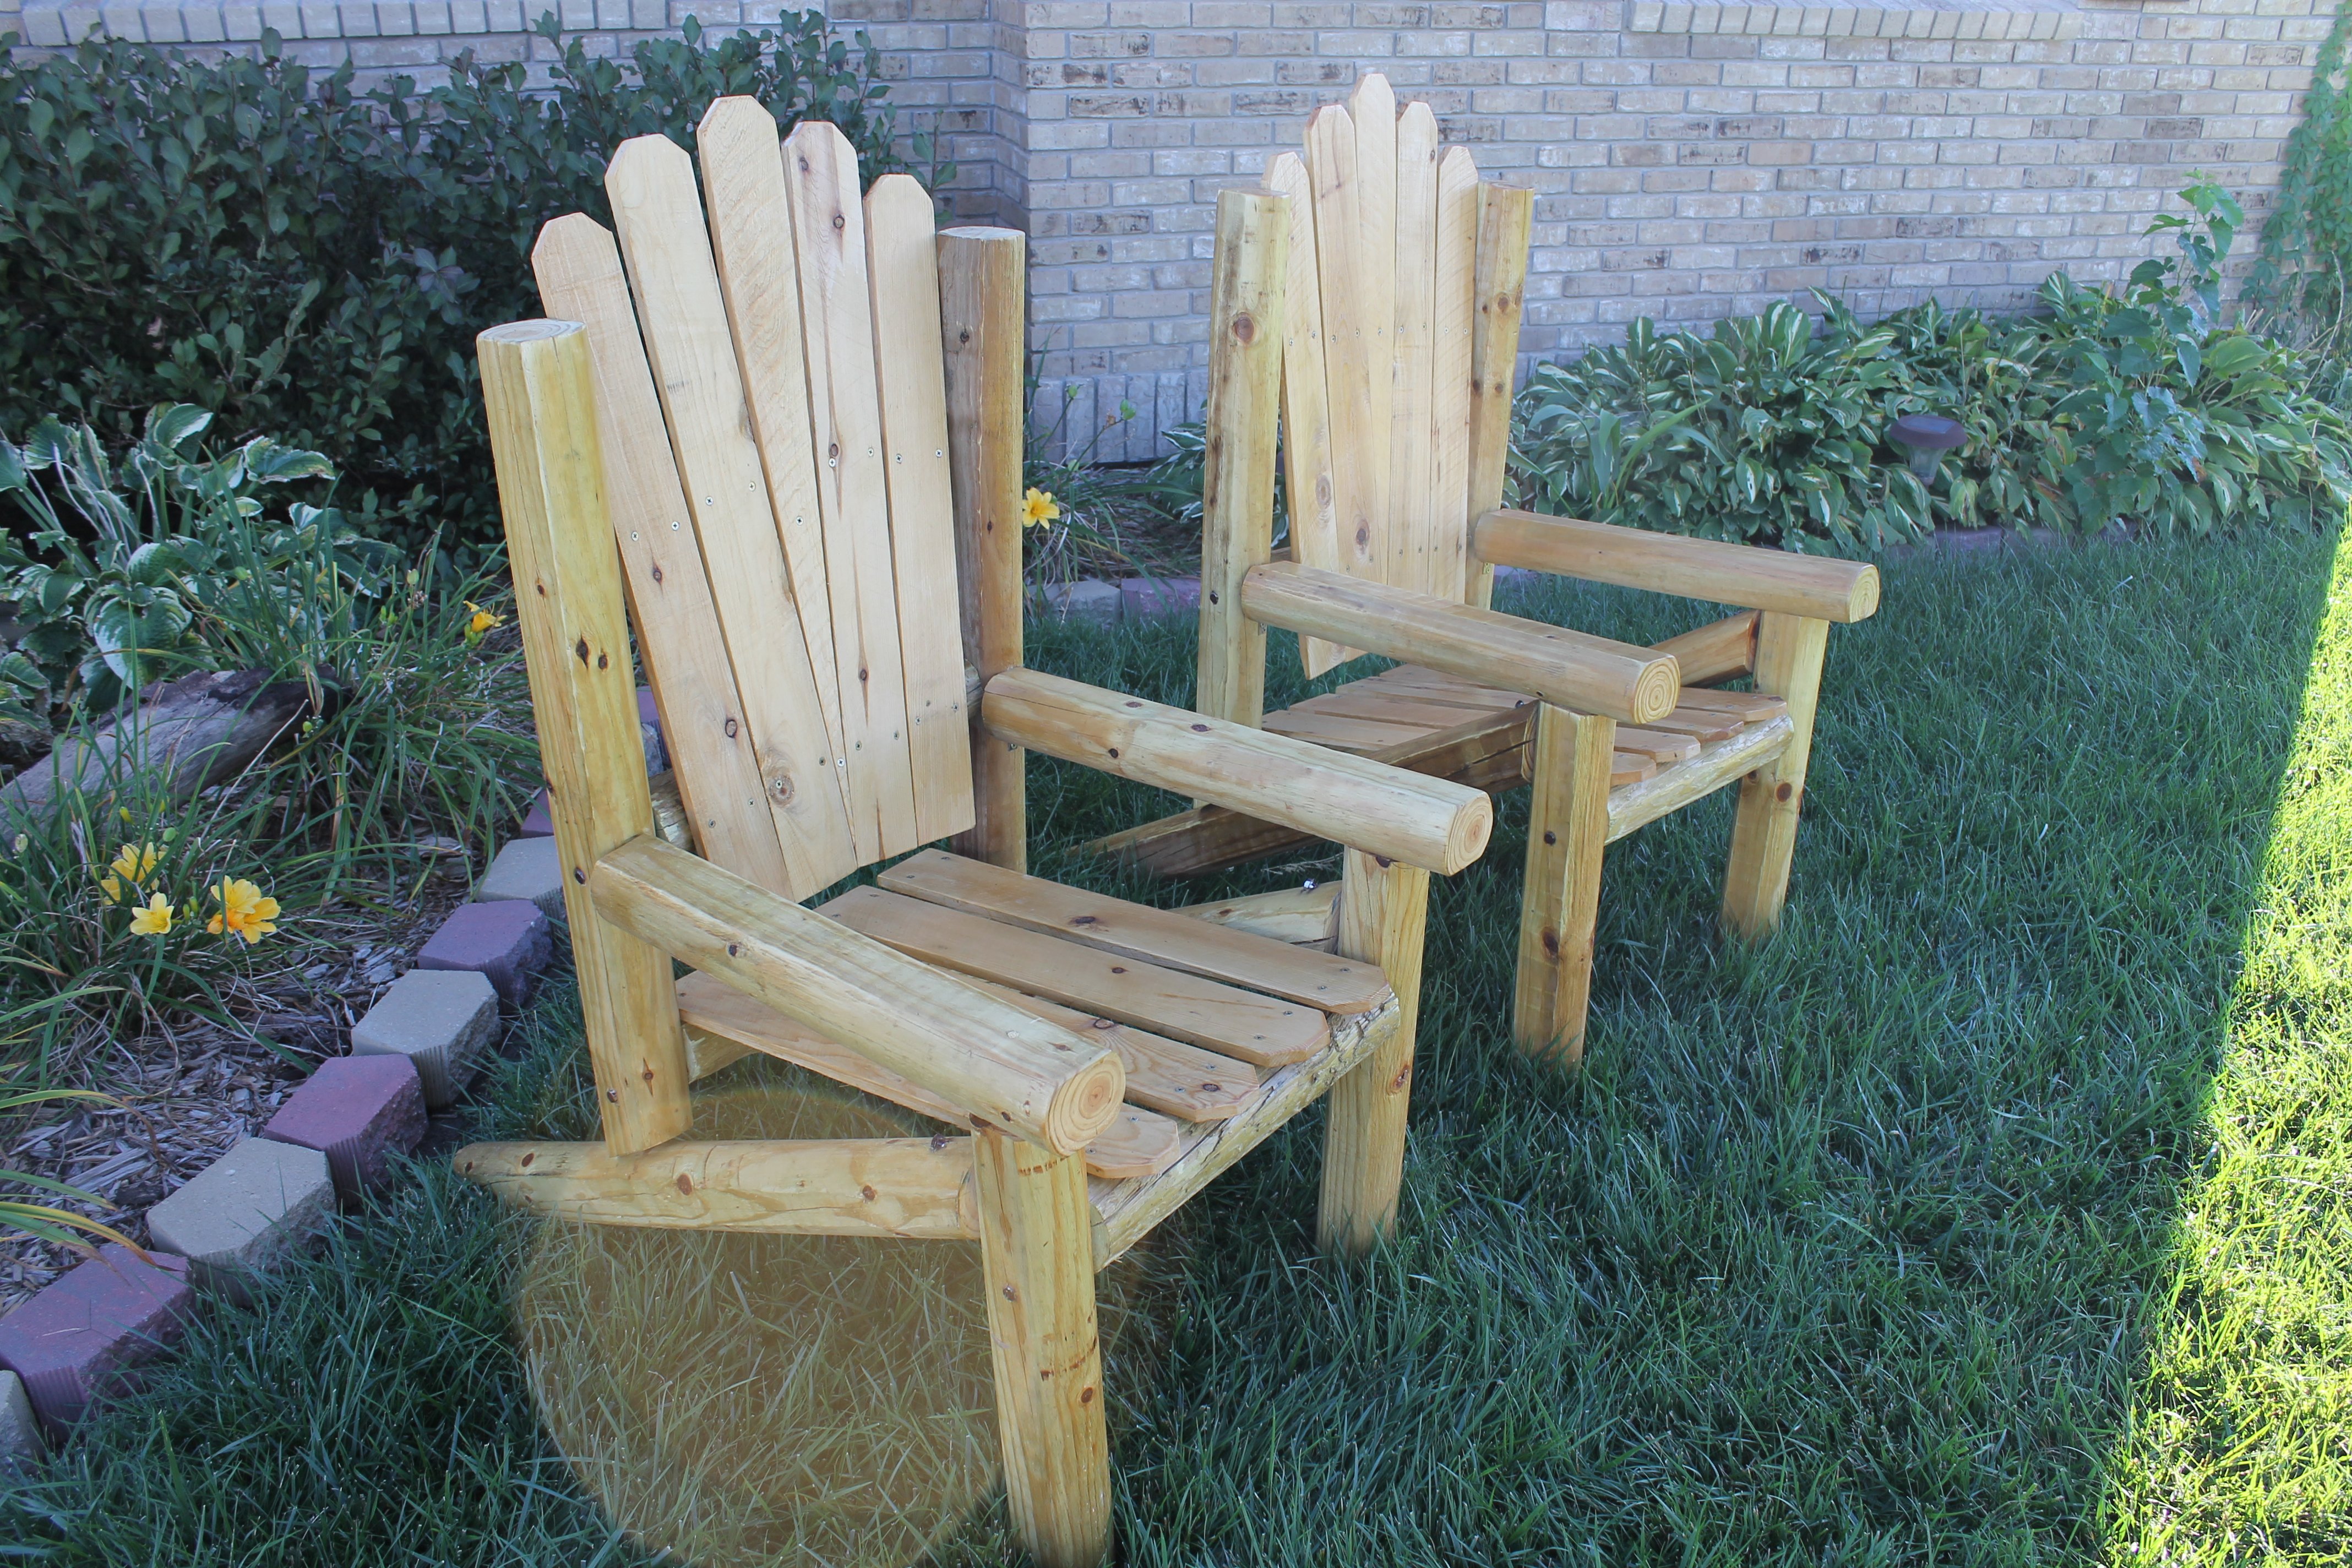
I built this chair for about $12. I used 6 four foot landscaping timbers. The legs are 12''
and i used 1/4'' cedar or you could use pallets. The ends are Dog Cut . The chair is sealed and finished with Helsmans Clear. E mail me if you have any questions

Estimated Time Investment
Afternoon Project (3-6 Hours)
Finish Used
Semi clear Spar.
Recommended Skill Level
Beginner
Comments
Thu, 09/26/2013 - 11:04
I love it! New idea to make
I love it! New idea to make for my parent's cabin...
Thu, 09/26/2013 - 18:36
Share it with your friends
If I get enough comments, I will post the full Plan,
PS you will use 5'' Lag bolts to hold the joints. Really a easy project Just need, A Saw and a pencil.
Craft Table
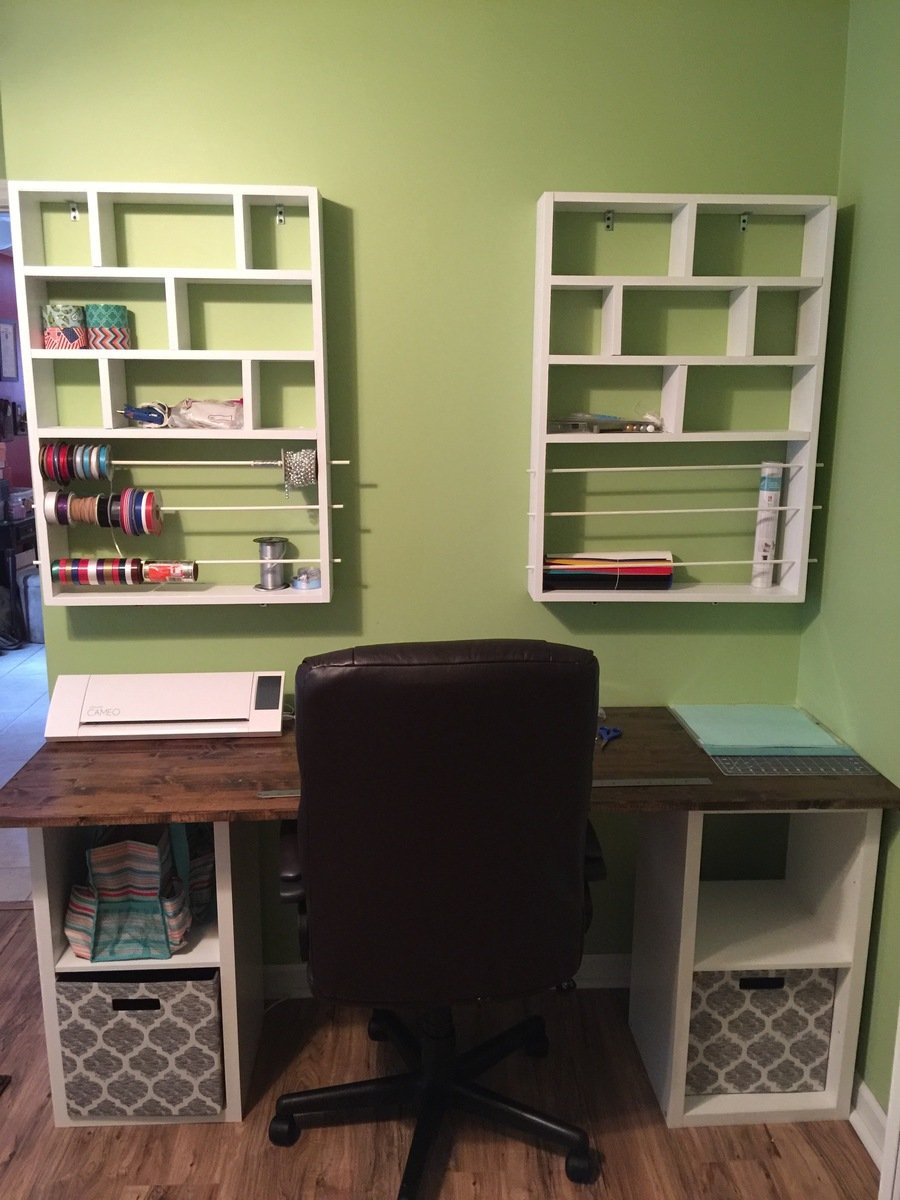
Project was rather simple. Just wanted to create a space that my wife could work her projects rather than always working on our dinning room table. Took the concept of the plans and made the table work for the space we had available.
Built from Plan(s)
Estimated Cost
$150
Estimated Time Investment
Weekend Project (10-20 Hours)
Finish Used
White Paint and Dark Maple Finish
Recommended Skill Level
Beginner
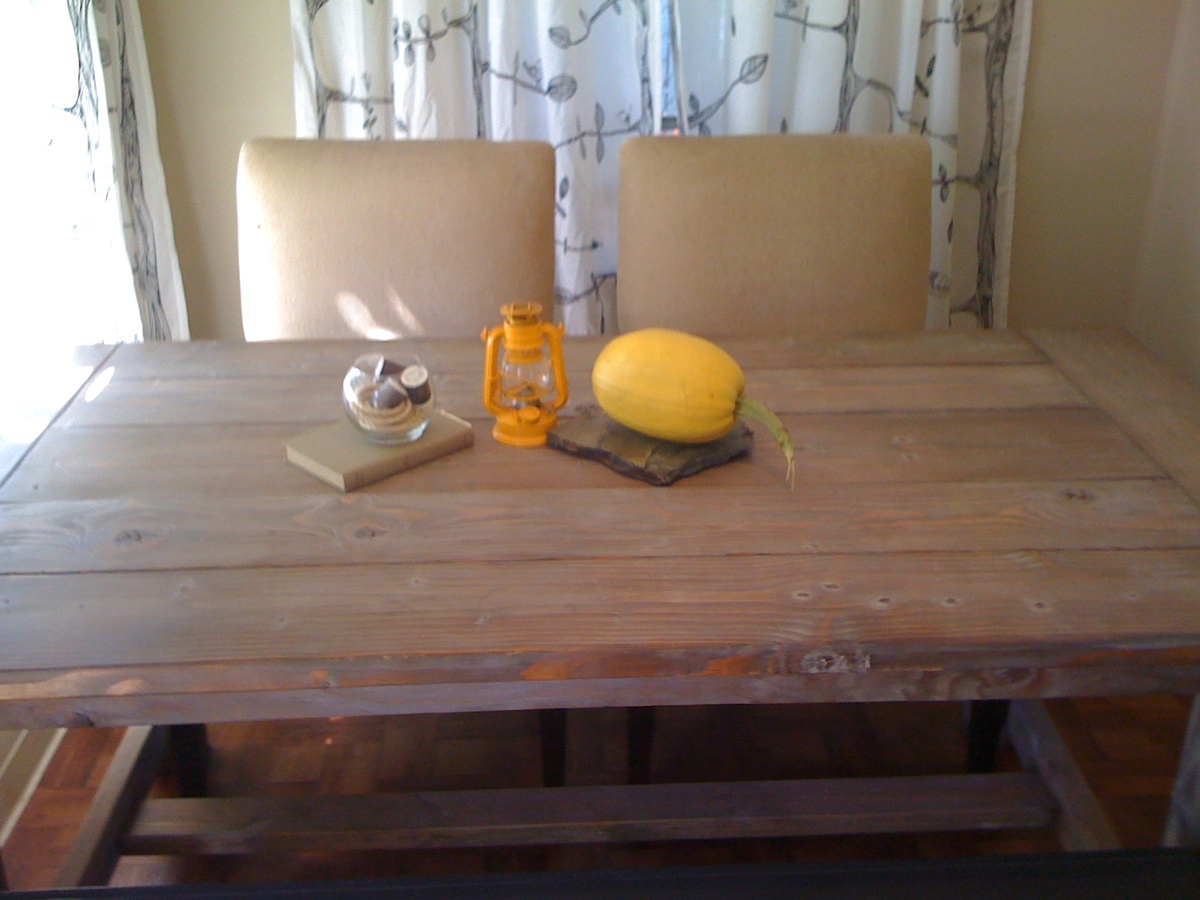
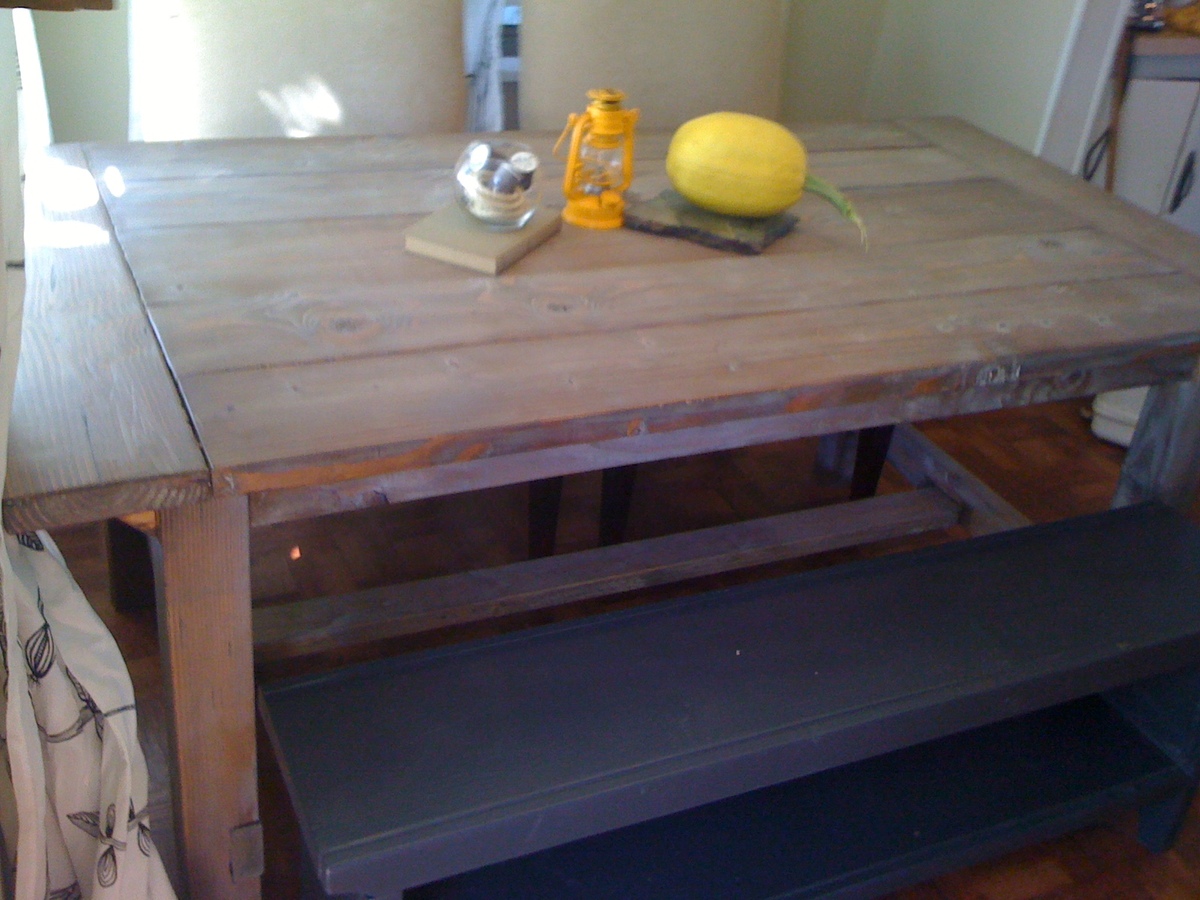
Coffee table
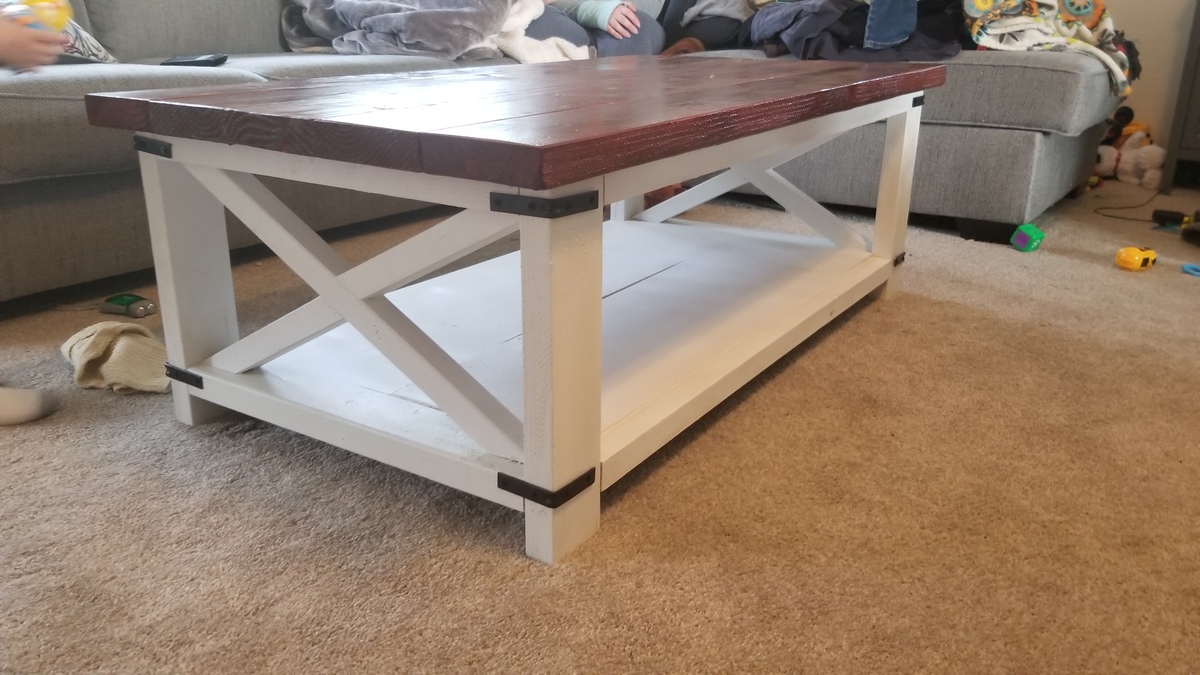
Sister asked me to make her a table. Since I am out or work right now I said yes and got this thing done in about 3 days!
Built from Plan(s)
Estimated Cost
130.00
Estimated Time Investment
Weekend Project (10-20 Hours)
Finish Used
White chalk paint for the bottom and a combo high gloss poly/stain for the top
Recommended Skill Level
Beginner
Christmas Stocking stand
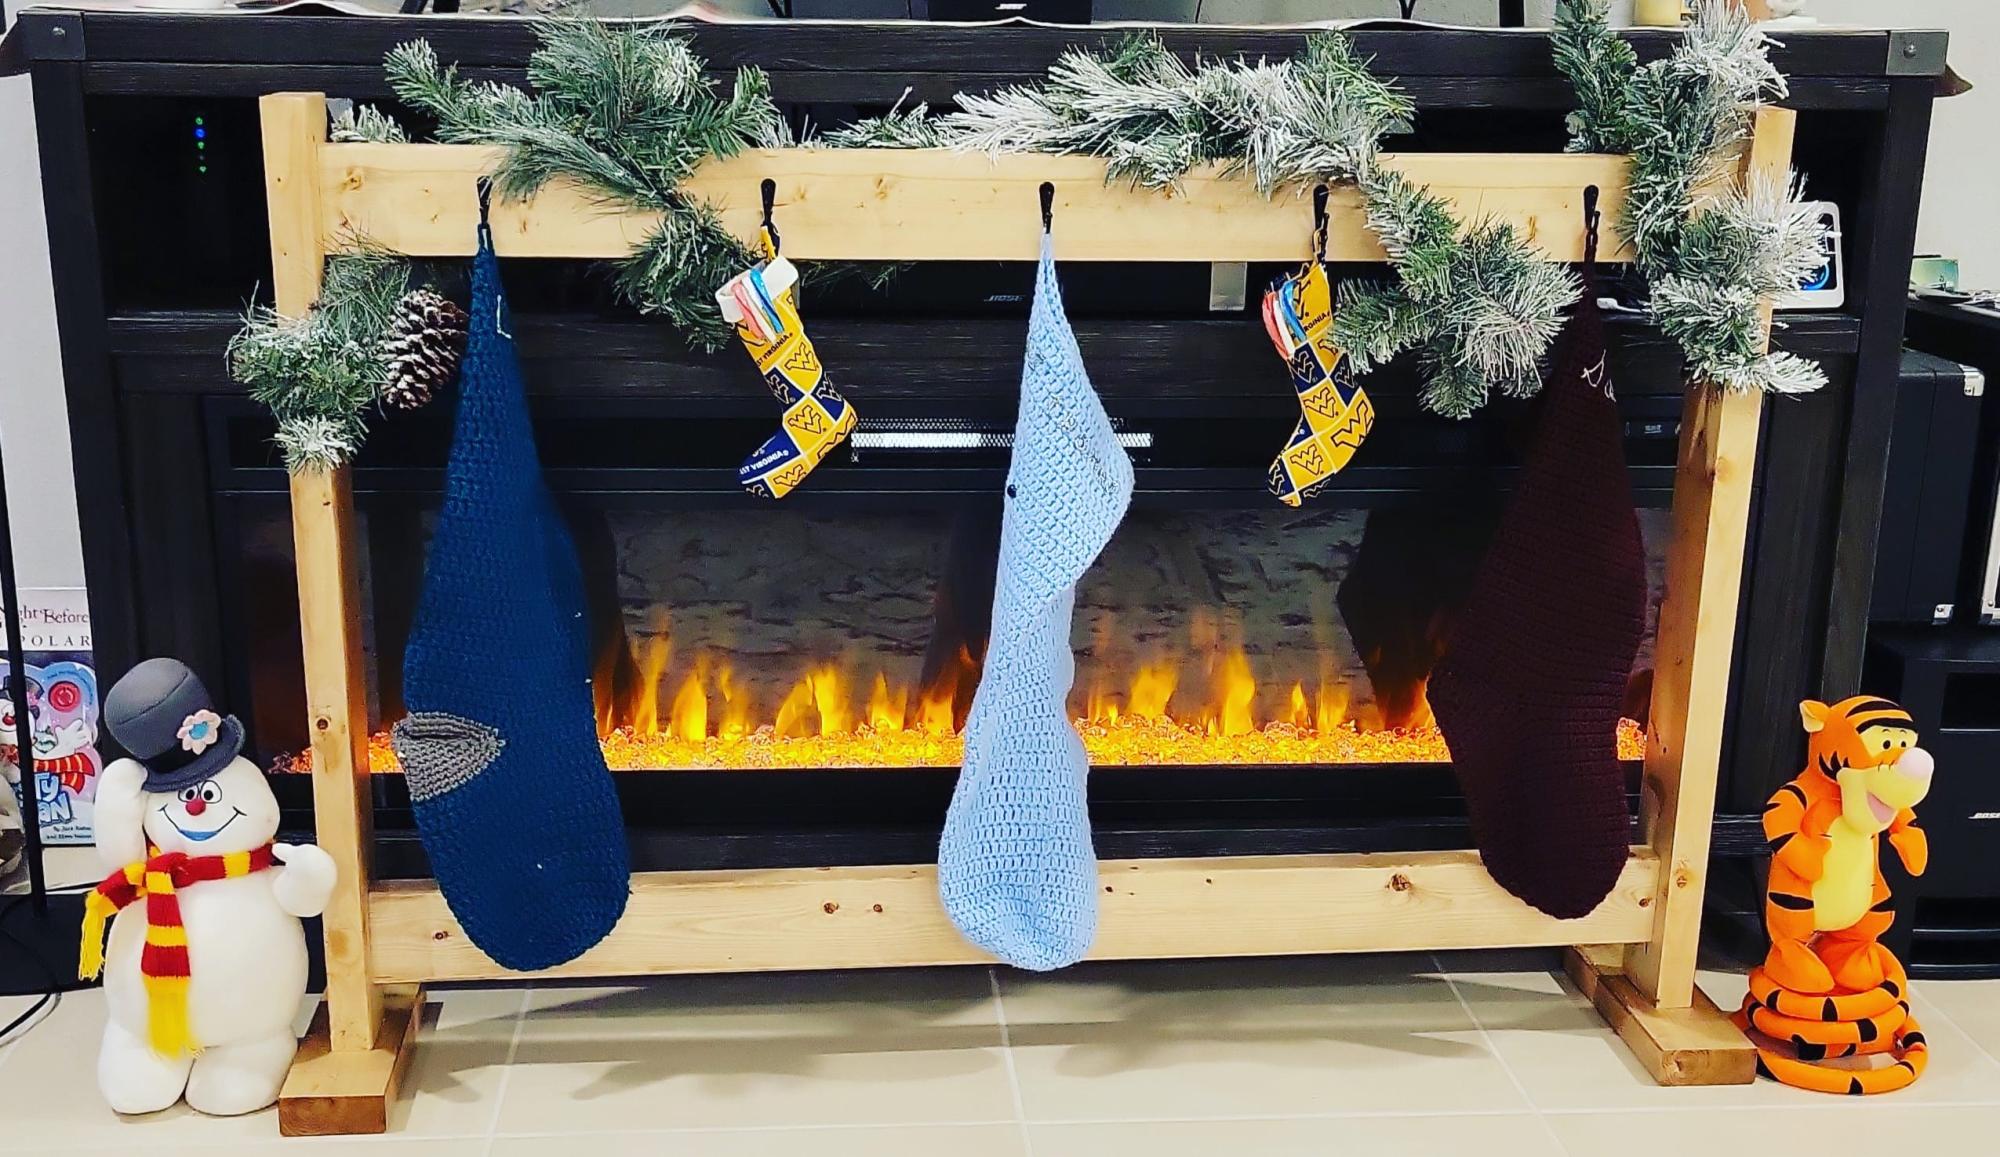
I enjoyed making this. The kids love it and it goes great in front of the fireplace.
#Todays_Spare_Time
Built from Plan(s)
Comments
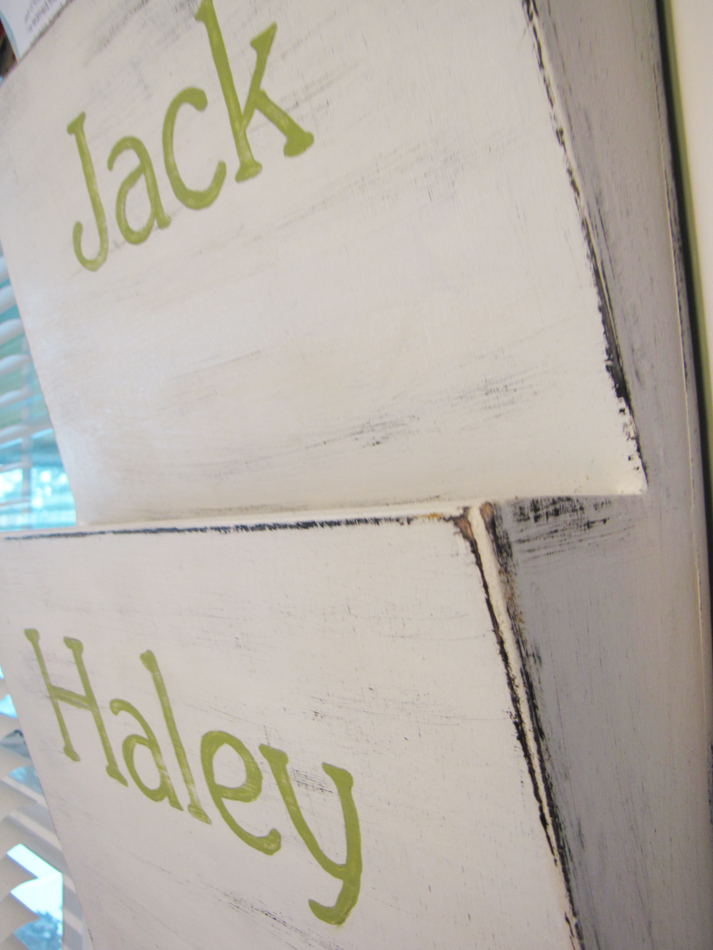
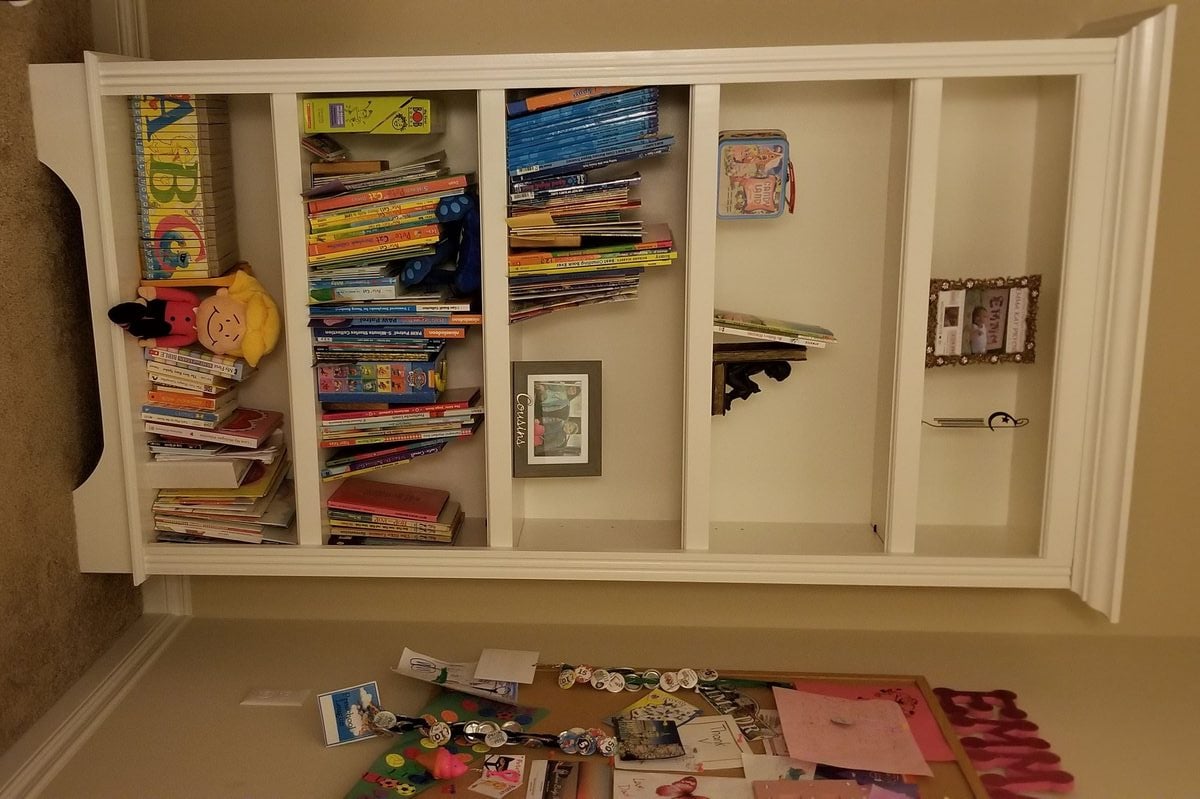
School papers organized
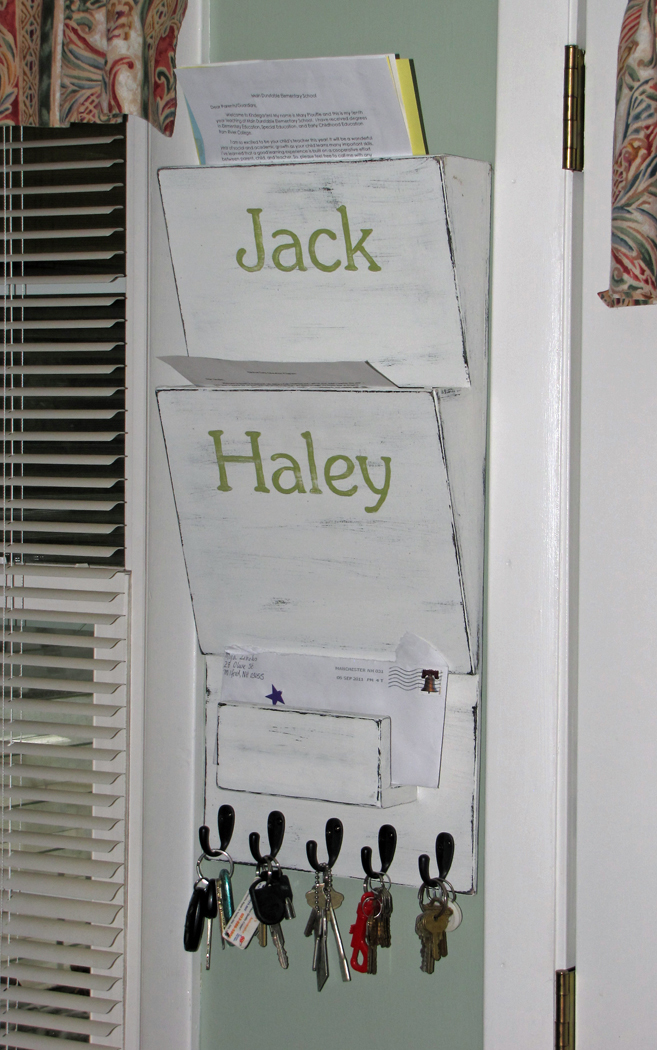
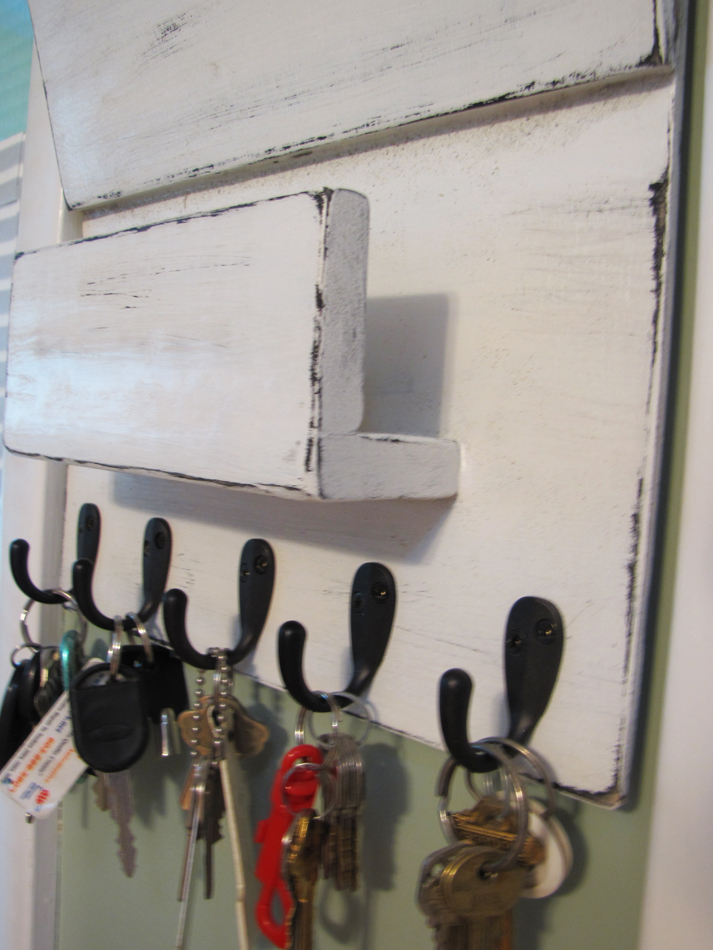
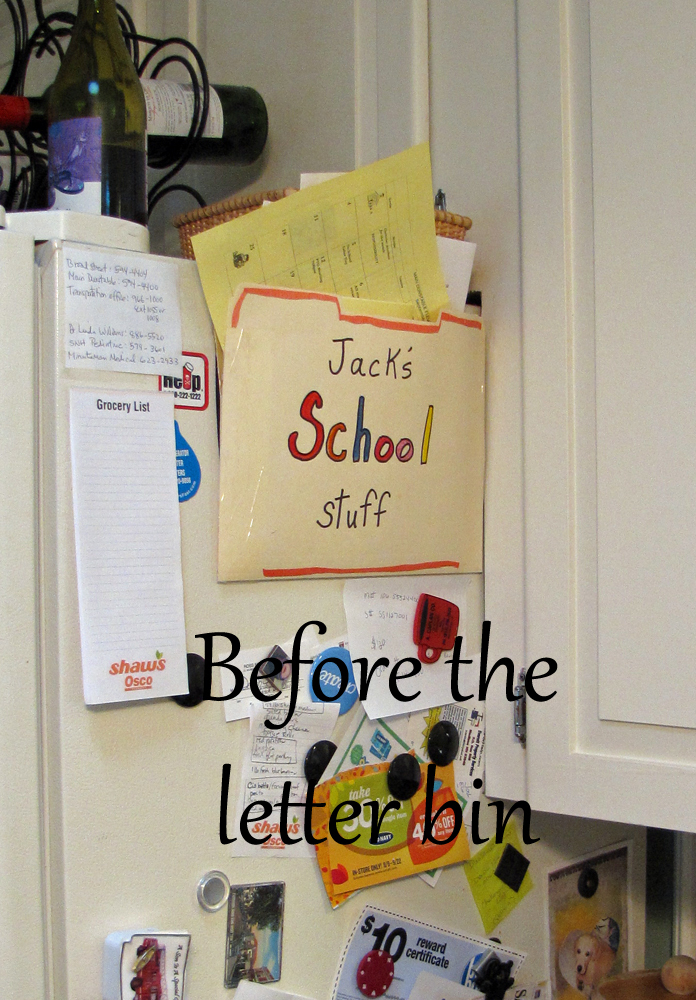
Now that we've got two kids in school, the previous system of storing school papers just wasn't going to work (see pic below). I used the plans on Ana's site as a guideline and made the letter bin to fit my space. I decided to also make it a holder for the mail and all our keys.
This was made used all leftover wood hanging out in the garage. Luan was used for the letter bin, and strapping (1/2" pine) was used for the mail holder. I spray painted black and then painted it a creamy white, the color of our house trim. I distressed a little bit and then added the hooks. I hope it can stand the test of time.
Built from Plan(s)
Estimated Cost
$16 (mainly in the hooks)
Estimated Time Investment
Afternoon Project (3-6 Hours)
Finish Used
Chose not to prime; black spray paint; creamy white; distress
Recommended Skill Level
Intermediate
Comments
Fri, 09/09/2011 - 10:17
Looks Great!
I'm actually getting ready to make something like this. I love what you did to yours. Great work!!!

Fri, 09/09/2011 - 16:42
Awesome
I just made the PB letter bin and now I wish I would have added the key hanger to the bottom since with 6 cars, we have tons of keys all over the place. Maybe I will make a separate one..
This looks awesome and I live the distressed finish.
Providence Bench
2x4s and a kreg jig is all you need!
Built from Plan(s)
Estimated Time Investment
Weekend Project (10-20 Hours)
Finish Used
mahogany stain
Recommended Skill Level
Beginner
Tree Shelf
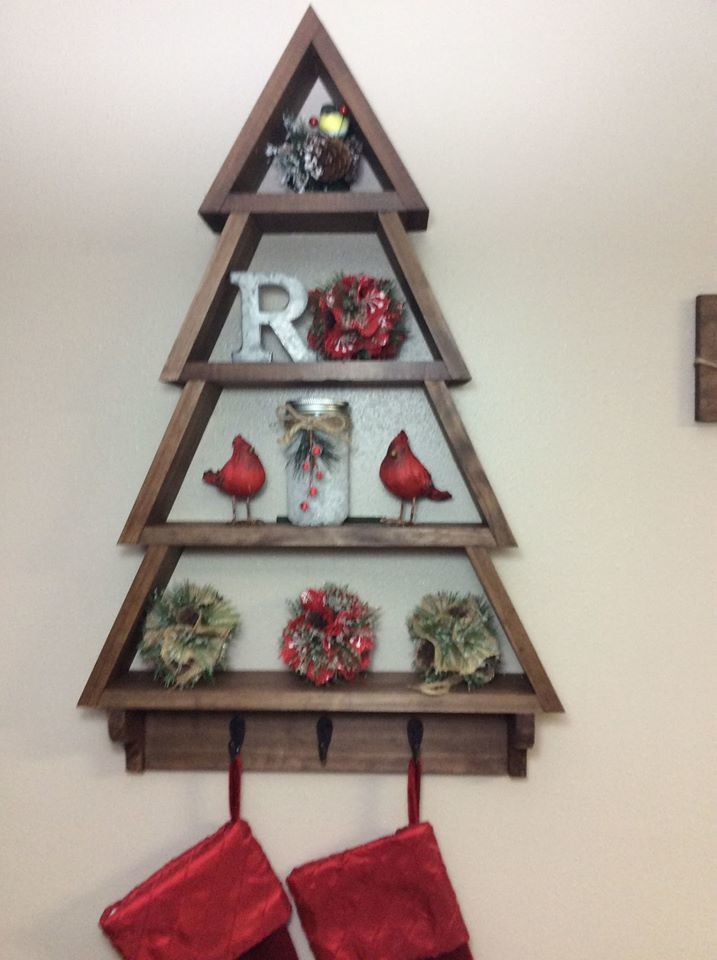
We loved making this project, I even learned how to work with angles.
Built from Plan(s)
Estimated Time Investment
An Hour or Two (0-2 Hours)
Finish Used
Minwax Dark Walnut
Recommended Skill Level
Beginner
Modern Outdoor 2x Chairs
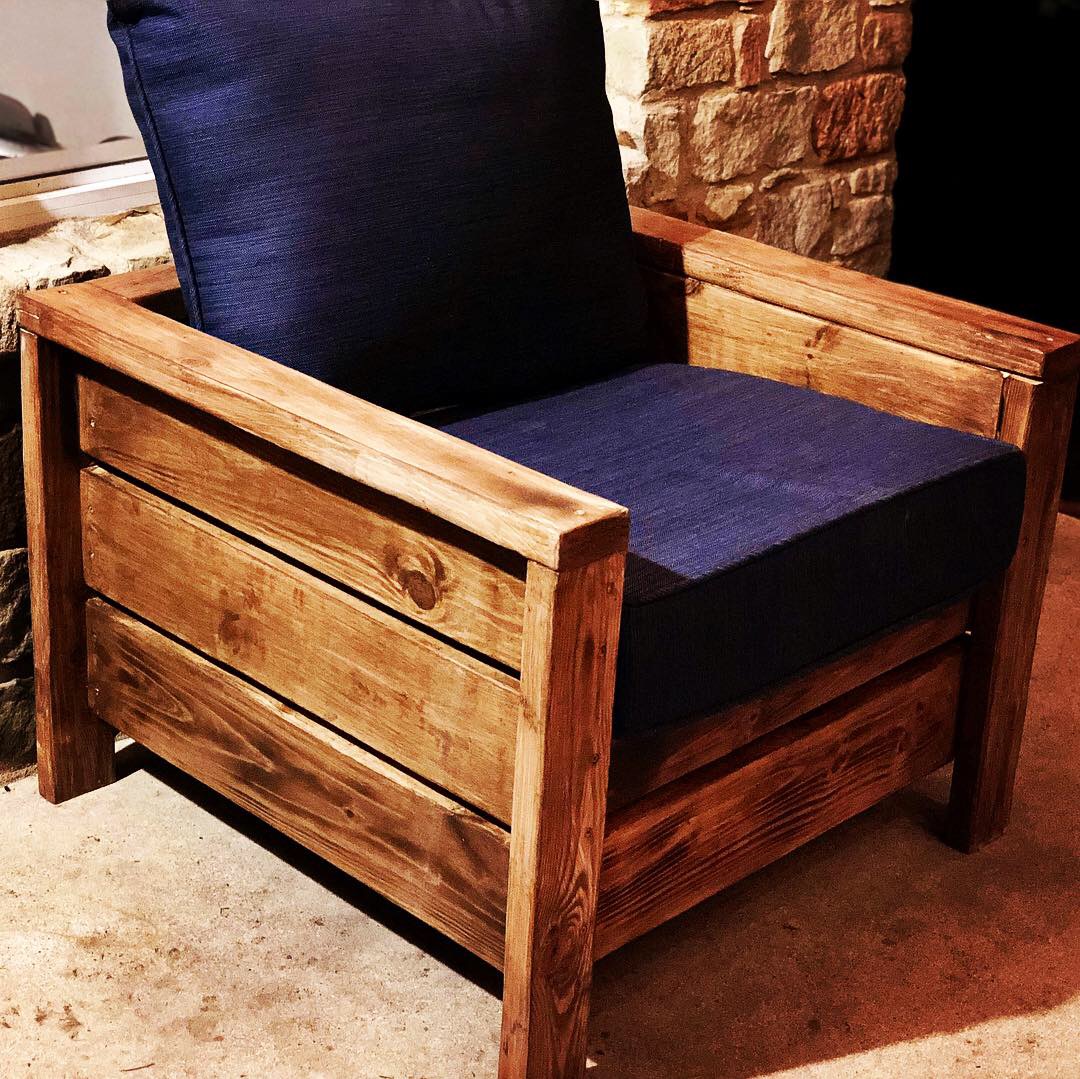
What a fast, fun, and FUNCTIONAL project! I did lower the seat height, as I think it allows you to sink into them a bit more -- especially with the cushions I had for them (which BTW, were on sale at Lowe's for $14.99/each.. normally like $60, I think). Thanks ANA, for making yet another project such a breeze!
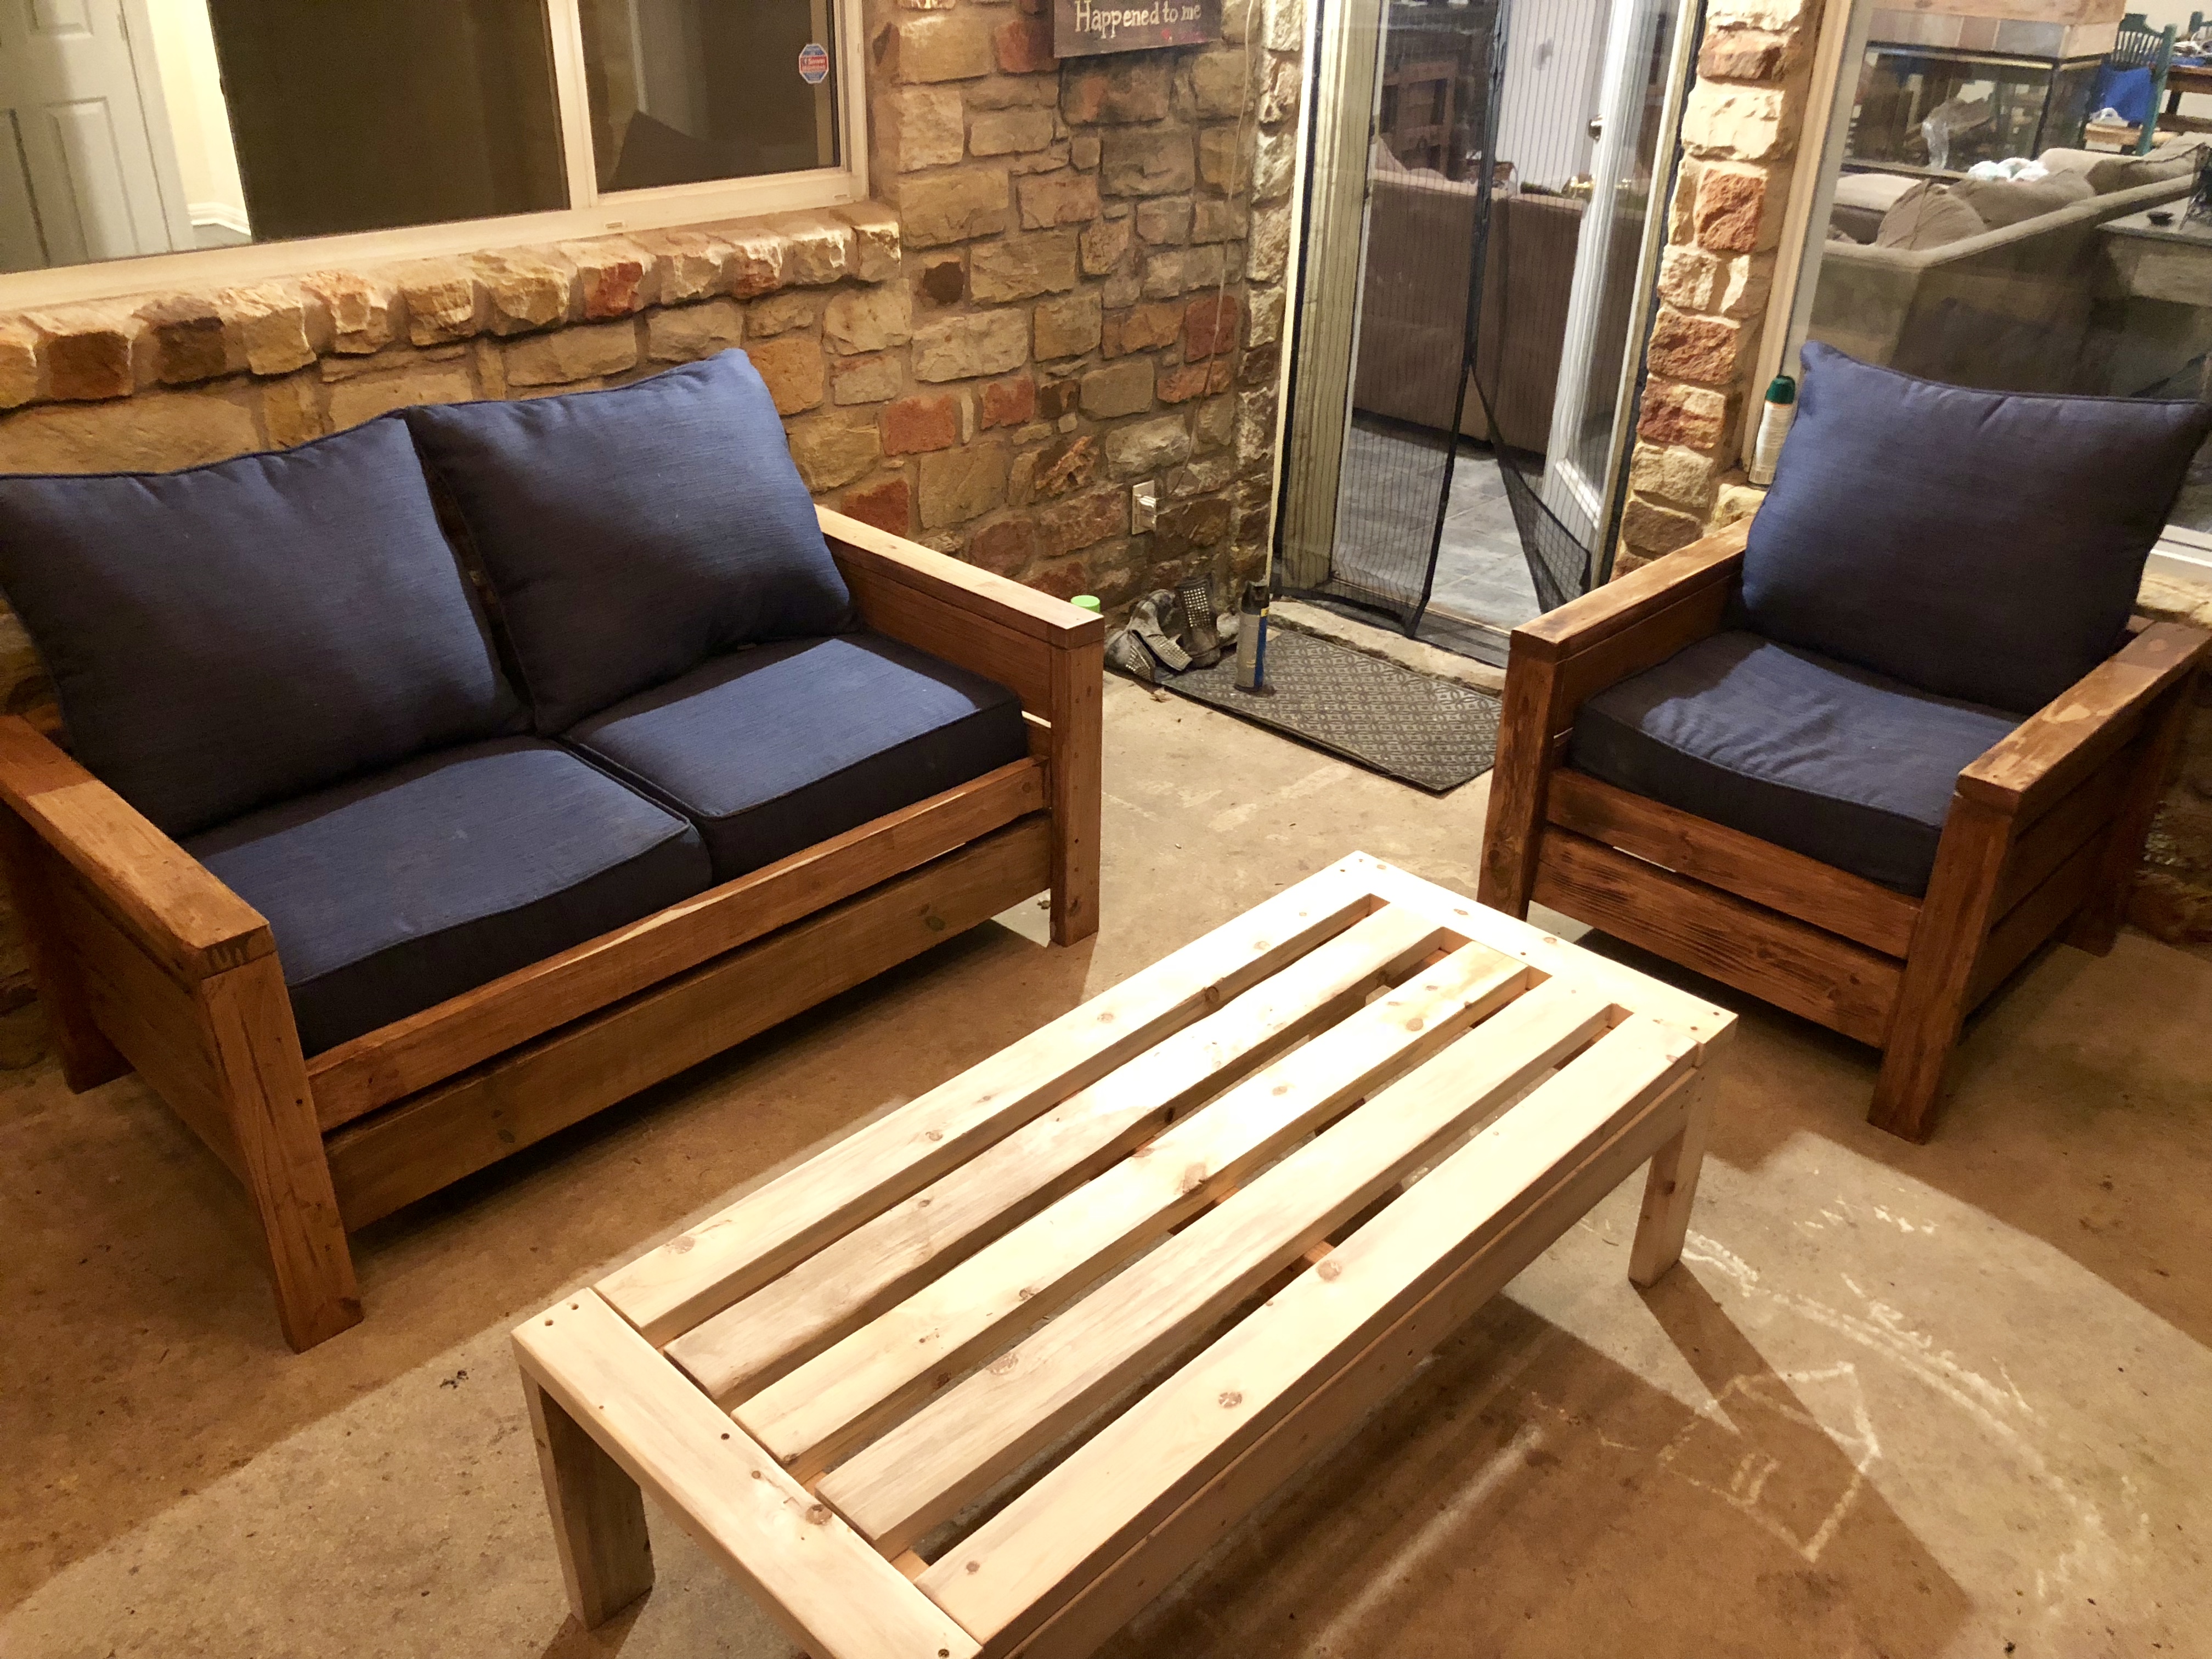
Built from Plan(s)
Estimated Cost
IDK.. I had all the wood laying around already.
Estimated Time Investment
Afternoon Project (3-6 Hours)
Finish Used
semi transparent deck stain in chocolate
Recommended Skill Level
Beginner
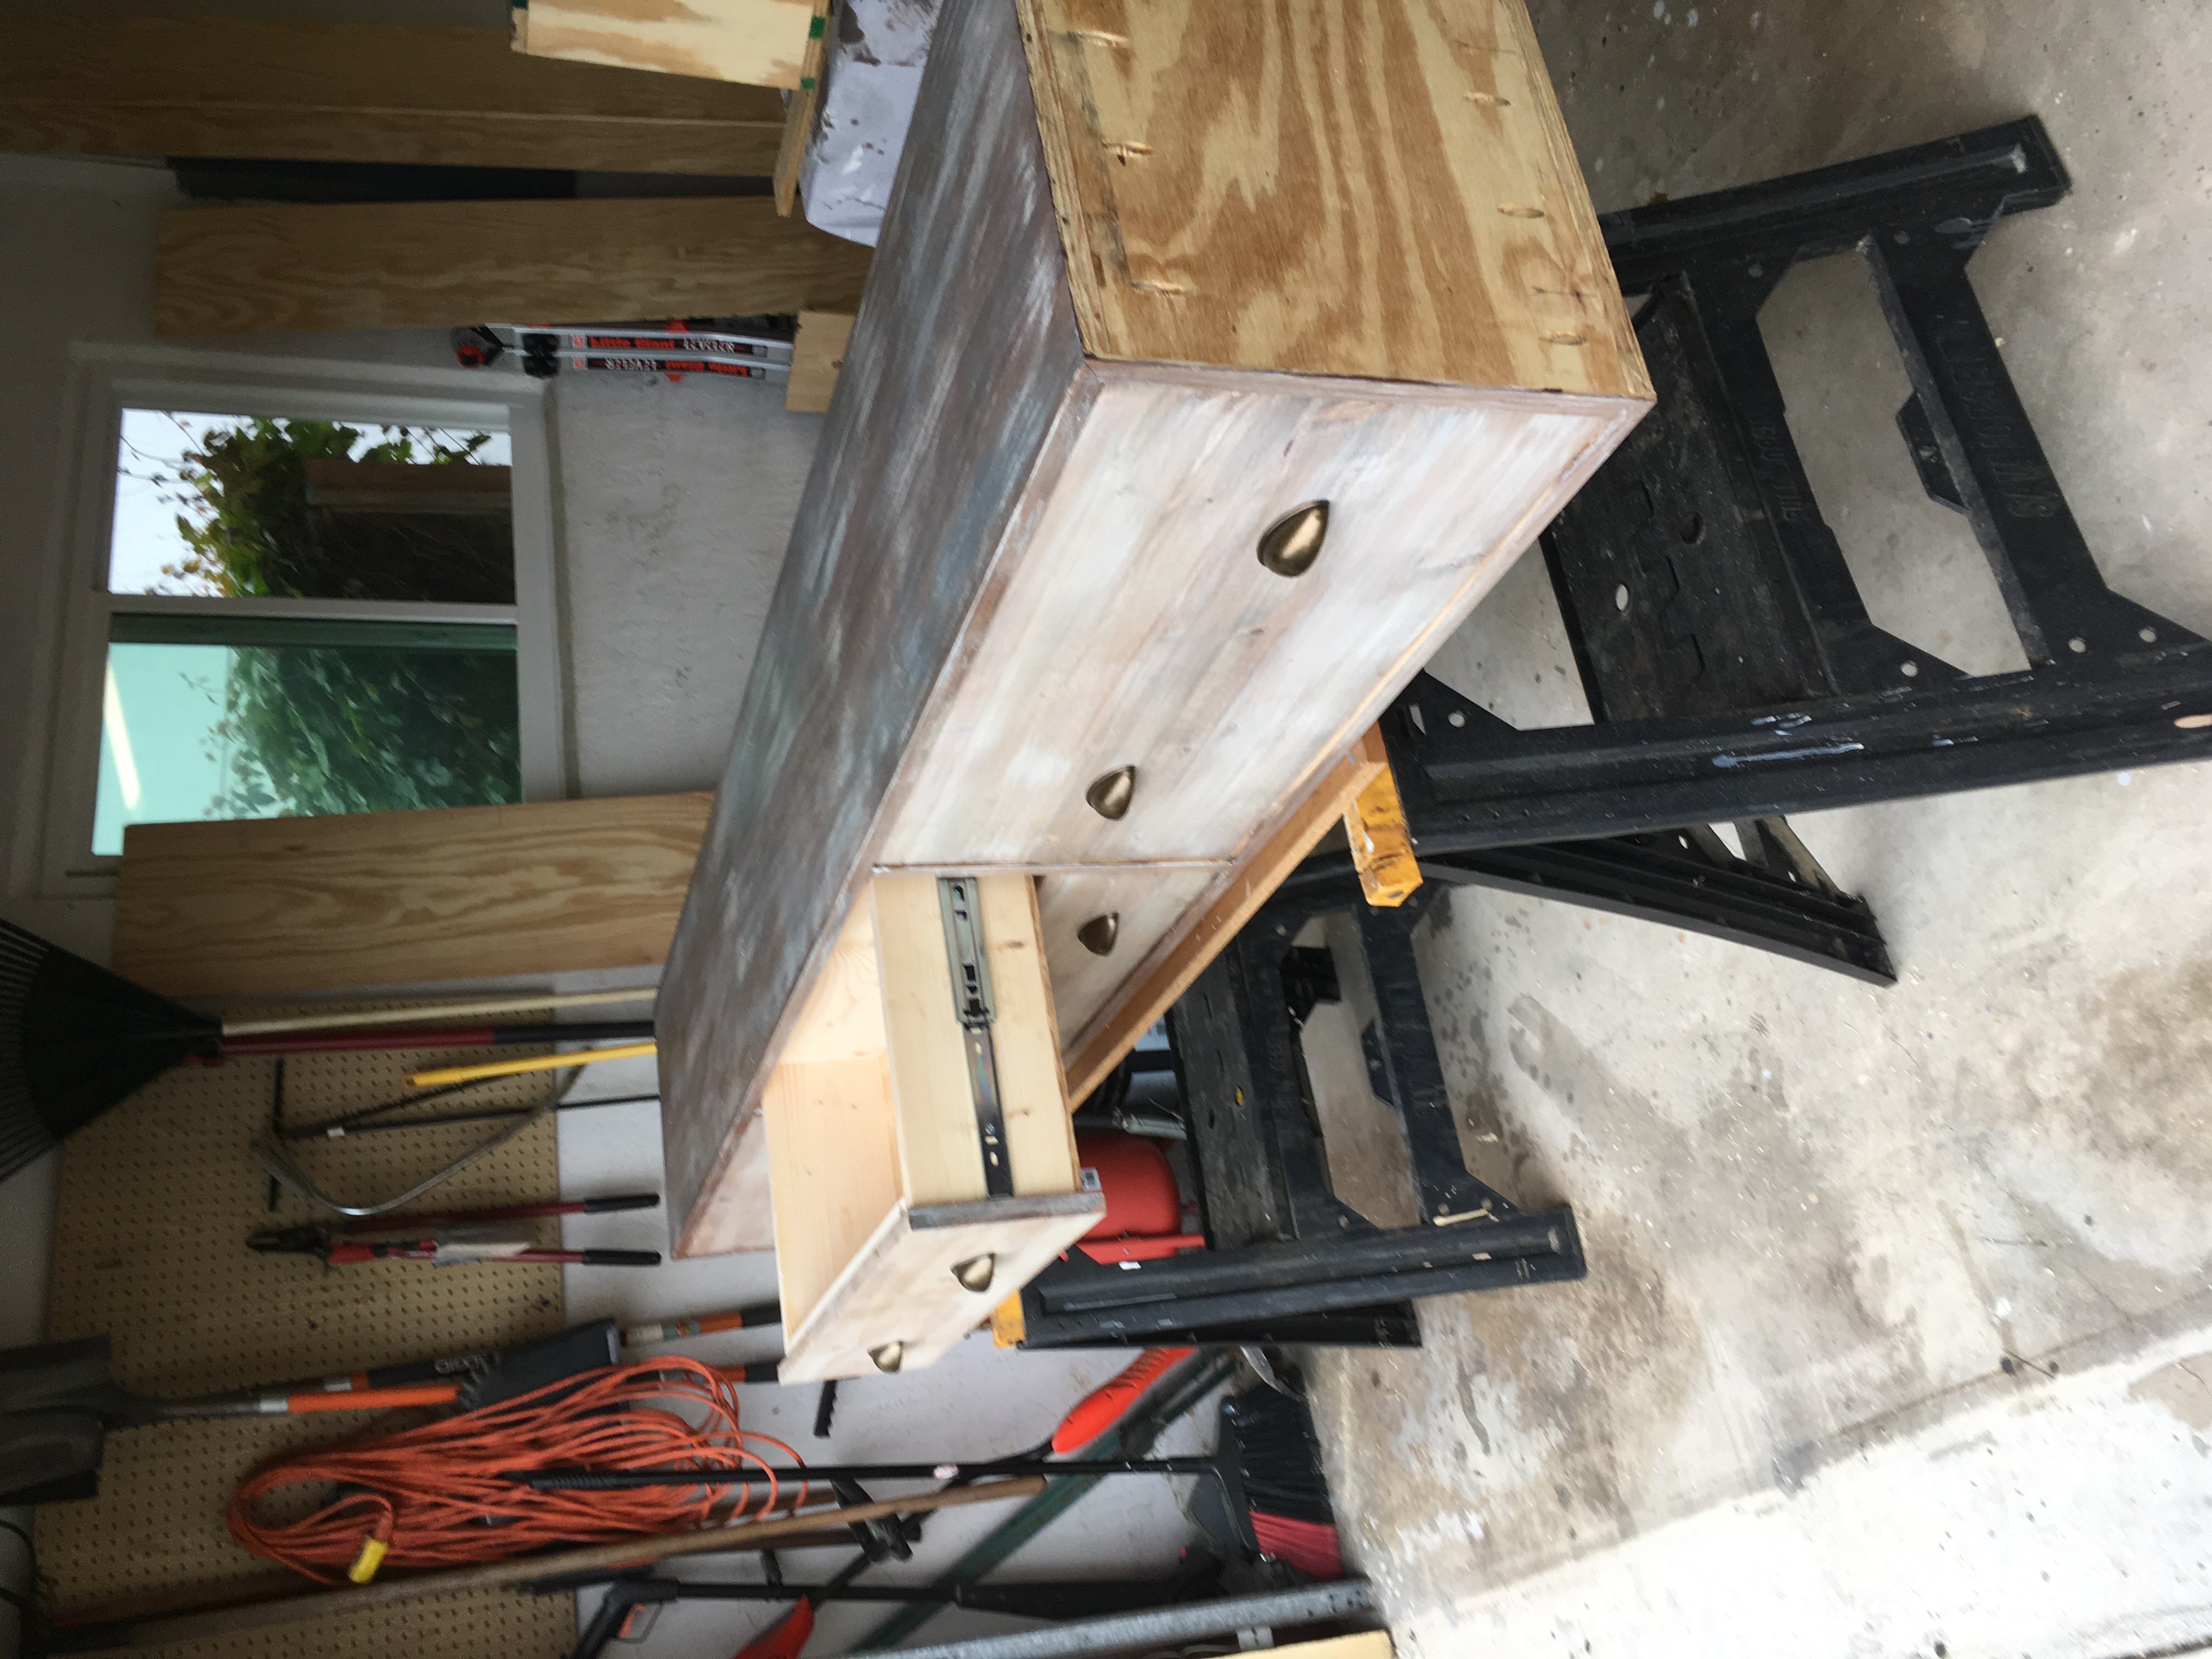
Markham Workbench Console and Rustic Hutch

I first saw this workbench and hutch on Ana's website, but didn't commit to the project until I saw them in person, as part of a model home that had been decorated by local Pottery Barn design services. I was sold. I built this for roughly $1900.00 less than PB charges. It was an easy weekend build for a guy with less than one years' experience in this arena.


Built from Plan(s)
Estimated Cost
150.00
Estimated Time Investment
Weekend Project (10-20 Hours)
Finish Used
Before I applied stain, I had my two youngest sons whack away (under my supervision, of course) at the piece with a hammer, hatchet, and chain to give it a distressed look. I took a page from Ana's playbook and used Minwax Early American with a Minwax oil-modifed water-based gloss polyeurethane topcoat. I moved the towel bar to the other end of the facade in order to reduce the depth of the piece and added a stationary bottle opener to the other side. Also, I added four lag screws toward the juncture of the legs and feet (a la PB's version), but these were purely cosmetic. All visible hardware was spray-painted with Rustoleum's textured black spray paint. Finally, I carved a heart with "A+A" inside one of the hutch cubbies to add a truly personalized element to the piece. I plan to build another for my father to use as a functional workbench. By far my favorite build (my wife kind of loves it, too). One last thing - if you don't have a Kreg jig, get one. Now. This was my first build using one and I cannot overstate its worth. Trust me.
Recommended Skill Level
Beginner
Comments

Thu, 09/15/2011 - 16:20
Nice dude! I just finished
Nice dude! I just finished my console last weekend. Was it worth it making the matching hutch? I haven't decided if I'll do it yet.....Great job though.
Thu, 09/22/2011 - 11:23
Absolutely. It's minimal time
Absolutely. It's minimal time investment, and it really seems to finish the piece off. I went with seven 1x6's (instead of a plywood backing) to give the hutch a planked look.
Sat, 09/17/2011 - 15:19
Very very nice. This has
Very very nice. This has been on my build list for way toooo long. It is beautiful and inspiring! Thanks!!!
Fri, 02/24/2012 - 05:43
legs and the kreg jig
Great job! I'm starting this same project and just purchased the kreg jig system but I'm stuck on assembling the table legs using pocket holes. I don't want to have visible pocket holes, could you give a quick description on how you assembled the legs and attached them to the feet using pocket holes? Thanks!
Harvest Table Love
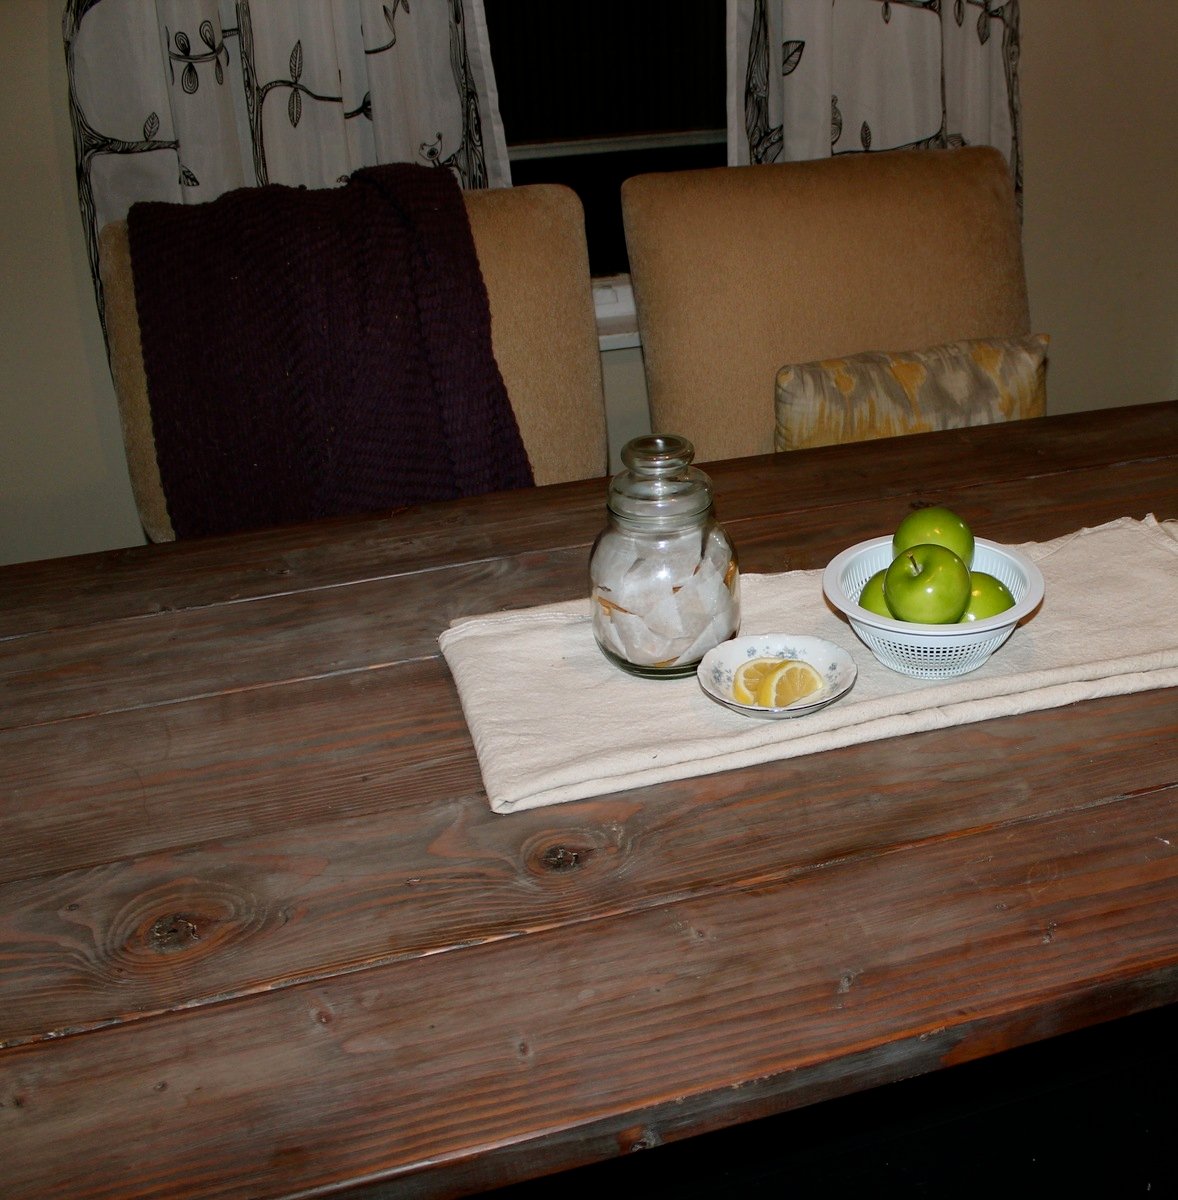
This Harvest table is the heart of our home. It was one of the first furniture projects we ever completed and my favorite finish to date. The night we spontaneously decided to buy lumber and build this table we had a lot of unexected visitors. We were out in the driveway working and a bunch of friends dropped by randomly so we all took a hand in building this table. It was so much fun. Spontaneous building party.
When I finished it it was my first time using a belt sander which wound up gouging some of the wood. The table top is super smooth but very rustic and I LOVE IT. I started with pre-stain conditioner, then cherry stain which I hated, then early american mixed with dark walnut. At this point it looked pretty lovely but I wanted it to look aged and gray so I lime waxed, dark waxed and buffed the whole surface of this piece. It turned out so special and you can see some red notes from the cherry stain and those are my favorite moments on this table.
Thanks again Ana.
** updated with a few better photos on 11/21

Built from Plan(s)
Estimated Time Investment
Afternoon Project (3-6 Hours)
Finish Used
See summary.
Recommended Skill Level
Starter Project
Toddler SIzed Easel
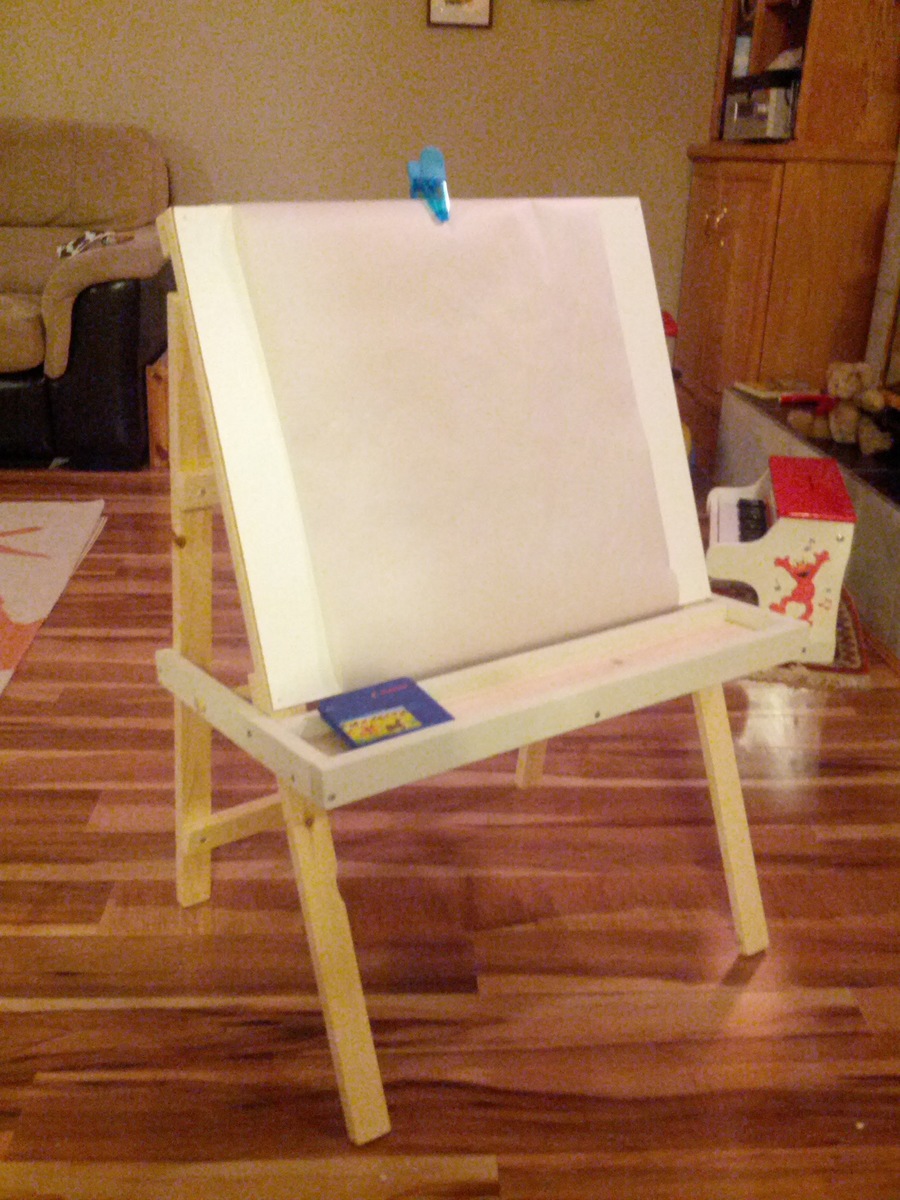
We opted to make this a regular easel (no chalkboard) and just used a sheet of paneling as the background. It's perfect, our toddler loves it. Thanks Ana!
Built from Plan(s)
Estimated Cost
$10
Estimated Time Investment
Afternoon Project (3-6 Hours)
Finish Used
unfinished
tray painted with milk paint
tray painted with milk paint
Recommended Skill Level
Beginner
Maple Bookcase with Fluted Trim
Just finished this maple bookcase with fluted trim for my daughter's room. I chose all maple trim even though it's painted because I wanted a good hardwood with low grain that would look good for decades to come. Full build details are on my website. Router bits used were a roman ogee and a core box bit.
Estimated Cost
100
Estimated Time Investment
Weekend Project (10-20 Hours)
Finish Used
White Paint - Behr Premium Plus Semi-gloss
Recommended Skill Level
Intermediate
Comments
Cornhole Boards with Custom Initials
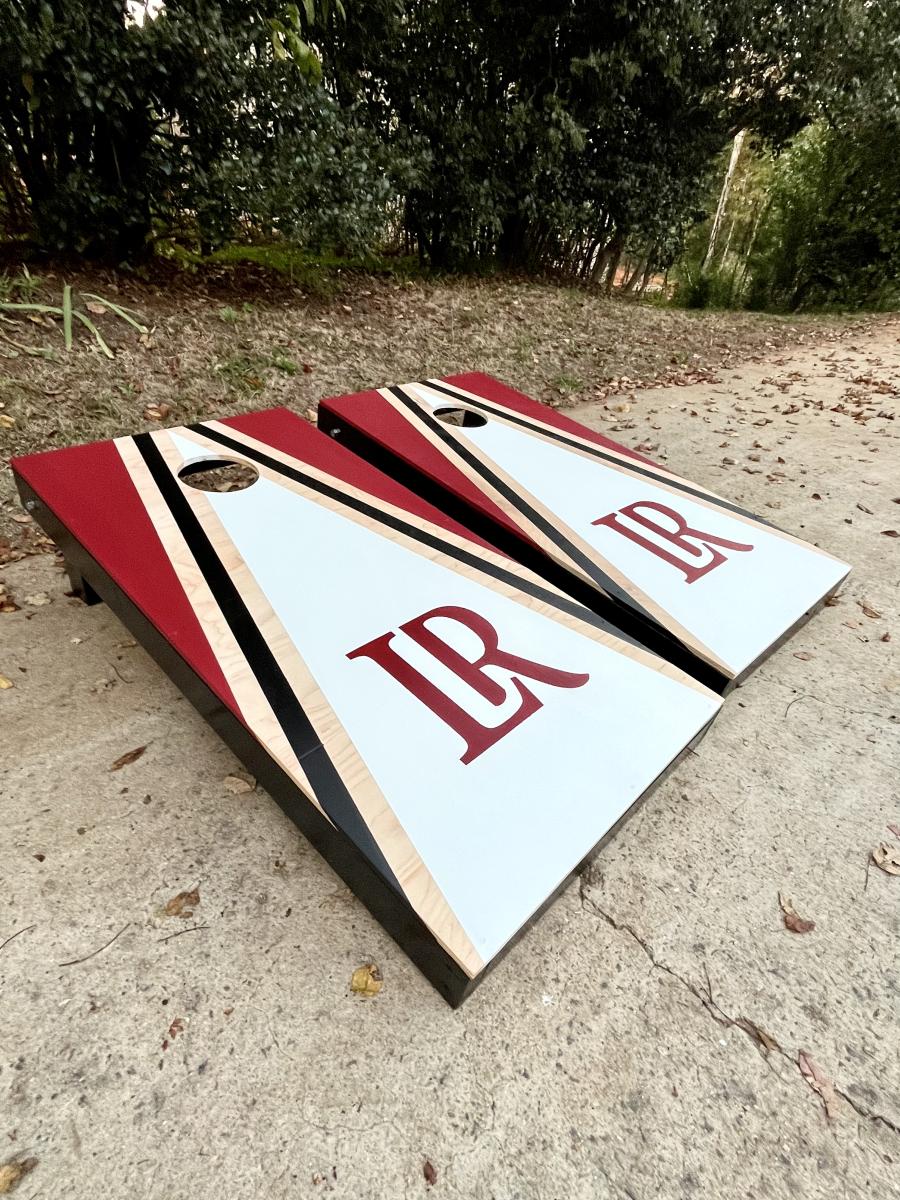
Thank you for helping me make my first set of cornhole boards! Super easy steps to follow and I love how they turned out!!!


Built from Plan(s)
Comments
Entryway/Mudroom Cabinet
My most *favoritest* project ever. I modified the Braden plans like crazy to fit my family's needs for the sunroom/mudroom. I kept the bottom open so the it woould allow for baskets to slide it easily (which makes sweeping inside a snap). Also, I added some braces about midway down to hold the coat hooks for my 3 and 5 year-old. I had them show me how high they could reach and I just placed the braces there.
I literally used up whatever I could find in my garage for this project. We had a TON of scrap wood in varying thicknesses and lengths so I just used that. The only thing that I had to buy for this project was some 1x2 to finish off the trim.
Can't wait to get hardware on and style her up pretty! Will post final pics as soon as I do. :) I've been DYING to get something up on Ana's brag board and I can't wait to keep 'em coming.
Built from Plan(s)
Estimated Cost
$30+
Estimated Time Investment
Weekend Project (10-20 Hours)
Finish Used
Kilz oil-based primer and 3 coats of Valspar Swiss Coffee in semi gloss.
Recommended Skill Level
Intermediate
Comments
Trimmed and ready for Christmas - Dollhouse
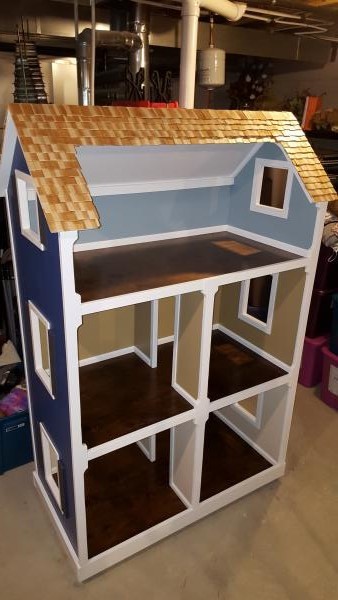
Built this from Ana's plan. Made a few small floor changes and added casing, baseboard, trim and cedar shake shingles.
Built from Plan(s)
Recommended Skill Level
Intermediate
Comments

Mon, 12/21/2015 - 15:22
I love all the attention to
I love all the attention to details here. It's a beautiful dollhouse.
Wed, 12/23/2015 - 15:07
Thank you!!
Thank you for the kind comments. I really appreciate your work putting the plans out there for others to follow, Ana! My father is a high end custom homebuilder and made a house for my 3 sisters 20 years ago for Christmas. I thought if I'm going to do this, I might as well go all in and try to make something grandpa would be proud of. It is for my 2 girls, ages 8 and 11. The 11 year old still plays with dolls. I'm trying to hold onto her youth as long as I can! Again, many thanks. -Shane
Wed, 12/23/2015 - 15:12
Thank you!!
Thank you for the kind comments. My father is a high end custom home builder and made a house for my 3 sisters 20 years ago for Christmas. I thought that if I was going to make a house I should go all in on something to make grandpa proud. I am very grateful, Ana, for your posting of the plans on the web for others to imitate! The house is for my 8 and 11 year old daughters. The 11 year old still plays with dolls and we are trying to hold on to her youth as long as we can. With thanks and gratitude, Shane
Comments
Ana White Admin
Thu, 11/17/2022 - 08:12
Great first project!
This looks fantastic! Thank you so much for sharing.