Community Brag Posts

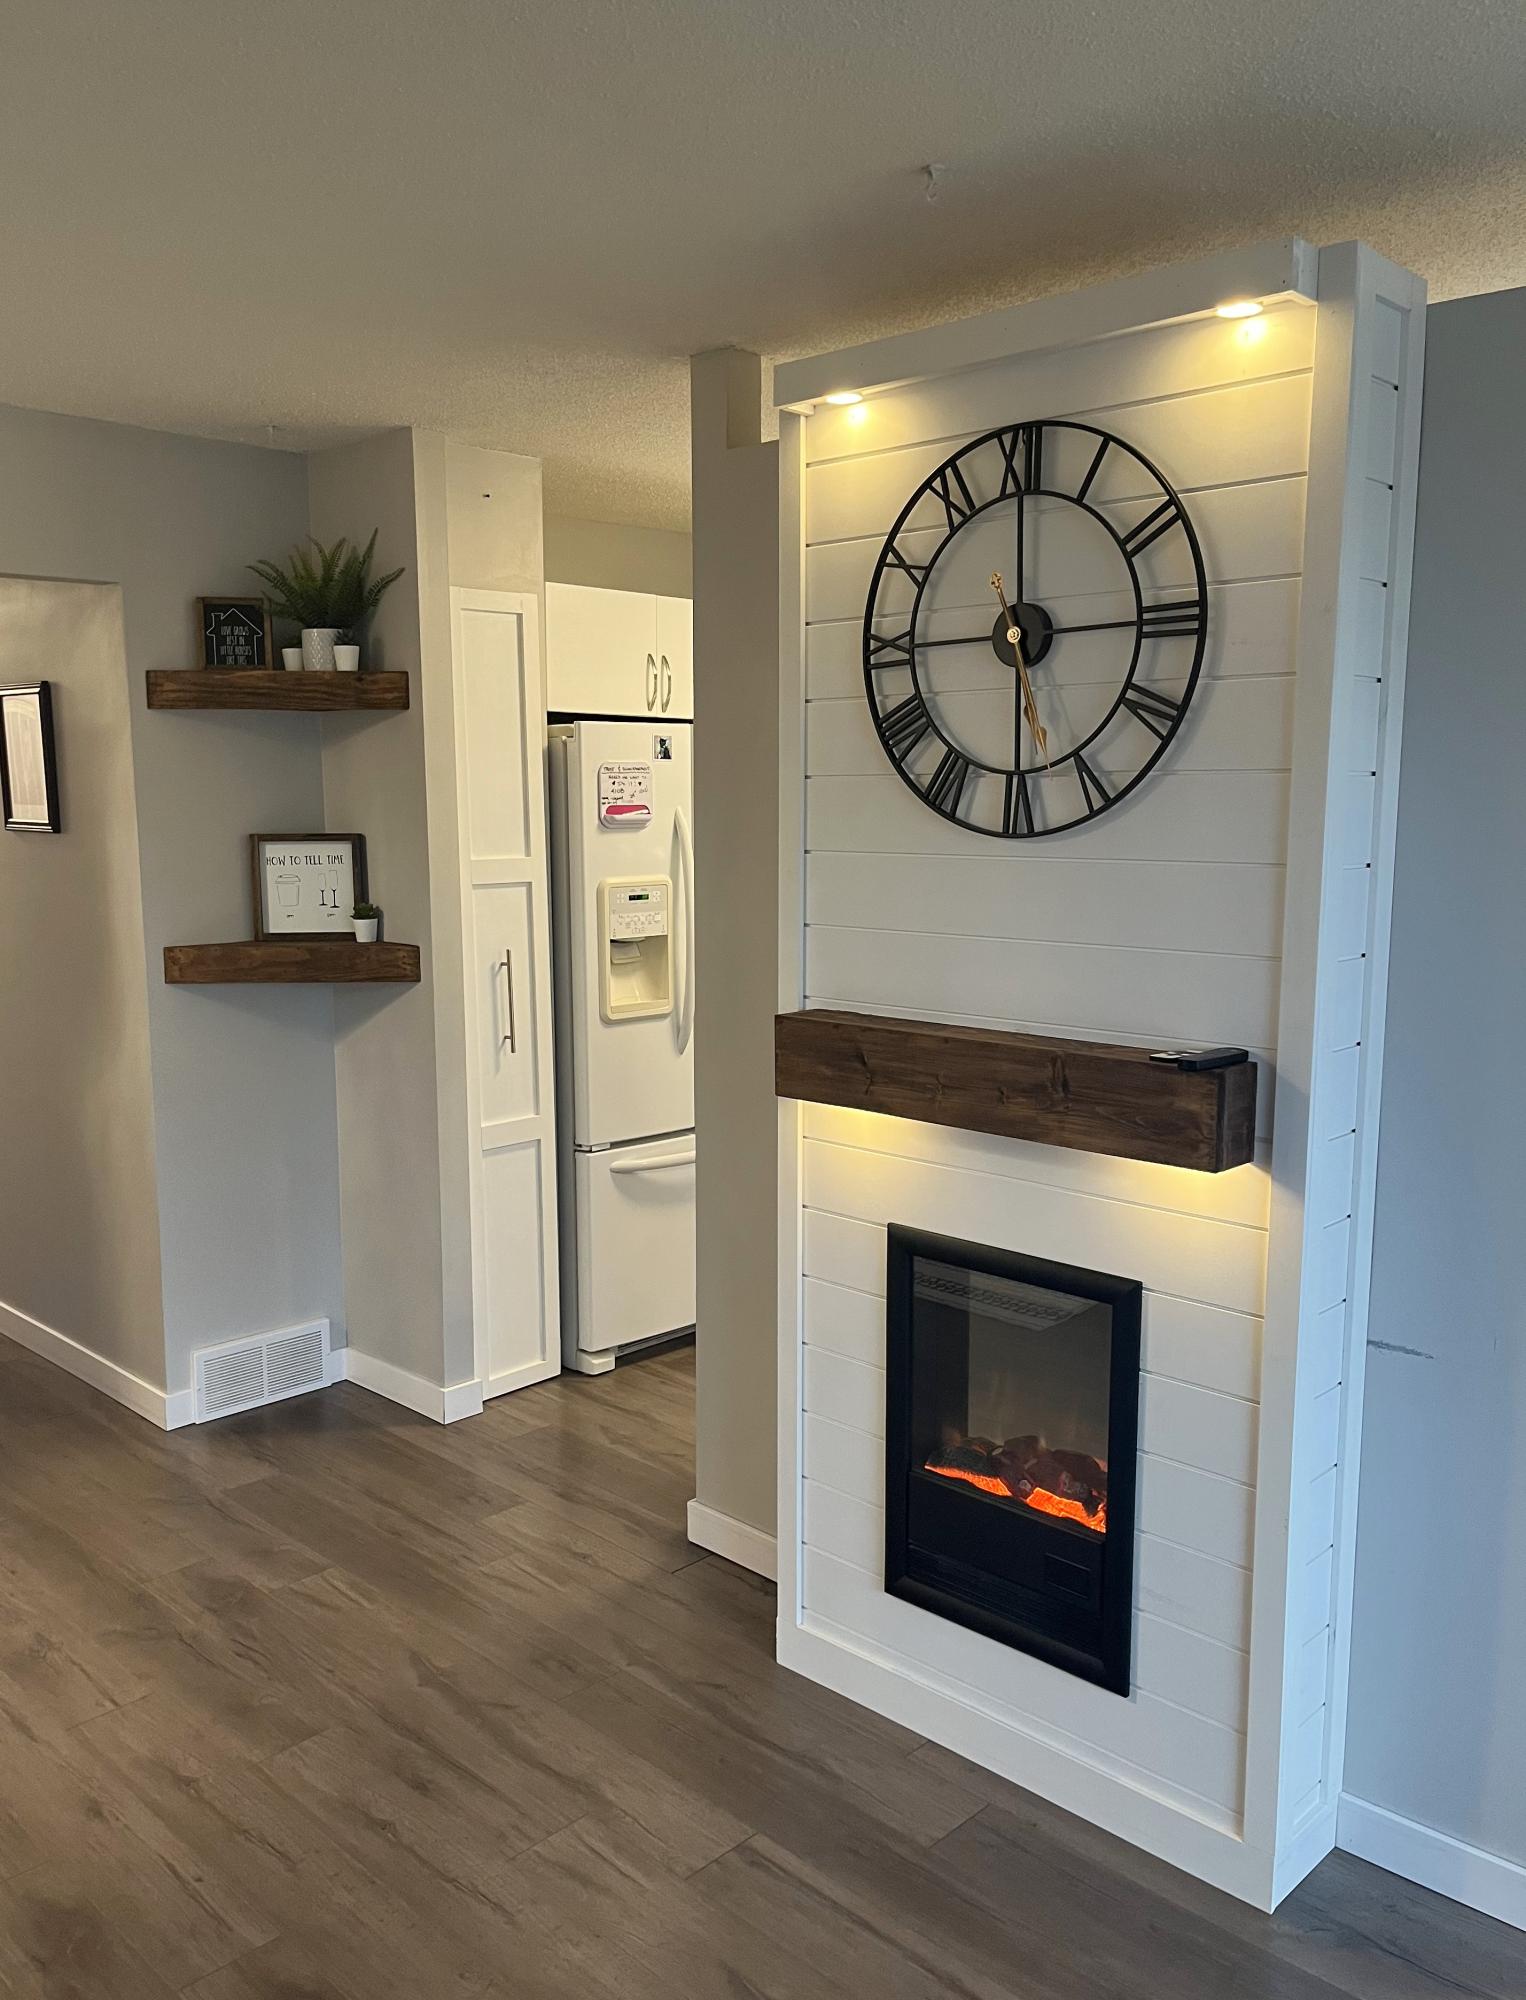
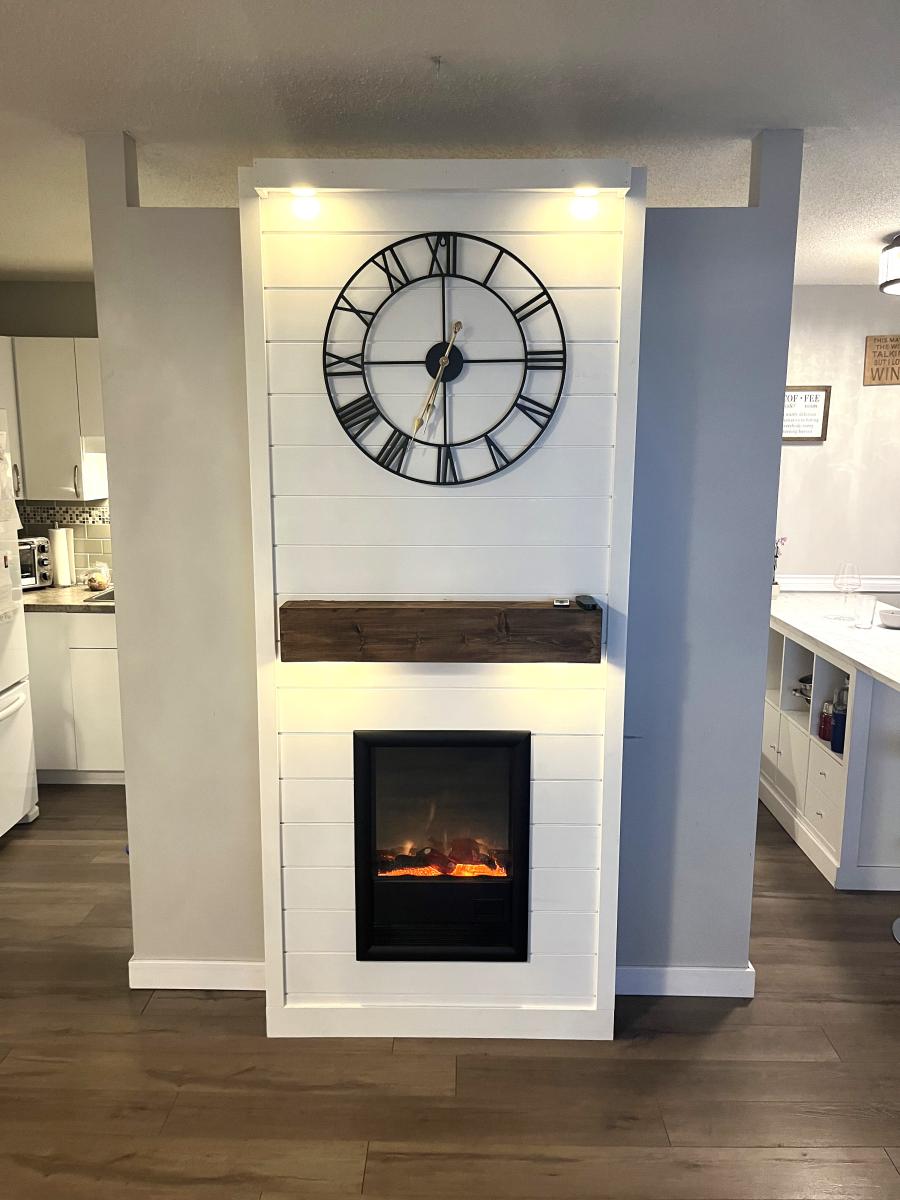
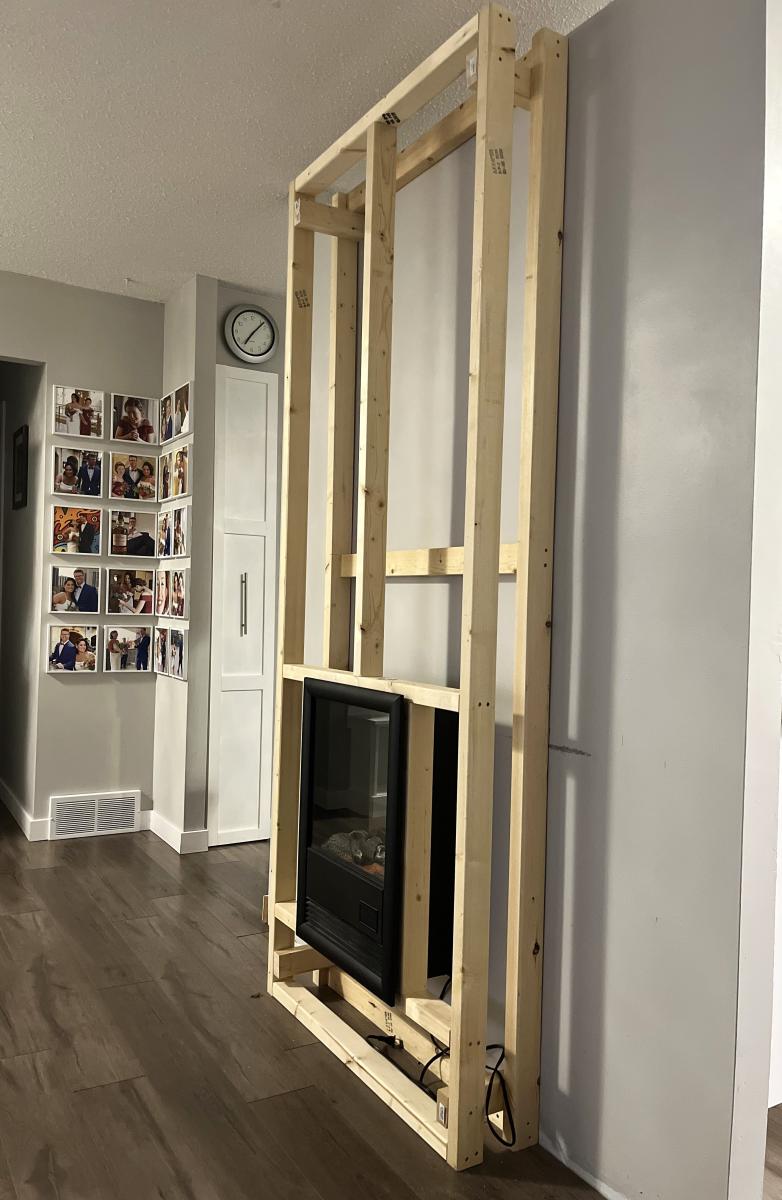
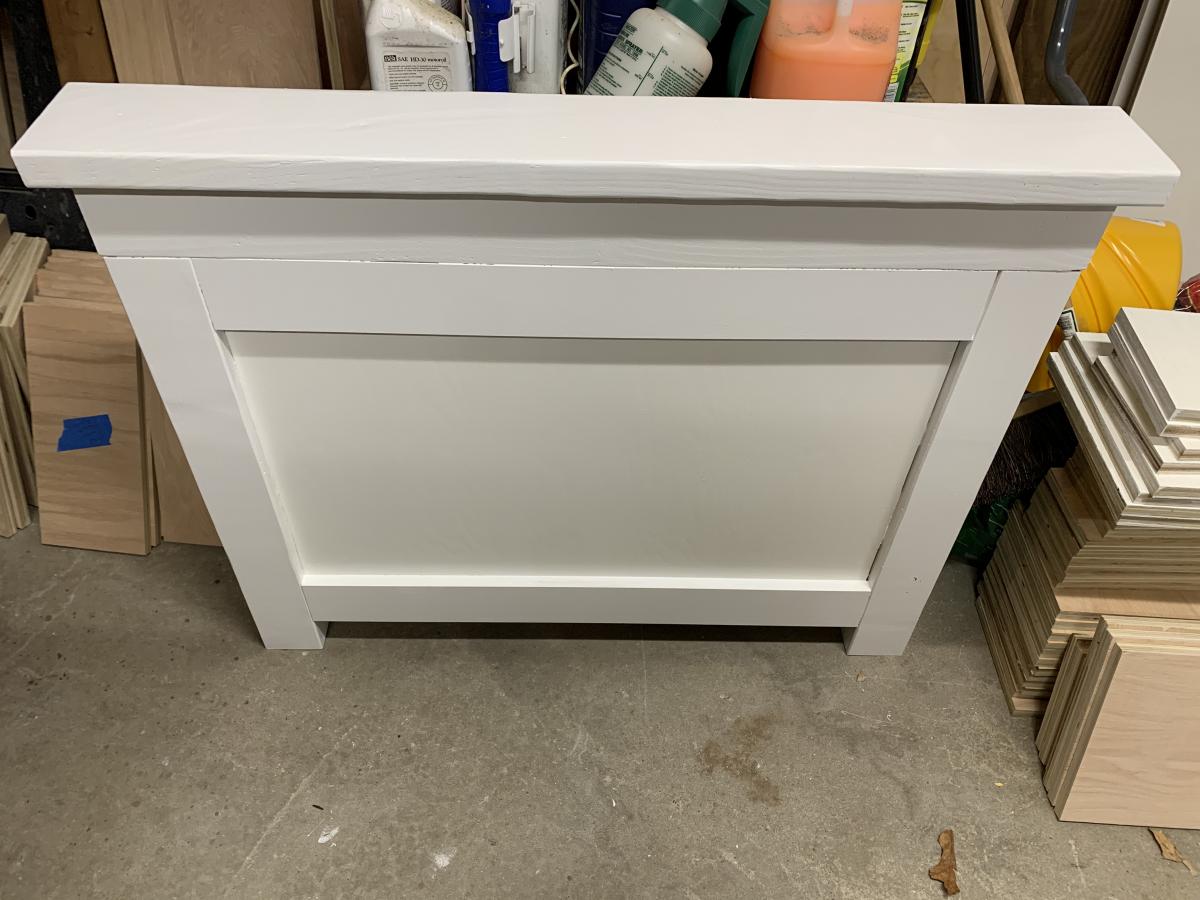
Faux Fireplace with Hearth

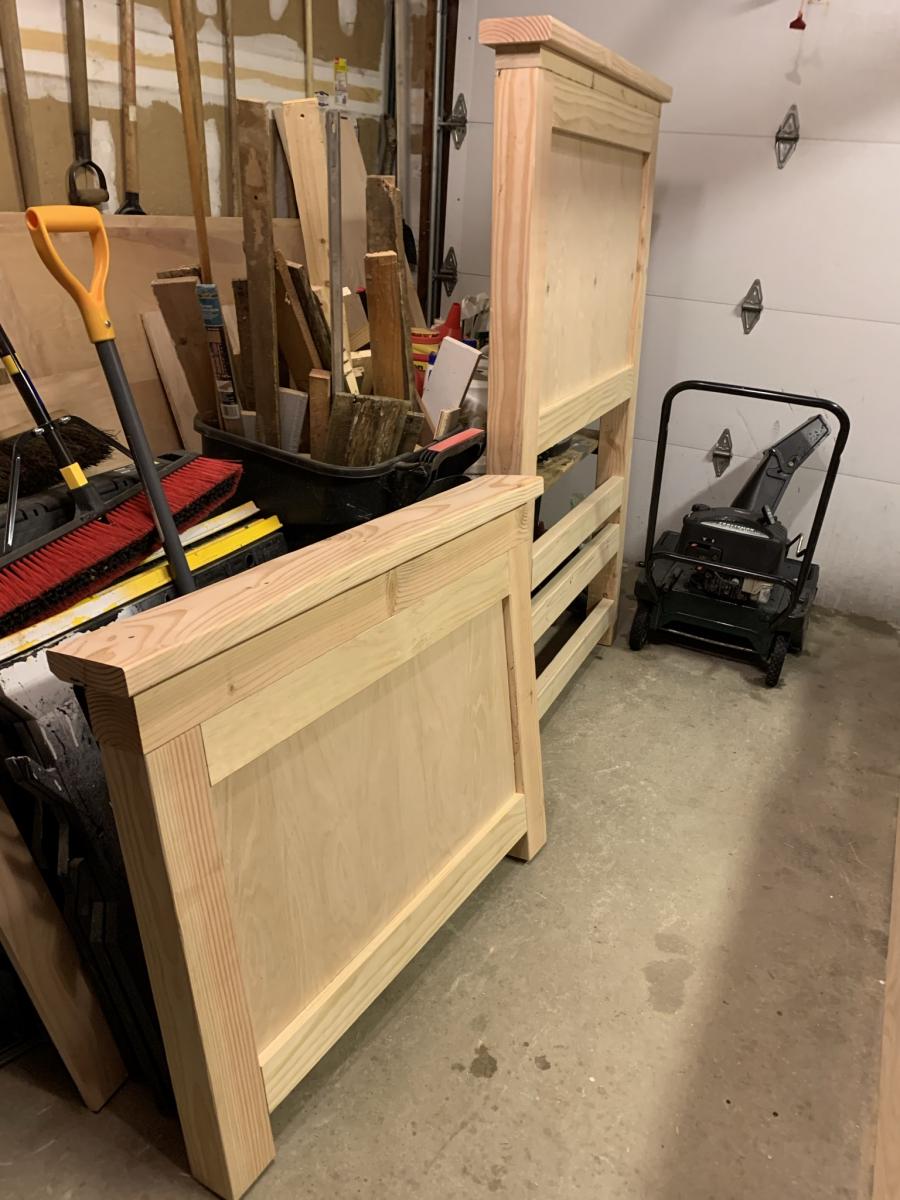
We made some modifications by adding a hearth for additional height (the room we have it in is very large and open) and joining 2x4s for the mantel and base which I stained grey for contrast. We decided to use thin brick for in the "firebox" to make it look more realistic. We also have a newborn and spent over two months putting it together a little at a time in our free moments so I'm not sure how long it would actually take to do at once, but cutting and putting up the brick was very time consuming. 

Estimated Cost
$250
Estimated Time Investment
Week Long Project (20 Hours or More)
Finish Used
White paint, Minwax "Classic Grey" stain
Recommended Skill Level
Beginner

Comments

westmoundstar

Thu, 08/27/2020 - 11:16

This looks great! I'm actually in the middle of this build with the hearth as well. Couple questions....
How did you connect the two pieces? Also, did you connect to the wall? I'm assuming you didn't leave the 5 1/2 inch gap on the bottom of the fireplace and connected direct to the hearth. Let me know, thanks!

Seasonal And Holiday

Cedar Boxes

Submitted by drowland on Sat, 07/09/2011 - 07:18

We built these before we saw these plans, but they are pretty much the same... We added the chicken wire to keep the rabbits (and our dog) out of the garden. We added the owl to keep the birds out. We've gotten a ton of tomatoes, onions, and bell peppers so far. Next year, we'll add a few more beds. We also added the verticle garden to take up less space, but its not deep enough. We'll make the next one deeper.

Estimated Cost
$30
Estimated Time Investment
An Hour or Two (0-2 Hours)
Finish Used
none
Recommended Skill Level
Starter Project

Comments

KatieO (not verified)

Sat, 07/09/2011 - 20:11

Wow! LOVE IT! I love the taller posts so you can incorporate the chicken wire! I SOOOO needed to do something like that this year. Also, the vertical garden boxes are BRILLIANT! LOVE IT!

drowland

Thu, 11/17/2011 - 07:59

We ended up getting a ton of tomoatoes and green peppers from the garden boxes. We've actually built a couple more. We'll probably double again before next spring. We're looking at adding more veggies.

We now have ton of stuff planted for the fall...

Guest (not verified)

Tue, 03/13/2012 - 10:46

How did you build the upright planter boxes? Do you mind explaining the building process/design? I really want to plant this in my yard!

colton's mom (not verified)

Tue, 04/03/2012 - 06:19

i love the vertical boxes. I am just trying my hand at the world with a green thumb and could use as much advice as possible about how to make as well as to line the boxes or not to line them. All advice appreciated!

berman (not verified)

Fri, 11/23/2012 - 21:53

Hi, my name is berman. I found you pin from my pinterest and your box garden is so great. I am a newbie in this field and so interested to build garden in my house. If i can ask you some question, could you please to answer that?

cheers,
berman

Seasonal And Holiday

Easy Build wood headboard - King

Submitted by nestbliss on Mon, 11/14/2011 - 19:14

We used this plan for the reclaimed wood look headboard from Ana-White and these dimension mods for a king. We used lots of tips from Create and Delegate who made the same headboard last year. I love how it turned out! I posted more photos and blogged about everything we did for the finish, etc. at - http://nestbliss.blogspot.com/2011/04/we-made-bed.html

Recommended Skill Level
Beginner

Comments

Small Shiplap Fireplace Wall

Submitted by Anonymous (not verified) on Thu, 10/26/2023 - 19:06

I copied Ana’s fireplace insert design. So easy and looks amazing.
It’s my favorite so far.
Thanks Ana!
Al

Comments

Great weekend project...the "love swing"

Submitted by Don Ellery on Mon, 05/19/2014 - 15:49

A great weekend project...the "love swing"! I used the plan from Ana for the swing seat and added two arm rests from left over 1x6, rounded them off and sanded.

I cobbled together an A-frame to hang everything, made from five 8 foot 4x4s and two 8 foot 2x6s laminated together for the stretcher. Assembled with 1/2" galvanized carriage bolts and hung with 1/4" chain.

Definitely going to want a good miter saw for the A-Frame angles (the top ones are a bit tricky to get everything lined up)

Love it! Thanks for another great plan Ana..and of course..Shanty2Chic!

Built from Plan(s)
Estimated Cost
$200 ish..including the A-Frame... the hardware and chain can be pricey!
Estimated Time Investment
Day Project (6-9 Hours)
Finish Used
Behr exterior weatherproofing stain - Chocolate.

Just 2 thin coats, dries fast...second coat can be applied later the same day.
Recommended Skill Level
Beginner

Comments

Carpenters Daughter

Mon, 12/12/2016 - 17:09

Could you please post the plans to build the a frame as well? I really love what you did and would like to copy it! Great Job!

Don Ellery

Wed, 07/19/2017 - 11:31

Hi! I wish I could, but I didn't take any notes on the angles or lengths when I made this and I left it with the house when we moved. 

Cedar planter and 3 tier planter

Submitted by Anonymous (not verified) on Tue, 08/04/2020 - 17:48

My very first attempts at wood working. My new COVID-19 hobby 🥰

Estimated Cost
20.00
Estimated Time Investment
An Hour or Two (0-2 Hours)
Recommended Skill Level
Beginner

DIY Lego Table

Submitted by hstreat on Mon, 05/01/2017 - 19:39

This is a Lego Table that I built my Grandson for his birthday.  I found the plans for it on Rogueengineer.com

https://rogueengineer.com/free-diy-lego-table-plans/


I switched things up a bit by routing all of the edges to soften them, and I added the little mover men casters under each of the legs.


It's one of the better projects that I done recently, and nothing beat the look on his face when he saw it...

Estimated Cost
Approximately $60.00, mostly cost of wood.
Estimated Time Investment
Weekend Project (10-20 Hours)
Finish Used
Minwax Golden Pecan & Winwax Clear Glossy Polyurethane
Recommended Skill Level
Intermediate

Cleaning Caddy

I wanted to build a cleaning caddy. Normally when I go to clean – I want to do it all at once. We have a bigger house – so I’ll be upstairs in the kids room – and realize I left the Windex downstairs – get upstairs – I left the paper towels downstairs….SERIOUSLY. So – hopefully this will stop that from happening!!!

So – here we have my Cleaning Caddy!! It was actually pretty easy to build. I had everything on hand. I had the dowels from another project – so that is how I based everything.

I took two left over pieces of MDF and made a design, cut it out with a Jig Saw. I wanted to make sure it was tall enough for the cleaning bottles.

Then I screwed the dowel to each side of the MDF sides.

I then measure the length I needed for the sides – I used scrap base molding we had laying around – I don’t even know where it came from!

Then came the bottom – I measured out the sides – and then I wanted it long enough to hold a roll of paper towels.

Glued and nailed everything in with the nailer (always use glue too – this thing is kind of heavy with all the cleaning supplies)

I screwed the dowel in from the bottom for the paper towels.

I painted it many times with white trim paint – used many different types of wood so I wanted it to look uniform.

Then for the finishing touches – I went to my abundant scrapbook paper collection – Mod Podged it all up. Love that stuff!!! On the front – I cut out “Cleaning Caddy” with my Cricut. And on the sides I trimmed it out with cording I had on hand, just used hot glue and did about a 6 inch section at a time. I hot glued buttons where my screws were on the outside tops. My counter sink bit was the wrong size, so they stuck out a little. Now it’s a nice decorative element.

Estimated Cost
Free
Estimated Time Investment
An Hour or Two (0-2 Hours)
Finish Used
Sanding, priming, painting, mod podge
Recommended Skill Level
Beginner

Kids Adirondack chairs

Submitted by Anonymous (not verified) on Tue, 10/05/2021 - 04:46

This was my first time building a chair. The plans were so easy to follow. The kids size fits an average child up to about age 5 or 6. If I were to build again I would add a bit of height to the backs so they could fit them even longer. My granddaughters aged 3 & 5 just loved them.

Built from Plan(s)

Project Complete!

Here is my patio sectional made of 2x4s. Used my Kreg Jig for the first time to complete this project. I used pocket holes in as many places as possible, then finished it with two coats of leftover fence stain and two coats of semi-gloss outdoor Varathane spar urethane for a nice sheen. I modified the dimensions to fit the cushions that my wife purchased before I began the project. I made the back substantially taller to support the cushions and left the arms off of both ends of the sectional so people could sit facing sideways too. I left the corner of the sectional without a cushion so people would have a place to set drinks.

Estimated Time Investment
Afternoon Project (3-6 Hours)
Finish Used
Two coats of Behr transperent weatherproofing all in one wood finish stain in "chocolate" (leftover from our fence) and two coats clear semi-gloss outdoor varathane spar urethane.
Recommended Skill Level
Beginner
Seasonal And Holiday

DIY Chaise Lounge Chairs

Submitted by jroubinek on Wed, 07/06/2011 - 10:44

This was my very first project to take on with Ana's plans. It took a little longer than I would have liked only because I got frustrated and put it to the side for a MONTH. I realized how important it was to pre-drill my holes and then got the motivation to get back to it. Once I got started again, it was finished in NO TIME! I still need to stain one of them, but I couldn't be happier with the result.

Estimated Cost
$60
Estimated Time Investment
Weekend Project (10-20 Hours)
Finish Used
I used Wood Conditioner to make sure I didn't have to worry about blotchiness. Then I used a paintbrush to apply Minwax's Dark Walnut stain.
Recommended Skill Level
Beginner

Comments

geophyrd

Sun, 07/31/2011 - 07:55

I'm right in the middle of building one of these. My problem is that the 2x4s specified are 2" thick...having to rip them down and that took a lot of guts. Did them all except the long boards. Going to do those later today (if I don't melt) and when my wife can give me a hand.

How did you rip them to size?

Also, did you use a router table to round the edges?

MichelleC

Fri, 07/20/2012 - 09:21

These look great! Geophyrd...do you mean 2x2's? You just use the ones straight from the store, also referred to as furring strips...that will save you a lot of time and stress rather than ripping down 2x4's. When the plans say 2x2's, they aren't going to actually be 2", and the plans don't say that they have to be 2". Ana writes the plans as simply as possible without us having to do complicated steps like ripping down boards thank goodness!

Double Inset Bookshelf Doors

Submitted by dholubar on Wed, 08/21/2013 - 07:08

You made this project look so simple that I just had to try it. However, to suit my needs I had to make a few alterations to the plans. I had a set of bi-fold doors that were in need of replacement and I thought inset bookshelf doors would be the perfect way to replace them. This project was easy enough for me to do it myself and I am really new to the DIY game but I did have some help. I really love the way they turned out. You can read all about my my adventure at http://heresalittletmi.blogspot.com/2013/08/bookshelf-doors.html

Built from Plan(s)
Estimated Cost
$120.00
Recommended Skill Level
Beginner

Mini console table

Submitted by Mikegarrod on Sun, 02/21/2016 - 21:50

First table built by us. I think it turned out pretty good! Custom built to avoid baseboard heater. 

Built from Plan(s)
Estimated Cost
$30-50 depending on if you need stain or not.
Estimated Time Investment
Afternoon Project (3-6 Hours)
Finish Used
Minwax stain, water based paint and Minwax Polycrilic.
Recommended Skill Level
Beginner

Comments

kg112677

Tue, 06/28/2016 - 19:09

The plans catalog link does not work. Can you please repost these plans? Thanks

Dunnie

Sun, 01/15/2017 - 21:24

I am in desperate need of instructions for

this mini console table.  I can't find them anywhere. I won't be able to modify other plans, lol I need it all planned  out.

theUgly_bear

Tue, 01/17/2017 - 12:35

i plan on making this next week, so i can update you with the plans, the only thing i am doing different is the way i am doing my cross in the back. 

stay tuned 

theUgly_bear

Tue, 01/17/2017 - 12:35

i plan on making this next week, so i can update you with the plans, the only thing i am doing different is the way i am doing my cross in the back. 

stay tuned 

Mrs.tash

Sat, 02/04/2017 - 13:12

This is beautiful and simple! Great job!

You costum built it to fit the baseboard, were the original plans Ana White's? Can you link it or tell me the name to find it?

I'm new to the site and not navigating very well. I'm trying to save plans for a console similar to this to my profile/account and looking for the little "save to plans" to easily find this again

Mudroom Bench with Easy Drawers

Submitted by GeekAthair on Mon, 01/06/2020 - 20:12

We've been desperate for more storage in our little house and this build really helped. The whole bench is 103“ wide and each drawer gives us 24"x17" of usable space. We had to do some custom shaping for the benchtop (two joined fir 2x12's) fit as the walls are not square but in the end we were really pleased.

The hardest part of the project was getting all of this built and in place while working around a busy family as this is our only meal space and the majority of cutting/forming was done either on the weekends or after bedtimes. If I were to do this again I'd prioritize sending the kids to grandparents for the weekend and know king everything except for paint out in one go. 

We could have spent less time with the benchtop by using plywood like in the plans but we wanted the look of a separate benchtop. We may replace the fir with stained oak down the line but this should be plenty sturdy for the next several years. 

Built from Plan(s)
Estimated Cost
$300
Estimated Time Investment
Week Long Project (20 Hours or More)
Finish Used
Valspar paint, minwax clear poly
Recommended Skill Level
Intermediate

Comments

Board & Batten Inspired Headboard

Our guest room finally has a headboard! I put together this queen size headboard using what I had learned building my daughter's headboard (and consulting the plans for the Reclaimed Wood Headboard) using the remainder of the plywood sheet from her headboard project, 2x3s for the legs, a 2x4 to join the legs (and connect to the metal bed frame), furring strips, and a 1x3 to top it off.

Our plywood had been cut to fit our car, so the first vertical furring strip was placed to hide the seam where I joined the two pieces back together. Then we evenly placed them from center as just looked right to us.

We had a great time seeing this come together as we didn't follow a specific plan, but were able to be a bit more creative inspired by various plans.

Estimated Cost
$45 including hardware & paint
Estimated Time Investment
Afternoon Project (3-6 Hours)
Finish Used
We painted with Martha Stewart's Stratosphere in a flat finish, distressed and rubbed on Minwax Provencial stain. Unfortunately, the stain gave the headboard a very green tint, so after a lot more sanding, we were able to finish the project with two quick coats of Minwax water based Poly.
Recommended Skill Level
Beginner

Comments

Playhouse for Christmas...almost done!

Submitted by lprollins on Sun, 11/25/2012 - 14:57

My husband and I used our Thanksgiving break to build this playhouse and deck, using Ana's plans. We are NOT builders...this is very doable for beginners with the right tools. Read the plans thoroughly before starting. Total cost (including all lumber, hardware, and paint) was under $600.

We still have door and house trim to complete, a little painting, and a handrail/ladder.

Santa may bring a slide and some other fun accessories!

Thanks Ana!!!!!

Estimated Cost
$600
Estimated Time Investment
Week Long Project (20 Hours or More)
Recommended Skill Level
Beginner

Twin storage bed, but with extra storage!

Submitted by bdrez33 on Thu, 04/08/2021 - 08:15

I just finished this bed and wanted to thank Ana White for the plans and directions. I didn’t understand the purpose of the gap between the storage cabinets so I extended the drawers making them deeper. This makes more sense to me rather than having dead space under the mattress. Who couldn’t use more storage?!? I also decided to make a second layer of drawers, so the bed is raised much higher. It was a bit of a challenge, but using the plans from Ana and SketchUp helped me plan. The bed looks amazing and my 6 year old loves the space she has not without a dresser in the room. Thanks, again!

Estimated Cost
$450
Estimated Time Investment
Week Long Project (20 Hours or More)
Finish Used
Semi-gloss white paint
Recommended Skill Level
Advanced

Comments

3 Tier Planter

Submitted by ranlim on Thu, 05/18/2017 - 21:24

Love this planter. Used quality pine. Perfect size for the balcony! I use it for fresh herbs... i have have other people wanting one too!

Estimated Cost
17
Estimated Time Investment
An Hour or Two (0-2 Hours)
Finish Used
Special walnut
Recommended Skill Level
Beginner

Weatherly Sofa

Submitted by astcgirl on Mon, 11/11/2013 - 14:25

Just wanted to show my Weatherly Sofa (Sectional) that I built recently. I've been drooling over Ana's plans for months now, I waited patiently until I could get a good deal on a Kreg Jig since so many of Ana's plans use it. I purchased my cushions first, I really wanted Sunbrella fabric since they will be outside in my Lanai so they need to stand up to the Florida elements, I was so excited when I found the seat and back cushions for $40 a set discounted from $98, however I kept watching them after I purchased them and they eventually dropped down to $20 a set (called Lowes and they refunded me the difference), so total for all 8 seat and back cushions was only around $170...the problem with them however was that they were 25 x 25 and not the 24 x 24 that Ana recommends in the plans. I just modified the length of the sofa's by adding 3" and With by 1" which did increase my cost of wood since I was short certain pieces however I really wanted them to fit and not look squashed in there. The extra 3" made them fit perfectly. I also have 8 matching back cushions but they are a little too puffy to keep on there so I just use 2 on the ends and stored the rest. The small cushions I also purchased were on sale for $4 a set of 2. This was a relatively easy project. I was a little intimidated to use a compound miter saw to do my cuts so instead I just purchased a Stanley Clamping Miter box that was able to do the 30 degree cuts to make the x's. Total cost was $470 with all the cushions. I used Behr Weather Proofing Wood Stain & Sealer Semi-permanent in COFFEE which gave it a driftwood beachy look. It is so comfortable and sturdy. I love it and considering it was my first build from Ana's site I'm now hooked....Thank you Ana

Built from Plan(s)
Estimated Time Investment
Week Long Project (20 Hours or More)
Finish Used
Behr Weather Proofing Stain and Sealer Semi-permanent (Coffee) they didn't have quarts so I just got 4 sample cans and only ended up using 3.
Recommended Skill Level
Beginner