Community Brag Posts
Chicken Coop

Great for a small flock of 5 or less.


Built from Plan(s)
Comments
Farmhouse Coop and Run
"I don’t consider ourselves experts at all and your plan was so easy to follow. We can’t wait to introduce our chicks when they’re old enough to transfer outside."
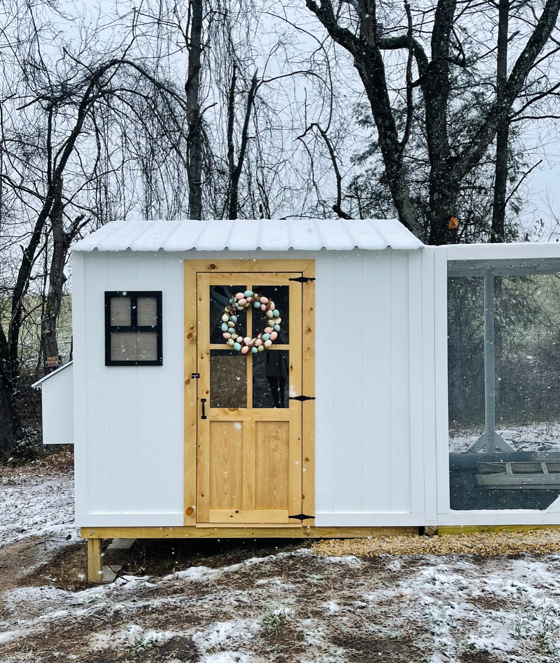
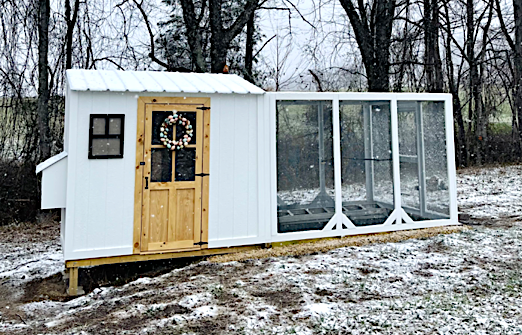
Built from Plan(s)
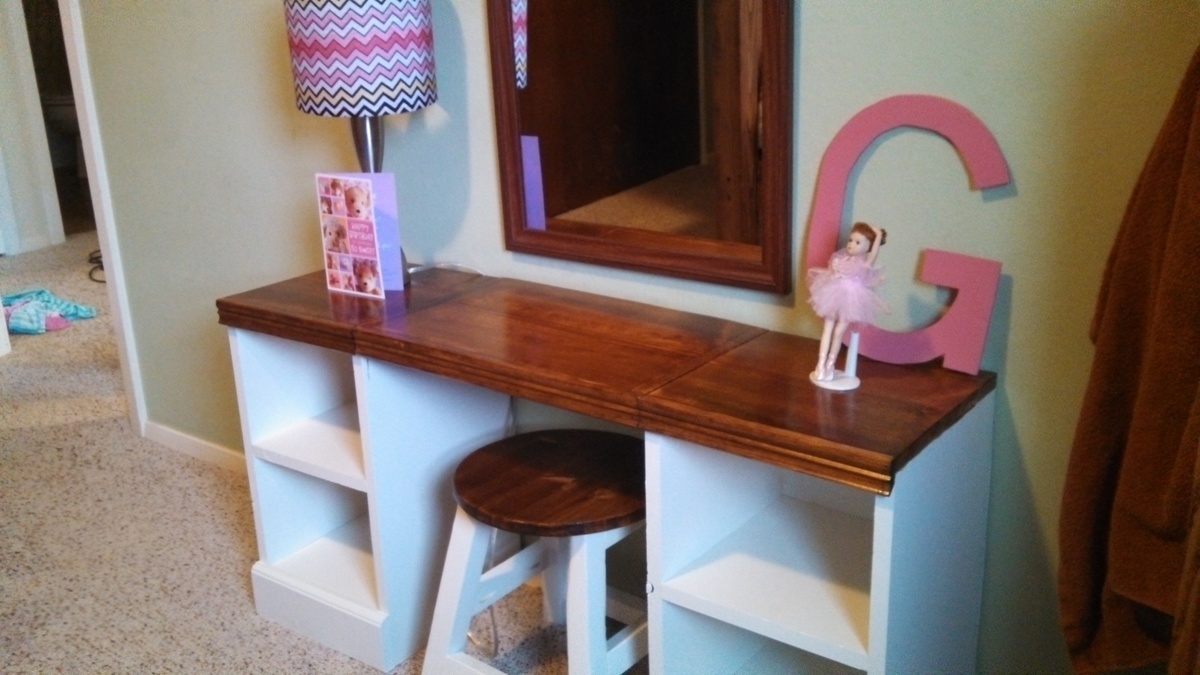
Play Vanity
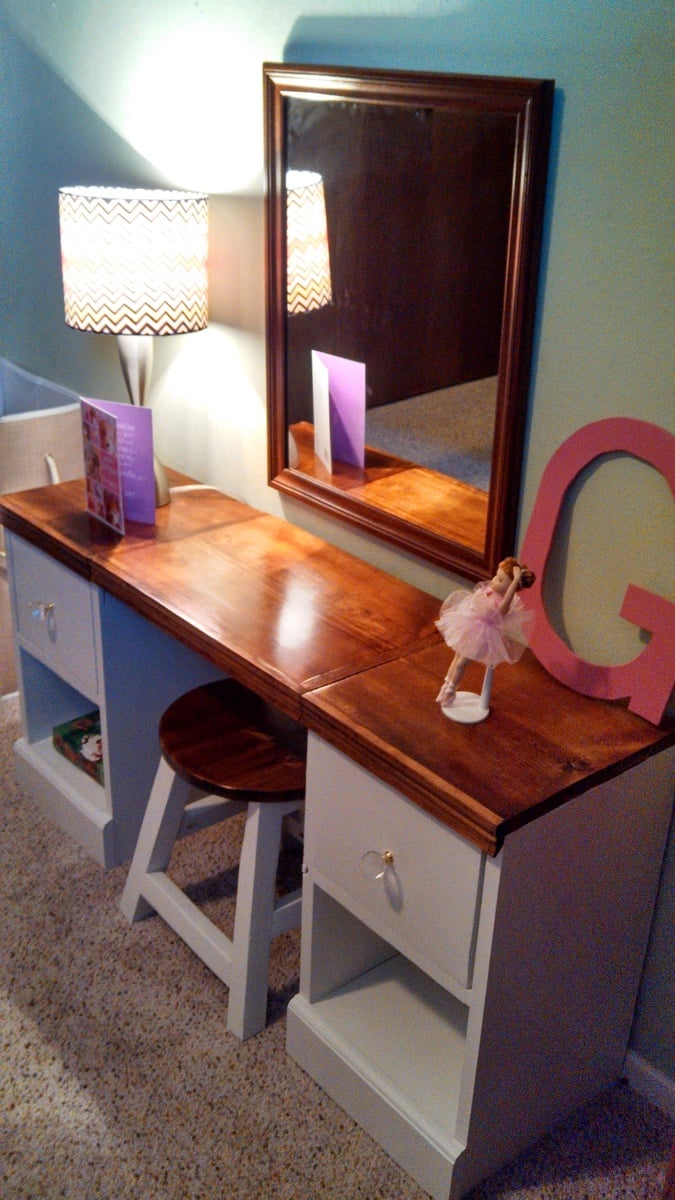
I wanted to surprise someone special with just the right gift on her 5th birthday. The size was just perfect for her and the space that was available.
At the last minute I decided to add drawers to contain all those girly things and am glad that I did. To finish it off I added pretty crystal knobs to really glam it up.
I also built the play table stool to complete the set.
Built from Plan(s)
Estimated Cost
$35-50
Estimated Time Investment
Day Project (6-9 Hours)
Finish Used
Minwax Red Oak, semi-gloss poly, White semi-gloss paint.
Recommended Skill Level
Beginner
Comments

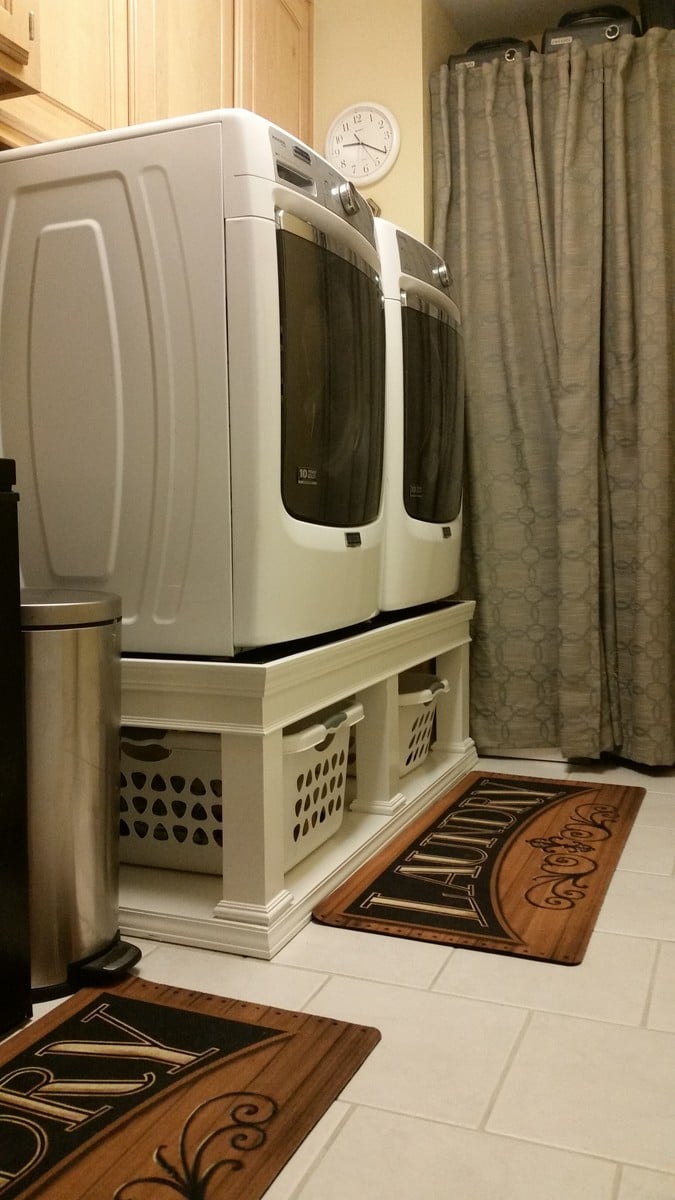
John's Washer/Dryer Pedestal
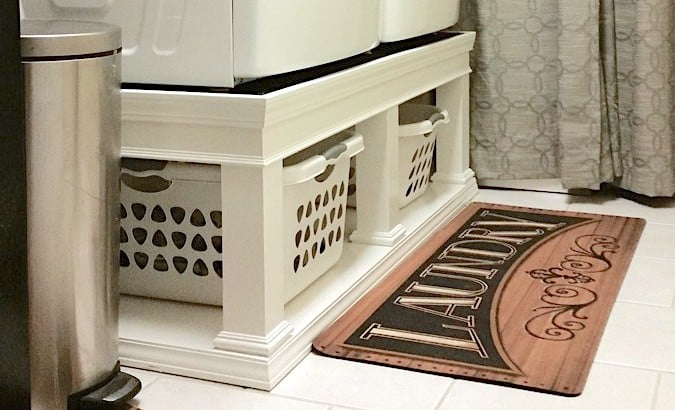
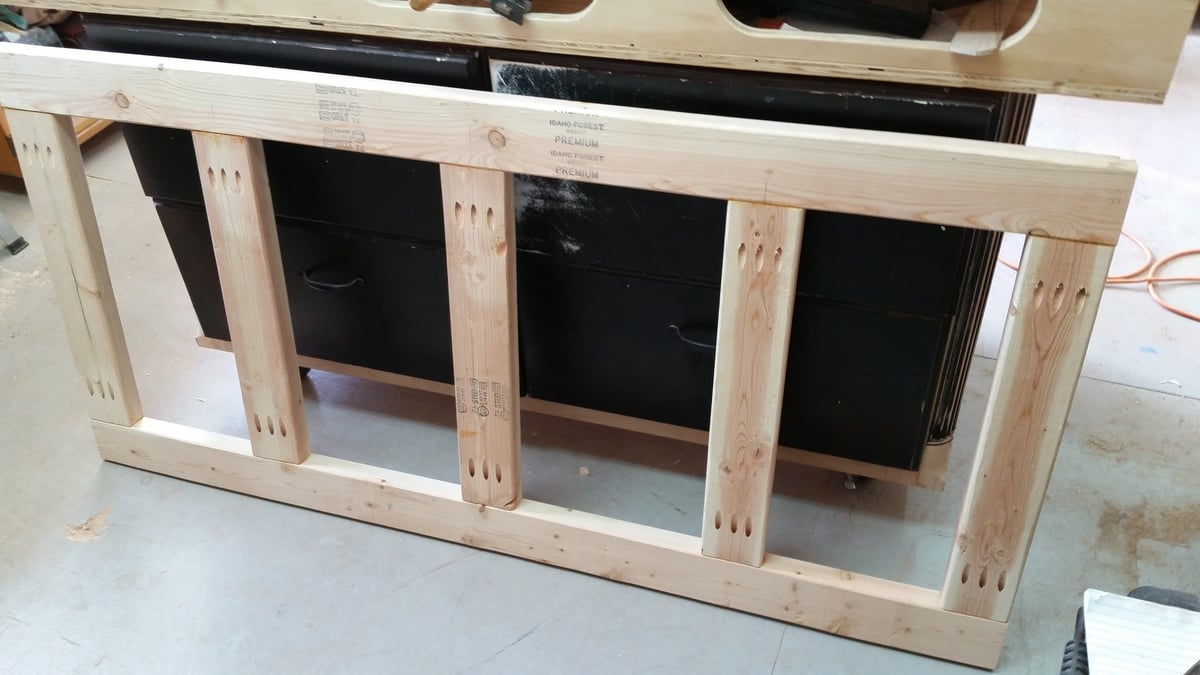
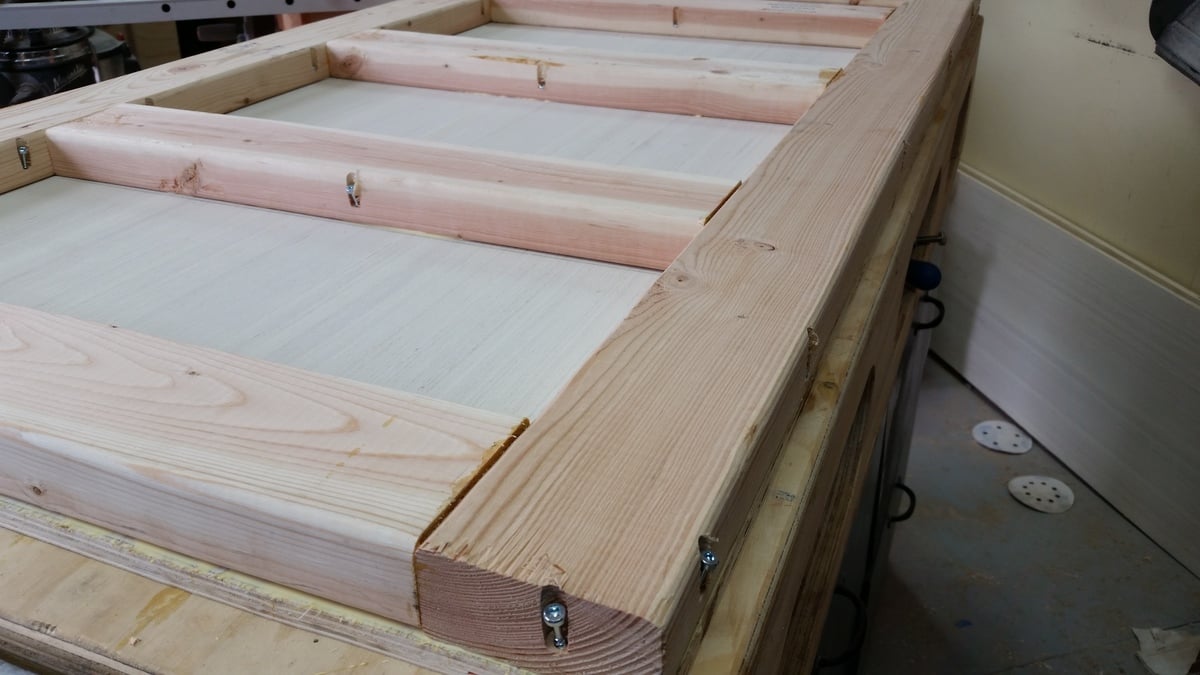
The wife has a hard time bending down so she wanted pedestals for the washer and dryer. The metal ones with a drawer were too tall. I showed her Sausha's and she really loved that design. I basically used the same construction plans idea from Sausha's project and some tips from Ryan's brag post. But, I wanted to beef it up some. I didn't like the L-bracket to attach the top and 4X4 legs. It didn't seem sturdy enough for me. I used my table saw to square the edges on the 4X4 posts and the 2X6 rails. Then I used my Kreg jig and glued and screwed everything together. I liked Ryan's trim ideas, so I used baseboard trim for the bottom and flipped it for the top trim. I made a 1/2" lip so if it were to vibrate, the washer/dryer would not fall. I put the trim on the bottom of the legs and was considering putting on the top but I put some different trim all the way around the bottom of the 2X6 rails. The wife liked that. I also added some carpet on the top to cut down on vibration and to help keep the units in place. I also put some 4X4 pieces of carpet on the bottom to keep the noise down and to help in moving it. I primed and used an gravity sprayer to paint it. Then I put 3 coats of polyacrylic to help in cleaning and to cut down on scratches from the laundry baskets.
Built from Plan(s)
Estimated Cost
150.00
Estimated Time Investment
Week Long Project (20 Hours or More)
Finish Used
Paint
Recommended Skill Level
Intermediate
Comments

Wed, 06/29/2016 - 14:31
Holy structure!
I think you could probably drive a truck on top of yours. :) I was a bit concerned about the strength of the construction when I first decided to build it, but I decided that since it would be stationary once I have it in place and the only force would be straight down, it would be fine. Once I got it put together, it was actually sturdier than I thought it was going to be...from a horizontal force perspective. Virtically, that thing could hold 100 washer/dryer pairs...the plywould would give out before the 2x4s and 4x4s would even budge.
Anyway, nice work! I love the Kreg Jig...I need one of those.
Sun, 01/29/2017 - 16:23
Great looking build, thanks for the detailed photos!
Great looking build, thanks for the detailed photos!
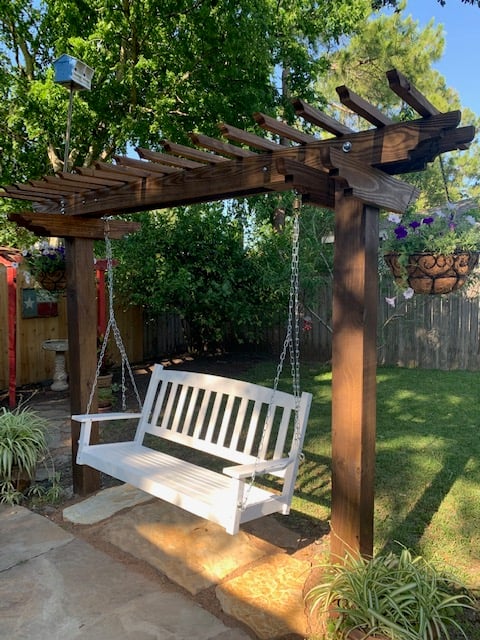
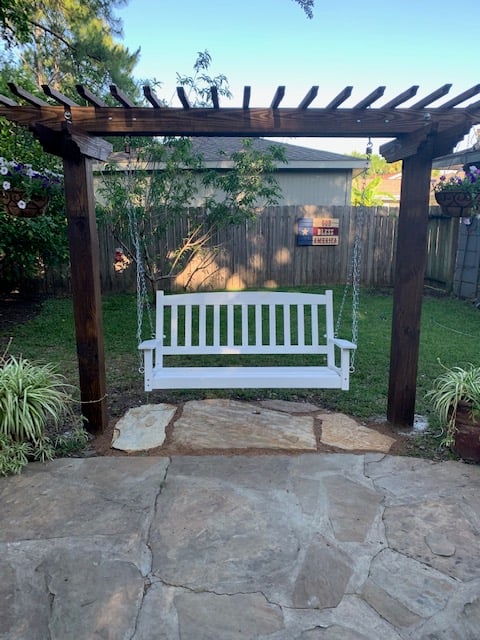
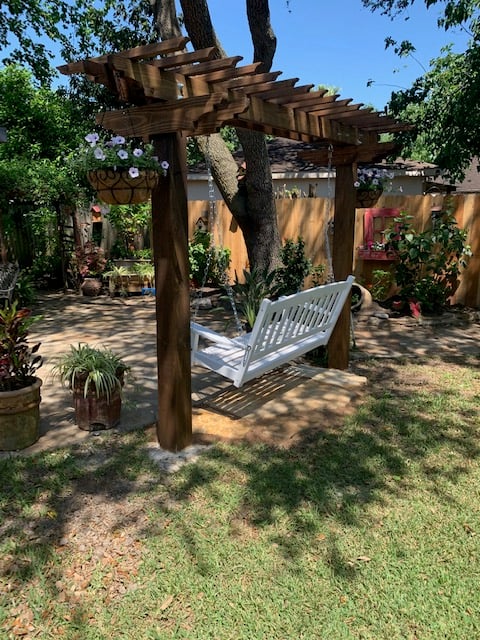
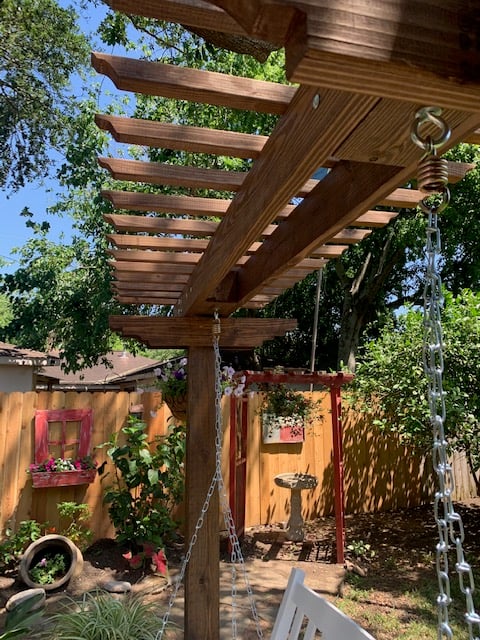
Pergola Swing
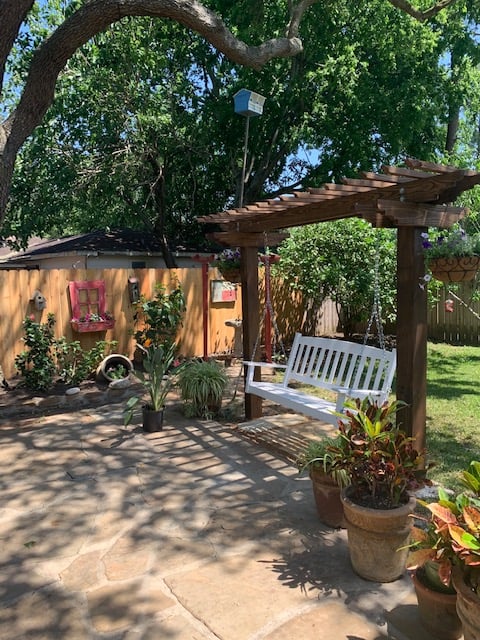
I saw this project on YouTube under Arbor Pergola Swing. It did not mention any specific detailed plans or cut list but it was enough to get me started. I began with (2) 10' 6" x 6" post. buried each 24" and cemented. I cut the post tops at 83" from ground line. The rafter consist of (2) 10' 2"x 6". I used the leftovers of the 6" x 6" post tops in the middle of my rafters to hang the swing from with 1/2 " eye bolt. Then I used (9) 2" x 2 " x 8' and cut each at 36" to finish off the top and (2) 2x6x8 for the 4 rafter supports. I drew out the designs of the rafters and top ends free hand and at made a template for the cuts with s jigsaw.
The entire cost including hardware minus the swing was $170. My wife had purchased the swing last Fall at a clearance for $40 brand new.
Built from Plan(s)
Estimated Cost
$170.00
Estimated Time Investment
Weekend Project (10-20 Hours)
Finish Used
Valspar Duramax Special Walnut
Recommended Skill Level
Intermediate
White King Size Storage Bed
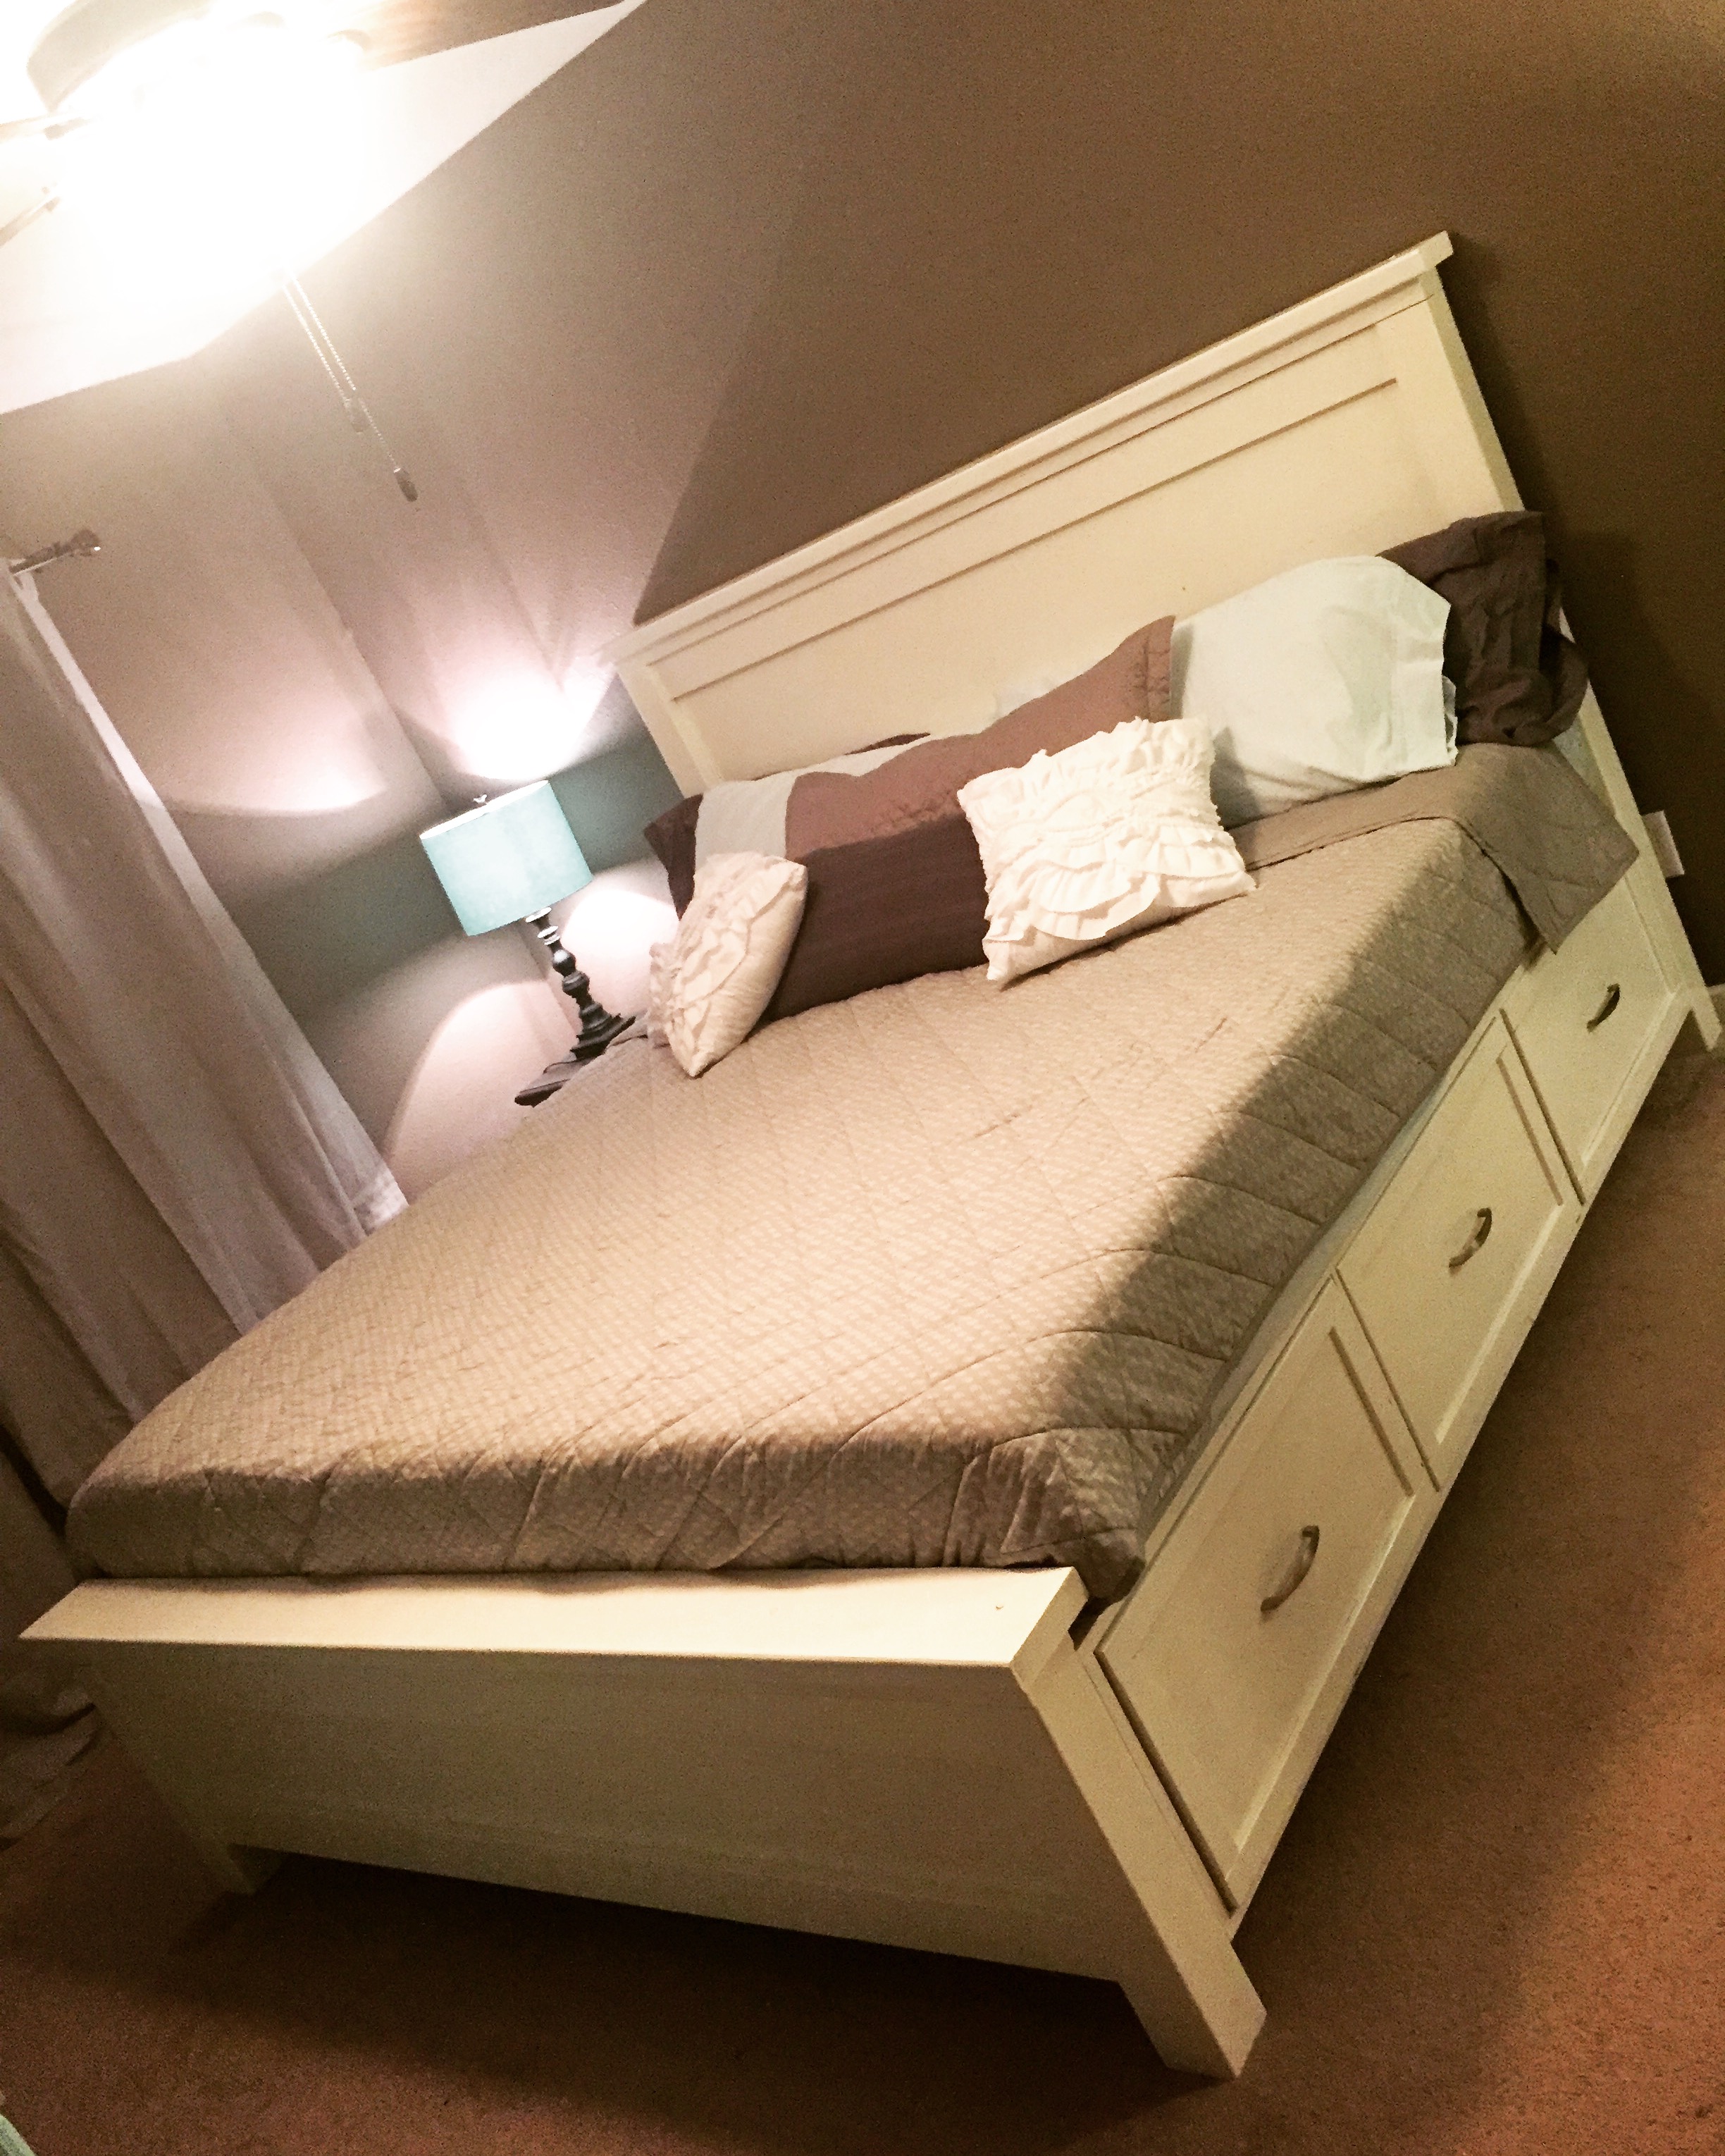
Took be about 2.5 weeks to build this bed, working evenings and a couple full days on the weekend. I HIGHLY recommend getting a Kreg Jig. It made life so much easier.
To go from a queen to a king, simply add 16" to all of the width pieces. All of the length pieces will be the same for a queen and king.
I added one 2x2 support beam down the middle of the bed, with two 16 3/4 inch legs attached to it, for added support. I screwed the slats into all 3 of the 2x2 support beams.
The drawers are the trickiest part. Make sure you follow the plan in order, waiting to install the drawers until after you have screwed the storage bins to the headboard and footboard.
Built from Plan(s)
Estimated Cost
$400 for everything (wood, paint, screws, drawer slides, etc.)
Estimated Time Investment
Week Long Project (20 Hours or More)
Finish Used
white Olympic One semi-gloss paint
Miniwax polyurethane
Miniwax polyurethane
Recommended Skill Level
Intermediate
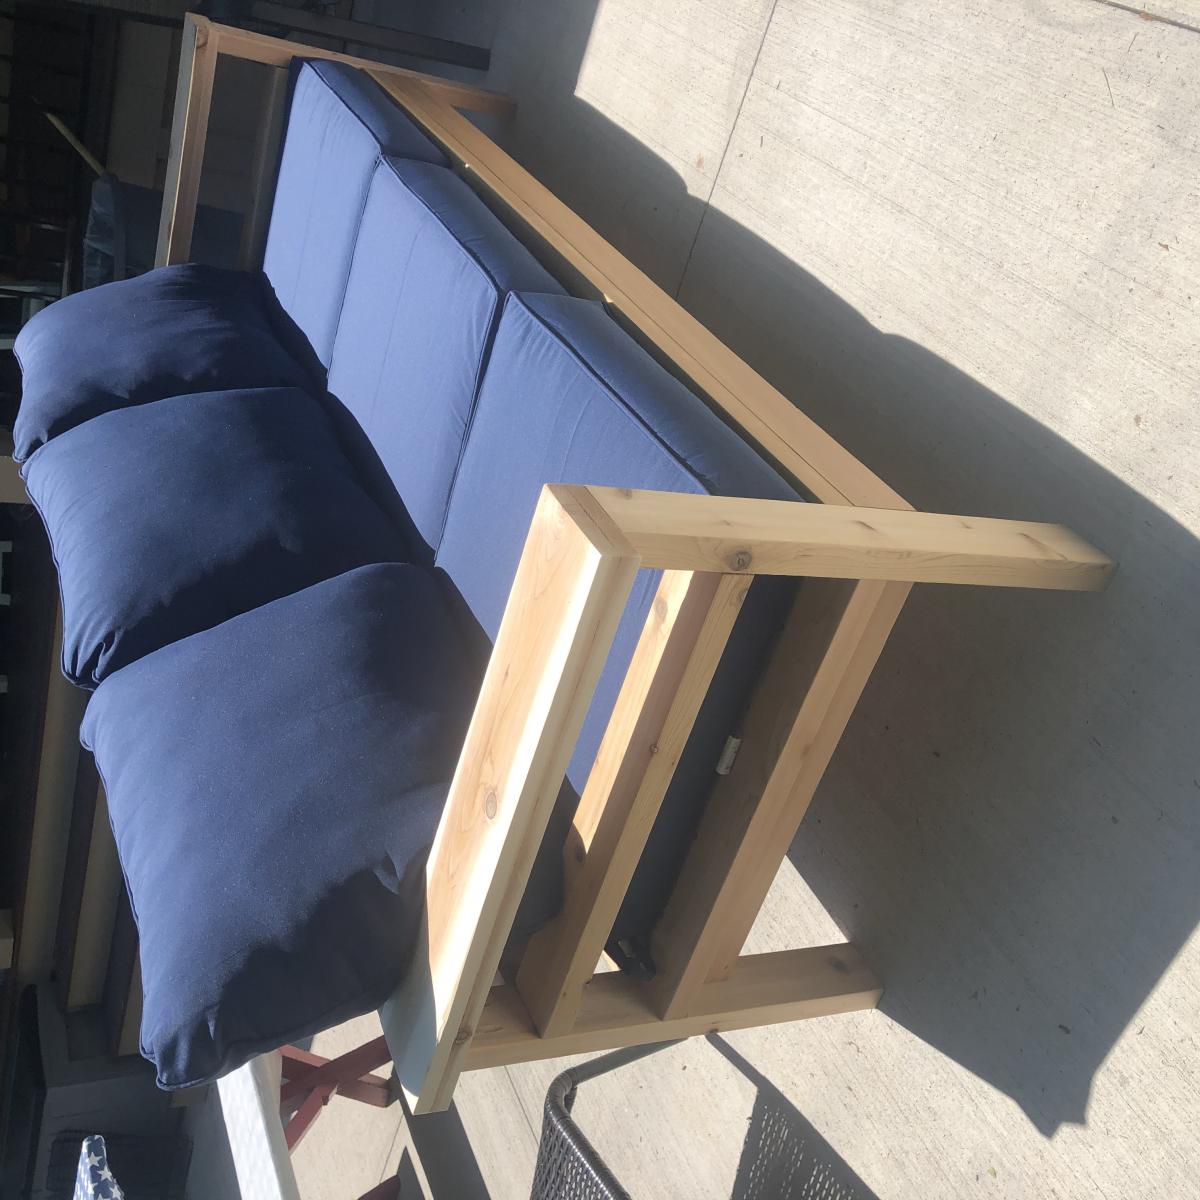
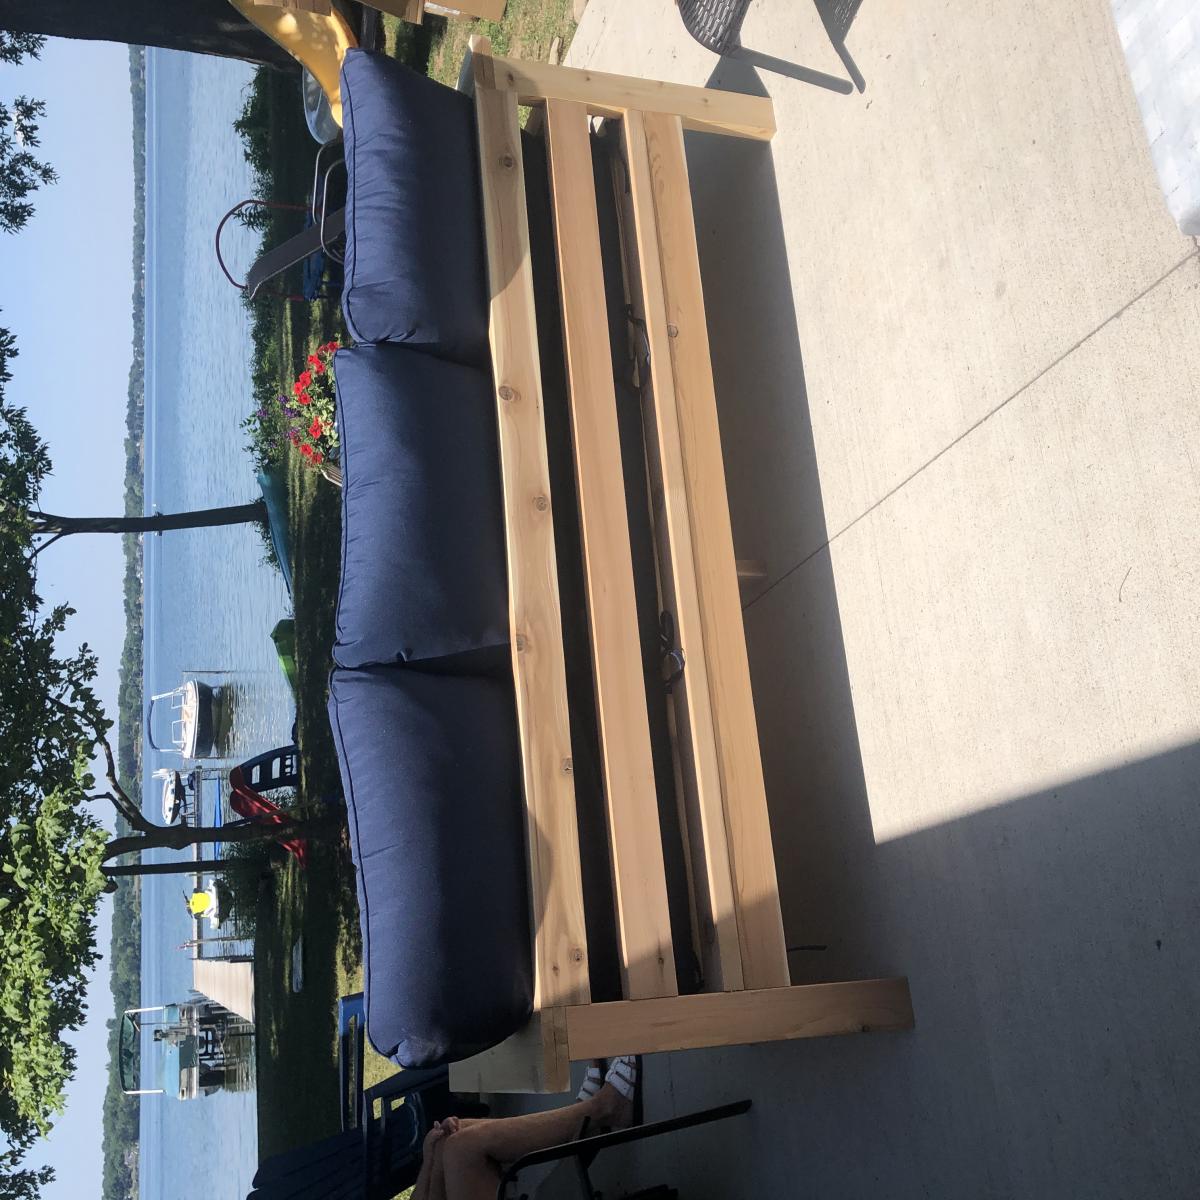
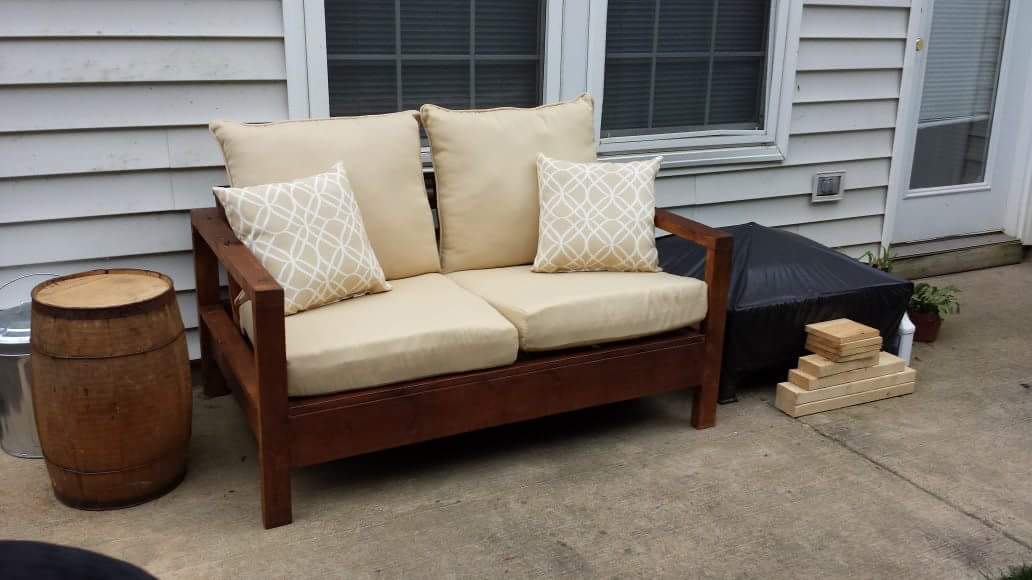
2x4 outdoor couch
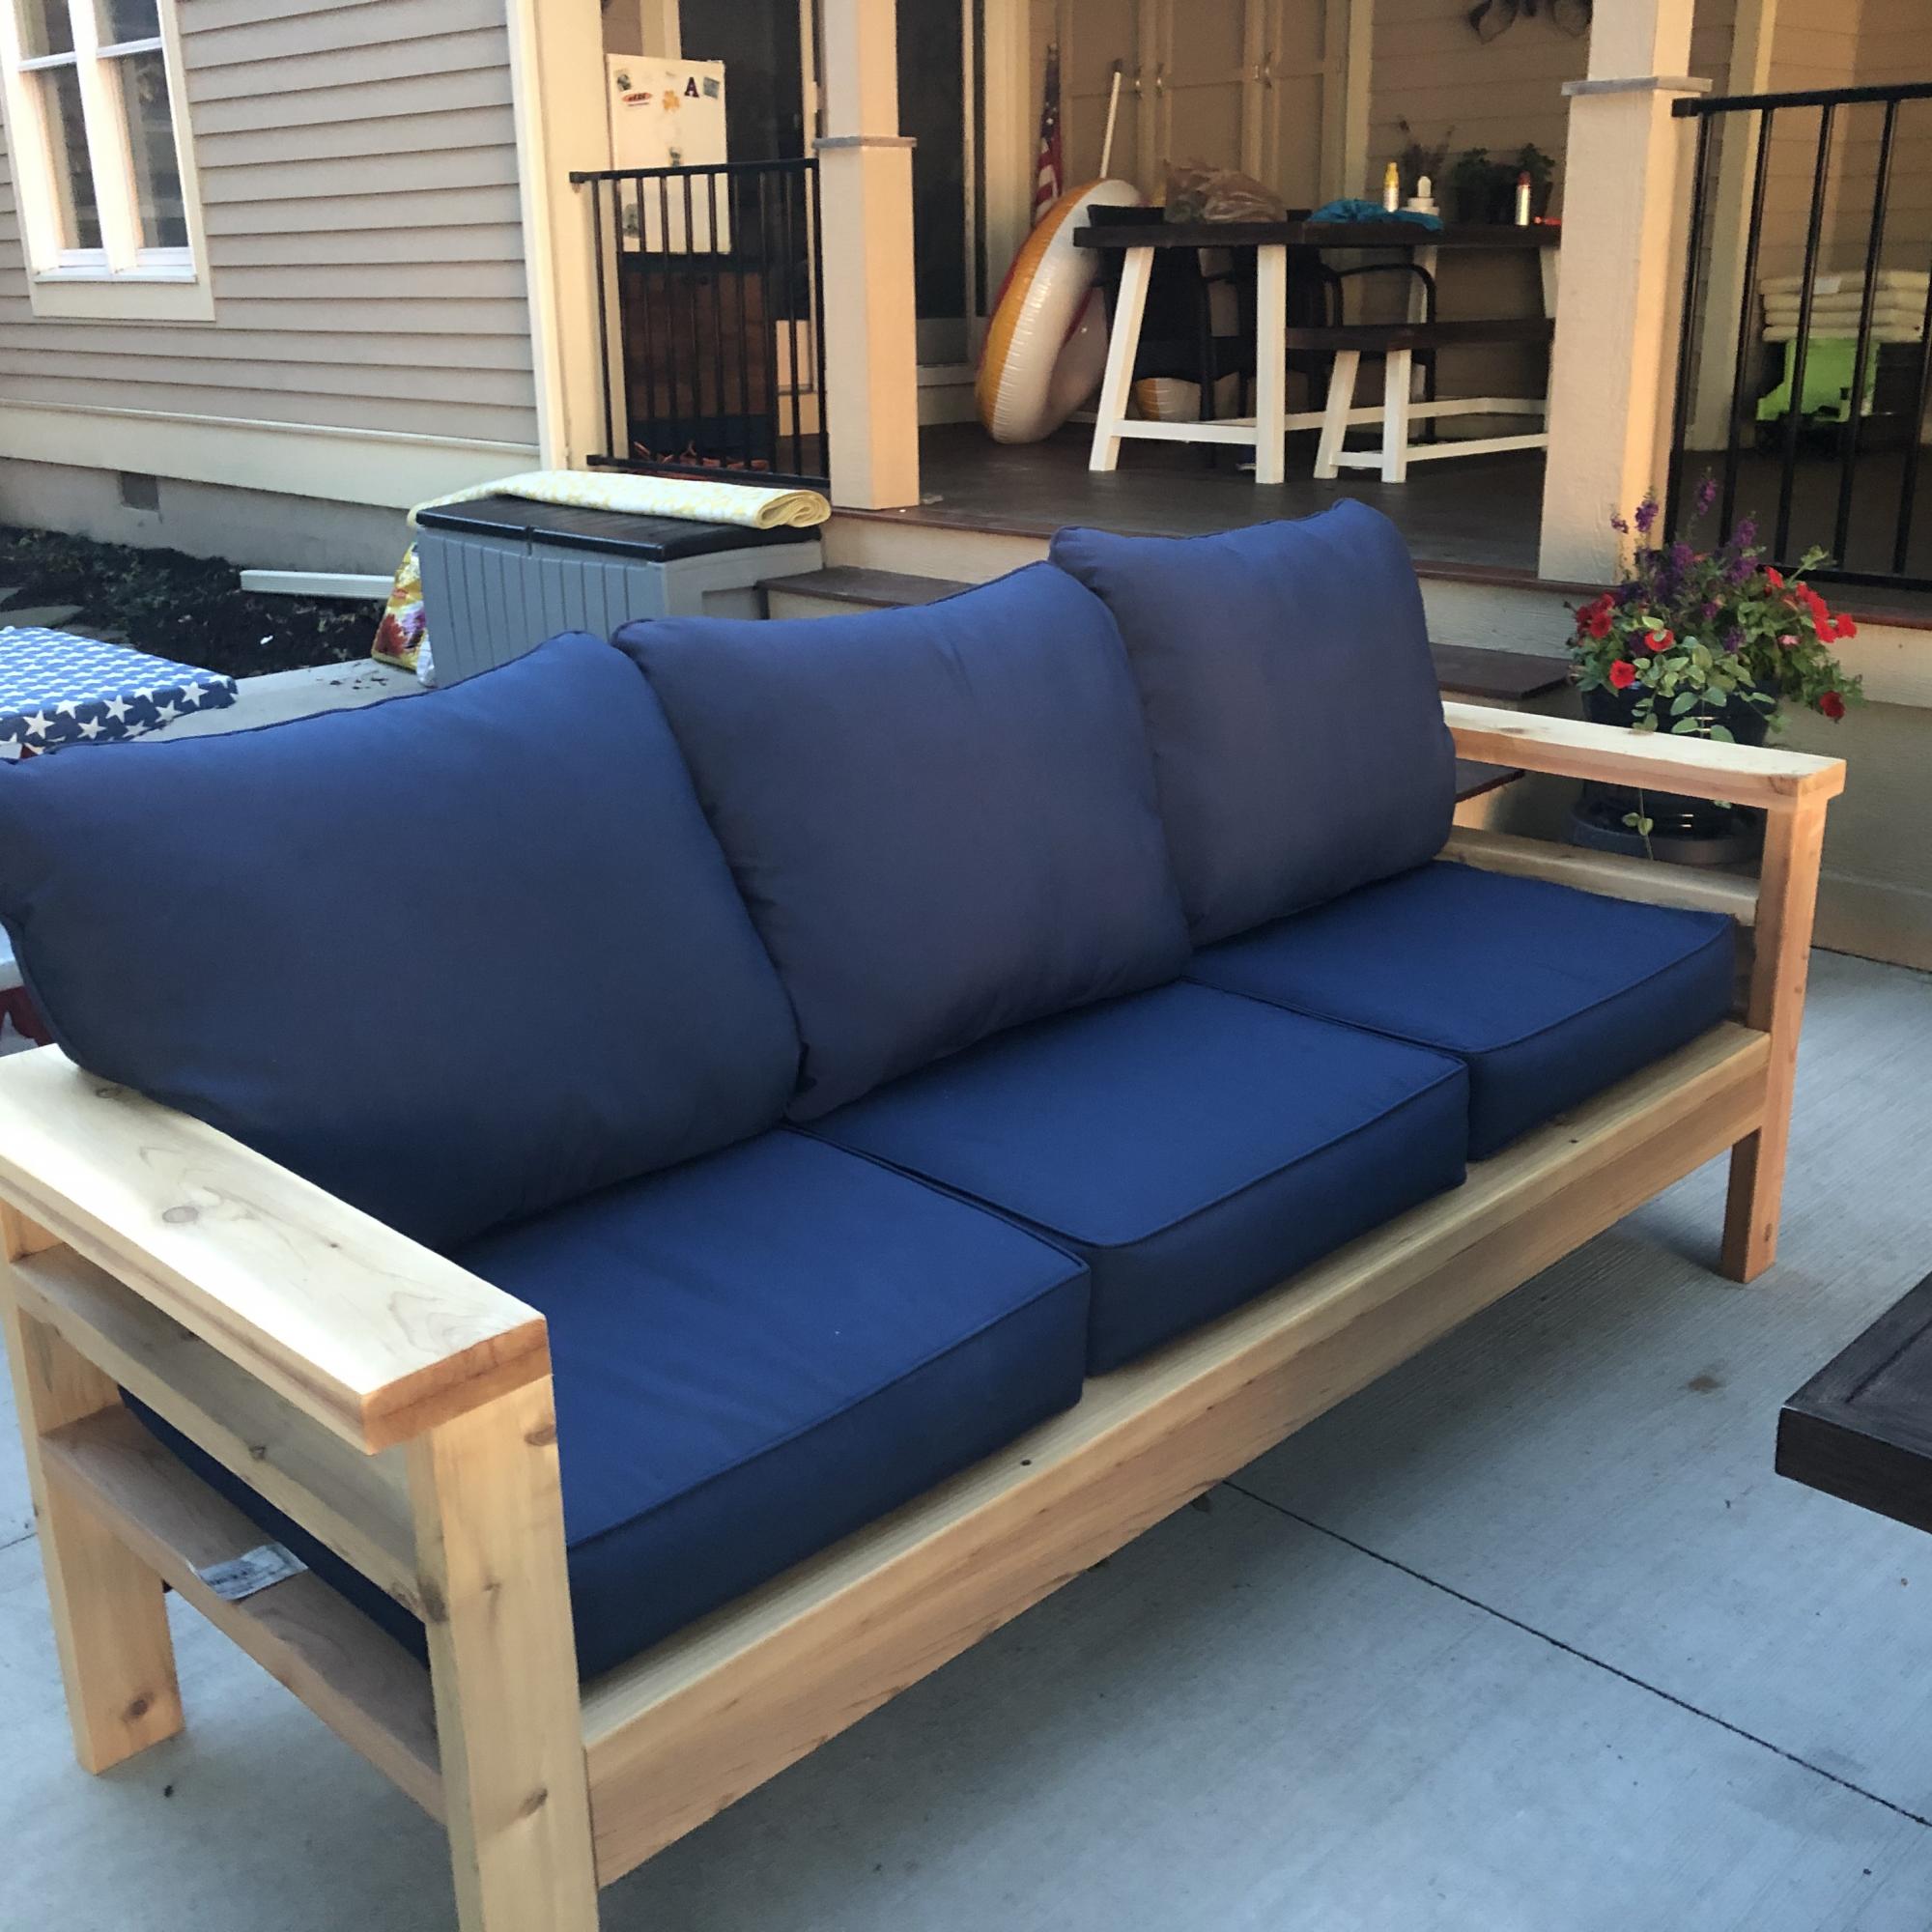
I used cedar and added the extra boards so the cushions would stay put. We also made the arms 2x6 boards so we wouldn’t need end tables for the couch. The plans were super easy to follow. I mostly used pocket holes so the screws wouldn’t be visible. Love how it came out! Thank you for the plans, Ana!!

Built from Plan(s)
Estimated Time Investment
Day Project (6-9 Hours)
Finish Used
Nothing yet. Deciding on whether to let it grey on its own
Recommended Skill Level
Beginner
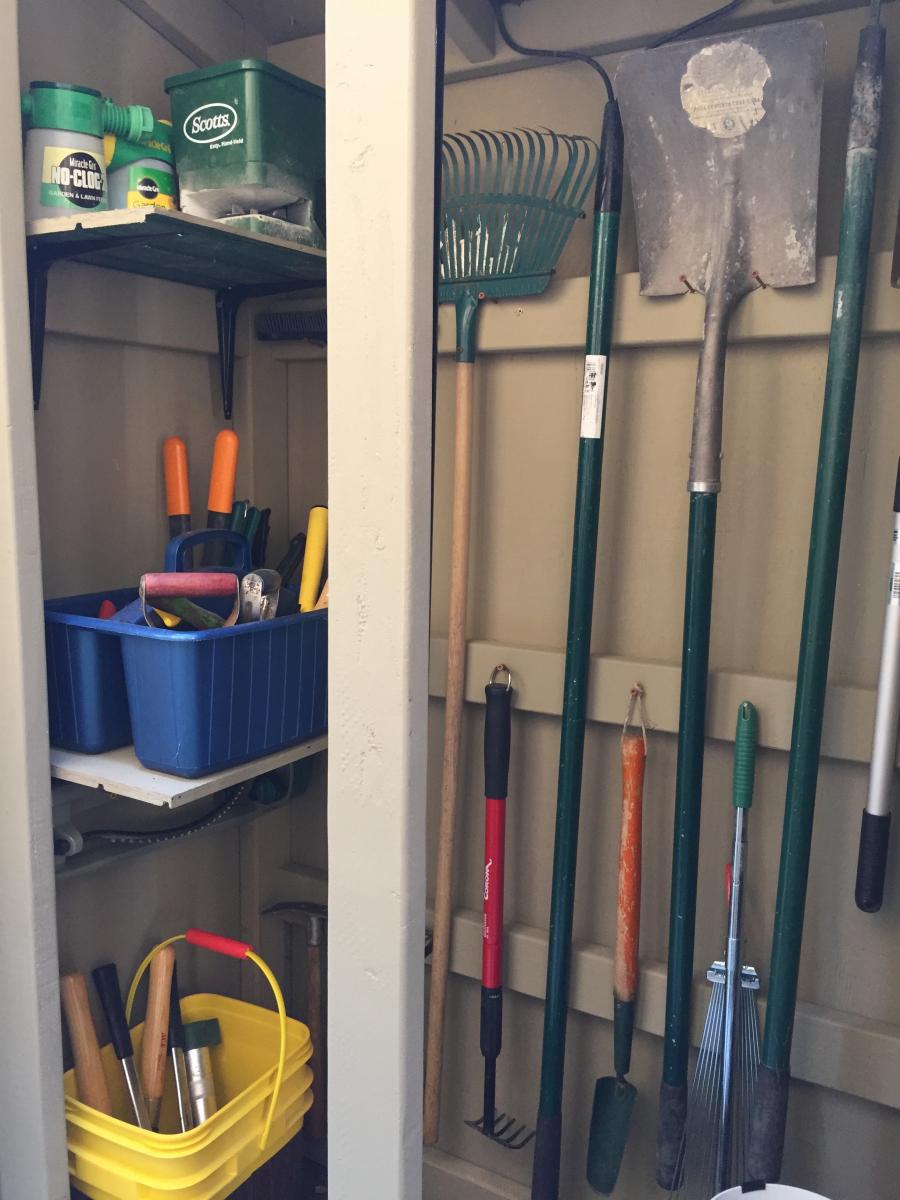
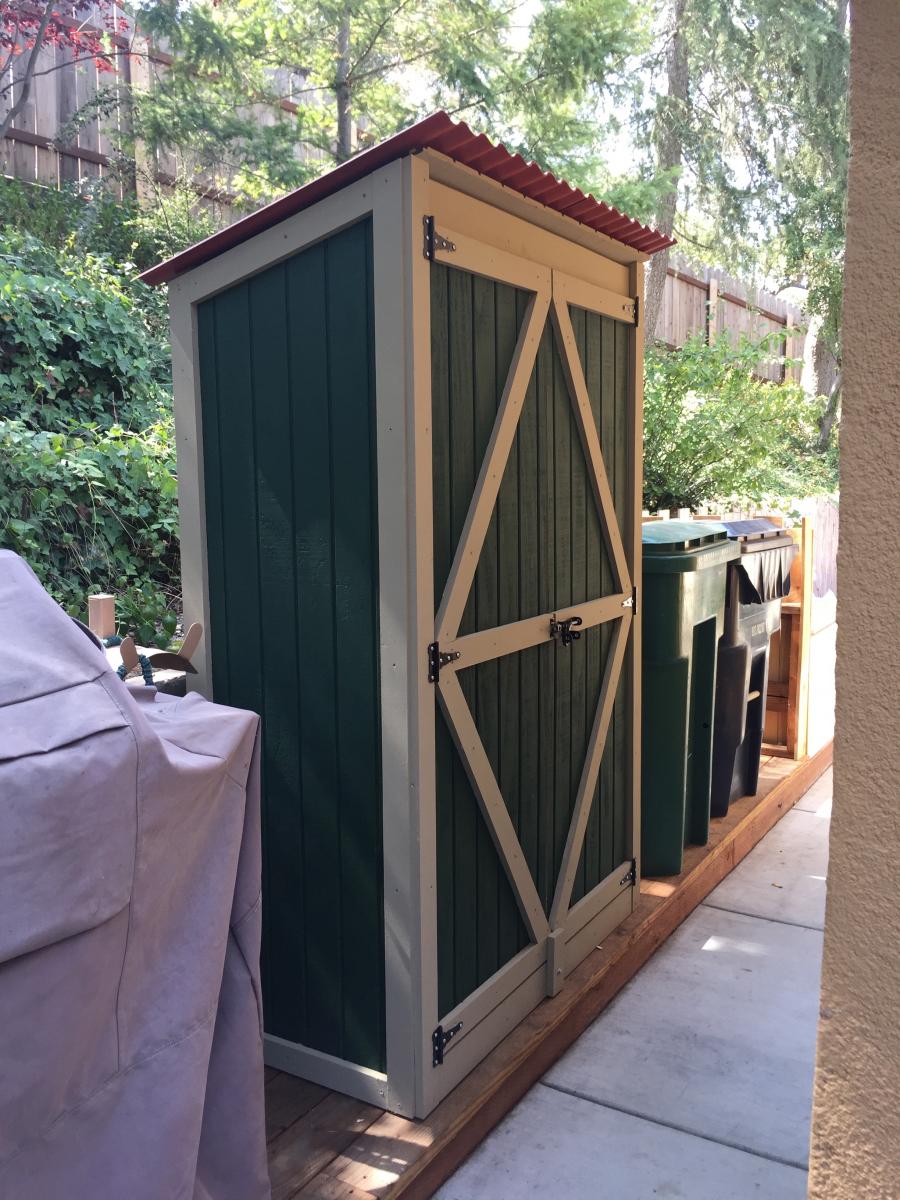
Garden Tool Shed (based on plans for Small Outdoor Shed)
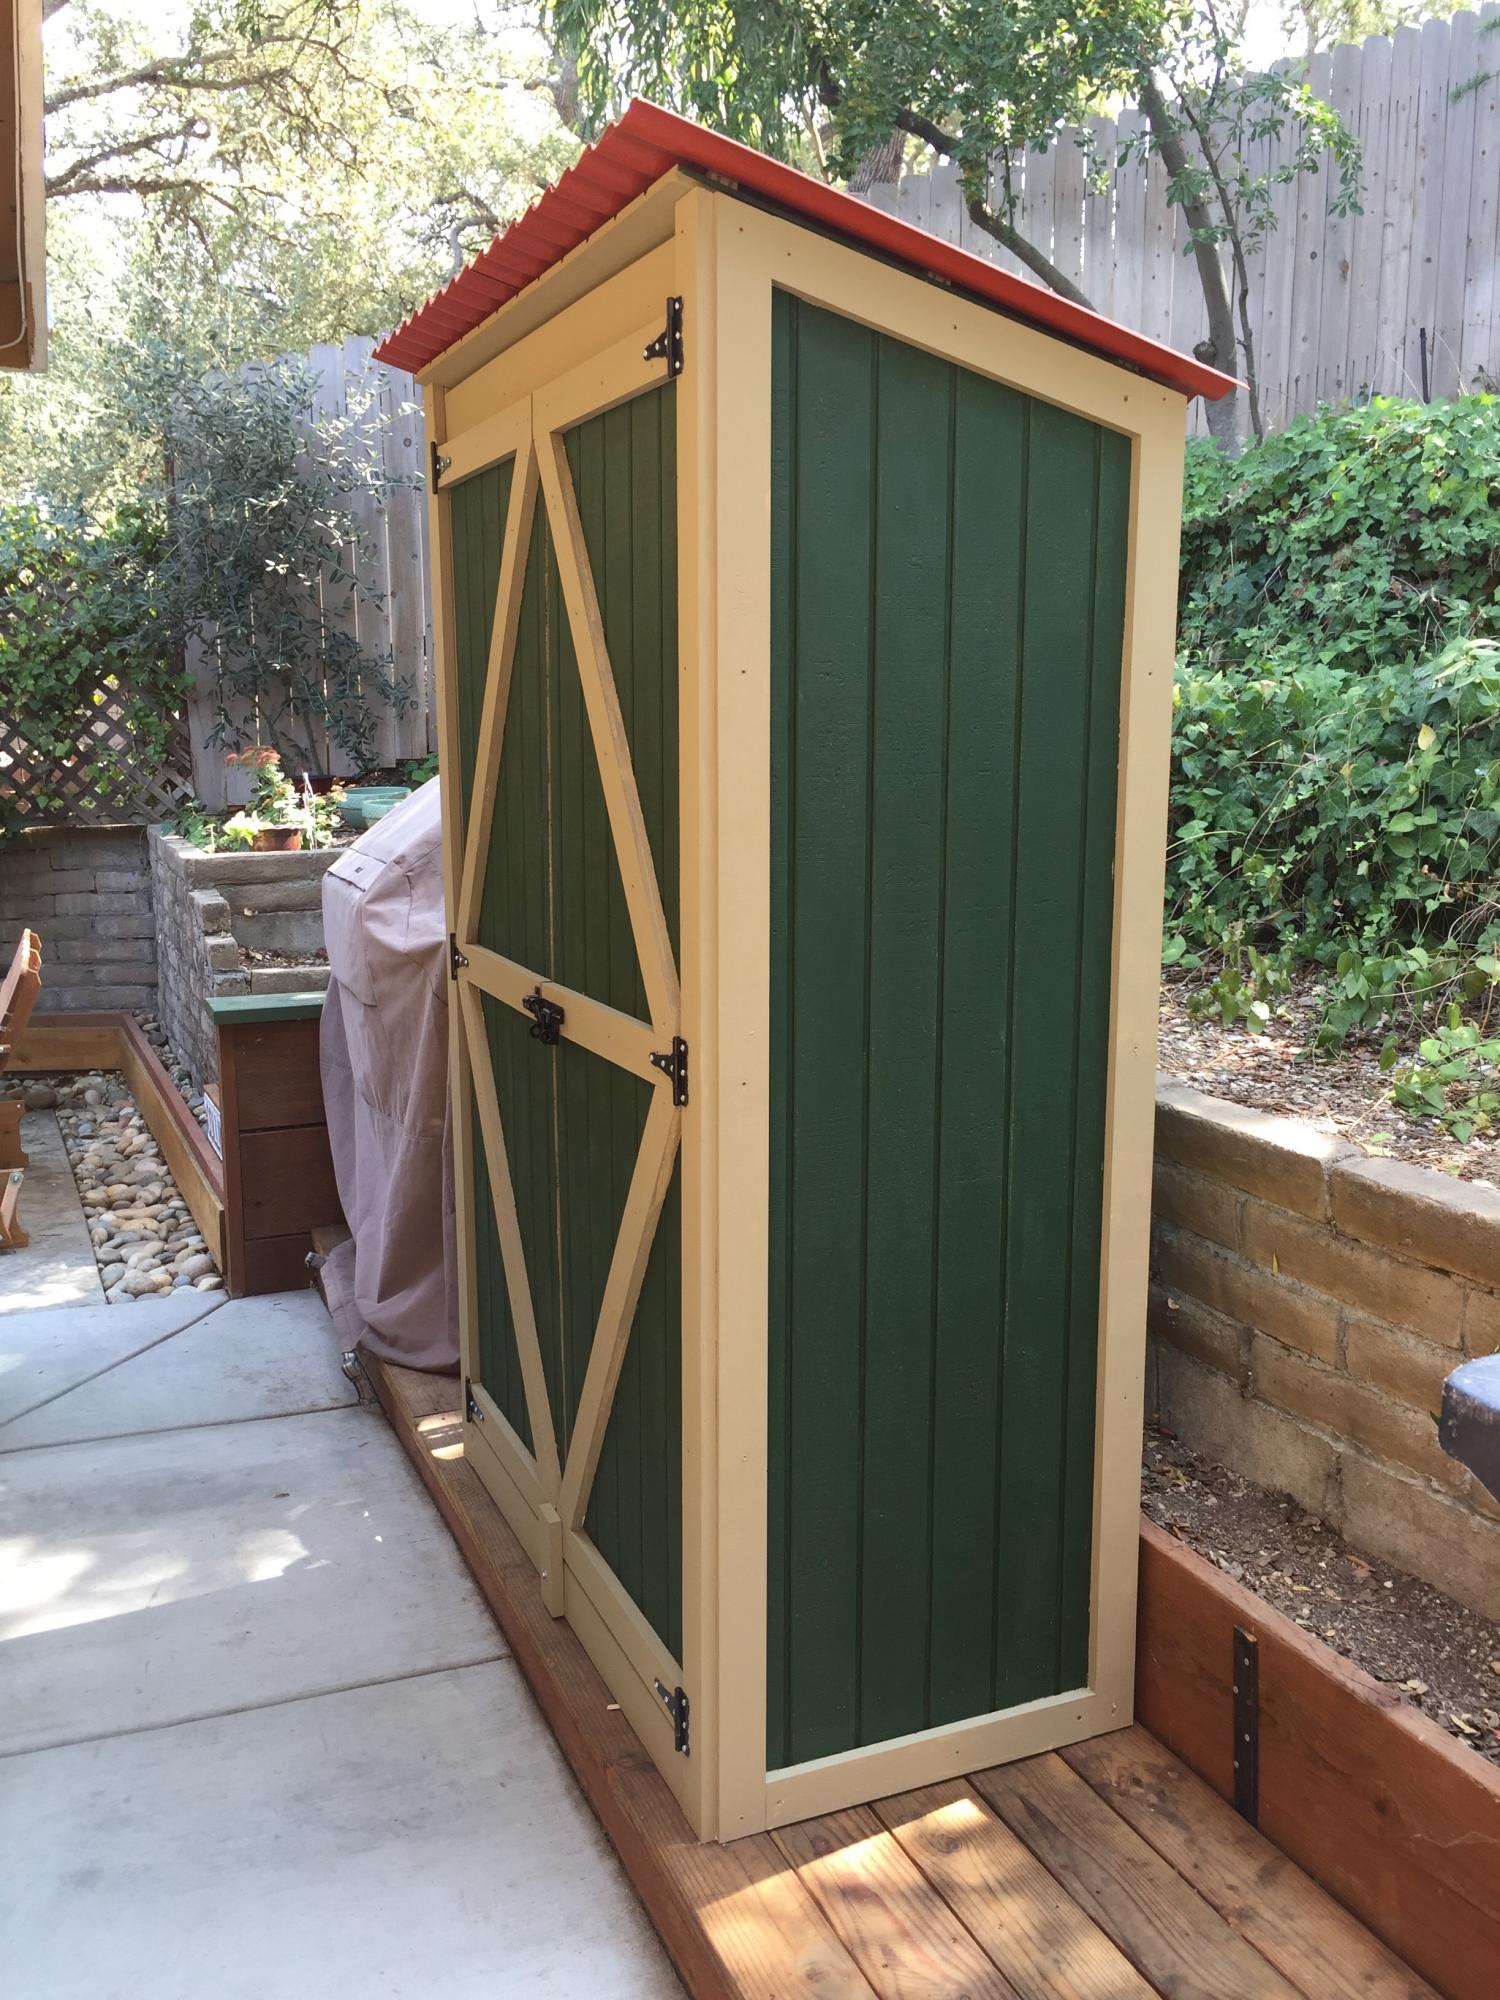
My husband and I built a garden tool shed using your plans for a "Small Outdoor Shed or Closet." We needed exactly this size for our available space. (THANK YOU! The video was really helpful and the plans were very detailed.) We are not handy at ALL, and are definitely beginners when it comes to woodworking. But, when the person who was supposed to build it for us was delayed, we thought we could try it, or at least START.
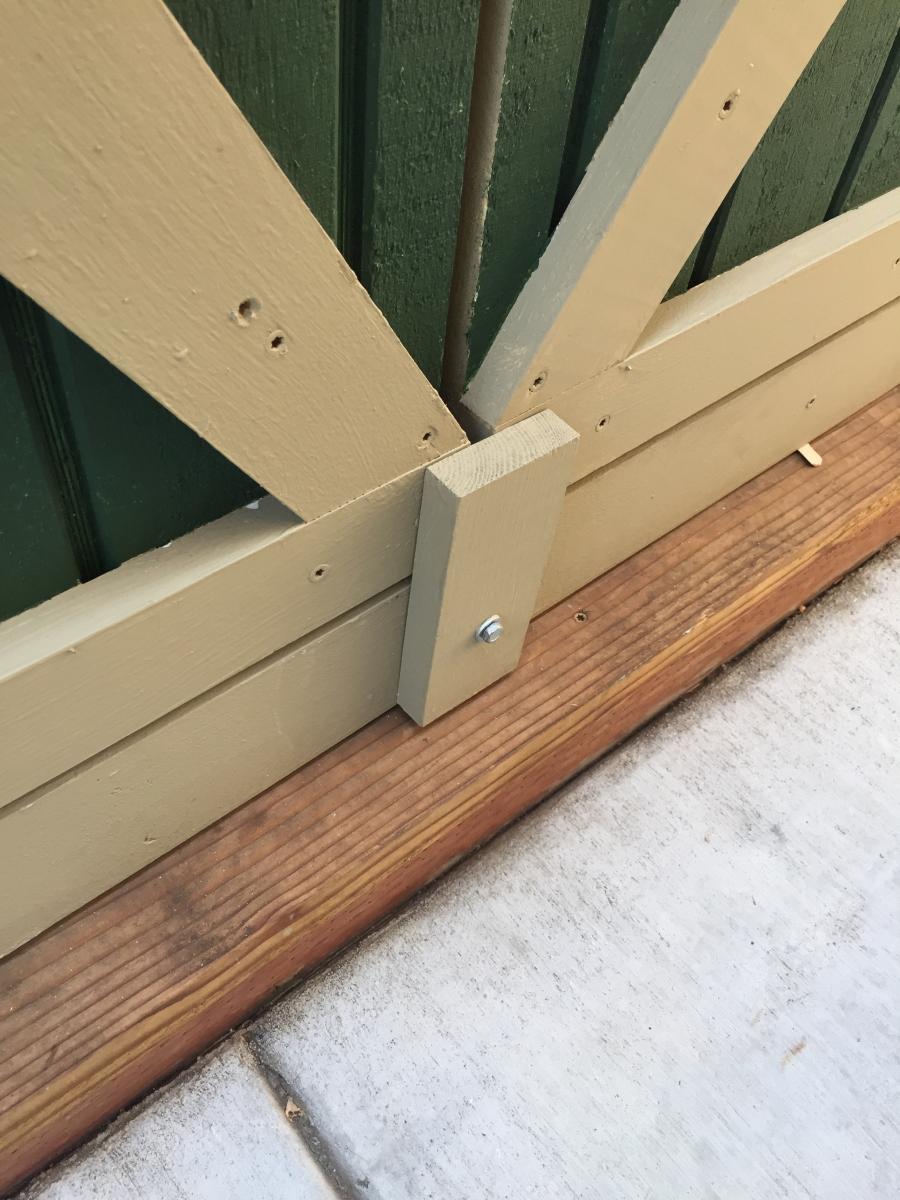
We bought a lower-end Kreg pocket jig and a secondhand mitre saw, and set to work, using T1-11 siding. We ended up building the entire shed ourselves, and were very surprised at the end result (and proud too!). The hardest part was building the doors, since we weren't really sure how to construct them to keep them from bowing. We ended up putting trim all around the edges of the T1-11 plywood doors, inside and out. (We were too far into building them when we realized we probably should have done it differently.) We also couldn't figure out how to get the double doors to stay tightly shut, but ended up using a rotating block (see picture) at the bottom and it works great, especially given that one of the doors had a slight bow at the bottom.
I think the only ways in which we deviated from the plan were that we added trim, an additional 2x4 up high across the back of the shed (for hanging long-handled tools), and two interior shelves on the left (from leftover siding). We used colored corrugated polycarbonate sheeting over the roof instead of asphalt shingles. (Unfortunately you have to use specific screws for the sheeting and one length was too short and the other too long and protrudes through the roofing slightly, into the interior. But we like the pop of color the sheeting adds, and REALLY didn't want to do shingles for such a small area, nor did we know how to do shingles.)
My final suggestions would be that a mitre saw and pocket jig are REALLY helpful and using star head screws is easier. I would also suggest that you paint everything (prime and color coat) before assembly and just touch up afterwards, especially if you use a lot of trim as we did. We primed and painted the siding but just primed the trim, and it was a real pain to put the color coat on all that 1x3 trim after construction.
This plan is listed as an "intermediate" project and I think that's probably a correct designation. As beginners, it just took BOTH of us to figure it all out (we work really well together) and to build it, and it took a much longer time than it would for someone with more experience.
Built from Plan(s)
Estimated Cost
I think we probably spent between $300 and $400 on lumber, hardware and paint, not counting buying the secondhand mitre saw and the Kreg jig.
Estimated Time Investment
Week Long Project (20 Hours or More)
Finish Used
Primed and painted, green and tan. (We bought the green and had the tan on hand.)
Recommended Skill Level
Intermediate
Comments
Tue, 10/06/2020 - 15:56
Well done! I love this! …
Well done! I love this! Can I ask what dimension your garden tool shed is? And how did you decide on the new roof size/angle? I have a similar space and am contemplating something similar. Thanks!!
Tue, 10/06/2020 - 15:56
Well done! I love this! …
Well done! I love this! Can I ask what dimension your garden tool shed is? And how did you decide on the new roof size/angle? I have a similar space and am contemplating something similar. Thanks!!
Farmhouse kitchen Island
I used the Ana White "Country Kitchen Island" plans to build. The only changes I made was the table top, bead board instead of pine planks, three drawers, and mostly 3/4" plywood. For the island top, i used the top of a maple desk and applied butcher block oil. To make things easier I used plywood to keep everything square and used bead board (very easy to install) instead of having to join boards together. After putting the shelves together I just used pine boards to cover the edges of the plywood. I also installed three drawers for convenient storage.
Built from Plan(s)
Estimated Time Investment
Week Long Project (20 Hours or More)
Recommended Skill Level
Intermediate
Comments
Wed, 10/26/2016 - 13:48
drawers
Do you have more details on how you did the drawers? demensions, etc? Did you just extend the divider vertical bards that are inside all the way up? Or did you build cut 3 holes out of the front facing horizontal board? If you did that were you able to add tracks?

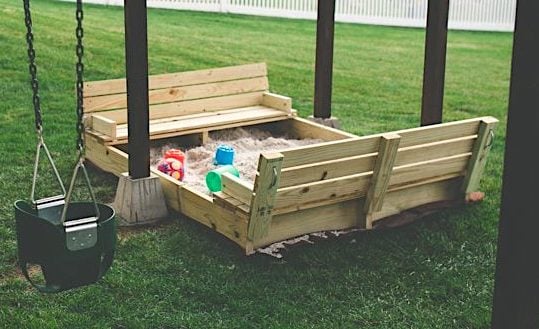
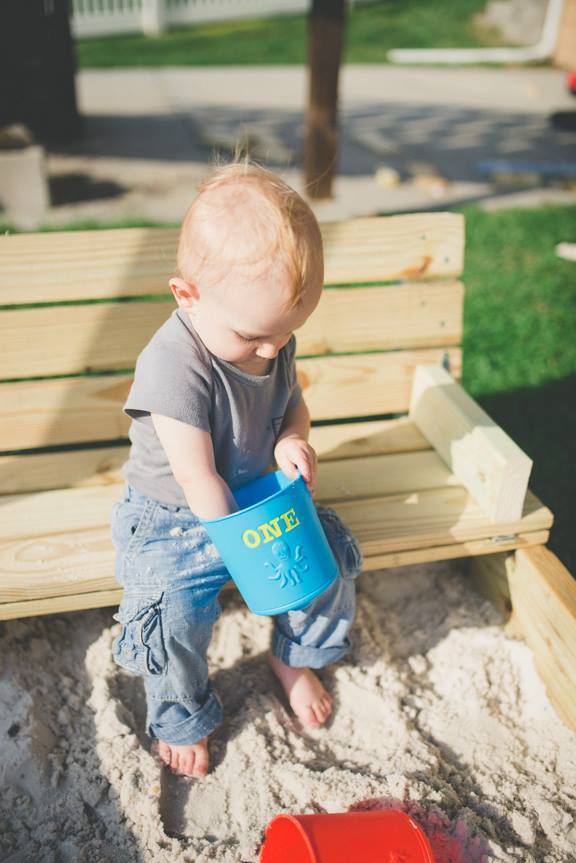
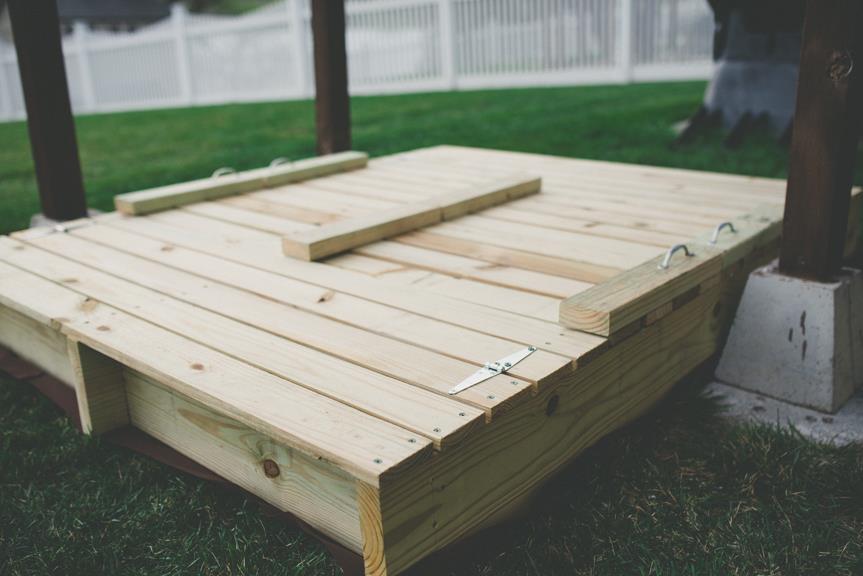
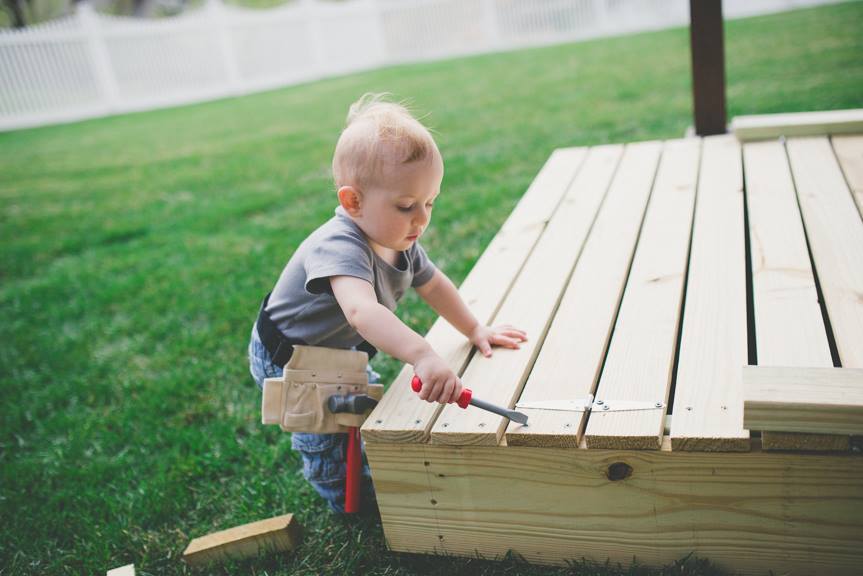
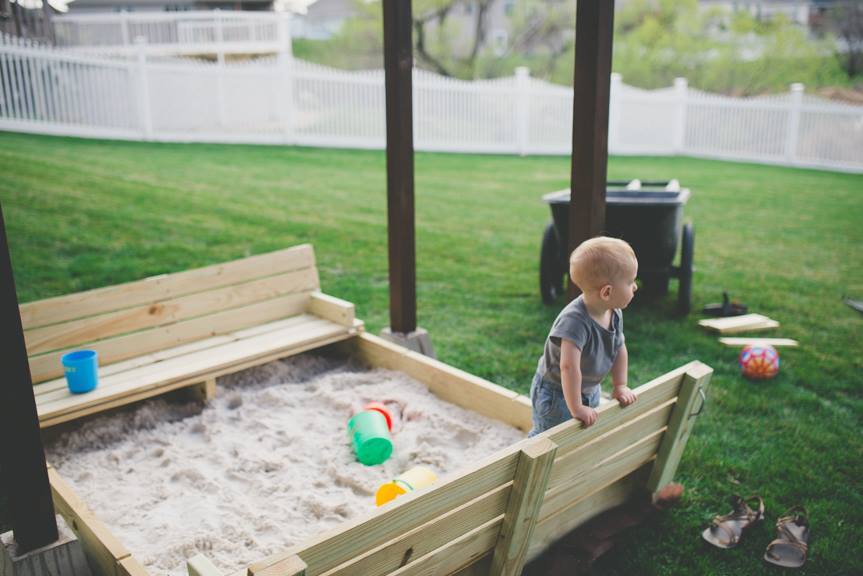
Sandbox with seats
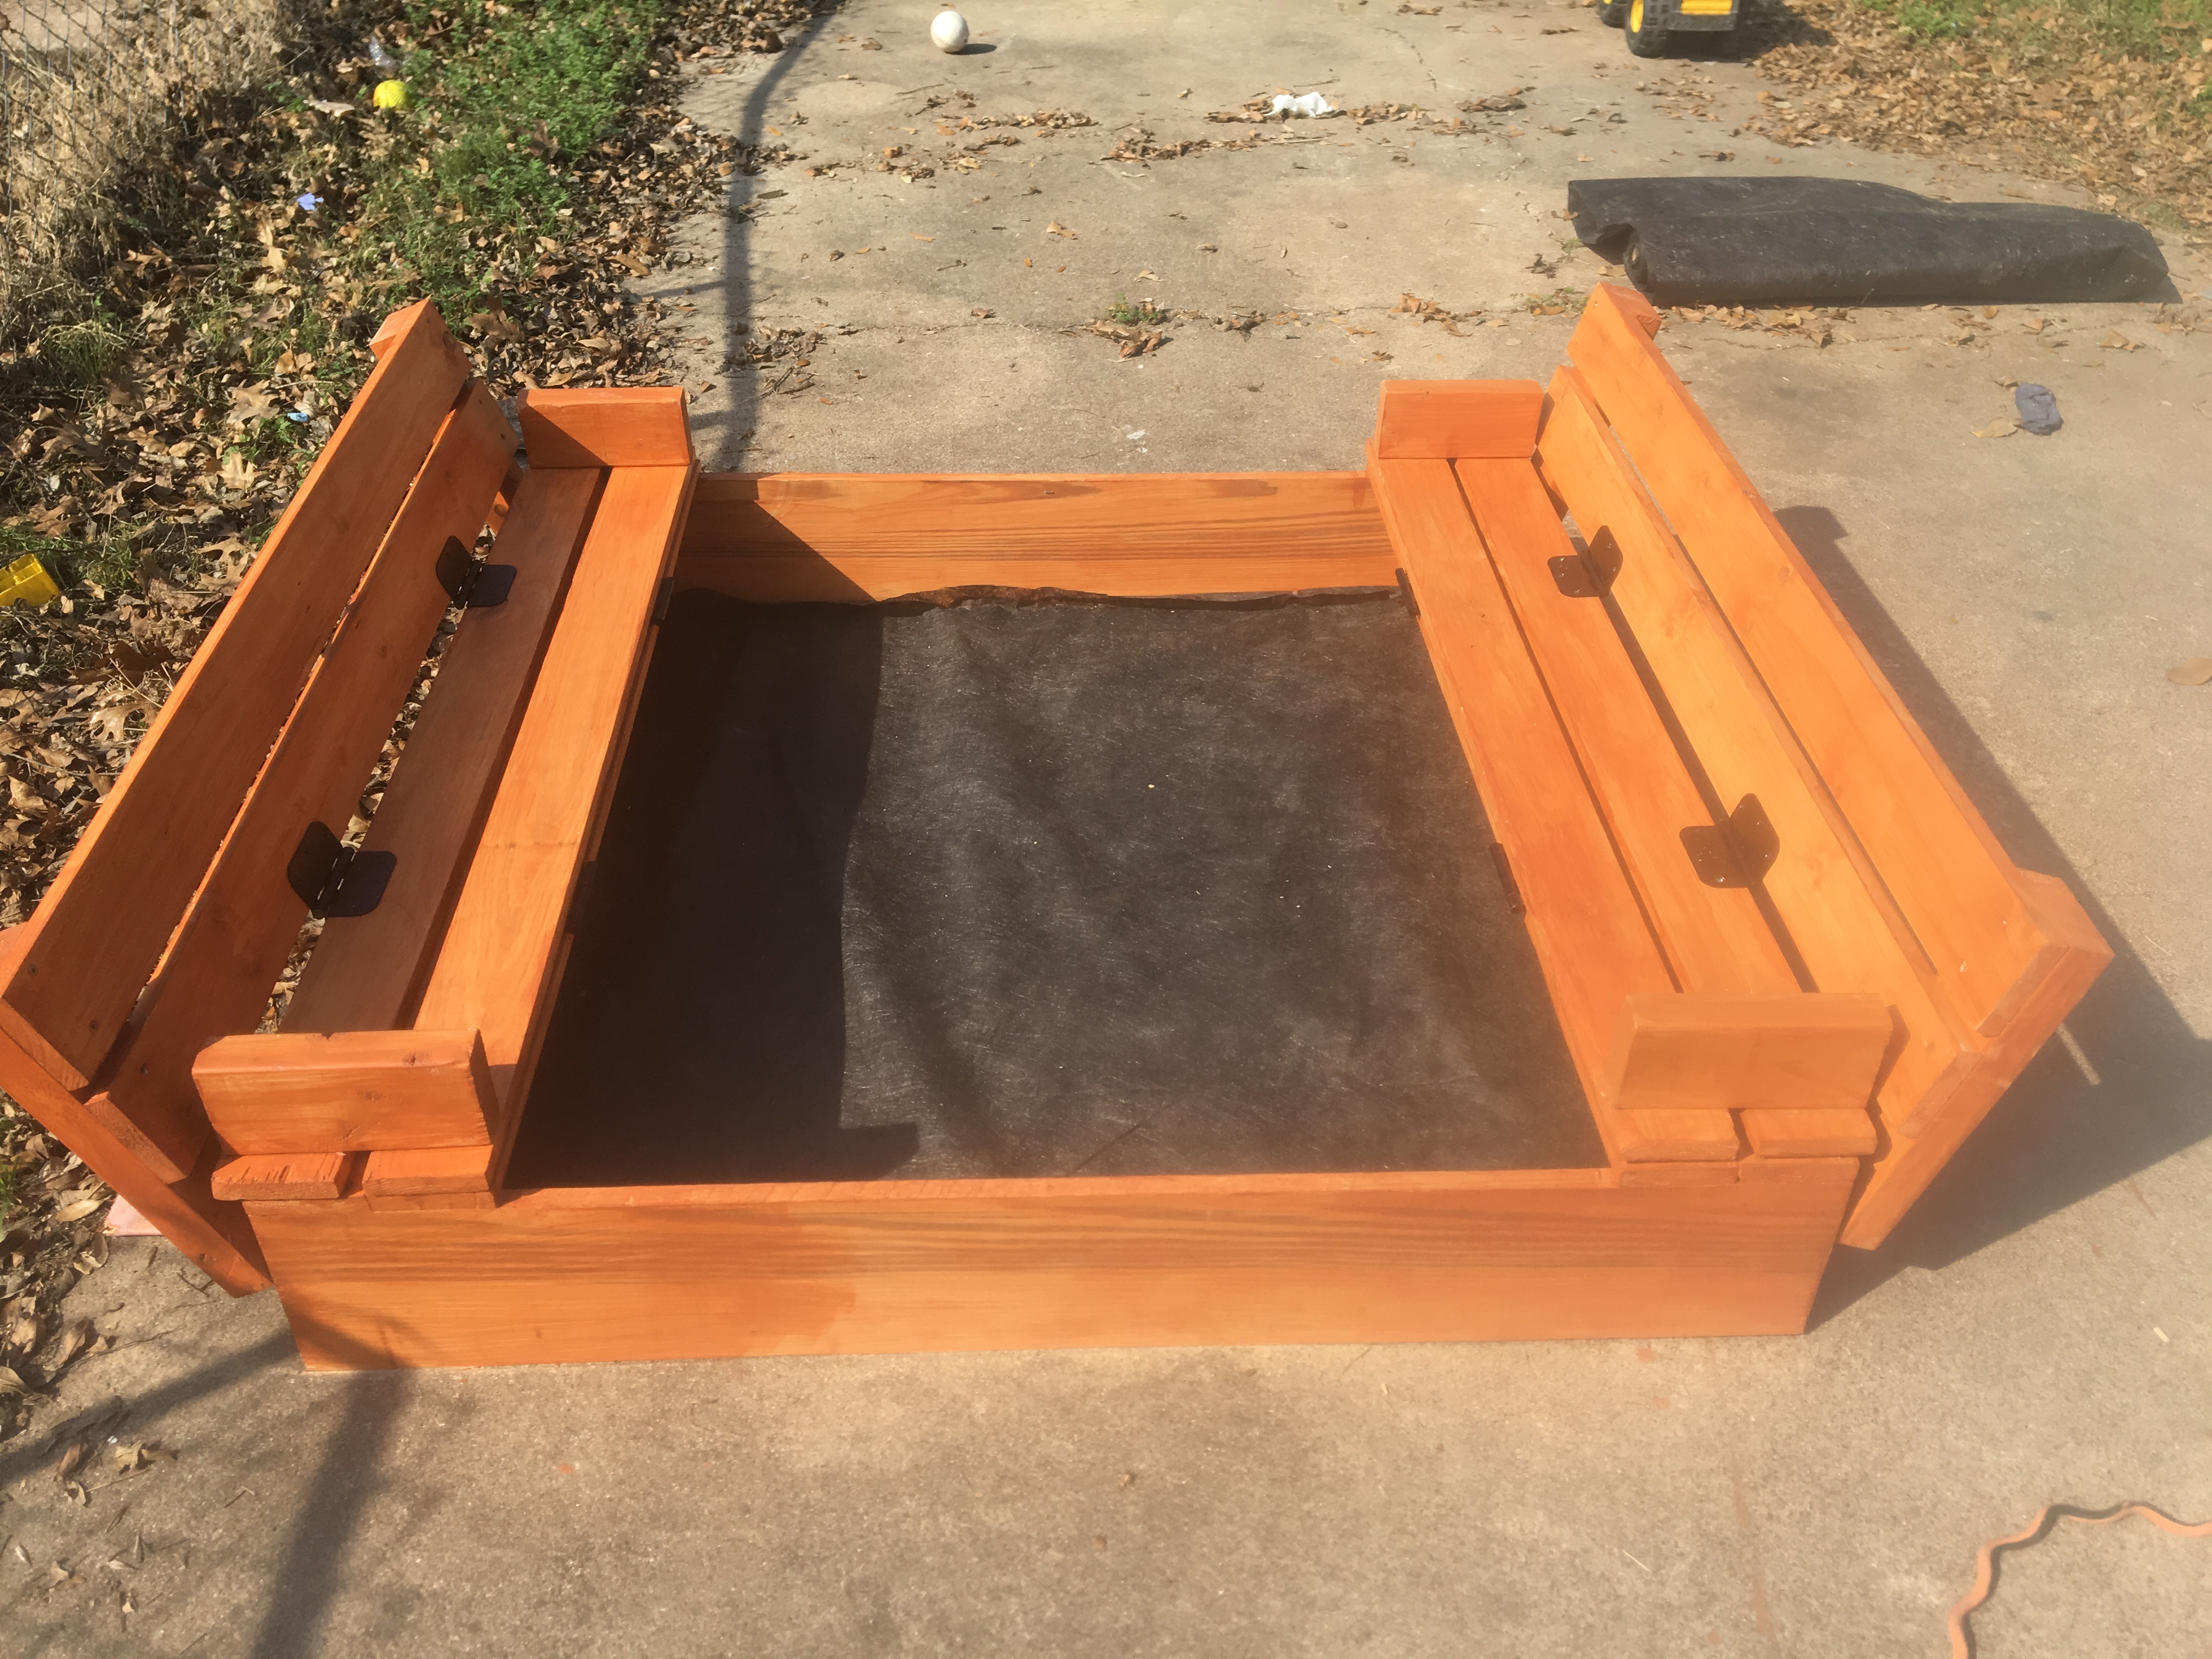
This was my first project ever. I had a lot of fun and it didn't quite turn out right but next time it will be perfect.
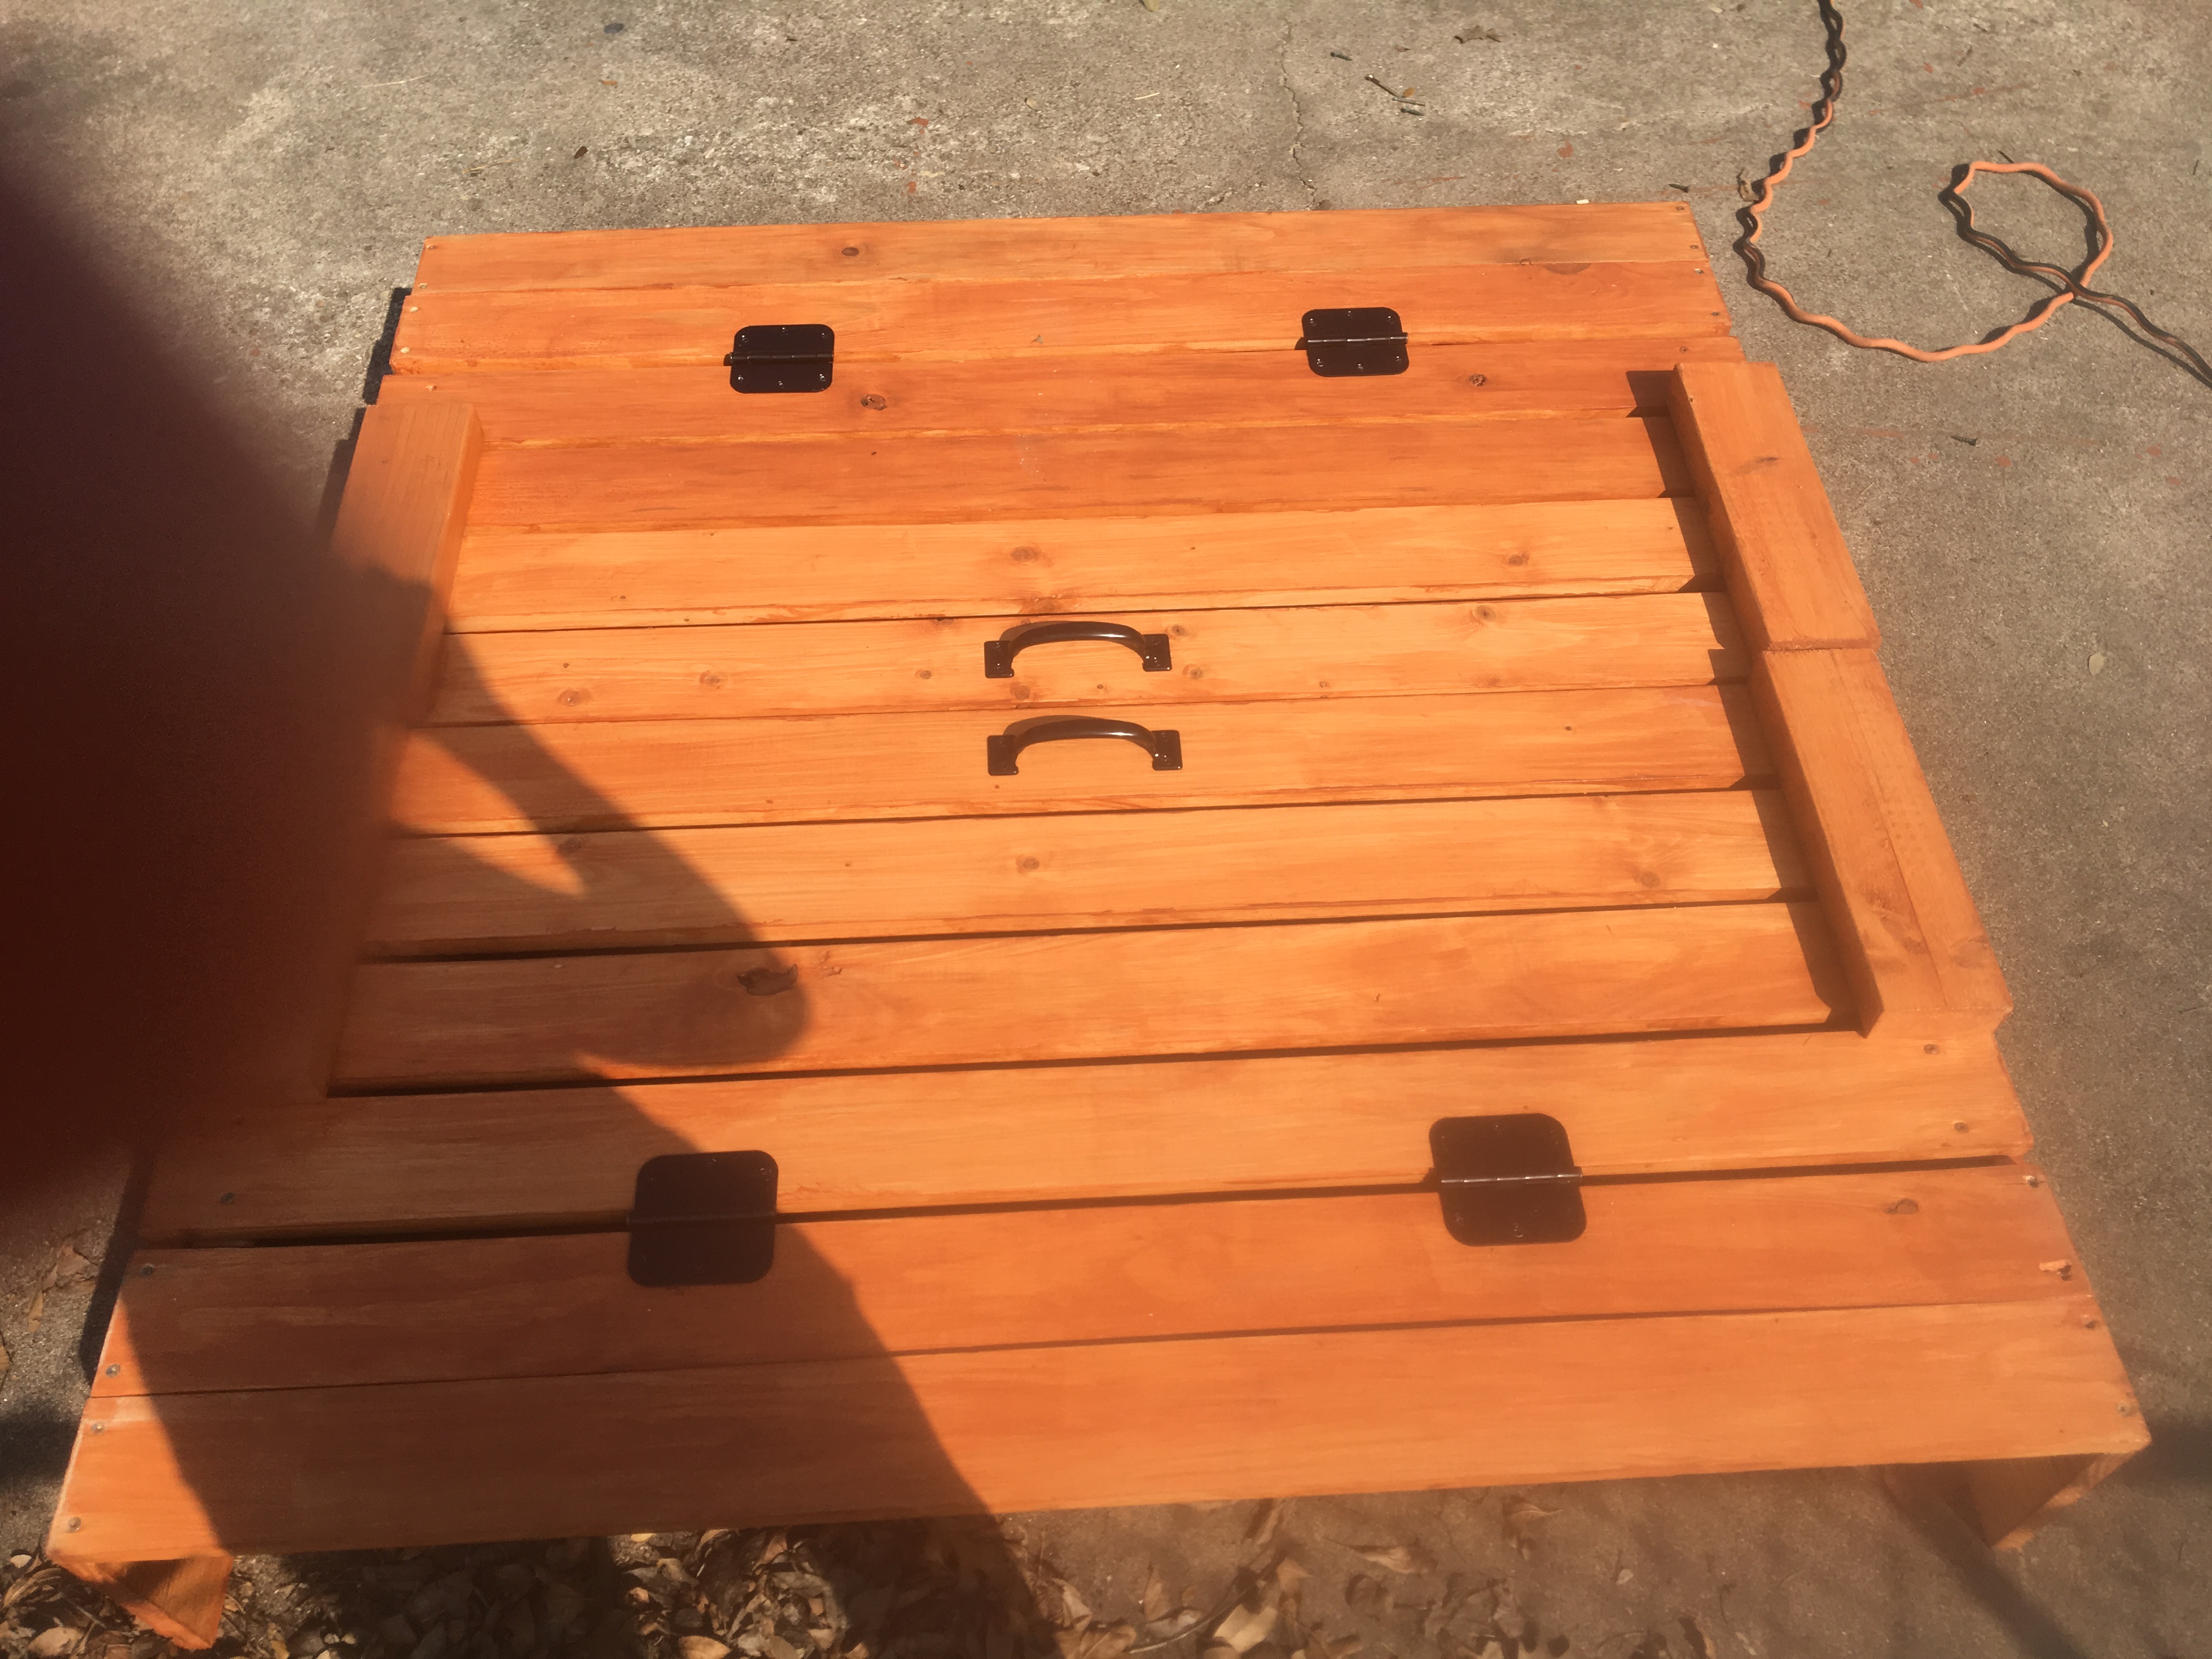
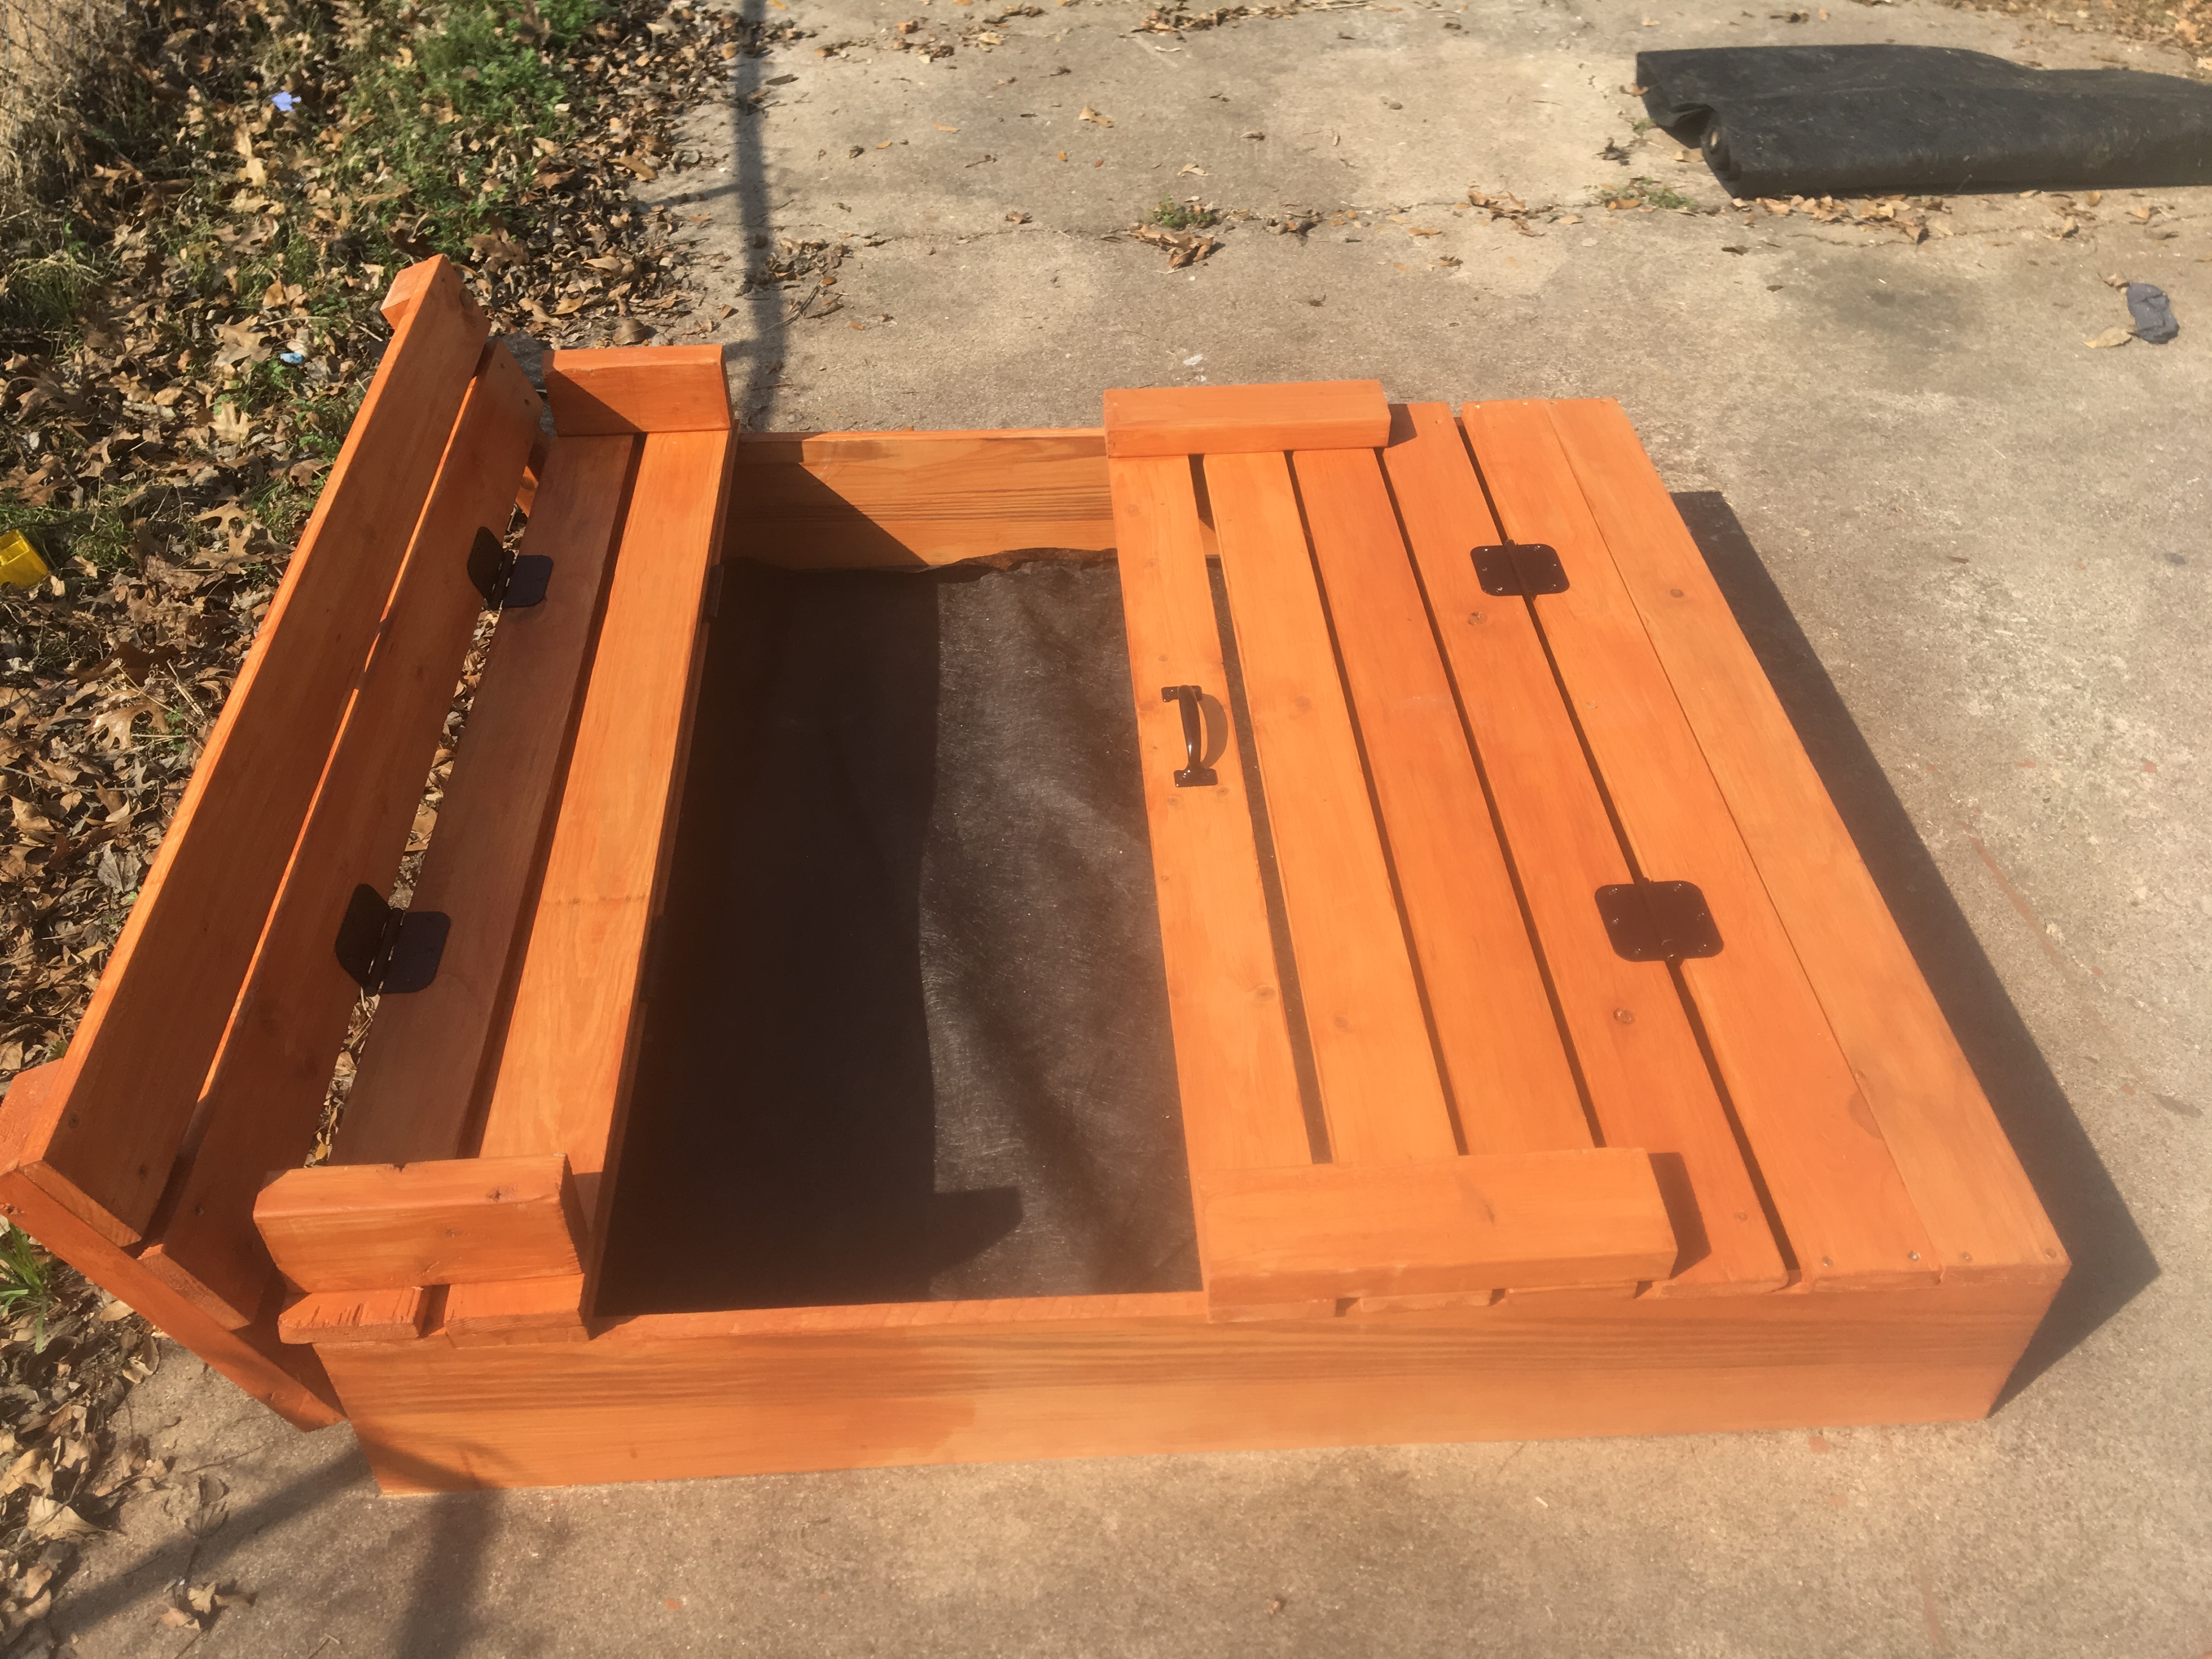
Built from Plan(s)
Estimated Cost
$65
Estimated Time Investment
Day Project (6-9 Hours)
Finish Used
Thompson water seal in cedar
Recommended Skill Level
Beginner
Outdoor Sectional
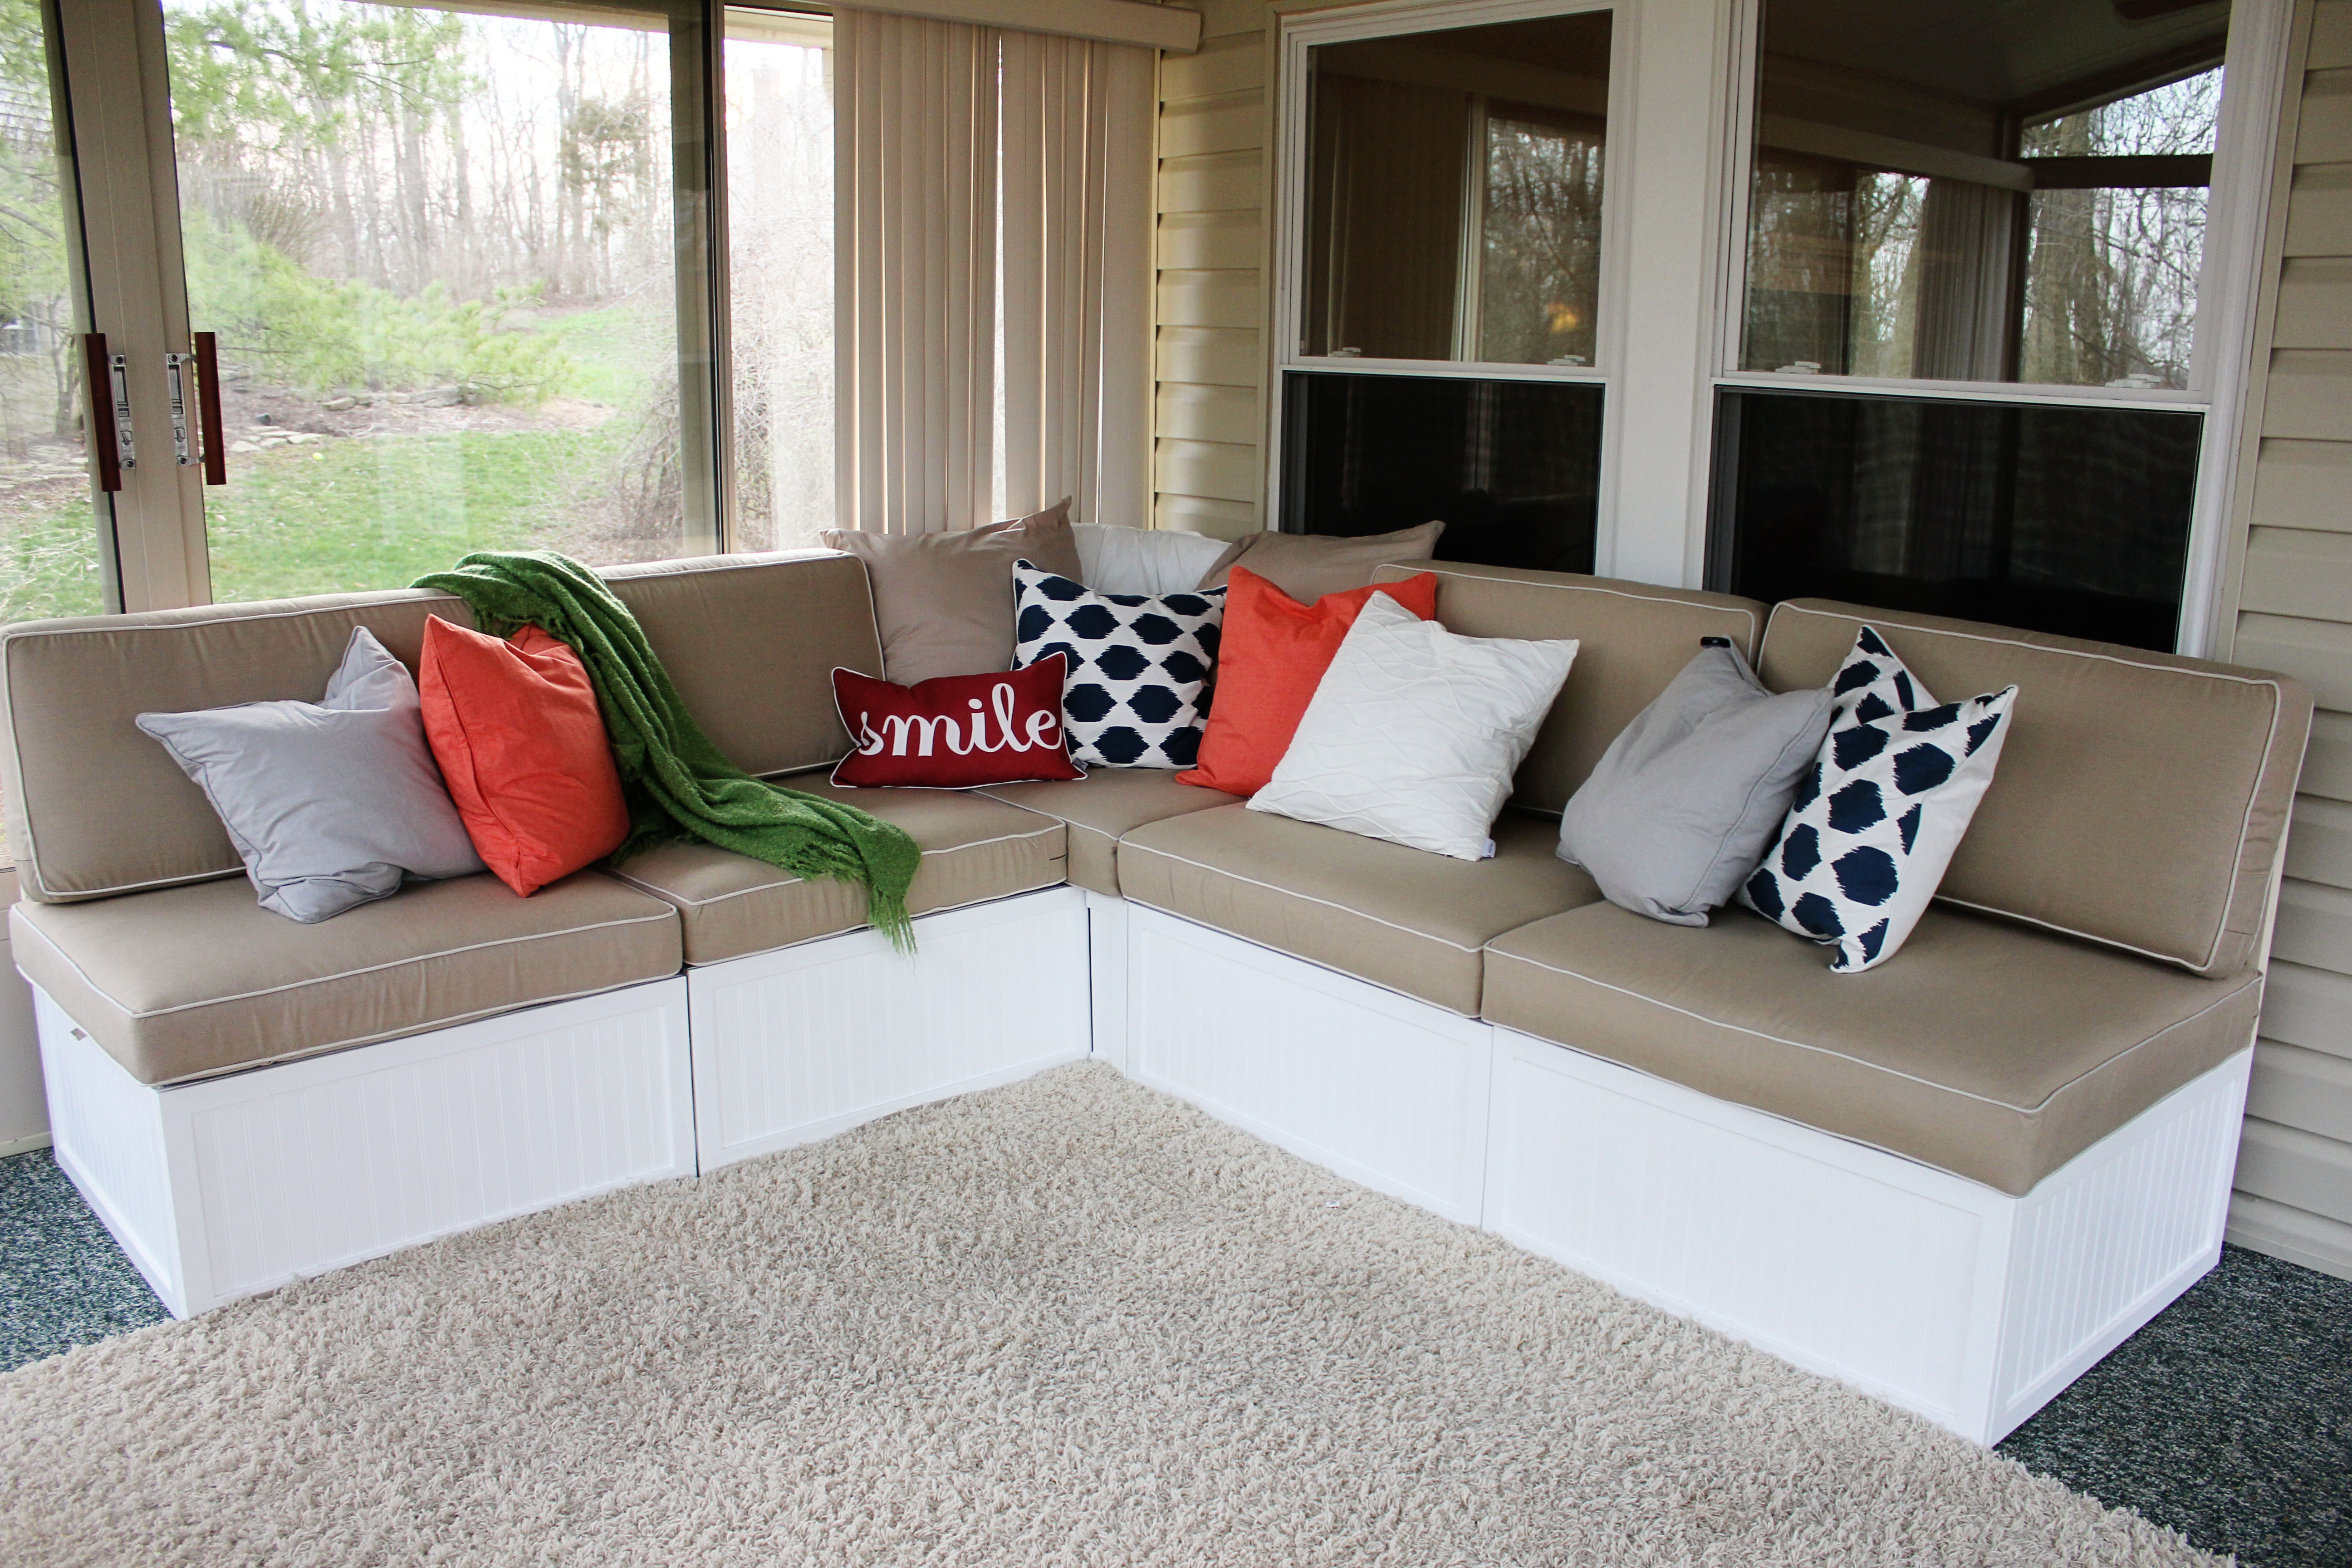
We followed the outdoor sectional plan from Ana Whites blog to create this outdoor sectional. First we bought the cushions and custom built this sectional to fit the cushions. We used 2x4's and the kreg jig for pocket screws, then covered the base in beadboard and some pine trim, gave it a good sanding and a nice paint job.

Built from Plan(s)
Estimated Cost
900
Estimated Time Investment
Week Long Project (20 Hours or More)
Finish Used
bead board and pine trim
Recommended Skill Level
Intermediate
Comments
Fri, 04/12/2013 - 05:46
Thanks! We built the frame
Thanks! We built the frame according to Ana's design (customized dimensions for our cushions) and then covered the base in bead board and used pine trim around the edges. The cushions are from the Frontgate Outlet in Cincinnati.
Wed, 05/07/2014 - 15:34
Planning on building this
Is there a link to the side/corner section of this so I do not have to guess. Thanks.
Sandbox with Benches
We altered the original plan by enlarging the sandbox (approx 5' x 6') which made for wider benches that can comfortably seat an adult. The benches and back rests are three boards deep instead of two. We added 2x12 supports under the benches for additional support, as well as another 2x4 support in the middle of the backrest.

Built from Plan(s)
Estimated Time Investment
Day Project (6-9 Hours)
Finish Used
None
Recommended Skill Level
Beginner
Comments


Tue, 04/14/2015 - 20:00
Thanks for sharing!
I just love seeing pictures of these built! Makes my heart swell :-)
Outdoor bar
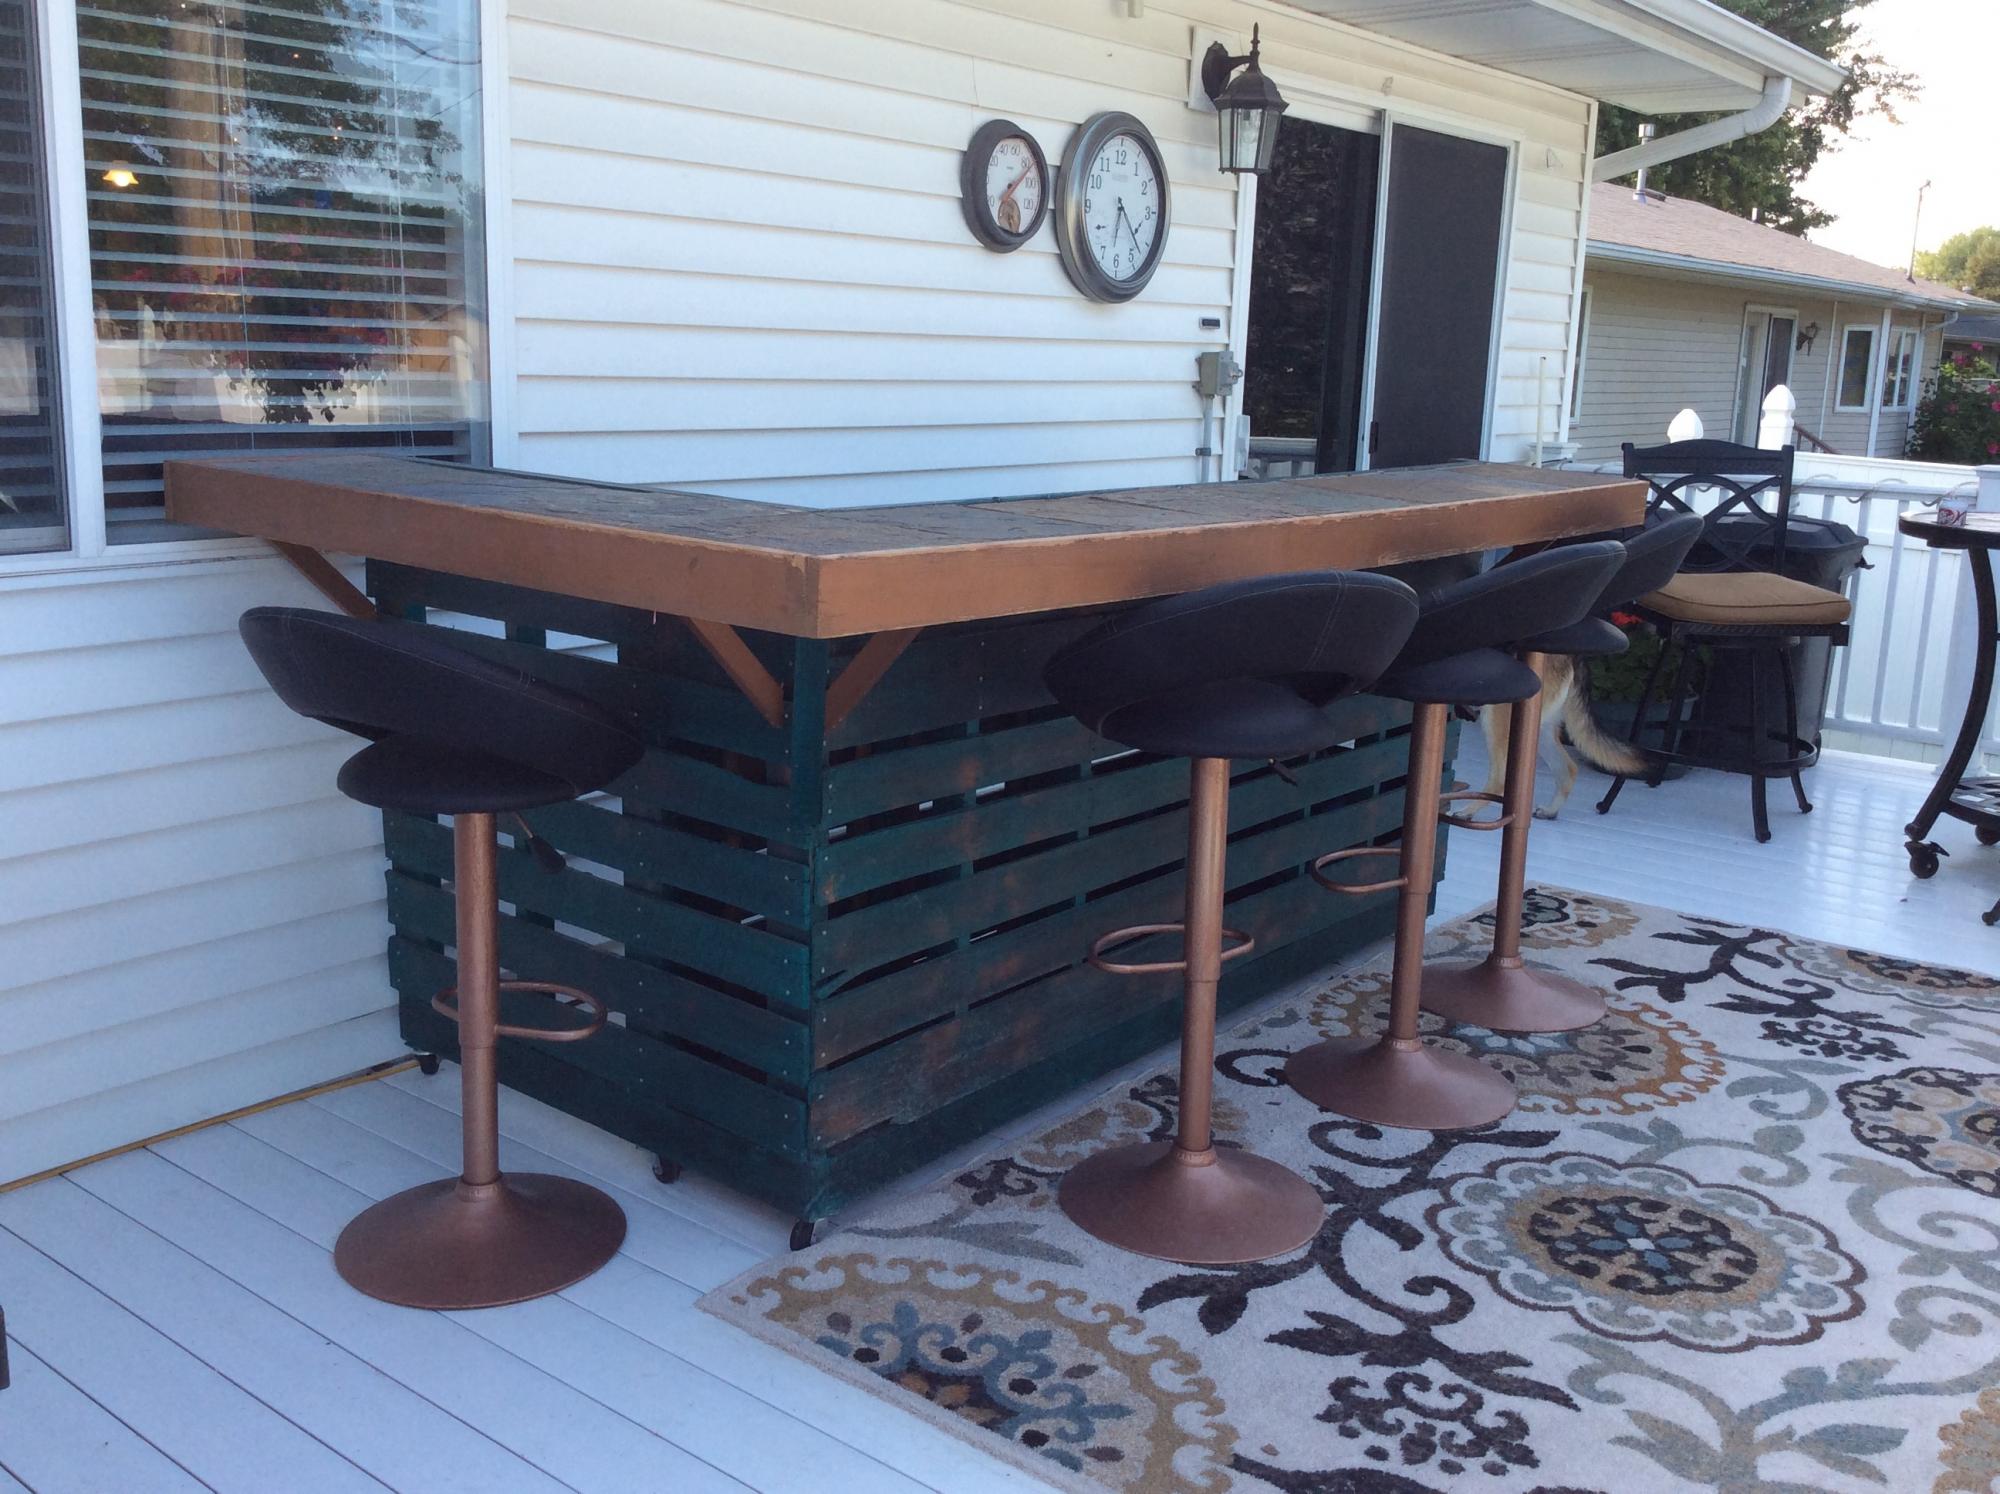
Outdoor pallet bar with sink I found in the garage. Just a dumping sink under cabinet,not hooked up to plumbing.
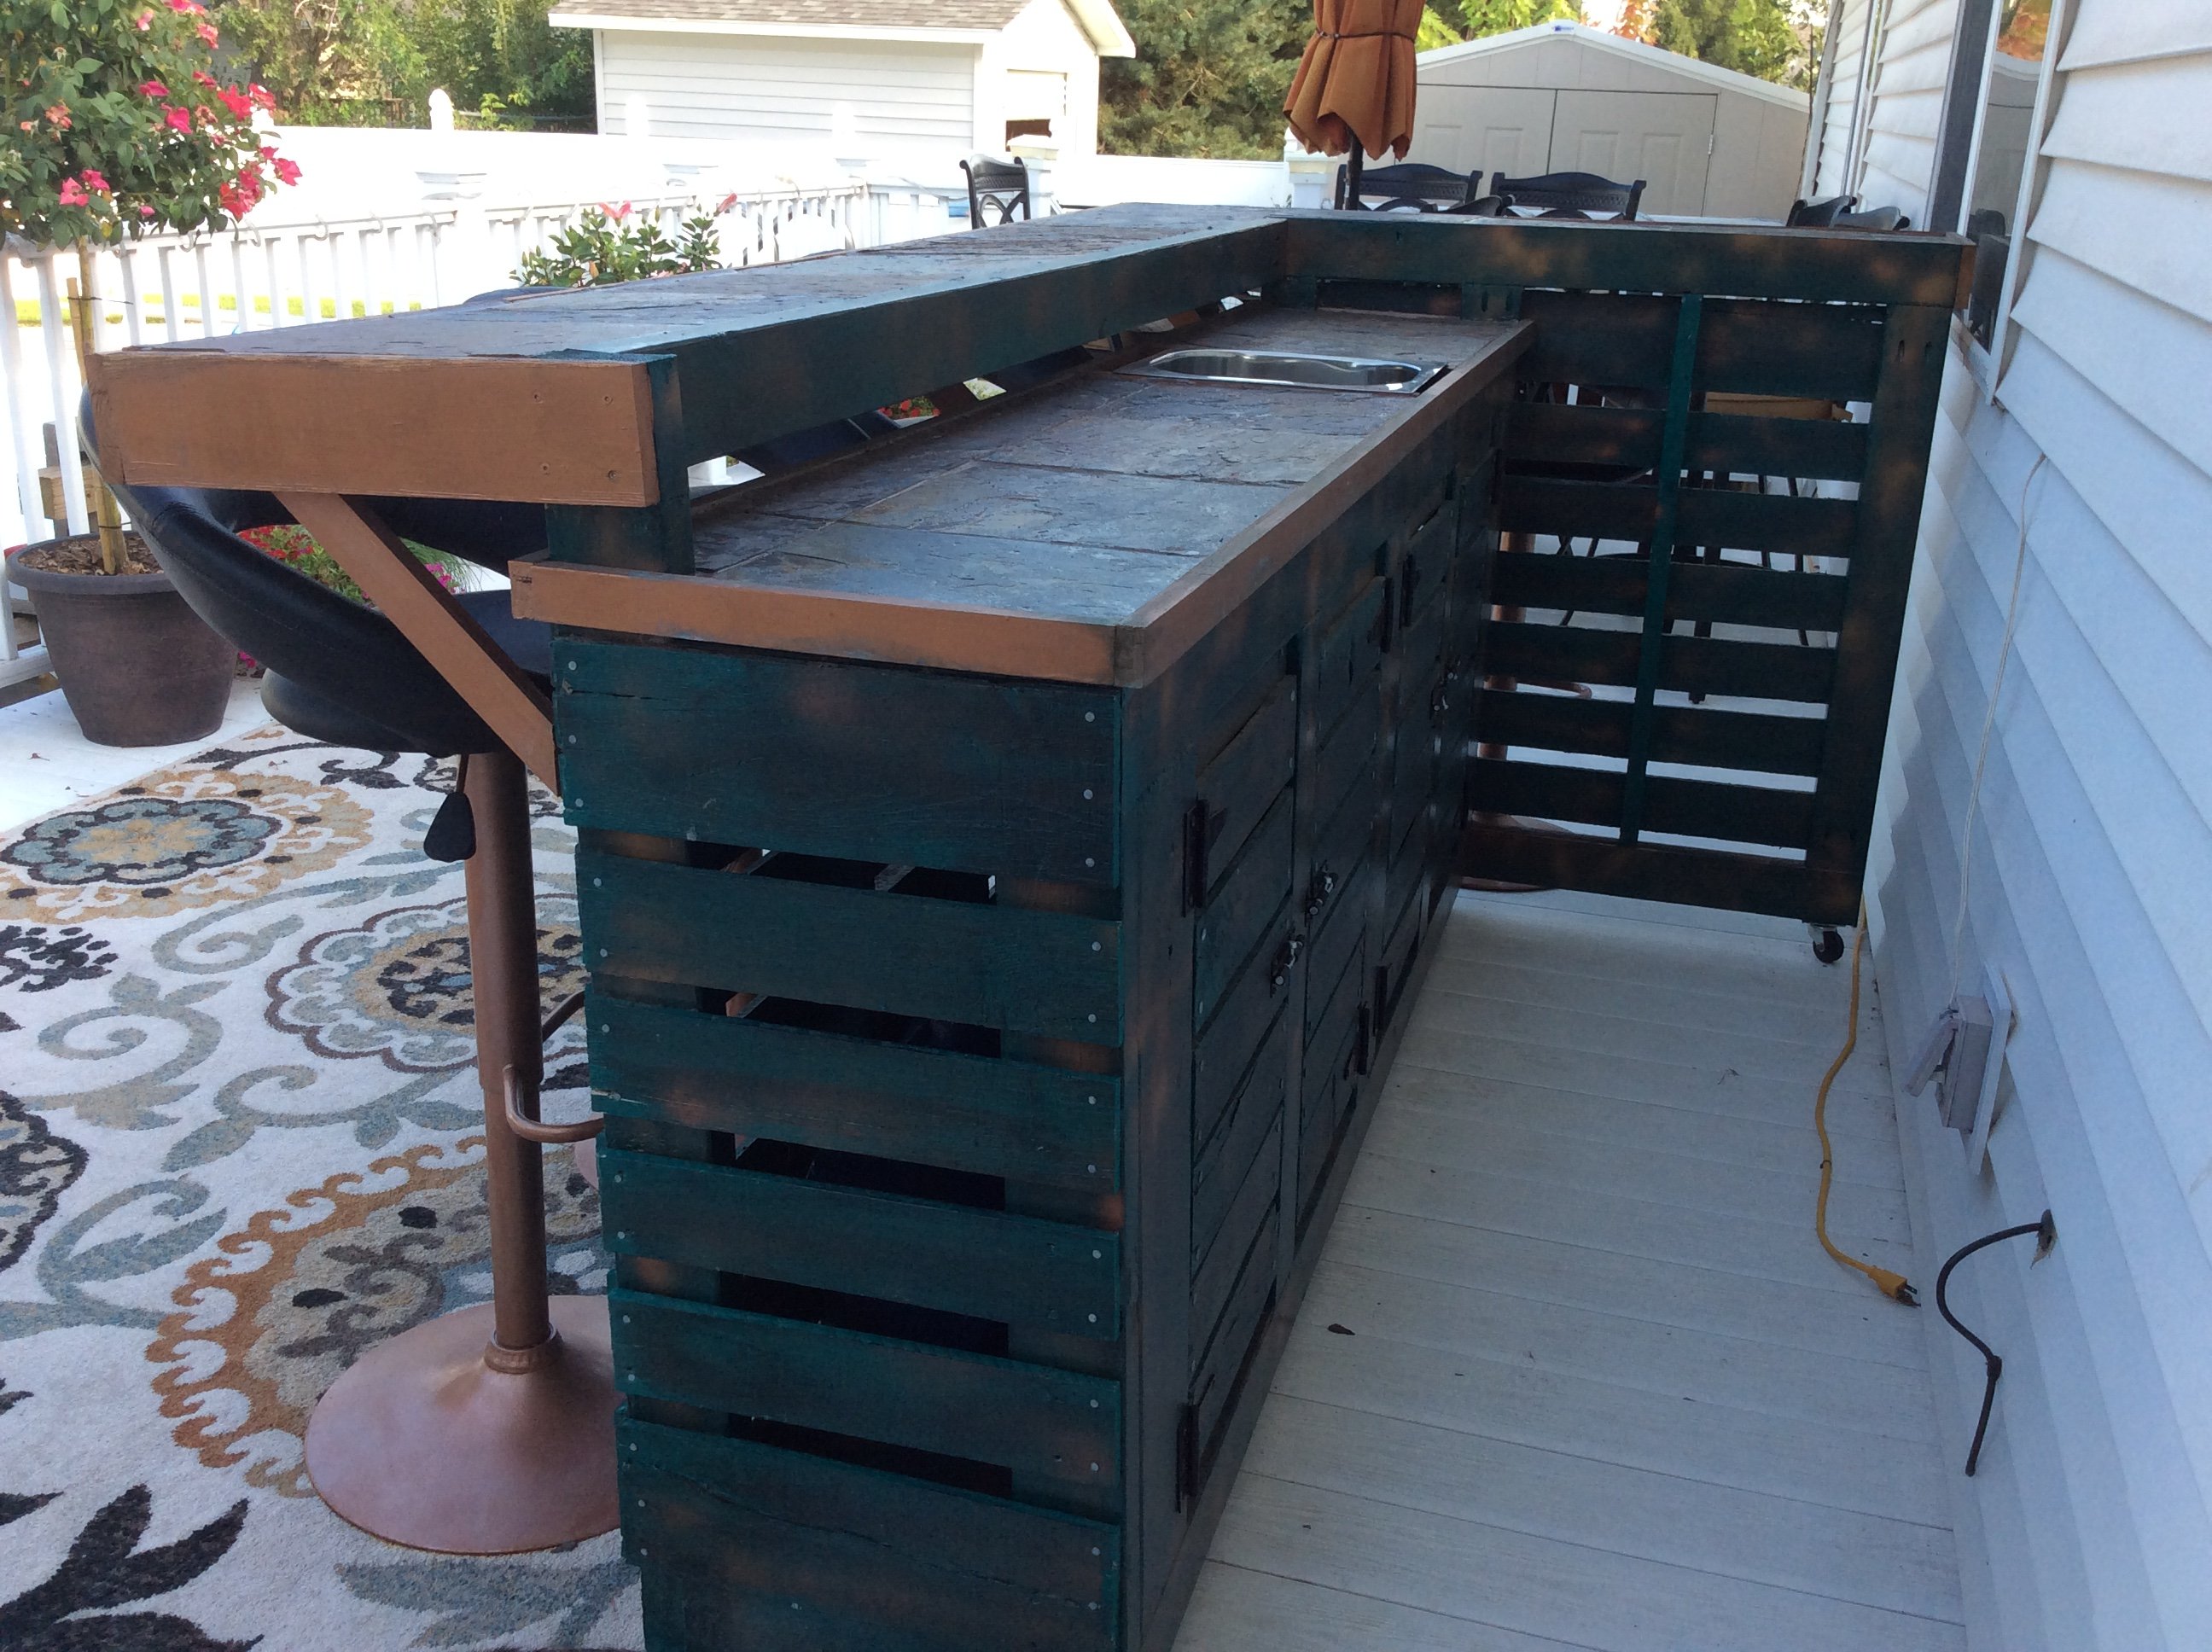
Estimated Cost
$200
Estimated Time Investment
Weekend Project (10-20 Hours)
Finish Used
Paint, stain over paint,poly, slate tile sealer
Recommended Skill Level
Intermediate
Comments
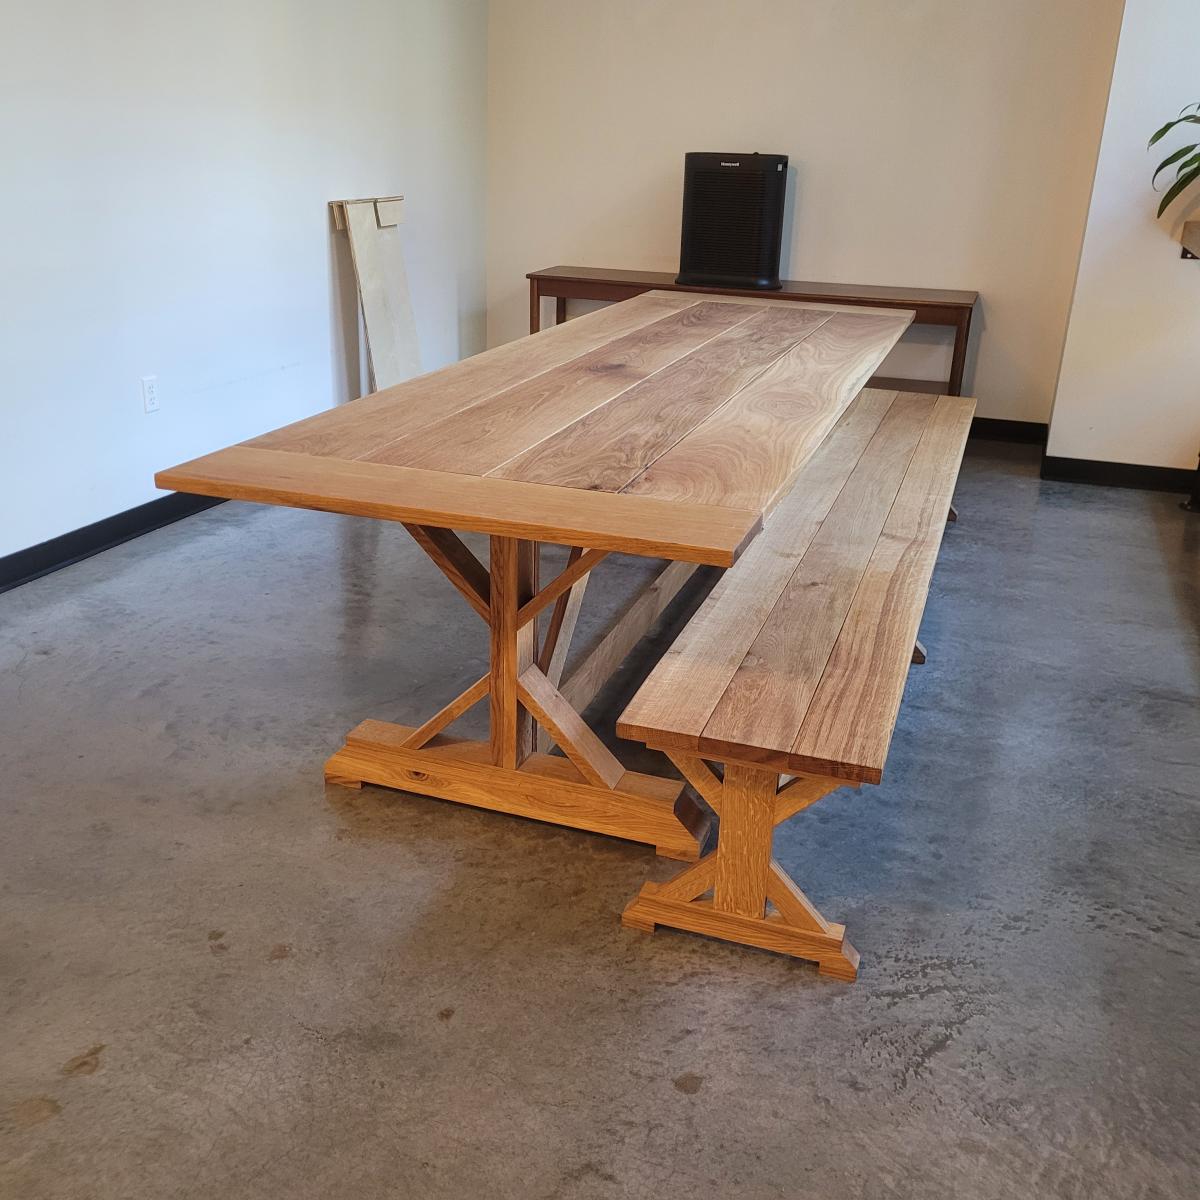
Fancy X-Brace Farmhouse Table and Bench
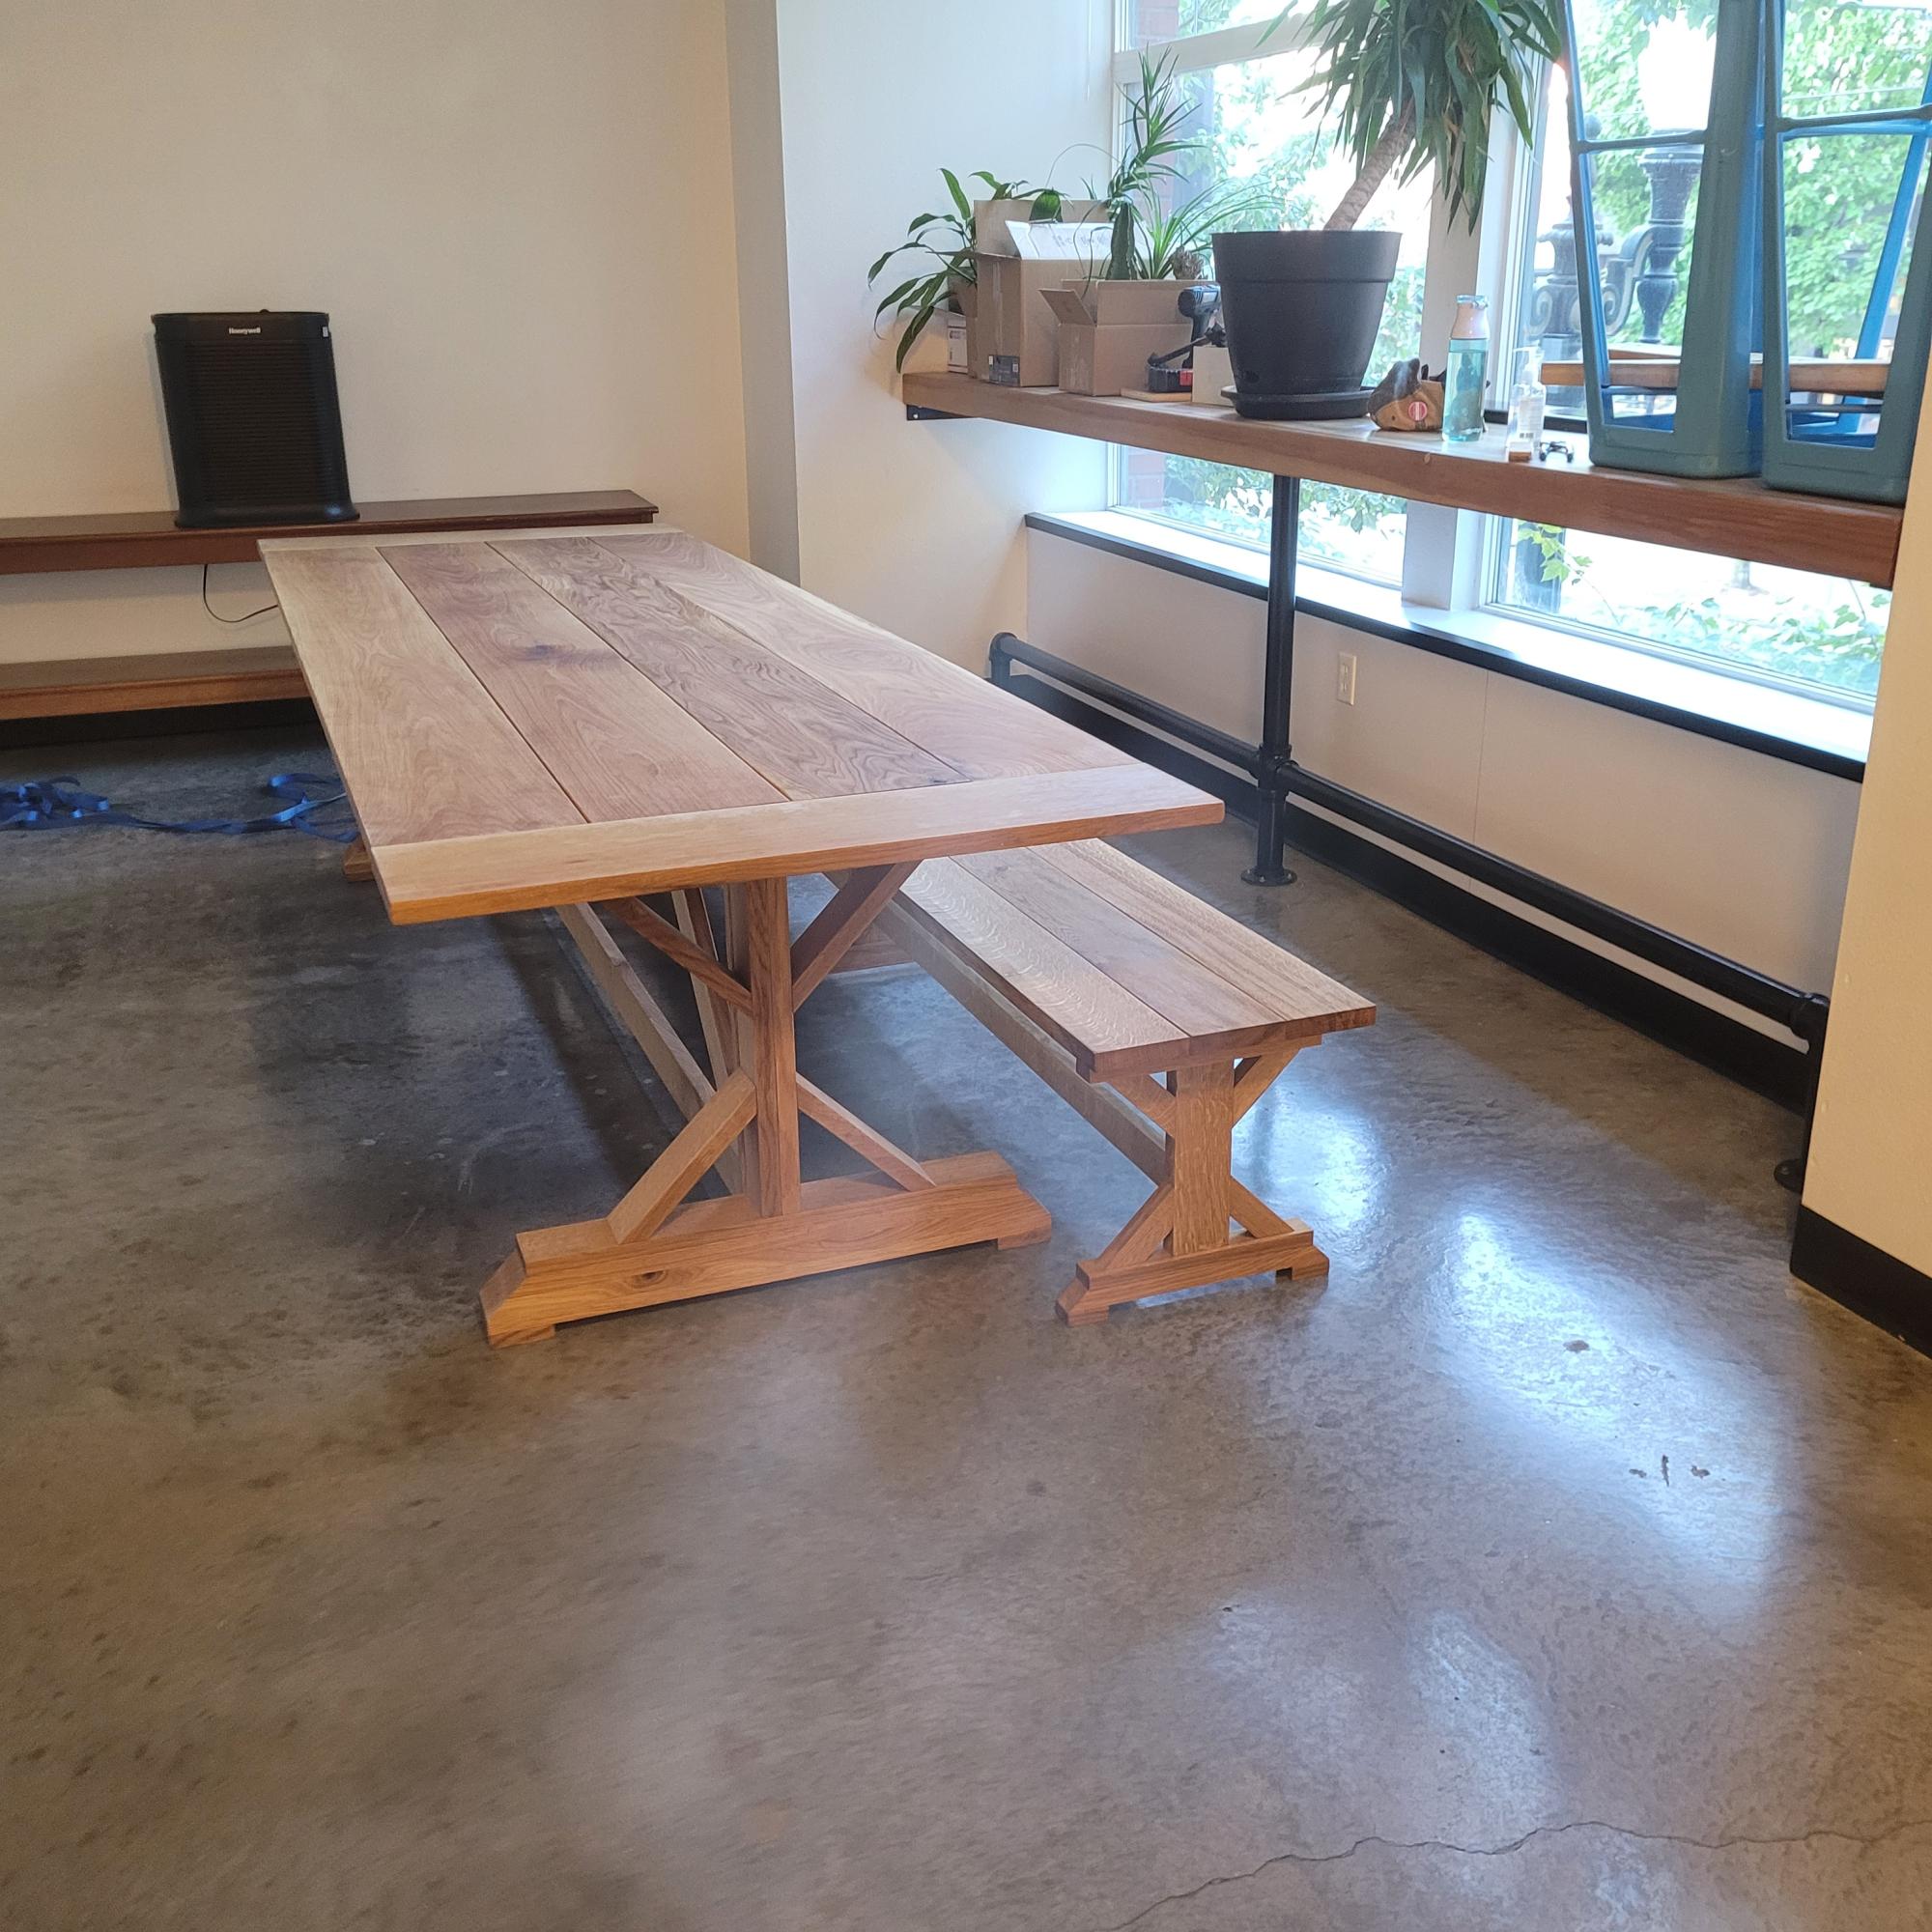
My employer asked for an "upscale farmhouse table" to act as a feature in our new training facility. After perusing designs online, I found this one and decided to upgrade it just a bit for the stated purpose.
Made entirely of white oak (over $1600 worth!) purchased as 4/4 and 5/4 stock, I milled all the lumber to spec in our shop. As it was to be 10' in length, and I was unable to acquire acceptable wide stock for the tabletop in that length, I went with breadboard ends, which also seems to have served to upgrade the appearance over "picnic table" to elegant showpiece. All joinery is invisible, using mostly dowels and glue where joints had to be hidden.
Final treatment was with tung oil, and it took up residence in its permanent home last week. I had to assemble it on-site, as there is NO way to move a table of this size in and out of the building. It's there to stay.
As my lumber wasn't exactly spec-size (1X4, 2X10, etc), I had to do the math and make some adjustments to achieve spec height, but the final product is a rousing success.
Thank you for the inspiration.
Built from Plan(s)
Comments
Mon, 09/26/2022 - 17:59
Stunning Table!
This is gorgeous and very well built! Thank you so much for sharing.
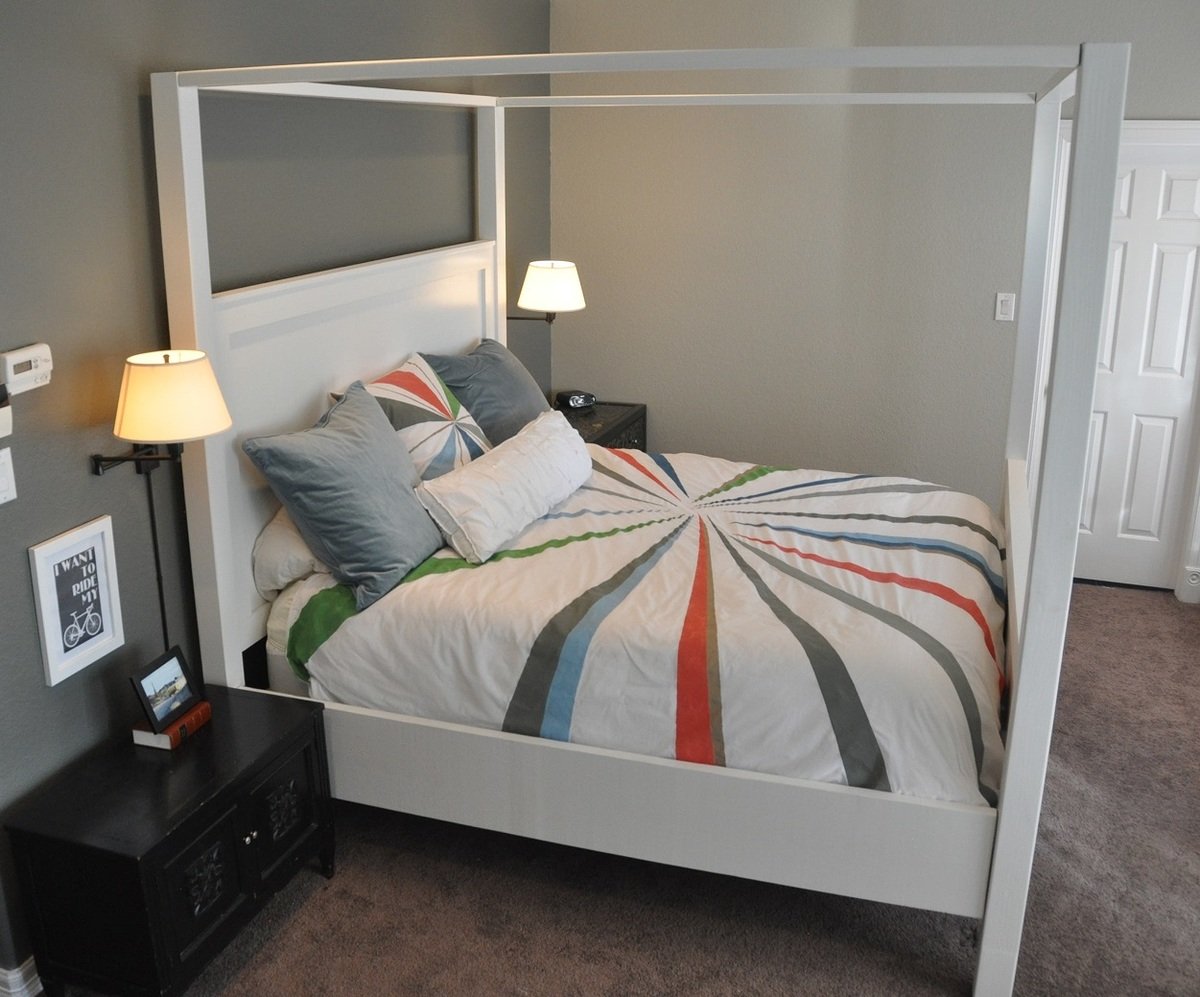
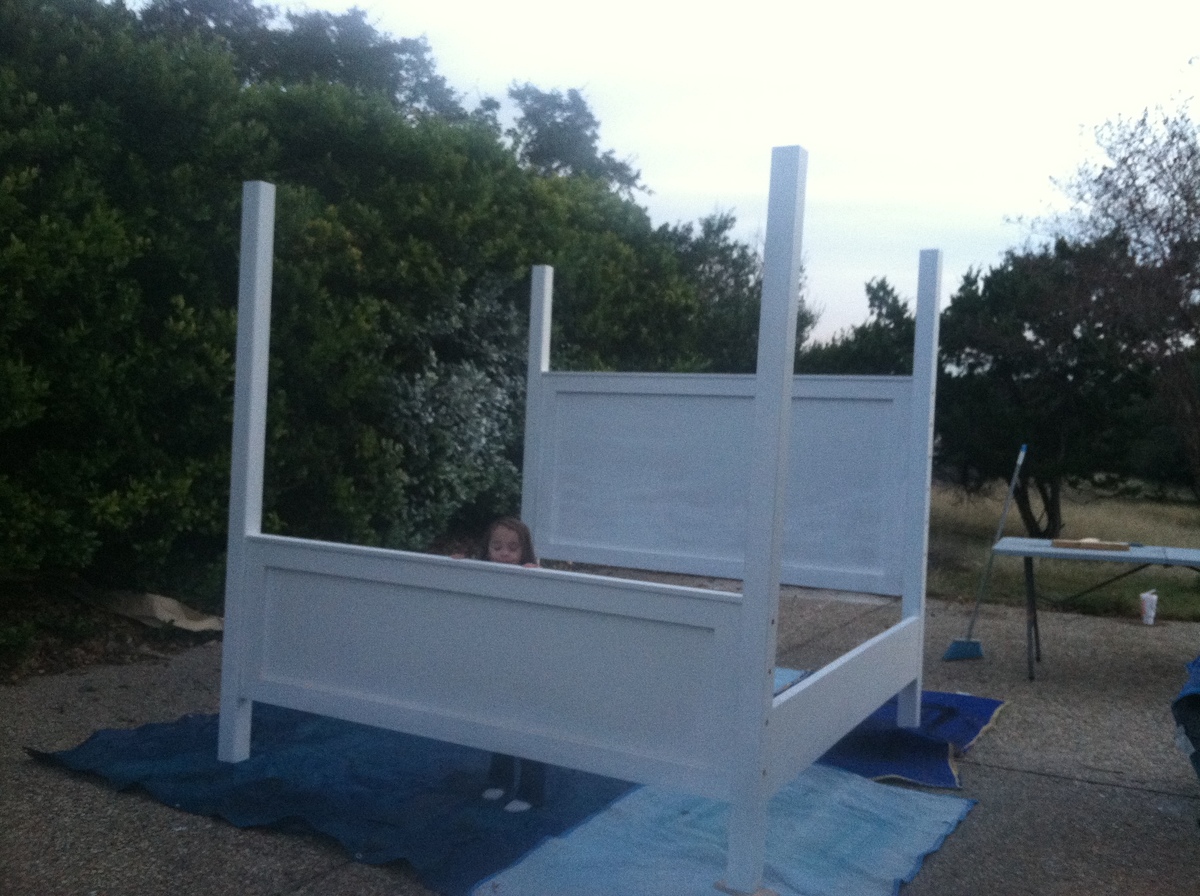
Modern King Farmhouse Bed with Canopy

Although I have experience building projects and using tools, this was my first Ana White project. I am a huge fan! I wanted a little bit more modern take on the Farmhouse bed with canopy, so I attached the headboards and foot boards directly to the 88" tall 4 x 4 posts. This was done instead of creating the king farmhouse bed first and adding the canopy on top of it like the plans show. I used solid 3/4" birch plywood instead of the planks for the headboard/footboard for a more streamlined look. I also used 1 x 4's around the entire perimiter of the headboard/foot board instead of just the top and bottom. I am thrilled with how it turned out, it looks exactly the way I wanted it to! Step-by-step information on how I built the bed are on my blog at decorsanity.com. Thank you Ana, you rock!!

Built from Plan(s)
Estimated Cost
$350
Estimated Time Investment
Week Long Project (20 Hours or More)
Finish Used
1 sprayed coat primer, 1 sprayed coat Behr flat paint in Polar Bear White, 1 coat sprayed Minwax Polycrylic
Recommended Skill Level
Intermediate
Comments
Fri, 01/24/2014 - 23:28
I love it
It looks very sturdy. I like your idea of the 1x4 around the entire perimeters and making the canopy the actual bed frame. Thats what I would have done too. I am always trying to think of ways to use 2 x's or 4 x's instead of 1 x's I like the chunkier look. Great job
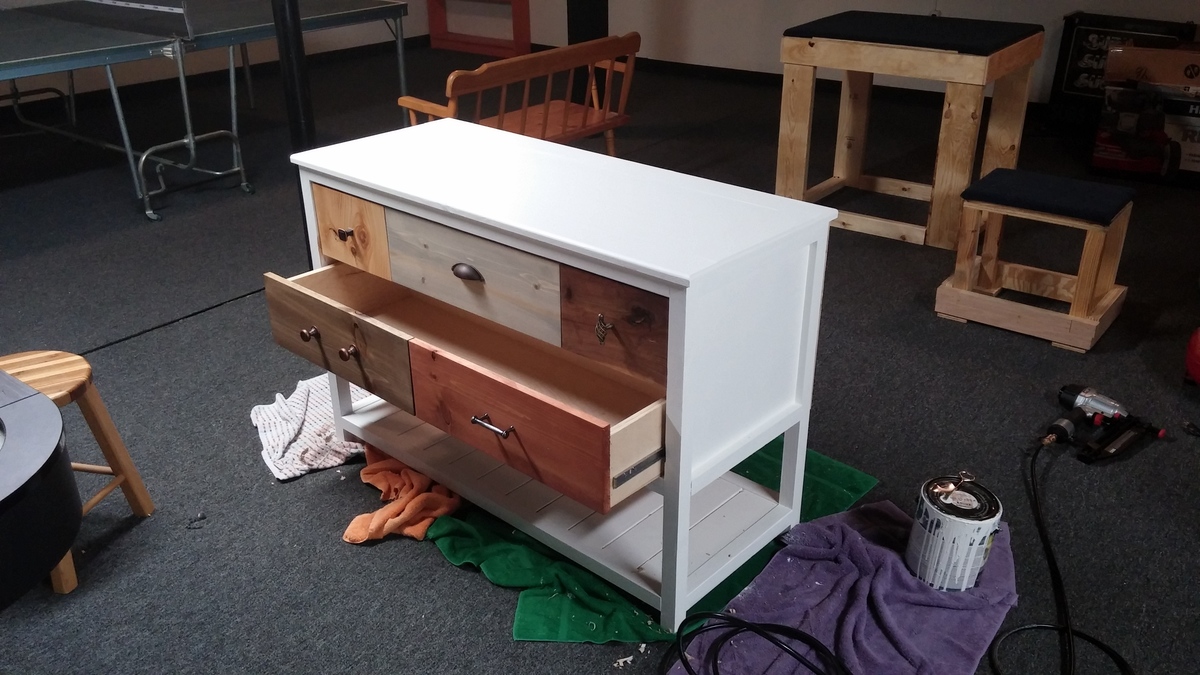
distressed wood console table
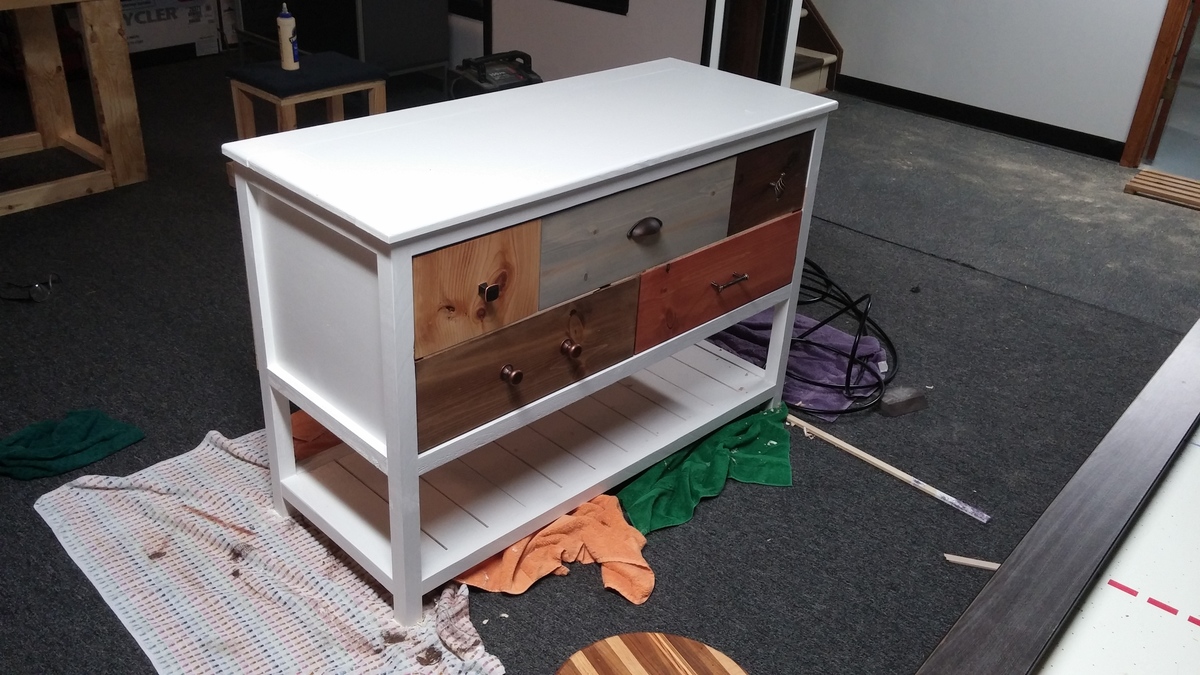
I saw this table on Anna's website from rogueengineer.com. The plans were simple to follow. I made it out of pine, 2×4s, and baltic birch ply.
Built from Plan(s)
Estimated Cost
$100-$150
Estimated Time Investment
Weekend Project (10-20 Hours)
Finish Used
Minwax Wood stain, wipe on poly
Recommended Skill Level
Intermediate
Comments
Childs toy stove
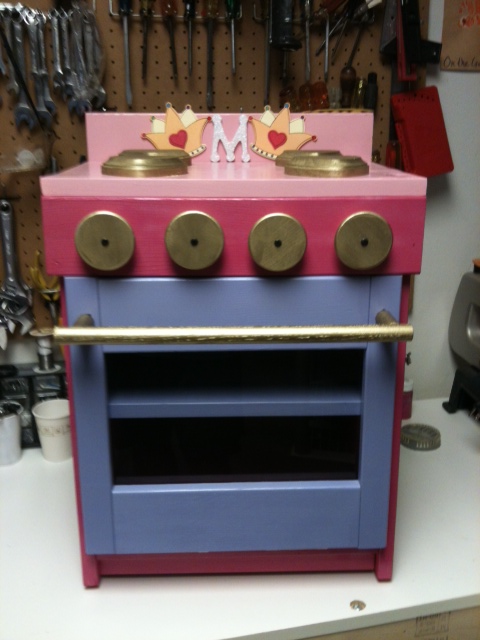
I built this stove for a close family friend for her 3rd birthday. For the burners I used heart shaped wooden cutouts. I also added her first name initial to the backboard as well.
Estimated Cost
$30
Estimated Time Investment
Weekend Project (10-20 Hours)
Finish Used
High gloss spray paint
Recommended Skill Level
Intermediate
Herringbone Rustic X Bench
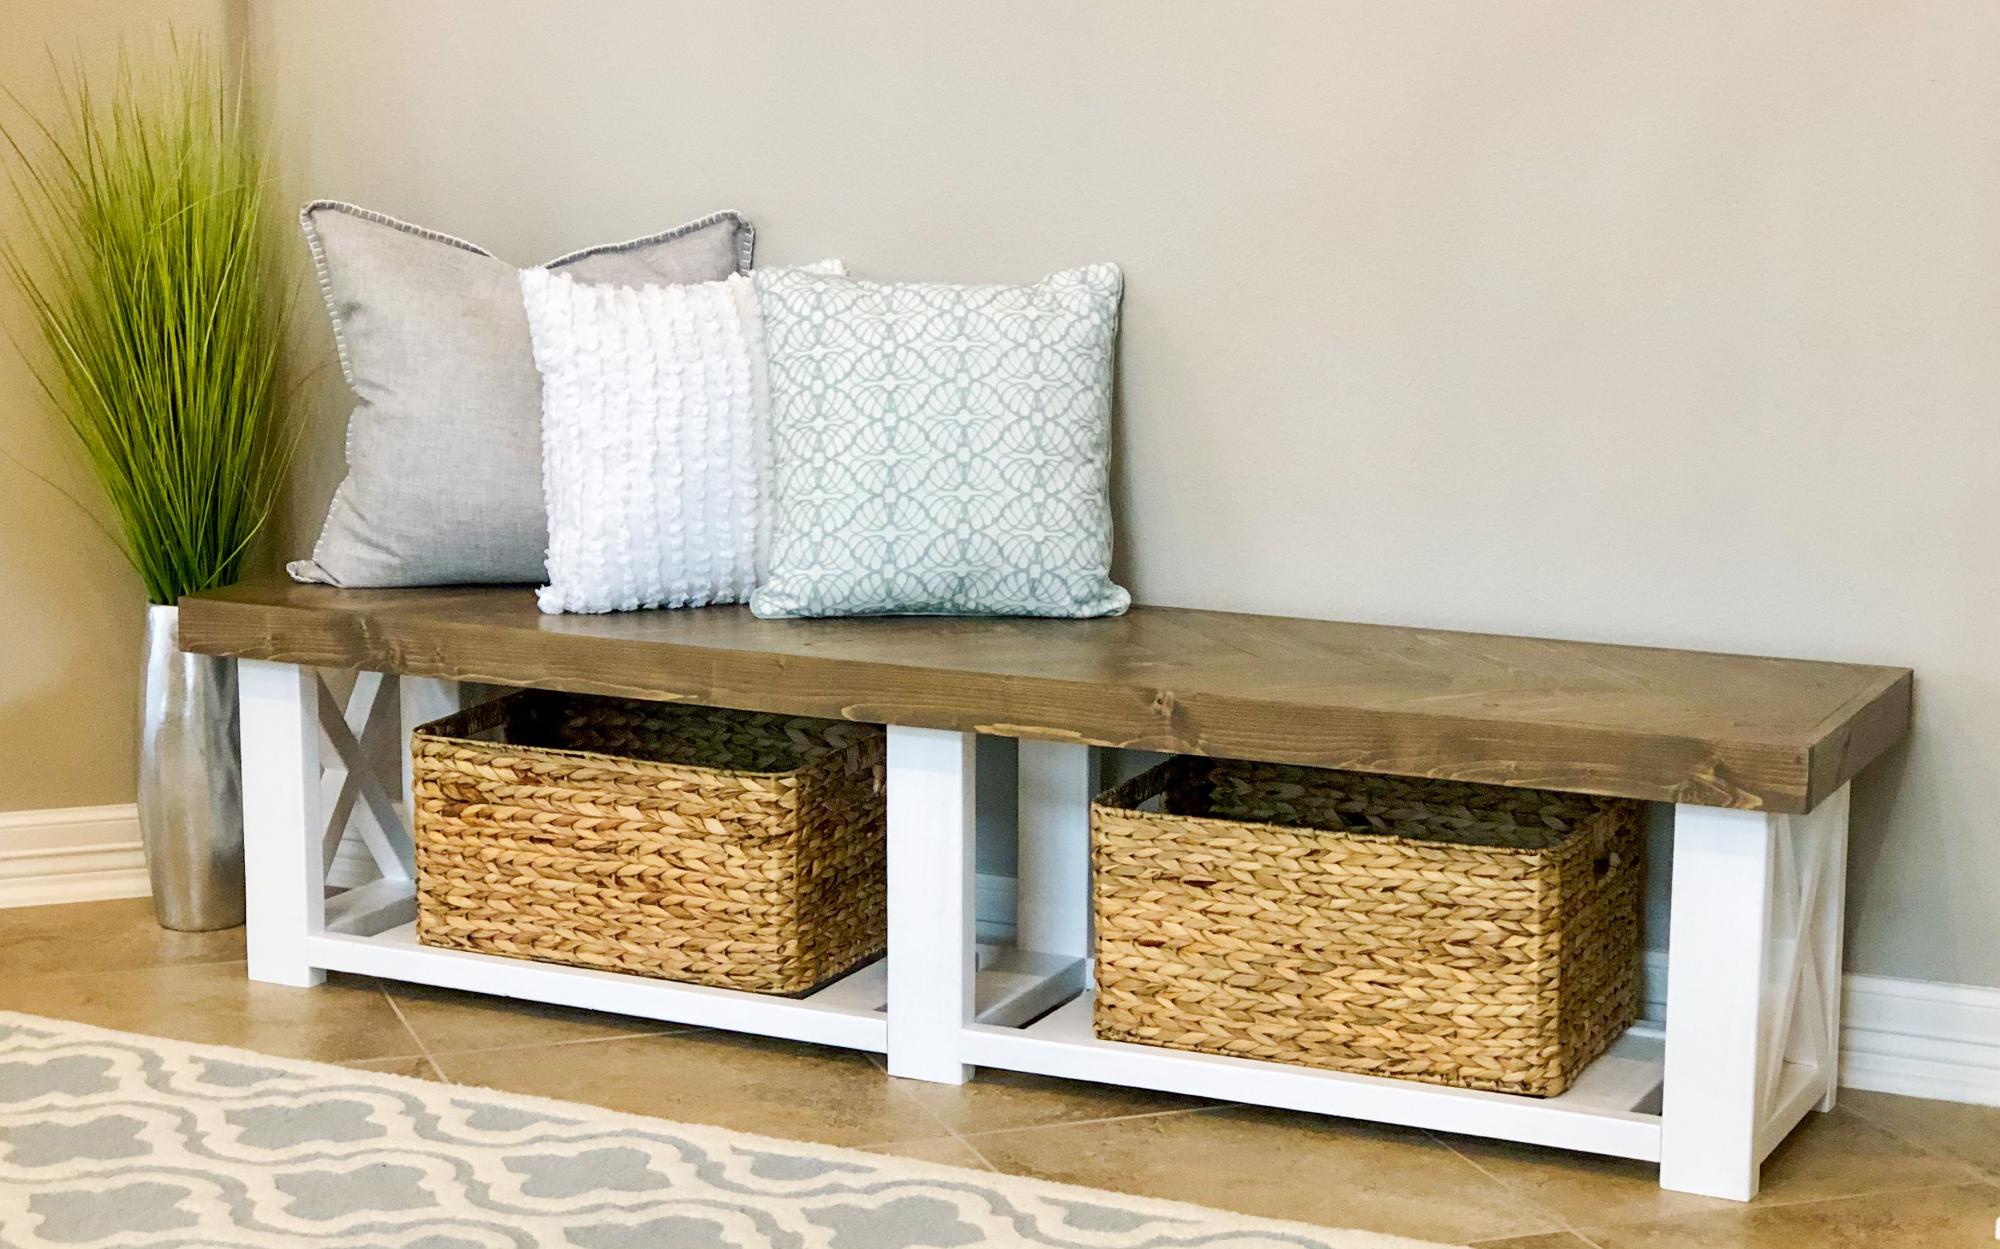
Built using the base plans from Ana's Rustic X Bench but added a herringbone top to it.
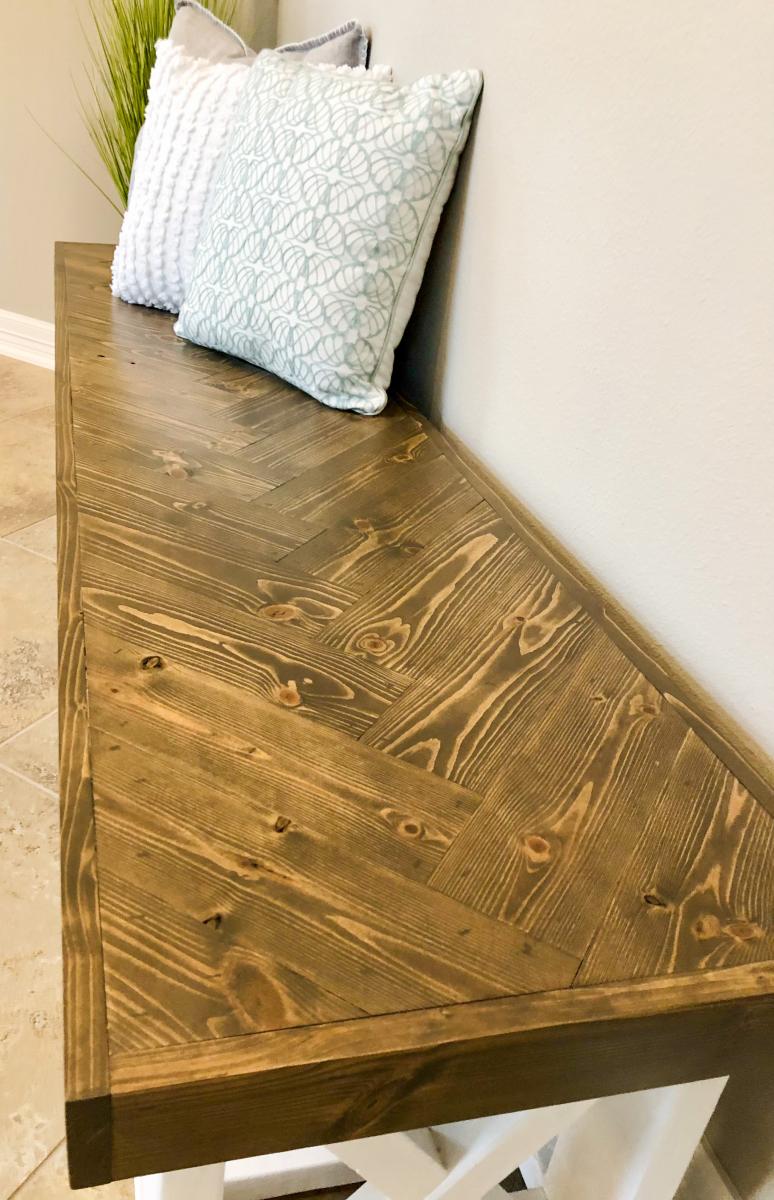
Built from Plan(s)
Finish Used
Used Varathane "Brairsmoke" for the bench top and satin white paint for the base.
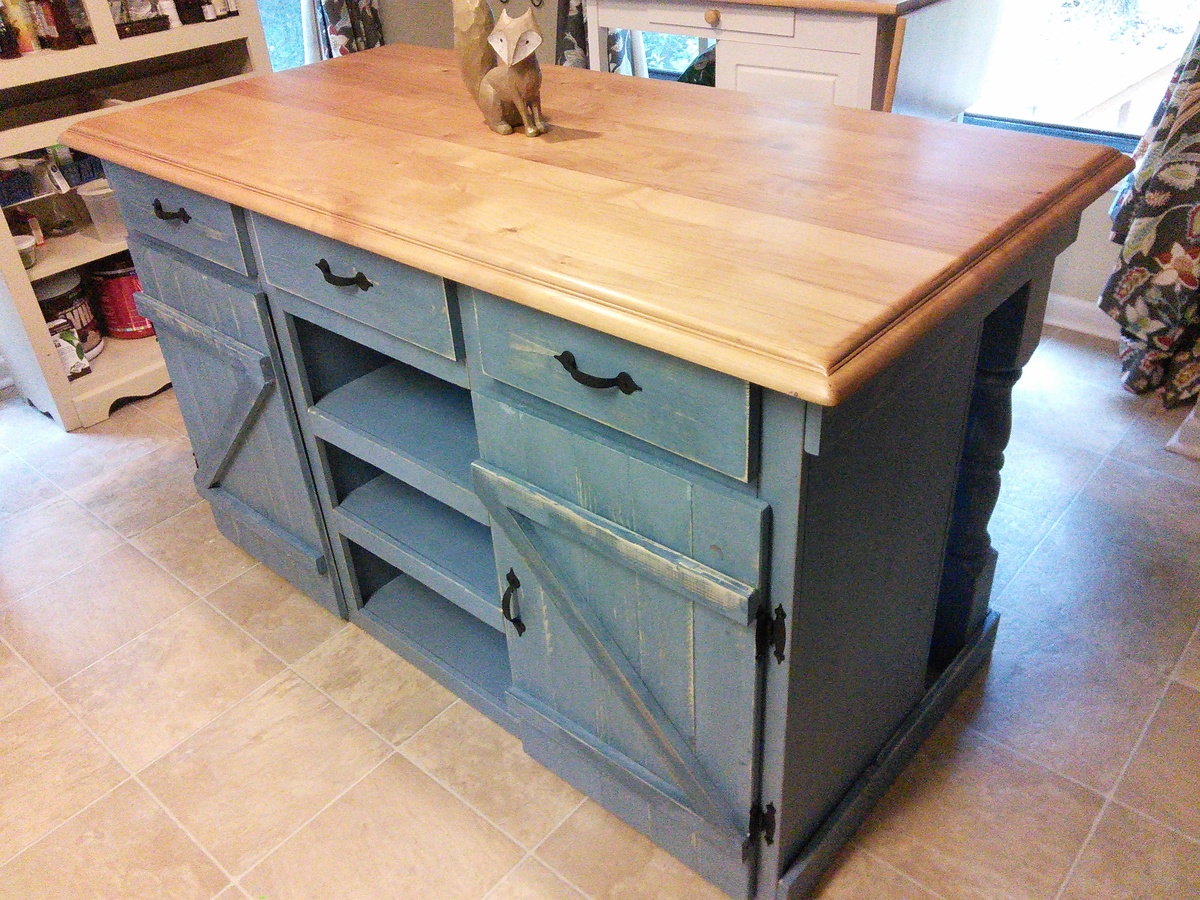
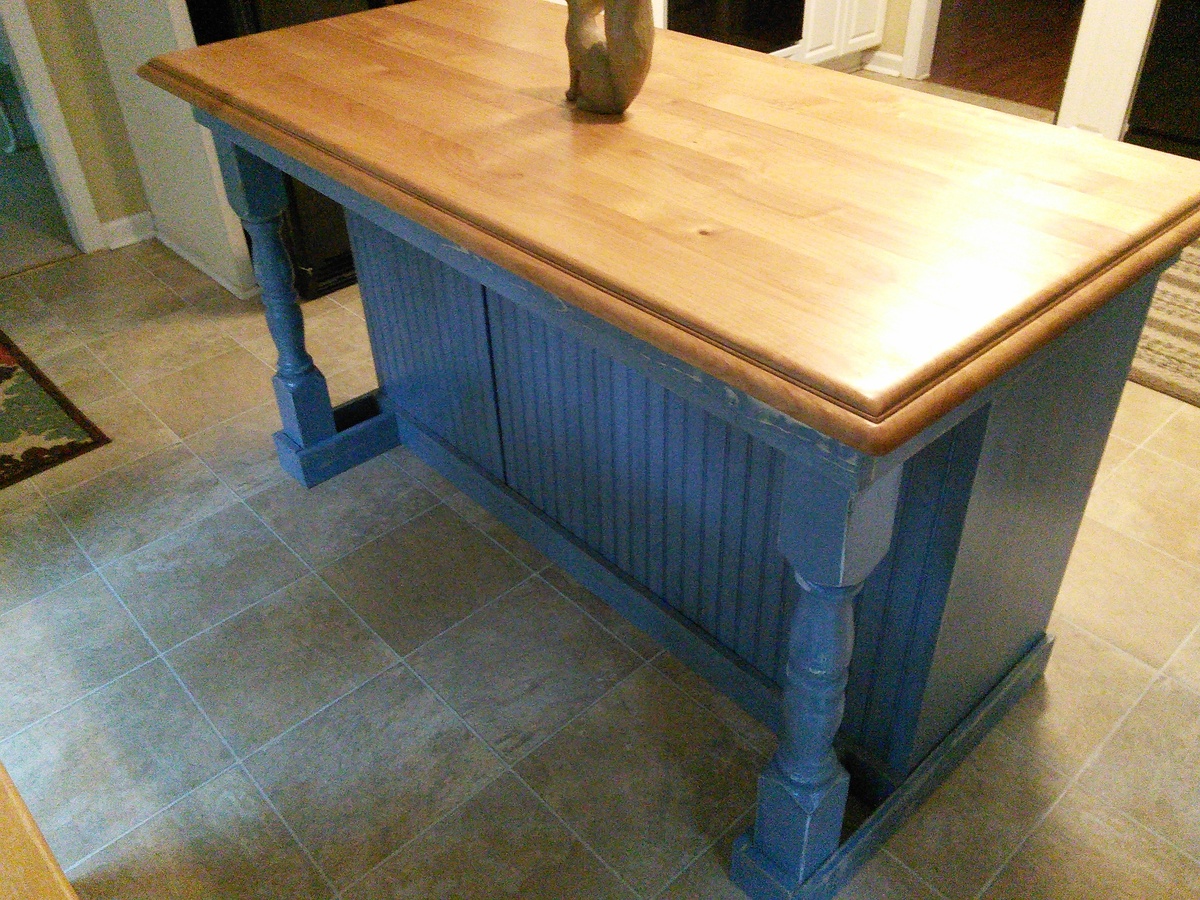
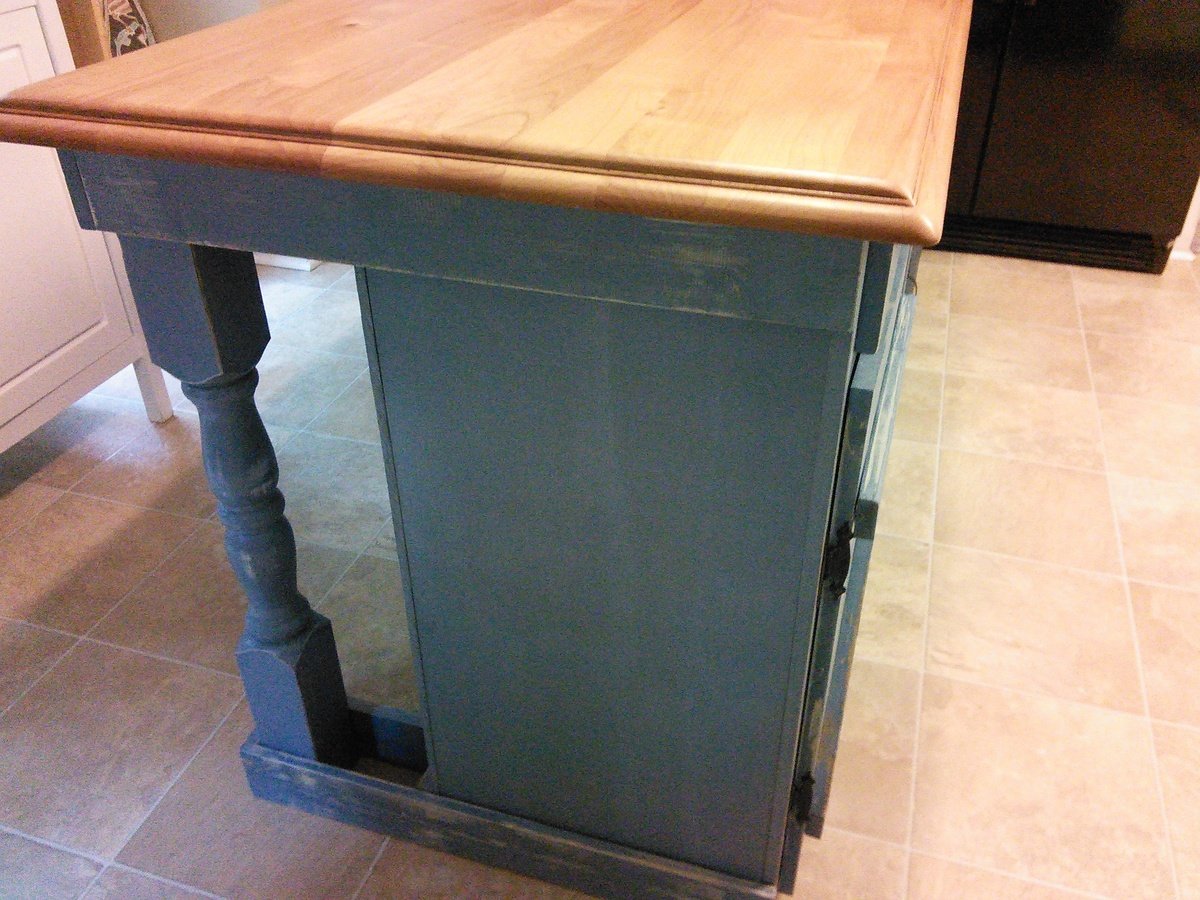
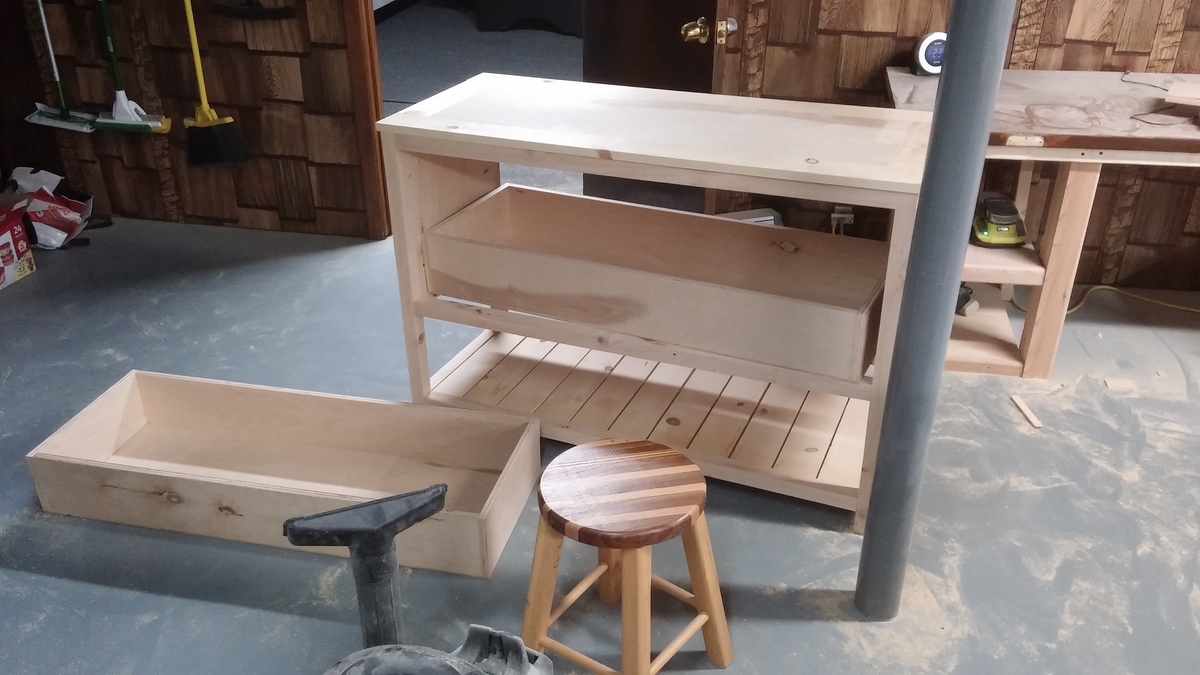
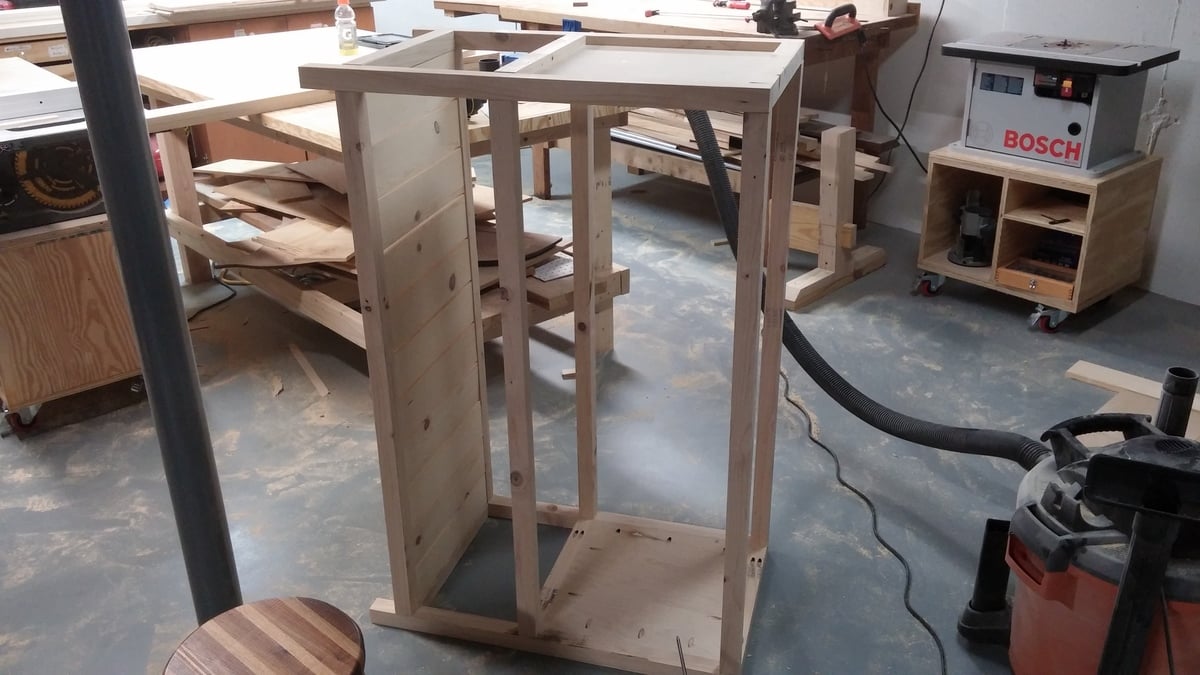
Kitchen Island with Trash Bin
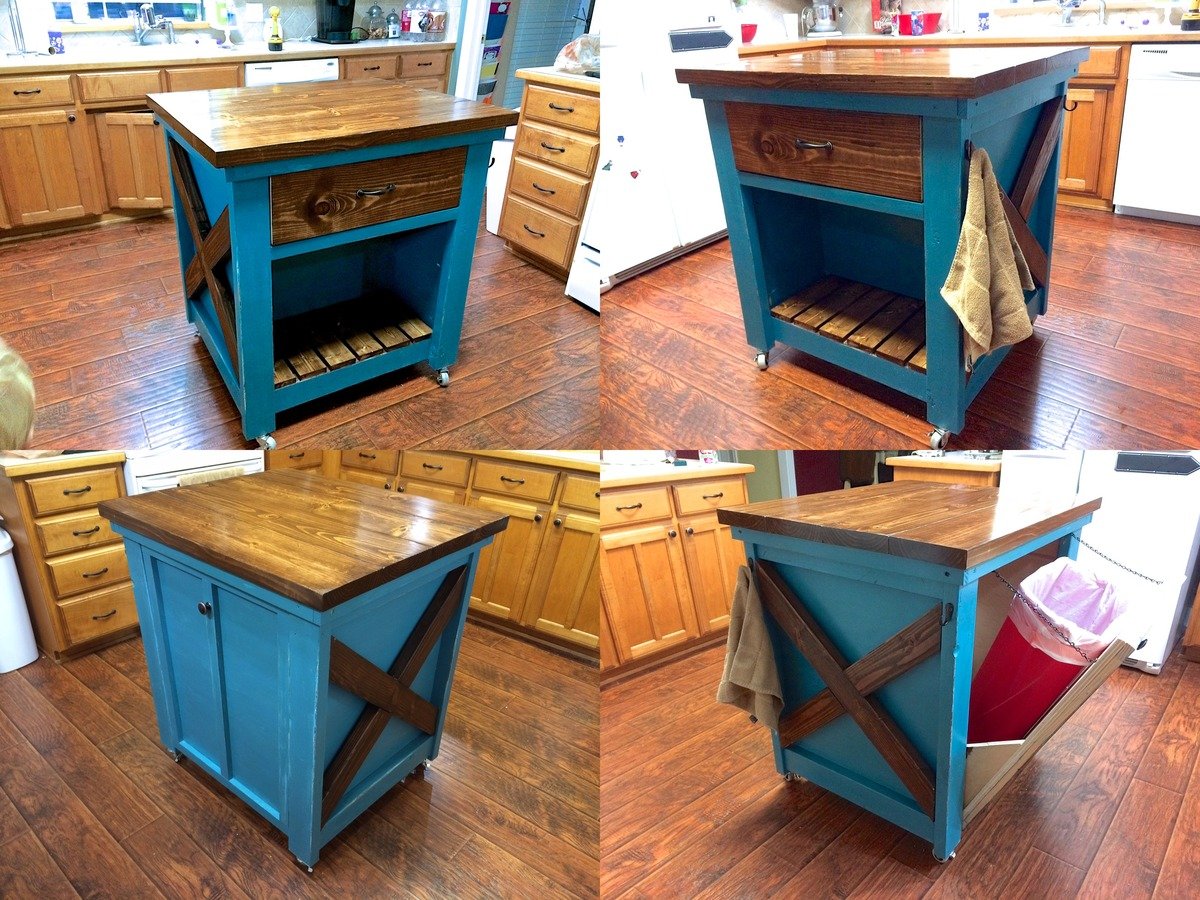
Well this was definitely the most challenging so far because we decided to modify the kitchen island plans to incoporate the tilt out trash bin. Very pleased with the results. Extended the back of the island to accomodate a 11" deep trash bin. Slim trash cans fit perfect. Found a gift wrapping bin for half price after Christmas and it is a perfect fit and 13 gallon bags fit great.
The x's were definitely a challenge because it changed the angles and it would have been best to just mark it with the board before finishing the whole box.
Now we just need to paint the cabinets and change the countertops and paint the kitchen walls. Not happening anytime soon, but at least the island is done.


Built from Plan(s)
Estimated Cost
$120 approximately - This included some hardware.
Estimated Time Investment
Weekend Project (10-20 Hours)
Finish Used
Used dark walnut stain for top, drawers, and underneath slats.
Did a very minimum distressing to edges of the turquoise pieces.
Did a very minimum distressing to edges of the turquoise pieces.
Recommended Skill Level
Intermediate
Comments
Mon, 01/05/2015 - 19:18
Thanks Ana! We love your site
Thanks Ana! We love your site. We've never built anything before finding it a couple months ago and now we can't stop.
Comments
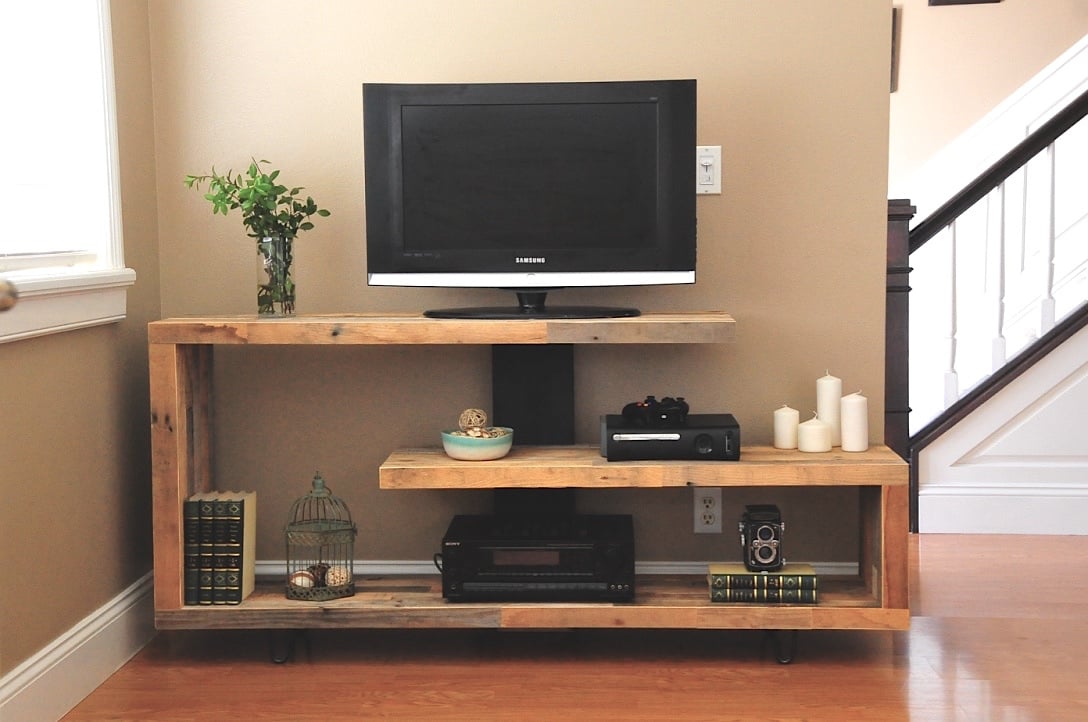
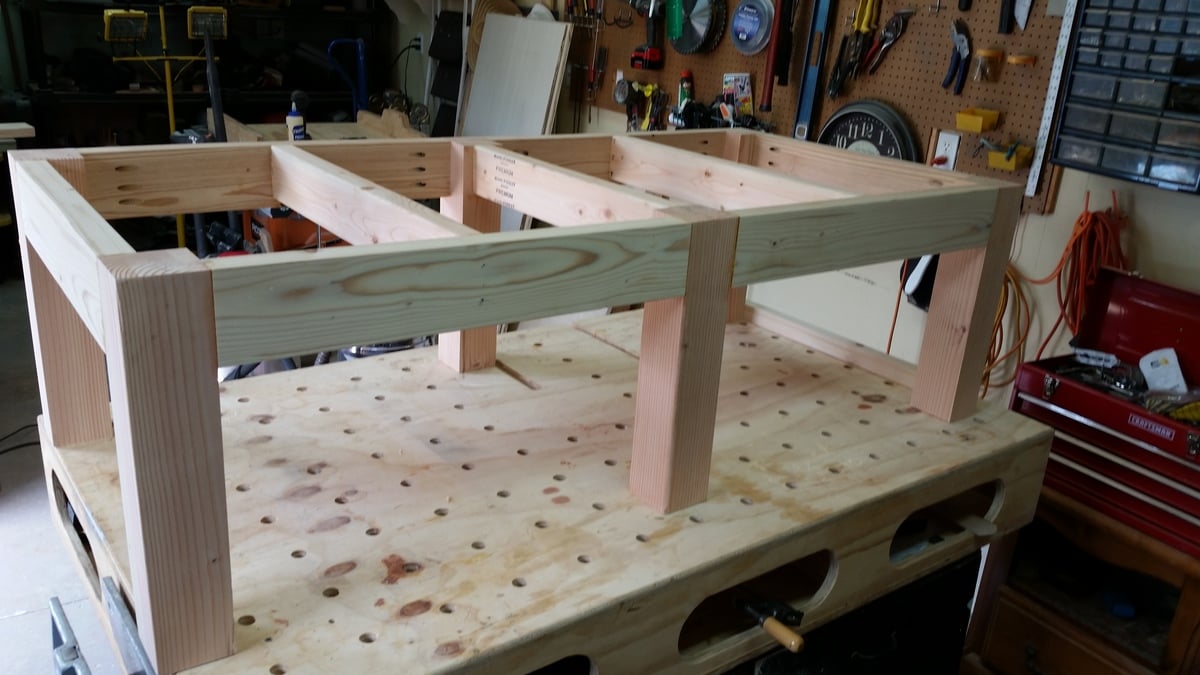
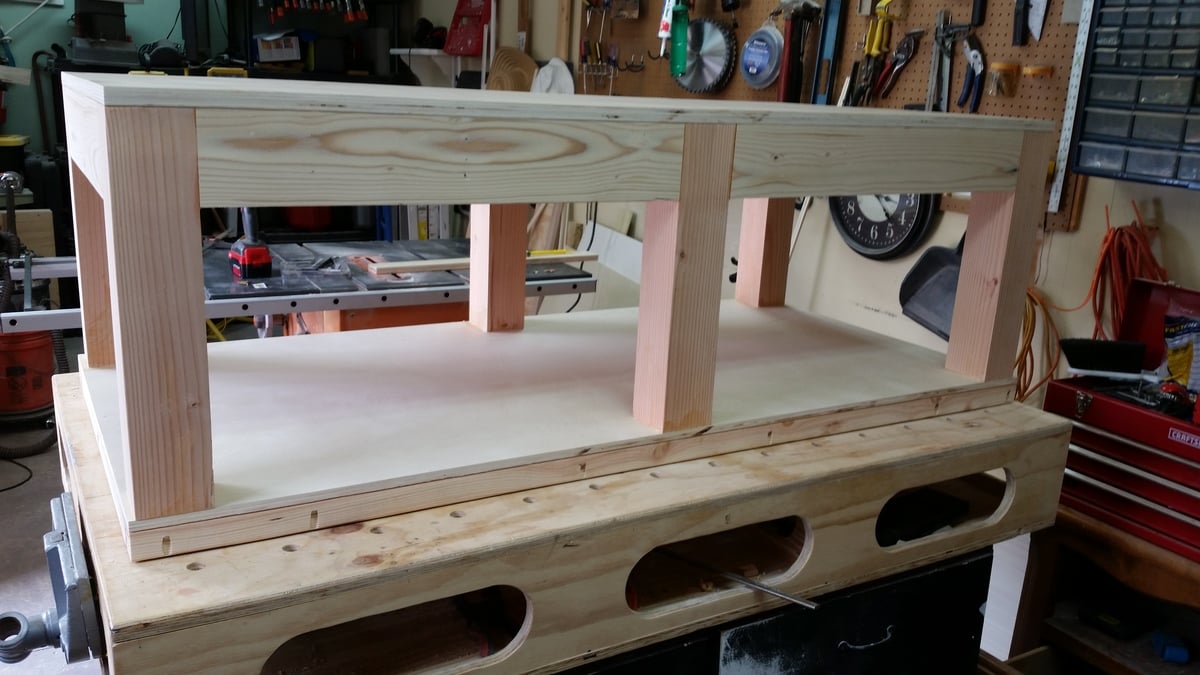
Ana White Admin
Sun, 09/06/2015 - 11:40
You did it again!
Knocked it out of the park with this one Brad! Love!!!
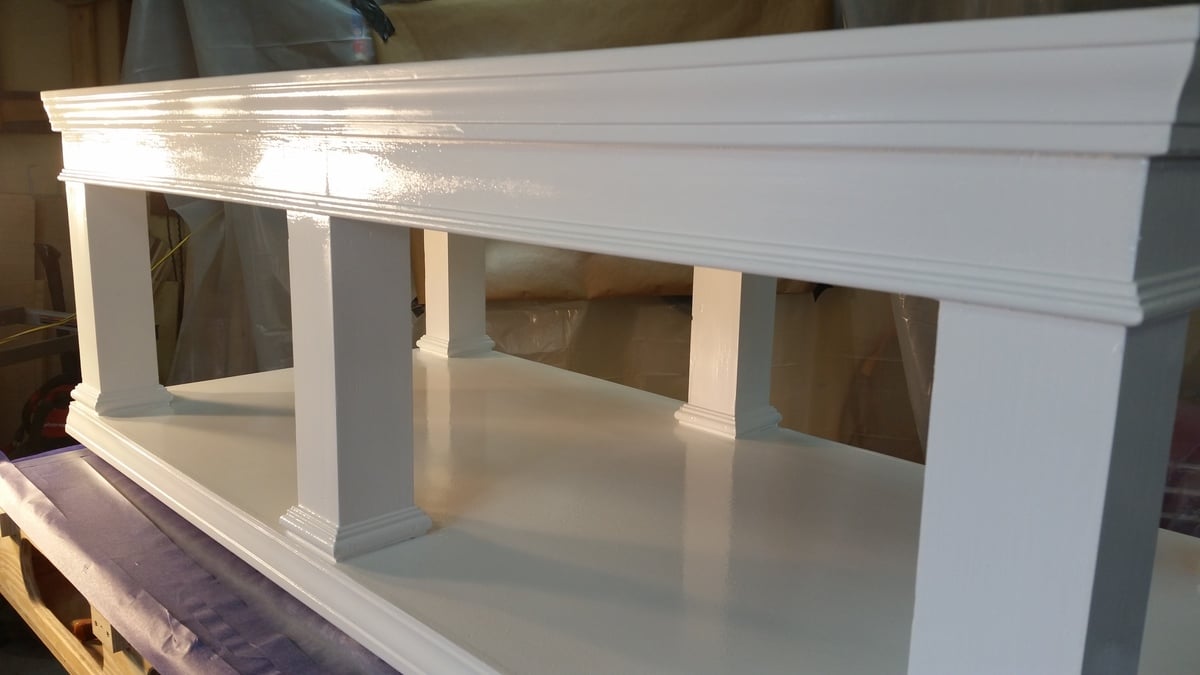
roshangautam
Mon, 11/23/2015 - 07:49
Missing Plan
Can't find the DIY plan here ? Am i missing something ?
Templar
Mon, 12/02/2019 - 22:10
Hi there Im new to site and…
Hi there Im new to site and also have the issue of not seeing the plans for this Rustic Modern TV Console. Are they available and Im doing something wrong or??
zoneoneboy
Sat, 06/27/2020 - 05:03
No Plans for "Rustic Modern TV Console"
I am logged in and I do not see the plans for the "Rustic Modern TV Console"