Simple DIY Desks by Bob The Builders Wife
"I built these from @anawhitediy plans online. Love how they came out. Super cute style too. I've been selling them online to support my DIY habit." Monica
Built from Plan(s)
"I built these from @anawhitediy plans online. Love how they came out. Super cute style too. I've been selling them online to support my DIY habit." Monica
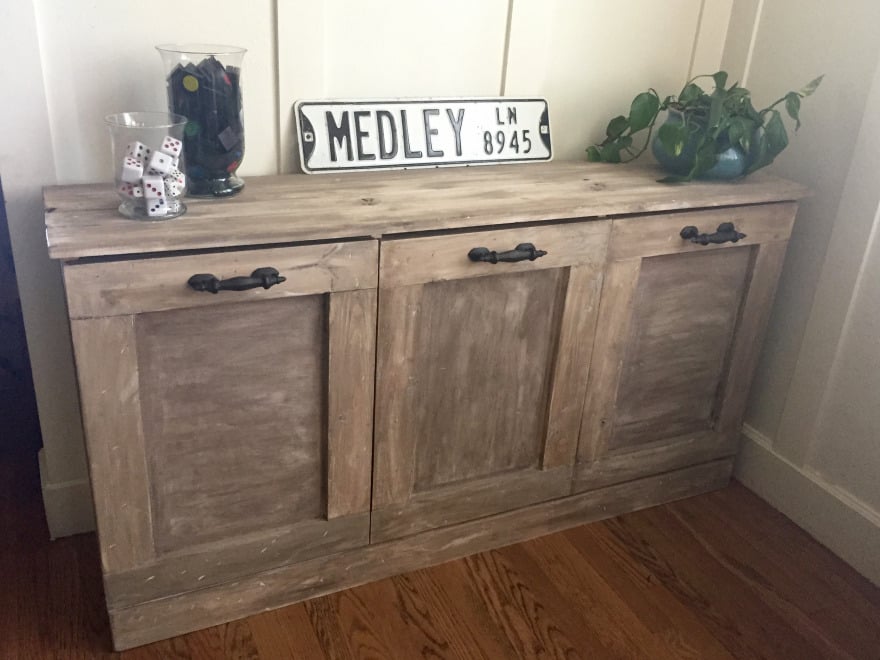
My laudry never looked so good! I love these plans from shanty2chic and anawhite. I spent a few days in the garage building, and now, my laundry can be hidden away in any room of my house.
Thanks shanty2chic and anawhite for your excellent plans.
http://www.shanty-2-chic.com/2014/08/diy-laundry-basket-dresser.html
http://www.ana-white.com/2011/04/wood-tilt-out-trash-or-recycling-cabin…
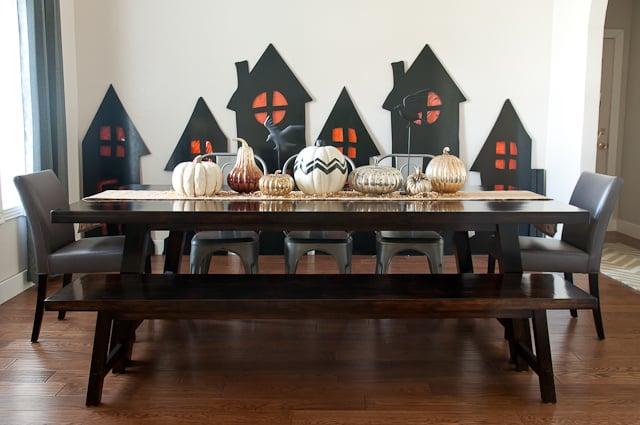
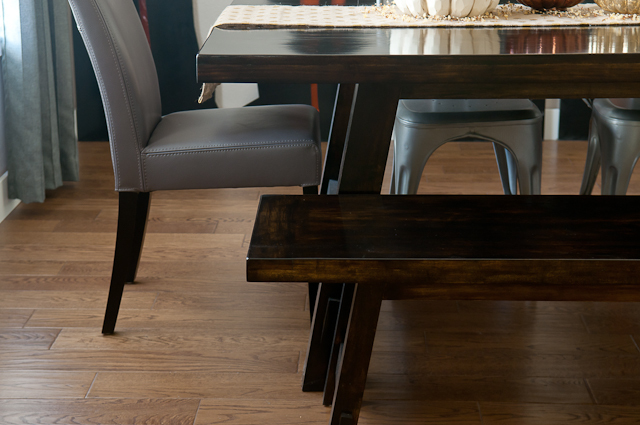
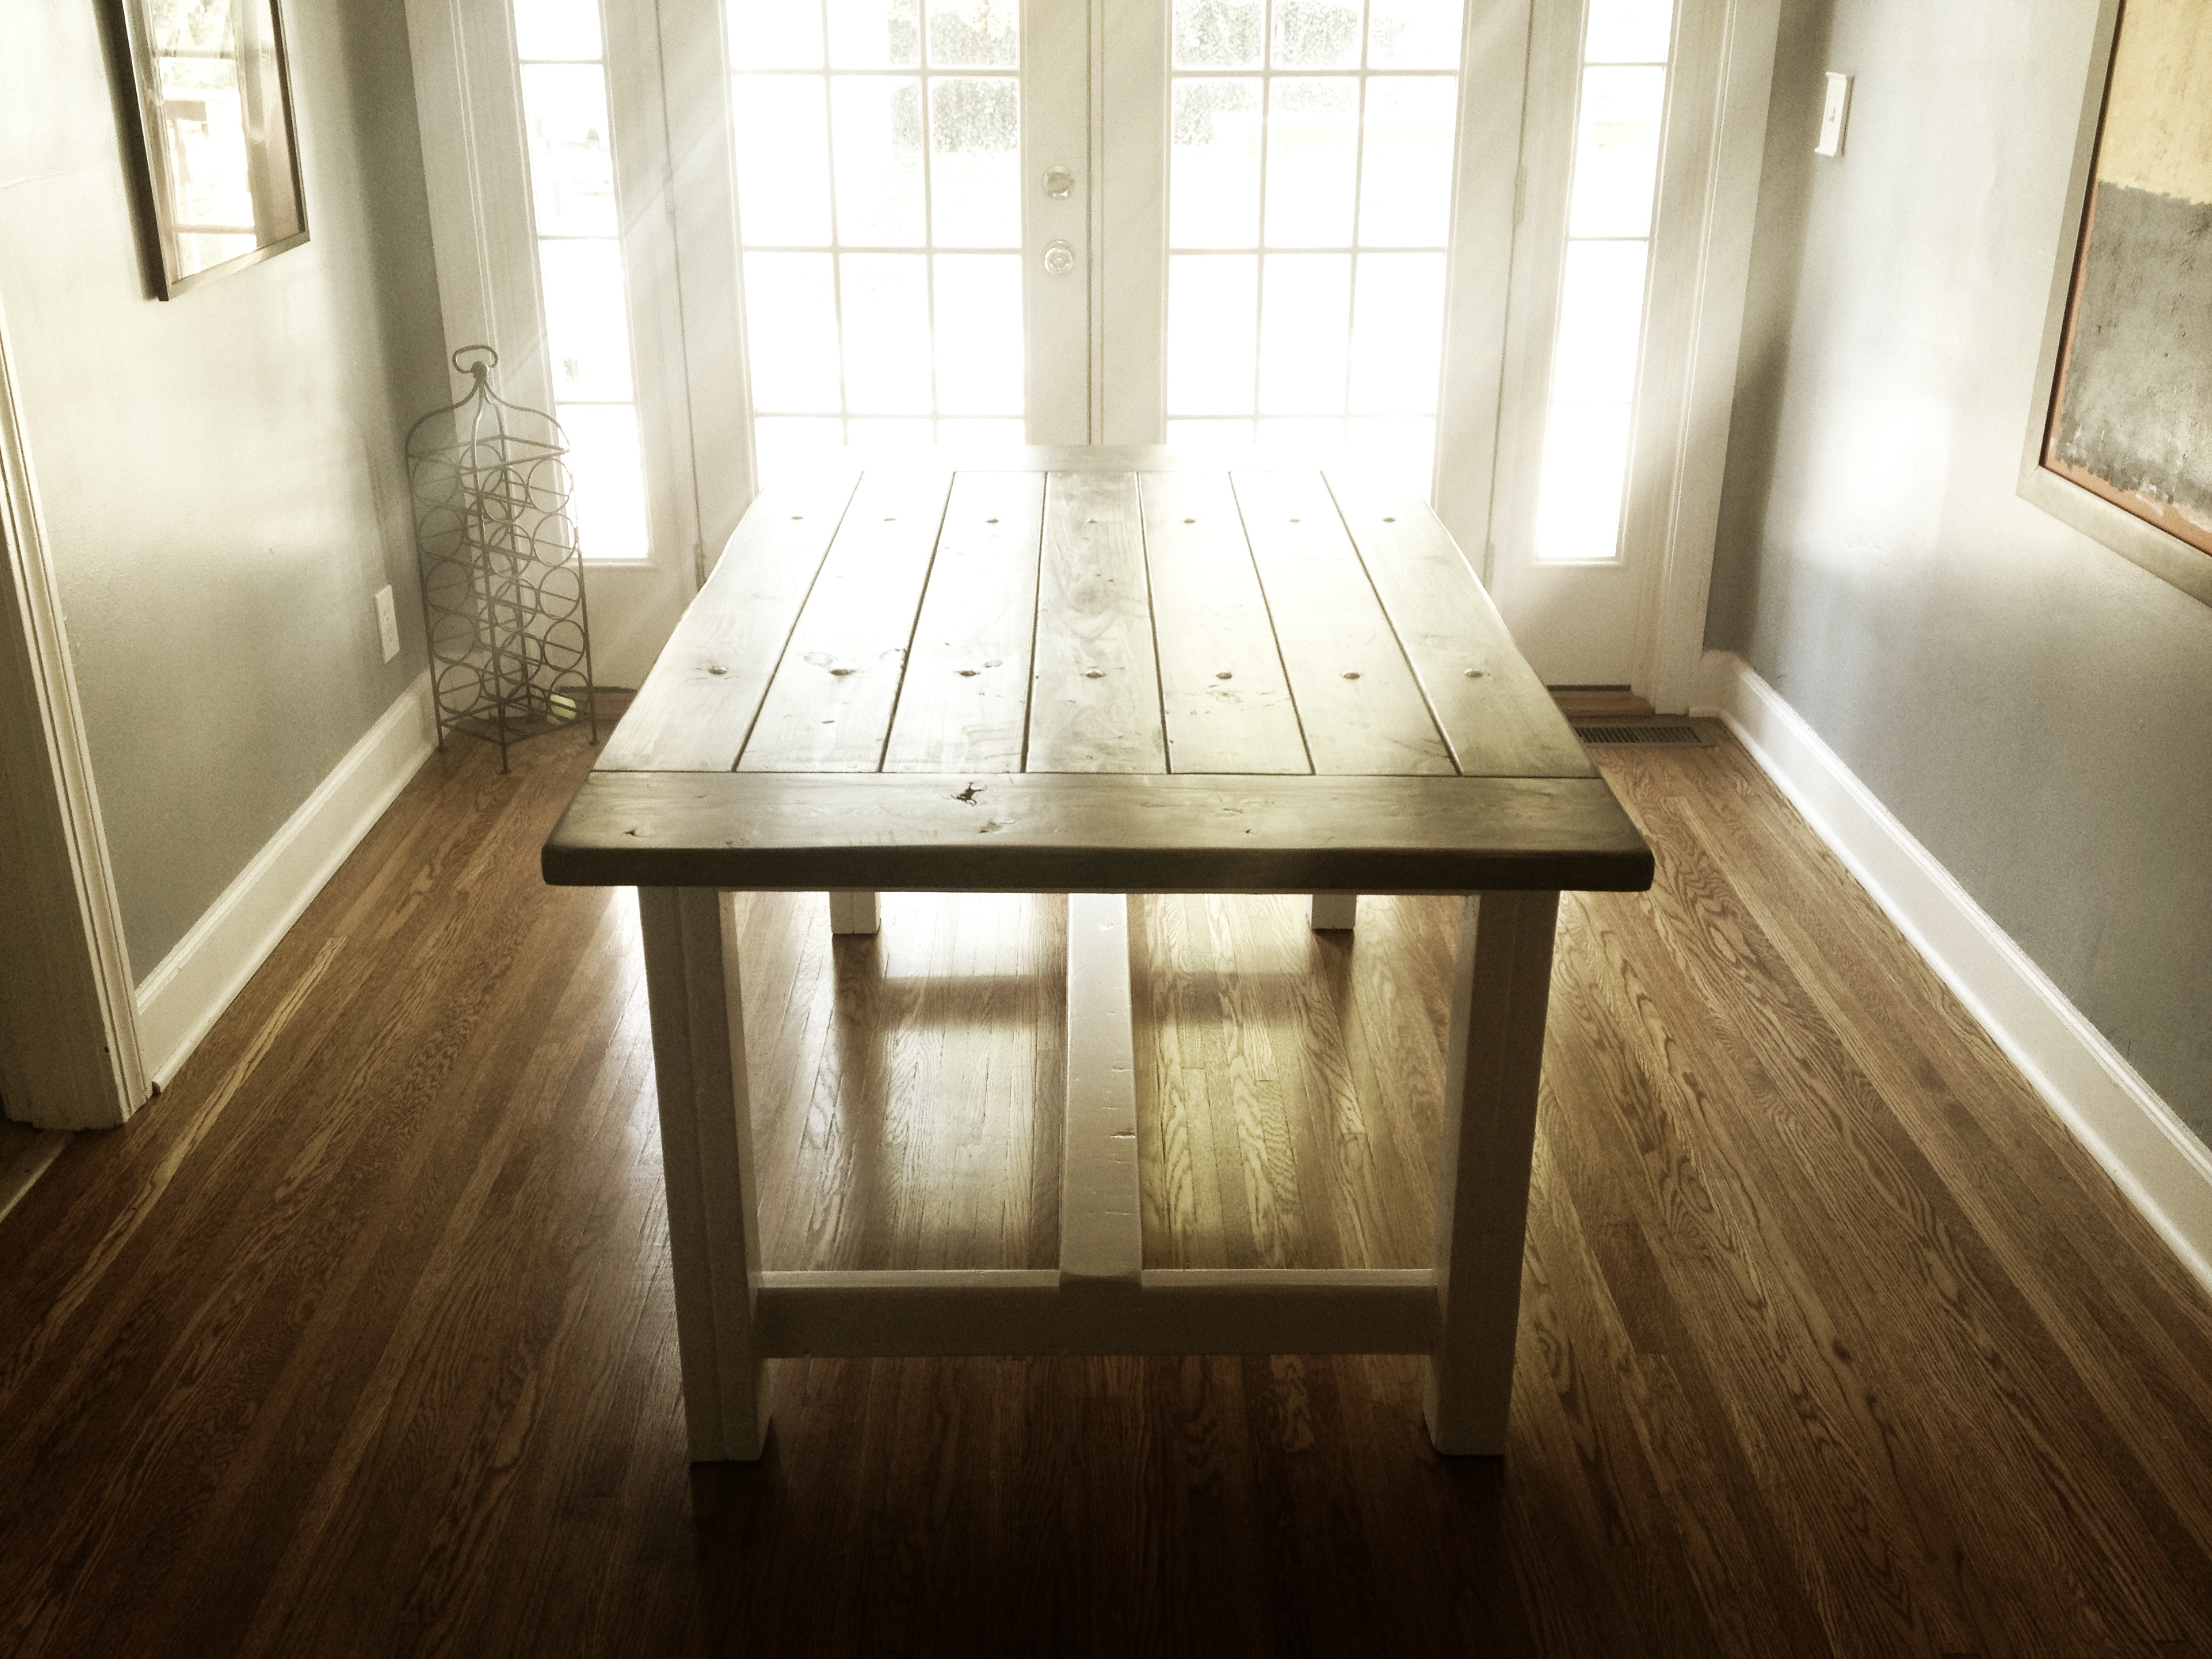
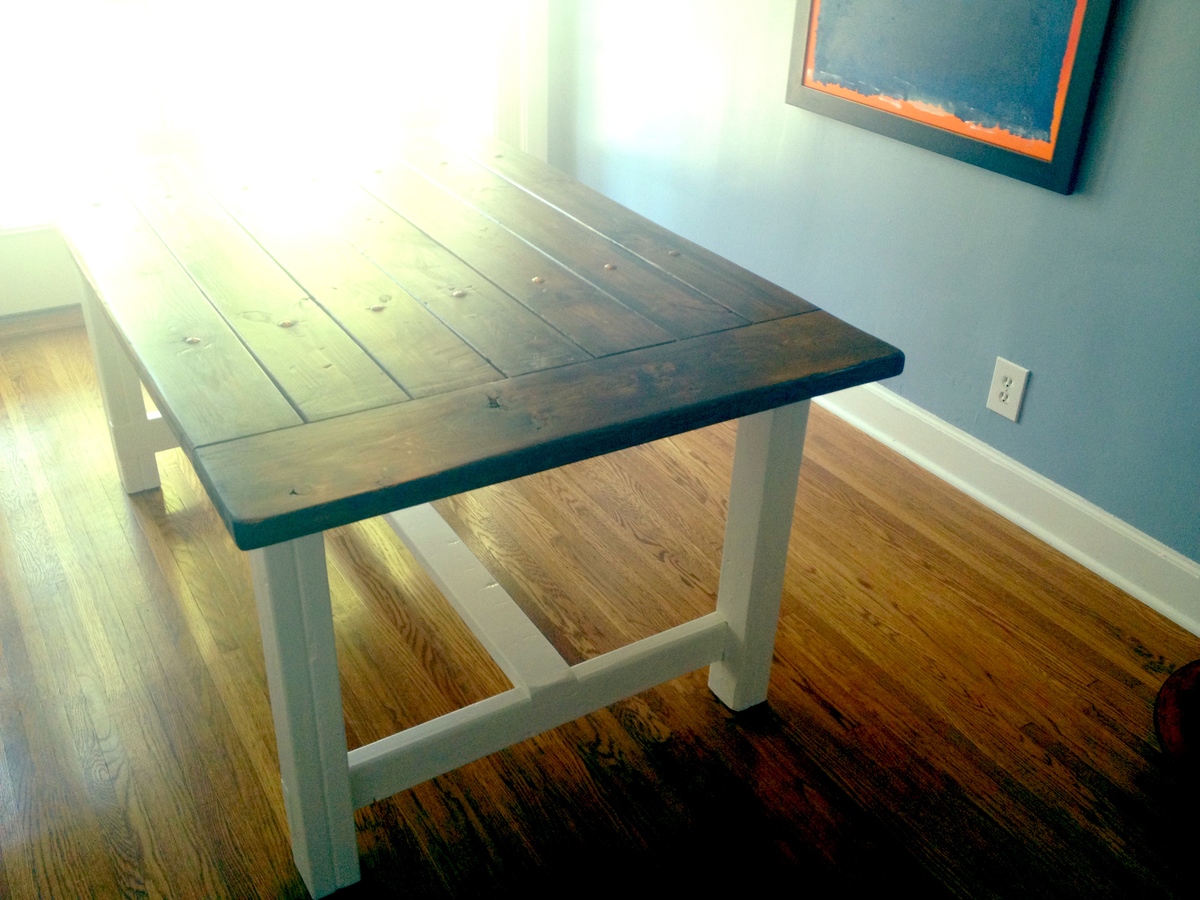
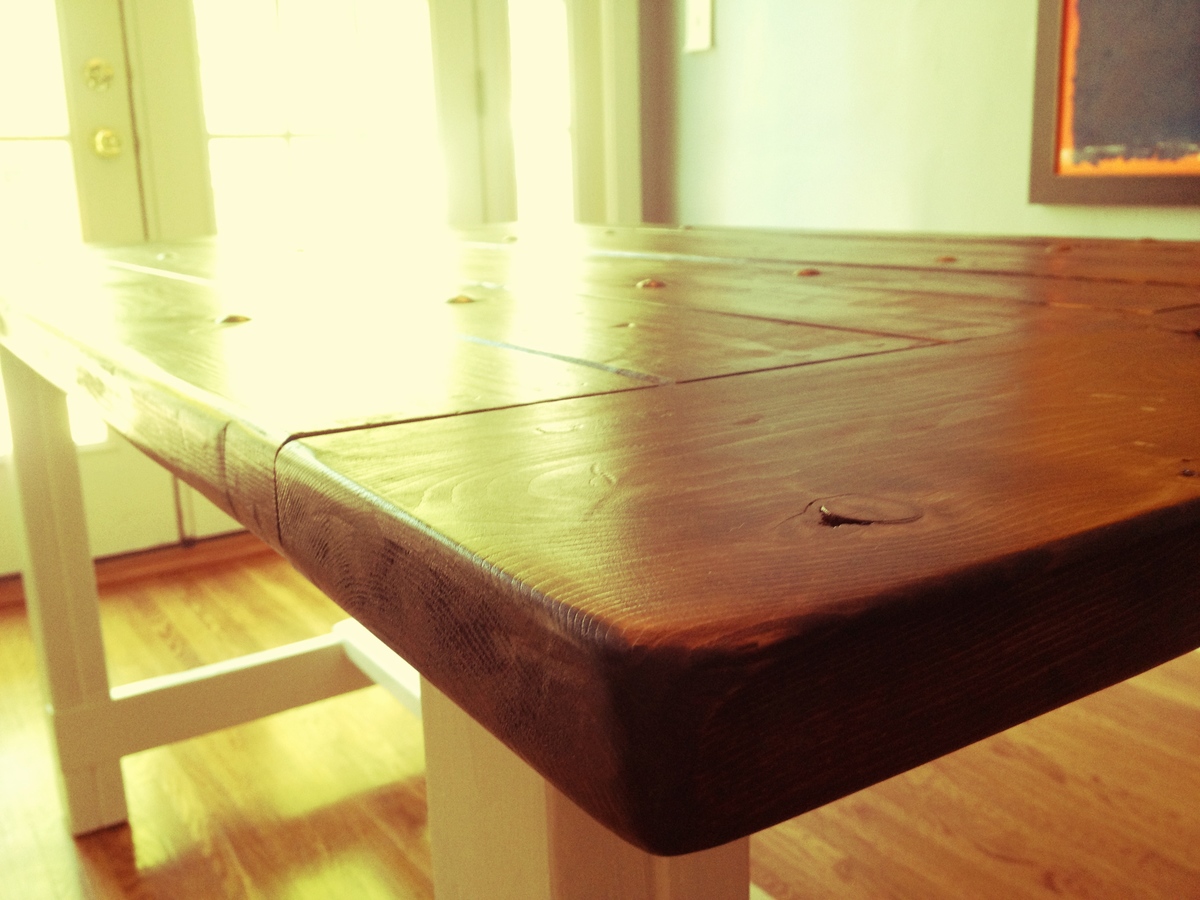
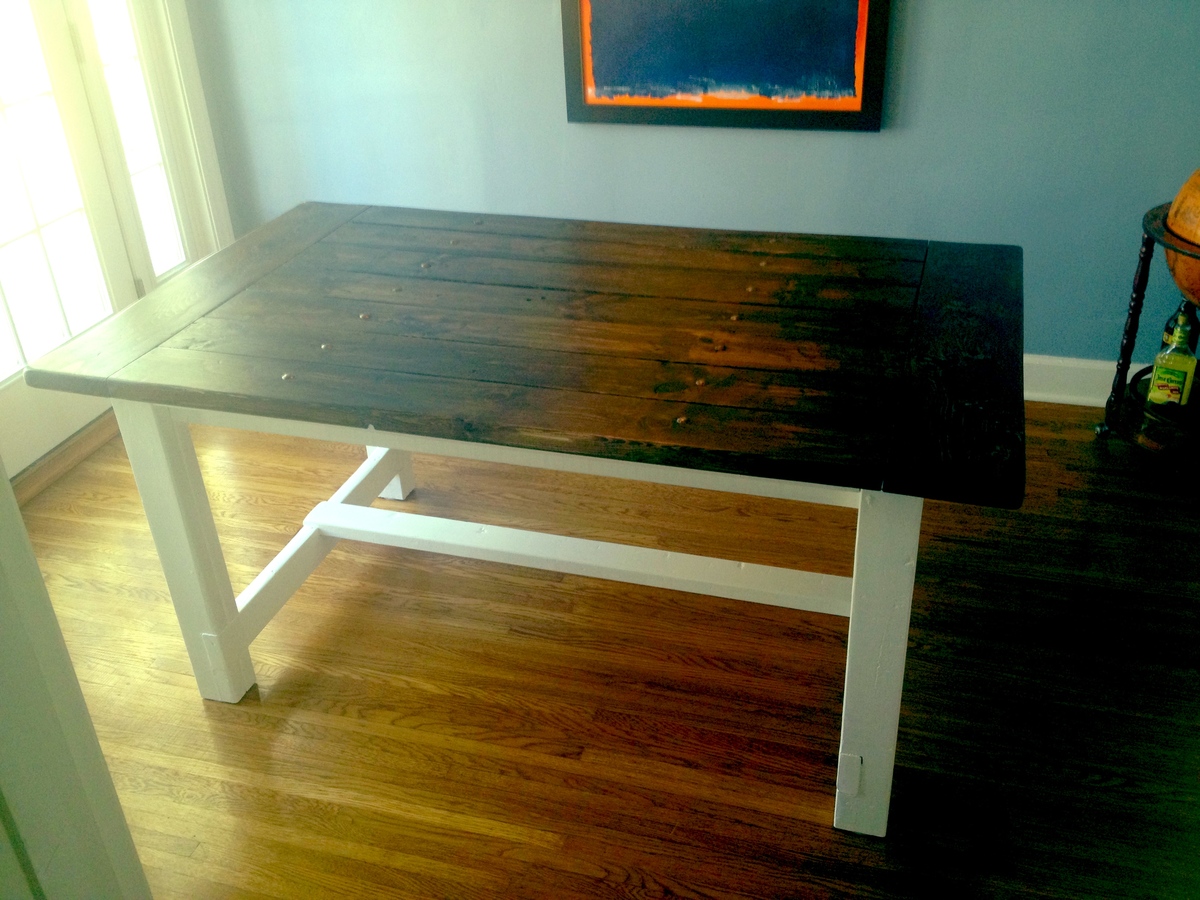
My husband says I have impeccable timing with all of my projects – I say there’s never a bad time to start a project! Case in point – my farmhouse table. I was five months pregnant visiting my parents in Idaho (I live in Arizona) and I decided that it was a good time to finally build the table I had talked of for two years. There’s no time like the present, right? My dad questioned my ability to get the table back to AZ safely, but I threw caution to the wind and would figure it out later! I built the table and matching bench out of hard maple and followed plans based on the Pottery Barn Benchwright series. I had never worked with hardwood before and there was definitely a learning curve. Luckily my dad had some experience with hardwood and he was able to lead me in the right direction. I pieced together the table top and bench top, and then assembled the legs, but kept them unattached from the table top. I built a wooden frame to transport the table to Arizona and attached it to the top of my car. In the heat of an Arizona summer, I proceeded to finish the table by staining it with an espresso stain from Minwax and then attaching the legs. Finishing projects like this always take more time than I anticipate and this table was no exception. After days and days of staining and days and days of drying, I sealed it with a wipe on poly. I lost count of how many coats I applied, but I know it was more than 15. Yes, 15. Wiping it on doesn’t apply a thick layer, so I did a lot of layers. I had to protect it from my 4 kids! I finished just a few weeks before I had the baby. Timing is everything. :) To see more details on the project check out my blog at lifewithfingerprints.com


Mon, 12/02/2013 - 07:33
Looks Great! I've built a few of tables of this same style and love them. What thickness did your top end up being?

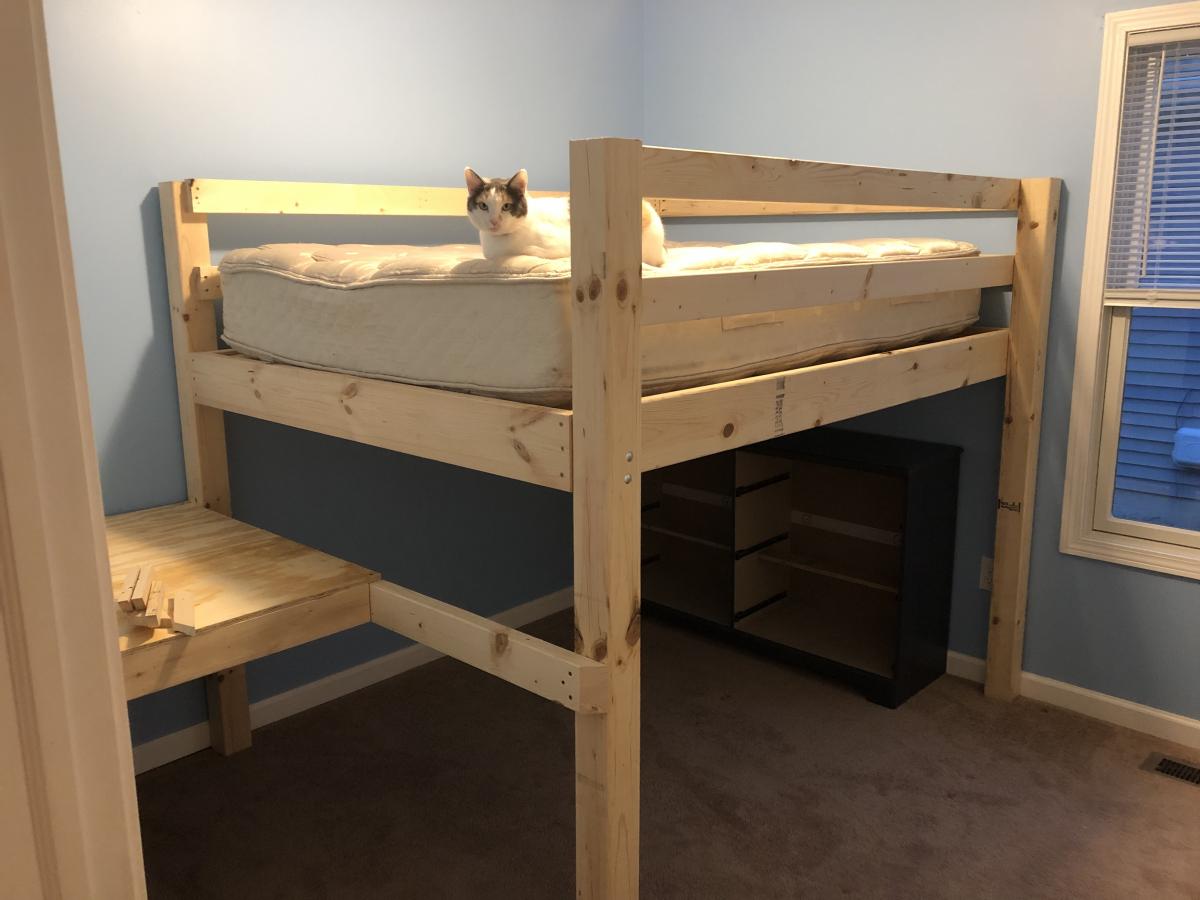
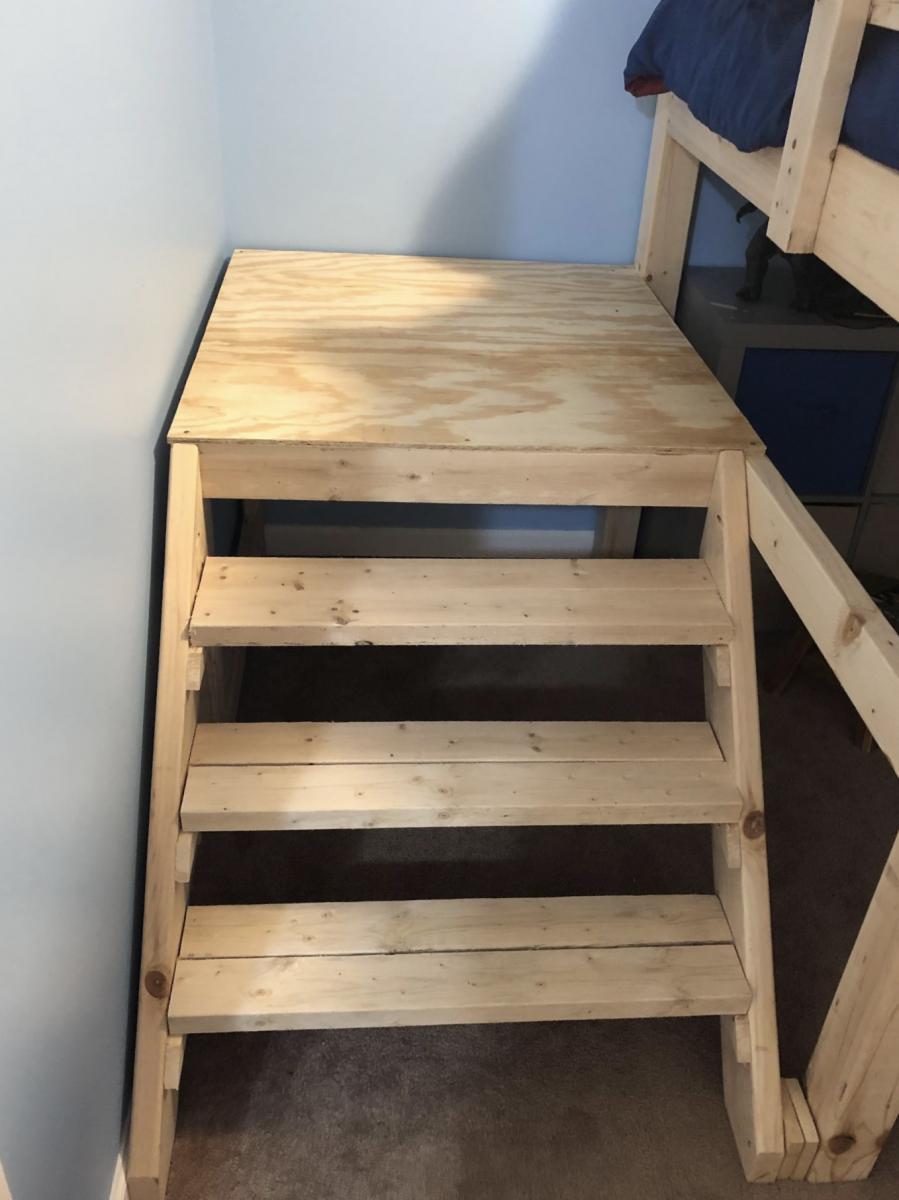
Built a full size loft bed for my kids but wanted something safer than having them climb up and down a ladder so used the Camp Loft Bed plans to add the platform and stairs. It is much easier for the kids. Going to finish by covering the platform and stairs with carpet.

Wed, 10/02/2019 - 09:51
I really like how the platform is only half way so the stairs are inset, this is very smart and good use of space.

The Ana White corn hole board plans were straightforward and easy to understand. Building was a breeze. Our boards turned out great!

The cover is a tonneau cover for a pickup truck. It's for a 6.5' truck bed so if you notice, I had to ad a 2x4 and one more picket on top to accommodate the extra length.
The cover would add a ridiculous amount of money to the project but it was repurposed. I found it on a truck that was in an accident and going to the scrap yard. I think it it came out great and my grandson loves it.
John

I’m no carpenter but this went well. I did it all with pressure treated because it is in the open. They filled in the area where there used be a hot tub. Surprisingly comfortable, too. Thanks Ana
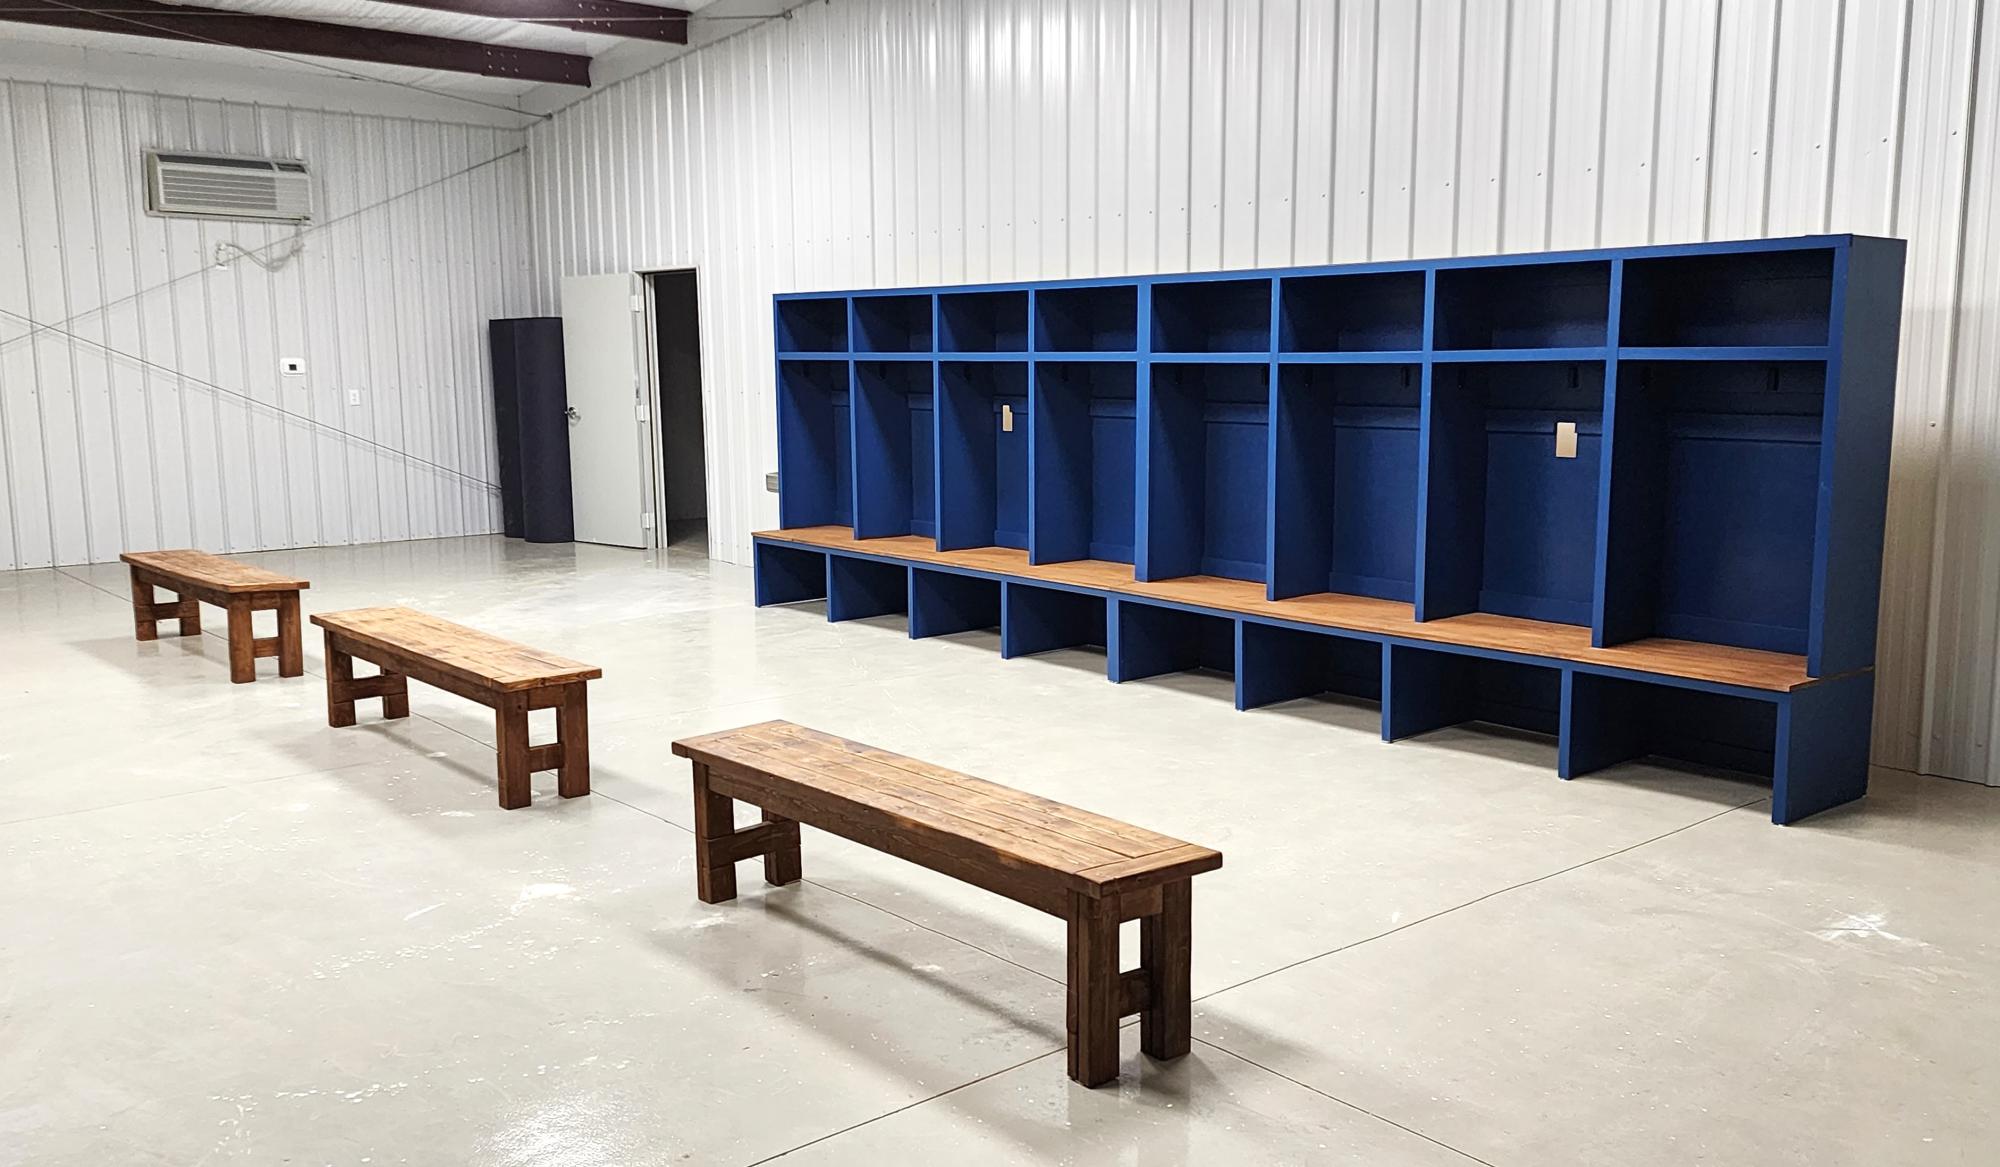
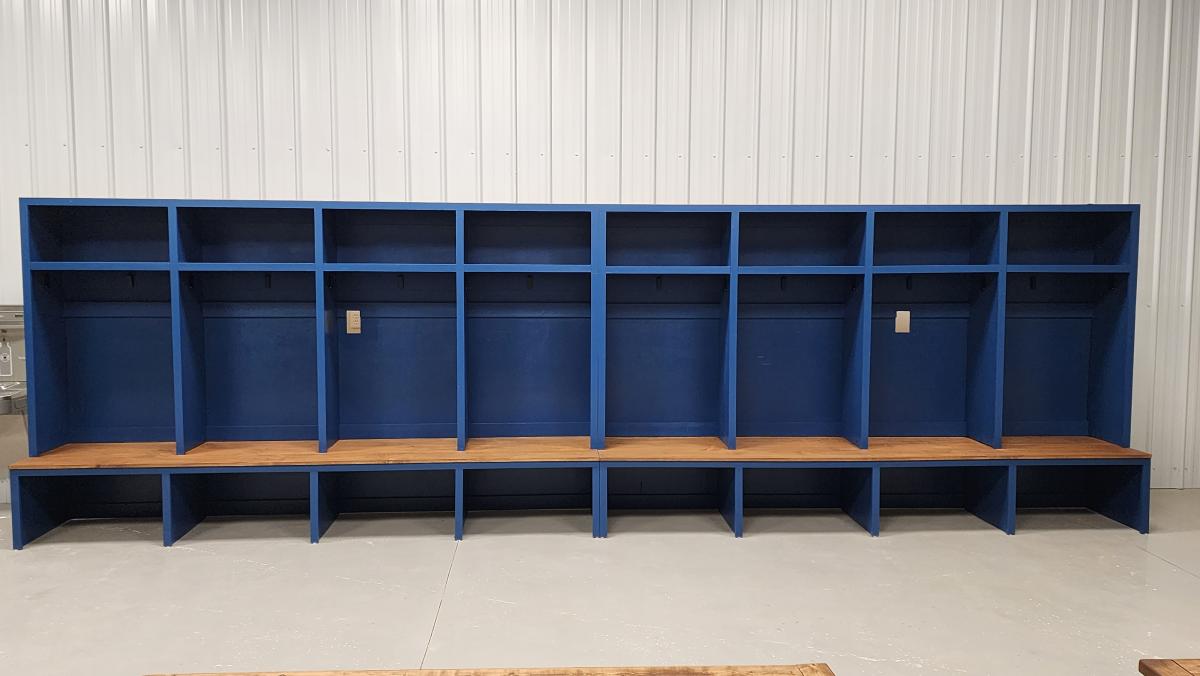
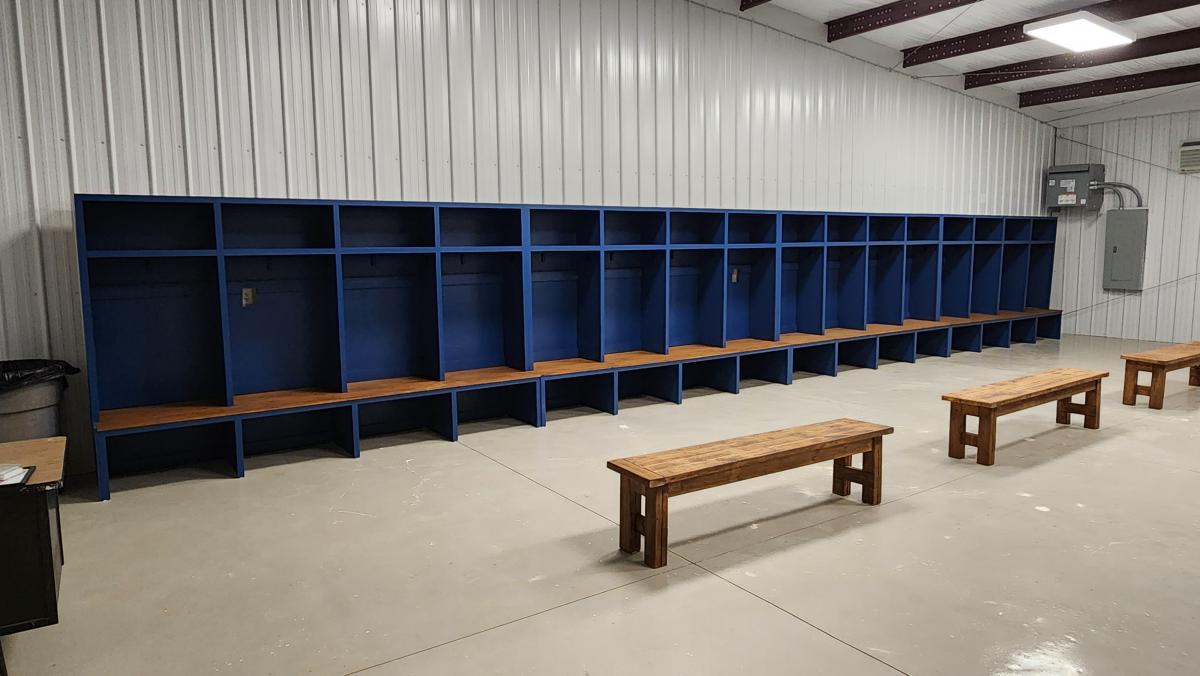
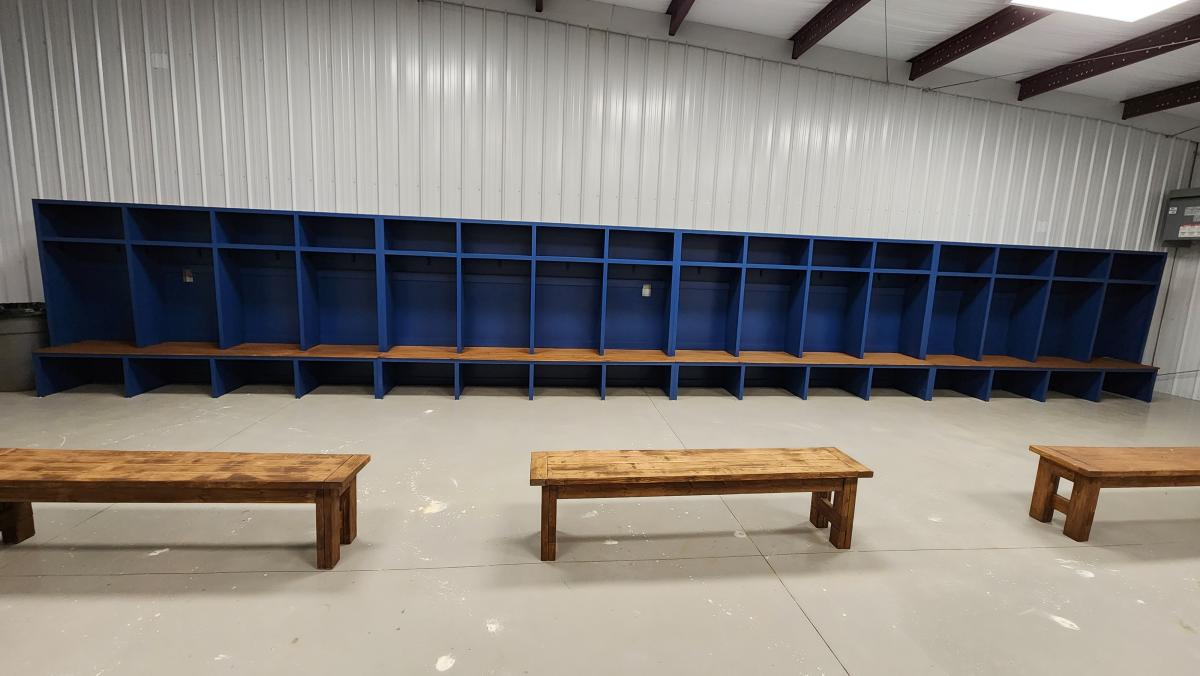
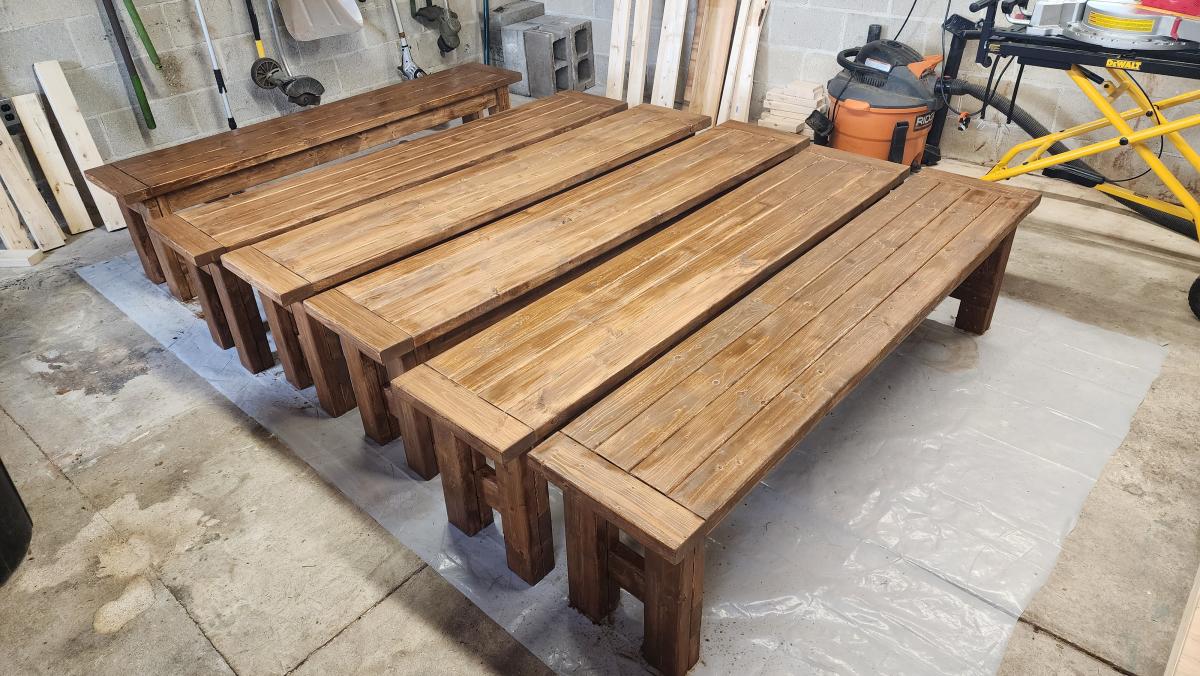
Here are a few pictures of the football lockers I built for our school. I used your mudroom locker plans and changed the dimensions to accommodate the boys' football gear. It worked great! I built 6 sets of 4 lockers, for a total of 24 lockers. I also used one of your plans to build 6 benches for the fieldhouse. Three for the home locker room and three for the visitor locker room. Each locker is 30 inches wide and 6 feet tall.
Melinda Glenn


I decided to go with a live edge mantel. I feel it really compliments my new hardwood floors.
thomasamayberry.com
This is the first thing I have ever built and I love it!
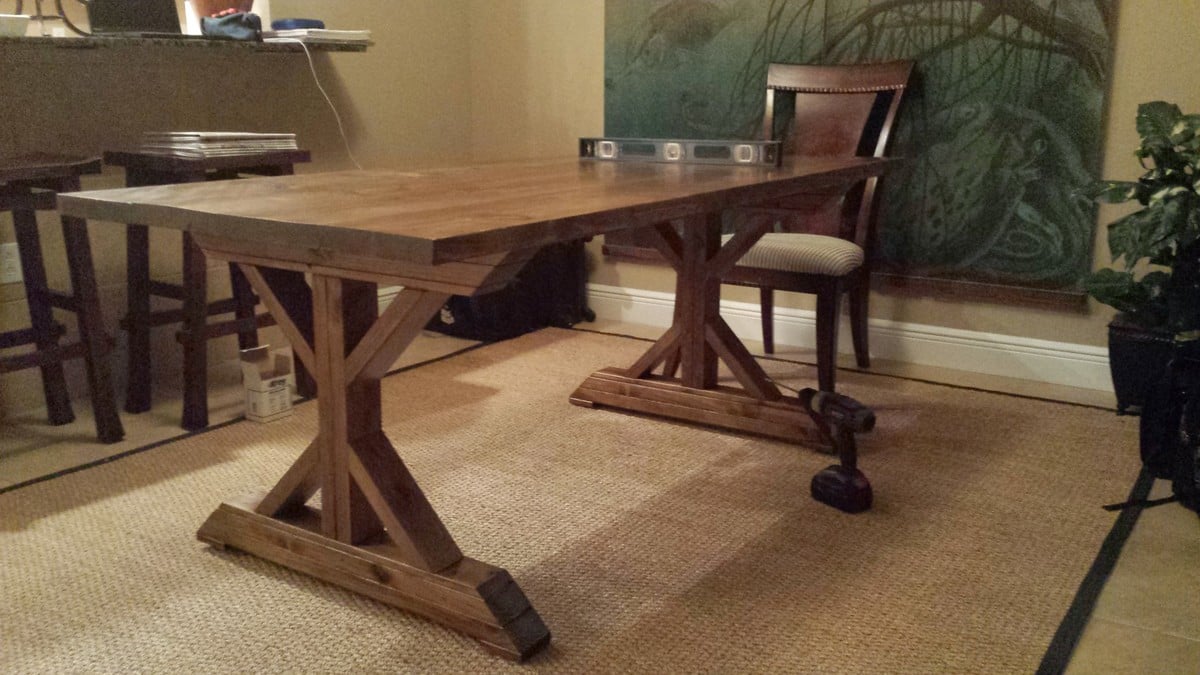
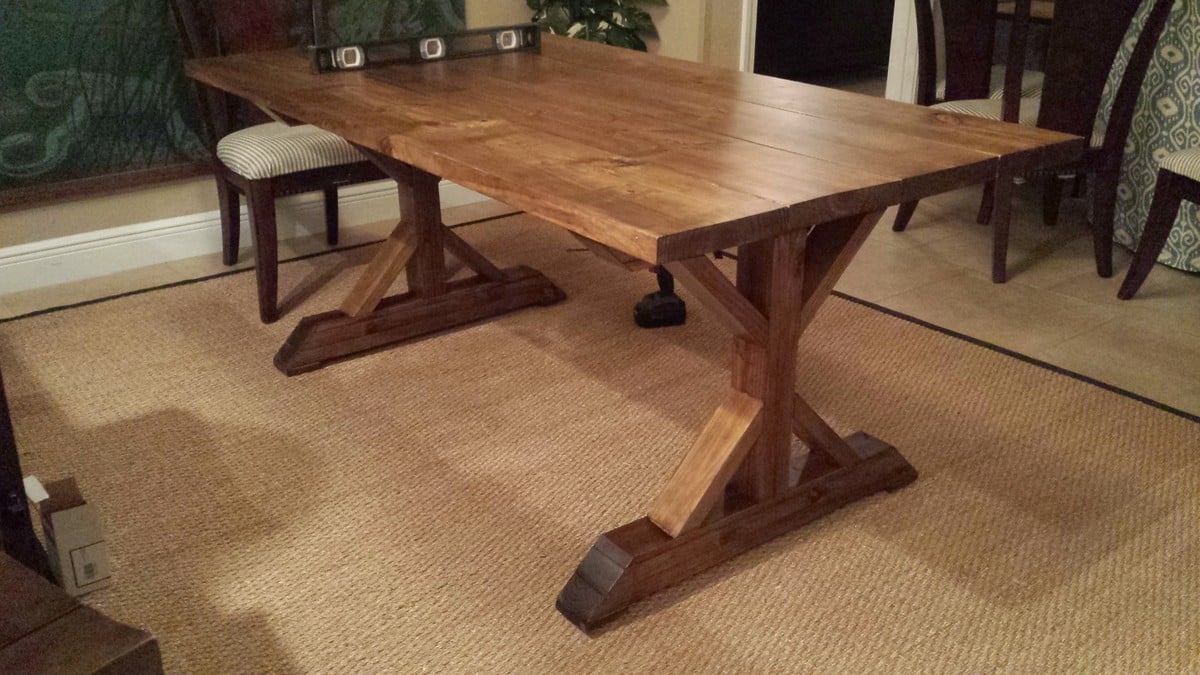
This was a week-long project. I love this site because there are so many original tables to get great ideas from! I chose the Farmhouse table plans because of its simplicity and beautiful lines. The length of the table was a little much for my room, so I shortened it a touch. Dark walnut for the stain and Satin Ultra Pure white for the legs to match the trim in my house... a real beauty! Have fun with yours!!!
Made the table 6 feet long to better fit the space. Made it 2 years ago, just now getting around to post it, but it has held up well in our vacation rental.

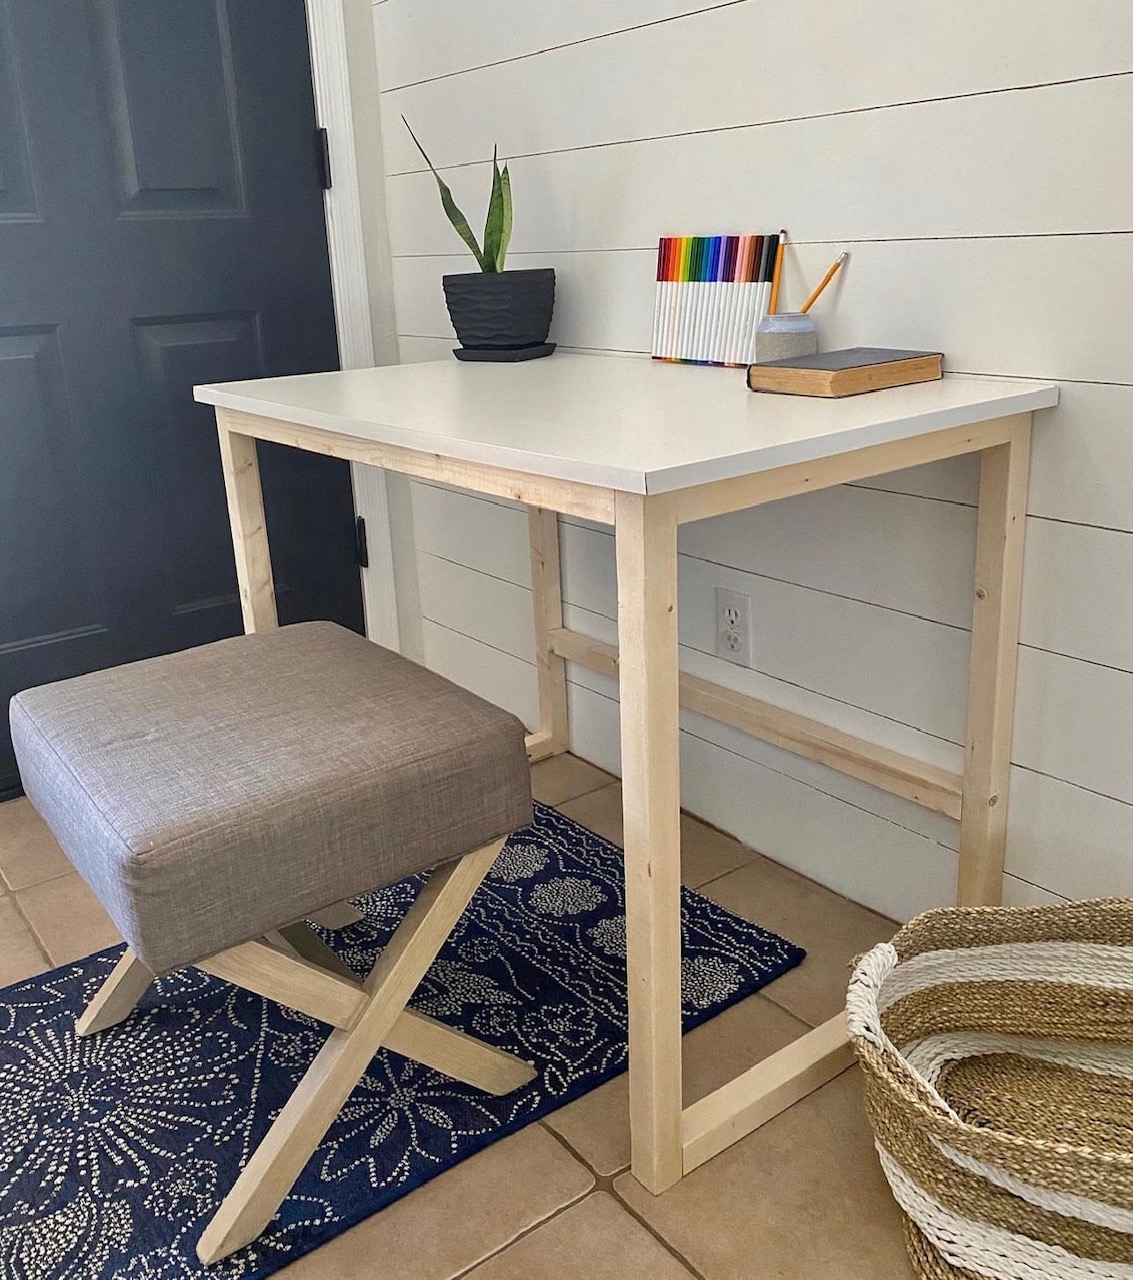
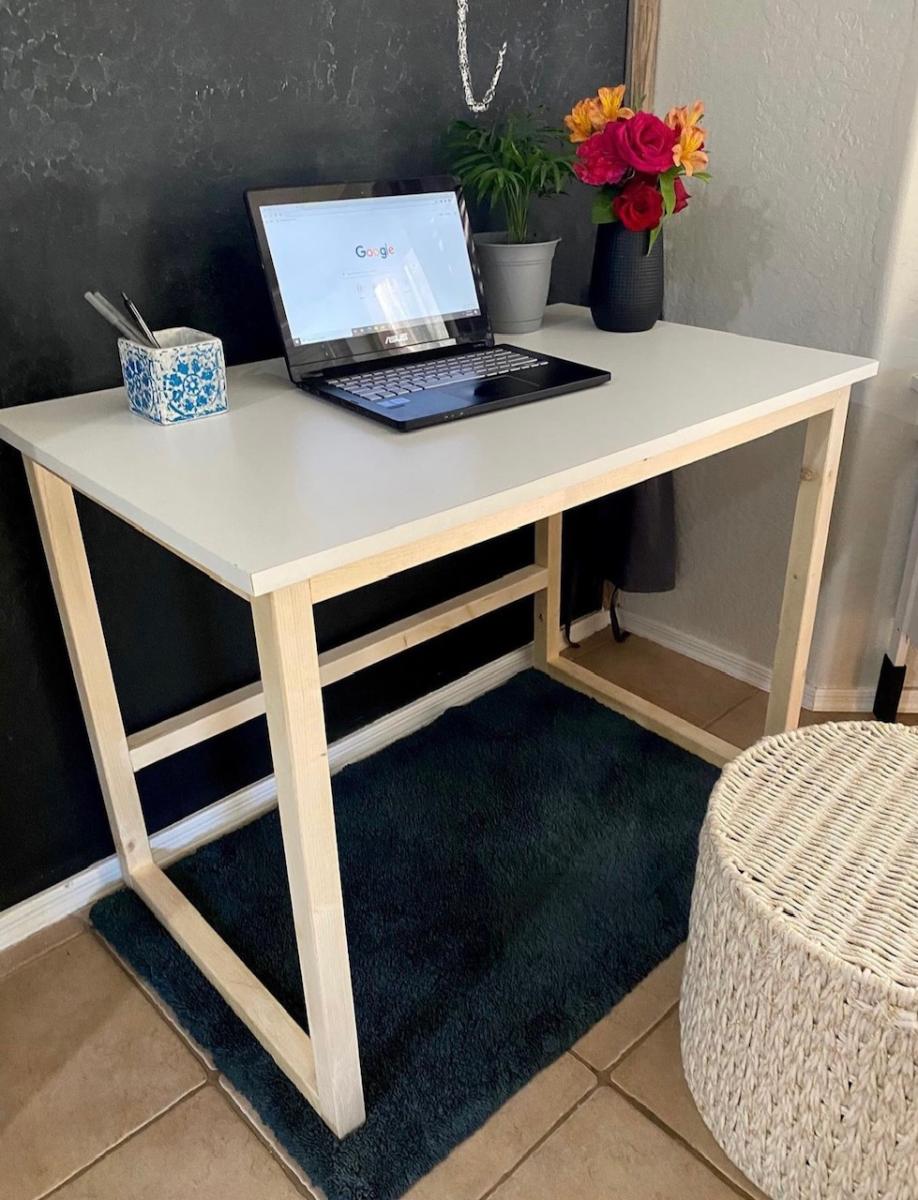
Love the simple modern look of this desk. The plans were so easy and this was a quick build. Modified the measurements as well as the top. I used a project panel for the desk top.
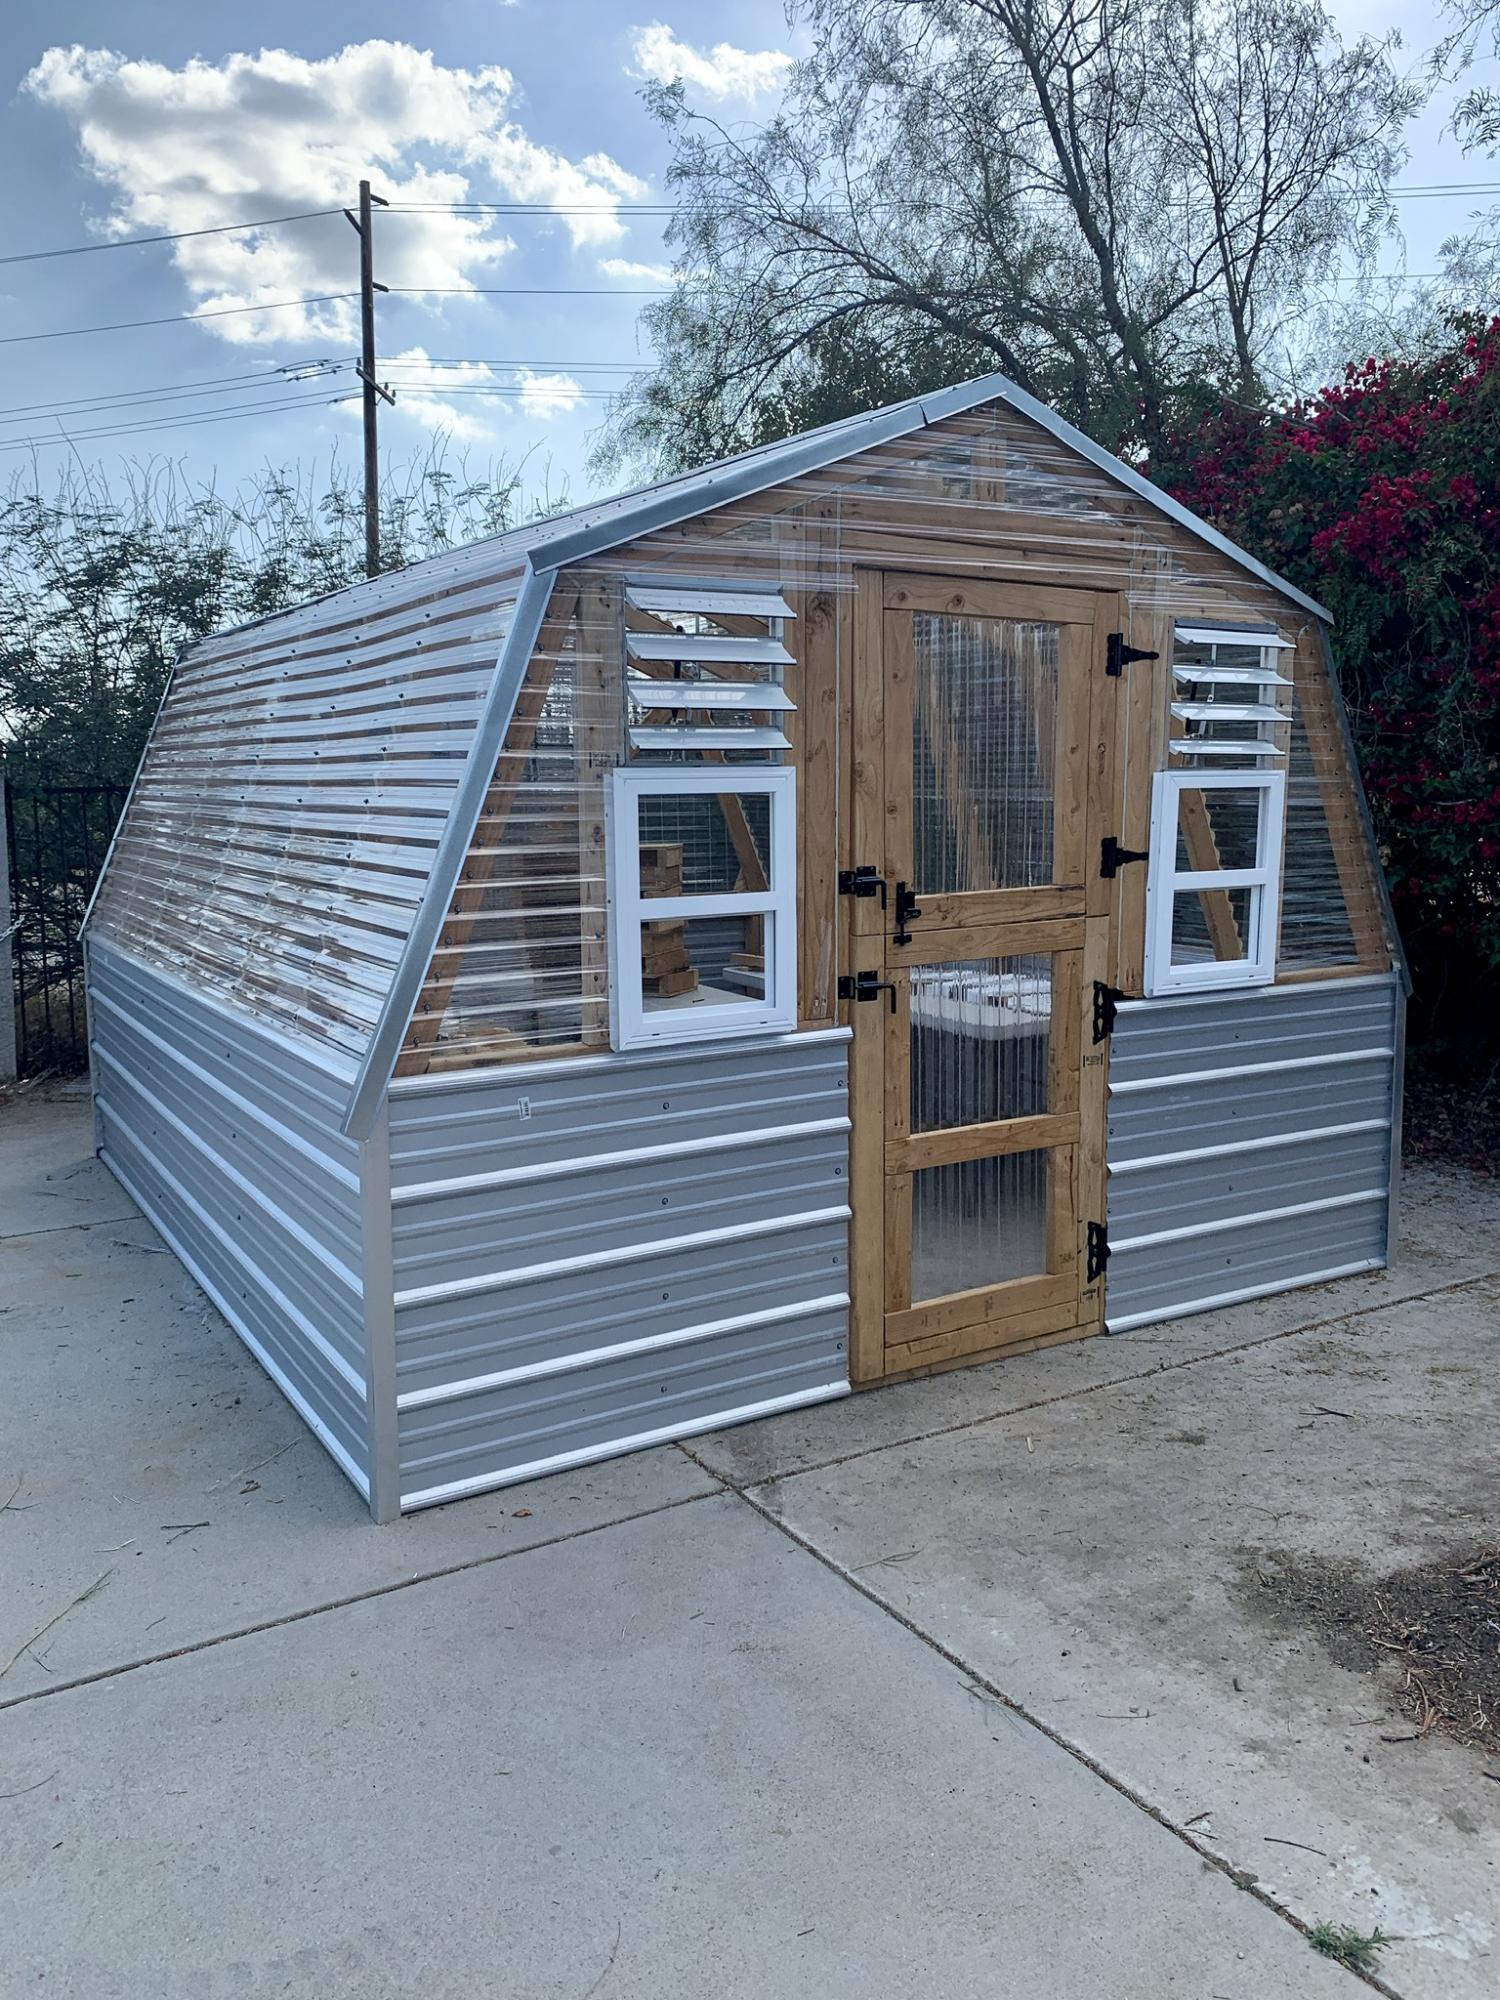
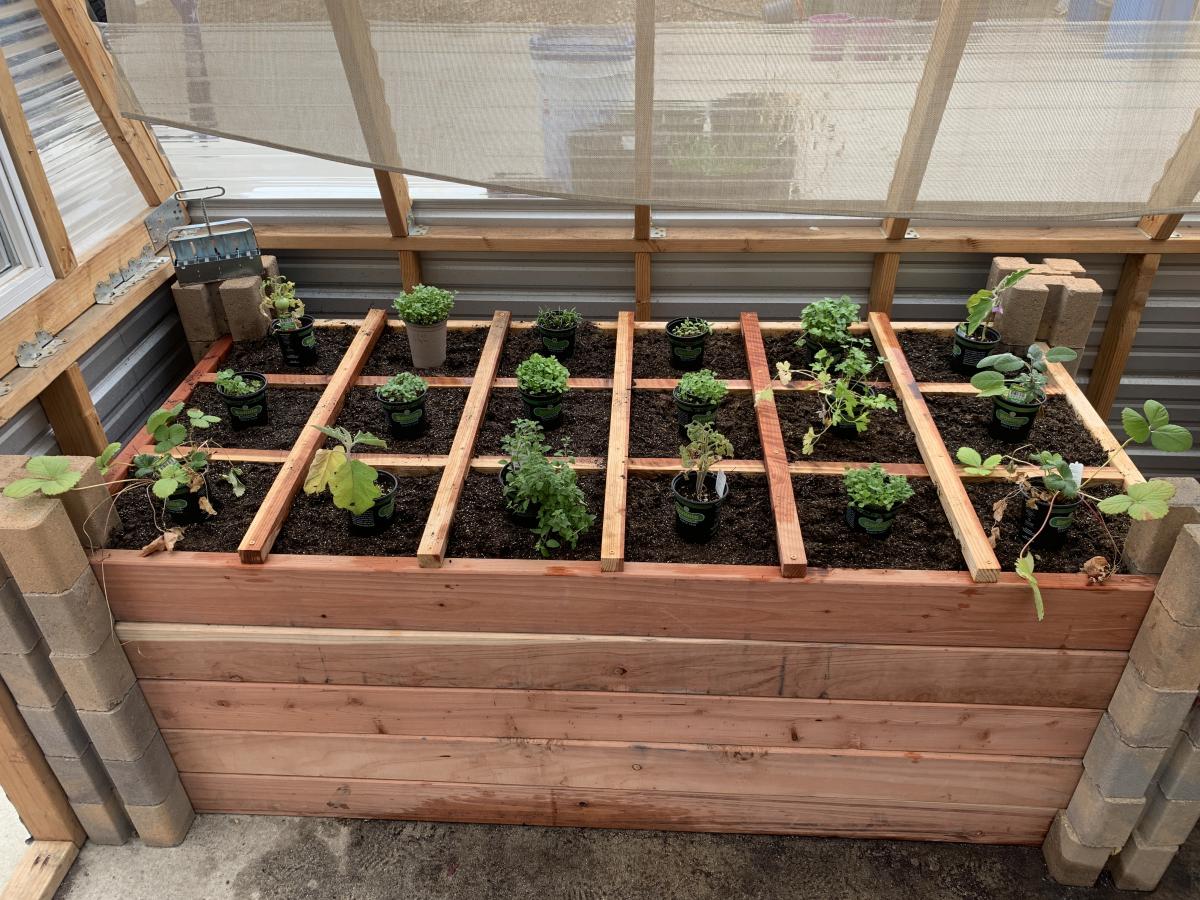
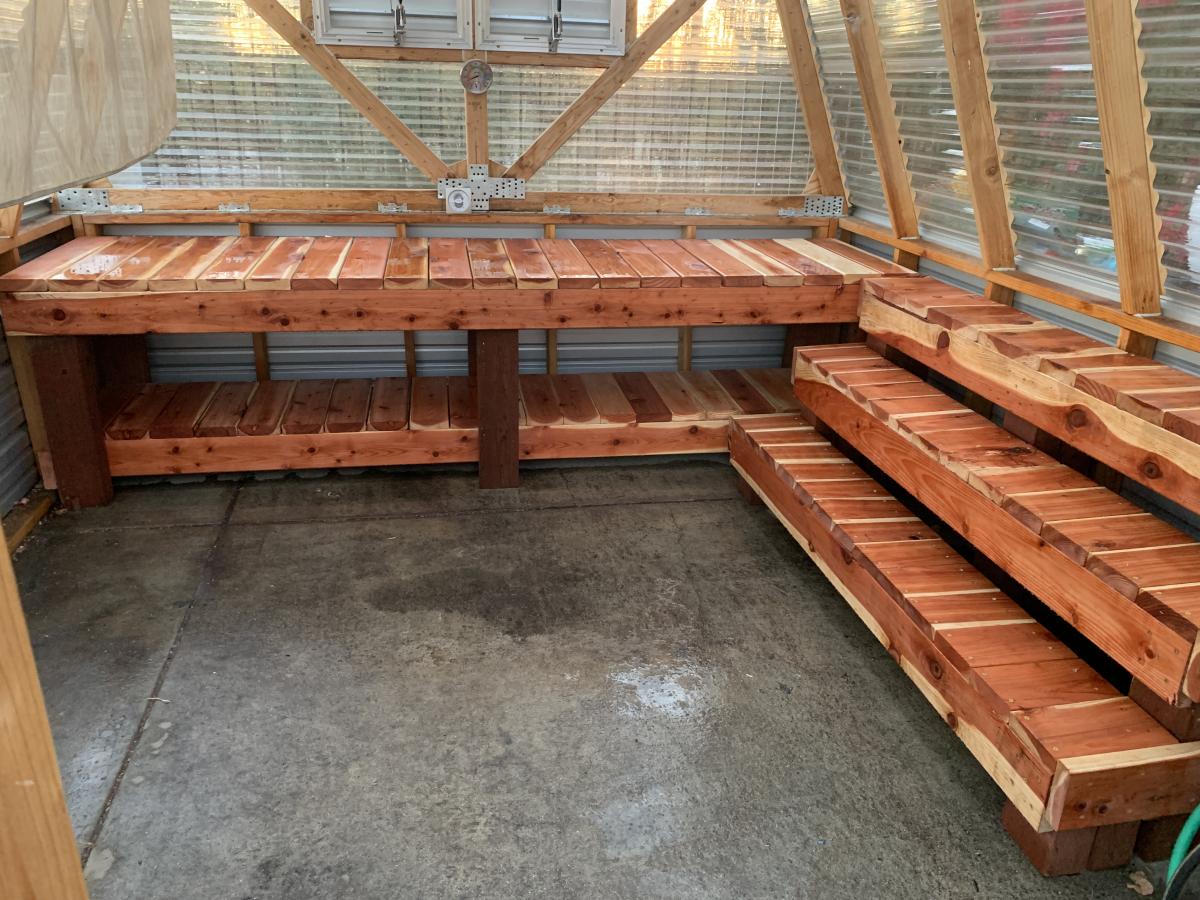
We made some modifications to the greenhouse to include a bench with three levels, a working bench and a square foot garden. We also put it on concrete to keep all the weeds out from the bottom as well.
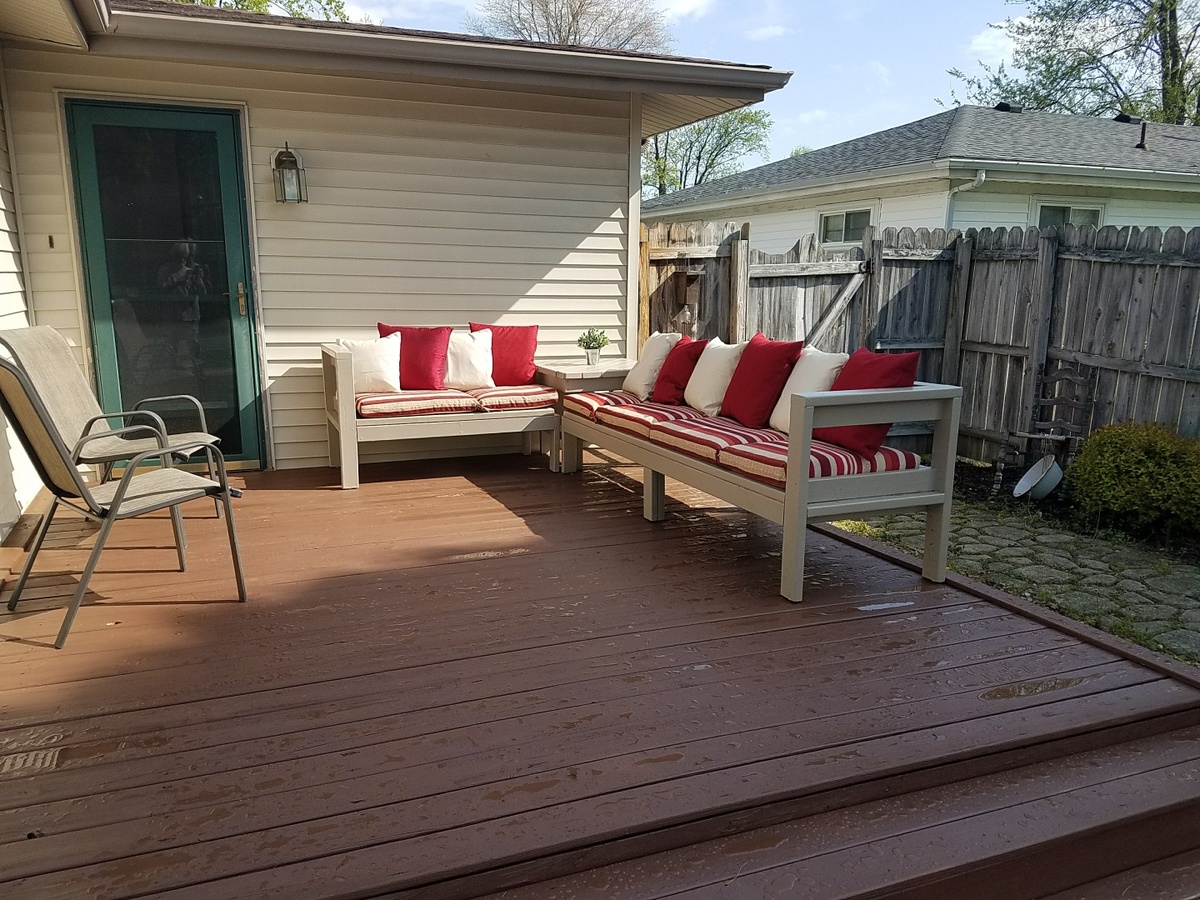
In the plans of selling our home and move from Indiana to Washington, I visited Ana's website I was able to build this easy, simple attractive outdoor furniture to give a little "Curb Appeal" Besides the couchs, I made a corner table. The cushions are made for chairs and the pillows are cheap pillows with new covers that my wife made. Sad thing about this is I hate to leave. I will just have to make another set some day?
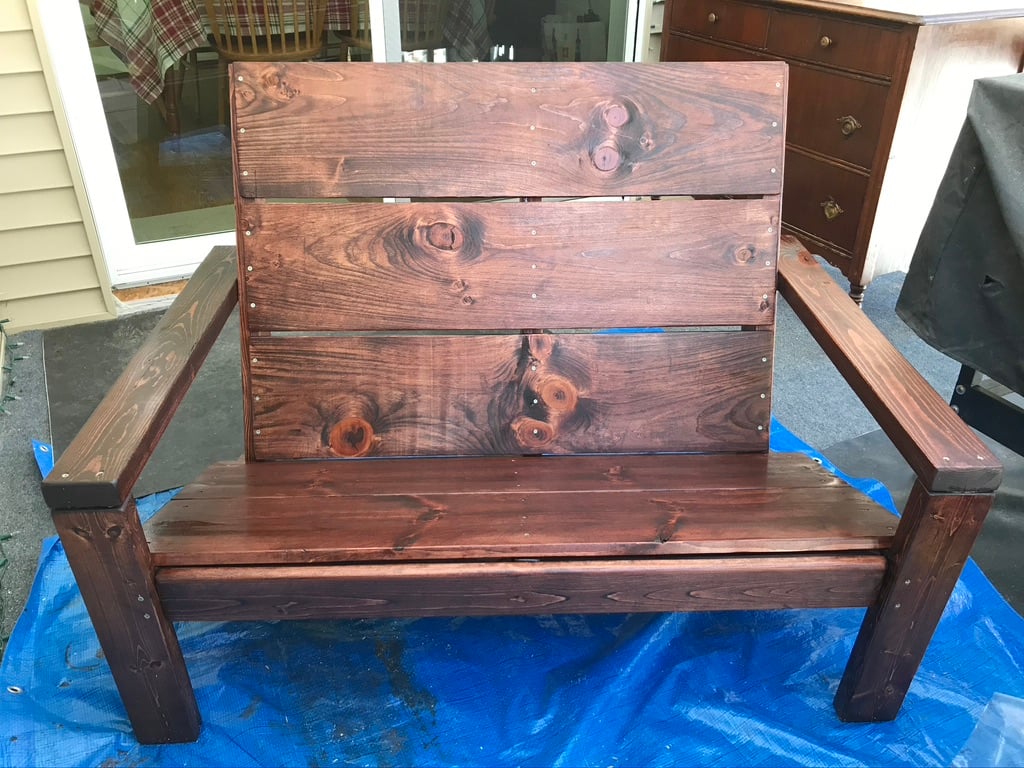
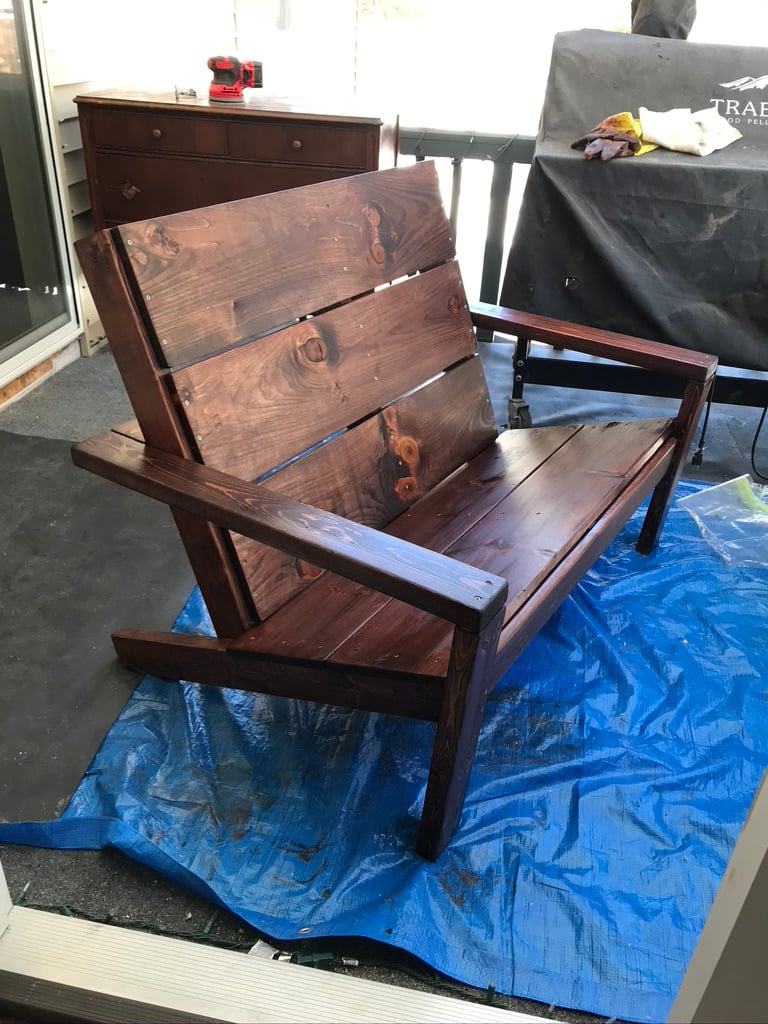
I loved the Rustic Adirondack Chair so much I felt I needed to make a bench in the same style. I had to be a little creative with the chair plans and modify them to make my bench work. I am absolutely thrilled with how it came out! I already have a friend who has requested a chair and bench (love seat) for his son's wedding gift!
Mon, 08/16/2021 - 10:51
Can someone tell me the dimensions of the wood (1x10) for the bench and the dimensions for the frame (2x4)
Please
Thank you
Fri, 08/20/2021 - 16:37
You can make the 1x10 in any length you want. I’m planning on making a loveseat too and The measurements I chose for the seating area will be 48” long (which is the size for 2 seat cushions).
The Step 1 in Ana’s plan, all measurements will be the same.
Step 2: The two 2x4 horizontal supports will be cut at 48”.
Step 3: the two 1x10 seat panels will be 3 inches longer than the horizontal supports. So you will cut the 1x10 seat panels at 51”.
Step 4: Instead of two, you will need THREE seat supports. So cut three 2x4’s @ 32 3/4”. The third seat support will go in the middle of the other seat supports, drilled to the horizontal back support.
Step 5: Attach your back bottom horizontal support which will be a 2x4 at 48”.
Step 6: Attach the 1x10 seat back panels. You will cut (3) 1x10 @ 48”.
Here is the cut list for the loveseat version of Ana’s Adirondack plan. These are the lengths I chose. So with this cut list your loveseat should be big enough for two 24x24” seat cushions. I plan to add cushions for extra comfort.
My cut list:
(2) 2x4 @ 31 3/4”
(2) 2x4 @ 19 1/2”
(2) 2x4 @ 33 1/4” Cut at 20 degrees as per Ana’s plan.
(3) 2x4 @ 48” Horizontal supports. One goes behind your calves.
The other connects the end frames/arm rests at the back.
(2) 1x10 @ 51” Seat panels.
(3) 2x4 @ 32 3/4” Vertical supports for the back panels.
(3) 1x10 @ 48” The back panels.
Fri, 08/20/2021 - 17:32
P.S.
You will also need an extra support attached underneath the seat panels in the middle for extra support and keep the long seat panels from bowing.

We went off the Farmhouse table and bench design but had to customize the length of the table and bench so that it fit in our kitchen space. The table was our first ever project and we made a few mistakes but learned from them and built the bench and are hoping to move up to the Farmhouse bed and then the fullstorage bed.


So a few notes... We added a base of 2x4 pressure treated wood footing around the entirety of the greenhouse which should help keep it from rotting? Blocks are an alternative here. Our lumber store didn't carry the right size of tin sheets so we added a 2x10 at the bottom which seems to work and still look okay. We picked up a 30" metal screen door there which should assist in keeping out the critters and allows us to lock out our small kiddos who might wreck the plants :) This is a great plan!!! Thank you so much! Oh - materials ran about $700 including screen door? We went through about 4 1-pound boxes of sheet metal screws and at least a large box of 3" screws?? and 2 small boxes 1.25"?? If you cut you pieces right you may end up with an extra 8' clear sheet of corrugated plastic? We spent about 20 hours building just the greenhouse but we had hauled a lot of stuff to the site by hand... We are new to carpentry and pulled this off so anyone can do this!! Dremel tool works for cutting plastic, but not as good as the tin!! Good luck and cheers!
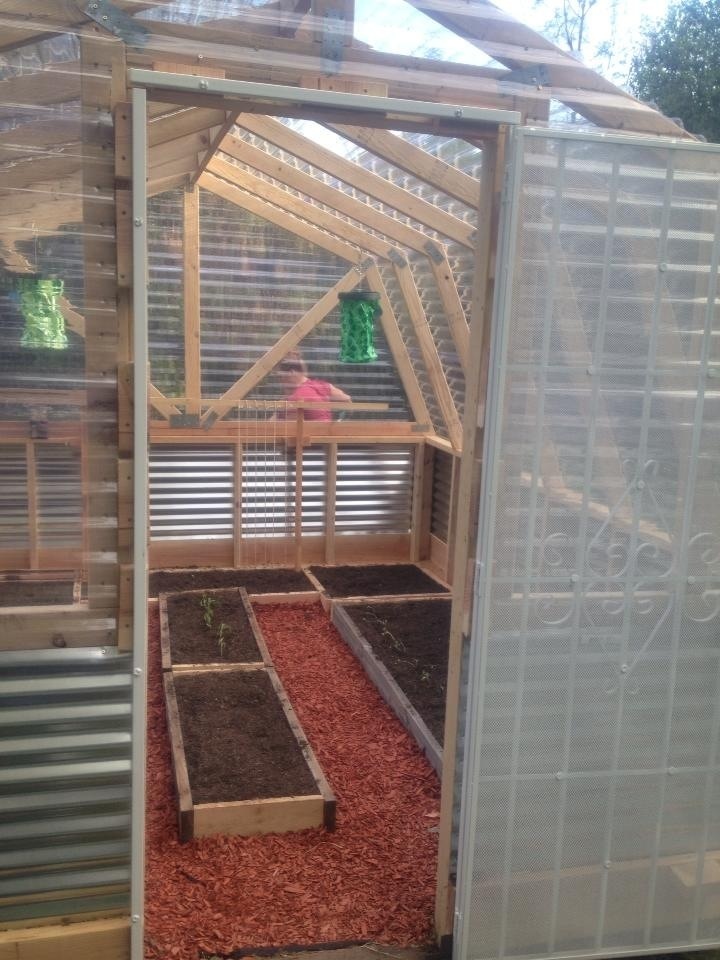
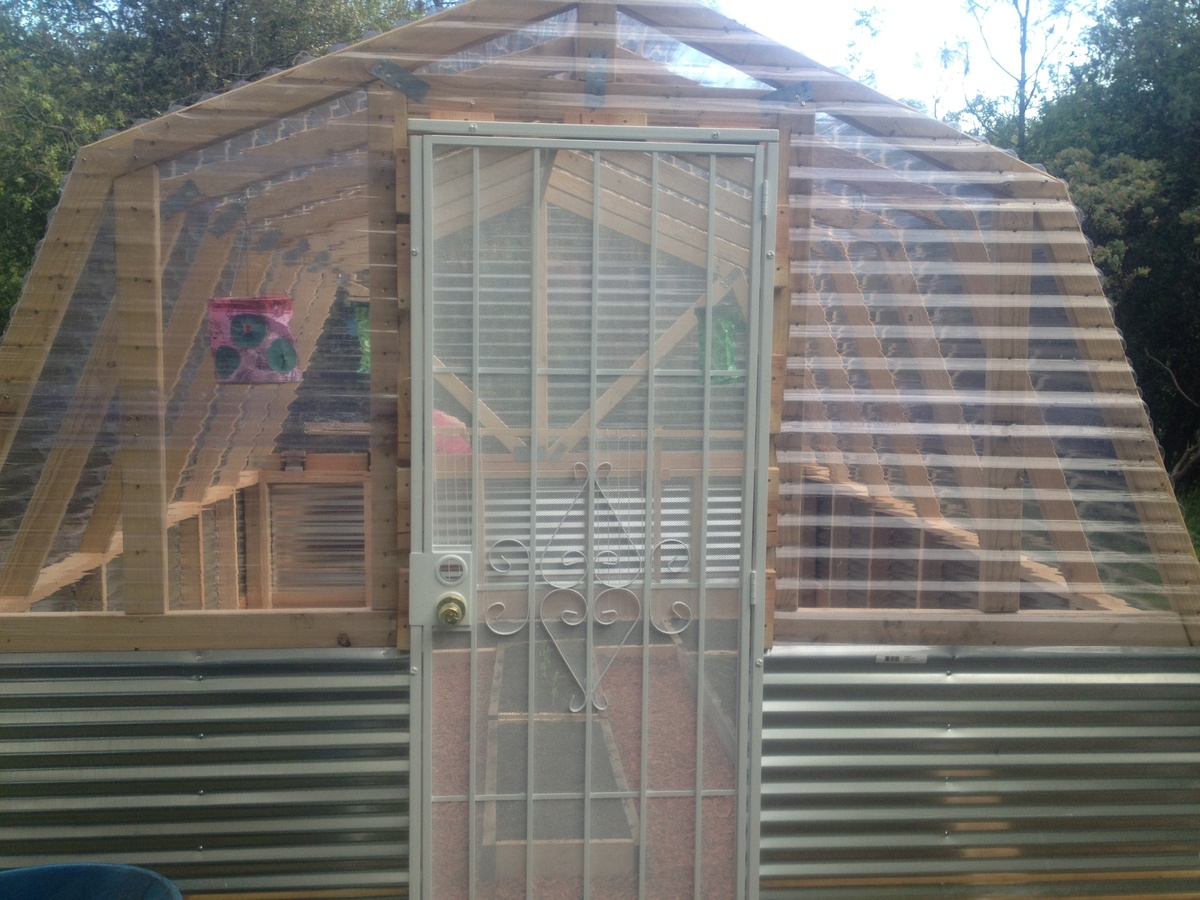
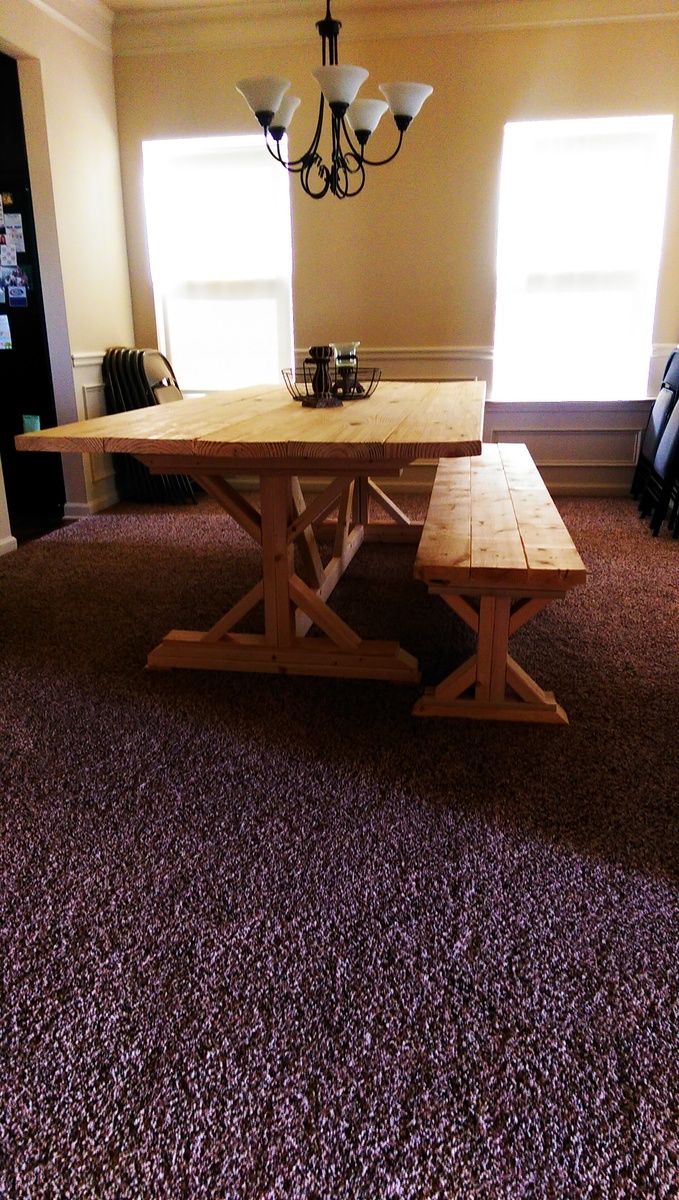
Table and bench before we finished it
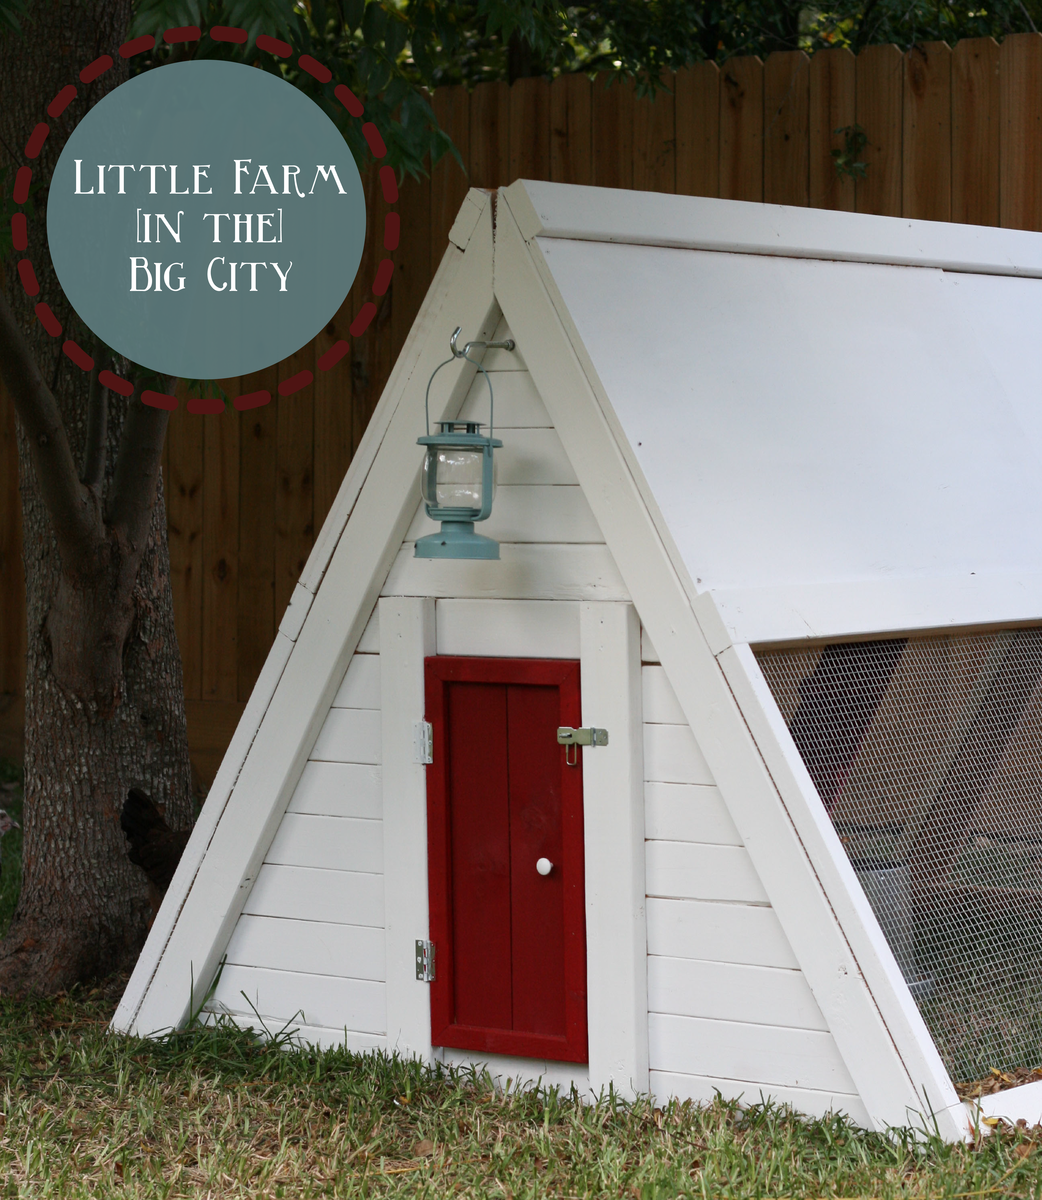
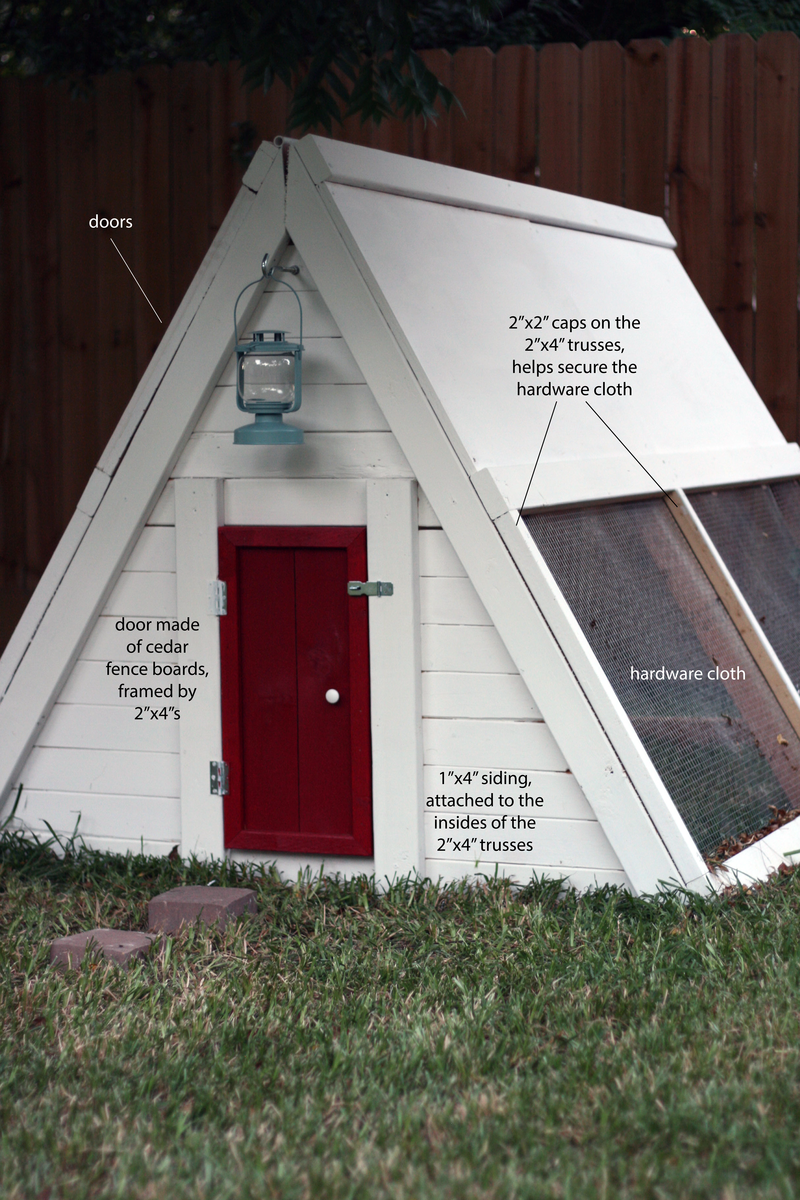
We built this A-frame chicken coop using the plans from Ana White. We modified them a bit to include a front door, a solid front wall, and 8-foot untreated cedar fence boards (cut in half) for the loft floor instead of plywood. We also used hardware cloth instead of chicken wire since racoons are a problem where we live, and they have been known to reach through chicken wire to grab at hens. Instead of being able to open both sides of the top of the coop, we only put doors on one side just to make the building process a little simpler. The hardest part of building the whole coop was cutting the 60* angles on the 2"x4" trusses. Our cuts are not exactly perfect, so the nodes (meeting points of the 60* angle cuts) are a little rough, but we plan on covering this with a roof cap eventually. More photos and details are on my blog: http://littlefarmbigcity.wordpress.com/2013/06/29/red-white-and-blue-co… -kate
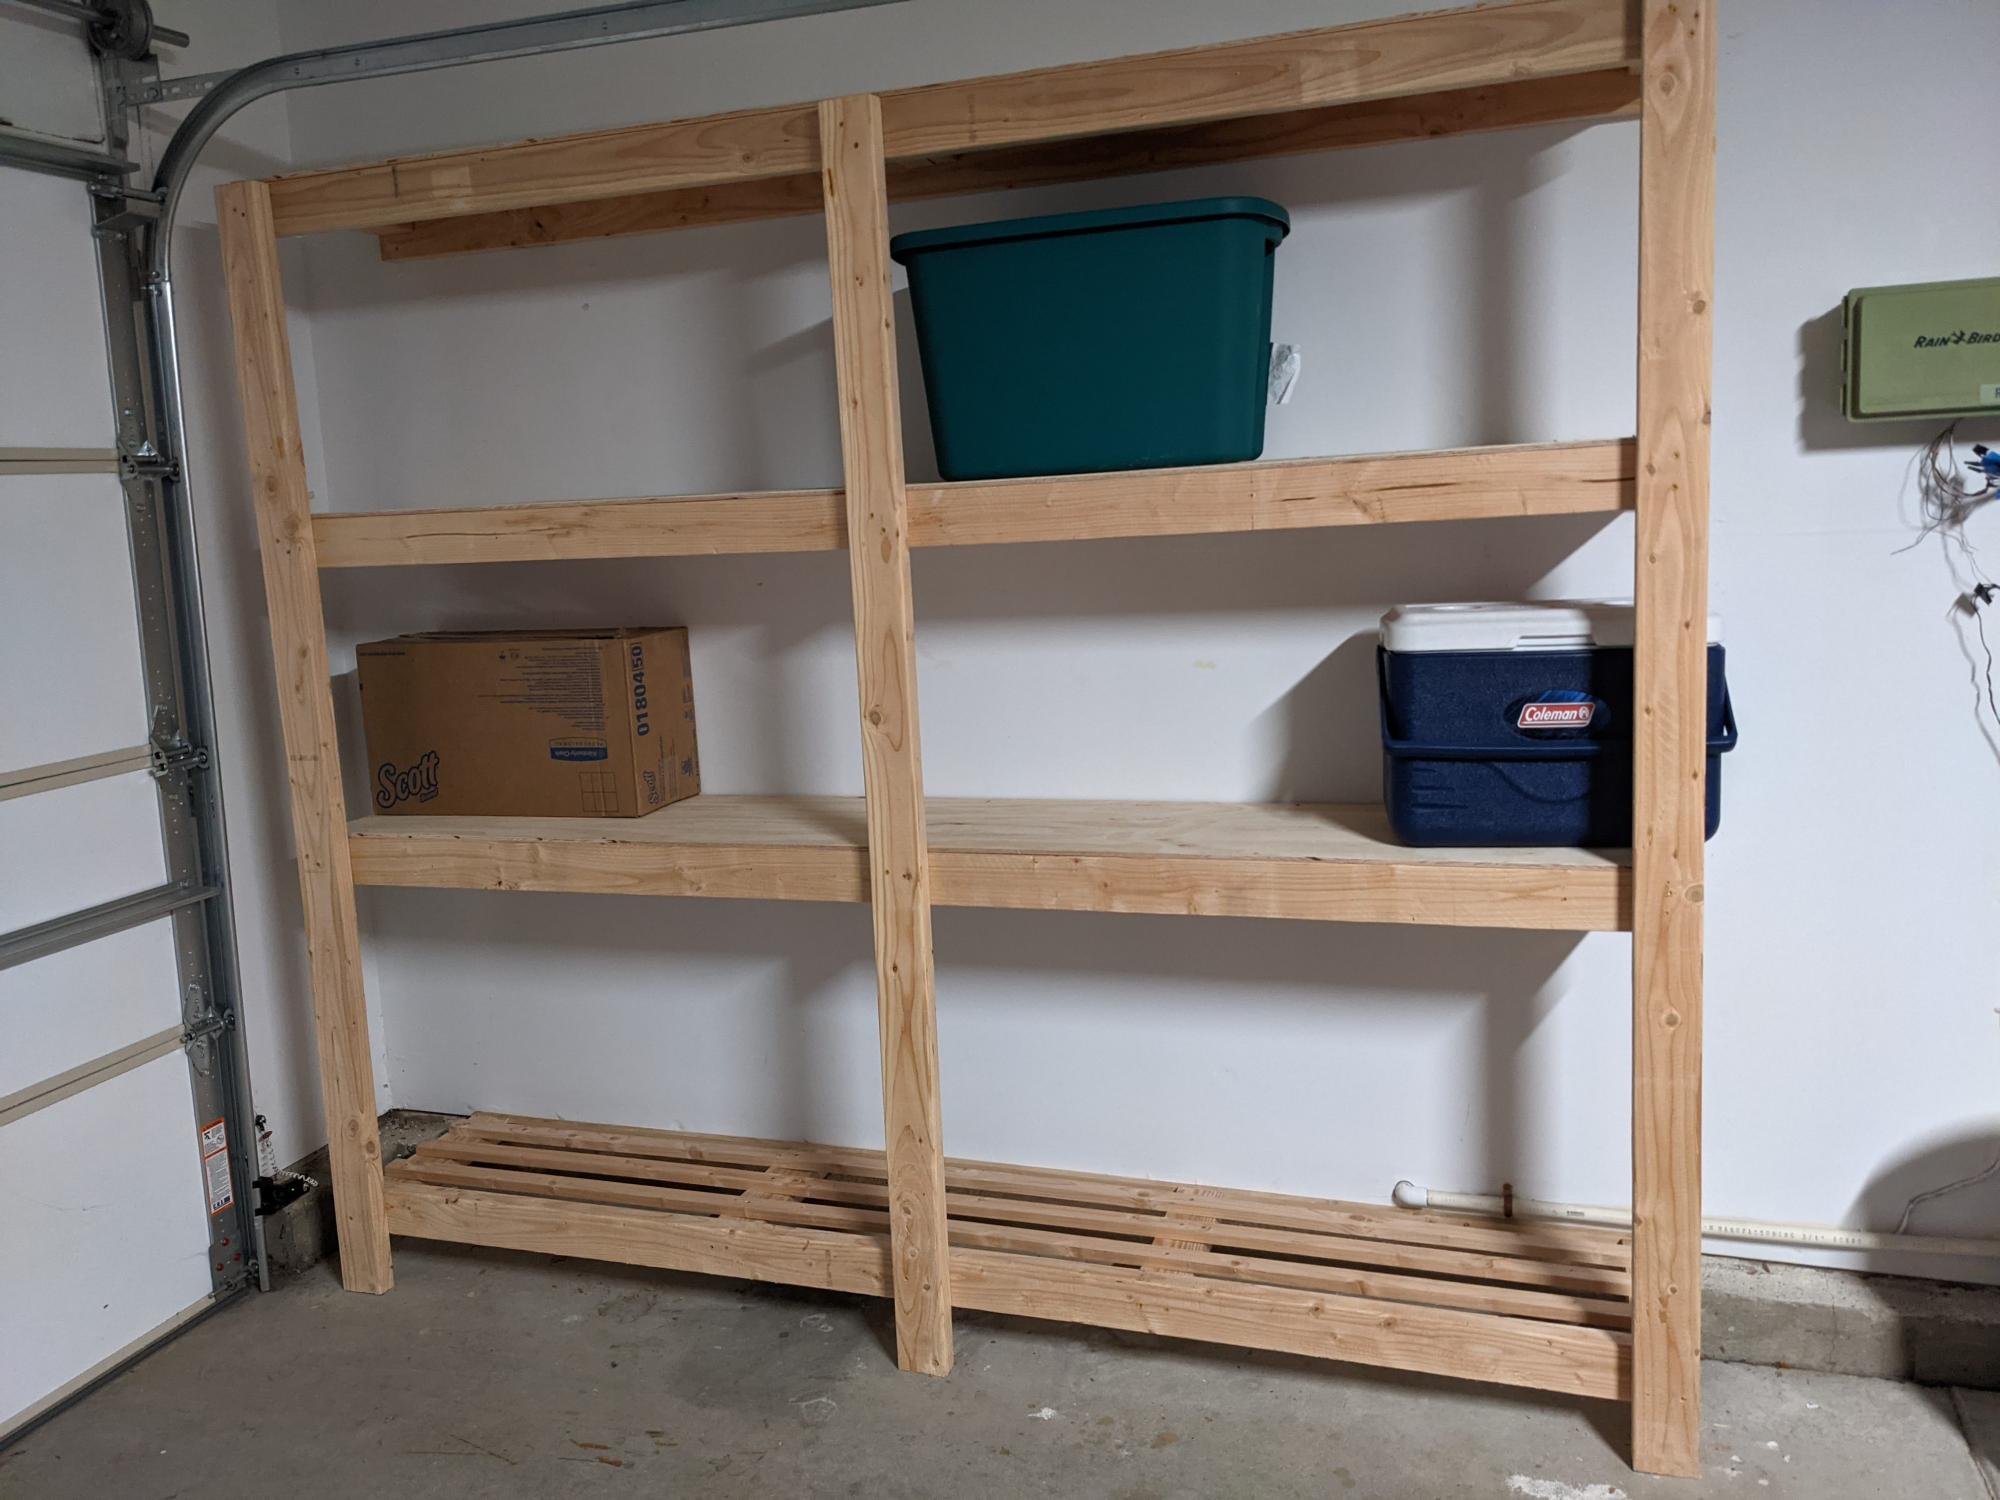
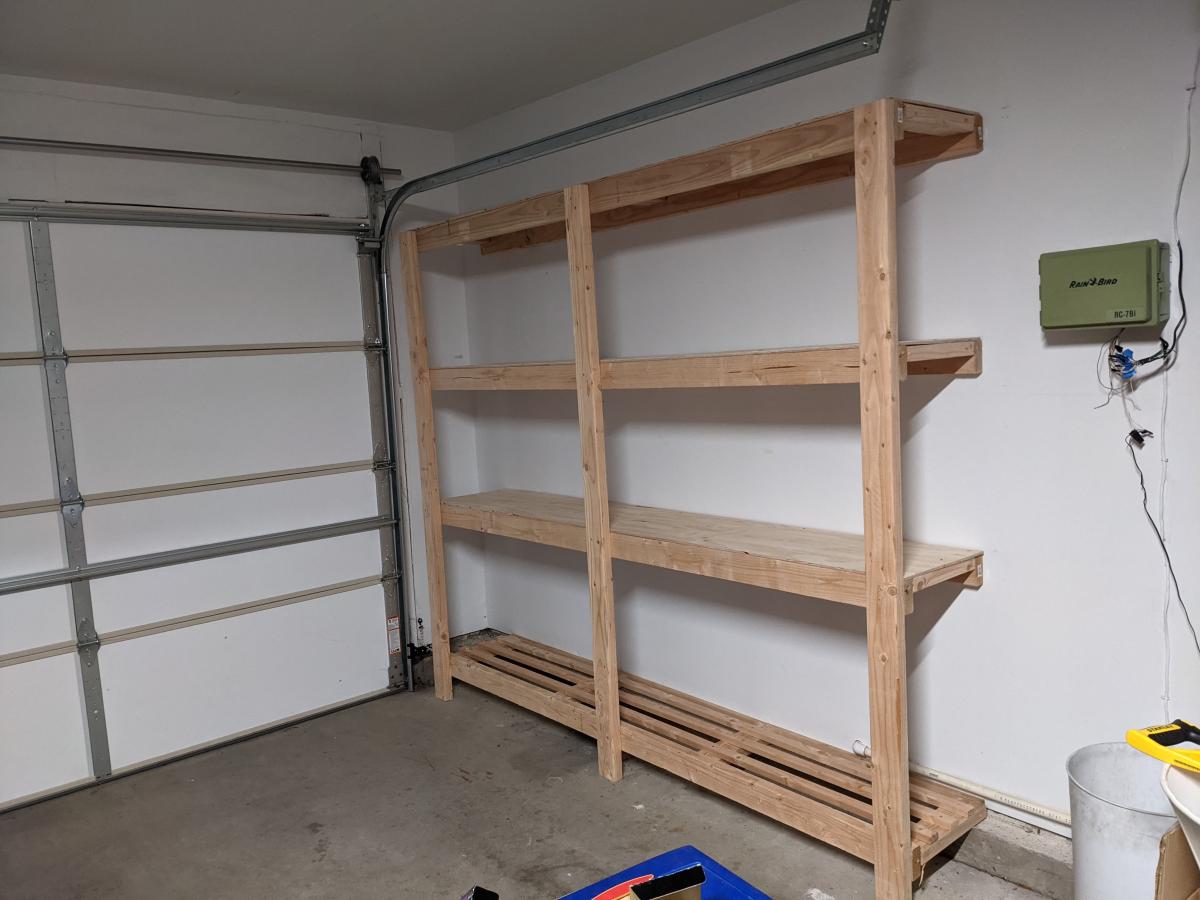
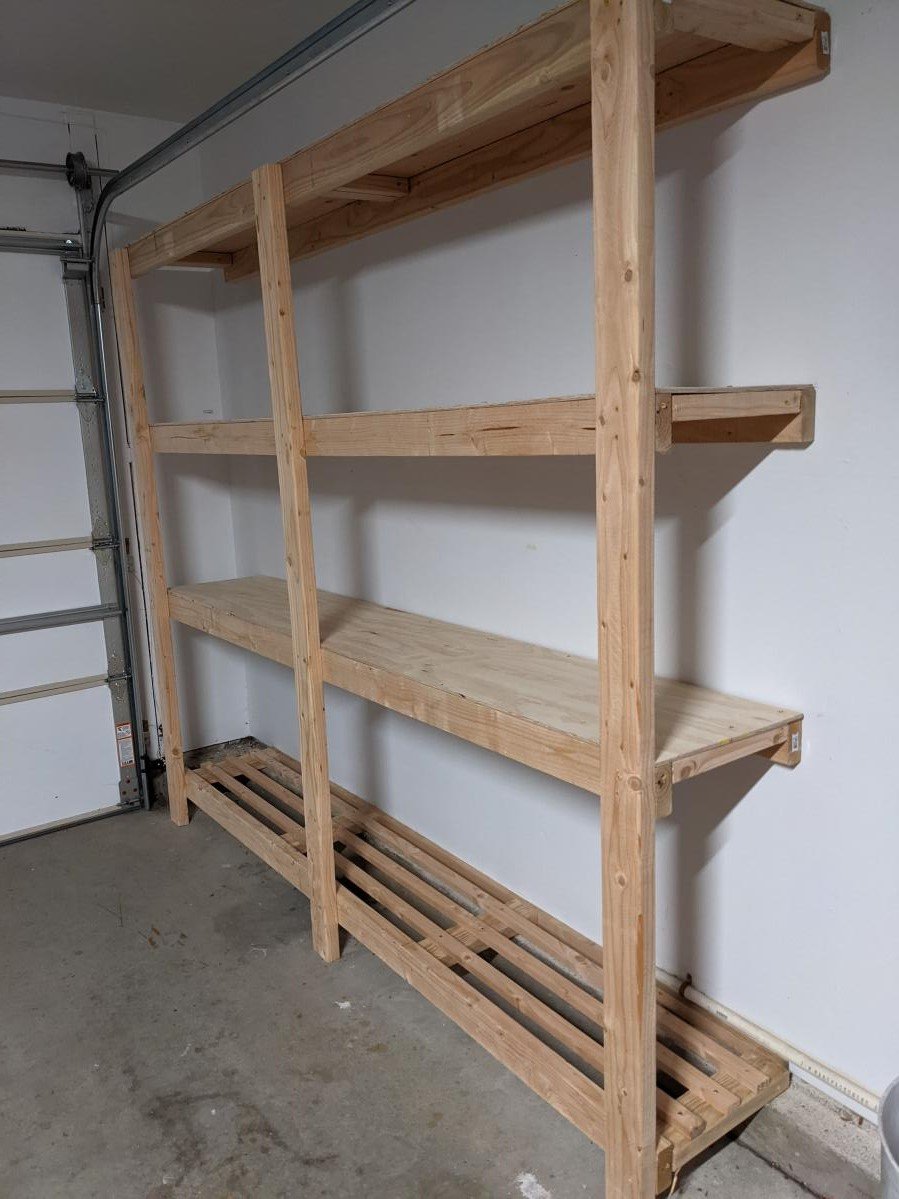
I just made this shelf using 2x4s 8 ft long wood. It is very strong and looks great. My garage size required the shelf to be max 16 in deep, so I used a 1 plywood sheet divided by 3 equal parts for the upper 3 shelfs. Since I made a 4th shelf, I used 3 1x2s for the 4th bottom shelf instead of a new plywood sheet and avoided having extra 2/3 of the sheet around and also saved like 30$ since the 2x1s were only 2$ea. That touch makes it look a bit stylish too so a win win. If you do that, here's a tip: use the outer 2x4s as rails - make sure that the cleats on the lower shelf are placed a bit lower ~ 1in. In such way, you can place the three 1x2 rails at the same level as the outer 2x4s and this you end up having 5 rails total in the shelf. Do use the wooden screws with star head if you can, they were muuuuuch easier to use compared with the regular ones. Note, this shelf is very strong, probably too strong for my needs. For a 8ft long, and my storage needs (camping, Christmas stuff, other lighter things), I'd probably use 2x2s instead of 2x4s. That would save costs, specially since wood isn't cheap these days( I spent ~$150 in materials Jan 2022).