Community Brag Posts
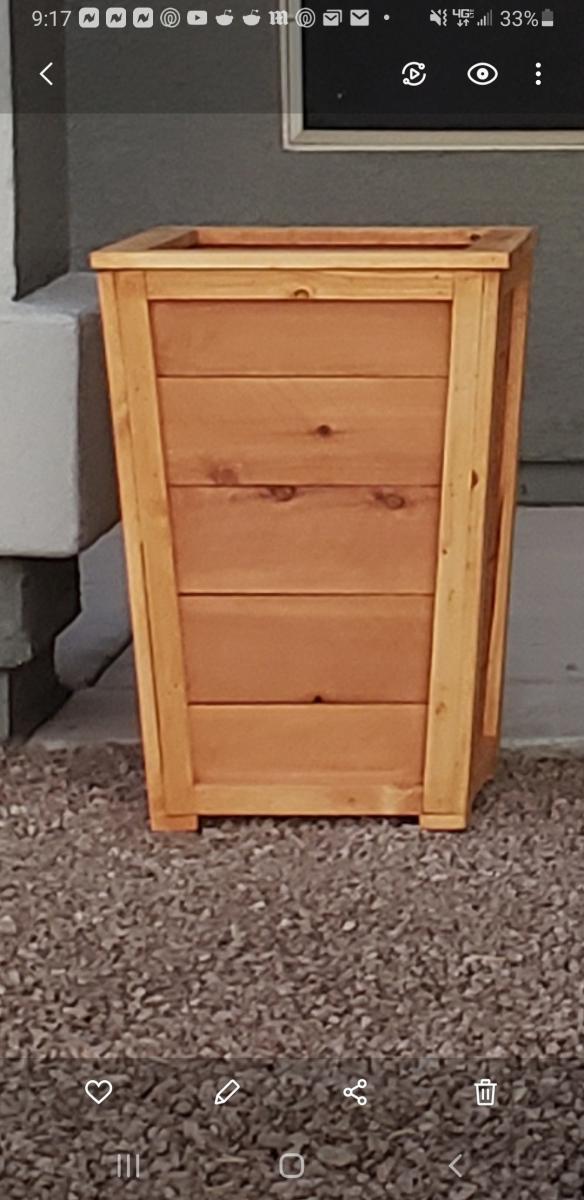
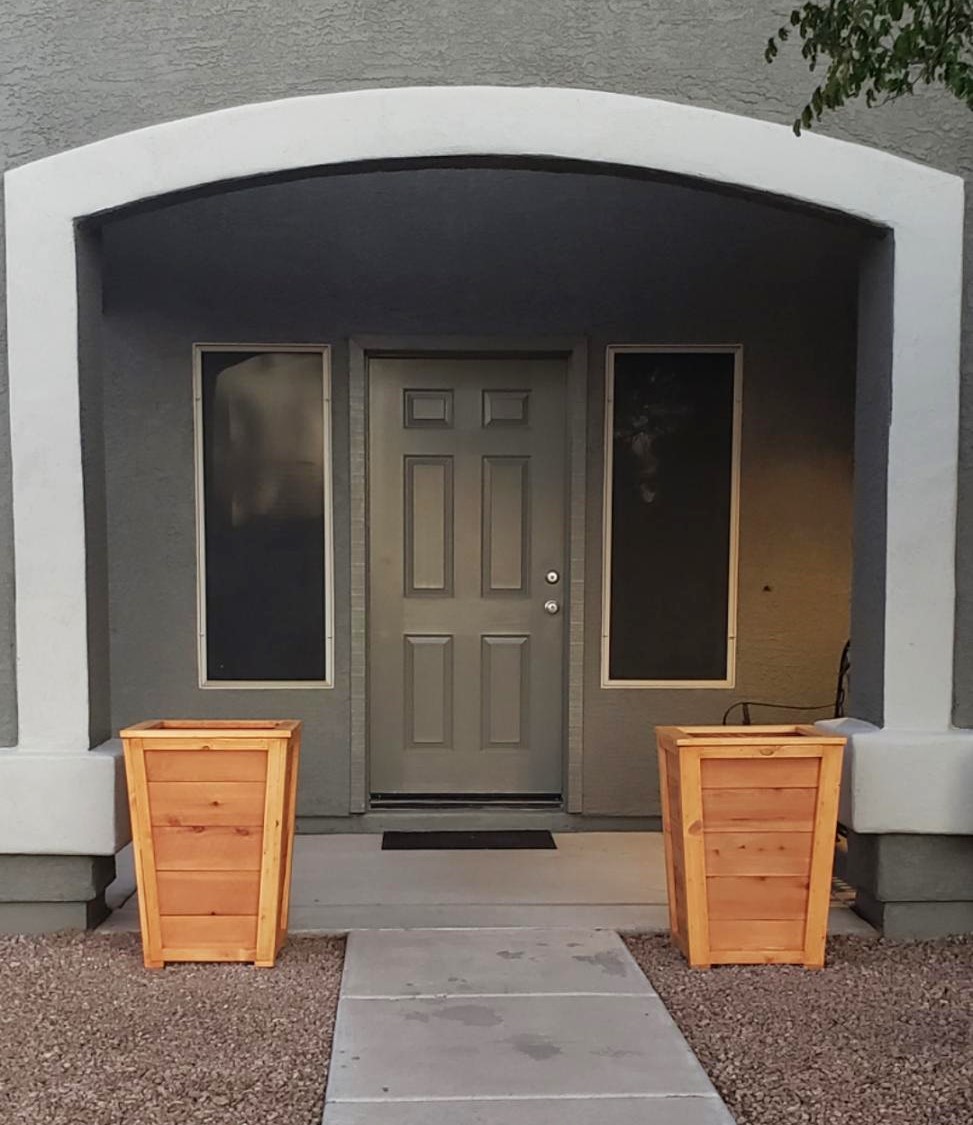
Front porch planters
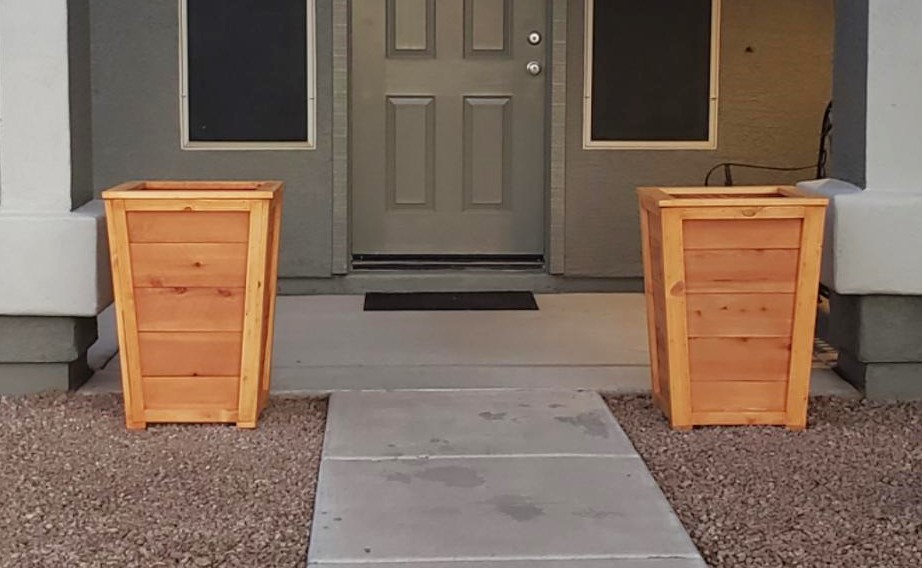
Followed your plan but added extra 1 x 2 trim to the sides, feet made from 1 × 3 and 1x 3 trim around the top
Built from Plan(s)
Estimated Cost
$35 per planter
Estimated Time Investment
Afternoon Project (3-6 Hours)
Finish Used
Cedar Naturaltone Behr Waterproofing Wood Finish
Recommended Skill Level
Intermediate
Comments
My incredible chicken coop and run!

This was my first attempt at building anything....ever. It was so incredibly fun and I certainly learned a lot. My 8 little chickens are loving their new home and I can't wait to build my next project!
Built from Plan(s)
Estimated Time Investment
Week Long Project (20 Hours or More)
Recommended Skill Level
Intermediate
Comments
Wed, 06/19/2013 - 11:51
Chicken Run
Hello! Could you repost the picture / info on your chicken run? I keep getting "page not available" and I've been trying for days :O) I think I want to build that chicken shed (too big for 3 hens?? It's just so cute!) and a run like that to go with it! Thanks! Have a great day!
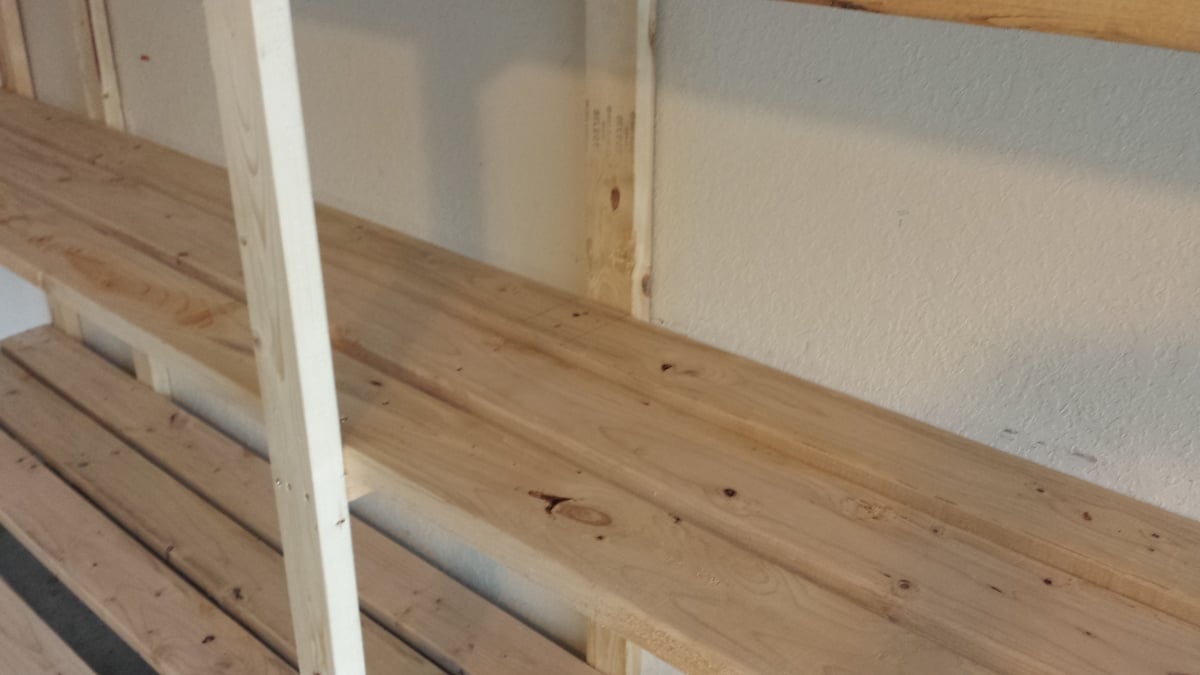
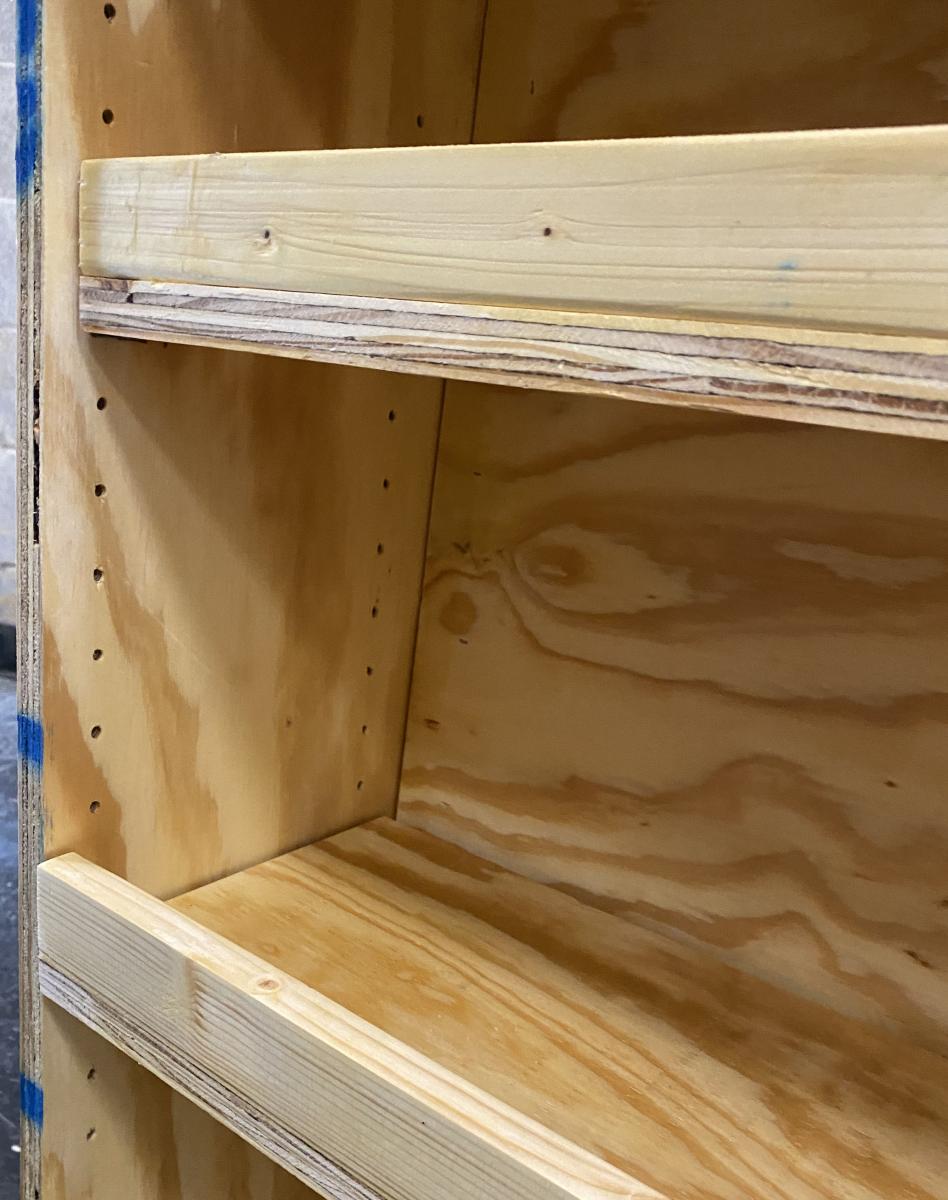
Garage Shelving - Some minor mods to Ana's great basic plan

My father-in-law and I knocked this project out in about 5 hours including the trip to the lumber yard. You've got a great basic design here! A few modifications we made:
1. I thought the depth of the shelves in the original plan was a little too shallow so I used 3 2"X6"s instead of the 4 2"x4"s. That made the shelves 1 1/2" deeper. Although 2"x6"s are obviously more expensive, the overall cost for the project didn't change much because we only had to use 3 boards per shelf instead of 4. This also reduced the amount of screwing and made it easier to position the shelf boards without taking measurements since we only had one middle board to deal with (instead of 2 with the 2"x4"s). We just eyeballed the spacing of the middle shelf board as we worked.
2. Since our garage has a 10' ceiling, I decided to go 8' tall with the unit. This allowed us to add a 5th shelf.
3. Some oversized tubs can be 18-20" high or more so I varied the height of each shelf -- 24" at the bottom, then 20", 18" and 16". There's approx. 24" available between the top shelf and the ceiling.
4. Due to the position of the garage door track, I had to notch out a couple feet at one side. The end support piece is only 6' high.
5. Since many storage tubs can be 16-18" wide, I made sure that there was at least 54" between 3 of the vertical support structures. This will allow us to store 3 tubs side-by-side and maximize storage. You might notice that I have two vertical supports that appear to be very close together near the back wall. I did this so I would have something on that side to attach more shelving to on that short wall where the garage door opener is.
The only cuts we had to make for this entire project were for the 18 1/2" 'braces' or support pieces on the vertical ladder structures. The shelves are either 14' or 12' (top shelf only) and the vertical 2"x4"s are either 8' or 6'. Most lumber yards will carry these lengths in either 2"x4"s or 2"x6"s.
We didn't use any wood glue, and I admit this may come back to haunt me. However, to get a good fit and eliminate gaps, I used clamps I already owned to squeeze the boards together before adding the screws. Everything feels very solid and sturdy to me.
Because of the extra height compared with the original plan, I was worried about it possibly tipping over (we have a 10-year-old who likes to climb ![]() ) so I made sure that 3 of the supports are lined up with the wall studs. After leveling the entire unit, I plan to anchor it to the wall using 3 1/2" screws.
) so I made sure that 3 of the supports are lined up with the wall studs. After leveling the entire unit, I plan to anchor it to the wall using 3 1/2" screws.
So for about $187 in lumber and maybe $20 in construction screws, I've got 76 feet of STURDY shelving that should accommodate hundreds of pounds! Not a bad investment at all...
Built from Plan(s)
Estimated Cost
$187 lumber + $20 construction screws
Estimated Time Investment
Afternoon Project (3-6 Hours)
Finish Used
None right now, but my wife wants to sand it and apply marine varnish to give it a shiny, yet still unfinished, look.
Recommended Skill Level
Beginner
Comments

Roll Away Workbench with Miter Saw Insert
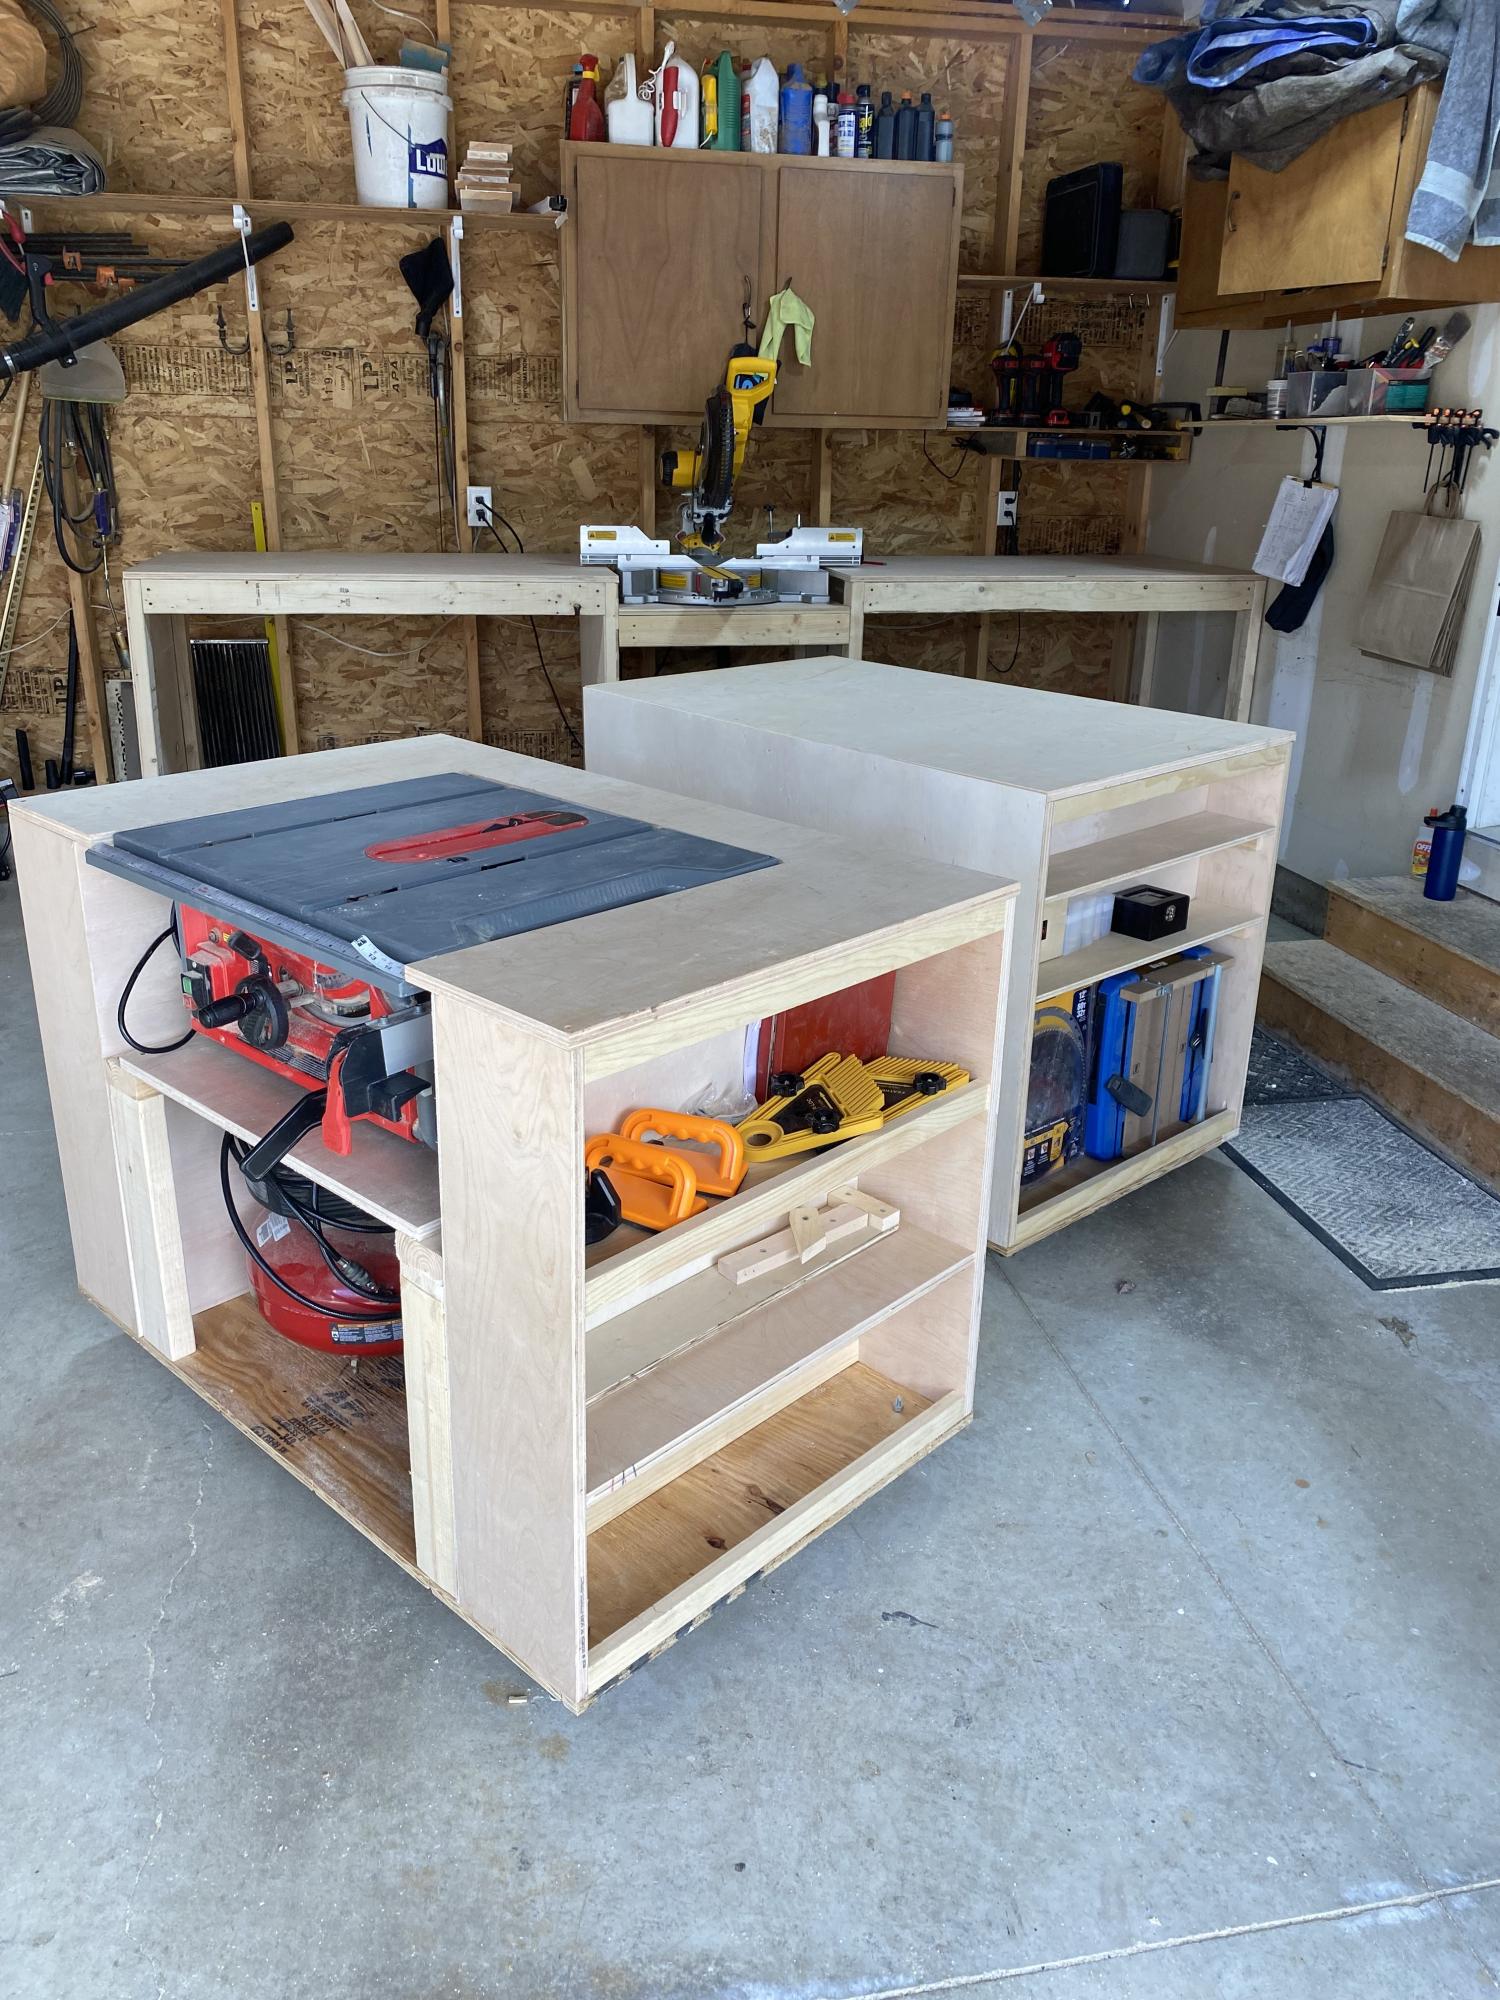
Modified these plans slightly for my needs. I kept the table saw open for easier dust collection and only had one side of shelving on the other bench to allow for storing larger items. I can’t get over how much storage in a small space you get with these and how multi functional they are.
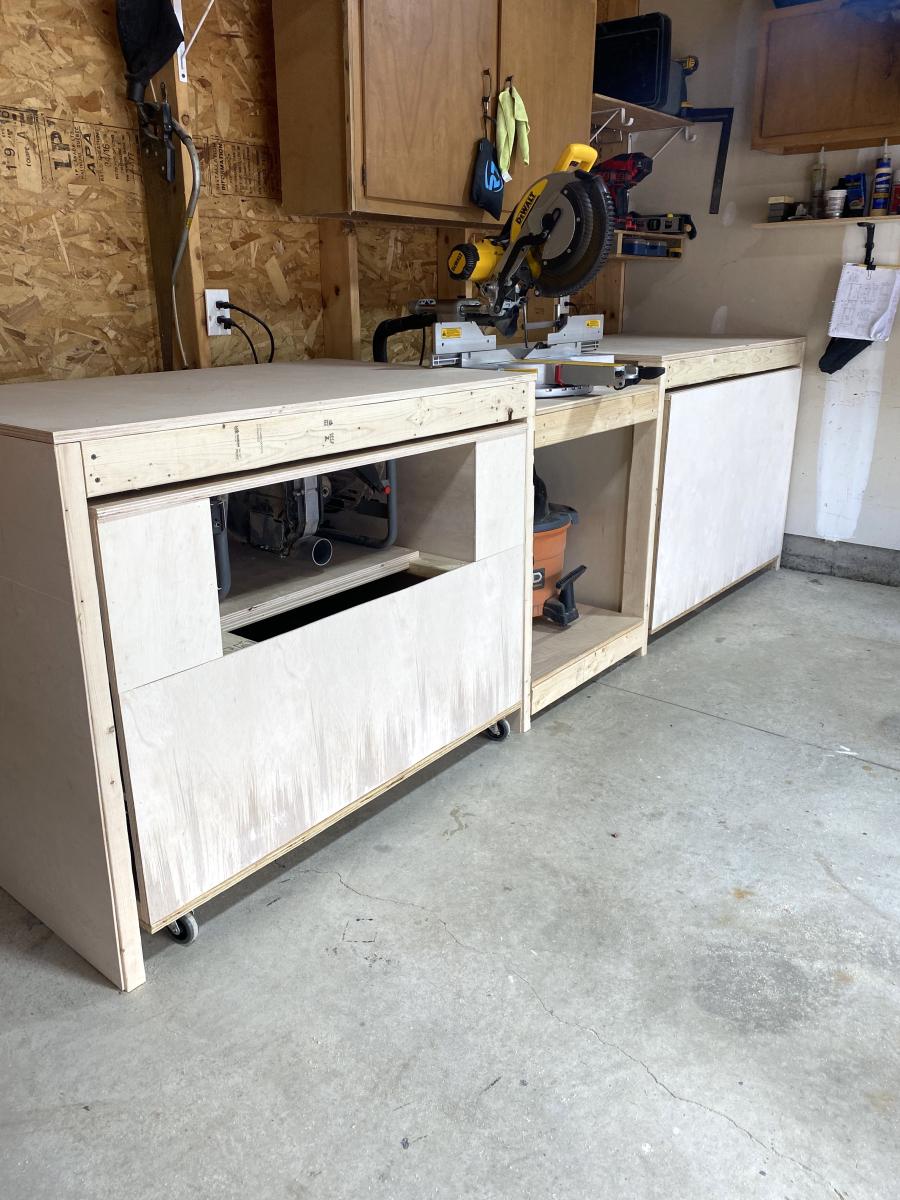
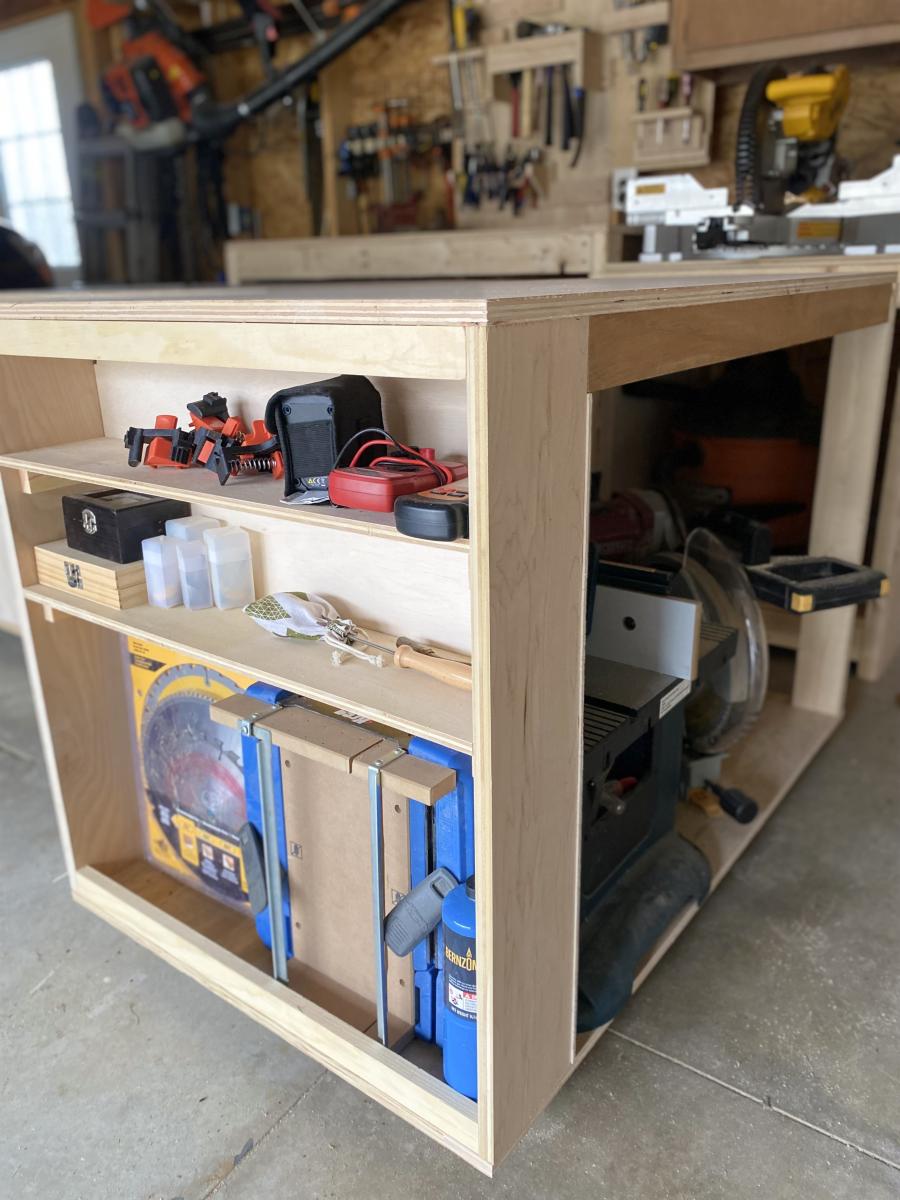
Built from Plan(s)
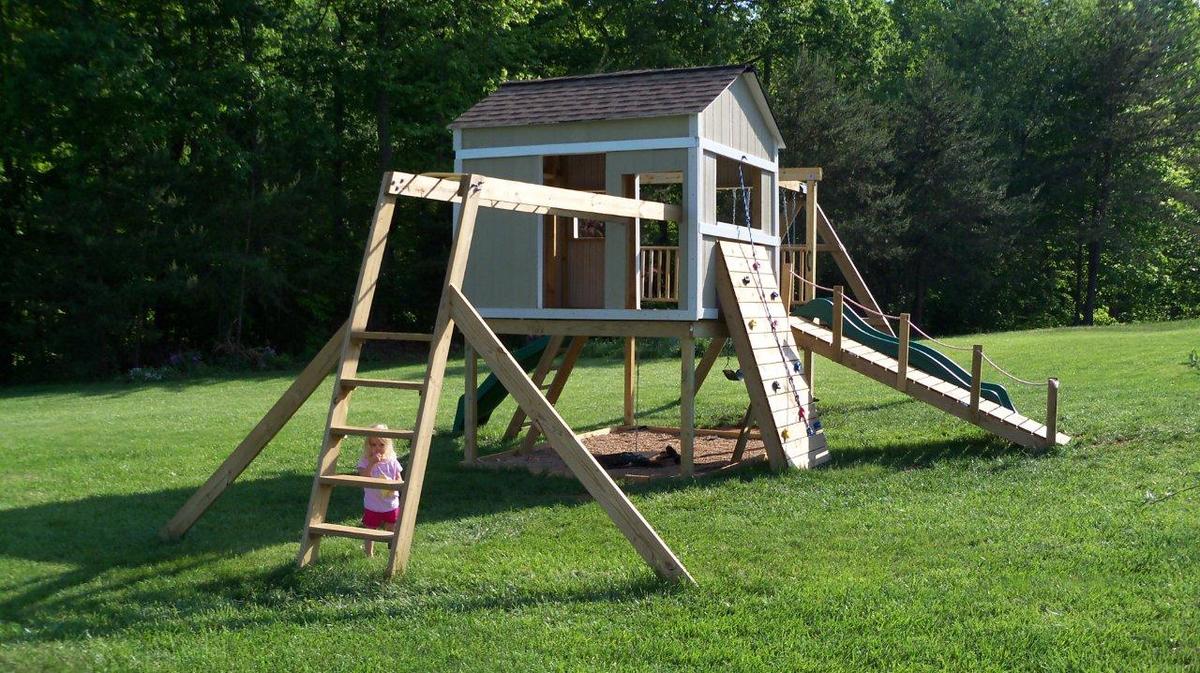
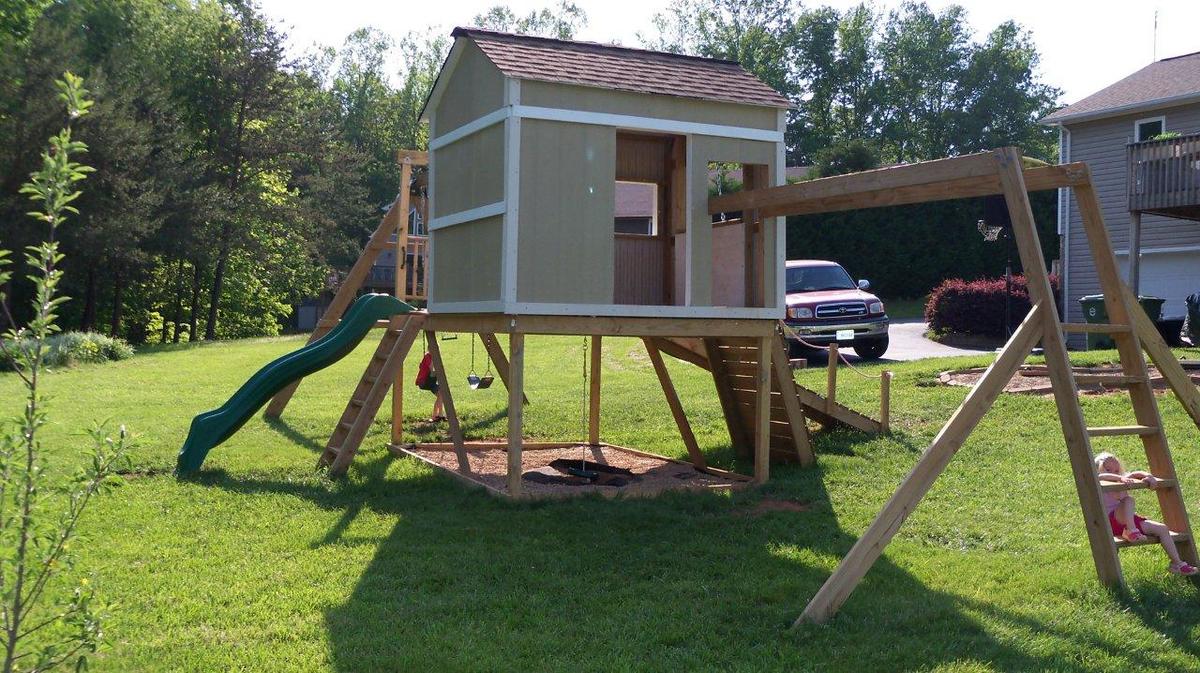
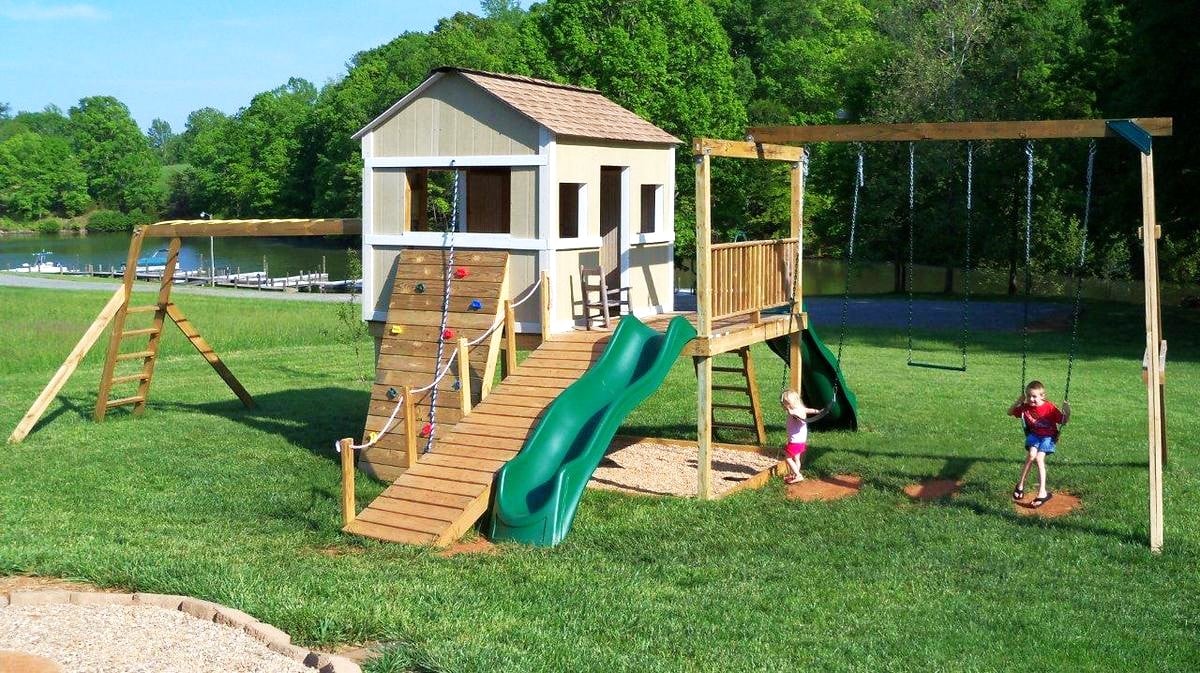
Clubhouse based on Ana's Plan
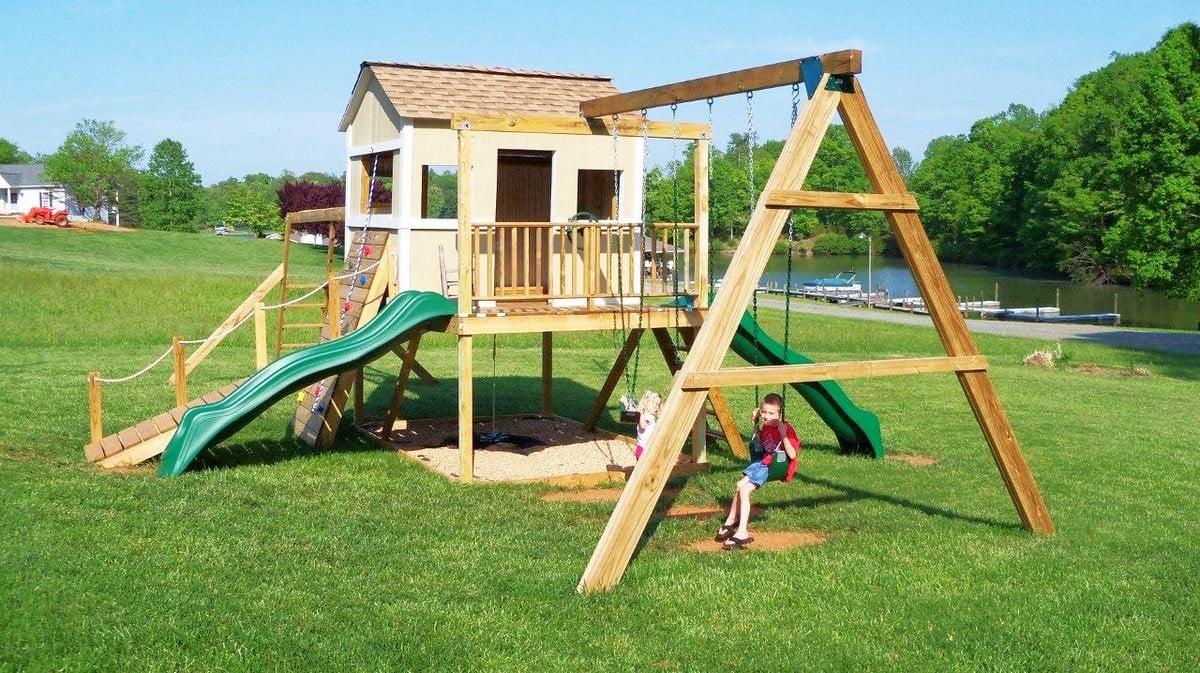
I used Ana's plan as a base.
I changed it from 8x8 to 8x12, made the 4x4x8's to 4x4x10' for a higher main platform and swing platform, and added a 12' long monkey bar set to the other side. Also, an 8' climbing wall and a plank walkway to accompany the two slides.
For the clubhouse, I used Hardiplank 4x8 sheets for the siding and an EZ-Framer kit for the structure itself.
The slides I purchased from Lowes, monkey bars from Amazon, and the swing frame braces from Amazon as well. The swing kits I got from ebay.


Built from Plan(s)
Estimated Cost
1500
Estimated Time Investment
Week Long Project (20 Hours or More)
Recommended Skill Level
Intermediate
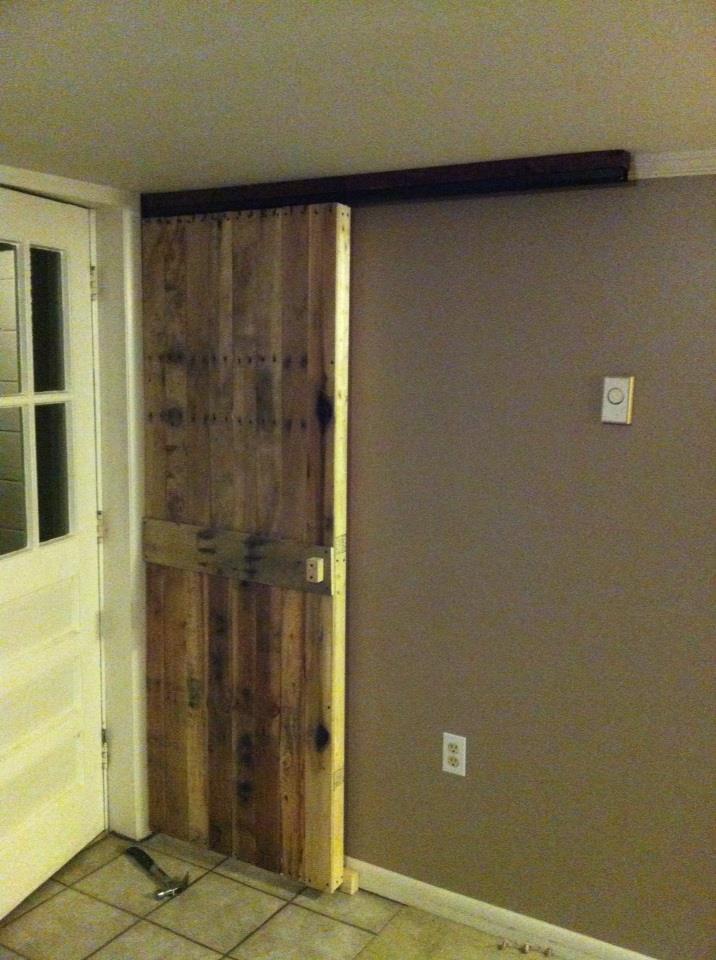
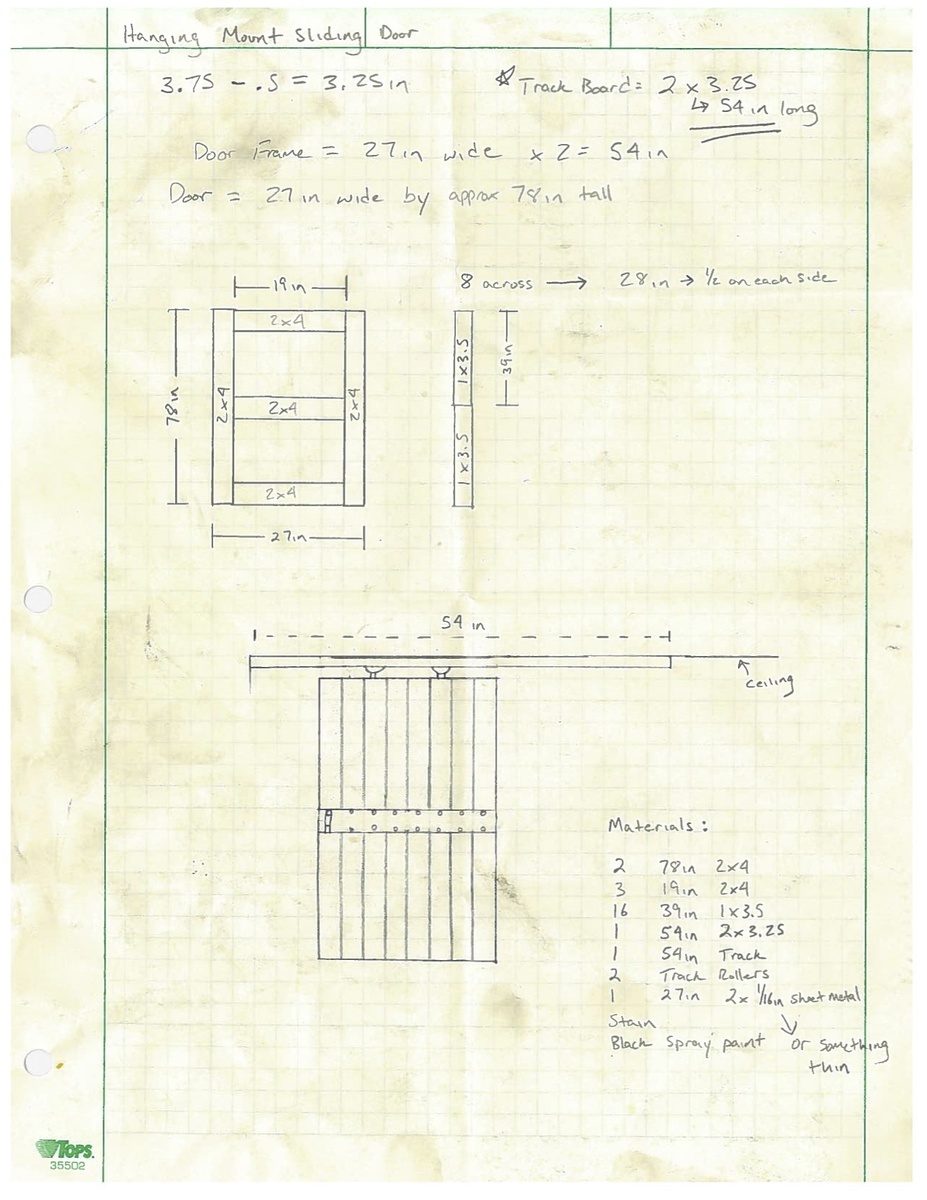
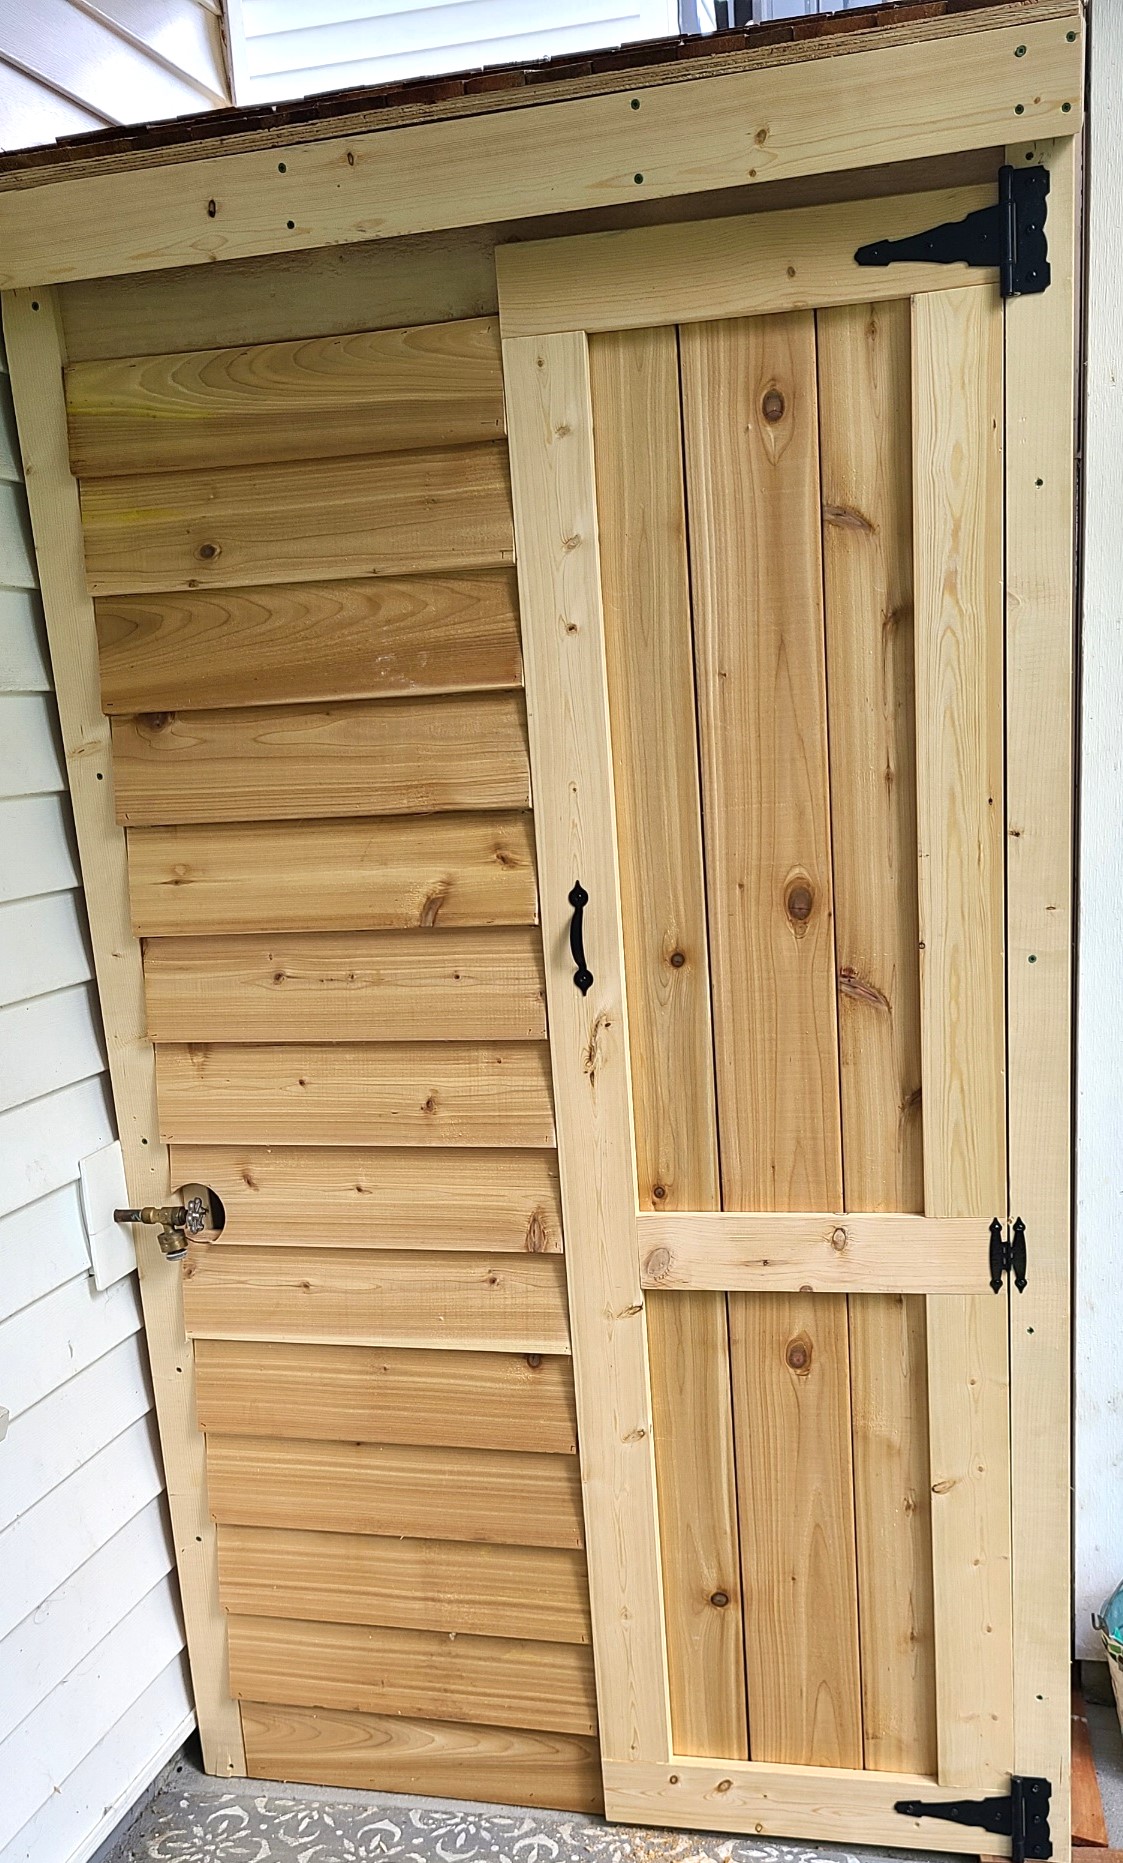
Sliding "barn" door from reclaimed pallet wood
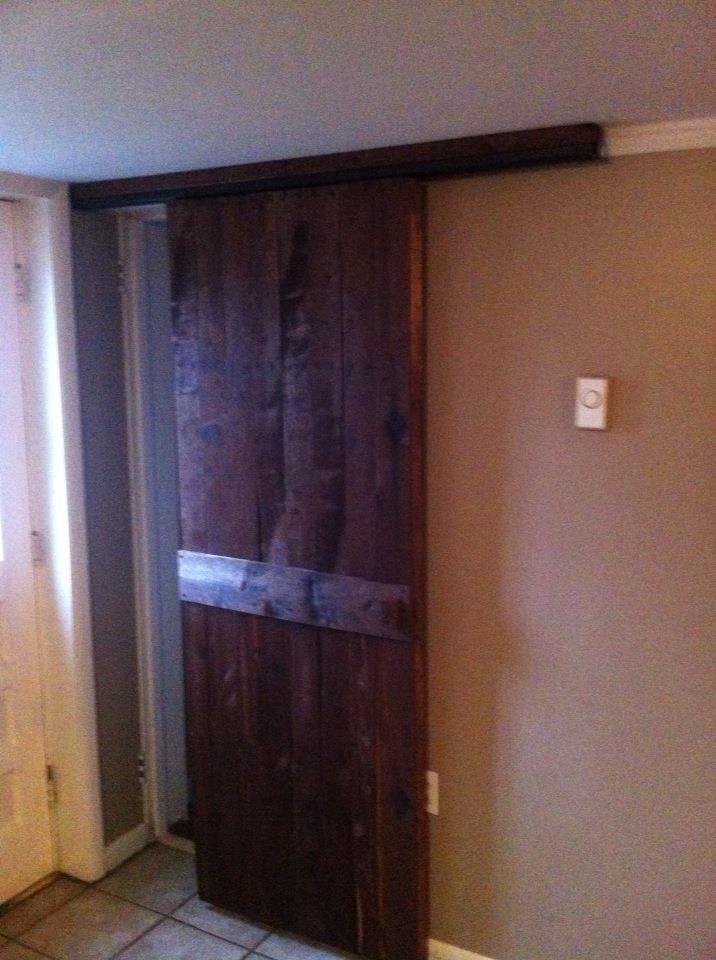
I saw many different sliding door projects online, so I did my own spin on one. I was able to get several old pallets for free (pine and oak). I went to Lowes and bought a few 2x3s which I used as the frame, and the track hardware which was only $13! Most doors I see are mounted from the wall, but since I have 7' ceilings downstairs I mounted mine from the ceiling. This project only took about 4 hours total and cost about $40 when you figure in costs for screws, stain, etc. The most difficult part was taking apart the pallets. Using a reciprocating saw with a 12'' demolition blade is the best way to take them apart. Thanks for the idea Ana.

Estimated Cost
$40
Estimated Time Investment
Afternoon Project (3-6 Hours)
Finish Used
Minwax Dark Walnut
Recommended Skill Level
Beginner
Comments
Mon, 05/13/2013 - 20:00
lowes door hanging hardware
Hi!!
This looks so awesome! I came across this and was hoping to repeat it. You mention that you found the door hanging hardware at Lowes for $13. I can't seem to find it. Do you happen to remember the name of it? I'm entering "hanging door hardware" into Lowes and Home Depot and can't seem to find any hanging door hardware at all. I'd appreciate the help. Thanks!
Tina
Eagle Project Workbench - Ultimate Roll Away Workbench with Miter Saw Stand
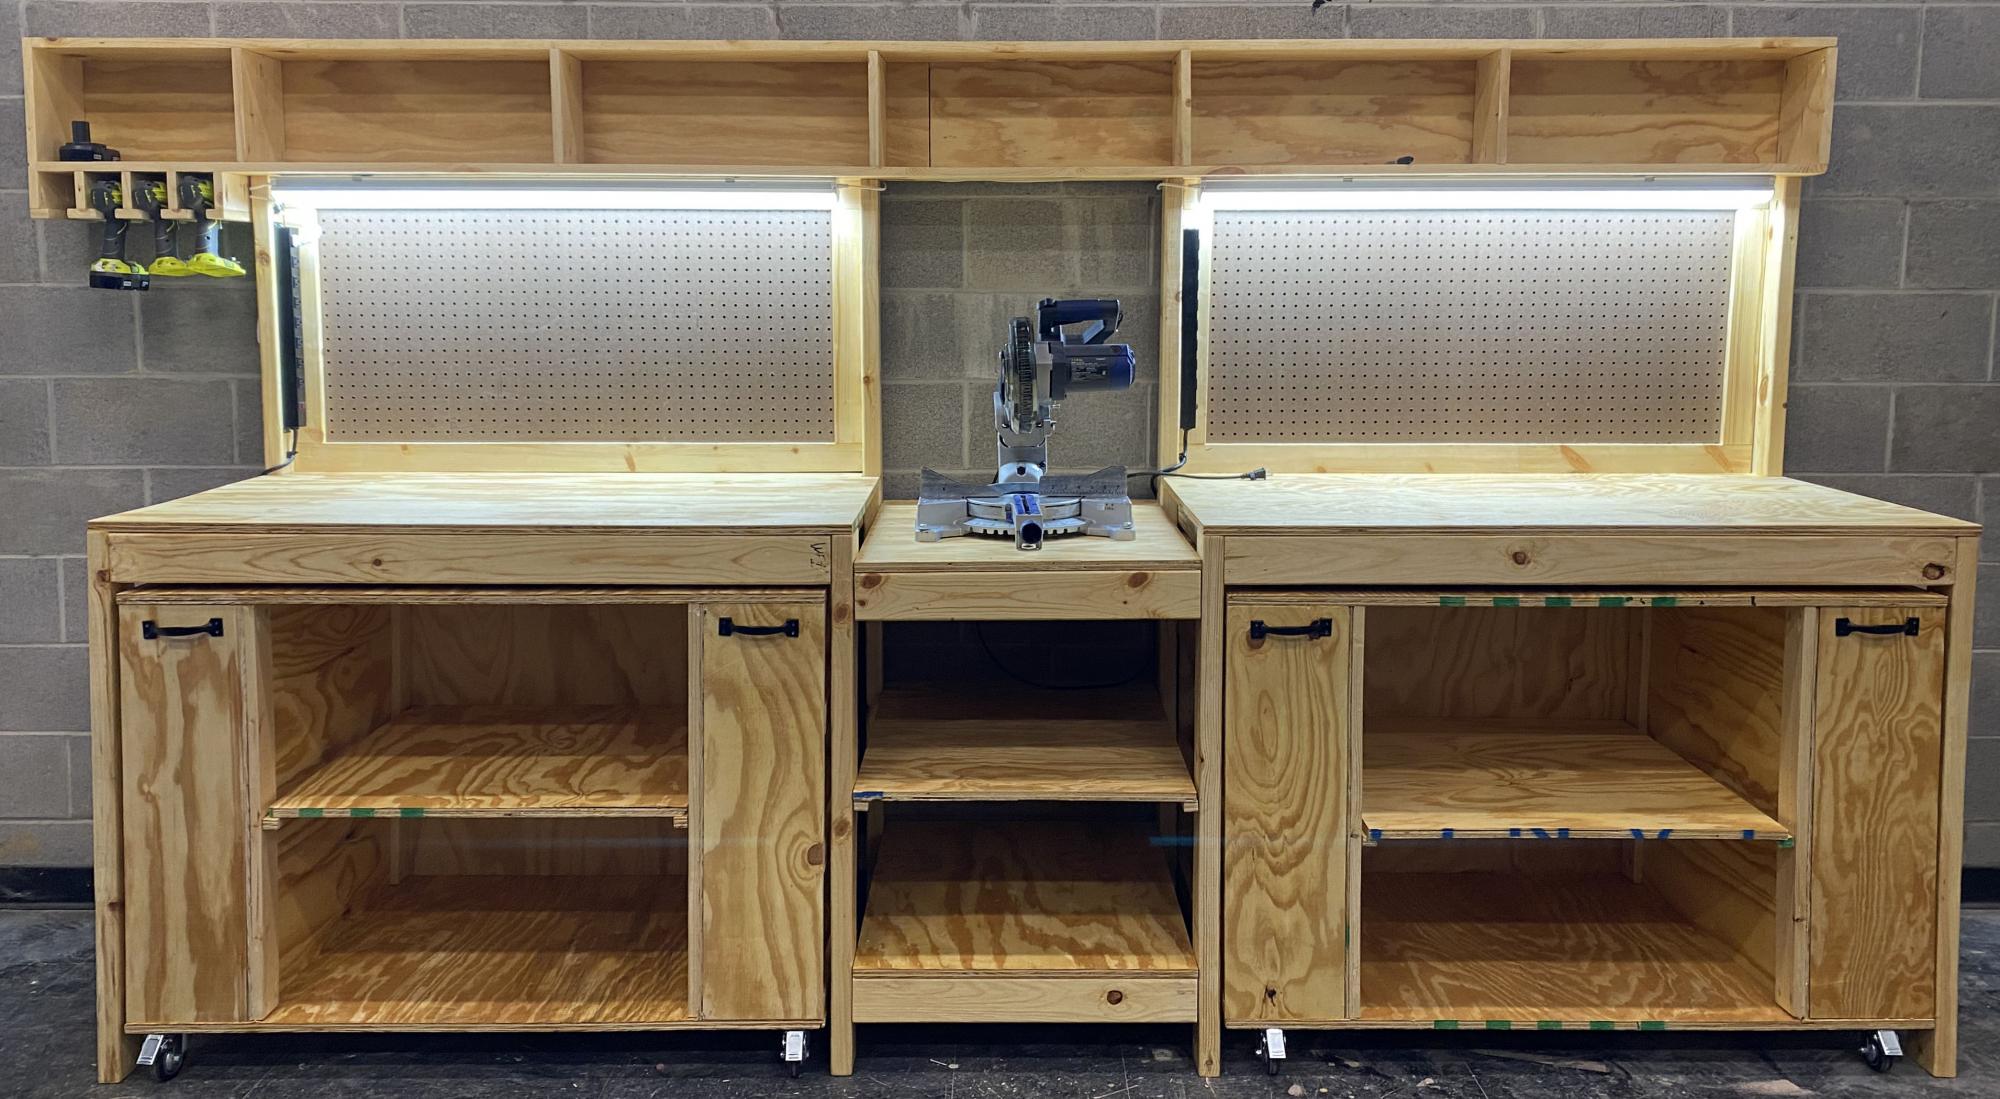
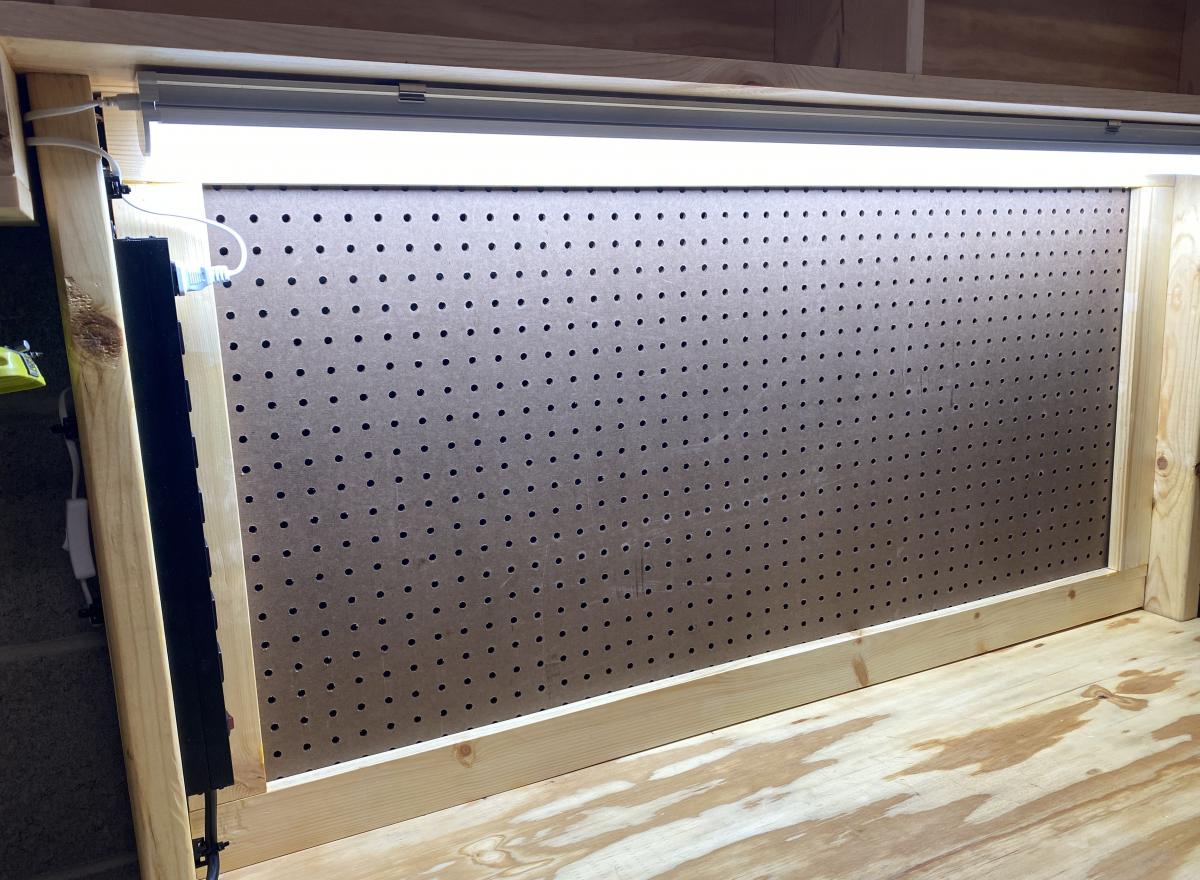
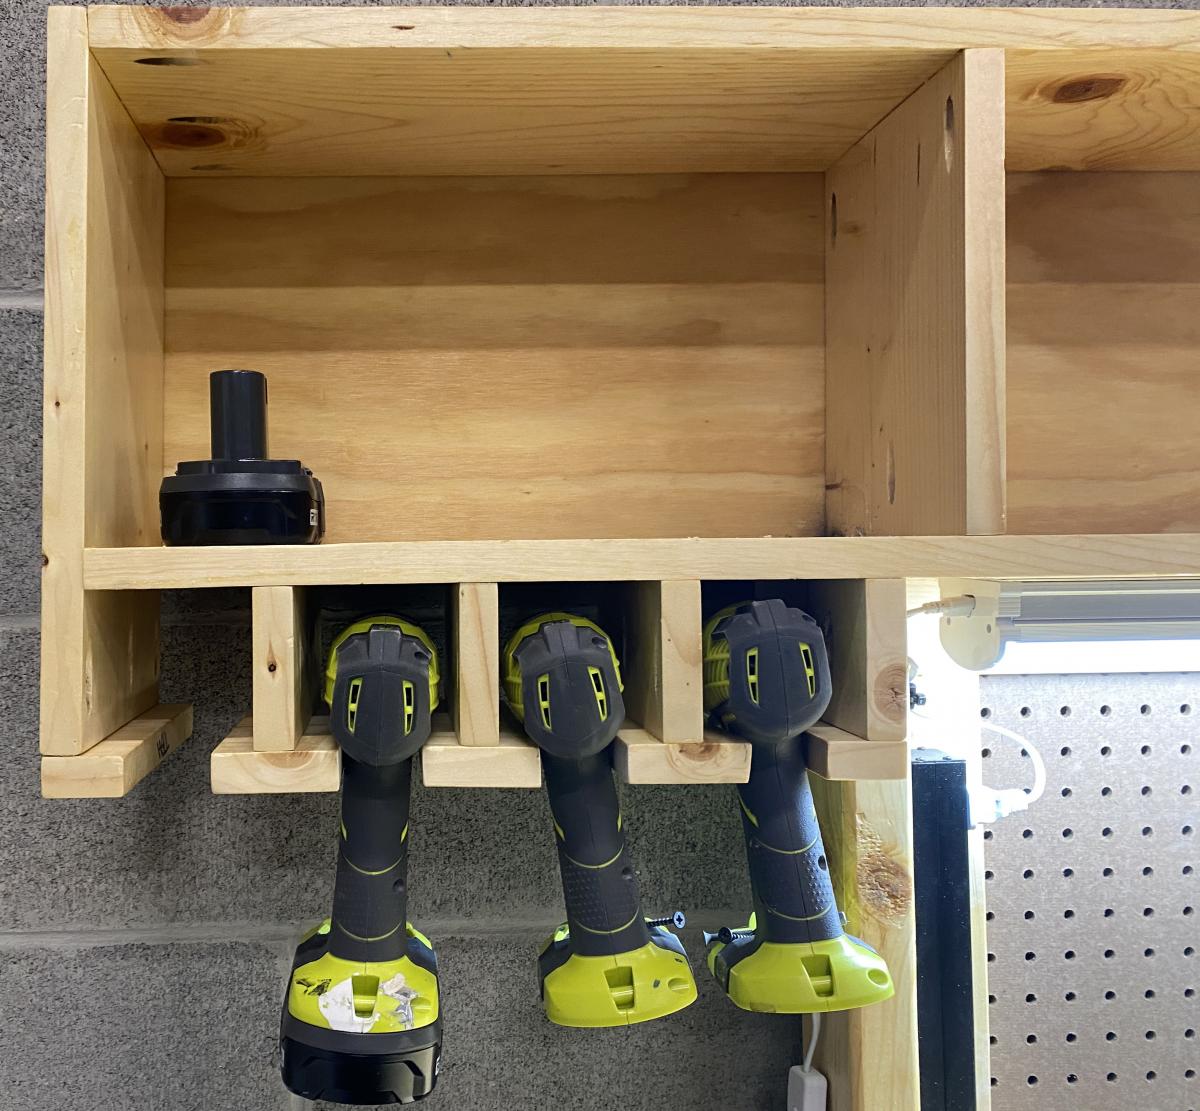
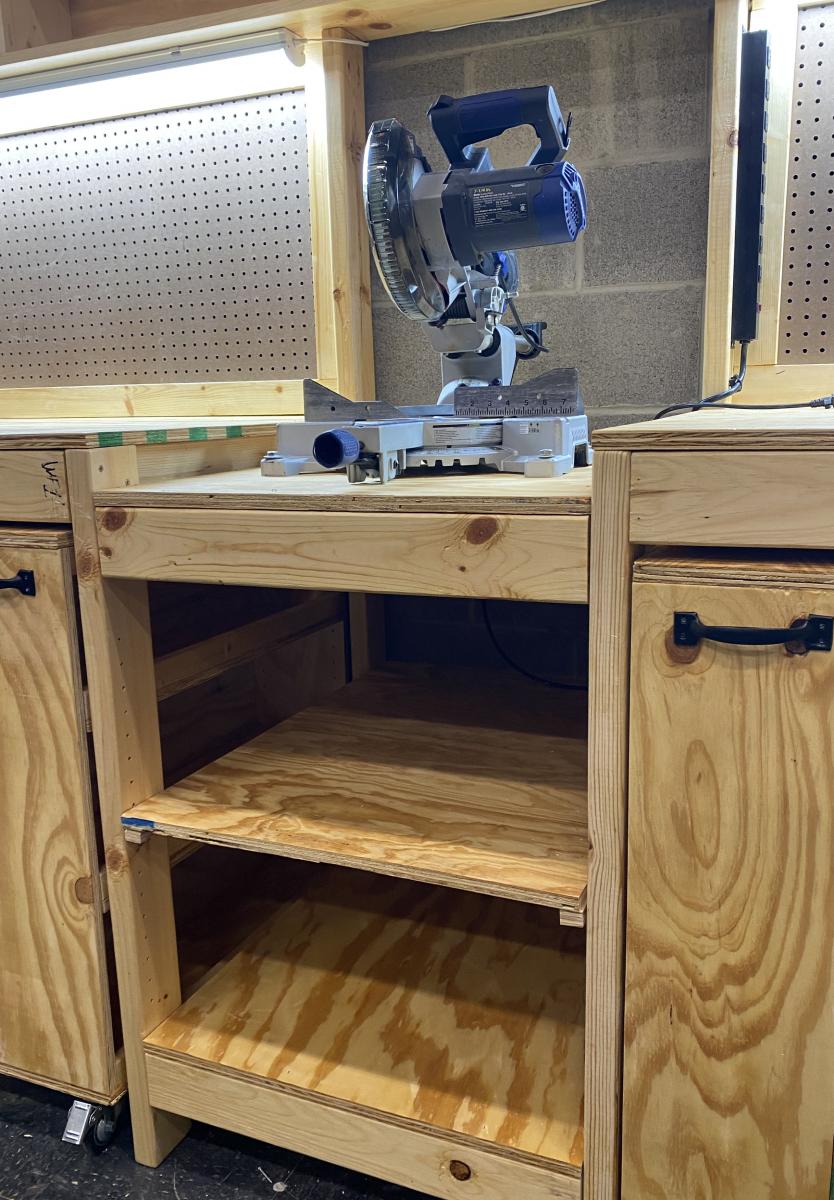
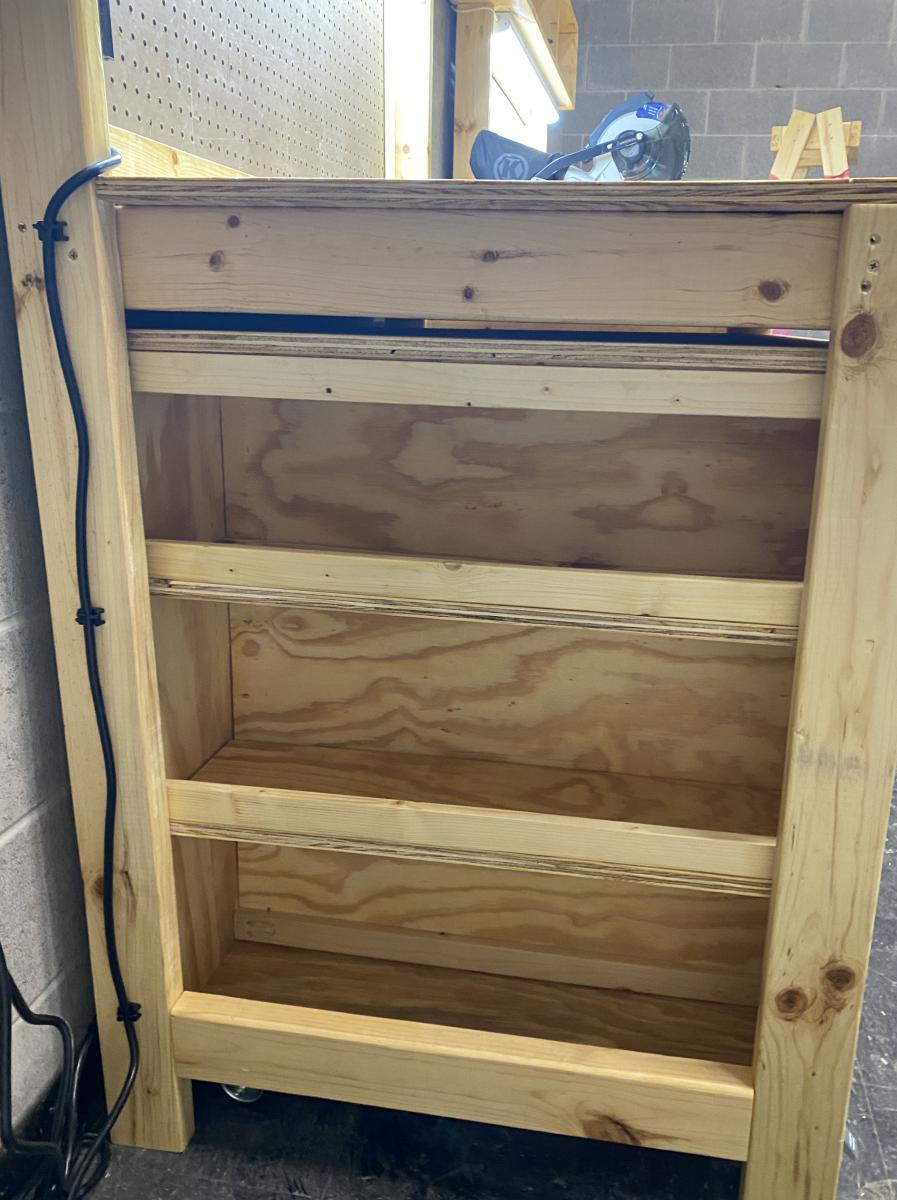
My son chose to make a workbench for his high school theater for his Eagle Scout project, and selected the Ultimate Roll Away Workbench with Miter Saw Stand as the basis for the project. The theater teacher wanted pegboard for tool storage, so we extended the rear legs on each workbench and notched the top to allow them to pass through. We built two frames from 1x3s to fit inside the rear legs, then put a pegboard inside each one.
To secure the extended legs, we added a riser shelf from 1x8s. We put a storage station for drills at one end of the riser shelf.
We also made all the cart shelves adjustable and added an adjustable shelf under the miter saw, and added lighting and power strips.
We left out the panels at the end of the workbench to allow access to the shelves there without having to remove the carts. Once we had constructed it, we added a brace at each end of the workbench to better support the outside front legs.
This plan was the perfect one for the theater, giving a stable work area for the miter saw and allowing for tool and materials storage. The carts can be rolled around to where a work surface is needed. This will come in handy for years of set construction in the theater. So proud of my son and all the leadership and hard work he put into this project!
Built from Plan(s)
Comments
Mon, 10/18/2021 - 11:54
Proud indeed!
WOW, that is absolutely amazing, thank you so much for sharing this story!
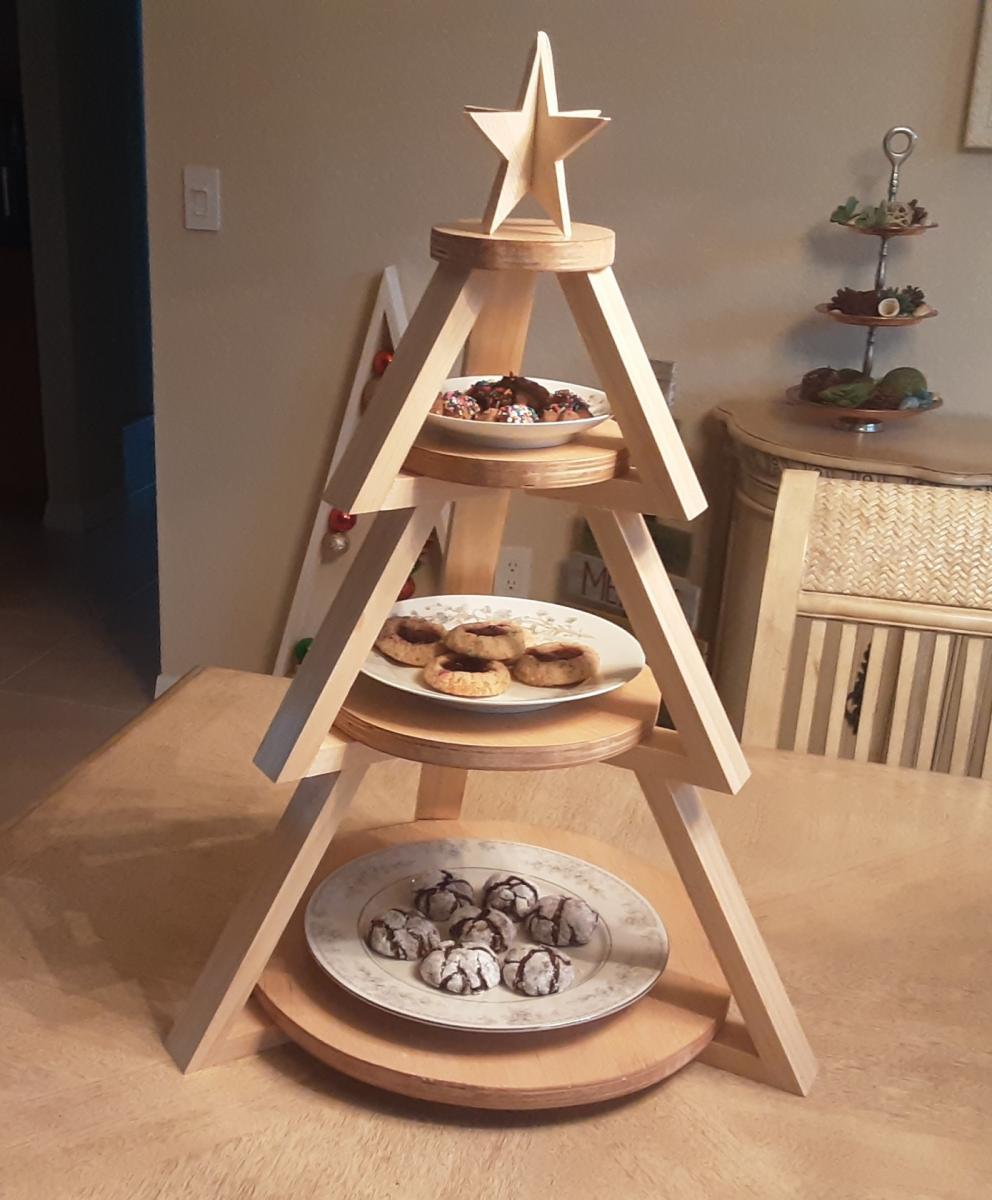
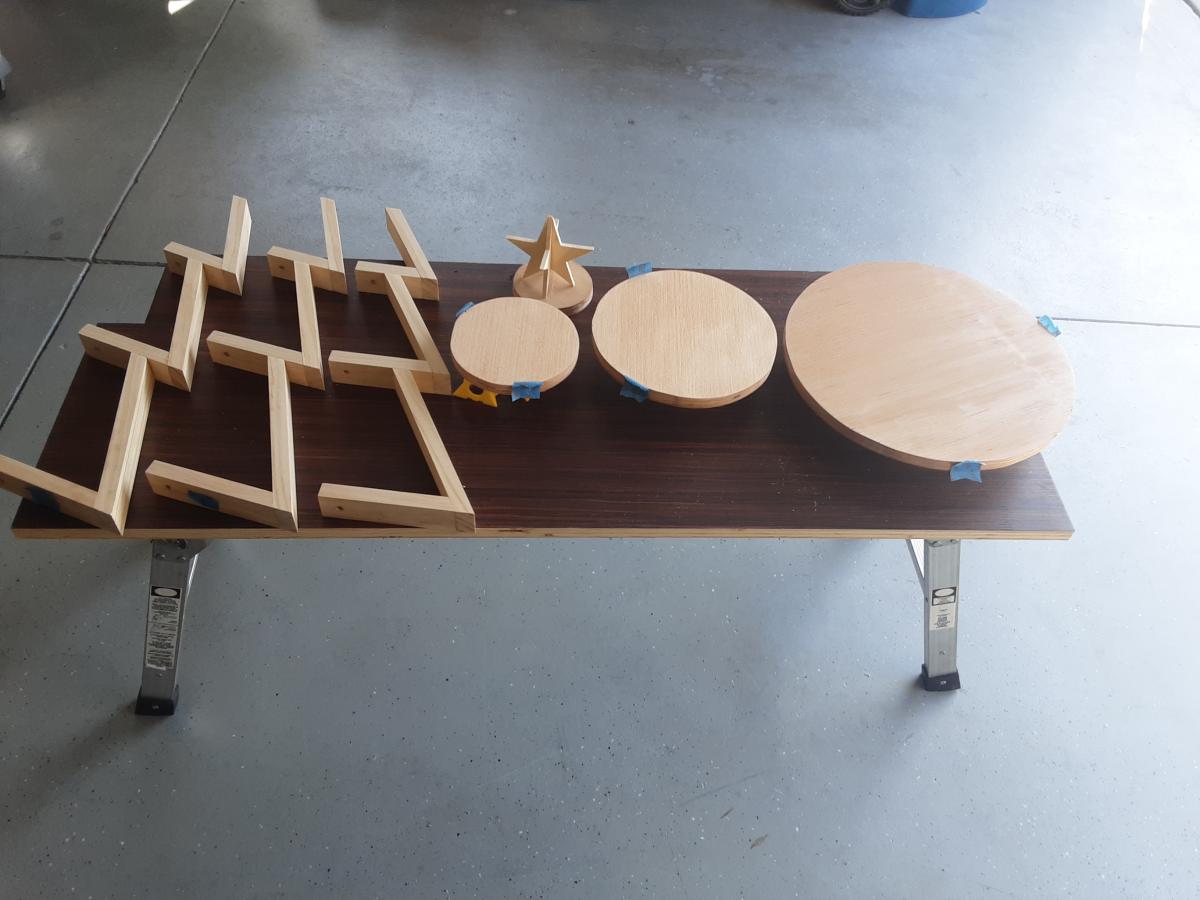
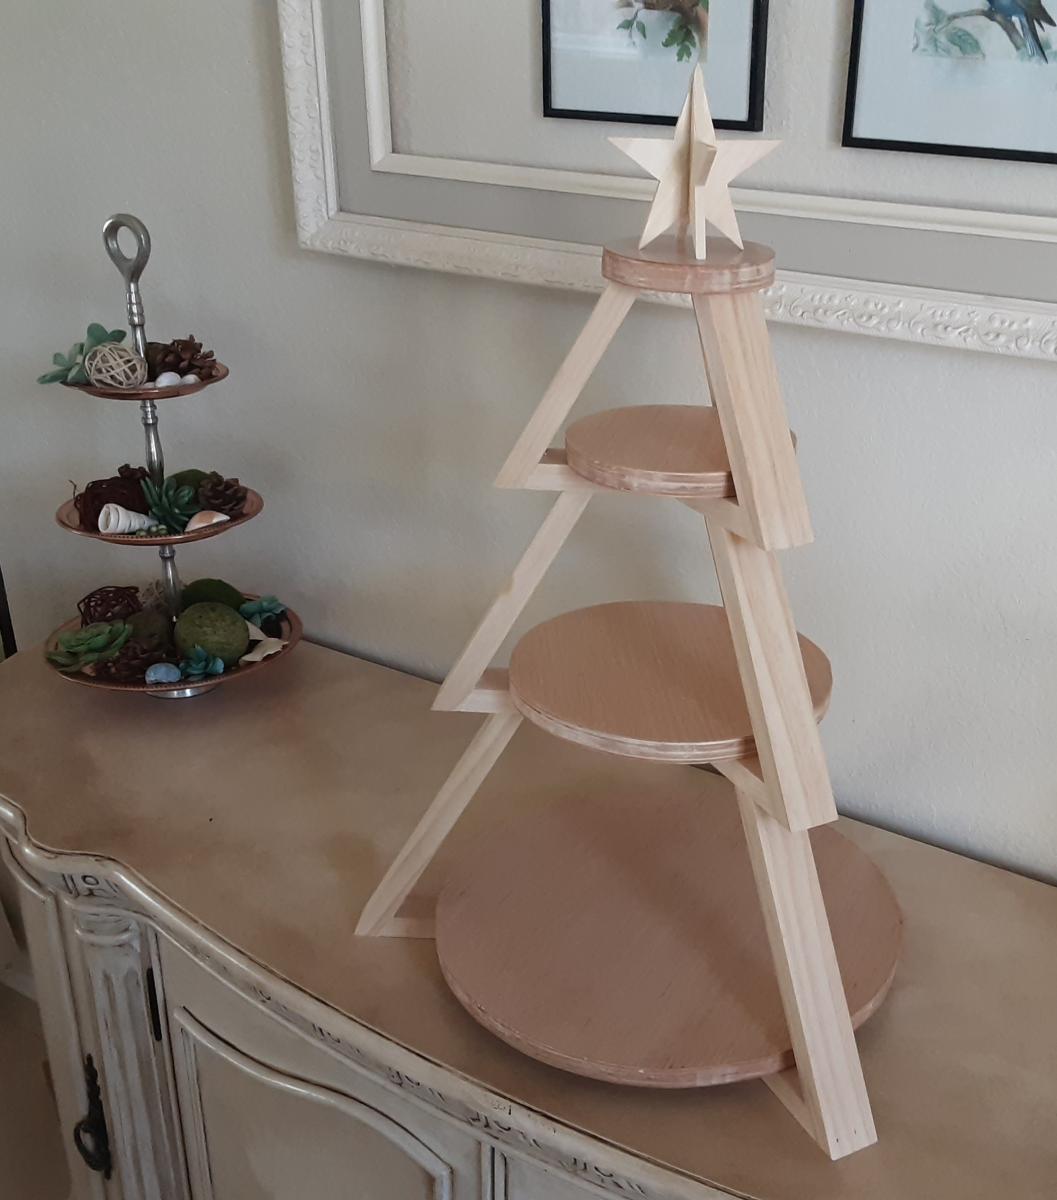
Christmas 3-tier cookie stand

Inspired by Shara of Woodshop Diaries, created this 3 tier tray for displaying cookies for Santa. Added a 3 dimensional star as the topper and simply followed the excellent photos and schematics on Shara's website.
Estimated Cost
$5
Estimated Time Investment
Afternoon Project (3-6 Hours)
Finish Used
Minwax paste wax
Recommended Skill Level
Beginner
Comments
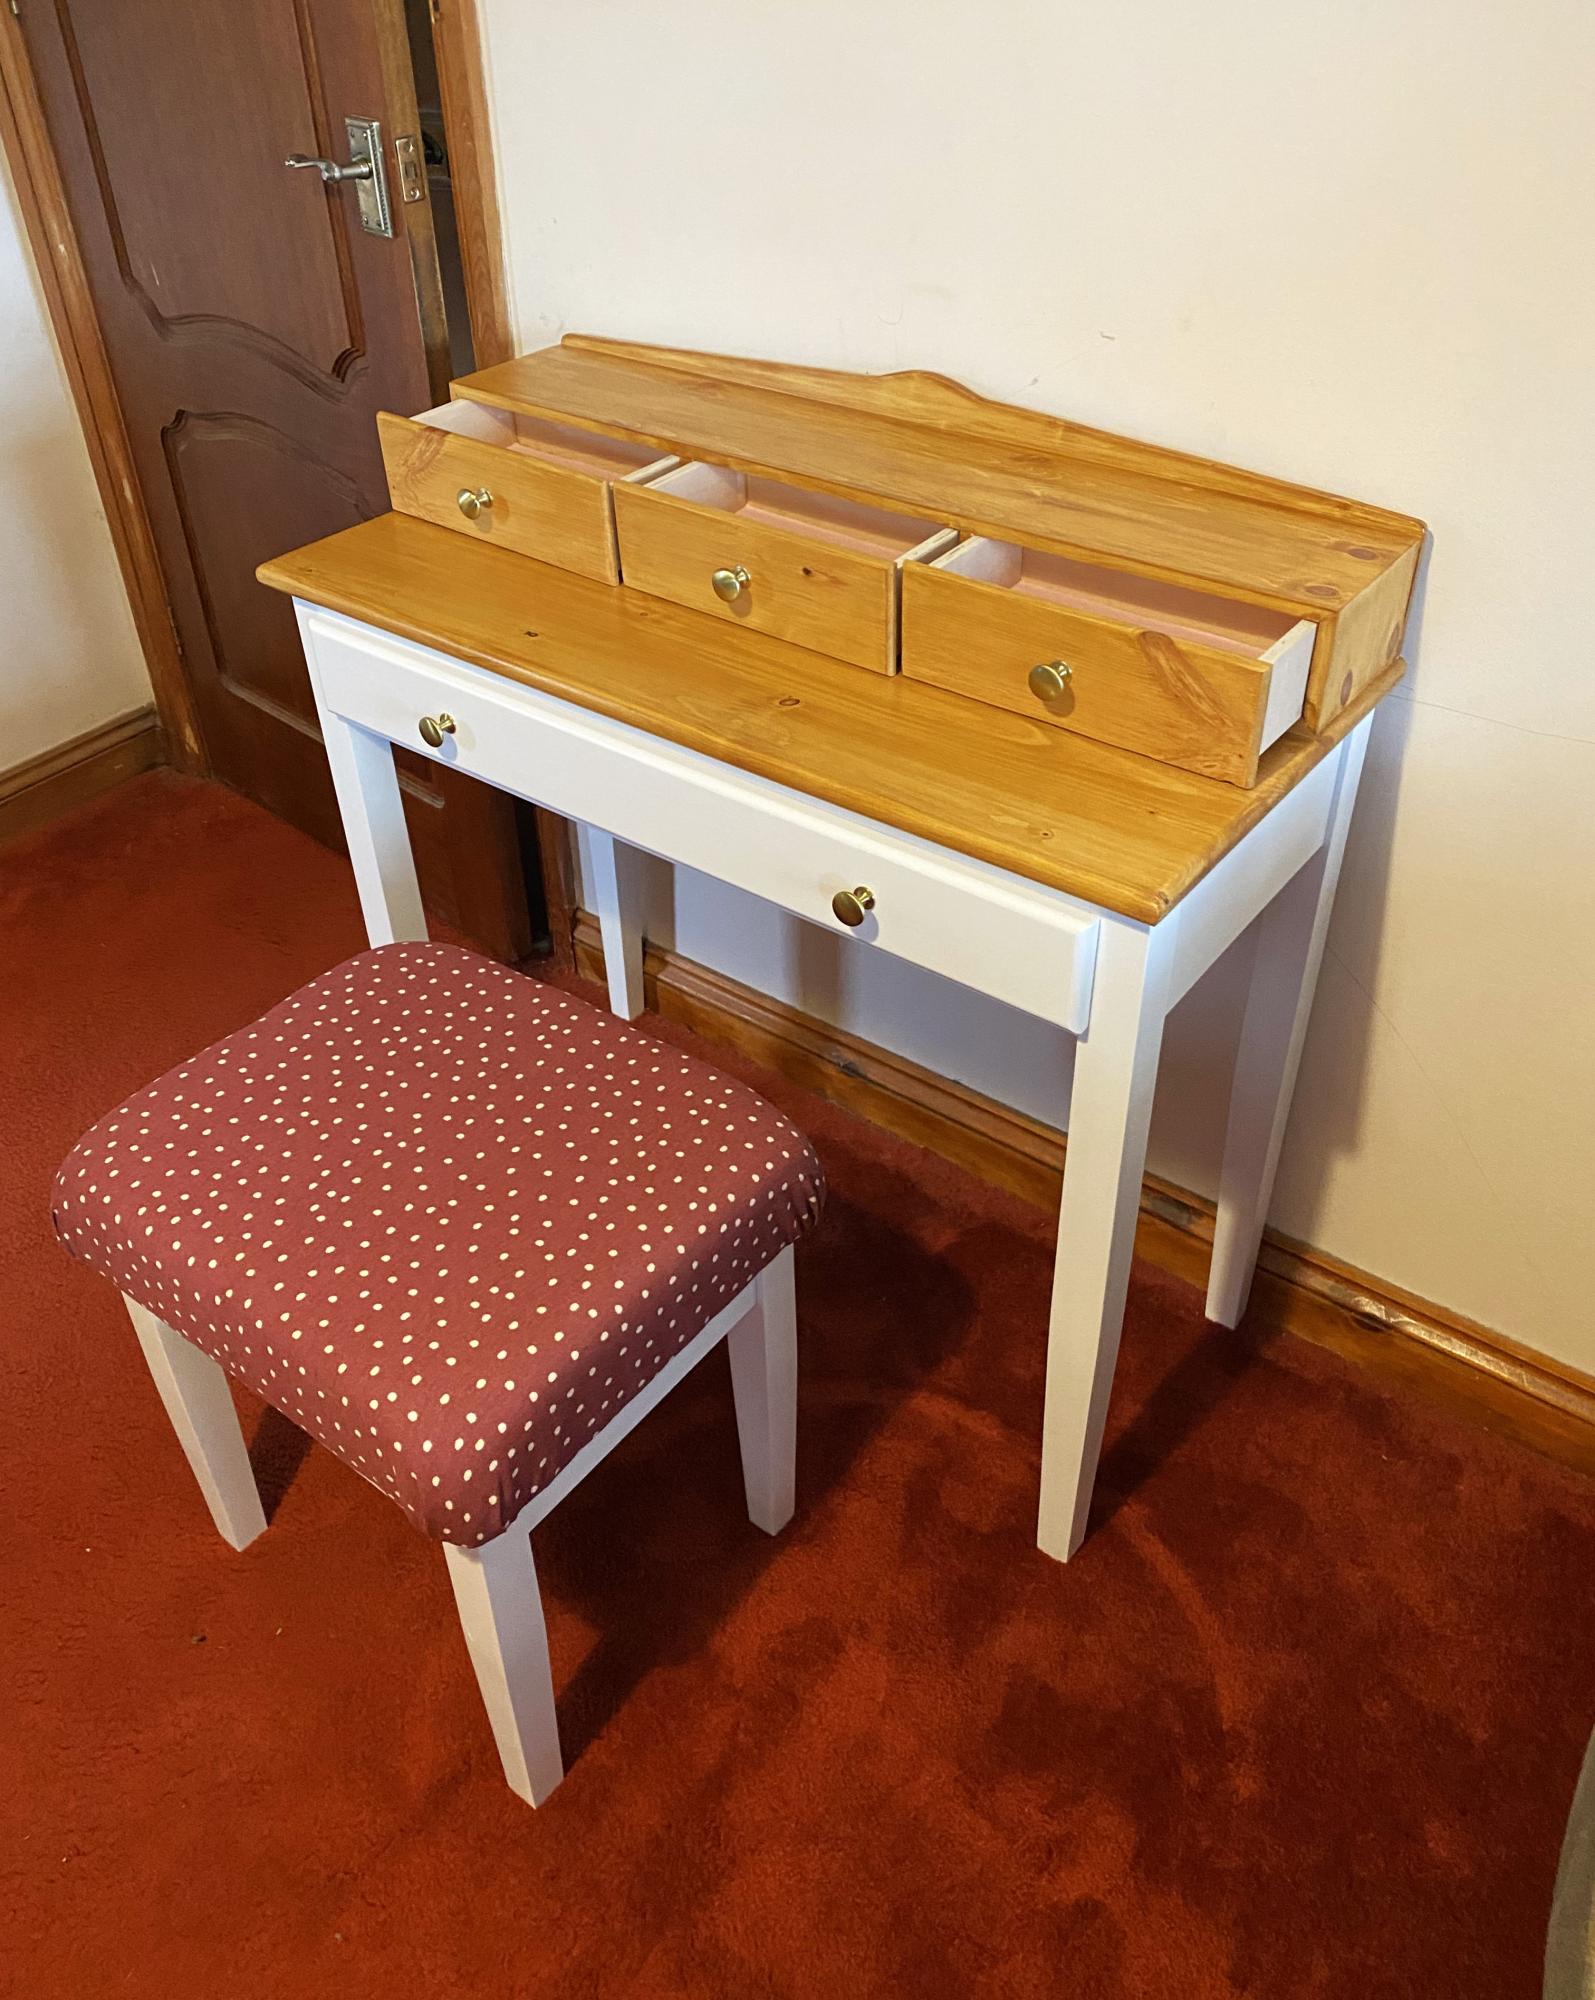
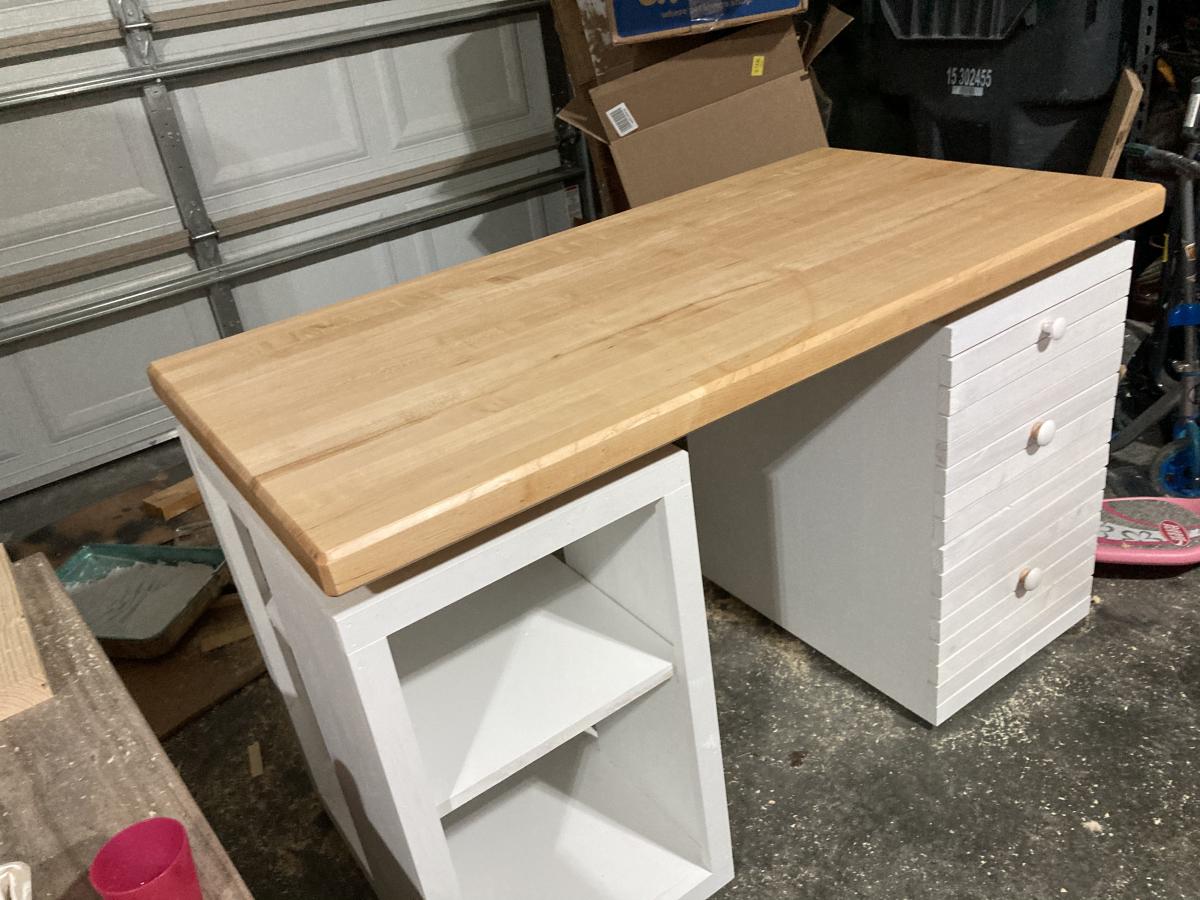
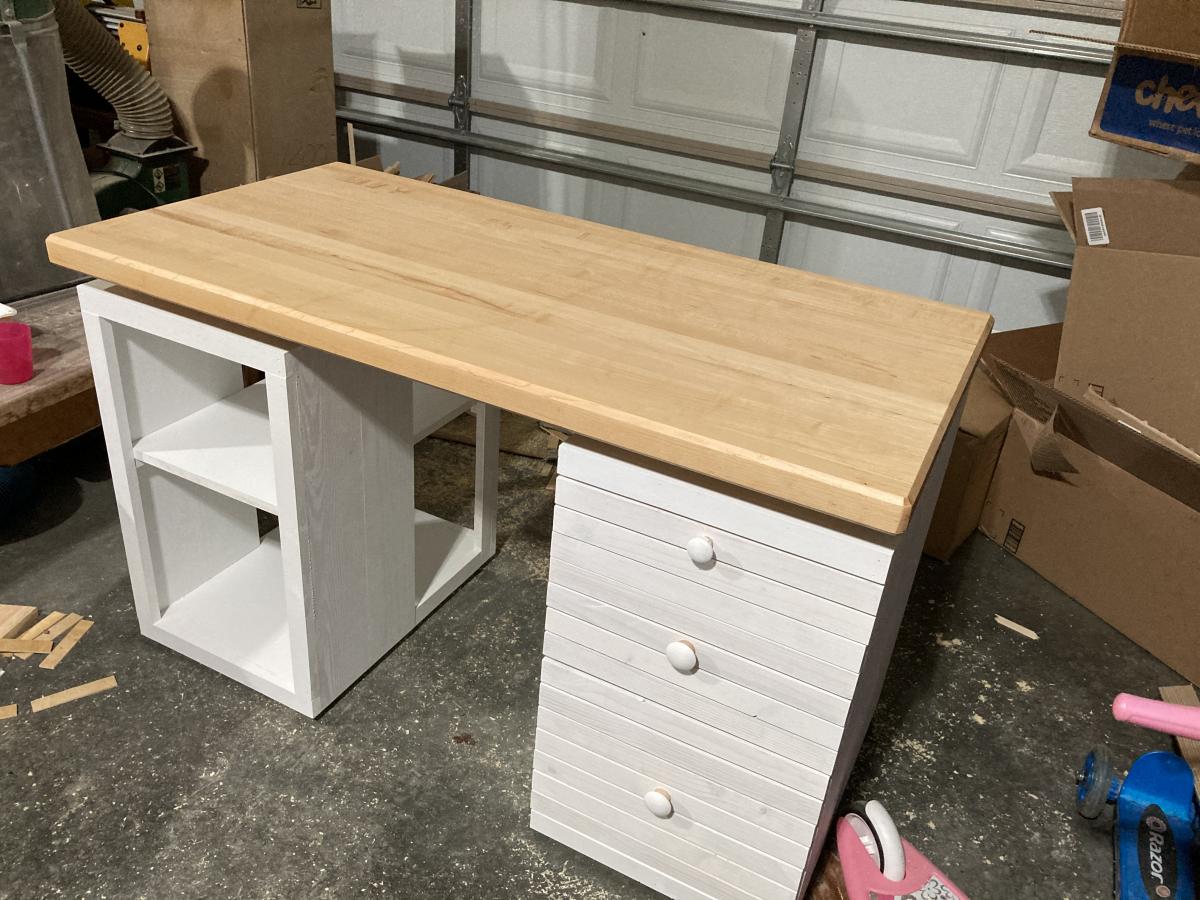
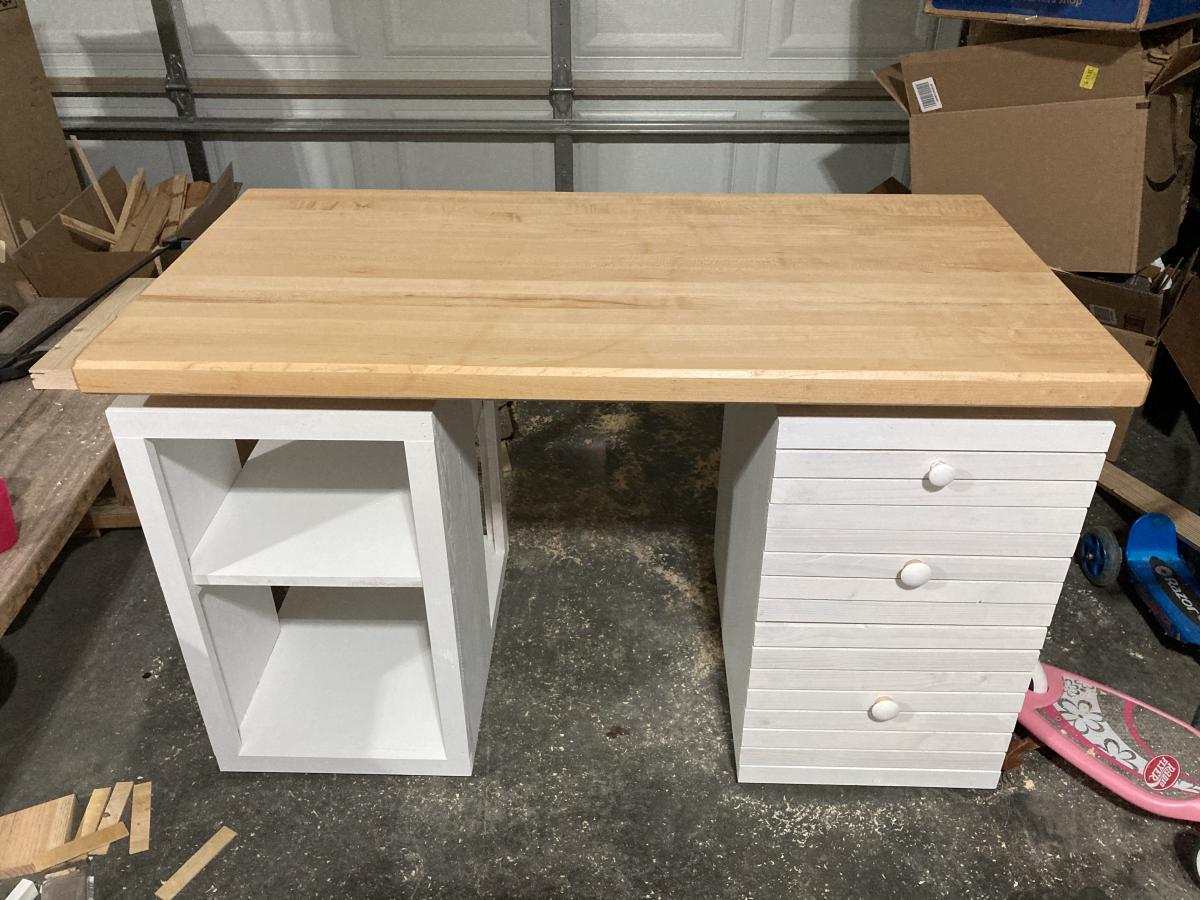
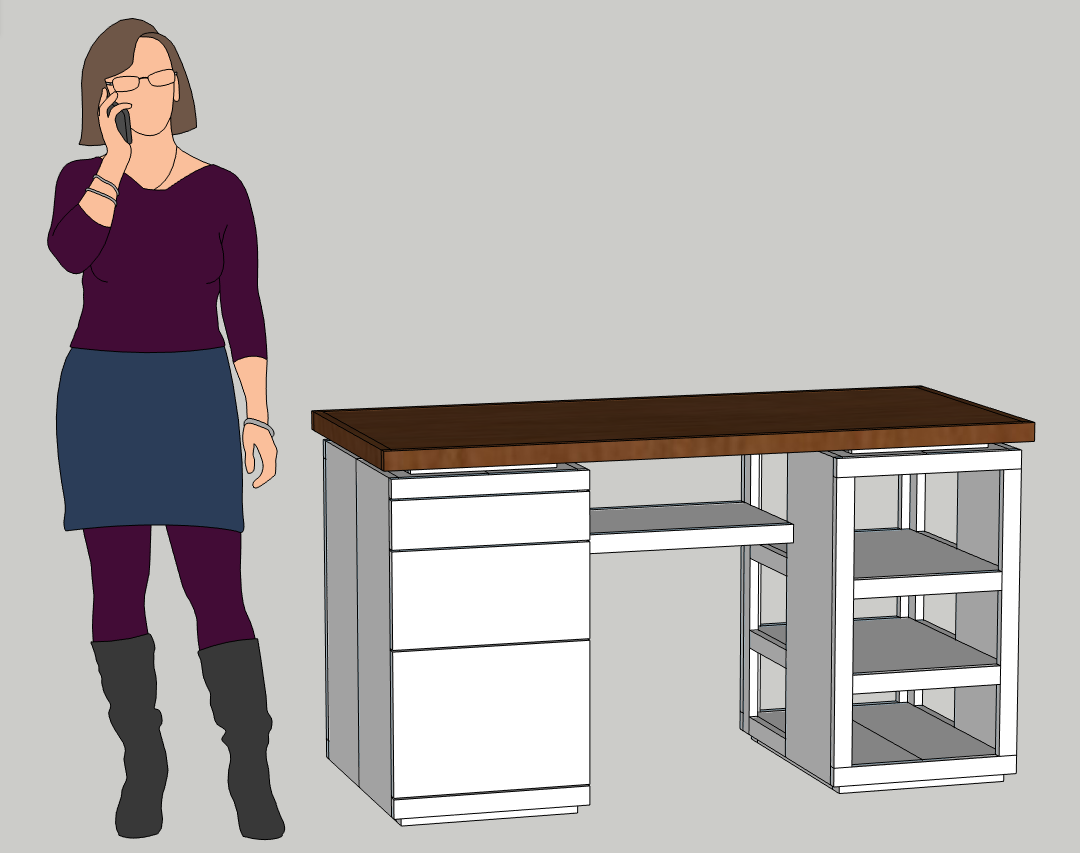
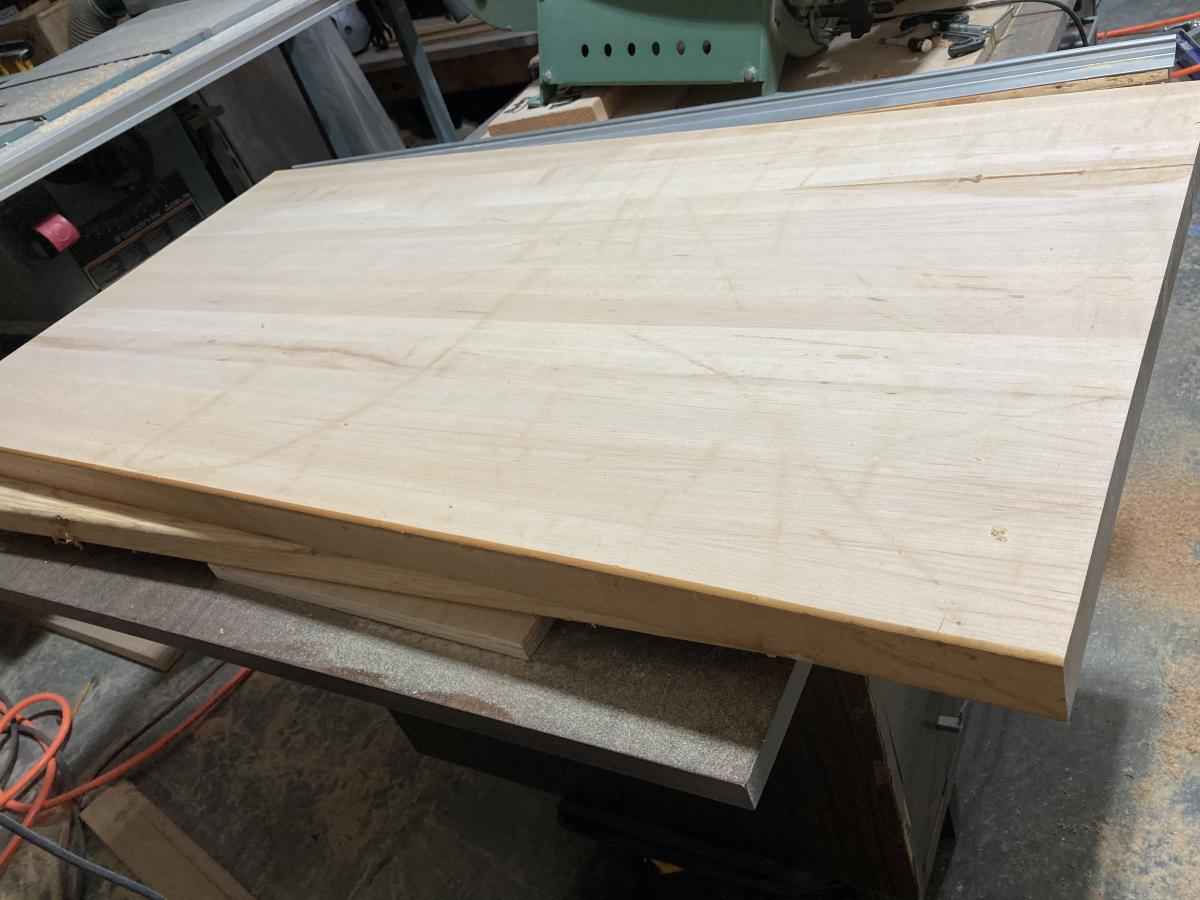
Modern craft table inspired desk
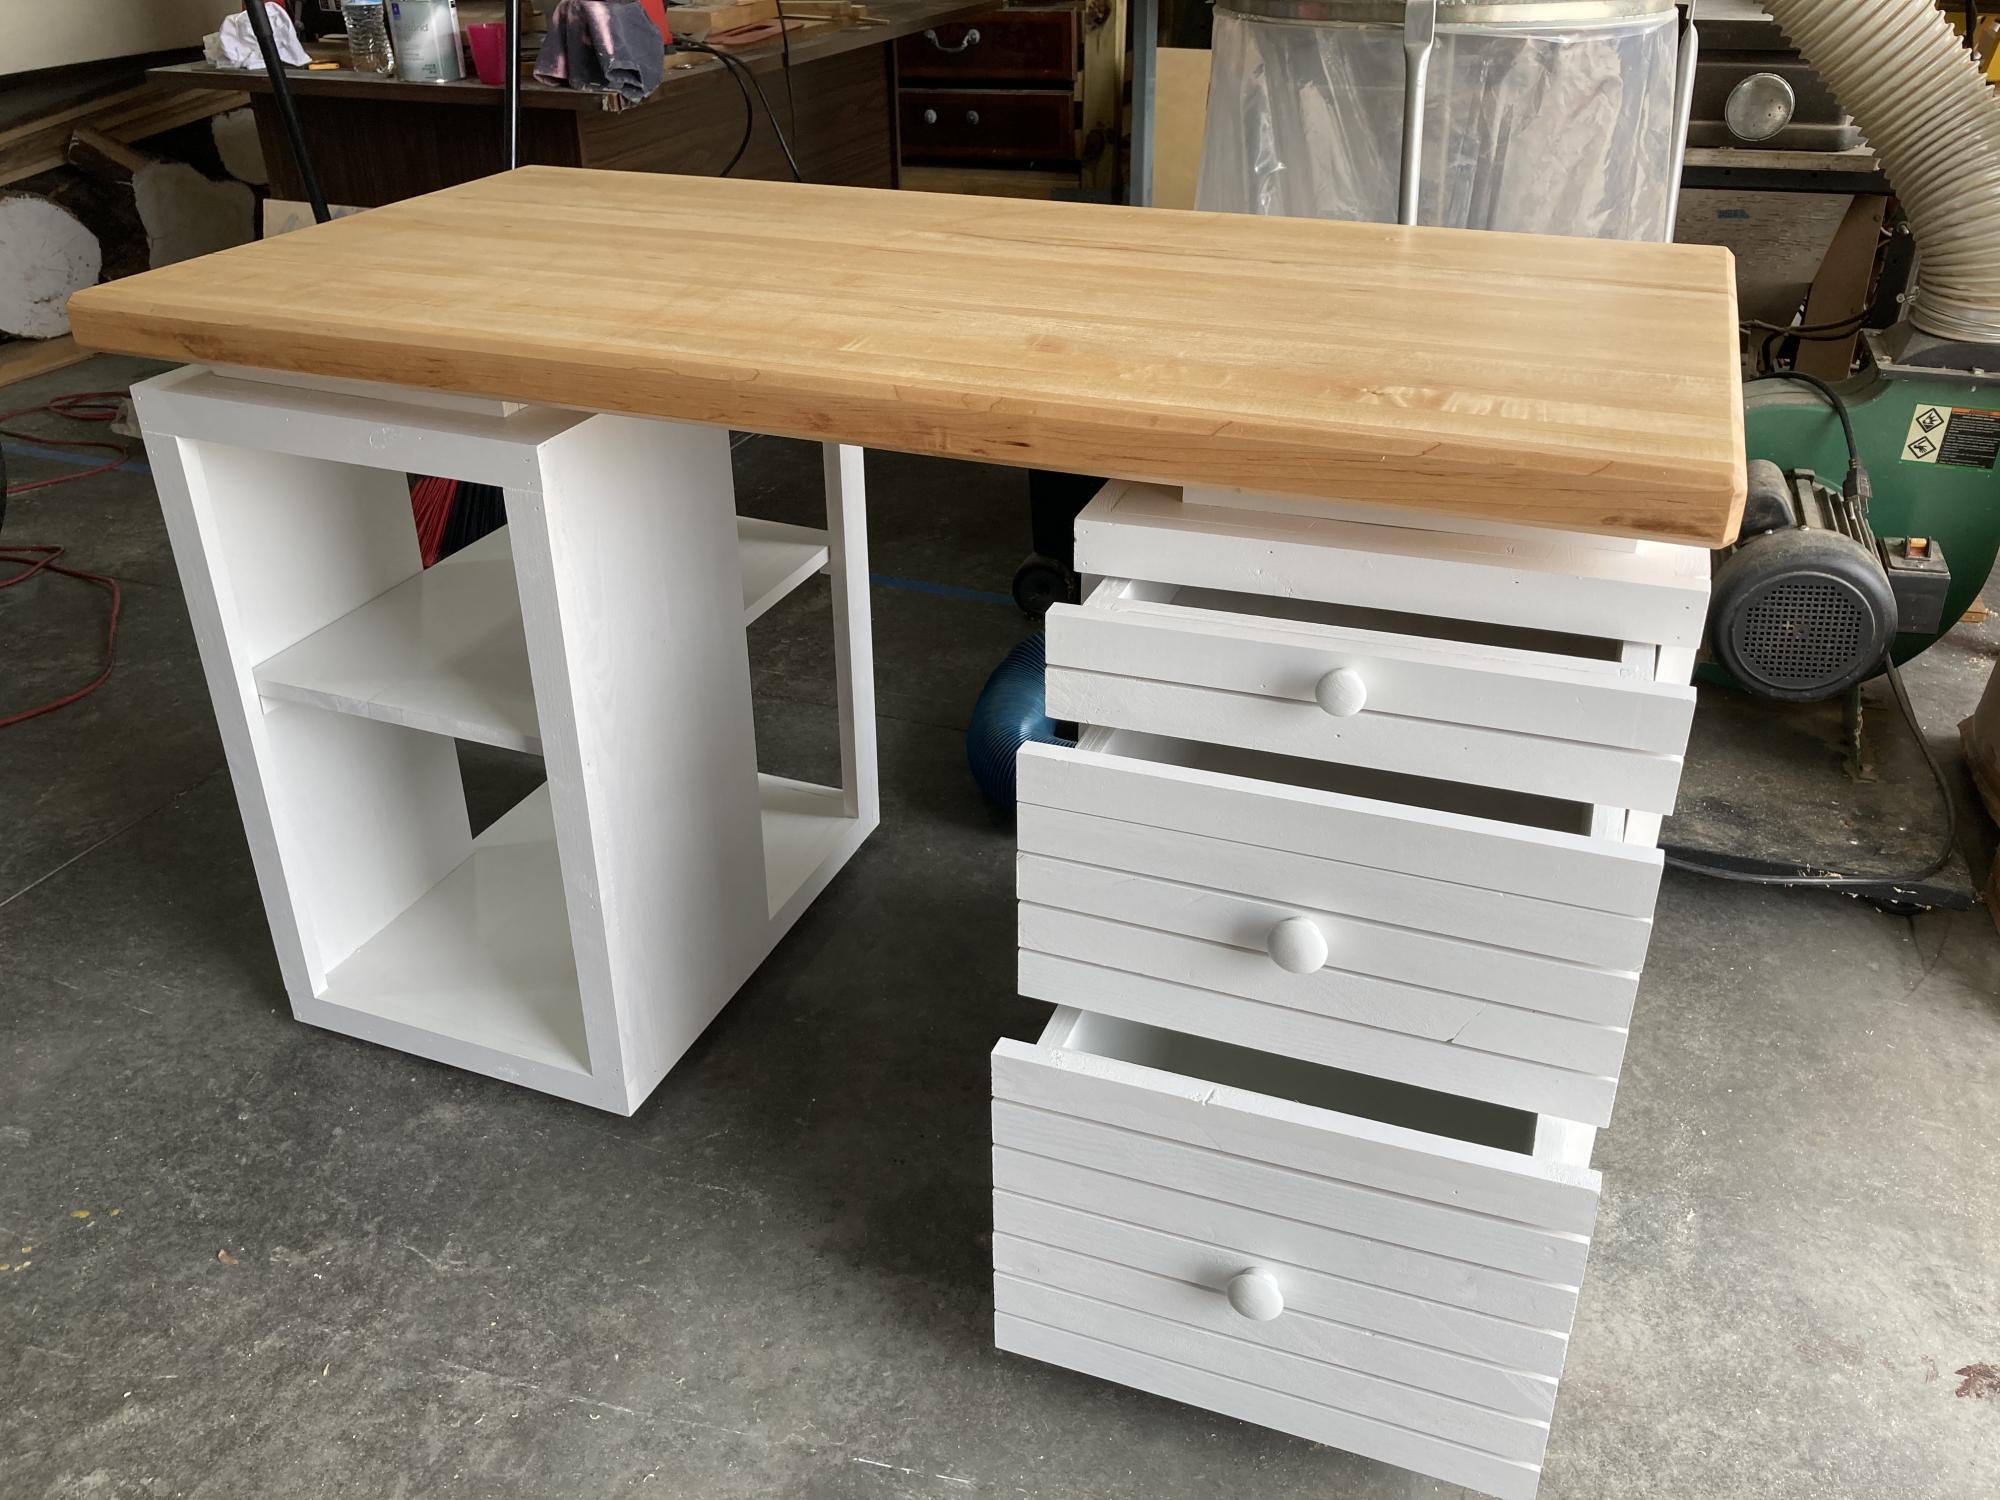
Your craft table was the kicking off point for this desk. Pine cabinets, plywood drawers, maple top.
Built from Plan(s)
Estimated Cost
I already had the materials, the paint was about $50
Estimated Time Investment
Week Long Project (20 Hours or More)
Finish Used
Sherwin Williams Pro Classic White paint & Minwax wipe on poly for the maple top.
Recommended Skill Level
Intermediate
Comments
Patio Swing
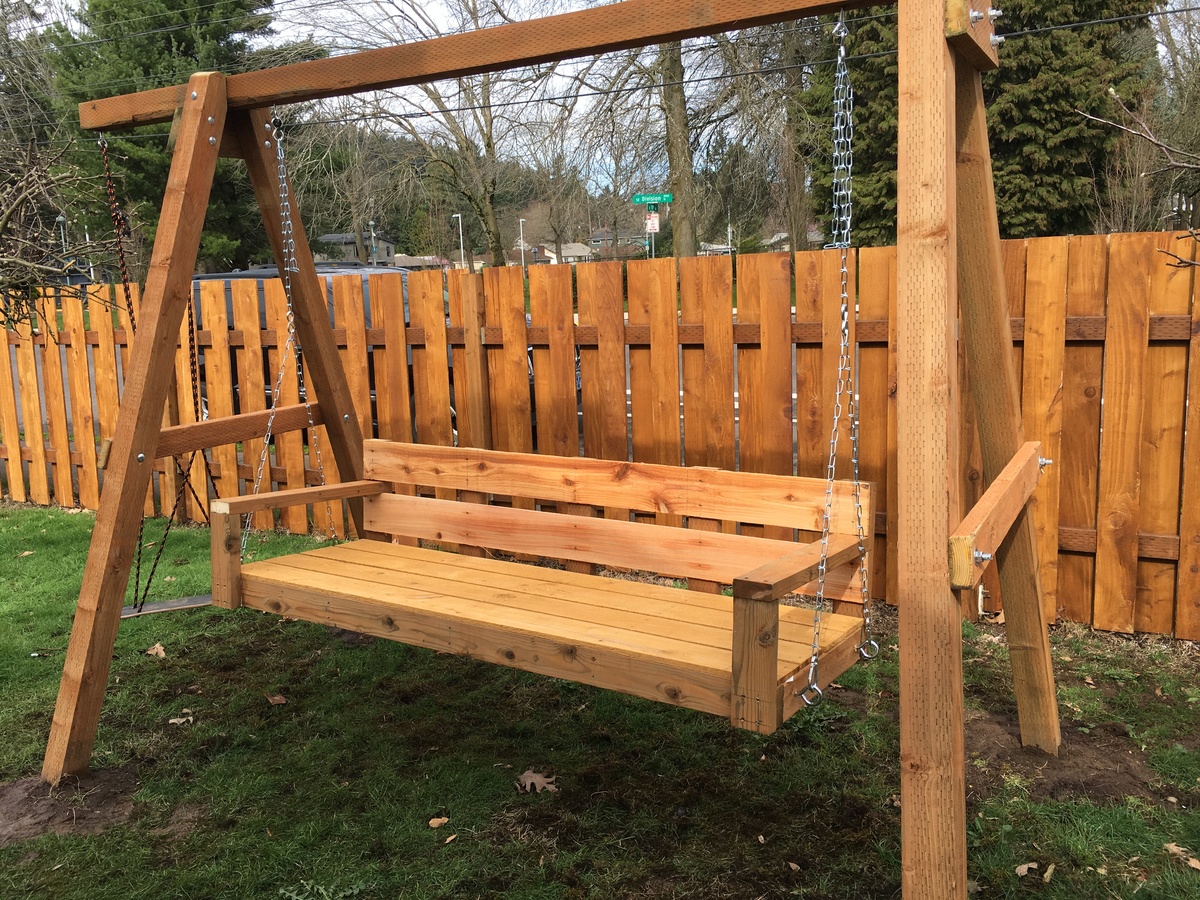
Quick build for the garden swing.
Built from Plan(s)
Estimated Time Investment
Afternoon Project (3-6 Hours)
Finish Used
Unfinished, we are still waiting for some sun in Portland.
Recommended Skill Level
Beginner
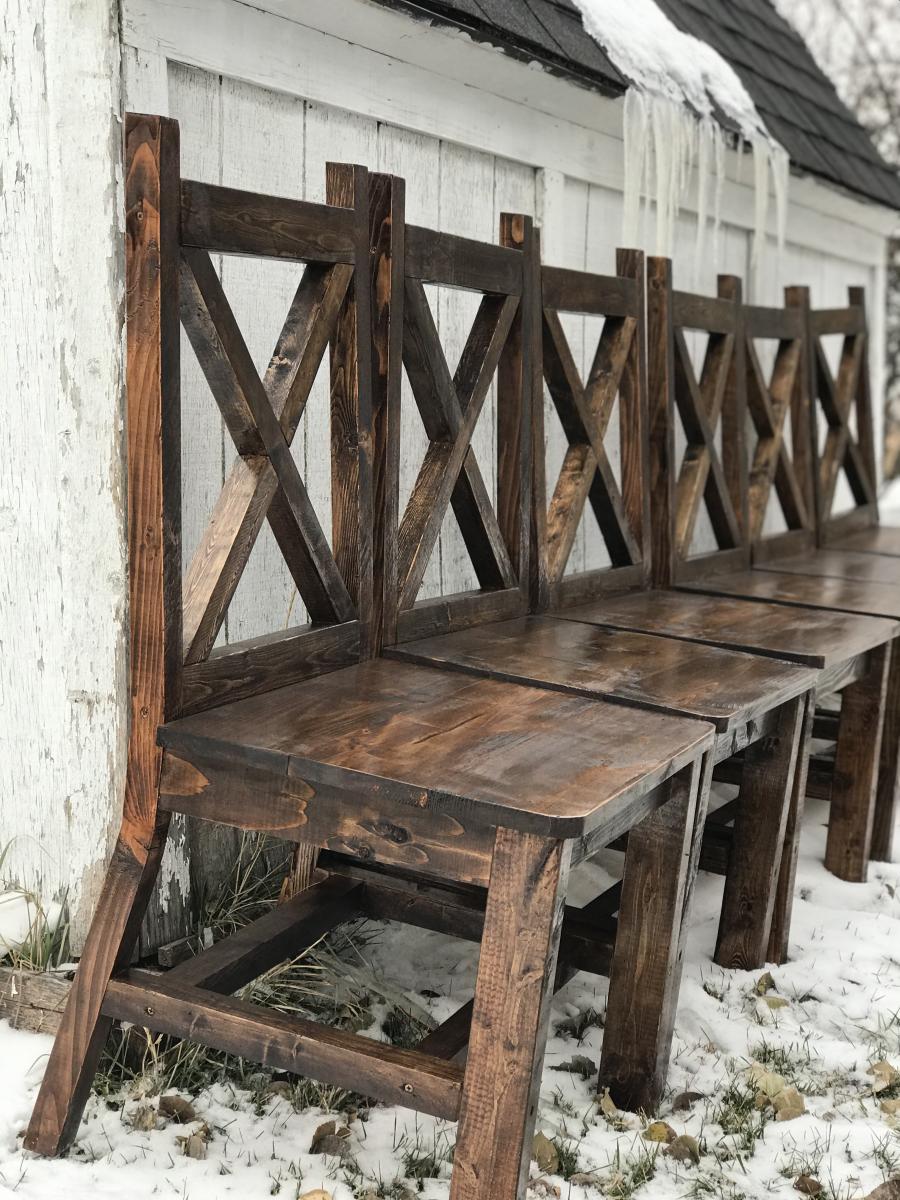
Farmhouse Chairs
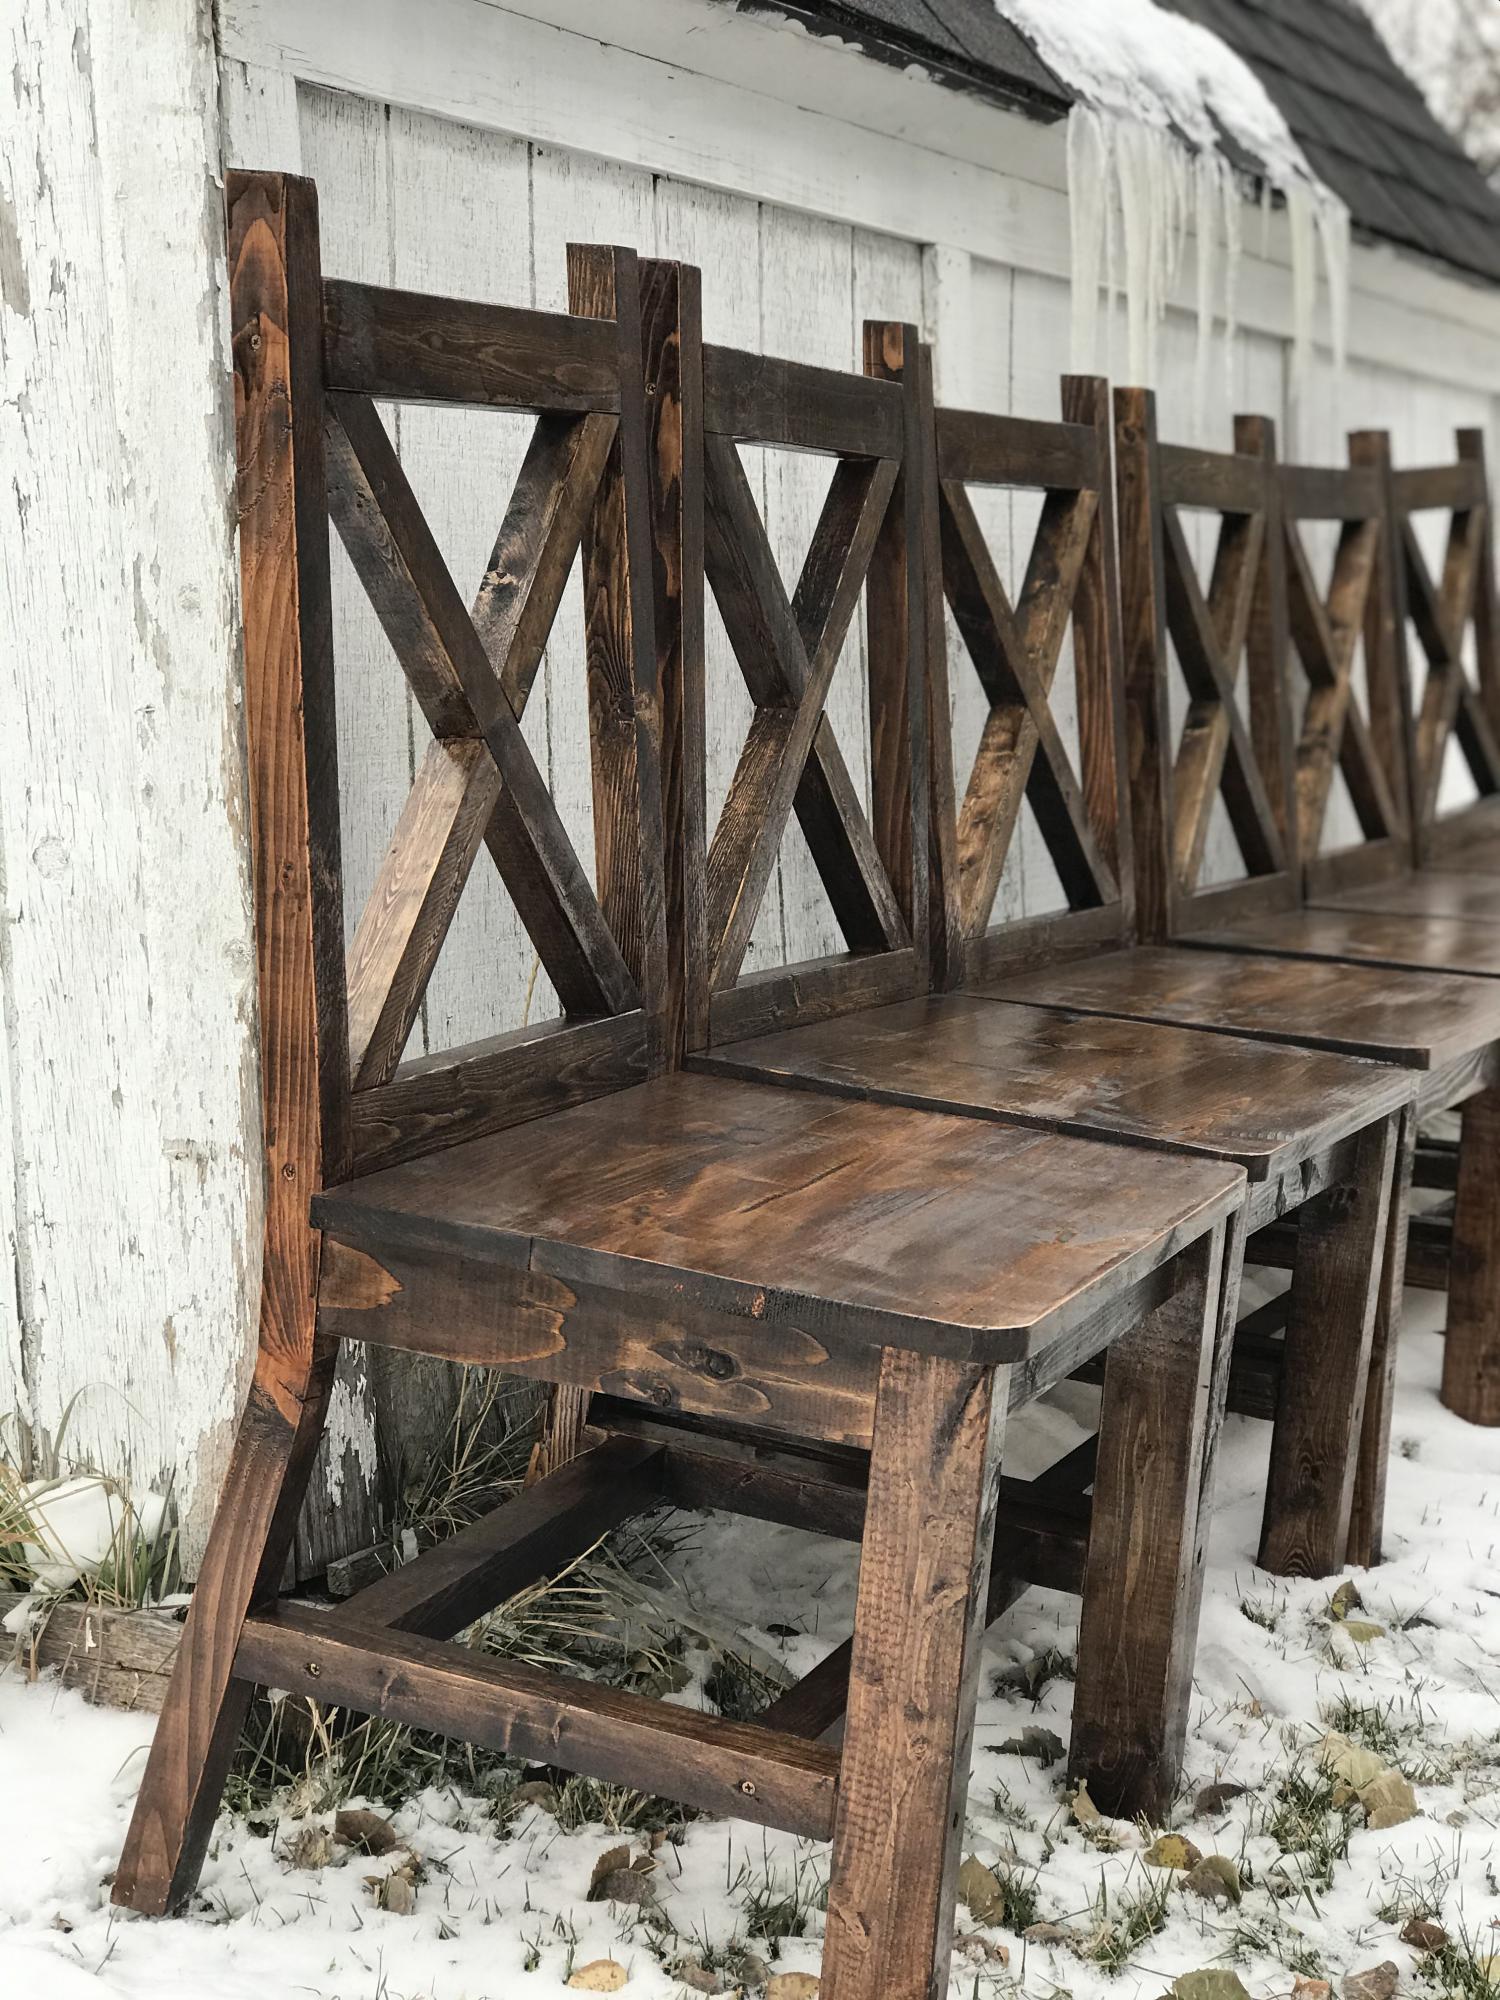
I found a picture of this style of chairs, and I really wanted to make them for my table. I created my own plans and adjusted them until they were perfect. I’ve since made several sets of chairs for other people including this set of 6.
Built from Plan(s)
Estimated Cost
$25
Estimated Time Investment
Afternoon Project (3-6 Hours)
Finish Used
After sanding down the chairs, I apply a coat of Preston by minwax. To get the color I wipe on the stain gunstock by winwax. After letting it dry for about an hour, I then wipe on a coat of espresso stain. For the finish, I apply coats of a gloss polyurethane by Minwax.
Recommended Skill Level
Intermediate
Comments
Wed, 12/18/2019 - 07:57
I'd love to make these for…
I'd love to make these for my parents, do you have the plans?
Rustic Countertop Organizer

This is such a cute countertop organizer ! The possibilities for this are endless - maybe a tea / coffee bar or a hot chocolate bar - a breakfast bar or a snack bar ..... I may need to make another one...and definitely one for the bathroom !
.
The shelves slide to change the width or turn one and it becomes a corner piece!

Built from Plan(s)
Comments

Tue, 09/12/2023 - 12:30
So great to see you made…
So great to see you made this and it turned out awesome! Thank you so much for taking time to share photos.
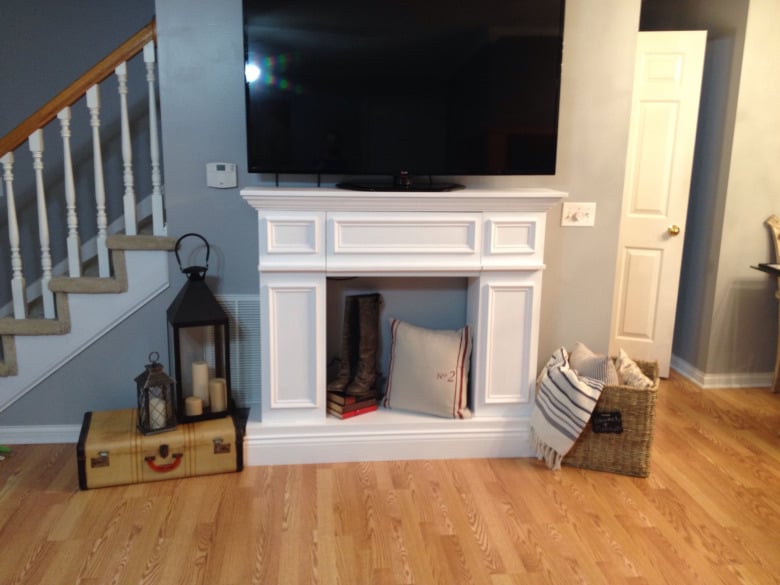
Faux Fireplace

Modified from Ana White's Faux Fireplace with Hidden Storage Plan
Built from Plan(s)
Recommended Skill Level
Beginner
DIY Greenhouse
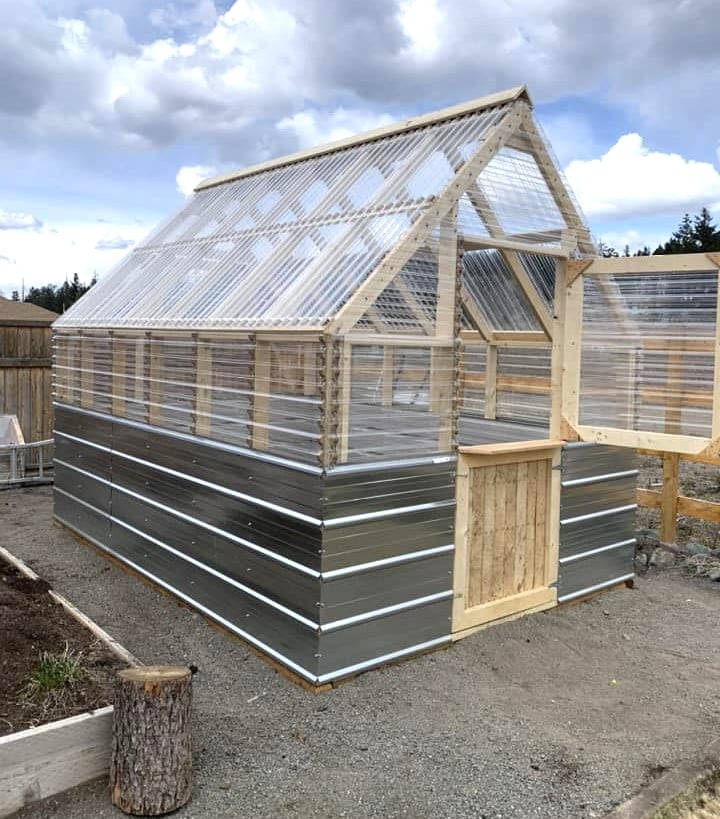
DIY Greenhouse by Trenton Kirby on Facebook!
Built from Plan(s)
Pirate Sandbox
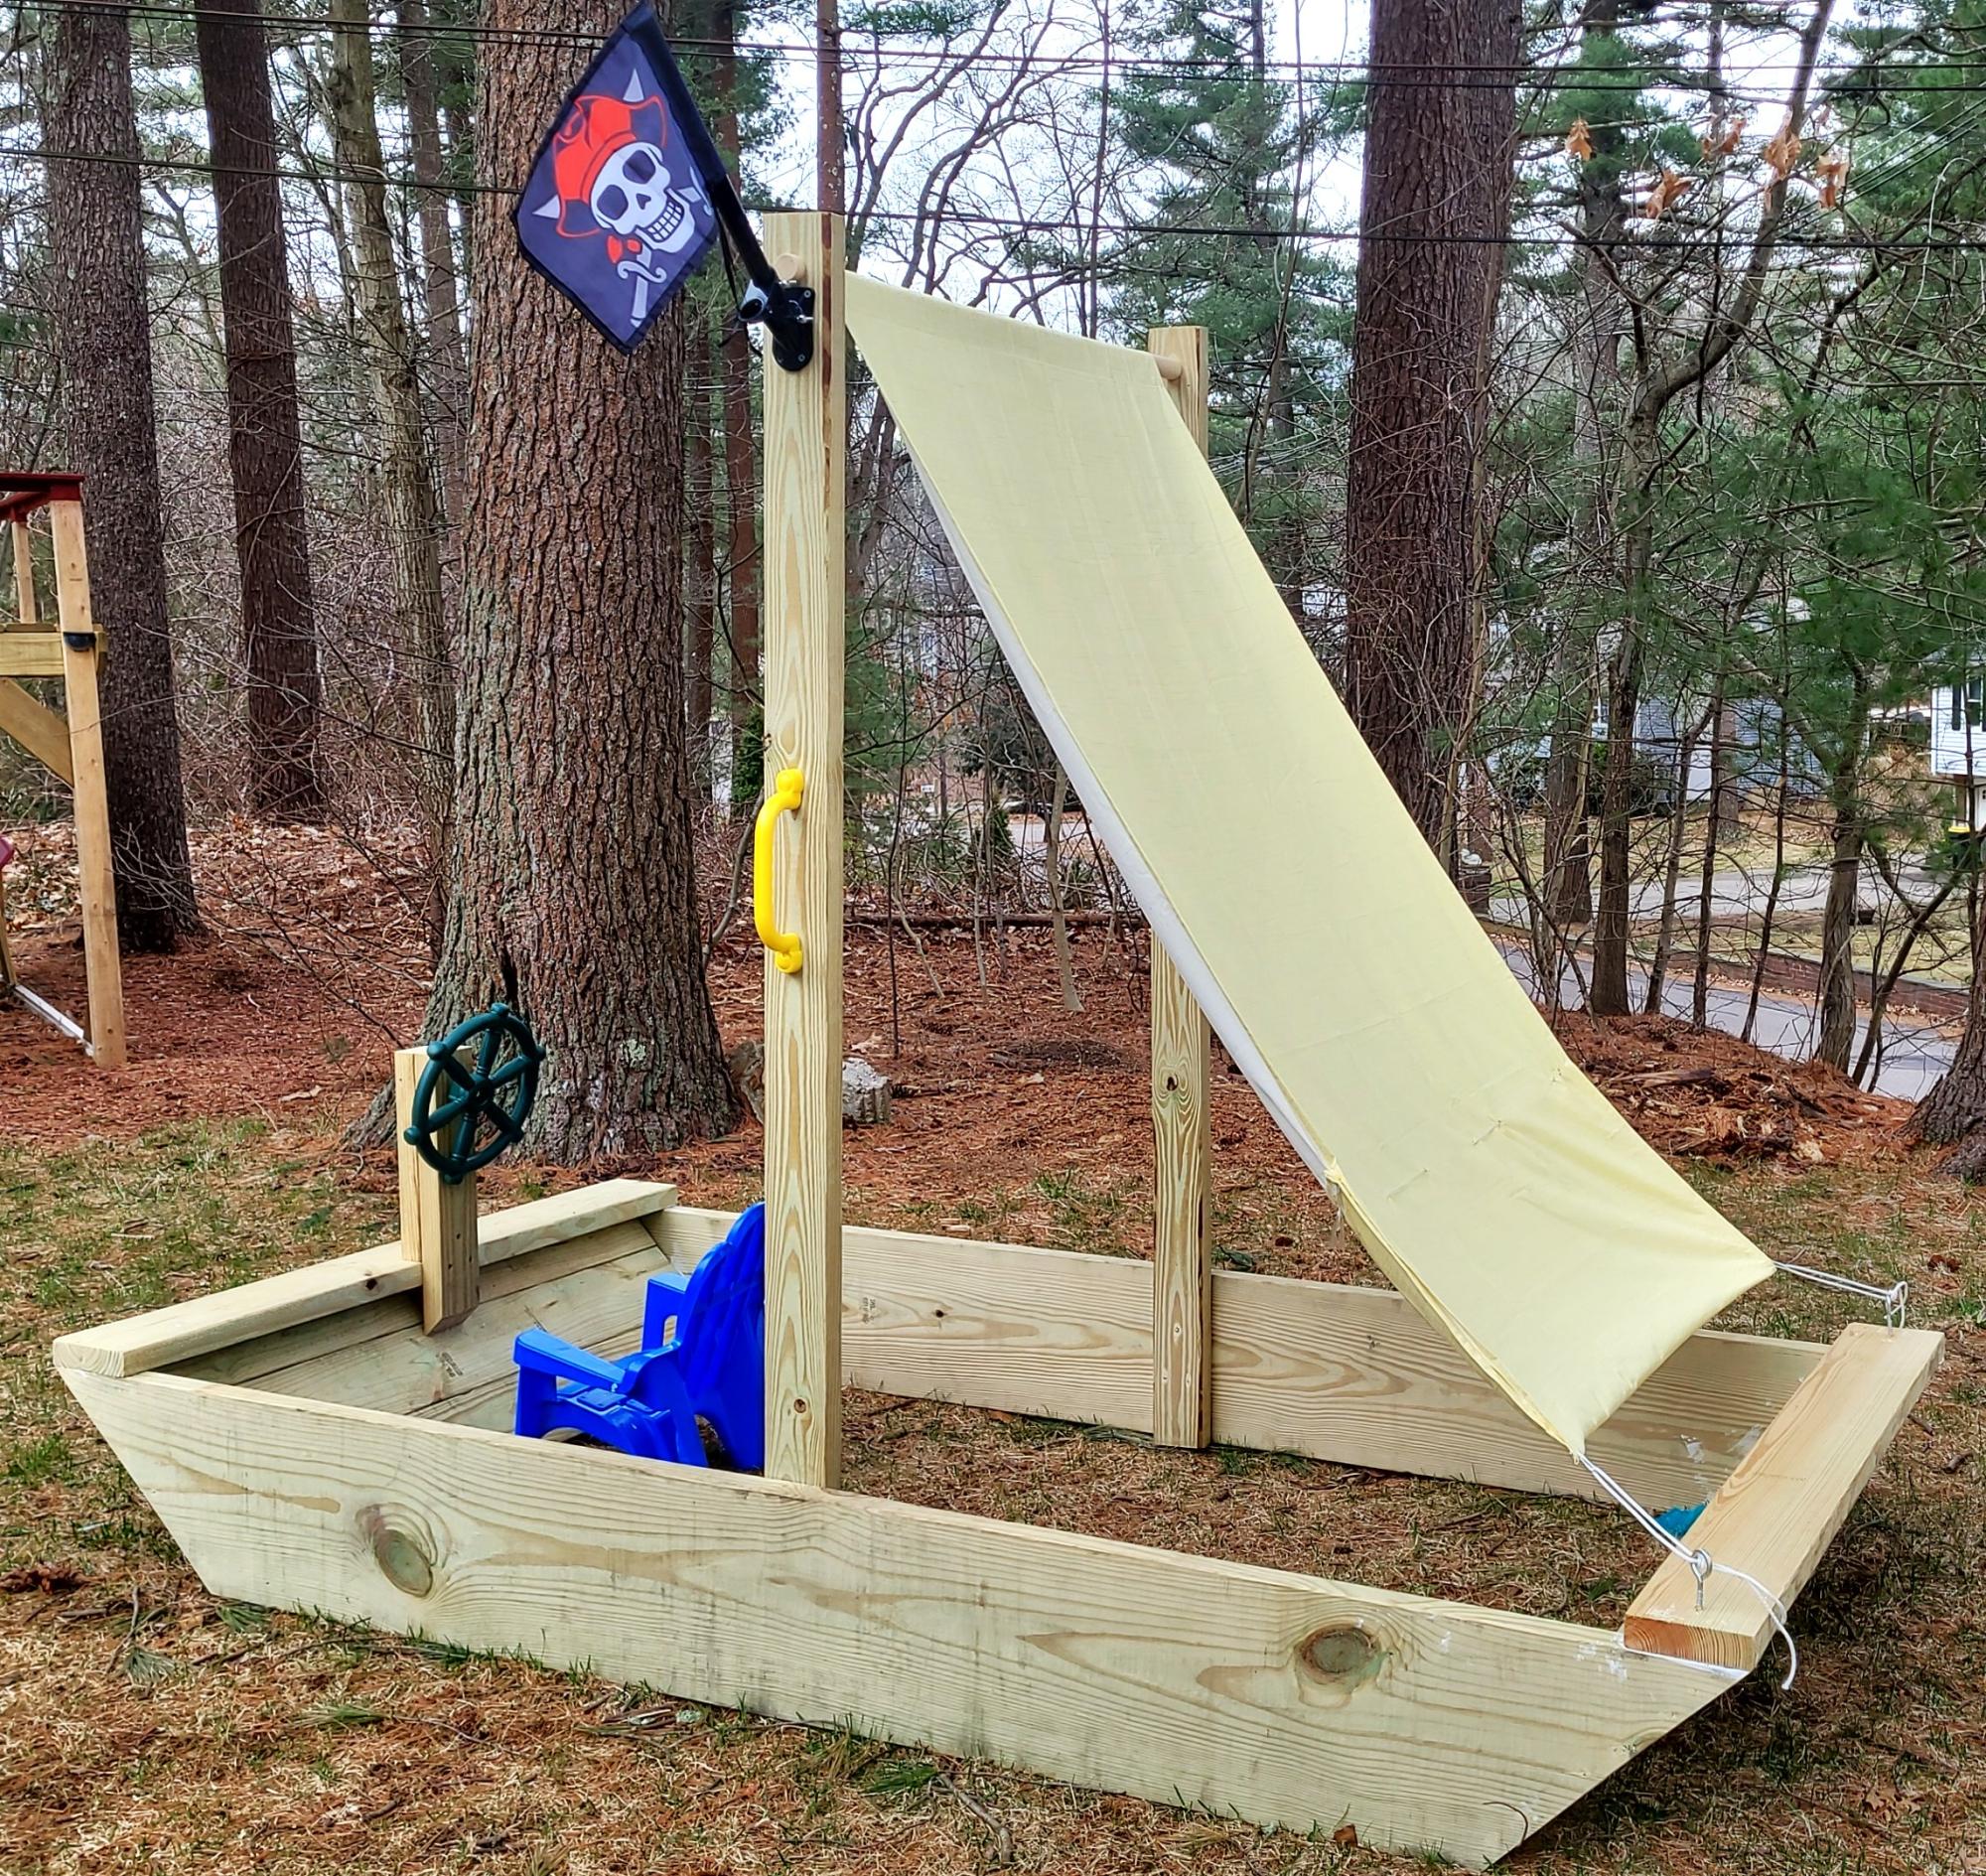
Turned the sandbox into a pirate ship. The kids love it!
Lea B.
Built from Plan(s)
Small Outdoor Shed Closet
Loved this build had to make it smaller but wow.
Paula
Built from Plan(s)
Essential Adirondack chair
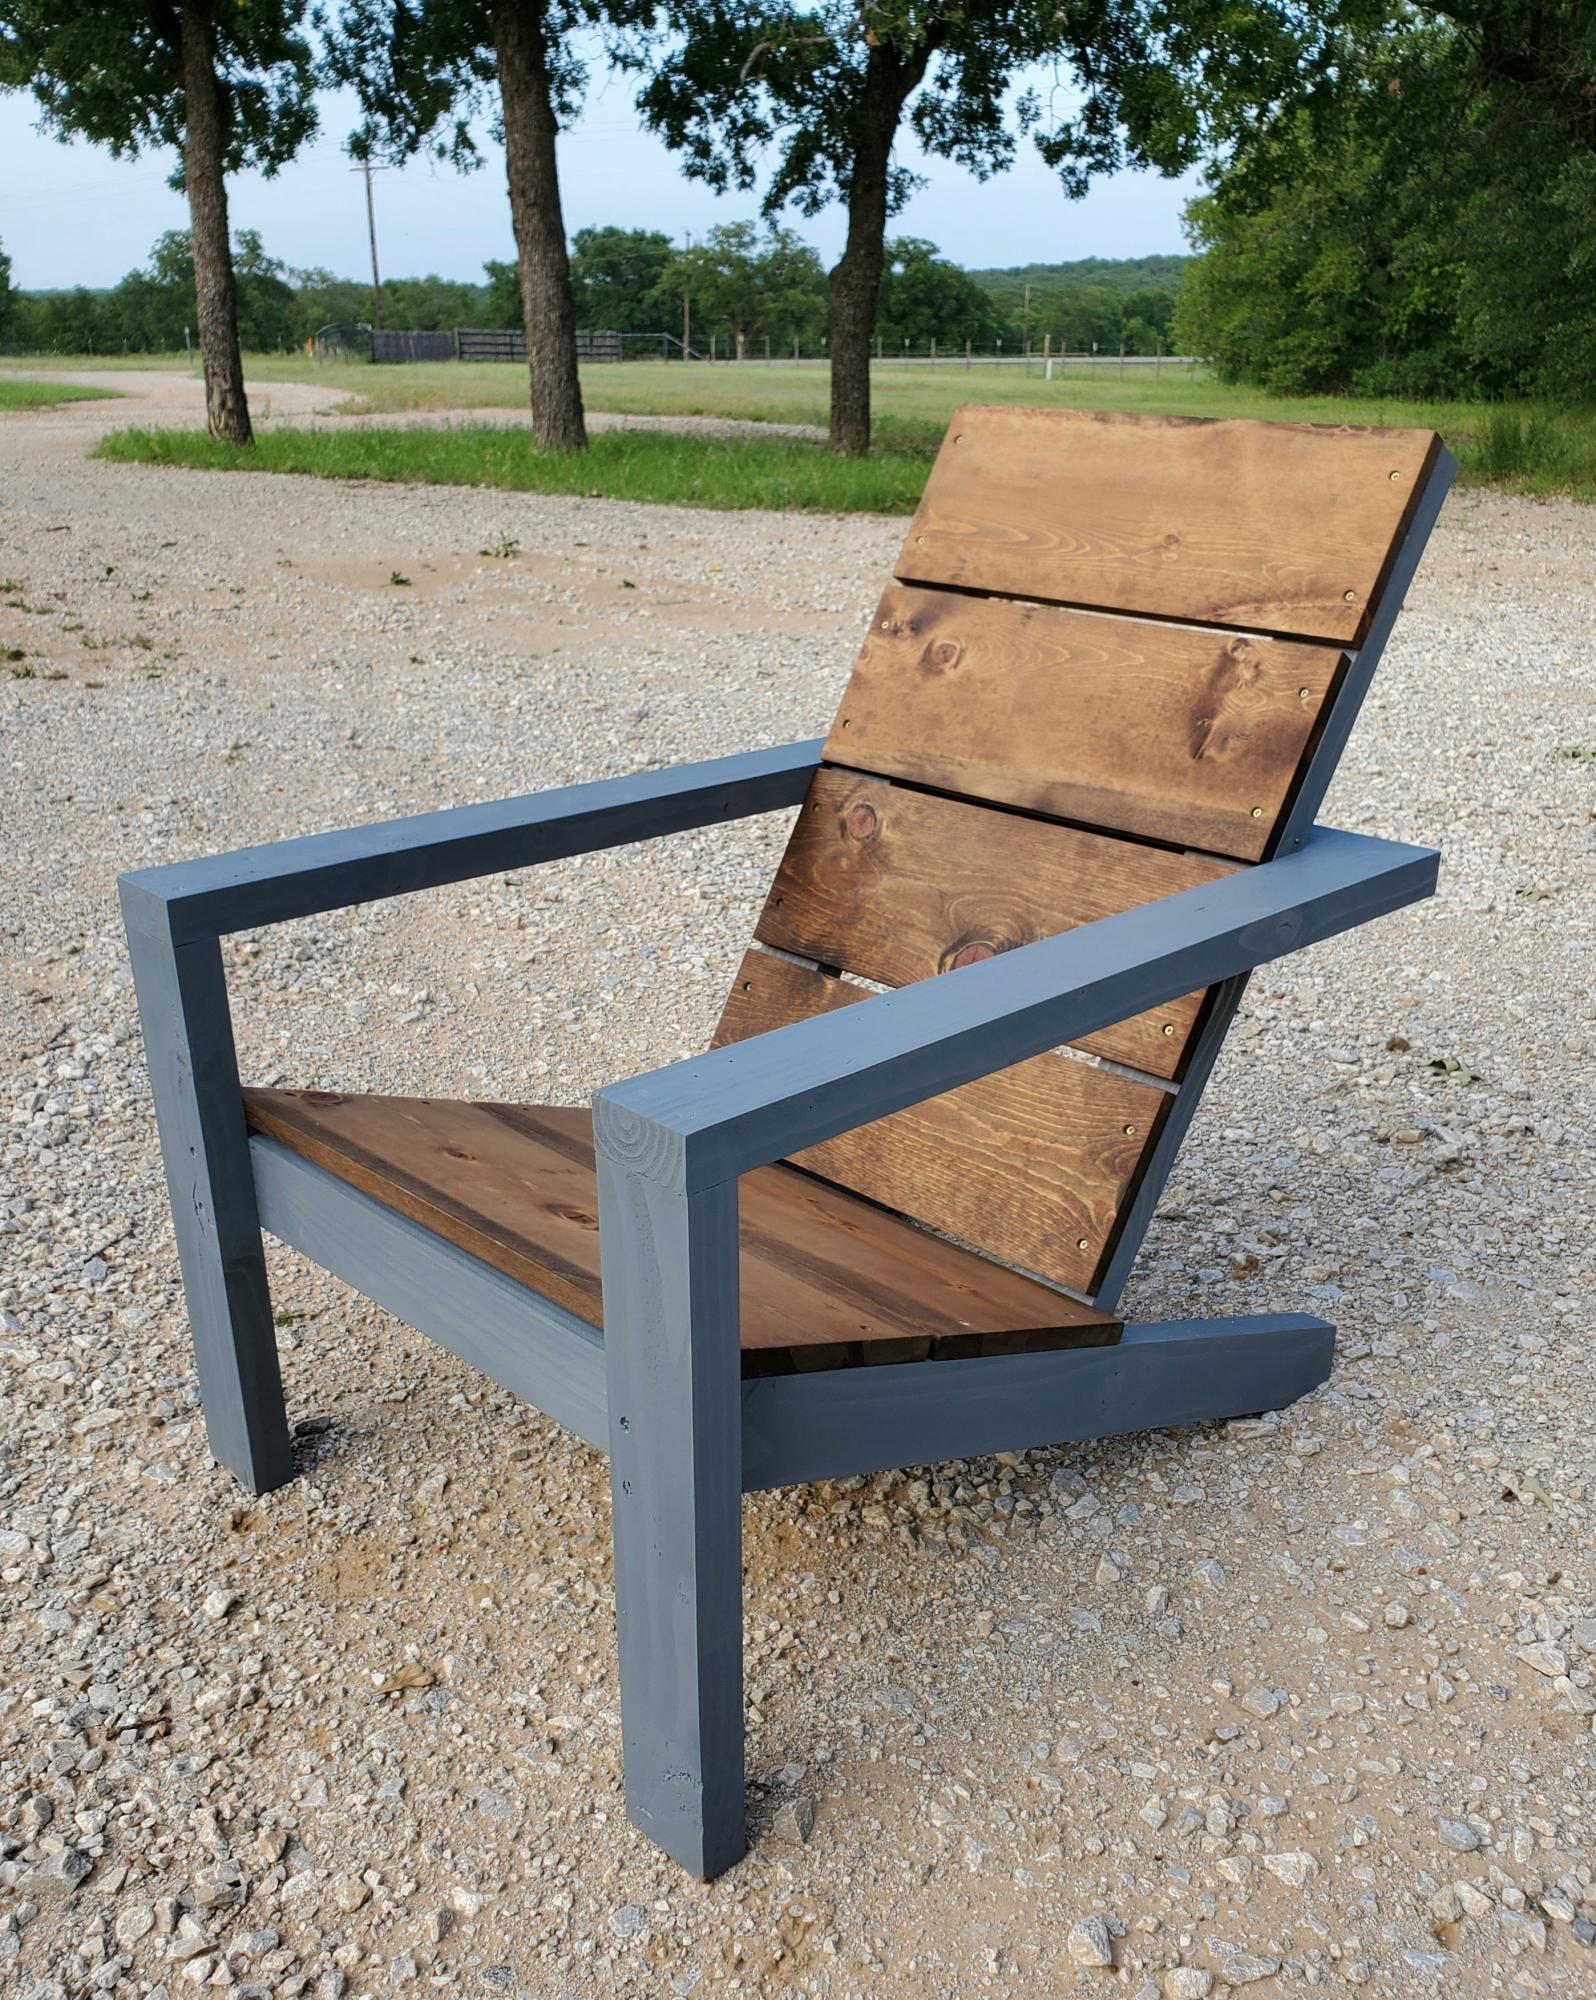
Like this chair! Changed the 3 1x10's on the back to 4 1x8's ripped down to 6 ¹⁵/¹⁶
Built from Plan(s)
Estimated Cost
40
Estimated Time Investment
An Hour or Two (0-2 Hours)
Comments

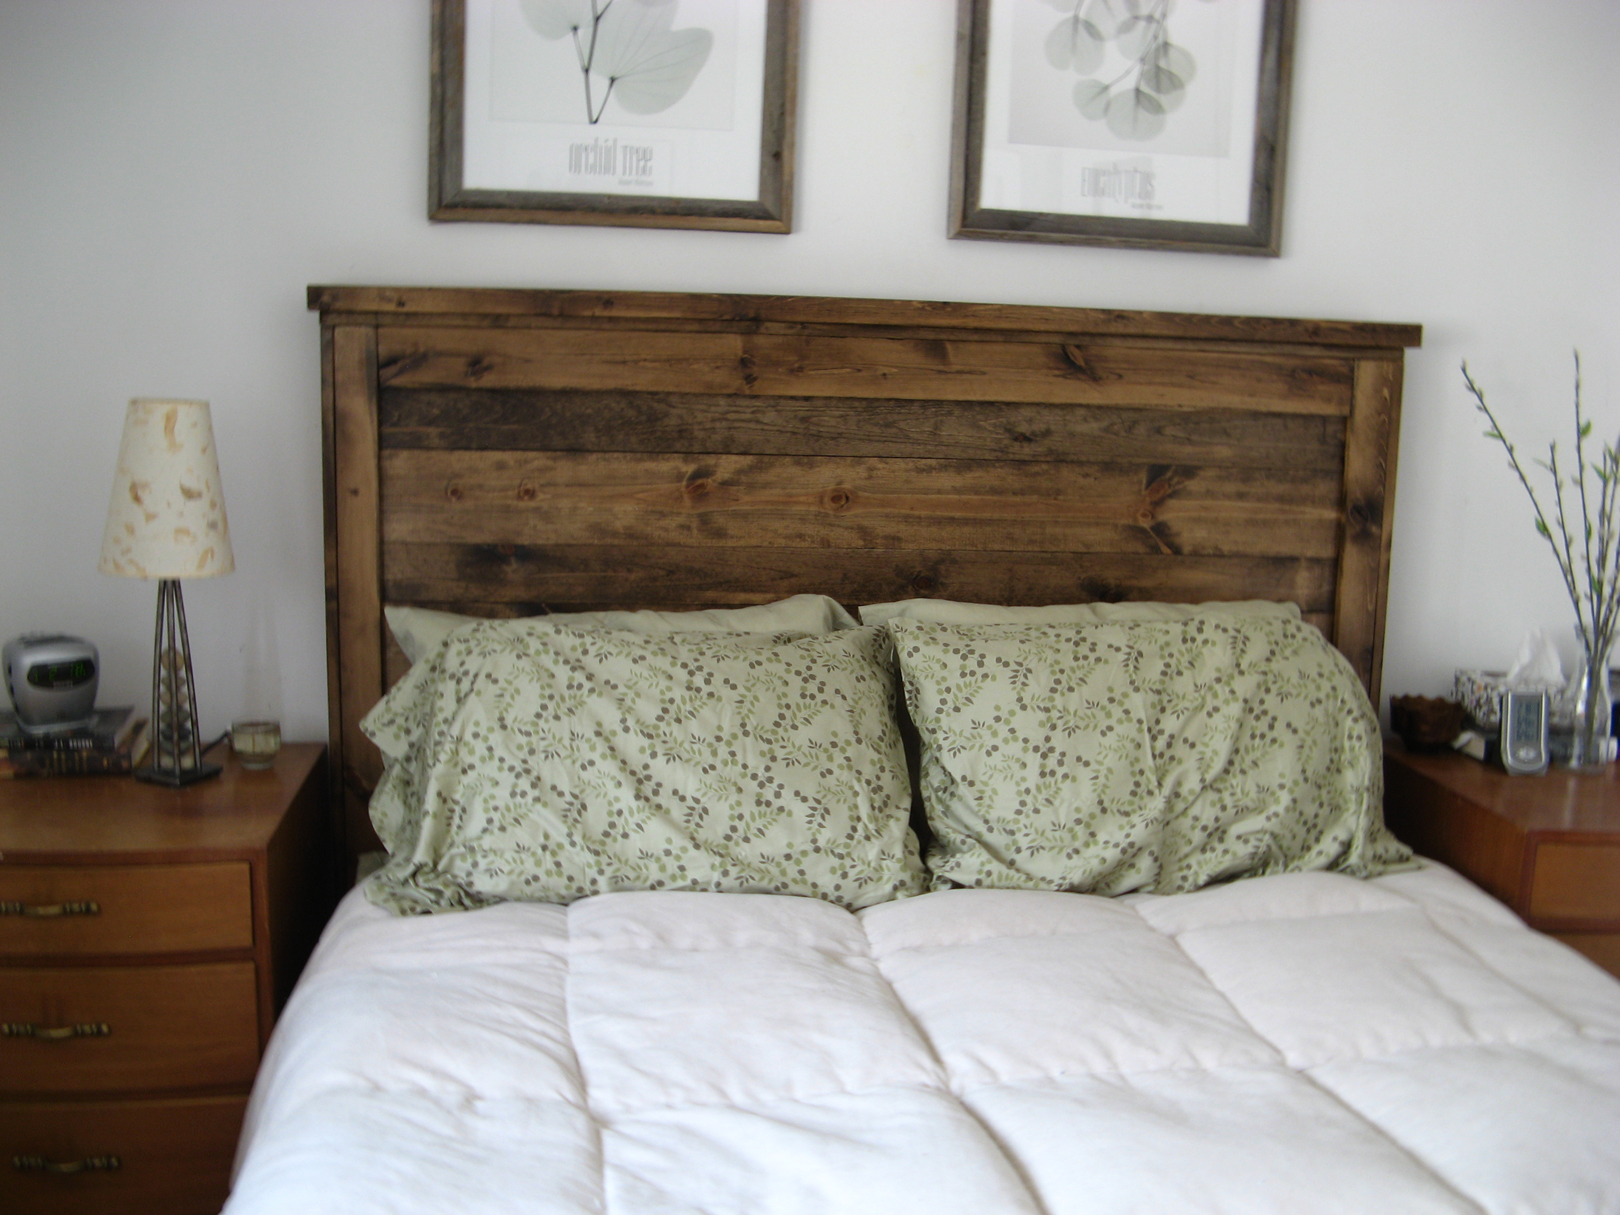
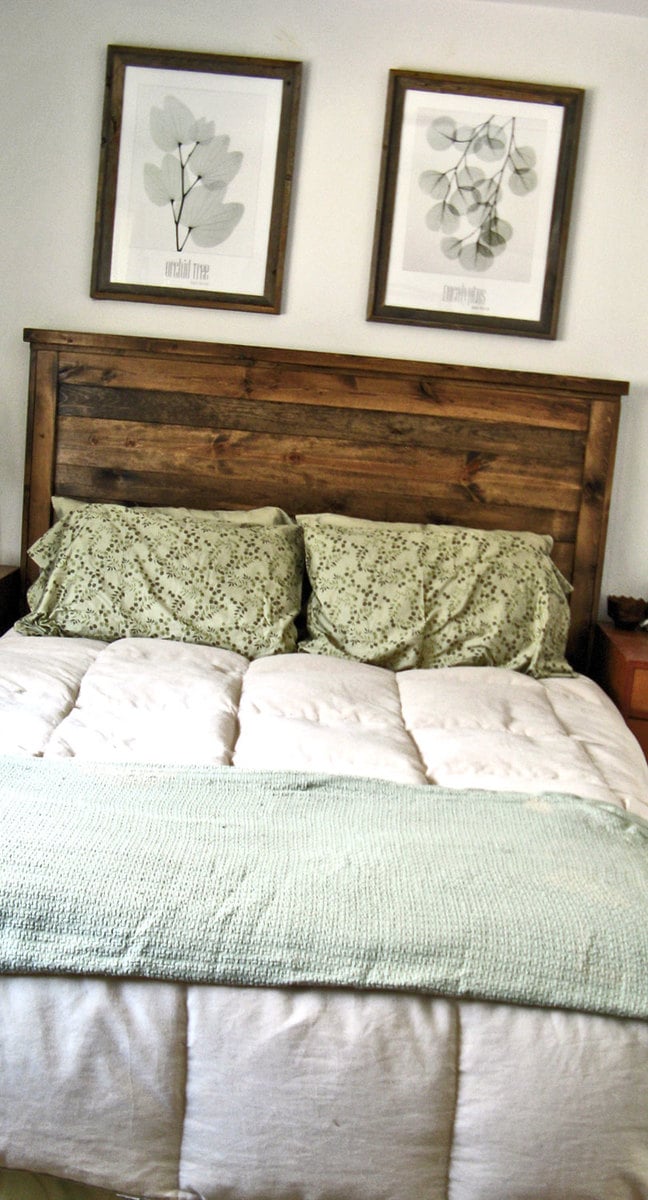
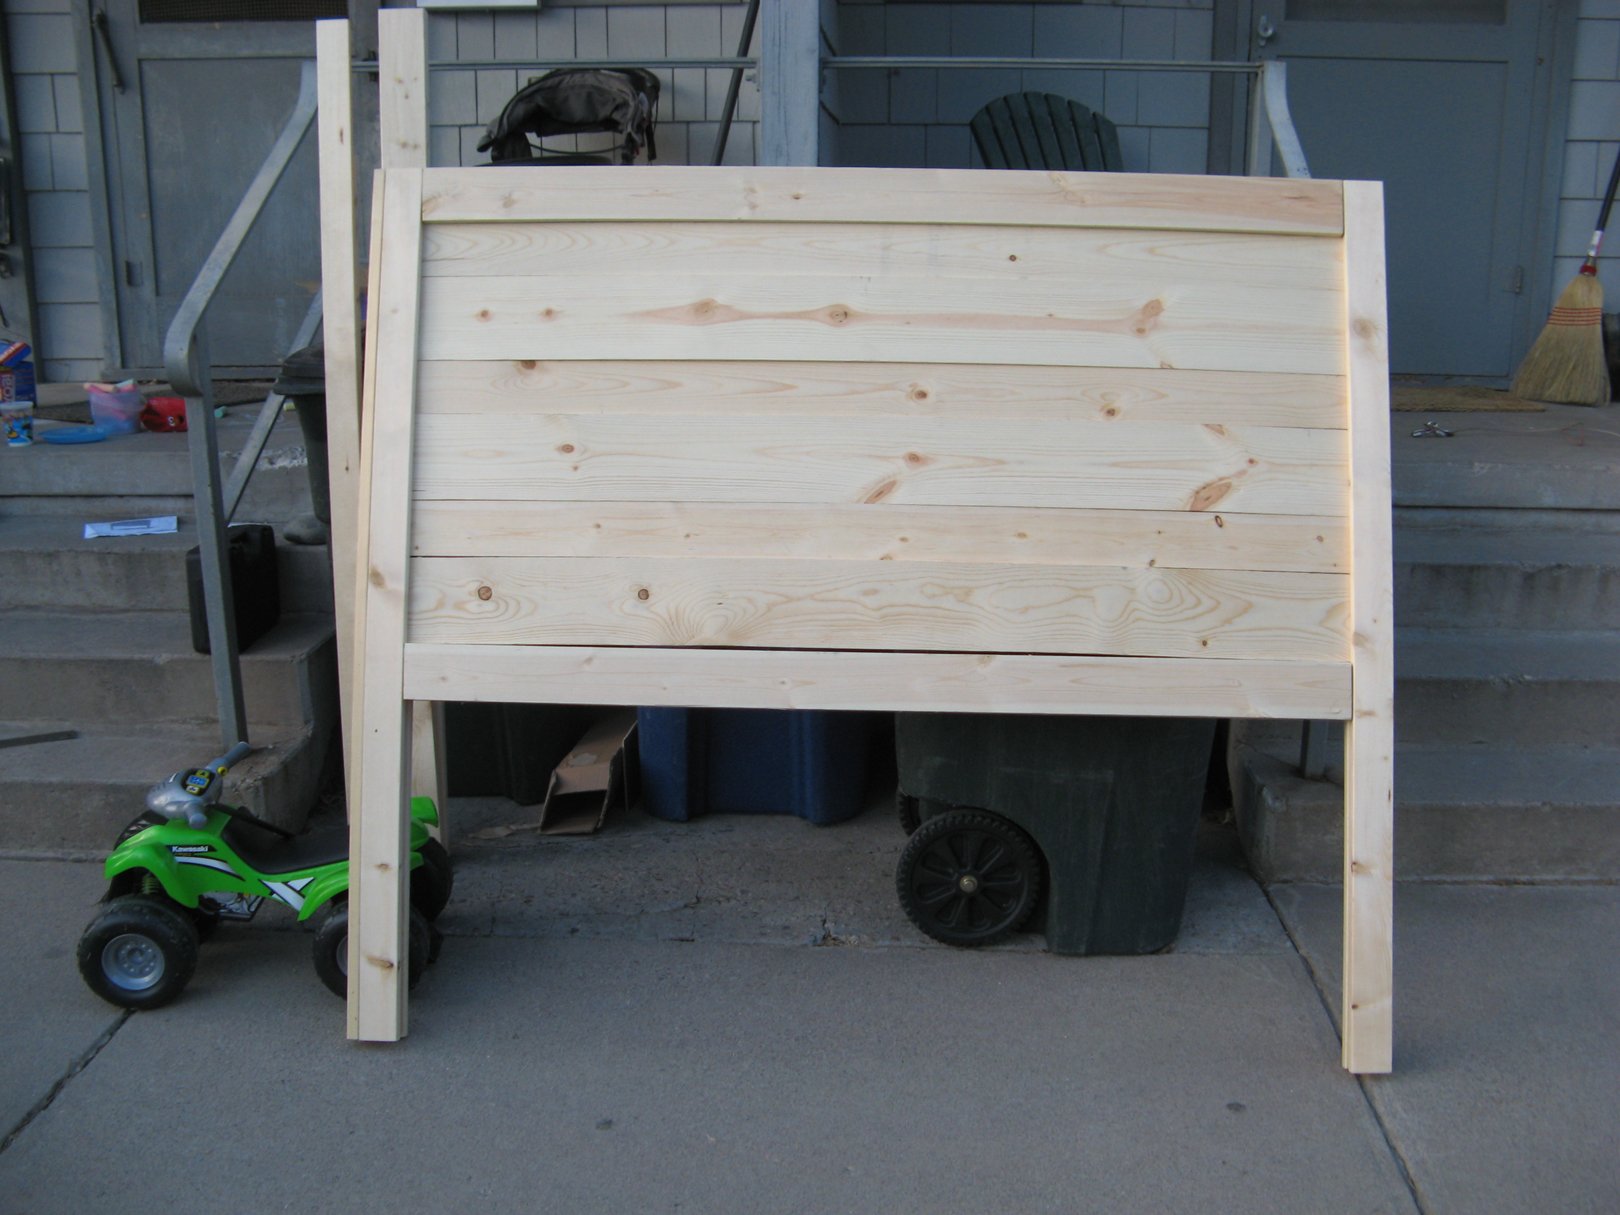
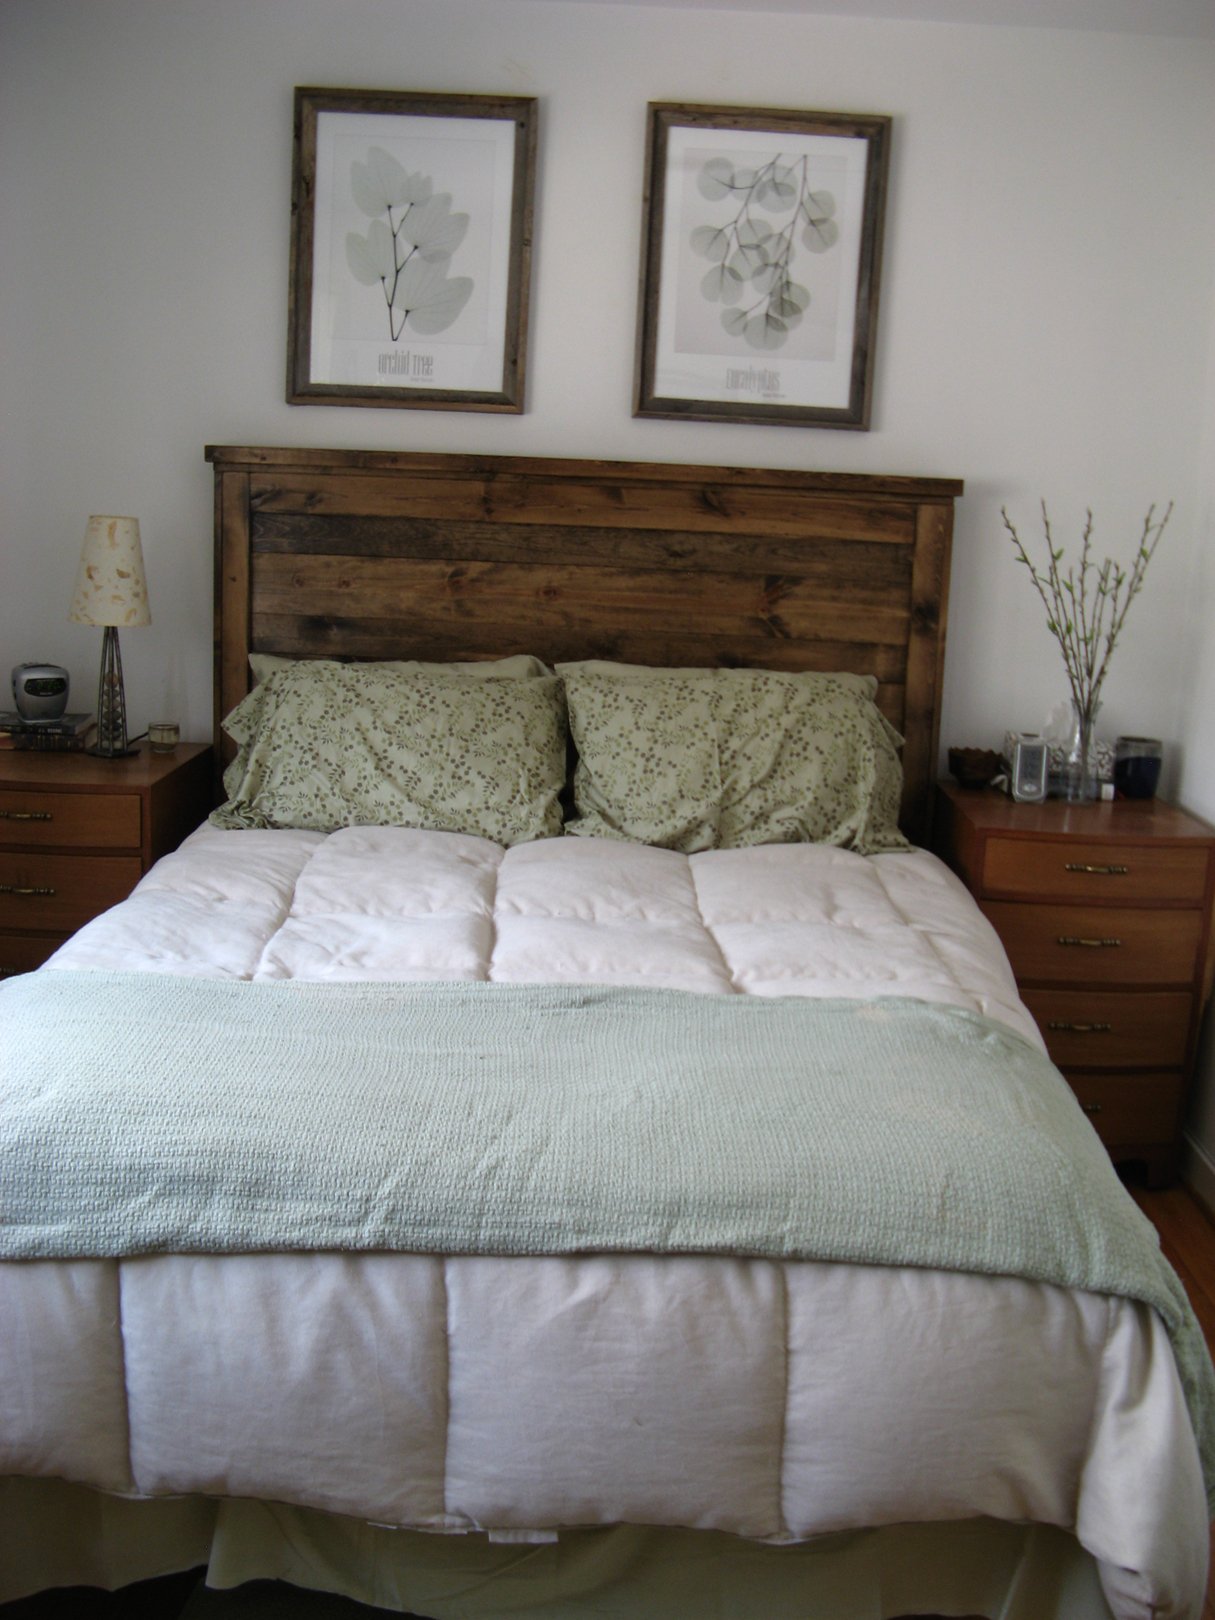
First Project- reclaimed wood look Queen headboard!
Pin For Later!
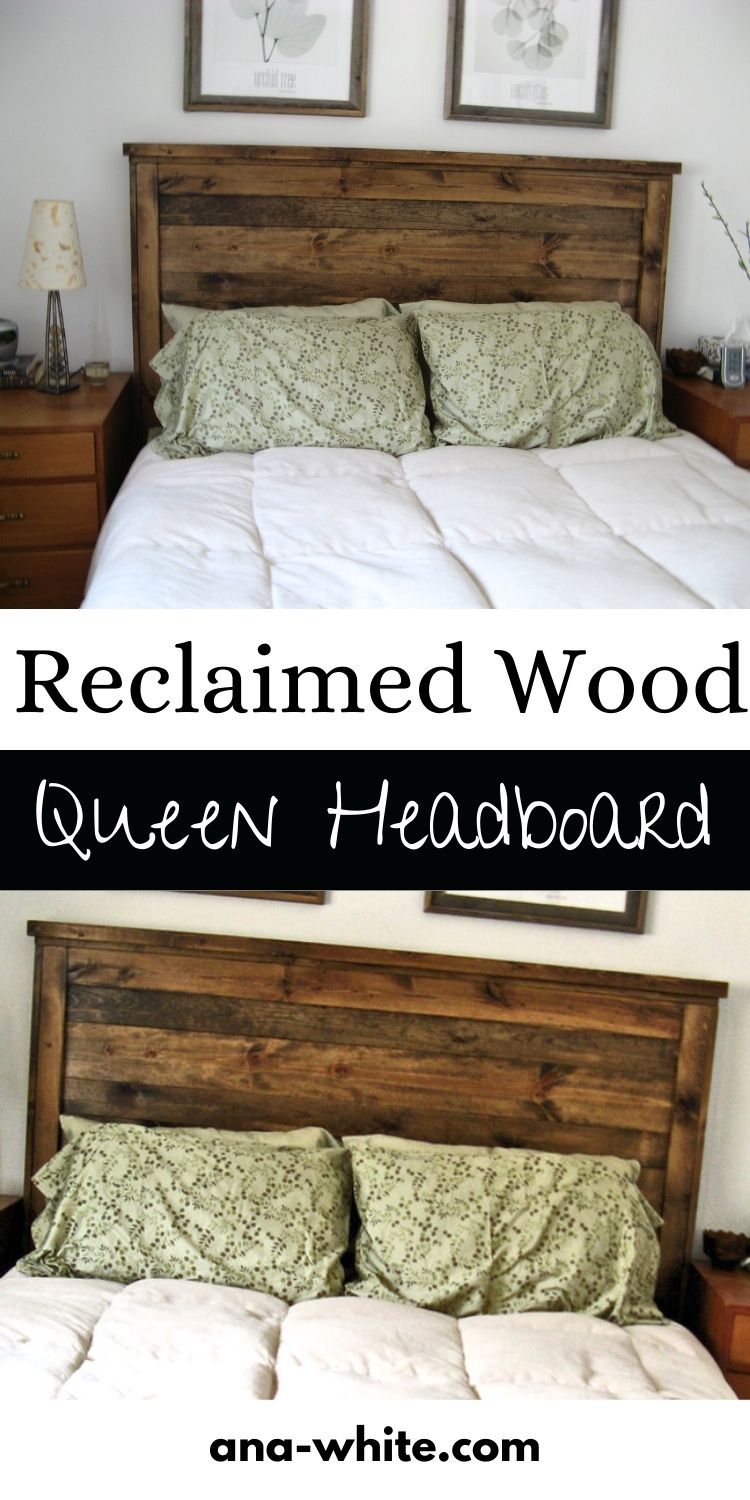


Built from Plan(s)
Estimated Cost
around $75
Estimated Time Investment
Afternoon Project (3-6 Hours)
Finish Used
Used only one coat of Minwax Dark Walnut (really liked the rustic look), and finished with Minwax polyueruthane.
This was a quick build- did all of the cutting, & got it mostly assembled while my toddler was napping! One thing to note- we had to add some wood braces on the back in order to straighten our boards out. They looked ok at the store, but we got them home & realized they were quite warped! Sanding, staining and polyurethaning took additional time that was spread out over a few days (didn't include that in total time). This was great for a first project. I've got lots more on my to-do list now!
This was a quick build- did all of the cutting, & got it mostly assembled while my toddler was napping! One thing to note- we had to add some wood braces on the back in order to straighten our boards out. They looked ok at the store, but we got them home & realized they were quite warped! Sanding, staining and polyurethaning took additional time that was spread out over a few days (didn't include that in total time). This was great for a first project. I've got lots more on my to-do list now!
Recommended Skill Level
Beginner
Seasonal And Holiday
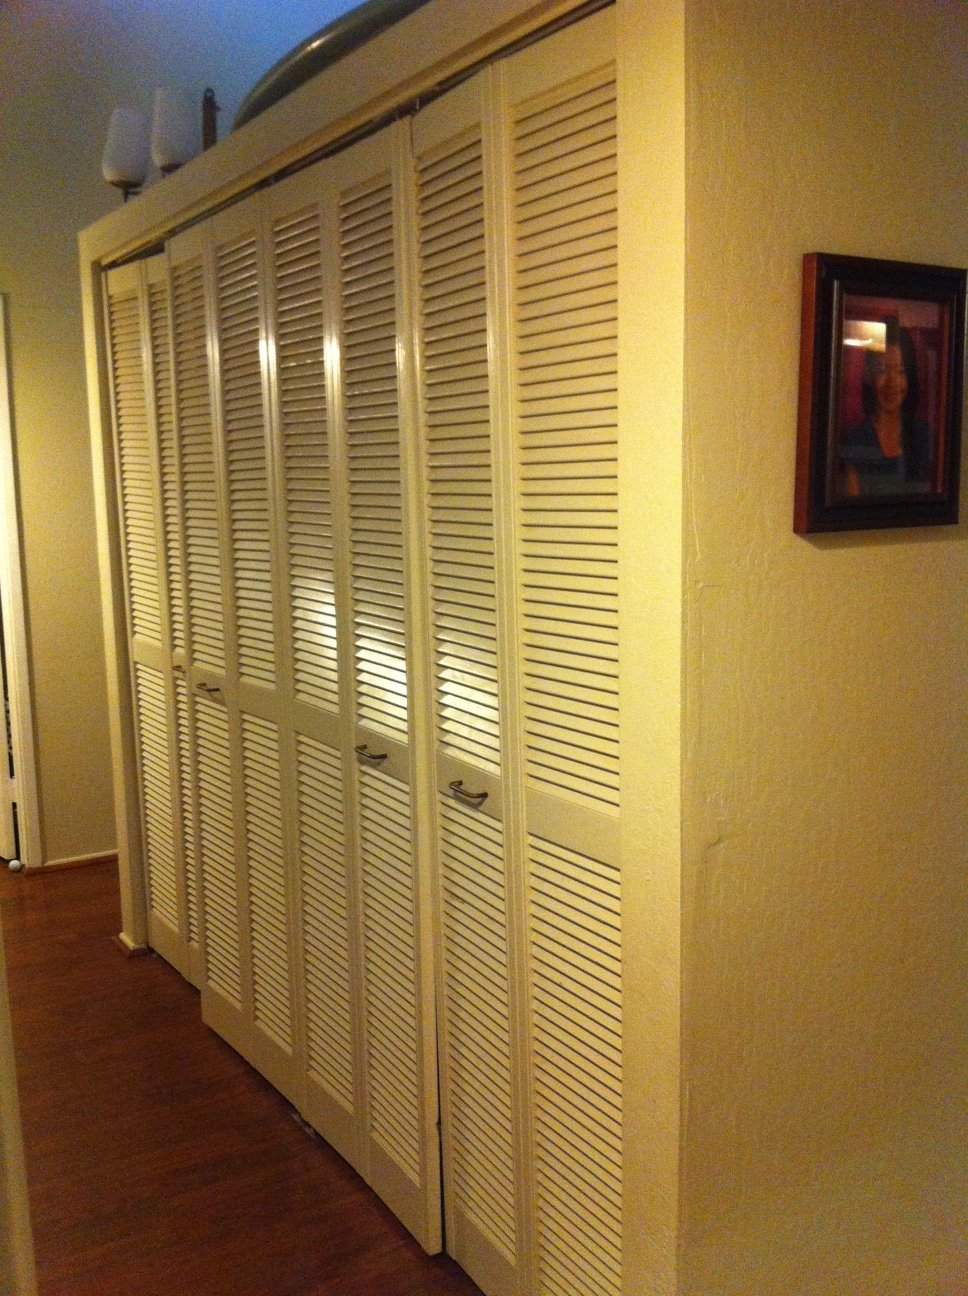
Bypass Closet Doors for the hallway and master bedroom
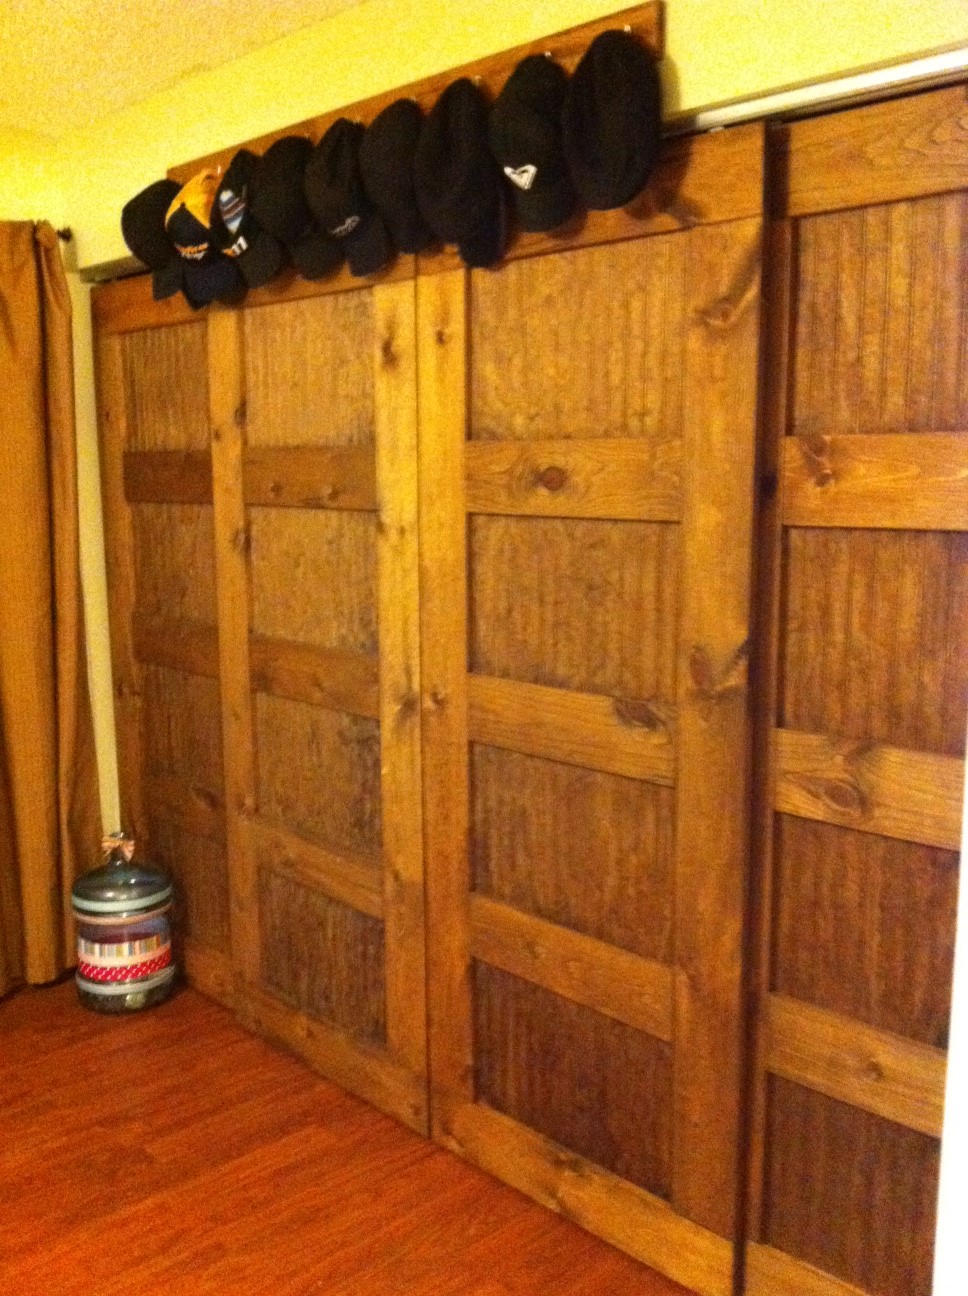
I loved the Idea of new closet doors and hated the idea of bi-folds. My house is crooked it seems. The doors don't sit straight and bi-folds always fall off their tracks. When I came upon the plans for Bypass Doors from Old Paint Designs I was hooked! I made 4 doors for the hallway in 1 day, oiled it with Danish Oil in Dark Walnut, hung it the next day and what a difference!! Glass is rather expensive in Hawaii and so is plexi-glass so I opted for Bead Board which gave it a more "country" feel instead of a more modern feel. I wish I could have used glass but the $150 price tag just wasn't fitting into my budget very well. My hubby loved the bypass doors so much he asked me to build them for our open closet. 2 days of work, 8 doors, 2 closets done!


Built from Plan(s)
Estimated Time Investment
Day Project (6-9 Hours)
Finish Used
Danish Oil
Recommended Skill Level
Beginner
Comments
Thu, 01/26/2012 - 13:48
Those turned out great. Love
Those turned out great. Love the bead-board and color.

Thu, 01/26/2012 - 23:24
Wow! Those turned out great!
Wow! Those turned out great! I love the idea of using beadboard - so creative!
In reply to Wow! Those turned out great! by oldpaintdesign
Fri, 02/17/2012 - 17:13
Thanks OPD!
Thank you for your plans...love them. I've been asked to help a friend of mine build some doors for his house!
Tue, 08/28/2012 - 15:27
Bypass Closet Doors
Great job on the doors! I am interested in doing this myself. I will have to make 4 doors for my closet as well since I have such a large opening. Can you tell me what the measurments of your closets are? Also what are the dimensions of the pine that you used? Thanks a bunch!
In reply to Bypass Closet Doors by Jilley27 (not verified)
Tue, 08/28/2012 - 18:44
My closet opening is about 8'
My closet opening is about 8' across. Each door is 26" wide and 79" tall. I made them so the would have a 1" overlap on each side...
I used 1x6 @ 8' lengths of pine. I like the really knotty pine with lots of character! Have fun building! These were pretty simple to make once you get all the boards cut.
Drop Leaf Mobile Kitchen Island

This was born out of the need for more counter space in our galley kitchen. We don't have the space to add an island. Especially around the holidays, it would be great to have extra space for making cookies, serving big meals, etc. I used Ana's Small Kitchen Island Prep Cart plans for inspiration. I adapted the dimensions to fit at the end of our counters when not in use and added a drop leaf to give us almost 4 additional feet of butcher block counter top when we need it. I used scrap lumber that I had for the cabinet and had an extra drawer handle that matches our kitchen cabinets but bought the butcher block, locking casters, drawer slide and hardware for the legs. Also, the weight of the butcher block makes it want to tip when it's away from the cabinet with the drop leaf down so I added a lead counter weight inside the drawer.


Built from Plan(s)
Estimated Cost
$150-200
Estimated Time Investment
Weekend Project (10-20 Hours)
Finish Used
Behr paint for the cabinet, food grade mineral oil and cutting board wax for the butcher block
Recommended Skill Level
Advanced
Comments
Tue, 04/27/2021 - 18:09
I am so interested in doing…
I am so interested in doing this, but would like more details on how the drop leaf was constructed. Would it be possible to get more information?

In reply to I am so interested in doing… by haartd
Sat, 07/24/2021 - 16:59
Sure! I used a 4 foot…
Sure! I used a 4 foot butcher block and cut it down. The horizontal part is 13 1/2" and the drop leaf part is 32 1/8" attached with a piano hinge. The legs need to be cut and hinged to fit when folded up. This one is made so that the drop leaf fits right under the overhang of the kitchen countertop that it is next to so it's snug against the cabinet and not an issue but, if you want it to be freestanding, the weight of the butcher block will pull it over if you don't weight the cabinet down with something as well. I got a 5 pound lead bar from Amazon in case we need to use it somewhere else. I hope that helps! Let me know if you have any other questions.