Community Brag Posts

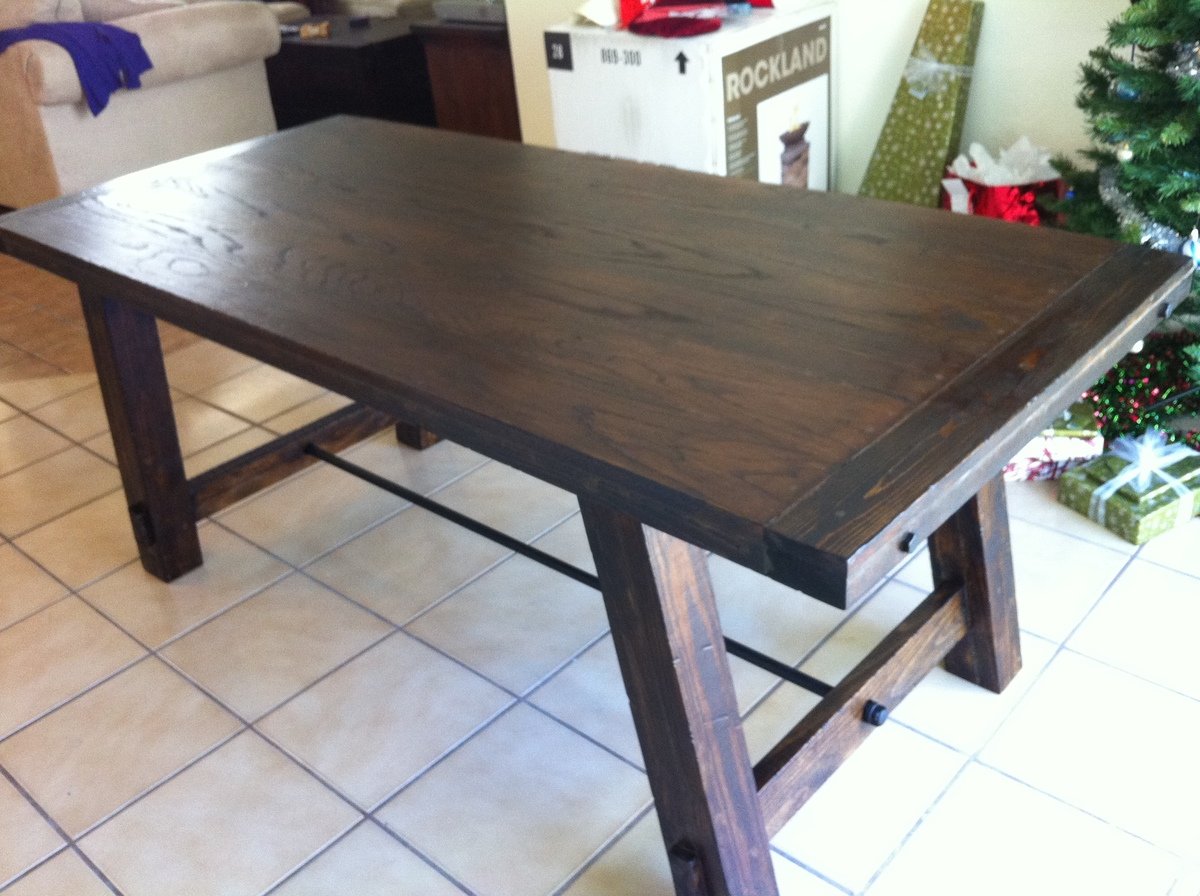
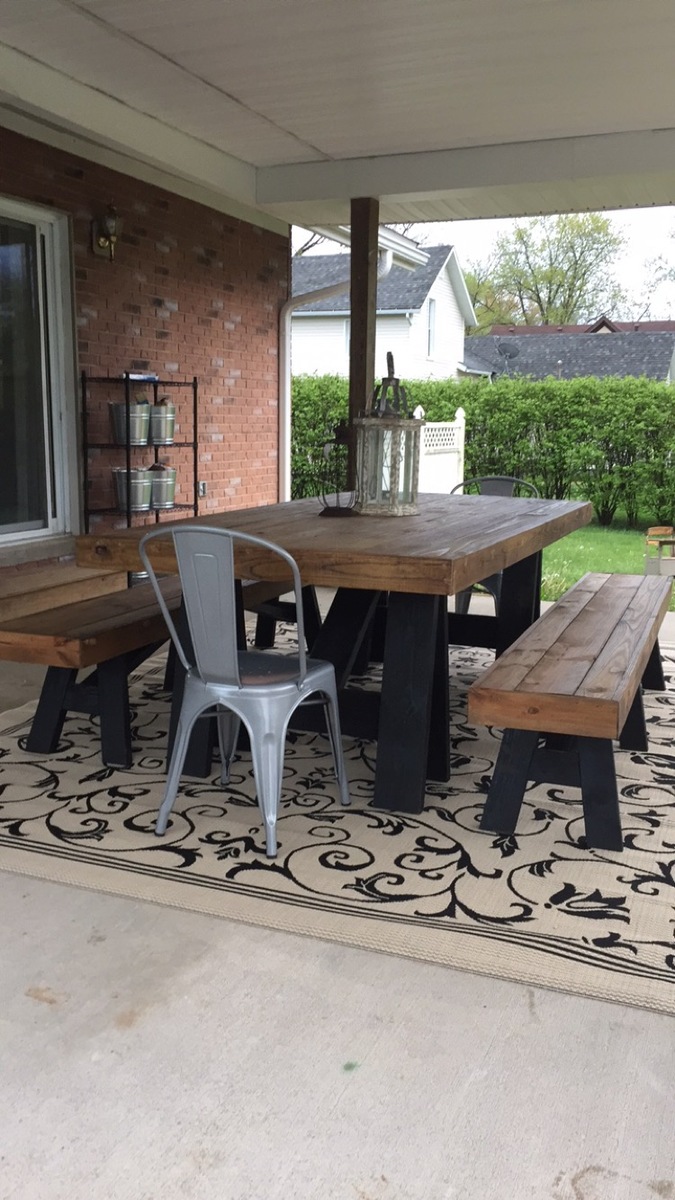
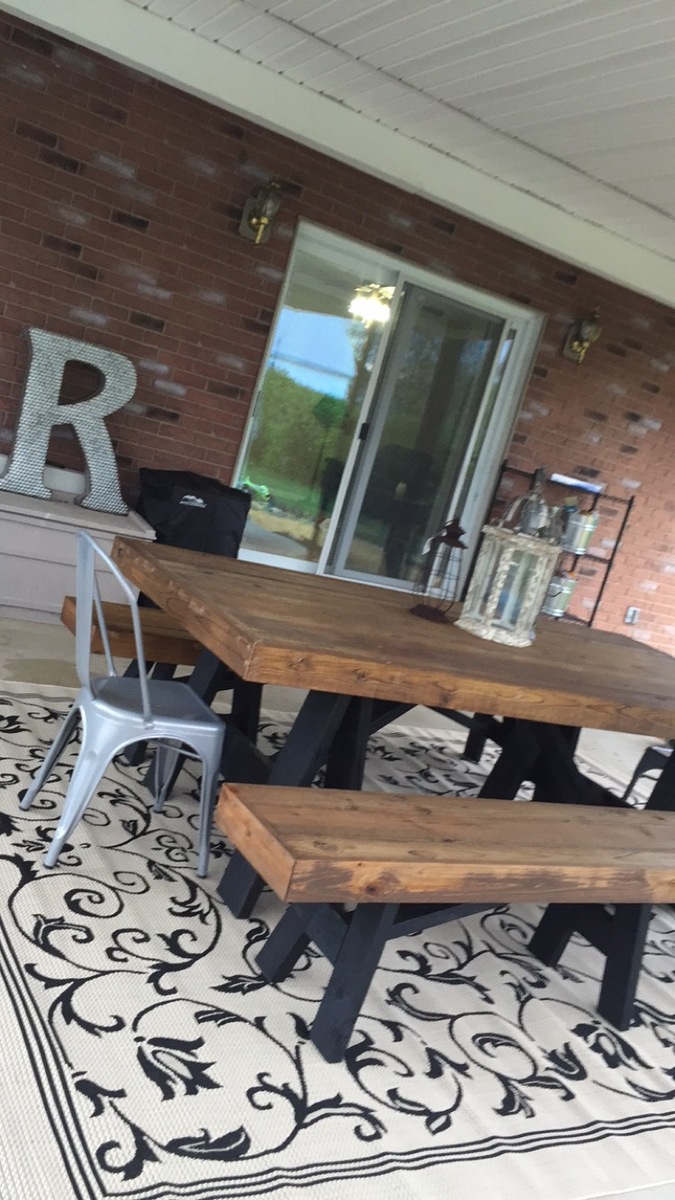
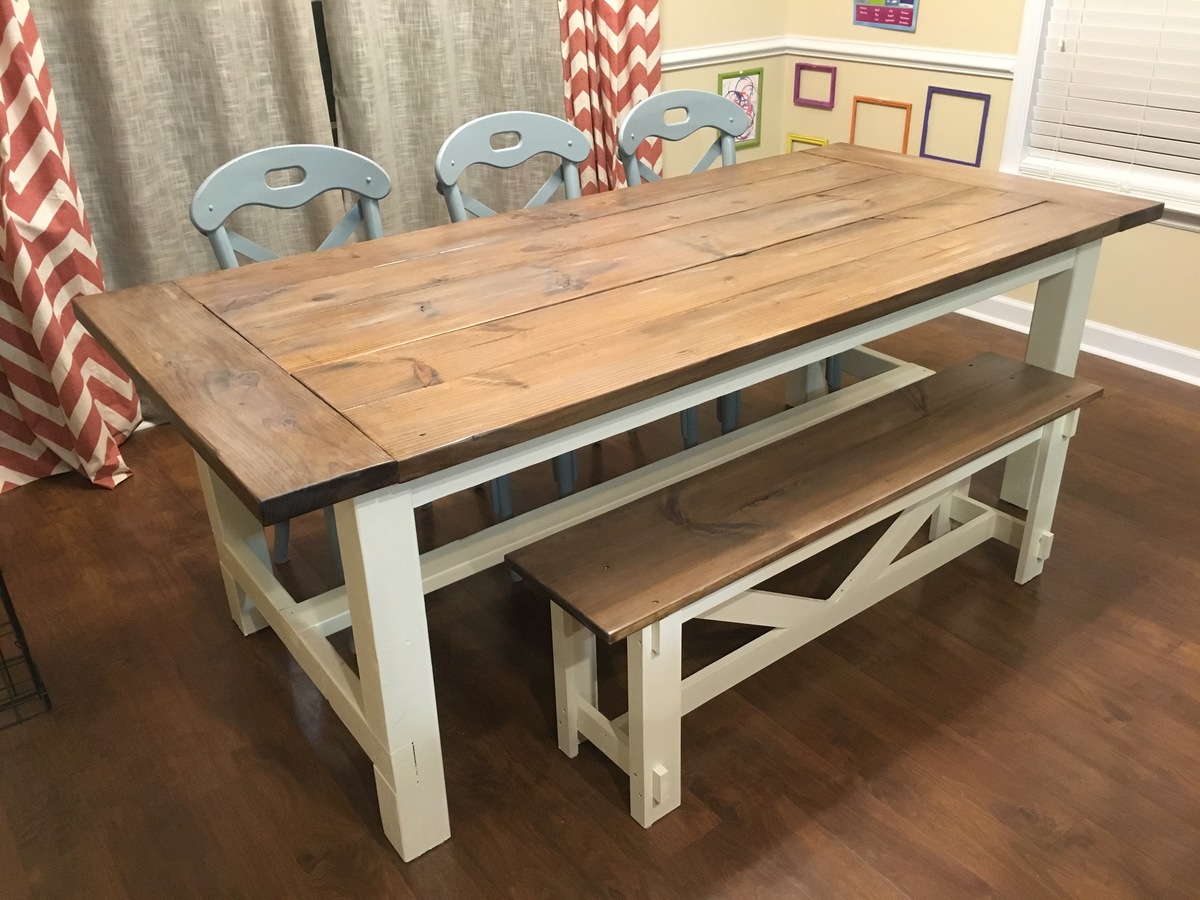
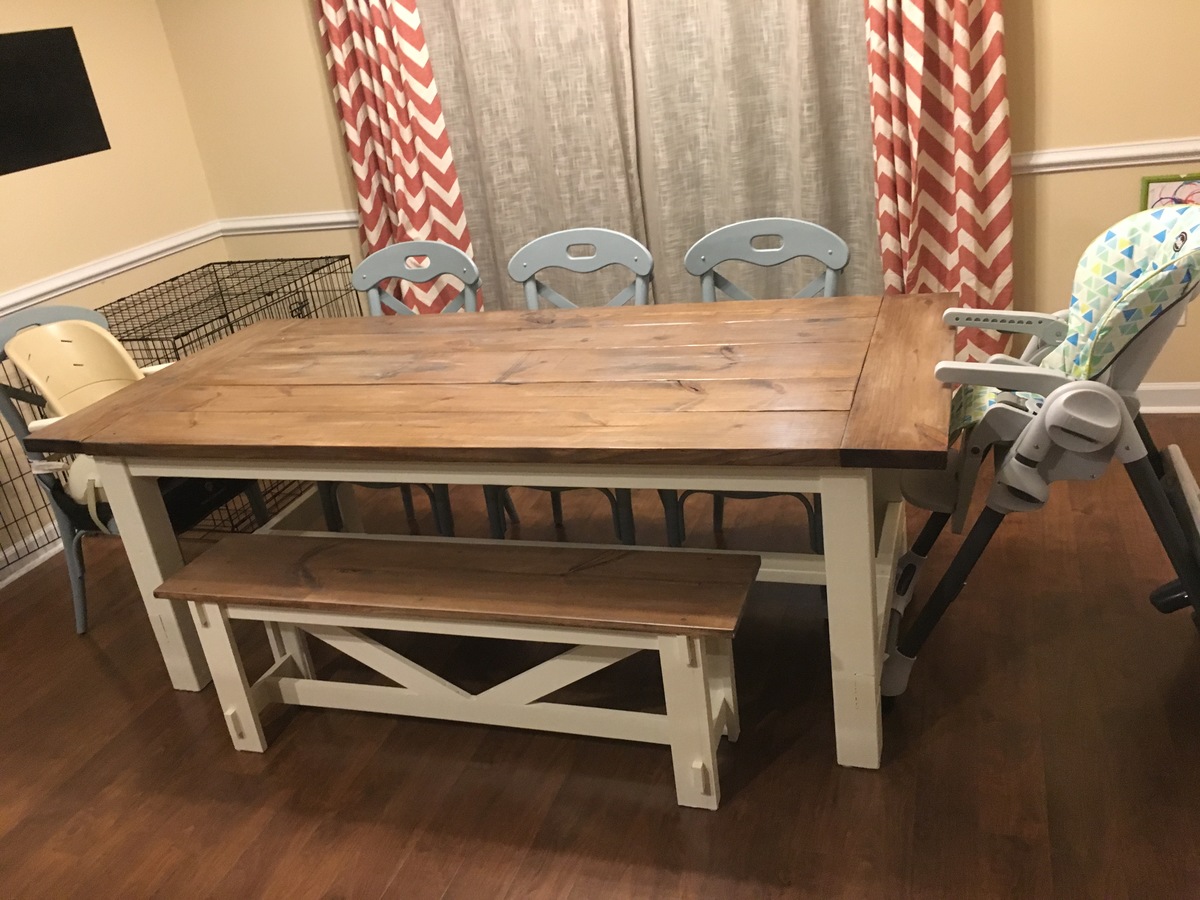
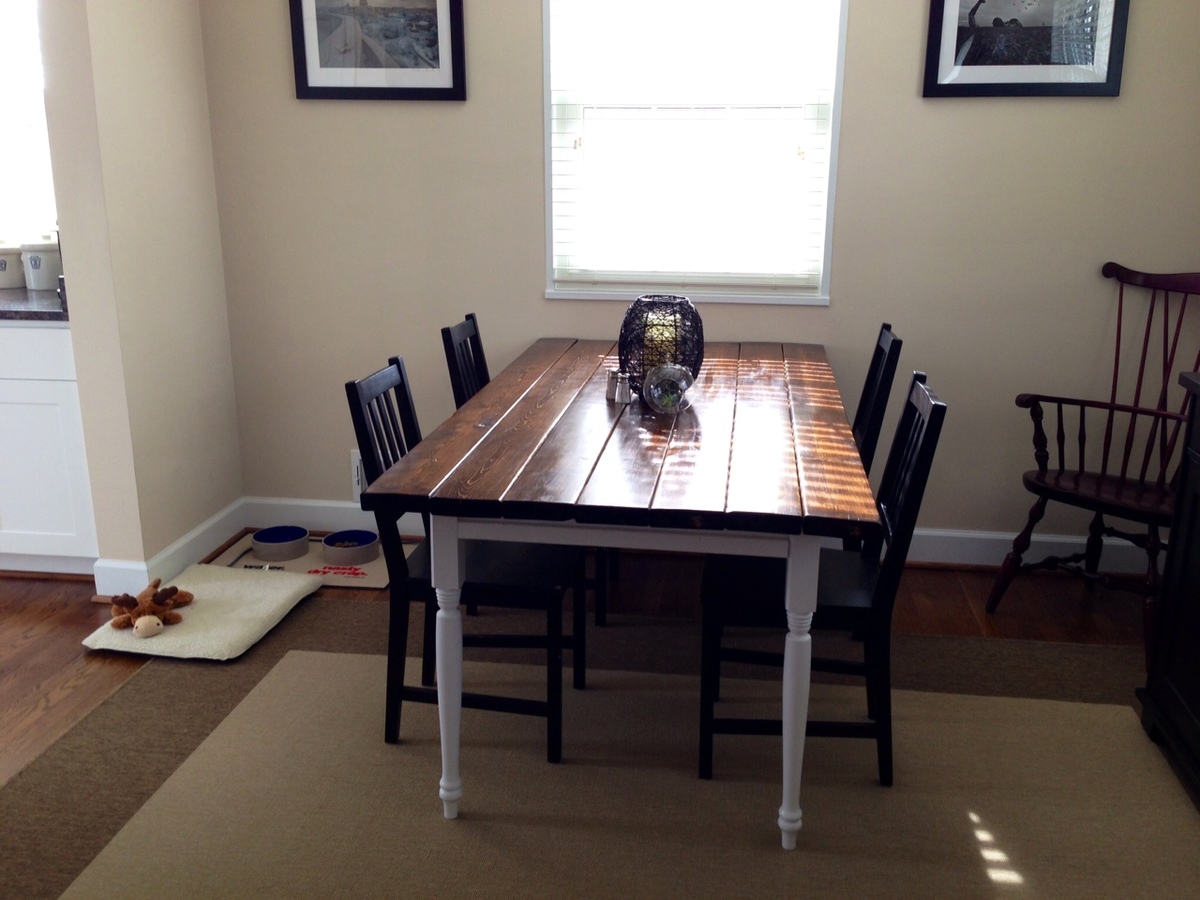
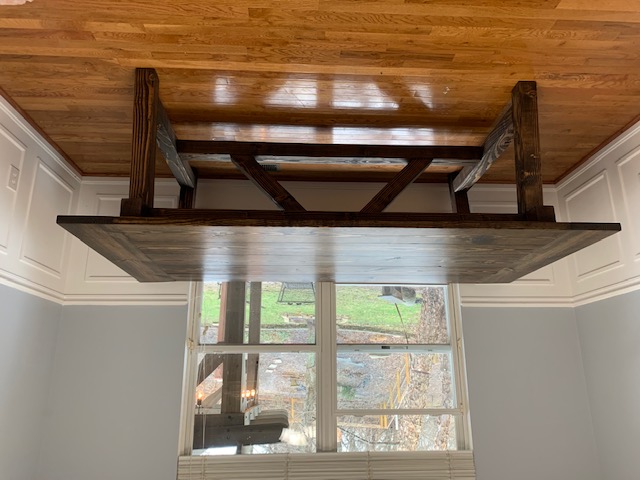
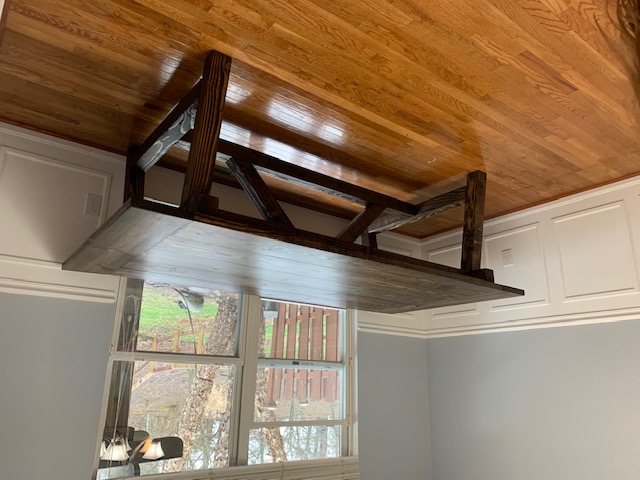
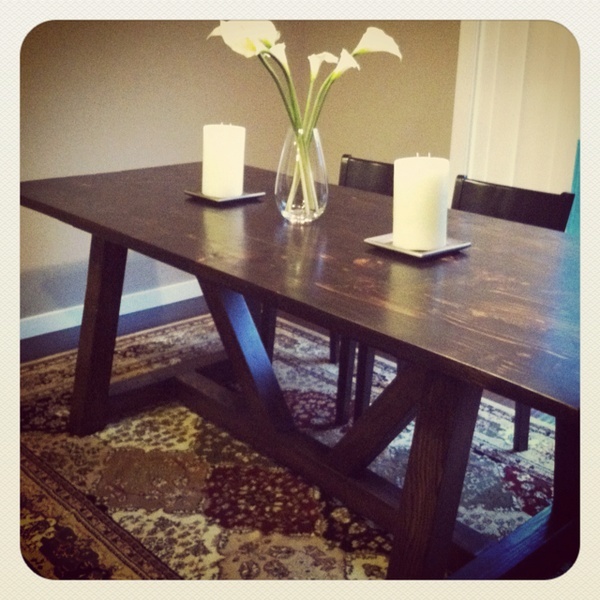
Benchright Farmhouse Table

Submitted by Beano911 on Fri, 04/13/2012 - 10:01

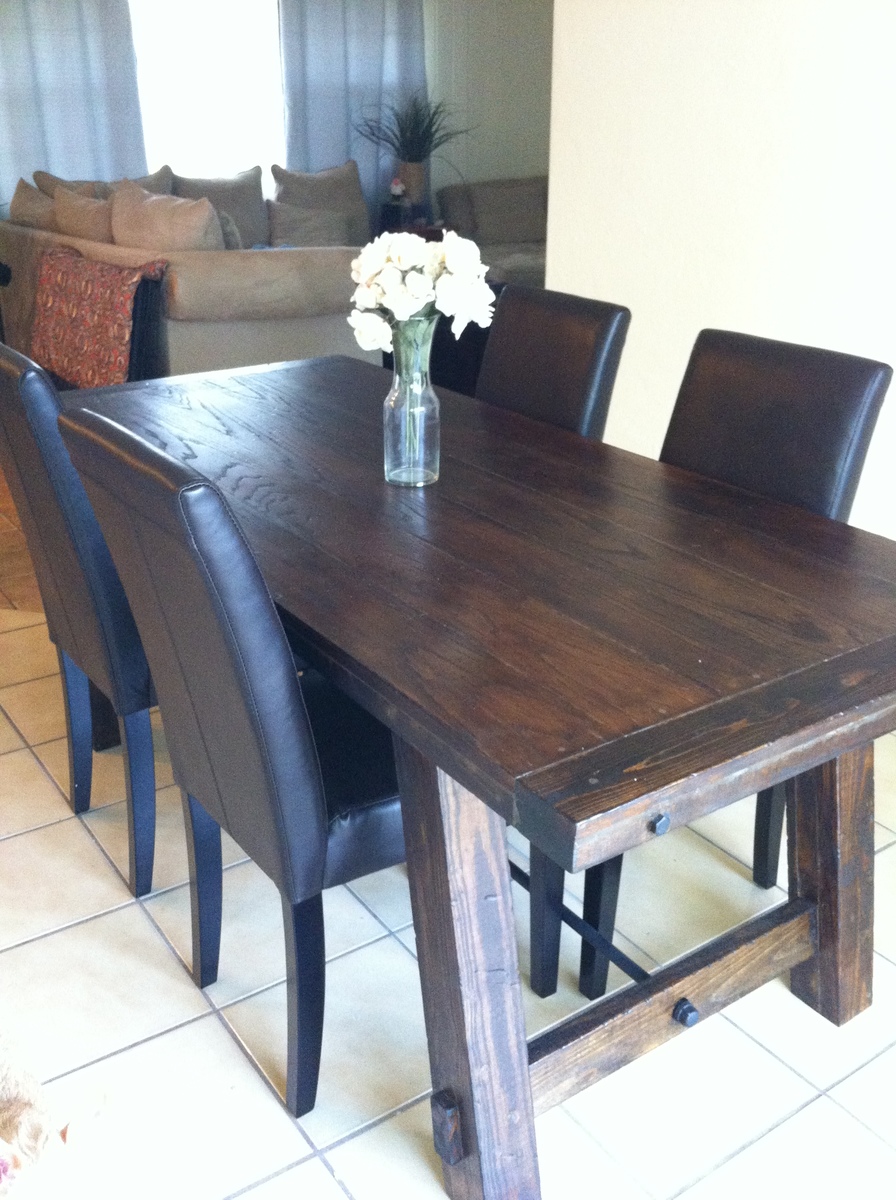
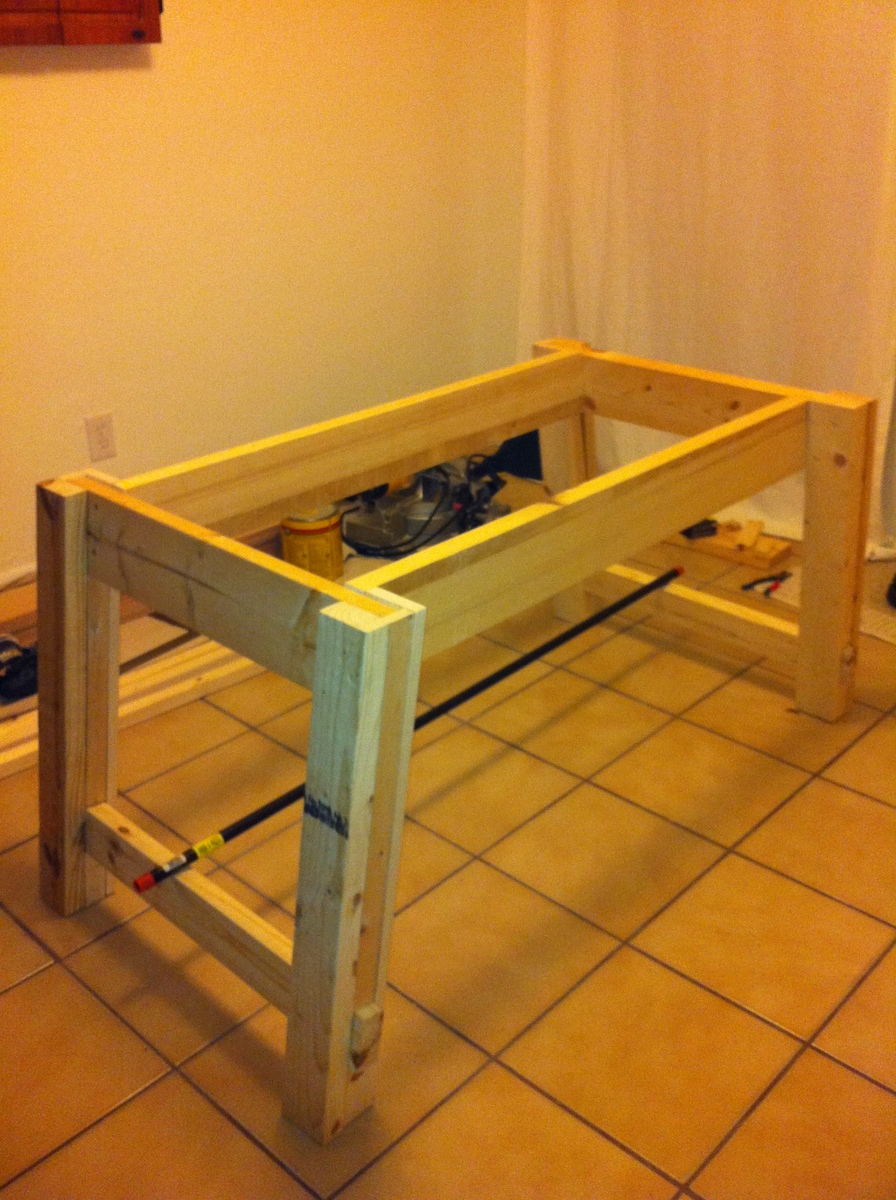
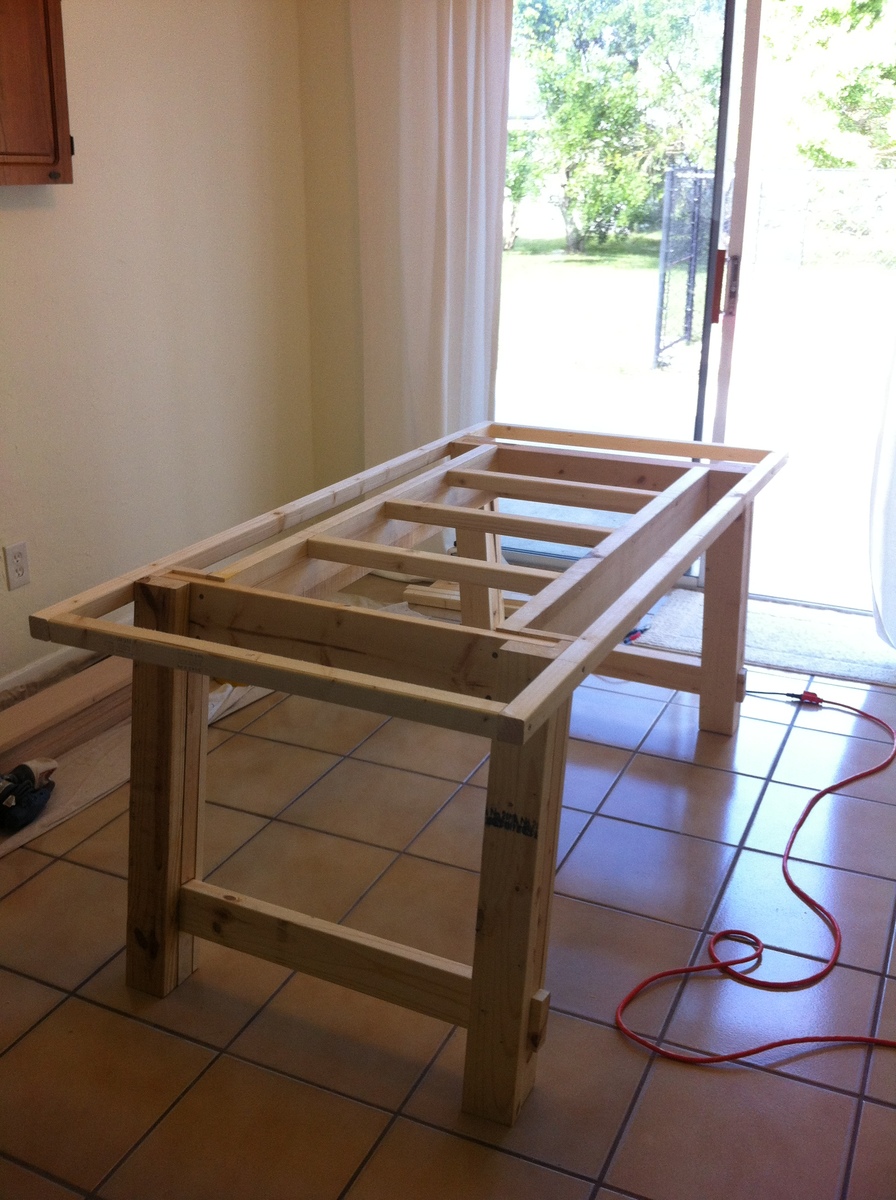
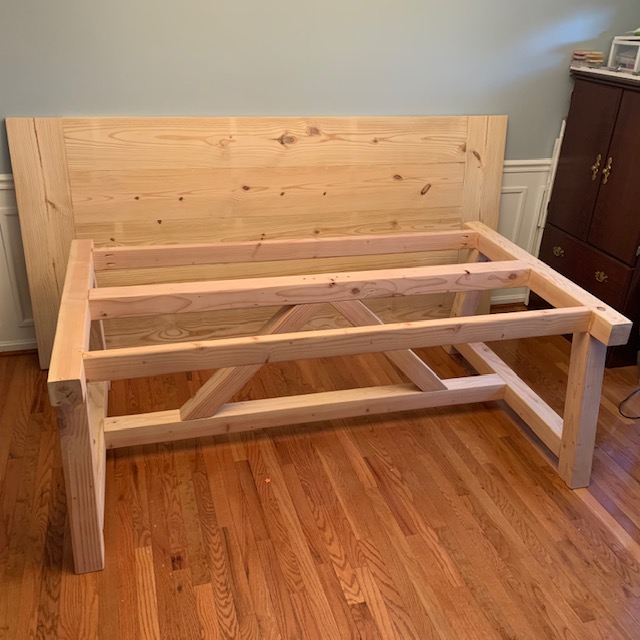
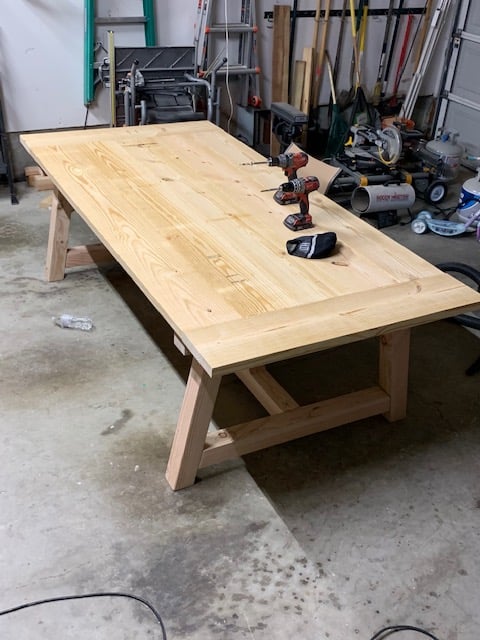
This was our very first project EVER and it came out beautiful! We needed a dinner table and couldn't find anything that came close to the thousand dollar Pottery Barn Benchright table. While searching for used furniture I came across these plans to build my own. After days of begging and convincing, my husband agreed to help me build it. Now he thanks me all the time! It was so fun and easy.

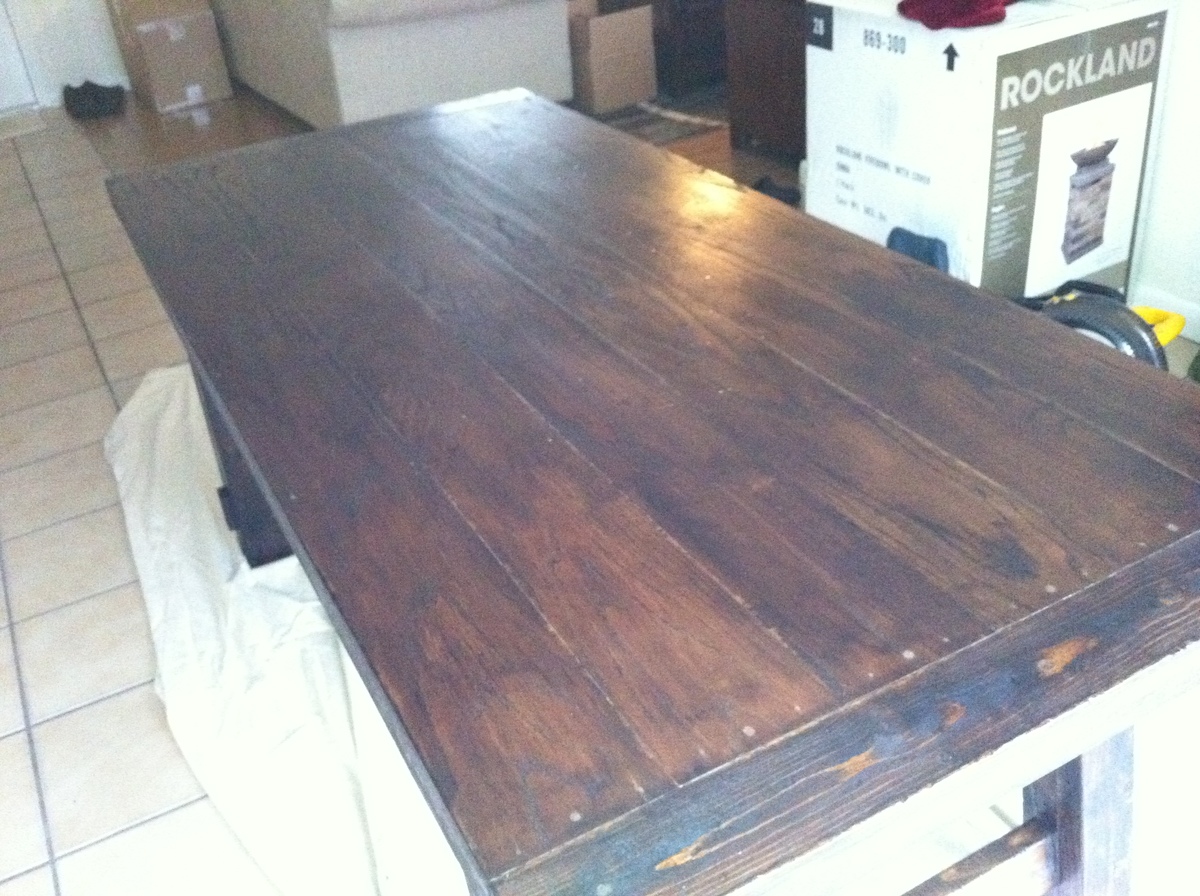
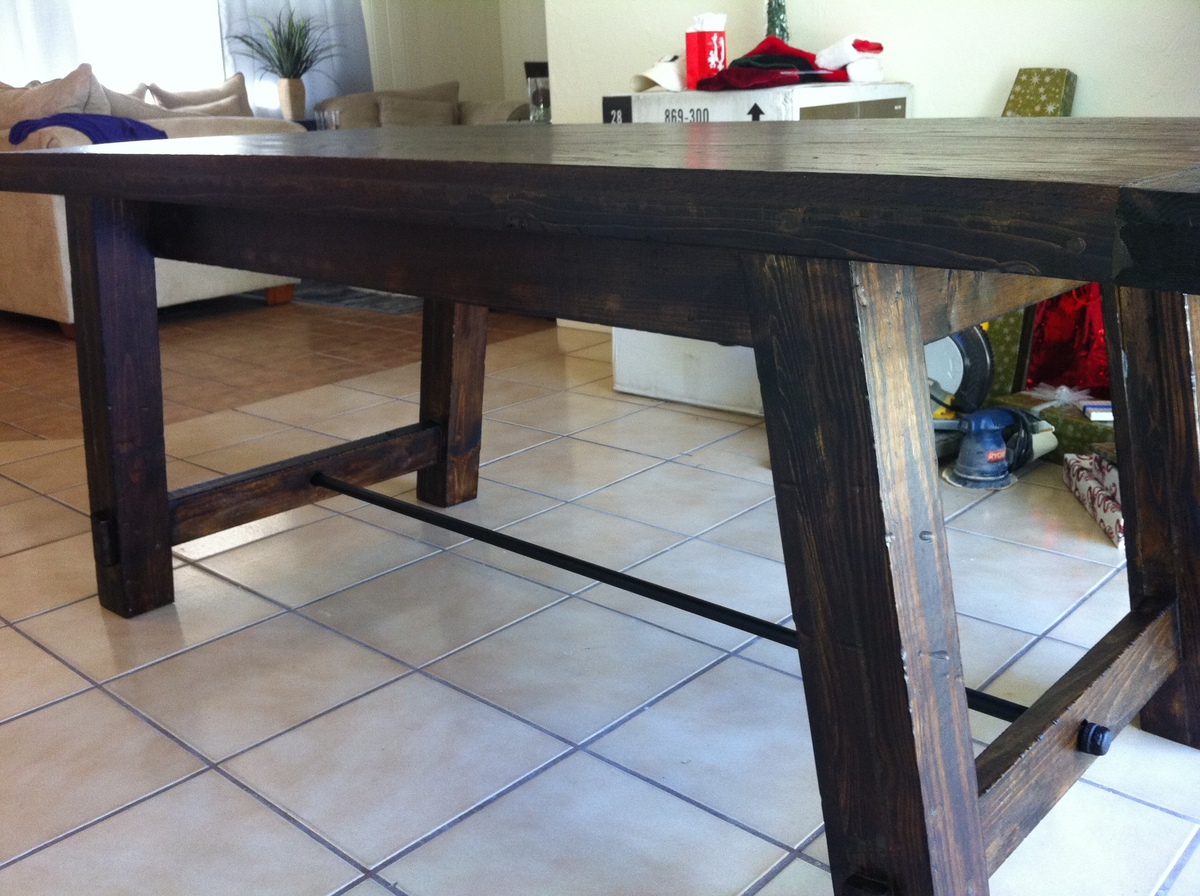
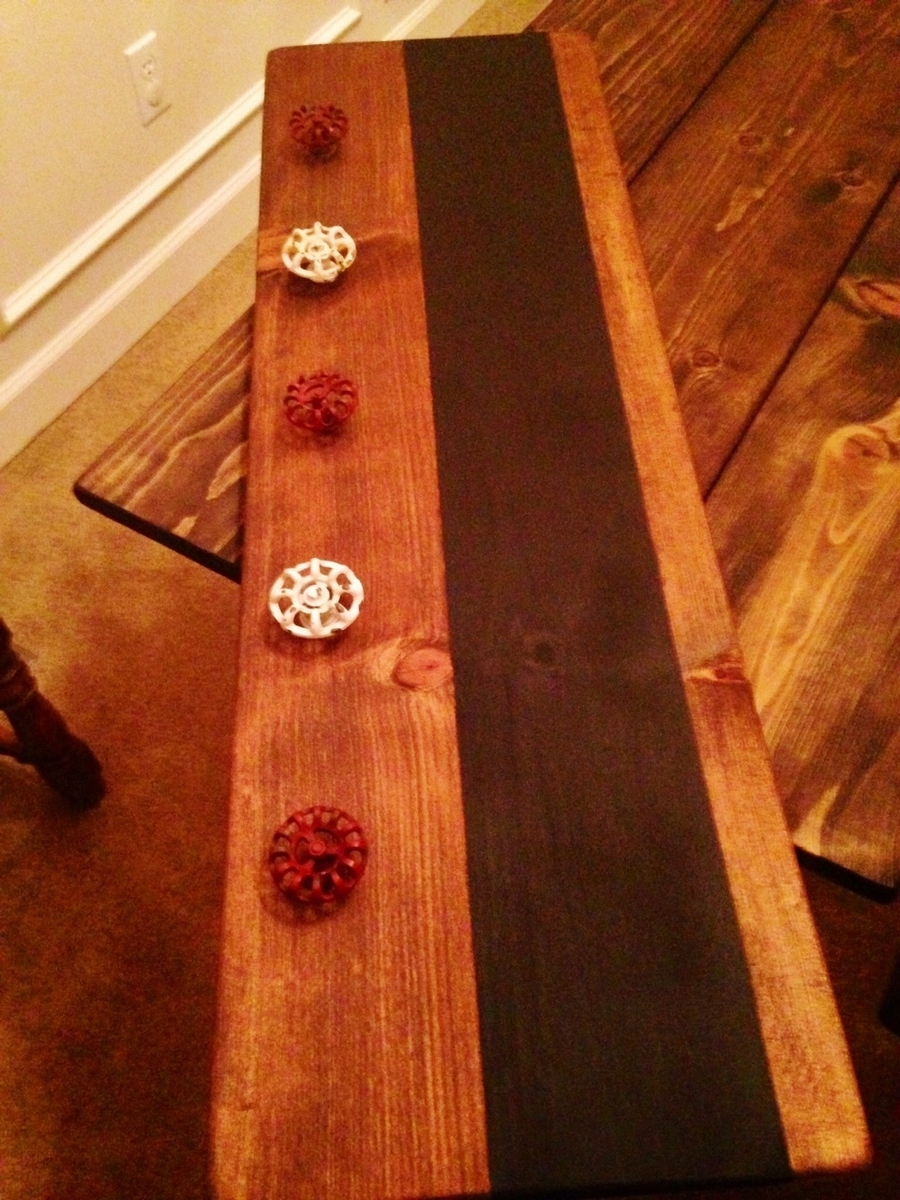
We did have a couple hiccups with the measurements. Ana did say to read through the plans and comments first, but we failed to write down and remember what others suggested. That being said, these plans were very easy. We took our time building this table since it was our first time using a miter saw and our first time building anything. Our table was a little more expensive than other braggers because we didn't use reclaimed wood and since we are beginners, we botched a couple cuts and had to buy a few extra boards :). After sanding, we took some chains and a hammer to the tabletop and legs to make a more distressed and rustic look. We painted the bolts and pipe black with Rustoleum Flat Black. Our pipe was longer than our table, so we had it cut. If you buy your pipe from Lowe's, they will cut and thread it for you. We couldn't find any hardware that look anything similar to the Pottery Barn Benchright. We checked Home Depot and Lowe's, but decided to settle with some plumbing knobs that screwed in the pipe. Once we painted everything and put it all together, we actually loved the pipe knob look more than the Pottery Barn table hardware!

This table is so darn sturdy and will last forever. I can't thank Ana enough, and thank you to everyone that posts these brags, because you helped me convince my husband and myself that we could do this!

Estimated Cost
$250.00
Estimated Time Investment
Weekend Project (10-20 Hours)
Finish Used
One coat of Minwax Wood Conditioner, Two coats of Minwax Wood Finish in Dark Walnut (the first coat will be ugly, but the second coat is money), One coat of Minwax Polyurethane in Clear Satin (we wanted our table to be protected, but not overly shiny.)
Recommended Skill Level
Beginner

Comments

Bunnie1978

Fri, 04/13/2012 - 16:07

It IS beautiful. When I first saw the main photo on the home page, I thought "there's no way they made that, they must have bought it at PB" because it looks JUST like the PB one. Like, exactly.

You did an excellent job!!

mweir

Sat, 04/14/2012 - 08:26

I love the look of your table, it is beautiful. You did a fantastic job for your 1st project. There will be no stopping you now. Love it!!

My version of ten dollar picture ledges/galley shelves.

I think I get more compliments on these galley shelves/picture ledges than anything else I’ve made, and these were probably the easiest things to make!

It cost me about $25 a piece but they were nearly 8 feet long each. I used a paint sprayer to paint them, WAY easier than brushing on the paint! watch for drips though (my first time using a sprayer, treat it like spray paint, light easy coats!)

Built from Plan(s)
Estimated Cost
$100
Estimated Time Investment
Afternoon Project (3-6 Hours)
Finish Used
used a satin white paint. that is the same as our molding in the house.
Recommended Skill Level
Starter Project

First project ever

Submitted by Anonymous (not verified) on Thu, 04/21/2016 - 18:53

I challenged my husband who is new to any woodworking project to make me this table! That he did!!

Estimated Cost
$250 (benches and table)
Estimated Time Investment
Weekend Project (10-20 Hours)
Finish Used
Rustoleum American walnut
Recommended Skill Level
Starter Project

First Ever Woodworking Project - Modified Farmhouse Table

I modified the Farmhouse Table With Pocket Holes plans to make the table counter height for our views of the woods from the dining area. We also have large family gatherings every Sunday evening so made the overall length 95” and the width 46” using 2x10s instead of 2x8s. I also made a little extra foot room on the ends by moving the stretcher support to the inside of the legs. All of the lumber was run through a planer multiple times to get everything nice and even. Large knot holes where left by choice for character, and I filled them with epoxy and sanded smooth.

I started the project with lumber that was not completely dry. As a result, my tabletop width shrunk by nearly 3/4” over the first few weeks after completion. I would recommend bringing your lumber package inside for several weeks before you begin the build to allow it to dry and shrink. Do not bother to glue the table top if your lumber isn’t dry as it will simply pull apart like mine did.

This table is a BEAST, and will definitely be our shelter in the event of an earthquake. Because of the size, I had to build it in the dining area and I wish I had sanded everything to final finish before I built it. There was a lot of creative shopvac help from the kids.

Thank you for the great plans and inspiration to take on my first major woodworking project!

Estimated Cost
$130
Estimated Time Investment
Weekend Project (10-20 Hours)
Finish Used
Minwax Classic Gray and Varathane Triple Thick Water Based Clear Matte Finish Polyurethane. I also chiseled out a few chunks from the edges and sanded them smooth to make a “used” appearance, as well as using a torch to “toast” the long edges and corners of some of the lumber to give it character and dimension.
Recommended Skill Level
Beginner

$10 Raise Cedar Garden Palnet, self watering

I read about a SIP, or self watering planter in Family Handy Man April 2012. There planse we expensive and compicated. These were easy and fun to make. I like the I dea of using 50% to 90% less water, and only watering once a week.

I added a post down the middle to help with bowing.

I found 5 foot cedar fence posts for $1.28 at orange. Including glue and screws $10. I have the palsit lininn, the withe piping on hand. HTe drain pipe was $6. for a total of $16.

Orange had a 2 x 2 plastic Self watering planter $30, big savings

I say starter only if you are not ripping, but using 1 x2 's

Estimated Cost
$10
Estimated Time Investment
Afternoon Project (3-6 Hours)
Finish Used
None
Recommended Skill Level
Starter Project

Comments

Our Bunk Bed

Submitted by aloewen on Wed, 01/29/2014 - 09:27

My husband and I are expecting our second child this April. We knew we wanted to move our 2 year old out of her crib and into a “big” girl bed so that the new baby could use the crib. I saw the Play House Loft Bed on Pinterest and fell in love. I showed it to my husband and convinced him it would be a great winter project for us. He of course started his research and had nightmares of our daughter falling over the top bunk. So when I saw the Sweet Pea bed I knew it was perfect. I pitched the idea to my husband that the bottom bunk could be her bed and the top would be her play area. He was sold. We went to Lowes and bought our first round of lumber and immediately realized this project was going to be more expensive than expected but we were still up for the challenge. My husband worked on the project two full days, I worked on it a half day and then together we worked on it a few hours over nap time or after putting our daughter to bed.

We made some modification to the plans, we liked the look of a flat front rather than 2x4’s so we used a flat sheet of ply wood. We added carpet to our stairs to help prevent any major injuries if fallen down. We left the roof off for now but may add it on later. We also decided to leave the bottom open for any size storage we needed. We added a fabric ruffle to hide the space.

Looking back we wish we would have done this project in the spring/summer and not dead winter. We had to park our cars outside and use our garage to cut and paint all the wood which meant space was limited. This also prevented us from being able to use a spray gun to paint. Had we been able to spray the paint this project would have moved a lot quicker!

Once the project was complete we were so happy with the outcome. Our daughter absolutely LOVES her new bed and loves her play area upstairs!

Built from Plan(s)
Estimated Cost
$800
Estimated Time Investment
Week Long Project (20 Hours or More)
Finish Used
Behr White, Gray and Pink Paint.
Recommended Skill Level
Intermediate

Comments

birdsandsoap

Wed, 01/29/2014 - 11:12

I love the color combo. This is a great bed to transition to from a crib, we did that with my youngest daughter too. I hope she enjoys it, both kids will be sharing a bunk in no time!

Farmhouse Table

Submitted by Anonymous (not verified) on Tue, 04/26/2016 - 12:38

My husband built this following the plans for the farmhouse table and I painted and stained it using 2 different stains and a whitewash. We are so pleased with how it turned out.

Recommended Skill Level
Intermediate

King Size Bed

Submitted by hailey807 on Fri, 01/17/2020 - 19:37

I love the farmhouse look and wanted to start changing out pieces in my bedroom. Good quality furniture is expensive, so I thought I would checkout DIY projects and came across Ana’s plans for a king bed. Her plans got me started and I changed a few things along the way. I LOVE the end result. 
 

I used Knotty Alder and Danish Oil in Dark Walnut. Alder is an easy wood to work with and the Danish Oil brings out all the beautiful grain. I highly recommend both. 
 

I decided to buy the metal frame and plywood to place the mattress on. 

Estimated Cost
500.00
Estimated Time Investment
Weekend Project (10-20 Hours)
Finish Used
Danish Oil in Dark Walnut. I applied one coat and the finish is satin.

FYI: Danish Oil is very easy to work with and it made the grain of the wood “POP”. The great thing about this product is that it’s a stain/sealer combination and you apply it with a foam paint brush.
Recommended Skill Level
Intermediate

DIY Wood Patio Set

Submitted by Anonymous (not verified) on Fri, 09/15/2023 - 08:46

We were in need of a nice patio set and just couldn’t find the right fit until we came across some 2x4 plans and thought “that seems simple enough”. Took some planning for the right dimensions but I swear my husband can build anything. It turned out beautifully. He made a table, a sofa and a chair….burned them with a torch is certain areas then put polyurethane on them. Thanks for looking.

Lanette

Peek-A-Boo Birdie Feeder

These little birdie feeders ended up being part of our Easter festivities. It was such a quick and easy project. I can't wait to hang them and see the looks on my kids faces as the neighborhood birds fly up for a snack.

We had almost all of the wood on hand from previous projects, they only thing we bought was the board for the faces.

Estimated Cost
$5.00
Estimated Time Investment
An Hour or Two (0-2 Hours)
Finish Used
Valspar Spray Paint, Acrylic Paint
Recommended Skill Level
Starter Project

First homemade piece of furniture!

Submitted by rsabina on Sat, 02/01/2014 - 10:10

I decided I had to have a farm table, but could not pay the store bought prices. SO I spent weeks poring over plans trying to figure out which one to make.
We picked this plan because I felt like as a beginning it would be hard to make the legs. I REALLY wanted to get the husky legs found in the plan but they were a little pricey, so I just got the same height legs at lowes.
I am SO happy with my table. For anyone feeling daunted by pocket holes and a kreg jig: get a kreg jig mini. I couldn't afford the regular kreg jig but the mini was only 20 bucks or less.
Happy building!

Estimated Cost
$105
Estimated Time Investment
Day Project (6-9 Hours)
Finish Used
Minwax american
Recommended Skill Level
Beginner

Comments

Octagon Benchmark Table

Submitted by Anonymous (not verified) on Fri, 04/29/2016 - 13:59

This was my first project and took about two weeks to complete from start to finish. I used an oil based walnut stain and five coats of an oil based semi-gloss polyurethane to finish, sanding in between coats. Be sure to wear a mask and eye protection.....holy sawdust!

Estimated Cost
$109 for lumber
Being that I started with nothing $400 - $500 for tools
Estimated Time Investment
Week Long Project (20 Hours or More)
Recommended Skill Level
Beginner

4x4 TRUSS BEAM TABLE

Submitted by largashell on Fri, 01/24/2020 - 07:52

I built this as a craft table for my family. I altered the plans to make the table larger to fit a specific space in our craft room. The table was easy to build and turned out great!

Thanks for the plans

Built from Plan(s)
Estimated Cost
$100
Estimated Time Investment
Weekend Project (10-20 Hours)
Finish Used
Craft table for the family
Recommended Skill Level
Beginner

Chalkboard Hangers

These are pretty easy to make, the hardest part is cutting off the extra length on the knobs, but make great presents!

Estimated Time Investment
Afternoon Project (3-6 Hours)
Finish Used
Stain and paint
Recommended Skill Level
Starter Project

sofa pottery barn cushions

Easy to build 2-3 hours. Weather proofed because did not want grey cedar in a few years. Liked the color of weather proofing but color continued to leak off. Polyed and sanding eventually stopped the leaking if colors. Scored pottery barn cushions 50% in the winter + 15% new email customer. Still $150... bought some pillows from pottery barn on sale for another $60. All in all looks awesome! VERY easy build. The rest ($$) is what hurts... Test any weatherproof in you use first before using.

Estimated Cost
$145
Estimated Time Investment
Afternoon Project (3-6 Hours)
Finish Used
Behrman weather proof, 3 coats poly
Recommended Skill Level
Starter Project

Distressed teal console

Submitted by Anonymous (not verified) on Wed, 01/29/2020 - 13:06

I’ve built quite a few of these. Once you understand how the plans are written, they’re very easy to modify!

Estimated Time Investment
Weekend Project (10-20 Hours)
Recommended Skill Level
Intermediate

Modern Outdoor Chair

Submitted by Anonymous (not verified) on Fri, 09/22/2023 - 07:46

Great Project. We are very happy with the chair. It is modern. Amazing. Ana thanks!! The drawings are great.

Jhrios2003

Comments

Province Table

Submitted by babyak81 on Tue, 04/24/2012 - 15:42

The plans I used were actually from design confidential but it is the same table.

Built from Plan(s)
Estimated Cost
$80.00
Estimated Time Investment
Week Long Project (20 Hours or More)
Finish Used
I mixed what I had together...then did about 10 layers of a wax finish.
Recommended Skill Level
Intermediate

Comments

Jill P (not verified)

Tue, 04/24/2012 - 23:16

This looks great! did you modify the plans (length) at all? It looks like your cross beams are closer together and I like that look best.

Kait (not verified)

Tue, 05/15/2012 - 04:15

My husband and I are looking to build this table very soon. He is unsure as to what wood you may have used for this project. We absolutely love this dark wood. Will you please tell us what wood you used for this project?

Thanks! Can't wait to have this beautiful table sitting in our dining area!!!

Rachel Babyak (not verified)

Tue, 05/15/2012 - 06:34

We used Douglas fir I believe. We got it at a lumber yard and I can't remember for sure. The stain is ebony dark walnut and a mahogany mixed... It was what I had on hand. Good luck and happy building!!

Storage locker unit

Submitted by khawley5 on Fri, 02/07/2014 - 21:23

I have been waiting a long time to have this amazing piece of storage. The size is what was intimidating to me but it was easy to build. This project is perfect for a beginner . Make sure you have an extra set of hands due to the size otherwise this was easy and straight forward to build. I love the storage it offers to keep my Minnesota winter gear organized. The kids have a place for all of their snow pants, boots, coats etc.

Built from Plan(s)
Estimated Cost
$150
Estimated Time Investment
Weekend Project (10-20 Hours)
Finish Used
I used a custom match color for the beautiful teal finish. I love teal!
Recommended Skill Level
Beginner
Back