Community Brag Posts

Farmhouse bed
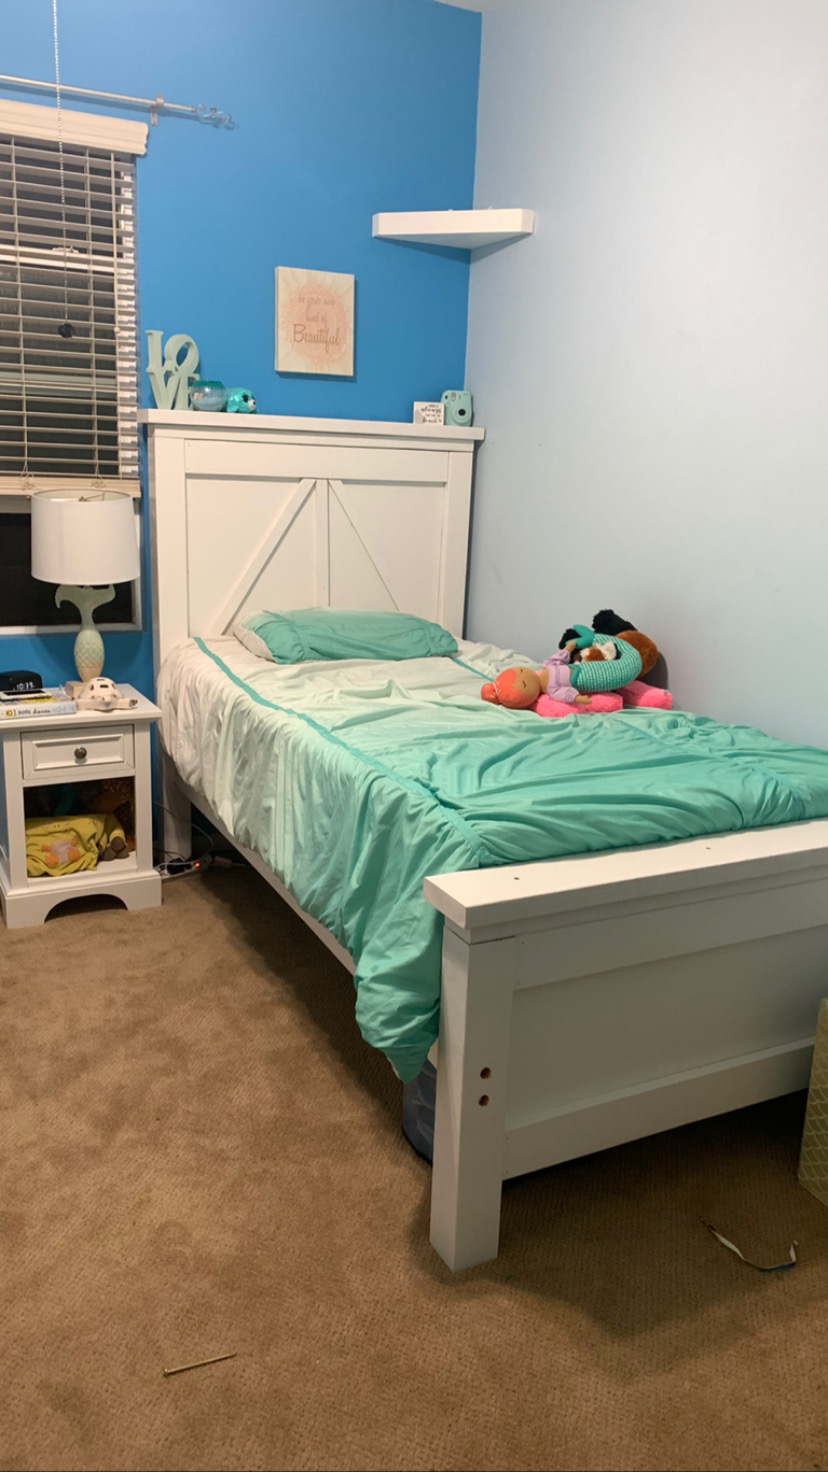
This was a fairly easy build following the plans. We changed the headboard slightly though.
Built from Plan(s)
Comments
Planked Wood Headboard- King

I made this in an afternoon as a wedding gift for my brother and soon to be sister-in-law. This was my first project using Ana's plans and I can't beleive I got it finished in a day. The hardest part was getting everything filled in and painted since I used paint grade pine. I did add a length of half round to the top just under the ledge for a little more decorative effect. I didn't realize how huge and heavy it would turn out. Guess that's just what happens when you build something entirely out of wood
Built from Plan(s)
Estimated Cost
$120.00
Estimated Time Investment
Day Project (6-9 Hours)
Finish Used
Satin finish Valspar paint in black.
Recommended Skill Level
Starter Project
Doll House Book Case

doll house book case with a Hot Pink Roof, also trimmed/painted the doors and window frames. Marking this as a week long project as I was only able to work on it in the evenings, however I believe this could be tackled in a weekend
Built from Plan(s)
Estimated Time Investment
Week Long Project (20 Hours or More)
Finish Used
PPG's HPC Pink and HPC White sprayed with gun
Recommended Skill Level
Beginner
Comments

Fri, 05/10/2013 - 07:19
Doll House Book Case
Wow, that is one happy little girl! And no wonder, what a beautiful job you did! Looks like a great gift for grandkids, too!
Blanket Ladder
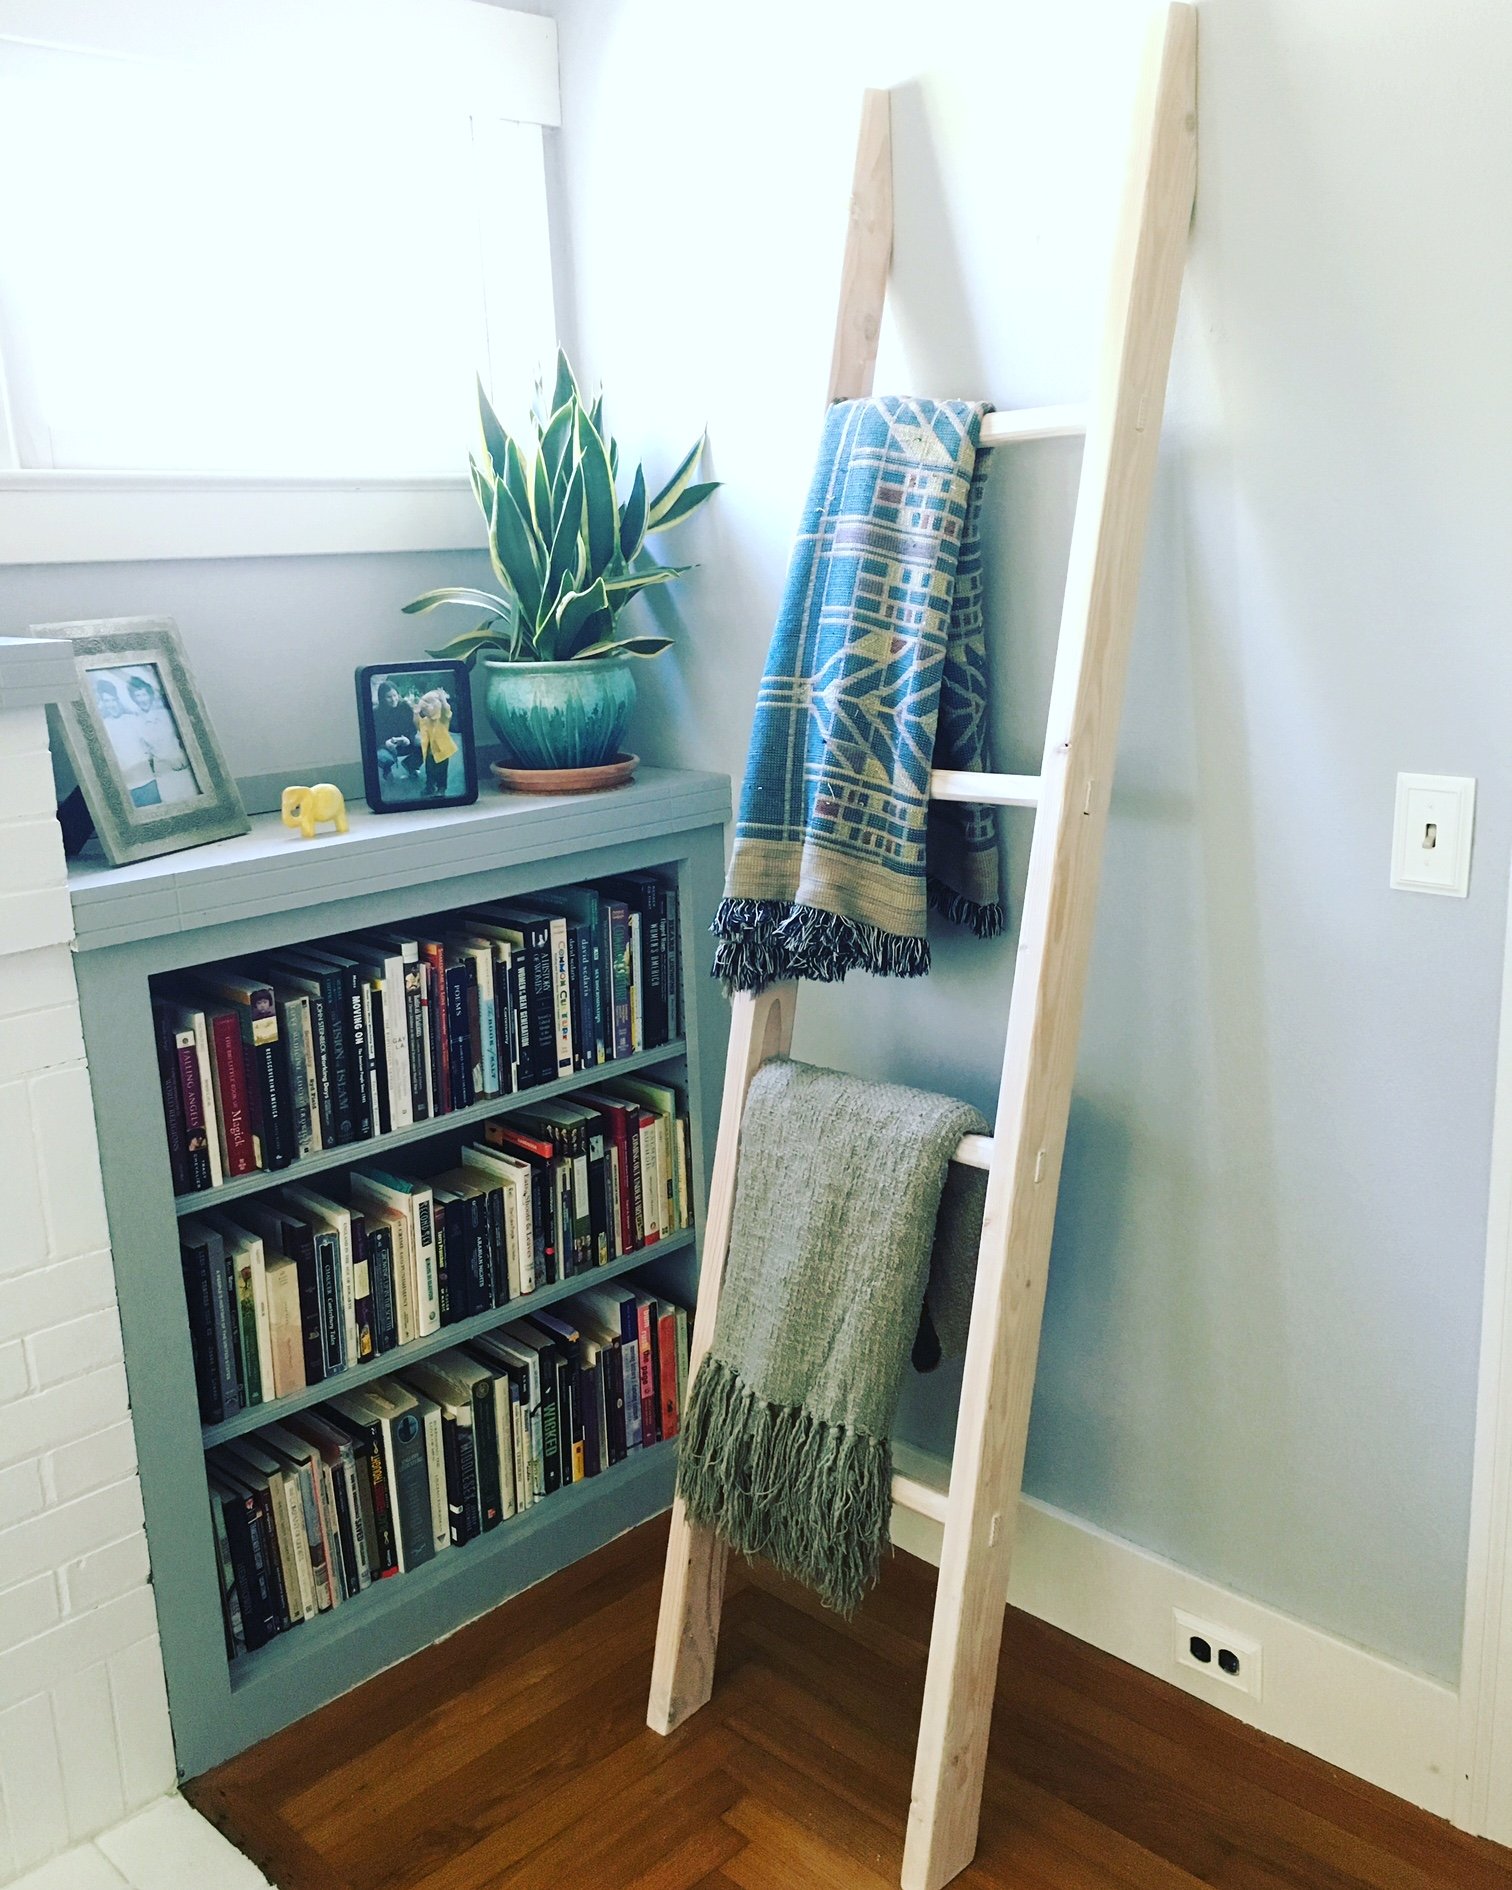
Created with hand chiseled mortise and tenon joints and a whitewash stain.
Built from Plan(s)
Recommended Skill Level
Intermediate
Modern Outdoor Chairs!
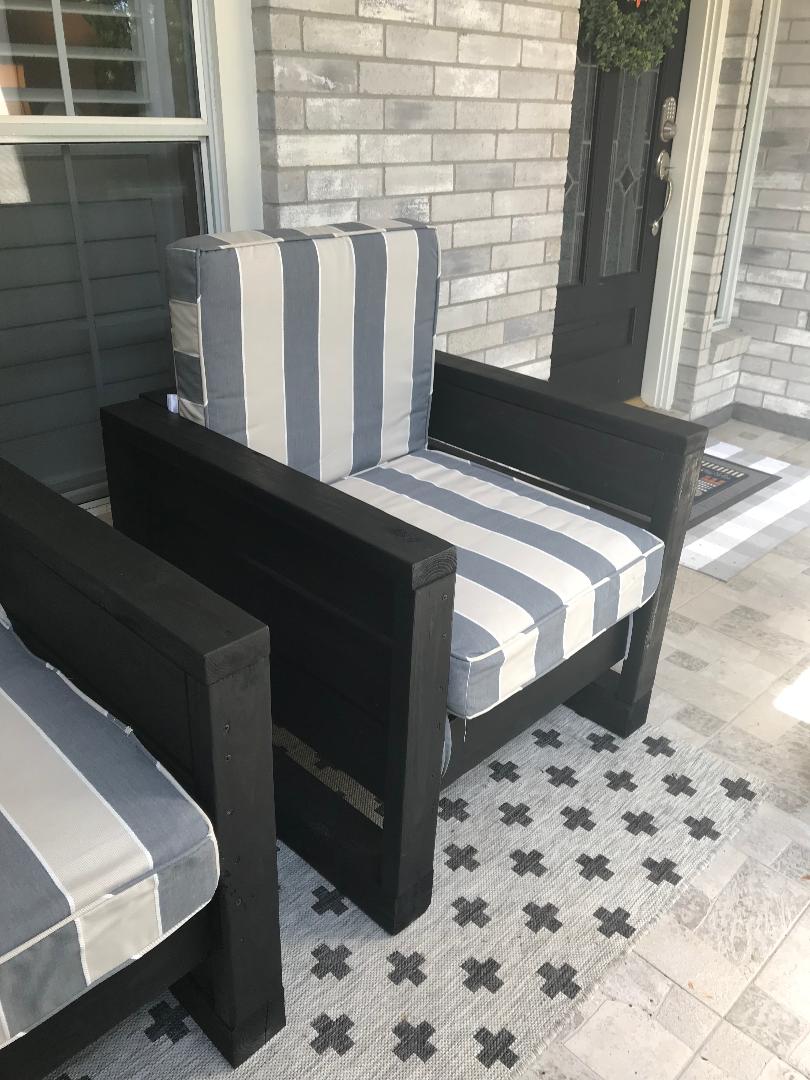
We love the new chairs on the front patio! My daughter and son in law's FIRST project! They completed both chairs in 1 day. We did add an additional 4x4 on the bottom to raise them as my son in law is tall. They sanded and stained them black to go with the gray brick and black door of their home. We picked up the cushions at "At Home" on clearance. Just need a new carpet and we're all set! On to our next project!
Built from Plan(s)
Comments
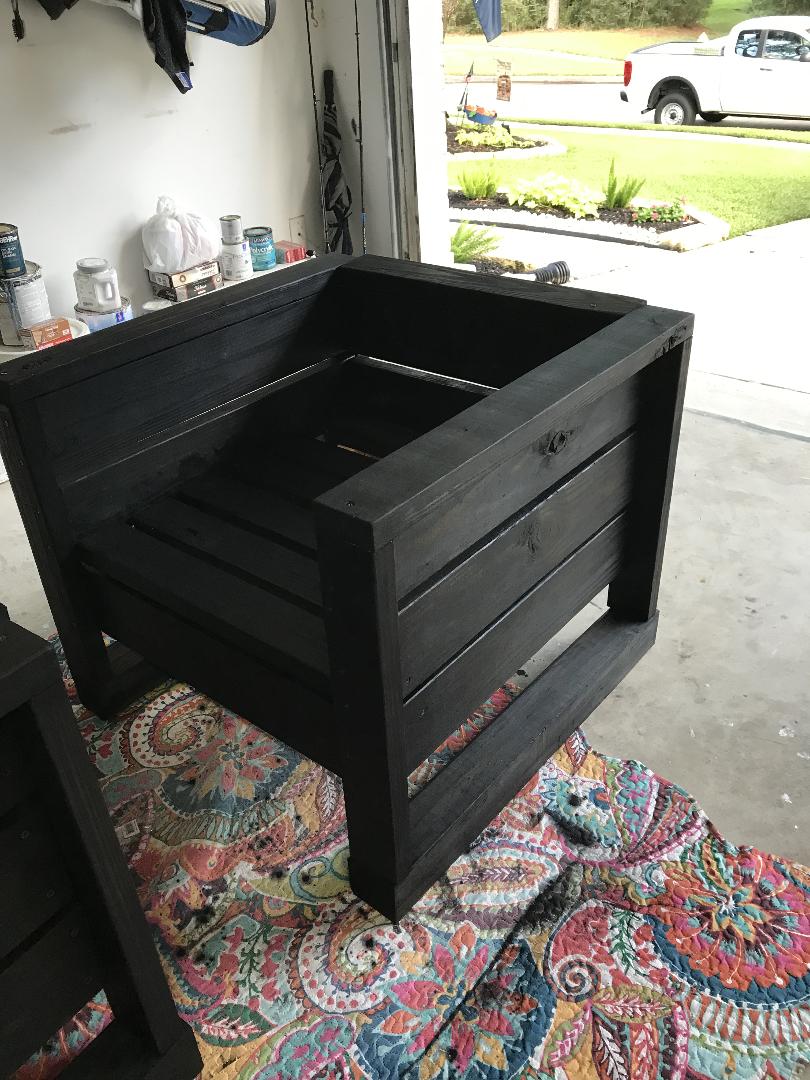
cubby bench

Three cube bench for entryway.
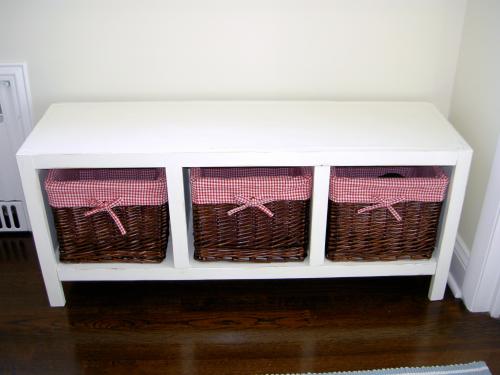
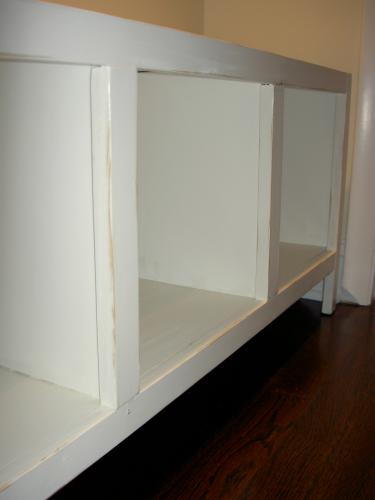
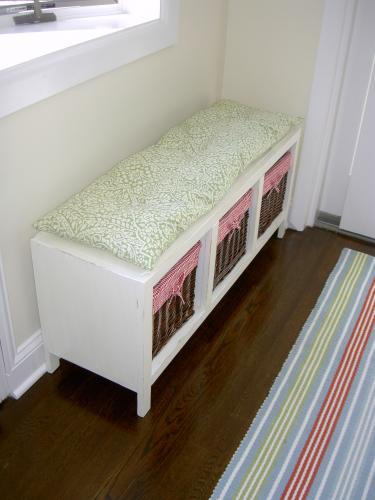
Built from Plan(s)
Estimated Cost
$60.00
Estimated Time Investment
Afternoon Project (3-6 Hours)
Finish Used
1. one coat primer
2. two coats Behr elegant white, satin finish
3. sand with 120 grit, light distressing
4. two coats satin poly
2. two coats Behr elegant white, satin finish
3. sand with 120 grit, light distressing
4. two coats satin poly
Recommended Skill Level
Beginner
Dog Crate/Kennel
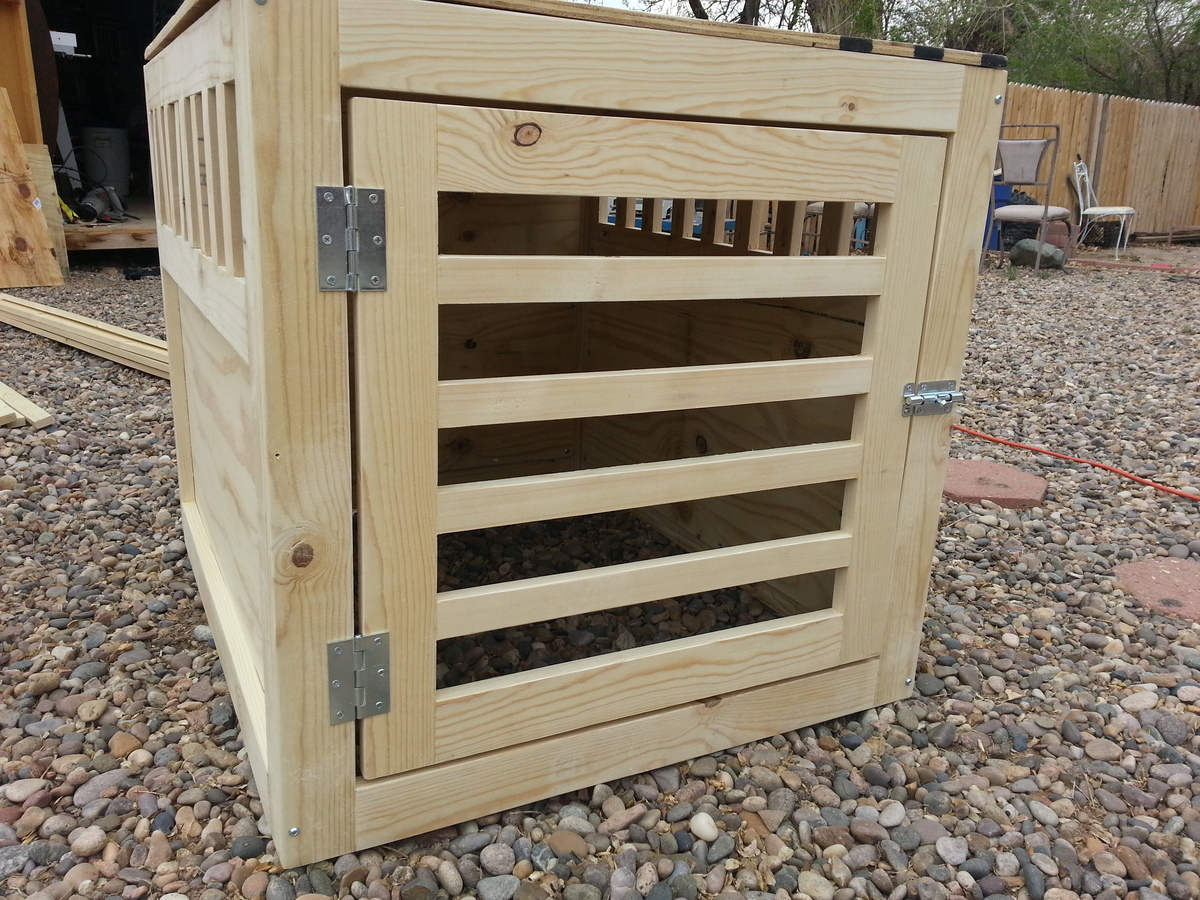
i build this crate a little bigger for my large doberman. She loves it and sleeps in it all the time. I put the gate on wrong though and she has since chewed the bottom slats, so im going to replace it and add one more so there is less room to chew between.
Estimated Cost
$170 (had to buy Kreg Jig)
Estimated Time Investment
Afternoon Project (3-6 Hours)
Finish Used
unfinished
Recommended Skill Level
Beginner
Comments

Scrap wood Buffet table
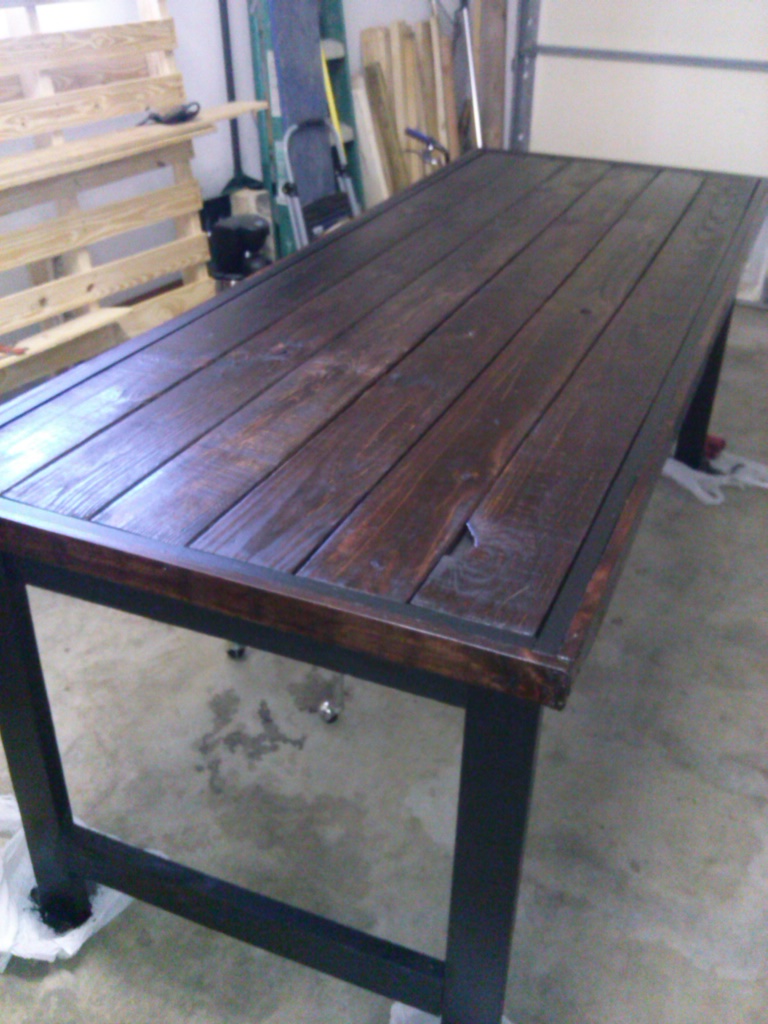
Built this 8' x 3' buffet/serving table from scrap wood gathered from work. I bought (2) 2x4's for the legs and the 1" particle board for stability under the slats on top. Finished with Red Mahogany and Polycrylic. It was built as a gift for my church and will now be used for Easter Service for Communion. One of many projects I've made and very happy with how this turned out.
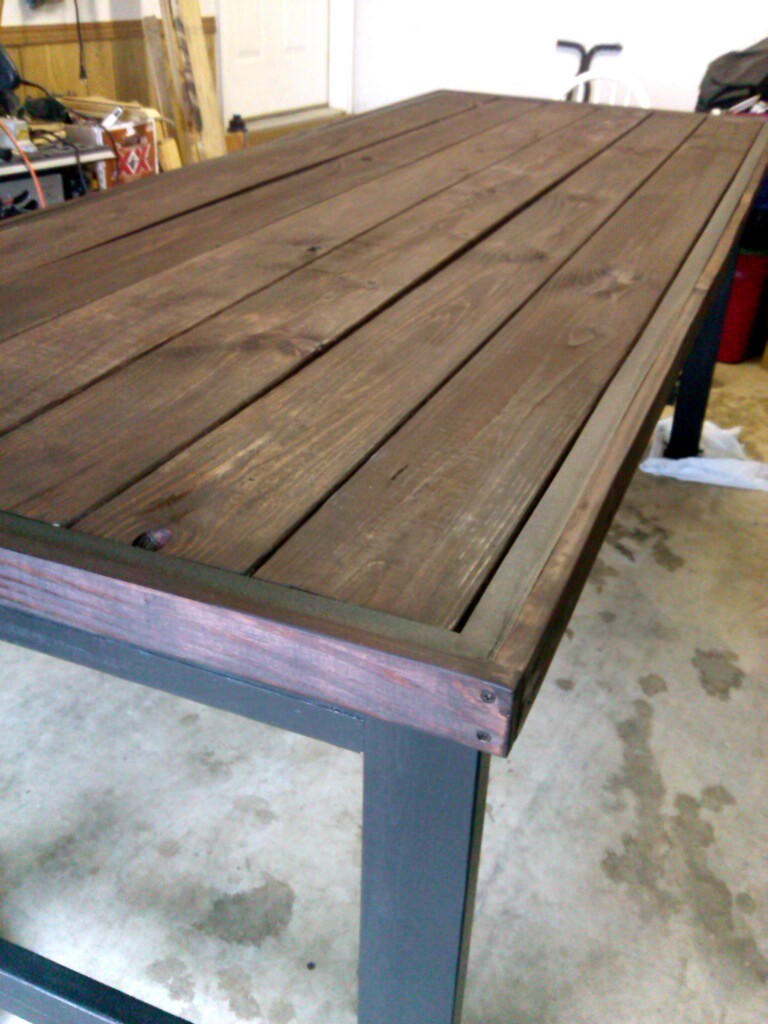
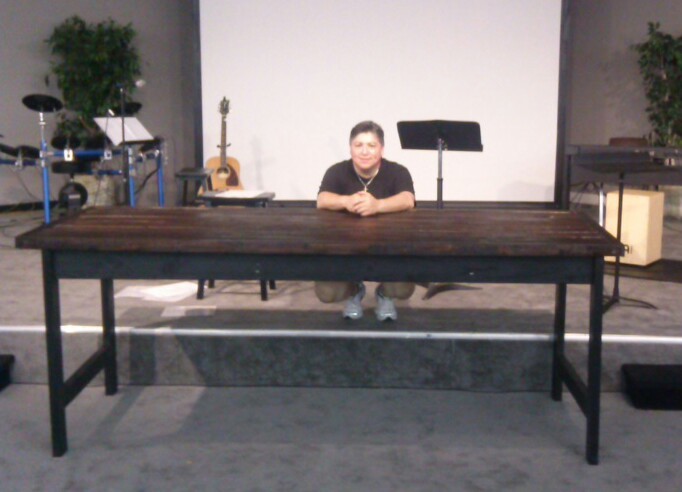
Estimated Cost
$30 for wood - $17 for paint - $6 for stain - $5 for sandpaper. Total spent - under $60.
Estimated Time Investment
Weekend Project (10-20 Hours)
Finish Used
I used 6 1x6x12 scrap gathered from work - we get a lot of pallets of product so scrap wood is easy to come by. Used the same scrap wood (ones less desireable for the table top and ripped 1" strips to size for the sides of the top.Secured the legs and table top using a Kreg Jig. Then finished the table using Red Mahogany and Polycrylic (1 coat) for the top and sides - and semi gloss black paint for the table legs and apron.
Recommended Skill Level
Intermediate
My Adaptation of Kendal's Extra Wide Dress
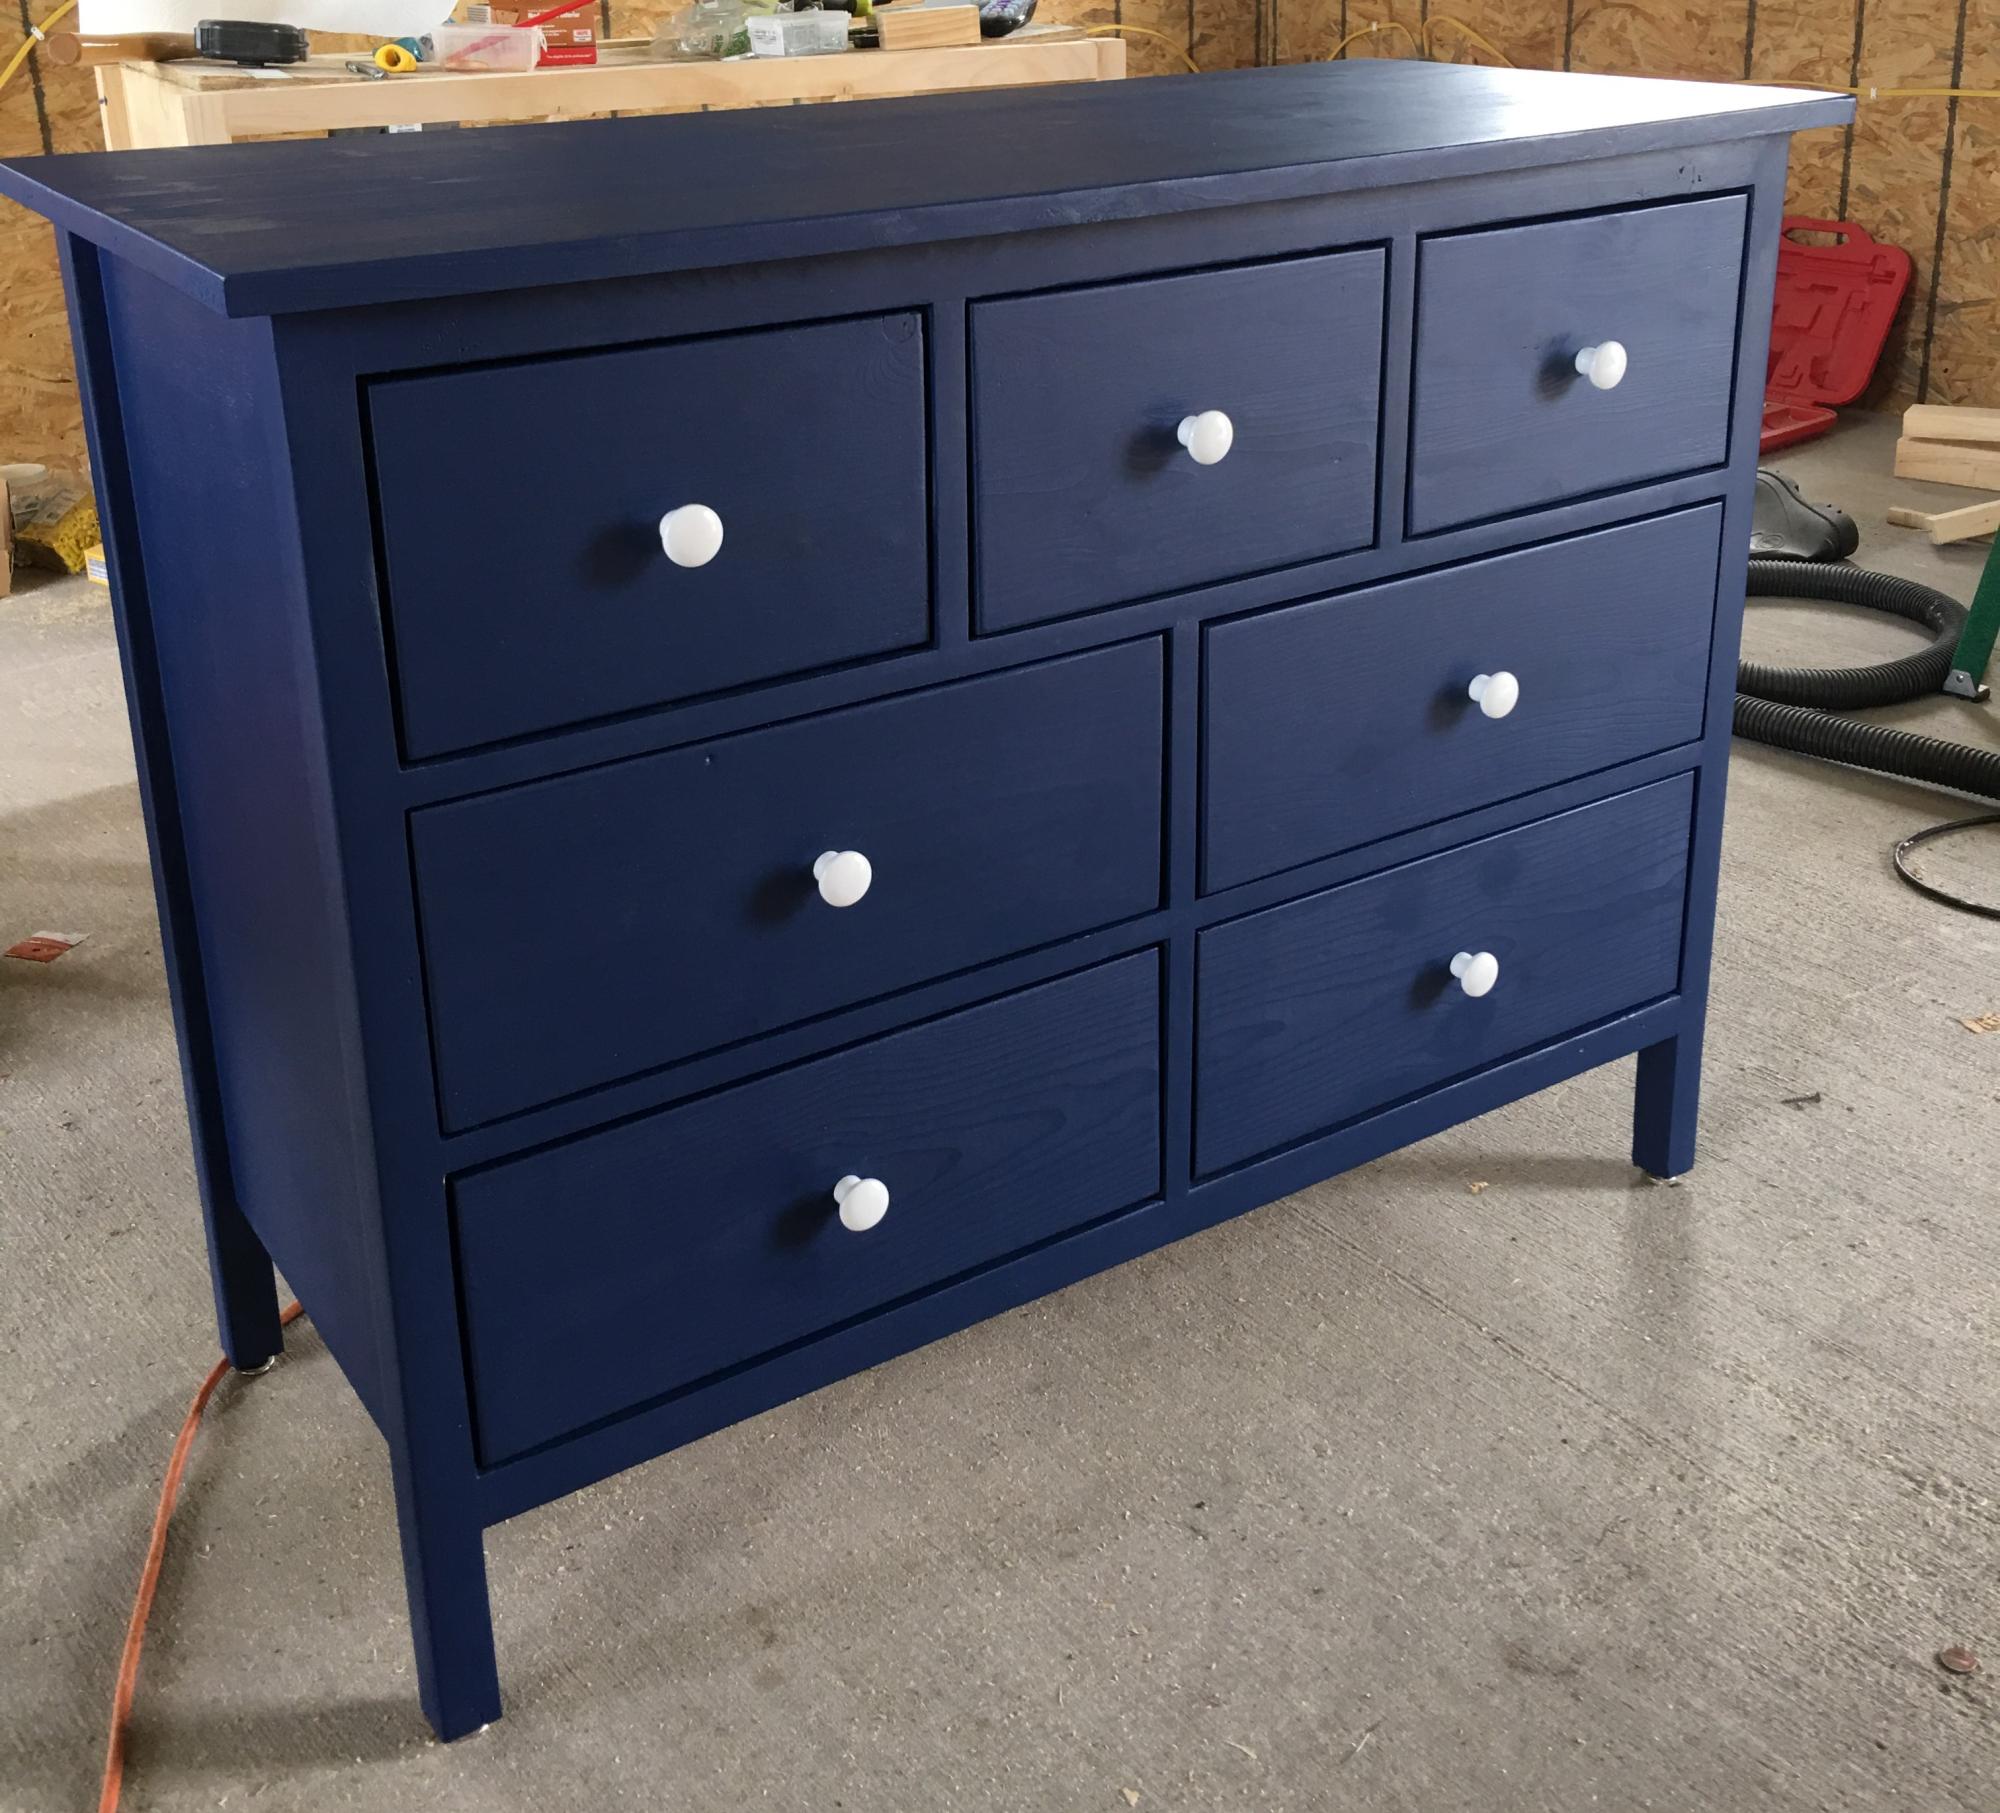
This my first real project built in my shop! I have long admired the projects that I have seen on this site and I could not wait to post a brag picture!
Built from Plan(s)
Estimated Time Investment
Weekend Project (10-20 Hours)
Finish Used
Sherman Williams Ovation Paint
Recommended Skill Level
Starter Project
Comments
Thu, 10/06/2022 - 13:59
Gorgeous dresser!
WOW, way to go, such a beautiful build! Thank you so much for sharing:)
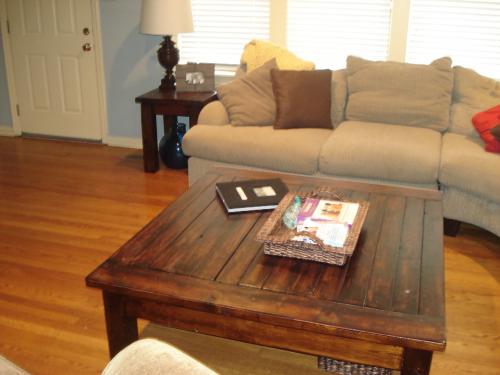
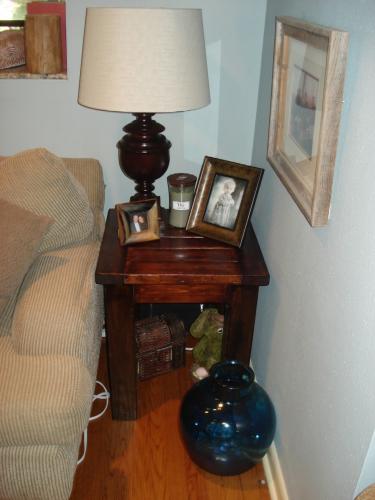
Bigger Tryde Coffee Table

My sister put in request for bigger coffee table and 2 end tables, again, the building part was not that difficult, the time consuming portion was staining. But they turned out great!


Built from Plan(s)
Estimated Time Investment
Week Long Project (20 Hours or More)
Finish Used
I "distress" the wood by using a piece of chaing and just beat it until I get a desired, uniform look. I used 3 coats of stain on each piece and sealed it once complete. I did not sand between coats and I use the cheap foam brushes and just toss them after each coat.
Recommended Skill Level
Beginner
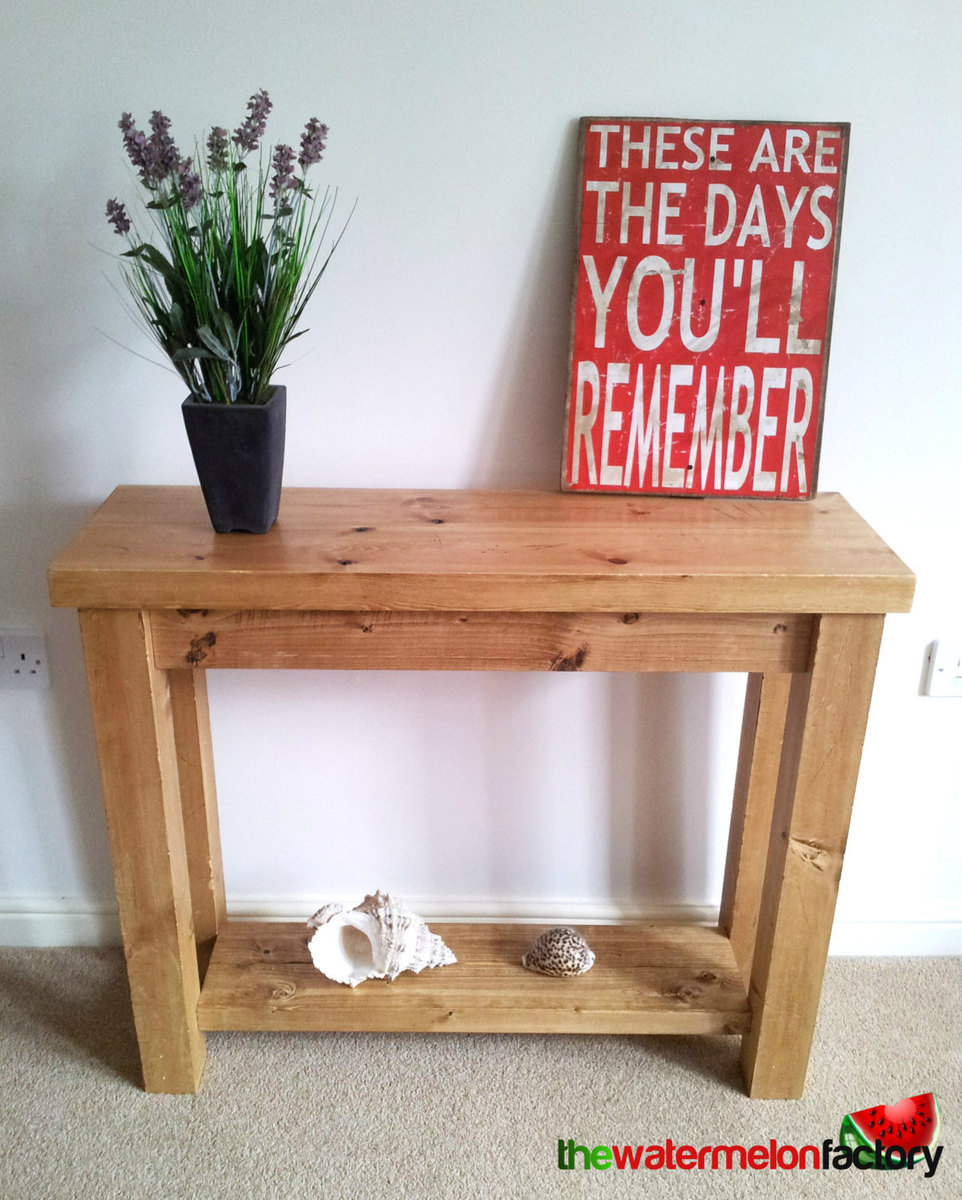
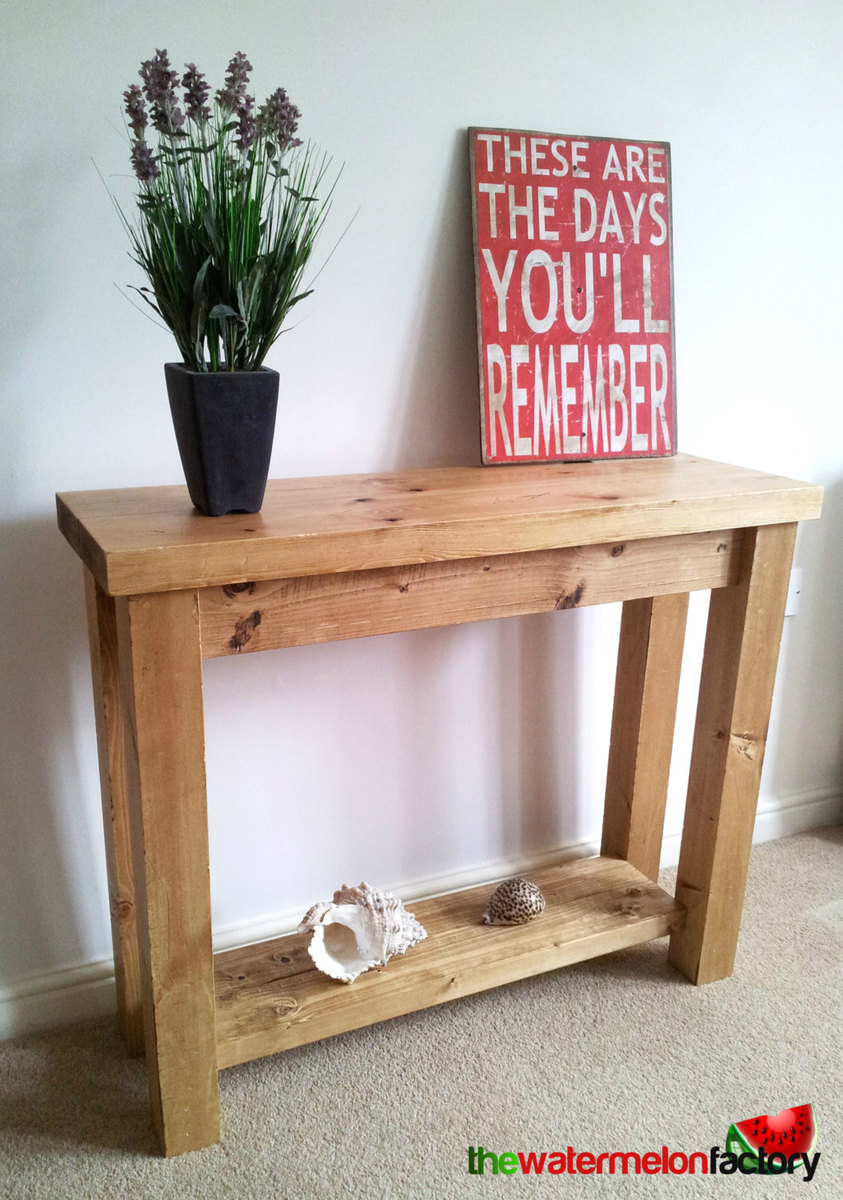
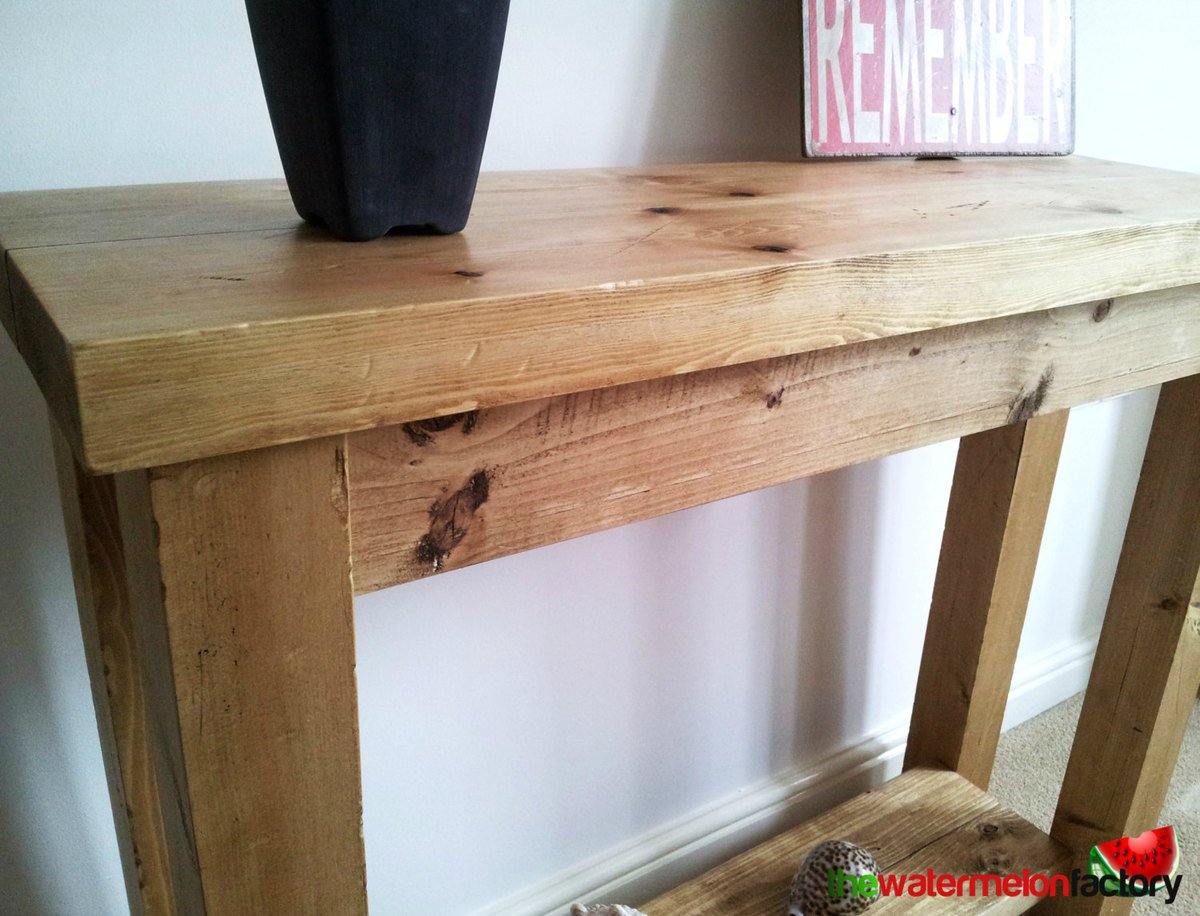
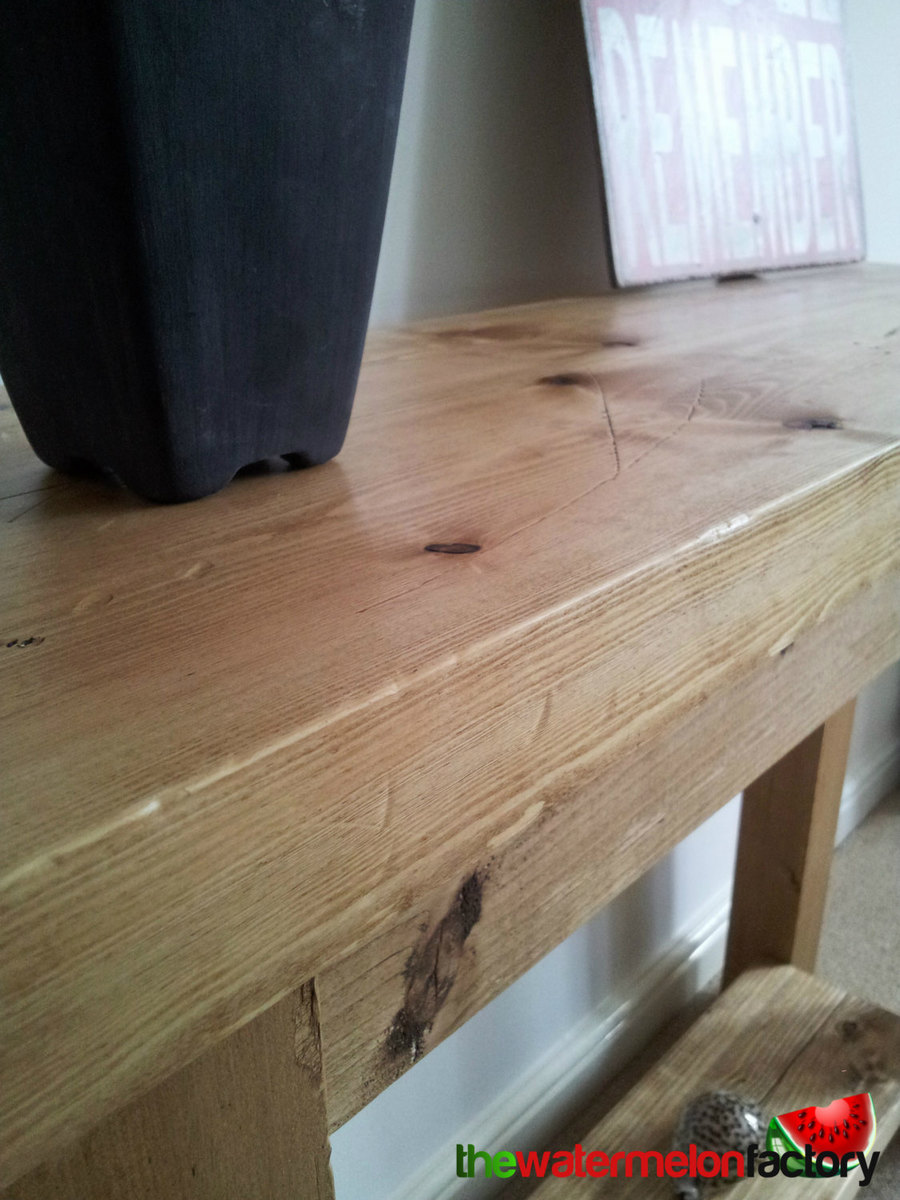
Chunky Rustic Hall / Console / Sofa Table
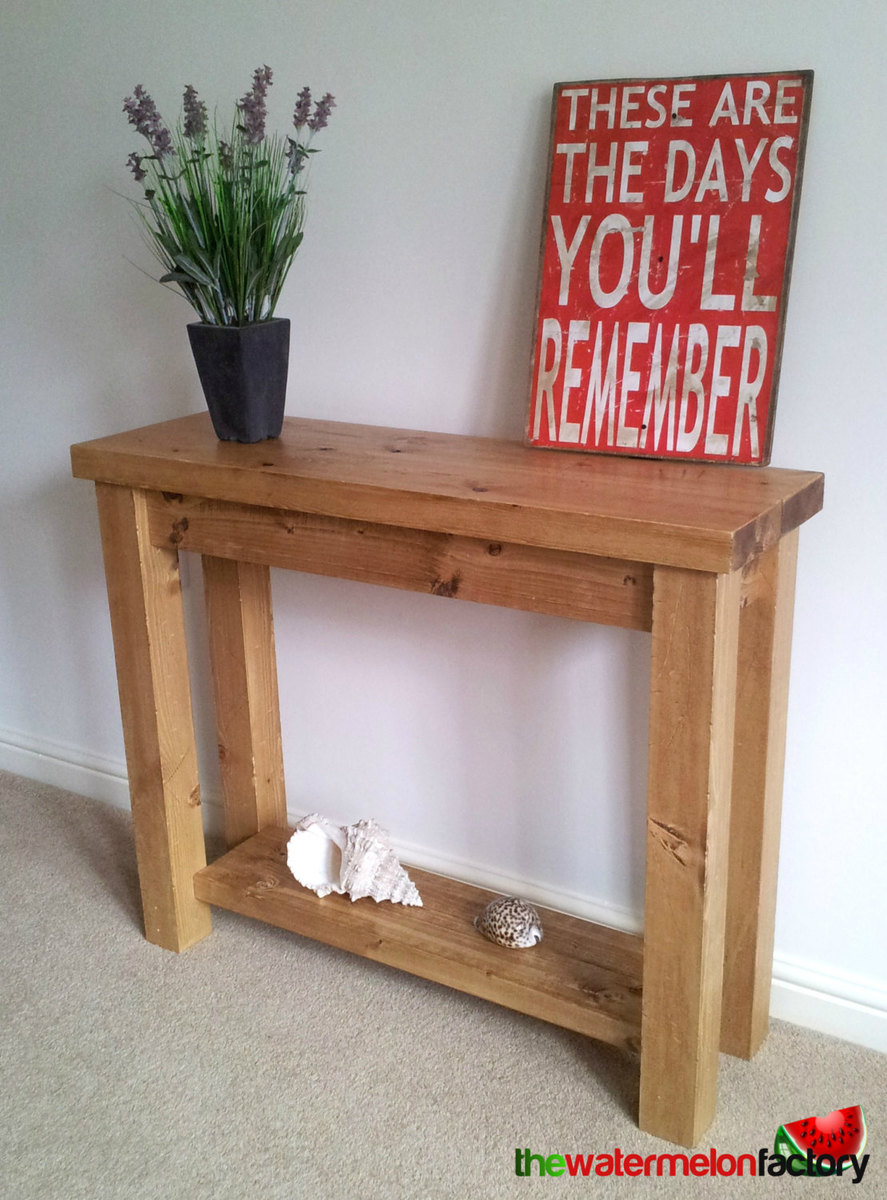
This table is made entirely from Ethically sourced Local Redwood Timber. The wood has been kiln dried which makes it very solid and perfect to make furniture with. This results in a piece which is known for it's sturdiness, it's chunky & rustic look and it's lovely grain and colour.
I have used carefully selected Kiln Dried Timber planks of varying sizes here. When the table has been finished, the grain and colour really shine through.
This table is very sturdy and moderately heavy (Approx 15kg's).
The table may move ever so slightly over it's years too. This is due to the temperature changes in your home and thus it may create very slight cracks and stretches etc. This is perfectly natural and only adds to the rustic charm of this kind of piece. I really like the way wood moves over time and creates a character of it's own. In this regard, each and every table is going to be unique.
The legs on this table are fixed, as is the shelf.
This console table has been distressed and aged and features authentic wear marks such as knocks, dings, scrapes and even nail and screw thread marks!! It looks like it been in this world for generations!
It is then finished off by being waxed all over to treat and protect the wood.
I hope you all like it! It's fun to build.
Mark :)
Estimated Cost
$60.00
Estimated Time Investment
Day Project (6-9 Hours)
Finish Used
Briwax (Tudor Oak)
Simply brush the wax on with a large paintbrush and wipe the excess off straight away before it dries fully to leave a perfect finish.
Simply brush the wax on with a large paintbrush and wipe the excess off straight away before it dries fully to leave a perfect finish.
Recommended Skill Level
Intermediate
Wooden Volcano Stacker
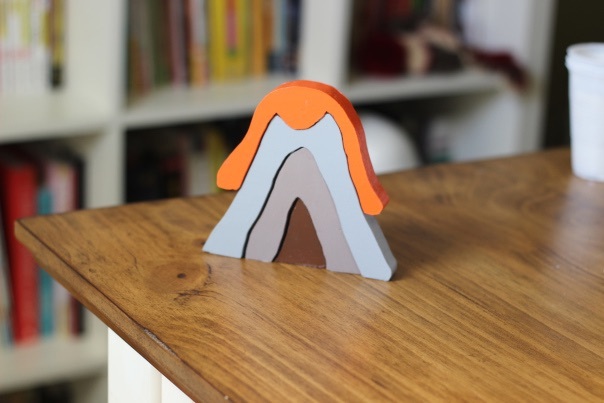
I'm so thankful for Ana's March scrap work love challenge for encouraging me to make use of scrap lumber. I completed several scrap work projects last month. This is a volcano stacker I made from a scrap piece of 1x12 pine. I got the pattern from the book Natural Wooden Toys. I used my scroll saw to cut out the shape. I painted it with craft acrylic paint and sealed it with Mod Podge. The toy is a hit with the little guy!


Estimated Cost
free
Estimated Time Investment
An Hour or Two (0-2 Hours)
Finish Used
Craft acrylic paint and Mod Podge
Recommended Skill Level
Beginner
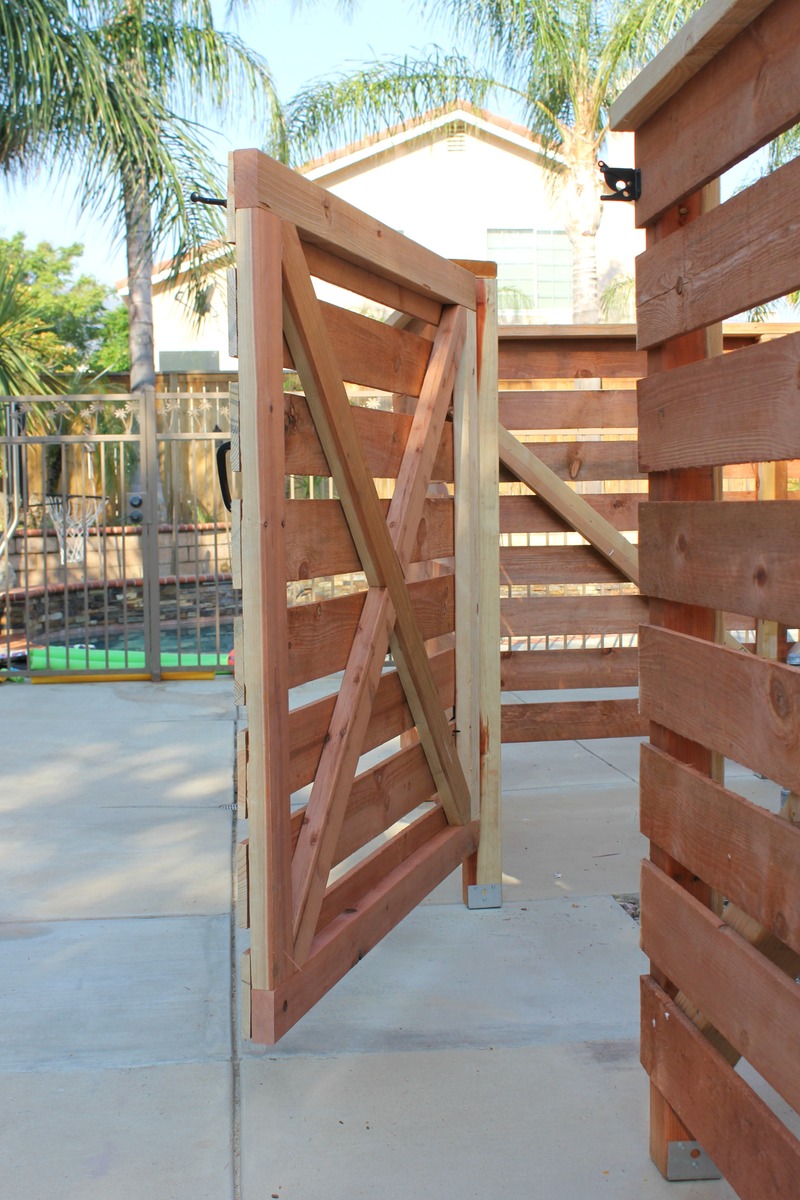
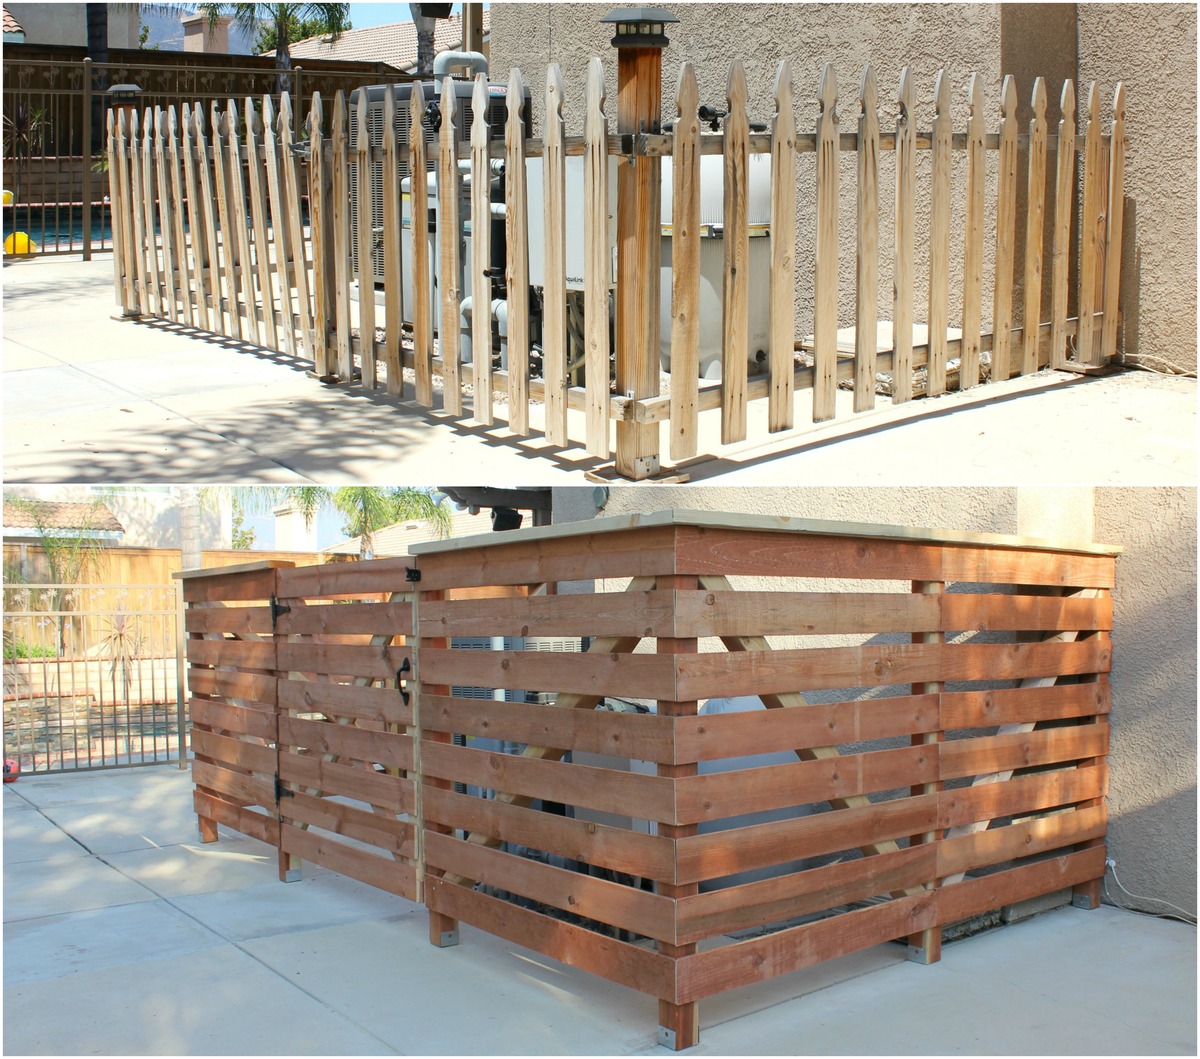
Pool equipment fence refresh
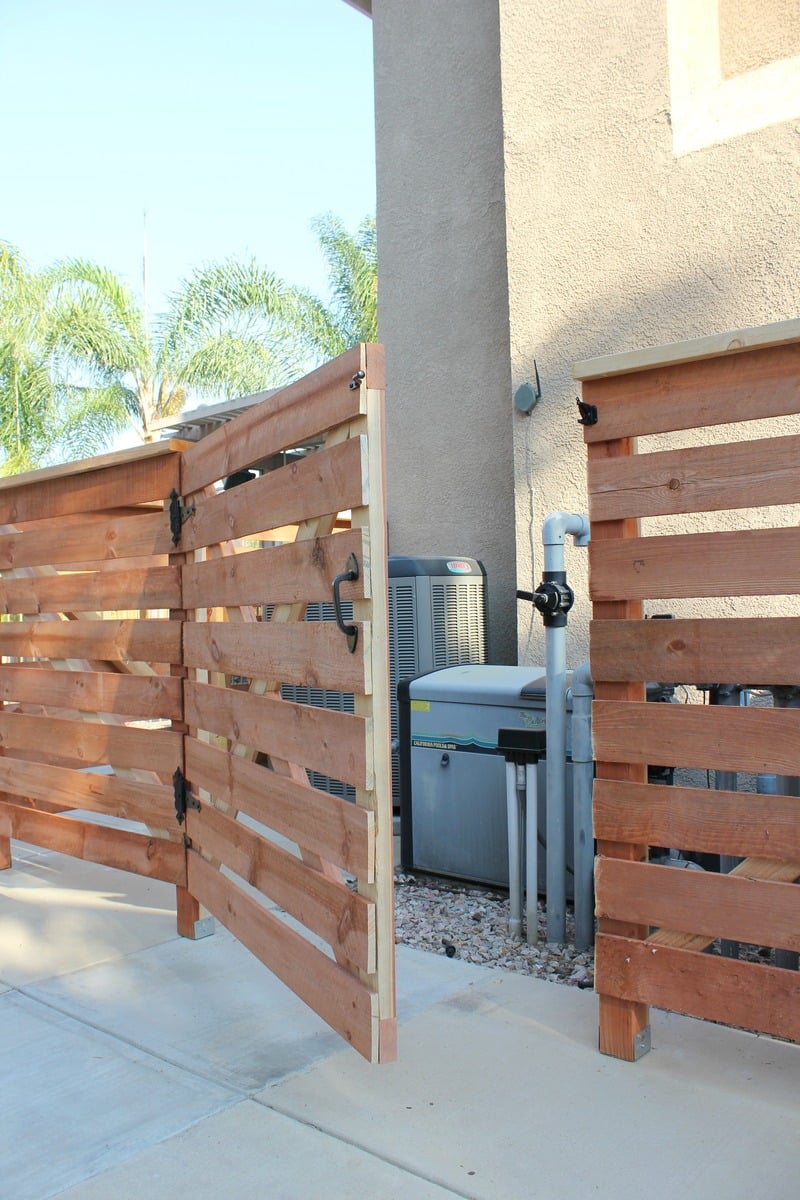
The fence the previous owners had in place was weather-worn and just overall non-aesthetically pleasing. We completed this project in 3 days and now we just love it!!!
Estimated Cost
$300
Estimated Time Investment
Weekend Project (10-20 Hours)
Recommended Skill Level
Intermediate
Alice’s Table and Chairs
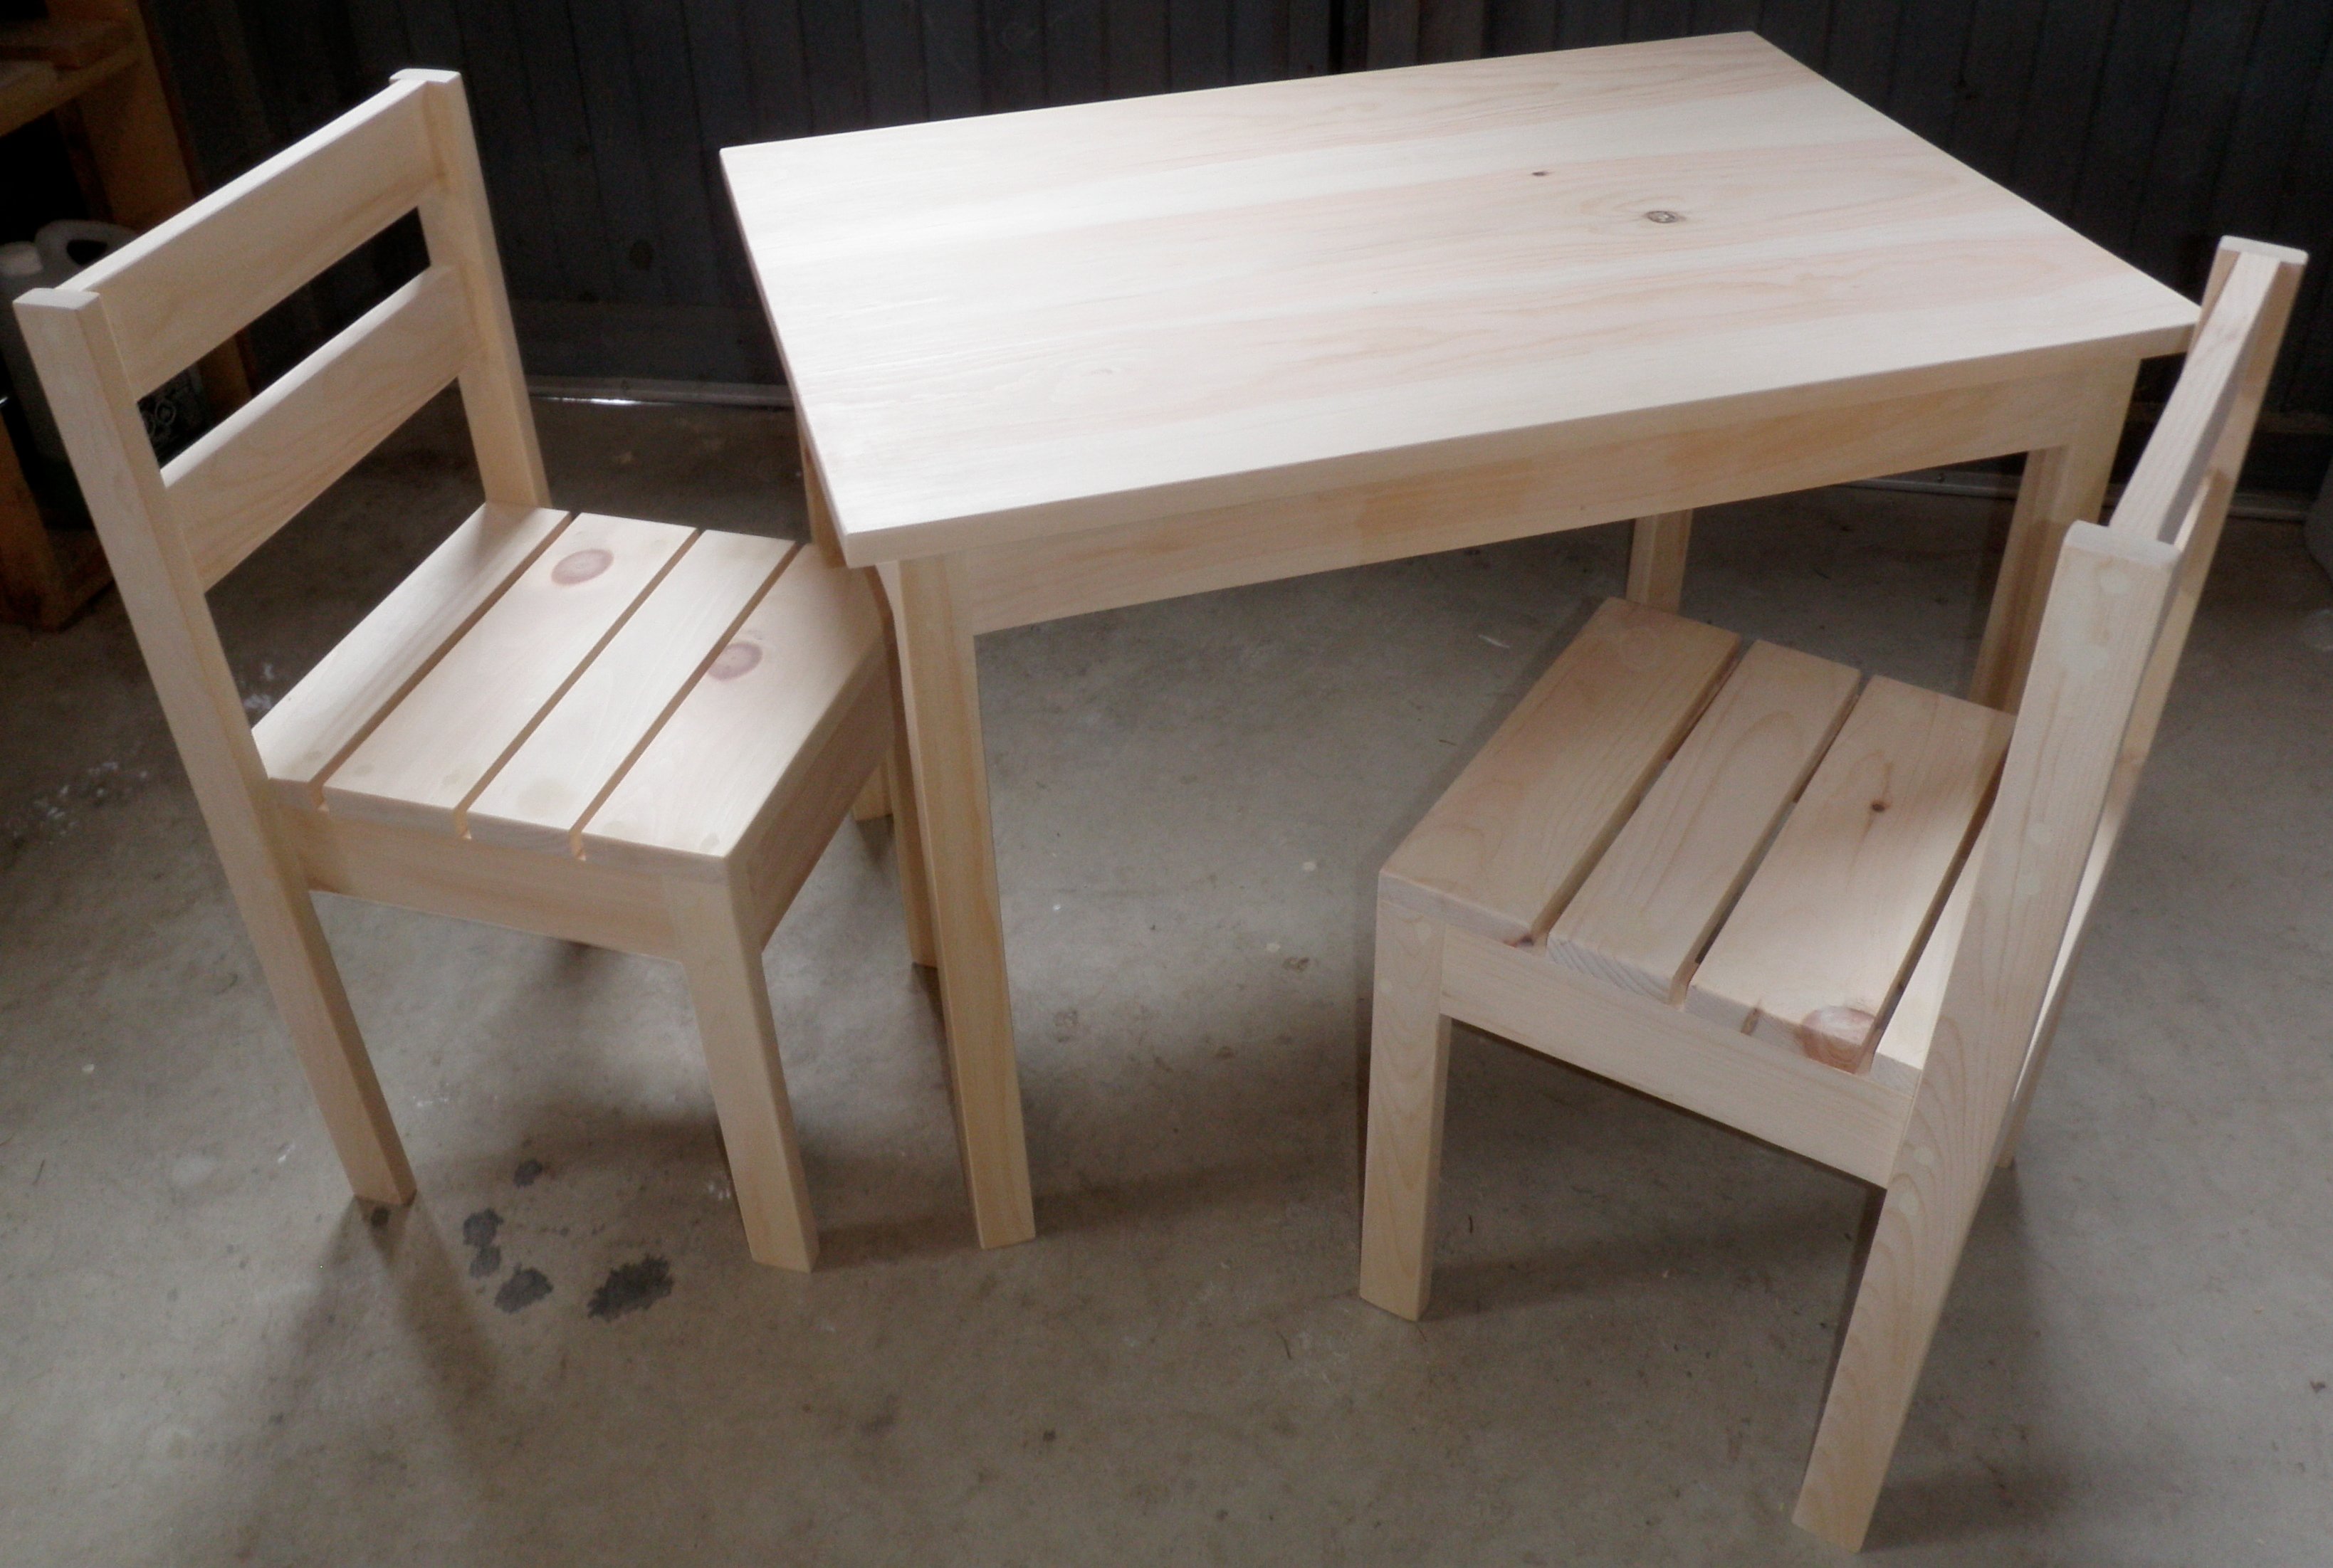
I built this set for my friends little girl, Alice. She’s the same age as my son Benjamin, and needed a kiddie table and chairs!
I had some trouble with the chairs, I need to work on my clamping and squaring. Now that I have picked up a better countersink bit my issues with screws should be solved though!
The table was super easy with the kreg jig! I got it clamped down well for each corner and the aprons/legs screwed together like a dream! I love that the table doesn’t have a single screw marring the surface of the wood, they’re all pocket holes underneath!
The chairs have a few more screw holes than they should’ve had, but they don’t look too bad. I decided to leave them unfinished so she can decide on the right finish for her space.
Thanx so much for the easy to follow plans Ana!
Built from Plan(s)
Estimated Cost
~50$ (honestly, I can't remember!)
Estimated Time Investment
Weekend Project (10-20 Hours)
Finish Used
Unfinished
Recommended Skill Level
Beginner
Wall art

This was my first project and I am so happy about how it turned out!! Heavy though...
Feel like I can build anything now:)
Estimated Time Investment
Weekend Project (10-20 Hours)
Finish Used
I painted it with a leftover creamy white, red and blue. Next I roughed it up with sandpaper and applied a walnut stain over to "age" it. :)
Recommended Skill Level
Starter Project
New Kitchen, New Table!
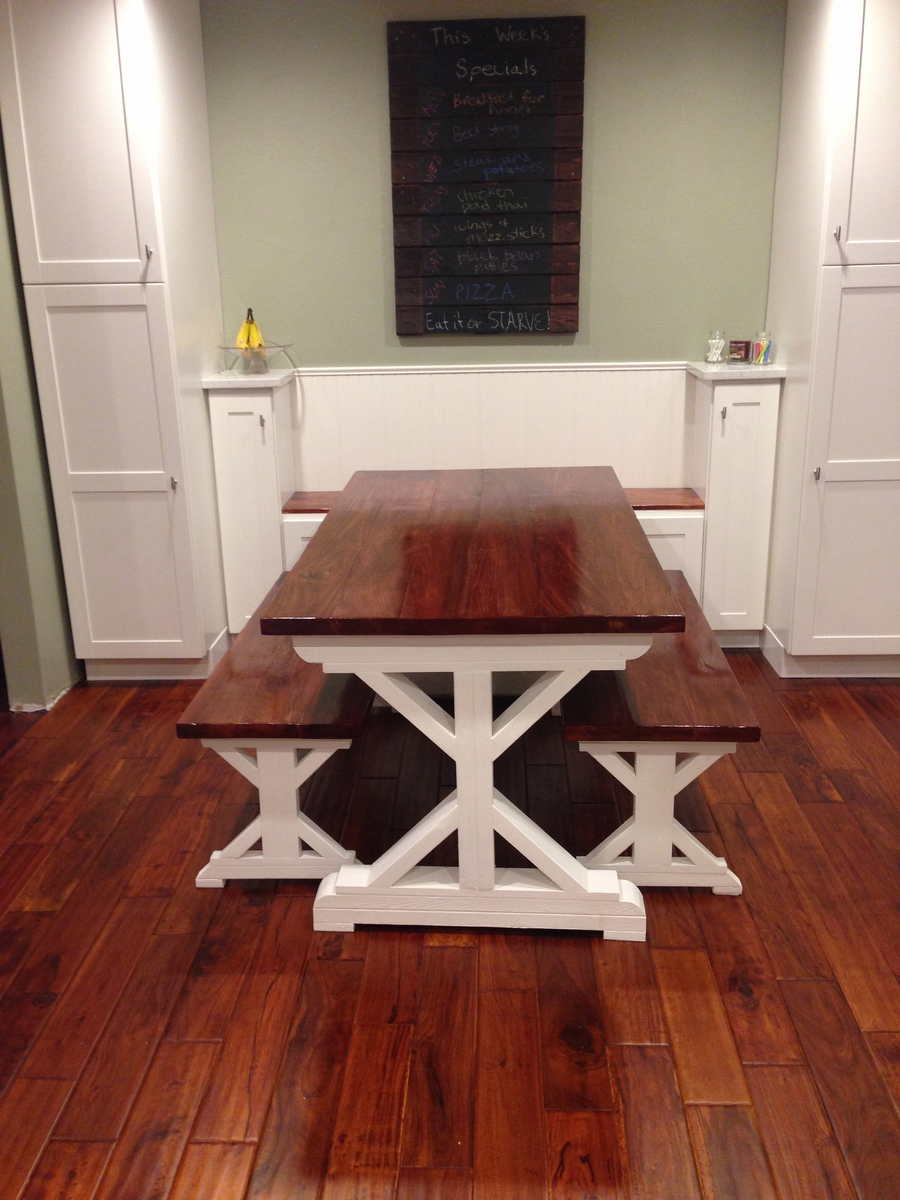
We just finished our complete kitchen remodel, from tearing down walls to new cabinets, appliances, hardwood floors, and countertops. I assembled the cabinets and installed them myself, along with tiling the backsplash and nailing down the floors. So I though I'd try my hand at furniture building. It was my first time building anything like this and I thought it turned out pretty nice!
I used left over boards from the removation for the bases of the table and benches and 2x6 poplar boards for the tops. I made some adjustments in the size since we're only a family on 3. Since I made the table shorter, I changed the 45 degree cuts on the cross braces to 30 degrees so they would fit.
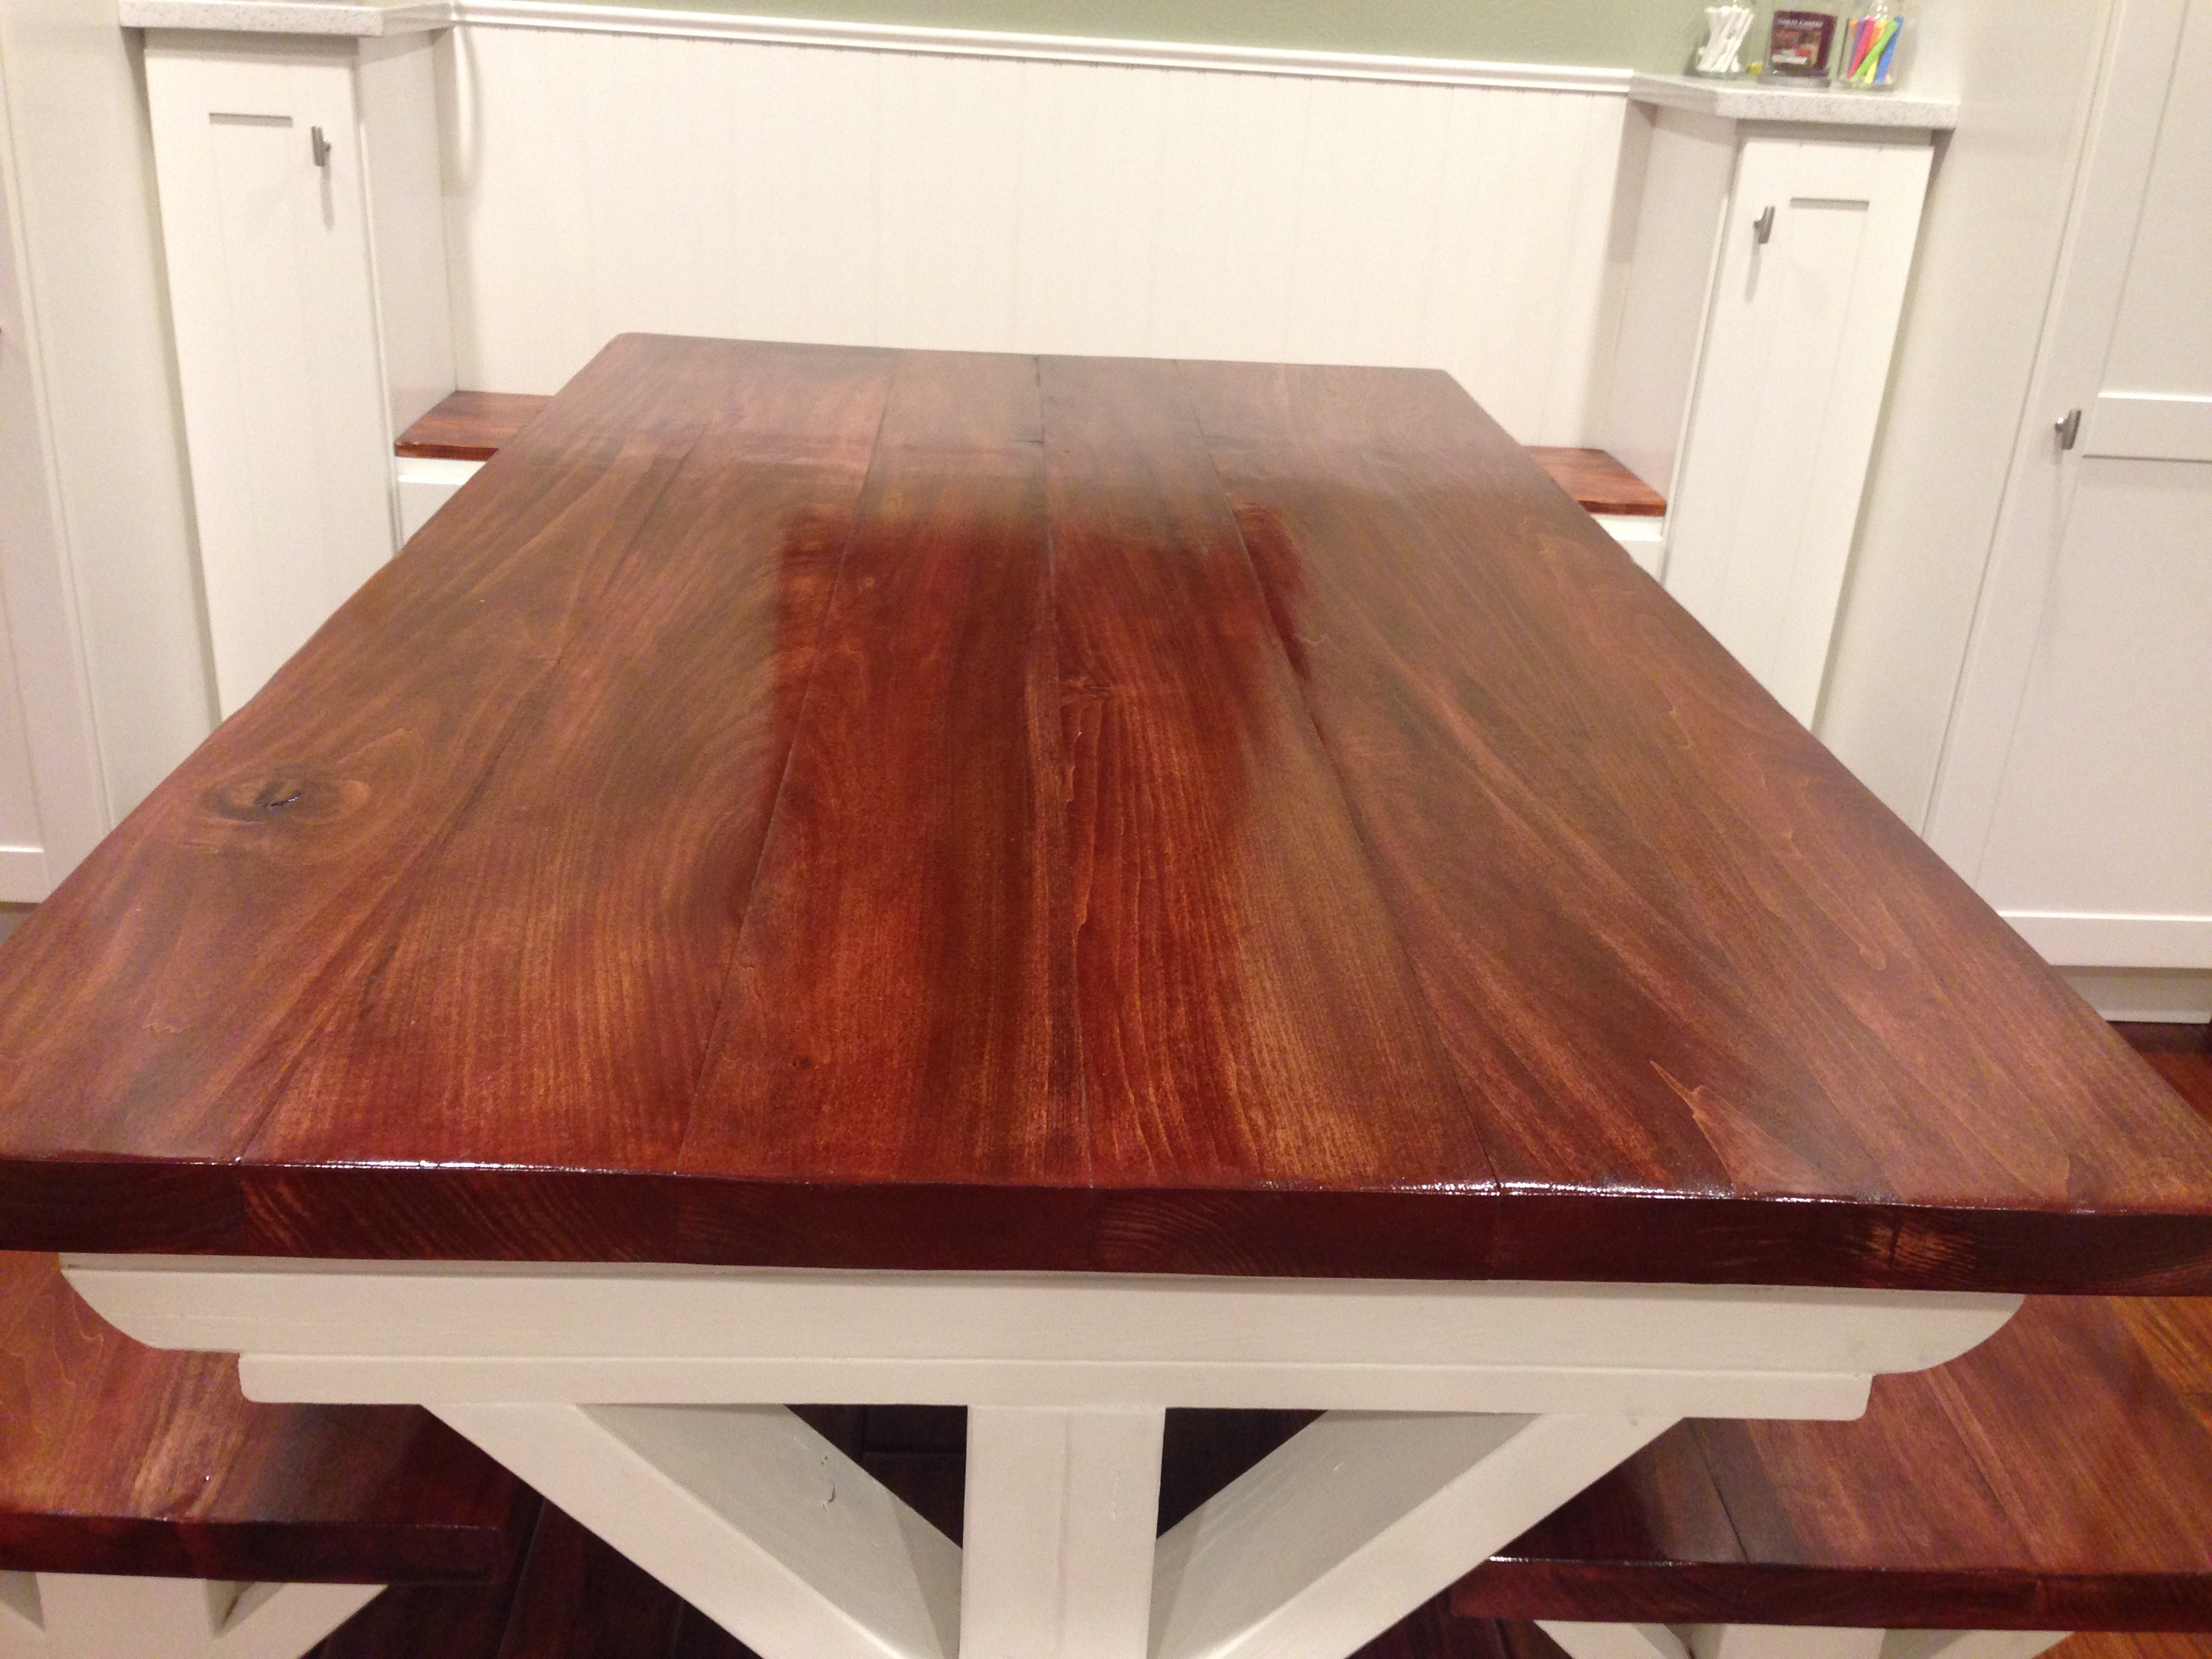
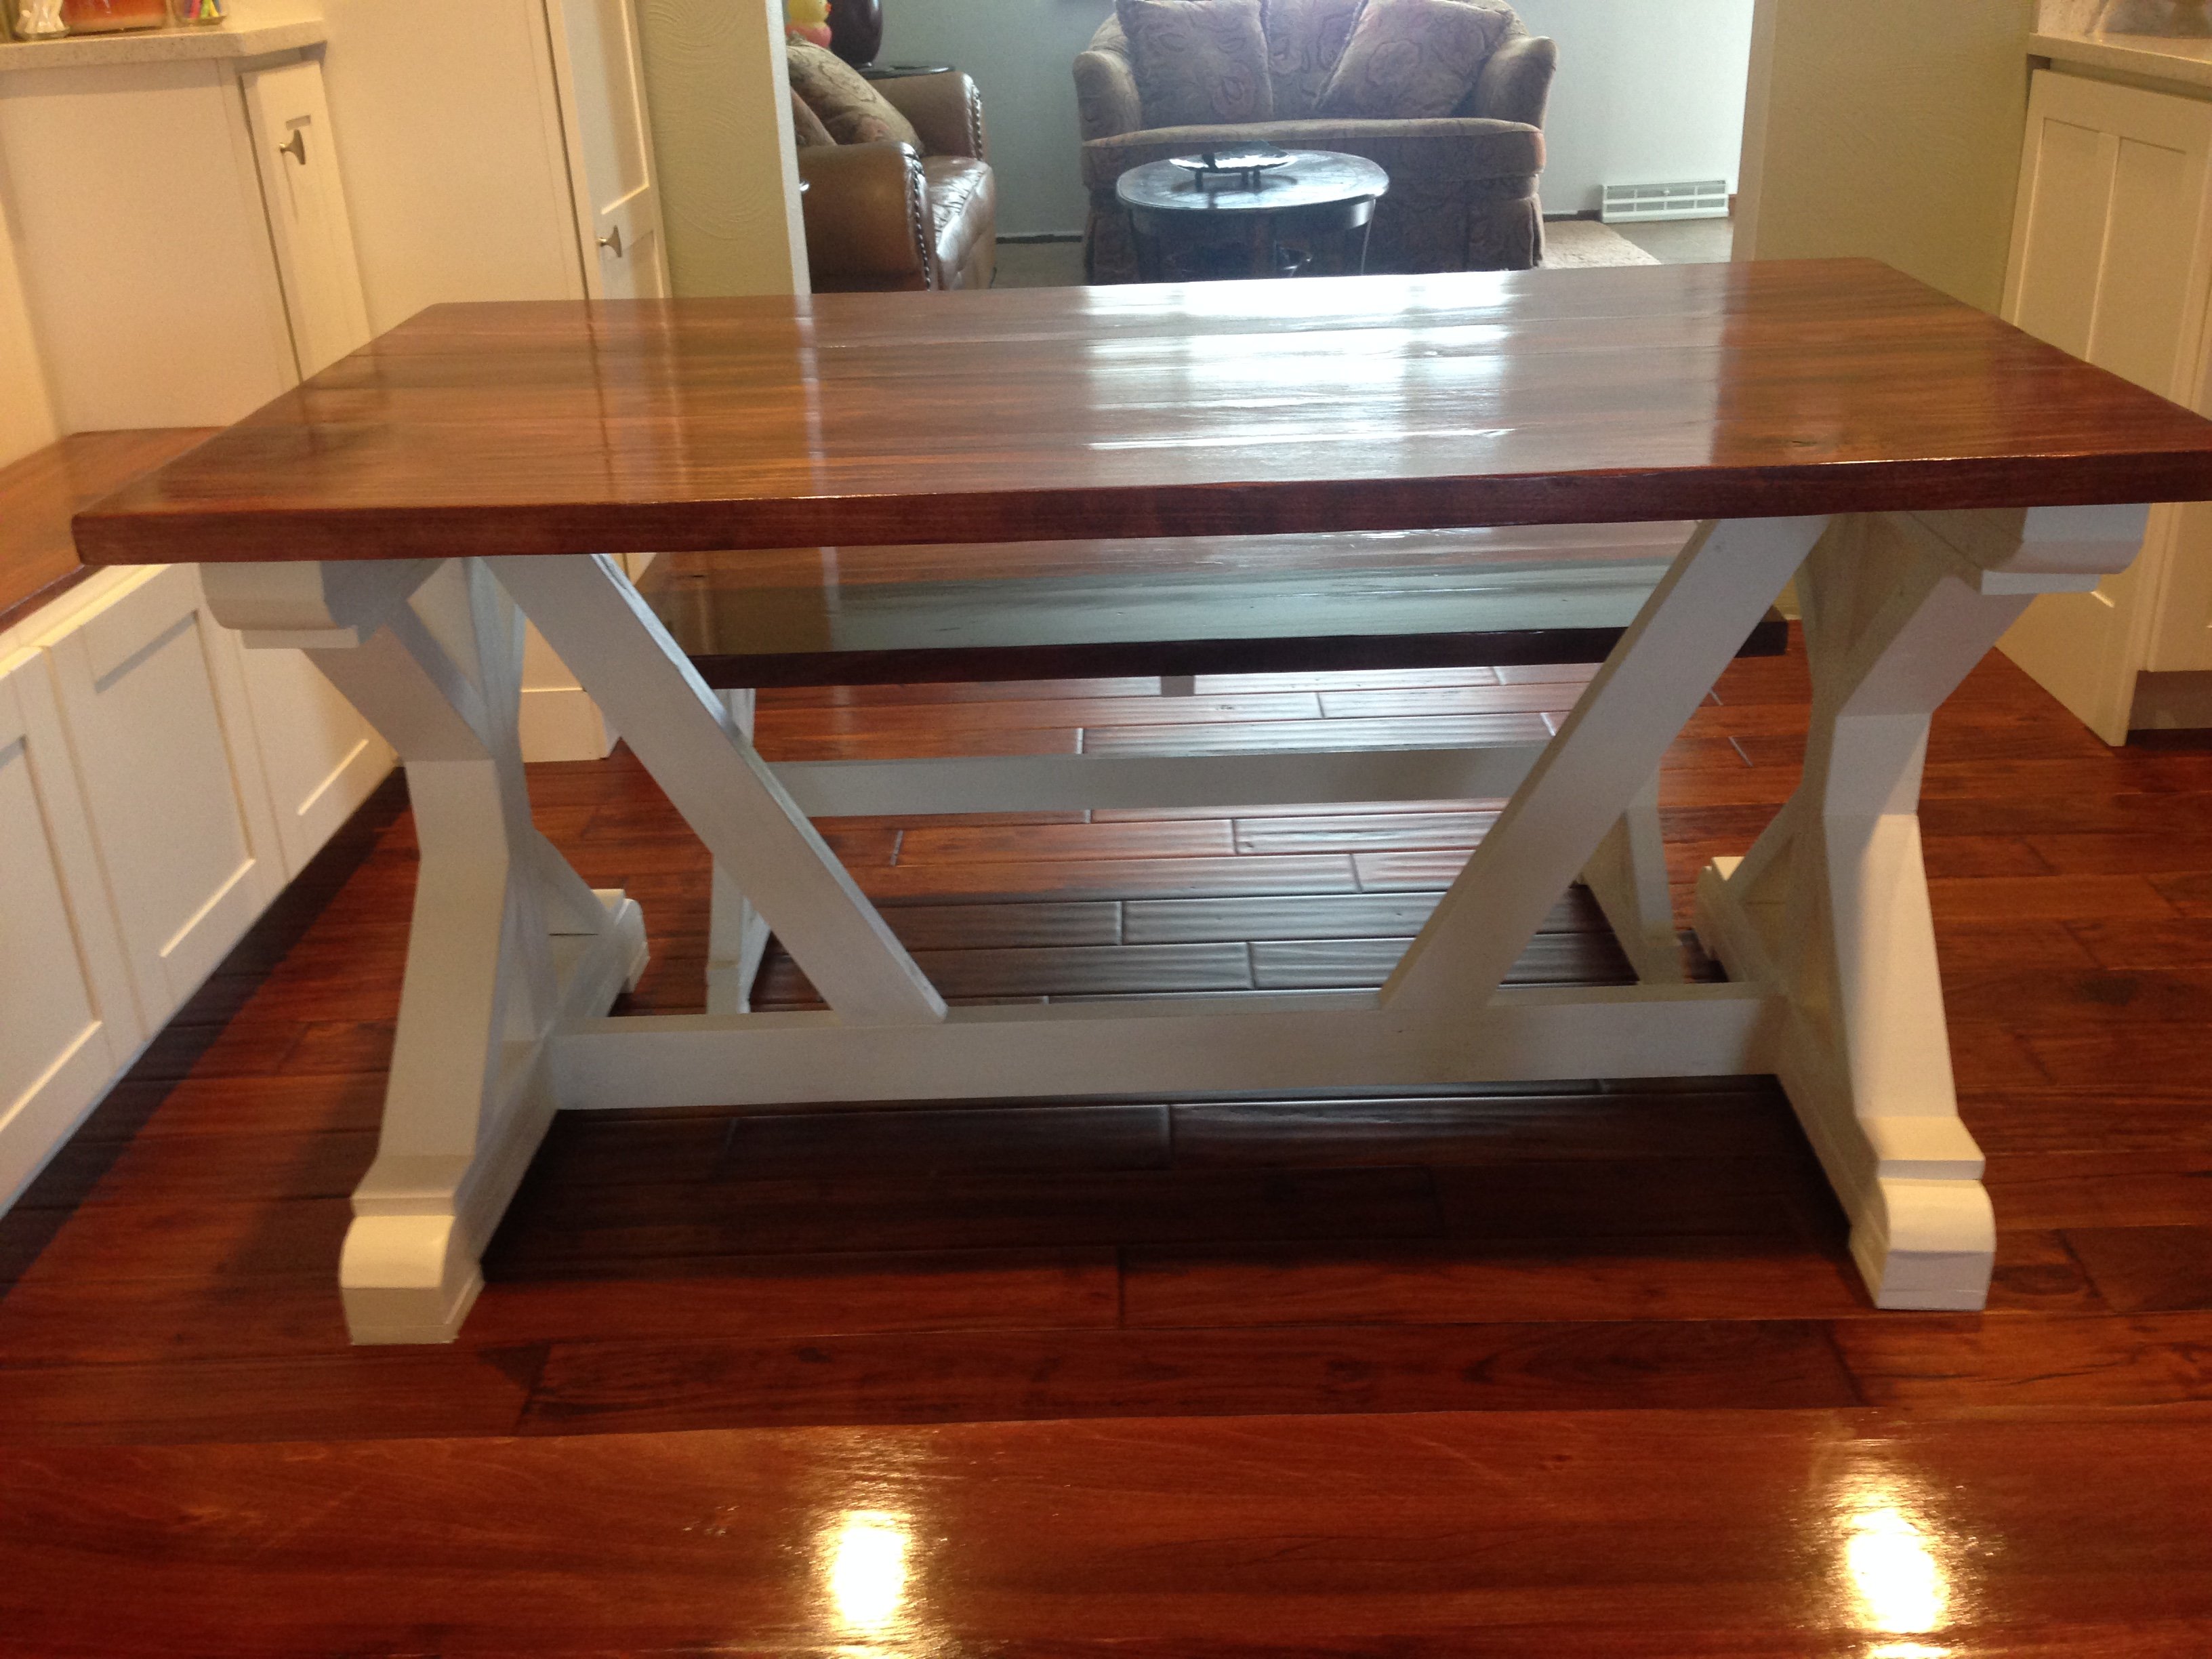
Built from Plan(s)
Estimated Cost
$300 just because I bought high quality poplar with the edges planed so they would fit together with no gaps
Estimated Time Investment
Week Long Project (20 Hours or More)
Finish Used
minwax sedona red
zar merlot
minwax red mahogany
in that order, but I found that the stain effects poplar differently than it does pine
3 coats of brush on polyurethane sanded with 220 in between coats
zar merlot
minwax red mahogany
in that order, but I found that the stain effects poplar differently than it does pine
3 coats of brush on polyurethane sanded with 220 in between coats
Recommended Skill Level
Beginner
Comments
Custom grandy
Custom 75" grandy
Estimated Cost
$275
Estimated Time Investment
Weekend Project (10-20 Hours)
Recommended Skill Level
Intermediate
Comments
Sun, 07/23/2017 - 08:18
Questions!
That is beautiful!! What color is the base? (Brand and color)
What wood/stain did you use on the top? I love how it contrasts itself, would be great for other furnature choices as well.
Thank you
Sun, 07/23/2017 - 08:24
Questions!
That is beautiful!! What color is the base? (Brand and color)
What wood/stain did you use on the top? I love how it contrasts itself, would be great for other furnature choices as well.
Thank you
Flip Down Wall Art Desk
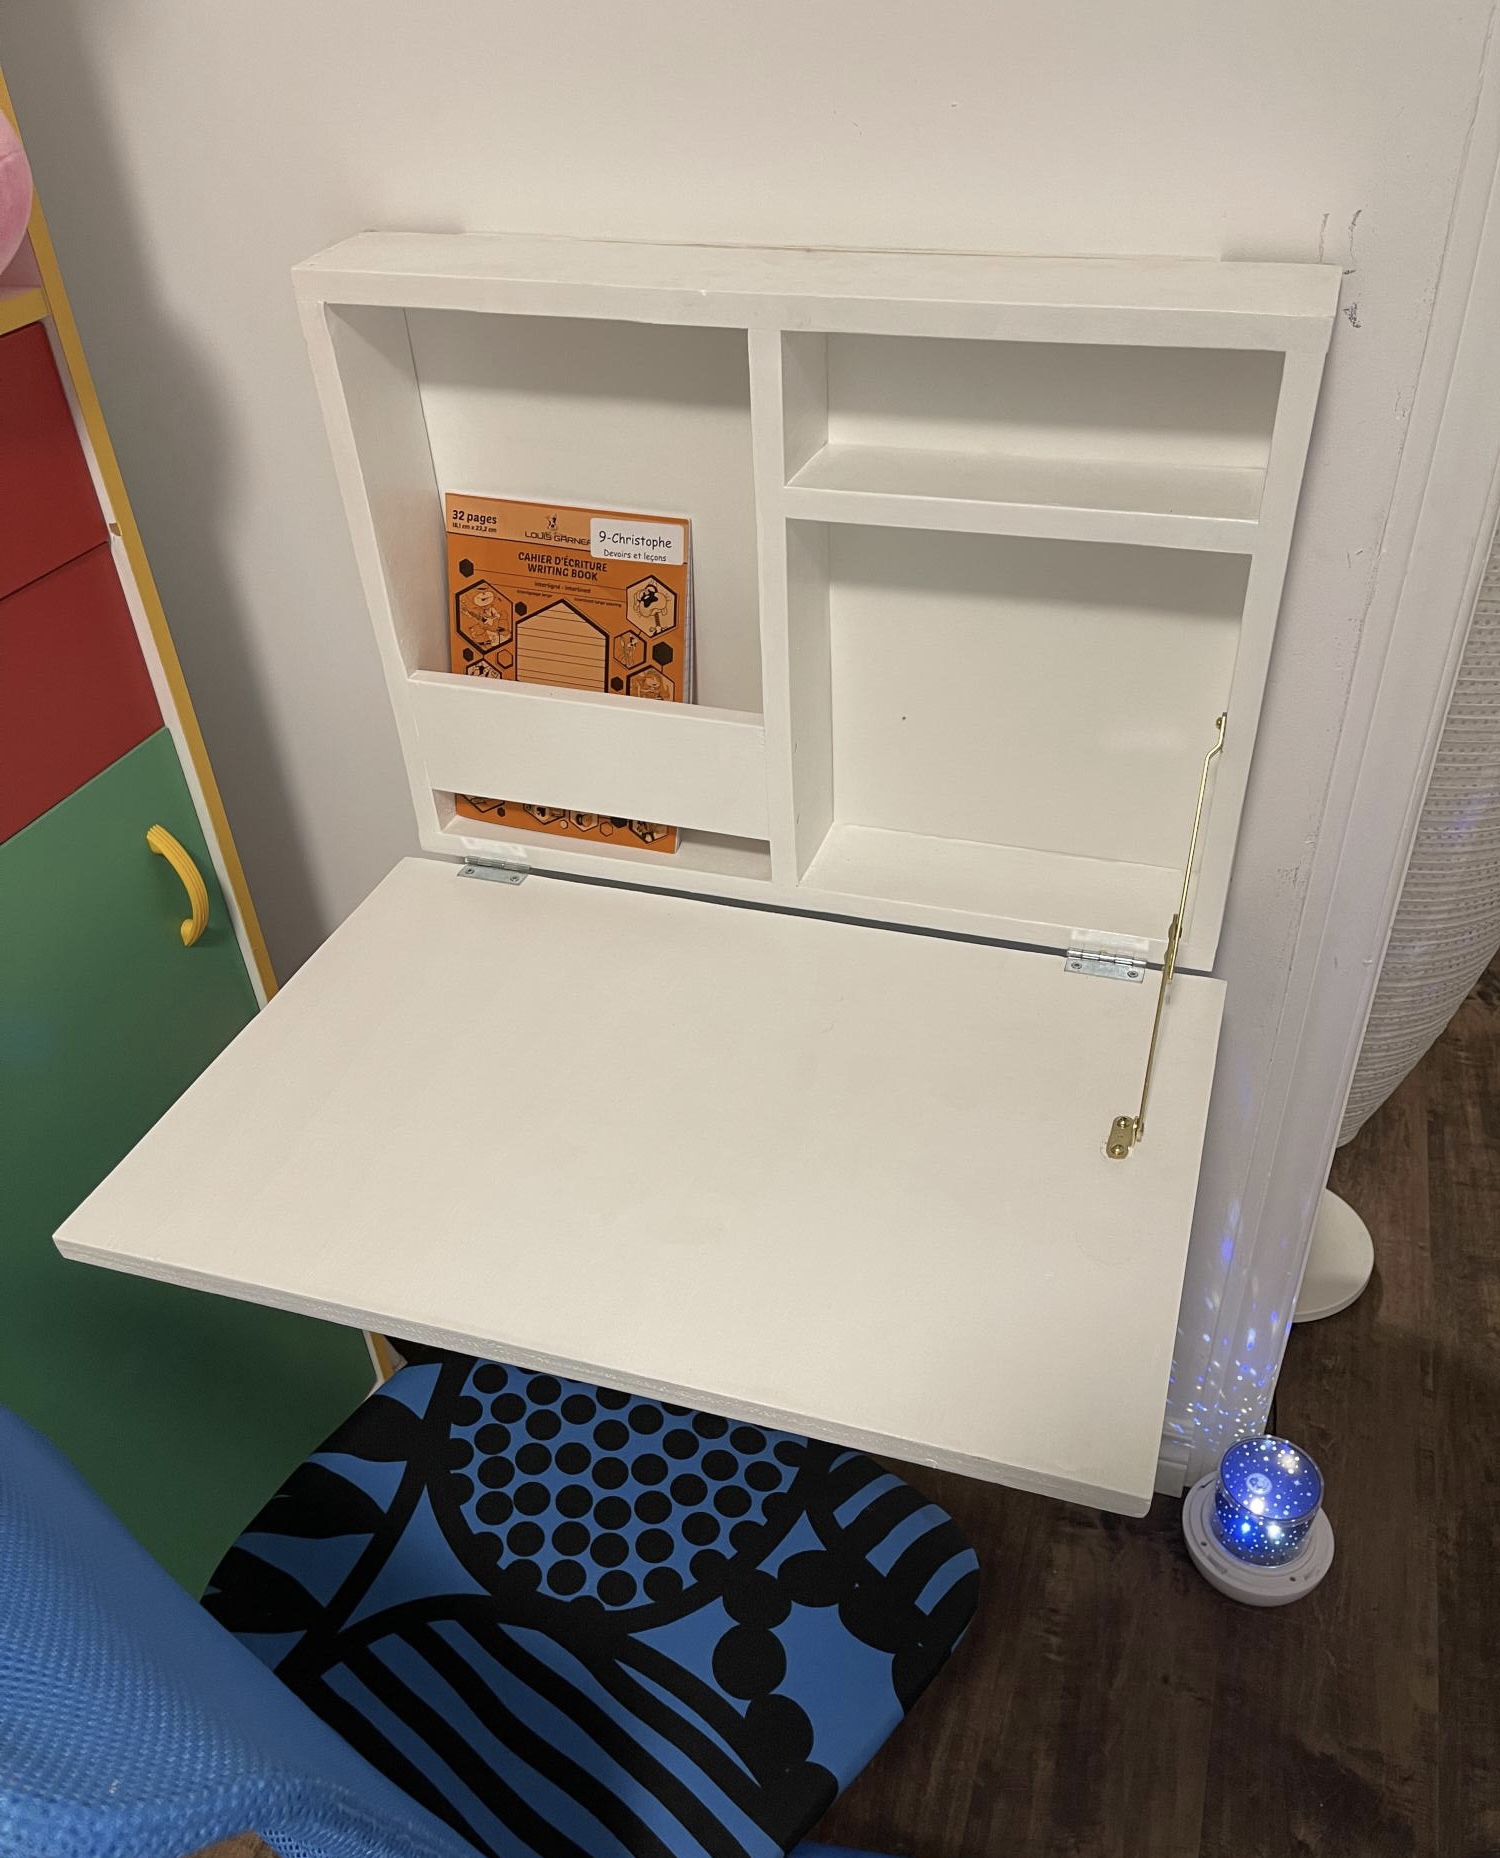
Followed the plans, made a few mistakes but my son and I like the overall result. Thanks Ana :)
Built from Plan(s)
Comments
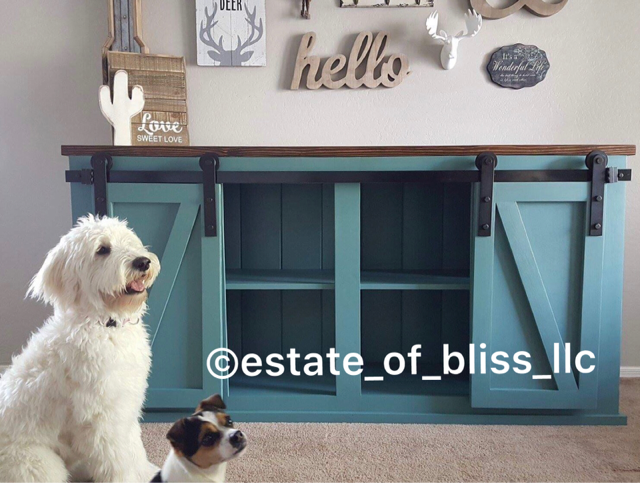
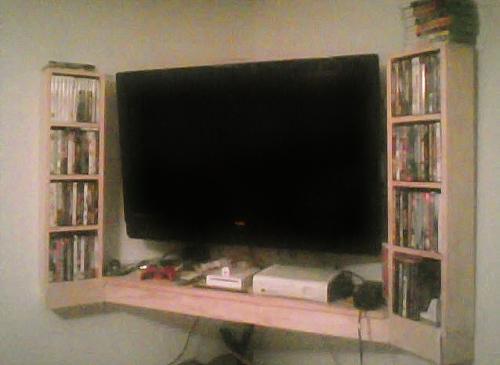
Floating Corner Entertainment Center
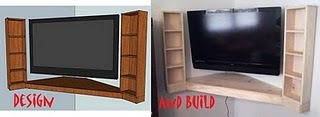
First I'd like to thank Ana for everything she does. Without her i would have never started building furniture, and without her I would have never picked up Google Sketchup and learned how to design my own furniture.
Ana, I can't thank you enough for the skills, hobby, and confidence you have given me. Thank you thank you thank you!
I attached this to the floating shelves plan because it is what inspired us to design this. And I chose intermediate because of figureing out the angles and for finding the studs in the wall and properly/securely mounting it so little ones don't get hurt.
Since moving into our new home Matt and I have been using my great-grandmother's old sideboard as a tv stand. Our house (and living room) is very small so I've been wanting to mount the tv on the wall in the corner and Matt's been wanting to buy a smaller tv stand. I did not want to do it his way because we have a large hyper dog running around knocking everything over, lol.
So after recieving an extra tv wall mount from my parents and mounting the tv in the corner like I wanted, we brainstormed and created this "floating" table/shelf to hold Matt's game systems and our dvd's. Its off the floor and out of Buck's destruction path, but it also made the room look so much larger!
***This plan was not designed to hold the weight of a tv. While it is plenty strong enough to hold the movies, game systems, dvd-vcr, and the chance his 6 year old decides she's a rock climber, we have no idea its actual weight capasity.
Built from Plan(s)
Estimated Time Investment
Afternoon Project (3-6 Hours)
Finish Used
We decided we prefered the natural look of the raw wood for now. If we later change our mind I will post new pics :)
Recommended Skill Level
Intermediate