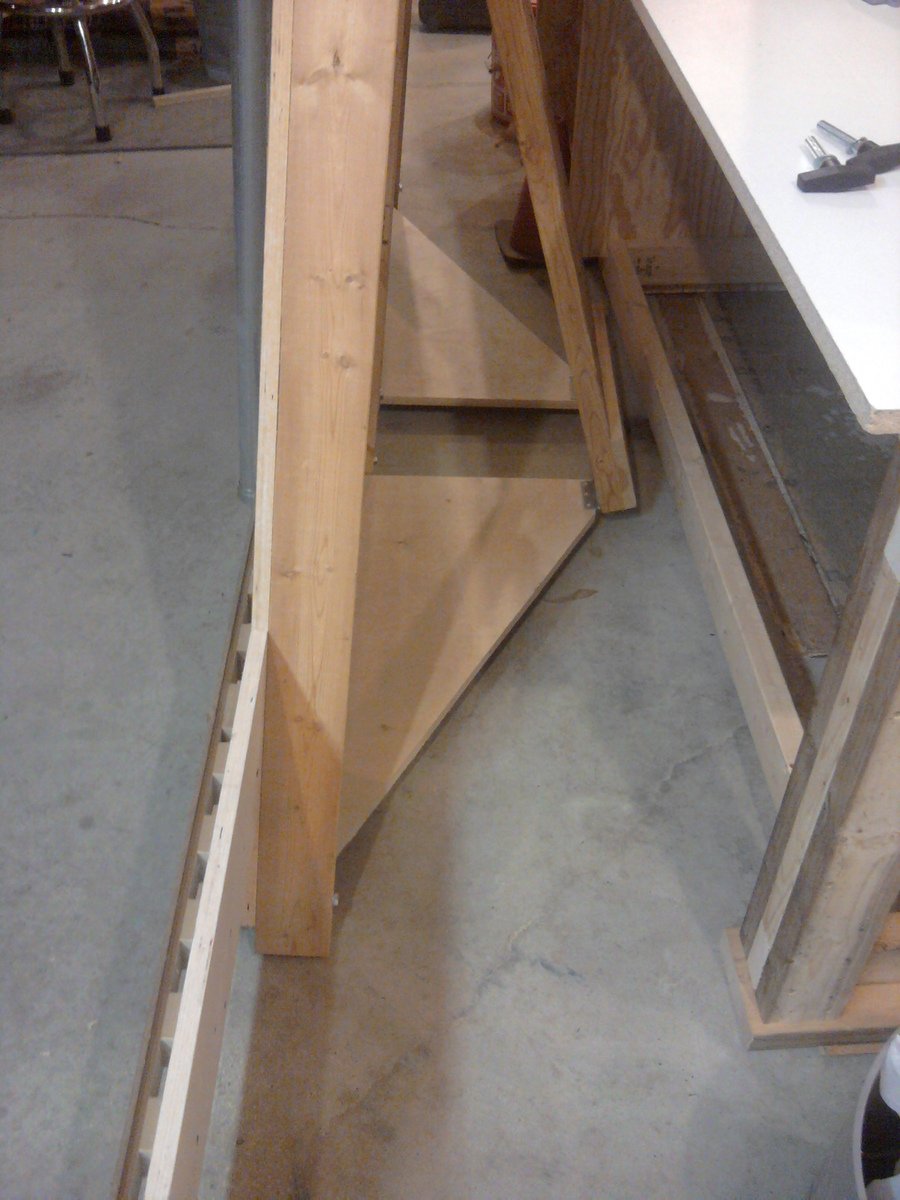
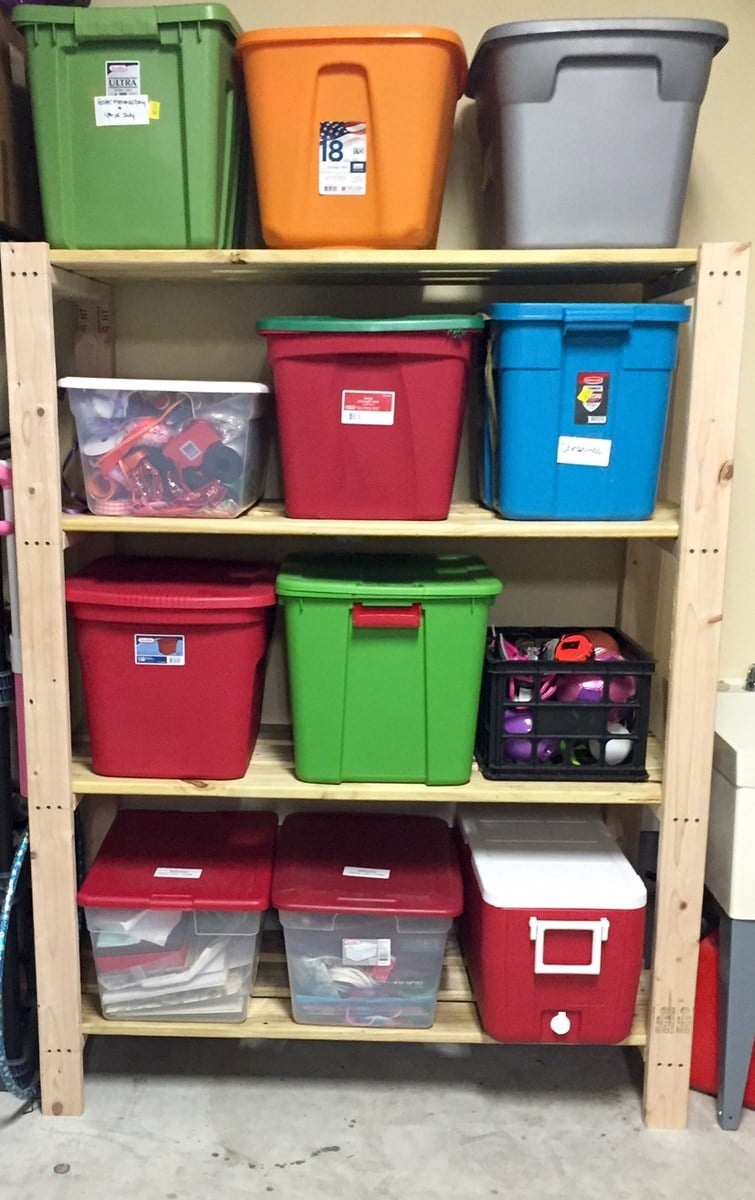
Community Brag Posts

Garage Storage

Submitted by wabilinski on Mon, 09/28/2015 - 10:48

My wife was needing some extra storage in the garage for seasonal decor totes.

So, of course, I first go to Ana White's website. Voila, I found the perfect plans for the space I had to work with.

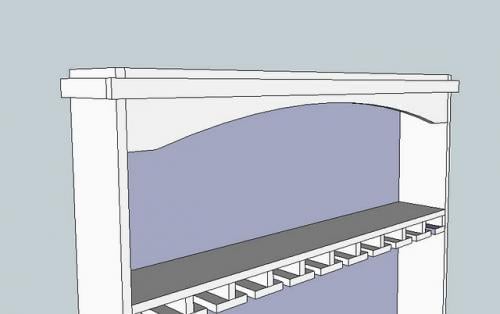
- The final product ended up being 72"Hx54"Lx21"W

- I used a counter sink bit to pre-drill screw holes so the heads would be slightly below the surface of the boards. This way the totes would not get caught on or damaged by the screws.

Estimated Cost
$90 for wood and screws
Estimated Time Investment
Day Project (6-9 Hours)
Finish Used
N/A - left unfinished
Recommended Skill Level
Beginner

Potting Bench

This was our first build project! We spent the most amount of time picking the color than we did on the actual assembly. We extended the back 2 legs 36 inches to accommodate the window frame and shelf.

Built from Plan(s)
Estimated Cost
$40
Estimated Time Investment
Afternoon Project (3-6 Hours)
Finish Used
Benjamin Moore Grey Wisp
Recommended Skill Level
Starter Project

Comments

Spring

Mon, 07/25/2011 - 09:02

This is beautiful! I have a garage full of these windows and I have been trying to figure out things to do with them before my husband decides to throw them out.

bhoppy

Mon, 07/25/2011 - 12:05

Love the window too! DId you paint hte wood right away or wait a while?

Emma AND Sarah

Wed, 07/27/2011 - 19:21

We painted it right away. We were so excited to finish our first project. We didn't paint the window though. Thanks for the comments

Adirondack Chair in Pine

This Adirondack chair was done in pine. I followed Ana's plan, with only one modification ... went with a wider armrest. I thought the wider armrest would be handy for resting a drink.

Estimated Time Investment
Weekend Project (10-20 Hours)
Finish Used
Haven't finished it yet, but have selected Minwax Puritan Pine 218, followed by a urethane finish.
Recommended Skill Level
Beginner

Easy Workshop Workbench

Submitted by Anonymous (not verified) on Fri, 07/01/2022 - 04:21

Great plan and great instructions (especially the cuts). My only two deviations from the original design were to use carriage bolts to secure the long apron pieces to the legs (I like to have the bench frame be more flexible while I add the components and then tighten everything up once all the pieces are in place) and to add adjustable feet (You might have stellar tradesmen up there, but down in the Pennsylvania woods, we tend to get the C & D graduates from Trade School; hence, level, evenness, & square are rare qualities to be celebrated when encountered and not taken for granted). My only other comment regarding the instructions would be to mention in the tools required that either a big honking set of clamps (36" span) or maybe ratcheting straps would be a good thing to hold the shell together while you are trying to screw the cross pieces into the shell. Maybe you are good enough to do it without clamps / straps , but I sure couldn't get the (slippery) glued cross pieces to stay put without some kind of support. Other than that, great design and instructions. Thanks!

Farmhouse Bed (King) Modified

Submitted by camcginty on Thu, 07/28/2011 - 09:00

I used the Farmhouse Bed Plans and a picture posted on the FB page to get the look I wanted. We have a split king adjustable bed and needed the bed to allow the mattresses to adjust up and down at the headboard and footboard. The actual opening for the bed is 82X82. I used birch plywood for the main panel on the headboard and footboard and trimmed it with 1X4's, 1X2's, cove & chair rail trim. The headers are 2X4's and 2X6's. I tapered the untreated 4X4 posts which I found at our local store. For the sides I used 2X12's and raised them to allow extra room under the bed for storage. I used lots of wood filler, sanded for a whole day, applied wood conditioner and used a gel stain. I made the mistake of not wiping off the first coat of stain because it looked so good. After I applied the second coat it was too dark and showed brush marks. When it isn't so humid outside, I plan to sand it down and re-stain. I'll also apply a protective top coat at that point. I did purchase bed rail brackets online and they provide a nice tight fit.

Estimated Cost
$300
Estimated Time Investment
Weekend Project (10-20 Hours)
Finish Used
Wood conditioner, Varathane Gel Stain (Cabernet)
Recommended Skill Level
Intermediate

Comments

StacieM

Mon, 08/01/2011 - 07:37

This is amazing! This is exactly the look I want when I make my King Bed. I love the geometric look with the trim on the headboard and footboard but the traditional look that the trim around the top gives. It makes the bed a little more modern versus rustic. I Love It!

Cassidy Bed Works Well with a Sleep Number Platform

My husband and I bought our California king Sleep Number bed several years after we bought our solid wood bedroom furniture and it was too big to use with the bed that came with our dressers. After our most recent move, I decided I would have to finally part with the dressers in order to have a bedroom set that matches, which was hard because I love the simple, classic style of the dressers. Then I found this site and the plans for the Cassidy bed.

To make the Cassidy bed work for us, I extended height of the side rails and footboard to the floor so that our little dog could not hide under the bed when it was time for her to go into her kennel. That means I had to buy two sheets of plywood, one for the headboard to be cut from and one for the footboard to be cut from, and I bought 1x16s instead of 1x12s for the side rails. I also adapted the entire dimensions of the bed so that it fits around the plastic platform of our Sleep number bed, so we did not need to use the 2x4 slats. In fact, we did not use any of the 2x4s in the plan. The side rails are hung on the scrap lengths of the plywood. Finally, we did not decorate the headboard with door shims.

In the end, the bed is incredibly solid and beautiful. Afterword, I finished it to match our dressers, which I had stripped, as well.

Built from Plan(s)
Estimated Cost
$450
Estimated Time Investment
Week Long Project (20 Hours or More)
Finish Used
Three coats of Minwax Red Walnut and three coats of Minwax Polyurethane (Satin)
Recommended Skill Level
Intermediate

Comments

Shopmade Panel Saw

Submitted by TMW on Thu, 10/08/2015 - 06:57

I built this saw several years ago using plans i got on the internet. At the time I needed a way to easily breakdown full sheets by myself. It is extremely accurate and easy to use. With the removeable wings attached it opens up to over 12'. It easily collapses for storage. I would reccommend this to anyone who does not have the room for a professional quality cabinet saw. It took me about a weekend to build. All parts were readily available at my local homecenter and hardware store. I since have gotten a cabinet saw and a tracksaw so sadly this saw now sits in a corner of my shop.

Estimated Cost
$250-350
Estimated Time Investment
Weekend Project (10-20 Hours)
Recommended Skill Level
Beginner

Farmhouse Bedside (actually entry) Table

Submitted by canterbc on Wed, 10/24/2018 - 16:04

I needed an entry table and when I saw this plan for a bedside table I knew with just a couple of size modifications it would be perfect for me. It is a little taller and wider that Ana's plans, but other than that is true to her design. Couldn't be happier with the new table!

Built from Plan(s)
Estimated Cost
Around $100, maybe a bit more. Higher cost is because I used Poplar. This plan can definitely be done for less if you use regular pine.
Estimated Time Investment
Day Project (6-9 Hours)
Finish Used
I painted the base with Valspar Signature in satin Blanched Pine, one of the 10,000 shades of white. For the bottom shelf and the top, I picked the darkest pieces of Poplar I could find and just used Minwax satin polyurethane on them.
Recommended Skill Level
Intermediate

Doll farmhouse bed for Avery

Submitted by brguad on Mon, 08/01/2011 - 13:58

Once I saw the plans posted I knew my daughter would love it and she does!! Every time she goes to bed she has to put her babies in bed too. This was a simple build but very rewarding. THanks Ana!!

Estimated Time Investment
An Hour or Two (0-2 Hours)
Finish Used
sanded 120, white flat paint
Recommended Skill Level
Beginner

Outdoor Sectional with Corner Pieces

Submitted by unotrainer on Tue, 08/27/2013 - 09:51

We used 2x4s instead of 1x4s to make it more sturdy. We had to adjust some cuts accordingly. I bought the cushions at Target on clearance.

Estimated Cost
$250 with cushions
Estimated Time Investment
Week Long Project (20 Hours or More)
Finish Used
Valspar paint
Recommended Skill Level
Intermediate

Scrap Wood Barn Door

Submitted by milleall on Mon, 10/12/2015 - 07:31

I am finally getting around to the final touches on the home we built.  I have a small pocket office that needed a sliding barn door.  I build this door out of 3/4 inch plywood framed with 1x2 oak boards.  I added planks of scrap plywood, 1x boards, and pallet wood.   I added some different colors to make for a fun industrial/modern look.  I made the barn door track out of steel purchased at a local metal shop and wooden wheels purchased online.  

Estimated Time Investment
Weekend Project (10-20 Hours)
Finish Used
Different colors of diy chalk paint (flat paint with water and plaster of paris), various stain colors, and triple thick satin poly.
Recommended Skill Level
Intermediate

Wood Tilt Out Trash cabinet with storage

Submitted by bcarter_1 on Tue, 10/30/2018 - 04:47

Modified the plans, my can was shorter for the bathroom, so I added a drawer.

Estimated Time Investment
Weekend Project (10-20 Hours)
Finish Used
Rust-Oleum weathered grey stain
Recommended Skill Level
Beginner

Comments

Farmhouse kitchen island

Submitted by Anonymous (not verified) on Mon, 07/25/2022 - 20:39

I found plans on here for a farmhouse kitchen island. I built it for my wife. She loves it.

Built from Plan(s)

Comments

Farmhouse Table

I asked my husband to build me Ana White's farmhouse table a few months ago...but he never found the time. Finally I announced I was doing it myself, expecting to get halfway through and then need my husband to finish it. I found out later he expected the same thing.

We were both surprised that I did manage to finish it myself, in about a week from the first trip to the store until it was finished and waiting to set before it came in the house.

I found notching the boards to be difficult at first, but my second try went great and everything fit as it was supposed to. We love our new table, and using the tools made me feel so empowered. I think I've found a new hobby!

Estimated Cost
$120 (after a second trip to the store when I messed up the first set of cuts)
Estimated Time Investment
Week Long Project (20 Hours or More)
Finish Used
Gel stain in honey oak, water based varathane coating on top.
Recommended Skill Level
Starter Project

sofa for my "portico"

Submitted by pattyitaly on Thu, 08/29/2013 - 14:18

I exactly used Ana's project but I decided to paint light grey and I used for cushions denim jeans. It is really resistent and cool. grazie Ana

Estimated Time Investment
Weekend Project (10-20 Hours)
Recommended Skill Level
Starter Project

Comments

JoanneS

Fri, 08/30/2013 - 09:23

Your sofa looks super! Love the gray color. What a cool idea to use denim jeans for your cushions!

Play Kitchen

Submitted by AnneReid on Fri, 11/09/2018 - 10:11

This was a fun build.  I used a dog food bowl from Walmart for the sink, the oven handle is a Restoration Hardware pull from Habitat Restore, stove knobs (spray painted red) and faucet are from Home Depot (I couldn't find either at Habitat, but it's worth trying). The utensil bar is from Amazon. I cut out an oven window and glued a small sheet of plexiglass acrylic from HD to the door.  I put a stick-on, battery operated light inside the oven that turns on and off by pushing it. I wanted the oven to open like a real oven, but I should have saved myself the trouble and just put the hinges on the side. The door bangs to the floor unless you can figure out how to install slide hinges to prevent it. (I couldn't make it work, but I'm sure more experienced DIYers would have no trouble.)  I printed out the stovetop coils free from "printablecuttablecreatables.com" and glued them on a thin sheet of black foam.

Built from Plan(s)
Estimated Time Investment
Weekend Project (10-20 Hours)
Recommended Skill Level
Beginner

Comments

Ana White

Fri, 11/09/2018 - 12:17

This is too adorable!  All your little details really made it amazing!

A small chair or rope can be used to keep the oven door from opening all the way if you want to try that.

Farmhouse Bedside table

My husband and I decided to tackle the farmhouse bedside table as our first project. It was a test to see if we could build together without fighting and bickering. We succeeded! It is a little "rustic" but we are pretty proud of our first build. It was definitely a learning experience. The top is a little uneven due to one of the boards having a slight bend to it. I also should have put epoxy on the knots of the pine before painting it. We are going to make one more to match for the other side of the bed. Thanks for the plans Ana!

Built from Plan(s)
Estimated Time Investment
Weekend Project (10-20 Hours)
Finish Used
We used a mahogany stain for the top. I did 3 coats of it, rubbing it off after 10 minutes and letting it dry for at least 4 hours between stains. I then did a polyurethane coat, glossy, on top. I sanded after the first coat and then did two more after. For the bottom part, I did a coat of oil-based Killz to seal it and prevent leak through. I then sanded as the killz tends to raise up the grain. I did two coats of a semi-gloss Behr latex paint. The name is seaside sand.
Recommended Skill Level
Beginner

ROLLING RUSTIC WOOD DRESSER

Submitted by jimmysingh on Sun, 09/01/2013 - 13:08

First big project, big for me anyway. Dresser came out better than I had imagined. I followed the plan exactly step by step except for the wheels part. Thank you Ana for the plans.

Built from Plan(s)
Estimated Cost
300
Estimated Time Investment
Weekend Project (10-20 Hours)
Finish Used
Rust-Oleum Traditional Cherry Wood Stain
Recommended Skill Level
Beginner

Farmhouse table

My daughter in law and I built this table,  together in Austin,  during my visit there!   We had such an awesome time,  together.   This was made from Ana's book, A Handmade Home. 

Estimated Cost
98.00
Estimated Time Investment
Afternoon Project (3-6 Hours)
Finish Used
Clear minwax
Recommended Skill Level
Beginner

Bunk Beds with Dual Desk

Submitted by bullfiter on Mon, 11/26/2018 - 06:14

My granddaughters needed new bunk beds and an area to do homework. So I combined the 2 projects into one.

Recommended Skill Level
Intermediate