Community Brag Posts

Ken's Salsa Console

First Project...Used pine for the base and oak for the top to match home counter top.

Built from Plan(s)
Estimated Cost
$250
Estimated Time Investment
Week Long Project (20 Hours or More)
Recommended Skill Level
Beginner

Side Street goes Shabby Chic

Submitted by Anonymous (not verified) on Mon, 06/27/2016 - 21:14

We sanded, stained, painted, and distressed the wood before building. That was truly the most time consuming part. The plans were great and everything went together smoothly! We decided to take off the top 2 planks from the footboard, and used those as the side rail. We created the ladder from what we had on hand. 

Built from Plan(s)
Estimated Time Investment
Weekend Project (10-20 Hours)
Finish Used
Stain- dark walnut
Paint- Paint left from our kitchen ceiling

Distressed with electric hand sander
Recommended Skill Level
Beginner

Comments

Seesaw

This was a pretty quick and easy project. My third one from this site, as well as being my third one ever. We rented a mitre saw to cut the wood (and cut wood for a few more projects we had on the go at the same time), and then it was just a matter of staining it and putting it together. The staining and waiting for it to dry actually took a couple of weeks, mostly because we don't have a lot of room to do that, so couldn't do it all at once, and it wouldn't stop raining. Once we actually had that done, drilling and assembling only took 2-3 hours at most. (Maybe even less, but hard to judge as I had two children helping the whole time.)

I've put a video of it in use on my blog as well. :)

Built from Plan(s)
Estimated Cost
$25
Estimated Time Investment
Afternoon Project (3-6 Hours)
Finish Used
Some of the wood was finished with Behr natural cedar that I had a sample can of, but I ran out and decided I didn't like how orange it ended up being. I bought a can of CIL walnut semi-transparent stain that was on sale for the rest, as well as putting it over the Behr on the ones I had already done.
Recommended Skill Level
Beginner

Atomic Credenza

Submitted by bethrose on Sat, 04/05/2014 - 19:01

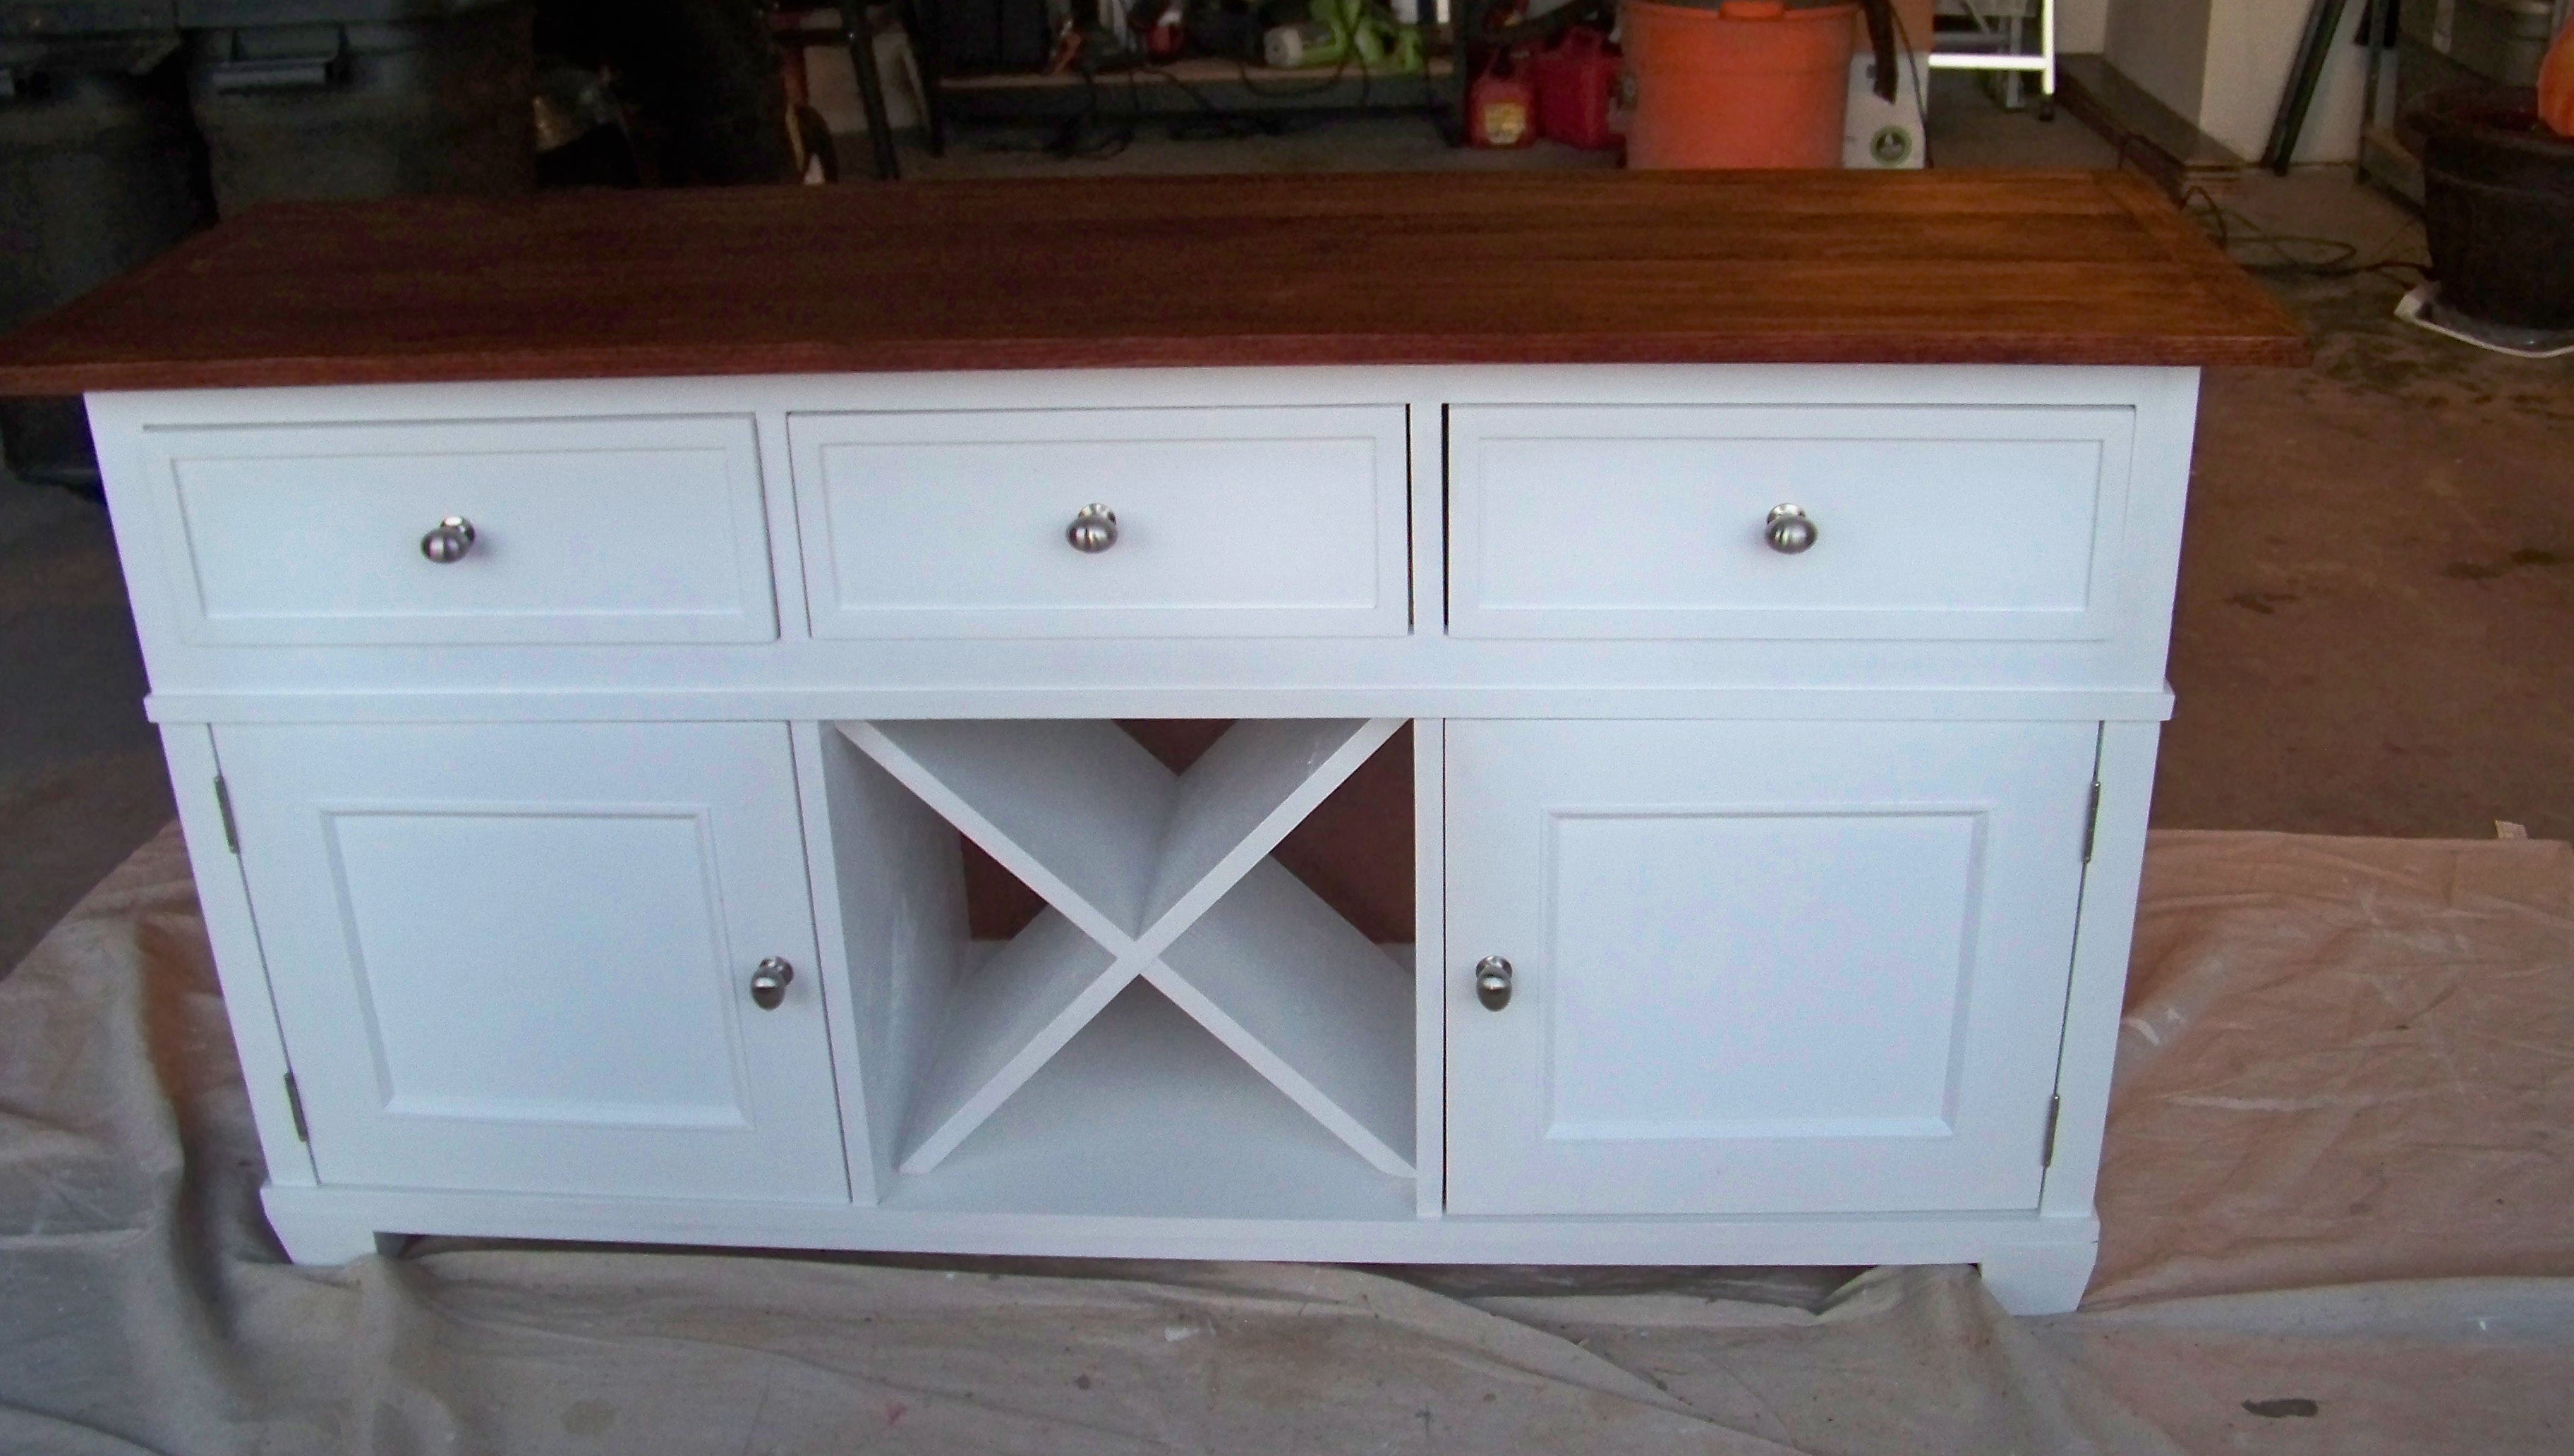
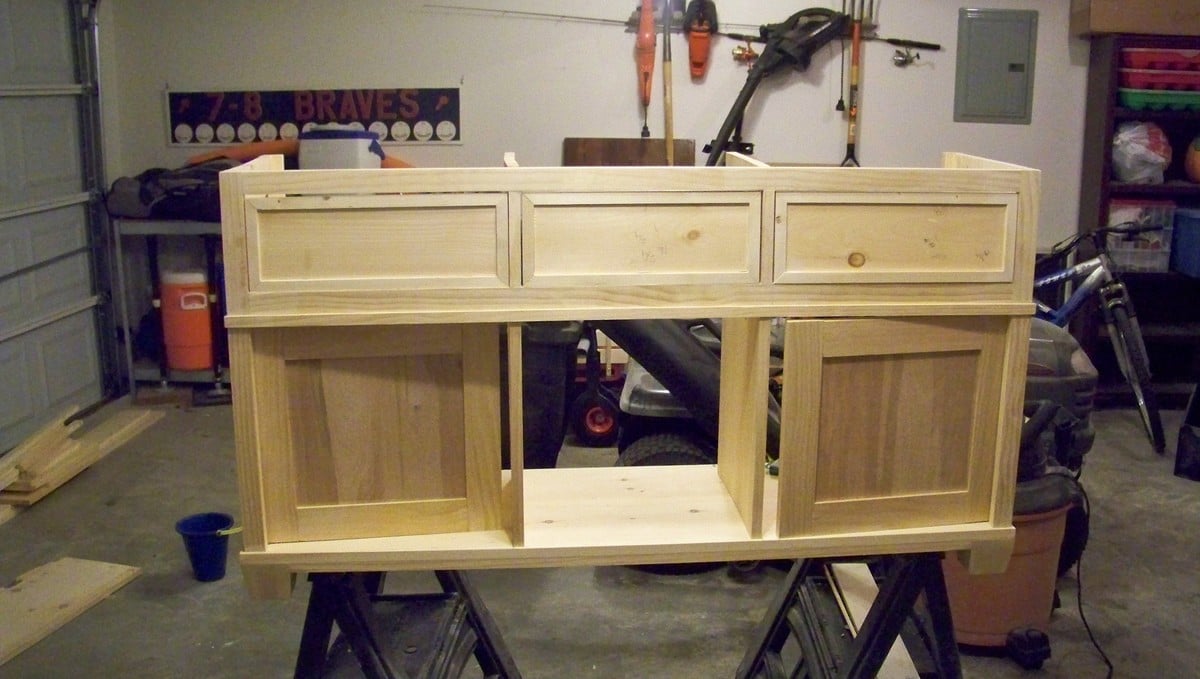
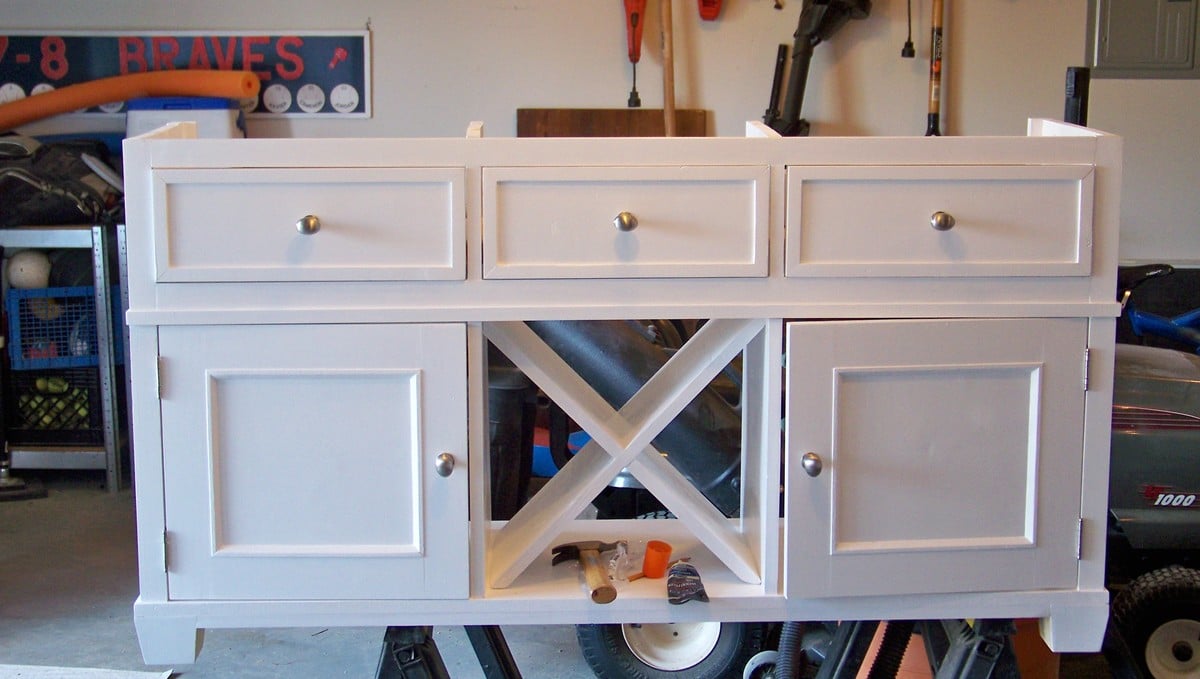
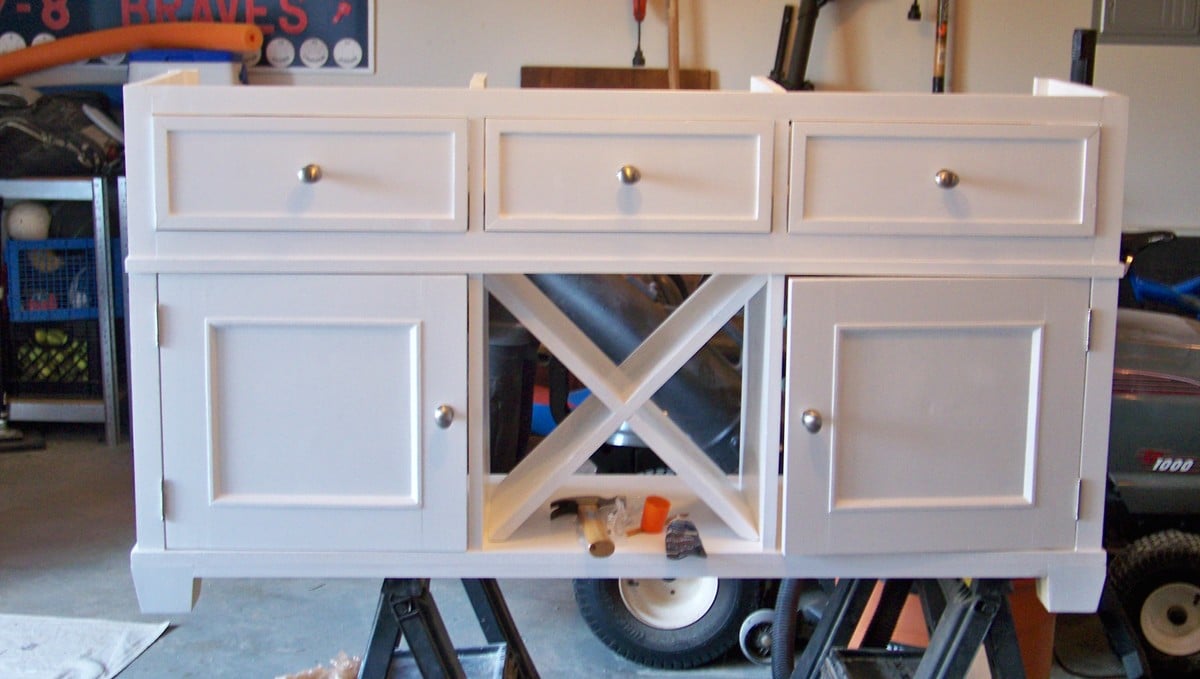
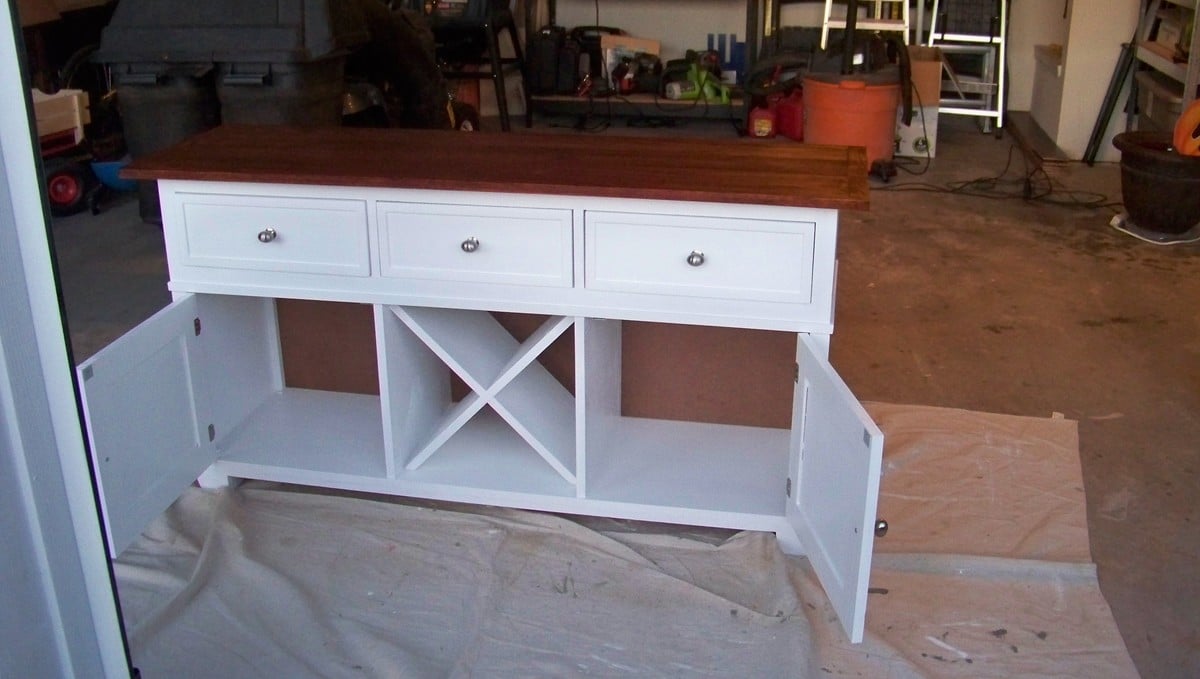
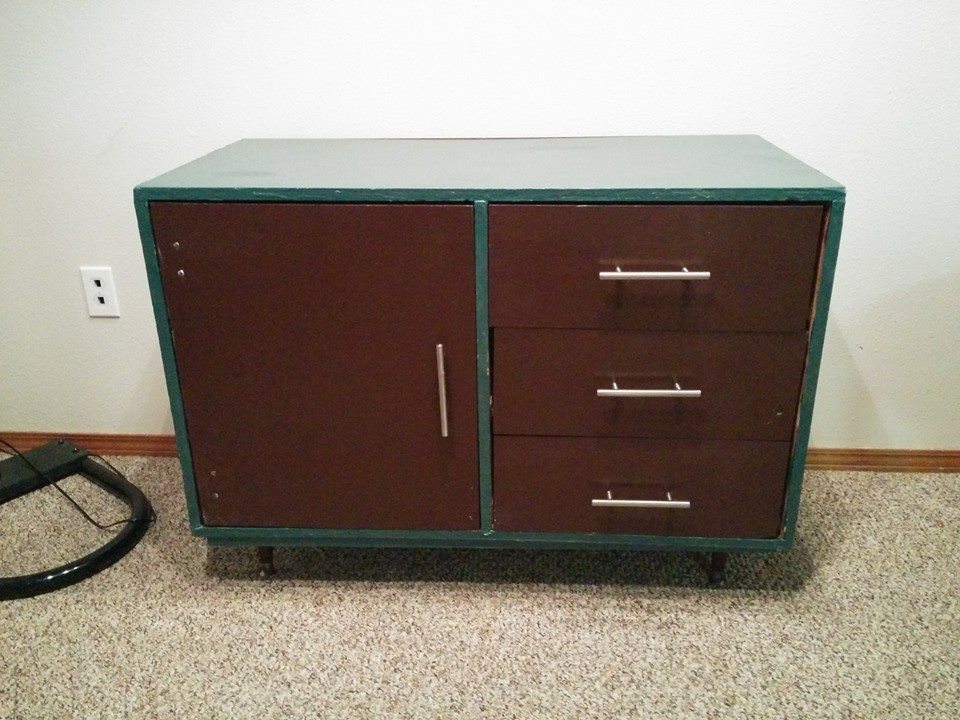
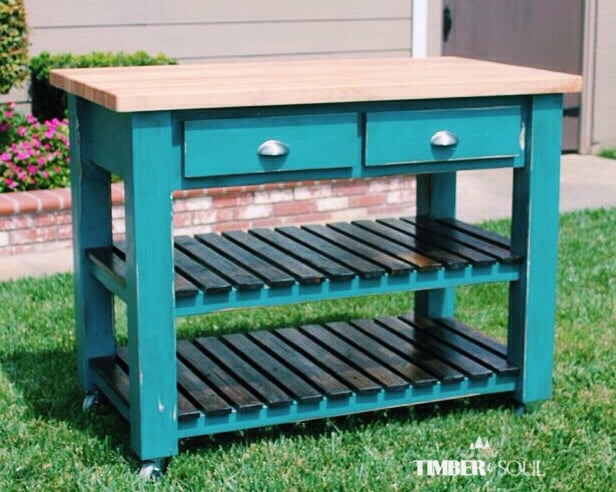
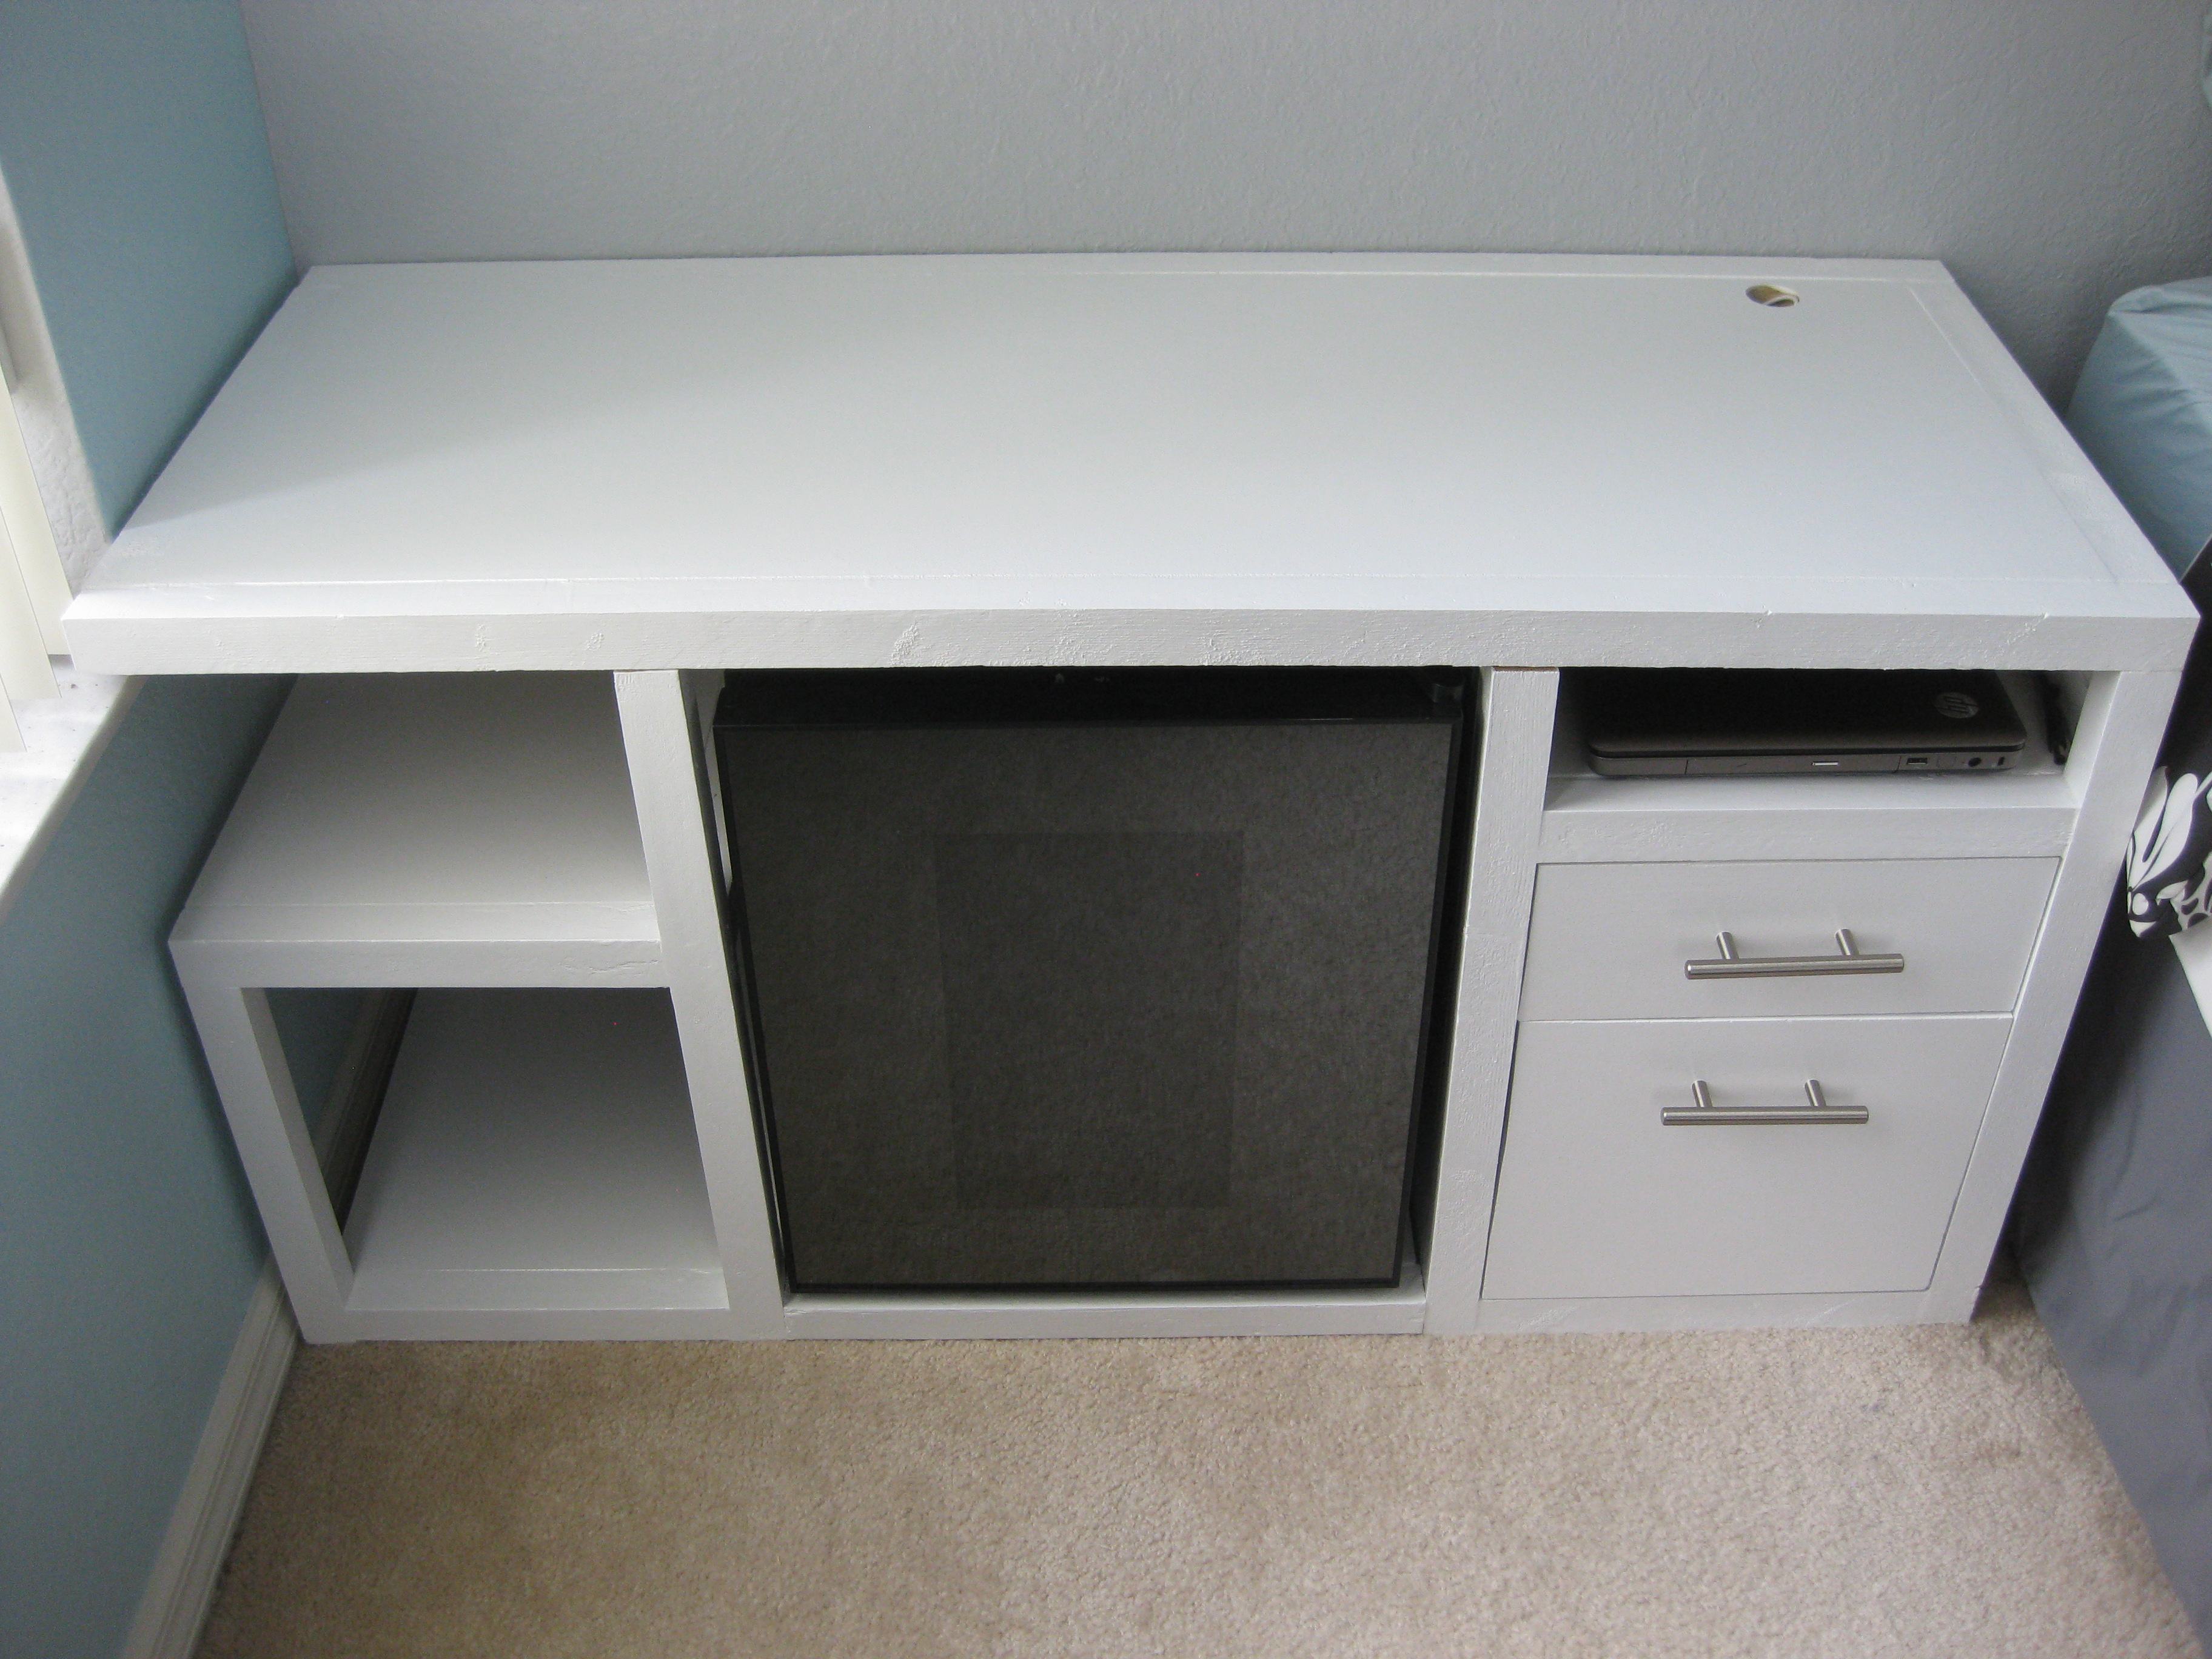
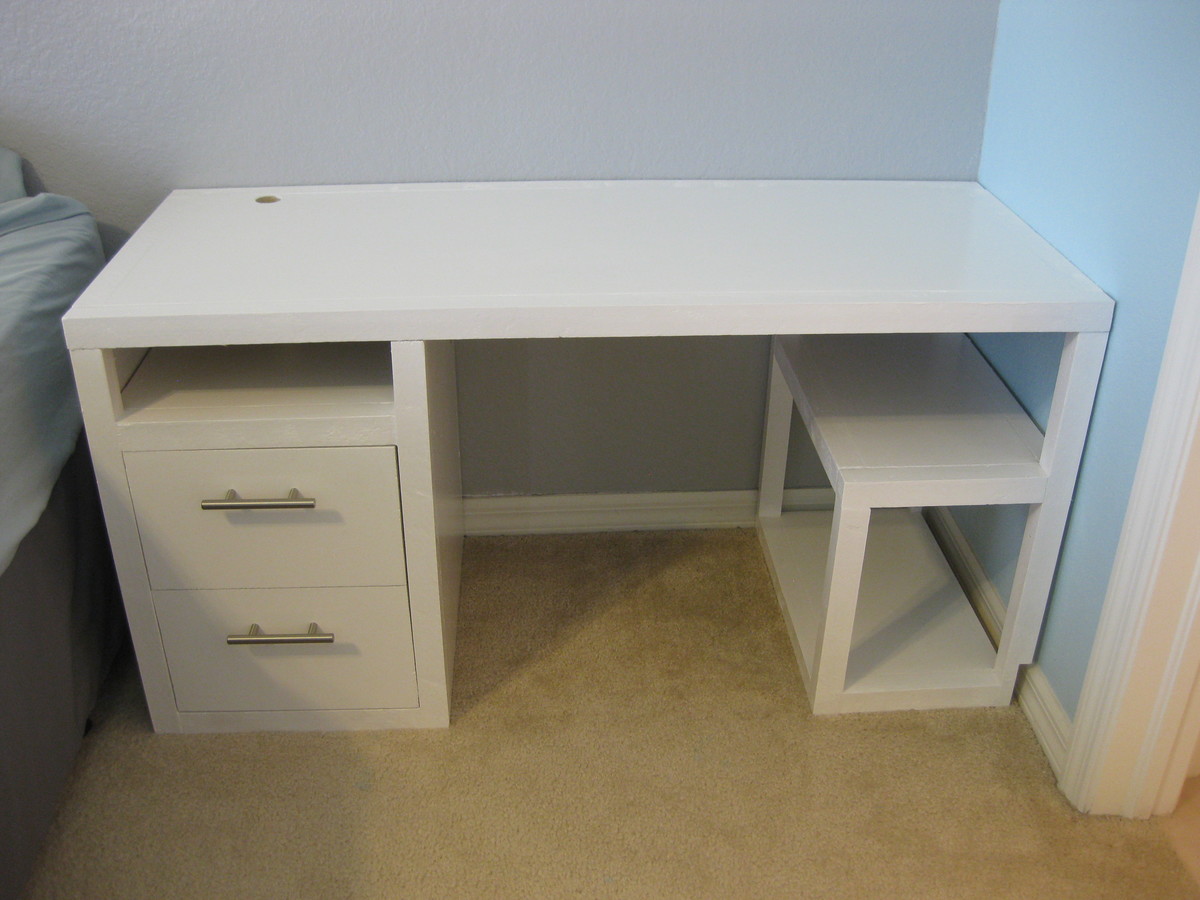
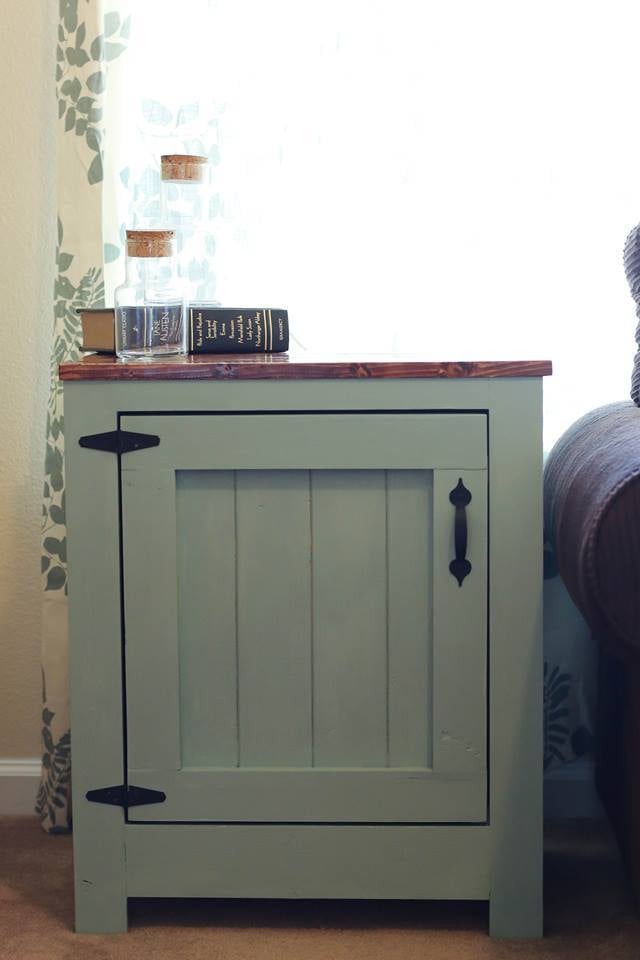
My neighbor loaned me a shop vac and a palm sander to refinish a table, and I fell down a rabbit hole. This is the Brooke Mid-century Console Table from this site. I need to touch up paint the front, and it's not perfect, but this was my first woodworking project. I think the hardest part was wrestling with the drawer slides; I think I had to remount them three or four times. There was plenty of swearing involved with the Euro hinge as well.

I took a "Woodworking: Your Own Projects" class at the local community college, but this project was almost entirely self-taught (although I had plenty of adult supervision while learning to use the saws.)

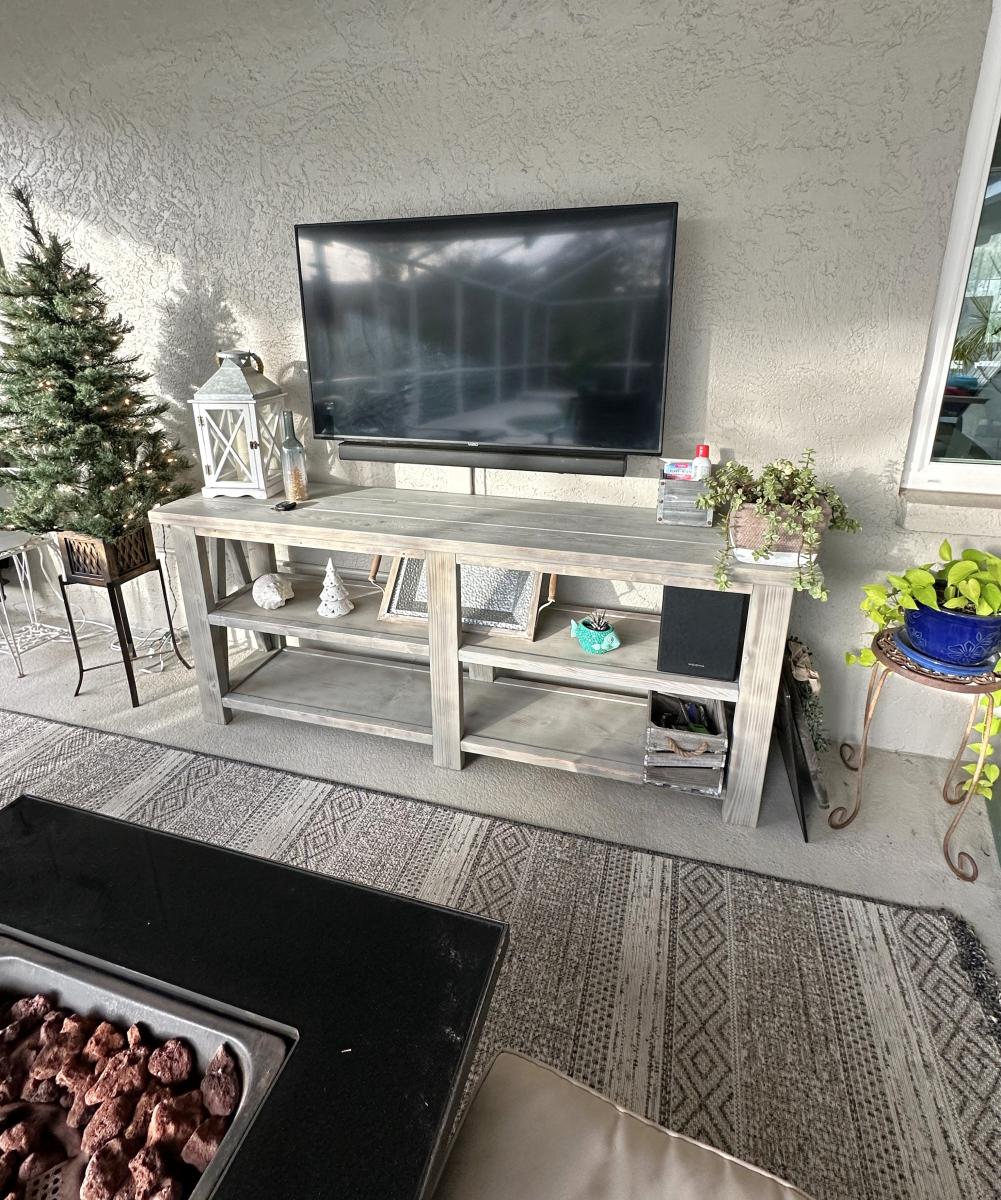
I bought most of the materials from Building Materials Resources, a local reclaimed building supply store. And then took about a million trips to the local big box home supply stores for "just one more thing."

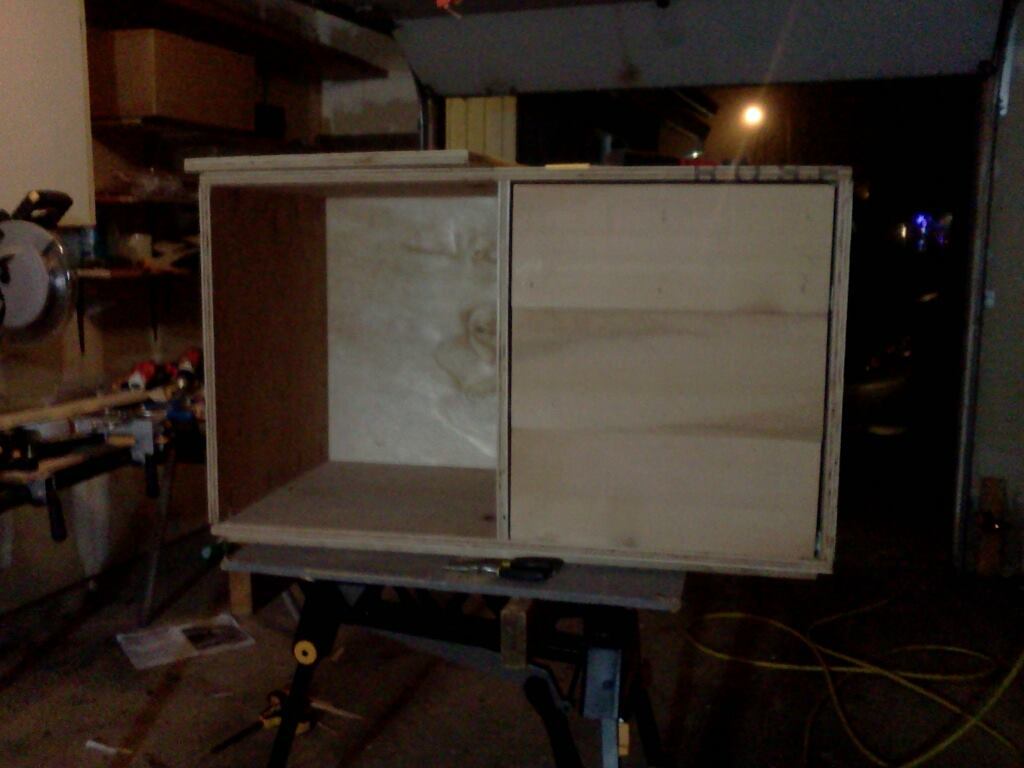
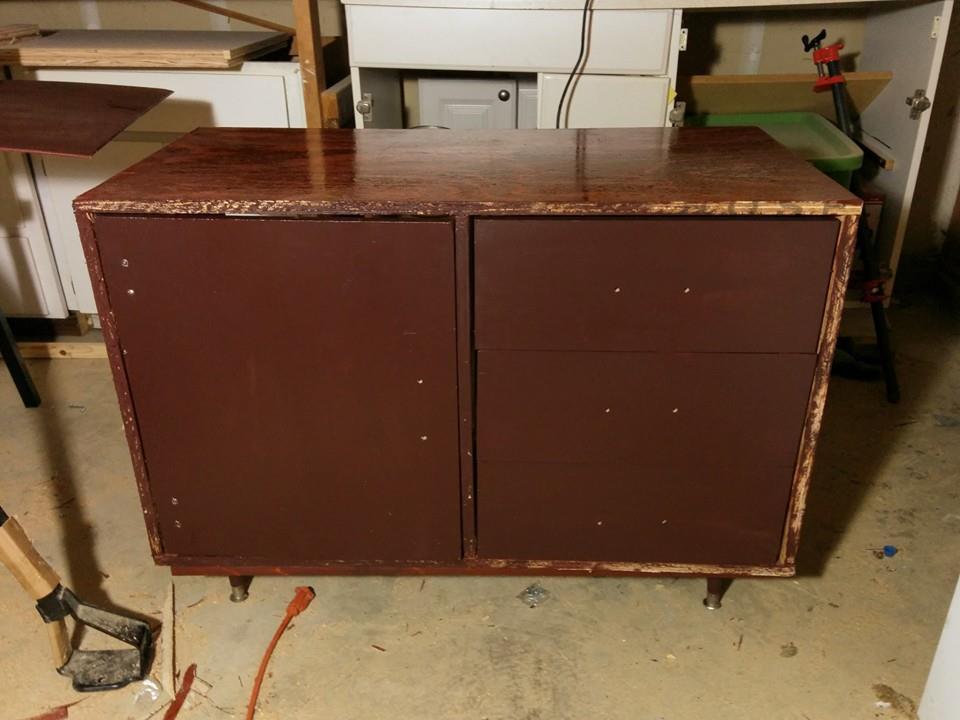
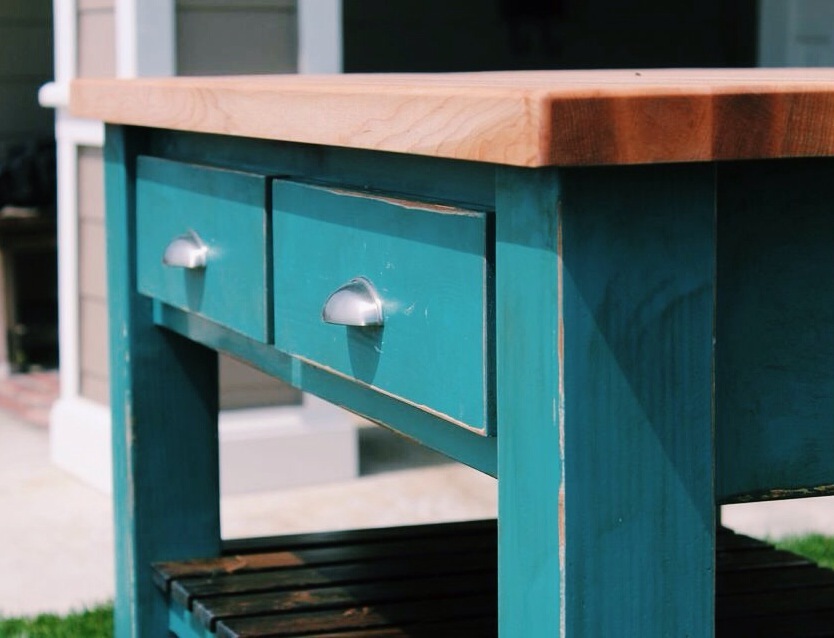
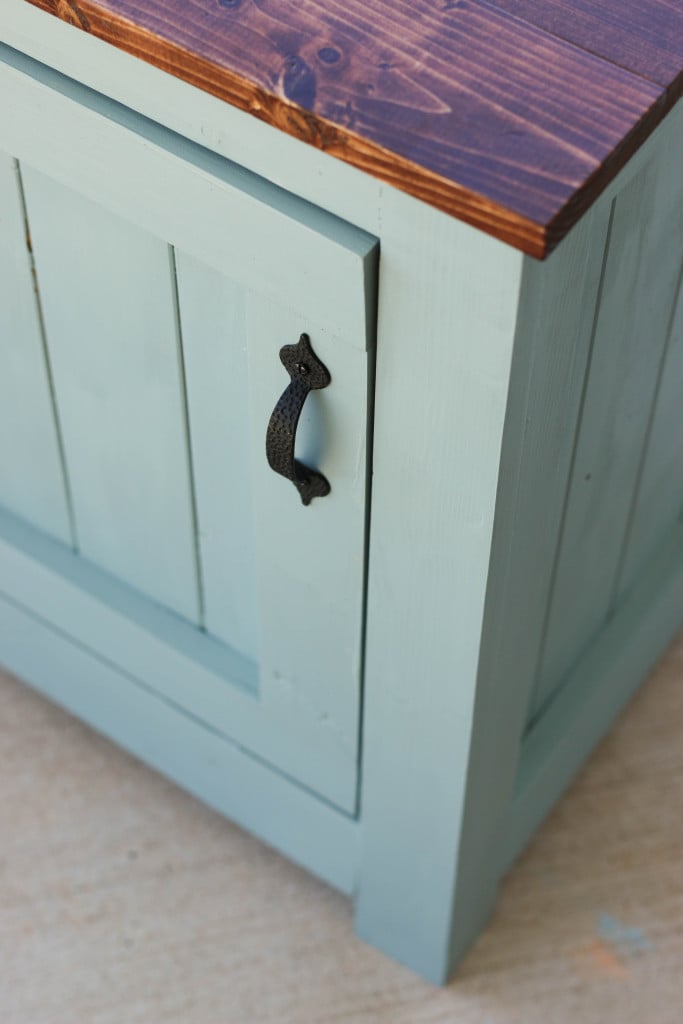
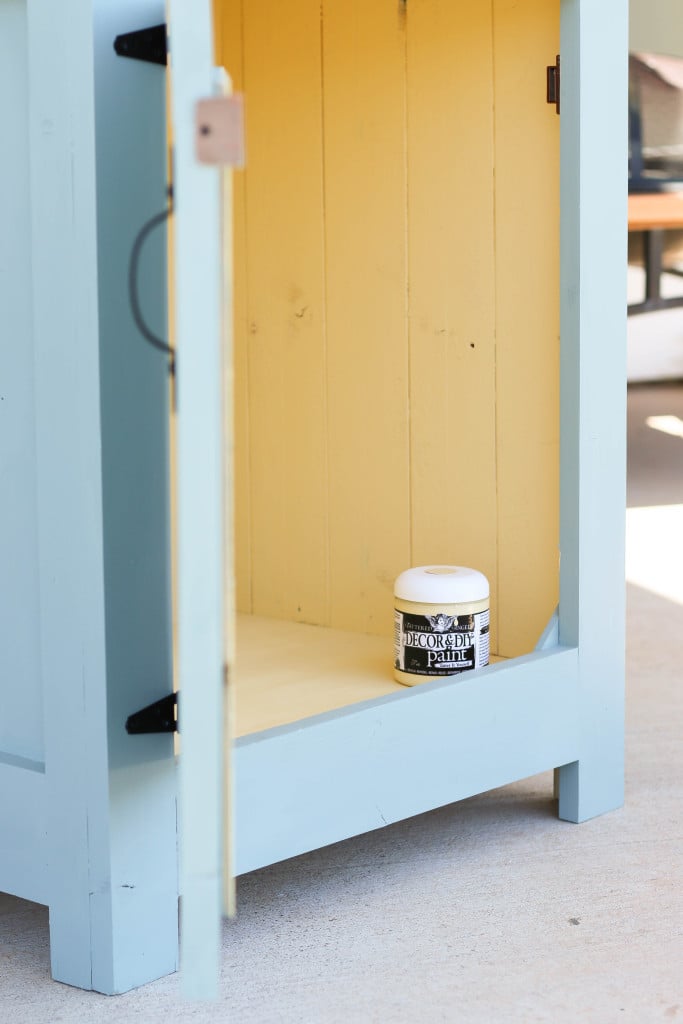
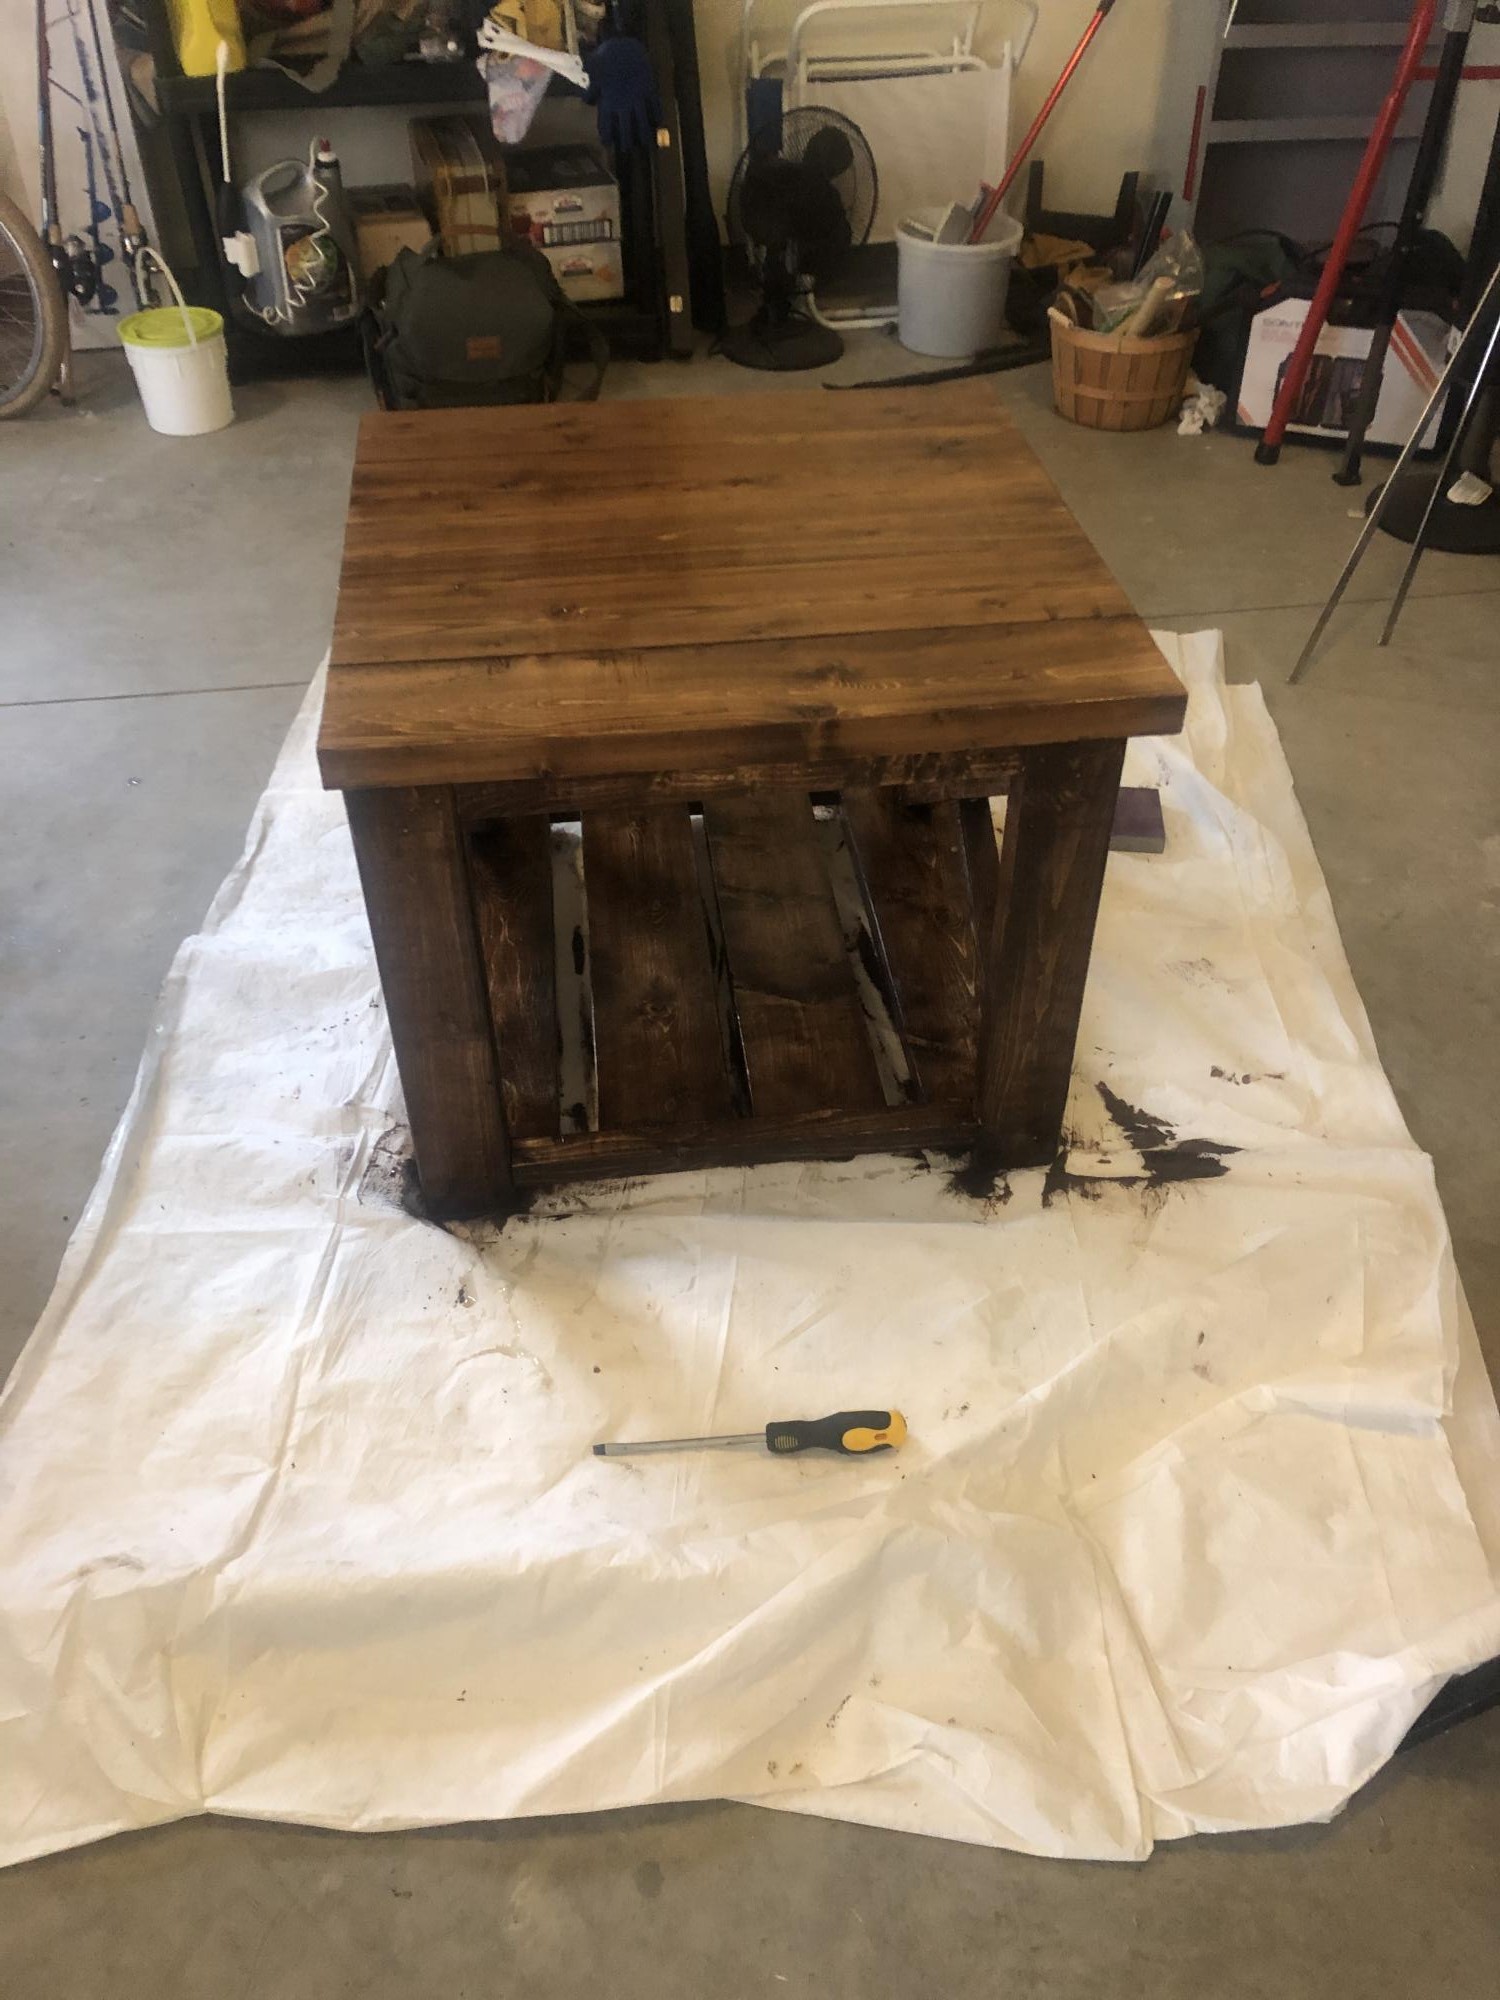
I had originally stained the project with Minwax Sedona Red and put some wipe-on oil-based poly on it, but the drawer fronts came out blotchy because I had used wood putty over the brad holes, so I painted those and the door brown ("Polished Mahogany" SW2838.) Then the edgebanding that I had applied on the front and stained was peeling off and looking terrible, and I didn't want to redo it.

I gave up and scuff-sanded the whole thing and painted the rest of it blue ("Still Water" SW6223.) I then applied several coats of semi-gloss spray water-based polyurethane, sanding lightly inbetween coats. I finished it off with a coat of Howards Feed N Wax and 0000 steel wool.

One tip that I have is that you can buy enormous (quart sized!) paint samples at Sherwin Williams for about $5 apiece. I used a paint sample for the brown portions, and a "real" quart of paint for the blue portion, and I cannot tell the difference in quality.

Skills learned:
Drilling pilot holes (believe it or not)
How to use the Kreg jig
How to use a miter saw
How to use a circular saw
How to use a table saw
Applying edgebanding
Applying wood filler
Staining
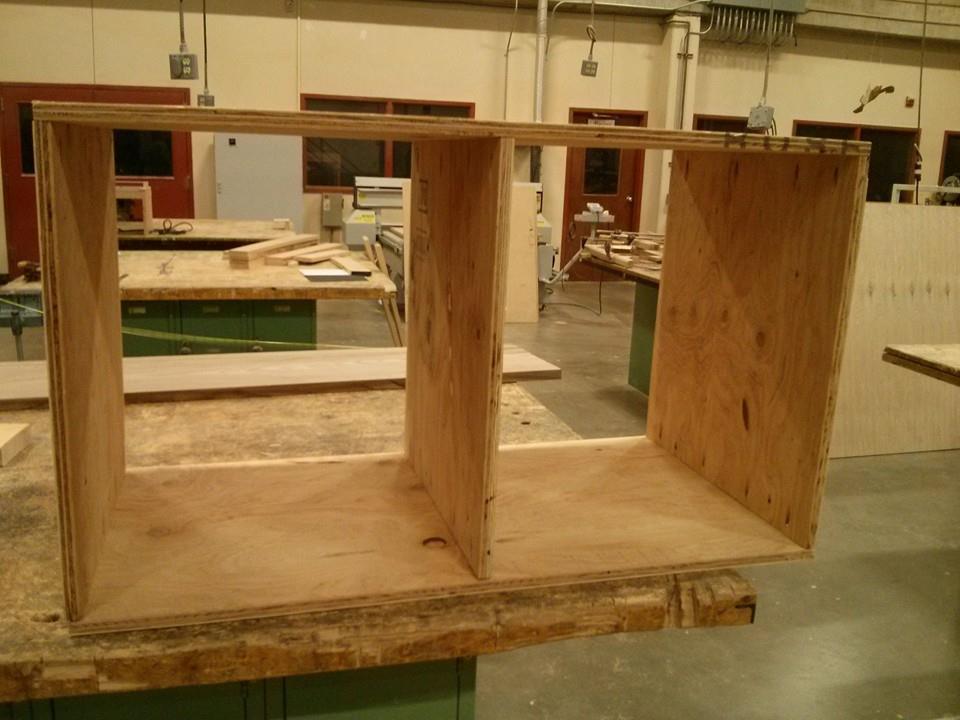
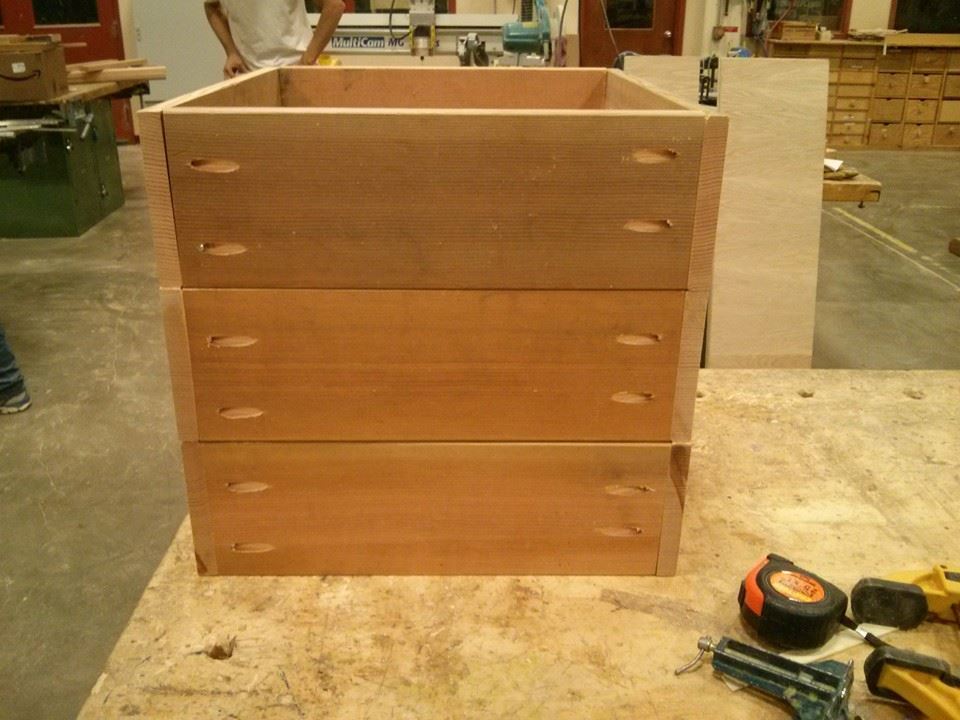
Building drawer boxes
Installing drawer pulls
Installing drawer slides
Installing euro-hinges (and how to use a Forstner bit)
How to use a brad nailer
How to attach table legs
Probably some other stuff that I forgot

Estimated Time Investment
Week Long Project (20 Hours or More)
Finish Used
Paint + Spray semi-gloss water based Varathane
Recommended Skill Level
Starter Project

Farmhouse table

Submitted by Shugh on Fri, 07/01/2016 - 16:01

Thanks for the plans!

Estimated Cost
$200 and 40 of that was a box of 1000 screws, and 35 for stain (not in image)
Estimated Time Investment
Day Project (6-9 Hours)
Finish Used
Still to be finished/stained
Recommended Skill Level
Beginner

Stand Up Desk

Submitted by Anonymous (not verified) on Mon, 04/27/2020 - 09:41

Anna's recent design for a stand up desk system with paper shredder inspired me. I have 2 side by side Stand Up desks on castors. I have customized to suite our needs.
Thank you Anna for teaching me to build, my "She Shed" has become my sacred space - Cheers from Canada

Estimated Cost
100
Estimated Time Investment
Weekend Project (10-20 Hours)
Finish Used
Old Masters Stain - Dark Walnut
Black Wax for desk top
Recommended Skill Level
Intermediate

Comments

Simple Outdoor Bench

My sister wanted this to go with the Simple Outdoor Chairs I had built her for her birthday. I added a 2x4 between each leg to make it more stable and shortened it by one slat to fit the cushion. This was very easy to build and would make a great beginner project.

Built from Plan(s)
Estimated Cost
Scraps from other projects and leftover paint from chairs
Estimated Time Investment
An Hour or Two (0-2 Hours)
Finish Used
Flat black exterior spray paint with exterior gloss clear coat
Recommended Skill Level
Beginner

First Console table!

I started this project without a cutting table or any kind of shop set up. I used a burnt out tree as my makeshift cutting table. With only hand tools I used Ana Whites blueprints from her website to do this whole table, the directions were very easy to
follow and very helpful.

Estimated Time Investment
Afternoon Project (3-6 Hours)
Recommended Skill Level
Beginner

House Bed

Submitted by T.R. on Tue, 07/05/2016 - 07:42

Took a canopy bed plan but made it to look like a house for my grandson.  

He loves it! 

Built from Plan(s)
Estimated Cost
$75-$100
Estimated Time Investment
Afternoon Project (3-6 Hours)
Recommended Skill Level
Beginner

Love our Small Easy Rustic X-Bench!

Submitted by afine1 on Mon, 06/18/2012 - 02:12

I have been redoing furniture for quite some time, but had never actually thought of making my own furniture, until I ran across Ana's blog. Now I am so addicted! My husband is very handy with his tools and can follow plans fairly easily (unlike me) so I definitely had to enlist his help with this project. We are stationed overseas in Germany so our project costs us a bit more than it would have if we were stateside, but still quite a bit cheaper than purchasing the similar one at Pottery Barn.Since it was our first project it did take us a bit longer than normal, but still easy enough to do. I absolutely love how this turned out and now my husband and I are ready for our next project of a rustic console table that we made our own plans for.

Built from Plan(s)
Estimated Cost
With the paint around $40
Estimated Time Investment
Day Project (6-9 Hours)
Finish Used
I first primed it and then painted it. Not sure what the actual paint color was because it was in German, but I would call it a country blue. I then distressed it and added some stain.
Recommended Skill Level
Beginner

Butcher Block Kitchen Island

I built this from Ana's plans with some slight modifications. The top is built from hard maple and is an edge grain butcher block. I sealed the top with mineral oil and beeswax. The finish is distressed calypso blue. I also added 3" locking and swiveling casters.

Built from Plan(s)
Estimated Cost
$200.00
Estimated Time Investment
Week Long Project (20 Hours or More)
Finish Used
The paint is calypso blue by Benjamin Moore. I sanded and distressed the piece. I then wiped on stain and wiped off stain to add a rustic look.
Recommended Skill Level
Advanced

Comments

Truss Table and Benches (Western Red Cedar)

Submitted by Anonymous (not verified) on Thu, 07/07/2016 - 14:47

We built this outdoor table and benches using Western Red Cedar for a patio area outside our house.   The cedar is pricier than doug fir or other woods, but is highly rot resistant and the best choice for an outdoor table.  We used Ana White's 4x4 Truss Beam Table and Benches plans and Kreg blue kote screws since they are weatherproof.   The breadboards were a little wobbly, so we reinforced them with black metal corner braces (http://www.truevalue.com/product/Hardware/Miscellaneous-Hardware/Corner…) and black coated exterior screws (http://www.homedepot.com/p/Everbilt-12-x-1-1-4-in-Phillips-Flat-Head-Wo…).   These braces provide a cool architectural look and provide much needed support for the table ends, and especially the bench ends.    We stained the Western Red Cedar with Minwax Weathered Oak and finished it with two coats of Man O War Spar Urethane in Satin finish.   Hopefully it will stand up to the elements and last for years to come.   Thanks for the plans Ana!

Estimated Cost
$600-$700
Estimated Time Investment
Week Long Project (20 Hours or More)
Finish Used
Minwax Weathered Oak (2 coats); Man O War Spar Urethane Satin (2 coats). Sanded with 400 grit sandpaper in between coats of urethane.
Recommended Skill Level
Beginner

My build of “House Bed Frame - Modern Tiny House Shape” for Ana-White

Submitted by pondrider on Mon, 05/04/2020 - 08:34

https://www.ana-white.com/woodworking-projects/house-bed-frame-modern-t…
As a high school teacher, I noticed Ana-White’s post for a contest to build a tiny house-shaped bed heading in to spring break; I entered and was selected. COVID-19 directed my teaching in a very different way and actually slowed down my woodworking while I have finished the project. Inspired by the Ana-White’s writings of making beautiful furniture with typical tools, this project is a perfect example of being able to build without the need for high-end shop machines. I followed the plans almost to the letter while keeping my mind open to slight improvement especially around the process of transportability. As a teacher, I emphasize that every writing is ready for editing and revision; with experience in woodworking, I approach building in a similar manner. My finished project below pictured below has some minor revisions planned for disassembly and reassembly in a minimal number of parts using only a screwdriver.

@anawhitediy
https://www.facebook.com/knockoffwood
Smart and stylish woodworking plans to make your home awesome.
#anawhite
smart.bio/anawhitediy

@SawDustDonLawler
https://www.facebook.com/HHH-Wood
@EduDonLawler

Estimated Cost
$160.00
Estimated Time Investment
Weekend Project (10-20 Hours)
Finish Used
The finish used on this project was Minwax Aged Barrel and Minwax Pure White.
Recommended Skill Level
Intermediate

Custom Kitchen Island

Submitted by Anonymous (not verified) on Wed, 12/27/2023 - 12:15

Our daughter lives in a small attic apartment that doesn't have much counter space or cupboard space in the kitchen. So my husband and I designed and build her a kitchen island for more usable space and a place on the back she can put stools and she can use it as an eating bar as well. It took us almost 2 weeks because we were trying to build it in the garage below her apartment when she wasn't home. Her reaction was perfection! It turned out so great!!!

Rob and Jen Smith

Bunk Bed

My girls wanted a bunk bed badly! I was shocked to see the prices shopping around at local furniture stores. So I made one :)

Bed is constructed with all pine wood and stained with Kona color stain. I added a few fun things like a window and a tent on top. These were really simple. Email me if you have any questions.

Built from Plan(s)
Estimated Cost
250.00
Estimated Time Investment
Week Long Project (20 Hours or More)
Finish Used
Stain color: Kona

Stain was sprayed on and a Matte finish poly for protection
Recommended Skill Level
Beginner

Comments

fkowalec

Sat, 05/18/2013 - 13:40

This is really cute i love the tent portion would love to know how you did it

Extended Nightstands

Submitted by PinnSB on Sun, 04/13/2014 - 20:33

These nightstands span the entire wall of our master bedroom. My husband's side features a mini-fridge, whereas mine has a space for an ottoman that I have yet to buy (or make?). It is a combination of the "Modern Nightstand" and the "Parsons Desk".

Estimated Cost
$80
Estimated Time Investment
Week Long Project (20 Hours or More)
Finish Used
Behr ultra white gloss paint and polycrylic
Recommended Skill Level
Beginner

Kentwood Nightstand Painted with Tattered Angels Paints

Submitted by Anonymous (not verified) on Mon, 07/11/2016 - 05:22

I saw the plans for this nightstand and loved it! It was exactly the piece of furniture I was looking for to use as an end table. I decided to stain the top and paint the bottom. The outside is a greenish-teal color and the inside is a light, fun yellow. I also submitted this project to Canvas Corp Brands' Blog and they published it! See the blog post here: http://blog.canvascorpbrands.com/diy-end-table-painted-with-tattered-angels-paints/

Estimated Time Investment
Day Project (6-9 Hours)
Finish Used
I used Minwax stain in the color of English Chestnut for the top. I also added two coats of shiny poly over the stain. For the paints on the bottom I applied Tattered Angels DIY and Decor paints in the colors of Mankato and Chamoise. I first wiped down the whole piece with a damp cloth to remove dirt, and then since it was already sanded, I just began to add color. I used a rag to stain the top and applied two coats. I used a small Purdy brush on the bottom to apply the paint. I did a light coat of paint first, then came back with another light coat to cover any spots I missed.
Recommended Skill Level
Beginner

Rustic end table

Submitted by Anonymous (not verified) on Tue, 05/05/2020 - 15:38

Doing the whole set of rustic coffee/end tables 1st one done! Thanks for the plan!

Built from Plan(s)
Estimated Cost
50
Estimated Time Investment
Weekend Project (10-20 Hours)
Finish Used
Black walnut
Recommended Skill Level
Beginner
Back