Community Brag Posts
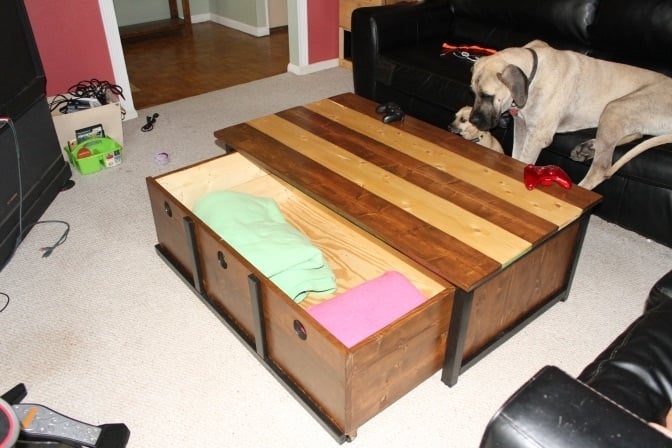
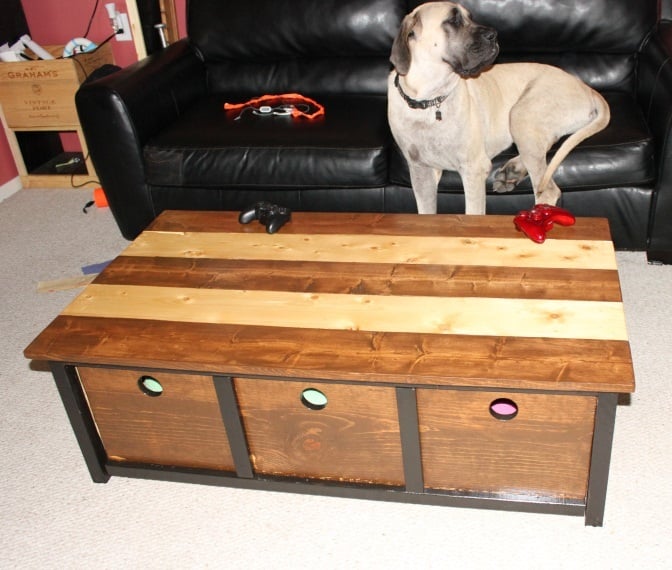
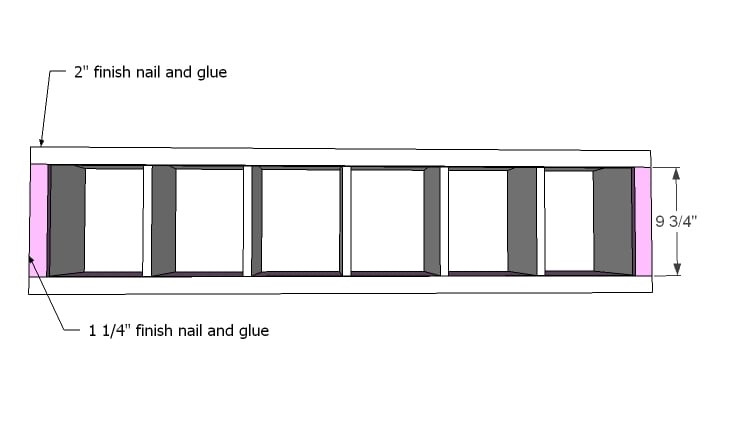
Tidy up Coffee Table
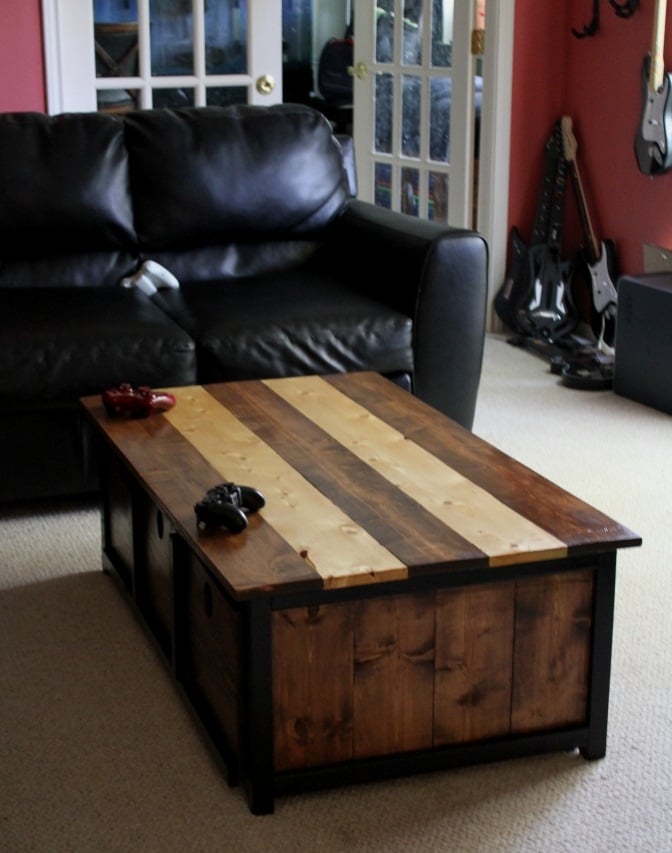
I Loved the idea of this table! It is in the kids' living room/game room. This room is usually cluttered with blankets for friends, games, game controllers and so on! I was thinking about building a storage chest for their coffee table, then I saw these plans! It is perfect! The boys even use it to clean up...WITHOUT ME FORCING THEM! Oh yeah!!!!
I wanted my table to appear to have three drawers instead of two, so I modified a bit. I also opted out on the breadboard ends and just made the top boards a little longer.
Built from Plan(s)
Estimated Time Investment
Afternoon Project (3-6 Hours)
Finish Used
I made stripes, alternating early american stain by rustoleum with natural wood, followed by two coats of satin poly
Recommended Skill Level
Beginner
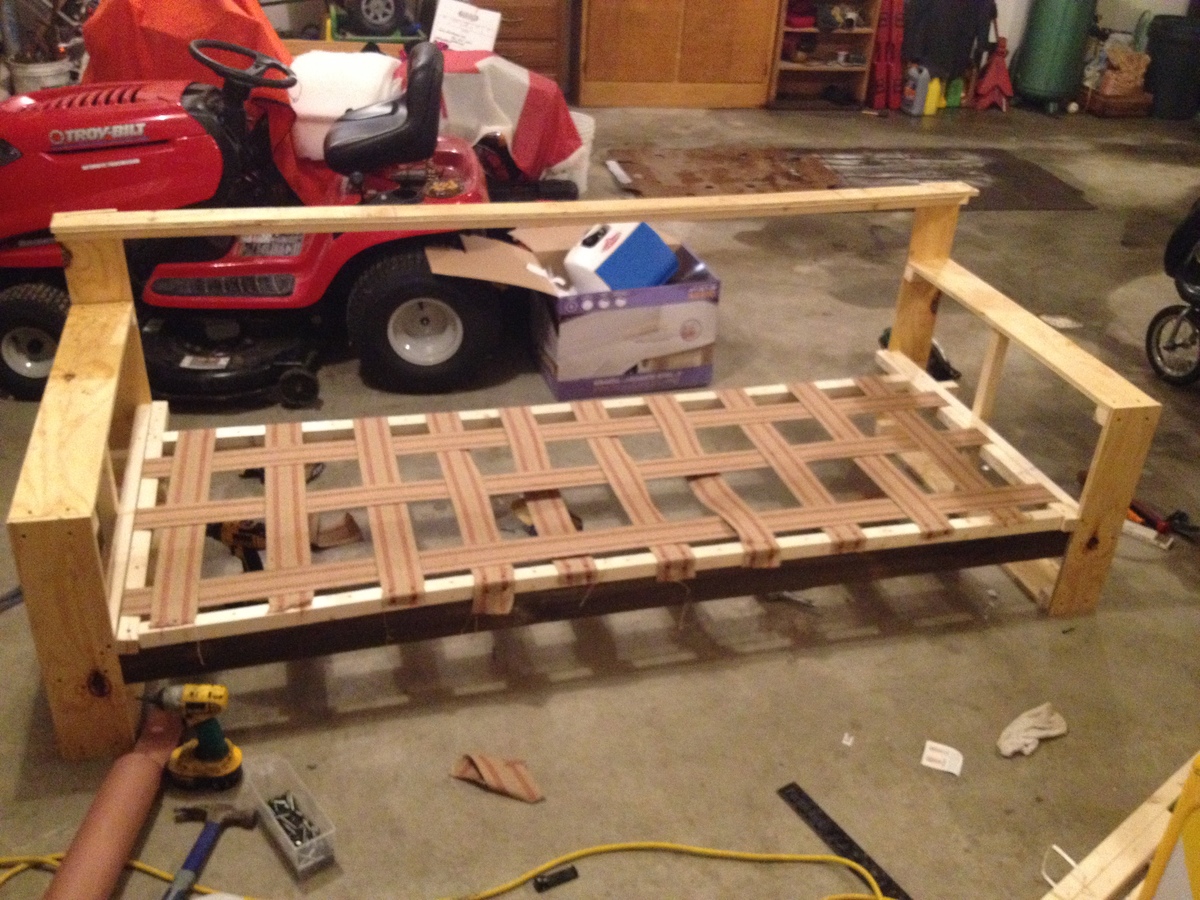
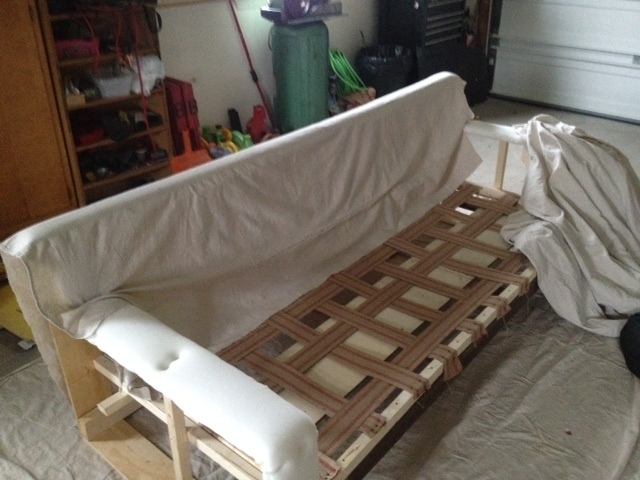
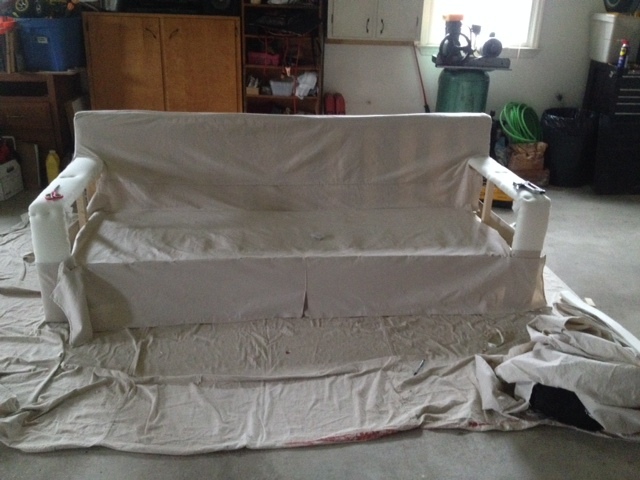
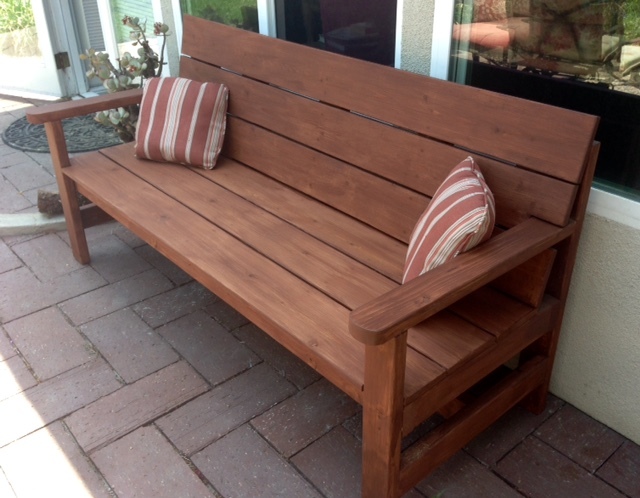
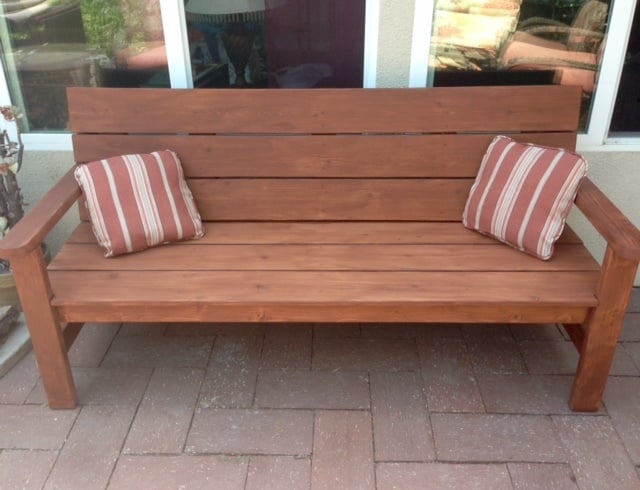
Sofa
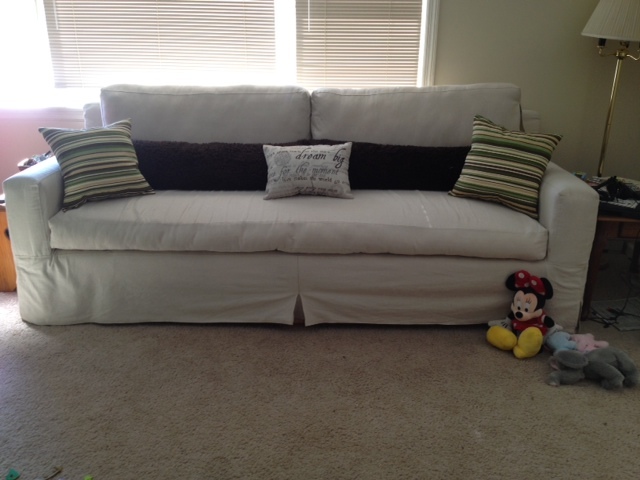
After looking at sofas in magazines and fliers, I decided I wanted to build one. For the quality (or lack of) at the price we could even dream of, it just didn't make sense to purchase one if I could build it. There are still a few little adjustments I may make as time goes on, but overall, I'm happy with the way it turned out! The pillows I made definitely added the finishing touch it needed!
It's a full 8 foot sofa designed with plenty of space underneath for storage! My plan was to build two wooden boxes on casters for the kids to use as toy boxes, but I think plastic totes will work just as well and much lighter and easier to clean! I drew up the dimensions and plans to fit what we wanted and went from there. The frame was the easiest part; took about a day. The cover and cushions on the other hand were quite a challenge. The sewing involved in this project was HUGE; took a little more than a week just for that. The pillows took an evening.
Thanks for checking out the project! Whatever you have in your heart, you can do!
Estimated Time Investment
Week Long Project (20 Hours or More)
Finish Used
I started using Canvas Drop-cloth for my upholstery projects after seeing a project that Ana did. That's what I used for this project; costing about $.54/yard instead of $7/yard (on sale) from a fabric store. I used about 90 yards of fabric total.
Recommended Skill Level
Advanced
Comments

Mon, 04/28/2014 - 09:07
I'm impressed!
I've sewn canvas drop cloth covers for an already made sofa, and you are absolutely right. It takes forever and it takes a TON of fabric! I am very impressed you built the sofa frame. How comfortable is it? What was your total cost including the foam, fabric, wood, everything?
Tue, 04/29/2014 - 12:44
RE: I'm impressed
My total cost was about $400. I think it's pretty comfortable, though I do need to adjust the seat cushion a bit. It's stuffed harder on one end than the other. As for the foam, I used a memory foam mattress topper (4 inch) from Walmart (about $150) and then used poly-fil to give it some shape and extra cushion. If you've ever shopped for foam, you'll know the high-density stuff is RIDICULOUS! Hope that helps!
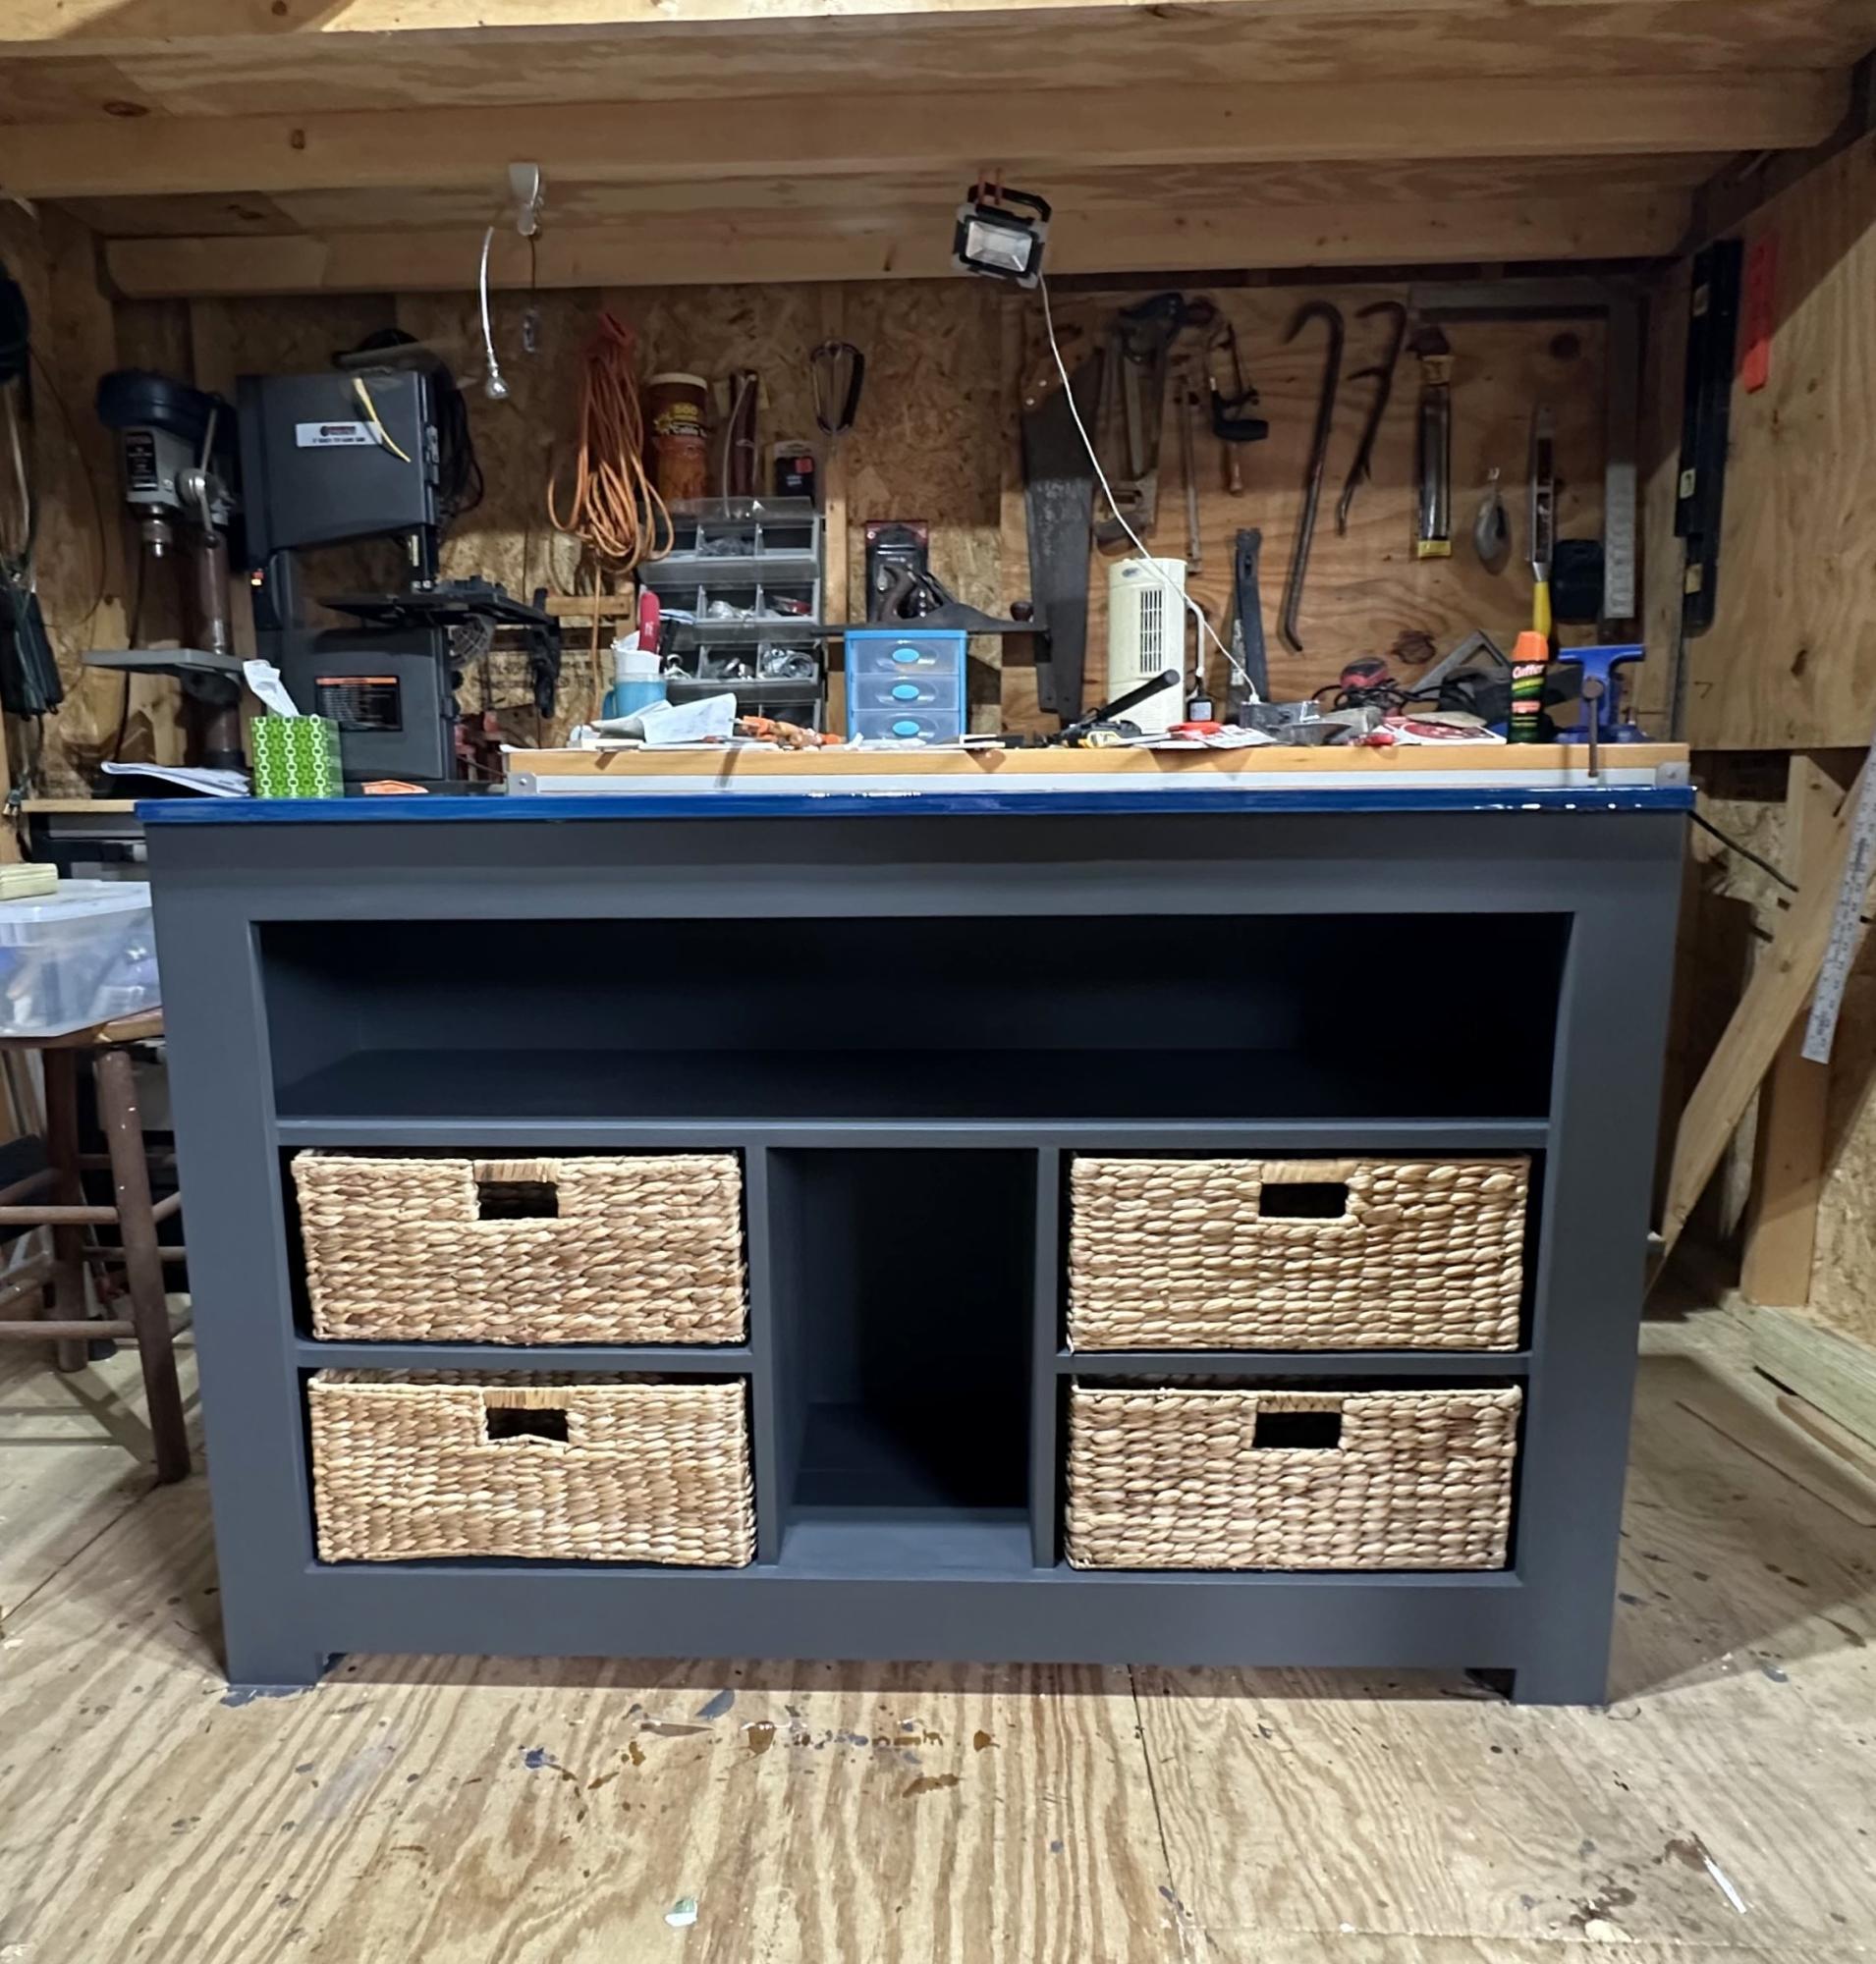
Living room media tower
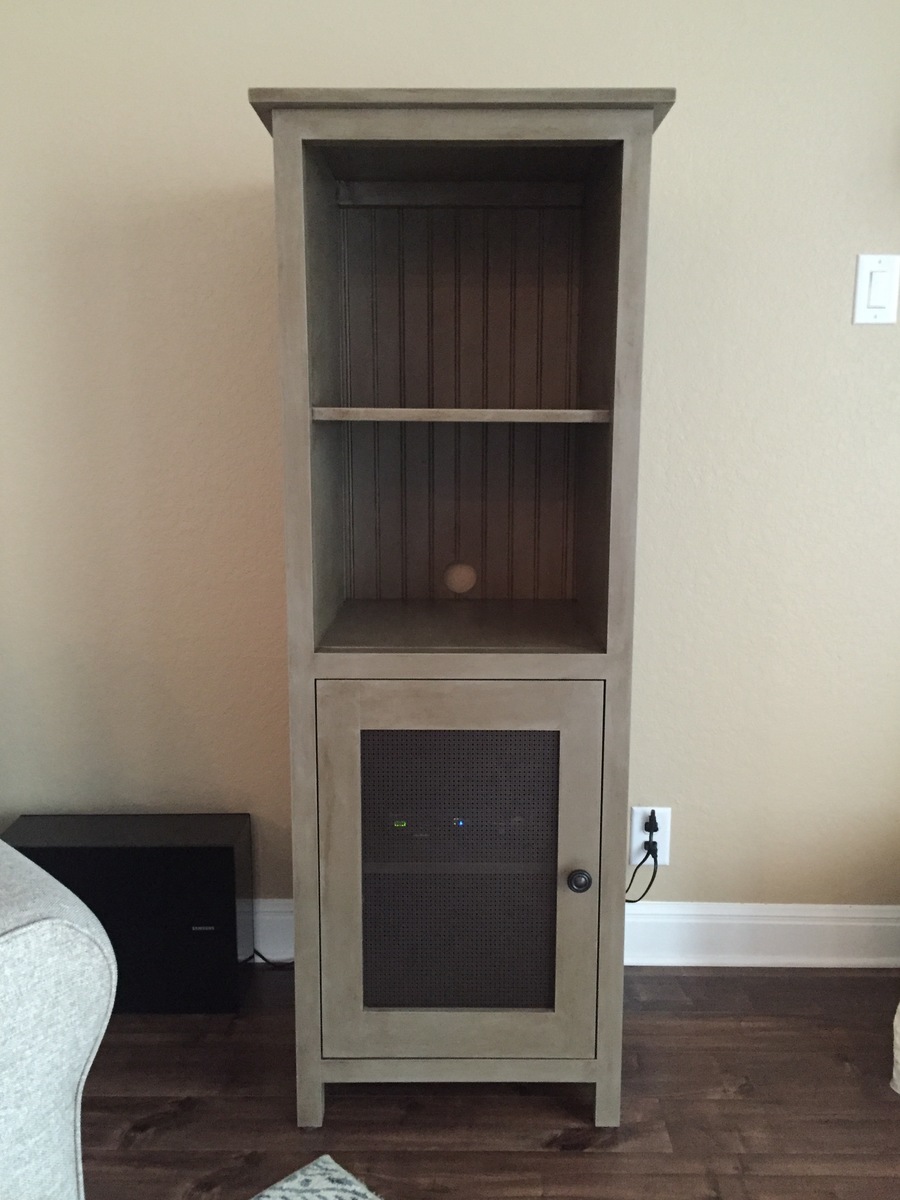
Built this media tower based off the plans inspired by the Pottery Barn Benchwright Towers. I used Annie Sloan's French Linen chalk paint followed by a clear then dark wax. The door panel was made using a decrotive bronze aluminum sheet cut to size. It makes a nice addition to my living room.
Built from Plan(s)
Estimated Time Investment
Weekend Project (10-20 Hours)
Finish Used
Annie Sloan chalk paint and wax.
Recommended Skill Level
Intermediate
Perfect Mudroom Addition
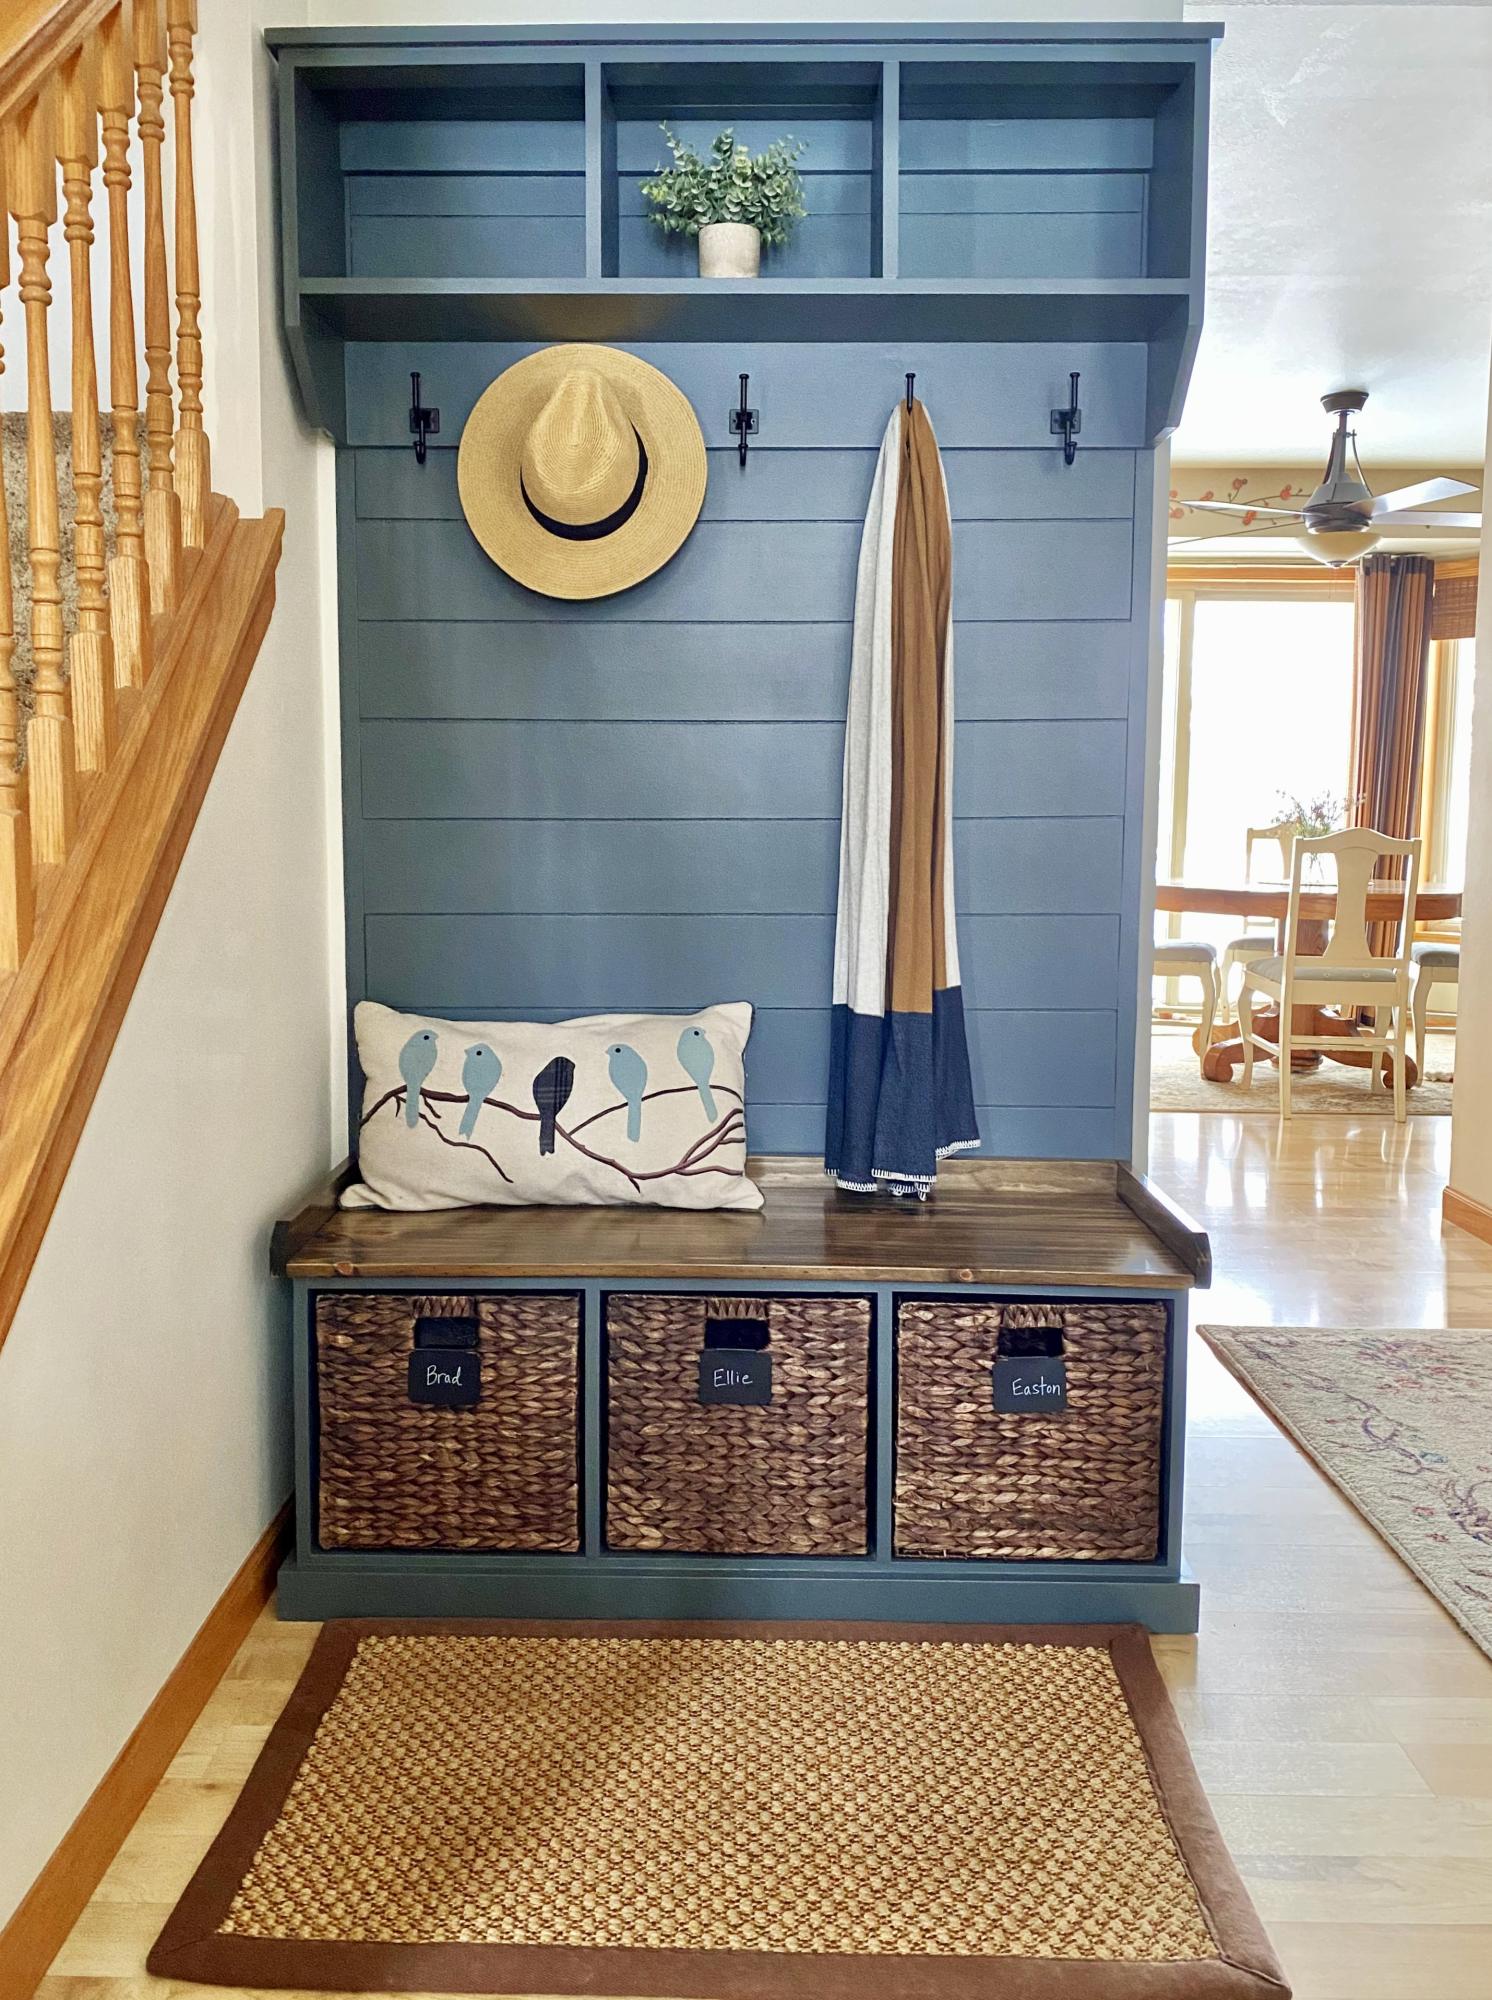
I used plans for the Essential Entryway Bench and Shelf with Hooks, tying them together with a shiplap panel. This was my first big project using a Kreg jig and Rip-Cut. Many more to come!
Built from Plan(s)
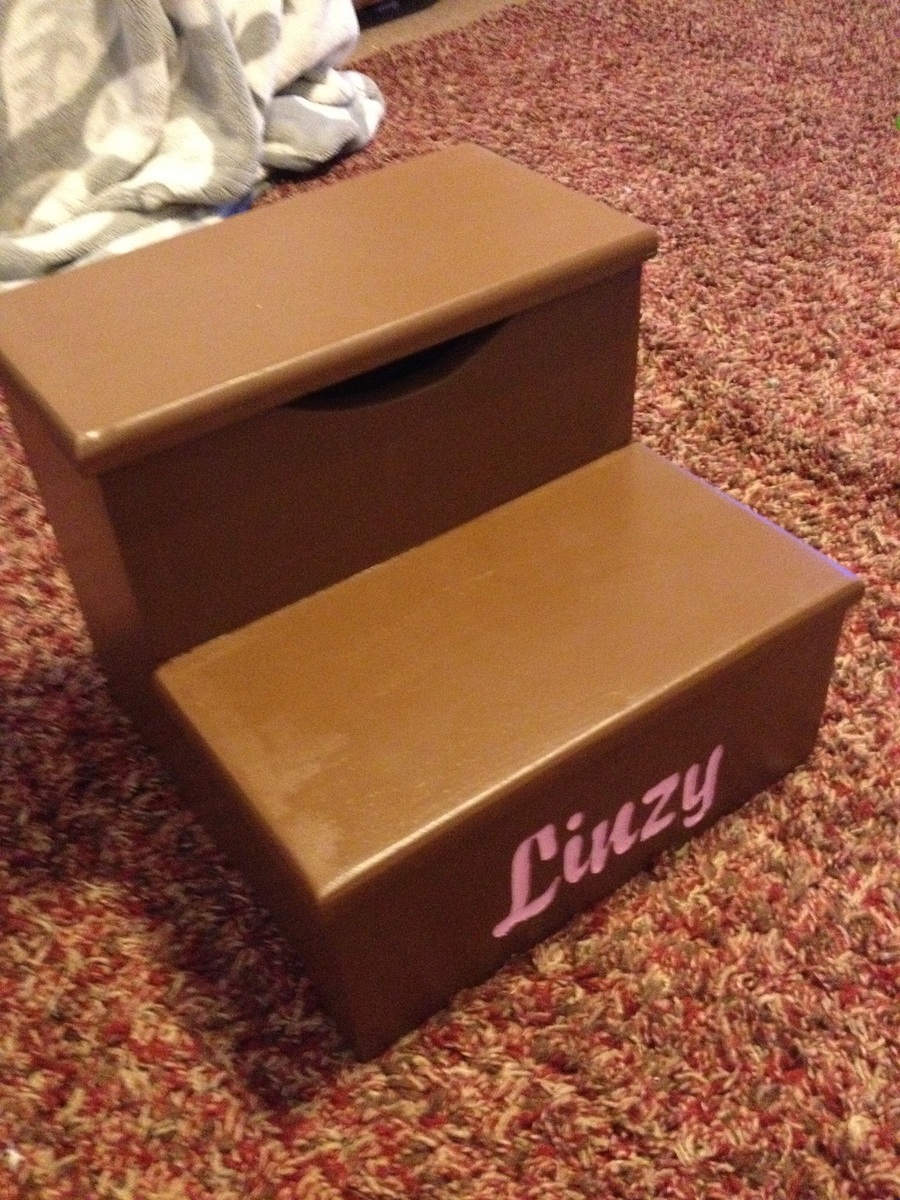
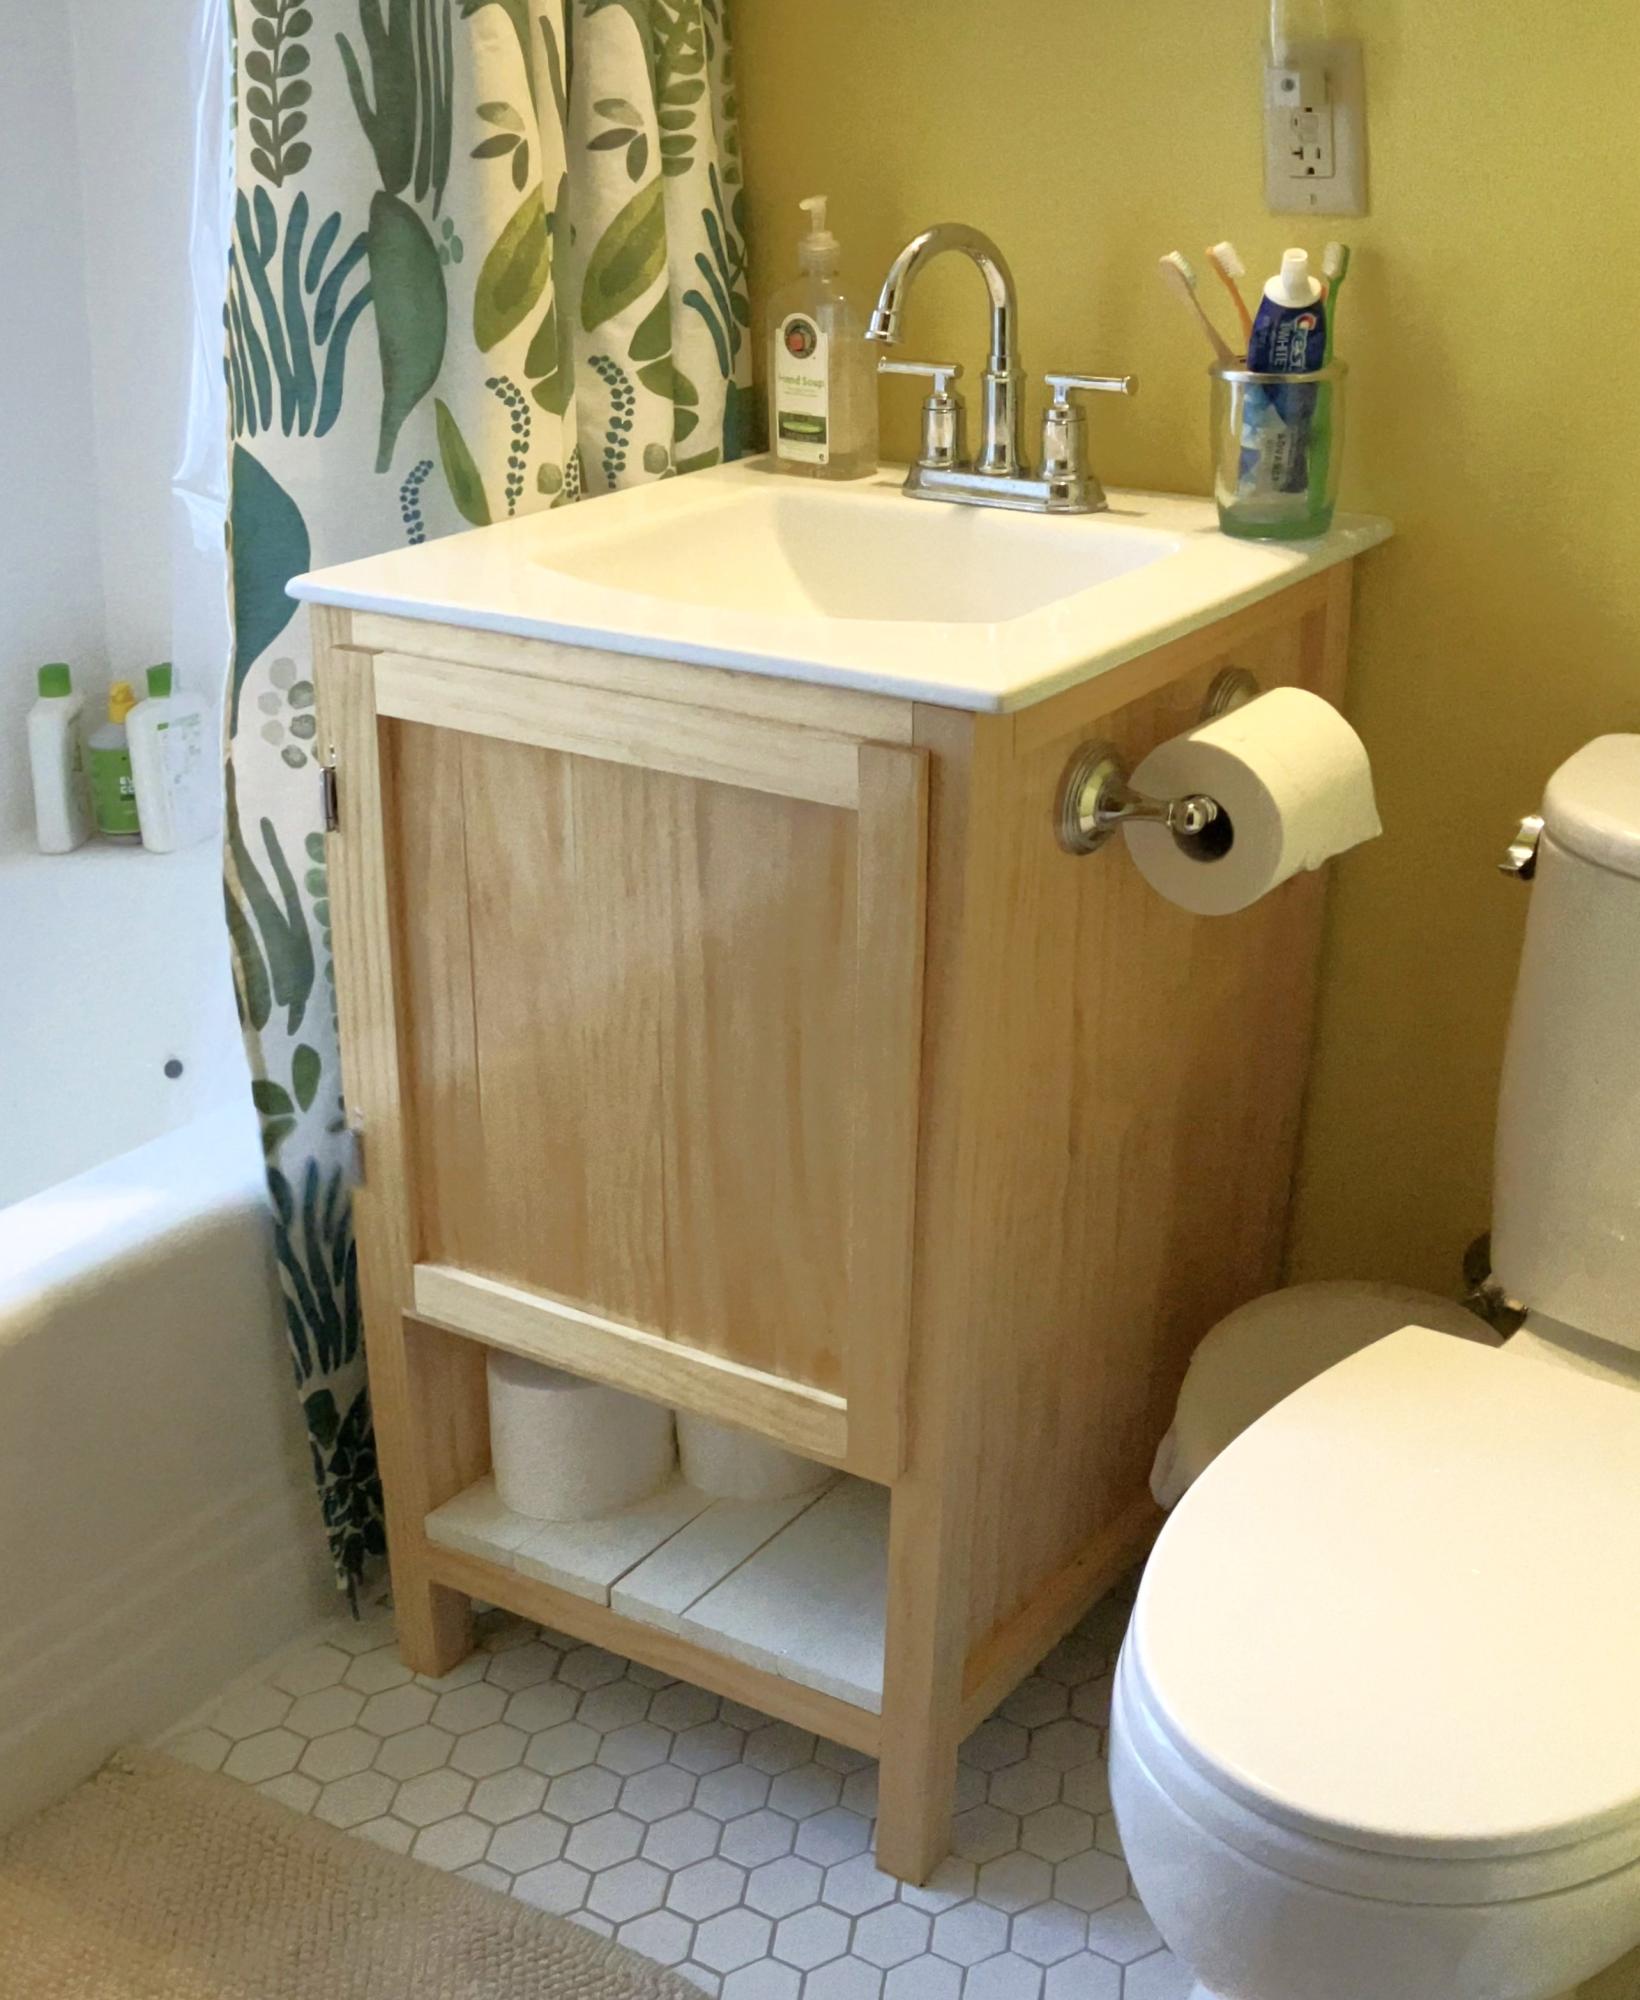
Kids Bathroom Step Stool
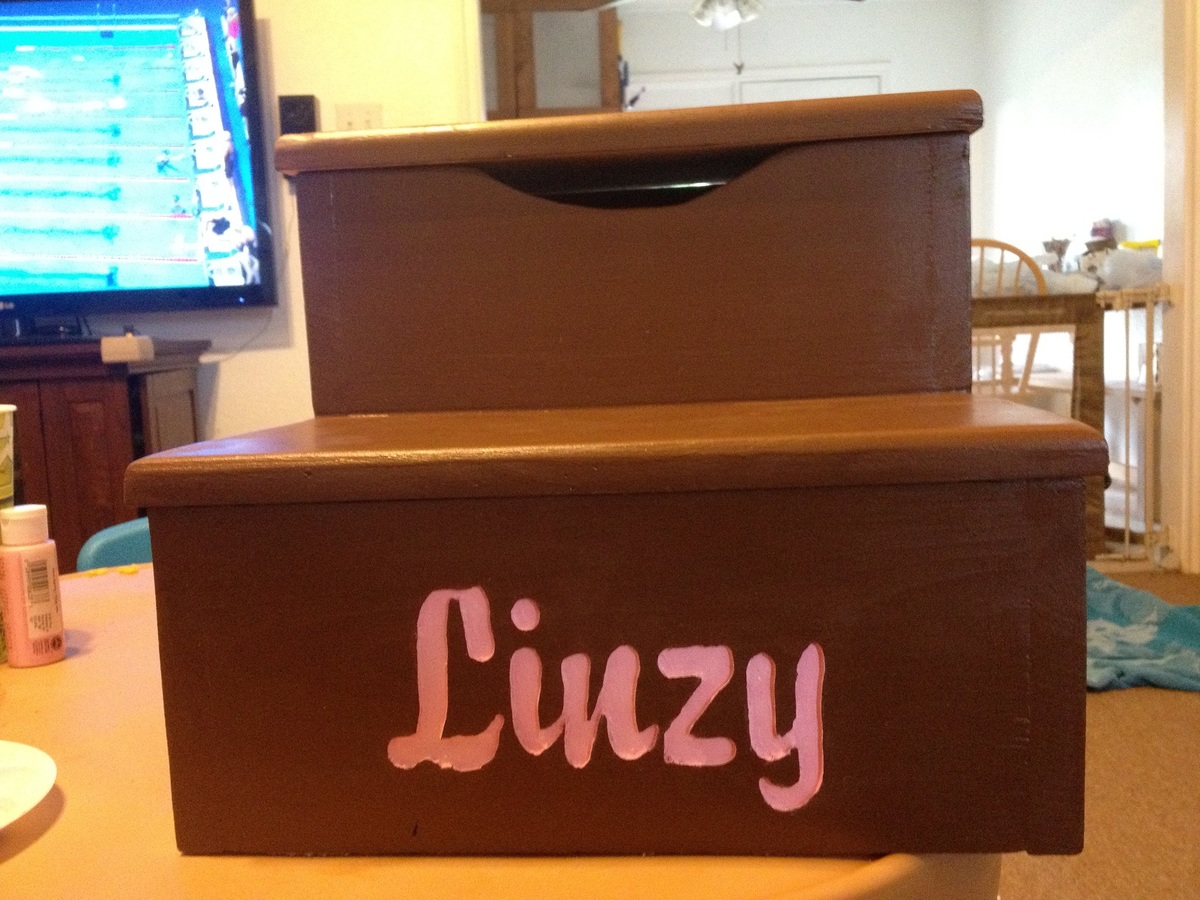
I built the entire project to plan.. I did however engrave my daughters name instead of painting it on.. I think it gives a little more personal touch..
Built from Plan(s)
Estimated Cost
$40
Estimated Time Investment
Day Project (6-9 Hours)
Finish Used
Double Chocolate paint (left over from previous project)
Pink Paint (on hand from wood burning projects)
Pink Paint (on hand from wood burning projects)
Recommended Skill Level
Beginner
Comments
Fri, 03/29/2013 - 16:18
Engravement
I was curious as to what tool/s you used to complete the engravement, this is a nice touch and I would like to do this for mine as well.
Fountain table
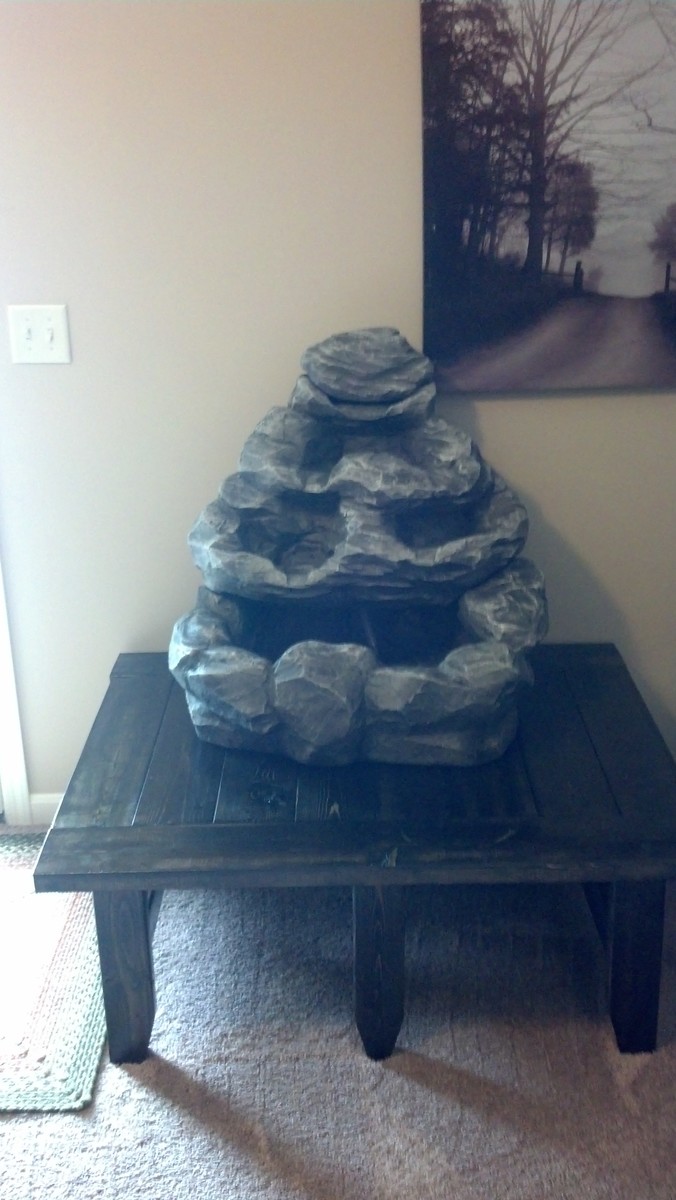
My wife got a large fountain for her birthday. She likes the sound of running water while she reads. What she doesn't like is damp carpet because the fountain splashes a little, as running water is wont to do. We had a choice of returning the fountain or me getting busy to build her a table for it.
The entire project is simply 2x4s and 2x6s. The top measures 44" x 36" and is made completely of pocket hole-joined 2x6s. The base is all made of 2x4s and is 16" high (plus top). I went for a little different look on the legs with a 15 degree cut, to a height of 4".
We both liked the look the Corona square table (the top especially)...BUT! She likes to be able to vacuum under furniture without having to move it or get Down on hands and knees with the wand attachment. So...recessed cross-brace to the rescue! I rigged up the miter saw to cut 1 1/2" into my bottom braces (2x4s on edge front-to-back), the exact depth of my cross piece (a 2x4 laid flat), and made repeated cuts, then leveled with a chisel.
I made sure to adequately brace the top, since the fountain, plus rocks, plus water comes in at well over 100 pounds. The pictures aren't all that great, but what can you expect when some are taken in an unfinished basement with no windows, on a cell phone...right?
You could probably replicate this for less than the $150 I spent, but I needed the wood, new stain, urethane, and new brushes.
Built from Plan(s)
Estimated Cost
$150
Estimated Time Investment
Week Long Project (20 Hours or More)
Finish Used
1 coat Minwax Oil-based Ebony stain, applied with a foam brush then wiped off after ~15 minutes
3 coats Minwax spar urethane, lightly sanded between coats for water resistance
3 coats Minwax spar urethane, lightly sanded between coats for water resistance
Recommended Skill Level
Intermediate
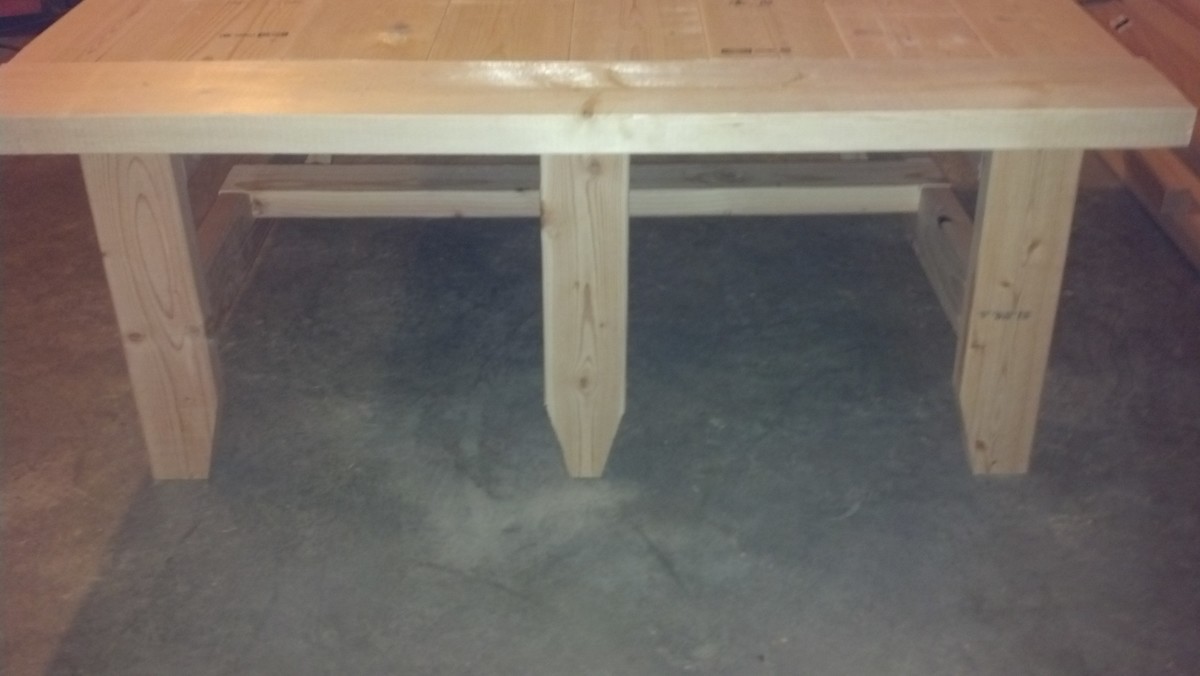
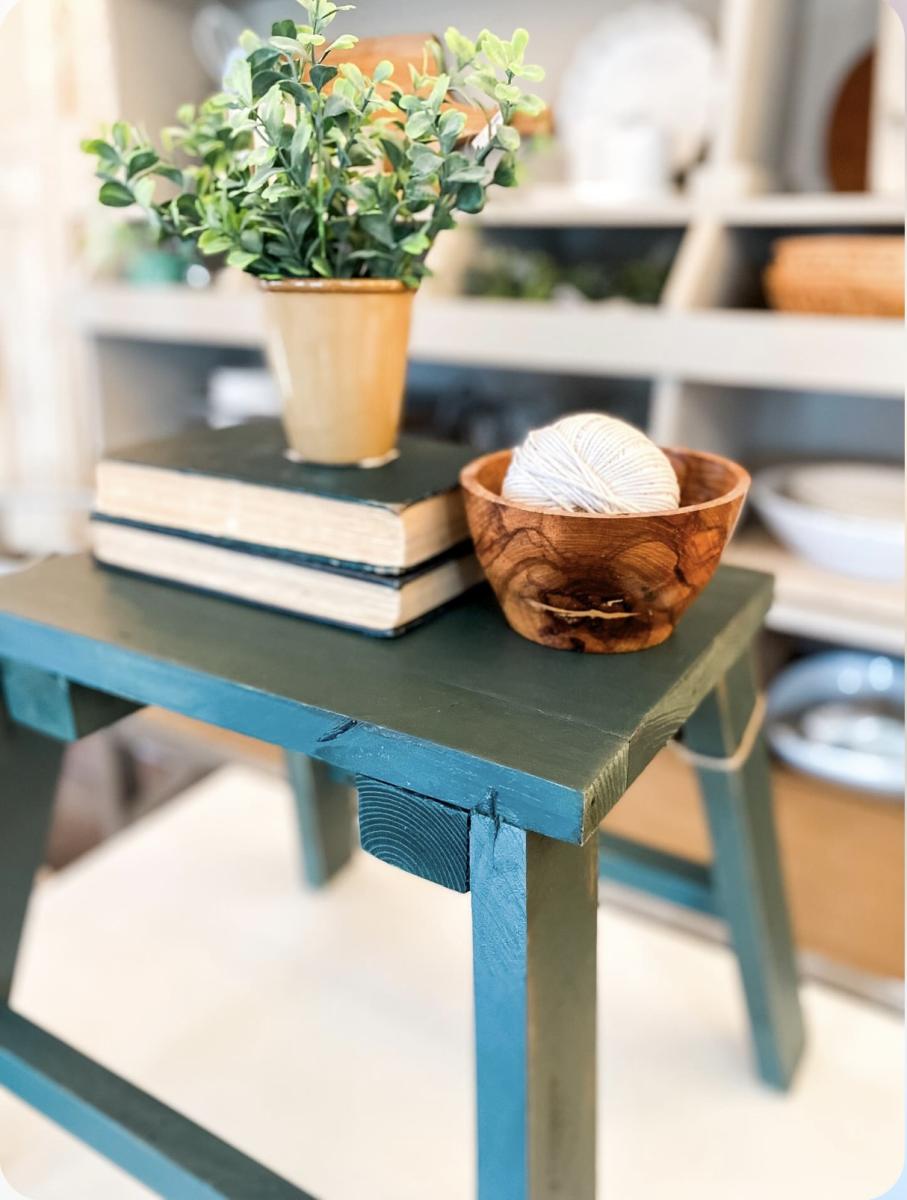
Farm/Trestle Coffee Table
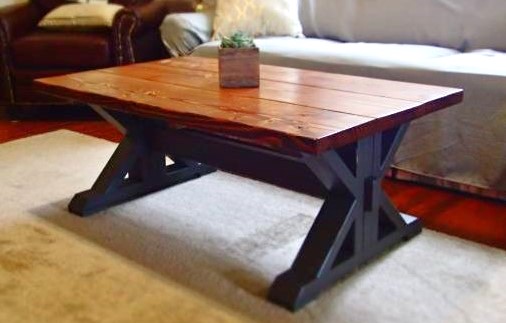
Trestle coffee table
Built from Plan(s)
Estimated Time Investment
Day Project (6-9 Hours)
Recommended Skill Level
Beginner
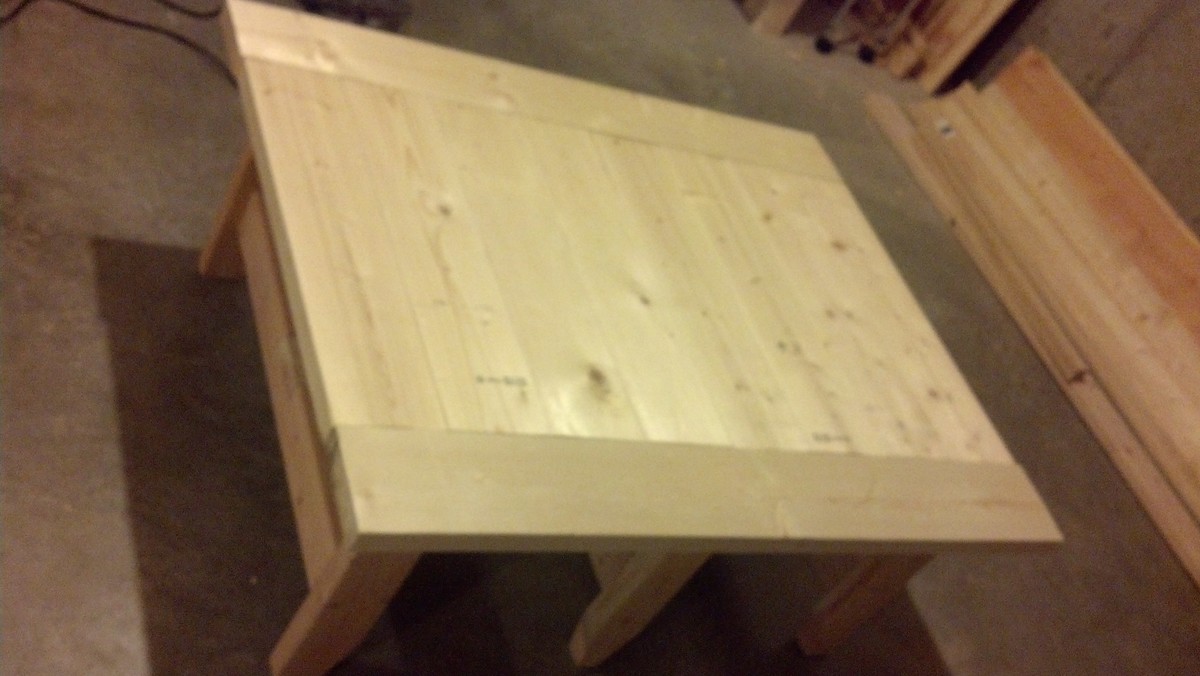
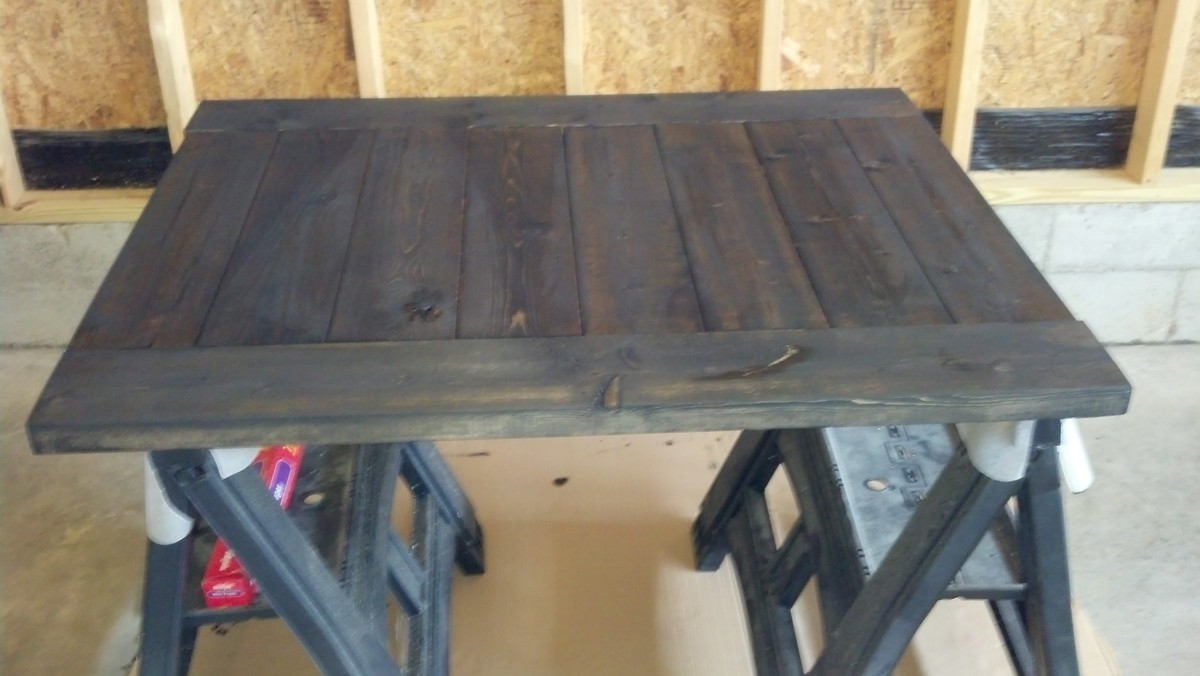
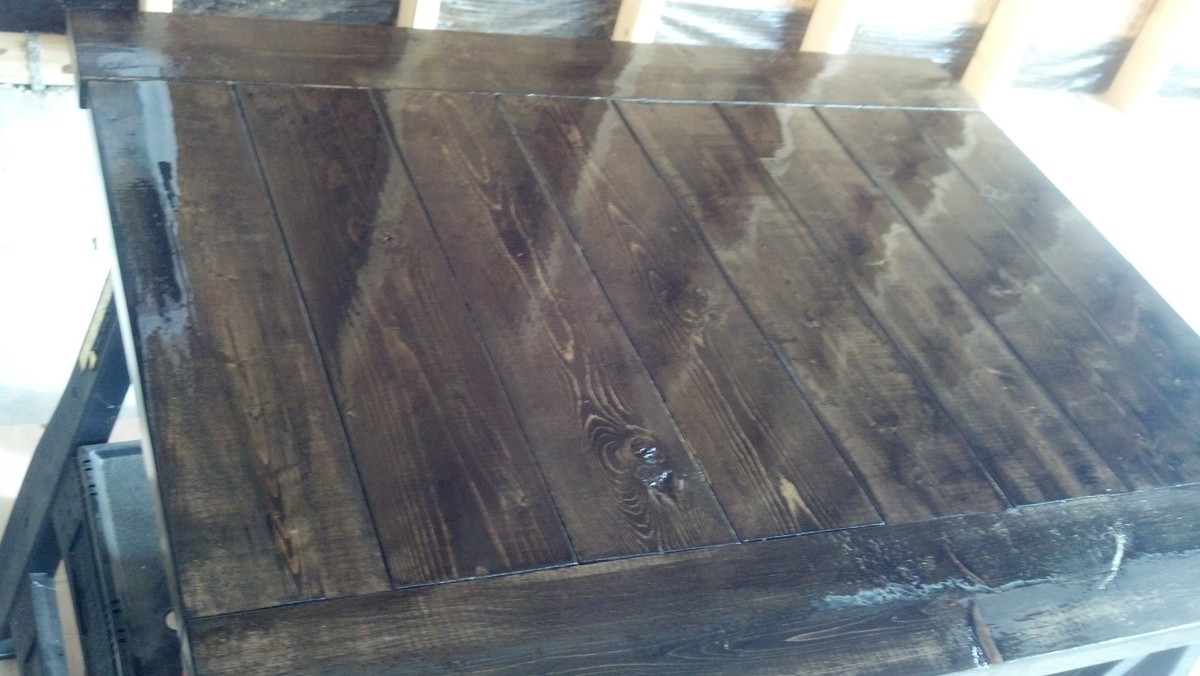
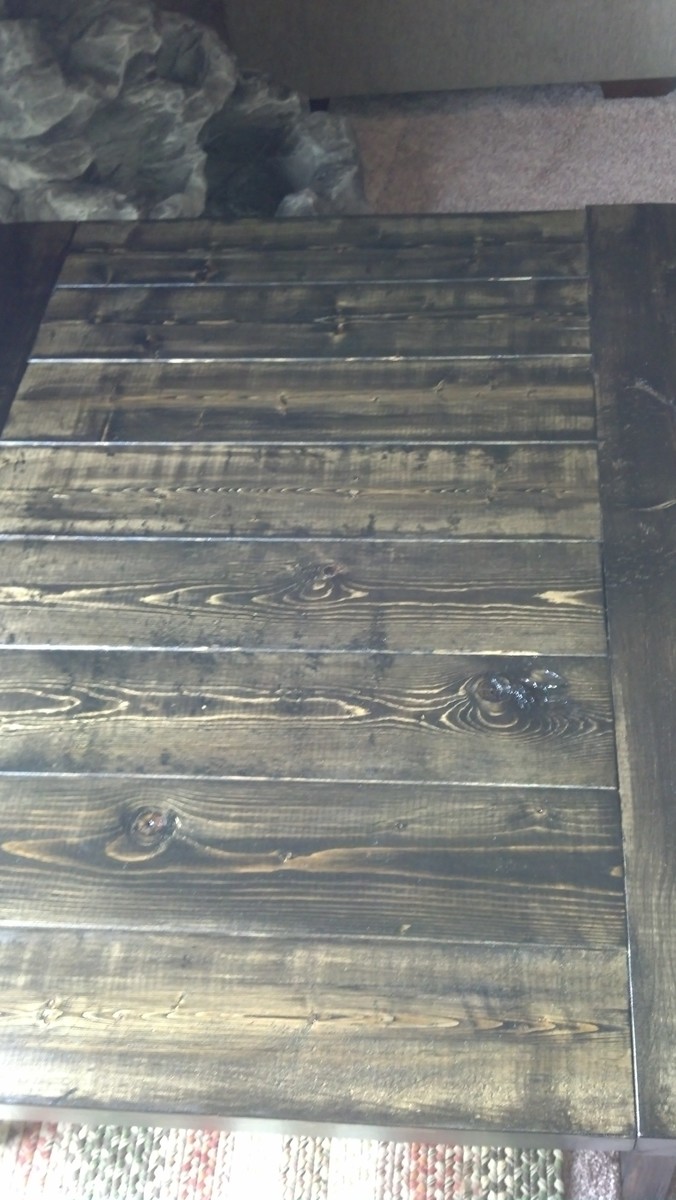
Farm House Coffee Table

Great plan. I could not get the X right (terrible carpenter). A neighbor suggested I trim where they join for a flush fit. One turned out great, the other I cut a little too much. This was for my Daughter, she liked the natural color, I finished with Tung Oil so it took a while for the finish to dry completely.
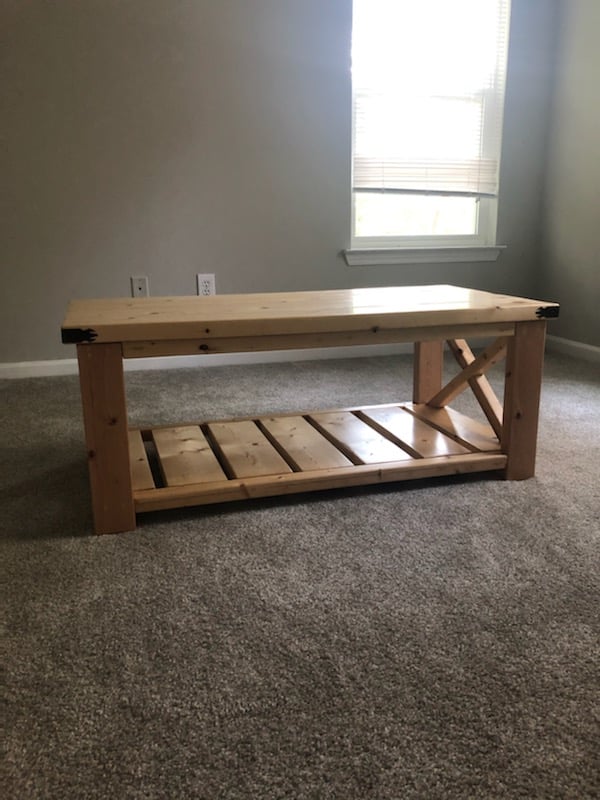
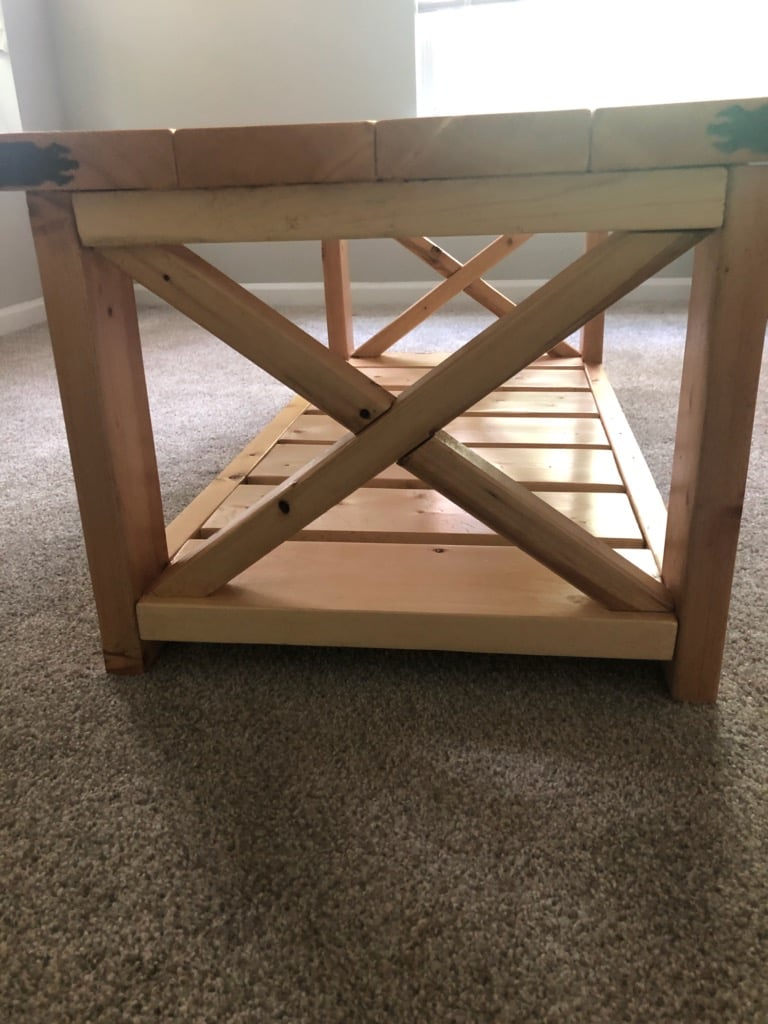
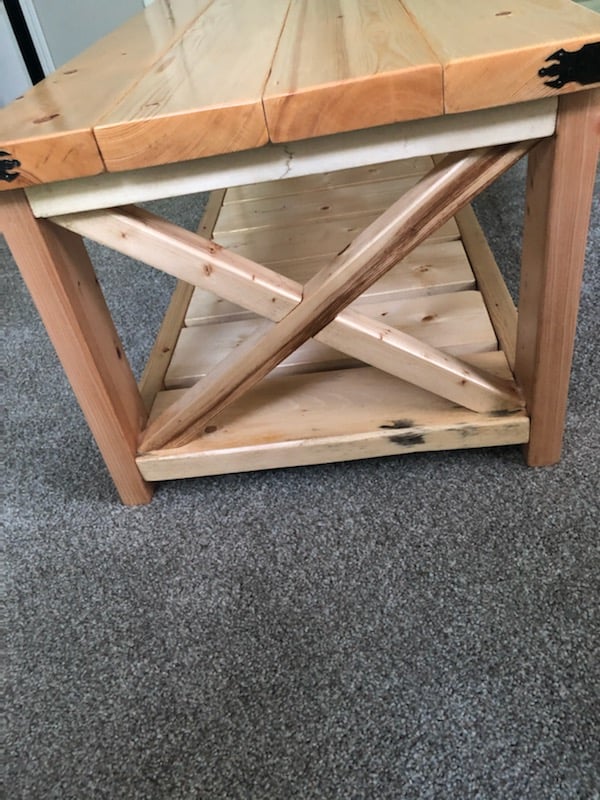
Built from Plan(s)
Estimated Cost
$60
Estimated Time Investment
Day Project (6-9 Hours)
Finish Used
Tung Oil
Recommended Skill Level
Beginner
Comments

Spring Tiered Planter
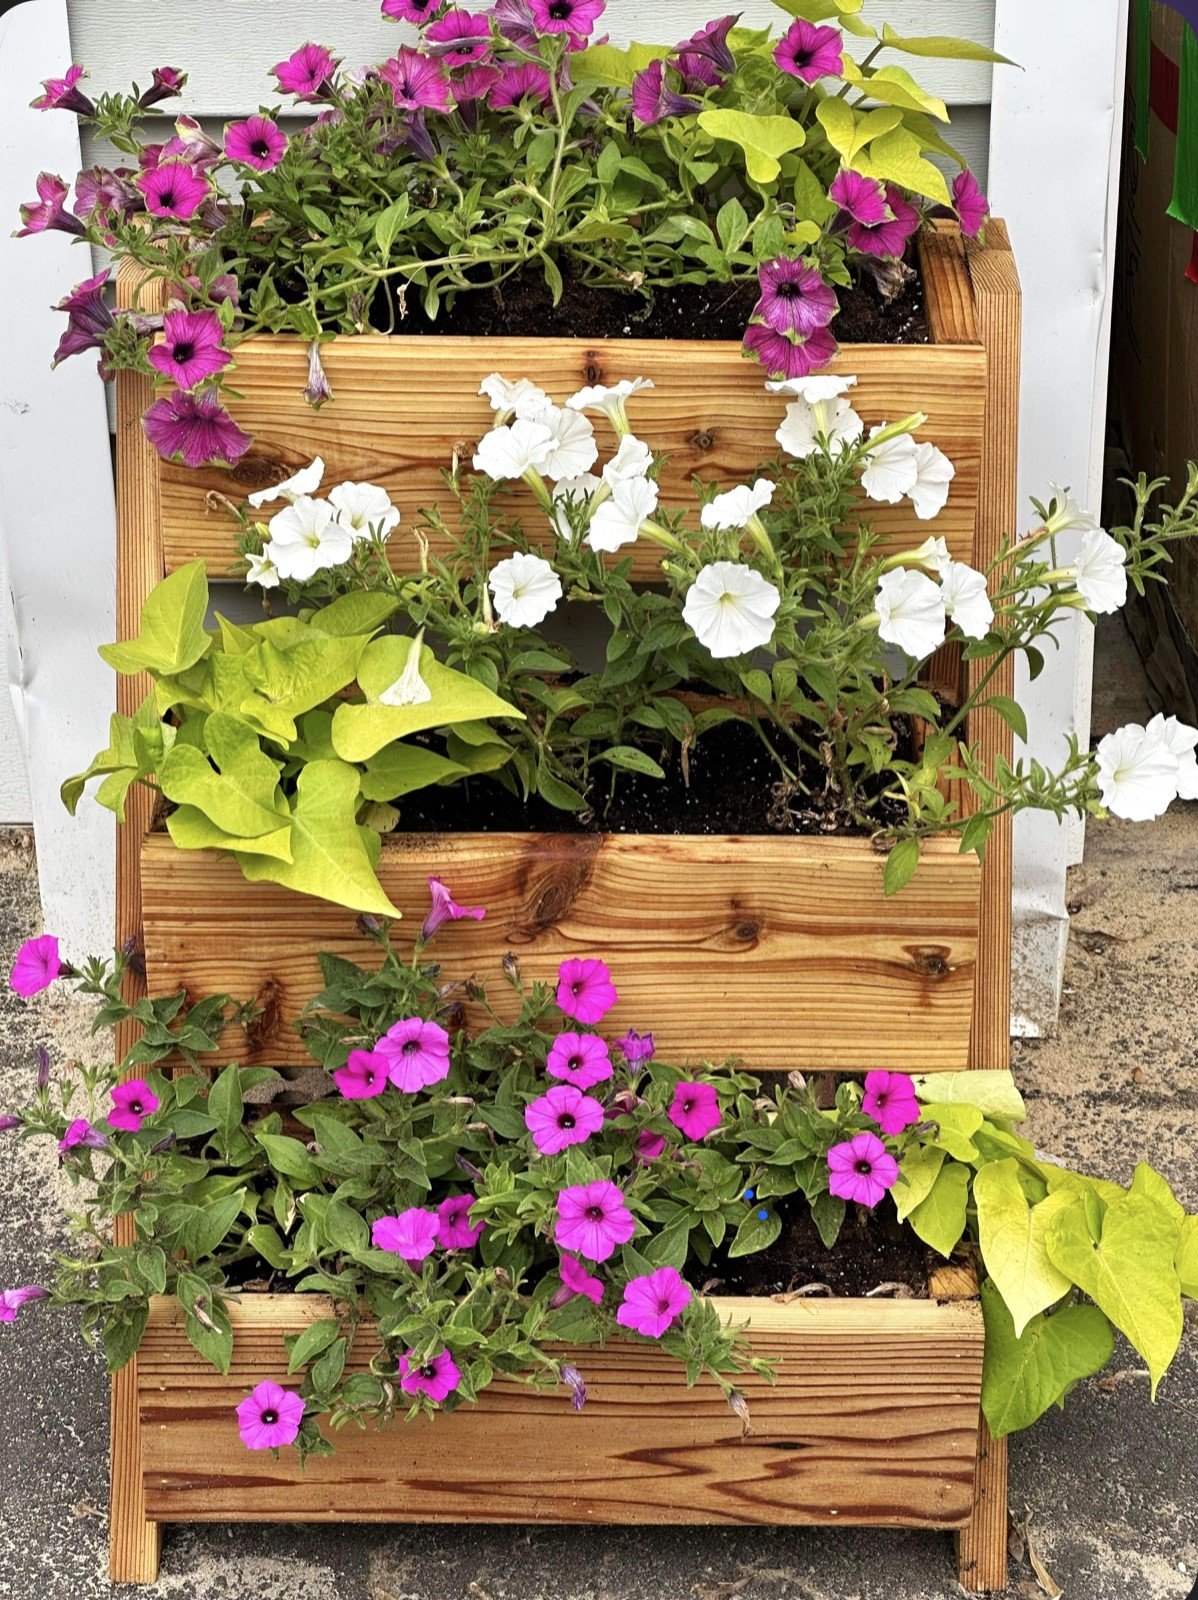
Tiered Cedar Planter
Built from Plan(s)
Apothecary Console Table
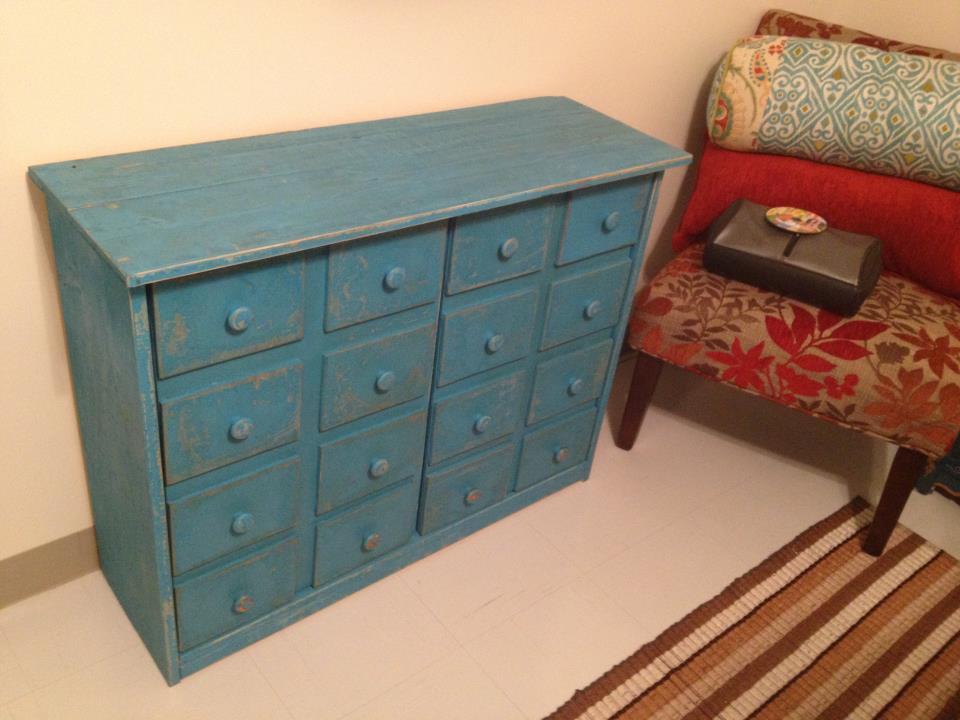
I live in Japan right now and my wife and daughters went to the states to visit family for 3 weeks. I decided to make a few projects. I went to my local home improvement store (HOMES), which is a combo of Lowes, Walmart, a pet store, and a furniture store rolled into one crazy store. I purchased the wood for about 11000 yen, paint for 1080 yen, hinges 800 yen, and door knobs for 2880 yen. Grand total of basically $200. I found that it is not cheap to buy supplies over here. I modified the plan and made 16 "drawers" instead of 20 due to the height of the space where I am putting the table. I used the plan for finishing with the distressed coffee stain. I really like it in our room.
Estimated Cost
$200
Estimated Time Investment
Afternoon Project (3-6 Hours)
Finish Used
Hapio water based all weather paint (teal), Starbucks French Roast Coffee, Clear spray lacquer.
Recommended Skill Level
Beginner
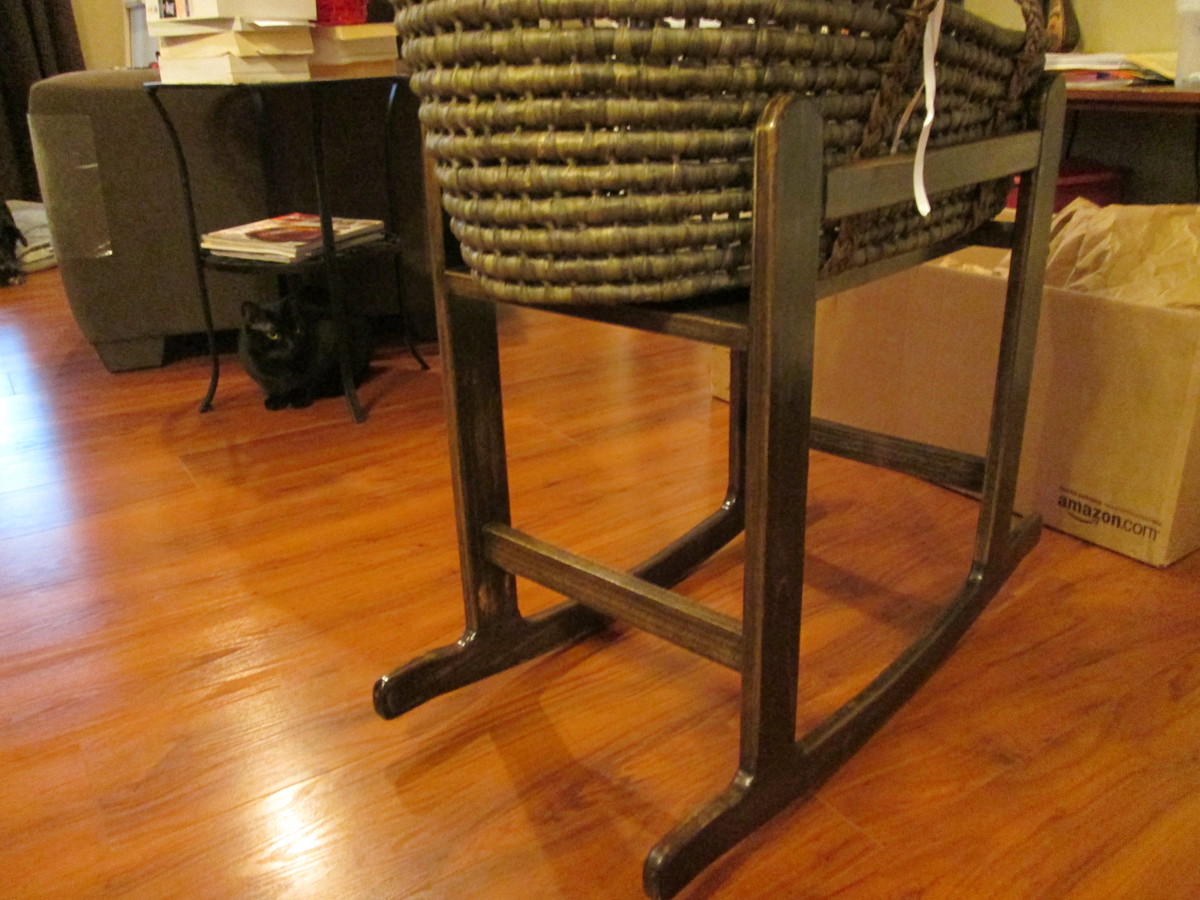
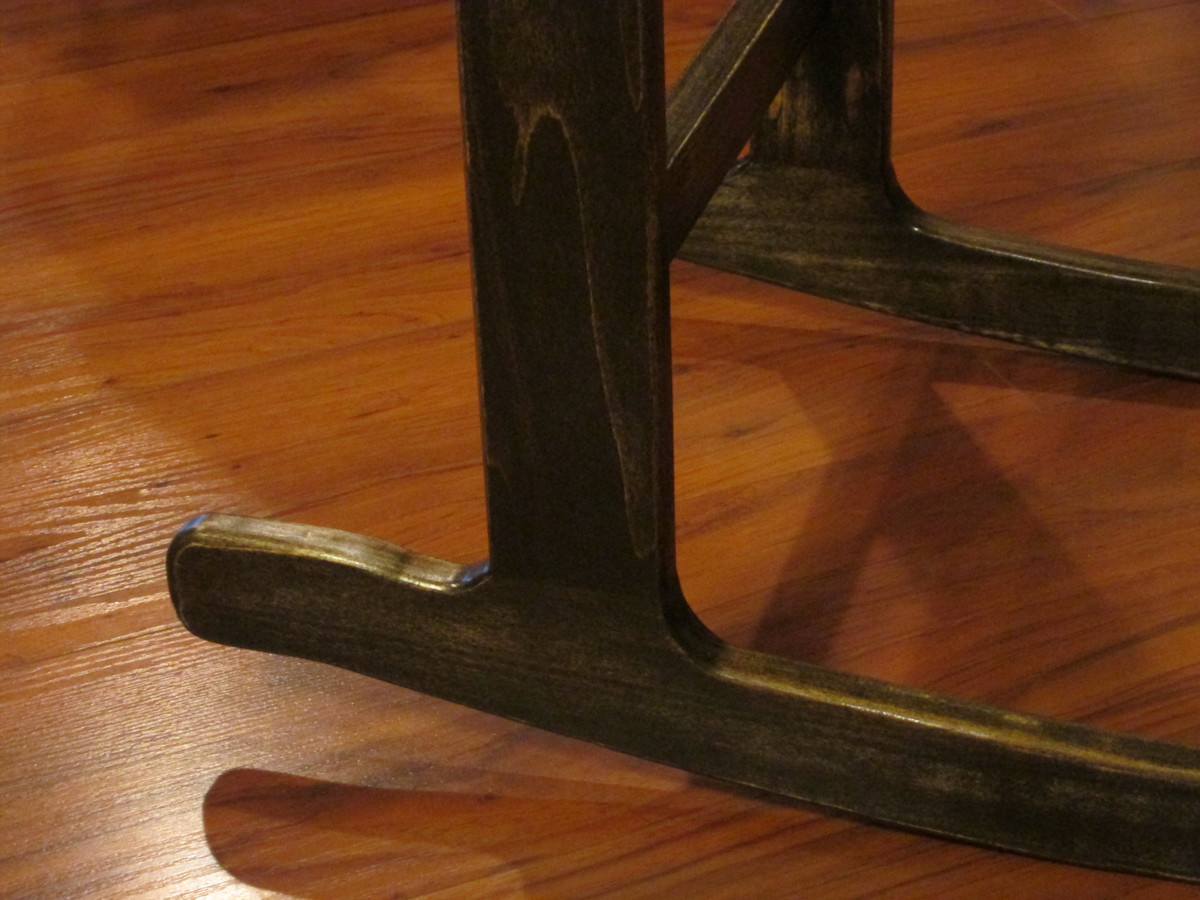
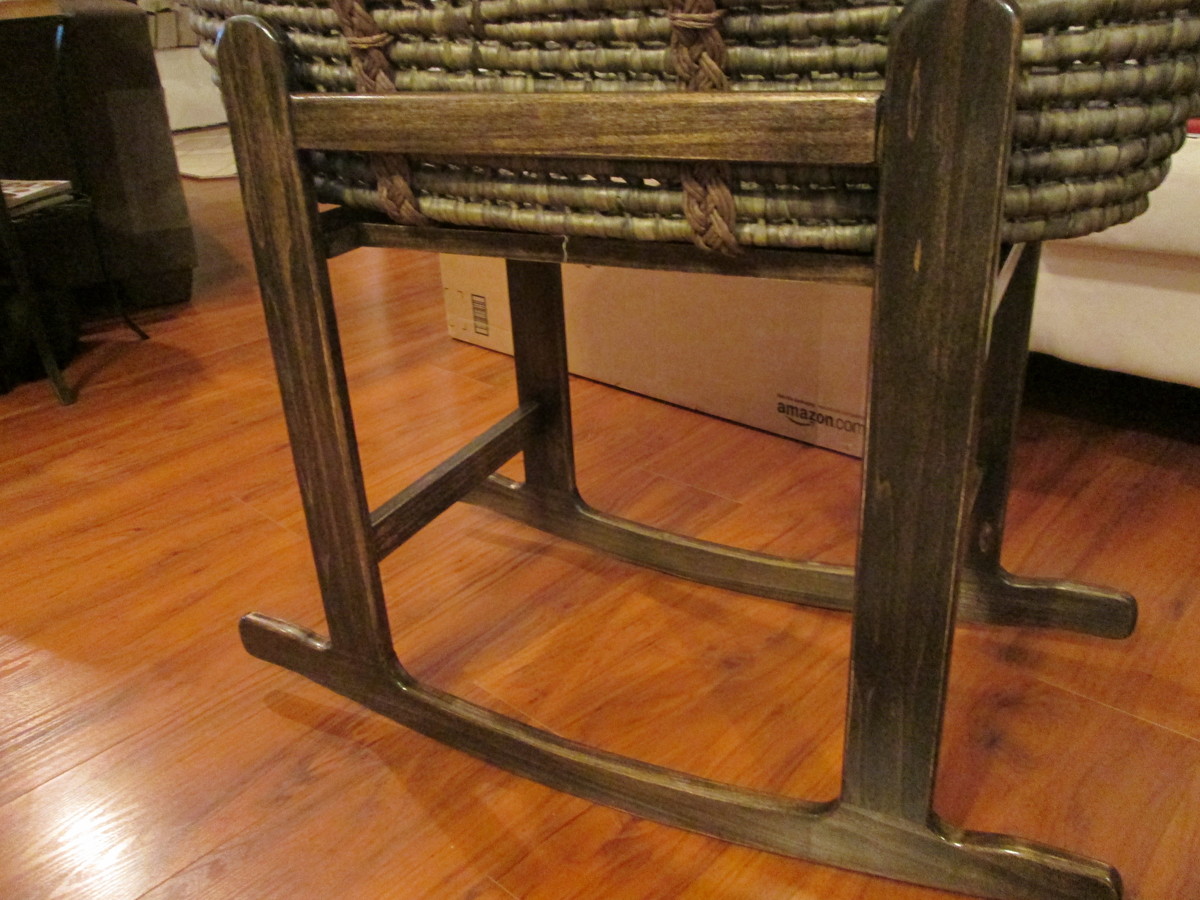
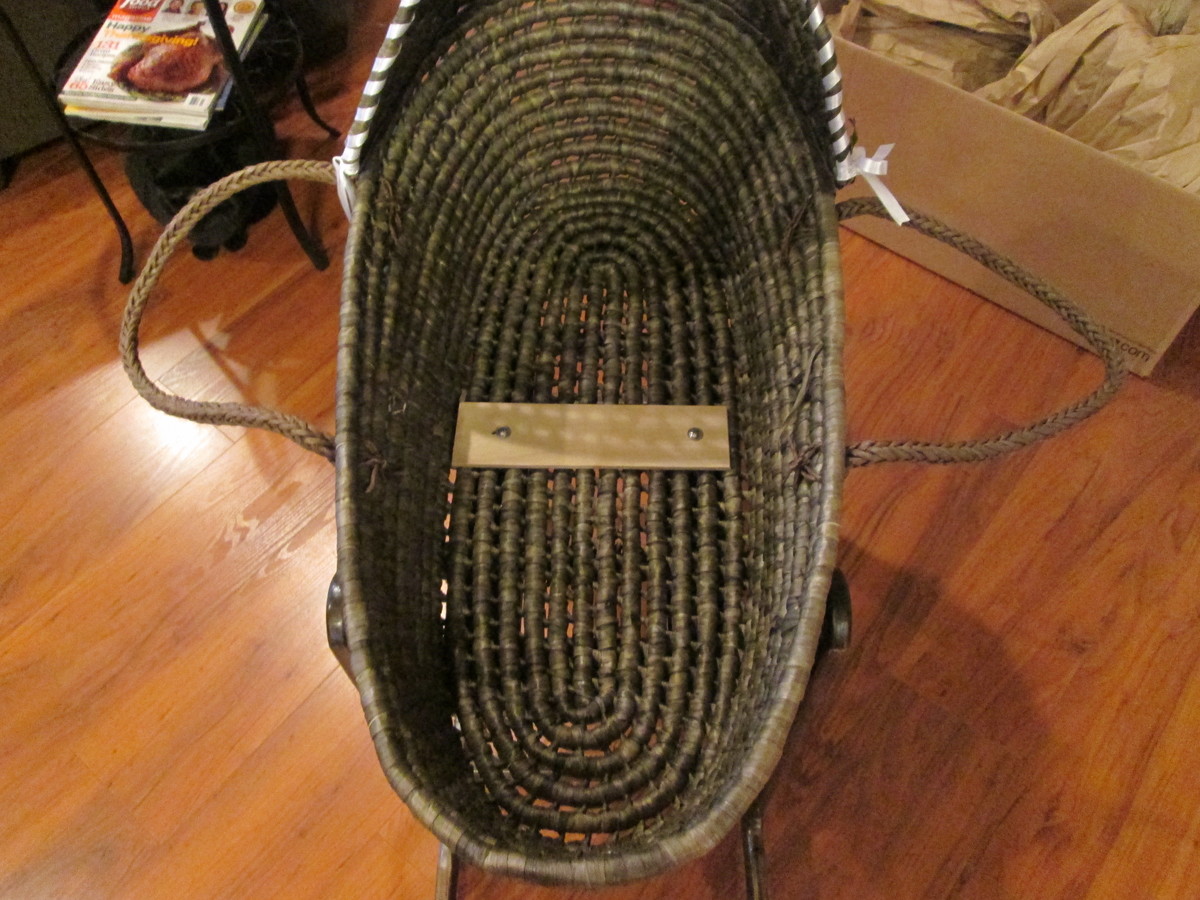
Rocking Moses Bassinet

Tools:
Miter Saw
Table Saw
Jig Saw (b/c my bandsaw is down)
Oscillating Spindle Sander
Orbital Sander
Router
1/8" roundover bit
1/4" roundover bit
Kreg Jig
Tape Measure
Tri Square
Materials:
S4S Poplar
Kreg Screws
Kreg Stain Grade wood plugs
3" panhead screws with matching washers and wingnuts to attach basket to rocker.
This is my third "Ana" project. I've built her baby changing table and the child tower thing for toddlers to stand at a counter.
I built two of these rocking stands for the Moses Bassinet (found on Amazon). The first was a prototype and joints at the rockers were just straight pieces of wood cut at the angle of the rocker. I built it out of pine from the big box store and used my Kreg jig for the pocket holes.
The second one (featured) I used S4S poplar which cost more but came pretty well uniform. I still had to find boards that were free of twist and bows, but that just took time and was easy to do. I use a "lay it on the floor" method and flip it to see if it rocks, twists, etc.. It works for now. I still find myself cutting around imperfections though. With this second rocker, I molded the sides into the rocker-bottoms./
I'm saving to buy a planer, which will be the last major tool for the wood shop (garage), so then I can mill my own lumber and be done with HD and L's.
Just some observations and steps I took:
To make the rockers and other parts of the project uniform that had curves which needed to be parallel to each other, etc., I used double-sided tape and put the pieces together when cutting and sanding. I recommend using the least amount of tape as possible. I learned the hard way and on the prototype rockers, I covered the entire surface of the pieces with the tape. It took an act of God to get the pieces to release after I had spent an hour or so cutting and sanding the edges. It nearly failed to come apart and I would've had to start over because it was the 3 major components that were taped together like this. On the second run with the featured rocker, I used a couple small pieces of double-sided tape. This held together through cutting and sanding without any issue.
I rounded some of the edges w/ a 1/8th or a 1/4" roundover bit on my router. On the pieces that weren't hit by the router, I just broke the edges with sandpaper, to keep hands from getting splinters, etc.
For finish I used Minwax wood conditioner, oil based stain and polyurethane. I first sanded the entire piece to 320 by hand. I applied the conditioner as instructed. It's a must on softer wood such as pine, poplar, whitewood, etc. Otherwise, you will have blotches. After that I applied one coat of stain. I applied a coat of poly with a foam brush. I didn't like the results. I sanded it down w/ 320. I then went and bought a "nice" brush for polyurethane at the big box store for like $8.00 and applied another coat. This one came out better. I sanded it with 400 grit and applied one final coat with a fine cotton cloth.
I followed the plans on here for the most part. They are complete and were easy to follow. Thanks Ana!
Built from Plan(s)
Estimated Cost
$50.00 not including basket
Estimated Time Investment
Weekend Project (10-20 Hours)
Finish Used
Minwax Wood Conditioner, Stain and Polyurethane
Recommended Skill Level
Intermediate
Kentwood Bed
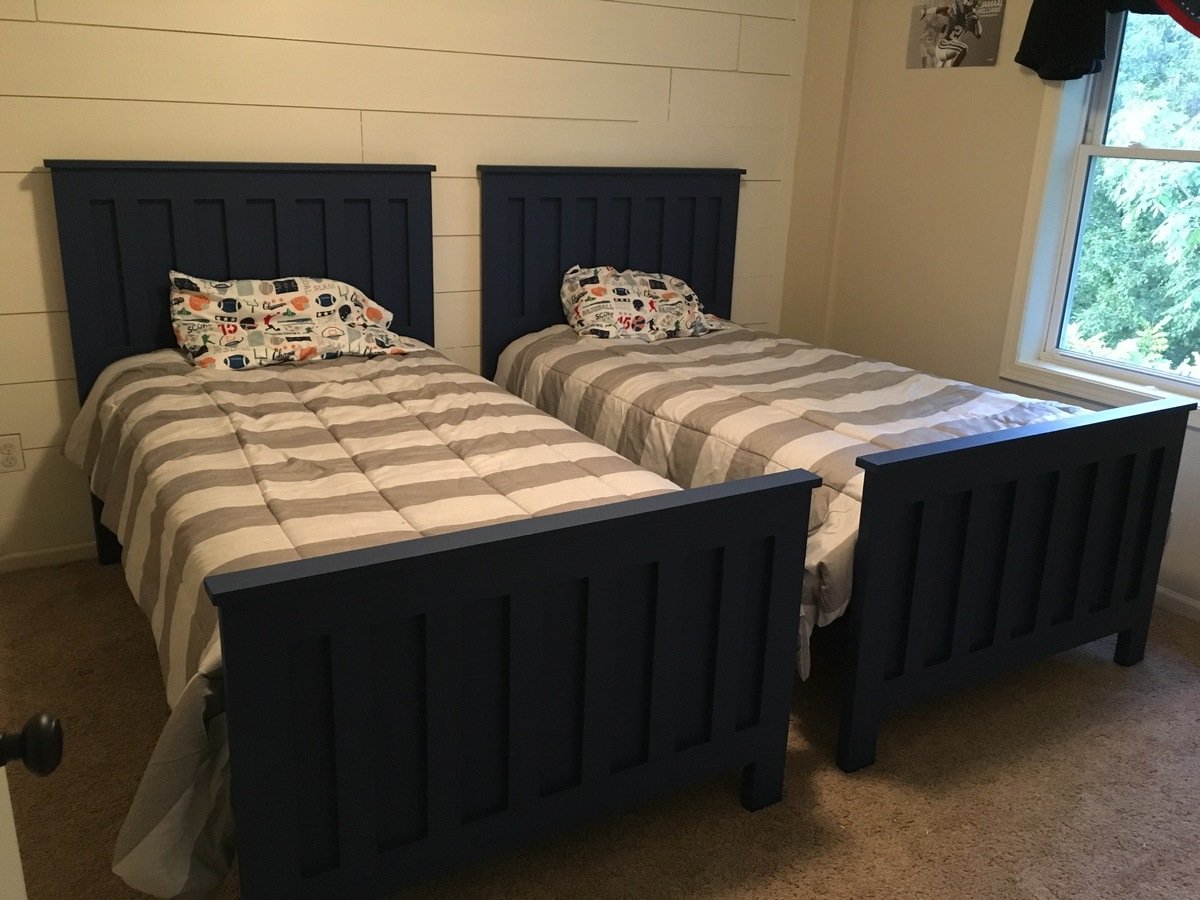
I made twin beds for my boys. It was the first time making furniture. It was a pretty easy plan to follow. Lowes did all my cuts for me so I didn't even need to find a saw.
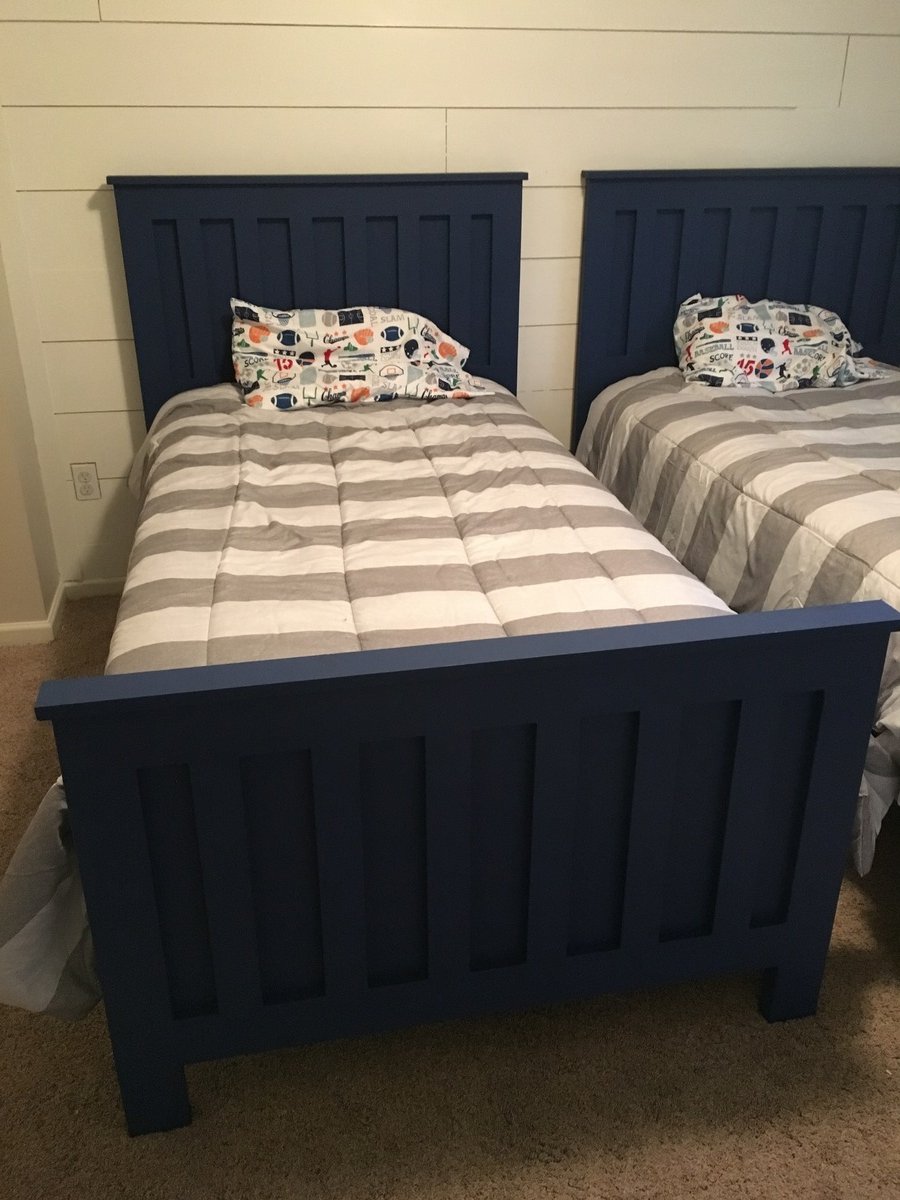
Built from Plan(s)
Estimated Cost
$170
Estimated Time Investment
Week Long Project (20 Hours or More)
Finish Used
Sherwin Williams Paint in Commodore
Recommended Skill Level
Beginner
Comments

Modified workbench
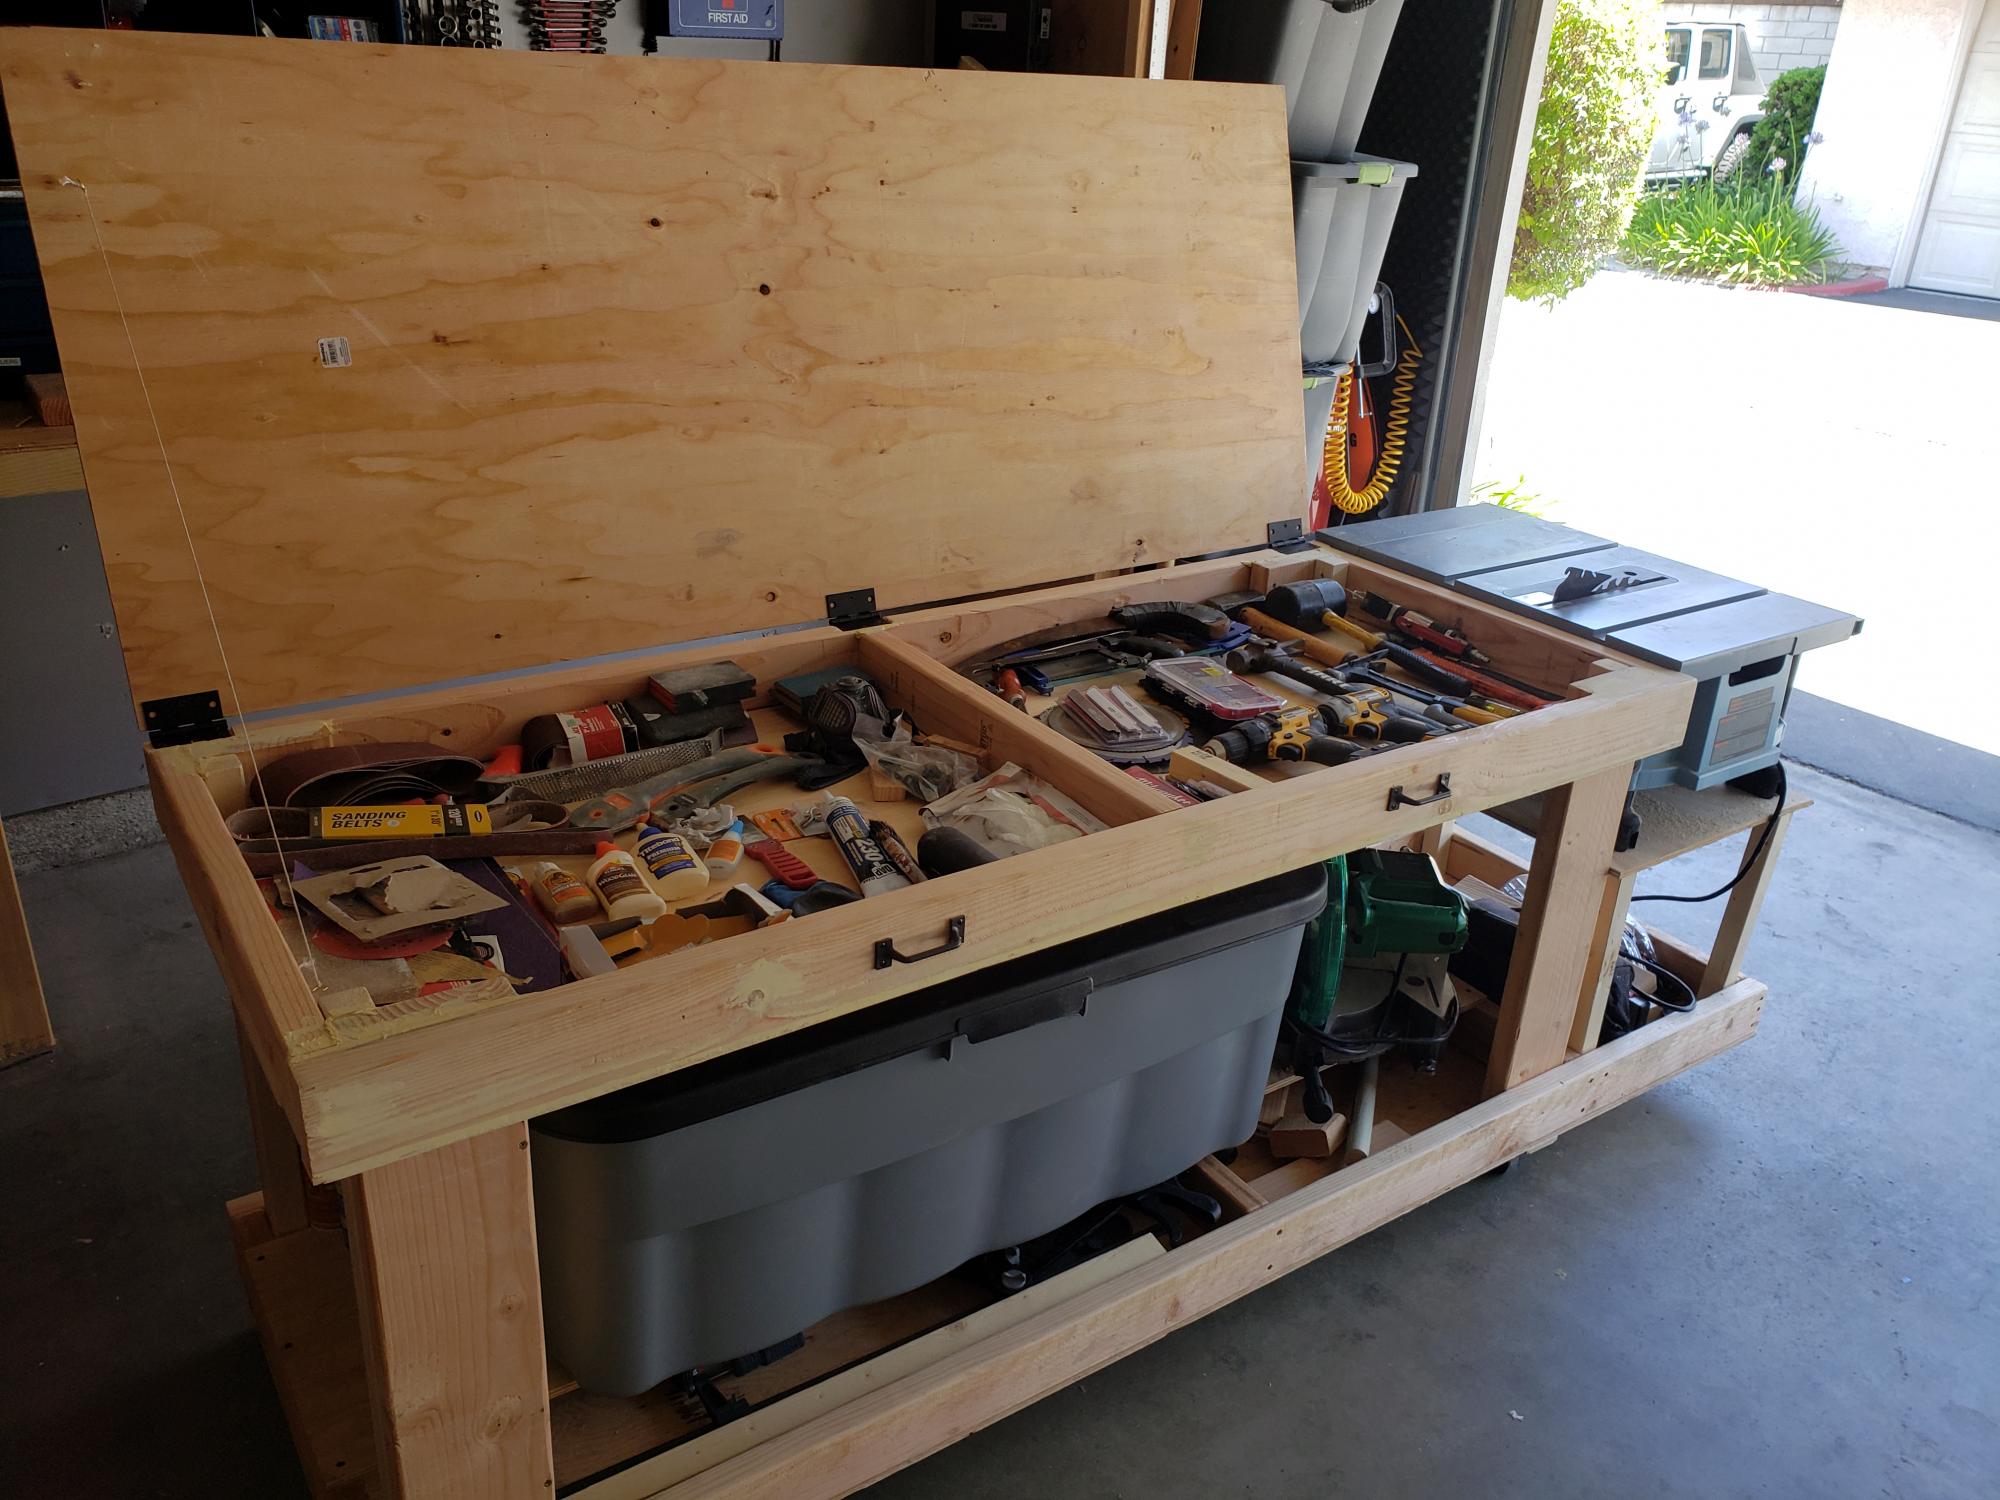
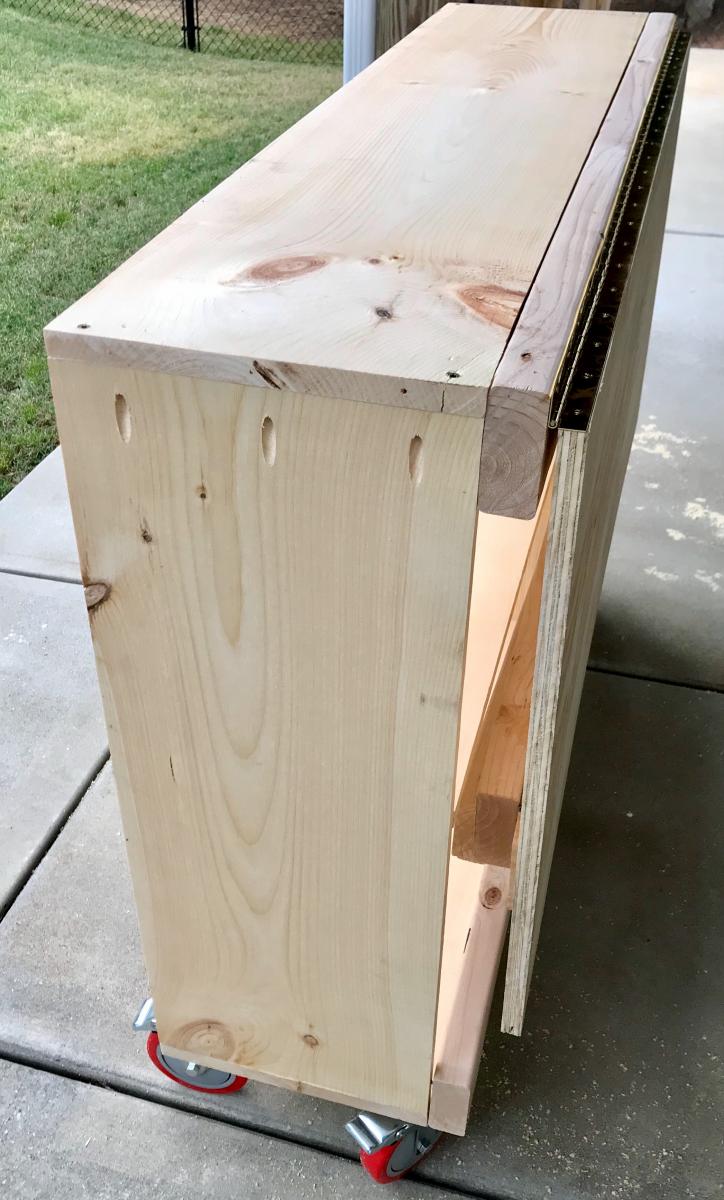
A modification of the traditional work bench. Great for storage. Bench area of 70 inches with 18 additional inches for the table saw.
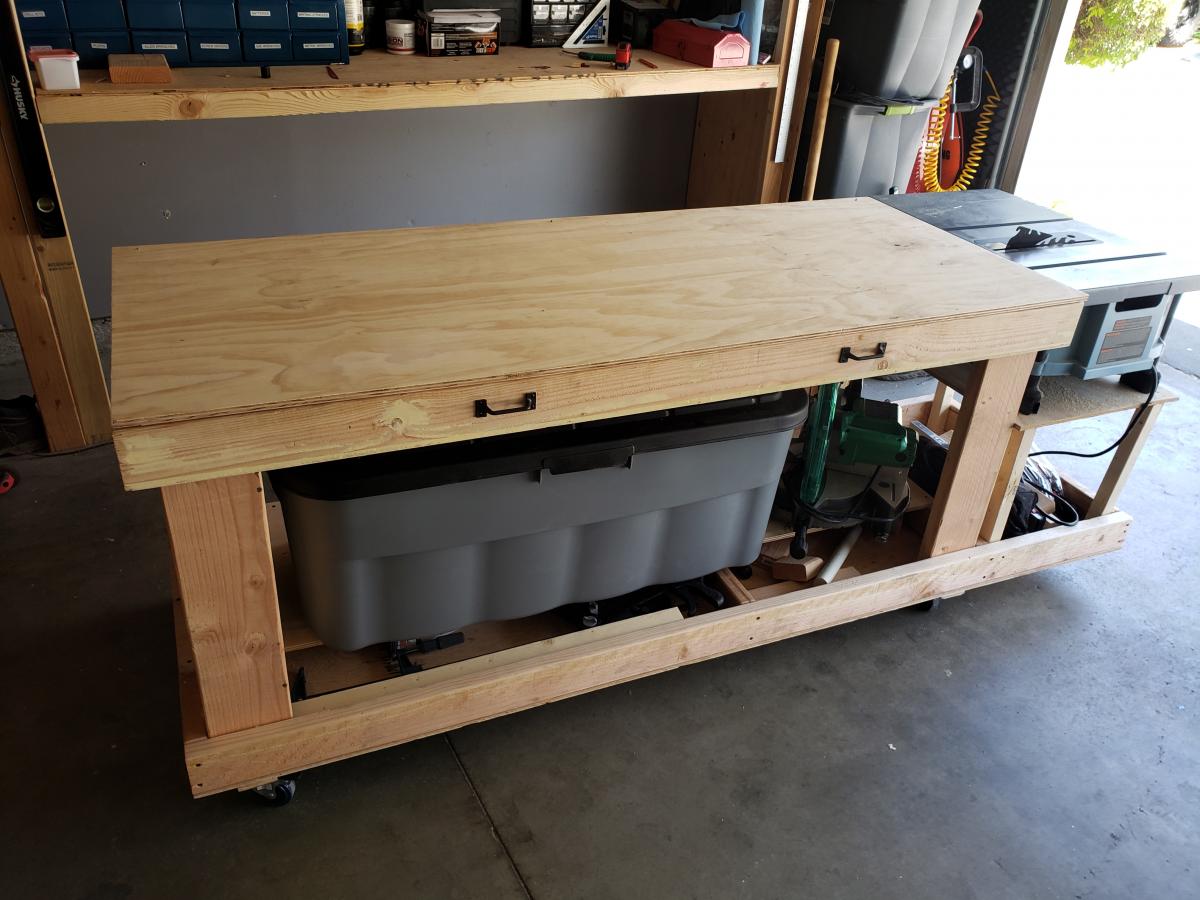
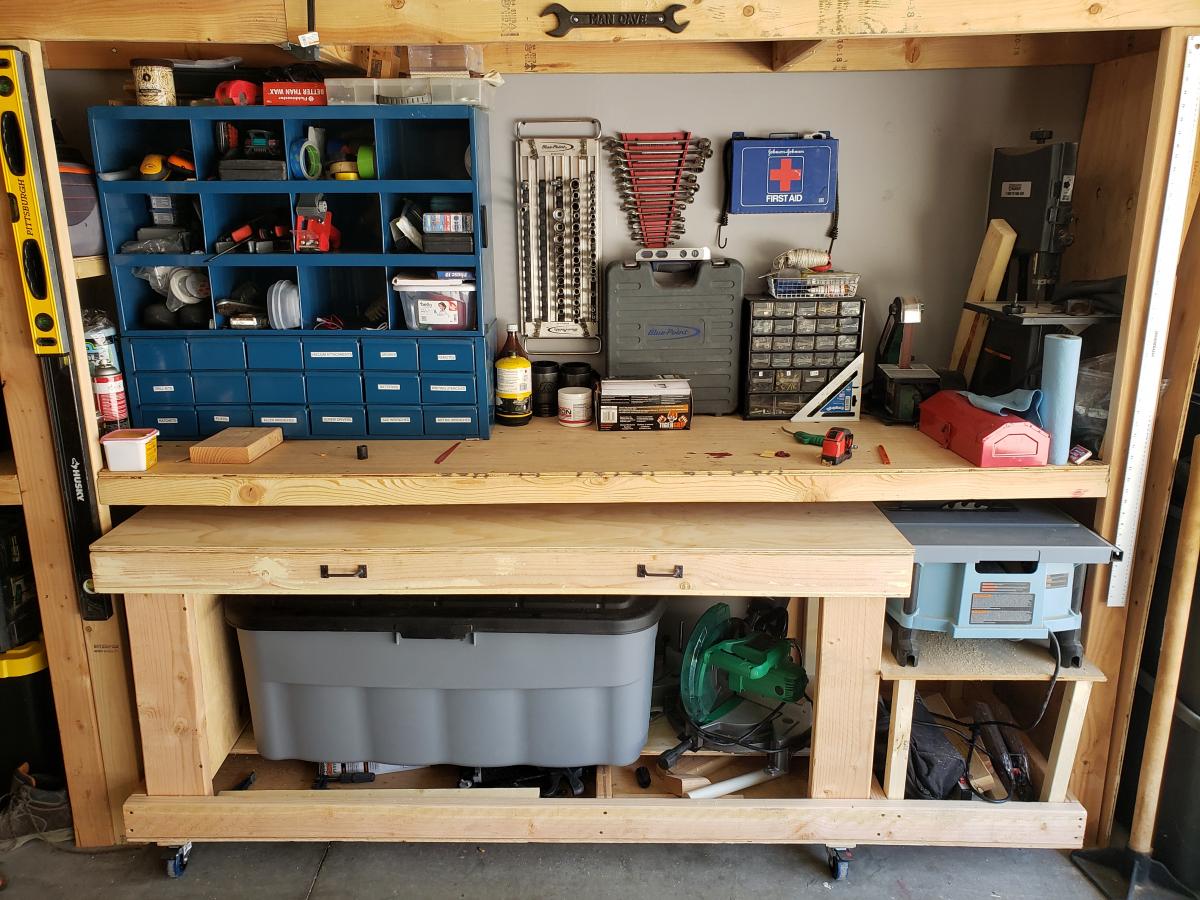
Built from Plan(s)
Comments
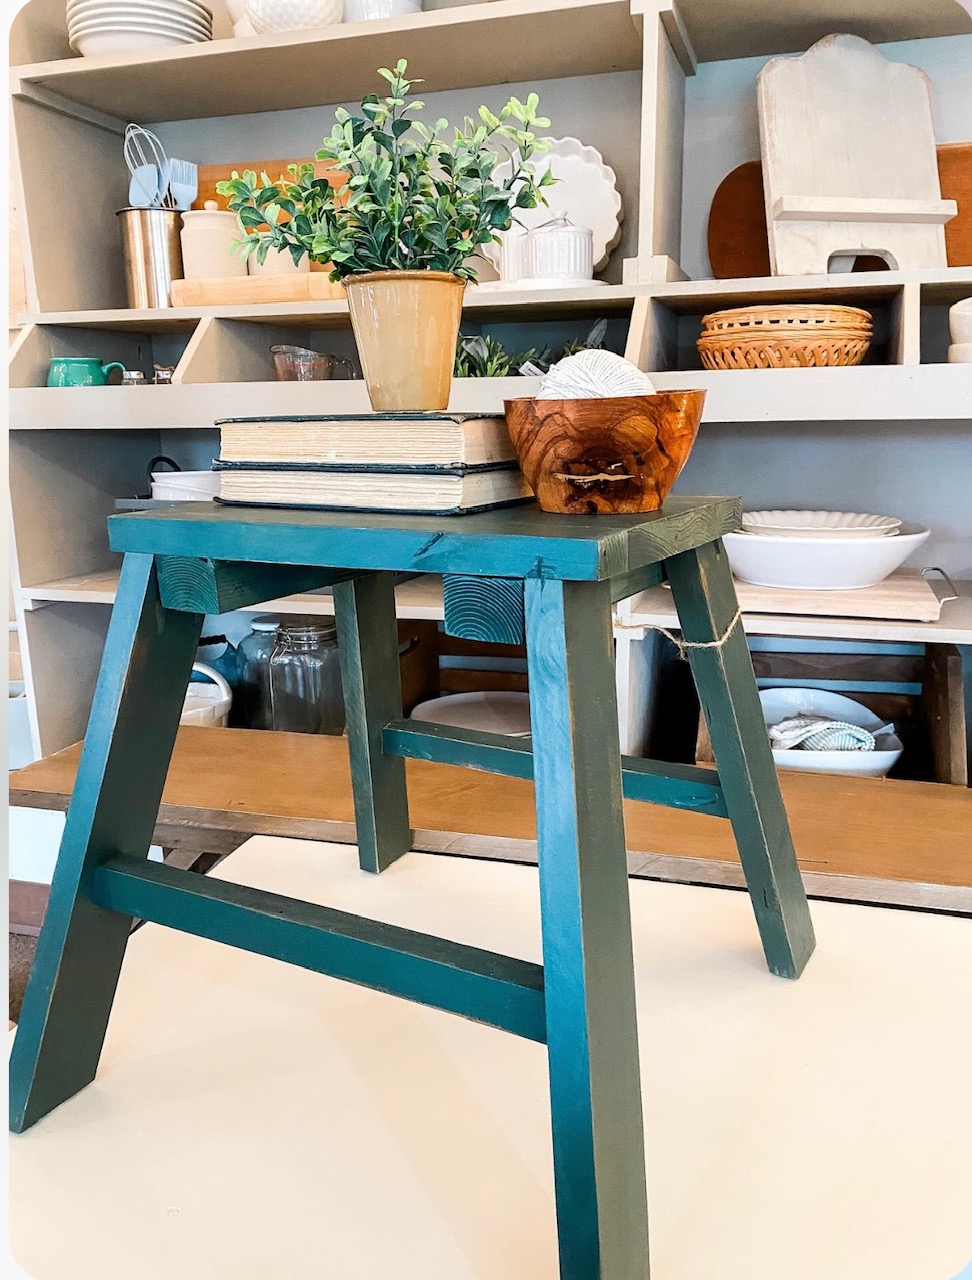
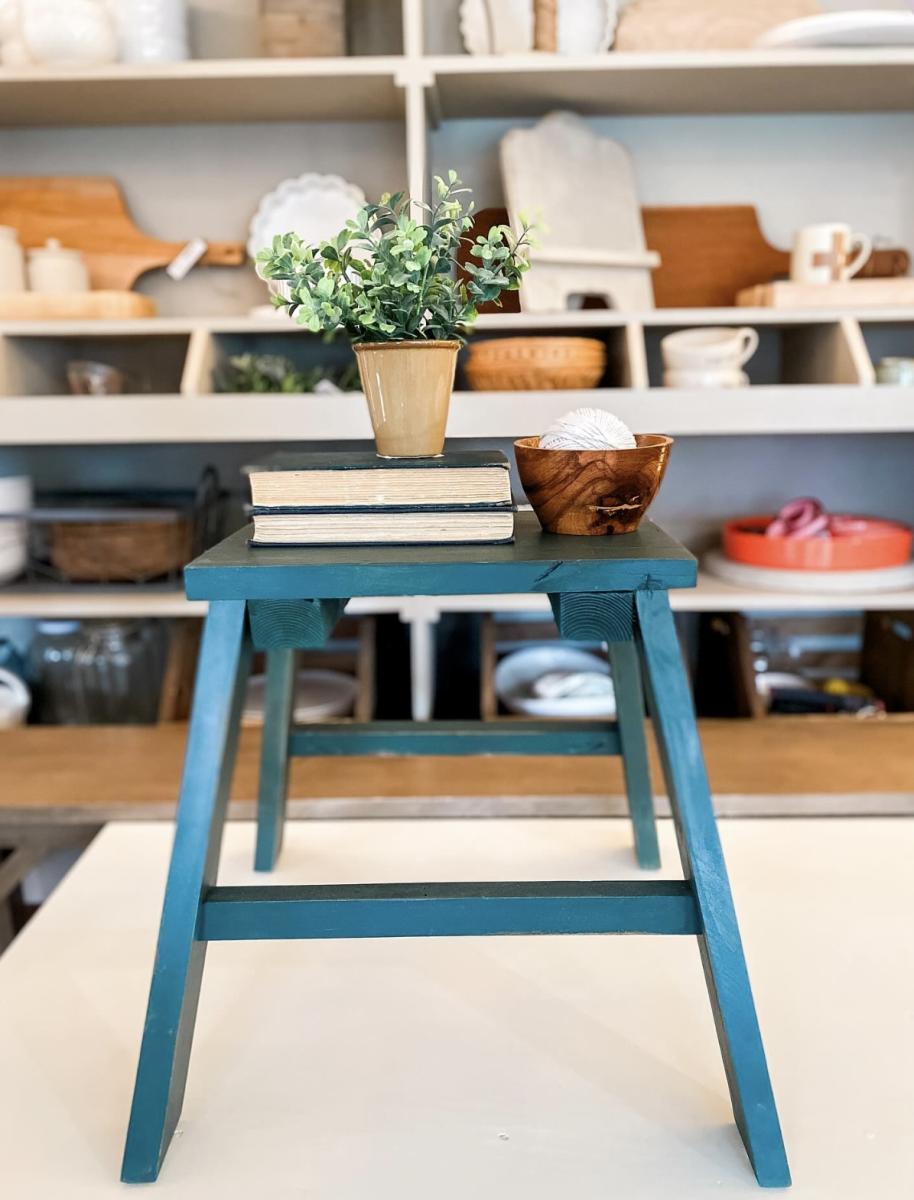
Green Skipper Stool
Chaise Lounges

Love these outdoor Chaise Lounges. They are very sturdy and comfortable. I am hoping to make a loveseat and tables to match. Makes a perfect patio sent for my back porch and pool!
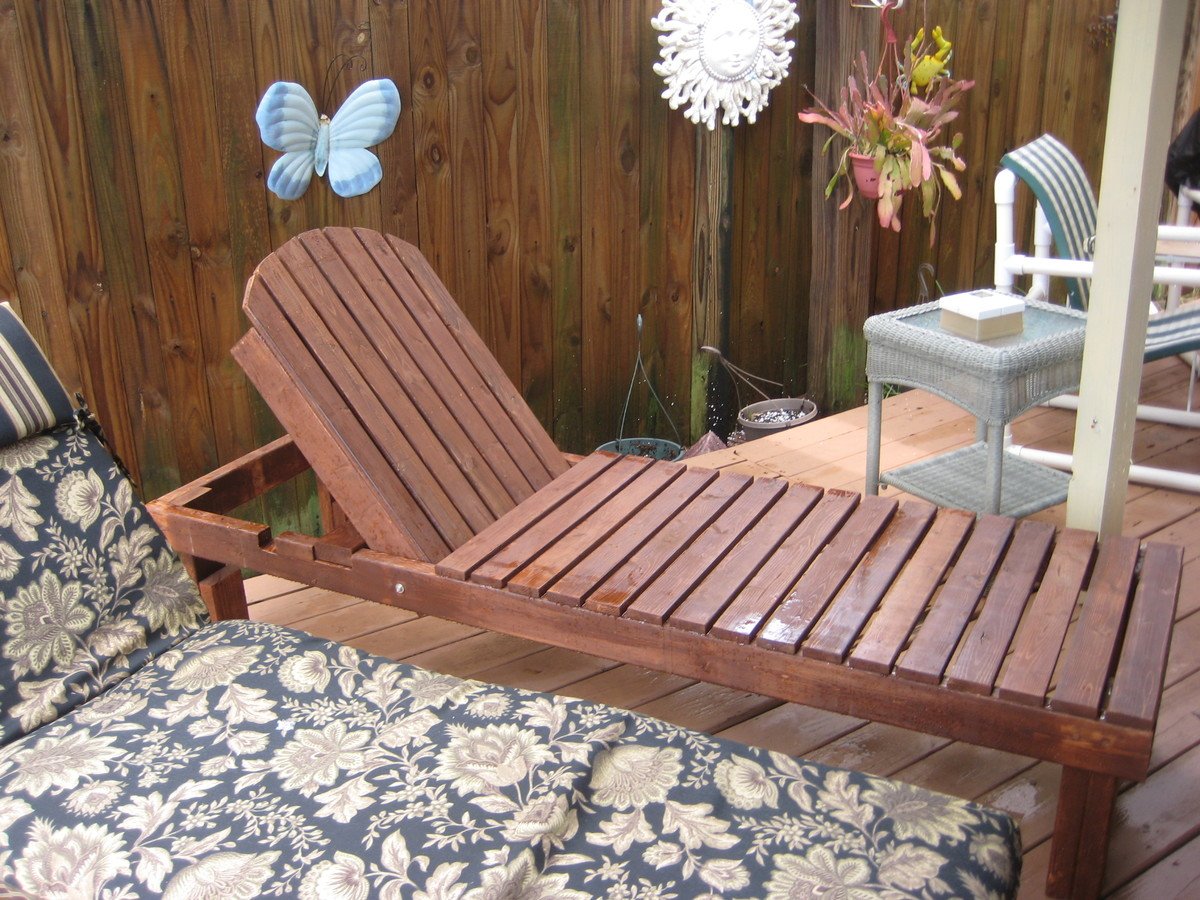
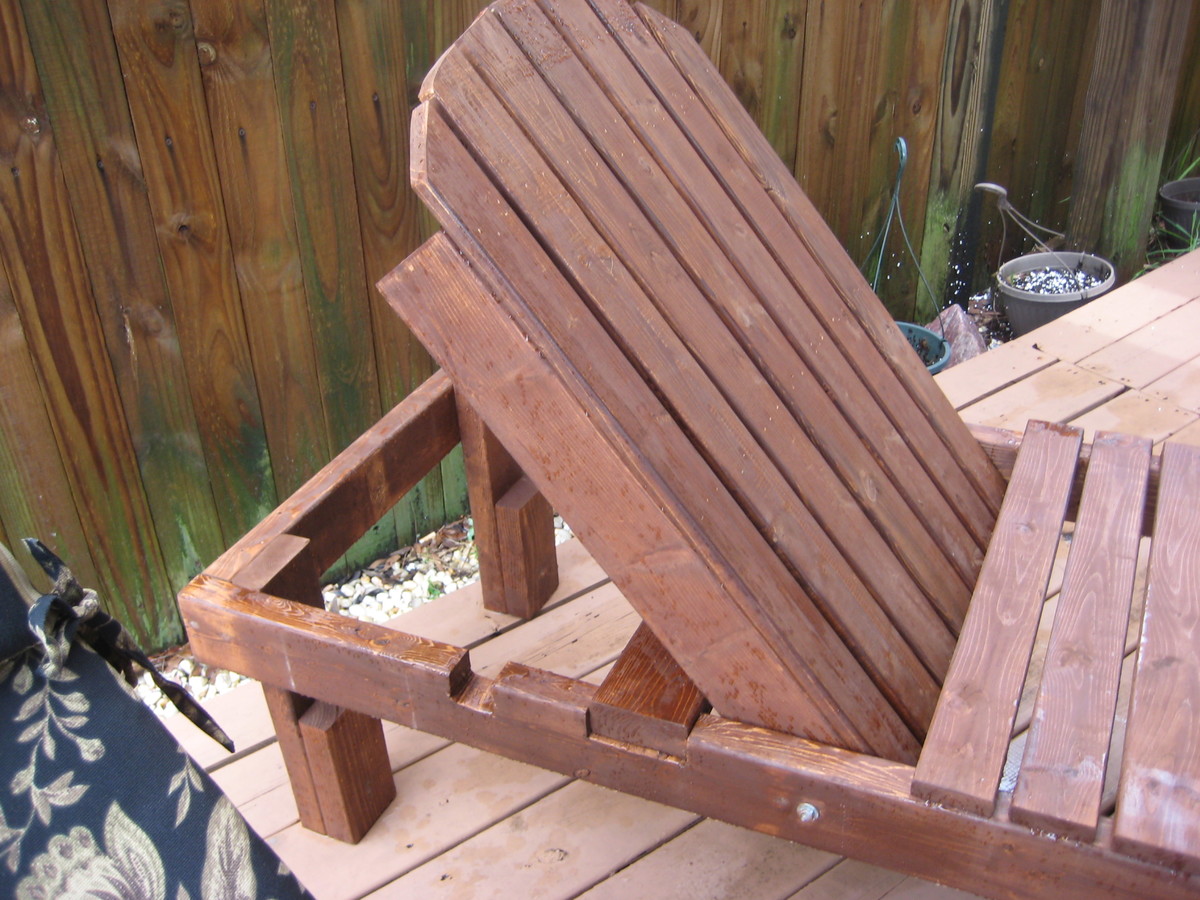
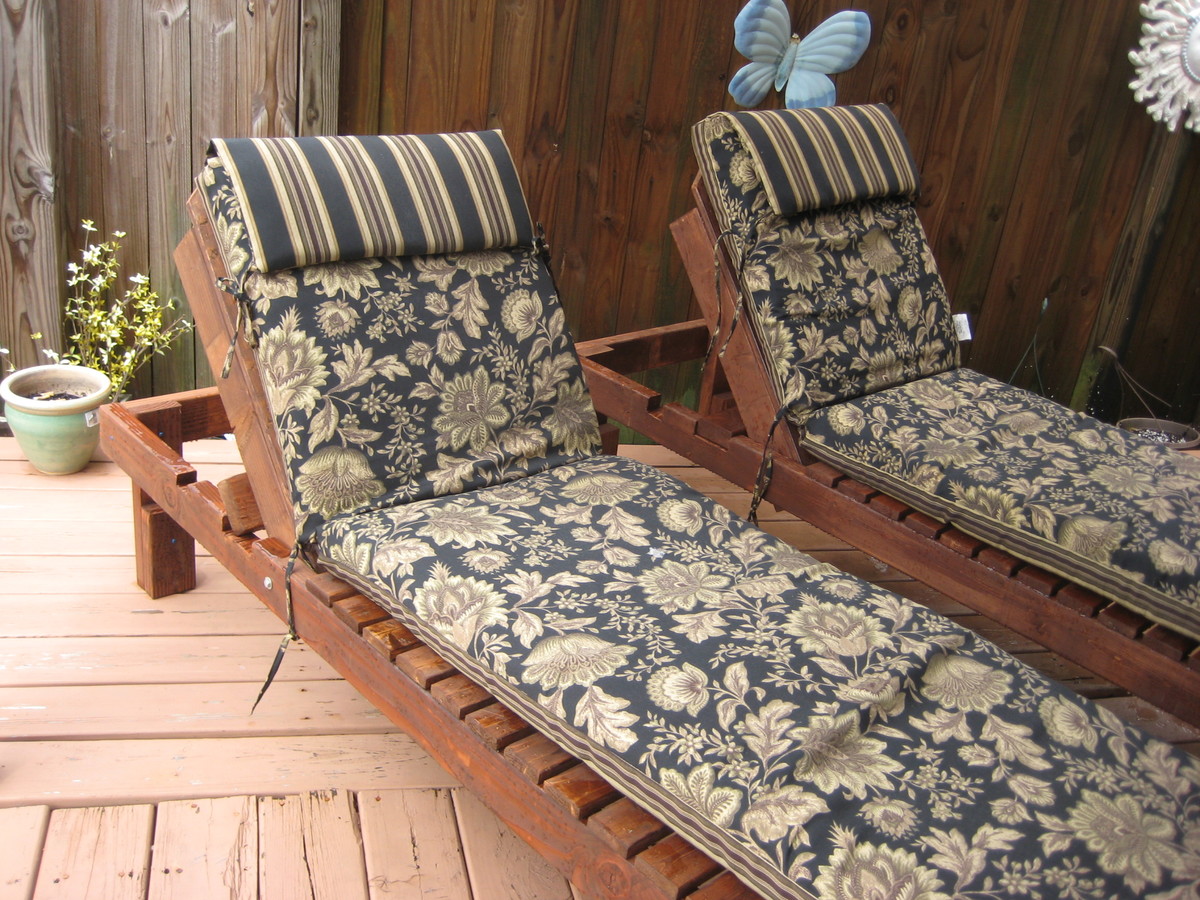
Estimated Cost
35.00 each
Estimated Time Investment
Weekend Project (10-20 Hours)
Finish Used
Stained in Miniwax English Chestnut then finished with Thompsons water sealer. Purchased the lounge cushions from Walmart on line and they fit perfectly!
Recommended Skill Level
Beginner
Infinity Mirror Coffee Table
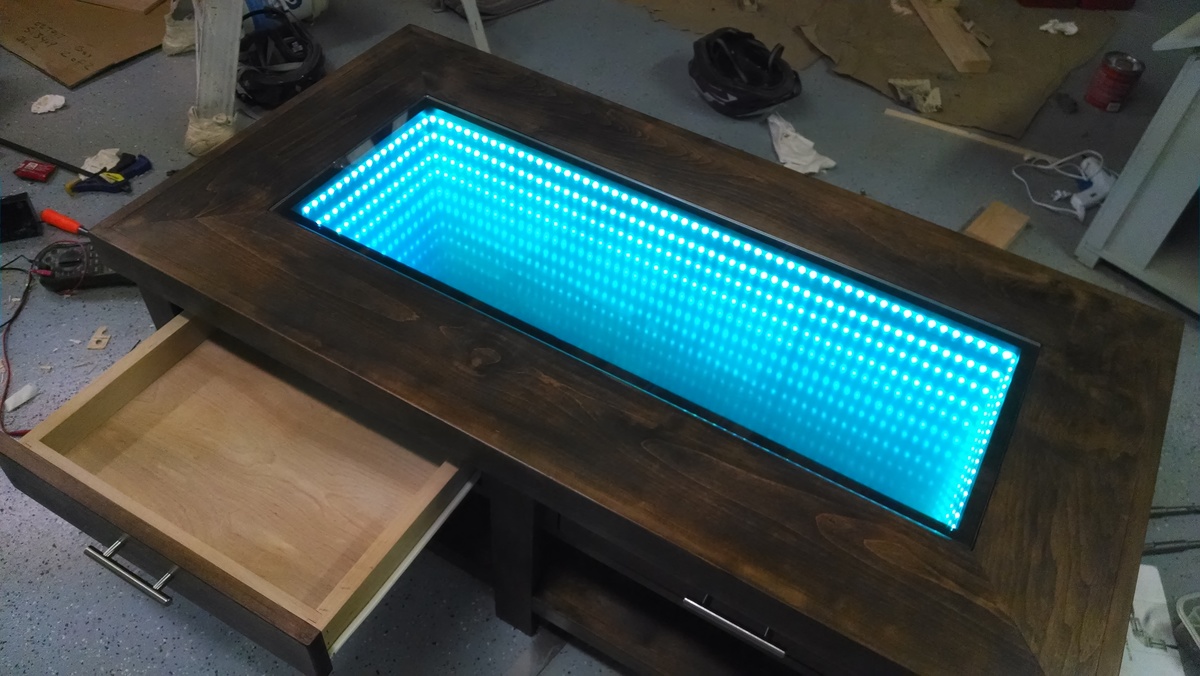
Used the Benchwright Coffee Table for all of the base which was very easy to follow. I used rough cut Alder, which I would not try to do again (way too many linear feet to cut!). I've done drawers before, and I've found that it's easier to attach the slides to the drawer box and the horizontal pieces that attach to the table. After that, attach once of the horizontal pieces first, and shim the other before attaching to the table. The top is 3 boards tall and is comprised of 1 layer of birch plywood, 1 layer of spacers, and the mitered edges on the top. The infinity mirror feature comes from a row of LED's sandwiched between a mirror (base) and glass with a semi-transparent mirror film (also known as one way mirror).

Built from Plan(s)
Estimated Cost
$300+
Estimated Time Investment
Week Long Project (20 Hours or More)
Finish Used
Minwax Espresso satin. Finished with spray lacquer
Recommended Skill Level
Intermediate
Comments

Modern Outdoor Bench
Great plans! I modified the bench by adding a slanted back (which enabled me to put the slats closer together), extending and curving the front of the arms and extended the seat to the outside of the legs.
Recommended Skill Level
Intermediate
Comments
Portable Workbench
I have a small workshop so this workbench allows me to bring the work outside. It was my first project and I think it came out great.
Built from Plan(s)
Estimated Cost
$100
Estimated Time Investment
Day Project (6-9 Hours)
Finish Used
None
Recommended Skill Level
Beginner
Finished the Simple Bed! (Twin)

Just finished this Twin Size Simple Bed direct from the Ana White plans. This is my first project that I've completed, and it went well! The plans were great, and my only advice would be to take your time. I know that some people don't like to paint the wood, but this white just fit the room perfectly. As a side-note, this bed is SOLID and very heavy! Amazing what a difference real wood is to the stuff you get at the furniture store.
Built from Plan(s)
Estimated Cost
$50
Estimated Time Investment
Weekend Project (10-20 Hours)
Finish Used
Menards flat bright white interior paint.
Recommended Skill Level
Beginner
Comments
Wed, 07/25/2012 - 12:49
I am looking into making this
I am looking into making this bed but into a bunkbed, but I am afraid of doing a bad paint job....any suggestions?? Should I paint prior to putting together? Thank you your detoured out GREAT!!!
Thu, 07/26/2012 - 05:20
Painting
Hi Amie! After putting this all together and then sanding and painting, I think this time around (I'm making a 2nd one), I'll cut the pieces according to the cut list, then sand and paint the pieces before putting them together. The painting wasn't too bad to do after putting it together, but the sanding was difficult with some of the angles on the head and footboard. I'll update this after I do it this other way..good luck with your project!! It's very satisfying to see the finished result after you finish!
Sun, 01/06/2013 - 13:35
Cost of wood
I just priced this out and the lumber comes to $130 for decent pine...
Sun, 01/06/2013 - 16:00
Pine Cost
Hi Ahab.. One thing I've figured out from reading posts is that the cost of lumber (and pine) varies widely across regions. Each store also has different grades of lumber available. If you take the time to go through lumber piles and choose boards that are straight you can save a fair chunk of change. Just my 2 cents.. Good luck with your project though!
Thu, 12/18/2014 - 16:36
Bed Rails
I have a question on how the rails connect to the head and foot board. I think the original plans have you make a box out of 2x2's, Do the 2x2's just screw to the headboard and footboard? This seems like the easiest, unless you want to take it apart and move it! Anyone have ant thoughts on this?