Community Brag Posts

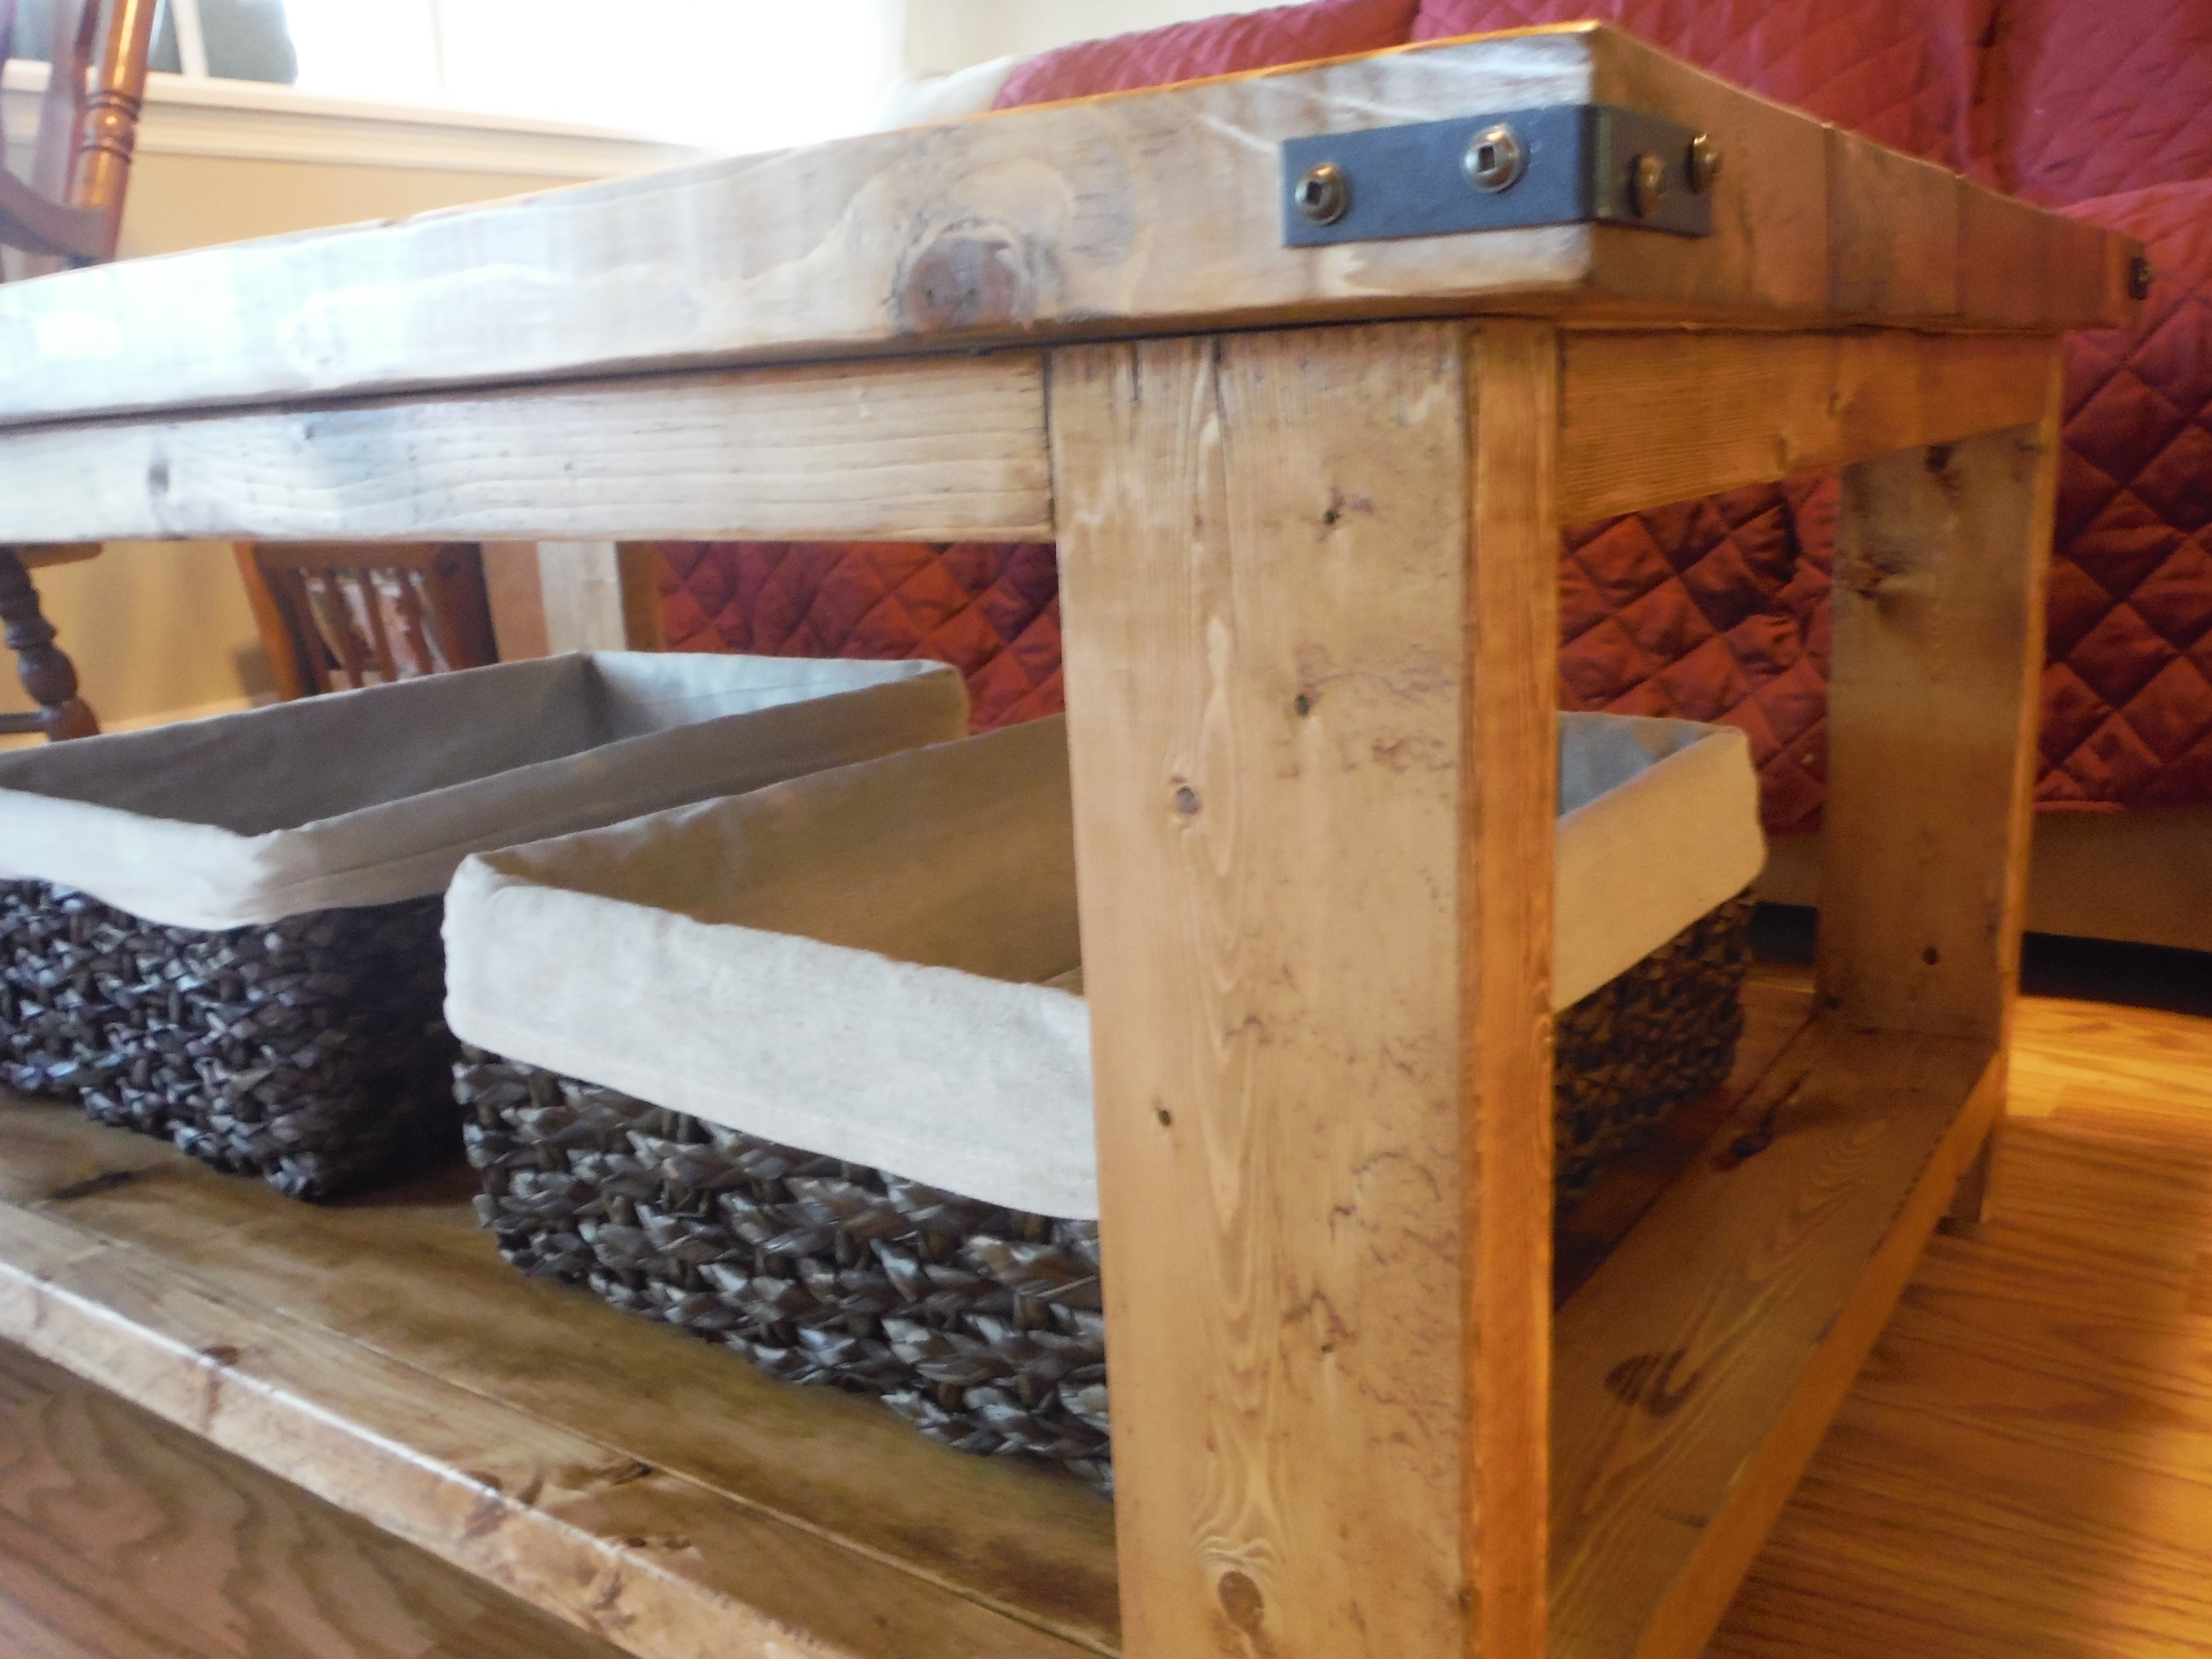
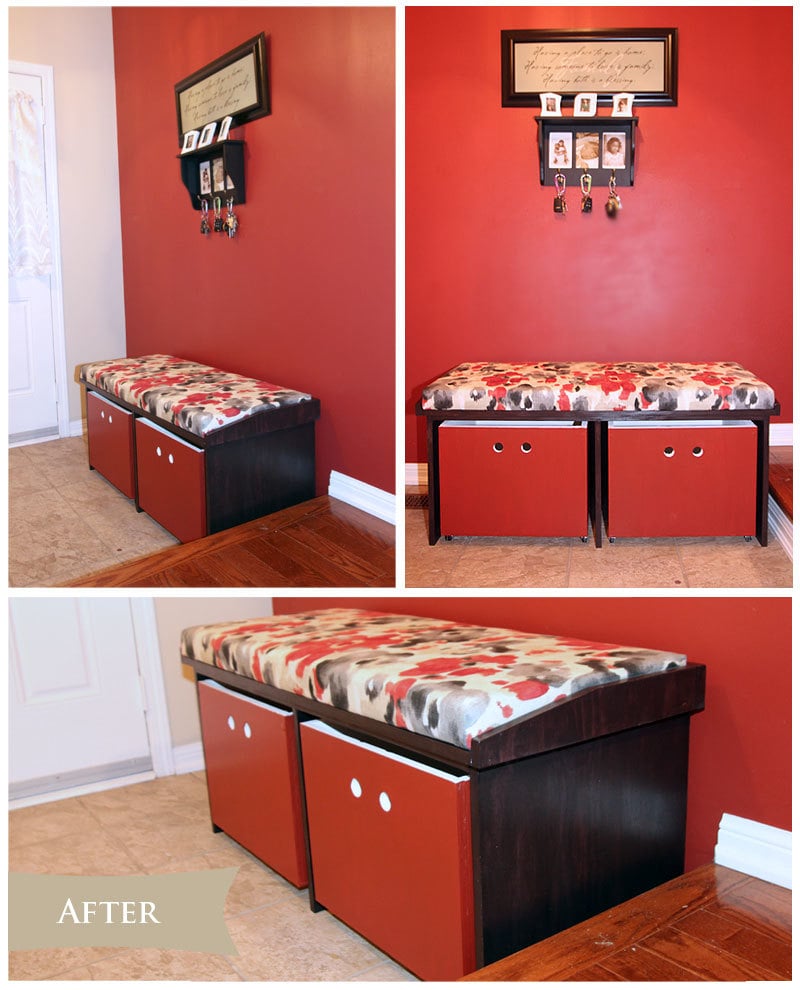
Spring Entry Update - DIY Storage Bench

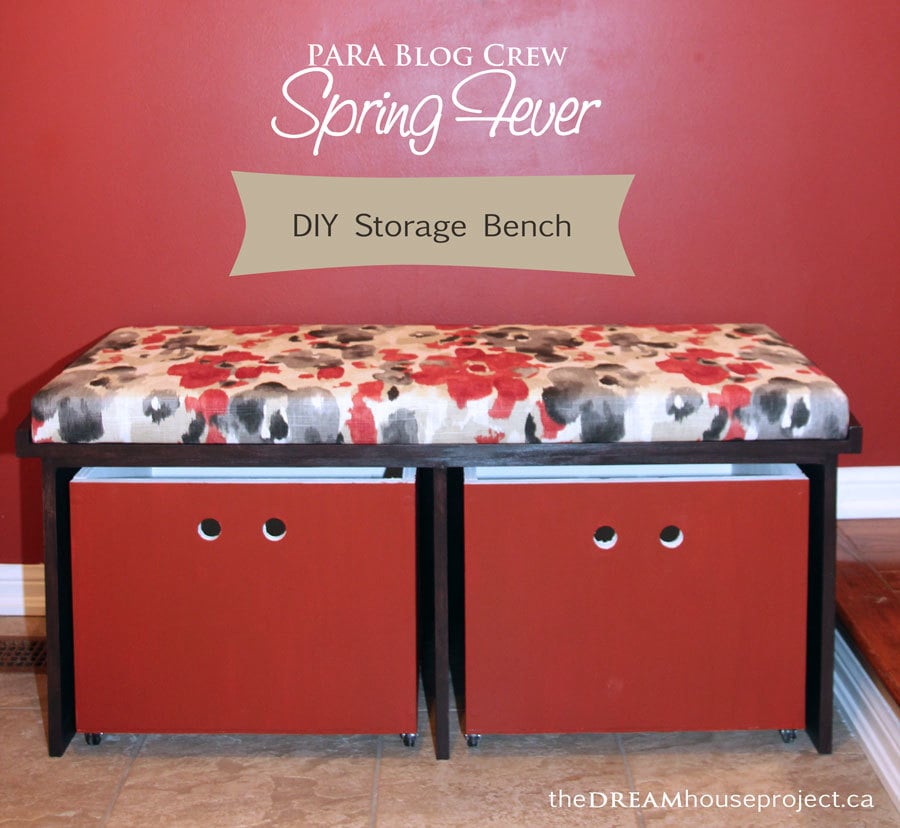
The entryway in my mom’s house was the perfect candidate for a spring update. Home to a broken, non-functioning storage bench and constantly cluttered with shoes, we decided it was time for an upgrade. It took us a weekend, some PARA paint & stain, a little fabric and lots of elbow grease, but we were able to take the entry way from boring to beautiful.

Estimated Cost
$100-125
Estimated Time Investment
Weekend Project (10-20 Hours)
Finish Used
Bench - PARA TimberCare Solid Stain tinted in Runway (P5191-85D) topped with PARA WoodCare urethane varnish in glossy

Bench seat - Landsmere fabric in 'Current' from Tonic Living.

Storage boxes - Primed & painted in PARA Too Hot To Handle (P5078-85)
Recommended Skill Level
Intermediate

Bedside Tables

Submitted by Anonymous (not verified) on Tue, 07/05/2016 - 18:33

Went together well, a few things modified. 

I get my wood from a sawmill and plane it myself, so the legs are 2x2's instead of the commercial sized 1.5's x 1.5's and to make them go with my Ana White Farmhouse bed I built a few weeks back I made the legs 30" long to compinsate for the height of the bed

Winwax Polyshades Mission oak

Built from Plan(s)
Estimated Cost
40 dollars before stain
Estimated Time Investment
Day Project (6-9 Hours)
Finish Used
Minwax Polyshades Mission Oak x2 coats
Recommended Skill Level
Intermediate

Modern Chairs, Modern Loveseat, and the 2x4 Outdoor Coffee Table

Submitted by Anonymous (not verified) on Wed, 04/29/2020 - 19:58

I took this opportunity while quarantined to make this set. I think it came out really beautifully!

Finish Used
Shou sugi ban, Simple Finish by Maker Brand, and Total Boat Halcyon Clear.

I used a blow torch to burn each board. Then I used a wire brush to remove soot, and washed with water and allowed to dry completely. I opted for pocket holes for the chairs and love seat. After assembling, I finished with Simple Finish by Maker Brand ($40/qt), and top coated with Total Boat Clear Halcyon ($32)

Twin Farmhouse Bed

Submitted by Sieryn on Mon, 06/18/2012 - 06:09

This was for a boys room so we wanted something sturdy, and oh man does this plan fit the bill.

Was easy to assemble, most of the project time went to sanding and staining to get the dark wood finish.

Finished in a poly gloss.

Built from Plan(s)
Estimated Cost
75
Estimated Time Investment
Weekend Project (10-20 Hours)
Finish Used
Miniwax Jamocha Stain
Recommended Skill Level
Beginner

Pottery Barn Harper Style Coffee Table

My wife saw the Harper Style coffee table by Pottery barn and loved it so as a gift to her i set out to recreate this table in a white wash look that is not available and after a week of creating plans and a weekend of work here it is with fully functional drawers that are accessible from both sides

Estimated Cost
$150-$200
Estimated Time Investment
Weekend Project (10-20 Hours)
Finish Used
combination of Minwax Honey and Ebony for the top and an underlying of random Ebony strokes and a few coats of Minwax Pickling White wash for the body of the table
Recommended Skill Level
Intermediate

Comments

Easy 2x4 potting bench

Submitted by Randall on Mon, 05/04/2020 - 11:20

Great easy to follow plans, I cut both front and back legs from one 2x4x8’ by having the back leg 1” shorter than plan. Also bought 1x4x39” slats at less cost than buying the 8’ ones.
Great unit would be perfect for near the BBQ and any place needing storage and work bench

Estimated Cost
$80
Estimated Time Investment
Afternoon Project (3-6 Hours)
Finish Used
Olympia Outdoor wood sealer
Recommended Skill Level
Beginner

Children's Picnic Table

Submitted by RHgaijin2 on Sun, 06/24/2012 - 09:20

Children's picnic table

Built from Plan(s)
Estimated Time Investment
Afternoon Project (3-6 Hours)
Finish Used
Helmsman Spar Urethane semi-gloss on table top and benches, Peek-a-boo blue on legs and supports.
Recommended Skill Level
Beginner

Platform Bed for 1st Apartment

Submitted by Sutton615 on Mon, 04/14/2014 - 08:48

My dad and I made this in a queen size to match a mattress it already had. We changed the plans a little, making the legs from two boards to make it more stable. We used a nail gun to put together the lip of the frame and used wood screws for the rest. The headboard was made from the left over slats and attached with a 2x4 on the back of the frame. We also bought square sliders and screwed them to the bottom of the legs so that they don't scratch our wood floors.

Estimated Cost
100
Estimated Time Investment
Afternoon Project (3-6 Hours)
Finish Used
I chose to leave the wood unfinished (which saved some time) because I liked the natural look. Just sanded it and left it. I may let it weather a little and then do something for staining it.
Recommended Skill Level
Beginner

Rustic X Console

Submitted by Anonymous (not verified) on Mon, 07/11/2016 - 14:15

My wife and I loved the look of this plan, so I decided to make it happen! I built this same console, only half the length for our dining room, and then made this full size version for the living room area. I used this plan for both designs. I used a table saw to cut dado channels from the intersecting pieces of material for the "X" design on each side of the table which was considerably easier for me. It can get a little tight when trying to secure the 11.25 inch pieces of 2x4 and 2x2 with pocket holes so I opted to secure through the outer frame with 2.5 inch screws. Countersinks, wood filler, and some sanding made for a clean alternative to the pocket-hole approach. Stained and chalk painted frame and shelves separately before assembling. We love this table and promise you will not be disappointed either.

Built from Plan(s)
Estimated Cost
80-100
Estimated Time Investment
Weekend Project (10-20 Hours)
Finish Used
Sea Foam Green Chalk Paint
Minwax Espresso Stain
Minwax Polycrylic
Recommended Skill Level
Beginner

X base farmhouse console

Submitted by megsy19 on Thu, 06/28/2012 - 07:56

I found this plan for the fancy farmhouse table on Pinterest and decided to tweak it to work as a console table.

Built from Plan(s)
Estimated Cost
100.00
Estimated Time Investment
Day Project (6-9 Hours)
Recommended Skill Level
Intermediate

Comments

spiceylg

Fri, 06/29/2012 - 05:37

That looks great! I never think to do stuff like that, modify/re-size. From what little I can see, love the room, too!

happygal (not verified)

Mon, 07/02/2012 - 14:46

Absolutely gorgeous. And what a great idea to make it a console. I am trying to figure out if I can fit it anywhere in my house. I really want to know about the top. Did you cover it in metal. I would love to hear what you did.

HeatherM3569 (not verified)

Sat, 10/20/2012 - 20:49

I would really love the measurements for this console table if that's possible.I'm also doing the farmhouse kitchen table and this goes great with it & my open floor plan :)If I'm unable to get the measurements from you can you provide me with someone who has them or another link maybe... Thanks

ericw113

Mon, 07/27/2015 - 06:54

Console table looks great!  What is the top made out of and how did you do the fabrication/install?

Modern Bench Turns Shoe shelf

Submitted by Veronica P on Wed, 04/16/2014 - 17:02

For our first project, my boys and I decided we wanted to build a shoe shelf for our front foyer. We loved the design of the modern slat top bench so adapted it slightly to fit our needs. Here's how it turned out.

Estimated Cost
$12.00
Estimated Time Investment
Afternoon Project (3-6 Hours)
Finish Used
Paint
Recommended Skill Level
Starter Project

Sofa Table

Submitted by lilbit2010 on Thu, 07/14/2016 - 18:29

So I made this a couple weeks ago. I used 2x12 for the top and 4x4 for the feet and legs. This was my first project and it came out ok. The feet need some work. The plan called for feet to be angled but unless you have a band saw just cut the 45' for the feet. 

Estimated Cost
$50-60
Estimated Time Investment
Day Project (6-9 Hours)
Finish Used
Minwax, Red Mahogany
Recommended Skill Level
Beginner

Barn Door TV Console

Submitted by Anonymous (not verified) on Fri, 05/08/2020 - 19:36

I built this during quarantine. Dark walnut on the top, and pure white paint ok the base and doors.

Built from Plan(s)
Estimated Cost
$350
Estimated Time Investment
Week Long Project (20 Hours or More)
Finish Used
Dark walnut stain, satin poly
pure white satin paint
Recommended Skill Level
Intermediate

Under Sink Organizer

Submitted by Anonymous (not verified) on Wed, 01/03/2024 - 07:53

I wanted to get my nasty pot scrubbers out from behind the kitchen faucet, so I thought this was an ideal solution. I substituted the paper towel rack for a length of vinyl rain gutter. I cut a piece of a baking cooling rack for the bottom of the rain gutter, so the wet pot scrubbers would not sit in dampness. I also made the rain gutter removable, because I knew it would get nasty and need to be washed occasionally.

kuyaLars


Fancier Simple Kitchen Island

A friend of mine was looking for extra counter space, and asked me to build a kitchen island, but with a few modifications. He wanted space on the end to slide two stools, so I used fewer slats. After I finished the build and the first coat of paint, he decided it was 3" too short. So, I got creative and used some stair spindles to create decorative feet! I'm actually really glad for the mix-up, because the feet give it so much character. I layered on the paint by starting with a coat of plum, then a coat of cherry, and followed it up with a glaze mix with oak stain. Then three coats of spray on poly and it was done.

Built from Plan(s)
Estimated Cost
$38
Estimated Time Investment
Day Project (6-9 Hours)
Finish Used
one coat plum paint, one coat cherry paint, stain glaze and 3 coats of spray on polycrylic
Recommended Skill Level
Intermediate

Comments

Distressed Entry Bench

Submitted by zduchene on Fri, 04/18/2014 - 11:10

This is a bench that I have built for a friend of mine to fit exactly in her entry way. I made it in the spirit of the Pottery Barn furniture that she already has. I used regular Douglas Fir found at anywhere lumber is sold.

The bench was put together using mostly 2-1/2″ pocket hole screws. I use my Kreg Pocket Hold Jig to drill the holes, but any jig should work.

See the link for detailed instructions.

Estimated Cost
60
Estimated Time Investment
Afternoon Project (3-6 Hours)
Finish Used
Any stain will work. I used a dark walnut with a gloss polyurathane
Recommended Skill Level
Beginner

Coffee Table

Submitted by jcbil on Sun, 07/17/2016 - 14:32

I loved building my Coffee Table, thank you Ana White! I built mine to be 42" long and kept all the other dimensions the same, (but didn't do the X's). I also installed leveling feet. I stained it Minwax's Early American, and used 3 coats of Polyurethane and applied everything with a rag. I used 2" Corner Brackets, spray painted with Rustoleum Metallic Charcoal. I bought the baskets from Michaels.

Built from Plan(s)
Estimated Cost
Just under $50. Already had Stains & Polyurethane on hand. Wood was $38. Hardware $5. Leveling Feet $3.50.
Estimated Time Investment
Week Long Project (20 Hours or More)
Finish Used
Minwax Early American, 3 Coats of Polyurethane, all applied with a rag.
Recommended Skill Level
Beginner

Nice and practical pair of desks/shelves

Submitted by dtmak on Mon, 05/11/2020 - 09:16

Built this using the Ana White plan. Construction was done in less than a day using leftover lumber from other repairs around the house. Painting and varnishing took multiple days for the paint and varnish to dry and cure though.

Used pocket screws - as shown in my diagram - to hold the pieces together.

The family has enjoyed using the desks and if you stack one on top of the other, the bottom one creates a shelf also. Will make a few more to share.

Thanks for sharing the plans.

Estimated Time Investment
Week Long Project (20 Hours or More)
Finish Used
Spray paint and spray on varnish.
Recommended Skill Level
Starter Project

DIY Home Fireplace

Submitted by Anonymous (not verified) on Mon, 01/08/2024 - 09:16

We built this fireplace where nothing existed before. The instructional video was very helpful. We are so proud of how it turned out.

Jim and Susie Jacob 

Comments

hmillgarv

Wed, 02/28/2024 - 19:20

Hello! I’m wondering if you think this could be built as a temporary piece that could be moved? I live in apartment and wouldn’t want to leave something like this behind after spending time and money to build it. Maybe if I built in some removable access panels (a few of the slats?) to be able to attach it to studs (and later remove it) after building the entire piece. Thoughts? TIA!

Back