Community Brag Posts

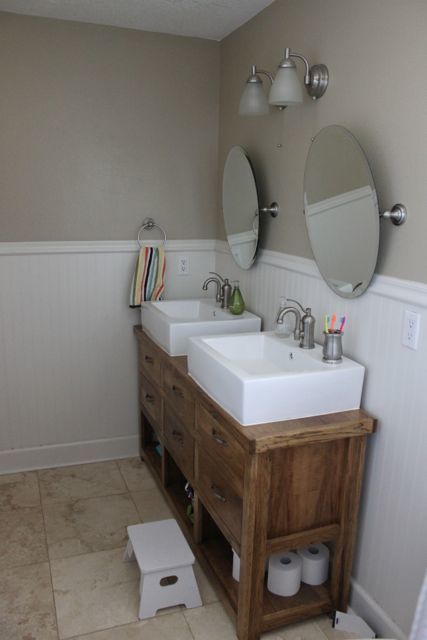
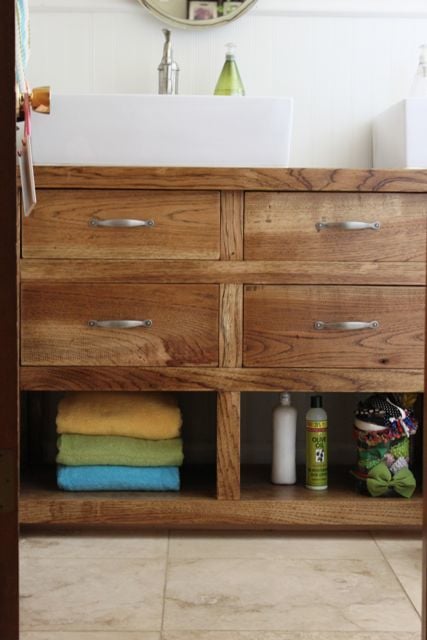
dresser turned bathroom vanity

Submitted by leahrush4 on Fri, 10/07/2011 - 08:23

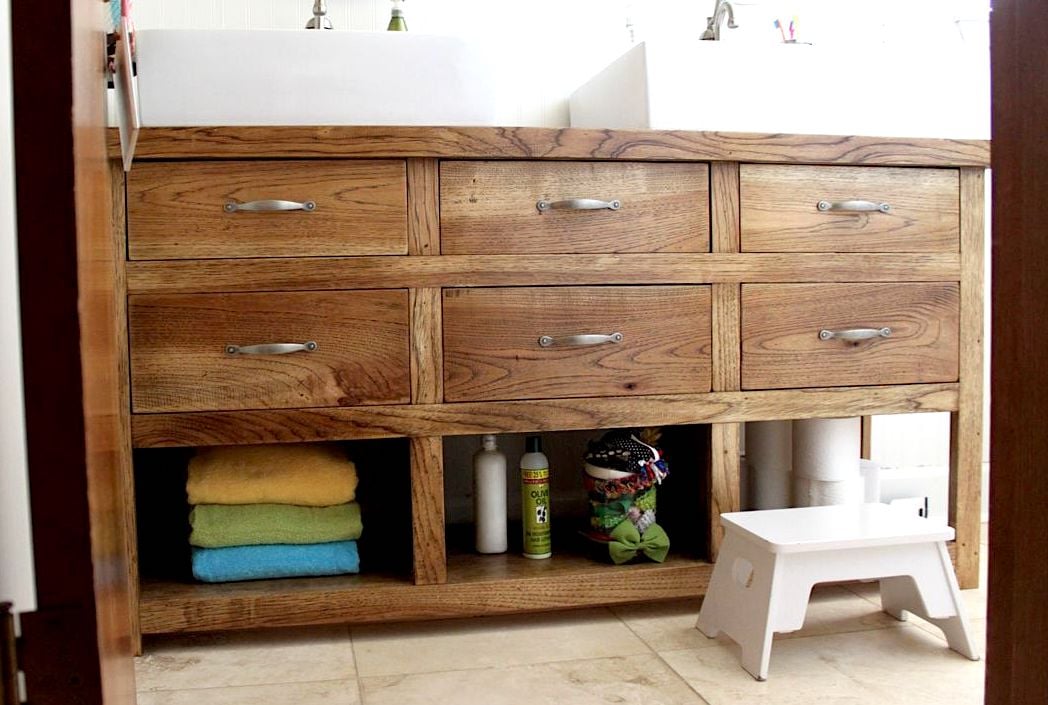
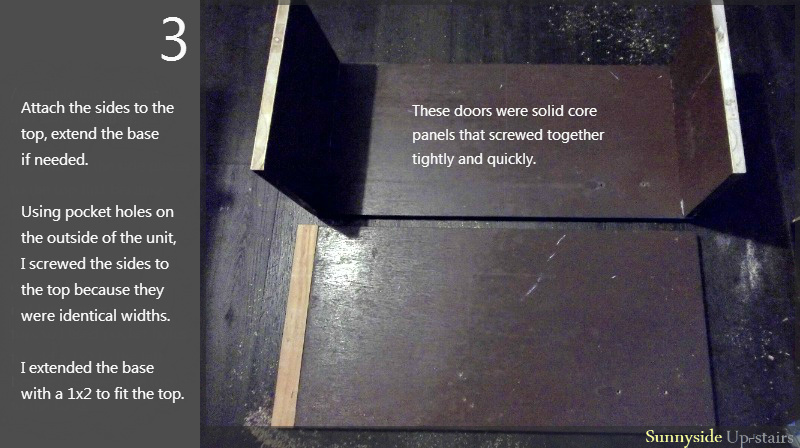
We looked high and low for a sturdy dresser we could convert to a vanity for our kid's bathroom. We could find nothing for under $500 so we decided to make it. We used solid hickory for the top and bottom and hickory vaneer for the rest. Only the middle drawers are useable, the side ones have a faux front to leave room for the sink plumbing behind. My husband also reinforced the bottom compartments by making them three separate compartments instead of one solid one. We ordered the sinks from overstock.com and the faucets are from Lowes.

Estimated Cost
$350
Estimated Time Investment
Weekend Project (10-20 Hours)
Recommended Skill Level
Intermediate

Comments

catee (not verified)

Fri, 10/07/2011 - 16:39

My kids have been bugging for years for double sinks. I LOVE this. I was thinking along the same line but never got past the thinking part. This is GORGEOUS!

cathrobi (not verified)

Mon, 11/21/2011 - 10:52

Wow, this is stunning! You did an awesome job! The only thing I can't figure out is how you were able to attach the plumbing? Did your husband have to crawl underneath to reach the pipes?

Toddler Closet Cubby

Solid wood is an amazing material because it can be cut, re-shaped, extended, filled, sanded, stained, painted, and essentially re-used almost endlessly.

Last week, I took old cabinet doors (from when we gutted the mouse-hole kitchen cabinets that used to be in our apartment before we moved in) and turn them into a free cubby for my daughter's closet. :)

Estimated Cost
$0, with new purchases, $20 estimate
Estimated Time Investment
Afternoon Project (3-6 Hours)
Finish Used
3 coats Olympic No-VOC semi-glass straight from the paint can.
Small paint brush for cut-ins, foam roller for surface coverage. Allow recommended dry time between re-coats.
Recommended Skill Level
Beginner

Comments

JoanneS

Mon, 10/07/2013 - 19:43

Beautiful Cubby from old doors! The trim adds elegance with the white color and it fits perfectly. Looks adorable! :)

My First Project

Submitted by cshandyman on Mon, 12/28/2015 - 15:10

I used Poplar for the top and Pine for everyting else.  Only took about two hours from start to finish.  This is my first project using a Kreg Jig and now I don't know why I didn't get one of these years ago! 

Estimated Cost
Total cost was $175. Can be done for less, but I upgraded the top to Poplar which cost more.
Estimated Time Investment
Afternoon Project (3-6 Hours)
Finish Used
Minwax Golden Oak Stain and MInwax Gloss Poly. Satin finish interior white paint for the remainder. I applied two coats of stain and paint and three coats of Poly.
Recommended Skill Level
Beginner

Adapted to Printer Stand

Submitted by Anonymous (not verified) on Tue, 03/05/2019 - 05:30

I adapted the plan to make a stand for our printer and shredder.  Except for one board, I was able to use scraps so my total out of pocket was $9!  I did plane the 2x material to 1 1/4”, and also used 2x material for the base to add a little strength to hold the shredder.  Thank you Ana White, for generously sharing your plans!

Built from Plan(s)
Estimated Cost
$9
Estimated Time Investment
Weekend Project (10-20 Hours)
Finish Used
Top - mixed brown and gray rustoleum stains. Finished with poly acrylic
Base - latex eggshell trim paint (custom mix leftover)
Recommended Skill Level
Intermediate

Twin Farmhouse Bed

This was made with the Farmhouse Bed Plan.
Woodworking runs in my family, but this is my first item built from scratch.

We decided to leave it bare for a while. It looks beautiful as is.

Built from Plan(s)
Estimated Cost
Right around $100 for all wood and screws needed. Mattress was $200 and bedding was $60
Estimated Time Investment
Weekend Project (10-20 Hours)
Recommended Skill Level
Beginner

Comments

jbayer80

Mon, 01/07/2013 - 07:24

I will be building this with modifications to the headboard. I'm going to put baseball bats in-between the 4x4's as the header.

Hannah Canopy Bed

Submitted by FSTASFCK on Wed, 10/09/2013 - 18:48

Utilizing the Hannah Canopy Bed plans, I made 2 changes that I am really glad I made. First, I added bead board to the headboard to give it a little style instead of the flat plywood. Second, I used 2x4's on all 4 corners because I could not find any 2x3's that were anywhere close to being straight. Overall I love the final project! It was nice, simple, and quick to get it all put together!

Built from Plan(s)
Estimated Time Investment
Weekend Project (10-20 Hours)
Finish Used
Painted white
Recommended Skill Level
Beginner

Perfect Side Table for the Kitchen

Submitted by Anonymous (not verified) on Wed, 12/30/2015 - 07:48

The only difficult part of this plan was making sure all the cuts were precise and fit together as they should.

Built from Plan(s)
Estimated Cost
$100
Estimated Time Investment
Day Project (6-9 Hours)
Finish Used
Stain is MIniwax Provincial, with 3 coats of Poly.
Recommended Skill Level
Beginner

My first wood project thank you Ana!

Submitted by Anonymous (not verified) on Sun, 03/10/2019 - 10:51

This is my first wood project, and first time using a Kregg jig.  A HUGE THANK YOU TO ANA!  Next is the matching end table and then outside chairs and a pagoda.  

Jeff F.

Finish Used
Grey minute wax stain, and white antique wash fr the bottom.
Recommended Skill Level
Starter Project

Compact Potting Bench

Submitted by vendo on Wed, 02/01/2023 - 12:43

I used Ana's Farmhouse Potting Bench plans and modified it to be more compact and left out the x detail. I built it for under $40 in material. 

Modifications for Shopping and Cut List - Construction and placement is same as Ana's original plan, so make sure you look that over.

Shopping List 

3 - 2x6x8

3 - 2x4x8

1 - 2x2x8

Cut List

FOR 2 Legs
4 2x6 @15.5"
2 2x4 @34.5"
2 2x4 @54"
(cut the 34.5 and 54 out of 1 board and repeat)

2x2 Cross Supports
3 2x2@28"

2x4 Cross Supports
2 2x4@28"

Center Tabletop Support
1 [email protected]"

Bottom Slats
4 [email protected]"

Tabletop Boards
3 2x6@36"

Top Cap Board
1 2x4@37" leaving 1/2" overhangs

VIDEO OF THE BUILD PROCESS

Built from Plan(s)

Narrow Farmhouse Sewing Table

Submitted by melodylisa on Mon, 10/17/2011 - 07:49

modifications to plans: legs not tapered; shortened table by two feet.

Built from Plan(s)
Estimated Cost
$70
Estimated Time Investment
Afternoon Project (3-6 Hours)
Finish Used
Olde Century Colors in ‘Candlelight’
General Finishes Wood Stain in ‘Georgian Cherry’
General Finishes Gel Topcoat
Recommended Skill Level
Beginner

Comments

Pretty in Pink

I made this as a gift for my niece. I fully assembled it, instead of presenting it as a kit. When I made the frame, I hadn't quite figured out how to make perfectly straight cuts with my circular saw, and I cut all the pieces before I came across Ana's tutorial on using a circular saw. So the bed is not perfectly square. Fortunately, a few pieces of thin craft foam glued to the bottom of a couple of the legs eliminated most of the wobble. That, and a generous application of pocket holes and screws. Each side rail is attached to the headboard/footboard with (6) 1 1/2" screws! I could probably jump up and down on the frame and it wouldn't budge. And I think I over-painted. Not to good with my spray painting technique yet. Plus, I forgot to sand between coats, and I didn't have time to add a clear topcoat.
When I look at this project, I see every flaw and mistake and feel dissatisfied. But, I just remind myself that I am my own worst critic. My niece, on the other hand, loved it. And no one else seemed to notice the mistakes: I received several nice complements. And the best part: it was practically free! I bought a can of pink spray paint, but everything else came out of my wood stash or my fabric stash. A present made with love, not money. And my first "real" building project.

Built from Plan(s)
Estimated Cost
$3
Estimated Time Investment
Afternoon Project (3-6 Hours)
Recommended Skill Level
Starter Project

Turntable/Vinyl Stand

Submitted by yhaas on Sat, 01/02/2016 - 09:21

This was a Christmas gift for my husband, who has resurrected his old turntable. I wanted the stand to be the same height as the chest I had previously refinished to house our stereo and cds. I also wanted to have two shelves for vinyl, so I modified the Channing bookcase to fit.

Built from Plan(s)
Estimated Cost
$80
Estimated Time Investment
Weekend Project (10-20 Hours)
Finish Used
Goudey stain in Rosewood, shellac wash coat, Goudey glaze in Van Dyke Brown, shellac again, then Deft satin polyurethane.
Recommended Skill Level
Beginner

Comments

jmb367

Mon, 02/26/2018 - 20:53

My husband has been looking for a stand for his turn table and this one looks perfect! Do you mind my asking for the adjusted measurements? I’d love to see if we could make one for him, if you don’t mind sharing. It looks fantastic!

yhaas

Sat, 12/01/2018 - 12:11

Apologies, I have not checked the site in almost a year. The height of the unit is 37,3/4' tall, the shelf widths are 14" inner width, and the spacing between shelves is 13" between the lower 2 shelves for vinyl, and 5" for the top shelf (for brushes or an occasional CD. Hope that helps.

Table and bench design

Submitted by Anonymous (not verified) on Fri, 03/15/2019 - 05:51

Okay, I hope you like this... it was the second and third thing I ever built!!! The table is made from 2 doors hinged together with accent hinges screwed on top. In the middle there are locks (hook and latch) for design. The frame is oak. measures 81X 56 and fits a good 10 people around.


The bench is an old cherry tree slab that someone I know did not want. its about 72 inches long and it is slighly curved. I ushed a shilac and kept the same color....  I just sanded it down.

Estimated Cost
250.00 (table)

bench was even less because the wood was free and I reused some stain from a previous projects.
Estimated Time Investment
Weekend Project (10-20 Hours)
Finish Used
black cherry, mahogany, and shilac
Recommended Skill Level
Beginner

4x4 Truss Beam Table

Submitted by Anonymous (not verified) on Tue, 02/07/2023 - 12:39

We stuck with th original plans, but instead of making table ends, we did full 2x10x8 boards and capped it with 1/3’s. We filled in the gaps in the wood with stainable wood filler. We also used a 1/2@ Forstner bit and recessed the screws and used wooden dowels to cover the screw holes. It gives it a beautiful finish. We also enjoy our pew pews, so we recessed .40, .45, .223, and .22 empty shells into the table. My husband wood burnt a message in the center of the table, then we sealed it all with one step minwax finish in mission oak.

Built from Plan(s)

Comments

Window seat with storage

I wanted a window seat that would fit my window. There was no way I could afford to buy anything. Ana's site inspired me to modify her plans to create what I wanted. My husband and I worked on this during the weekends and between my son's nap. The piece is so large that 2 people were needed just to pick up the wood. The finished piece is 8' long, 2' deep and 18" tall. If we ever move, it might have to stay with the house.

Estimated Cost
150.00
Estimated Time Investment
Weekend Project (10-20 Hours)
Finish Used
3 coats of Swiss coffee (Home Depot)
2 coats of poly
Recommended Skill Level
Beginner

Comments

Bench

Submitted by vic b on Wed, 10/16/2013 - 14:25

Love this bench, you can fit lots of kids on it and it is very sturdy.

Built from Plan(s)
Estimated Cost
$0
Estimated Time Investment
An Hour or Two (0-2 Hours)
Finish Used
Left over treated pine framing timber from our garage construction.
Recommended Skill Level
Intermediate

Double-dogged

Submitted by Anonymous (not verified) on Sun, 01/03/2016 - 09:47

Two big dogs, so two big houses . Long project but so cute. Don't worry, they are inside /outside dogs...

Estimated Time Investment
Week Long Project (20 Hours or More)
Finish Used
Outdoor stain, asphalt shingles, daisy chains.
Recommended Skill Level
Advanced

CA King Farmhouse Bed

Submitted by Anonymous (not verified) on Fri, 03/22/2019 - 09:39

This was my husband's 3rd or 4th Ana White project.  We also had to go back for mre wood as the shopping list was not complete.  

Estimated Cost
$350
Estimated Time Investment
Week Long Project (20 Hours or More)
Recommended Skill Level
Intermediate

Comments

My Tryde Media Console Hutch

This was the second part of my Tryde media center build. You can read about the console build here.

This part of the project was very quick to put together, I spent a lot of time reading the brag board and looking at pictures of what others produced.  I really appreciate when people upload high res pictures of their builds so you can really look at the details - I've tried to do the same on my blog post about this project in case you needed further information (see link below).

I made the plan as per Ana's original, with some modifications.  These were:

  • added a back kickboard at the base for stability
  • added trim around the back and sides at the base to stop it toppling over
  • added felt to the feet to avoid scratching my console underneath (worked so hard on that one!)
  • added 'L' shaped brackets to join the two pieces together, for added stability (check my previous post for more details on this)
  • changed the orientation of the beadboard on the back to be vertical and not horizontal (I just preferred it this way)
  • after seeing Perchik's build of the Tryde media center I shamelessly copied his idea to extend out the trim around the top.  It looks much better wrapped around than jutting out the front, a little less severe I think

I hope you would give this project a go, as a hutch it is very simple to put together for a beginner and quite satisfying.  To get more information about my build please read my blog post where I go in to a lot more detail (and leave a comment too, I'd love to know what you think!)

Happy building!

Estimated Cost
Approx $100AUD (not incl hardware, paint)
Estimated Time Investment
Weekend Project (10-20 Hours)
Finish Used
Taubman's Endure interior paint (satin) in 'Milk Paint'
Custom 'glaze' (see blog posting for details)
Cabot's wood putty in 'Radiata Pine'
Recommended Skill Level
Starter Project

Comments

perchik

Tue, 10/25/2011 - 08:34

Annie this looks great!
I'm glad you found inspiration in my design. I think I'll go back and upload a side picture and the sketchup model I worked from so that other people can see the details of how I did the trim. I think yours turned out wonderful!

I don't like painted furniture in my home but I really like the look of your furniture. The antiqued white goes well with the stained console top and the faux drawers.

Great job!!

CreativePineapple

Tue, 10/25/2011 - 15:37

Aww cheers Perchik... You're right, the natural beauty of wood is lovely, but I have so many different shades of wood in my living room from collecting 2nd hand furniture and old college furniture over the years that nothing seems to match :) Plus I do like this modern trend of stained top and painted legs, it looks quite fresh. The hard part with this stuff is deciding which project to do next - so many to choose from :)

CreativePineapple

Tue, 10/25/2011 - 15:38

Oh also I think if you have that sketchup stuff to hand I would definitely upload it, I zoomed in quite a lot on your photos and others photos of completed builds to understand details that are sometimes difficult to visualise on the plans.