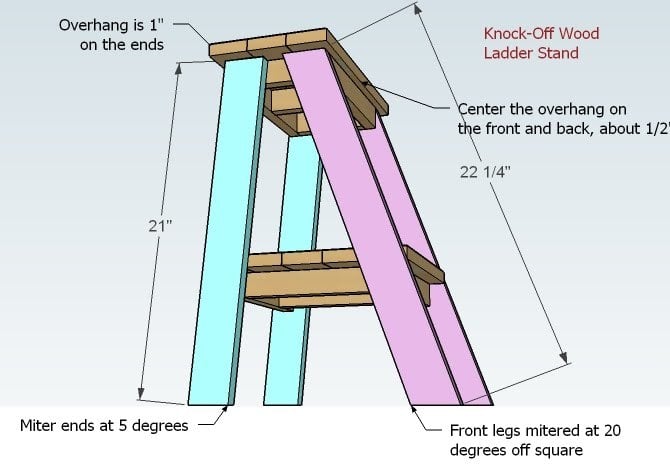
Modern Park Bench Plan
I love the plans for this bench! Very well thought out plans, easy to cut the wood and easy to put together. Thank you for all the hard work in coming up with all of these great plans!
Reanna Tovar
Built from Plan(s)
I love the plans for this bench! Very well thought out plans, easy to cut the wood and easy to put together. Thank you for all the hard work in coming up with all of these great plans!
Reanna Tovar
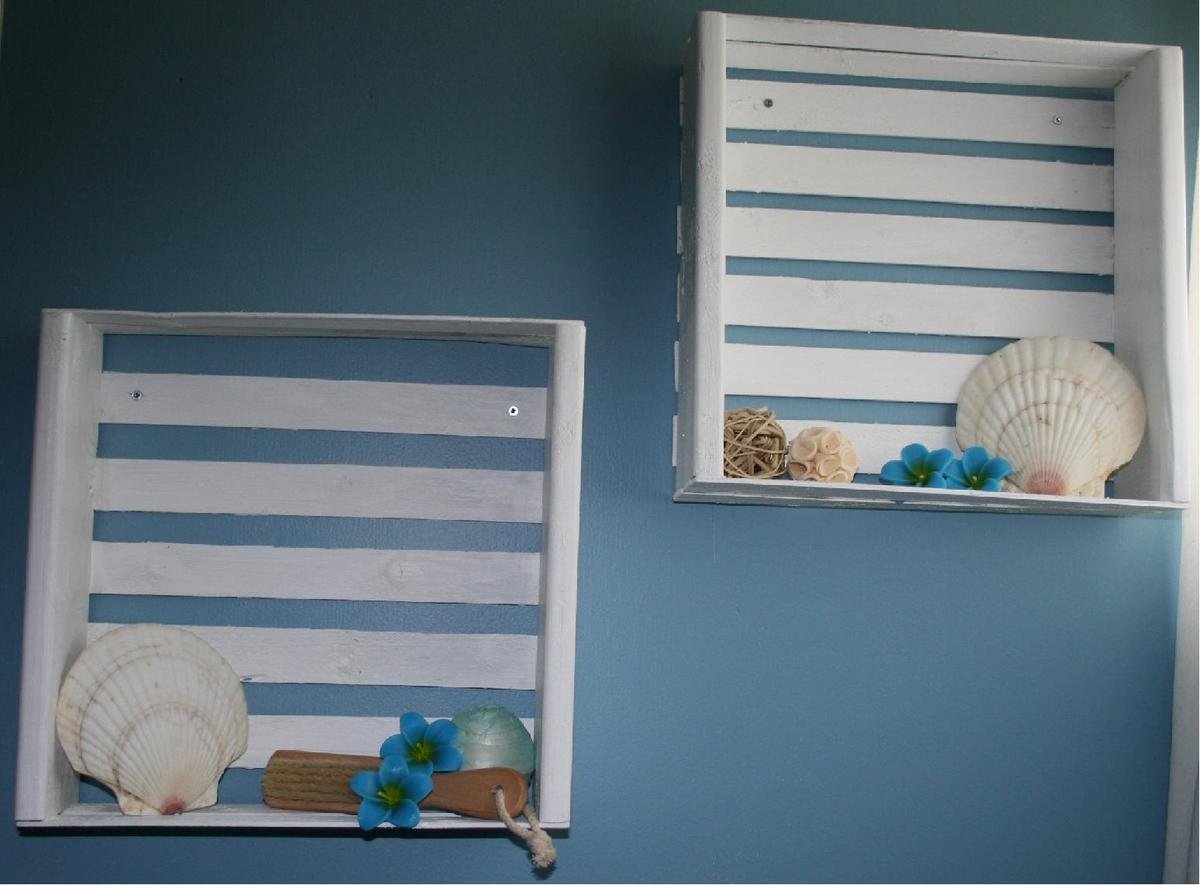
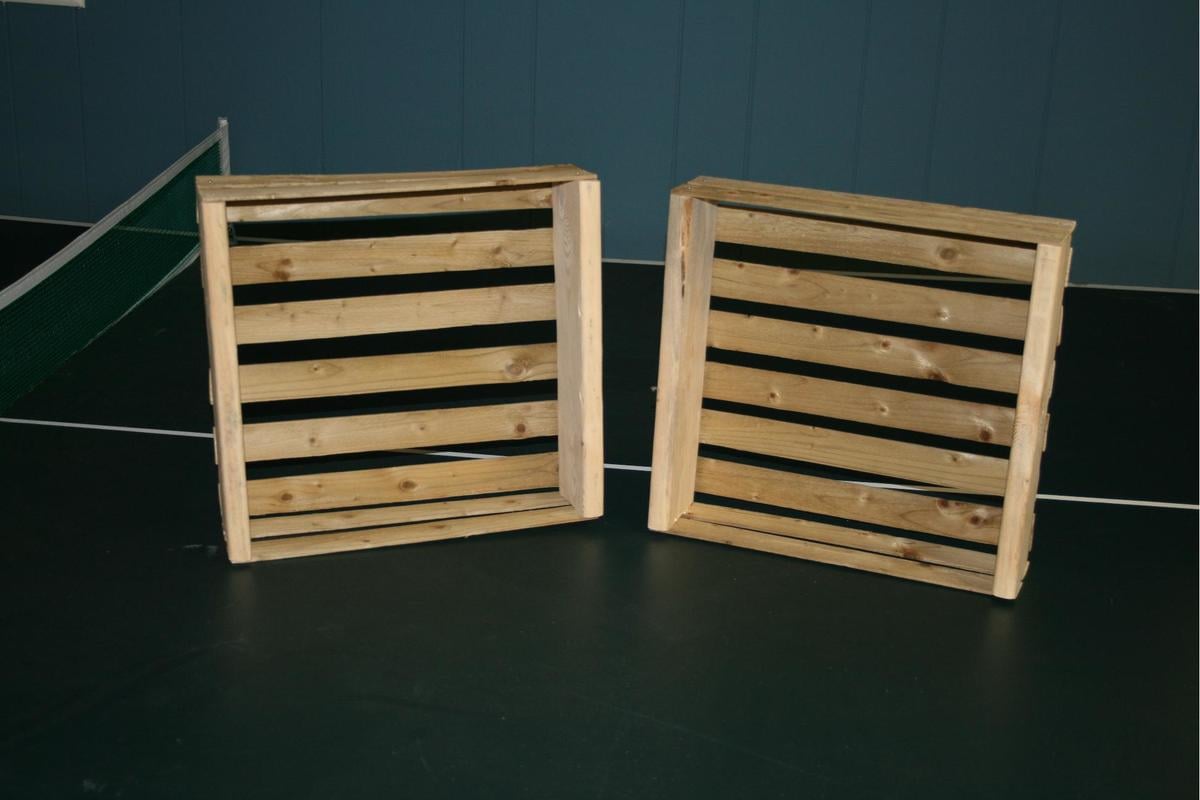
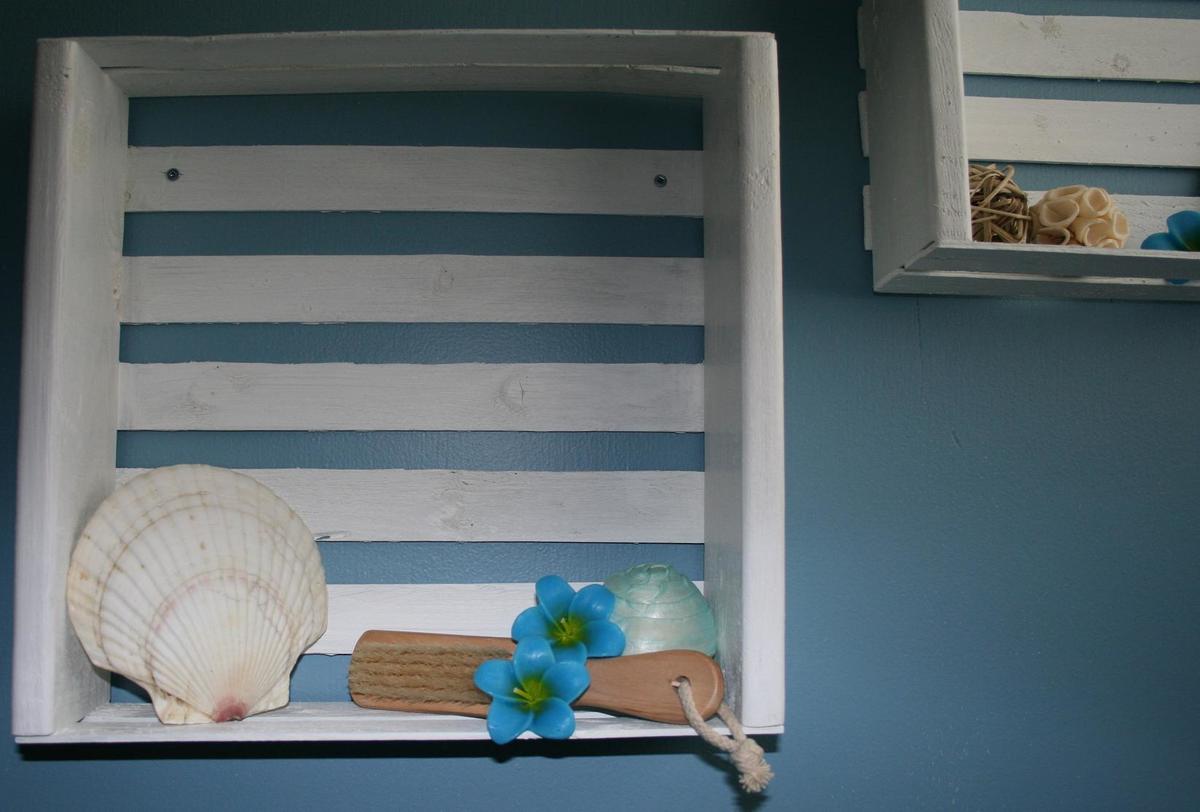
My first project where I made the whole thing by myself! My friend and I each loved this idea and so together we each made our own version! It was just what I needed for some bathroom beautifying in a small space!!


My husband made this for my daughter's 4th birthday. she loves it! We did decided not to add the wheels and it seems to be fine without them. We chose to do her name in letters as well. I did the lines and dots with a sharpe marker.
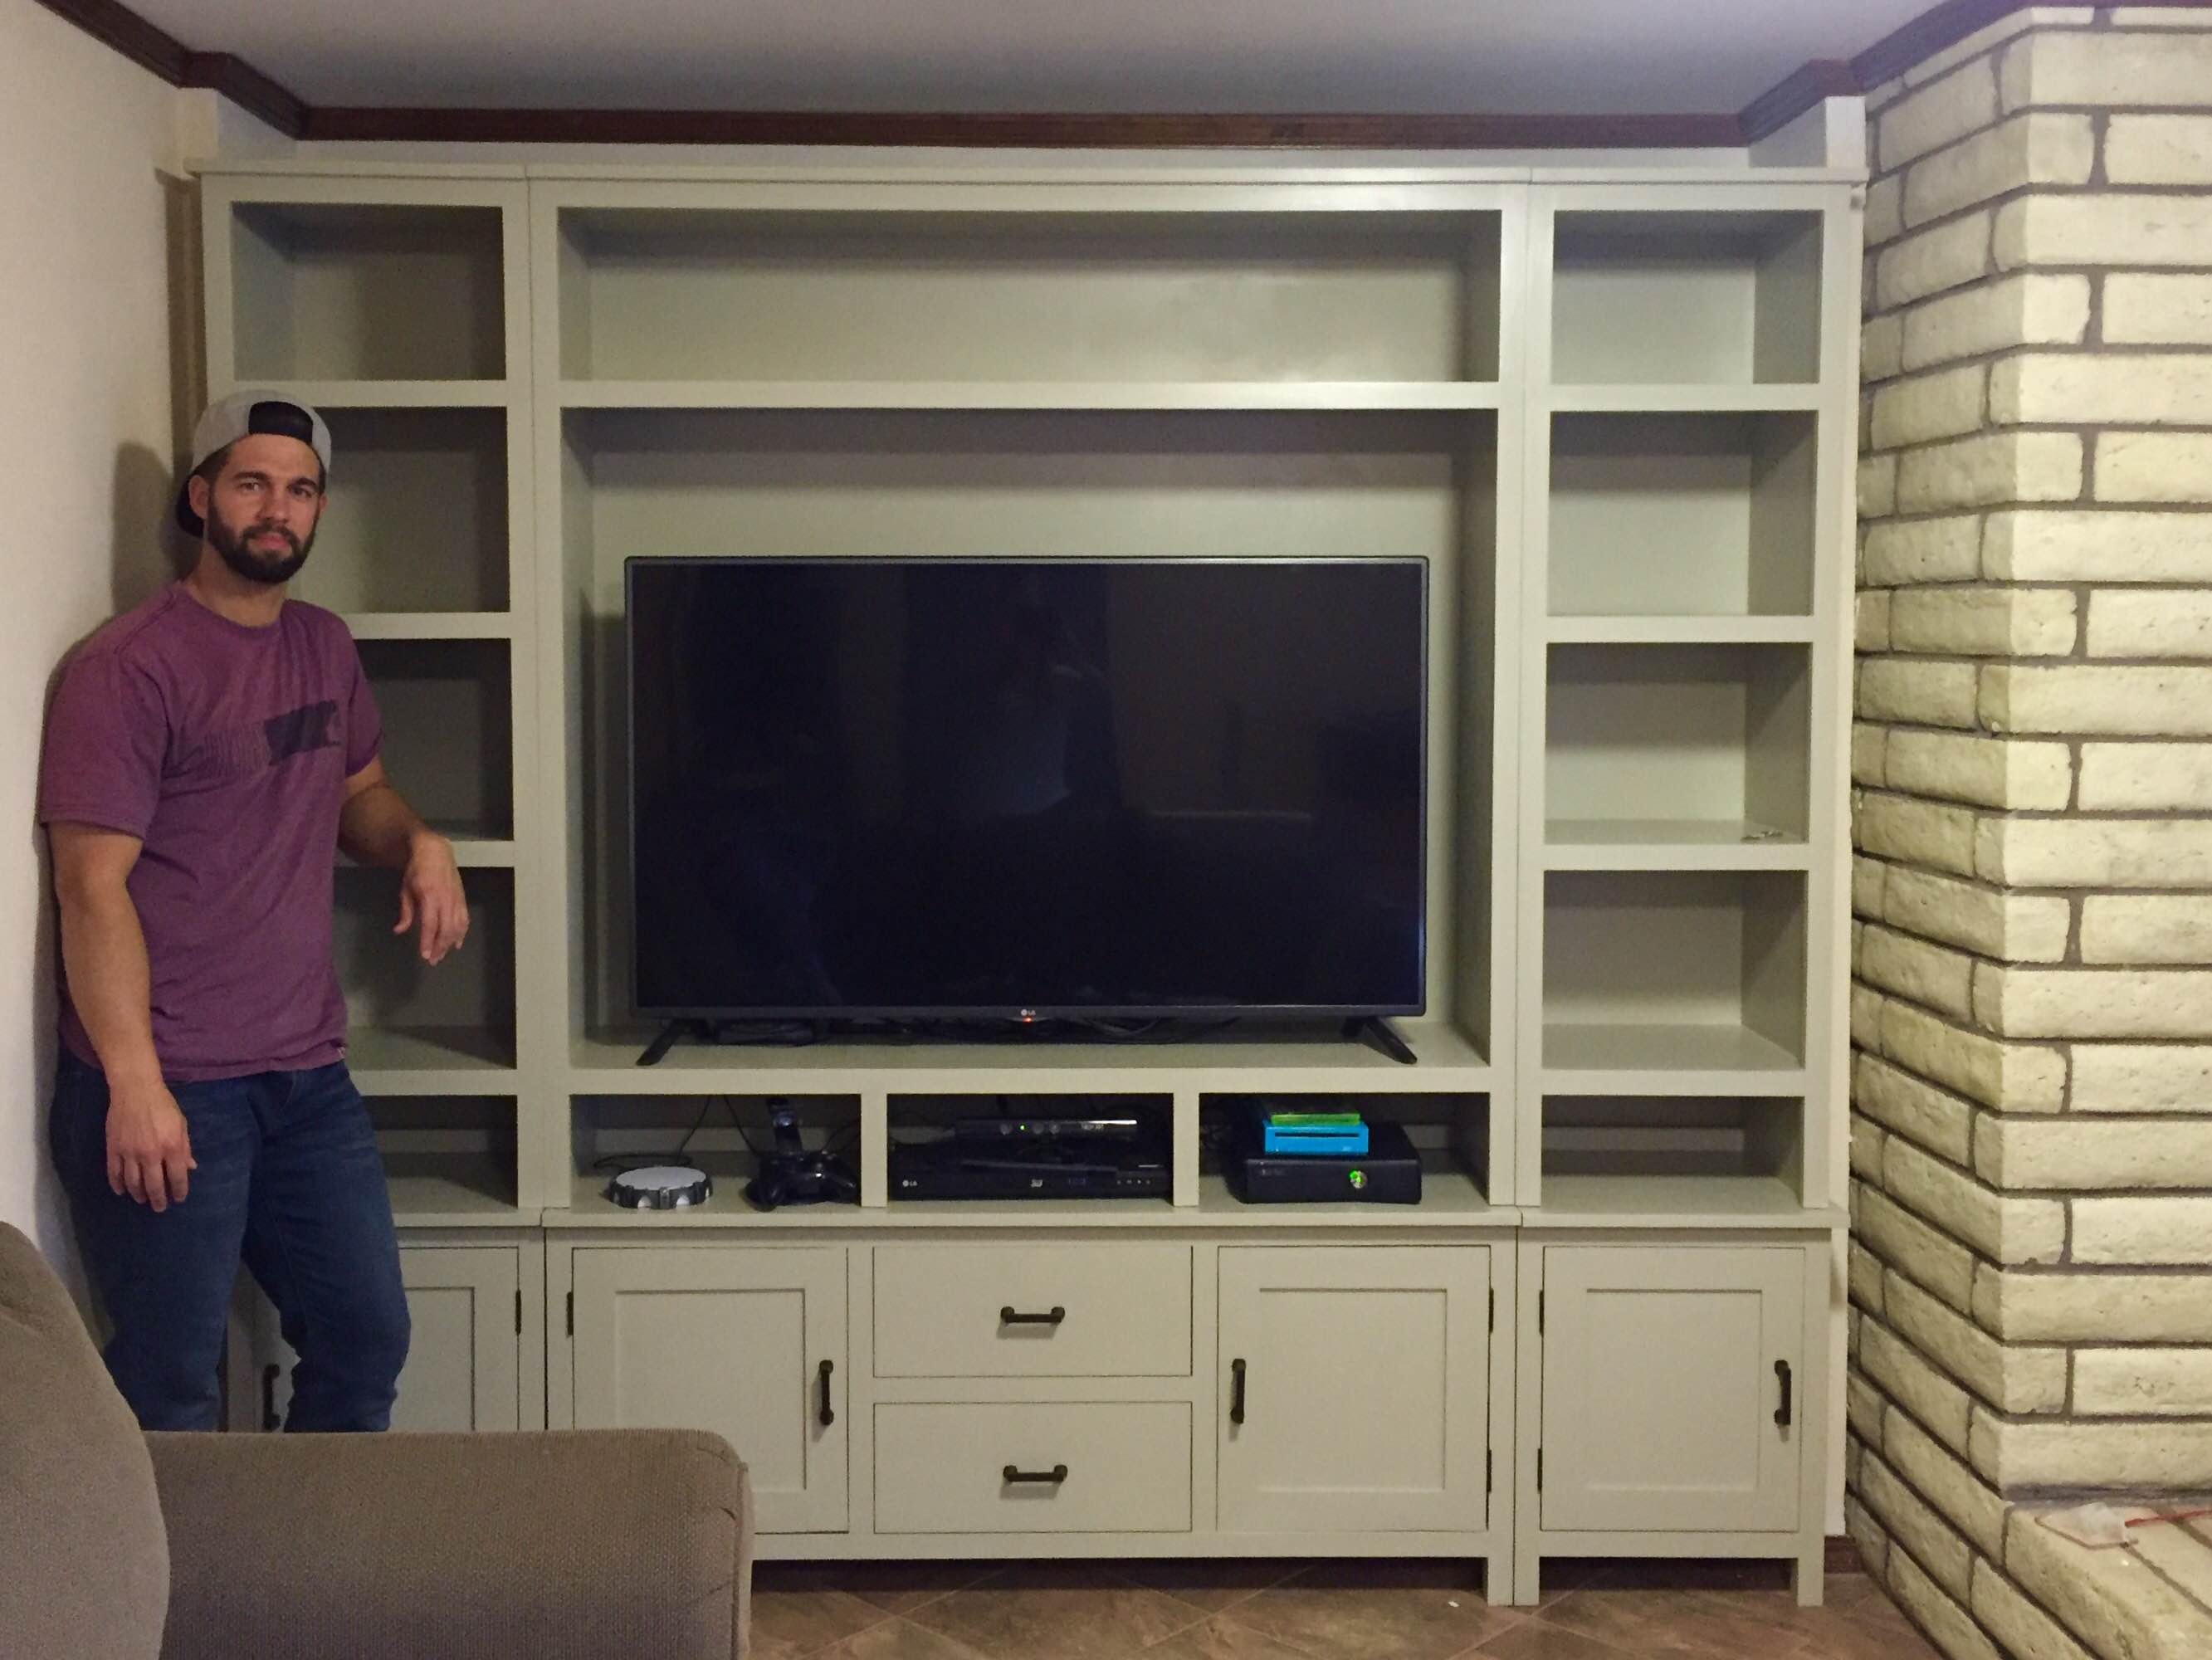
I built this for my oldest brother. I only used 2x2's for the legs. I built the carcuses out of plywood and used 1x2 select pine for the face frames. I built the top shelfs to be 5 feet tall. So the whole thing is 7 feet high by 8 feet wide.
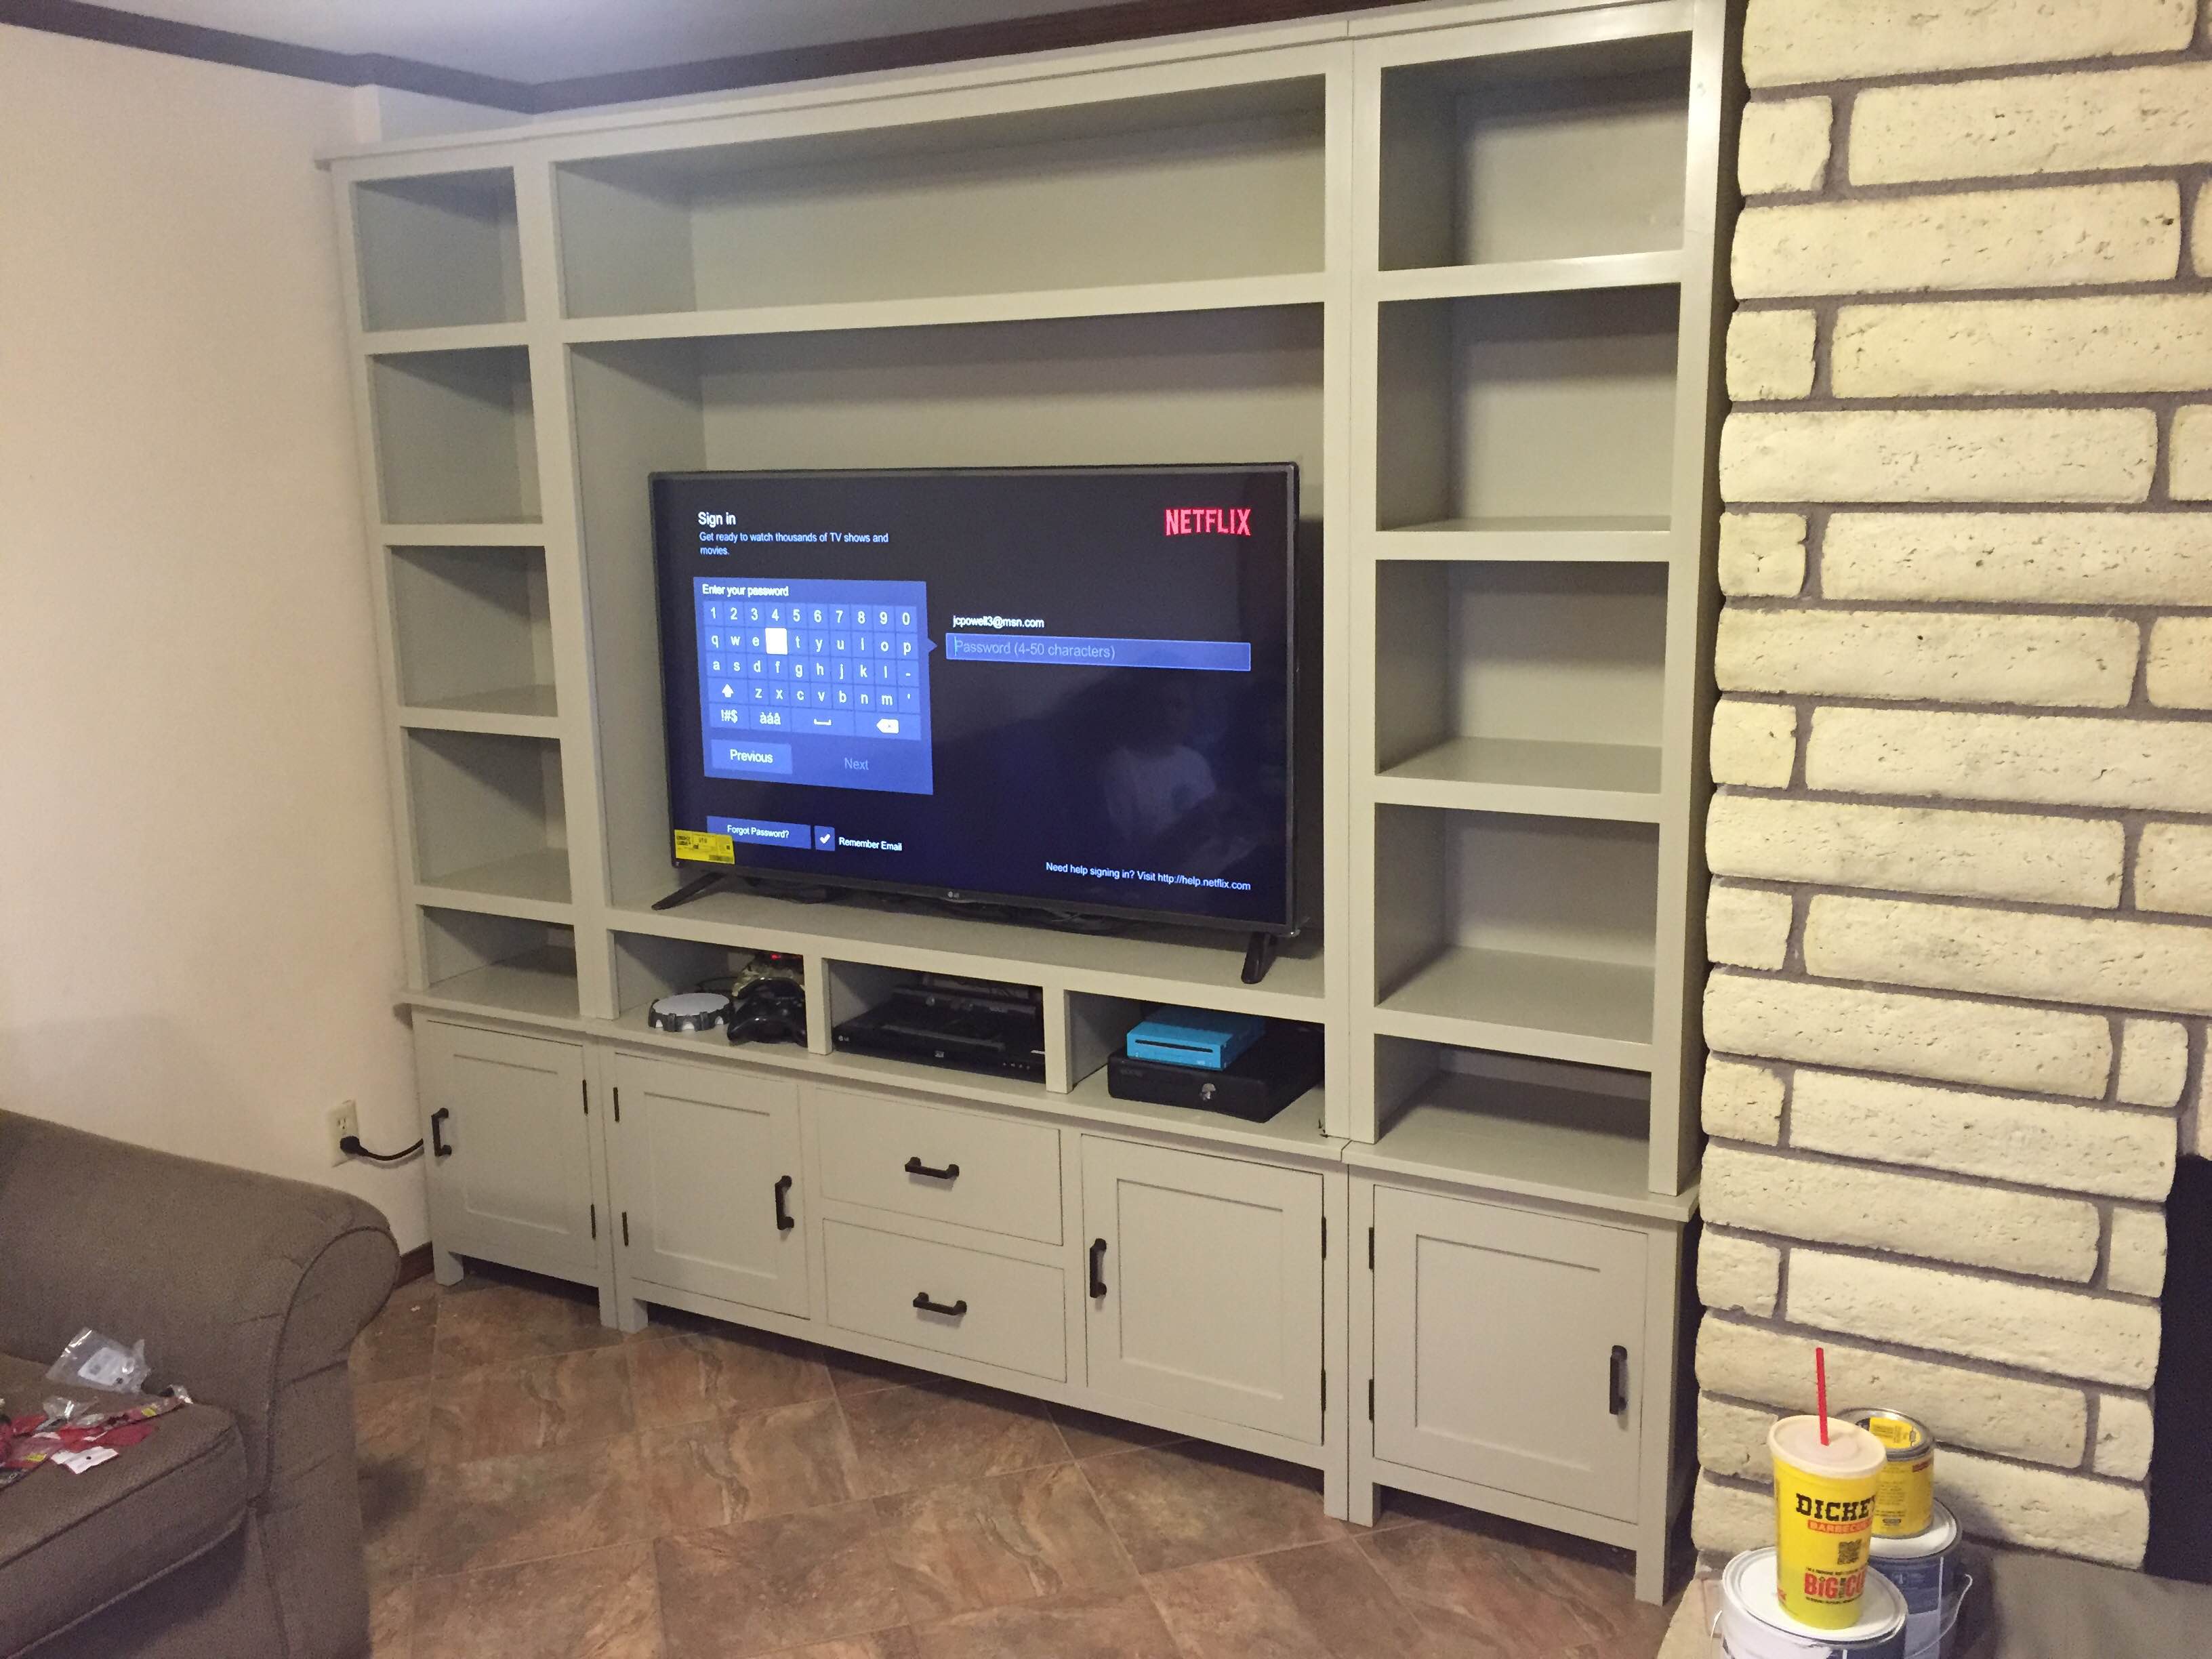
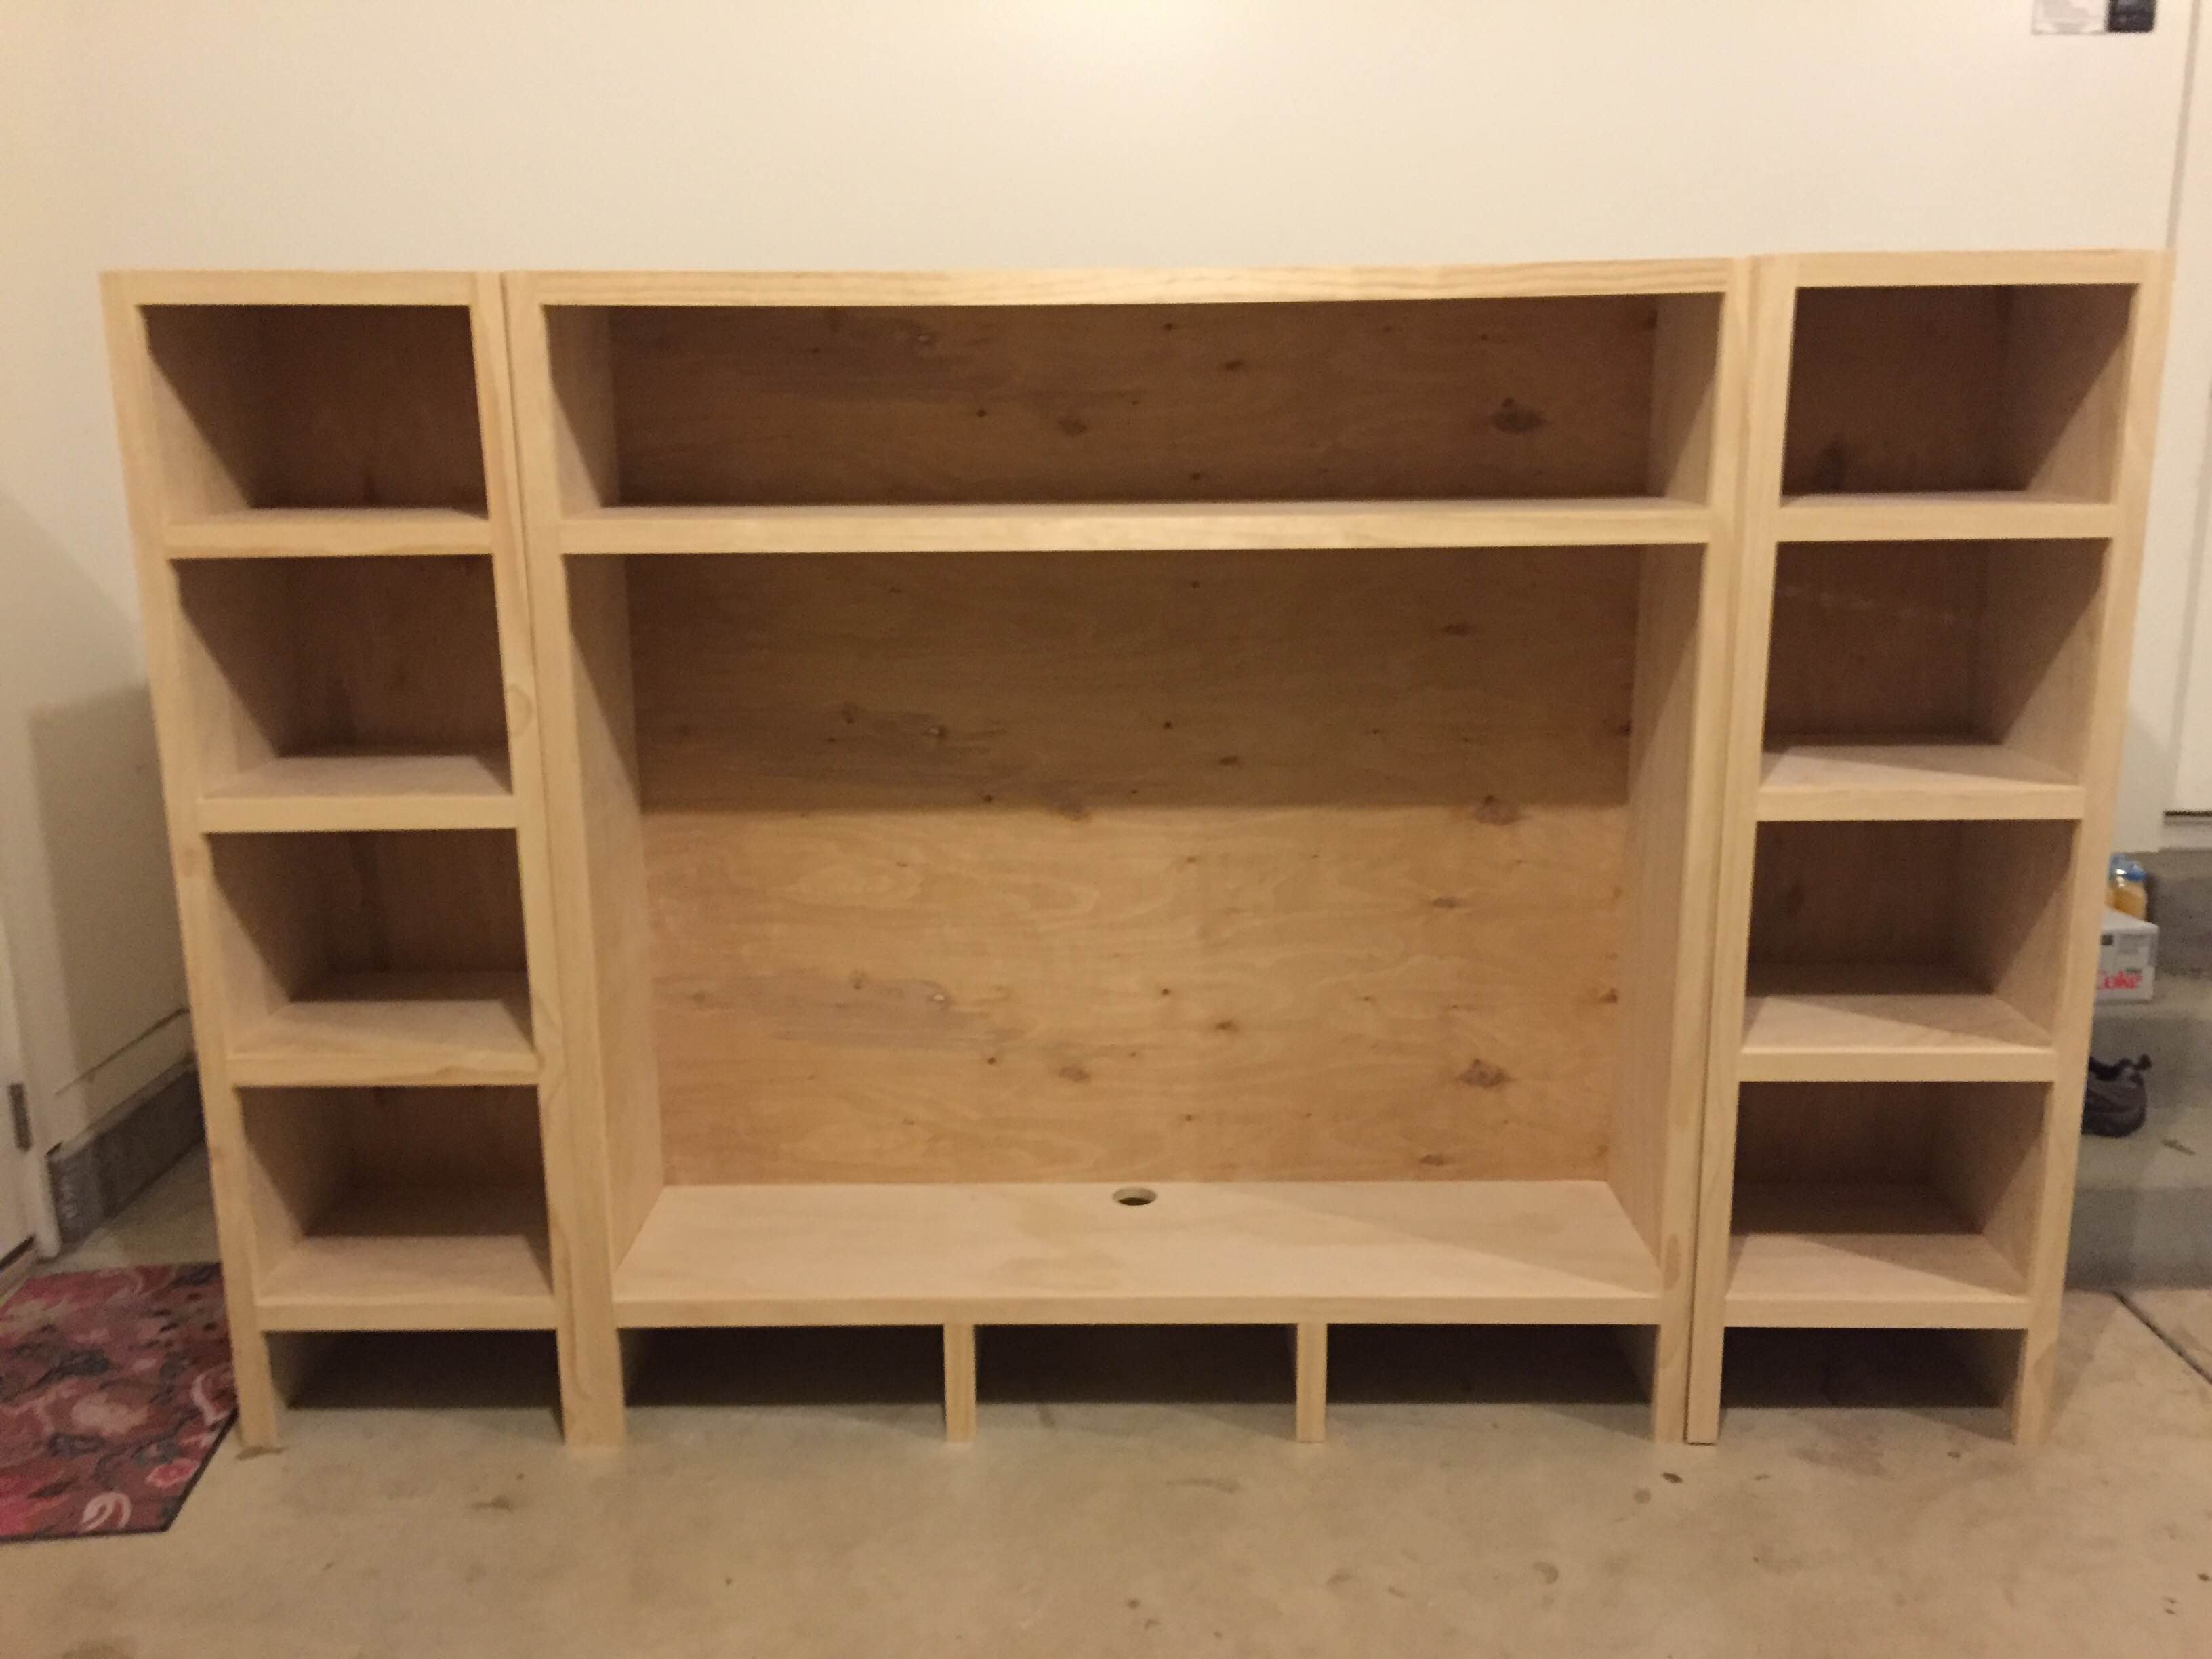
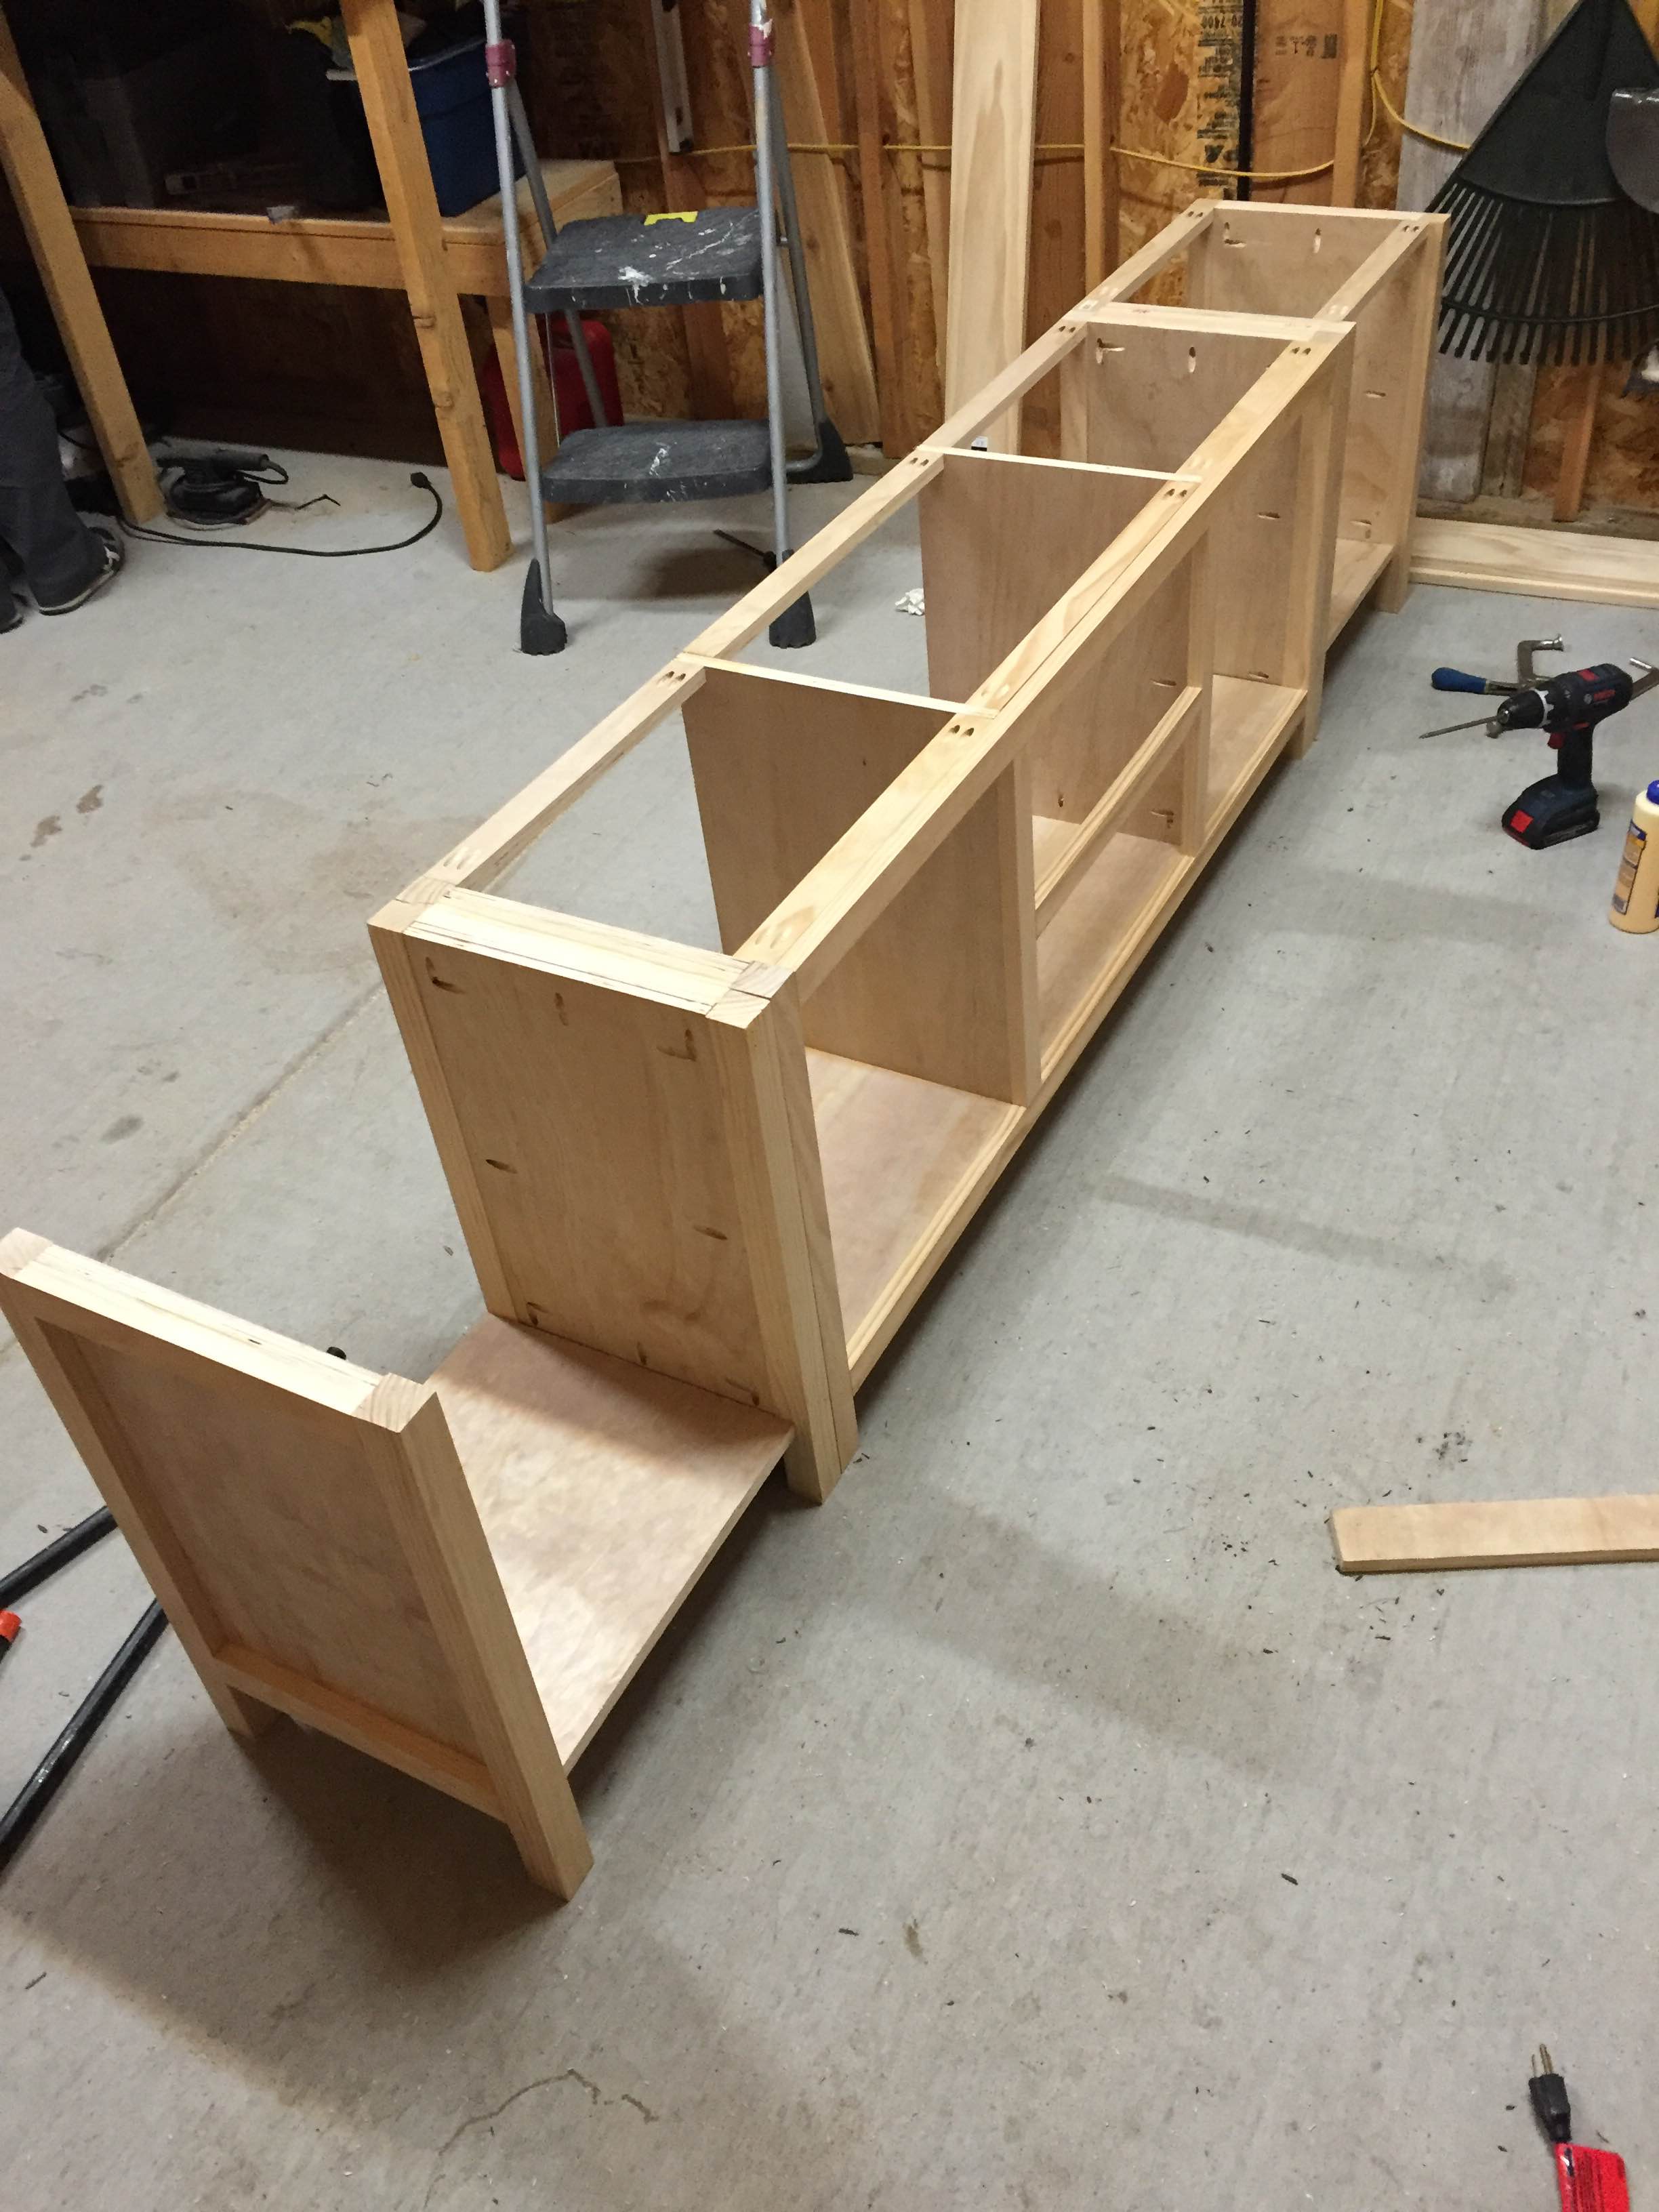
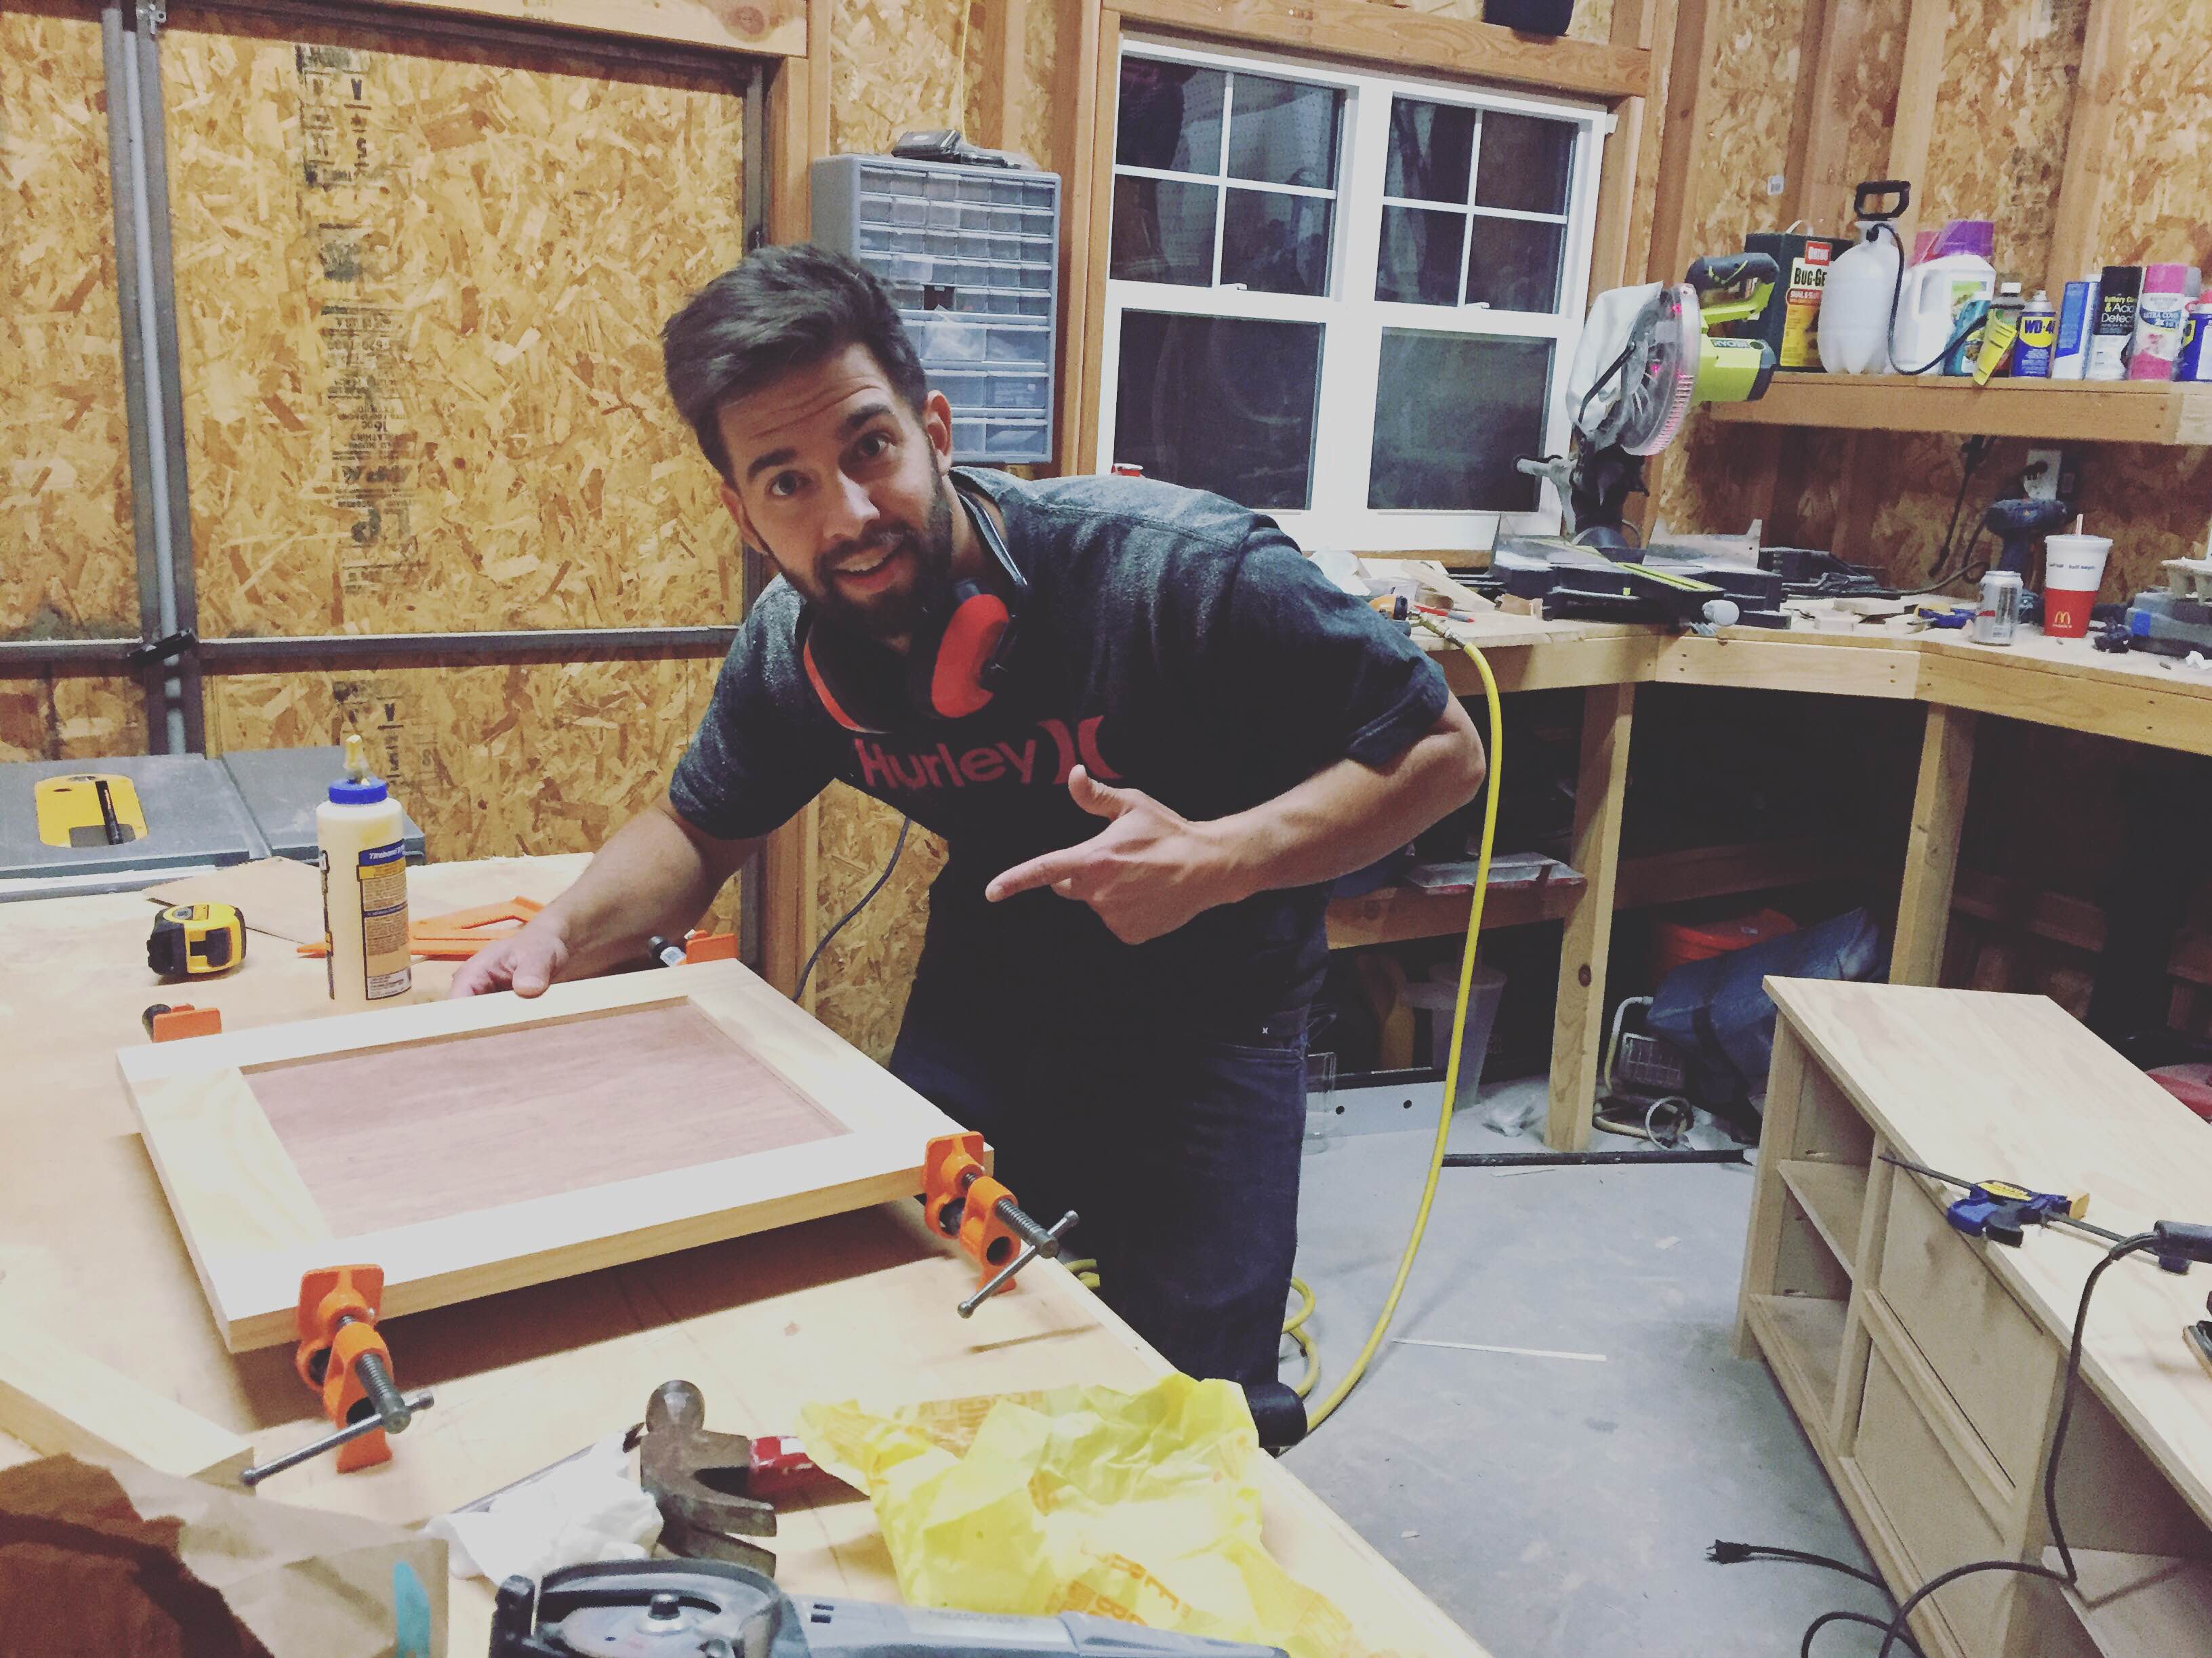
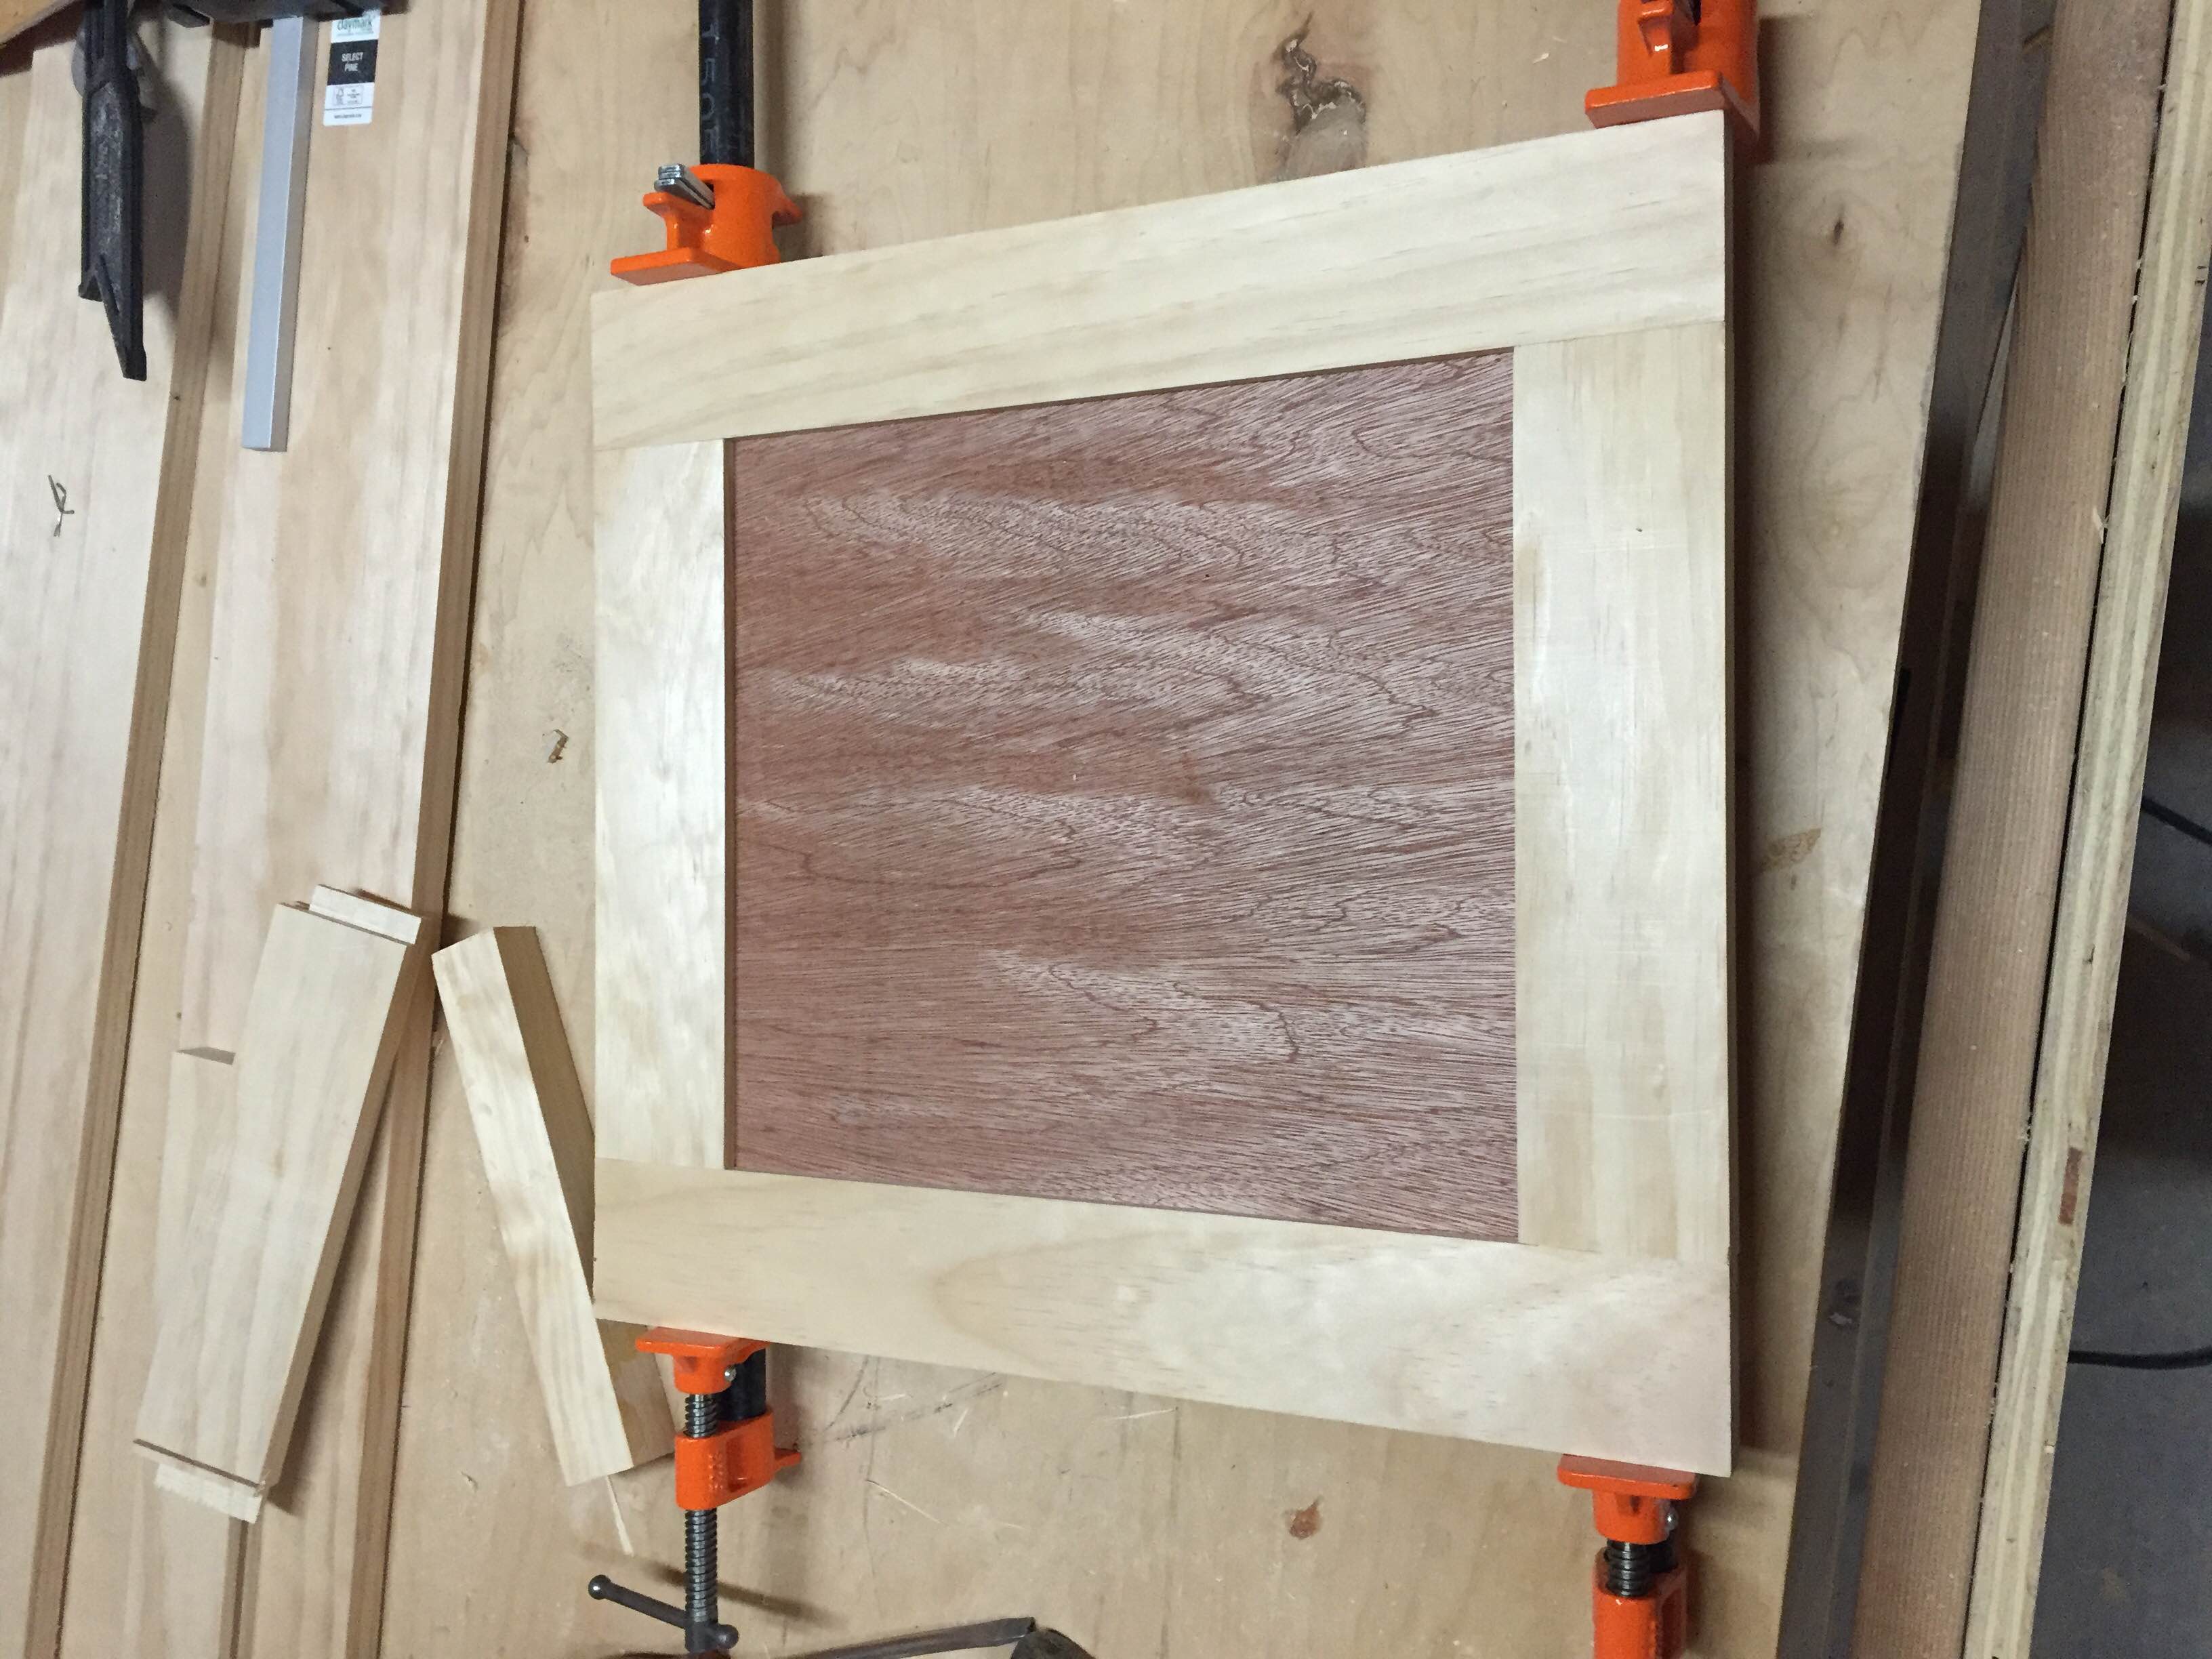
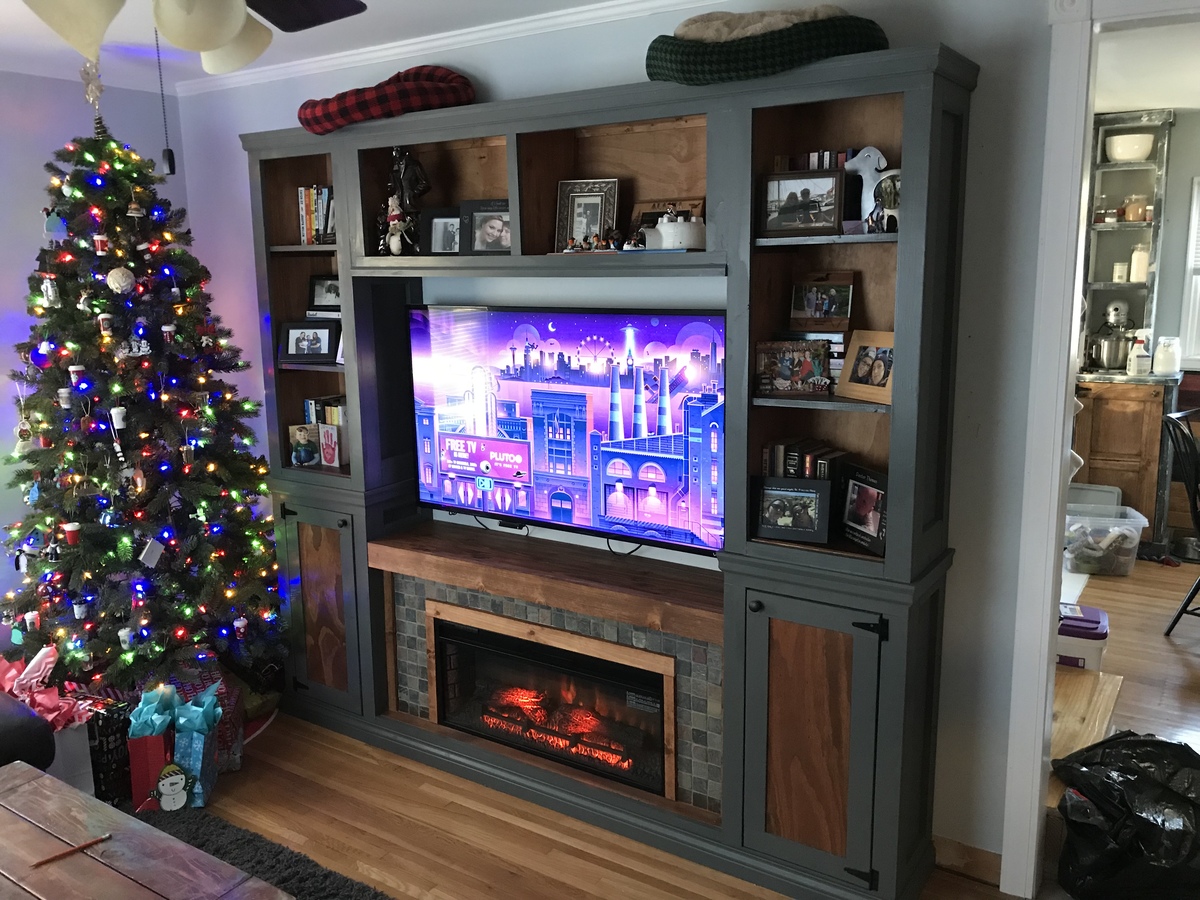
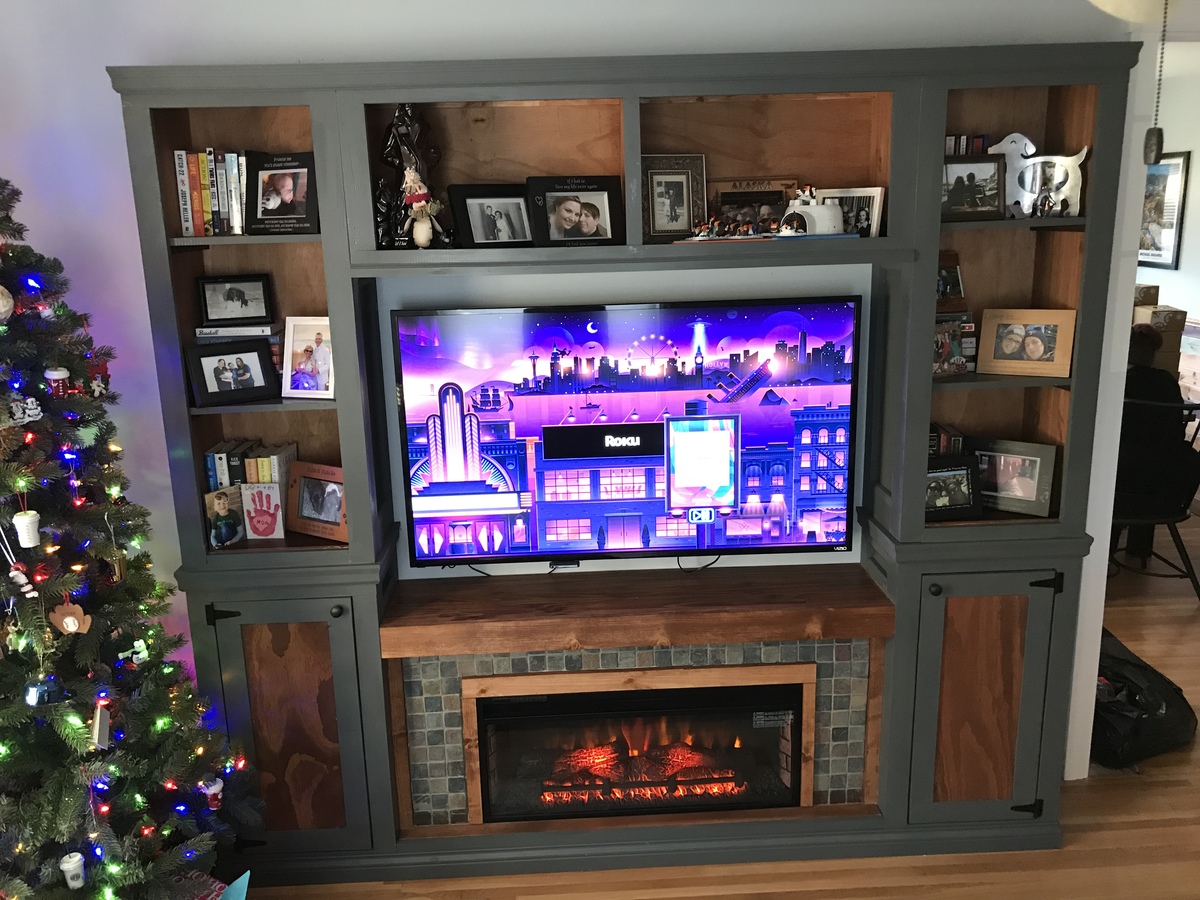
We needed a surround for the TV and really wanted to have a fireplace underneath. I took the Shanty Hutch/Sideboard plans and made some modifications. Took about 2 weeks to complete.
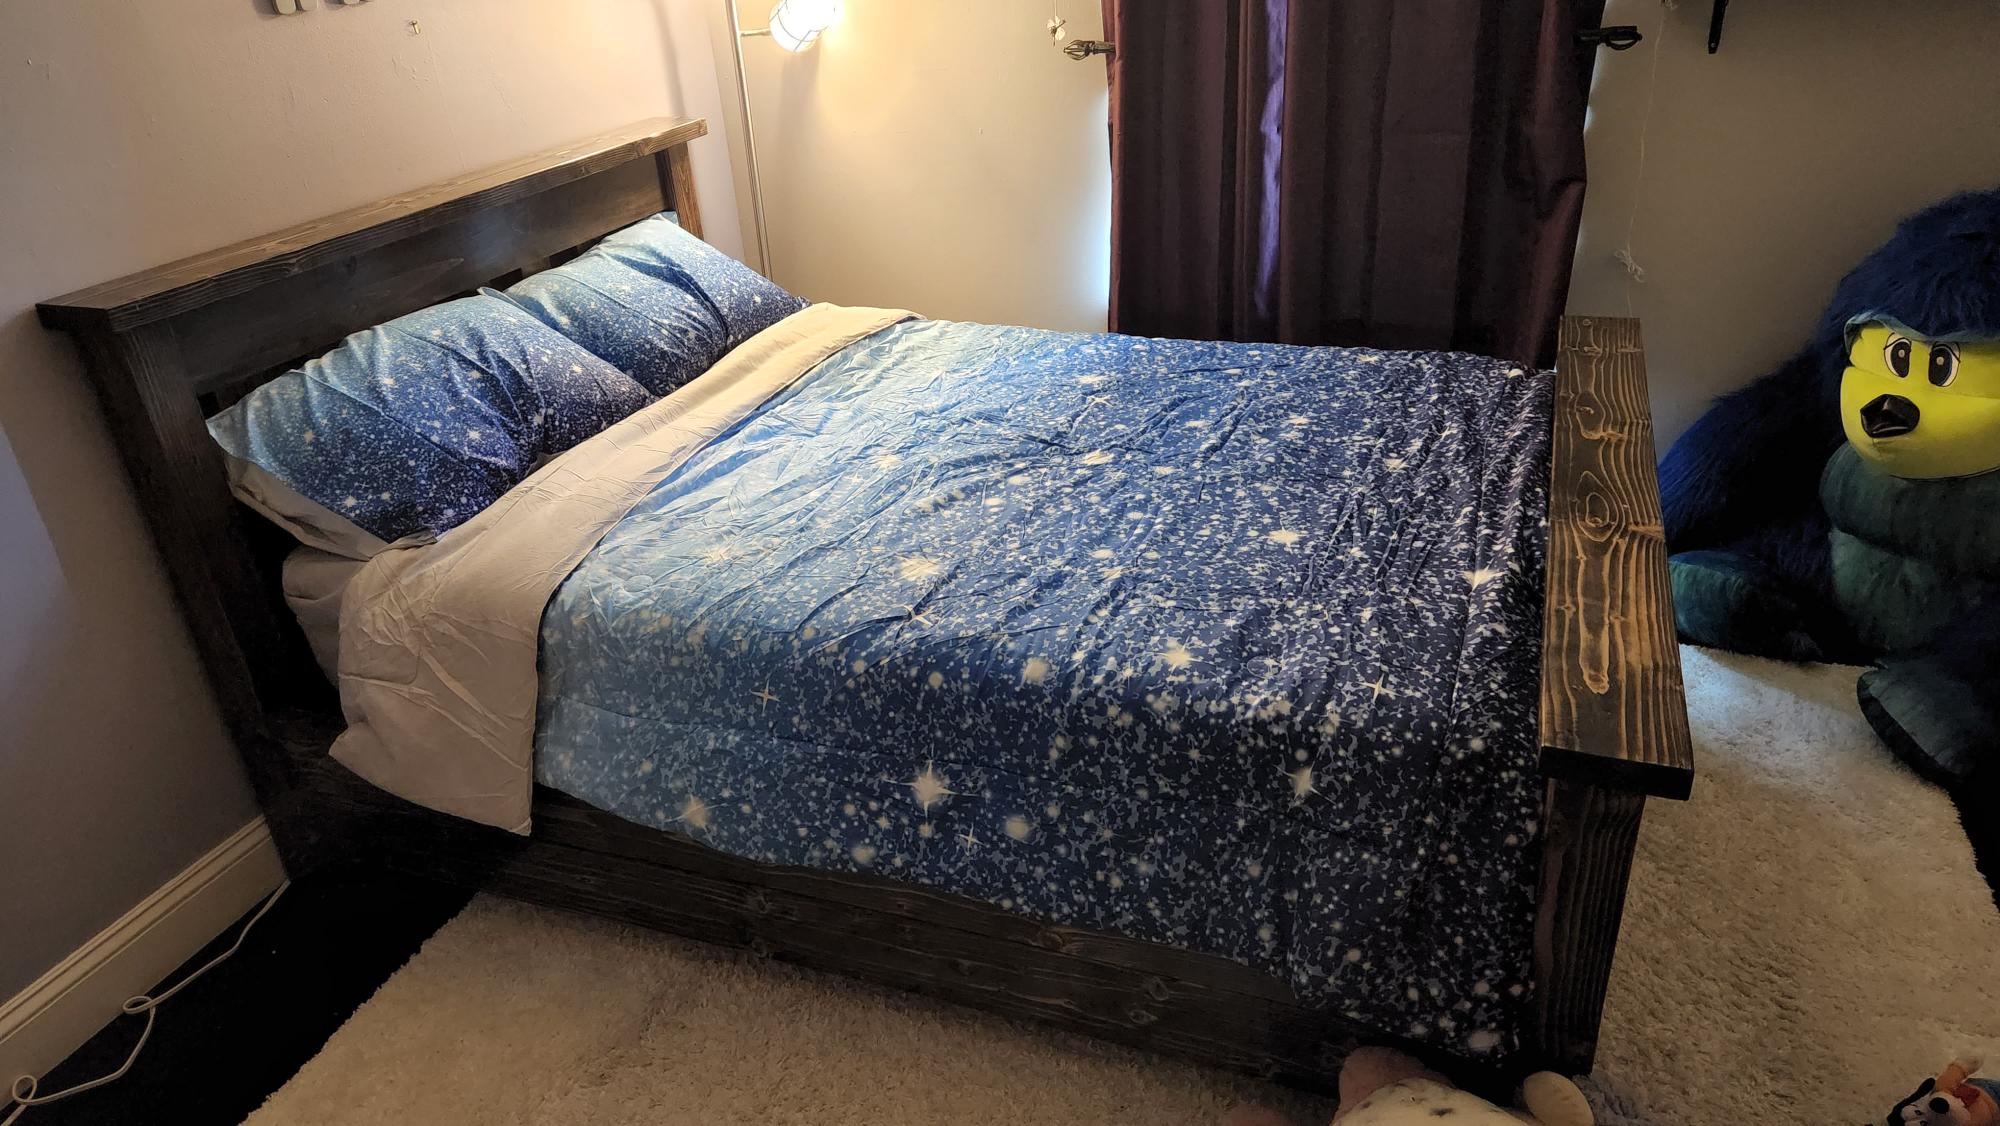
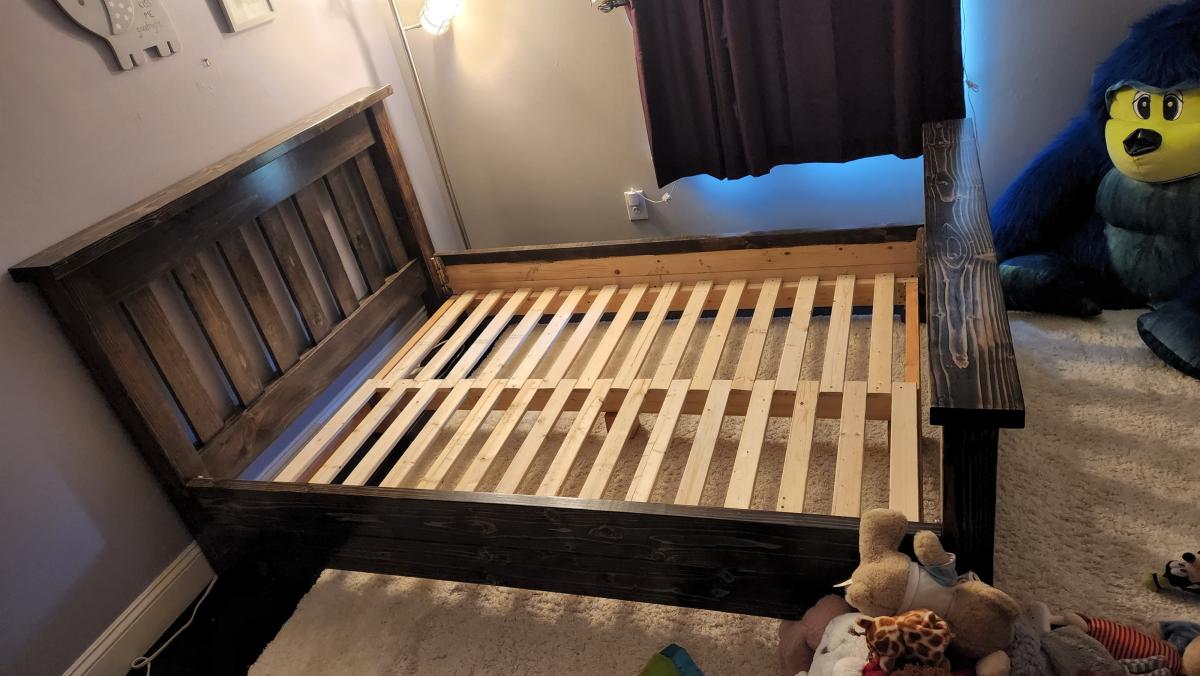
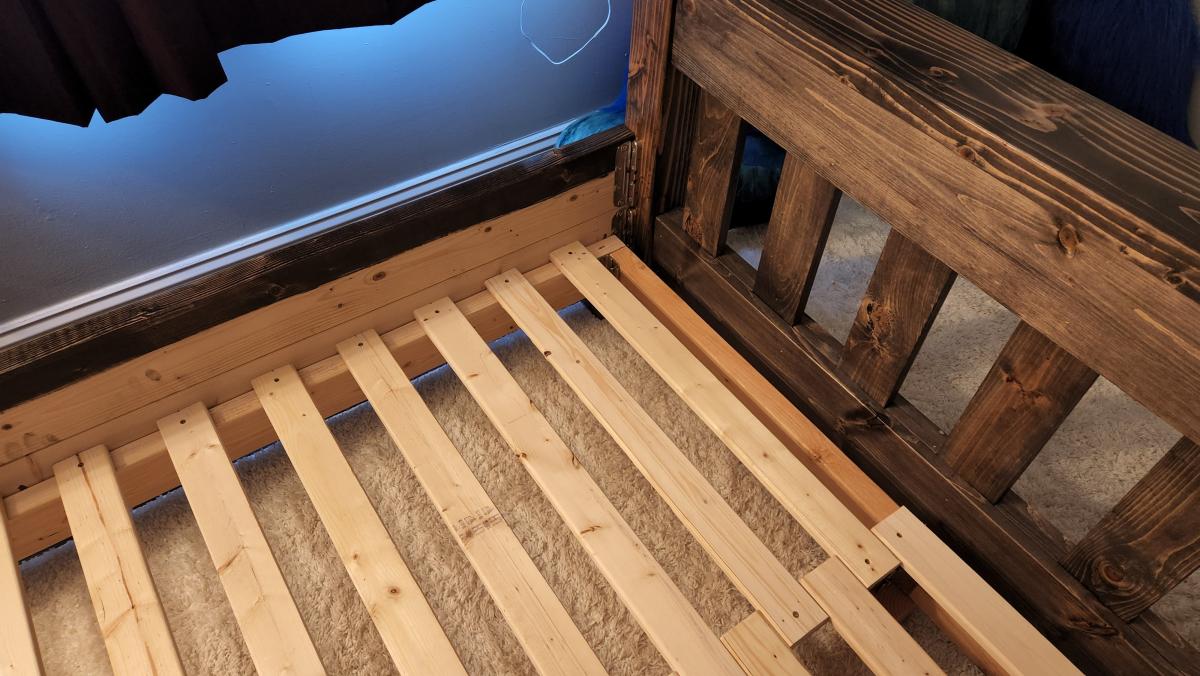
My daughter needed to get out of her Toddler Bed so I built this quickly. Used 2 2x6 for each rail, and cut down the height of the headboard and footboard. Also as always I use Rocklers 5" Surface Mounted Brackets for all beds. I have the rails also sitting on 3 inch blocks to support the extra jumping this bed will endure by a 4 yr old.


I love my dogs, but their wire kennels were an eyesore. Removing them completely was not an option, but I was tired of looking at them. I went back to my first-ever rehab project, and took it one step further to create a one-of-a-kind castle for my pups.
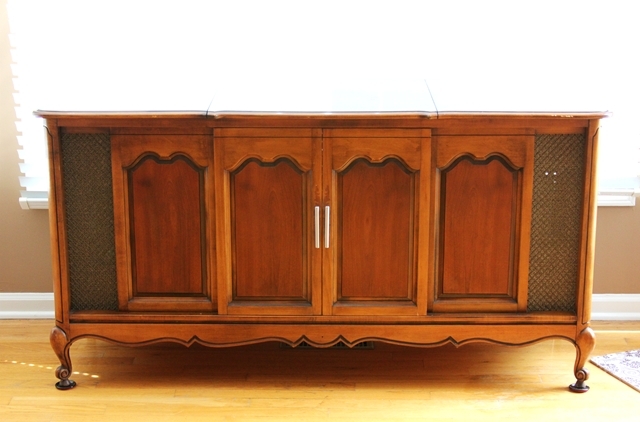
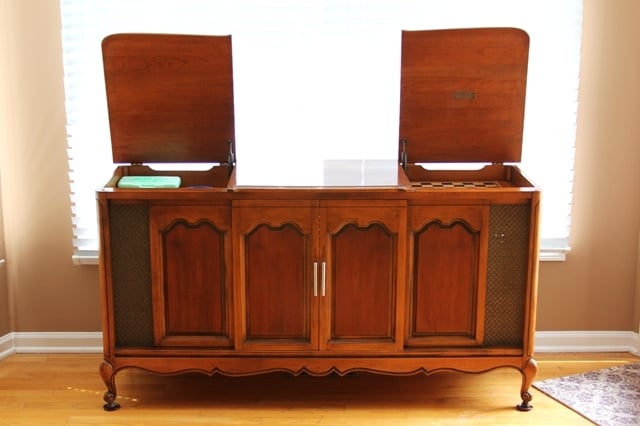
The original piece of furniture was an old console-style TV cabinet. Sliding doors on the front revealed the TV, and two lids on top contained the tuner and a turn-table.
Armed with screwdrivers, hammers and a dremmel, all components were removed form the cabinet, leaving just the shell. (PLEASE be sure you remove all sharp, potentially dangerous, screws, staples and what-not’s from the inside of the cabinets, to avoid injuring your pet! The dremmel allowed me to cut off and grind down stubborn screws.)
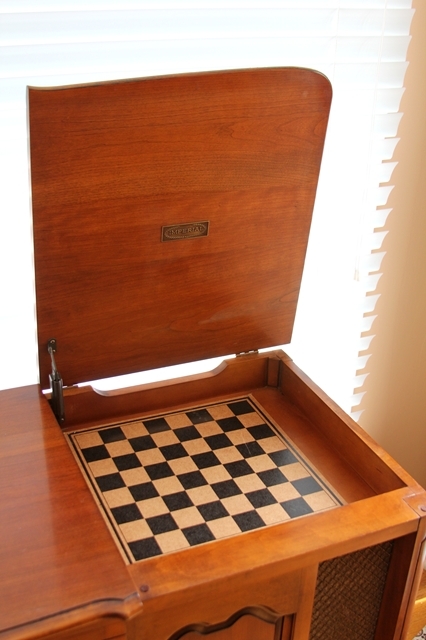
To cover the holes in the top cabinets, I used old checker boards. The cubbies are now a great place to store dog treats and leashes.
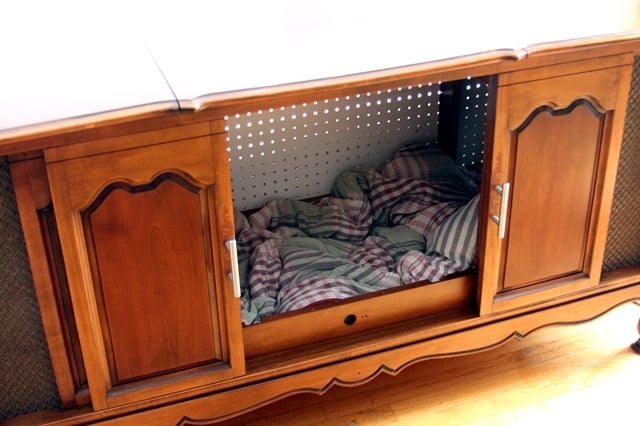
OPTIONAL: The back panel of the cabinet I used had holes from the TV components. I elected to replace the back board with a new sheet of peg board. (The peg board allows for much-needed ventilation.) In order to get the size perfect, I traced the old back onto the new and marked the original screw holes.
I vacuumed the inside to remove all construction debris and polished the exterior with Pledge. Then, I inserted an old comforter into the kennel, and stood back as my two pups launched themselves into their new abode.
The doors can stay open during the day for them to enter at their own will, and close for bedtime. And my eyes no longer hurt.
Thu, 08/11/2011 - 18:41
This was such a great idea. I love the old console. I love to build but I love it so much more when I can use old wood or repurpose parts of old furniture and industrial pieces. I feel creative. The checker boards are great. Do you have a blog?
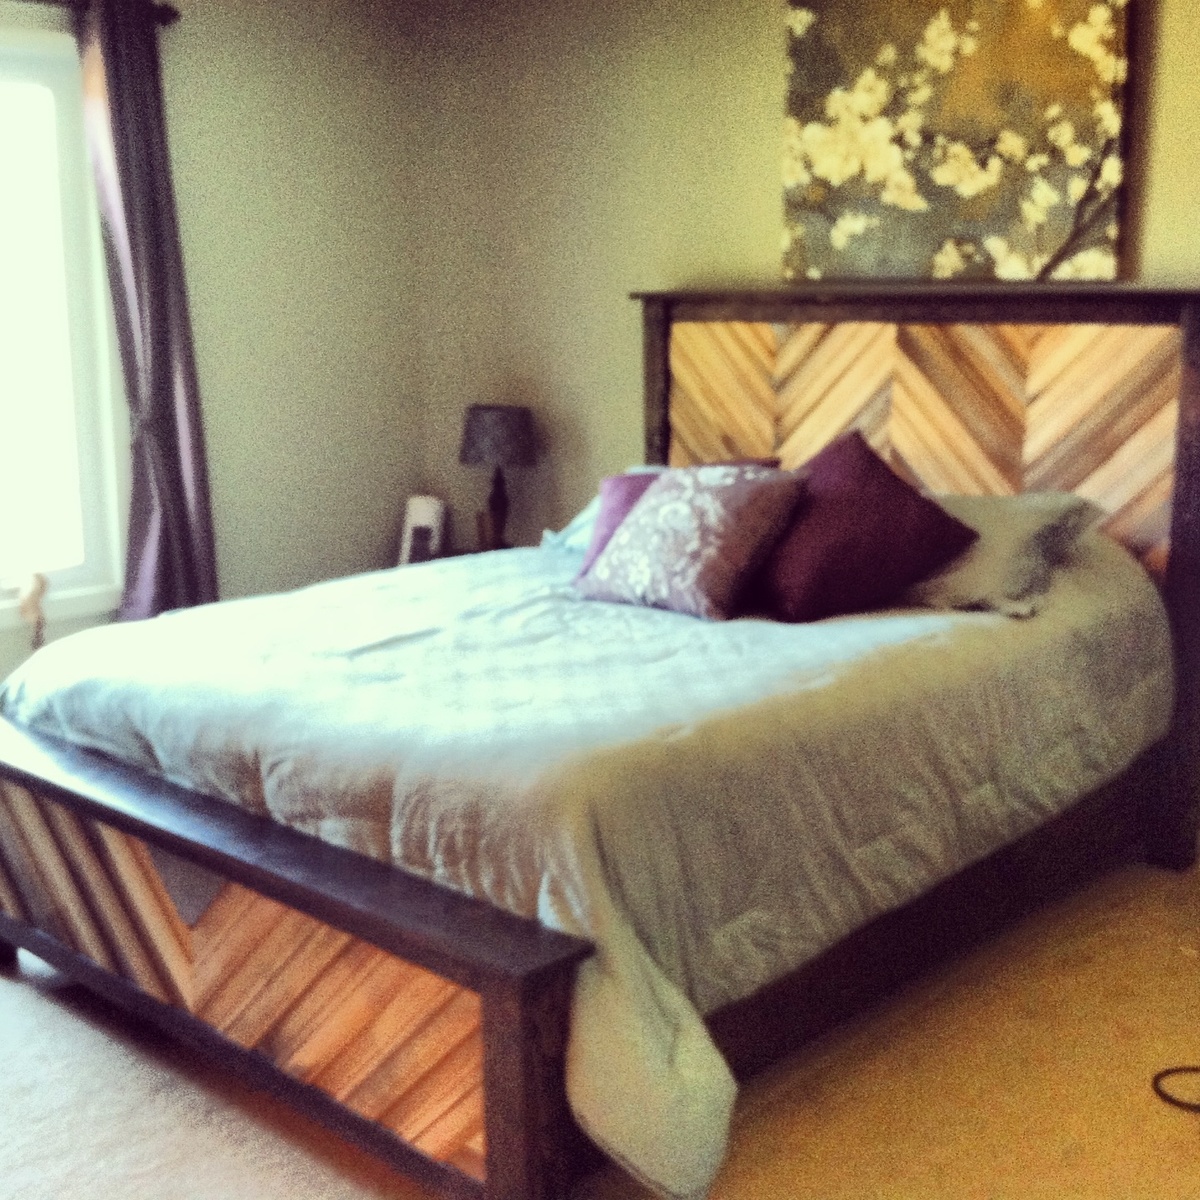
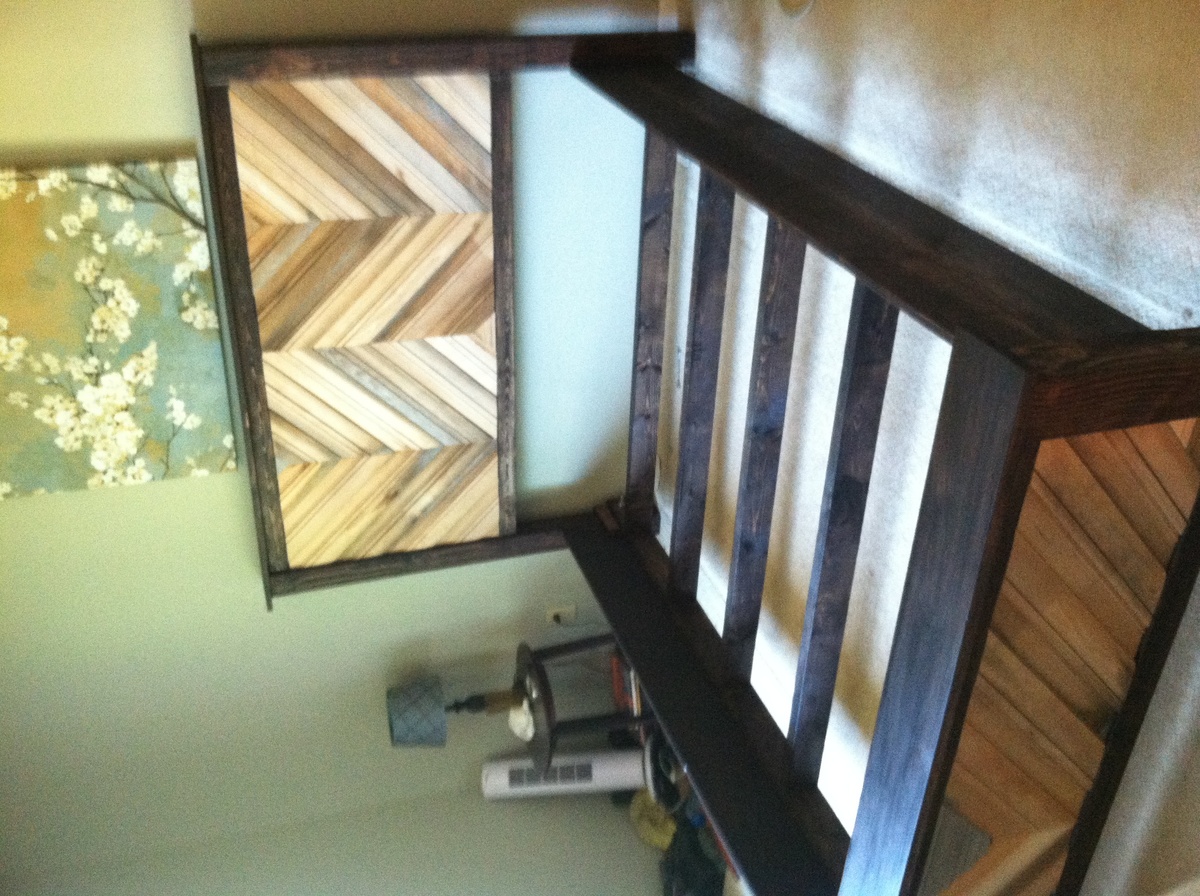
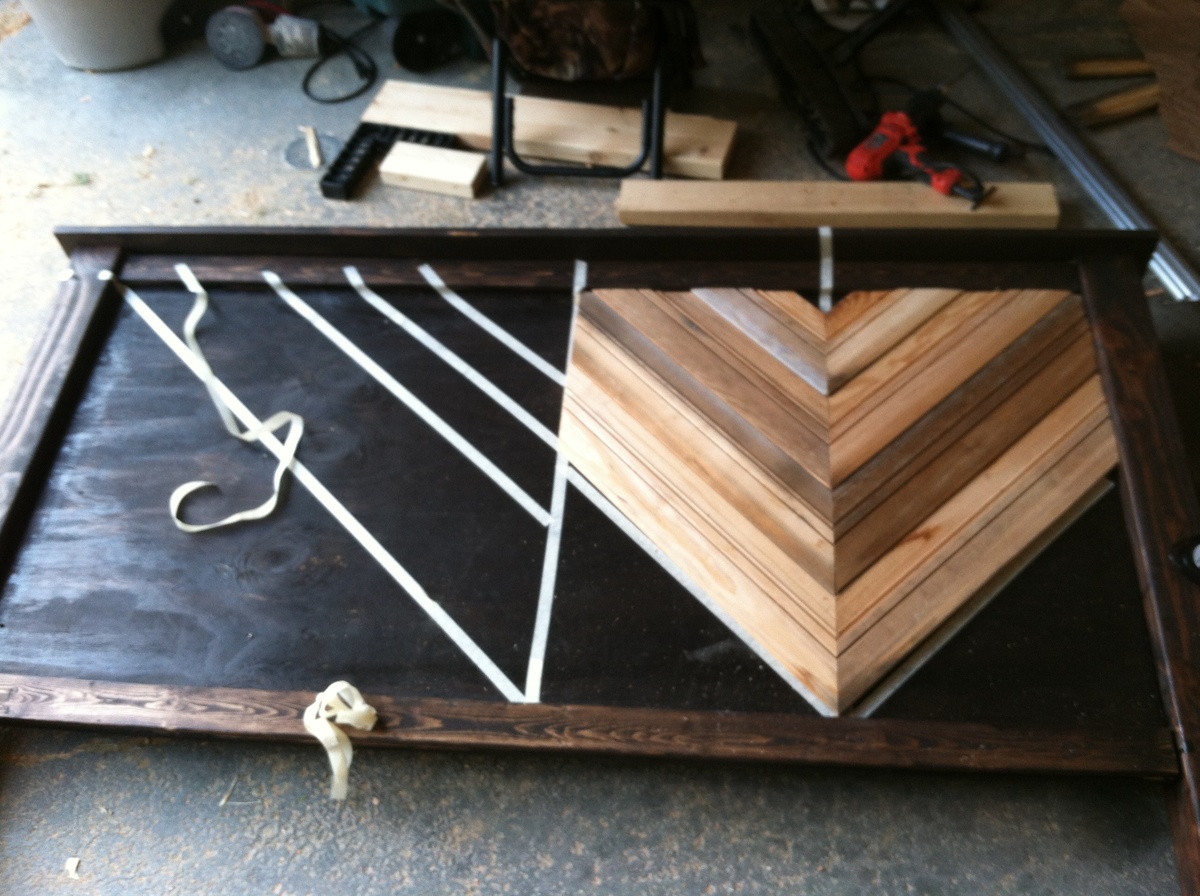
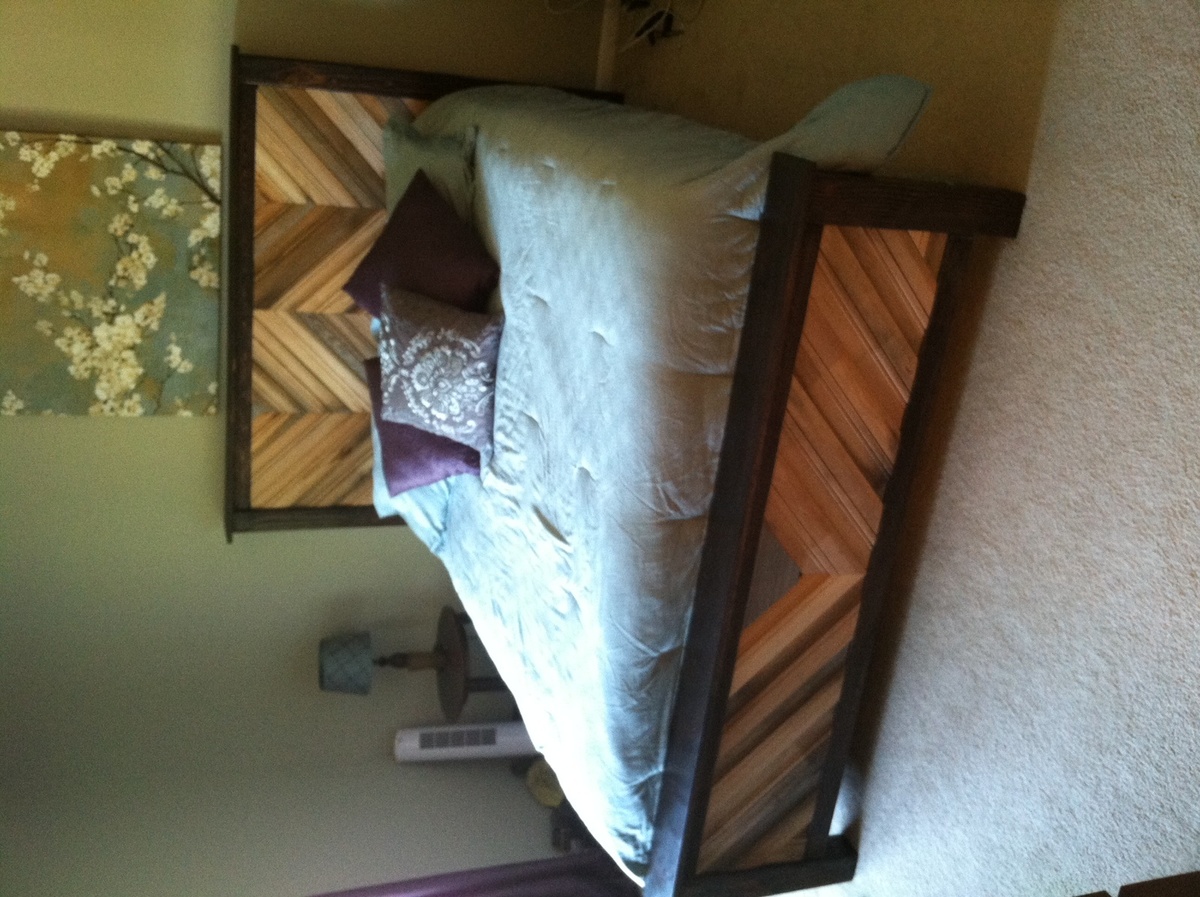
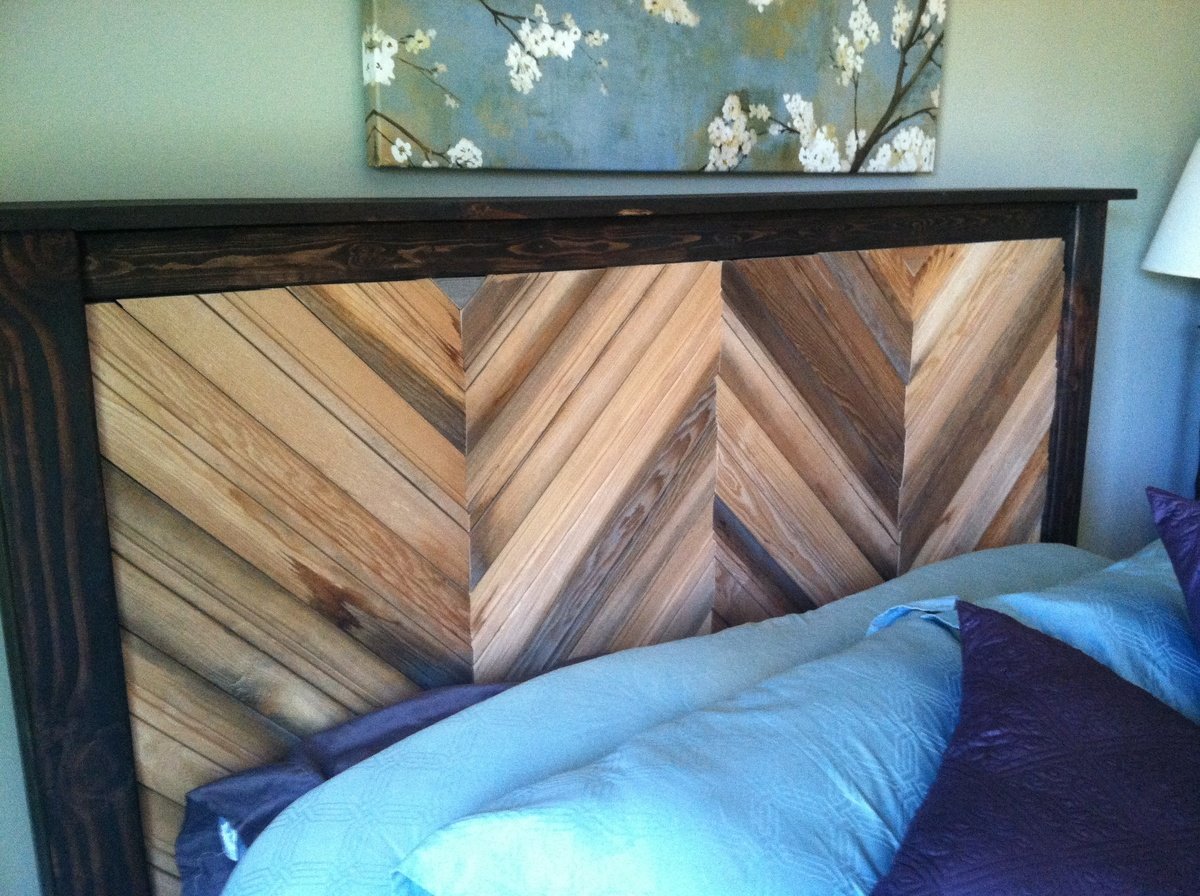
We took the general plan of the Cassidy wood shim bed but added some features of our own. Since my husband is in the military we knew we would be moving more than the average builder so we made the bed to be more durable for frequent disassemblies. Instead of screwing the frame to the head and foot board we used carriage bolts to secure the pieces.
We also wanted to add a reclaimed aspect to our bedroom. We bought some reclaim cedar siding from a local estate investor and decided to do a chevron pattern. After staining the whole frame, we applied the siding to both the head and the foot board since we bought basic plywood and wanted to cover both ends. Plus, we liked the look with both ends done better. We cut the siding at 45 degree angles and then custom cut each piece to fit. This was a time consuming area since, with reclaimed wood especially, each piece is unique. We then just used liquid nails to secure the pieces.
To finish we assembled the bed and applied a paste wax.
Wed, 09/04/2013 - 21:12
This bed sure looks amazing. I made a bed from the same design just a little more like the main shim bed with a tad bit of modifying. like you guys i was military and made the bed for easy take apart with 7in lag bolts vs nailing. Good luck with future builds.

Sat, 09/14/2013 - 23:44
Wow, I'm amazed at how awesome that bed is! I love the pattern of the wood and the varying colors of it. Turned out great!!!
Tue, 05/13/2014 - 08:44
You guys did a fantastic job! My wife and i were looking to create a bed with a chevron or herring bone pattern, and this provides the perfect visual. Question about the foot board: It looks like there are varying thicknesses or some type of beading on the boards. Is there?
Thank you!
j
Sun, 11/06/2016 - 15:53
How did you place and secure the carraige bolts to the frame? I move around a bit too and would love to know how to do this. If there is anyway to upload a picture of what it looks like, that'd be great.
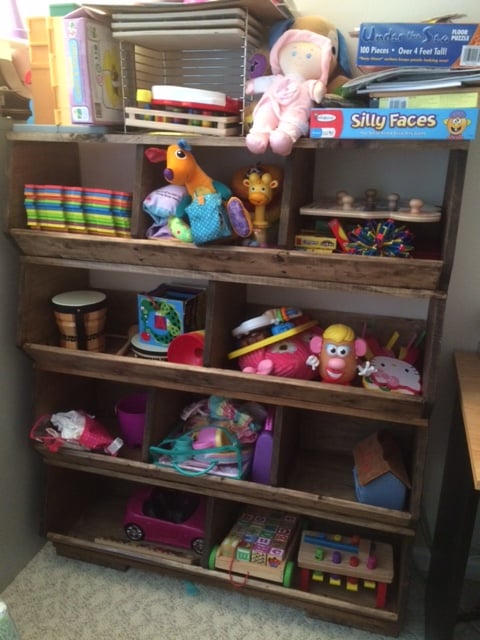
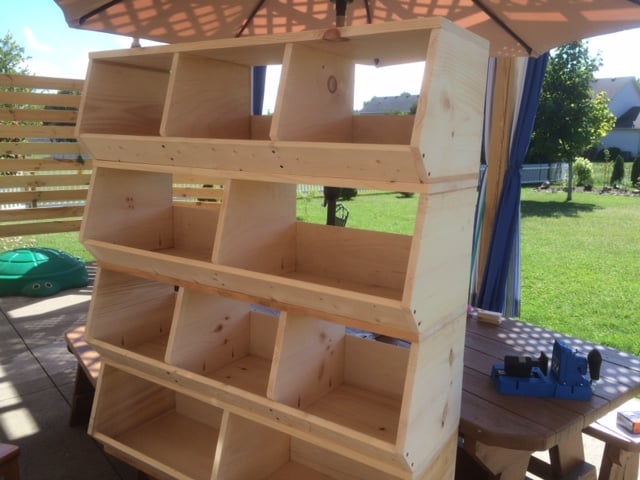
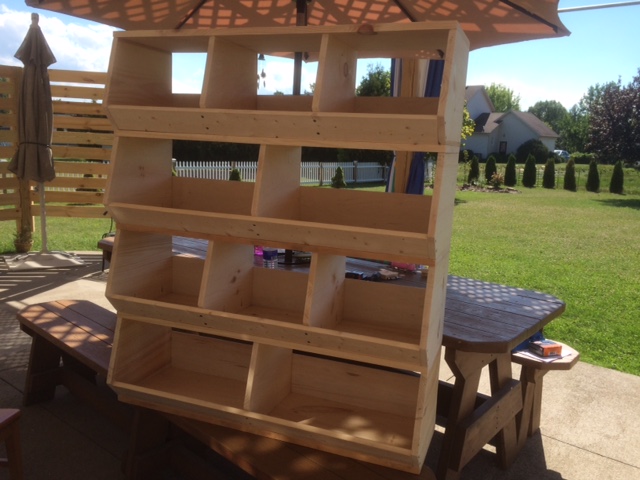
This was my first Ana White project and the first time using my new Kreg jig that my wife bought for me as a birthday gift. I modified the plans to build this as one complete unit and not as separate bins to be stacked. I used my Kreg jig on the dividers and ends to attach each section to the next. This saved on material and made it a bit lighter since I was building it 4 units high. I added small 2x3 feet to the bottom to clear an outlet behind the toy bin. Two L brackets were used to anchor the unit to the wall.
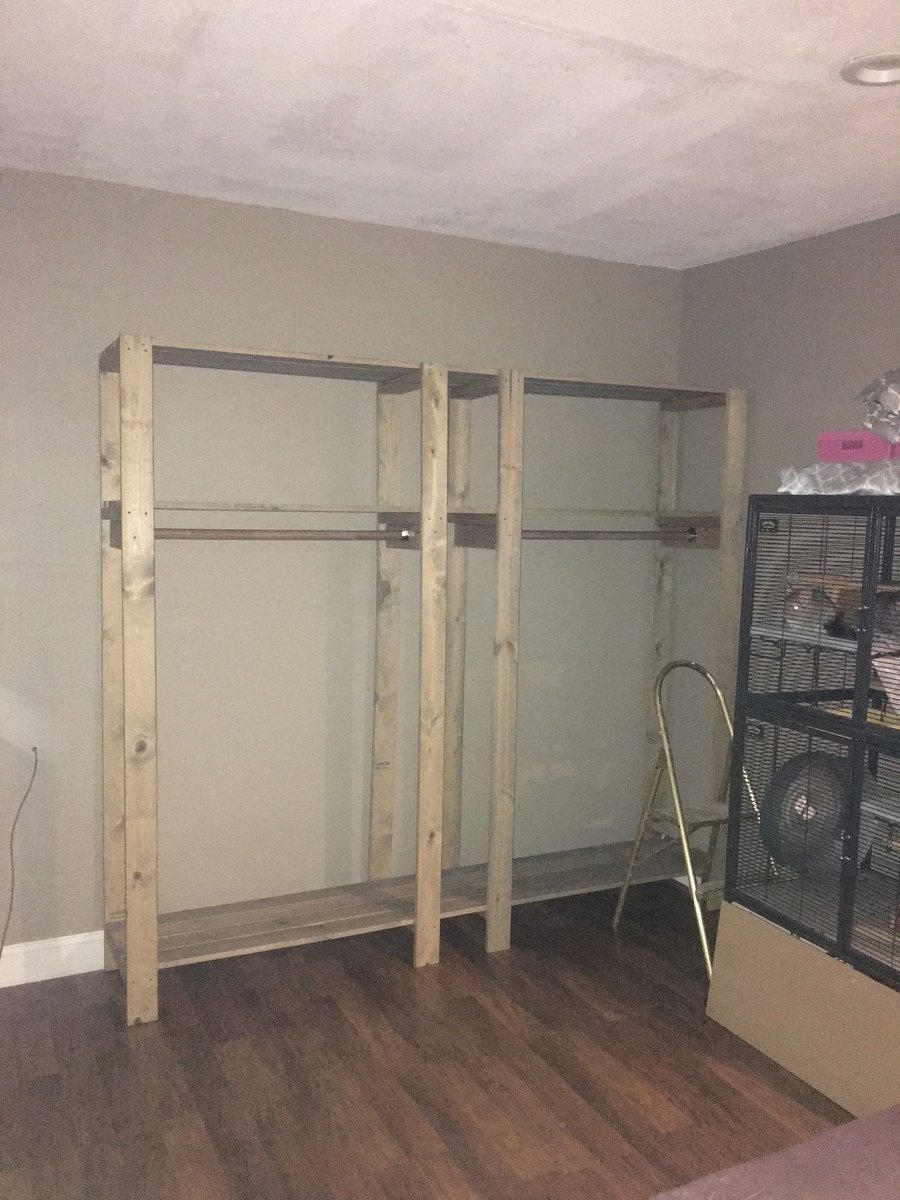
Instead of using galvanized pipes, to save money we opted for ready made closer rod & hardware from Lowe’s and added additional 2x4 pieces perpendicular to the shelf supports and screwed the closet rods into those.

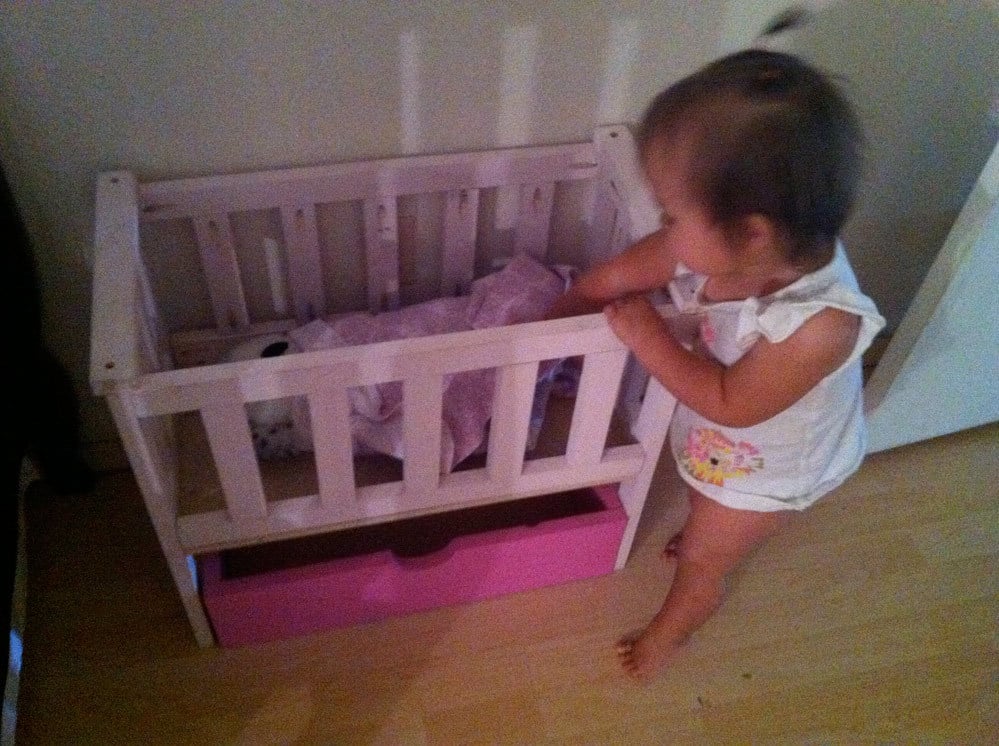
Well, this crib is STILL unfinished, and the date-stamp says I built it December 5th.... So... Uhh.. I should really get on that!
I had initially built this crib for a friend's daughter's birthday gift, but the baby (8 months old at the time) got REALLY sick, so I wasn't able to finish it in time (don't worry, we got her a Pillow Pet - she got a gift still!). It was just before Christmas, so instead of going out and spending more money that we were tight on, I just bought 3 1x2s and used scraps for the rest of it.
The crib's basically been sitting in the baby's room looking cute until about a month ago. That's when she decided that her stuffed owl (from Build-A-Bear) needed to be put to bed every night before I put HER to bed. It's become such a routine that I have no idea how she'd react if we couldn't put her owl to bed! So I'm scared to try to start filling all the holes and painting in fear that we'd have a mental breakdown if I didn't finish in time for bed! EEK!
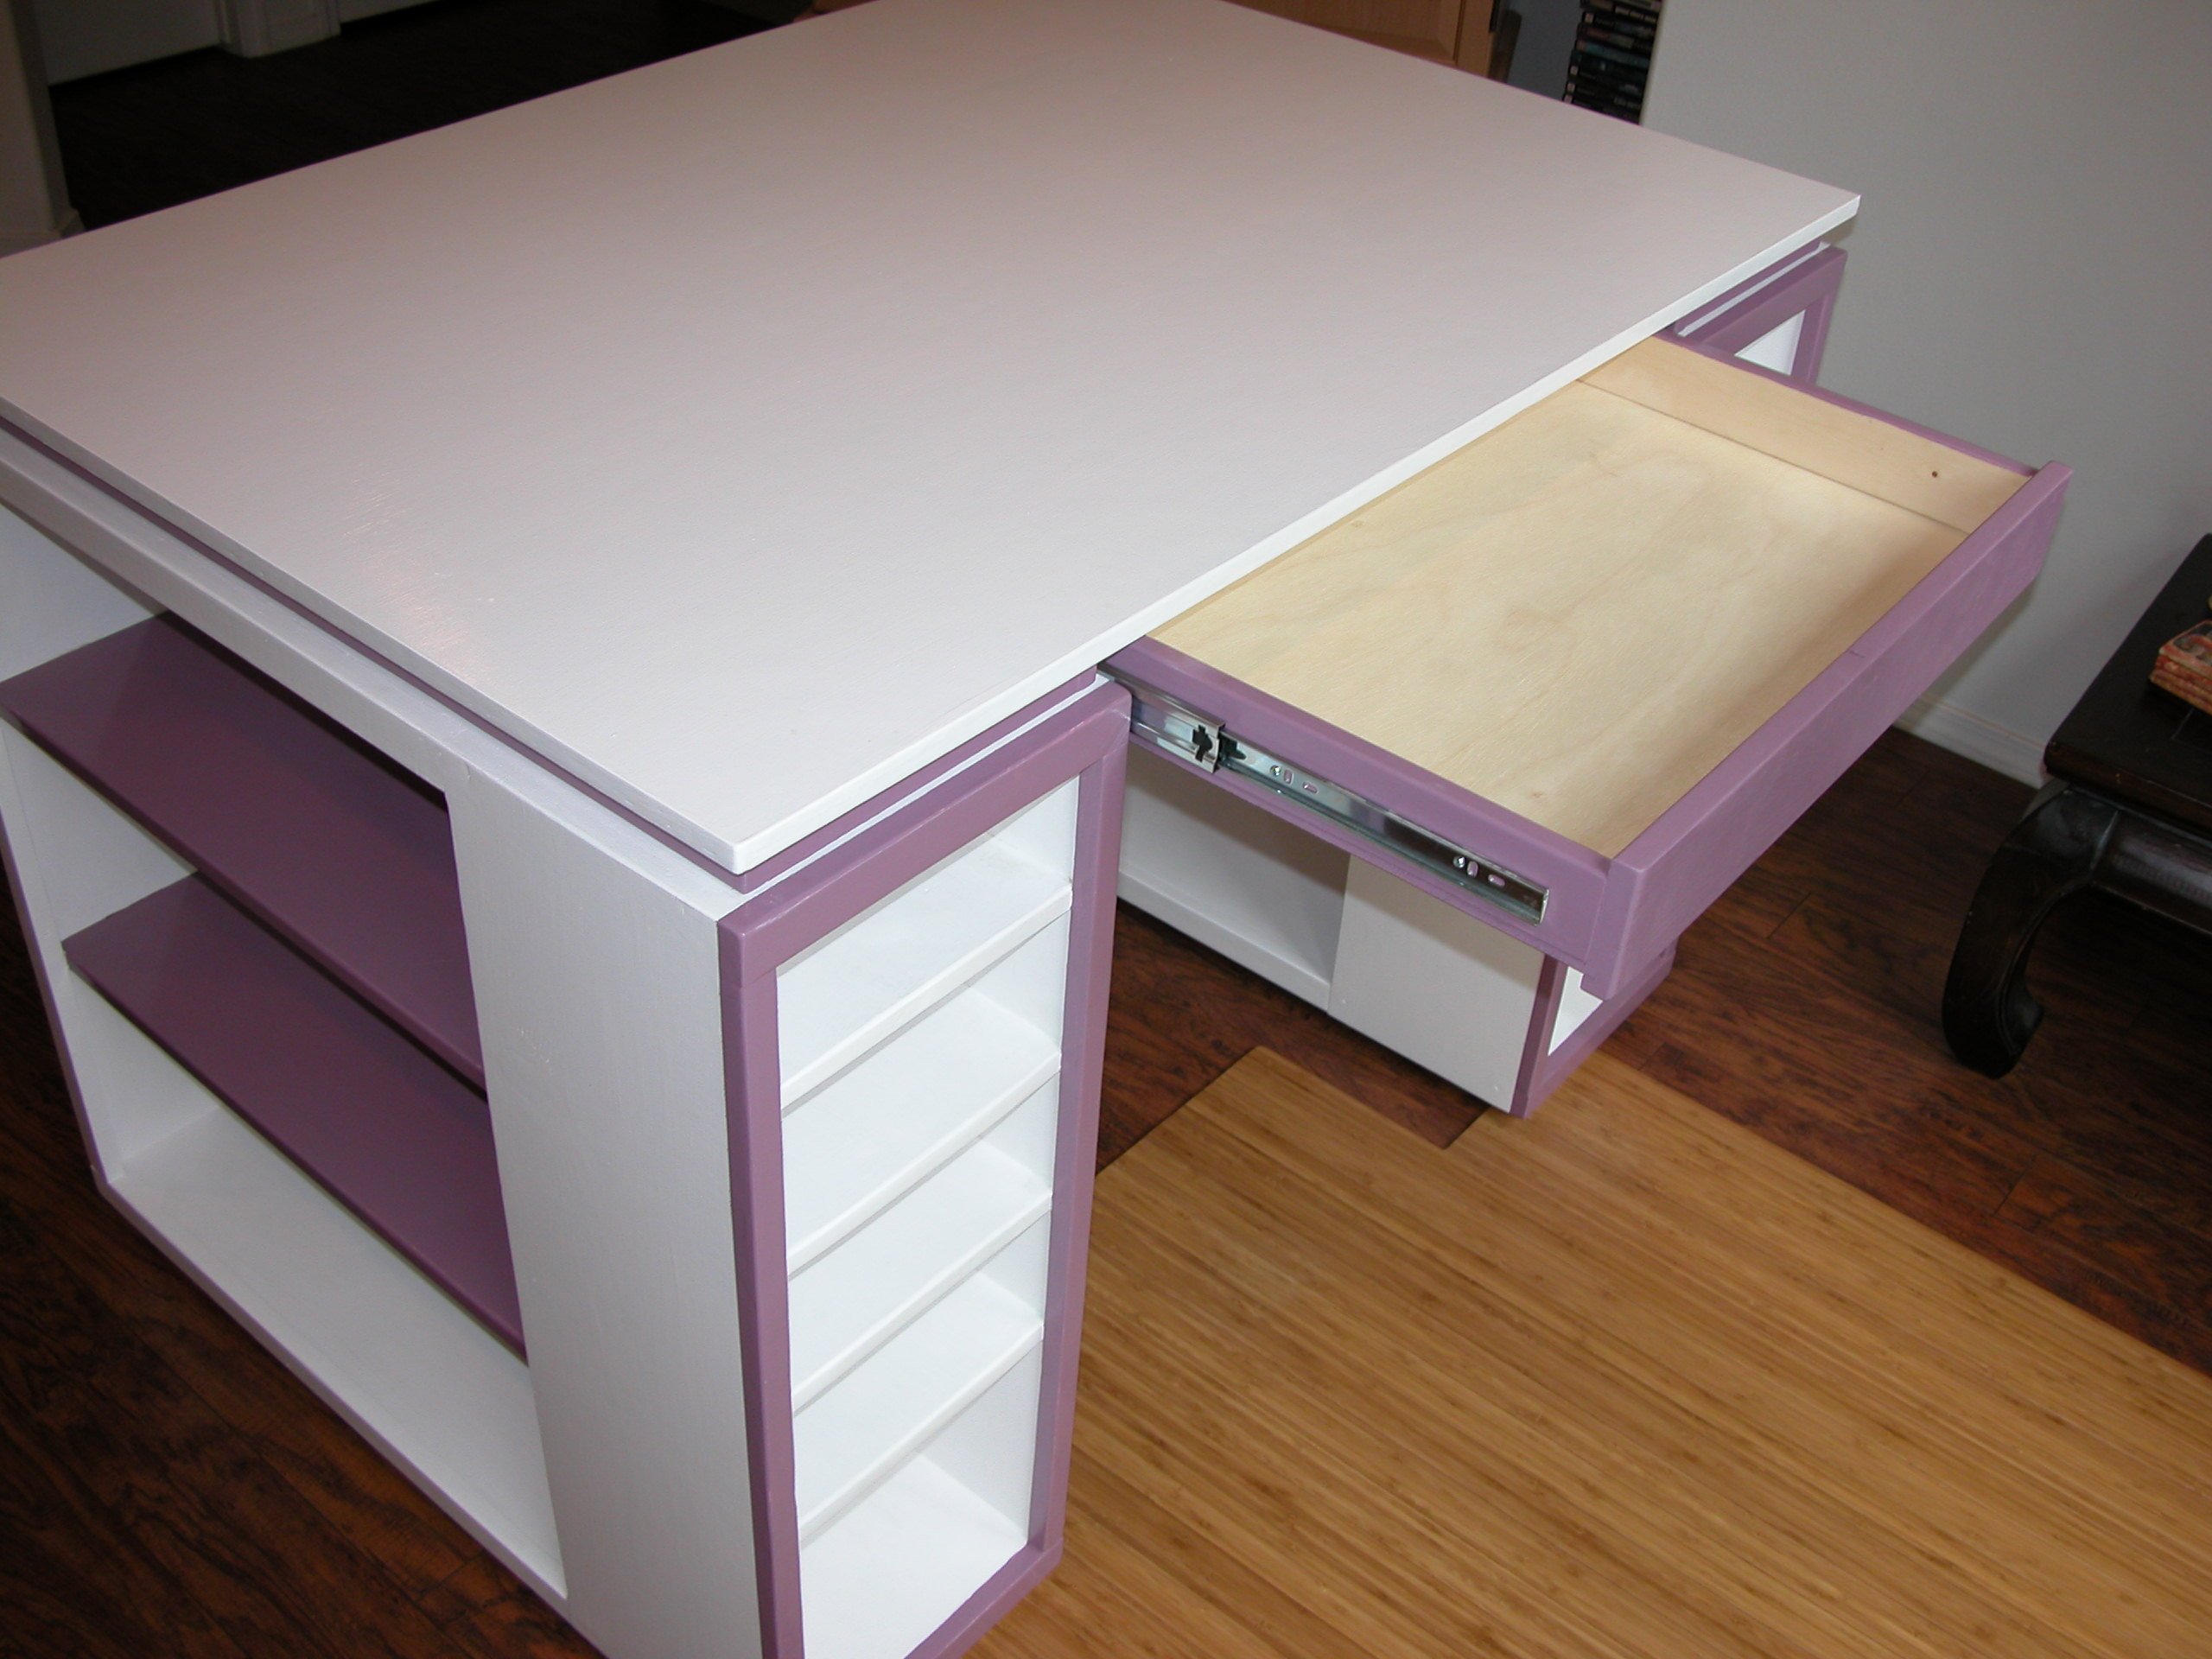
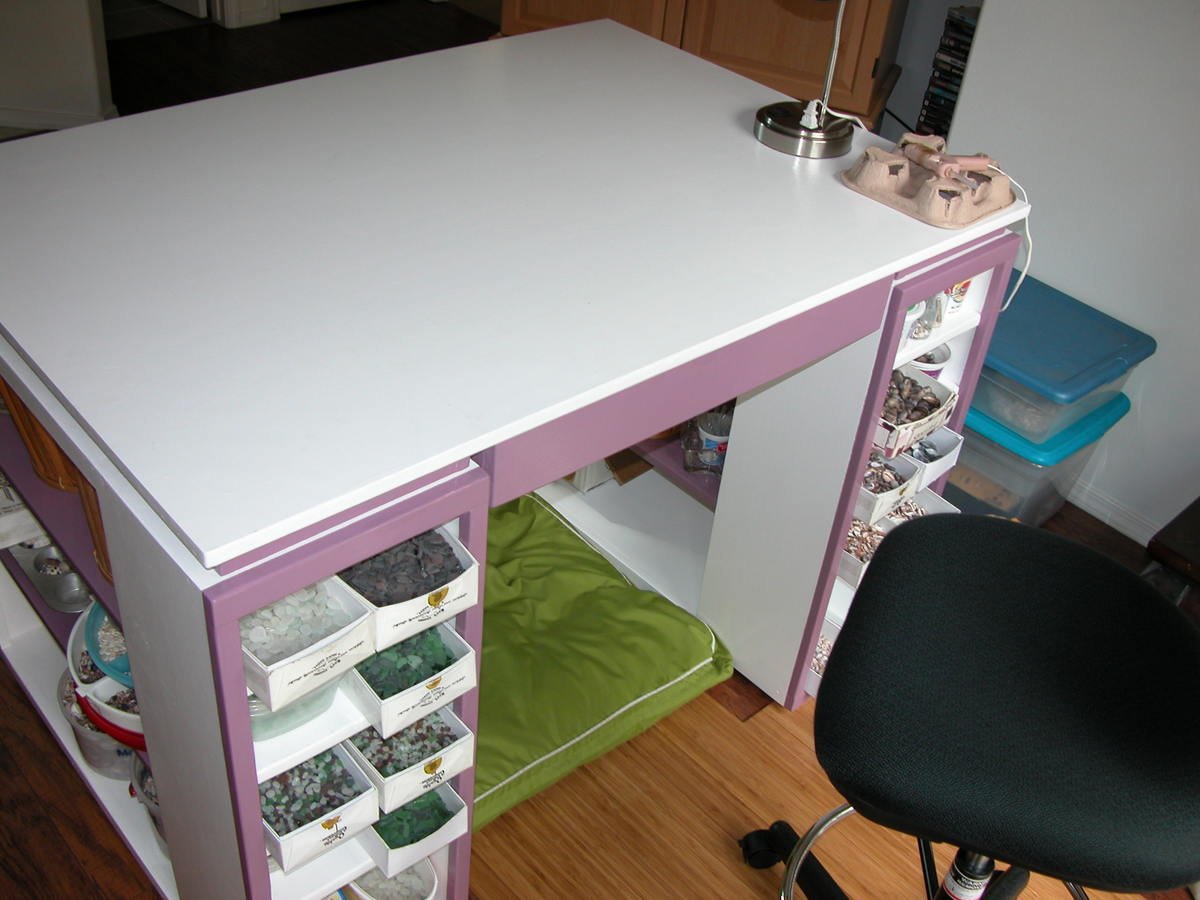
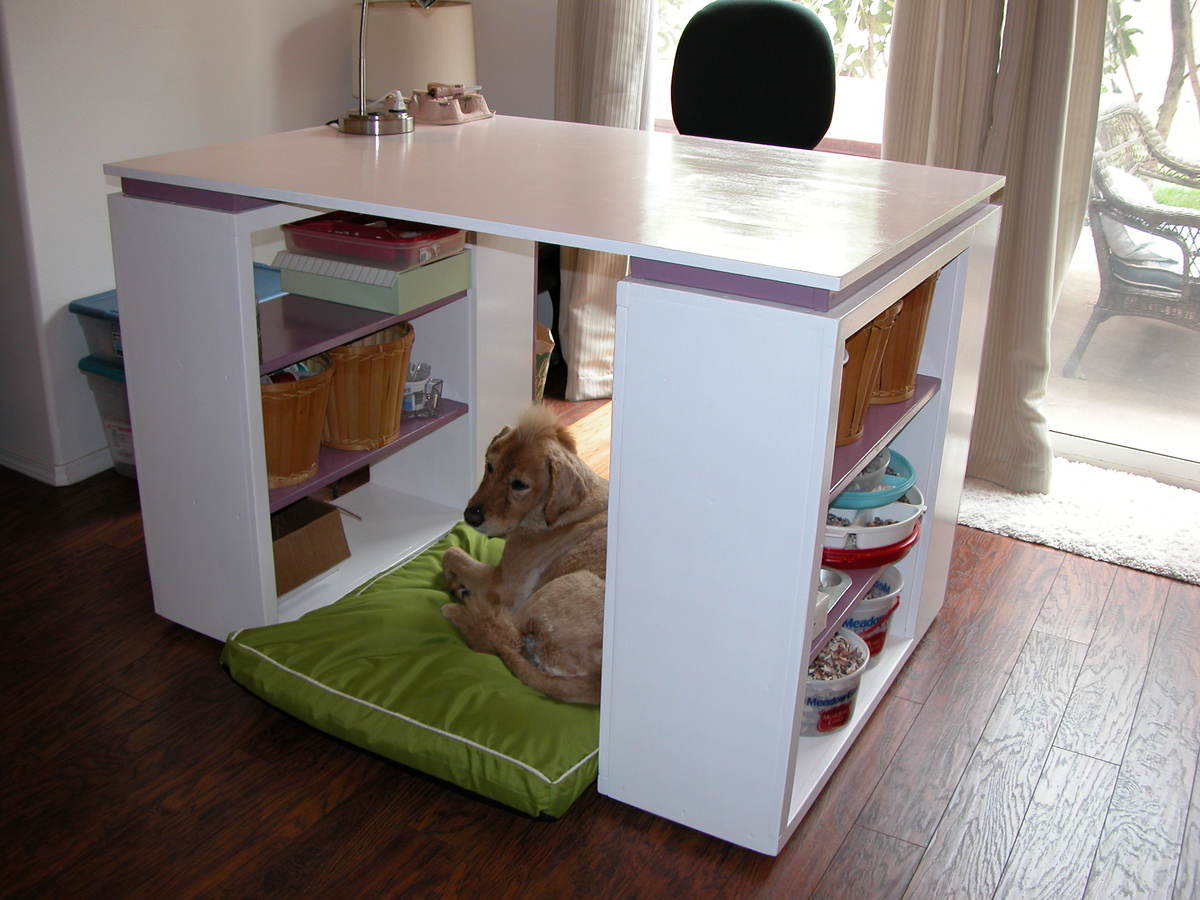
Maui Costco had a craft table but I waited too long to go back (1 week!) and they were sold out & discontinued. I stumbled across Ana White's website and found the "modern craft table." After a couple of modifications I am extremely happy with the results, as is my Golden Retriever "Buddy" who likes hanging out underneath while I am working. And yes, he has a mohawk!
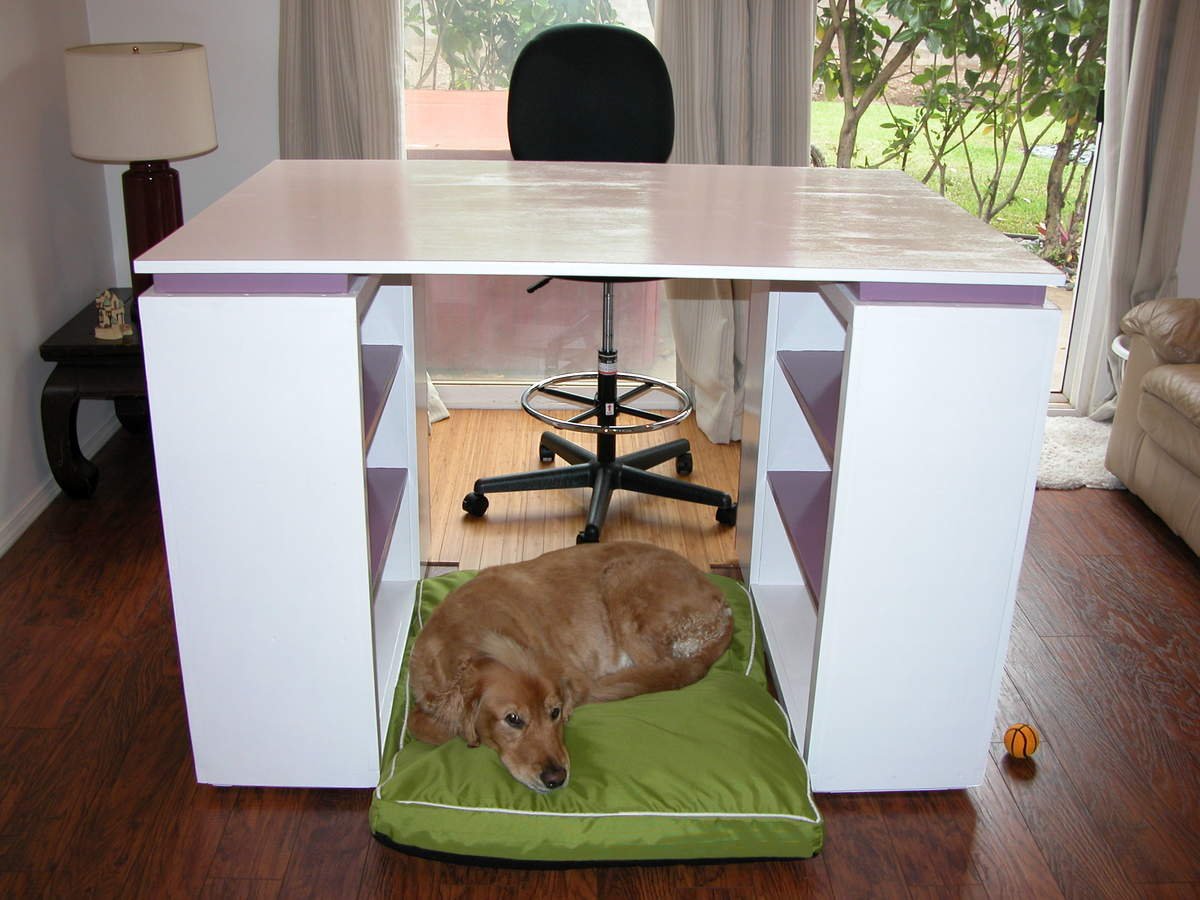
Sat, 09/14/2013 - 23:39
Buddy looks very comfortable under "his" craft table ;-). Great job and isn't it fun to get something you want anyway - even after the big stores have sold out or discontinued, or both!? Love that part of building!

I used the plans from Michaela's kitchen island, but modified the top. Instead of 2x4s pine studs, I used black walnut boards a friend of mine had lying around. They were ~1x8" boards so I ripped them to ~4" width and ~60" length. They were a little warped so I glued and screwed them togther using a Kreg jig (best tool ever). This made a huge difference and there was only minimal gaps (1/16") between the boards. I ended up borrowing a belt sander from another friend to take out the 1/16"-1/8" lips in the boards. First time using a belt sander and it took a few minutes with 80 grit across the grain to get a level surface. Used 120 grit paper with the grain to smooth out the scratch marks from the 80 grit. Attached the top to the base with screws, finish sanded with 220 and 320 grit, cleaned up the dust with a tack cloth and then applied a few coats of polyurethane. For the drawers, I couldn't find 21" slides so I ended up modifying the drawers for 20" slides. Another fun and satisfying project!
Thu, 11/05/2015 - 15:31
I don't seem to have friends with stashes of black walnut lying around : D
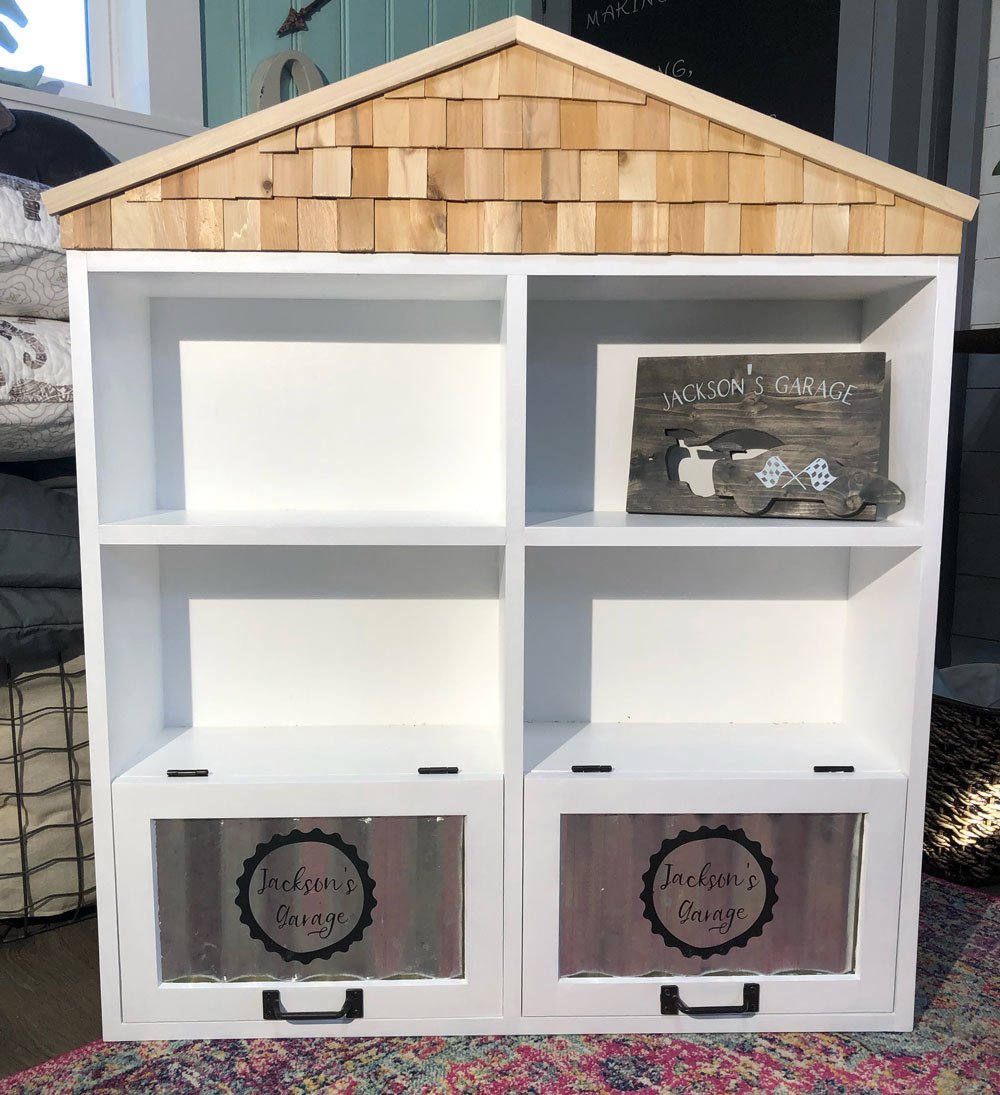
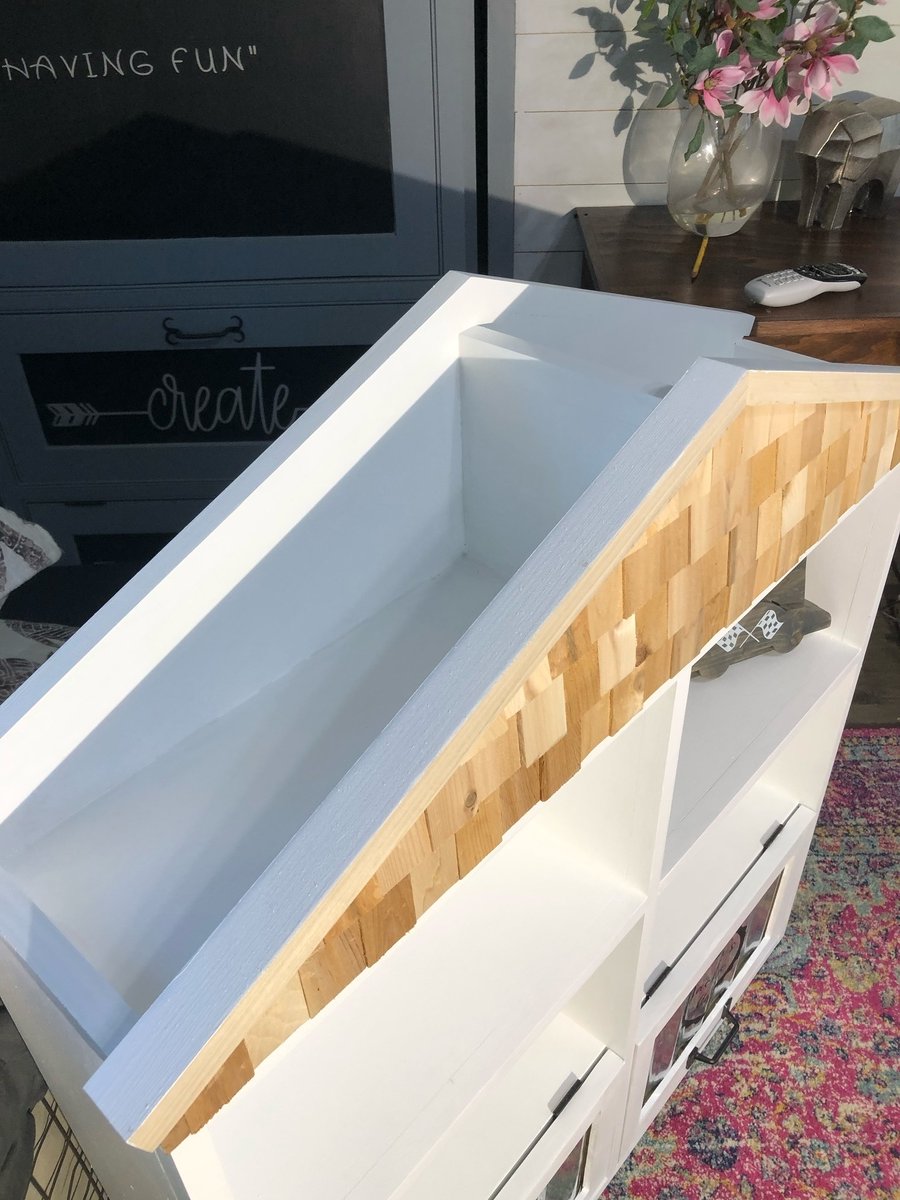
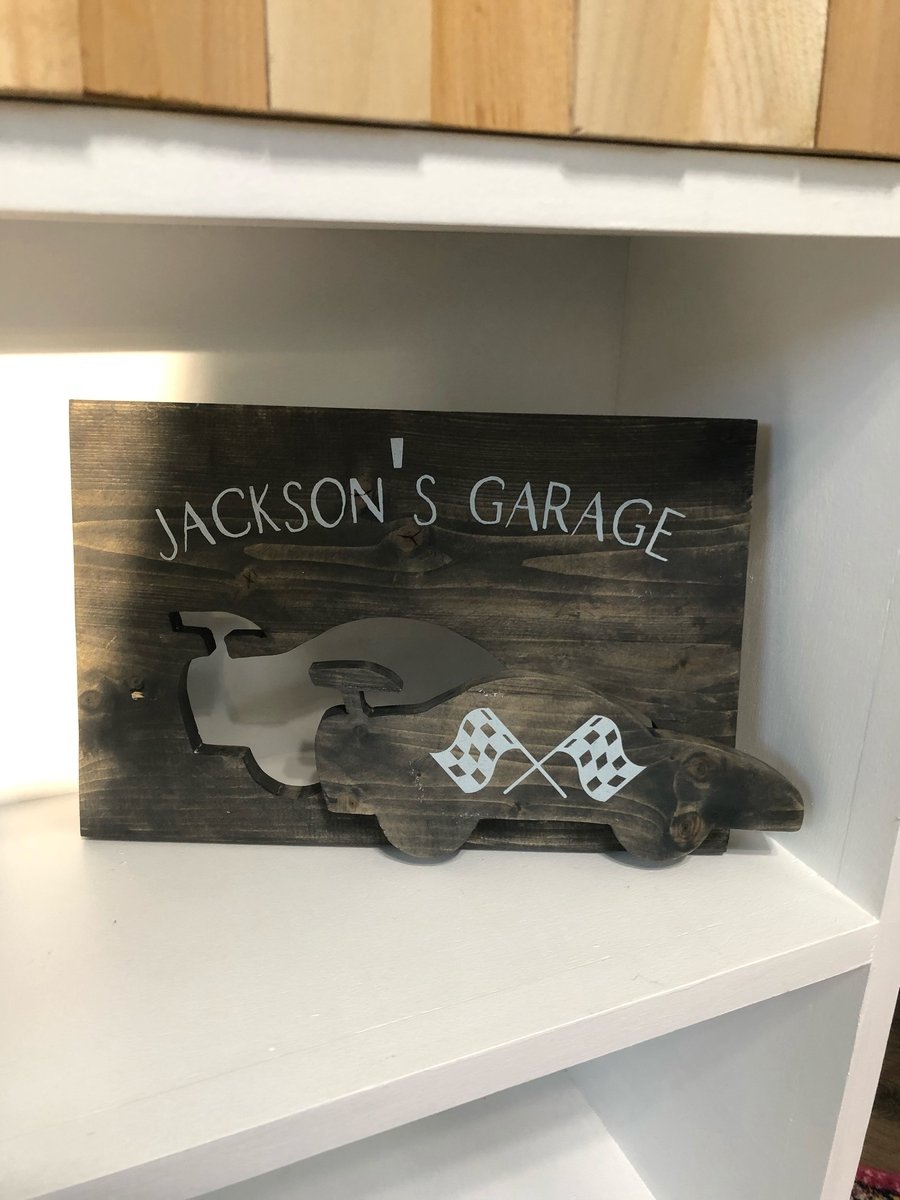
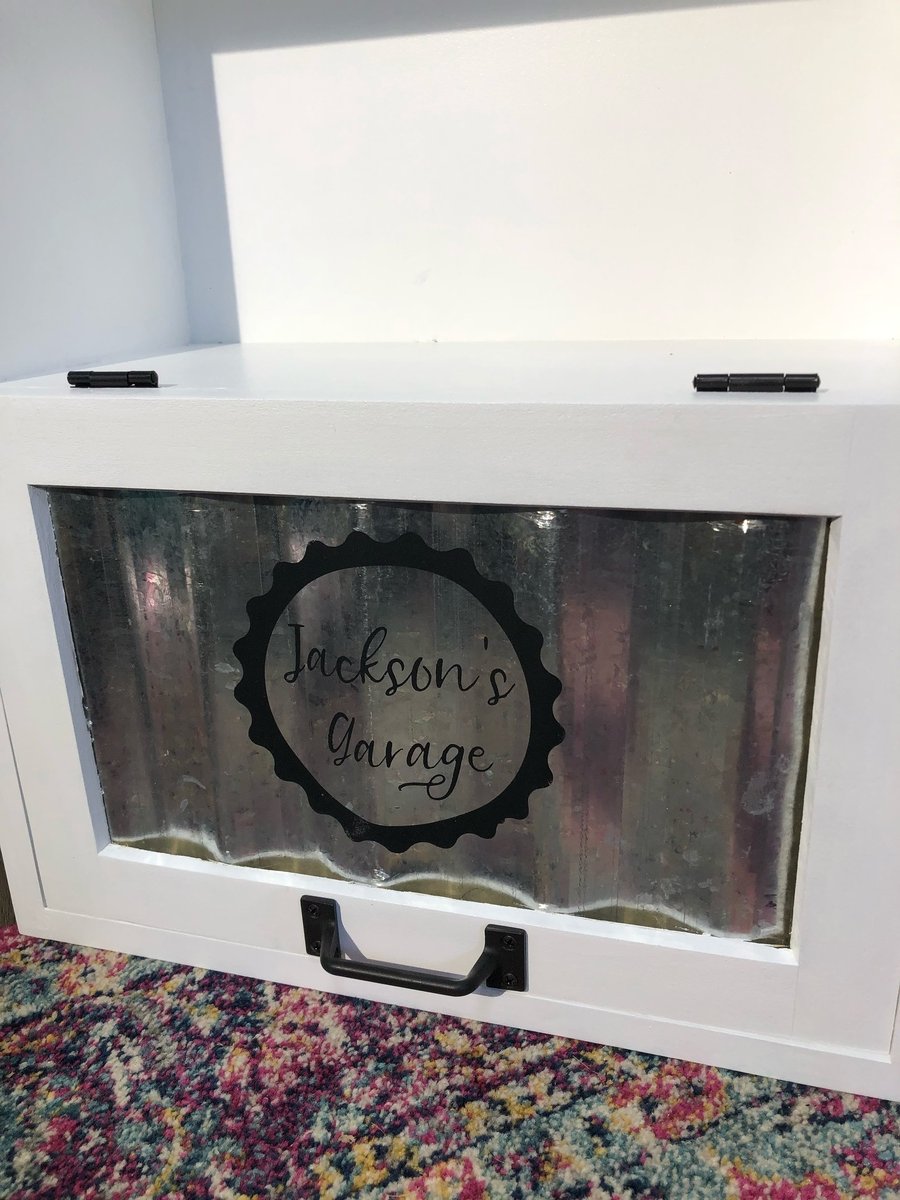
I built this bookcase for a friends son for Christmas. She sent me a sketch of what she wanted and I drew up the plans in sketch up. I built it out of plywood and capped plywood with poplar strips. I made the Cedar shingles out of Cedar shims that I cut down to 2 inches, I used corrugated metal for door panels to give garage look.
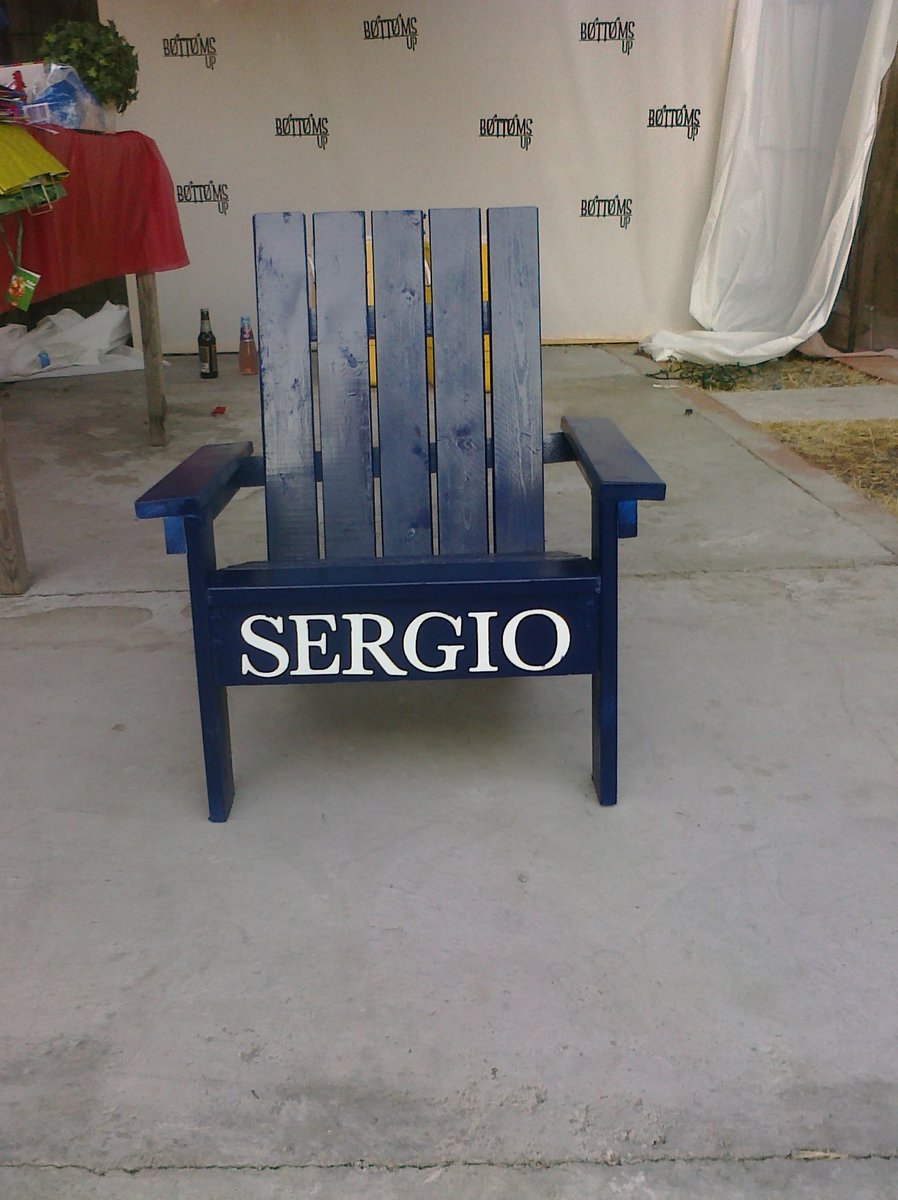
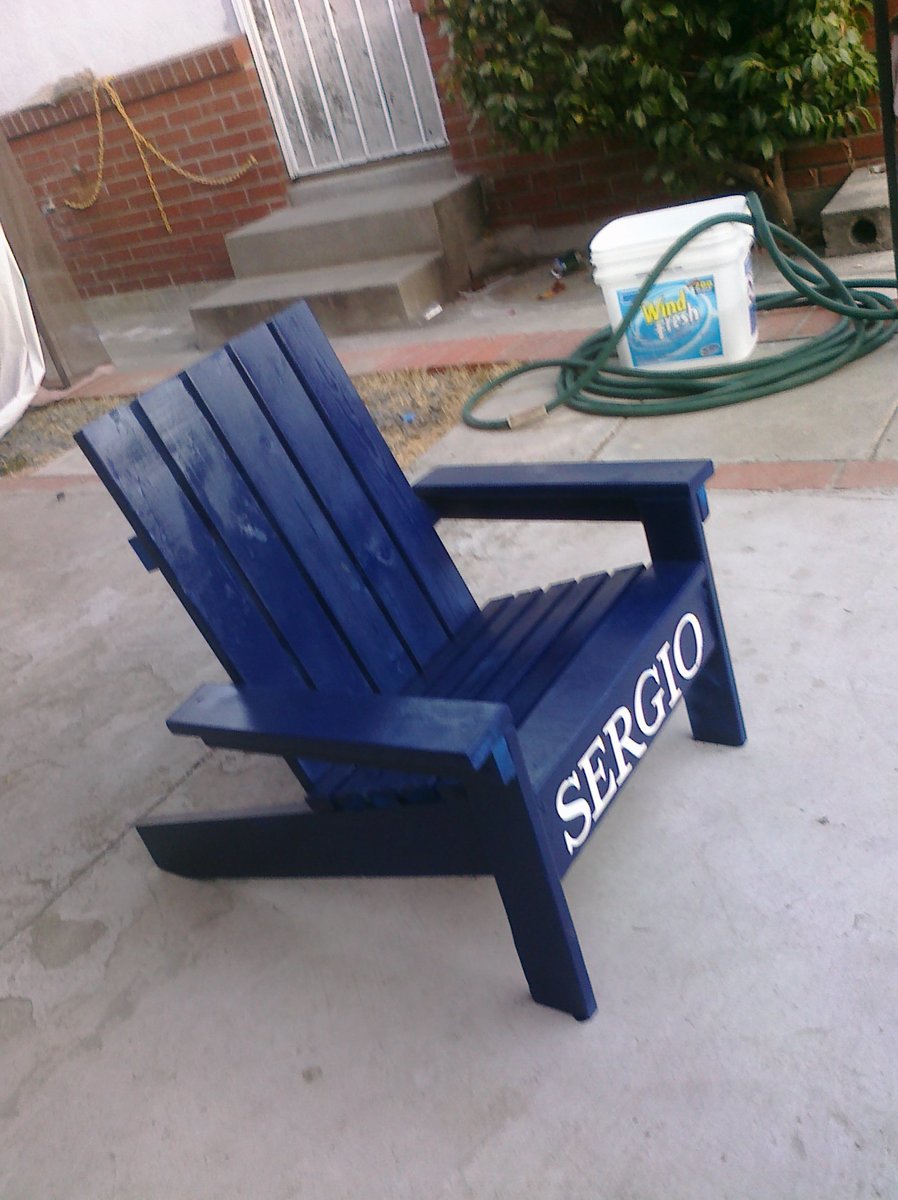
I made this chair for my 3 year old son's Birthday, he loves it. Really easy build.
In reply to Great colour! by Francoise
Wed, 08/17/2011 - 15:03
I love the navy blue and white combination, I am trying to use it more around the house...just waiting for my son to be tired of his toy story theme room to re-do it. :)
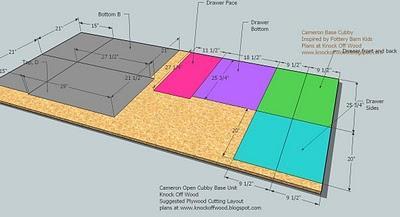
Finished this project using scrap pine for the frame and shelves and old barn wood for the doors/siding/table top. Turned out great, can't wait for other projects to finish.
Mon, 09/09/2013 - 15:03
Do you have plans for this project that you are willing to share. I really love the piece!
Tue, 09/10/2013 - 13:23
hello, I really don't have plans for the project but I could send some pictures to you that would show how it was contructed. For the legs, lower shelf box, and table top box I used precut standard board (scrap board from Menards, $1 a piece. and then I glued the doors together and the side skirts, the back I just screwed on from the inside and these parts were all the barn wood.
Tue, 09/10/2013 - 13:24
Thank you, the end result was very rewarding. Now I just have to fill it up with something before my kids start putting their toys in it.
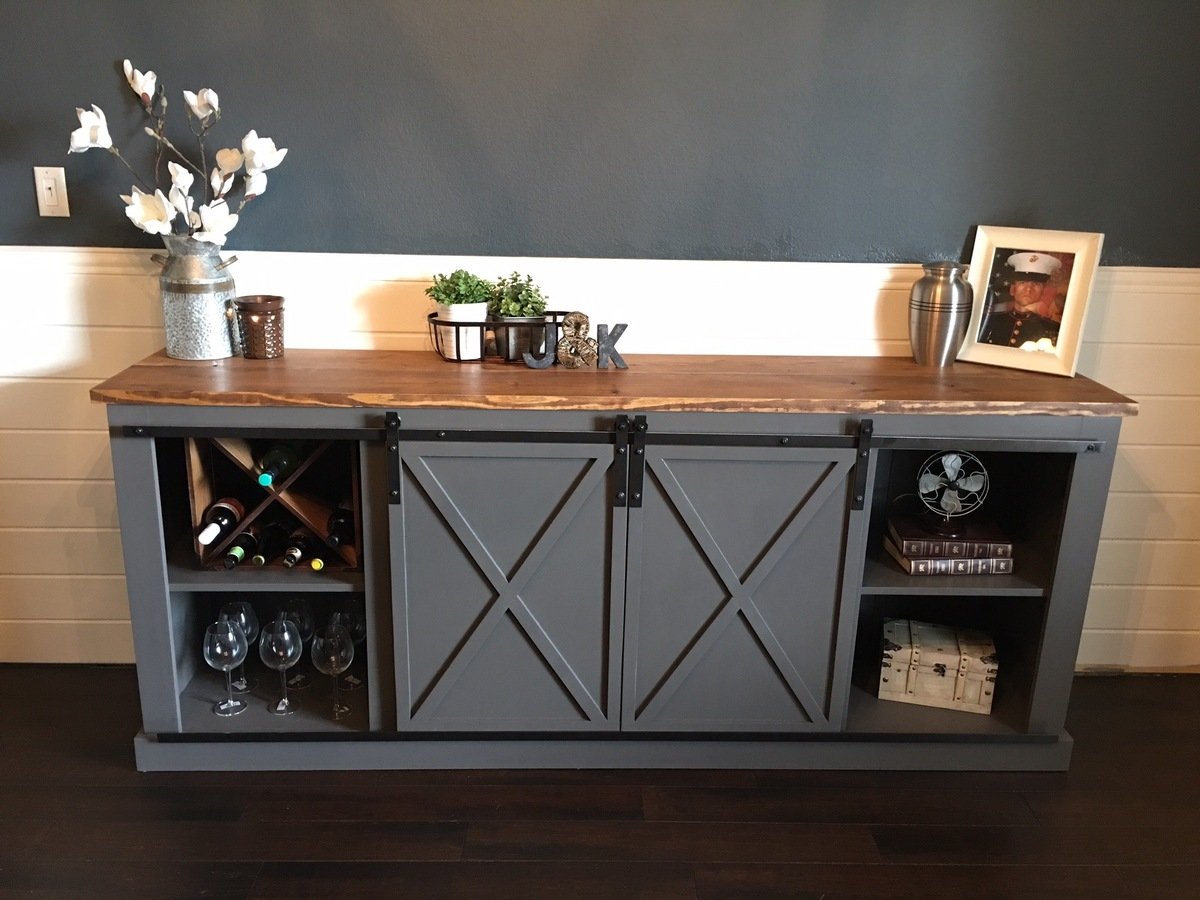
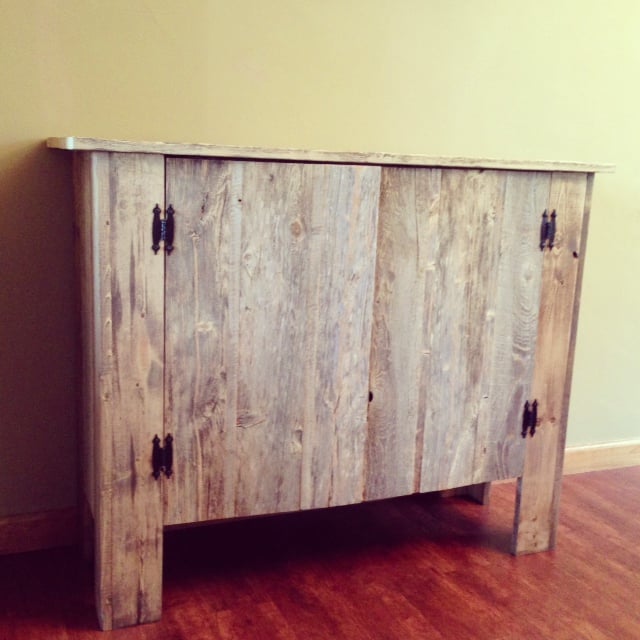
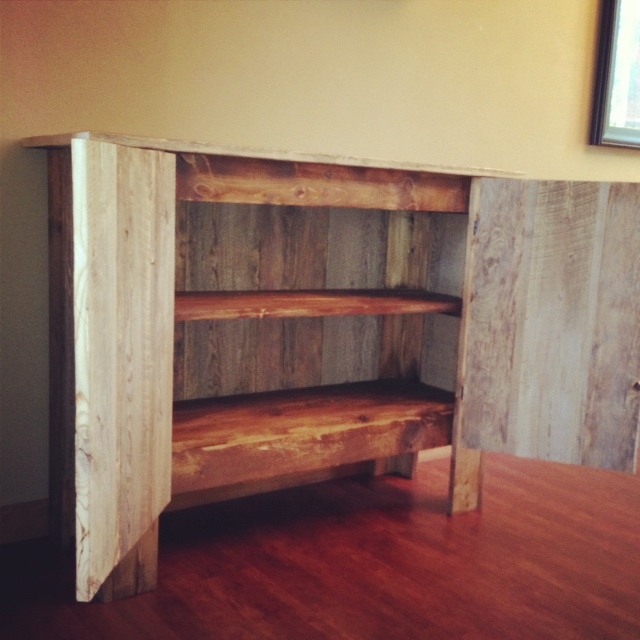
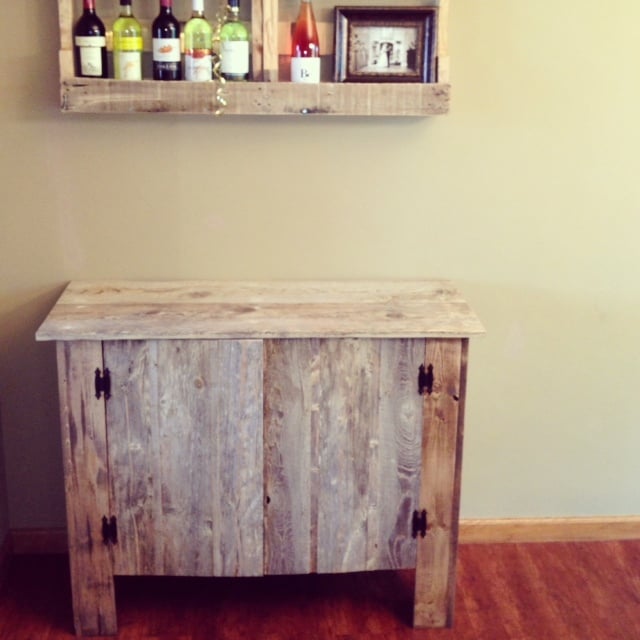
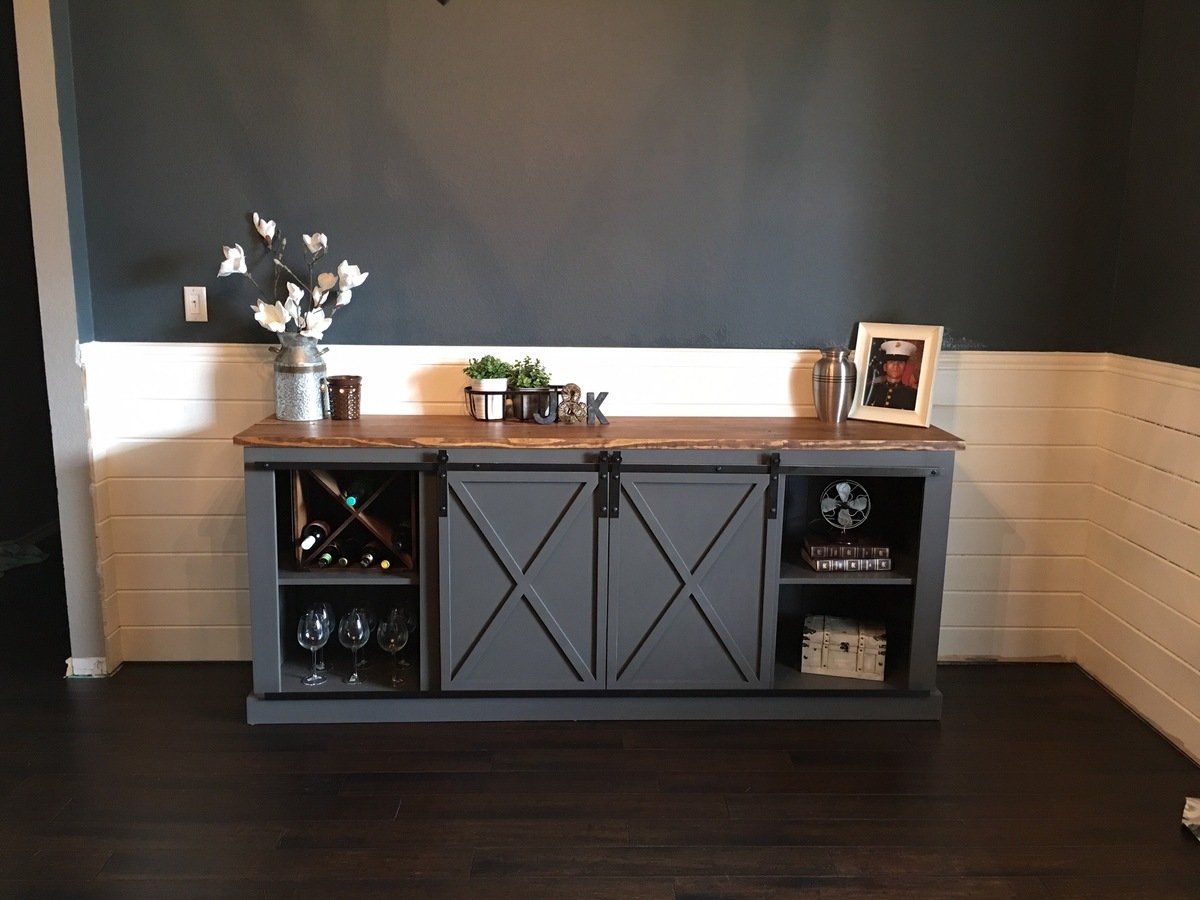
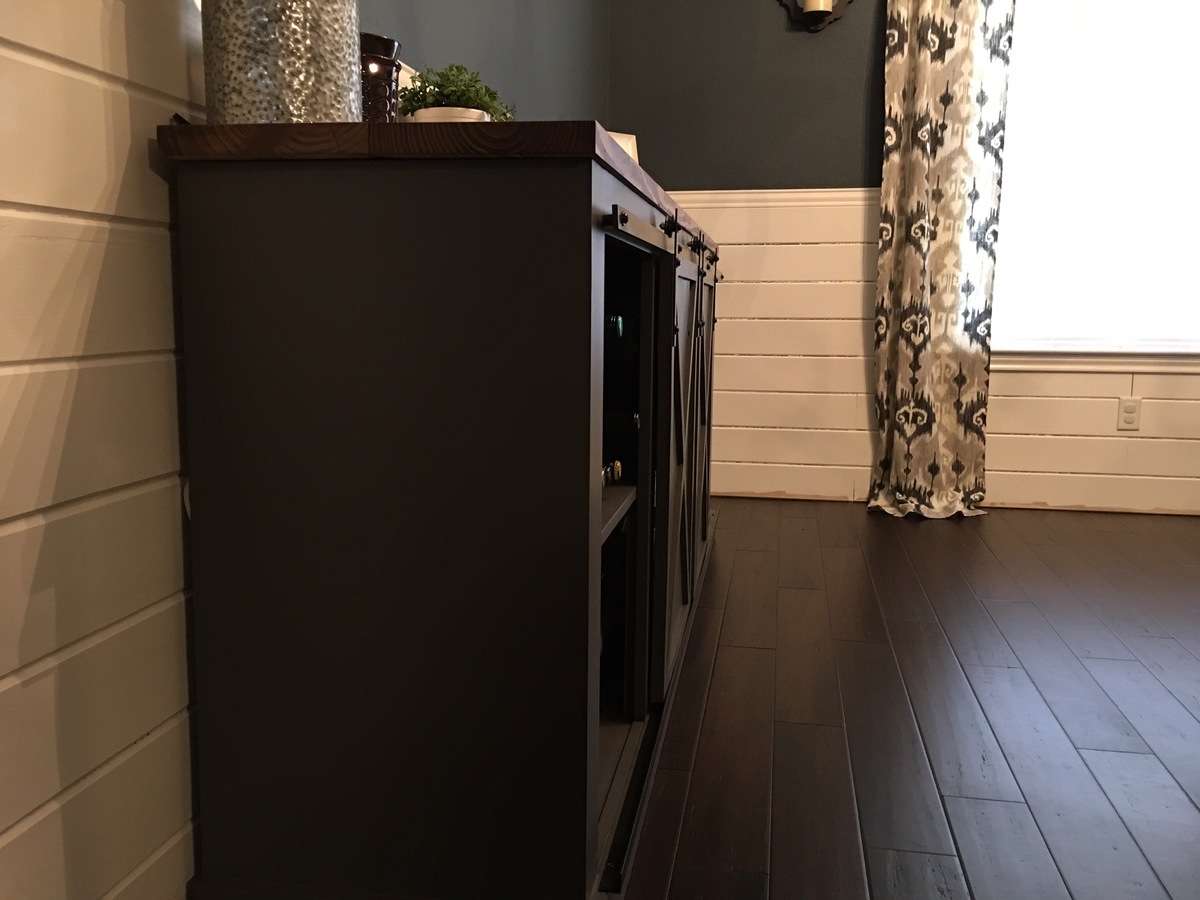
This is my build of the sliding door console. I built this for my wife after she insisted we needed this for our dining room. The build overall was pretty easy, after my wife decided to change the paint color 3 times (yes, after we had bought the gallons, and I had it completely painted every time). I will say though that if you plan on painting this then you should use plywood for the front facing boards of the frame. I built mine over the course of about a month and after I had painted it I noticed significant wood shrinkage on the areas where boards came together. Plywood shrinks minimally if any at all so it should take care of that issue.
P.S. Don’t mind the unfinished construction in the background, we are in the process of installing bigger baseboards, and the planked walls are still unfinished.

Fri, 12/11/2015 - 19:53
Looks awesome! We have ours built (except the doors and hardware). Any tips? Thanks!
Wed, 12/23/2015 - 15:00
Hey, Im so sorry for the late reply. I hope you were able to get that doors/hardware done without problems! The doors werent bad at all, I added right angle bar below the door into my plan to keep them gliding smoothly and in line. Also we have a 1 and a half year old that would most definitely figure out a way to get the doors off without it. As far as the rest of the hardware, I used the link that Ana posted on her original post for building it, it wasnt too bad at all. I had to improvise on a few things, other than that I just followed the instructions. Let me know how yours turned out!
Sat, 03/26/2016 - 08:44
Looks fantastic! Where did you purchase the barn door hardware from? Finding it difficult to find some that won't break the bank!
Fri, 07/22/2016 - 23:56
I recently completed this project with a few changes. I used 1/4th inch aluminum flat bar for the track and the hinges . For the wheels I used metal screen door replacement wheels. I originally had the pully wheels, but when they are on flat bar it's very difficult to move and has a rough time sliding across the flat bar. The screen door wheels were about $6 and gives you a nice smooth glide for your door, because the wheels have ball bearings.
Sat, 01/09/2016 - 17:53
Hello. I have one built, about 90% done just need some staining and paint. My wife and I went to home depot today to look at paint and looked are your intellectual because we really like how yours turned out. Intellectual looks to be a dark gray? In your pictures it looks like there is a possible tint of a blue? What finish did you get? We bought a sample and painted a piece of the wood to see how it would turn out in our room. Doesn't seem to match your color.
I made some dimension alterations to our, will post picture when its complete.
Tue, 02/16/2016 - 20:14
The color is intellectual, but the light coming in might make it look a little blueish. Also the color we have our walls painted behind it is "steel blue," so it may be making the buffet look more blue than gray. The finish we used was satin. Sorry this is a late reply but I hope you got yours all finished and love it!
Fri, 01/08/2016 - 20:24
Can anyone recommend where to find 2x3 pieces of lumber like she calls for in this plan? We can find 1x3 and 2x4 but no 2x3s anywhere!
Fri, 01/15/2016 - 14:43
Is that a 1x10 or 2x10 on the top. All 2x10 I find are rounded on the edges and yours look squared. Ran threw the table saw but now I am short and to big of a gap.
Tue, 02/16/2016 - 20:18
I used 2 2x10s for the top but I jointed them first so that may be why it looks squared. I ended up rounding it over a little bit anyway to soften the edges. I ended up cutting off more than I wanted also and while I didnt have a gap on mine - the edge doesn't hang over on the front as much as I would like.
Fri, 01/15/2016 - 18:31
Did you use a 2x10 on the top? I can't tell. If so where did you find one with squared edges??
Fri, 02/05/2016 - 10:29
what color stain did you use? and when you painted it, did you spray it or roll it on? I'm struggling with the quality of paint job I can do once I finish a project
Tue, 02/16/2016 - 20:22
The stain I used was Miniwax "Special Walnut." I actually used our paint sprayer that we got for a christmas present for the first time! It took a lot of practice and I ended up having to sand off a bunch before I got the technique down, but in the end it was worth it. The sprayer makes it look much more professional and finished. Just be sure if you use a polyeurathane for a sealer, that you get a water based and not an oil based.
Thu, 10/27/2016 - 11:08
Do your doors stop when sliding open or can they slide off? Great Work!
Sun, 01/15/2017 - 07:07
Sorry for late reply, I never get notified when there has been a comment. At the moment they slide all the way off, but there is a simple pin system you can use that stops them from sliding off. Thank you!
Mon, 12/12/2016 - 08:53
So in the materials it lists
2 - project panel pieces 17-1/4" x 36" (may be advertised as 18" wide project panel - measure in store)
What is the thickness of these supposed to be? I cannot find this at any hardware store and was going to ise 1x4 strips instead. My question is, if this is going to have heavy use, do I need to use thicker boards to ensure it can hold the full weight of the top?
This is for my art studio and will hold tools, printer, laptop ect.
thanks!
B
Mon, 12/12/2016 - 12:03
So in the materials it lists
2 - project panel pieces 17-1/4" x 36" (may be advertised as 18" wide project panel - measure in store)
What is the thickness of these supposed to be? I cannot find this at any hardware store and was going to ise 1x4 strips instead. My question is, if this is going to have heavy use, do I need to use thicker boards to ensure it can hold the full weight of the top?
This is for my art studio and will hold tools, printer, laptop ect.
thanks!
B
Sun, 01/15/2017 - 07:11
I believe the thicknesses are the same of 1x material that you find at a big box store. If you are going to lowes or home depot it would be in the back of the section where the nice 1x boards are (pine ranging from 1x2-1x12). They will be wrapped completely in plastic shrink wrap. Hope this helps, sorry for late reply!
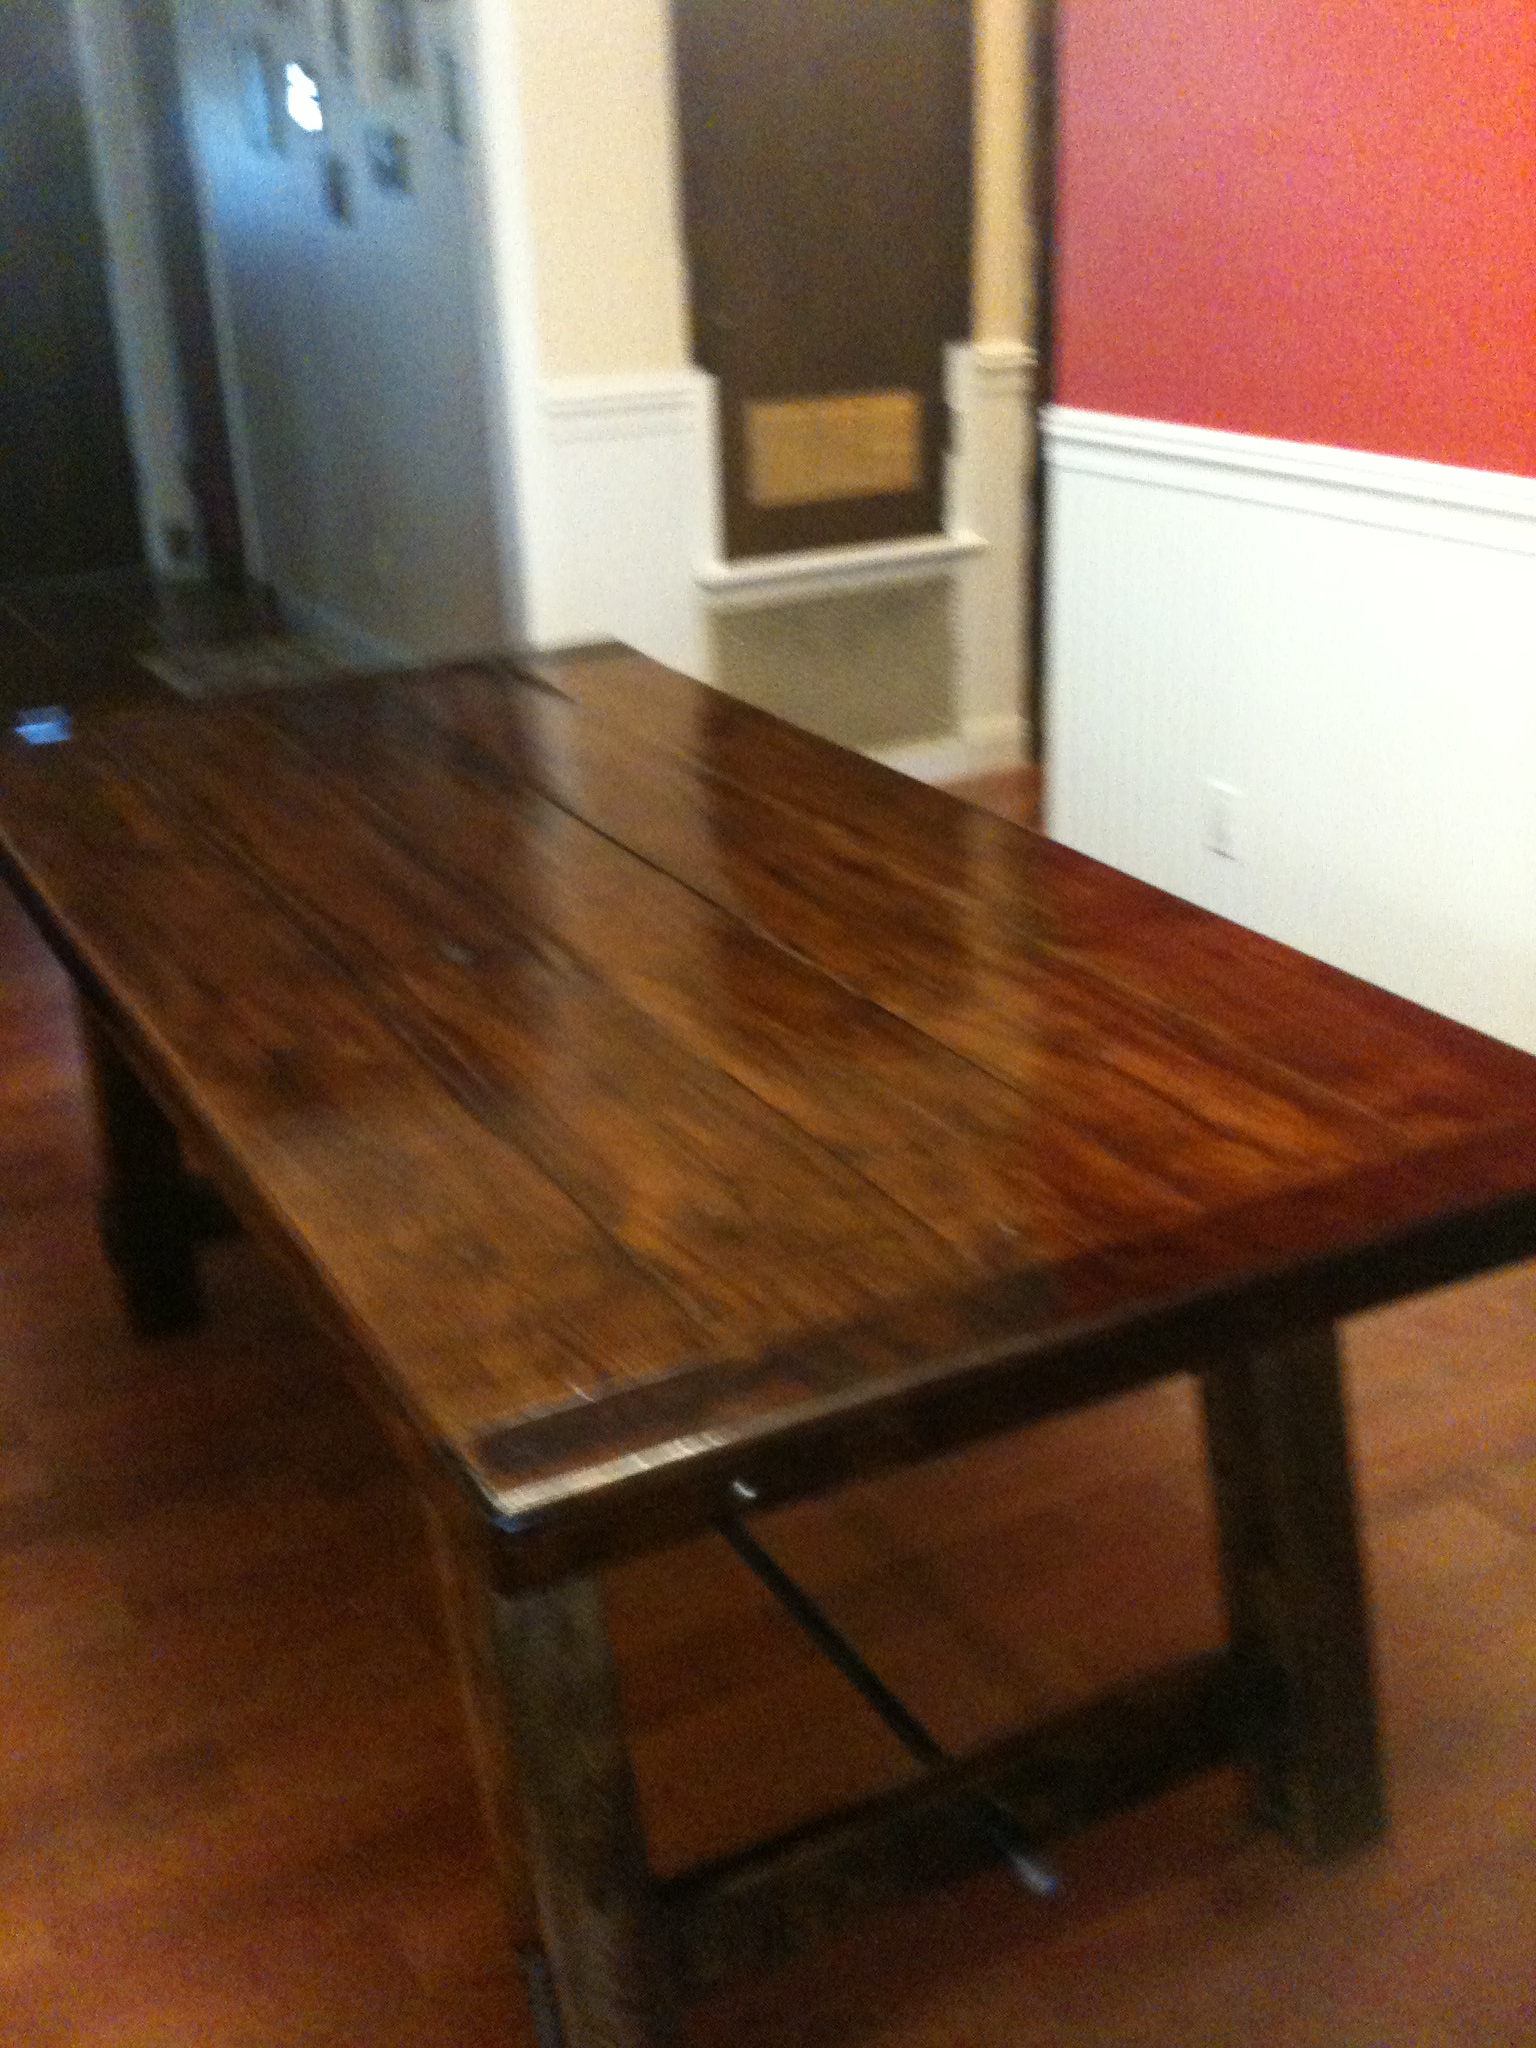
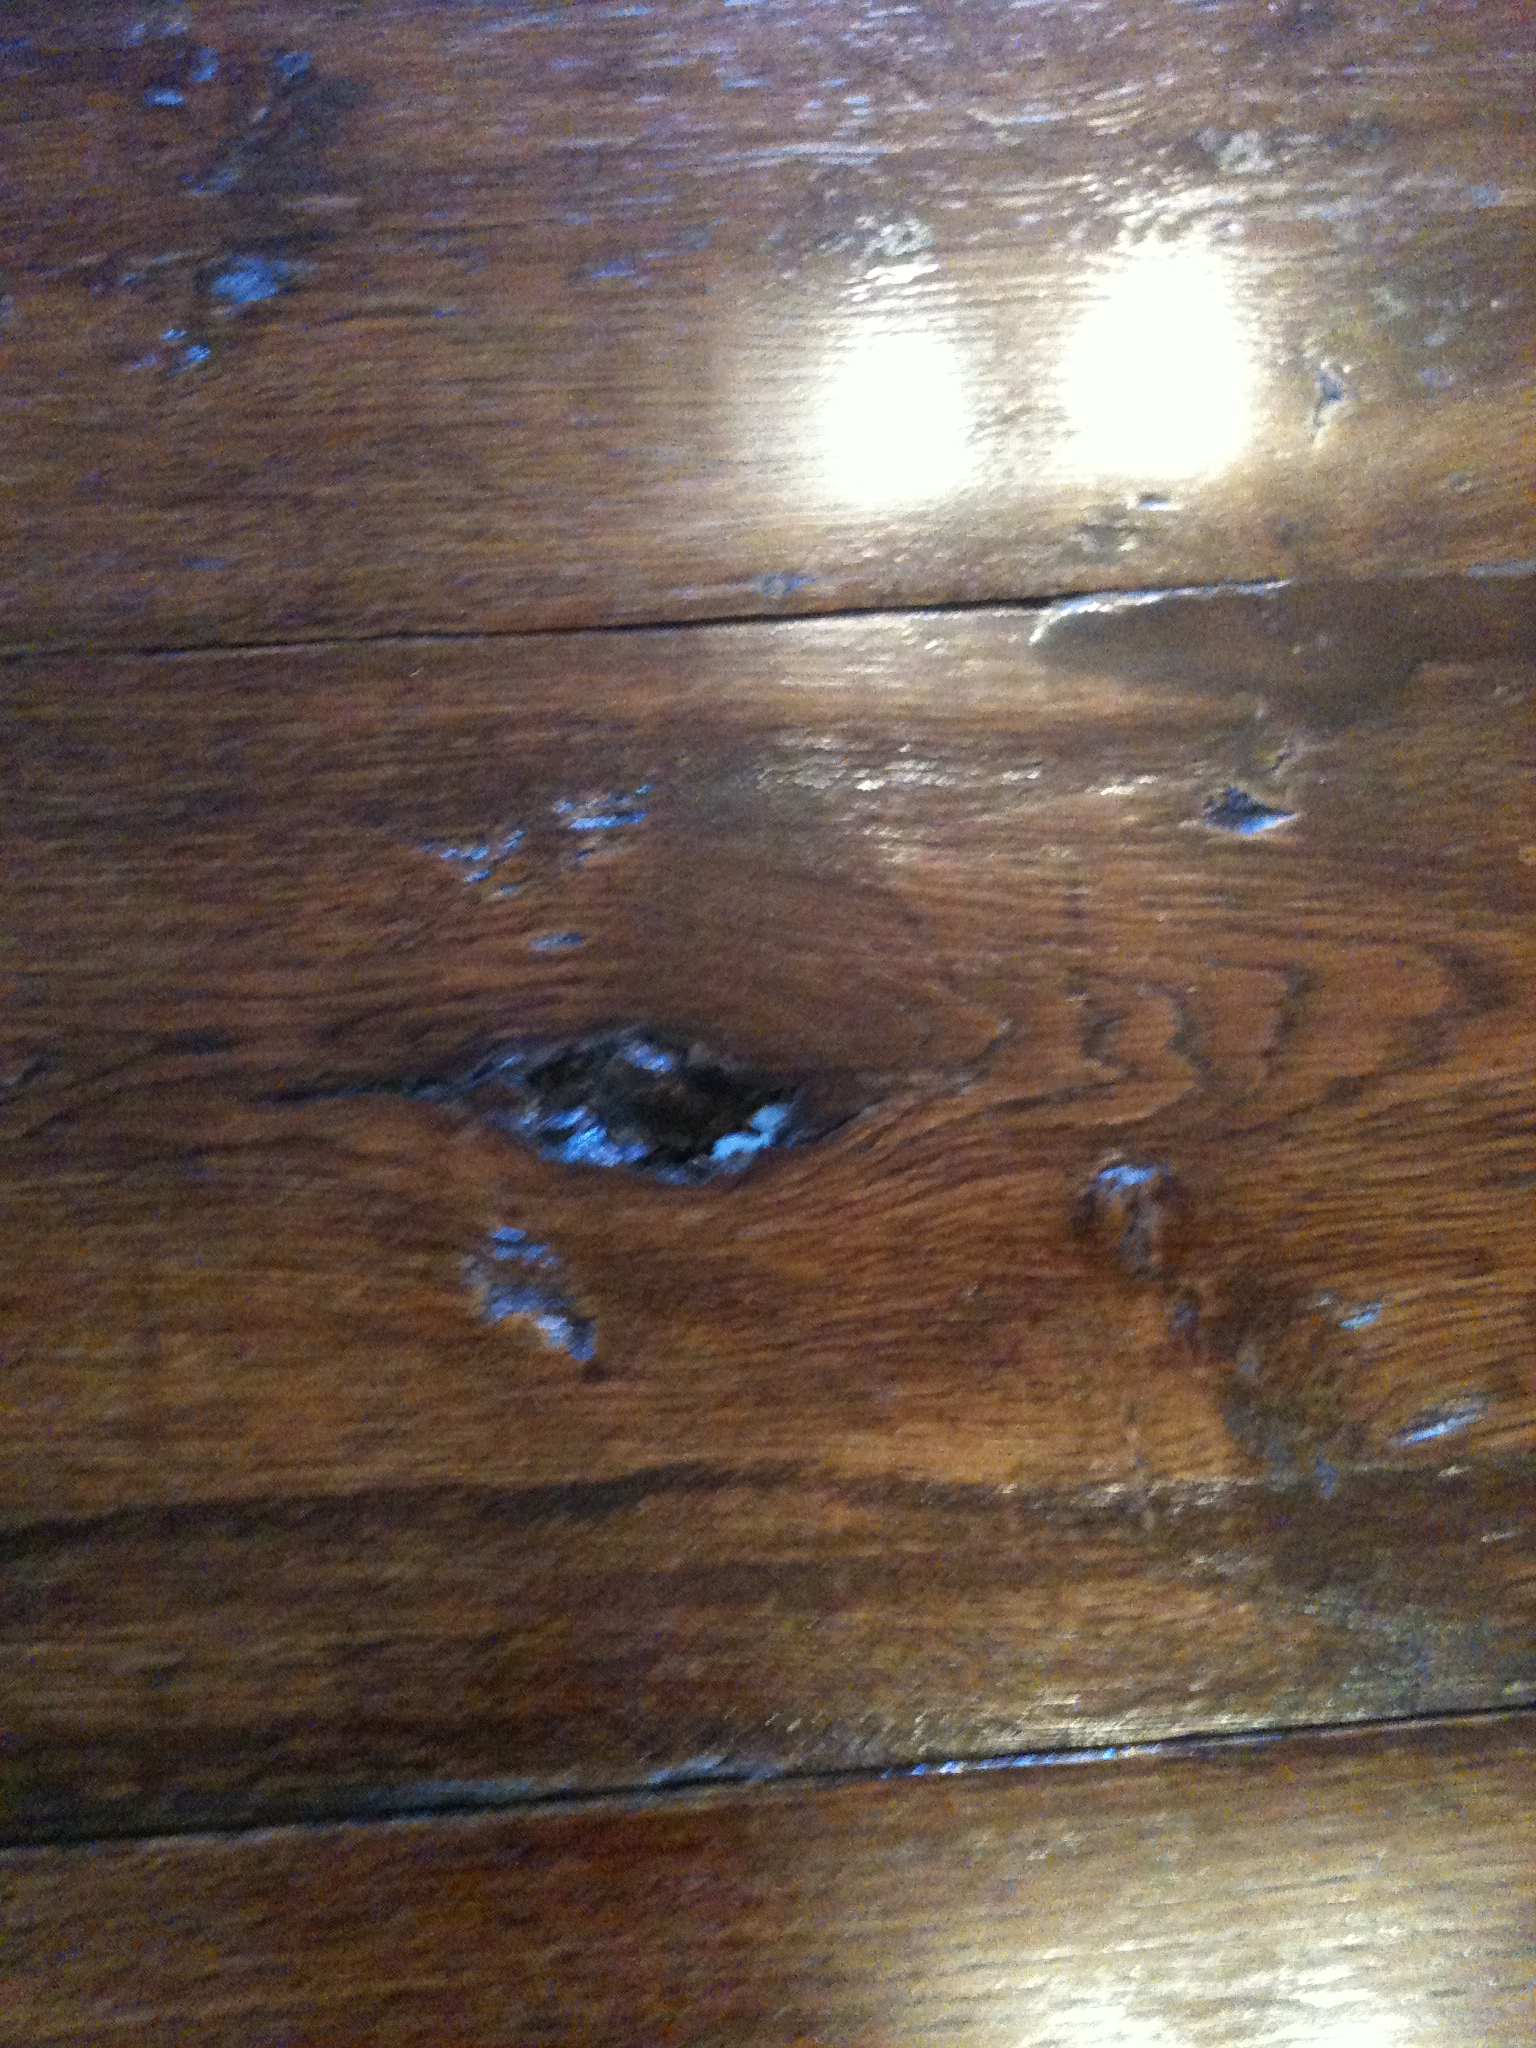
We really liked the plans for this table, but it was too narrow for our taste. My husband altered the plans so that the table is 36" wide. The solid oak boards on the table top are reclaimed from the old barn out back.


Sat, 08/20/2011 - 19:14
Beautiful built! I'm so excited to see your table! Thank you so much for sharing!
Thu, 08/25/2011 - 20:20
Thank you Ana for making the plans available and easy to follow. My honey-do list gets longer. You do such great work.
Mon, 08/22/2011 - 04:50
Great finish. What type of wood did you use for the top and what color was your stain?
Thanks,
Susan
Thu, 08/25/2011 - 20:19
The top is oak from an old barn we have on our property. The stain is named Provincial from Minwax. The rest of the boards are whiteboards from Lowes.
Mon, 08/29/2011 - 19:25
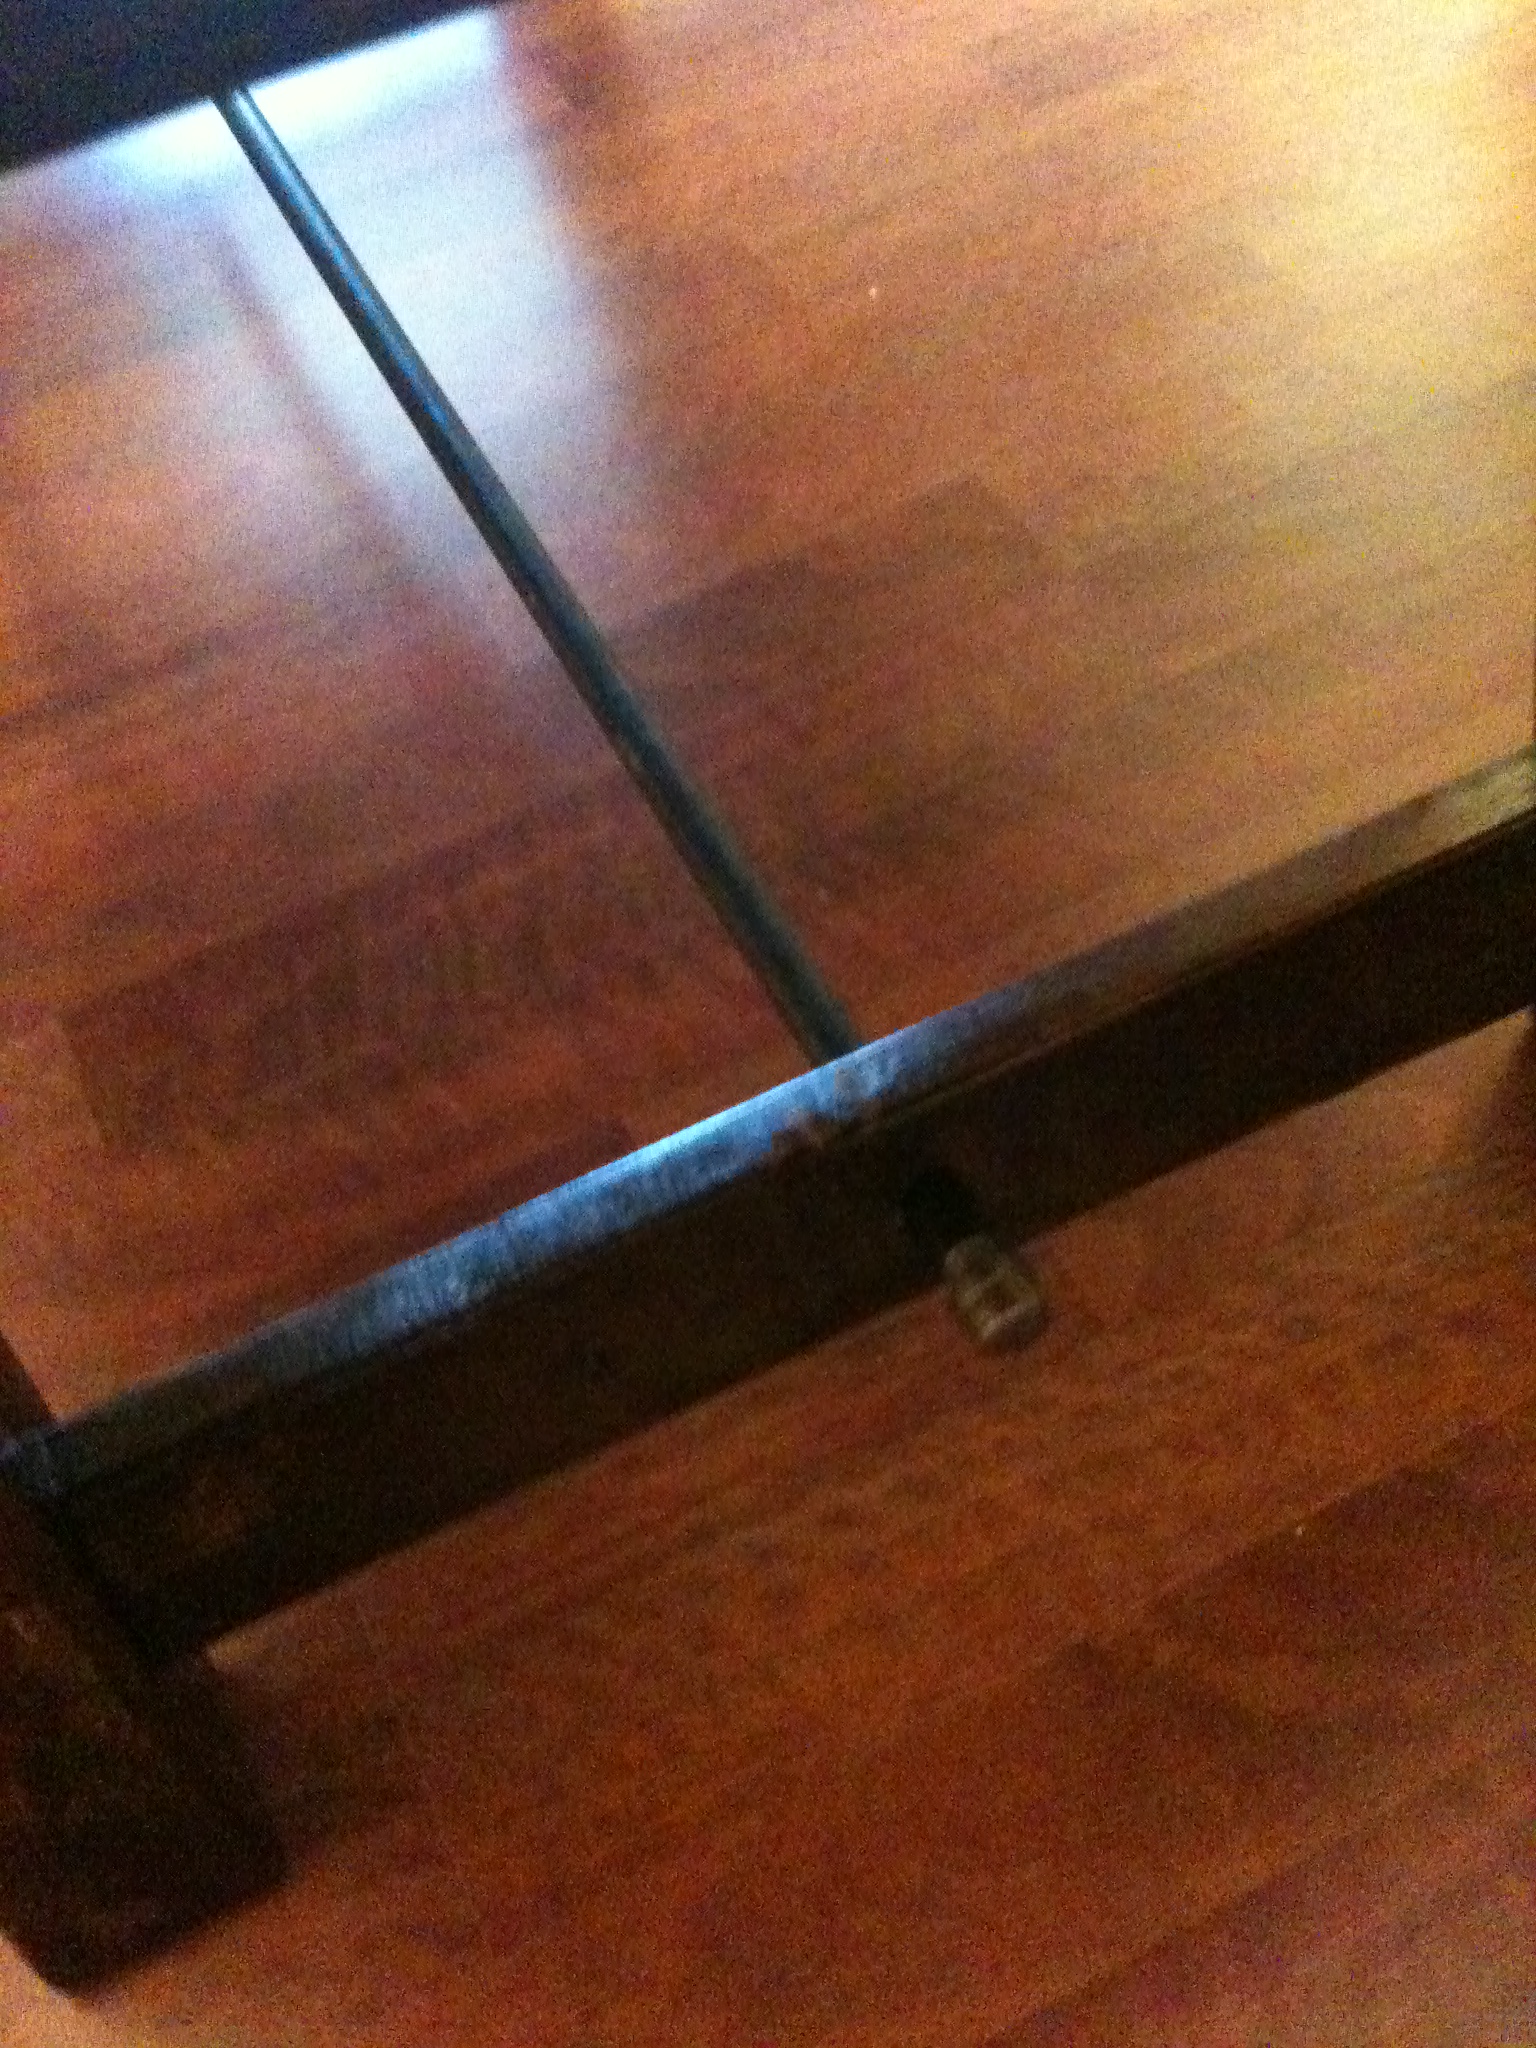
Gorgeous table! Where did you find the metal rod for the bottom of the table?
Wed, 08/31/2011 - 14:49
I found it a Lowe's in the section where the pipes are sold.
Sun, 12/04/2011 - 07:14
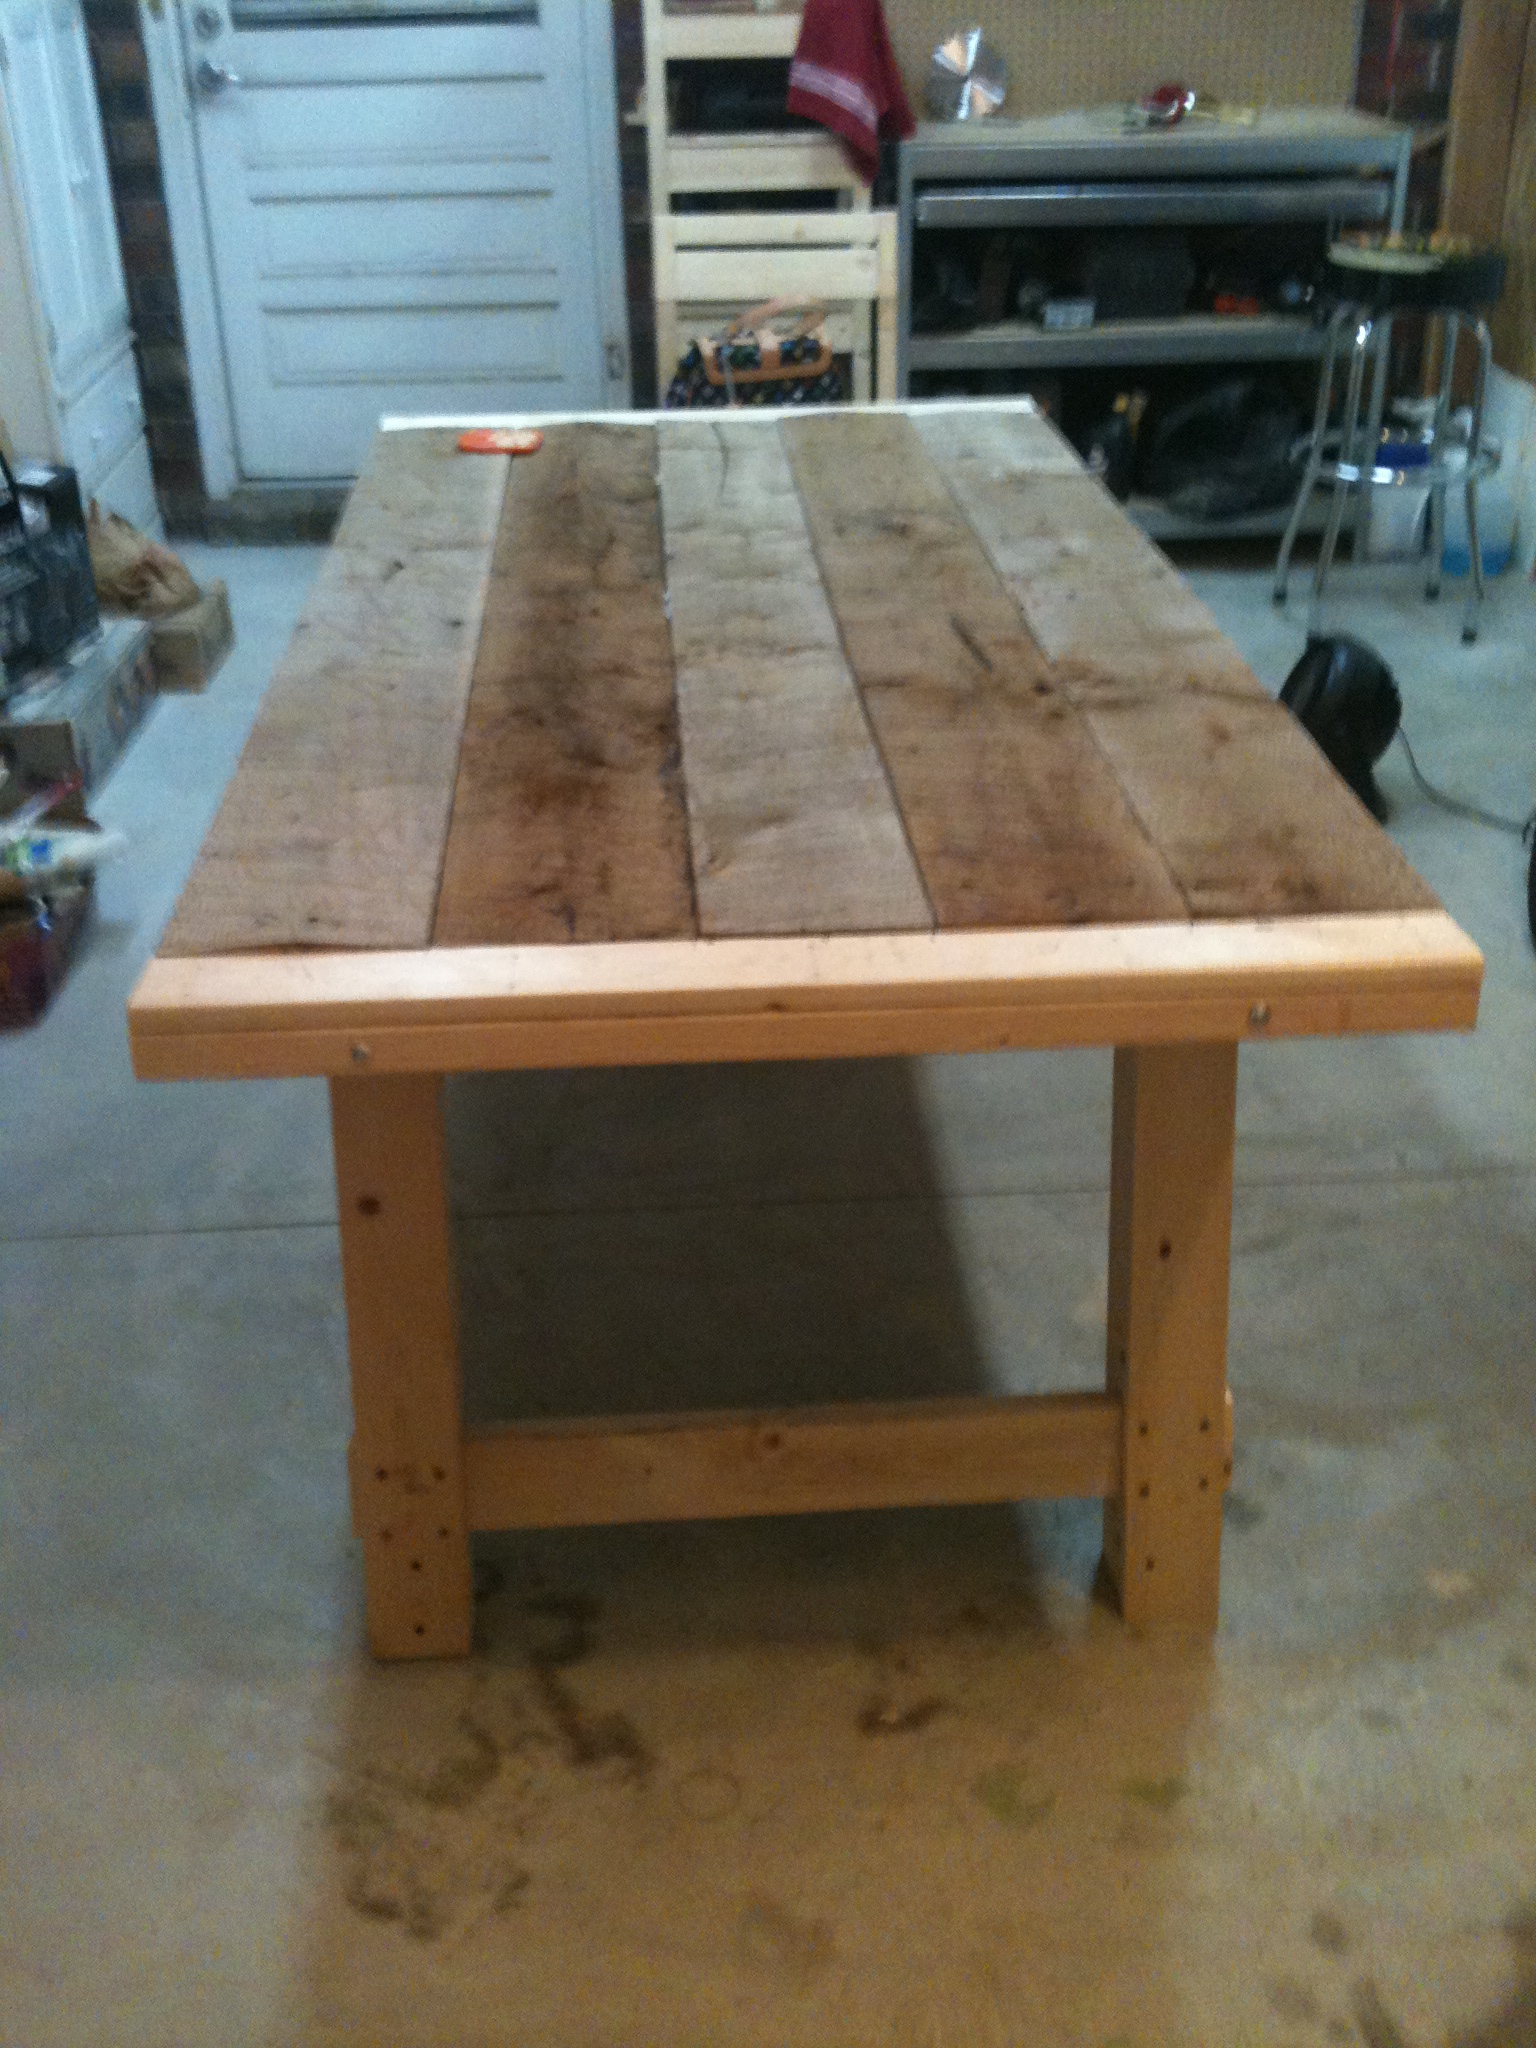
Gorgeous table!!! I love the finish, and I know you must be so proud of your work. I love the pic that shows the bones of your table in progress. It shows the craftsmanship that you put into this piece. Great job!
Sun, 02/12/2012 - 10:11
Hi,
You mentioned that you used "Provincial by Minwax" I looked at it at lowes but it doesn't seem nearly dark enough to achieve the color from your pictures. I have included a link to it so, maybe I have the wrong stuff:
http://www.lowes.com/pd_45804-24-22110000_4294766269_4294937087_?produc…
If you could let me know if I'm on the right track that would be great!
Thanks!
Tue, 02/14/2012 - 04:55
You have the correct stain on the website, I used 3 coats on the table top to get it darker and let the stain soak in longer before wipping off the extra. On the chairs only 2 coats were applied. What I did was sand in between all the coats, even though the stain directions say its not needed, I just wanted to try and the results I liked. As always try on a spare piece of wood first. I hope this info. helps, thanks for looking and asking.
Wed, 02/22/2012 - 10:30
Great! Thank you for the reply. I am going to start on this project in a few weeks and your input is very valuable. I'll give it a go and let you know how it goes.
Thanks again!
Wed, 03/07/2012 - 19:39
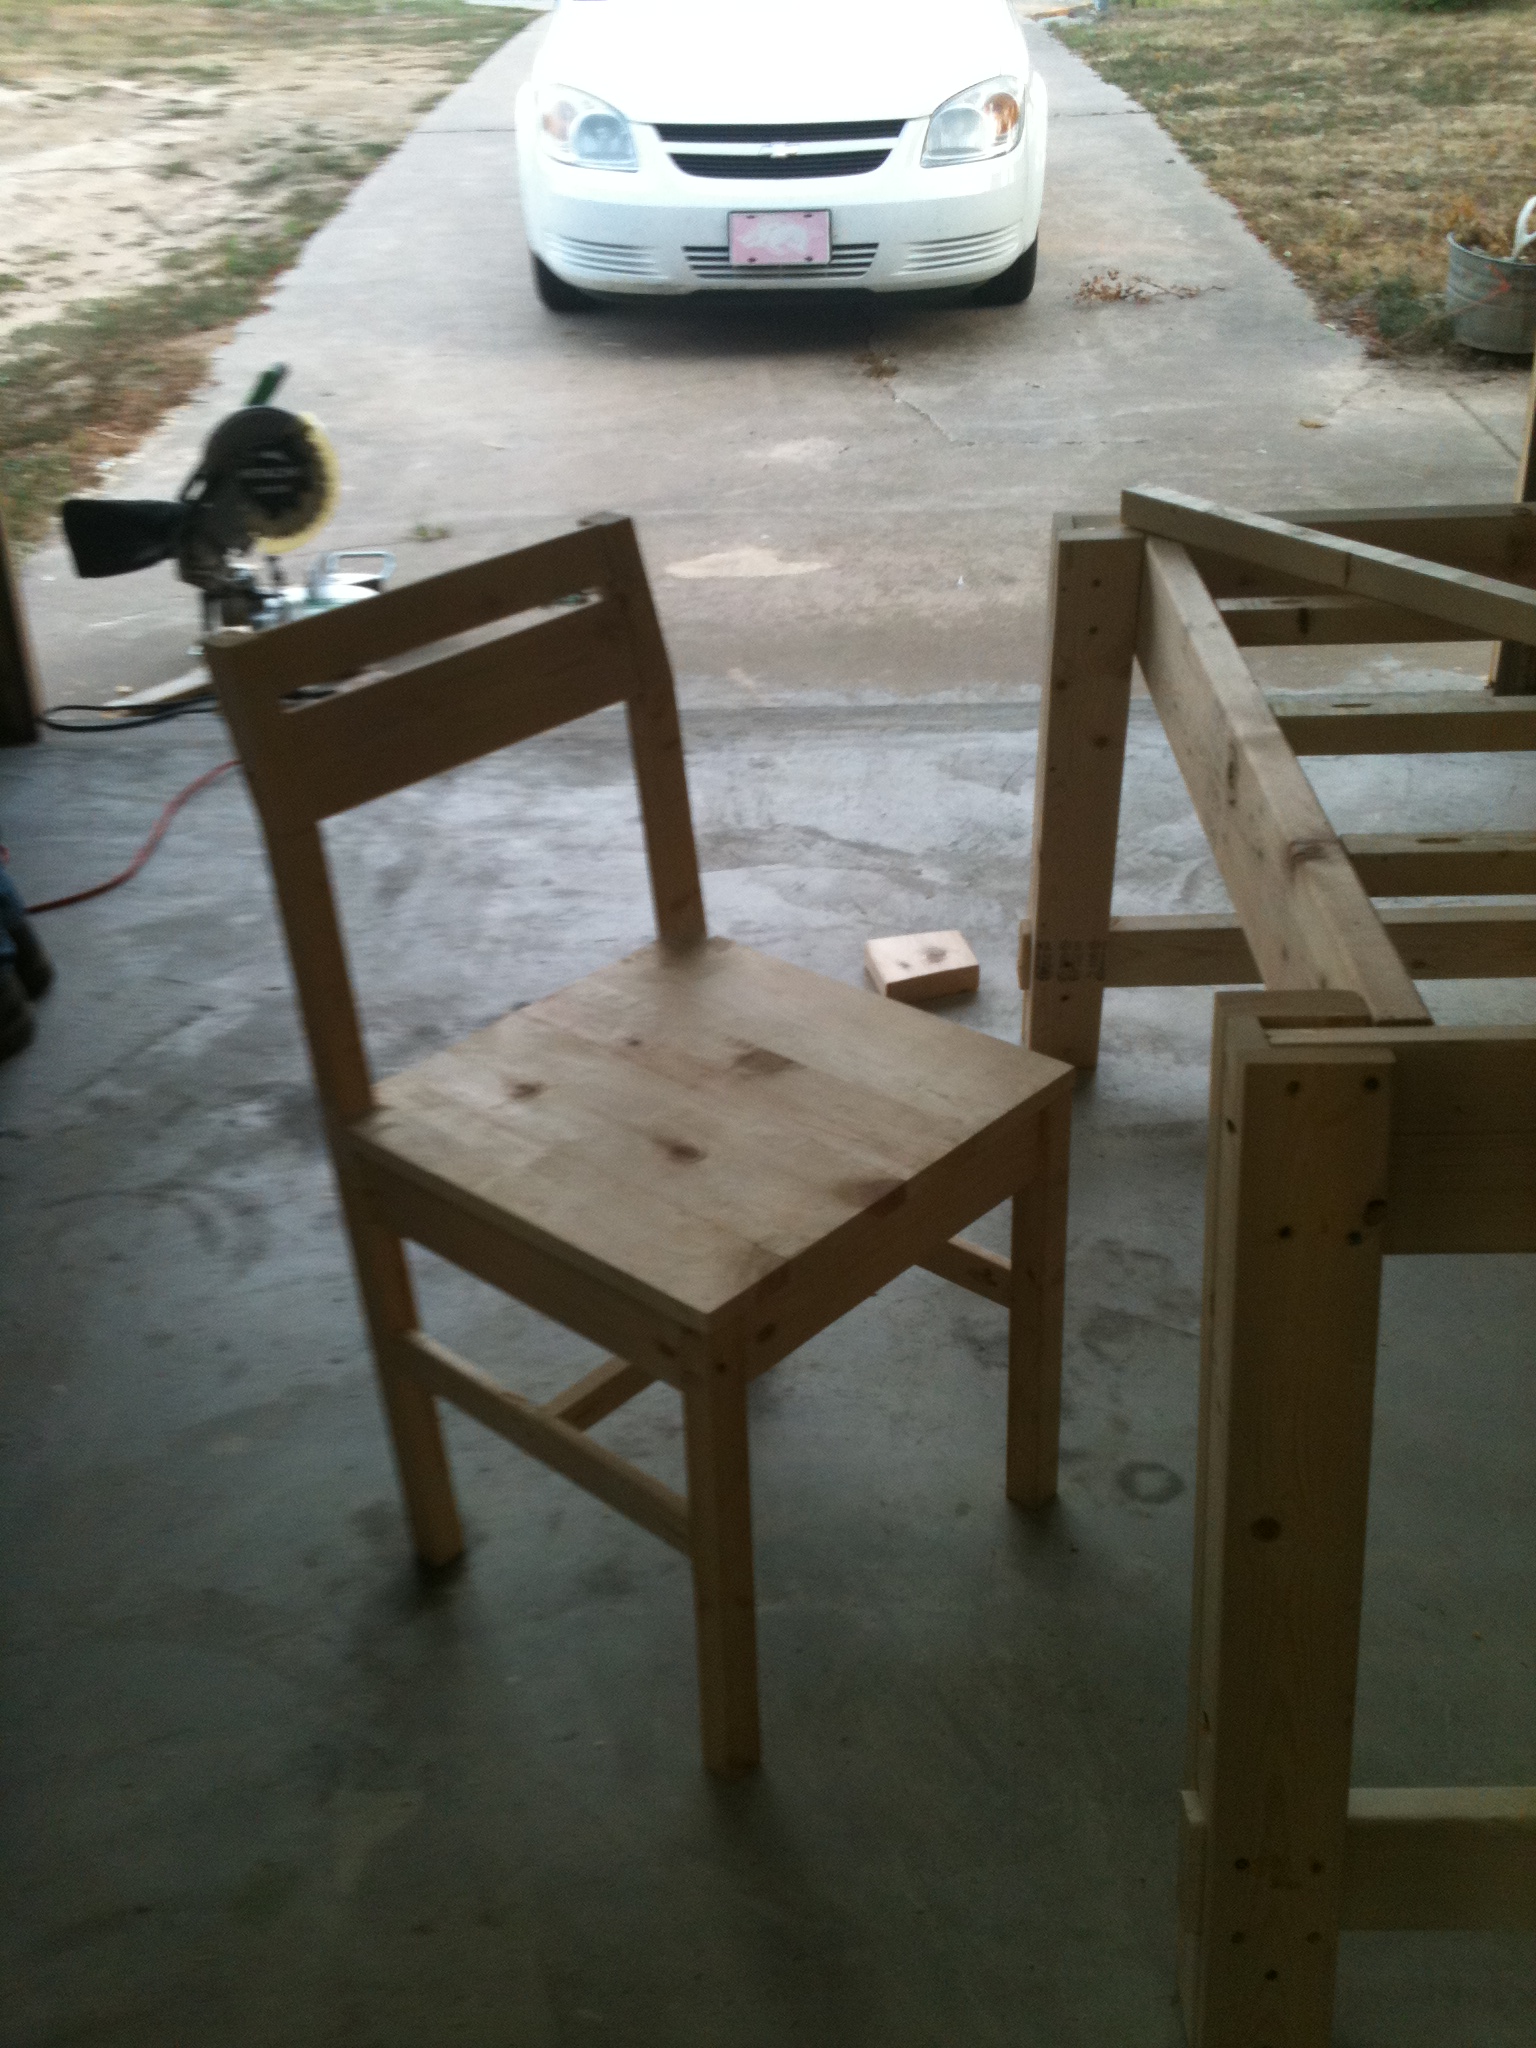
I love the table, but I'm suprised that no one said anything about the chairs. Do you have the plans for the chairs you made? I built the table but would love to have chairs that matched! Thank You
Tue, 03/13/2012 - 14:21
I'm in LOVE with your table!!! Did your husband follow Ana's directions for the legs? They look like they are at a slight angle. Does your husband have the plans for this? Thank you so much!!
Tue, 03/13/2012 - 14:26
Hi, I LOVE your table - it came out so beautiful! Just wondering, did you change the plans other than the with of the top? The legs look like they are at a slight angle and I love that!
Sat, 03/31/2012 - 15:47
I followed Ana's plan to build the legs, they are at a slight angle. The chairs are based on the Modern Angle Chair. They are posted as another project. I did add the three cross supports on the bottom. When I saw my wife sit down and lean back a little bit I could see the back legs moving to much in the wrong direction. I basically used a 1x2, and I tried to measure about the middle or what looked good and screwed them in. It added more strength to the legs and made the chair much sturdier. I hope this info., helps. Sorry it took awhile to reply back.
Thu, 01/31/2013 - 04:40
This table is stunning, great work. Everytime we think we know which type of table we want to build we go and see another that looks even better.
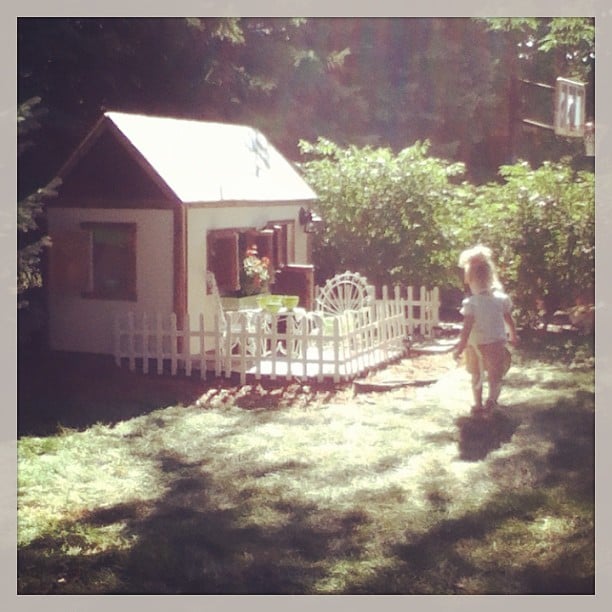
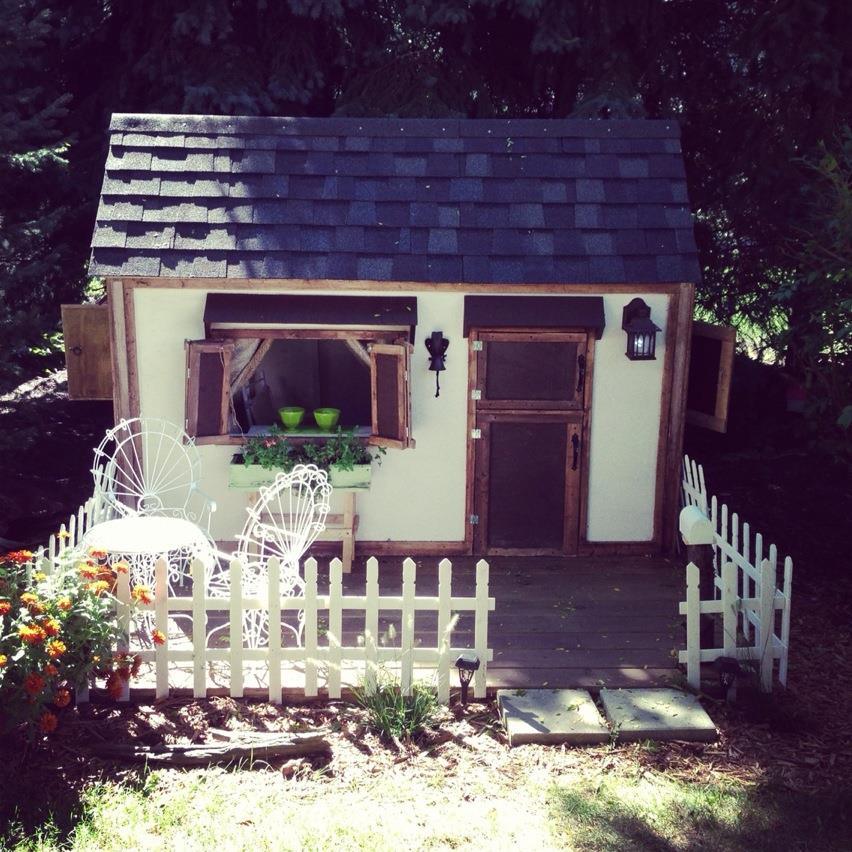
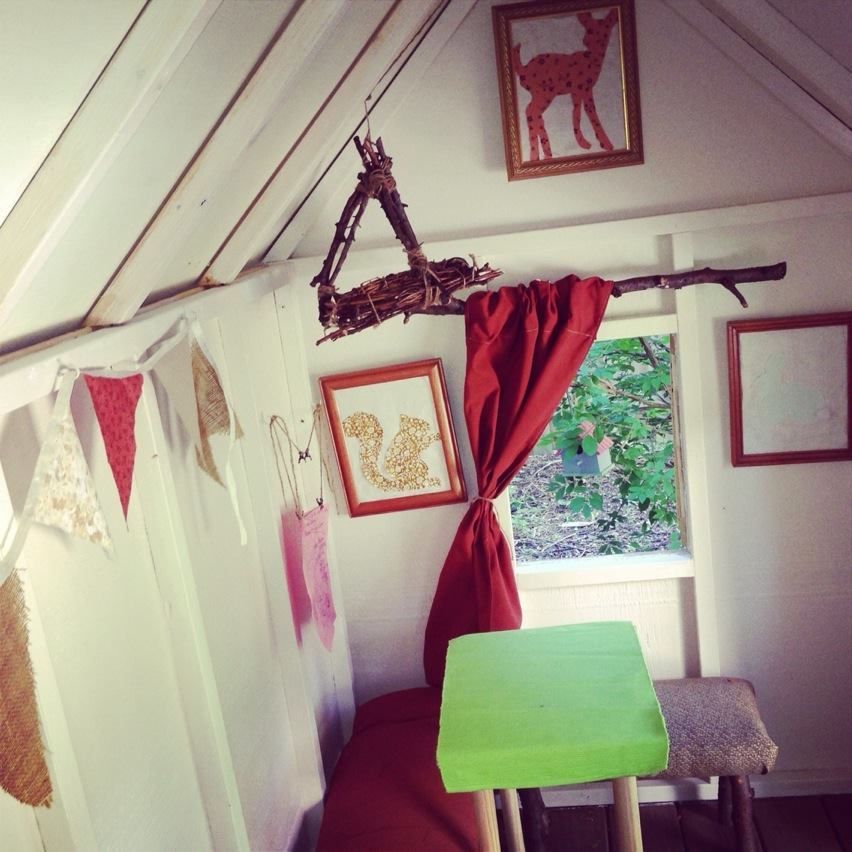
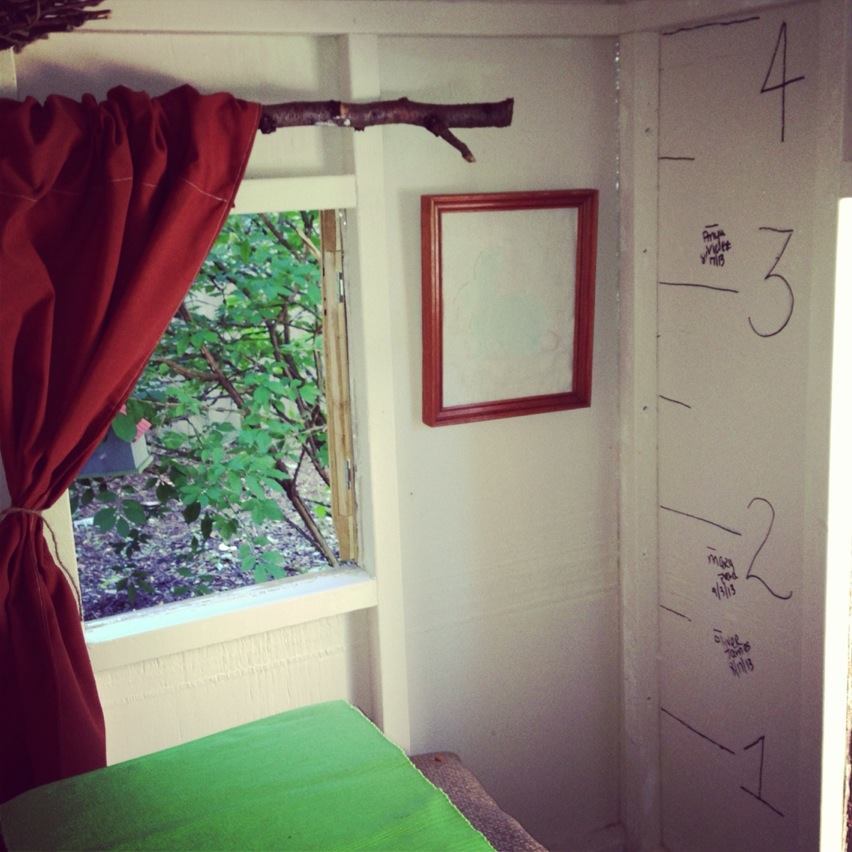
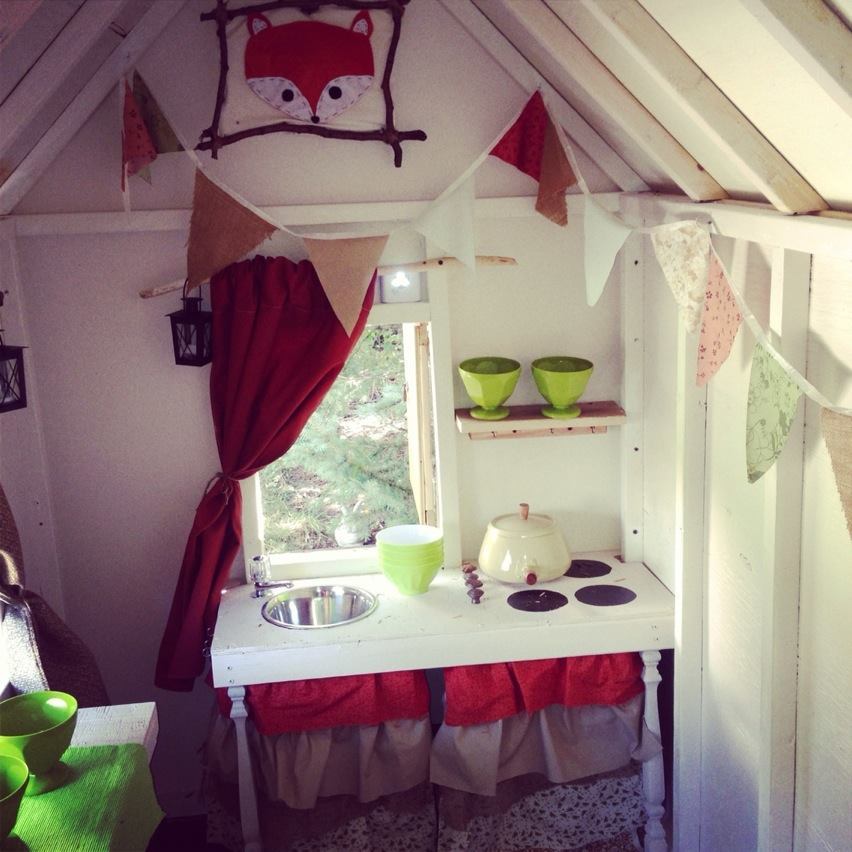
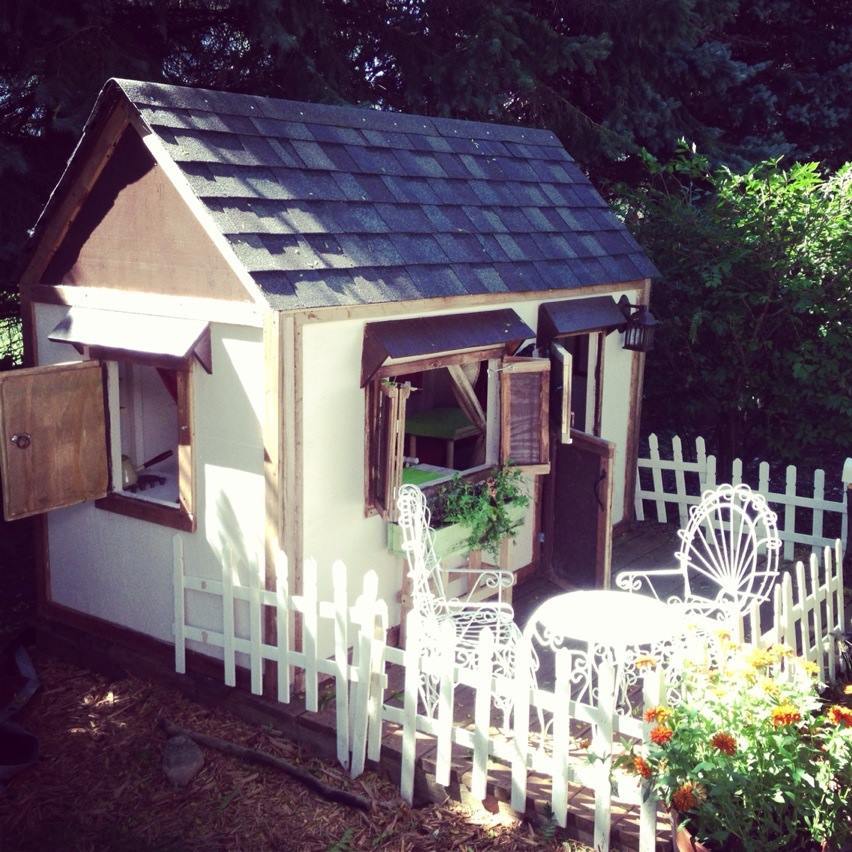
This was something I had always wanted to build for my nieces and nephew! it was a blast to build and see it come together. Two people working on this job is best. I loved the look of being able to open the doors top and bottom! I added the awnings above all the windows and doors to prevent as much water going into the playhouse as possible. The roofing was a little overwhelming at first but as we got going it turned out just fine! I wanted to lantern in the front to actually light up but I didn't want to run electricity so I got the lantern and put a motion sensor battery light on the inside and it works great! I also put one on the inside for more lighting there too, along with 3 battery "candle" lanterns. For the inside decoration I went with a wood land theme, put a growth chart on the inside wall to measure their height each year, and even made face masks! This is always and ongoing project for me seeing as how i'm always adding something new. The little ones love coming over and getting mail in the mailbox. Thanks Anna for the playhouse plans! I'm excited to see my nieces and nephews imaginations grow with all the possibilities the playhouse brings!
Thu, 09/12/2013 - 14:04
This is like the picture perfect childhood for me. I LOVE it. Great build!
Tue, 07/29/2014 - 14:04
So I had a hard time figuring out which house to build for my daughter and your house gave me such inspiration! I cannot wait to make this for my little girls 2nd birthday. She loves play pretend. Thank you for your inspiration!

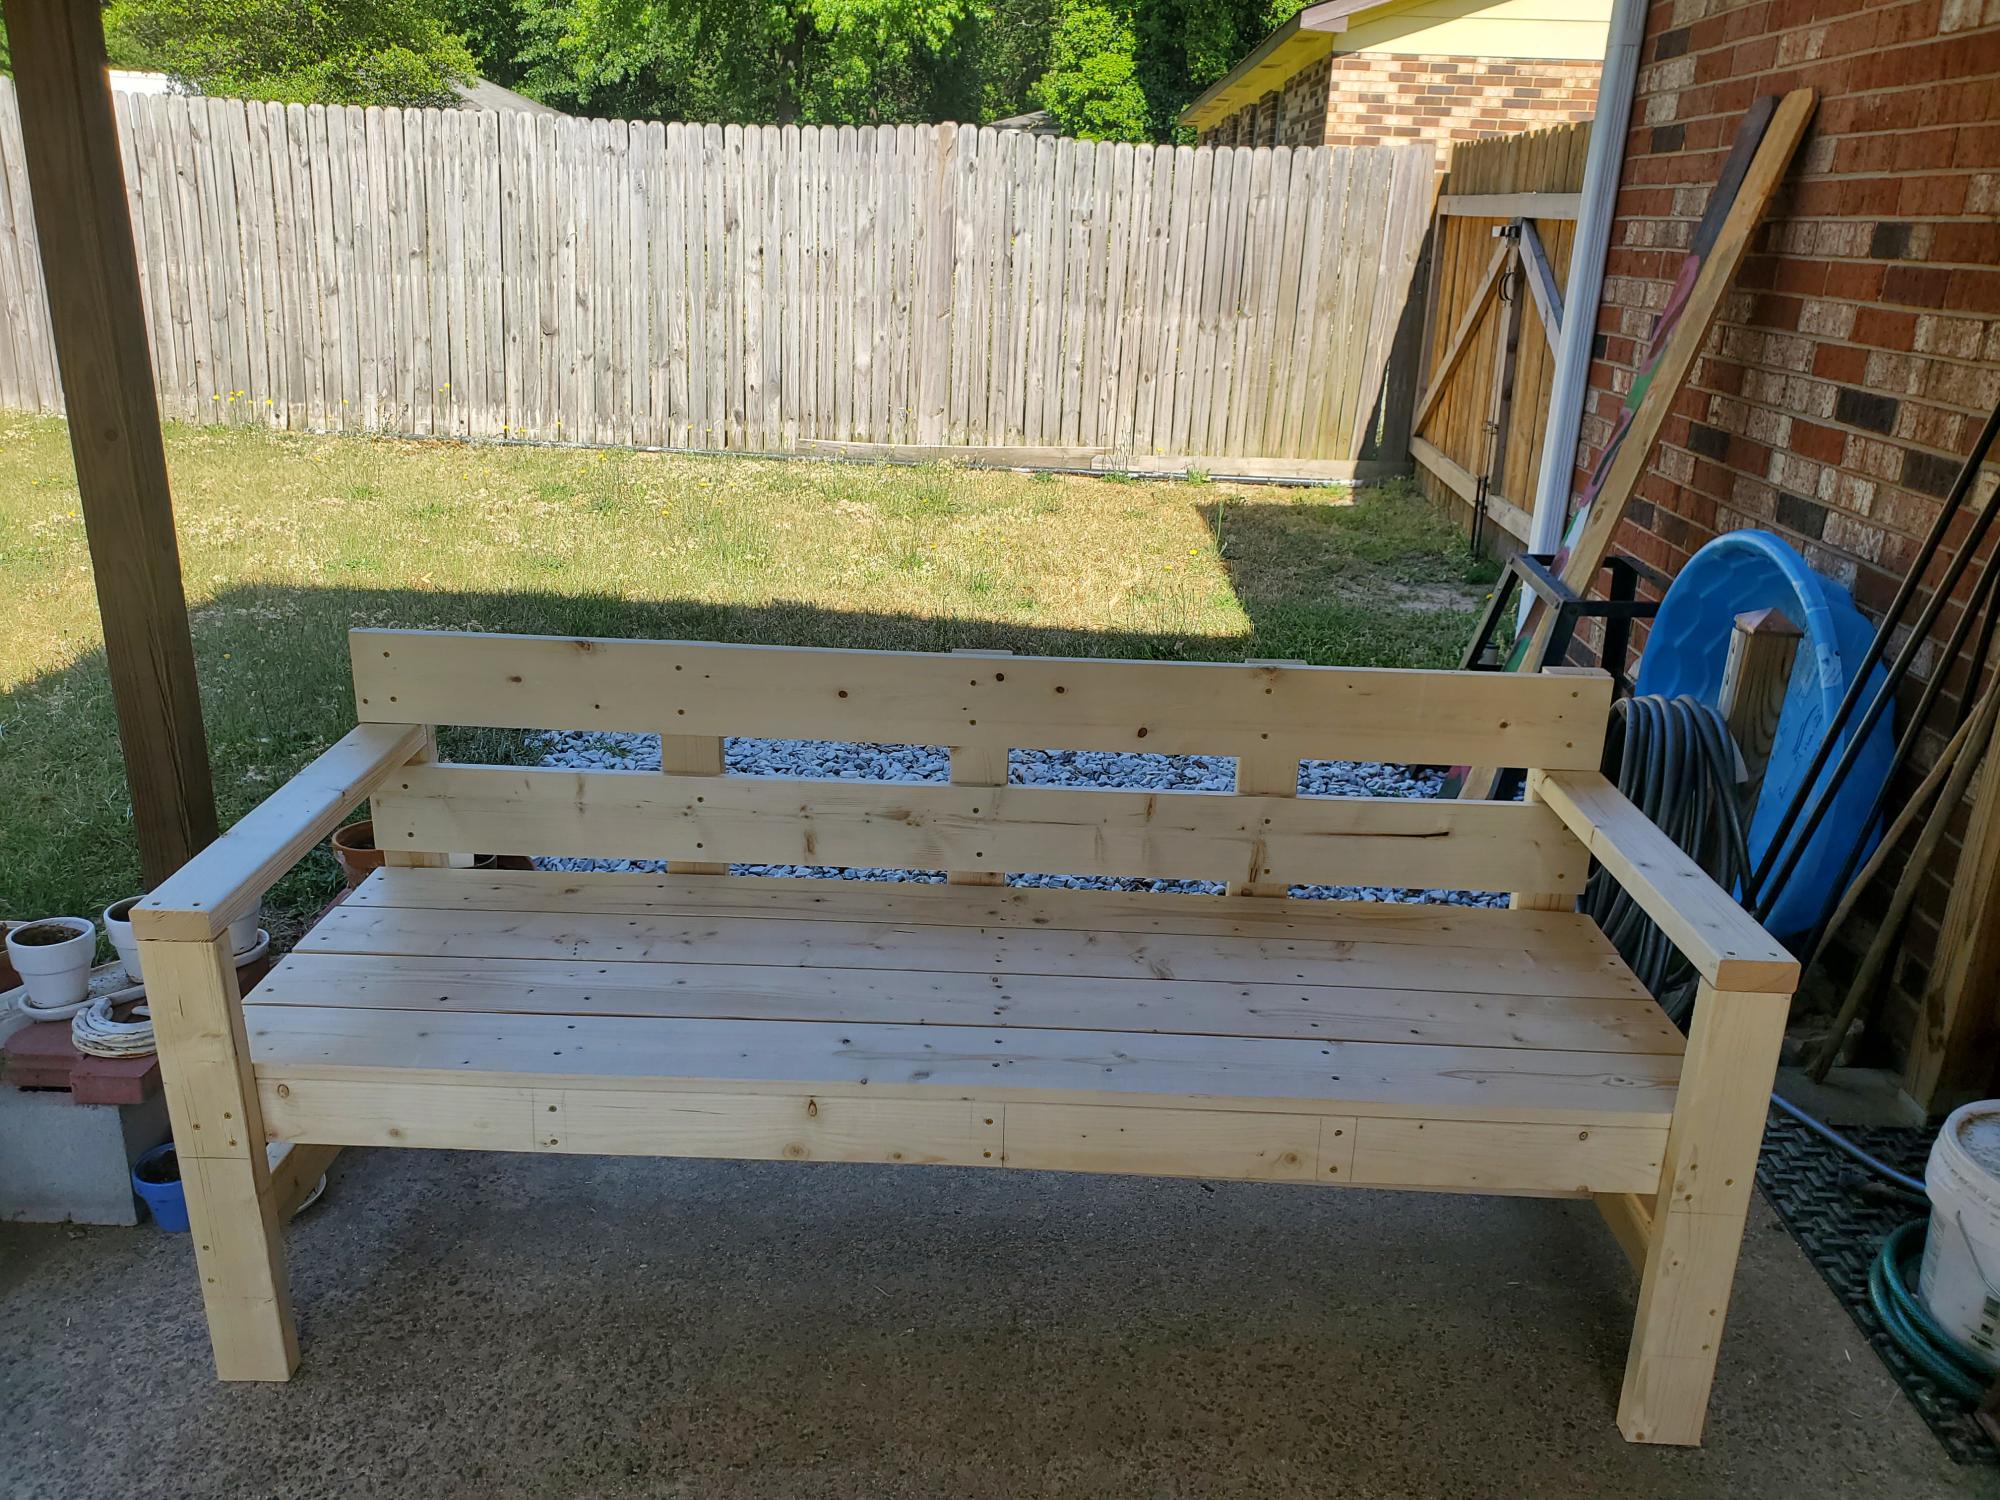
Enjoyed this project. Already have a request to build a whole set.
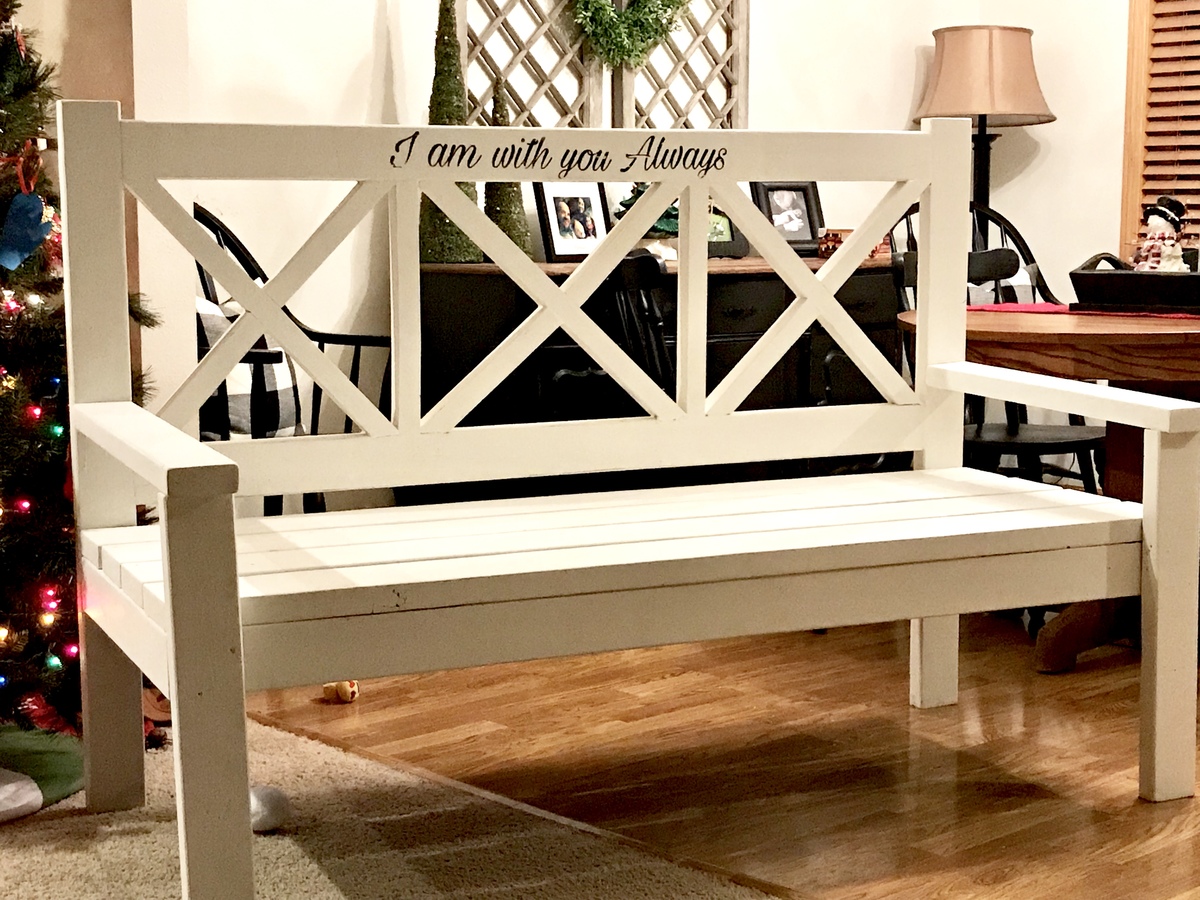
Love the easy to follow plans!!! Make sure you have room when building....this a Big bench.
Rob V.


Comments
Ana White Admin
Mon, 08/15/2022 - 11:13
Great bench!
Thank you for sharing, it looks awesome!