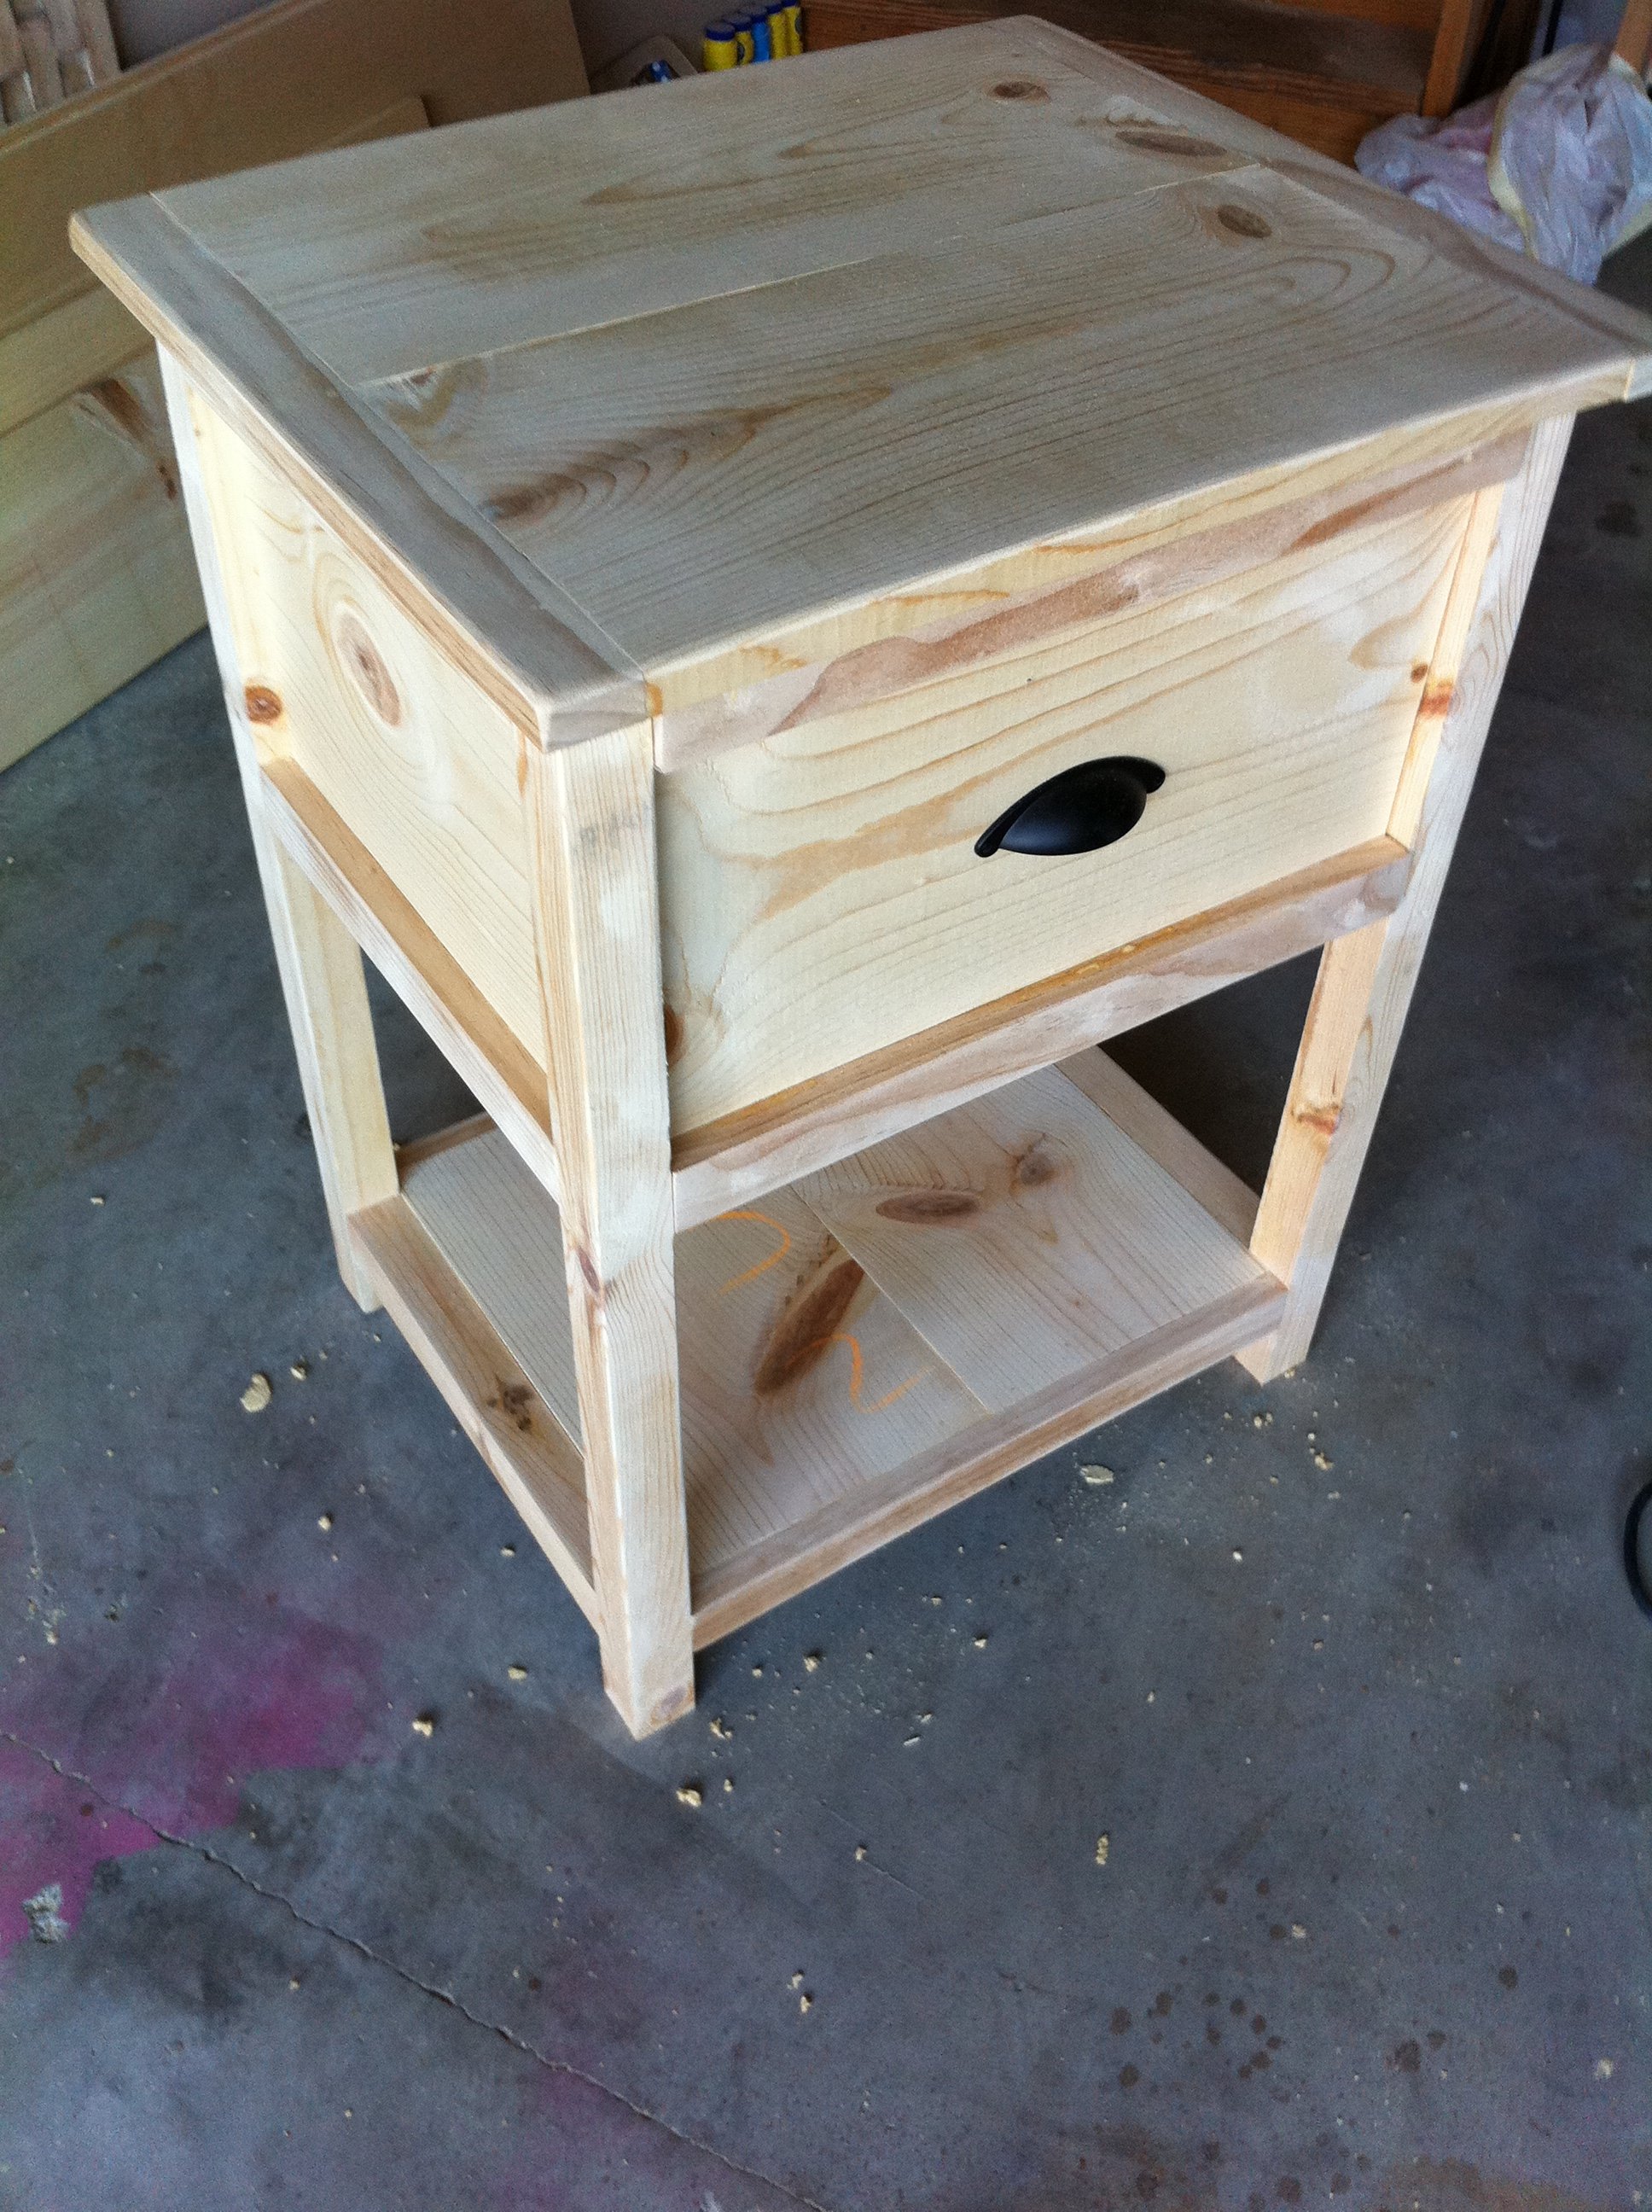
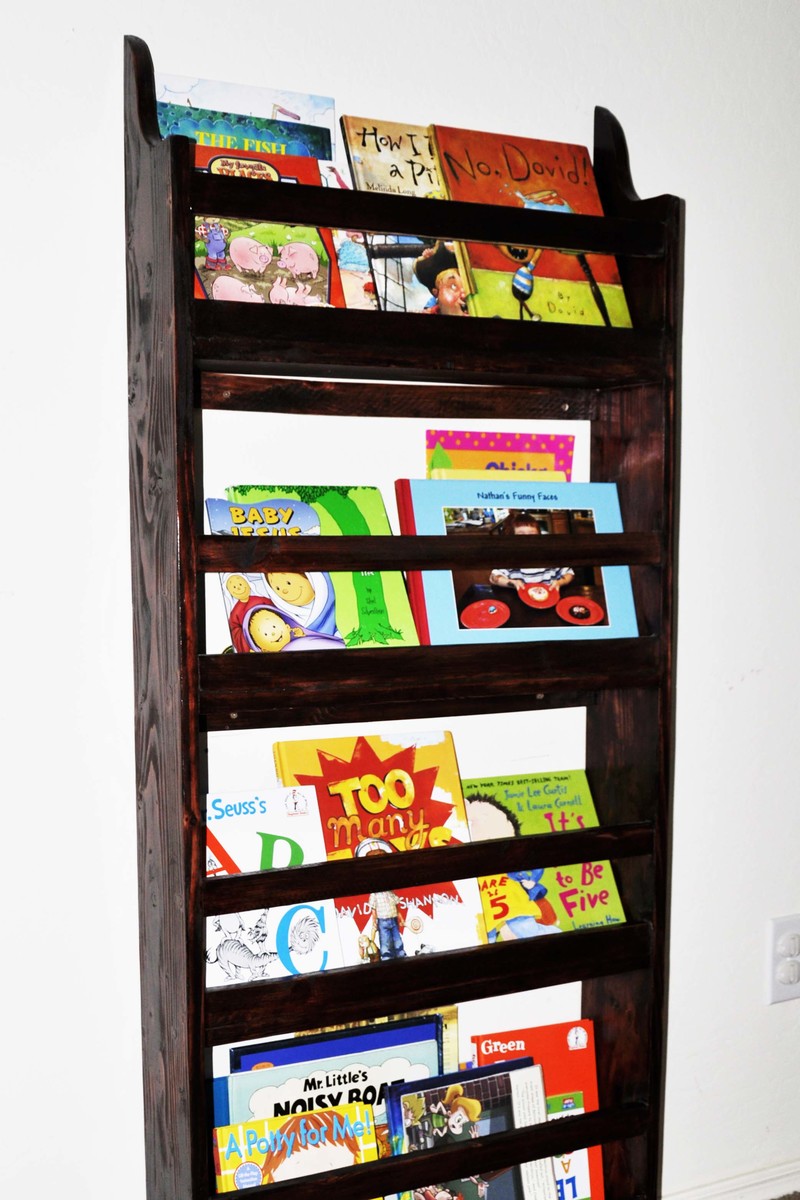
Under the Sink Storage
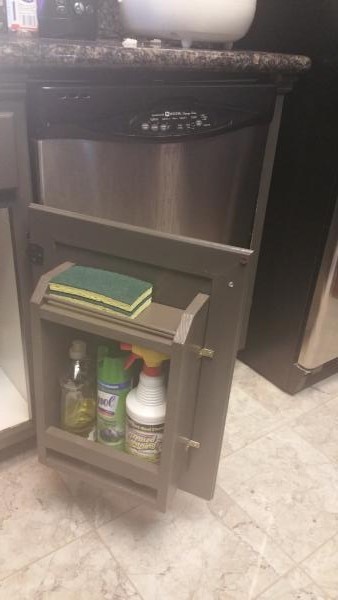
My under the sink door cabinet is smaller than what's on the plan so i had to improvise. A paper towel dispenser won't fit anymore so I just made another shelf. I love it. No clutter and everything is so organized. :)
I made the table from rough-cut cedar that was harvested on my father's land. All I spent was $16 on Danish oil and $5 on sand paper but its priceless to me. Thanks Ana!!!
My take on a corner cupboard. I used old barn tim form backing and somewhat modified the plans. I actually made the hall tree first and then the matching cupboard. I finished it off with a custom distressed finish.
My husband and I built this as our first project & are thrilled with the way it turned out! We shortened it to 44" to fit our space. It took us a few hours but we got the Kreg Jig working the first try (though on a current project it is giving us some headaches). We really enjoyed building this on a rainy Saturday and received many compliments after posting the finished project on facebook. Looking forward to our next project - thanks so much for all your tutorials Ana & other submitters!
Tue, 08/27/2013 - 16:35
Fabulous job on this build! Looks awesome! The colors go so beautifully with your kitchen!
After I built the dresser for my son, he decided he needed a nightstand. This was his project, I only advised and offered assistance. He was 15 and he came up with the design and we glued up the panels. He cut, sanded and assembled himself. He stained and applied the shellac. I am very proud of him.
Your plans are so clear and easy to follow. Your video on using the skillsaw to cut a circle was sooo valuable. We easily created the same jig and got really good results. I have followed your YouTube channel and blogs for years and wanted to finally say thank you for all that you share!
I needed new bedside tables to replace mine that were falling apart. I love the whole Stratton line at PB. I wanted to make something similar, but a bit more sturdy.
So, I made this table with a much more solid bottom shelf and a deep drawer with a full face to mimic the sides and the back panels.
The design for this feeder came from Ana's raised feeder as well and the people who have made these feeders with tile. I had a lot of fun making this and I love how it turned out! I can see how they would be addicting to make. I constructed the wooden base (I just eyeballed how long to make it and how tall to make the legs based on the size of my bowls). I nailed hardibacker to the wooden top and applied the tile with thin set and mortar. This feeder is for my bigger dog, so disregard my small dogs checking it out:) The grout was a dark tan color before it dried, and I really like the color it ended up being. I bought the tile and grout from the habitat from humanity store, which had a big selection of miscellaneous tiles for basically free! Fun project!
I started about 2 years ago by making one of the Mini Farmhouse Style bedside tables. My wife loved it so I made a second. Then I made the bench a year or so ago with plans from this site too. Unfortunately I can't find where those plans are now. Maybe in Ana's book (I have that at home too)? I just finished the Reclaimed Wood Headboard with wood I reclaimed from the big orange store :)
I put a 1/4" chamfer on the edges of the panels for the headboard, and had to add a brace in the back because none of them were perfectly flat. No one has seen the headboard yet, but I've had friends ask me where I bought the bedside tables and bench. I've never had a matched set before. This is a definite bedroom upgrade!
Stain is Minwax Special Walnut, paint is Gotham Grey from Behr.
Mon, 10/12/2015 - 11:03
All of your furniture looks amazing, I am really loving the finish! Thanks for sharing!
Very comfy outside sitting
I needed some extra shoe storage just outside our sliding glass door on our deck. I used Ana's easiest 2x4 bench plan with drawers, just left the drawers out and did some extra 2x4 framing. Once the 2x4 frame was built, I wrapped it with cedar fence pickets. This thing is sturdy and pretty much weather proof!
easy to follow instructions. I work in a hardwood sawmill as a sawfiler. I get a lot of wood from the mill. I bought a kreg pocket hole jig for the first time. Building the doors was easy. I'll never use mortise and tenon joints on small doors again. The door ornaments came from Lowes
Loosely based on the small cedar fence picket storage shed plan, this was my first attempt at making a storage unit with a roof. There was only one unplanned trip to the store (to replace two 2x4's that I cut to the wrong length). Pro tip: "measure twice, cut once" doesn't work if you measure the wrong length twice. Also almost lost two fingertips because I'm an idiot and forgot the most basic of safety rules for power tools, namely the "don't put your fingers near the blade of a circular saw when it's in use" rule. Very lucky to only come out of it with a good scare and some wounds that will heal without permanent damage.
Queen Farmhouse Bedframe made from Poplar and stained with Carbon. Don't remember brand name of stain. Finish is by General Finishes Flat sheen.
I was so excited to start the Queen storage bed - but then I had all that lumber and the cuts weren't perfect, and my measuring skills need work, and I don't fit into 12 x 18" spaces, and my vision isn't great to begin with and I certainly can't see into those dark, dark spaces!
But, in the end, I had fun, and the drawers work, the finish turned out well, I still have all my fingers, my bruises are about gone (2 weeks later, for goodness sake!) and, most important, my son and his wife say it looks great, is sturdy, and the drawers work! Whew!
Next month I'm doing the twin sized version for my daughter - and no drawers, yeah!
Sat, 08/13/2011 - 19:34
Well for all the problems with fitting into the spaces, seeing, and such, it turned out beautifully!! Well done! I
I followed the plan but added a drawer. I had a drawer that I had previously built but it didn't fit that project. It just happened to be the right width for this, I had to cut off some on the length, and that turned out to be easier than I thought it would be. I used wooden slides.
The kitchen island I built from your plans for my wife. I used hickory and for the top I used rustic cherry.
This was my very first Ana project. It probably took me three times as long as it would take anyone with any experience. That said, we love it! I have since made two more for friends! No need to look too close, there are plenty of mistakes.
I made the Restoration Hardware couch and deck chair. I got really nice Sunbrella material cushions for $60 each at HD. I wanted to make a matching coffee table. I just threw it together. It's a little "jacked up".