Community Brag Posts


Sliding X Door Console

I created this based off the Grandy Style Console. However I used an actual cabinet style with adjustable shelves. Loved making it!
Follow me on Facebook or instagram!
www.facebook.com/four8zero
www.instagram.com/four_8_zero
Built from Plan(s)
Estimated Cost
$225
Estimated Time Investment
Weekend Project (10-20 Hours)
Finish Used
Sherwin Williams SnowBound Pre-Cat Lacquer for the base and Minwax Ebony for the top.
Recommended Skill Level
Beginner
Comments

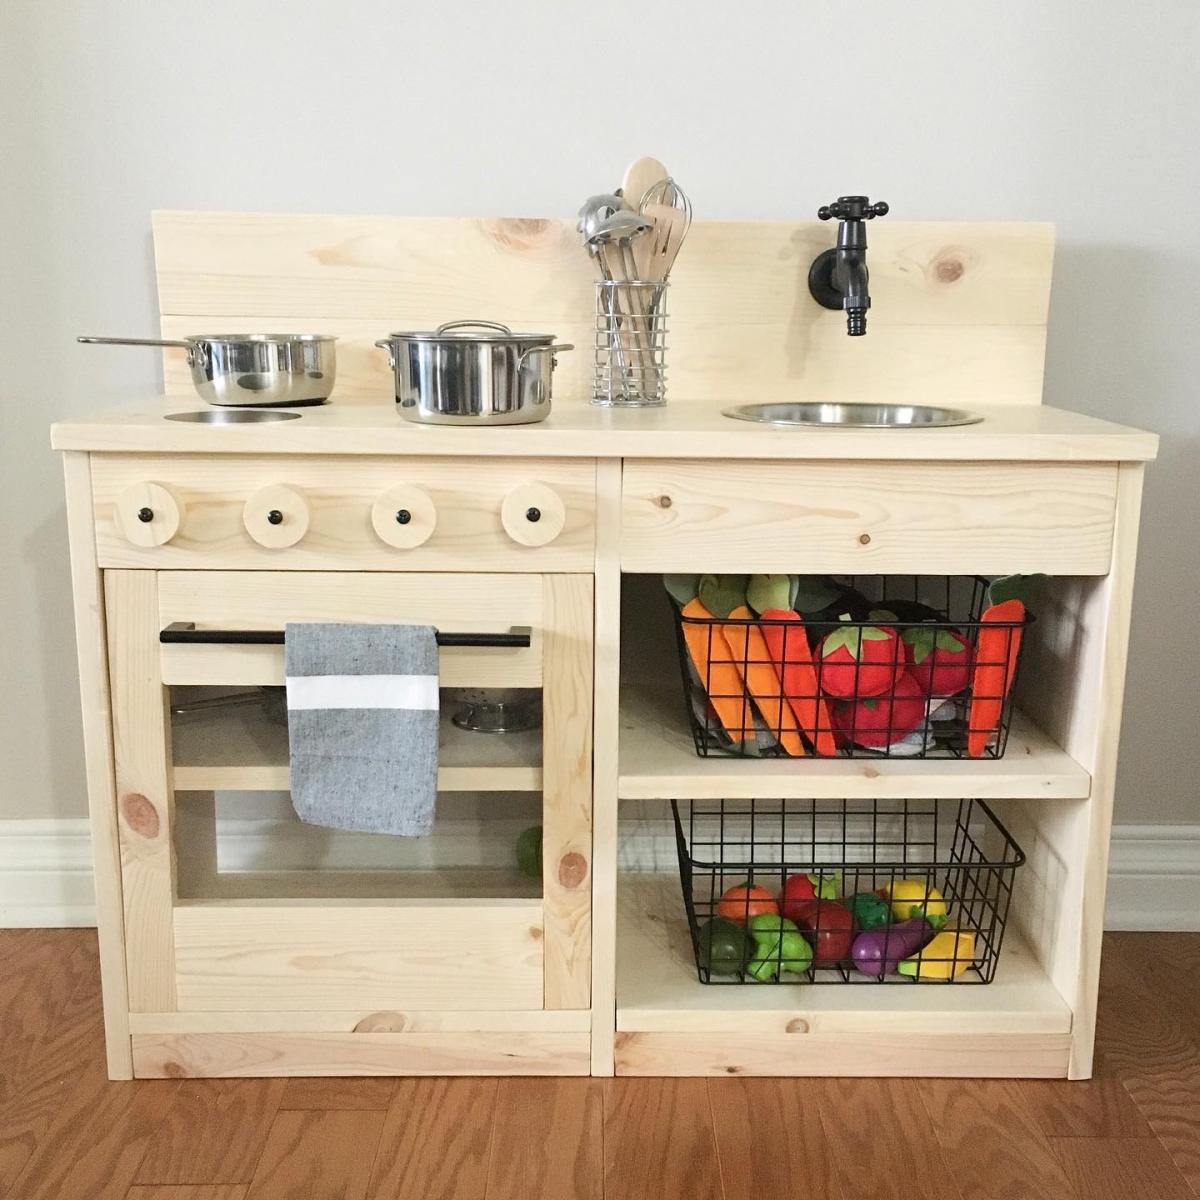
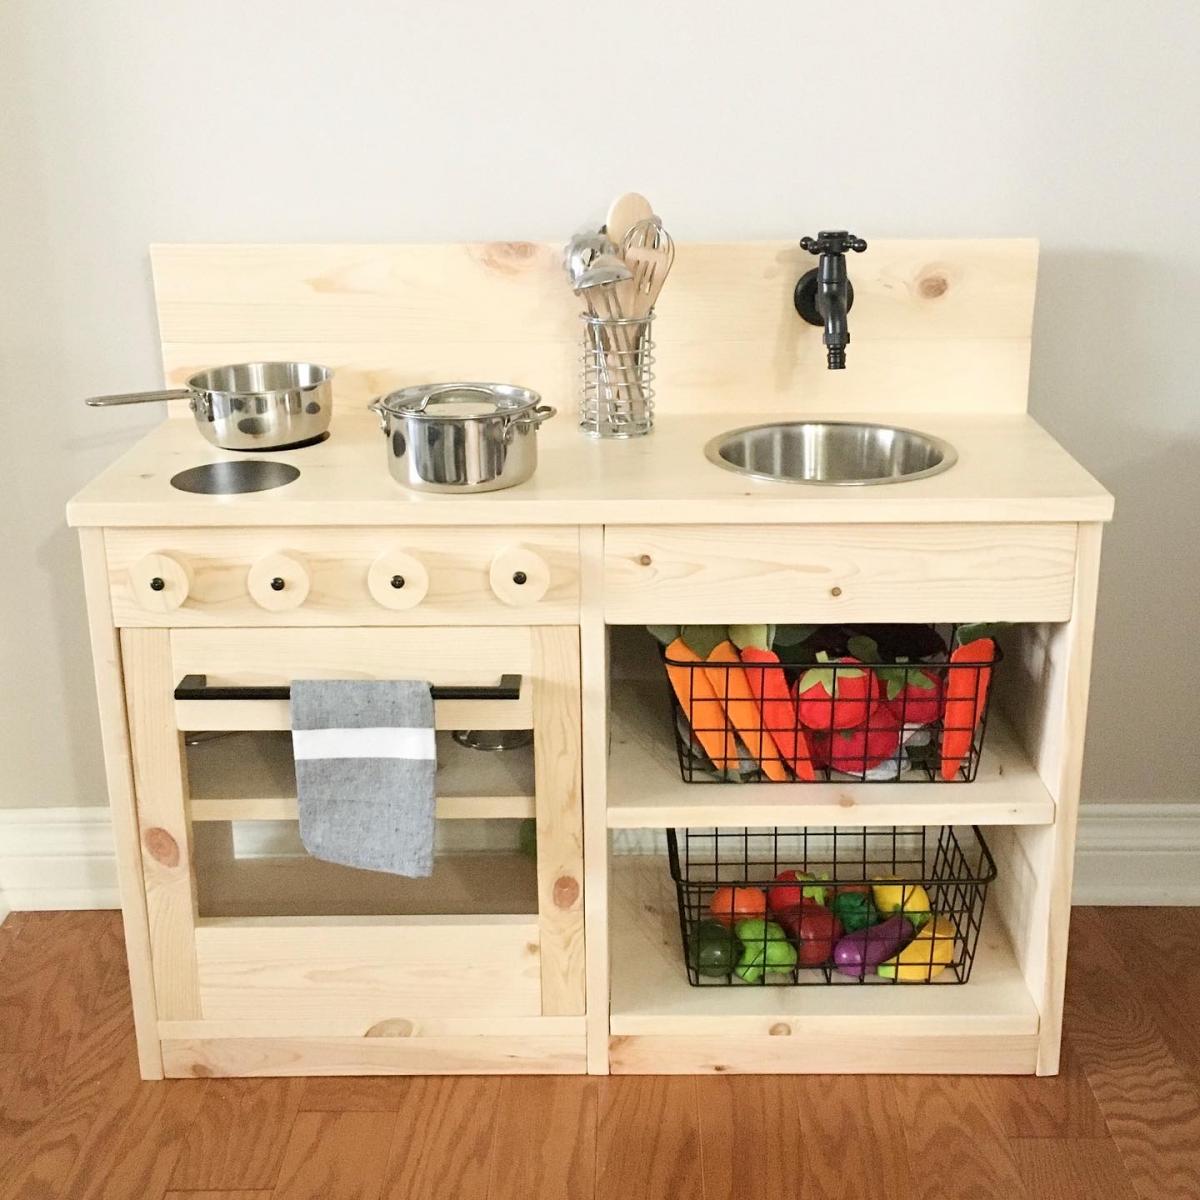
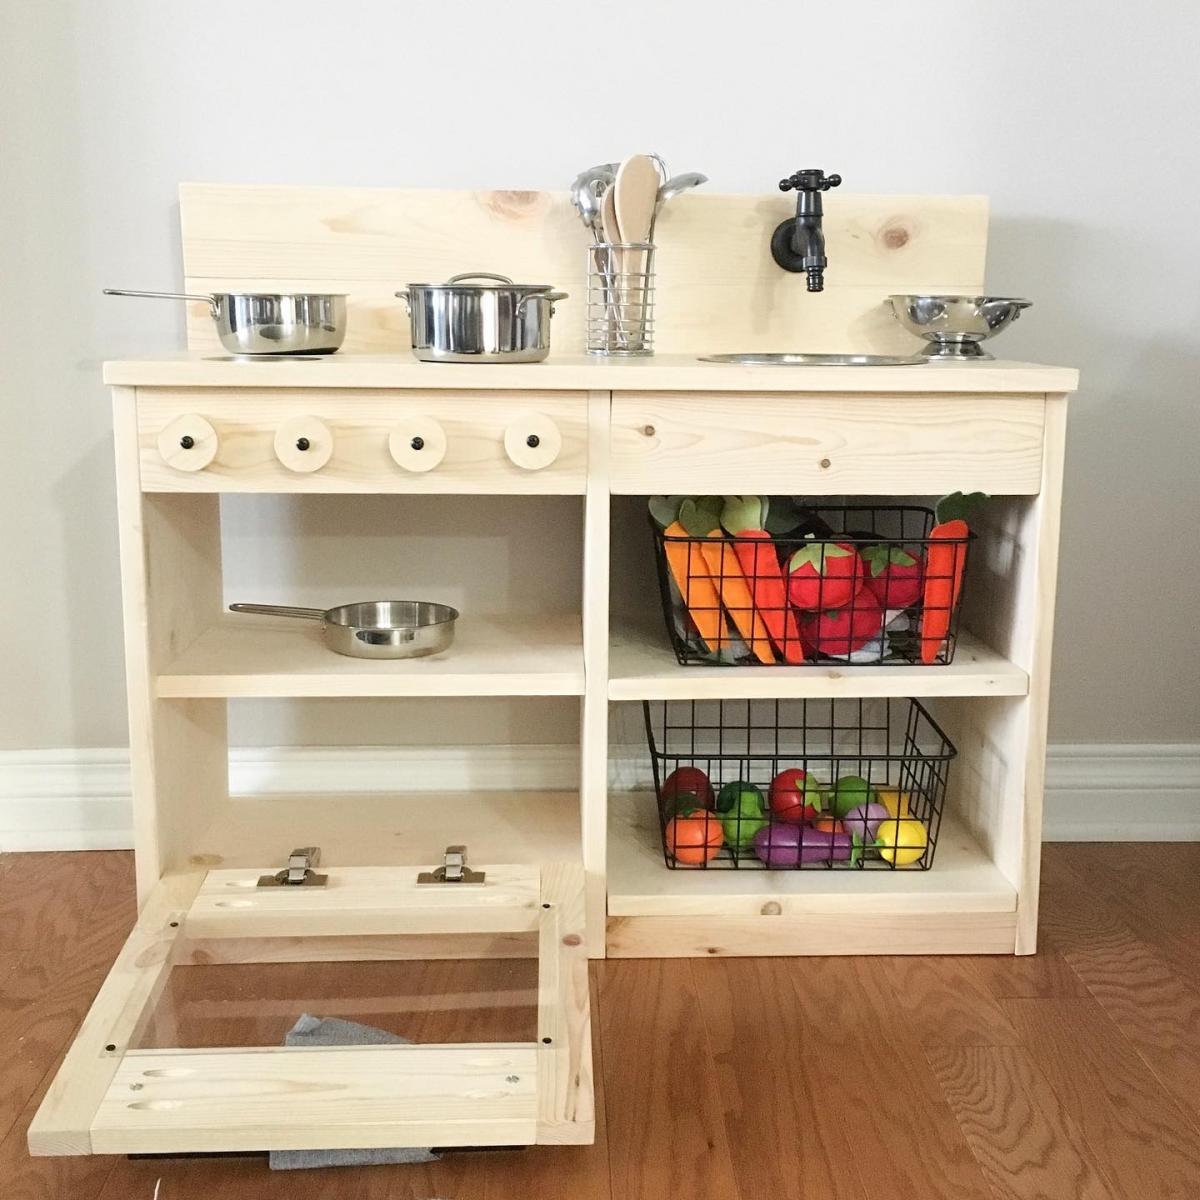
Levi's play kitchen

We modified the plans a little we made the 2 pieces together instead of separate. We used a 2” hole saw to cut out the oven knobs, then drilled holes a tad bigger than the screw so they would still turn once attached. We also made the back splash taller to accommodate our faucet that had to attach on the back splash instead of the counter top. We used all pocket holes to attach everything it makes it look so much nicer but doesn’t need to be done that way. We bought vinyl circles for the burners on the stove. A dog bowl for the sink and a laundry room faucet for the faucet.
Links to products we used
Faucet - https://www.amazon.com/gp/product/B01KRCTHEA/ref=ppx_yo_dt_b_asin_title_o07_s00?ie=UTF8&psc=1
Oven hinges - https://www.amazon.com/gp/product/B004K7V8UU/ref=ppx_yo_dt_b_asin_title_o08_s00?ie=UTF8&psc=1
6 – 4 inch circles matte black Stove vinyl - https://www.etsy.com/listing/713062039/circle-circles-pack-set-vinyl-decal-car?ref=yr_purchases
Sink 56oz dog food bowl - https://www.amazon.com/gp/product/B00H6OXRN0/ref=ppx_yo_dt_b_asin_title_o01_s00?ie=UTF8&psc=1
Oven handle - https://www.lowes.com/pd/Sumner-Street-Home-Hardware-Vail-10-in-Center-to-Center-Matte-Black-Pull/1001368422
Built from Plan(s)
Estimated Cost
100.00
Estimated Time Investment
Weekend Project (10-20 Hours)
Recommended Skill Level
Beginner
Comments
DIY Outdoor Chairs
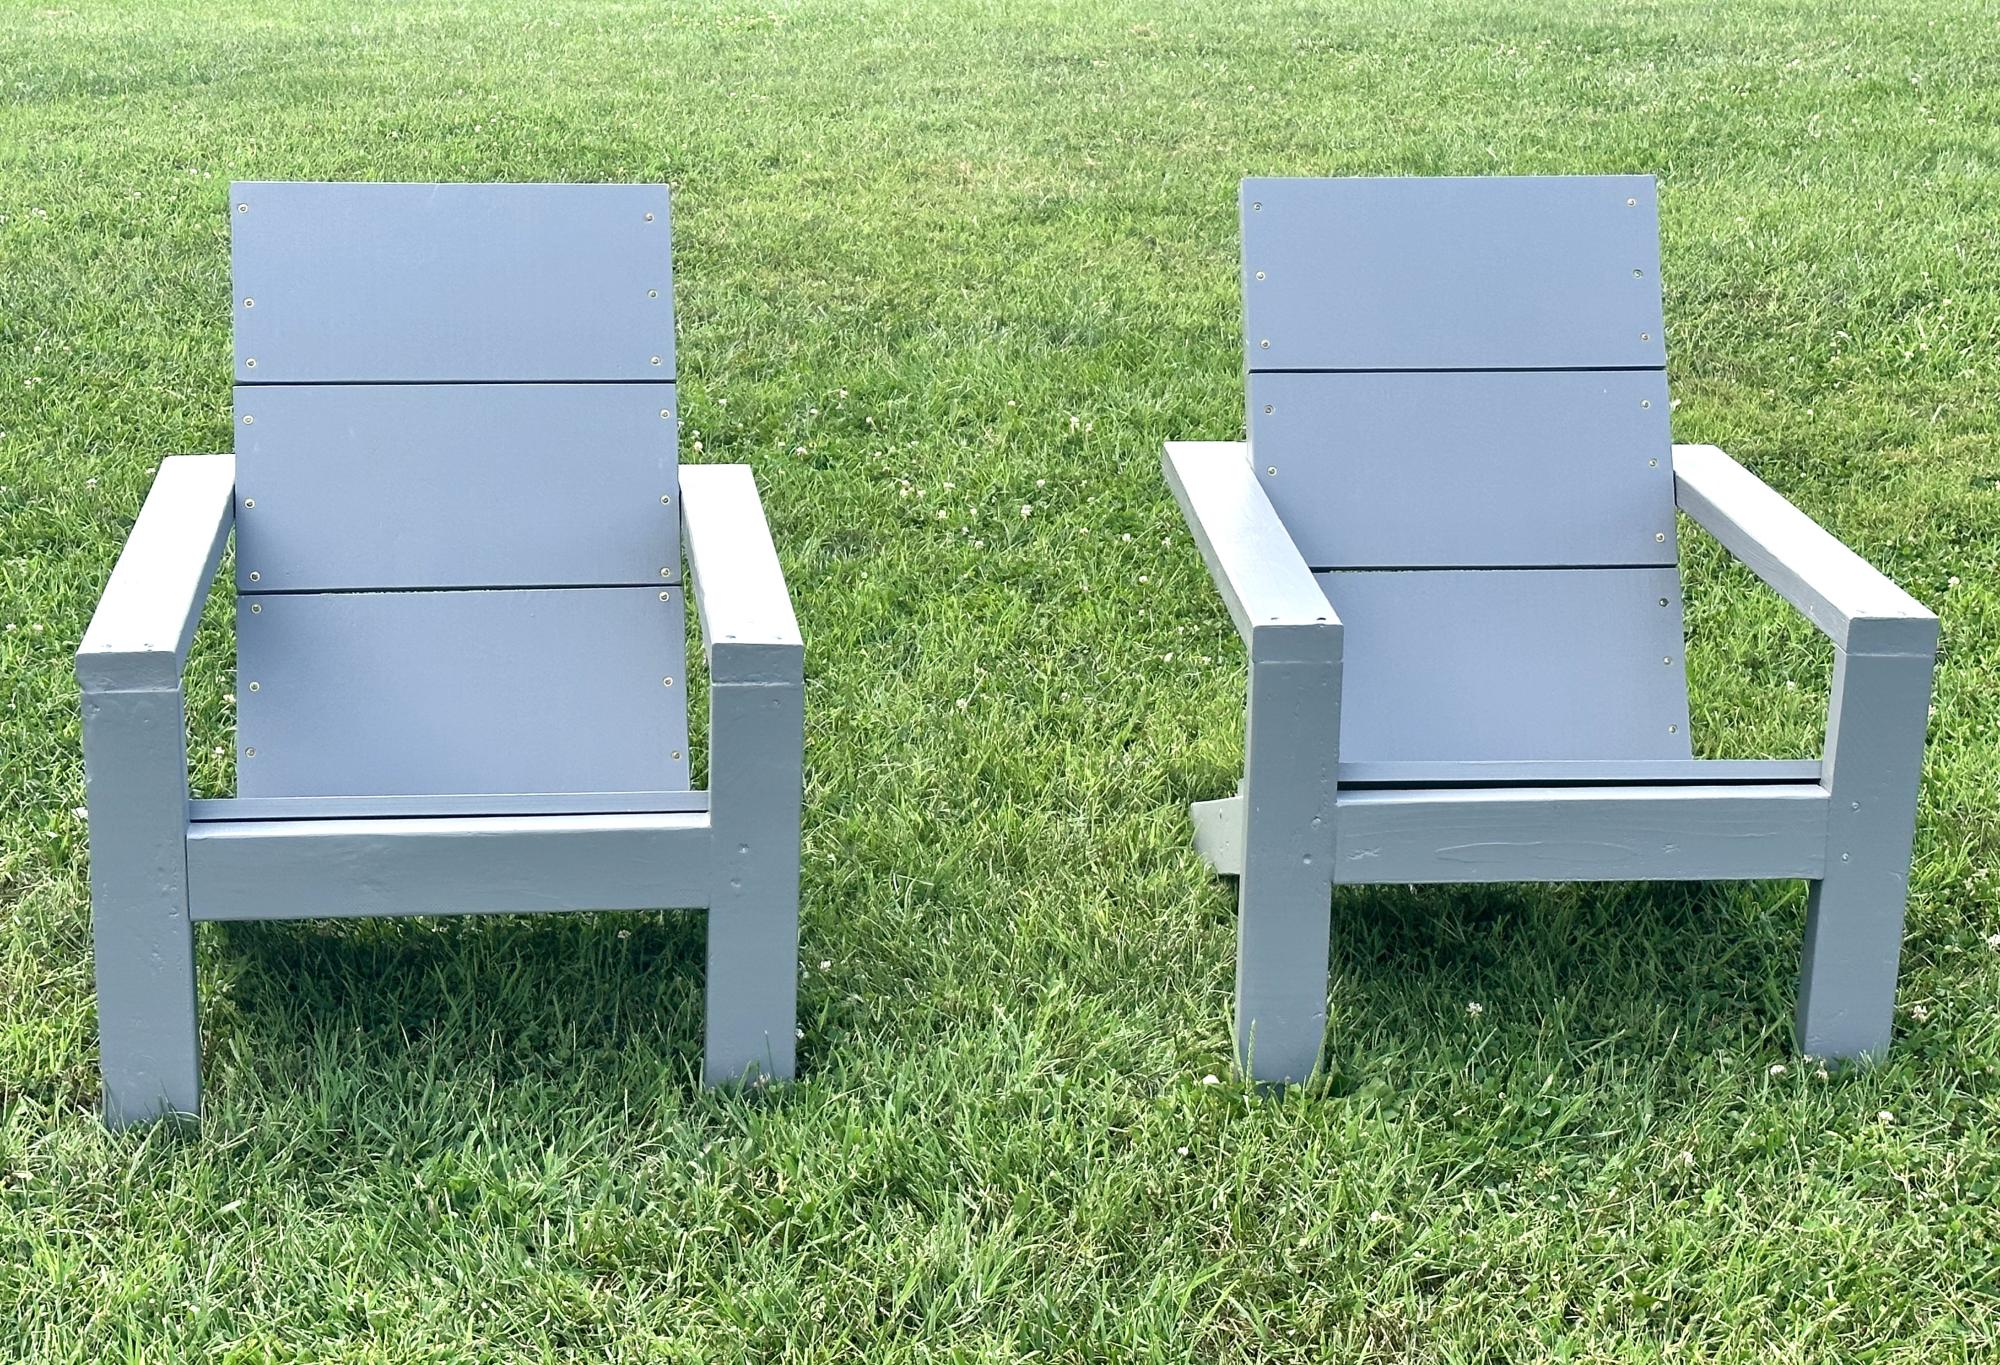
Adirondack Chairs
Built from Plan(s)
Simple Beds

I used the basic design for this bed but altered it quite a lot to make the joins stronger, the edges smoother and the whole thing generally easier to take apart and put back together.
I used beech wood and completed the project at a woodworking club, so it's quite hard to estimate the time taken, as I only did it one evening a week and spent most of the time bringing the wood out, putting it away and clearing up each time I was there!
I am still undecided whether to give it an oil finish or to paint it white with chestnut wood stain on the headboard and footboard tops.

Built from Plan(s)
Finish Used
Possibly oil or maybe white and chestnut wood stain - haven't decided yet!
Recommended Skill Level
Intermediate
Island cart

Just copied the plans from ana, we built it for an auction to support a group home. it was easy and quick. the project panel was big enough to also use as a shelf when cut down for the top, we loved how the top and shelf matched. we built a bigger drawer to have a more chunky look.


Estimated Cost
under 70.00
Estimated Time Investment
Day Project (6-9 Hours)
Recommended Skill Level
Beginner
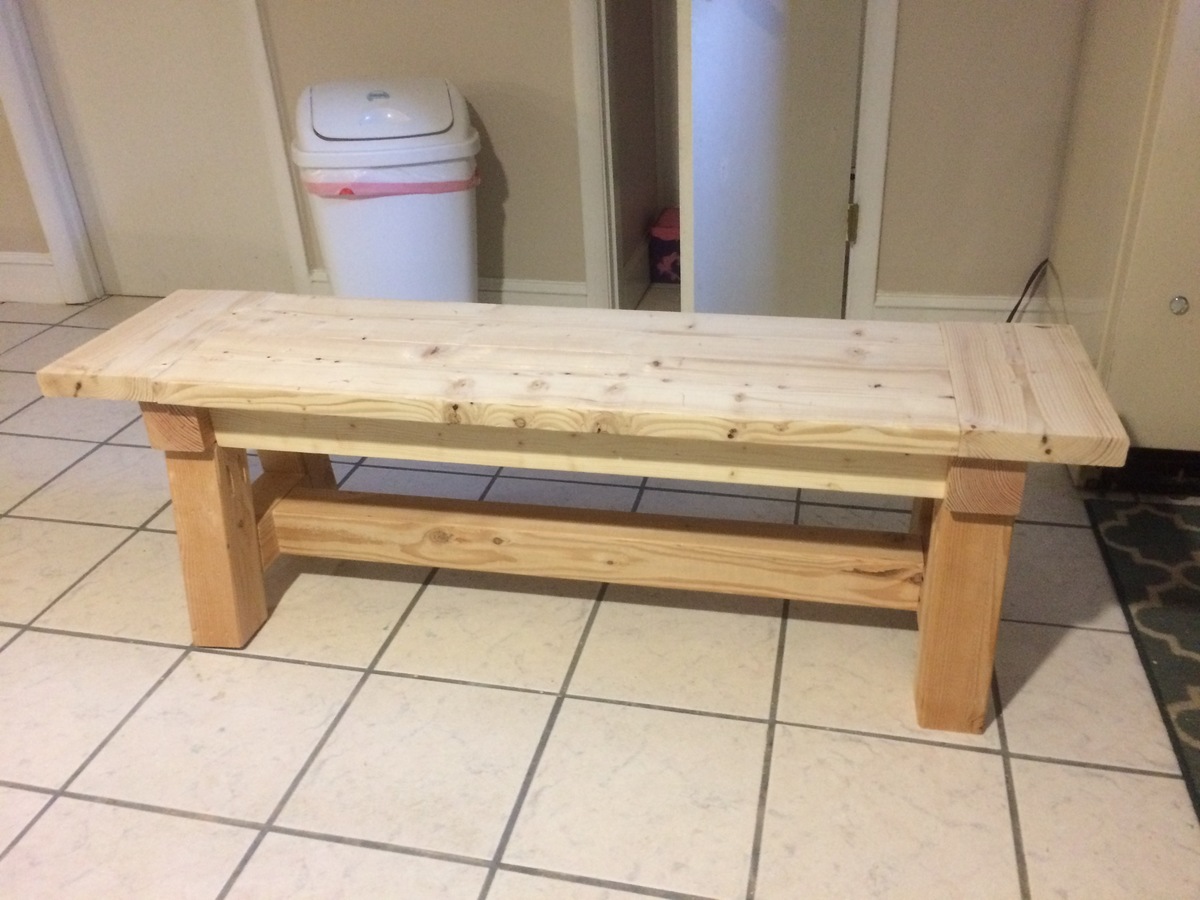
Beach Bench
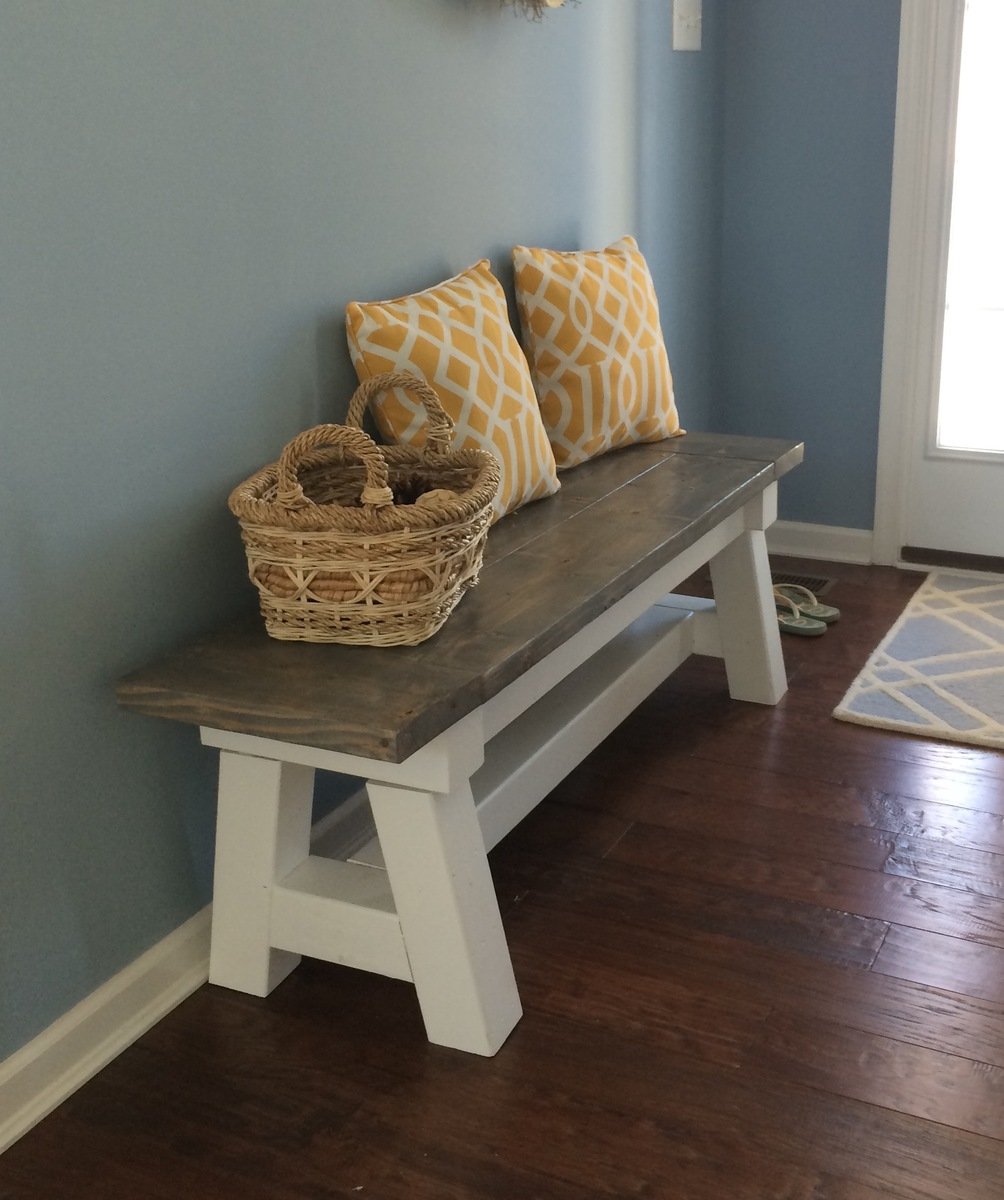
Thanks for the plans, Ana!
Built from Plan(s)
Estimated Time Investment
Afternoon Project (3-6 Hours)
Finish Used
Weather Gray stain with a white paint finish for the bottom.
Recommended Skill Level
Intermediate
Rustic X Hall Tree
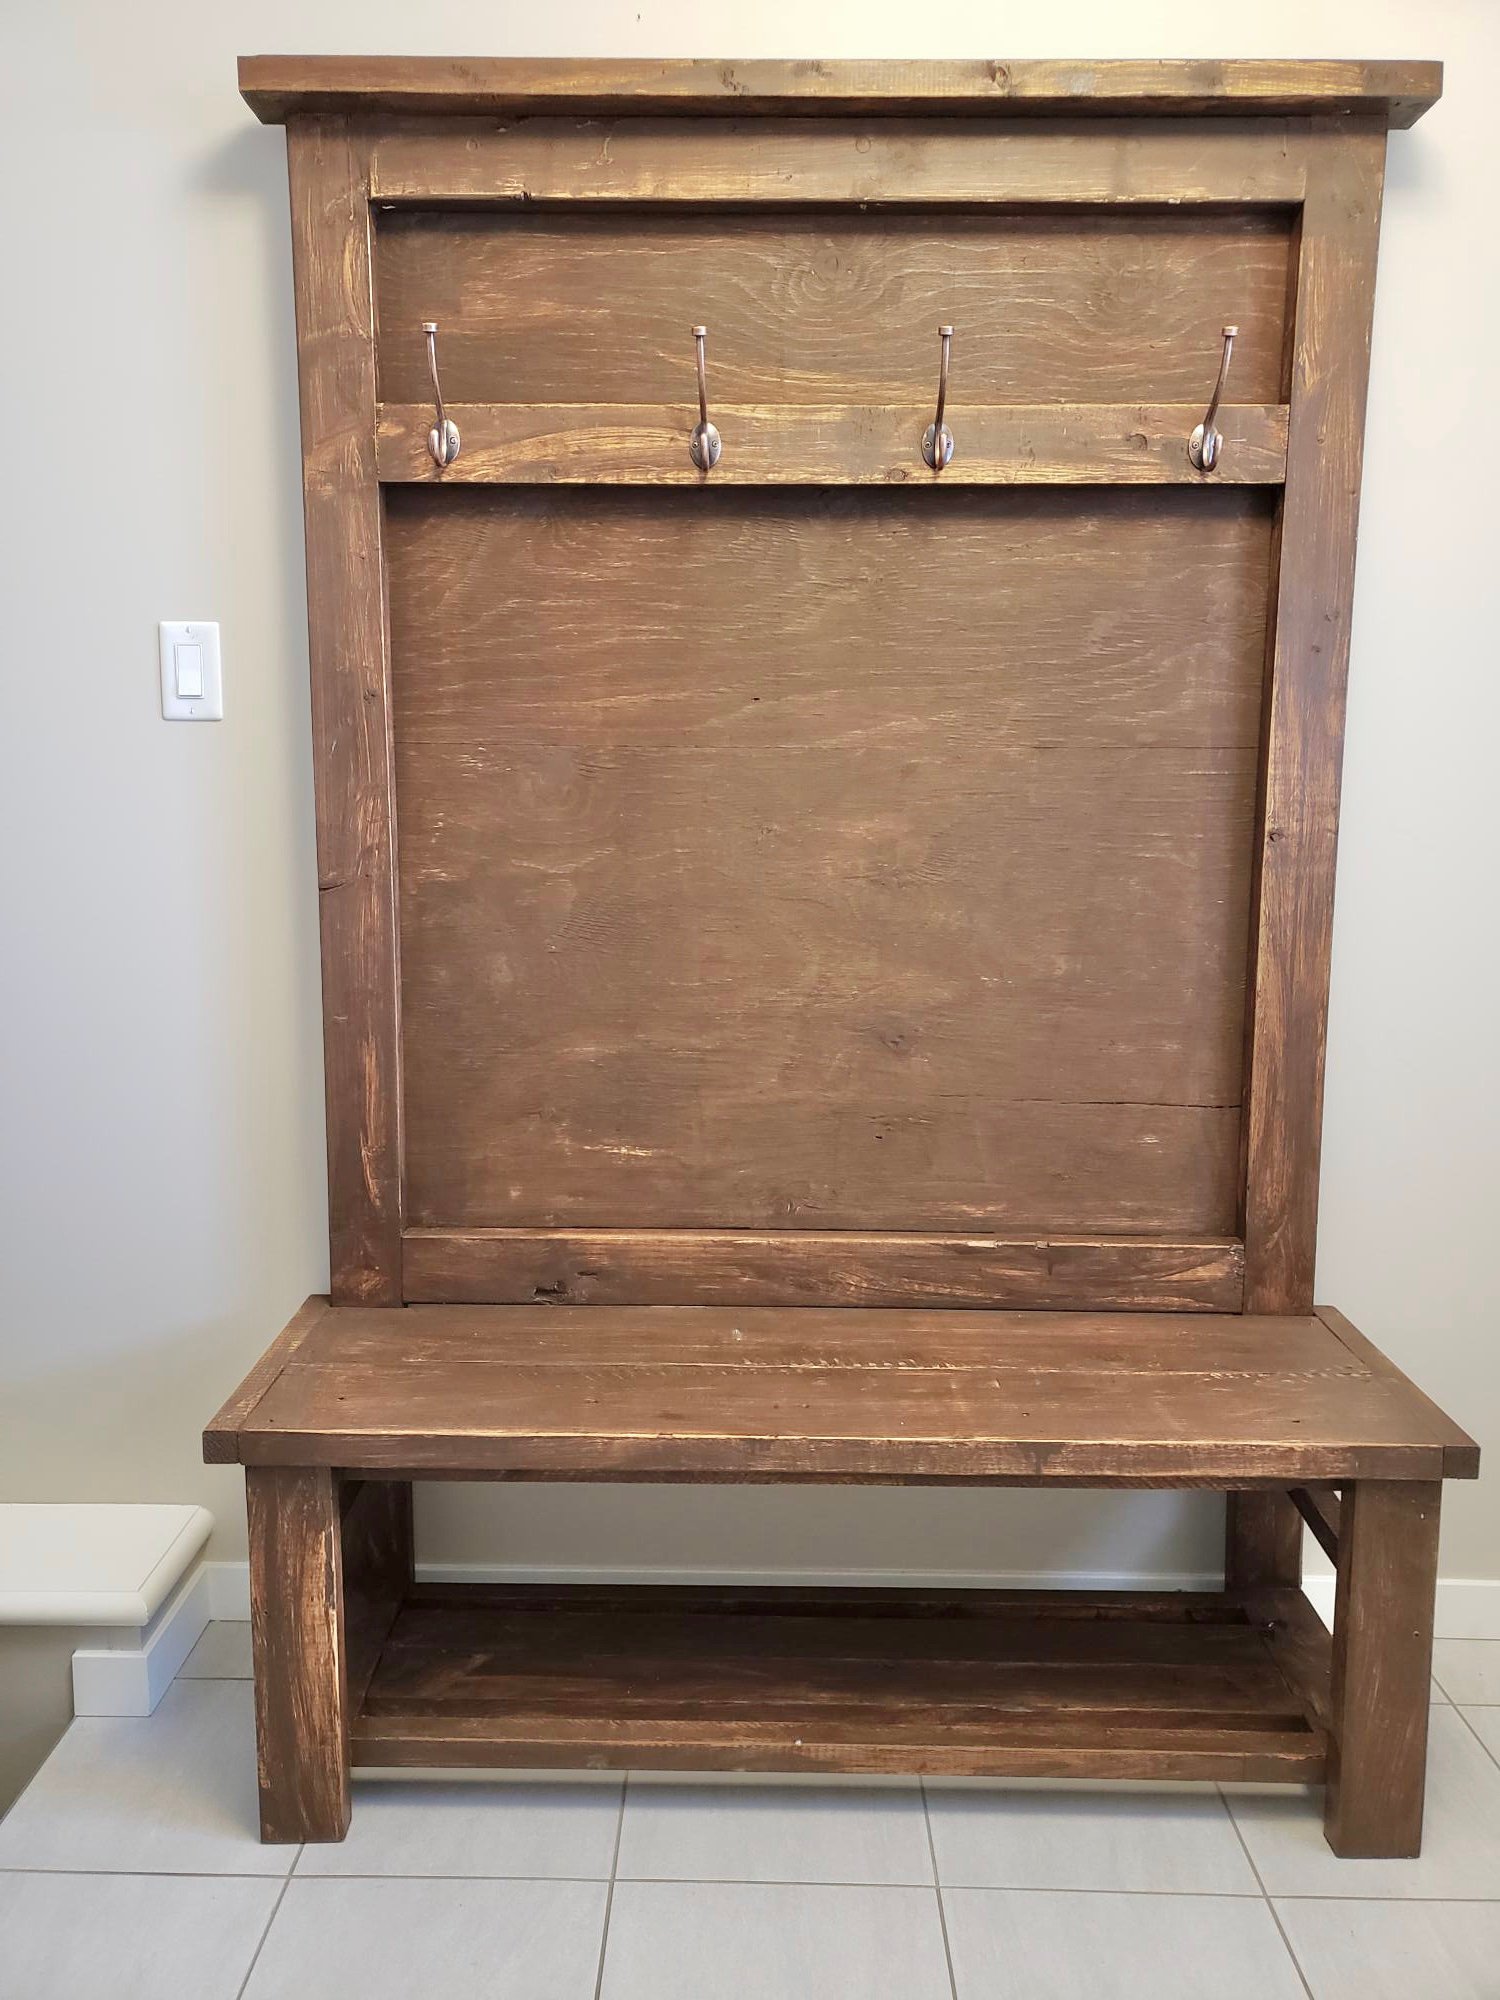
Completed this about a week ago. As usual, I went with the "--" instead of the "X", but it still turns out great.
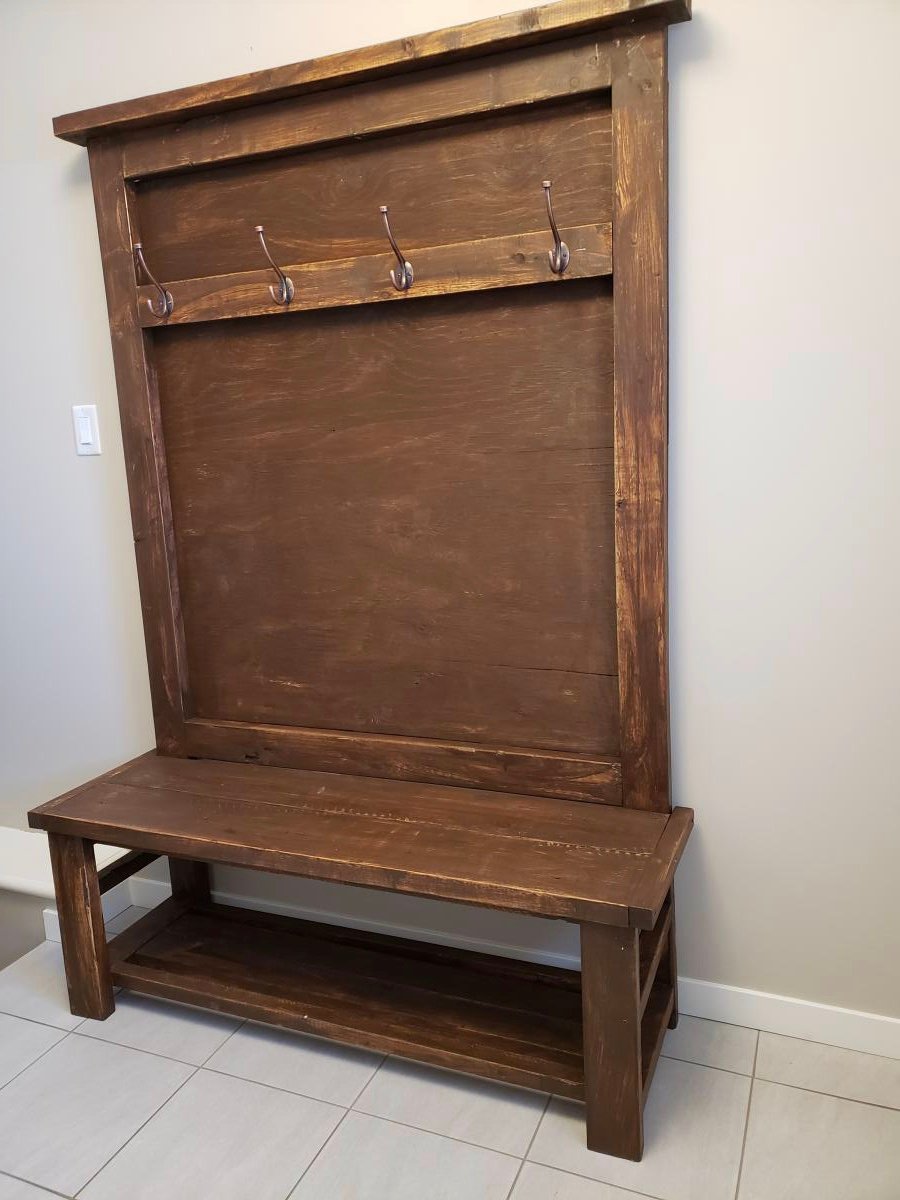
Built from Plan(s)
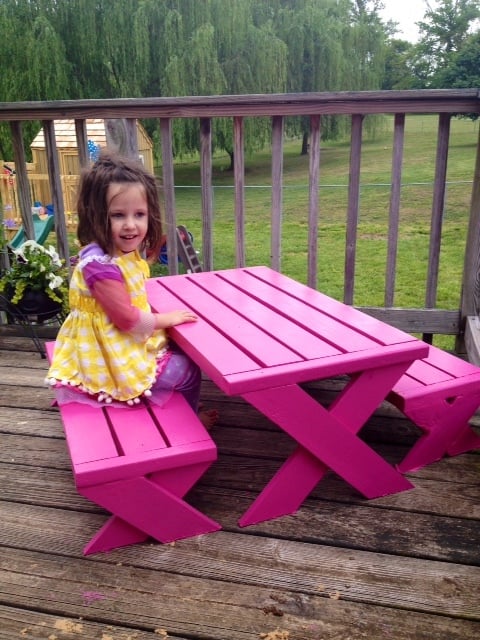
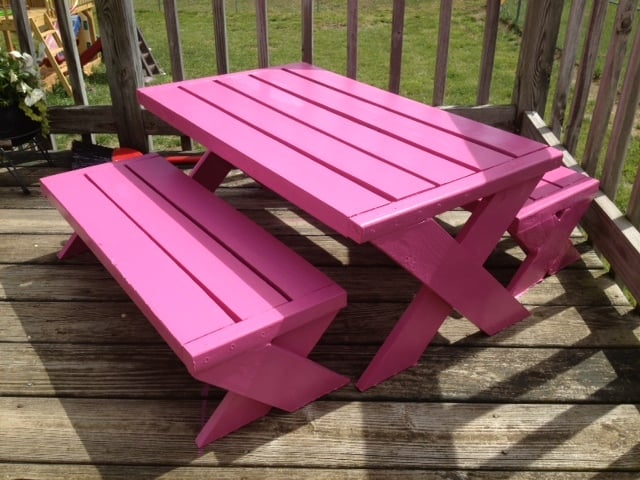
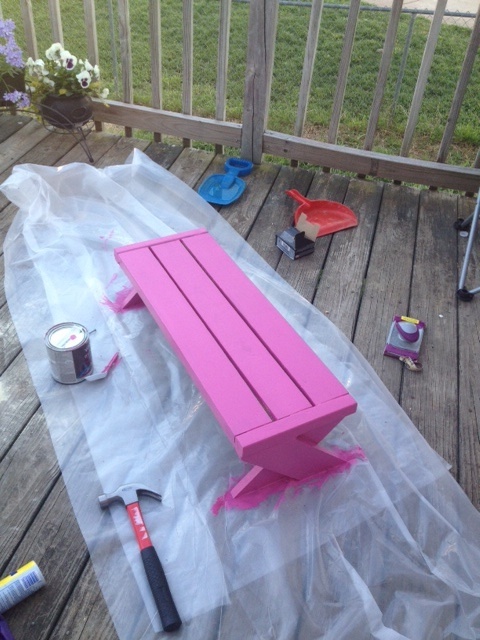
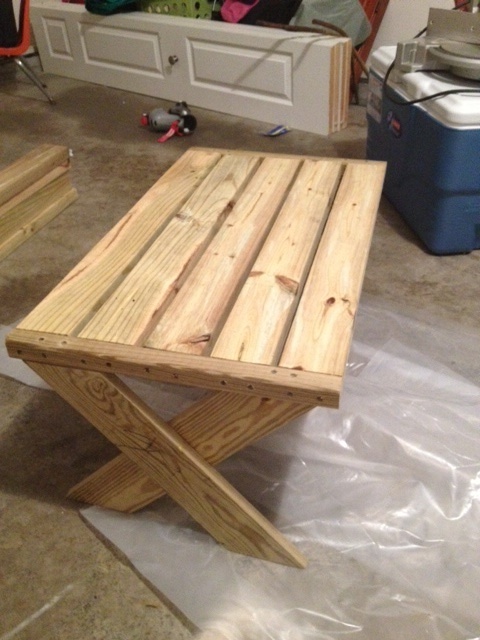
Kids Picnic Table

Small kids picnic table (from Ana's plan)
Pa pop
Built from Plan(s)
Little Helper Tower
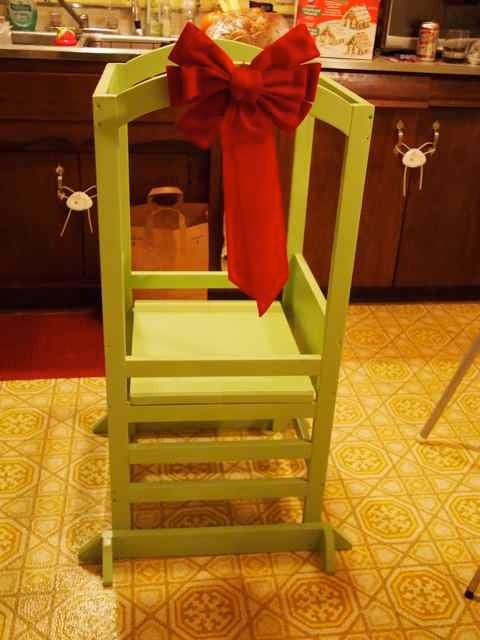
We decided to make a helping tower for my little guy for Christmas after I saw it on Pinterest. The curves were not the easiest, but I think they turned out fine. He's just finally starting to use it more as a helping tool rather than a playing platform. Definitely happy that it keeps him from standing on the chairs.
Thank you so much for this plan. I love this site!
Estimated Time Investment
Weekend Project (10-20 Hours)
Finish Used
green spray paint to match kitchen.
Recommended Skill Level
Beginner
Comments
Sat, 07/14/2012 - 13:57
Beautiful! Love the colour
Beautiful! Love the colour too. I will be attempting this as a beginner project myself: fingers crossed!
Sat, 07/14/2012 - 13:58
Beautiful! Love the colour
Beautiful! Love the colour too. I will be attempting this as a beginner project myself: fingers crossed!
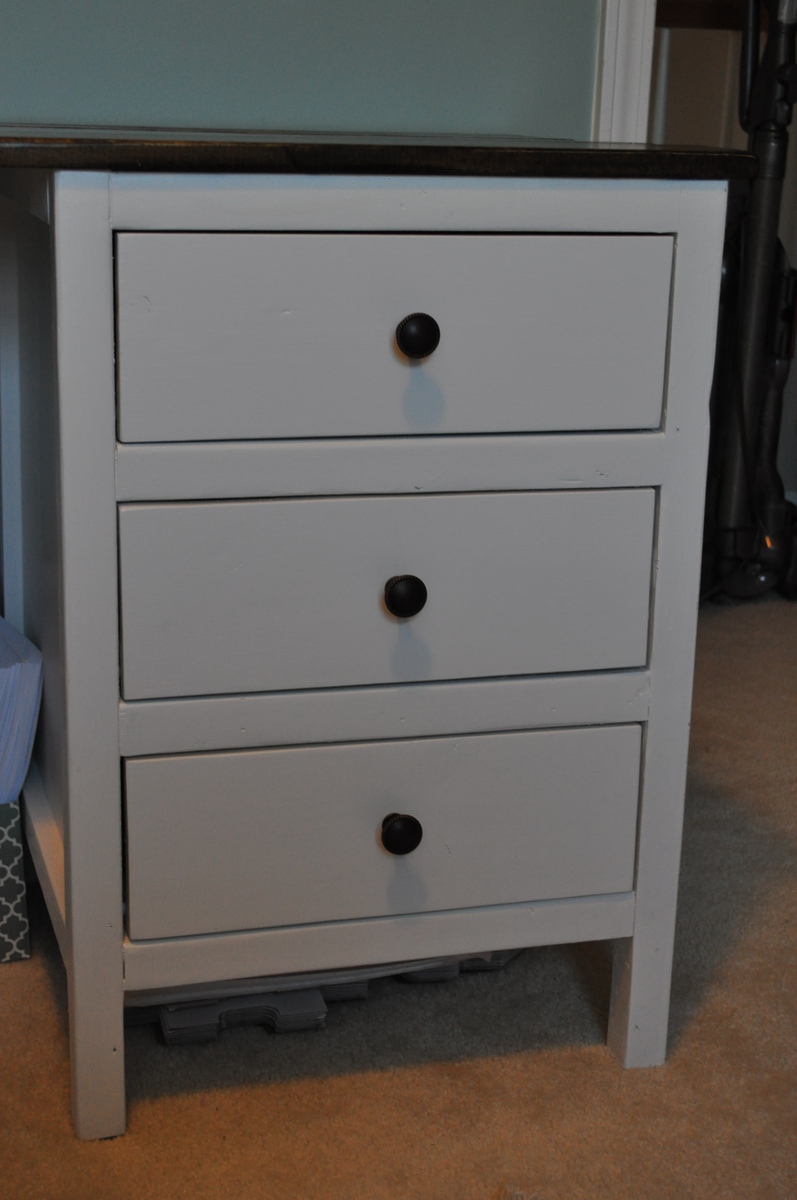
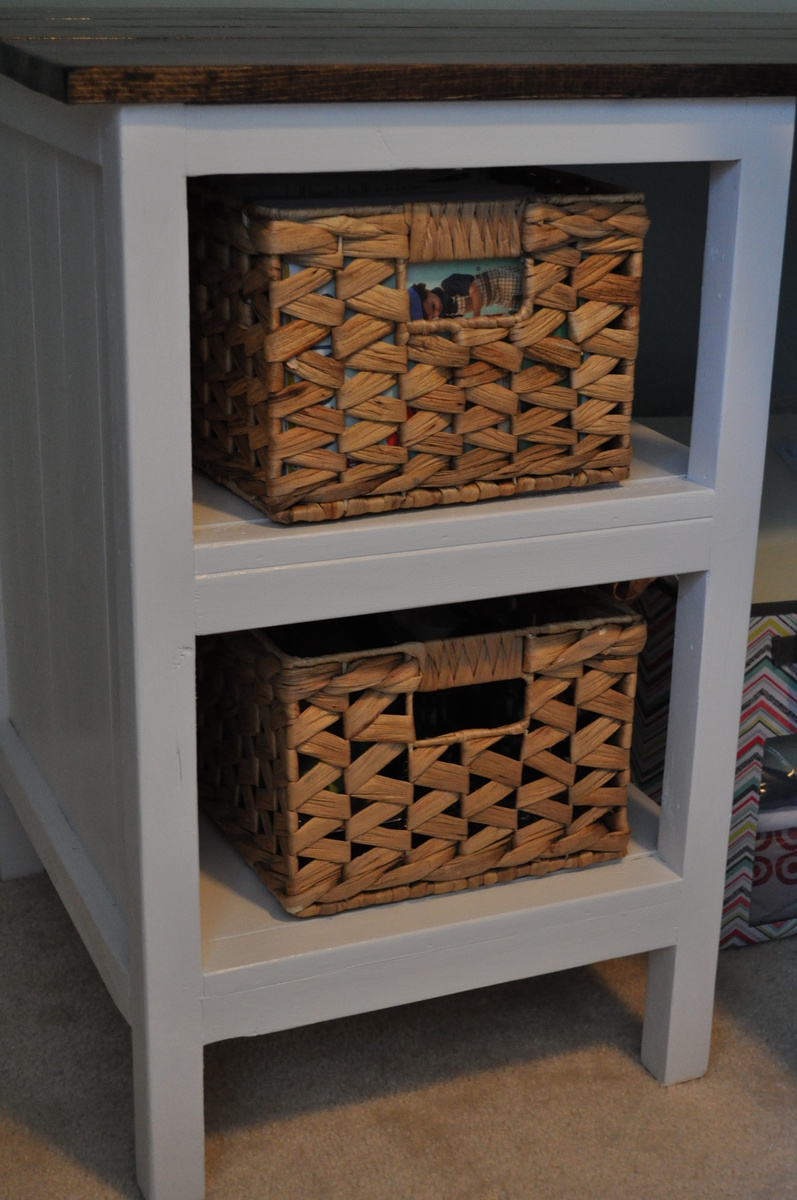
Craft Room Build

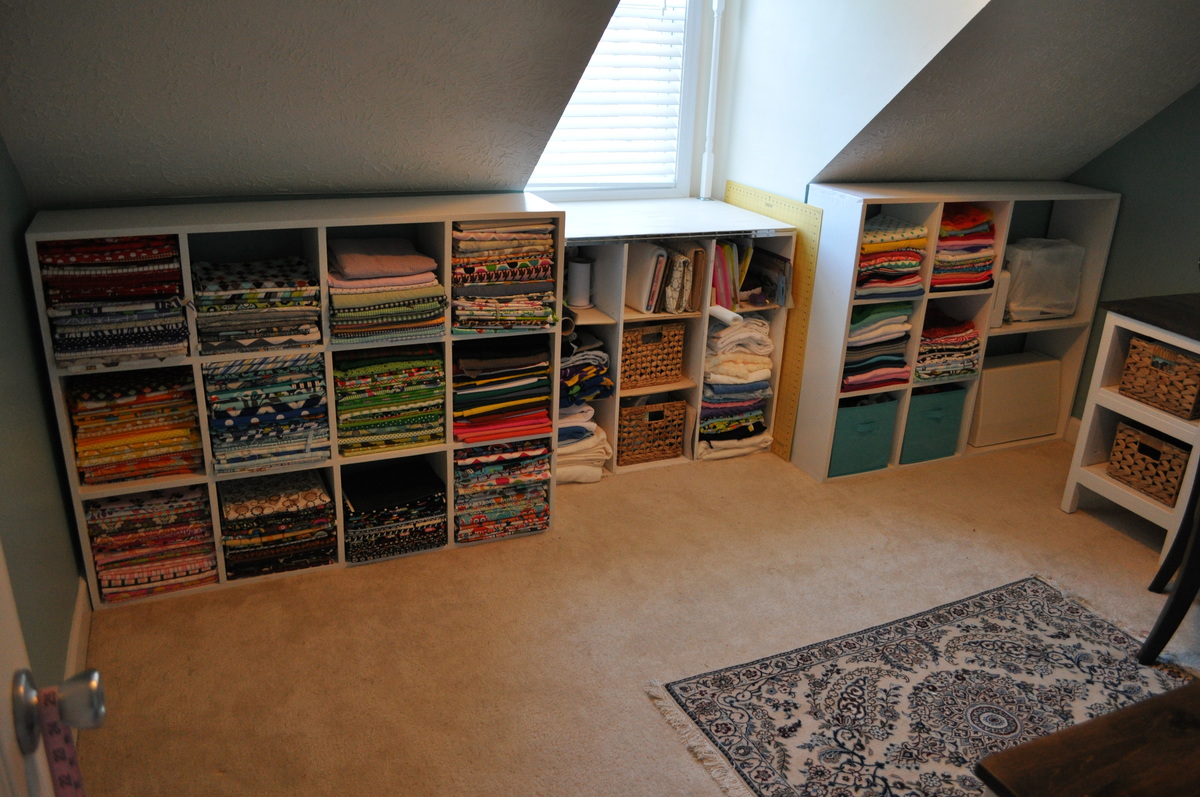
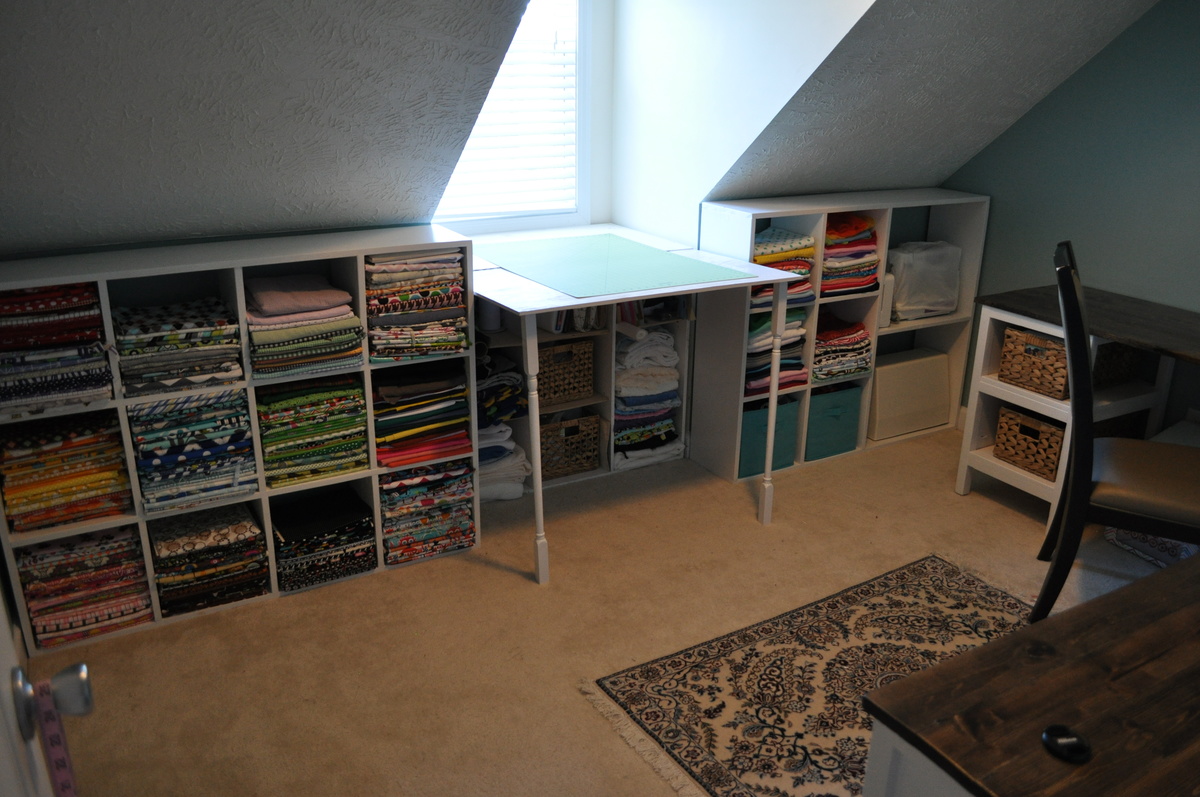
This project was one that I've been planning for about 18 months- I had to wait until we moved back into our home to start the build, so I had plenty of time to think about how to maximize my storage space in this small room with a slanted ceiling. My husband had some time off from work and offered to watch our toddler during the day time- so that was all the motivation I needed to start this big build!
Overall, it took about a week from beginning to end. The cost was between $400-$500 for everything- including hardware, paint, supplies etc. Still a huge savings over what it would have cost us to purchase desk and storage units to work in this room (I priced them out at about $2000-$2500 - WAAAAY out of our price range).
For the main desk unit I used the plans for the reclaimed look wood bedside table. I modified the height of the legs to 28" tall so that the sewing desk height was correct for when I'm sitting at my machine for hours on end. I also modified one of the units to be an open shelving unit, so that I could store my patterns and misc. sewing notions in baskets on the shelves.
The desk top was created by using six 1 x 4 whitewood boards joined with pocket holes. The corner joint is "woven" in a sense to give a unique look to the unit. I used 4 brackets in the corner (secured to the studs) to support the weight of the corner of the desk. I used Dark Walnut stain and then followed up with 3 coats of Poly (sanding in between each coat).
The two fabric/machine storage bins were made using the cubby bookcase plans as a base. Both plans were modified to maximize fabric storage with the small space- hence no face frame on each unit. The middle storage unit is one that was my first build a few years back, before I'd even heard of knock off wood- oh how it would have been so much easier if I'd known about this site back then. I added a plywood top with a piano hinge to fold out for a stand up cutting unit. For the legs, I simply went to the table/baluster aisle at my local hardware store and purchase some hardware to secure two balusters to the plywood top. Screwed them in on the outside of the window frame so I don't have to unscrew the legs every time I fold it up and away, cut the balusters down to the proper height and that was done!
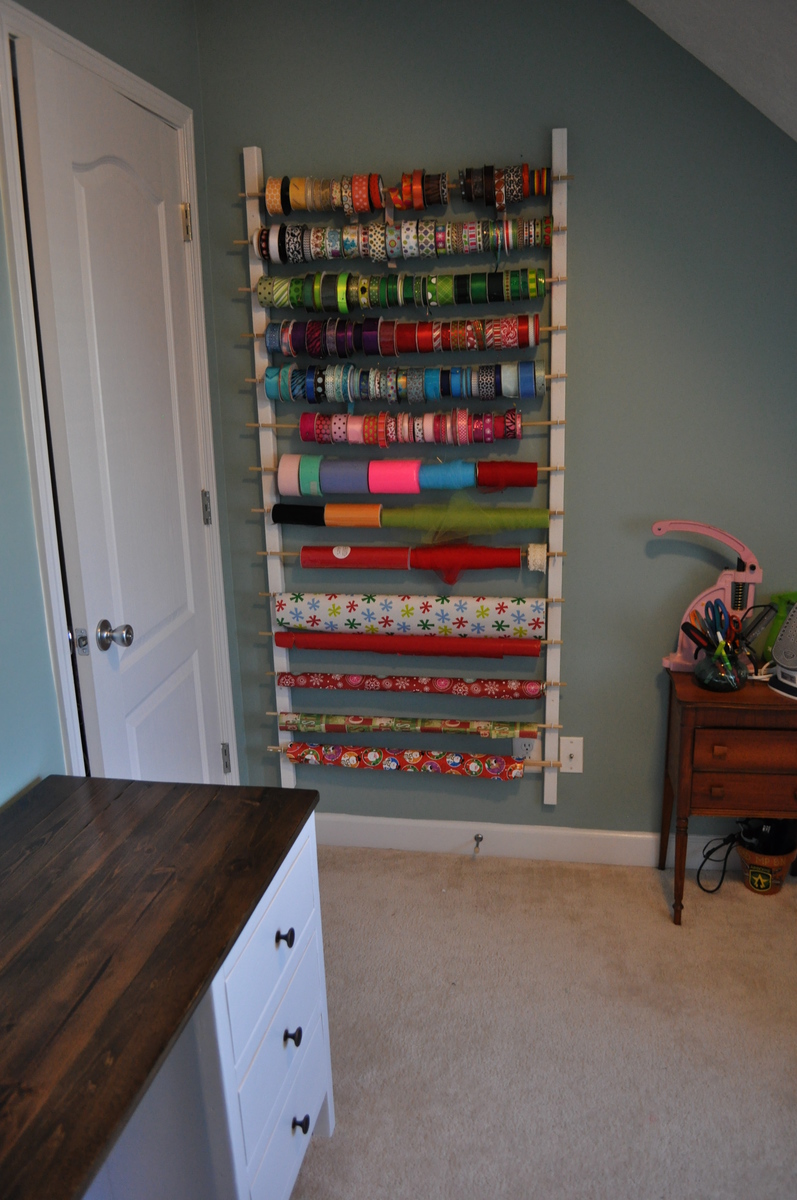
The ribbon/wrapping paper storage was super easy- just used some of my left over 2 x 2 furring strips, along with 14 dowel rods and 1 /14 screw in hooks. I pre-drilled the holes for the screw in hooks as well as the 3" screws I used to mount it to the wall.
The thread holder was a previous build of mine as well- just cut out LOTS of dowels that fit into the peg board and glued them in place. Added a little decorative trim to finish it, and painted it white.
Overall I could not be more excited about how this build turned out...aside from wood working, sewing is my next favorite thing (I have a small Etsy shop and do local craft fairs for fun). Having the stand up cutting station is a HUGE relief, as after 10 or so years in the Army, my knees and back are shot (who would have ever thought that jumping out of airplanes wasn't good for you!) The fabric storage is great and allows me to see all of my different fabrics so I eliminate over-buying (which I obviously have a problem with) and purchasing doubles.
I can't thank Ana enough for her website- I grew up with a dad that builds everything, but was always a bit intimidated when it came to building stuff for myself. Her plans really break everything down to the simplest level of instruction and make the building process stress free. This was my first time building a cabinet unit and I was very worried about the drawers not working, but I just followed along on the instructions and they came out perfect.
Built from Plan(s)
Estimated Time Investment
Week Long Project (20 Hours or More)
Finish Used
Valspar semi-gloss white
Minwax dark walnut with Rustoleum POLY top
Minwax dark walnut with Rustoleum POLY top
Recommended Skill Level
Beginner
Comments

Fri, 01/24/2014 - 10:23
Thanks Ana- I could have
Thanks Ana- I could have never done it without your website... I can't thank you enough for this resource!!
Fri, 01/24/2014 - 17:11
Impressive!
You did an amazing job, way to go! I love to sew too, and I think building is a lot like sewing...but with saws and hardware instead of scissors and a sewing machine!
Tue, 02/04/2014 - 09:51
help with corner weave
Stephanie Dexter -
Can you give us more insight on the corner weave? Maybe an up close picture? Angles? Board lengths? Thanks!
Tue, 02/04/2014 - 09:51
help with corner weave
Stephanie Dexter -
Can you give us more insight on the corner weave? Maybe an up close picture? Angles? Board lengths? Thanks!
Fri, 02/07/2014 - 13:09
Great job...
I would also like to see your corners up close.
Was your decision to not use a leg(s) for the support (and instead used the brackets) for a reason? Was it just easier?
I love the desk that size, but since we are military we move every couple years...I want to use legs for easier breakdown for transportation instead of something as permanent as the brackets. Not sure how far apart to space the legs for the support...
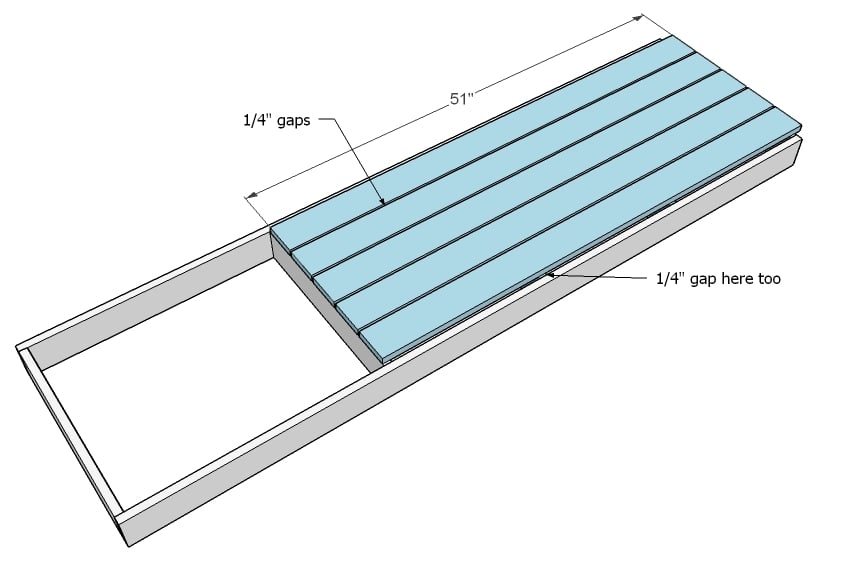
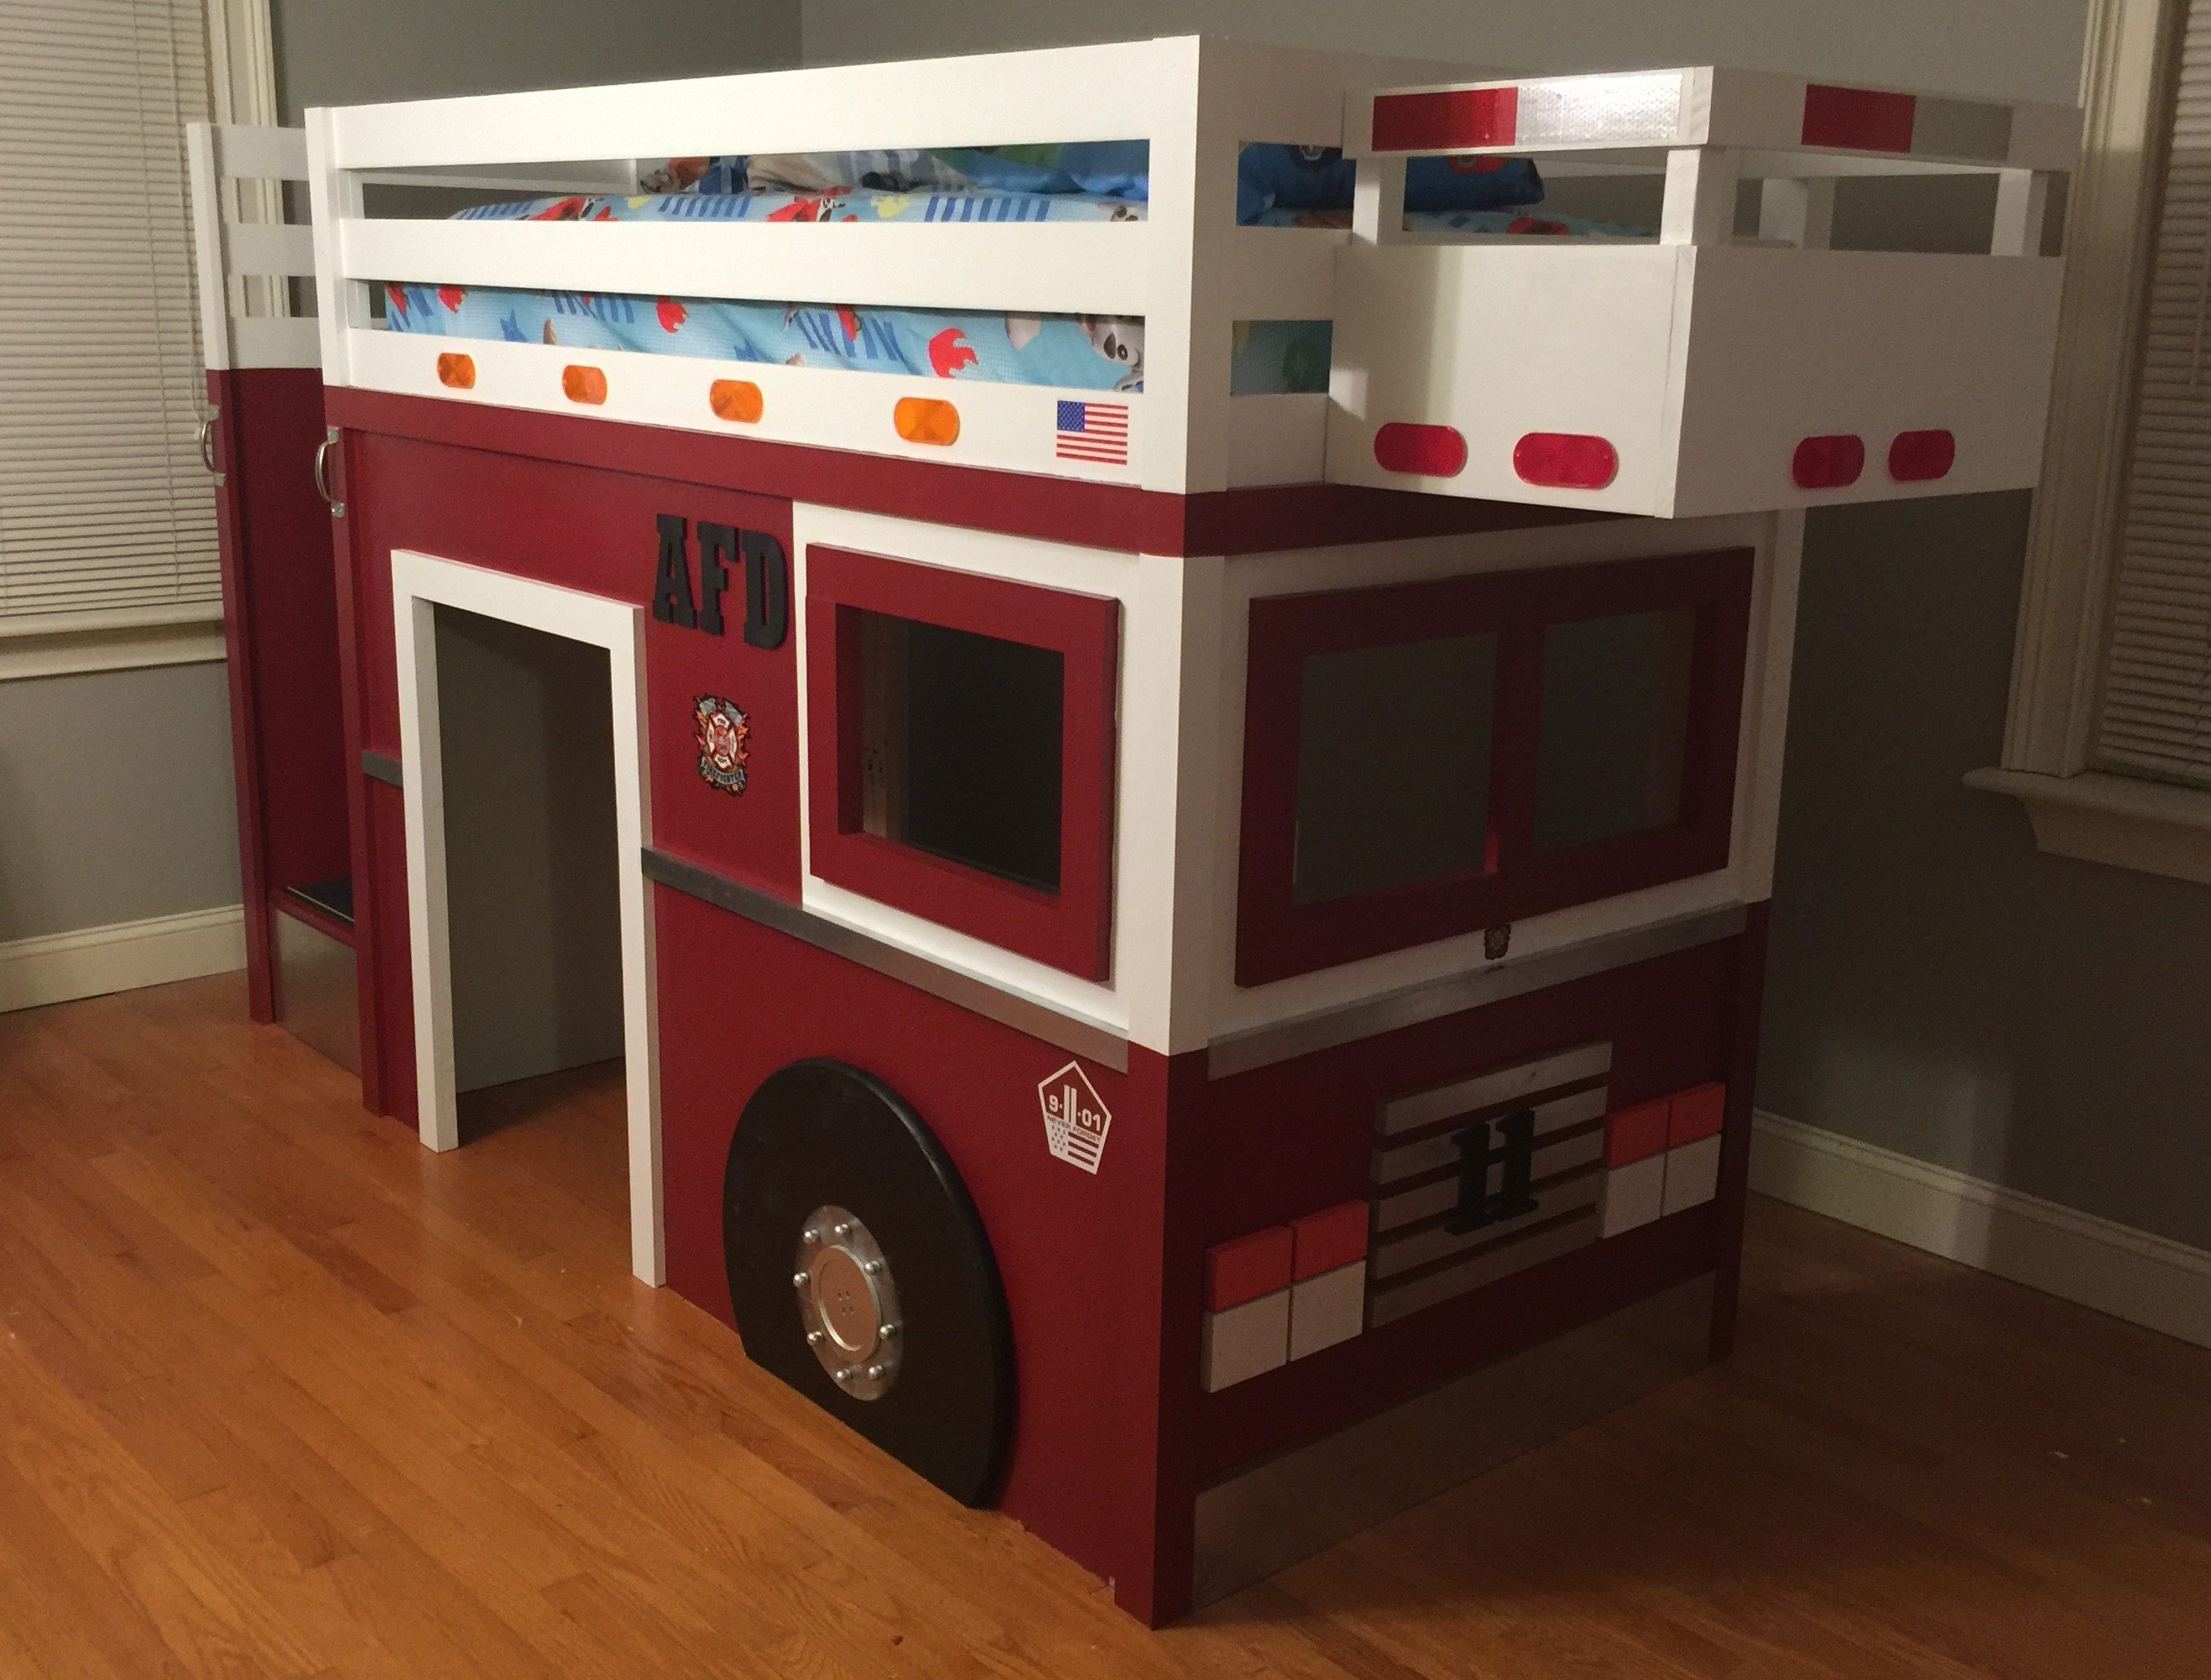
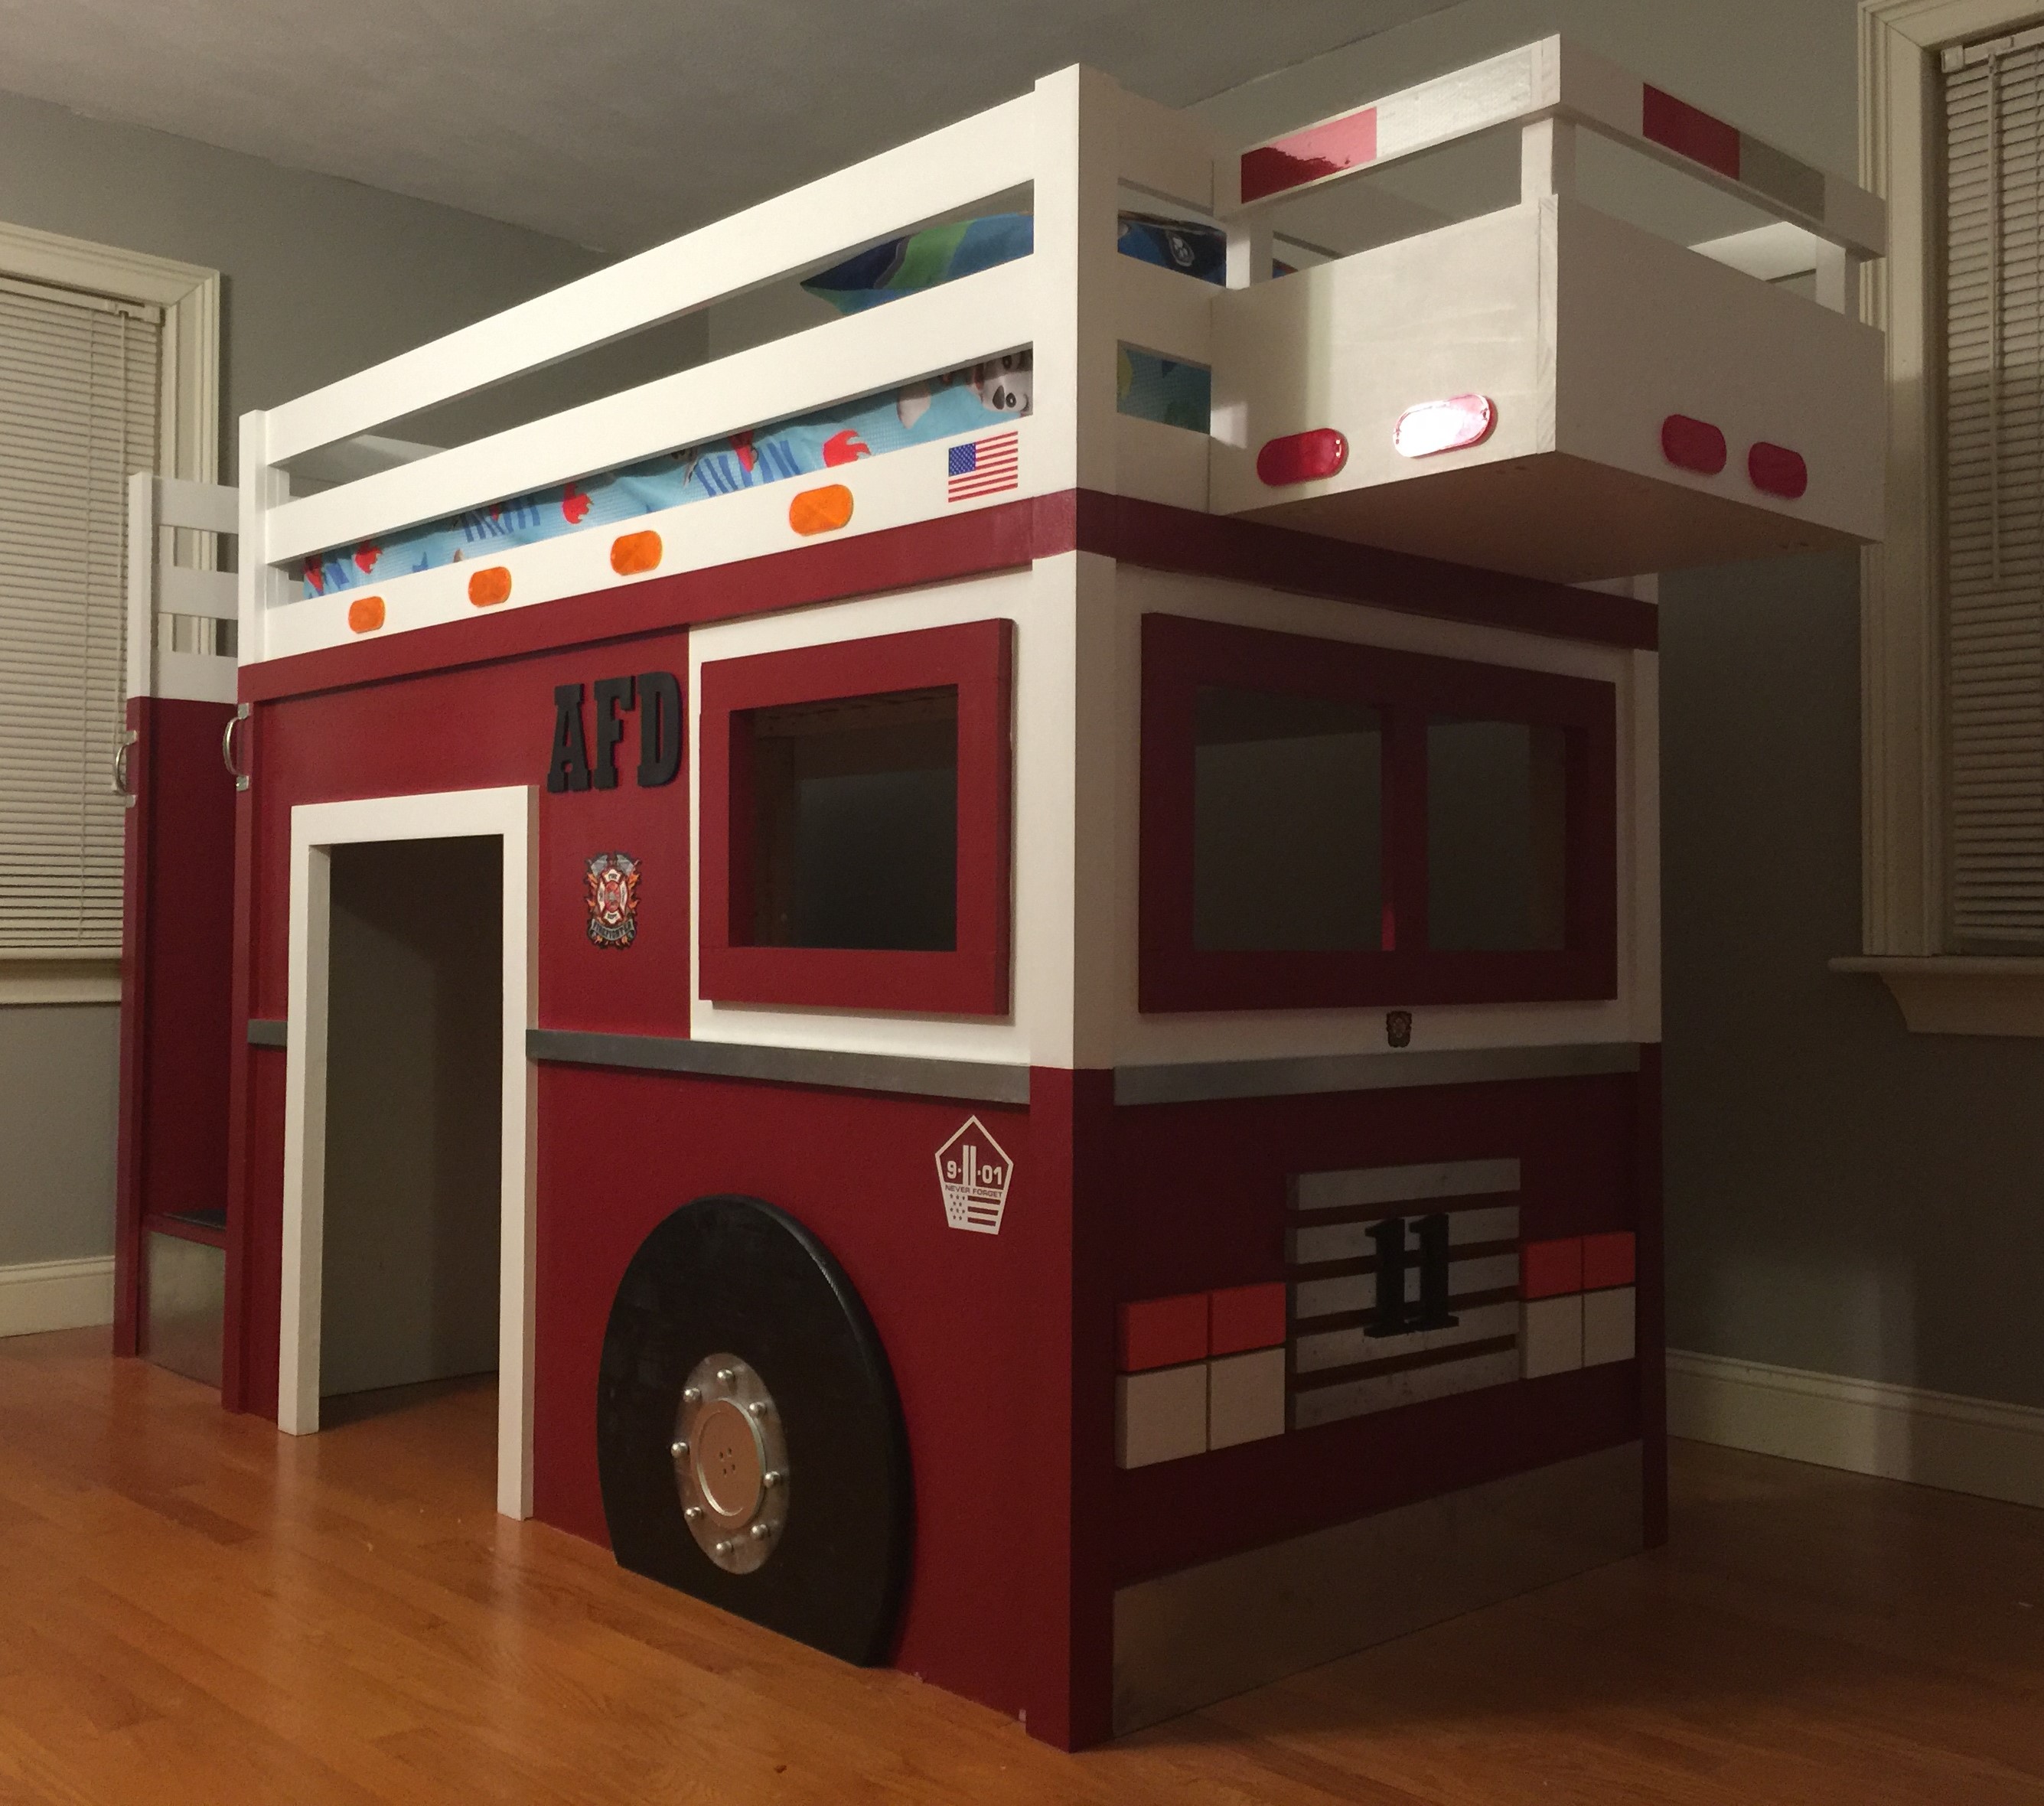
Fire Truck Loft

I built this for my son using the fire truck loft and playhouse loft plans combined. I put tread on the stairs to add safety and enhance the realism. I was pleased with the instructions. The hardest part was painting it red. I hate painting anything red. Make sure you get a primer tinted to gray that works with the red you choose.

Built from Plan(s)
Estimated Cost
$600
Estimated Time Investment
Weekend Project (10-20 Hours)
Finish Used
Latex paint, chrome spray paint for the mirrored bumpers.
Recommended Skill Level
Intermediate
Kids table

This little table and chairs were so simple to build. My little granddaughter just loved her Christmas present.
Estimated Cost
$50
Estimated Time Investment
Day Project (6-9 Hours)
Finish Used
Unicorn SPiT, pixie punk pink, zia teal and purple mountain majesty. 2 coats of wipe on polycrylic, and 2 coats of furniture wax.
Recommended Skill Level
Beginner
Add Metal Accents to Furniture
Here's a small tutorial on how to add simple metal accents to furniture. We used something as simple as door knobs at your local home improvement store to make it happen!
Check out the tutorial here http://sawgrasshome.com/?p=1443
Built from Plan(s)
Estimated Cost
$20 - $30
Estimated Time Investment
An Hour or Two (0-2 Hours)
Recommended Skill Level
Beginner
Comments

Wed, 03/25/2015 - 11:26
Add Metal Accents to Furniture
Hello,
I am very interested in this tutorial, "Add Metal Accents to Furniture", but it appears that the link provided, is a dead link. Do you happen to remember anything about this tutorial? Thank you!
Wed, 03/25/2015 - 11:25
Hello, I am very interested
Hello, I am very interested in this tutorial, "Add Metal Accents to Furniture", but it appears that the link provided, is a dead link. Can you please assist me in finding the direct link to this tutorial? Thank you!
Wed, 03/25/2015 - 11:25
Add Metal Accents to Furniture Tutorial
You can email me at [email protected]


Wed, 06/02/2021 - 05:31
By the way, how do you do…
By the way, how do you do the initial analysis of the alloys to determine which metal is best to take?
Shanty Sideboard and Hutch - First Build
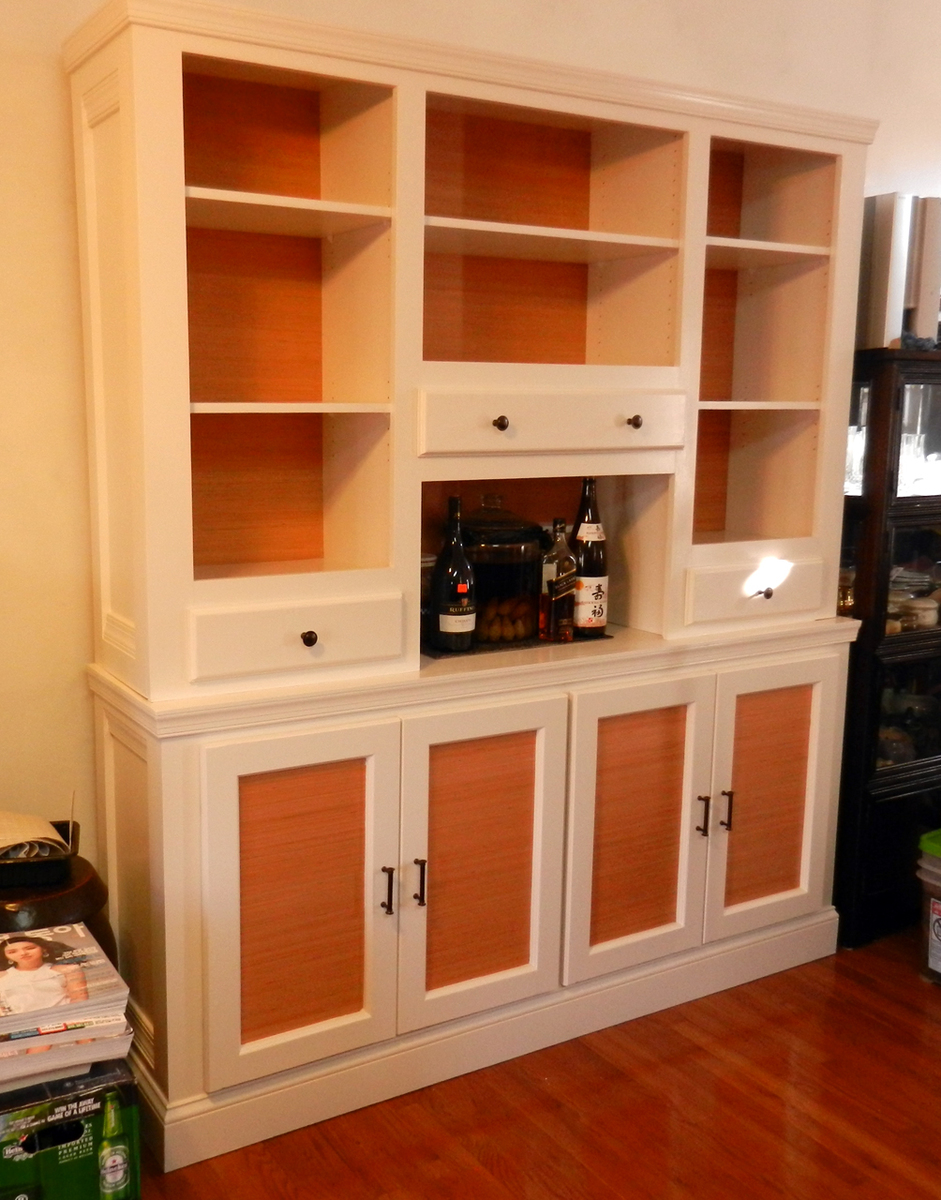
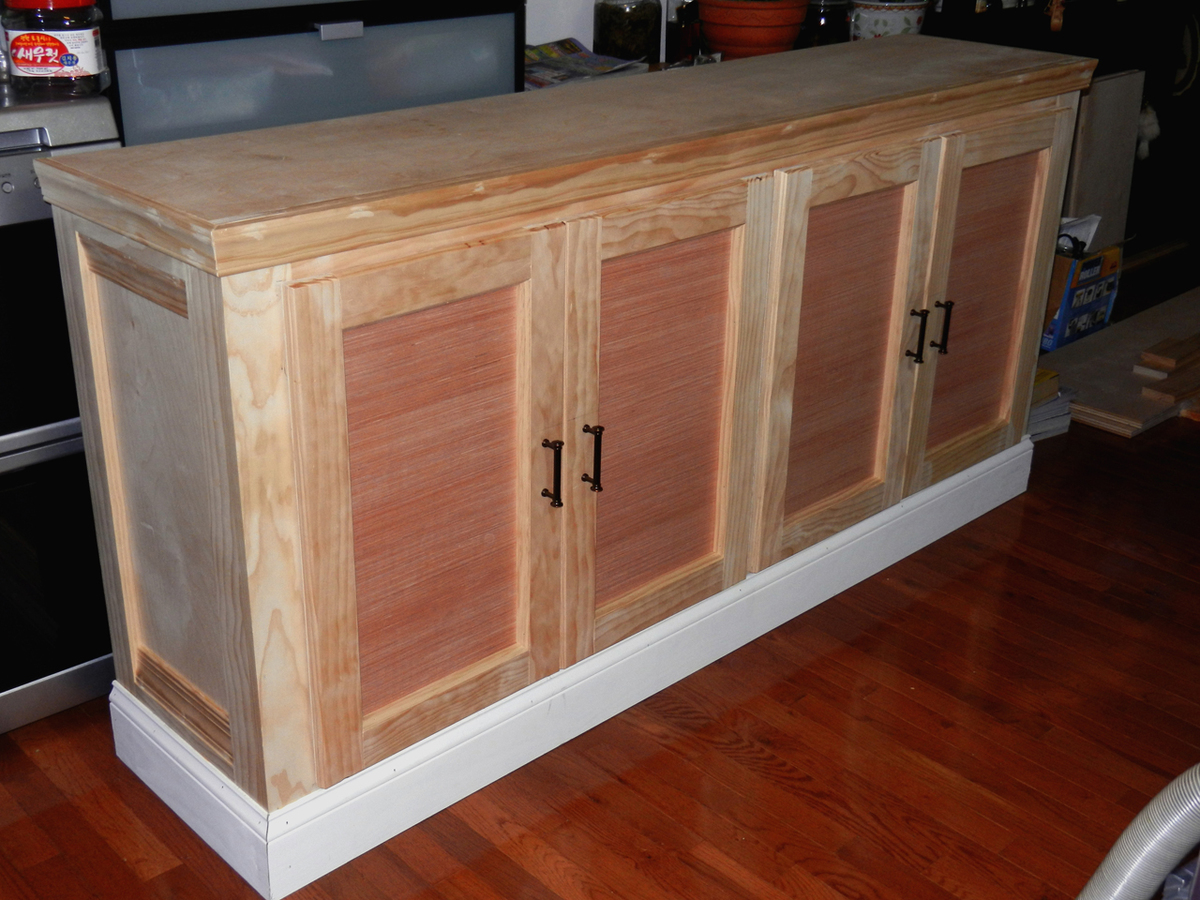
I came across the Shanty Sideboard plan while looking around the site. I decided to make this my first build from the site. I modified it slightly by making overlay doors instead of inset. I found that this allowed me more room for adjustments to the doors to get the best look. I used Pure-Bond Birch Hardwood Plywood from Home Depot for the main build with Select Pine from Lowes as the trim. This was all put together using Kreg Pocket Holes and 1 1/4 inch screws.
I used Luane Plywood as the backing for the doors. I then finished it by painting it with an off-white from Olympic (at Lowes). I left the Luane plywood in its natural state. The doors were mounted with Blum style Face-Frame cabinet hinges. I then applied several coats of Water Based Ultimate Polyurethane from Rustoleum.
I have included a picture of the sideboard in the unfinished and finished state.
I will soon be building a Hutch to go one top. I will use the Shanty Hutch Plan as the basis and modify it from there.
----------------------------------------------
I recently completed the hutch for the sideboard. I used the Shanty Hutch plan as the beginning point and then modified it quite a bit. I made three sections and added drawers at the bottom of each section.
I then used the same Luane Plywood to make the backing. This brings it all together.
The total cost was around $550.00 and worth every penny. Much better than spending $3,000.00 at store.

Built from Plan(s)
Estimated Cost
$550.00
Estimated Time Investment
Week Long Project (20 Hours or More)
Finish Used
Olympic One Egg-Shell paint in Off-white with Ultimate Polyurethane Coating from Rustoleum.
Recommended Skill Level
Intermediate
Comments
Sun, 02/23/2014 - 12:50
Updates to my Shanty Sideboard and Hutch
I finally completed the Hutch for my Shanty Sideboard. It now looks completed. Check it out here.
Thanks
Faux Mantle
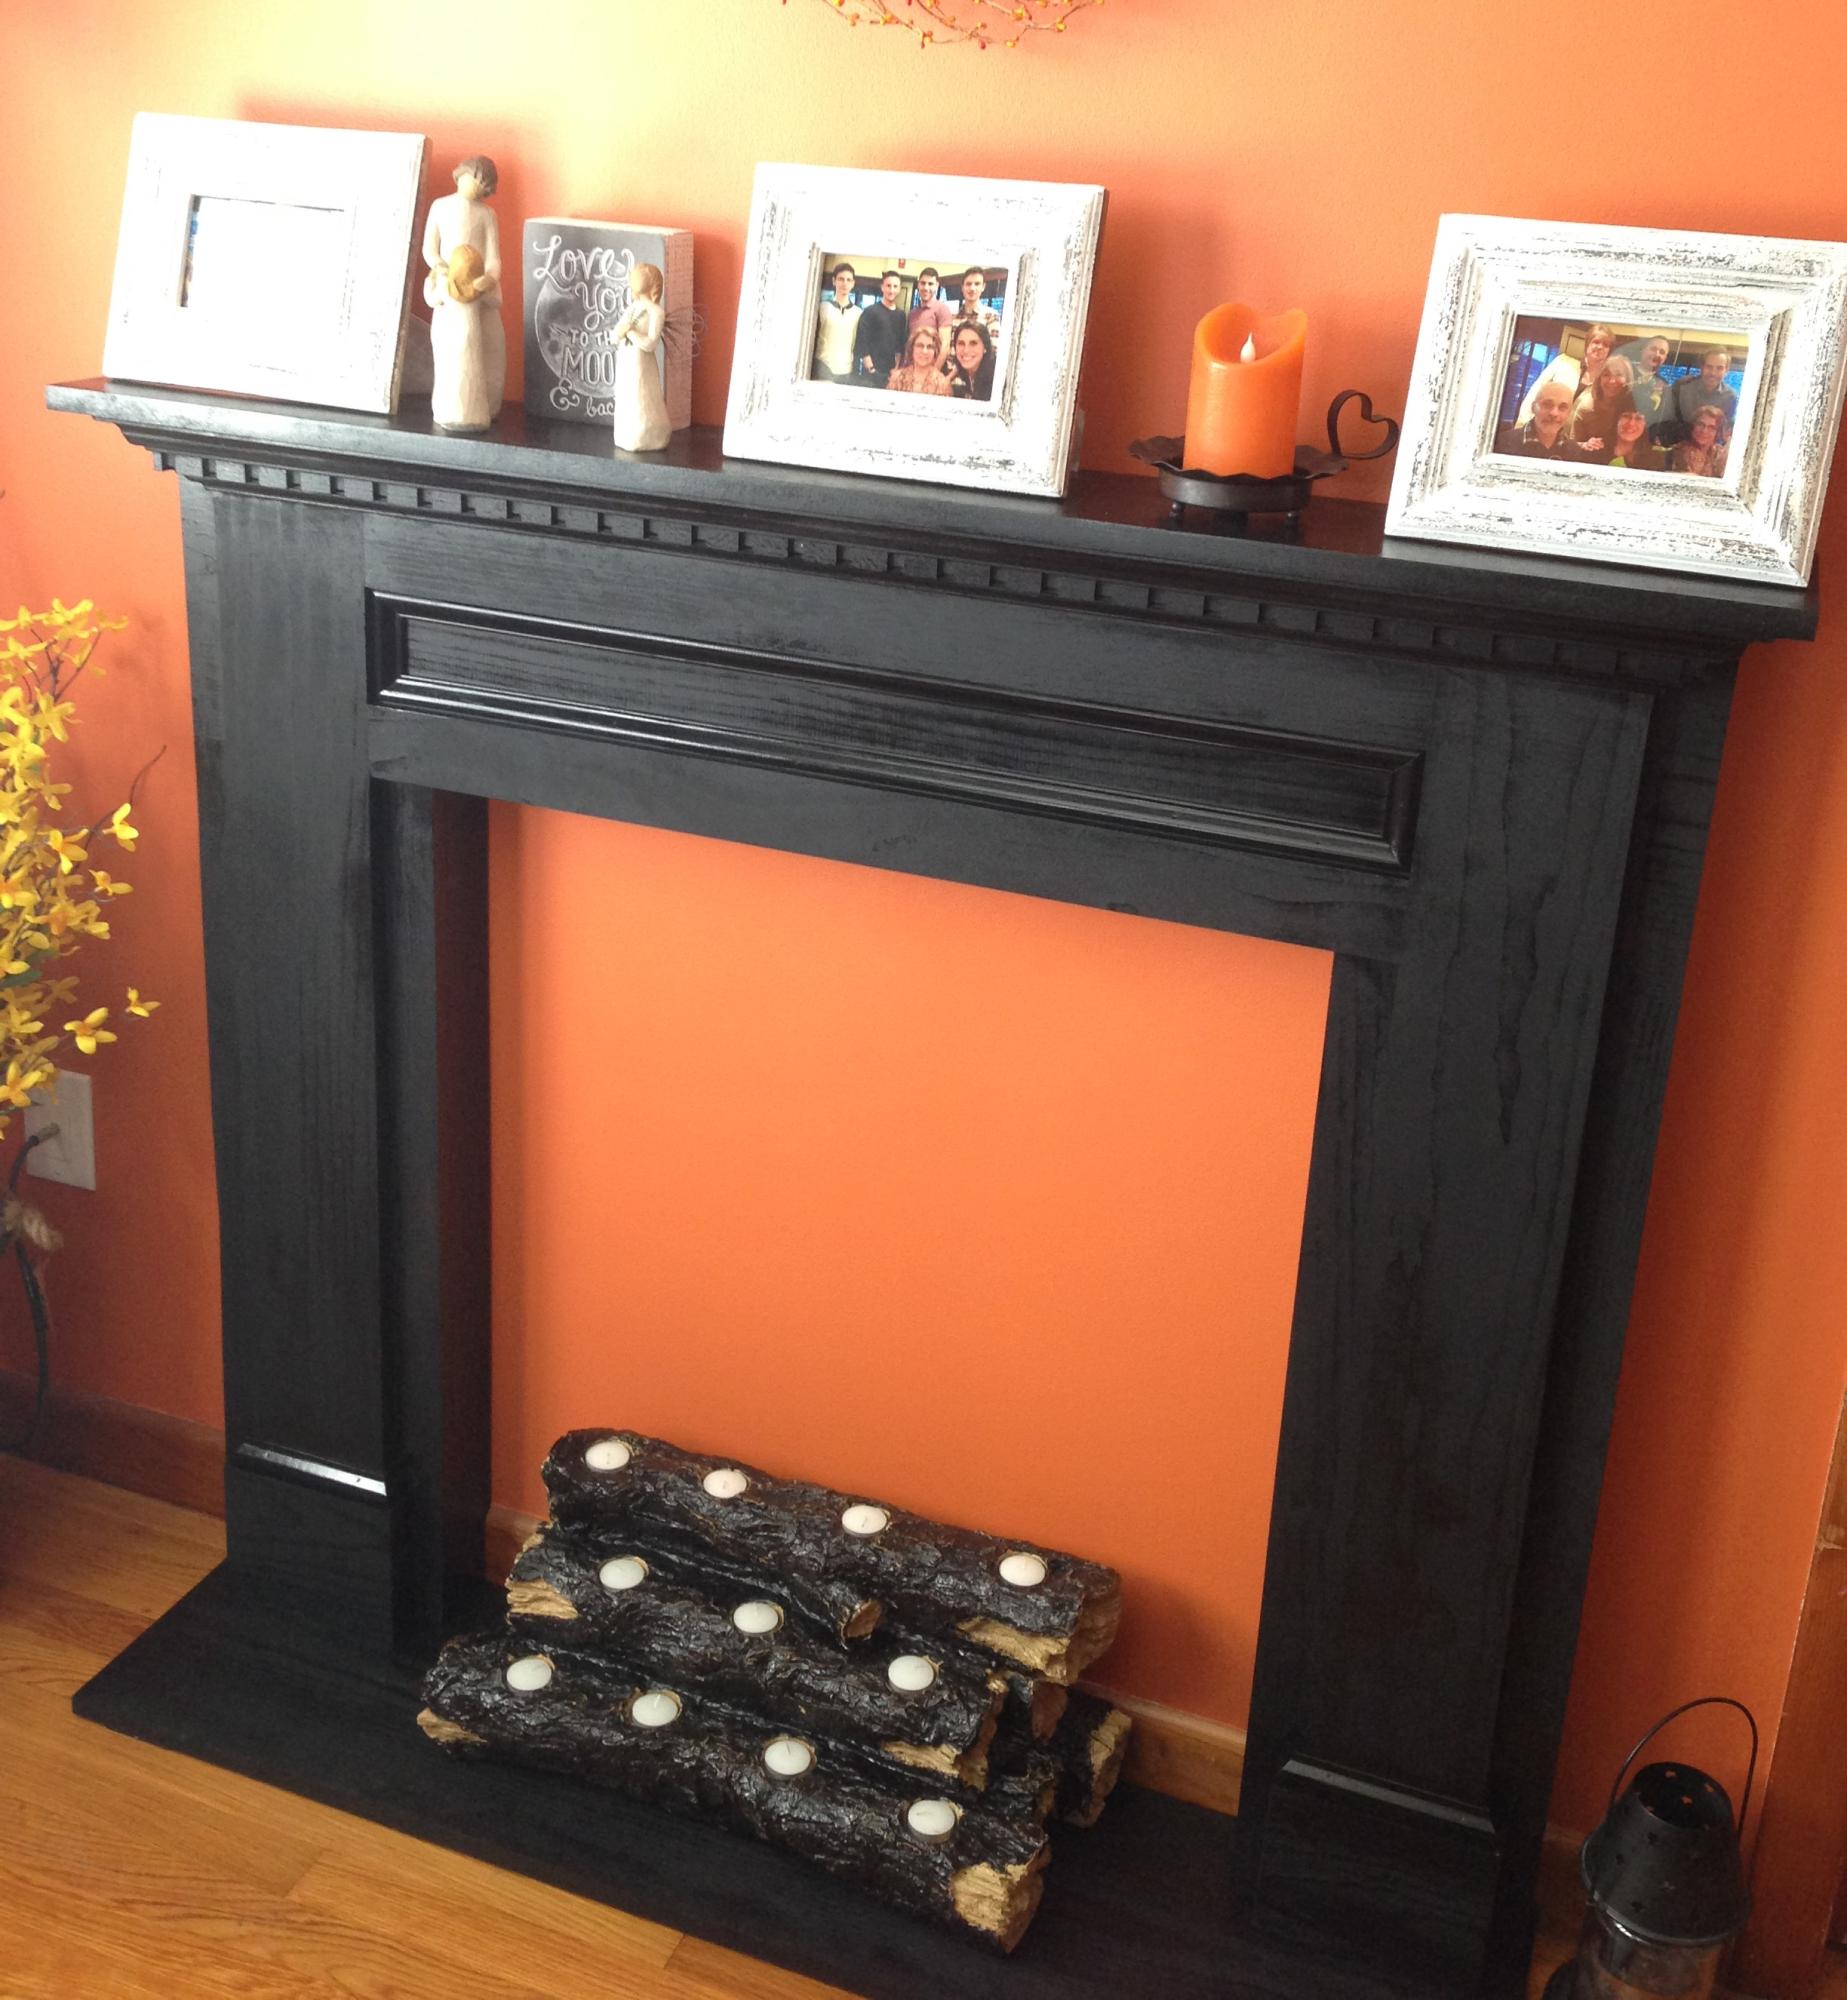
My office faux mantle came out awesome thanks to Ana White. The only changes we made was that we used dental crown molding and we added the base. Other than that everything else was exactly according to the plans.
Estimated Cost
$180 using #1 pine from Home Depot
Estimated Time Investment
Day Project (6-9 Hours)
Finish Used
We used Black spray semi-gloss
Recommended Skill Level
Intermediate
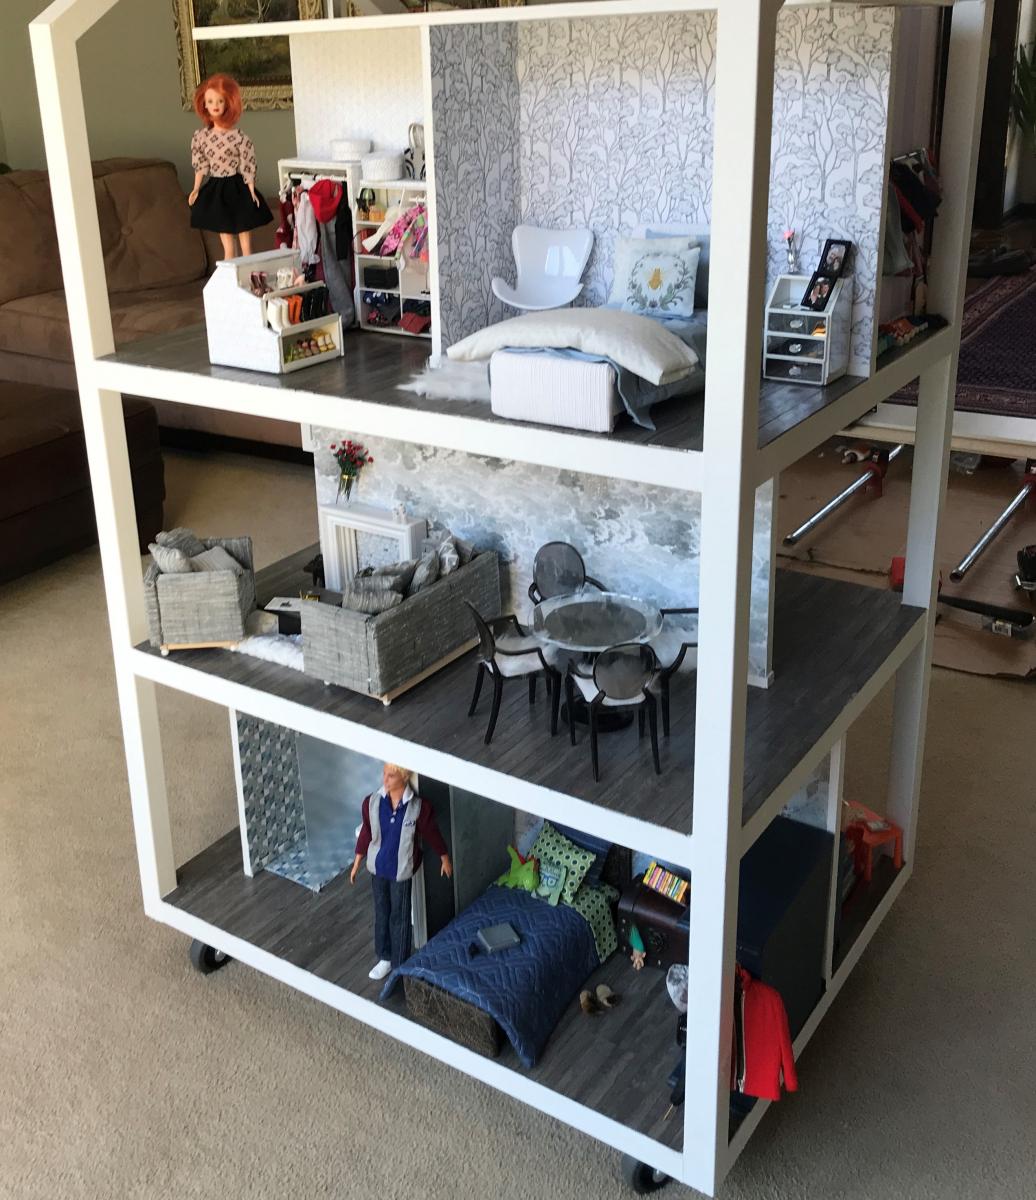
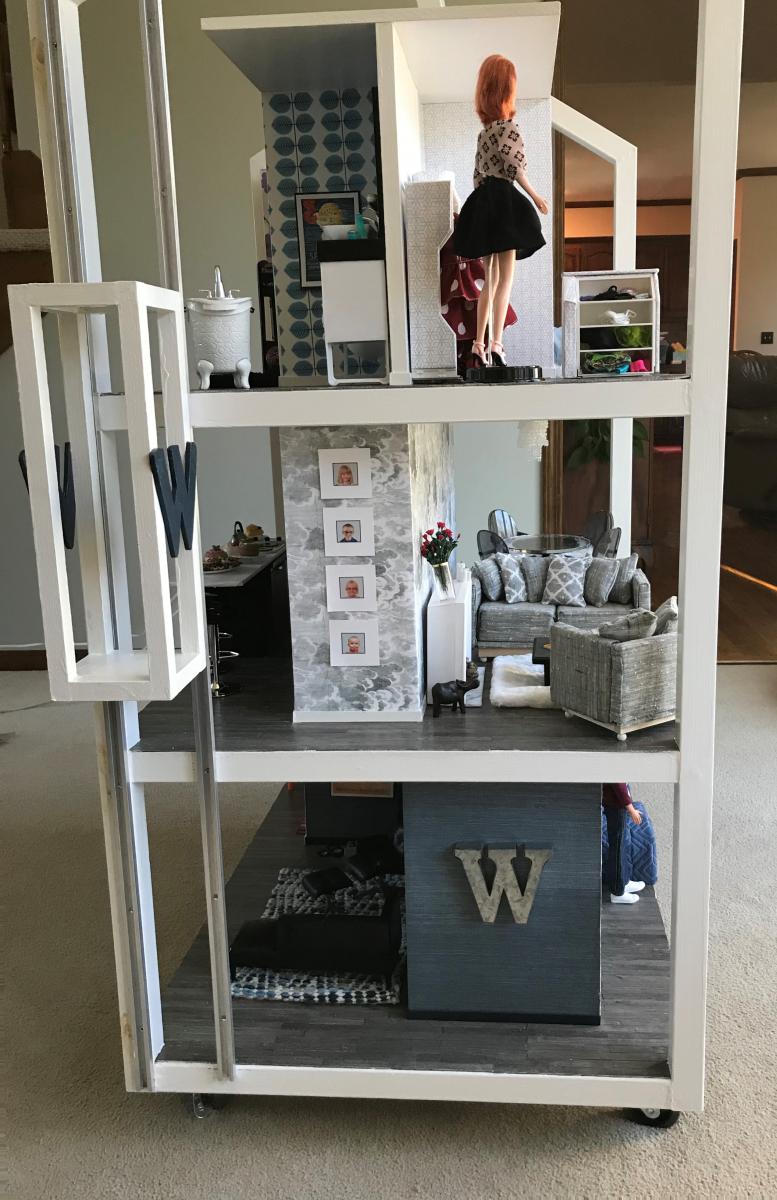
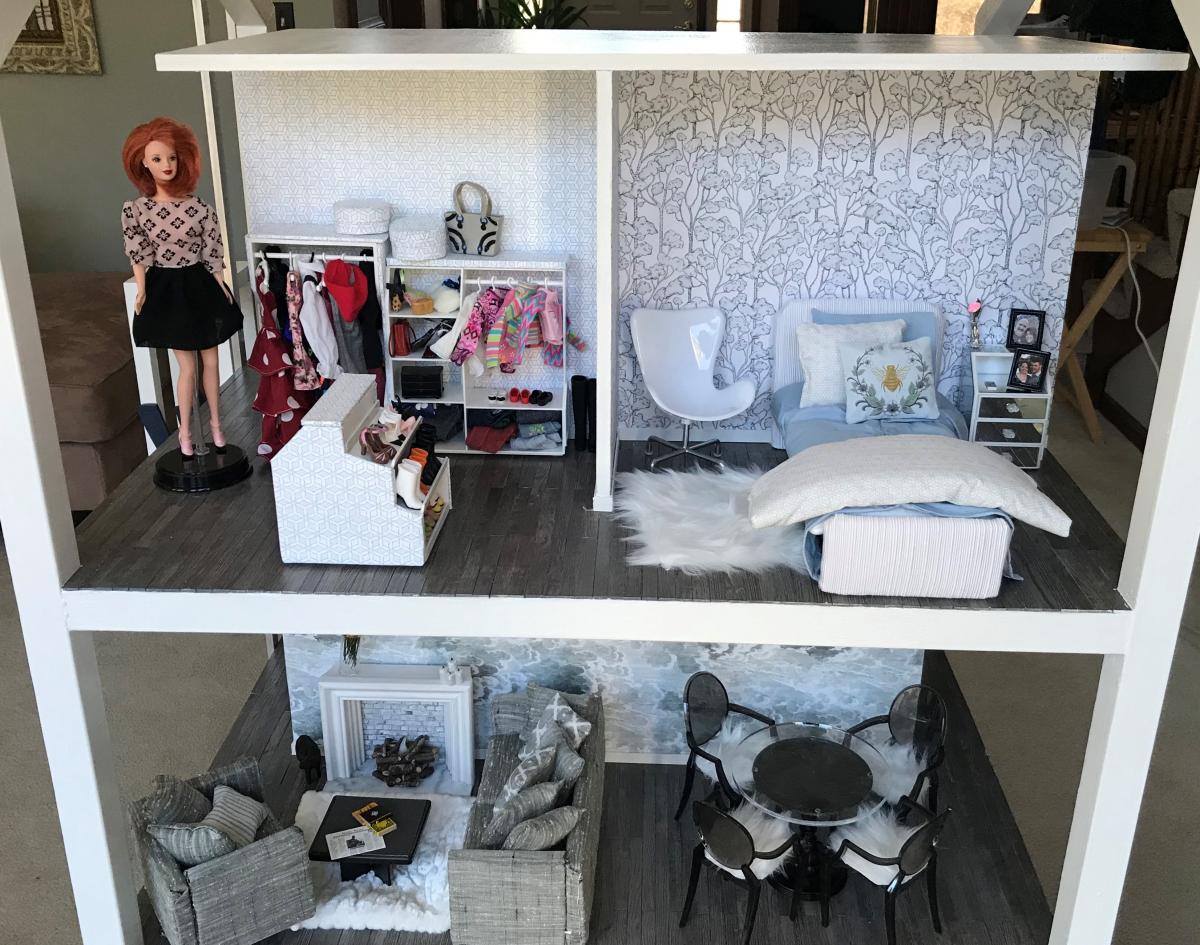
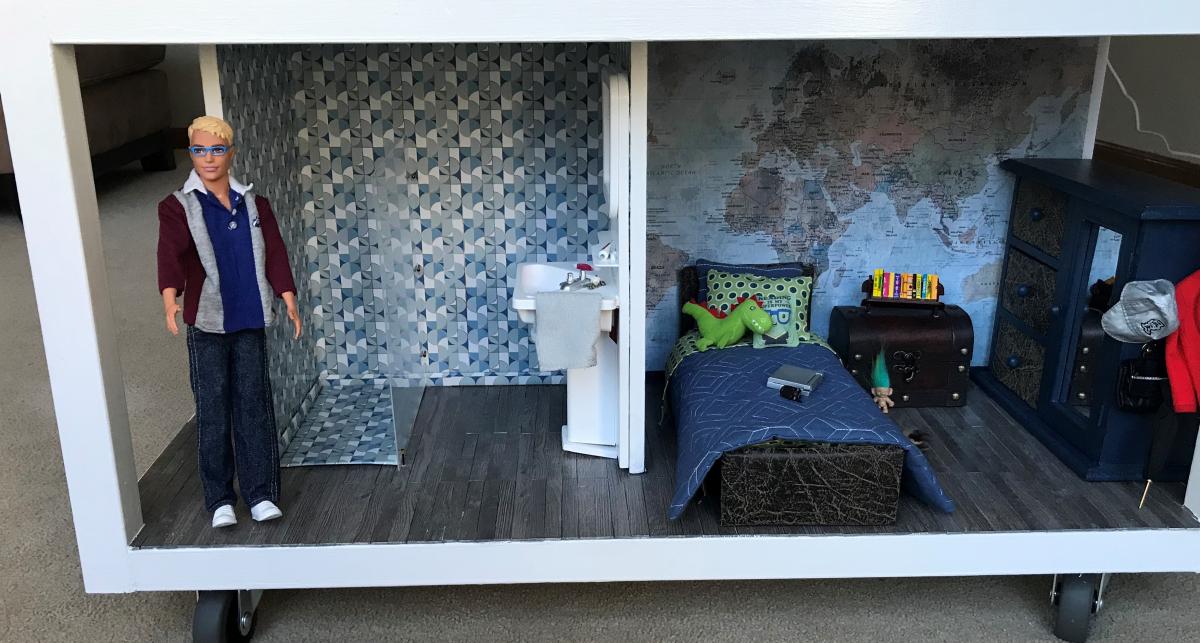
Expanded Dream Dollhouse
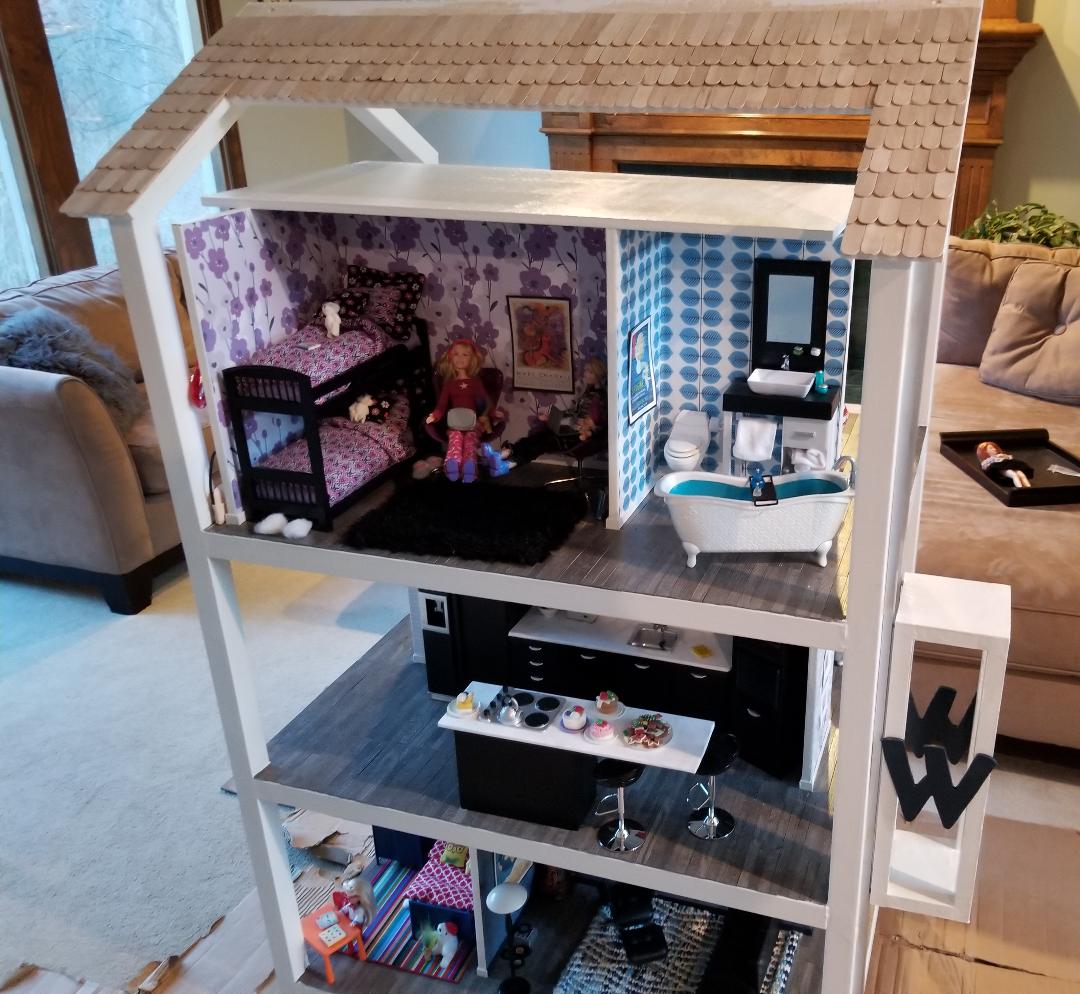
We chose the Dream Dollhouse plan because all four grandchildren could play with it at the same time. We also wanted to make the dollhouse entirely by hand - including much of the decor. The original plan was expanded by raising each floor 2 inches (to allow for the repainted Susy oven cabinets); and an attic was added to allow all the third floor walls to be full height. Interior walls were increased (7, 9 and 12 inches) to accommodate Barbie-sized furniture. Eliminating the stairs and adding an elevator also increased usable floor space. The wallpaper was scaled from online wallpaper images or designed to coordinate with the space. All the bedding, rugs and the living room furniture were made by hand. Some plastic Barbie or Susy doll furniture was repainted. All the art and photos are specific to each grandchild. Both the fireplace and chandelier will light. The floors are cut from vinyl floor tiles. The shingles are cut from jumbo craft sticks. The completed house took 2.5 months with some very long days as we were on a Christmas deadline! We intend to make a 2-car garage topped by a deck (and maybe a pool) that can sit next to the house this summer.

Built from Plan(s)
Finish Used
white paint with primer for all wood surfaces, sticky vinyl tiles cut into strips for flooring, jumbo craft sticks for shingles, t-tracks (from a workbench system) for the metal elevator slides.
Recommended Skill Level
Beginner
Kids Modern Picnic Table
This is my very first wood working project! I know its not perfect and I learned from my mistakes. I found a miter saw at a garage sale and after three hours of plugging it in and unplugging it, I finally worked up the courage to make it make a noise! Then I eventually worked up the courage to cut wood lol! I'm pretty proud of myself for building something and I am going to continue practicing until I can make really cool stuff!
Built from Plan(s)
Estimated Cost
$20
Estimated Time Investment
Afternoon Project (3-6 Hours)
Finish Used
Valspar, Quart Size, LA218, Fuchsia, Duramax, Exterior Semigloss, Base 4 214-4.75, 113-31.75, 105-3.63, 115-2Y7
I used 2 coats
I used 2 coats
Recommended Skill Level
Starter Project
Kid's Trestle Play Table and Rolling Cubbies

We have been slowly updating our sunroom and making it a play area for our kids. I built this trestle play table and a couple of rolling cubes to go with it. I still need seating for two more (for playdates and when the grown-ups want to sit) so I'm trying to decide what to do on the other side.
I wanted to use all wood that we already had in the garage, so the top is made from 1x12s connected with pocket holes, and the legs are 2x6s.
In the background you can see the board & batten my husband and I installed a few weeks ago. We also ripped out some moldy carpeting, sanded the concrete and laid vinyl plank flooring. It's coming along!
Plan for the rolling storage cubes: http://www.shanty-2-chic.com/2012/07/rolling-storage-cube-stools.html


Built from Plan(s)
Estimated Time Investment
Day Project (6-9 Hours)
Finish Used
Rustoleum Ultimate Stain in Dark Walnut on the top, plus three coats of poly. The base was painted with Behr semi-gloss in Swiss Coffee.
Recommended Skill Level
Beginner
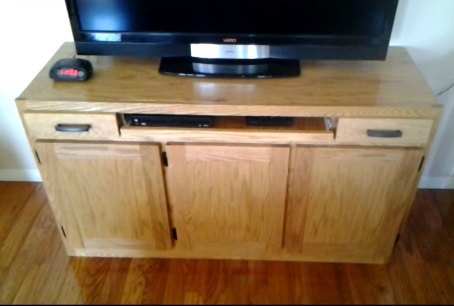
Media Center Console Unit
We just love your work and detailed plans!
Hubby and I built the Console Unit and plan to add on the base units and hutches. We built the unit only 30" tall vs. the 34-1/2" height from the plans. We used oak plywood and oak trim and finished it with a Fruitwood Stain and Polyurethane Seal. We shortened the height of the upper shelf, adding two shallow drawers and a pull-out tray for setting our cable modem on and hooking up our laptop to view movies and You Tube videos on our television, when desired. My hubby loves to make You Tube videos and made one of our work and posted it at:
https://www.youtube.com/watch?v=6JuQ4N-jUq4
Keep up the great work and we plan to posted more pics!
Built from Plan(s)
Estimated Cost
$125 for 1-1/2 pieces of oak plywood and approximately 5 pieces of oak trim. We also used 100 kreg jig screws.
Estimated Time Investment
Week Long Project (20 Hours or More)
Finish Used
Minwax Fruitwood with Polyurethane Seal.
Watch the video to see it applied at:
https://www.youtube.com/watch?v=6JuQ4N-jUq4
Watch the video to see it applied at:
https://www.youtube.com/watch?v=6JuQ4N-jUq4
Recommended Skill Level
Intermediate
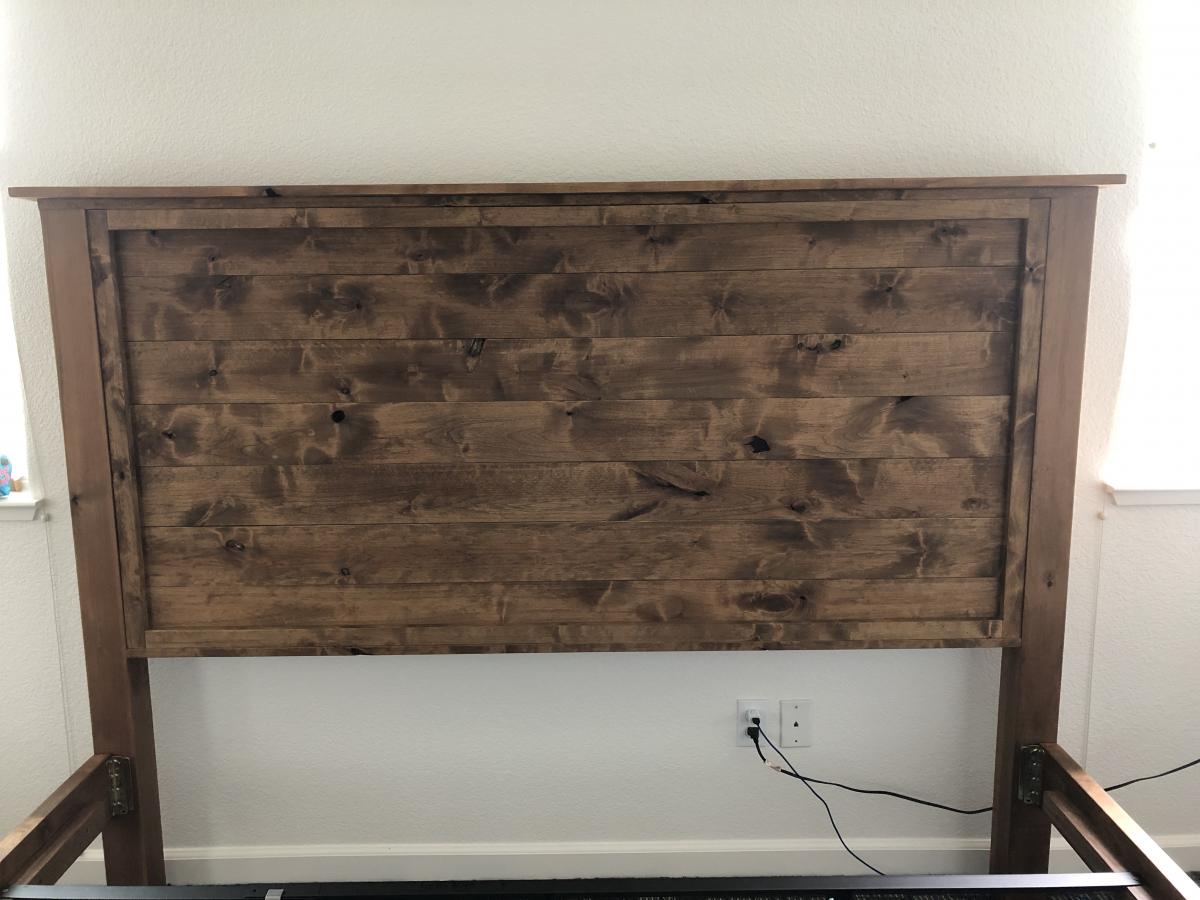
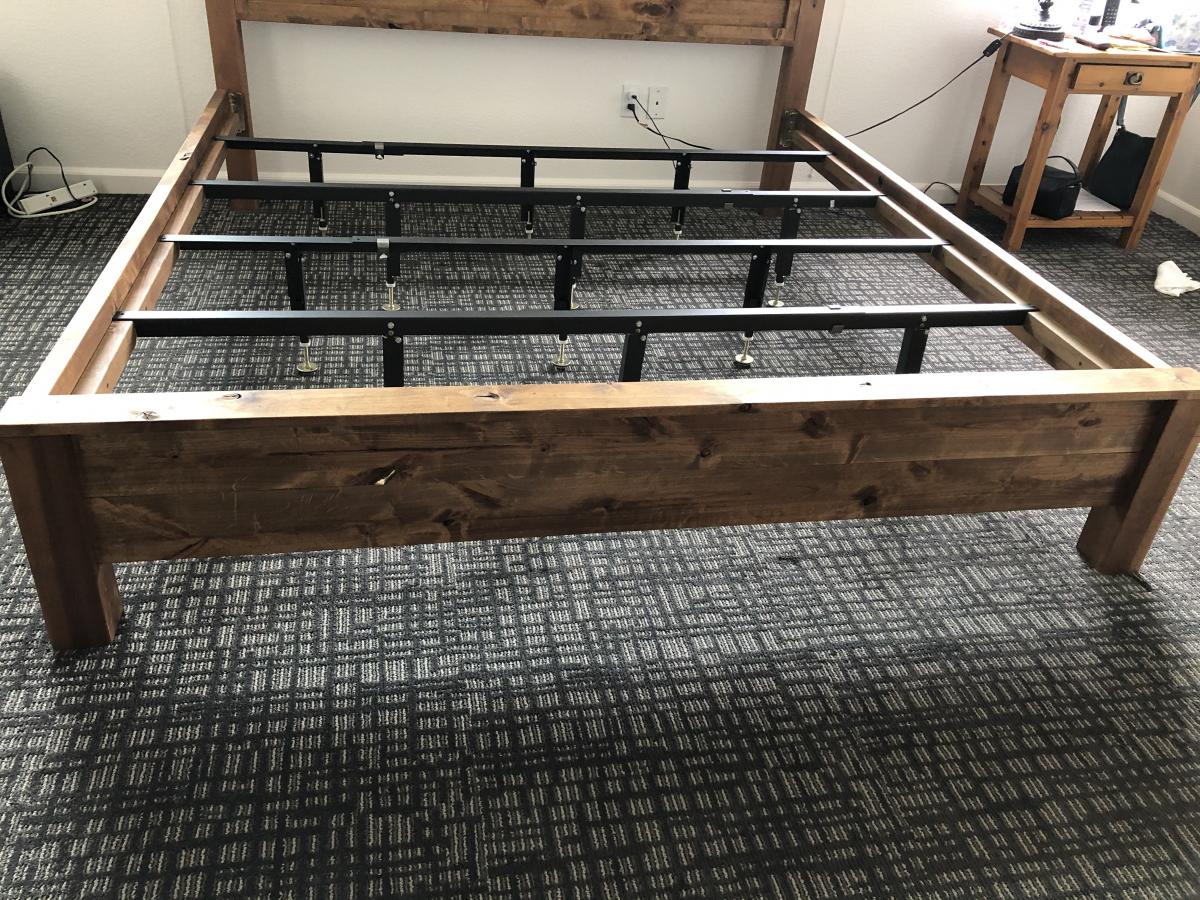
Farmhouse king bed
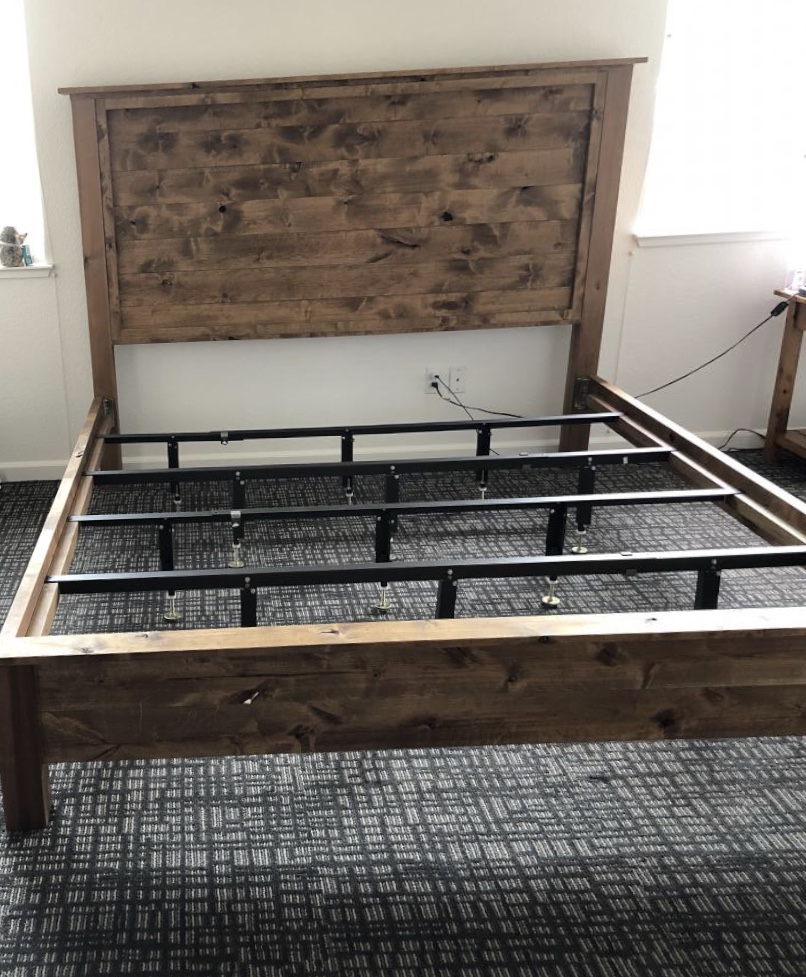
i love the farmhouse look and decided to start changing the furniture in my bedroom. I went shopping and everything I liked was very expensive. I looked online and found DIY plans on Ana’s website. They were an awesome start. I tweaked a few things and absolutely love the end product.
I decided to buy a metal frame and put the mattress on plywood. It’s as solid as a rock!!
Built from Plan(s)
Estimated Cost
500.00
Estimated Time Investment
Weekend Project (10-20 Hours)
Finish Used
I did one coat of Danish Oil in dark walnut. If you have never used Danish Oil....I highly recommend that you try it. I applied the oil with a foam paint brush and wiped off the excess with an old pillow case. It took about 2 weeks for the smell to lighten up.
The knotty alder is beautiful wood. It sands nice and stains easy.
The knotty alder is beautiful wood. It sands nice and stains easy.
Recommended Skill Level
Intermediate
Comments

Fri, 01/17/2020 - 21:03
Sorry that some of the…
Sorry that some of the pictures are sideways. I don’t know how to change them.
Comments
BJ D
Thu, 04/05/2012 - 12:33
center line blocks
what are the blocks along the center used for?
joja
Thu, 04/05/2012 - 14:01
Re: Center line blocks
The bed has two matresses, the blocks are there to keep the matresses in place.
Ally (not verified)
Tue, 04/17/2012 - 11:21
Plans for this project?
Now this is my kind of project! Looks easy but polished. Do you have plans for this?
joja
Tue, 04/17/2012 - 12:03
No plans, but some measures
Platform bed measures:
- Deck: 18x120 mm, width = matress width + 10 cm, length = matress length + 5 cm.
- Headboard: Height 80 cm, width = matress width + 10 cm.
- Beams bed: 36x150 mm, length = matress length - 5 cm.
- Beams headboard: 36x150 mm, height = headboard height - 5 cm.
joja
Wed, 04/18/2012 - 14:00
Headboard
Sorry, forgot to write that the headboard "deck" is made from 18x120 mm.
PS) We used fir, but pine or cedar or the like is fine.
Sdash
Thu, 04/11/2013 - 23:04
Plans request
I would love to make this but I would require plans in order to build it. So if there is any way I could get plans you would make me quite happy.
JJisblue
Fri, 01/15/2016 - 17:11
Plans would be great if anyone has them
It looks simple enough, but the headboard looks like it may be tilted. Can you provide instructions on the attachment of that? Thank you