Community Brag Posts

X Coffee table

Submitted by Anonymous (not verified) on Sun, 12/25/2016 - 09:40

Rustic coffee table. Plans by Ana White. Coffee, vinegar, steel wool stain

Estimated Cost
$60
Estimated Time Investment
Day Project (6-9 Hours)
Finish Used
Coffee, vinegar, steel wool with prime of black tea
Recommended Skill Level
Intermediate

My fancy farmhouse table version. 10' long

Submitted by JS on Fri, 11/23/2012 - 10:48

Built this fancy farmhouse table for the back patio. Made it 10' long. Instead of 4 2x10's I used 5 2x8's 10' long. All yellow pine from Home Depot. This is the first table or wood type construction project I have ever made. Screwed everything together, filled in holes with stainable wood filler, used 3 coats of Minwax Provencial stain and then 3 coats of outdoors Helmsman Spar Varnish (sanding with 000 steel wool between coats). Turned out great. Total materials including wood, screws, sanding, stain, varnish, and brushes was a little less than $300. The stain and varnish I bought was about $100, 1 gallon can of stain and 1 gallon can of varnish. Tools used were miter saw, cordless and corded drills, and sanders before staining. Thanks for the plans Ana-White.

Estimated Time Investment
Week Long Project (20 Hours or More)
Finish Used
MinWax Provencial stain (3 coats)
Helmsman Outdoor Spar Varnish (3 coats 000 steel wool sanding between coats)
Recommended Skill Level
Starter Project

Comments

Yo

Wed, 07/31/2013 - 10:12

That is a great table. You clearly are a talented homemaker. I build kit cars. I bet with your skills we could do great work together.

SOCOOLJ

Wed, 07/31/2013 - 10:52

Looks great. I did the same but I went and bought a Home Depot table(pre-built) and just stained it. Looks almost identical except 1/4 of the time and cost. BTW I love the painted brick. Thanks for sharing. I give your table a 10!

Hall Tree - Shiplap and Old Growth Fir

Loved doing this project. Used the Ana White plans with a few mods. Made the back removal so that I could easily transport. This was for my daughter's apartment that had no entry closet for her shoes and coats.

Built from Plan(s)
Estimated Cost
$200
Estimated Time Investment
Weekend Project (10-20 Hours)
Finish Used
Benjamin Moore Ceiling Flat White and Wipe on Poly for the seat.
Recommended Skill Level
Intermediate

Comments

Charlie's Personalized Highchair

A few days before Thanksgiving, my mom told me she wished we had a restaurant style high chair for my daughter. The old one was so large and bulky, and was hard to reach food on the table. I knew just where to look for plans! I spent $6 on the lumber and used scraps for the seat and back. The chair is painted in three coats of lime green paint. We used my mom's Cricut to cut the vinyl letters and stuck them on the back. Then three coats of polyurethane for easy wiping and it was ready for straps! I picked up $3 worth of 1" webbing from Hobby Lobby along with a parachute snap clip. I used two small cabinet screws for each strap on the bottom to attach. I decided to loop the front strap over the 1x2 front bar to prevent any risk of splitting by drilling into that thin side. Instead both ends are screwed down on the bottom.

We absolutely love this new highchair! It perfectly fits under the table and Charlie has no trouble eating (and throwing) food now. And for $10, you just can't beat it! Solid wood, perfect color, personalized name. I really love DIY

Built from Plan(s)
Estimated Cost
$10
Estimated Time Investment
An Hour or Two (0-2 Hours)
Finish Used
three coats of lime green latex paint, followed by three coats of polyurethane
Recommended Skill Level
Intermediate

Comments

Console X

Submitted by linwoods on Tue, 09/09/2014 - 18:11

I modified the plan so that that I had a 48" table top and 4 legs only.  I didn't need such a long version in my entry.  The picture frame is from left over wood from the project.

Can anyone guess where I took the photograph in the frame?  Somewhere in the lower 48 states.

Thanks Ana for the design!!

Daren

Built from Plan(s)
Estimated Cost
$100
Estimated Time Investment
Weekend Project (10-20 Hours)
Finish Used
I followed the rustic Yet Refined Wood Finish Pretty closely, except I let the special walnut sit a little longer.
Recommended Skill Level
Intermediate

Side board with hutch

Built from scratch looking at a photo someone sent me that cost $5200. I built for $500

Estimated Cost
500-550
Estimated Time Investment
Week Long Project (20 Hours or More)
Finish Used
Special walnut and poly
Recommended Skill Level
Intermediate

Farmhouse headboard

Submitted by benhuard on Thu, 11/29/2012 - 06:04

This was my first project. My wife wanted one, I made one. End of story. Now I'm hooked on woodworking and each time my wife says she wants something, the first thing out of my mouth is, "I can make that".

Estimated Time Investment
Weekend Project (10-20 Hours)
Recommended Skill Level
Beginner

Truss table

My husband built this table for me as an 8th Anniversary present.  It came out absolutely beautiful! For the first time,  we can host  family and friends with plenty of room. I paired it with some chairs that we already owned. He will be building the matching bench soon.

He left out the 45 degree diagonals,  may add them later.  It is so sturdy, they are basically decorative. 

Built from Plan(s)
Estimated Cost
$200
Estimated Time Investment
Weekend Project (10-20 Hours)
Finish Used
Min wax golden pecan for top
Behrman Roman plaster paint, satin finish
Satin poly on top.
Recommended Skill Level
Intermediate

Garage Sliding Screen Doors

Inspired by your diy barn door hardware, I wanted to create a way to have airflow in my garage as I work in there without the nuisance of bees, flies, and hummingbirds entering in. Since this is my first attempt to make a project like this, a few mistakes were made along the way, but, overall, I am happy to say my objective has been accomplished! Thank you, Ana, for inspiring me to start and finish this project to the end!DI

Estimated Cost
$250
Recommended Skill Level
Intermediate

Comments

eegad1973

Thu, 02/16/2023 - 12:52

Amazing, can you tell me what thickness your flat bar was and what size Fender washers you used. I am wanting make hardware for a door that is 27.5 inches wide by around 68 inches high. It is 1.5 inches thick. So I’m also curious what size bolts you used as I want to ensure 1/4inch bolts are enough. I’m struggling to find 2 inch diameter fender washers that have a 1/4 inch hole. I’m excited to make the hardware as traditional hardware is too big for the space. Any ideas are appreciated.

Scrap wood heart collage

Submitted by kristen on Sat, 12/01/2012 - 09:12

I have a hard time throwing out any scrap I have after I finish a project, so I had accumulated a fair amount of 3/4 and 1/2 plywood. I used up every last bit of it putting a scrap wood heart collage in my daughter's room! This is the perfect project for getting lots of practice making cuts on a miter saw for a beginner and hanging it is a breeze if you follow the steps I took in the blog post I wrote up about this.

Easy and free. Love those kinds of project :)

Estimated Cost
Free, if you use scraps
Estimated Time Investment
Afternoon Project (3-6 Hours)
Finish Used
I used s small bottle of craft paint for the finish.
Recommended Skill Level
Starter Project

Comments

Doll high chair

Submitted by Anonymous (not verified) on Tue, 01/03/2017 - 05:33

A delight for our daughter. We added an extra rung to the back rest, and kept the seat pretty high for her small babies. Otherwise, we just followed the free plan. Thx!

Recommended Skill Level
Beginner

Brookstone Desk

Changed the top of the desk size to 24” x 36” to fit my tiny space.

Built from Plan(s)
Estimated Time Investment
Day Project (6-9 Hours)
Recommended Skill Level
Beginner

Ladybug Moped Rocker

Submitted by sbowes1 on Mon, 12/03/2012 - 21:24

There were some parts missing from the plans. I wrote out what I did to build this rocker on my website.

http://www.domesticated-engineer.com/1/post/2012/12/ladybug-moped-rocke…

Make sure to use hard wood! My rocker broke within the first hour. Wood glue fixed it but it gave me a good scare!

Built from Plan(s)
Estimated Cost
$15
Estimated Time Investment
Afternoon Project (3-6 Hours)
Finish Used
Paint and clear coat
Recommended Skill Level
Beginner

Robins egg blue console table

Submitted by lrsummers on Wed, 09/17/2014 - 13:51

Made this beautiful TV stand from the "Rustic X Console table plans". I shortened it to 2 ft high to fit the space for a TV. Love how it turned out!!

Built from Plan(s)
Estimated Time Investment
Weekend Project (10-20 Hours)
Recommended Skill Level
Beginner

Comments

AlexO

Mon, 01/19/2015 - 15:11

To you have any trouble with sagging without the 2x4 in the middle? Looks great like this!

Toddler Book Shelf

Submitted by mjs1143 on Fri, 01/06/2017 - 09:14

I needed a book display rack for my boys so I built this one from the plate rack plans and modified it to suit the size I needed. I actually used all scrap lumber from previous projects, so the cost was minimal.

Built from Plan(s)
Estimated Cost
$40 worth of leftovers maybe. 
Estimated Time Investment
Afternoon Project (3-6 Hours)
Finish Used
Grey Paint and Walnut Stain that matches a dresser in their room.
Recommended Skill Level
Starter Project

Table & Chairs for Kindergarten Co-Op

Simple table and chairs for a kindergarten homeschooling co-op. Perfect size for 4-6yr olds. Sturdy enough for older kids as well. We used a stair tread for the seat tops instead of 1x3 to make it more solid and to minimize little fingers getting caught between slats also the bull nose on the stair tread makes a nice edge for little legs to rest against.

Estimated Cost
$140
Estimated Time Investment
Week Long Project (20 Hours or More)
Finish Used

It is finished using two coats of Minwax PolyShades stain & polyurethane in classic oak with sanding using 320 grit sandpaper in between coats. Then a polish with steel wool #0000, beeswax and orange oil.

Raised Cedar Fence Post Berry Patch

Submitted by AmyJM on Fri, 12/07/2012 - 17:56

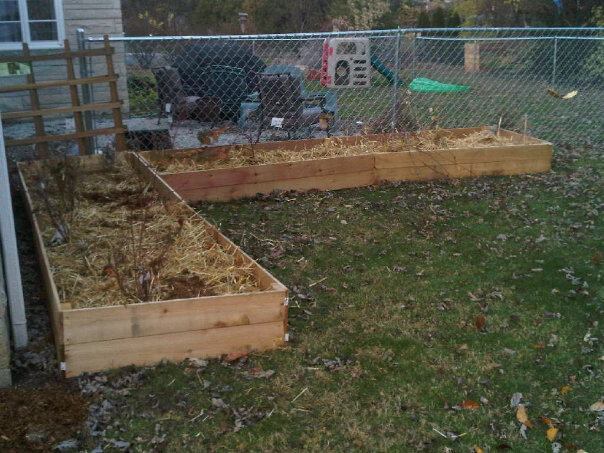
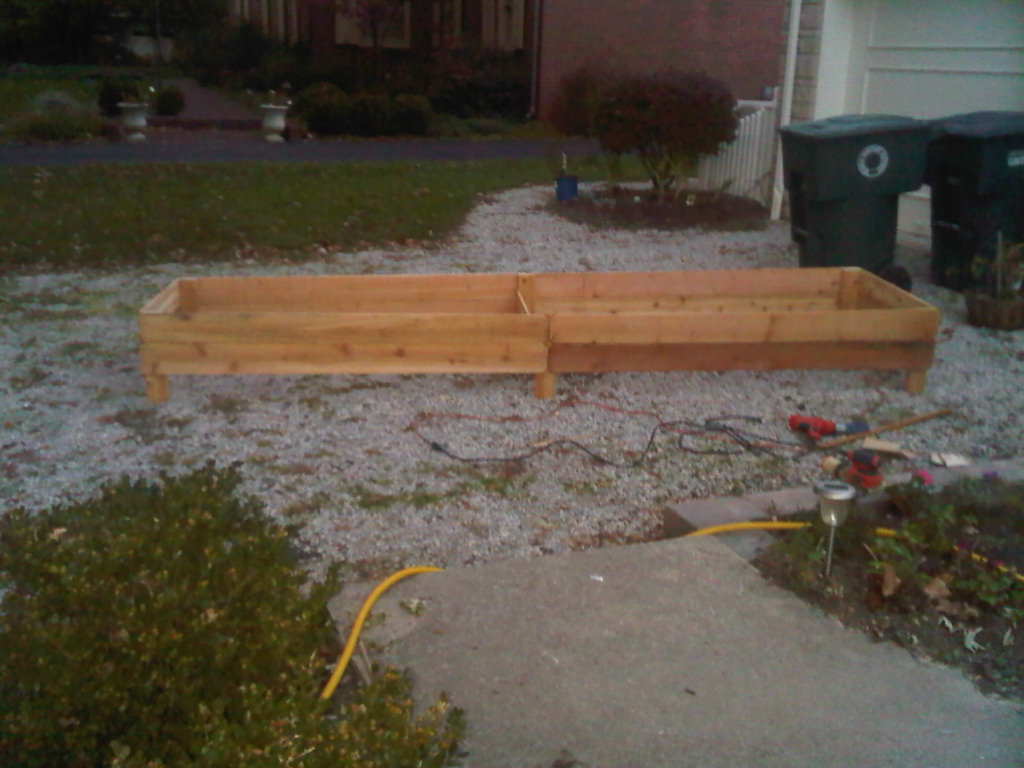
I used the same cedar fence boards, but for a large berry patch made with minimal cuts. The end boards are 1/2 the length of the long side boards. I made them 2 fence widths high - about 11 inches. Each bed is nearly 12 feet long. I joined the dogeared ends of 2 boards in the center, making a diamond cut out pattern that looked good. In order to support the tall sides, I used cedar 2x4x8 boards. Use 18-24 inch posts on each corner and at the center joint. I cut an additional board in half, affixing it to the center posts, to brace the long sides and add stability. Each box is approximately 3 feet wide, 12 feet long, and 11 inches tall. You'll need 8 fence posts for the long sides, 2 for the short sides, and 1/2 for the brace - you could use a different piece of wood for this, but the cedar fence posts are such a deal. You'll also need approximately 9 feet of cedar 2x4 for the corner posts - I bought 8 foot lengths and cut each into 2 foot posts for stability. The cost was around I'll add 2x4 posts in the spring and put a trellis behind the raspberries. If the birds start to steal my blueberries, I'll add metal or wooden corner posts that will support fruit netting. We're planting strawberries around the base of the larger fruit bushes. The 11 inch sides should keep rabbits from invading. If they are persistent, I'll add a few inches of chicken wire around the top edge. This made the equivalent square footage of 4 of Ana's original $10 beds.

Estimated Cost
Around $75 for 2 - most of the cost was in the 2x4s.
Estimated Time Investment
Afternoon Project (3-6 Hours)
Finish Used
Light sanding, no finish
Recommended Skill Level
Starter Project

Comments

CEFreeman (not verified)

Sun, 12/09/2012 - 10:40

I'm putting together several L-shaped raised beds out of 6x6s with the internal walls being 2x6s. This gives me encouragement. I really like the look of this! Thanks.

CEFreeman (not verified)

Sun, 12/09/2012 - 10:42

I'm putting together several L-shaped raised beds out of 6x6s with the internal walls being 2x6s. This gives me encouragement. I really like the look of this! Thanks.