Community Brag Posts

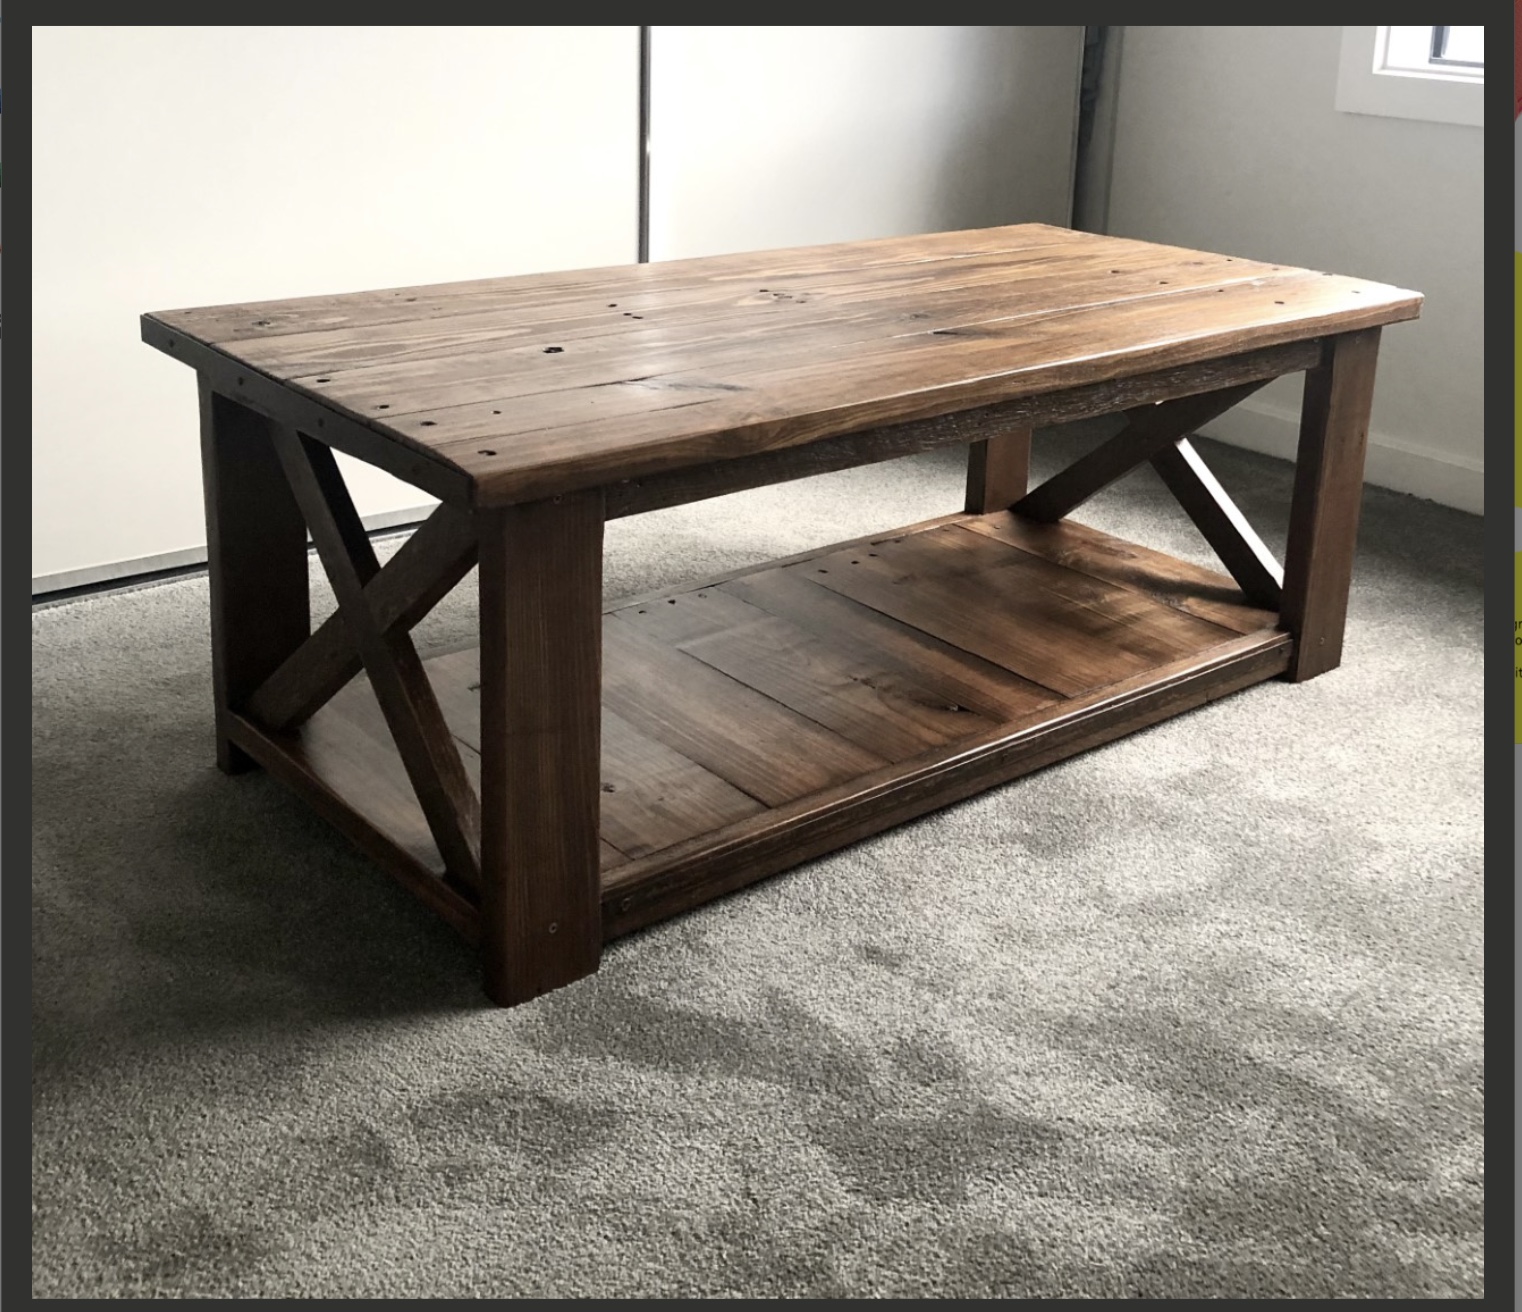
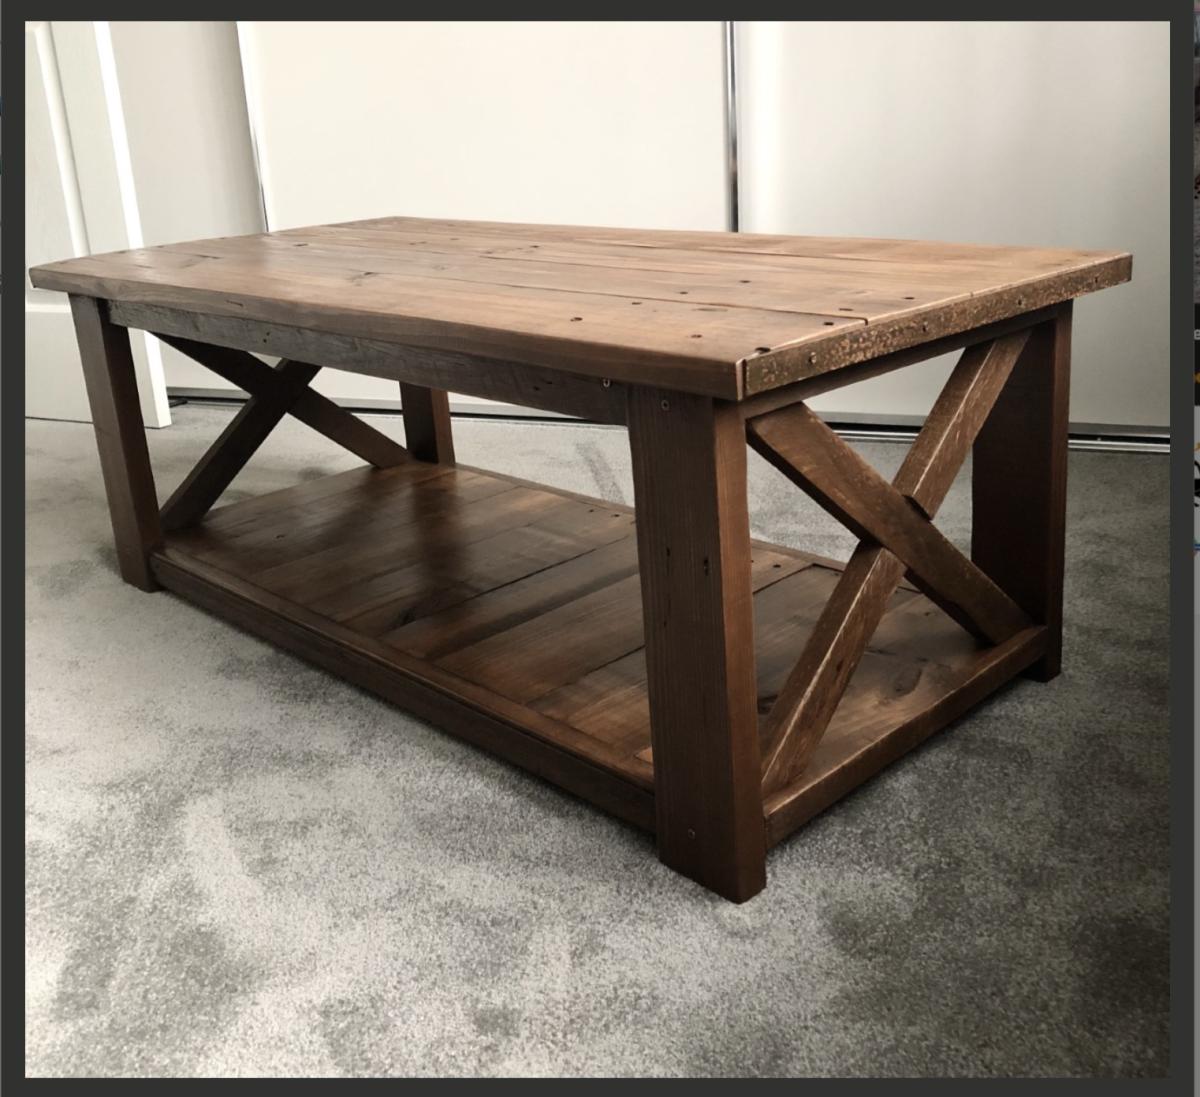
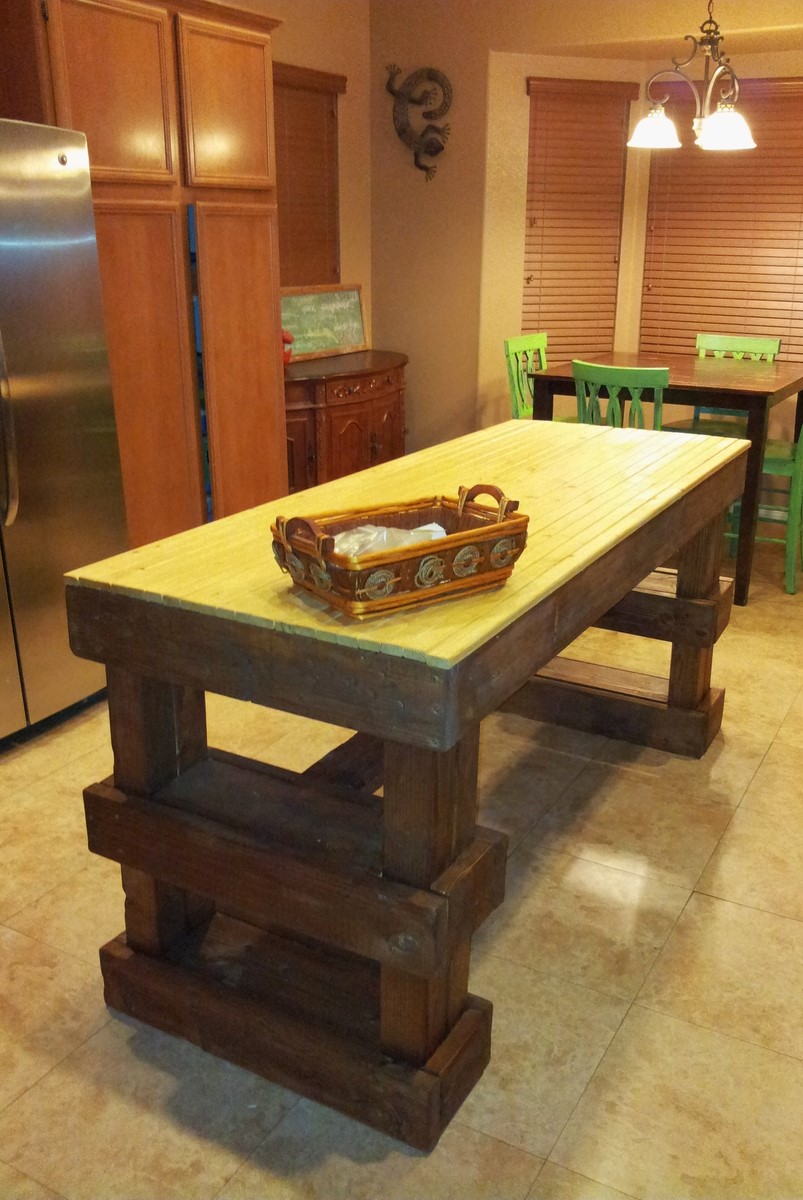
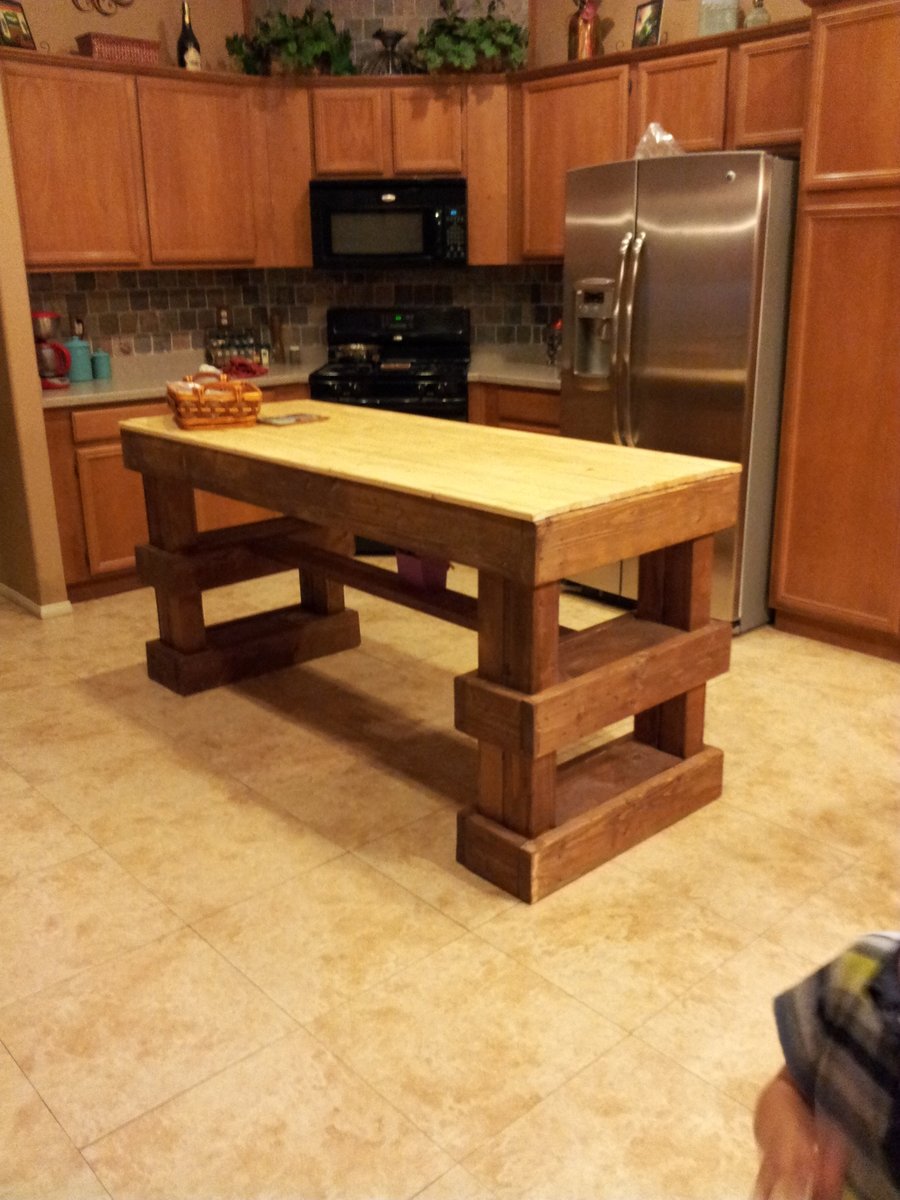
Counter Height Craft Desk

Submitted by Stockweb on Mon, 09/28/2015 - 07:39

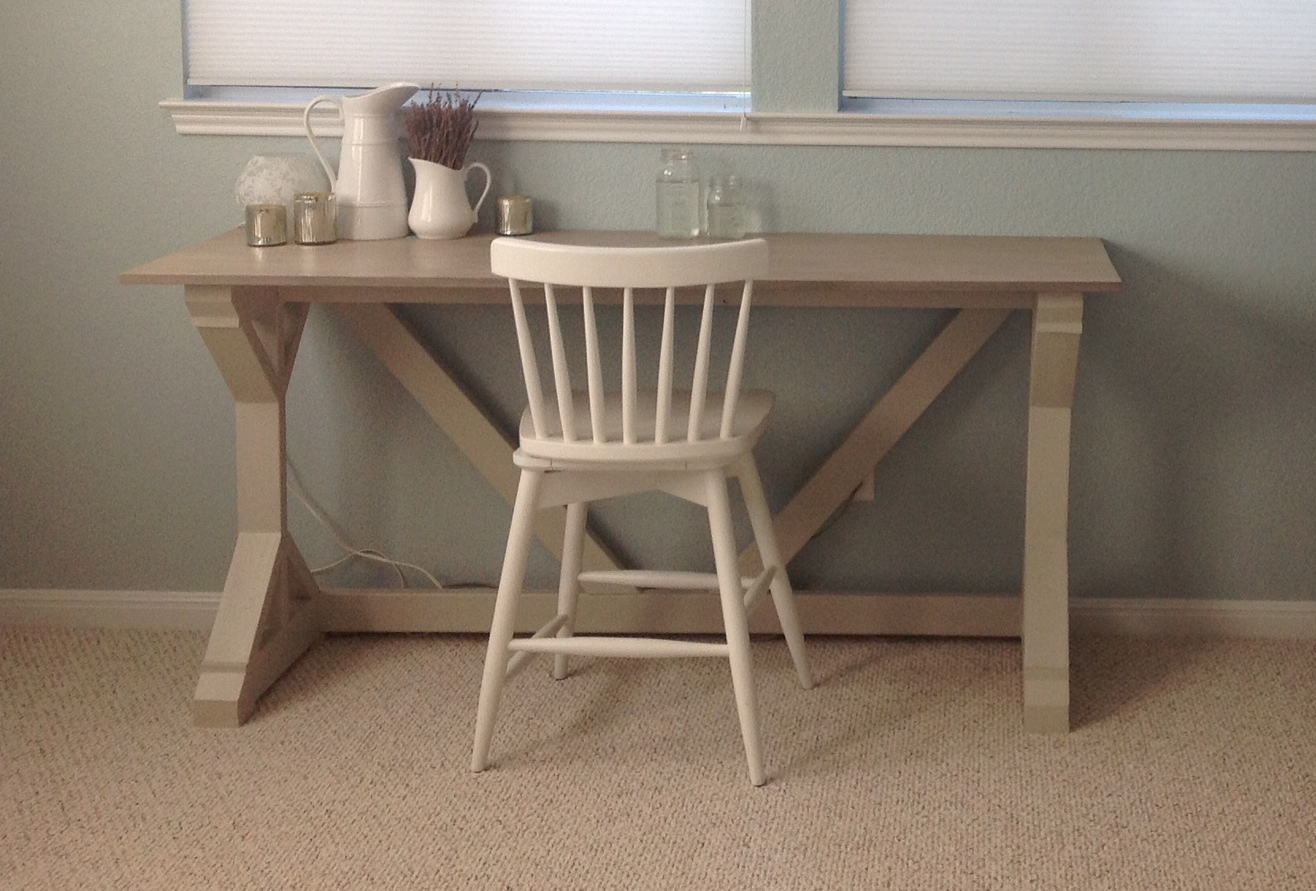
This was pretty easy for my first build!  Don't look too closely though....  I raised thedesk to counter height to adjust for working while standing and add a bar stool.  The hardest part was adjusting the angle of the diagonal braces.  For the desktop I found a 2' X 6' piece of aspen at the blue big box store.  Sanded well, grey "whitewashed" it and sealed with paste wax. 

Built from Plan(s)
Finish Used
Base painted with satin interior in revere pewter. Made my own grey wash for the desktop and sealed with paste wax.
Recommended Skill Level
Starter Project

Comments

DIY outdoor chairs for our firepit

Here is one of the new chairs I'm building for our new fire pit.  They are made out of four pressure treated 2x6s (and one 2x4), and have a comfortable 18" seat depth, 19" seat width, and 110 degree angle for the backrest.  

More information, and a link to our plans are located on our blog, FamousArtisan.com

Estimated Cost
$50
Estimated Time Investment
Day Project (6-9 Hours)
Finish Used
None yet.
Recommended Skill Level
Intermediate

Comments

Patio Living

Submitted by Anonymous (not verified) on Mon, 06/20/2022 - 11:44

We had a new backyard patio installed this spring and after a tree fell last year and crushed most of our mix-matched furniture I knew it was time to build a new set. We opted for the chair and loveseat from the outdoor seating set. We did make one small adjustment which was to tilt the back so that the back of the seat was 8” from the back base - super small adjustment but we find the angle to be more comfortable. It only require recurring the seat slats and we secured the back to the frame through one screw in the back rest of the pieces. We get a ton of compliments on this and while super heavy and durable, we can move it easily on the patio stone to sweep and clean.

Comments

Adirondack side table ~ using recycled pallet wood

Submitted by Sharon L. on Sun, 07/24/2011 - 06:37

This was a very fun and one of the easiest projects I have made from Ana's plans! This makes me want to see if I can make matching chairs as well!

If you have seen my other projects, you know that I try to keep the lumber cost of my projects as close to free as possible. Living on the Eastern Shore of Virginia, pallets are not free, so I did have to pay $2 for each pallet, being VERY choosy about the slats being all the same size and straight. The hardest part of the project was taking the pallets apart! Check the blog link for more details.

I used 1 1/2 pallets for this project, and the following tools:

Jigsaw (to cut the ends off the pallet)

Pry-bar (to loosen the slats from the center of the pallet)

Miter saw

Drill

Table Saw (ripping the 2x4 sections of the pallet, to make the legs and spacers of the table)

Palm sander

Estimated Cost
less that $20
Estimated Time Investment
Day Project (6-9 Hours)
Finish Used
Gripper Grey primer by Glidden (leftover from other projects)

Brilliant Red Acrylic by Benjamin Moore (also leftover)

I use the Gripper Grey primer/sealer on most outdoor projects because it is a nice one-coat sealer and great for underneath darker colors.

The Brilliant Red is an off-the-shelf color.

I would recommend removing and priming/painting the tabletop pieces separately(after assembly)so that you can assure great coverage between the slats, being careful to remember where each piece belongs.
Recommended Skill Level
Beginner

Rustic Table w/ two tone finish

Submitted by Ash_Ahrens on Wed, 08/21/2013 - 19:35

This was totally my first real build. Like most others I modified the plans to fit in my mother-in-law's dining room. I used 4x4s for the legs and built two benches to go with it.

Estimated Time Investment
Week Long Project (20 Hours or More)
Finish Used
Varathane Cabernet stain with polyurethane top coat.
Recommended Skill Level
Beginner

Grandy Console with Barn Doors

Built in about 2 days.  Hardest part was definitely the hardware.  Looks great!

Built from Plan(s)
Estimated Time Investment
Weekend Project (10-20 Hours)
Recommended Skill Level
Intermediate

Comments

Jelmelda3

Sun, 10/18/2015 - 10:49

This came out so awesome. Did you use the same dimensions given in the example? Also what size is your TV? I ask because I want to build this but I'm scared my TV would be too small but this actually looks really great! 

HankTheTank

Thu, 02/11/2016 - 08:32

I used the same dimensions as the plan.  That TV is a 42".  We have since upgraded to a 60" and it now looks more proportionally correct.

HankTheTank

Thu, 02/11/2016 - 08:32

The hardware was a pain in the butt.  The metal bar was easy to cut actually.  I just put one of my old blades back on my mitre saw and it worked great.  Extracting the wheels from their casing was the most challenging.  I ended up putting the entire thing in a vise and drilling through it.  It is totally worth it though.  Everyone who comes over is obsessed with it.  Also, I did not attach the boards on top.  It's much easier to move if you take those boards and the doors off and carry it.  Good luck guys!

HankTheTank

Thu, 02/11/2016 - 08:29

I used the same dimensions as the plan.  That TV is a 42".  We have since upgraded to a 60" and it now looks more proportionally correct.  The hardware was a pain in the butt.  The metal bar was easy to cut actually.  I just put one of my old blades back on my mitre saw and it worked great.  Extracting the wheels from their casing was the most challenging.  I ended up putting the entire thing in a vise and drilling through it.  It is totally worth it though.  Everyone who comes over is obsessed with it.  Also, I did not attach the boards on top.  It's much easier to move if you take those boards and the doors off and carry it.  Good luck everyone!  

Ashlin

Sat, 03/26/2016 - 08:41

Hey, love how this turned out! Was wondering where you purchased the barn door hardware? Been stuck with trying to find some that won't break the bank!

Rgoodwin1206

Tue, 01/03/2017 - 00:02

Can you please help me as to exactly what hardware to get

 My husband and I can only find the hardware for the big barn doors. We are so lost and no one can help us!


Fortnite Battle Bus boys bedroom loft

Submitted by bbcarey on Mon, 10/15/2018 - 08:31

We remodelled my son's room and what better theme than Fortnite for an 8 year old... and what better loft than the Battle Bus!!

Estimated Time Investment
Week Long Project (20 Hours or More)
Finish Used
Latex paint
Recommended Skill Level
Intermediate

Altered Farmhouse Table

Submitted by Anonymous (not verified) on Sat, 06/25/2022 - 23:32

Hi. Just thought I’d share this for those who are on a really tight budget.
My nephew wanted me to make him a coffee table but to be honest, I didn’t have the funds. Wood is expensive here in Australia so I ought it from a place that sells wood recycled from pallets and crates. I had to work with what they had so it’s not as lovely and chunky as Ana’s and The wood was different sizes than the plan.
Where there were boo boo’s and pieces that weren’t quite matching, I covered them up with metal straps which I rusted to look old like the wood.
I hope he likes it. Thankyou so much Ana for the plan;))

Comments

Bedroom Dresser Cubbies / Media Stand

Submitted by Debi G on Wed, 07/27/2011 - 14:08

This is inspired by pieces I've seen here, though I sketched it out on paper myself to make sure it would suit the limited space in our room. I built the simple piece to match our bed (made from Ana and her reader's plans, see my photos below).

Originally, I planned to include cabinet doors, but with the limited space we have, this is better for us.

For nightstands, I stained plain wooden crates I had in the basement. Still working on how to hide the cords.

The baskets under my bed are from Bed Bath Beyond. The baskets in the "dresser" are from Target.

Sorry about the poor photo quality.

Built from Plan(s)
Estimated Cost
Built from leftover materials (Baskets $5.99 each)
Estimated Time Investment
Afternoon Project (3-6 Hours)
Finish Used
Minwax Provincial (one coat) and one Minwax water-based poly coat.
Recommended Skill Level
Beginner

Comments

Debi G

Wed, 07/27/2011 - 14:09

I was trying to show that these pieces are a set, but instead the photos look pretty random.

Debi G

Sat, 12/10/2011 - 07:41

Sorry I haven't logged in in so long--the bed follows plans for the king Stratton, combined with the reclaimed wood headboard. The headboard is attached to the wall. We can slide the foot bench part out to hide presents behind, which is really handy (though heavy) to do.

Chunky Rustic Kitchen Island

I wanted a Super Rustic and Super Chunky Island with out the Super High price tag. So I turned to pintrest for inspiration. I switched up a few things , but the end result was EXACTLY what I was looking for. Score!!!!

Estimated Time Investment
Weekend Project (10-20 Hours)
Finish Used
Early American stain from Minwax.
Recommended Skill Level
Beginner

Memorial flag case

Submitted by TMW on Wed, 10/07/2015 - 13:11

I built this case for my Grandma when my Grampa died. I wanted to be able to display the shells as well. The design is a combination of a few I saw and like different aspects of.

Estimated Cost
$30
Estimated Time Investment
Afternoon Project (3-6 Hours)
Finish Used
shellac
Recommended Skill Level
Beginner

Comments

Garage shelv

Submitted by Anonymous (not verified) on Tue, 10/23/2018 - 18:38

104.5” long, 17 1/2” wide. Heughan varies but on average is 72”. My garage slopes downward, so each front leg is a different length which made the unit level. I used joist hangers instead of pocket holes. 

Estimated Cost
$300
Estimated Time Investment
Week Long Project (20 Hours or More)
Recommended Skill Level
Intermediate

Modern Adirondack chair with a couple of variations!

Submitted by Anonymous (not verified) on Sat, 07/09/2022 - 10:40

Needed a chair to sit and drink a beer in, this was a quick and easy build, and does the job of being sat in whilst drinking beer admirably well. Good work all round.

Comments

My Ikea Lack Inspired Bookshelf

This was my third project, but it is my favorite to date!

Estimated Time Investment
Day Project (6-9 Hours)
Finish Used
2 coats of Benjamin Moore Natura paint in Banana Yellow
2 Coats of poly acrylic
Recommended Skill Level
Beginner

Comments

joyreneeb (not verified)

Tue, 09/20/2011 - 12:16

Can you give a price estimate on your project? Looks great, btw!

In reply to by joyreneeb (not verified)

CapriciousElle

Fri, 09/30/2011 - 21:21

The lumber was about $25 and the paint I ordered online with a few other colors, but it is listed at $21.99. I only ordered a quart. Everything else I already had around the house. I hope that helps!

Mini Farmhouse Bedside Table

Submitted by bcarter_1 on Tue, 10/30/2018 - 04:20

I'm just learning to make things with wood, I made two of these for the bedropom update last year.

Estimated Time Investment
Weekend Project (10-20 Hours)
Recommended Skill Level
Beginner

Comments

Deck Chairs

Submitted by mgb11184 on Thu, 07/21/2022 - 19:54

I made a couple of additions/modifications

I also made a couple of side tables and foot stools for the chairs. A total of four chairs, two tables and two foot stools for the deck set.

Comments

Simple Oudoor Dining Table

Submitted by kmatt55 on Wed, 08/03/2011 - 17:15

I know, I know...Where are the legs? Unfortunately, I have to store this until December while our multi-family mountain house is being constructed. This way I can store it up against a wall and save a lot room in storage for more Ana White projects. FYI - The legs will be white 2x4's about 29.5 inches tall. For the top I used 1x4 cedar slats spaced 1/4 inch apart. As for the painted white frame, I used treated pine. Why spend money on nice cedar if I am just going to paint over it, right? The contrast of the white and natural cedar was appealing to me for some reason. I used Thompson's clear wood protector/water sealer on the slats to prolong the natural cedar. BTW, if you can build the simple outdoor bench you can definitely take on this project. The two are not very different. I'll have to take pictures of the finished table with legs when I haul these up to the Blue Ridge Parkway and upload them again. Thanks again Ana!

Built from Plan(s)
Estimated Cost
$100
Estimated Time Investment
Day Project (6-9 Hours)
Finish Used
Semi gloss white, Thompson clear wood protector/water sealer.
Recommended Skill Level
Intermediate

Comments

DIY Storage Lockers {No Mudroom? No problem!}

I love my new lockers, and I am in love with building! I think the Kreg Pocket Jig is my new best friend!

This is my first project, and I made a couple of changes to Ana's awesome plans. I used bead board for the backing instead of ply wood, and I added divider shelves on the bottom shelf. I also added hooks on both sides of each locker so that my kids can hang lots of stuff.

Since I am a total beginner builder, I made a few mistakes as I built these lockers. If you are a beginner, too, please check out my post on OneCreativeMommy.com so that you don't have to make the same mistakes! I included a chart that shows the order I used to put everything together and added instructions for the extra dividers.

I am loving my organized space (and so are my kids)!

See the project now: http://bit.ly/lockers-kids
Pin it for later: http://bit.ly/14FpeHD

Built from Plan(s)
Estimated Cost
$150
Estimated Time Investment
Weekend Project (10-20 Hours)
Finish Used
This project was painted with 2 coats of Bare Wood Primer and finished with two coats of Valspar Rapids in Semi Gloss.

Hint--one quart of paint is not enough! I bought one quart of primer and one quart of paint. I scraped the cans clean and had to leave a few hidden spots with only one coat of paint. I have nothing left for touch up. Splurge and buy the larger can. You can always use it to paint accent pieces to match!
Recommended Skill Level
Beginner

My Julia Nightstand

I decided it was time to use up some of the leftover materials from previous projects.  This little nightstand is a mix of spruce, mdf and plywood.  I constructed the little "feet"  from a stair baluster that I cut up and drilled a hole into the top to add a piece of dowel before gluing to the table leg. 

Built from Plan(s)
Estimated Time Investment
Day Project (6-9 Hours)
Finish Used
Painted a soft white and finished with a clear coat in a satin finish.
Recommended Skill Level
Beginner

Comments