Community Brag Posts

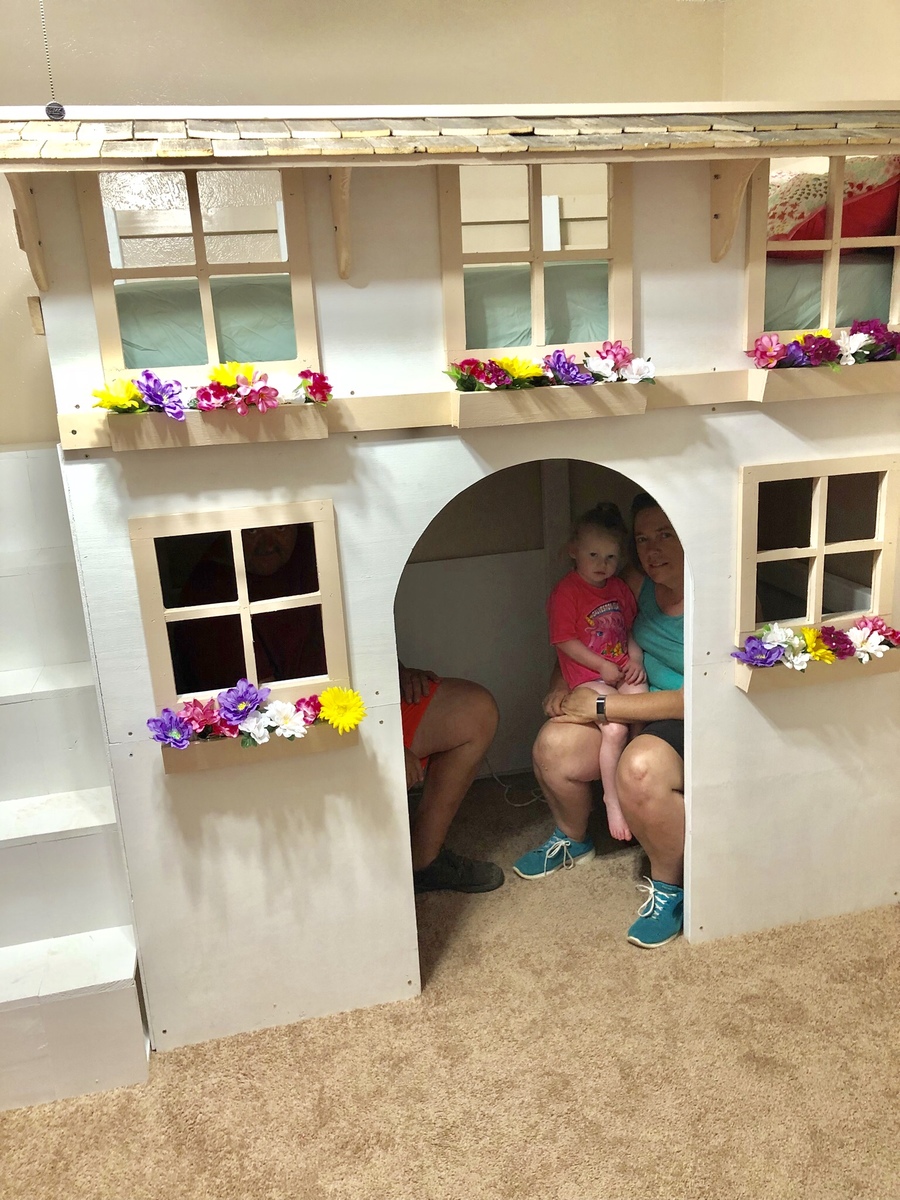
Princess Play Loft Bed

Submitted by fsmumford on Wed, 06/22/2011 - 09:26

I love the play loft bed, but wanted to add a princess twist for my 5 year old's birthday. I found melamine plywood, which helped in the finishing since it was already white. It was a lot of work, but so worth it! I think the kid's favorite feature so far is the slide, which has seen a ton of use :) My favorite feature is all the storage! Thanks so much Ana! If it wasn't for you, there is no way I would have had the courage to tackle a project like this!

Built from Plan(s)
Estimated Cost
$350
Estimated Time Investment
Week Long Project (20 Hours or More)
Finish Used
The plywood was already white, but after filling the holes I went ahead and painted the whole thing white so that it would all be the same color.
Recommended Skill Level
Intermediate

Comments

Ari Z (not verified)

Thu, 06/23/2011 - 11:12

What a fantastic design for your daughter! She must pretend she's Rapunzel every time she gets into bed. The little cubbies to store toys were an excellent idea.

fsmumford

Mon, 07/11/2011 - 19:32

I started out by building the back and outer walls just like the stairs, just slightly narrower to fit my space and the side walls longer, coming out into the room more since the slide sticks out into the room farther. I then also did the top platform of the slide like the top step, having the top stair trim, cleats, and plywood support underneath the front of the platform. Then, I did some calculating to figure out how long to make the slide and what angle to use. I wanted it to come out into the room farther than the rest of the bed so that the slide wasn’t too fast, but I didn’t want it to stick out too far. So I used a piece of melamine board (nice and slick wood) that was 56” long. At the bottom of the slide, I put a piece of plywood that went from the ground up about 8 inches, so that the end of the slide would be up off the ground. So the slide ended up dropping a total of 34”, from the platform down to the plywood 8 inches off the ground. This made a fairly quick slide, but perfectly doable for my little ones. Then, before mounting the slide, I attached 1x2’s to each of the sides of the slide under where the slide was to be to support the slide from beneath. Then, I used a kreg jig to attach the slide to the sides and then screwed the slide into the supports. This made a very stable slide. If you have any more questions, I would be happy to try and help. I hope I’ve made sense ☺

Guest (not verified)

Sat, 07/16/2011 - 15:45

Hello Slide! My daughter screamed when she saw this bed...can you please tell me how to build it all? I would love it if you could share...

fsmumford

Sat, 07/16/2011 - 20:54

I'll try :) I started by building the towers. It was just deciding how wide I wanted them (I did one narrower and one wider to use like a window seat). Each tower is essentially three sides of plywood with one having shelves in it and the other having one shelf to make a seat. I also put a shelf at the bed's height so that my daughter can use it to put things when she is in bed, such as her alarm clock. Then I knew how long I needed the bed to be and how wide each of the towers were, and I made the middle front section to be the remaining width. The rest of the bed is very similar to the Play loft bed with storage steps, but instead of making the steps storage, I just attached them down and then cut out on the inside underneath the stairs to allow access for storage from within the castle. I used a jig saw to cut out the window. The top pink parts of the tower are just decoration, so I bought a thin piece of plywood and used a jigsaw to cut the up and down cuts. And then on another post I talked about making the slide. I hope I helped some :) If you have any more questions, feel free to ask and I will try and help.

Guest (not verified)

Sat, 10/01/2011 - 12:53

*I'm willing to pay you for your help*

I wish to start making this bed, but need some help. I'm novice and need more instructions. If I were to email you measurements, could you elaborate more in depth?

Please respond.

Thank you for your consideration.

fsmumford

Thu, 10/06/2011 - 10:04

I would love to help in any way I can (free of course!) I have wanted to do the plans on the computer, but haven't been able to figure out the program :( So feel free to ask away and I'll try and help. You can post questions here, or email me at [email protected].

jkcd513 (not verified)

Tue, 07/19/2011 - 13:01

I was wondering what the dimension for your room are (especially the wall the bed is against. Just trying to figure out if the slide idea would work in our little room. Also would you mind telling me how wide the the n_n_n (That is my attempt to show the part of the castle that has the little rectangles/squares and then a space and another rectangle/square (the pink and purple parts of the bed) I have been drawing some trying to get spacing right and they never seem to look right, but your spacing looks great. And is the purple part that has the shield painted on it a seperate piece from the rest or is it cut out with the main part of the bed- if it's seperate how wide across and length down is it? We are in the process of attempting a similar bed for our little one and I have been playing around with ideas and so far yours looks like what I have been trying to show my husband in my drawings, only yours looks a lot closer to what I had in my mind than what I have on paper. Any help would be appreciated.

fsmumford

Mon, 07/25/2011 - 09:27

The wall the bed is against is 125.25", so a little over 10'. I still have a few inches of wall left and wish I had made the slide a little wider (the slide I made is 14.5" wide), but thought I would be tighter on space. For the pink on top of the tower, I first used 1 x 3 that I attached to the front of the tower. Then I used 1/8" plywood for the part that I cut the up and down parts. It is 6.5" tall, but part of it sits behind the 1x3, so only 5" is visible. I then cut the plywood 3" down, 3" across, 3" up, 3" over, etc. to make that up and down look at the top of the towers. And the purple part with the shield is separate. It is again just a thin piece of plywood that I nailed to the bed. When I put this up, part of the shield thing was sticking above the bed and I didn't think anything of it until someone broke off part of it. So now I've added a piece of wood behind the shield (the same width of the shield) so that it keeps the shield from being broken. The shield's overall size is 23.25" wide x 27" high. I hope this helps :) If there is anything else I can help with, please just ask. Good luck with your adventure :) !

Guest (not verified)

Sun, 08/21/2011 - 22:19

I am incredibly curious to know if I can get plans for this bed. I have looked extensively throughout various internet pages for a bed/playhouse like this. I would like to make it with a queen mattress on top. I have look through your posts and haven't gathered enough information to proceed. I am willing to pay for the plans.

Is there anything different you would do, if you did this project again?

Thank You,

Guest

Guest (not verified)

Tue, 10/18/2011 - 08:43

Hello:
First of all I have to say THANK YOU. I found the plans for the playhouse (which are fabulous) are there plans available for the princess castle?

fsmumford

Tue, 10/18/2011 - 19:54

Hey all, I added the plans for this under the plans section of this website. Please let me know if you have any questions, and have fun building!

CherylBella (not verified)

Thu, 04/05/2012 - 15:40

I would love your directions or plans to build this my little princess. Thanks for any help. Just love this bed!

Fancy X Farmhouse table with built in copper cooler

Submitted by J Dixon on Sun, 08/23/2015 - 01:54

My version of Fancy X Farmhouse table with a built in copper cooler!!

Built from Plan(s)
Estimated Time Investment
Weekend Project (10-20 Hours)
Finish Used
Dark walnut colored danish oil base with satin poly top coat.
Recommended Skill Level
Intermediate

Comments

Codding58

Thu, 05/12/2016 - 12:27

VERY nice build!   How did you make the copper cooler, if you don't mind me asking.    Great Idea and love that you can hide it away!  Cheers

Harriet Outdoor Dining Chair with Cedar Slats

Submitted by kmatt55 on Sun, 06/26/2011 - 16:49

This chair was pretty easy to make with Ana's plans. I plan on making four more just like it (updated: completed). The only modification I made was adding another slat to the back of the chair. I used a miter saw for all cuts which really helped with the speed of the project. The 2x2's are treated pine and the 1x3 slats are cedar that I got from the "orange box store" for about four bucks a stick. I also primed and painted the 2x2's (legs) before I assembled. I could not imagine trying to paint the legs white and not getting at least some on that beautiful cedar. The contrast really pops in person. Thanks ana-white.com! $20 per chair.

Estimated Cost
$20
Estimated Time Investment
Day Project (6-9 Hours)
Finish Used
Semi-gloss exterior white, outdoor seal.
Recommended Skill Level
Intermediate

Comments

sgilly

Thu, 07/14/2011 - 10:35

Love the chairs! and like the painted body with the natural pine slats.

CreativeBaggage

Wed, 08/03/2011 - 08:03

I love that you added the extra slat on the back. Such a simple change that made a big impact. The contrast is also very clever! They look great :)

kmatt55

Wed, 08/03/2011 - 11:29

Thanks CreativeBaggage! I finished the dining table yesterday, I'll have to post that soon. As a couponer myself, I really like the standing can rack you made on your blog. Brilliant!

Apothecary Media Console

Apothecary Media Console Table. No modifications to plans.

Built from Plan(s)
Estimated Cost
$200-$300
Estimated Time Investment
Weekend Project (10-20 Hours)
Finish Used
Minwax Dark Walnut Stain, Rustoleum red spray paint, and Minwax Finishing Paste Wax. I stained the bottom trim and top board. I then spray painted 2 coats over all visible MDF surfaces. I sanded the spray paint and used the stain to glaze all visible surfaces. For the false fronts, I stained them first. I then rubbed soap (standard hotel soap) all over the fronts, heavily coating the edges. I then spray painted them red. Using a large chisel, I chipped off the paint around the edges, distressing where I thought appropriate. I glazed back over the paint with the Minwax stain. I stained the wooden knobs. I finished by applying the clear paste finishing wax all over and buffing.
Recommended Skill Level
Intermediate

4x4 Truss Beam Table Black

I had trouble with the angled cuts not fitting perfectly. I have a circular saw, not a table saw or miter saw, so I had to measure with a protractor and mark, then try to follow my lines exactly. Tedious, but I like the table. It is mad heavy though!

Built from Plan(s)
Estimated Cost
$30 for stain. I had all the rest of the reclaimed wood. Otherwise, $150.
Estimated Time Investment
Weekend Project (10-20 Hours)
Finish Used
Minwax "ebony"
Recommended Skill Level
Intermediate

Comments

My-First Build-Simple Console Table

Submitted by gabrielle on Fri, 07/01/2011 - 11:44

This was my first build and I'm not going to mention how many times I built the legs (which is why it took so long). I added a full shelf so I could learn to use the kreg jig. While not perfect, it feels perfect to e!

Estimated Cost
$80.00
Estimated Time Investment
Week Long Project (20 Hours or More)
Finish Used
paint, semi gloss and kilz over the pine
Recommended Skill Level
Beginner

Wine Glass Rack

I made this after seeing the Rustic Wood Entertaining Shelves on the Pottery Barn website. I fell in LOVE with the wine glass rack, but $80 was way too much for me. I had some leftover 2x6s in the garage, so I Kreg jigged them together to make the shelf. I found some under cabinet mount wine glass racks at Bed Bath & Beyond for $10, so I bought them and spray painted them with Rustoleum oil rubbed bronze, and attached them to the bottom of my shelf. I found some shelving brackets at Home Depot and used those to hang the shelf on the wall. I could not be more proud of my wine glass rack/shelf!

Estimated Time Investment
An Hour or Two (0-2 Hours)
Finish Used
Rustoleum Stain in Kona & Rustoleum spray paint in Oil Rubbed Bronze
Recommended Skill Level
Starter Project

2 x 4 Outdoor Couches

Submitted by Liz Miller on Fri, 05/04/2018 - 10:14

I actually made these a year ago and finally got around to blogging/brag posting. This was the very first DIY furniture I ever attempted. In fact it's what introduced me to Ana White and got me inspired to start my blog! I saw outdoor couches at Pottery Barn that I loved but were way out of my price range, especially because I wanted two. This project could not have been easier. It took me two afternoons, one for each couch, but now that I know what I'm doing I could put them both together in a few hours. They held up with heavy usage all summer. I'm so excited I took a chance on these plans!

Estimated Cost
$45 per couch
Estimated Time Investment
Afternoon Project (3-6 Hours)
Finish Used
I used a Minewax deck stain to help protect them from the elements.
Recommended Skill Level
Starter Project

Comments

Ana White

Tue, 06/05/2018 - 14:49

What a lovely first project!  Looks like it's holding up well!  I love the dark finish!

Thanks so much for sharing a brag post, can't wait to see more from you!

Ana

Liz Miller

Wed, 12/05/2018 - 06:00

Thank you Ana! I've gone on to build a few more of your projects and I can't believe how much I'm learning following your plans and videos. You have have been a game changer. I didn't think we could afford to update our house in a meaningful way, but through your site I've been able to add pieces that are quality, affordable, and most of all meaningful. I hope more women get invovled in woodworking, you have made it so accessable. Plus, powertools are fun! Thanks for all you do!!

Storage Bench and Crates

I modified the bench to make it longer and for four cubbies (for four kids and their shoes) instead of three.

Estimated Cost
$20-$25
Estimated Time Investment
Afternoon Project (3-6 Hours)
Finish Used
Distressed grey paint, sanded on edges with Jacobean stain used as a glaze. Three coats of poly.
Recommended Skill Level
Beginner

Our Simple Outdoor Dining Table

My husband followed the plans Ana-White provided to make me this. I love it! We're also going to make the chairs in the future. To check out additional photos of this table and other home projects we've tackled please take a look at my blog, Our Up House Love.

Estimated Cost
$200.00 for table and benches
Estimated Time Investment
Afternoon Project (3-6 Hours)
Finish Used
Outdoor Stain
Recommended Skill Level
Beginner

Rustic X Coffee Table (Minus the X)

My sister came to me with a picture of a coffee table.  She wanted to build it!  Together we spent a weekend building the Rustic X Coffee table.  She is a little disappointed with how dark the stained turned out, but I actually really like the color!  She has found a new hobby in woodworking and I really look forward to building new projects with her.  Next up, she wants a new tv stand. :)

Built from Plan(s)
Estimated Cost
$65
Estimated Time Investment
Weekend Project (10-20 Hours)
Finish Used
Minwax Wood Finish (Jacobean), Vermont Natural Coatings PolyWhey (Satin)
Recommended Skill Level
Beginner

Cottage Bunk Bed

Submitted by kottmer on Tue, 06/12/2018 - 09:58

I used the surf bed plan and put a plywood face on the front and added the roofline, windows and flower boxes. The steps double as a bookshelf. 

Built from Plan(s)
Estimated Cost
$400
Estimated Time Investment
Week Long Project (20 Hours or More)
Finish Used
Semi-gloss paint
Recommended Skill Level
Intermediate

Comments

Ana White

Thu, 06/14/2018 - 11:32

This is adorable!  Glad you used the surf bus plans - those plans are so easy - smart to just add your own front too it!  Very much appreciate you sharing a photo.  Great job!

TV Console

Submitted by Anonymous (not verified) on Wed, 04/27/2022 - 10:11

Used knotty pine, and finished with Varathane using stain color “Jacobean”. Modified from a bookcase plan.

Built from Plan(s)

Comments

Giveaway @ www.RustiChic.com

Submitted by Anneke on Thu, 07/07/2011 - 16:33

I have arranged a giveaway for $50 on my blog at www.RustiChic.com. I have learned so much from Ana and other builders on here, I couldn't NOT let you know!

On a side note....any advice on the button??? I've tried all three links and can't get it on there for whatever reason and NEED to!!!

Also, any web/blog/wordpress designers with advice or services? I am interested!

Best of Luck!

~Anneke

Recommended Skill Level
Beginner

Comments

JES

Sat, 07/09/2011 - 18:36

Such a cute thing for taking baby pictures! Love it! You did a wonderful job. :) J

Rustic X end table

Submitted by raflis35 on Sat, 08/10/2013 - 15:05

Took a Saturday to make this project. Loved the plans!

Built from Plan(s)
Estimated Cost
40 dollars
Estimated Time Investment
Weekend Project (10-20 Hours)
Recommended Skill Level
Beginner

Comments

yurra-bazain

Sun, 08/11/2013 - 20:50

I'm amazed by 1 day projects and the builders, like you, who pull them off! =D It must have been an incredible feeling to built it and bring it the same day.

DIY Faux Marble Round Table

Hi friends!

Jen Woodhouse here from The House of Wood. 

Take a good look at this round marble side table. Would you guess that isn’t real marble? It’s contact paper! Yep. It’s true.  We’ve been wanting to put a table here between our sofas for months now, so I’m thrilled to have this project finally crossed off the list. This sleek side table cost about $50 to make!


I built this table in about 3 hours – the super simple yet sleek, modern design is beginner-friendly so if you’re wanting to tackle your first project, this is a great one for you. 

Be sure to tag me @jenwoodhouse if you share photos of your build on social media. I'd love to see it!

You can get all the details for this build on my website jenwoodhouse.com.

Estimated Cost
$50
Estimated Time Investment
Afternoon Project (3-6 Hours)
Recommended Skill Level
Beginner

Comments

Greenhouse

Submitted by Zhang on Fri, 05/06/2022 - 22:55

Greenhouse is nominal 10X20. Internal square footage 192.6 sq-ft so no permit required (< 200 sq-ft). Modifications planned:

1. No metal on vertical walls since sun light is desired at all levels. Planting will be directly in the ground as well as in cedar boxes an on shelves.
2. Let in (mortised) 1x4 diagonal bracing to provide strength since no metal will be used on the verticals.
3. Two windows in the back wall (truss). Not sure yet where to source these - suggestions please? Might build them from scratch.
4. Dutch door on the front wall so that the top half of the door can be opened in combination with the back windows to allow air flow the length of the greenhouse.
5. Metal flashing on the exterior corners just for a nice finished look.
6. Has a 6 x 6 preassure treated (rated for ground contact) perimeter foundation. All other wood ,except the diagonal bracing is pressure treated rated for above ground. Finding 1 inch pressure treated wood seems impossible.
7. Ridge poles will be 2x6 so that sloping joist hangers can be used to attach the rafter legs to the ridge poles.
8. Will have a middle truss so that two 10 ft ridge poles can be used. I believe finding a nice straight 20' pressure treated 2 x 6 would be difficult or impossible.

Will add more photos as the build progresses.

Comments