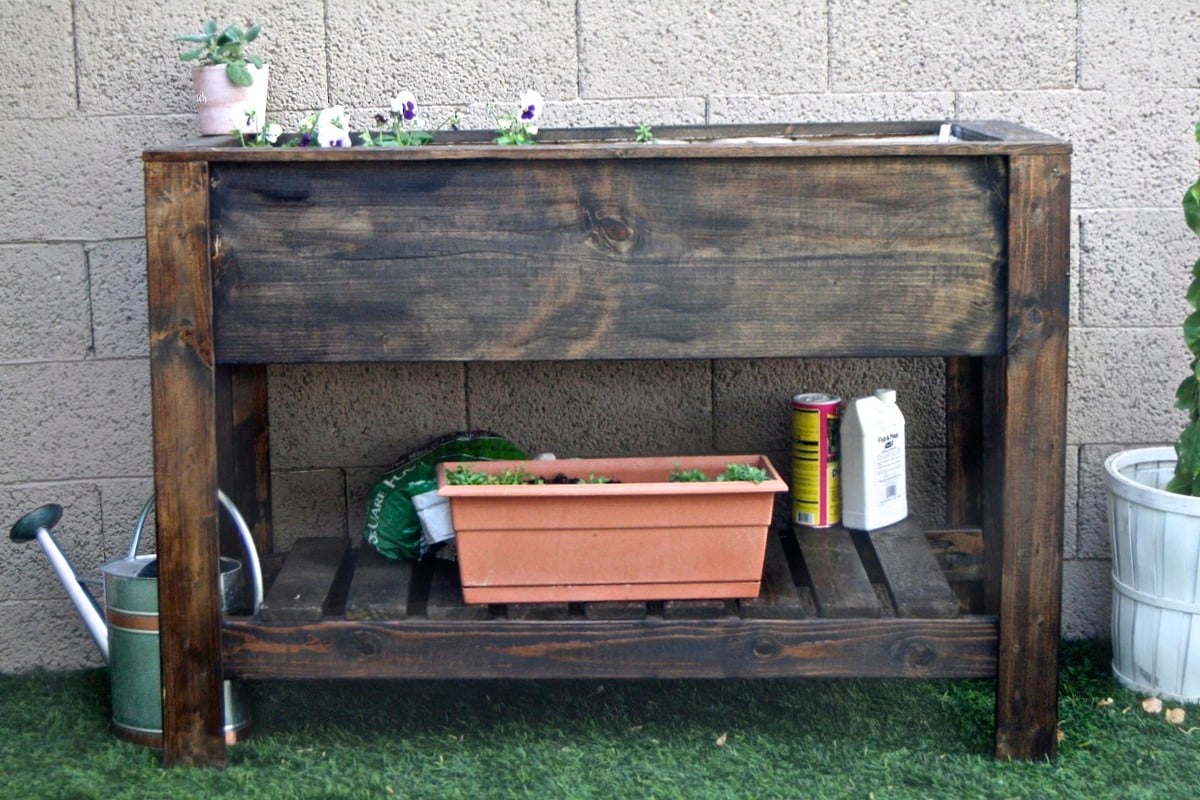
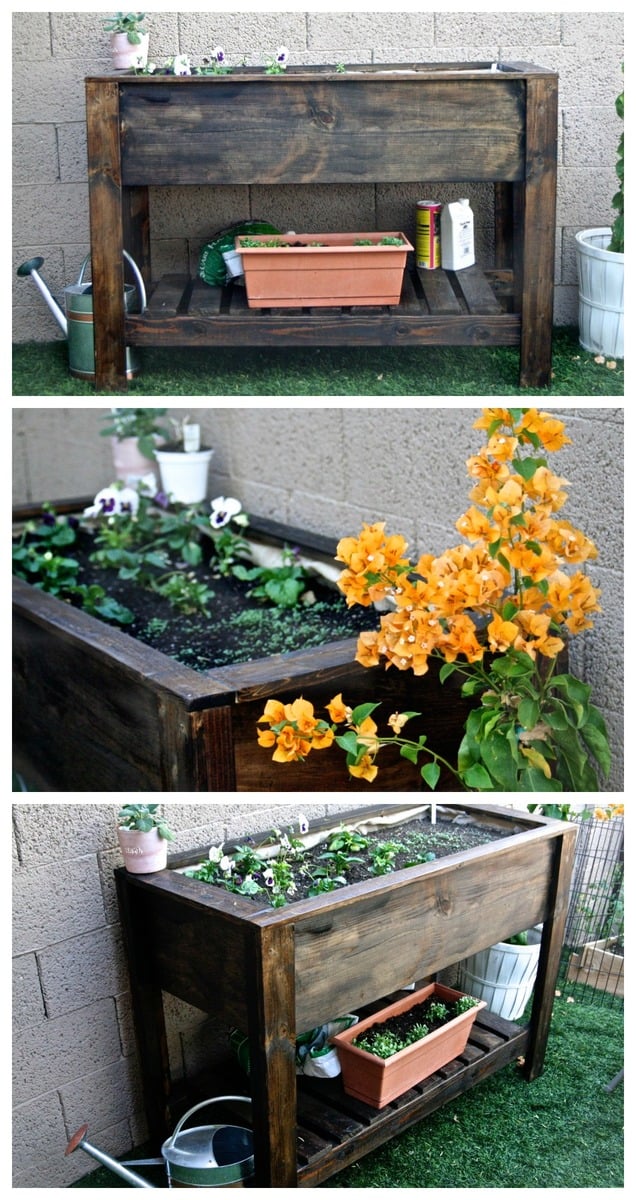
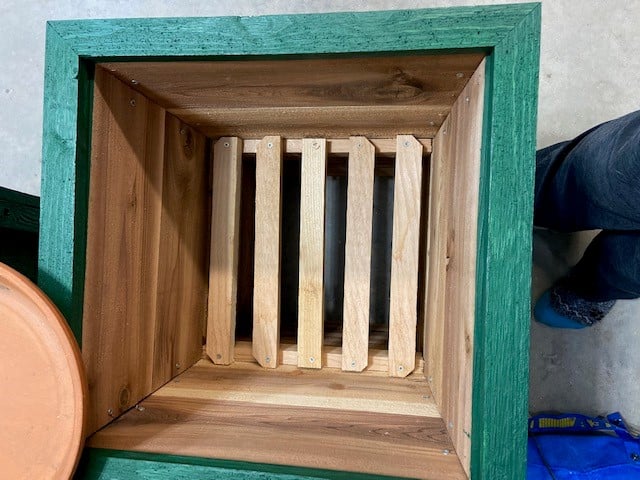
Community Brag Posts

Tall Planters

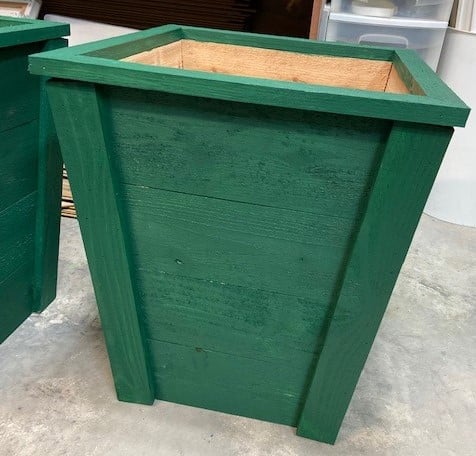
These were made using the Tall Planters plan...4 cedar pickets for each one. I also used cedar rough cut trim for the 1x2's and 1x3's. They are painted to match cedar shutters I made for my parents mountain house. I used Cabot's Solid Color Acrylic Deck Stain in Evergreen to protect the planters exterior. The only alteration to the plans was adding the top trim. I used 1x2's cut at 16" long each on a 45 degree angle to form the box. I glued and nailed together the trim before nailing into the tops.

Built from Plan(s)
Estimated Cost
$35.00 ea
Estimated Time Investment
Afternoon Project (3-6 Hours)
Finish Used
Cabot Solid Color Acrylic Deck Stain (tinted to Evergreen)
Recommended Skill Level
Beginner

Raised Planter Box

Submitted by ang312 on Fri, 01/25/2013 - 12:24

Living in Tempe, Arizona, I am always in need of creative planter boxes so that I can garden with more ease. I loved this tutorial and recommend it to anyone, even beginners! A full tutorial can be seen here: http://www.barerootgirl.com/homemade/2012/11/5/homemade-diy-raised-gard…


Estimated Cost
$30
Estimated Time Investment
Weekend Project (10-20 Hours)
Finish Used
Minwax Stain in Provincial
Recommended Skill Level
Beginner
Seasonal And Holiday

Balin Console Table

My husband built this in his spare time and I stained it, makes a great addition to my foyer!


Built from Plan(s)
Estimated Cost
About $150
Estimated Time Investment
Week Long Project (20 Hours or More)
Finish Used
General Finishes Java, applied wood conditioner 15 minutes before staining. One coat of stain on table top and 3 on bottom. This gel stain really does a better job on pine than other stains.
Recommended Skill Level
Beginner

Comments

Step stool

Submitted by Jay Pepper on Sat, 02/25/2017 - 21:56

Step stools I built for my kids to use.  The second one I actually used glow in the dark paint for the lettering and the stars. Took me longer to paint since everything was hand drawn / written.  Total time for the project would have been a few hours if it wasn't for the paint and poly added.  

Estimated Time Investment
Weekend Project (10-20 Hours)
Finish Used
Paint and polyacrylic.
Recommended Skill Level
Beginner

Console Table

Submitted by mrich_d60 on Sat, 12/12/2020 - 06:42

This was my first indoor woodworking project, where it mattered if the corners were 90 degrees and the colour matched and the wood was not warped.
Even when the lumber yard gave me the wrong width of board, did all the cuts and I didn't notice until I was home, laying out my pieces and measuring everything, I will still able to complete it.
I went with the 10" (9 3/4") wide top instead of the 12" (11 3/4") rather than go back to the lumber yard and have it recut. I was anxious to make my project and it was a hassle to drive that distance. it didn't have the 1 1/2" overhang that the larger width would have had but it fit in my tiny space better.
The next time I visited that lumber yard for more wood, I got my money back and I learned a valuable lesson - just because the lumber yard staff are picking up the wood for you, you need to read and check. I didn't go closer to see it because of Covid-19 restrictions but next time I will ask to measure it and check it before I bring it home. I've learned to carry my tape measure with me, just in case!

Estimated Cost
$50
Estimated Time Investment
Afternoon Project (3-6 Hours)
Finish Used
Varathane ultimate one coat stain and Varathane triple thick clear finish. Used a cloth to apply and brush in the corners where the cloth could not reach easily. Applied 2 coats with light sanding in between. I used a dark stain because other furniture in the room is stained a darker colour. Due to the pine's absorption, it is a little lighter, as I wanted.
Recommended Skill Level
Beginner

Bench Seat for our kids' toyroom

Submitted by Lewfam on Sat, 01/26/2013 - 21:26

We used Ana's plans from her dining room banquette bench and made a bench for our boys' toyroom. We didn't put a back on because the bench sits in the middle of the room. We love the way it turned out! Thanks, Ana!

Estimated Cost
Bench seat
Estimated Time Investment
Weekend Project (10-20 Hours)
Recommended Skill Level
Intermediate

Comments

Lewfam

Sat, 01/26/2013 - 21:27

Woodworking part was for beginners but the sewing part was a bit challenging. I had never done box cushion corners before but I got the hang of it after the first corner.

Decorative Stocking Holder

I loved the look of the DIY Stocking Holder, and decided to use it as inspiration to design my own. I basically built a box using scrap 1x6.

The front and back boards were cut to a length of 22" (that was the length my scrap would allow), while the side pieces were cut to a height of 6 1/4" to allow for a 3/4" legs on ends. The bottom piece for the box was cut to a length of 20 1/2". I then sanded all pieces 150 and 220 grit sand paper.

Using 1 1/4" inch finishing nails and wood glue, I attached the 6 1/4" side pieces to the 20 1/2" bottom piece (allowing clearance on the bottom for the 3/4" legs), and then attached the 22" front and back boards. I then cut trim to fit the front of the box. Finally, to keep a rustic look, I applied one coat of a dark burgundy paint. I really wanted the grain of the pine to shine through. After allowing the paint to dry, I attached the hooks. 

It turned out to be a quick, simple, and fun build. I can't wait to hang our stockings and fill the box with pine branches and other decorative christmas items.  


Estimated Cost
Under $20
Estimated Time Investment
An Hour or Two (0-2 Hours)
Finish Used
One coat of a dark red/burgundy paint.
Recommended Skill Level
Beginner

Pallet wall shelf

Submitted by amf699 on Tue, 02/28/2017 - 11:31

A pallet wall shelf unit that I made for my bathroom for my wife. There are four shelves, with the top and bottom around 8.5" deep, and the middle two around 5" deep. I planed the edges of the boards for joining, but just lightly sanded the faces to preserve the rustic look of the boards (so they are smooth to the touch, but still have texture). The back is edge glued and pocket screws, and the shelves are glued and pocket screwed into the back, and screwed in from the backside for extra strength. I finished with Minwax Water Based Wood Stain in Ebony and Satin Polycrilic.

Estimated Cost
Used materials that I had on hand, but would cost around $30-40 if you had to buy the screws, stain, and poly.
Estimated Time Investment
Day Project (6-9 Hours)
Finish Used
One coat of Minwax Water Based Wood Stain in Ebony, brushed on and wiped off. One coat of Polycrilic in Satin, with an additional coat applied to the shelf tops.
Recommended Skill Level
Beginner

Reclaimed wood sliding door buffet

Submitted by loritabor on Wed, 12/16/2020 - 10:29

I made this out of primarily reclaimed lumber. This project had to be modified in size to fit in a certain space.

Estimated Cost
Less than $100
Estimated Time Investment
Week Long Project (20 Hours or More)
Finish Used
Watco oil in Dark walnut
Recommended Skill Level
Intermediate

Comments

Tidy Up Coffee Table & Side Tables

This was my second project. I am very happy with the way they turned out. The plans were very easy to follow. I did add L brackets to the legs as others have suggested. I added handles to my trundle because I could not get the cut-out handles consistent.

Estimated Cost
$90 on the wood for all three pieces; caster wheels, handles, and stain where extra
Estimated Time Investment
Weekend Project (10-20 Hours)
Finish Used
I used Minwax Pre-Stain Wood Conditinoer, Minwax English Chestnut Stain (one coat, about 5 minutes) and Minwax Fast-Drying Polyurethane semi-gloss (4 coats on top, 3 coats everywhere else).
Recommended Skill Level
Beginner

Comments

Weathered end table

Used the great plans from this website. Very easy to follow. Painted white, sanded, stained to give the weathered look. Very happy with it! Made two of them.

Recommended Skill Level
Beginner

Comments

Ecaruso

Fri, 11/28/2014 - 09:46

Hey there friend,

I must ask for detailed instructions on how you painted/stained your table.  It is gorgeous!

Thanks.

Ed

First thing I ever built

I took the plunge last year and started woodworking. This was my first build. I definately have learned alot since then. But I am pretty proud of this table.

Estimated Cost

50$
Estimated Time Investment
Day Project (6-9 Hours)
Finish Used
This was stained with jacobean varathane stain and sealed with clear varathane.

Console Made From Ana's Book!!

Submitted by CareyM on Thu, 01/31/2013 - 15:11

I am SO excited to show off my first build, thanks to Ana White and her amazing book!! This console was on the cover and I fell in LOVE LOVE! After I finished it I tried to find out the paint color with no luck....can't stop a woman on a mission...I googled looking for an iPhone App to match colors. BINGO! Benjamin Moore has one. I took a pic of the table in the book, and...you tell me...it sure looks like a match!

Thank you Ana so much for your generous help showing girls like me...YES WE CAN!

Estimated Time Investment
Weekend Project (10-20 Hours)
Finish Used
Top: Minwax English Chestnut
Paint: Benjamin Moore #608 Erin Green
Recommended Skill Level
Beginner

Comments

JoanneS

Thu, 01/31/2013 - 15:34

Beautiful build, you did a wonderful job, congrats on your first project! Looks just like the book cover! Happy building! :)
Joanne

Rustic ladder ceiling lamp

Submitted by mobe00 on Sun, 11/30/2014 - 14:26

A rustic ladder lamp to have over our dining table. Big bulbs and wire mesh lamp shades.

Estimated Time Investment
Afternoon Project (3-6 Hours)
Recommended Skill Level
Beginner

Rustic X Coffee Table

Submitted by Anonymous (not verified) on Mon, 03/06/2017 - 17:02

I skipped the X part, I had a few issues with alignment. I also used the oxidizing mix reccomended on the page. Mine turned out very grey, I'm not complaining. Could be because I only let the mixture sit for a few hours? I really dont know. It was a fun project though and I plan to try more for sure. 

Note: The 1x12s didnt oxidize much at all. Neither did the wood filler I used (must make much better cuts next time).

Built from Plan(s)
Estimated Cost
$90 (+$50 or so for needed tools/supplies)
Estimated Time Investment
Weekend Project (10-20 Hours)
Finish Used
Oxidized and Minwax Polycrylic clear satin
Recommended Skill Level
Beginner

Modern Park Bench - Son & Daughter In-law Christmas Gift

Submitted by mballway on Fri, 12/25/2020 - 14:13

A first for me in many years, over 40+. Not really since basic wood shop projects in Middle School. Anyway, my son (and daughter in-law, but she doesn't know) had asked for a backyard patio bench for Christmas this year (2020) so what could go wrong. Anyway, the plans are straight forward in this design. He saw the picture of a stained version on YouTube and said that would be perfect. The project took me three late afternoons/evenings as my day job took priority. After making all the cuts and beginning assembly I could really see this coming together nicely once the four legs were attached. Between wood fill and sanding I asked what finish they preferred and was told he would finish that part. So I sanded the exterior on it and glad for having him finish the coatings as I was just finished it that point on Christmas Eve Day. The red bow is also first for me.

Built from Plan(s)
Estimated Cost
< $100.00
Estimated Time Investment
Afternoon Project (3-6 Hours)
Recommended Skill Level
Intermediate

Farmhouse Table

The table is one that I have been waiting for my husband to retire from the Marines to make me. We moved so often while in the military that I knew there was no need to buy expensive furniture just to get damaged. When I found the plans for this I was thrilled.

The edges of the table have been sanded to resemble the worn weathered look.

Please forgive the pictures. I will retake soon.

Estimated Cost
$150.00-200.00
Estimated Time Investment
Weekend Project (10-20 Hours)
Finish Used
Stain is the Special Walnut then coated with three coats of poly.
Recommended Skill Level
Beginner

Comments

Lighted Chalkboard

For my birthday I asked for power tools. My boyfriend followed your video of beginners tools and got me a lot of them.   

For my first project I decided to do the Lighted Chalkboard Sign.  I accidentally nailed my working table and I was drilling the holes with the wrong direction on the impact drill but I managed. Rookie mistakes :)

Everyone loved it and I´m super exited to build new things.

Thanks for the inspiration and easy to follow instructions!

Estimated Time Investment
Afternoon Project (3-6 Hours)
Recommended Skill Level
Beginner

Comments

Rustic console

Submitted by wacman on Wed, 03/08/2017 - 09:27

Since everyone else is making them, I had to jump on the bandwagon.  Typical console, but I left off the metal trim (for now at least) and used a wire brush on the top boards and the face of the legs to eat away at the wood and raise the grain.  It gives it tremendous texture and really makes it look more like old reclaimed lumber.

Estimated Cost
$40
Estimated Time Investment
Afternoon Project (3-6 Hours)
Finish Used
Minwax Special Walnut with a layer of poly on top
Recommended Skill Level
Beginner

Clara Table and Chairs

Submitted by sraper2 on Mon, 02/04/2013 - 06:38

I built this for my daughters for Christmas. I also built another for my friends daughter. Ours is made putting 3 pieces of wood together with pocket hole screws and our friends is just one solid piece. I definitely recommend doing it with just the solid piece. It makes it easier for coloring! It took me about a total of 5 hours to make the 2 tables and 4 chairs not including paint.

Built from Plan(s)
Estimated Time Investment
Afternoon Project (3-6 Hours)
Recommended Skill Level
Beginner