Community Brag Posts

Board and Batten Fireplace

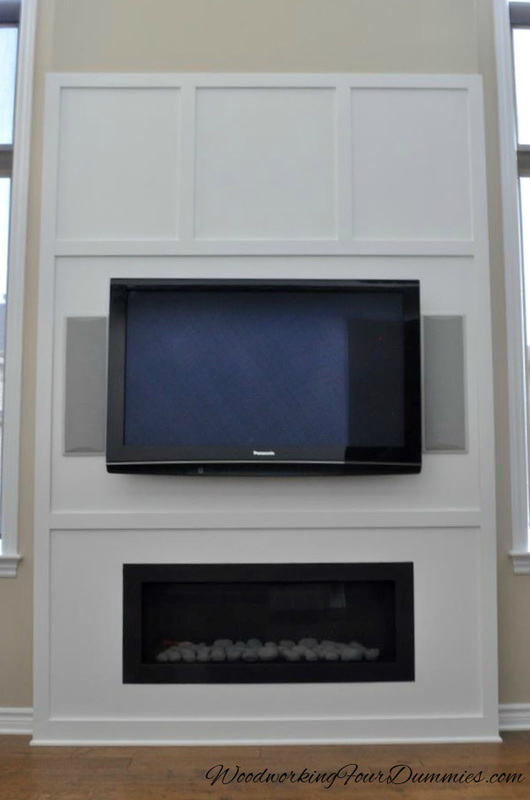
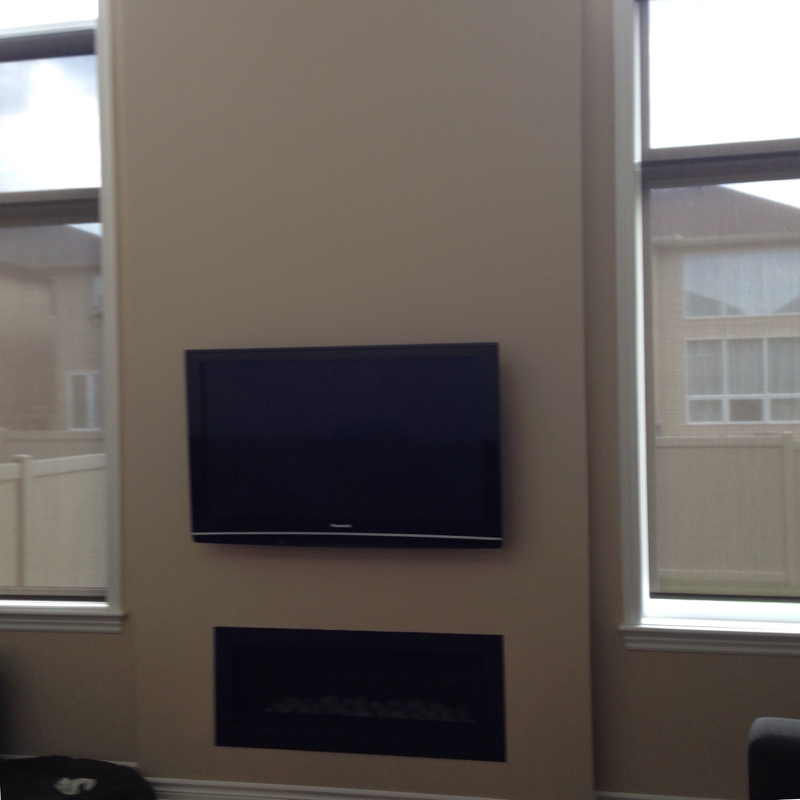
Our fireplace wall was quite plain to say the least. We thought about stone, tile but then ended up doing a simple and inexpensive board and batten wall.  This is a simple DIY project, we kinda made up the pattern as we went.


More details on my blog - http://www.woodworkingfourdummies.com/blog/board-and-batten-fireplace


Cheers,

Ian

Estimated Cost
$100 - I ran out of white paint, the rest was for mdf boards
Estimated Time Investment
Weekend Project (10-20 Hours)
Finish Used
satin white paint
Recommended Skill Level
Starter Project

Potting bench

Submitted by Anonymous (not verified) on Sat, 05/14/2022 - 18:53

Thanks to Ana White for the inspiration, plans, and instructions to make our own Potters Bench. We had a little help from grandchildren for the final steps. We used cedar and made it 60” long rather than 48” just for a little more useable space. After purchasing the wood, we got busy and completed the whole project in a Saturday afternoon, with just the finish coat left to apply.

This was a very satisfying project to work on and complete. We will always look at it with pride and be able to say “we built that”!

Pat & Lawrence
Calgary, Alberta, Canada

Built from Plan(s)

Comments

Our first project, EVER!

Submitted by RyansMama on Wed, 07/13/2011 - 18:30

I had never built anything before. I also hadn't had a headboard in years, so I figured two birds with one stone. The biggest lesson we learned was how important it is to find the best wood. One of our pieces was not straight and we ended up having to make another trip out to the store. Otherwise, it was a pretty easy build!

Estimated Time Investment
Weekend Project (10-20 Hours)
Recommended Skill Level
Beginner

Media Console

Submitted by kaileelev on Sun, 09/13/2015 - 19:15

I based this off of the farmhouse media console plans, but made a lot of changes with dimensions, doors, etc. Originally we wanted the doors to slide sideways instead of opening outwards... but we couldn't figure out how to do that and still make it look nice! Very easy to build. I am happy with the end product!

Estimated Cost
$60
Estimated Time Investment
Weekend Project (10-20 Hours)
Finish Used
Minwax Provincial stain. Polyurethane coat over the stain.

An off white paint I found in the basement. Polyacrylic over the shelves for protection.
Recommended Skill Level
Beginner

Ryhan Console Table

Submitted by tssroo on Sat, 08/11/2018 - 18:45

We really wanted a narrow console tabtabltabtable for this space. This was perfect! Modified the original plans to add to the width and height so it is counter height. We added a butcher block top to match our existing kitchen cabinets. I used aluminum decor inserts from Home Depot for the doors. Thank you Ana for your amazing plans!

Built from Plan(s)
Estimated Time Investment
Weekend Project (10-20 Hours)
Finish Used
General Finishes Flat Finish, Sherwin William's Intellectual gray
Recommended Skill Level
Beginner

2x4 Sectional & Handmade cushions - LOVE!

Submitted by Anonymous (not verified) on Thu, 05/26/2022 - 21:46

Building this project and sewing the cushions was like a love letter to my family. I made them a year ago while on a high dose of Prednisone for my asthma and chronic pain (so helpful!). I finally felt capable of doing something that would bring our family together outside. A year later it continues to serve us well.

The instructions for the sectional were very well done. Super friendly and made me want to keep going! I used black analin dye to stain the wood. Swoon!

For making the cushions:
- I relied heavily on Sailrite's resourceful web site & tutorials for their thorough and detailed instructions on making cushions, cutting foam and sewing piping.
- Home Depot has the best pricing on foam.
- Used the brand 'Cushion Qwik' Silk Film (Amazon) to wrap the foam so they can withstand PNW rain.

Comments

Rustic X Coffee Table with Bread Boards

In need of a new coffee table and having a budget lower than what would allow for similar looking store bought tables, I decided to build a variation of the Rustic X coffee table. I used the modified plans by Pete Sveen which included the bread boards on the table top. We used a solution of white vinegar and steel wool to age the wood and used a clear furniture wax to finish it.

Estimated Time Investment
Weekend Project (10-20 Hours)
Finish Used
Vinegar/Steel Wool for Age. Clear furniture wax for finish.
Recommended Skill Level
Beginner

Comments

Slim Trus Console Table by Drew Cameron

Submitted by deaconcam on Thu, 09/13/2018 - 09:30

This project was a great learning experience and turned out fantastic. The mitered/beveled cuts were a bit tricky for me, It took me a while to understand how to use my miter saw to make the cuts correctly. Other than that, the building plans were clear and easy to follow. Cara, an author at Inspired Workshop, posted the plans at the following link: https://theinspiredworkshop.com/diy-slim-truss-console-table/ 


-Drew Cameron

Built from Plan(s)
Estimated Cost
$100
Estimated Time Investment
Weekend Project (10-20 Hours)
Finish Used
Minwax PolyShades Espresso Oil-based Interior Stain
Recommended Skill Level
Intermediate

Comments

Organizing My Little Boys!

Submitted by MamaPepper on Sun, 07/17/2011 - 15:05

I really needed an entry way system that was easy to corral all of my 3 boys shoes/coats/crap, etc. . . and I LOVED this plan! I messed up on the frame, so just left it off, and decided that I didn't need the back either. I painted little chalkboards on the side of each boys cubby.

I'm fairly certain that this isn't made perfectly, but it's perfect for us! This was my 2nd project and I'm really super psyched about it!

Built from Plan(s)
Estimated Cost
$60ish or so?
Estimated Time Investment
Weekend Project (10-20 Hours)
Recommended Skill Level
Beginner

King Size Farmhouse Bed

Submitted by krochelle on Tue, 08/20/2013 - 08:12

This bed was made as a Christmas present for my parents. At the time, there were no plans for a king-sized bed so I modified the queen plans to fit their mattress. I added a 5th leg to support the center of the bed and also added some plywood sheets underneath to better support the mattress.

Estimated Cost
$150
Estimated Time Investment
Weekend Project (10-20 Hours)
Finish Used
"A Day at the Jeweller" by Valspar with a red mahogany stain over (used almost as a glaze)
Recommended Skill Level
Intermediate

Counter Height Craft Desk

Submitted by Stockweb on Mon, 09/28/2015 - 07:39

This was pretty easy for my first build!  Don't look too closely though....  I raised thedesk to counter height to adjust for working while standing and add a bar stool.  The hardest part was adjusting the angle of the diagonal braces.  For the desktop I found a 2' X 6' piece of aspen at the blue big box store.  Sanded well, grey "whitewashed" it and sealed with paste wax. 

Built from Plan(s)
Finish Used
Base painted with satin interior in revere pewter. Made my own grey wash for the desktop and sealed with paste wax.
Recommended Skill Level
Starter Project

Comments

DIY outdoor chairs for our firepit

Here is one of the new chairs I'm building for our new fire pit.  They are made out of four pressure treated 2x6s (and one 2x4), and have a comfortable 18" seat depth, 19" seat width, and 110 degree angle for the backrest.  

More information, and a link to our plans are located on our blog, FamousArtisan.com

Estimated Cost
$50
Estimated Time Investment
Day Project (6-9 Hours)
Finish Used
None yet.
Recommended Skill Level
Intermediate

Comments

Patio Living

Submitted by Anonymous (not verified) on Mon, 06/20/2022 - 11:44

We had a new backyard patio installed this spring and after a tree fell last year and crushed most of our mix-matched furniture I knew it was time to build a new set. We opted for the chair and loveseat from the outdoor seating set. We did make one small adjustment which was to tilt the back so that the back of the seat was 8” from the back base - super small adjustment but we find the angle to be more comfortable. It only require recurring the seat slats and we secured the back to the frame through one screw in the back rest of the pieces. We get a ton of compliments on this and while super heavy and durable, we can move it easily on the patio stone to sweep and clean.

Comments

Adirondack side table ~ using recycled pallet wood

Submitted by Sharon L. on Sun, 07/24/2011 - 06:37

This was a very fun and one of the easiest projects I have made from Ana's plans! This makes me want to see if I can make matching chairs as well!

If you have seen my other projects, you know that I try to keep the lumber cost of my projects as close to free as possible. Living on the Eastern Shore of Virginia, pallets are not free, so I did have to pay $2 for each pallet, being VERY choosy about the slats being all the same size and straight. The hardest part of the project was taking the pallets apart! Check the blog link for more details.

I used 1 1/2 pallets for this project, and the following tools:

Jigsaw (to cut the ends off the pallet)

Pry-bar (to loosen the slats from the center of the pallet)

Miter saw

Drill

Table Saw (ripping the 2x4 sections of the pallet, to make the legs and spacers of the table)

Palm sander

Estimated Cost
less that $20
Estimated Time Investment
Day Project (6-9 Hours)
Finish Used
Gripper Grey primer by Glidden (leftover from other projects)

Brilliant Red Acrylic by Benjamin Moore (also leftover)

I use the Gripper Grey primer/sealer on most outdoor projects because it is a nice one-coat sealer and great for underneath darker colors.

The Brilliant Red is an off-the-shelf color.

I would recommend removing and priming/painting the tabletop pieces separately(after assembly)so that you can assure great coverage between the slats, being careful to remember where each piece belongs.
Recommended Skill Level
Beginner

Rustic Table w/ two tone finish

Submitted by Ash_Ahrens on Wed, 08/21/2013 - 19:35

This was totally my first real build. Like most others I modified the plans to fit in my mother-in-law's dining room. I used 4x4s for the legs and built two benches to go with it.

Estimated Time Investment
Week Long Project (20 Hours or More)
Finish Used
Varathane Cabernet stain with polyurethane top coat.
Recommended Skill Level
Beginner

Grandy Console with Barn Doors

Built in about 2 days.  Hardest part was definitely the hardware.  Looks great!

Built from Plan(s)
Estimated Time Investment
Weekend Project (10-20 Hours)
Recommended Skill Level
Intermediate

Comments

Jelmelda3

Sun, 10/18/2015 - 10:49

This came out so awesome. Did you use the same dimensions given in the example? Also what size is your TV? I ask because I want to build this but I'm scared my TV would be too small but this actually looks really great! 

HankTheTank

Thu, 02/11/2016 - 08:32

I used the same dimensions as the plan.  That TV is a 42".  We have since upgraded to a 60" and it now looks more proportionally correct.

HankTheTank

Thu, 02/11/2016 - 08:32

The hardware was a pain in the butt.  The metal bar was easy to cut actually.  I just put one of my old blades back on my mitre saw and it worked great.  Extracting the wheels from their casing was the most challenging.  I ended up putting the entire thing in a vise and drilling through it.  It is totally worth it though.  Everyone who comes over is obsessed with it.  Also, I did not attach the boards on top.  It's much easier to move if you take those boards and the doors off and carry it.  Good luck guys!

HankTheTank

Thu, 02/11/2016 - 08:29

I used the same dimensions as the plan.  That TV is a 42".  We have since upgraded to a 60" and it now looks more proportionally correct.  The hardware was a pain in the butt.  The metal bar was easy to cut actually.  I just put one of my old blades back on my mitre saw and it worked great.  Extracting the wheels from their casing was the most challenging.  I ended up putting the entire thing in a vise and drilling through it.  It is totally worth it though.  Everyone who comes over is obsessed with it.  Also, I did not attach the boards on top.  It's much easier to move if you take those boards and the doors off and carry it.  Good luck everyone!  

Ashlin

Sat, 03/26/2016 - 08:41

Hey, love how this turned out! Was wondering where you purchased the barn door hardware? Been stuck with trying to find some that won't break the bank!

Rgoodwin1206

Tue, 01/03/2017 - 00:02

Can you please help me as to exactly what hardware to get

 My husband and I can only find the hardware for the big barn doors. We are so lost and no one can help us!


Fortnite Battle Bus boys bedroom loft

Submitted by bbcarey on Mon, 10/15/2018 - 08:31

We remodelled my son's room and what better theme than Fortnite for an 8 year old... and what better loft than the Battle Bus!!

Estimated Time Investment
Week Long Project (20 Hours or More)
Finish Used
Latex paint
Recommended Skill Level
Intermediate

Altered Farmhouse Table

Submitted by Anonymous (not verified) on Sat, 06/25/2022 - 23:32

Hi. Just thought I’d share this for those who are on a really tight budget.
My nephew wanted me to make him a coffee table but to be honest, I didn’t have the funds. Wood is expensive here in Australia so I ought it from a place that sells wood recycled from pallets and crates. I had to work with what they had so it’s not as lovely and chunky as Ana’s and The wood was different sizes than the plan.
Where there were boo boo’s and pieces that weren’t quite matching, I covered them up with metal straps which I rusted to look old like the wood.
I hope he likes it. Thankyou so much Ana for the plan;))

Comments