Community Brag Posts


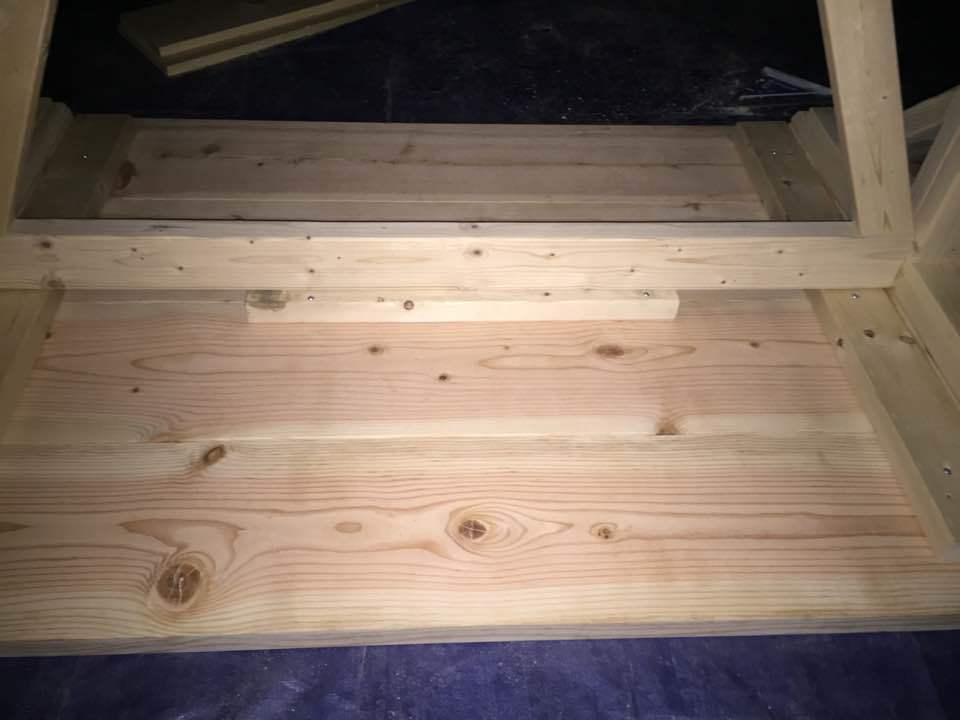
Big Kids Picnic Table
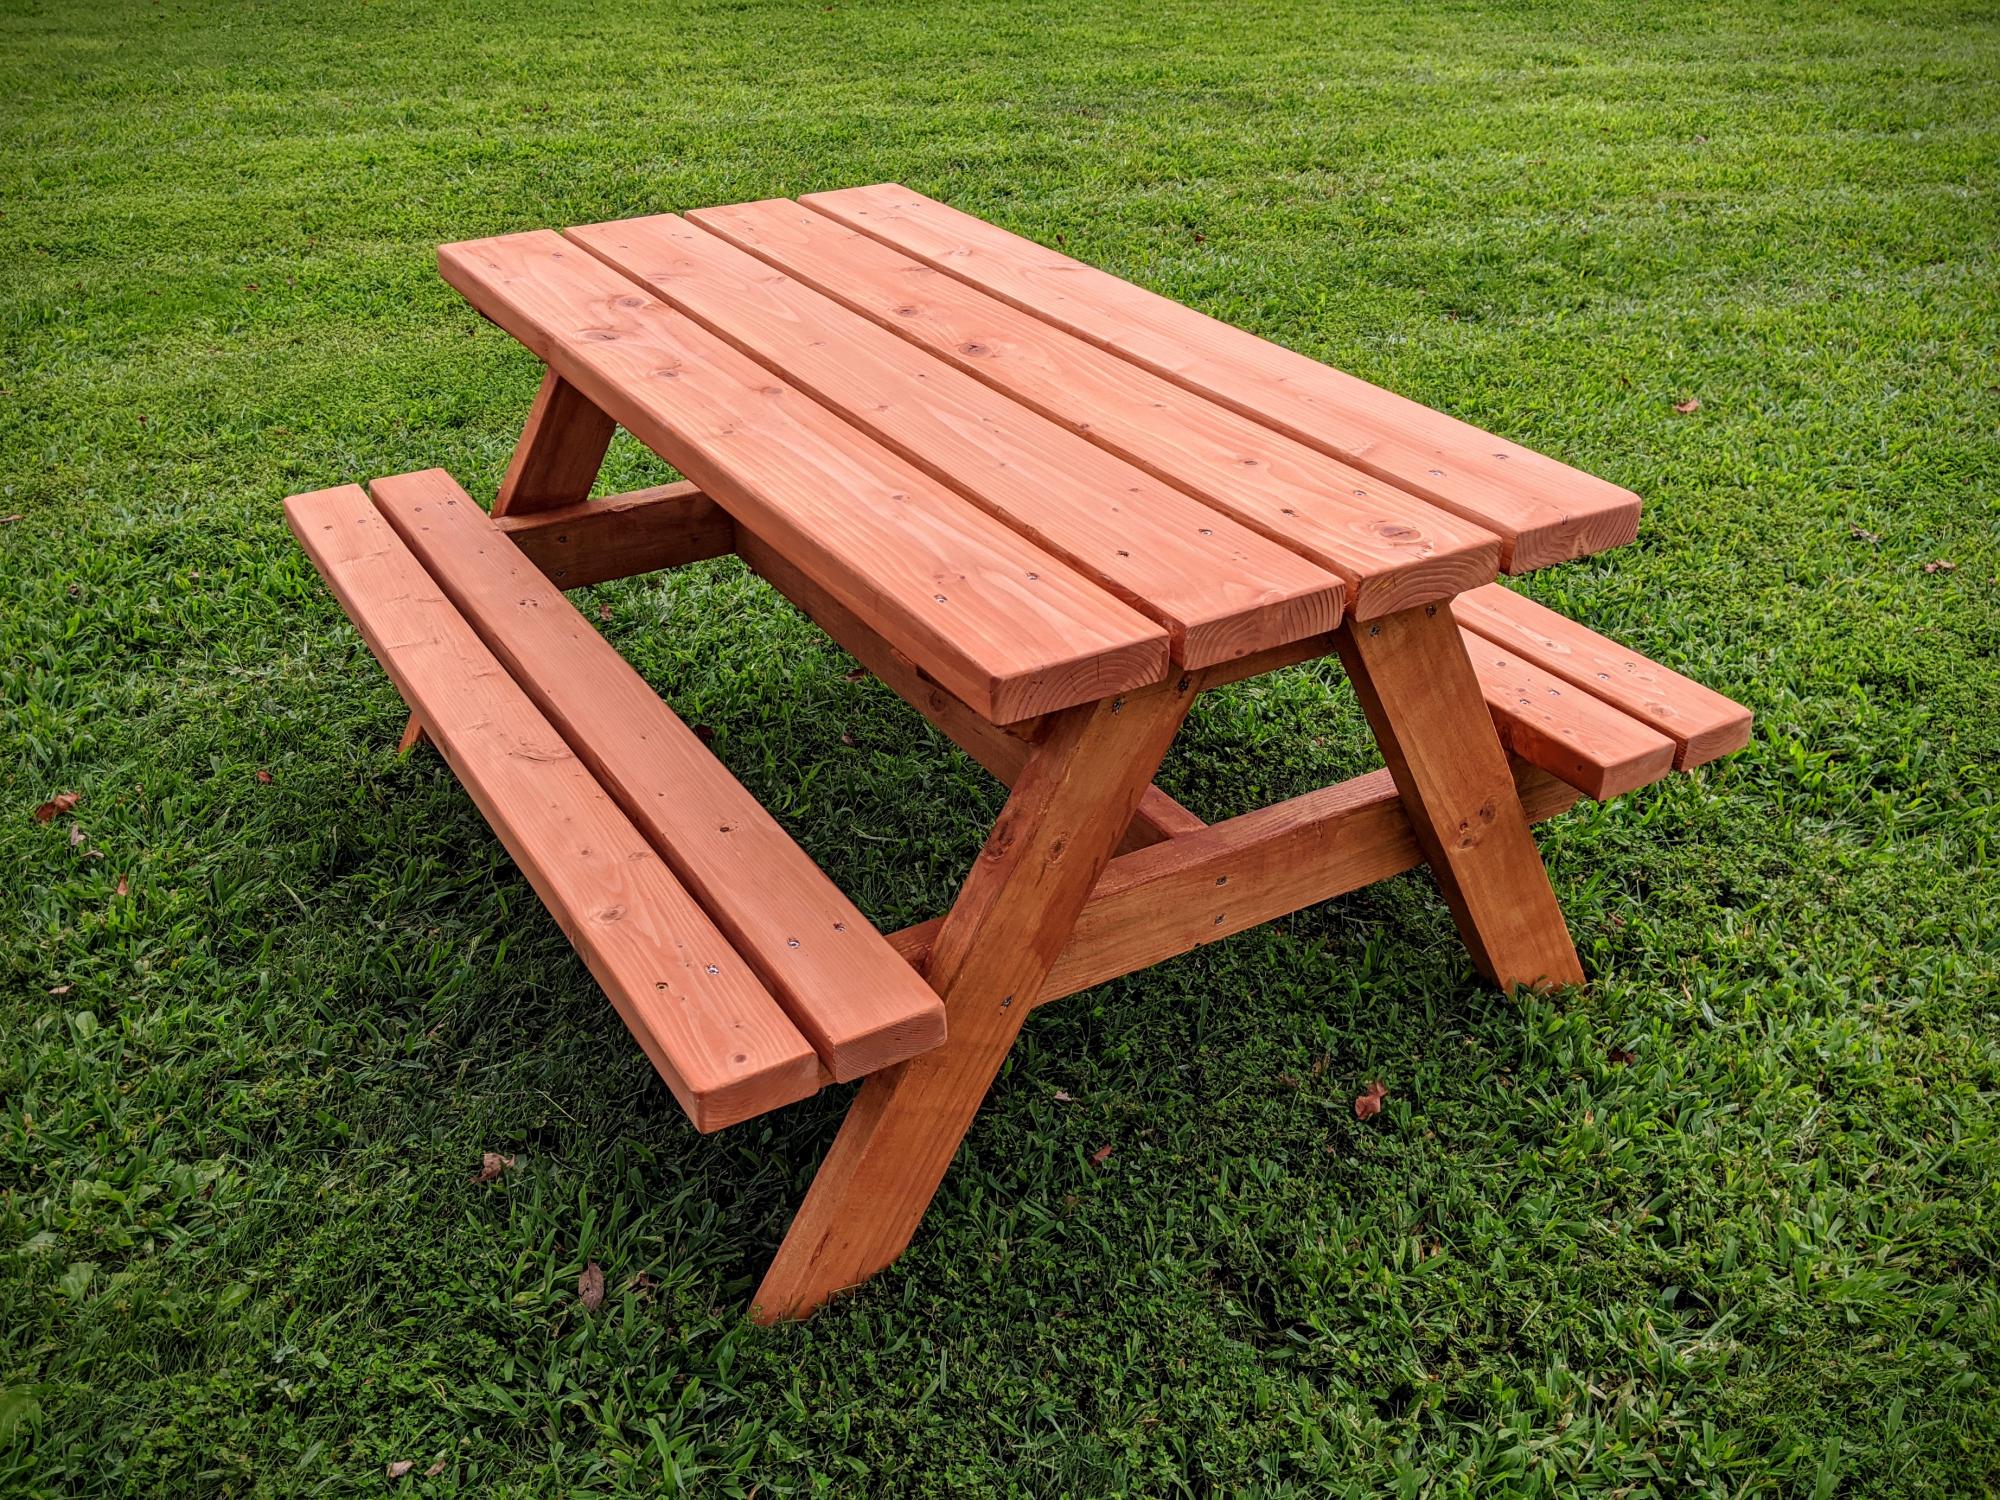
Built using Ana Whites plans for a Bigger Kids Picnic Table. Used pressure treated 2x4 for frame (legs and supports), 2x4 and 2x6 pine (fir) for table top and bench. Finished with Cabot's semi-transparent redwood stain and sealer.
Built from Plan(s)
Estimated Cost
$50.00 plus screws and finish
Estimated Time Investment
Afternoon Project (3-6 Hours)
Finish Used
Cabot's semi-transparent redwood stain and sealer
Recommended Skill Level
Beginner
Fancy X Desk
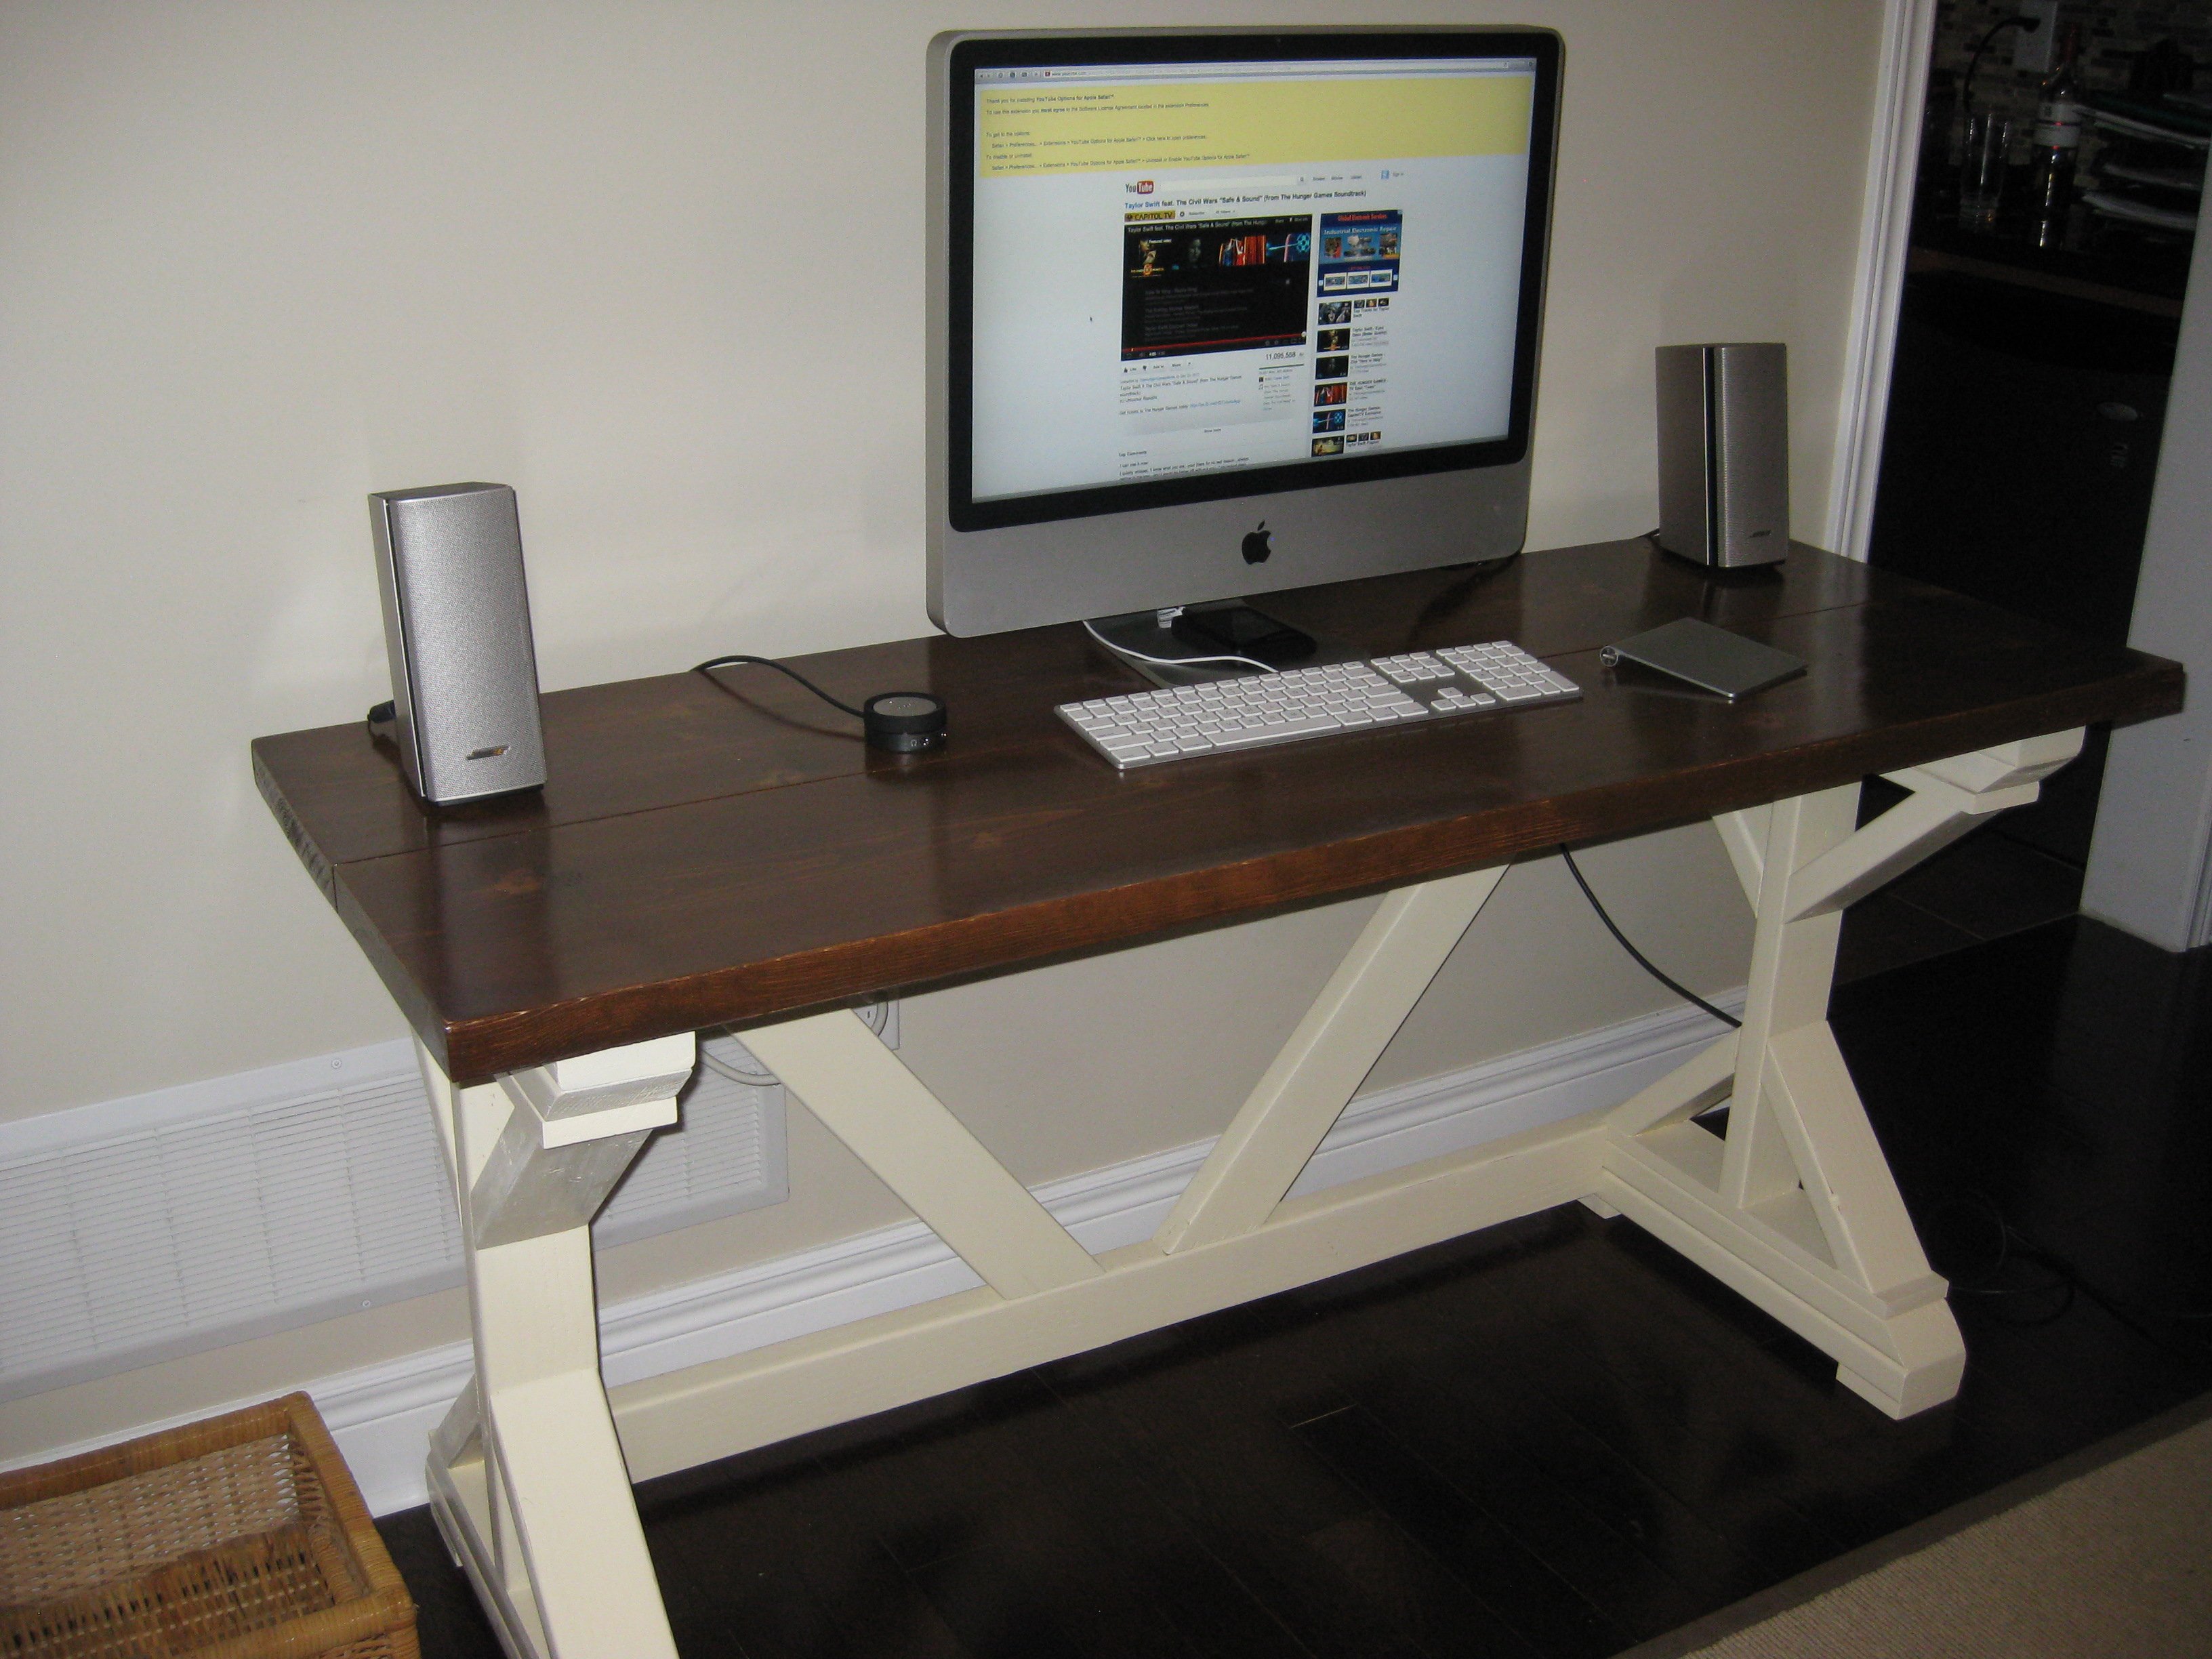
easy project especially since I asked the guys at the hardware store to cut my pieces to length and I cut the angles with my new sliding compound miter saw. Since I reduced the length of the desk to 5 feet, the angles and length of the cross supports in the back changed drastically and had to be played with to get it right. I also added a hidden shelf between the 2 support 2X4's to hide all the cable for the computer. I just used scraps for the hidden shelf. Nothing more unattractive than a bunch a cords and cables hanging behind. Worked great and I should have taken pictures as the build was happening.
Estimated Cost
$75
Estimated Time Investment
Weekend Project (10-20 Hours)
Recommended Skill Level
Beginner
Comments
Thu, 11/08/2012 - 06:07
Looks Great!
The desk looks wonderful! I am curious what color of paint and stain you used? I am wanting to build a coffee table and that is the combination of paint and stain I like!
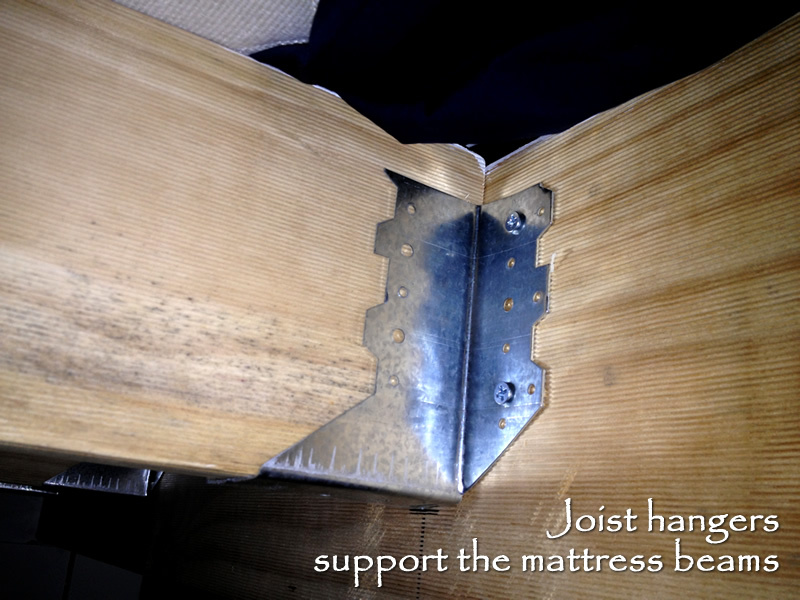
Farmhouse Queen Plans
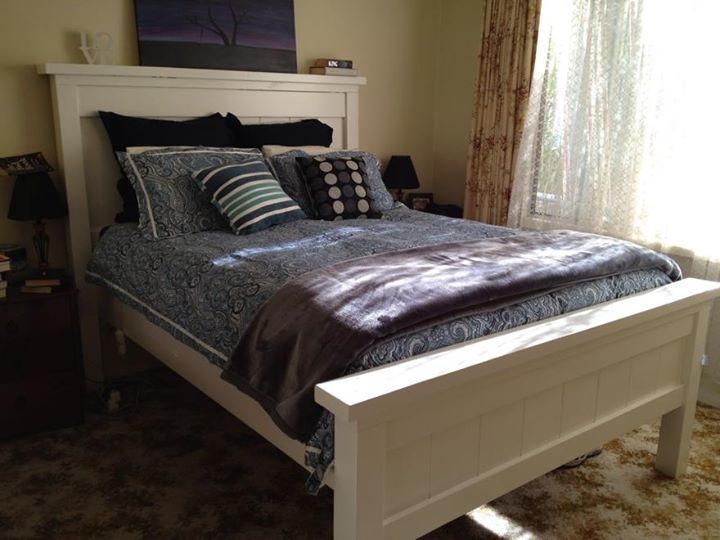
I have wanted to build this bed for a very long time. I finally bit the bullet, stopped procrastinating and just got on with it and thank god I did. It was actually easier than I thought. It just about built itself! I built this bed taller than the plans called for. I used joist hangers to support the mattress beams. The joist hangers were attached to the inside of the siderails and the mattress beams just slot into them for easy removal. The most time consuming part about this build was the painting. It is extremely sturdy. This bed will last a life time.
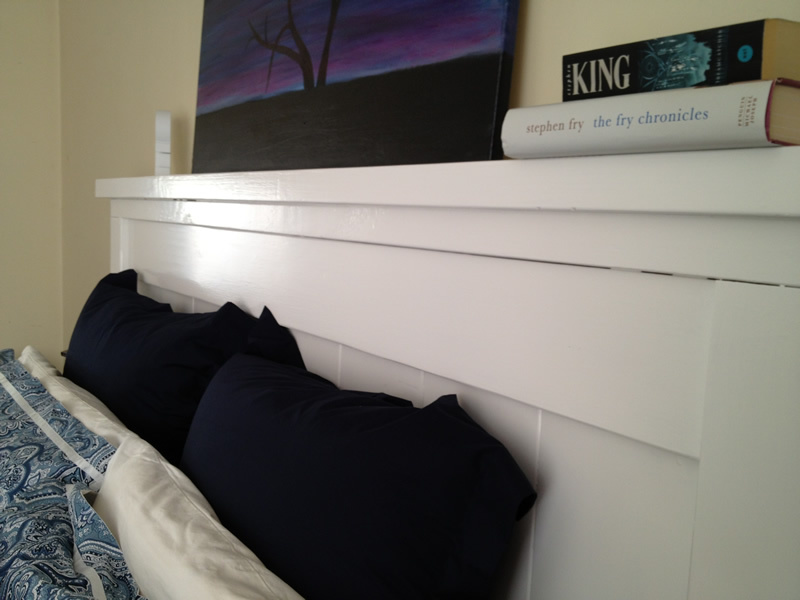
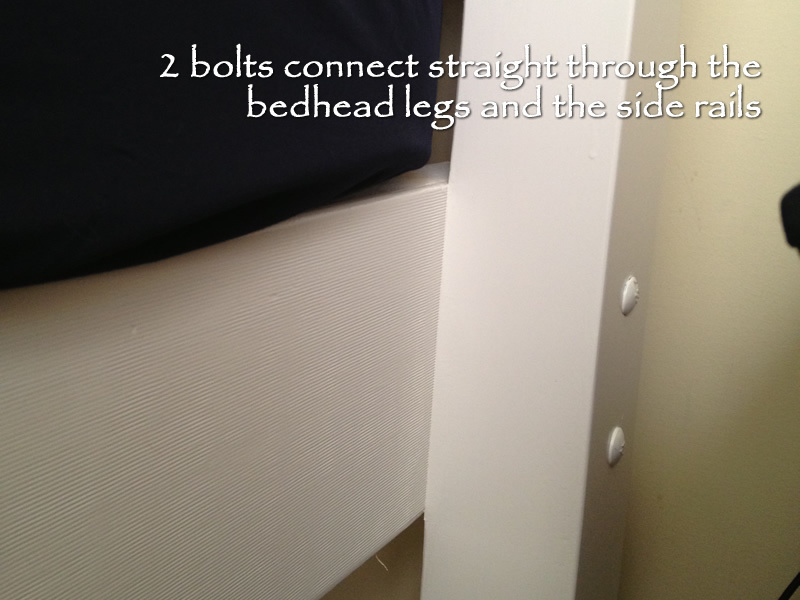
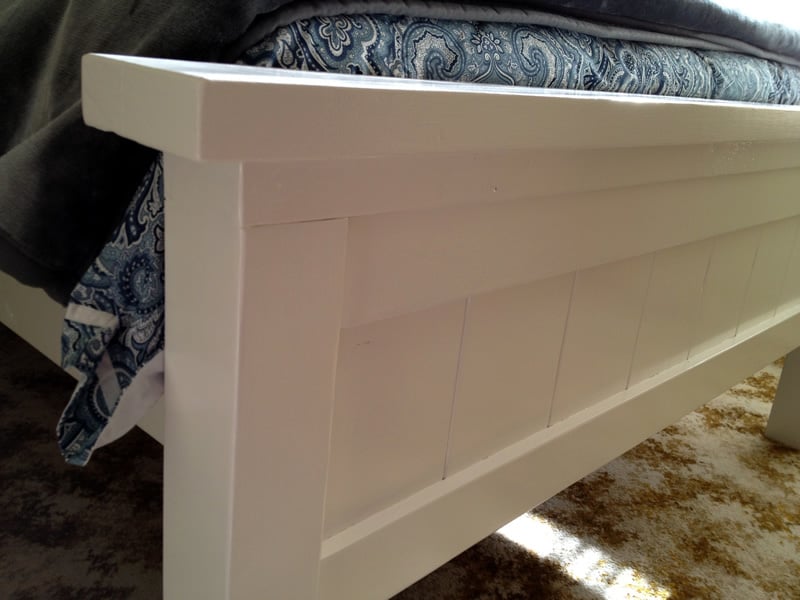
Built from Plan(s)
Estimated Cost
$400
Estimated Time Investment
Week Long Project (20 Hours or More)
Finish Used
White Enamel Paint
Recommended Skill Level
Beginner
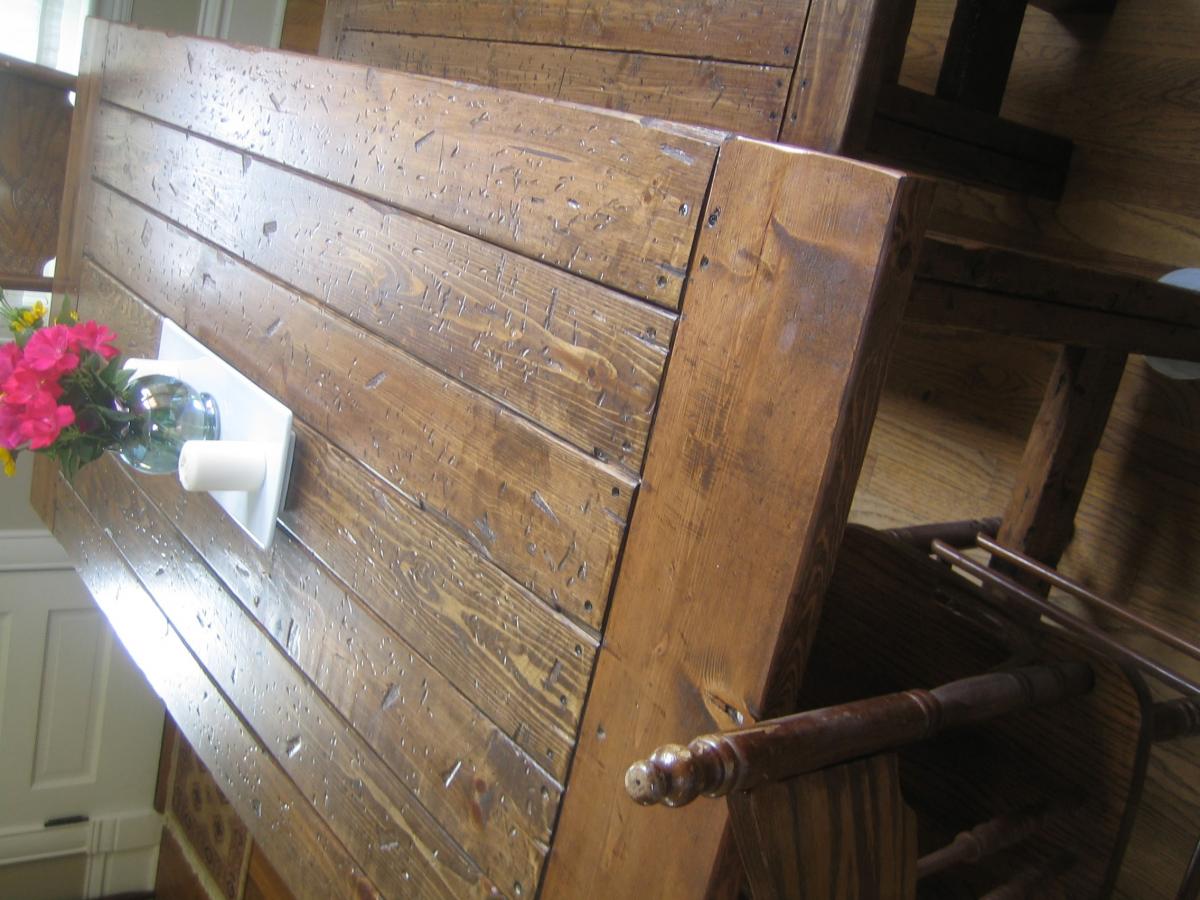
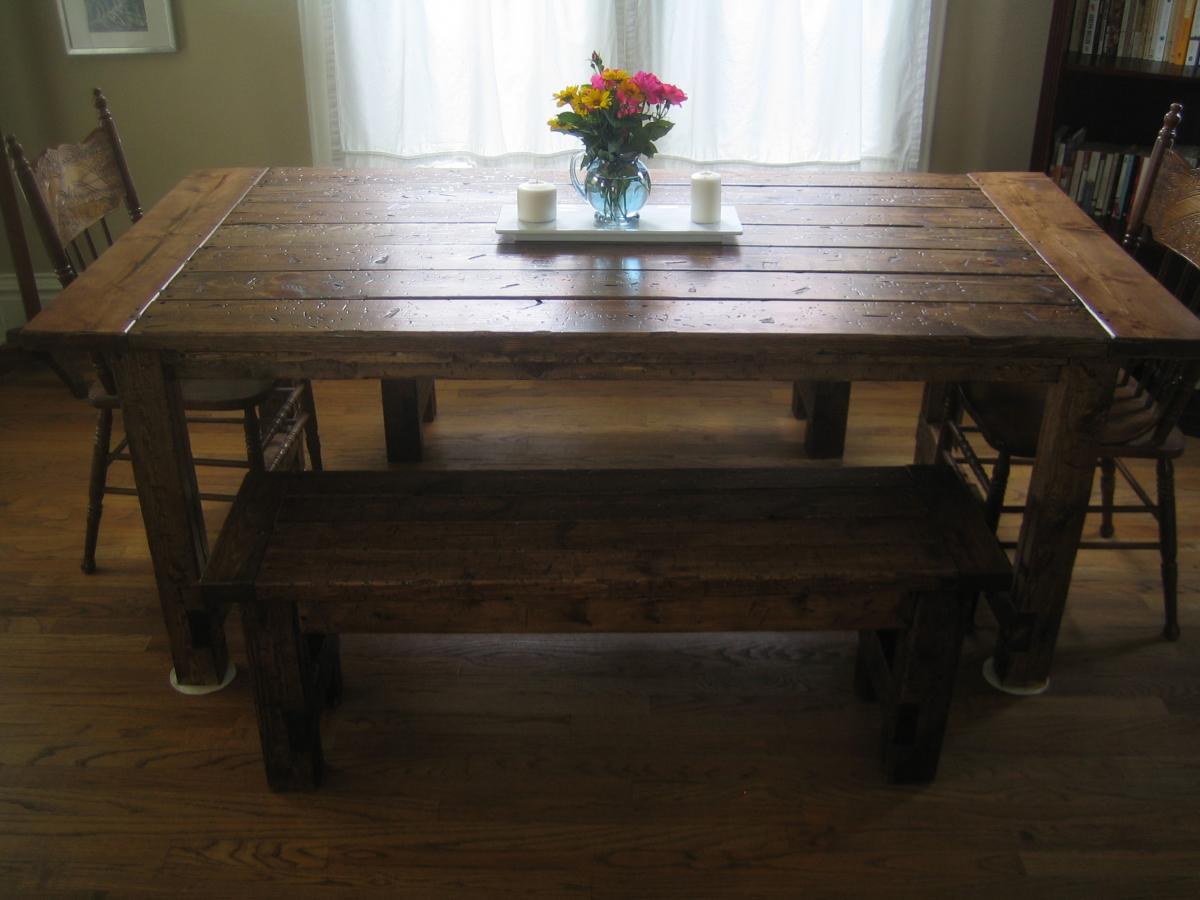
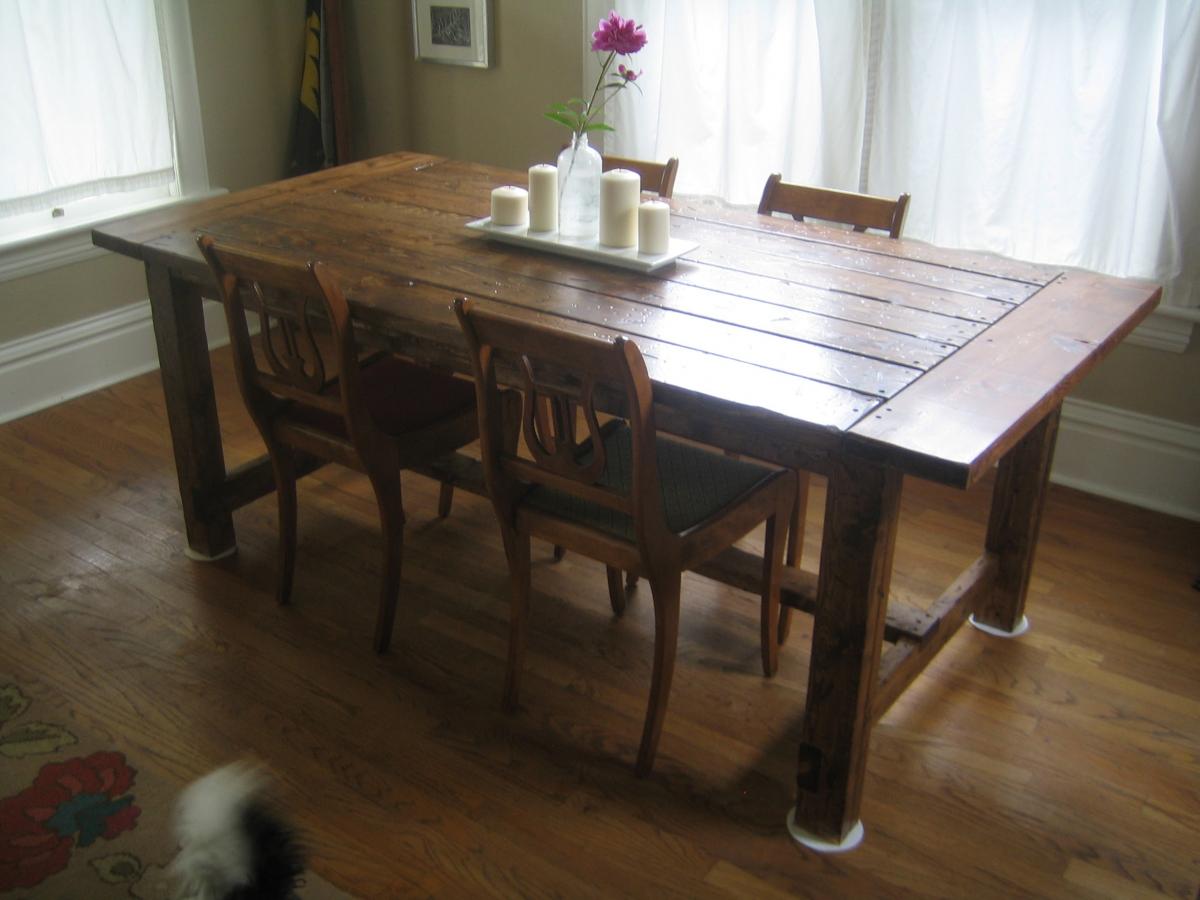
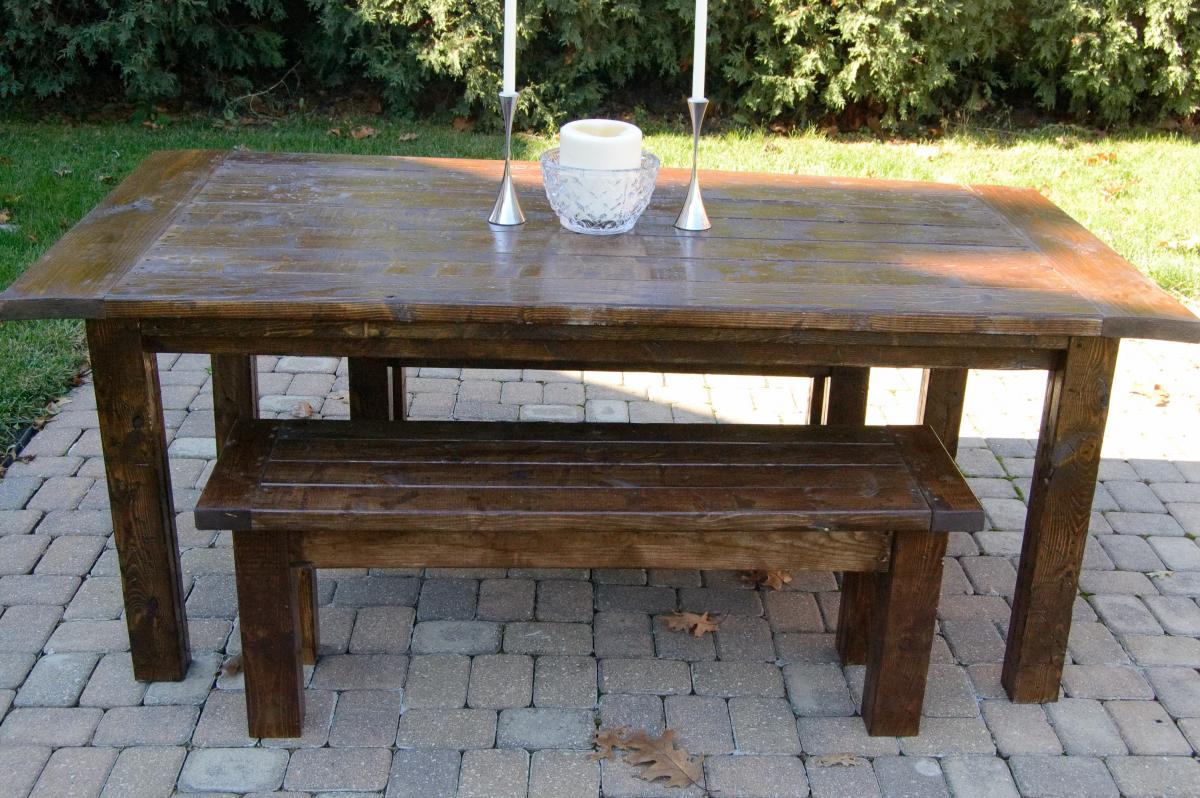
DIY Farmhouse Table w/ Matching Benches for the Dining Room
This was a relatively simple job and saved hundreds of dollars versus buying a new one in the store. Distressed the wood myself and modified the plans to fit our space. Minimal tools and woodworking skills were needed. A big shout-out to Ana White for the DIY plans.
🍒 Here is a video I shot to show the final project➔ https://youtu.be/tnskR5J-8Mo
Good luck!

Built from Plan(s)
Estimated Cost
$200
Estimated Time Investment
Weekend Project (10-20 Hours)
Finish Used
Dark stain and three layers of poly
Recommended Skill Level
Starter Project
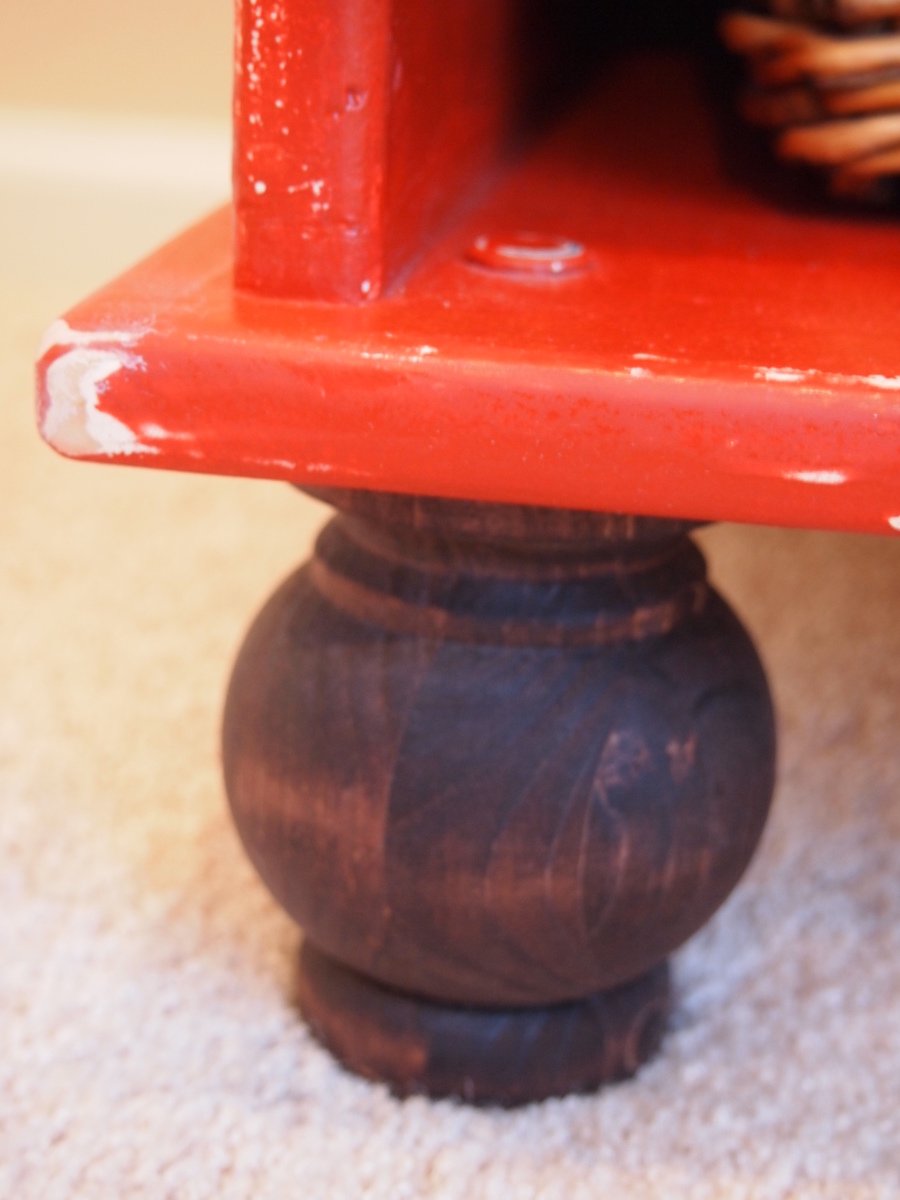
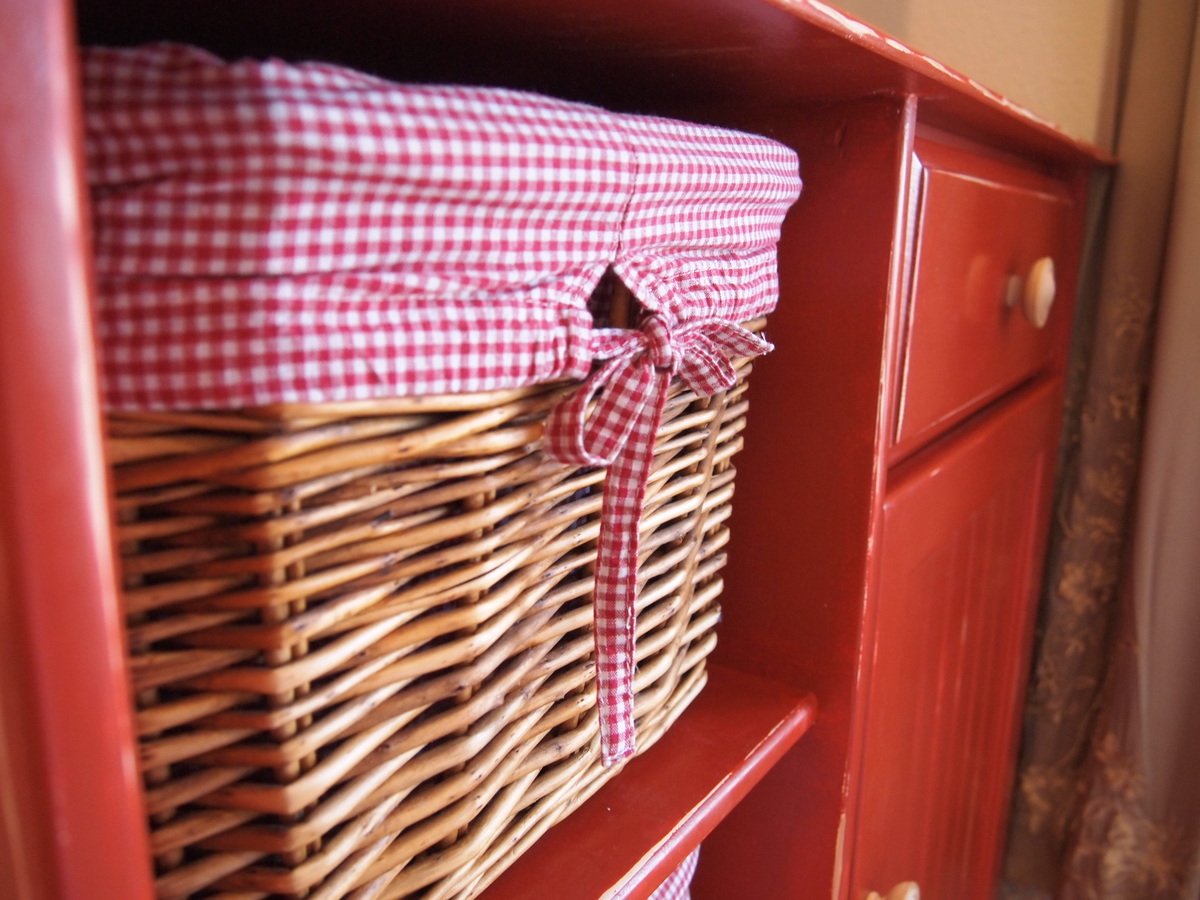
Dresser Makeover
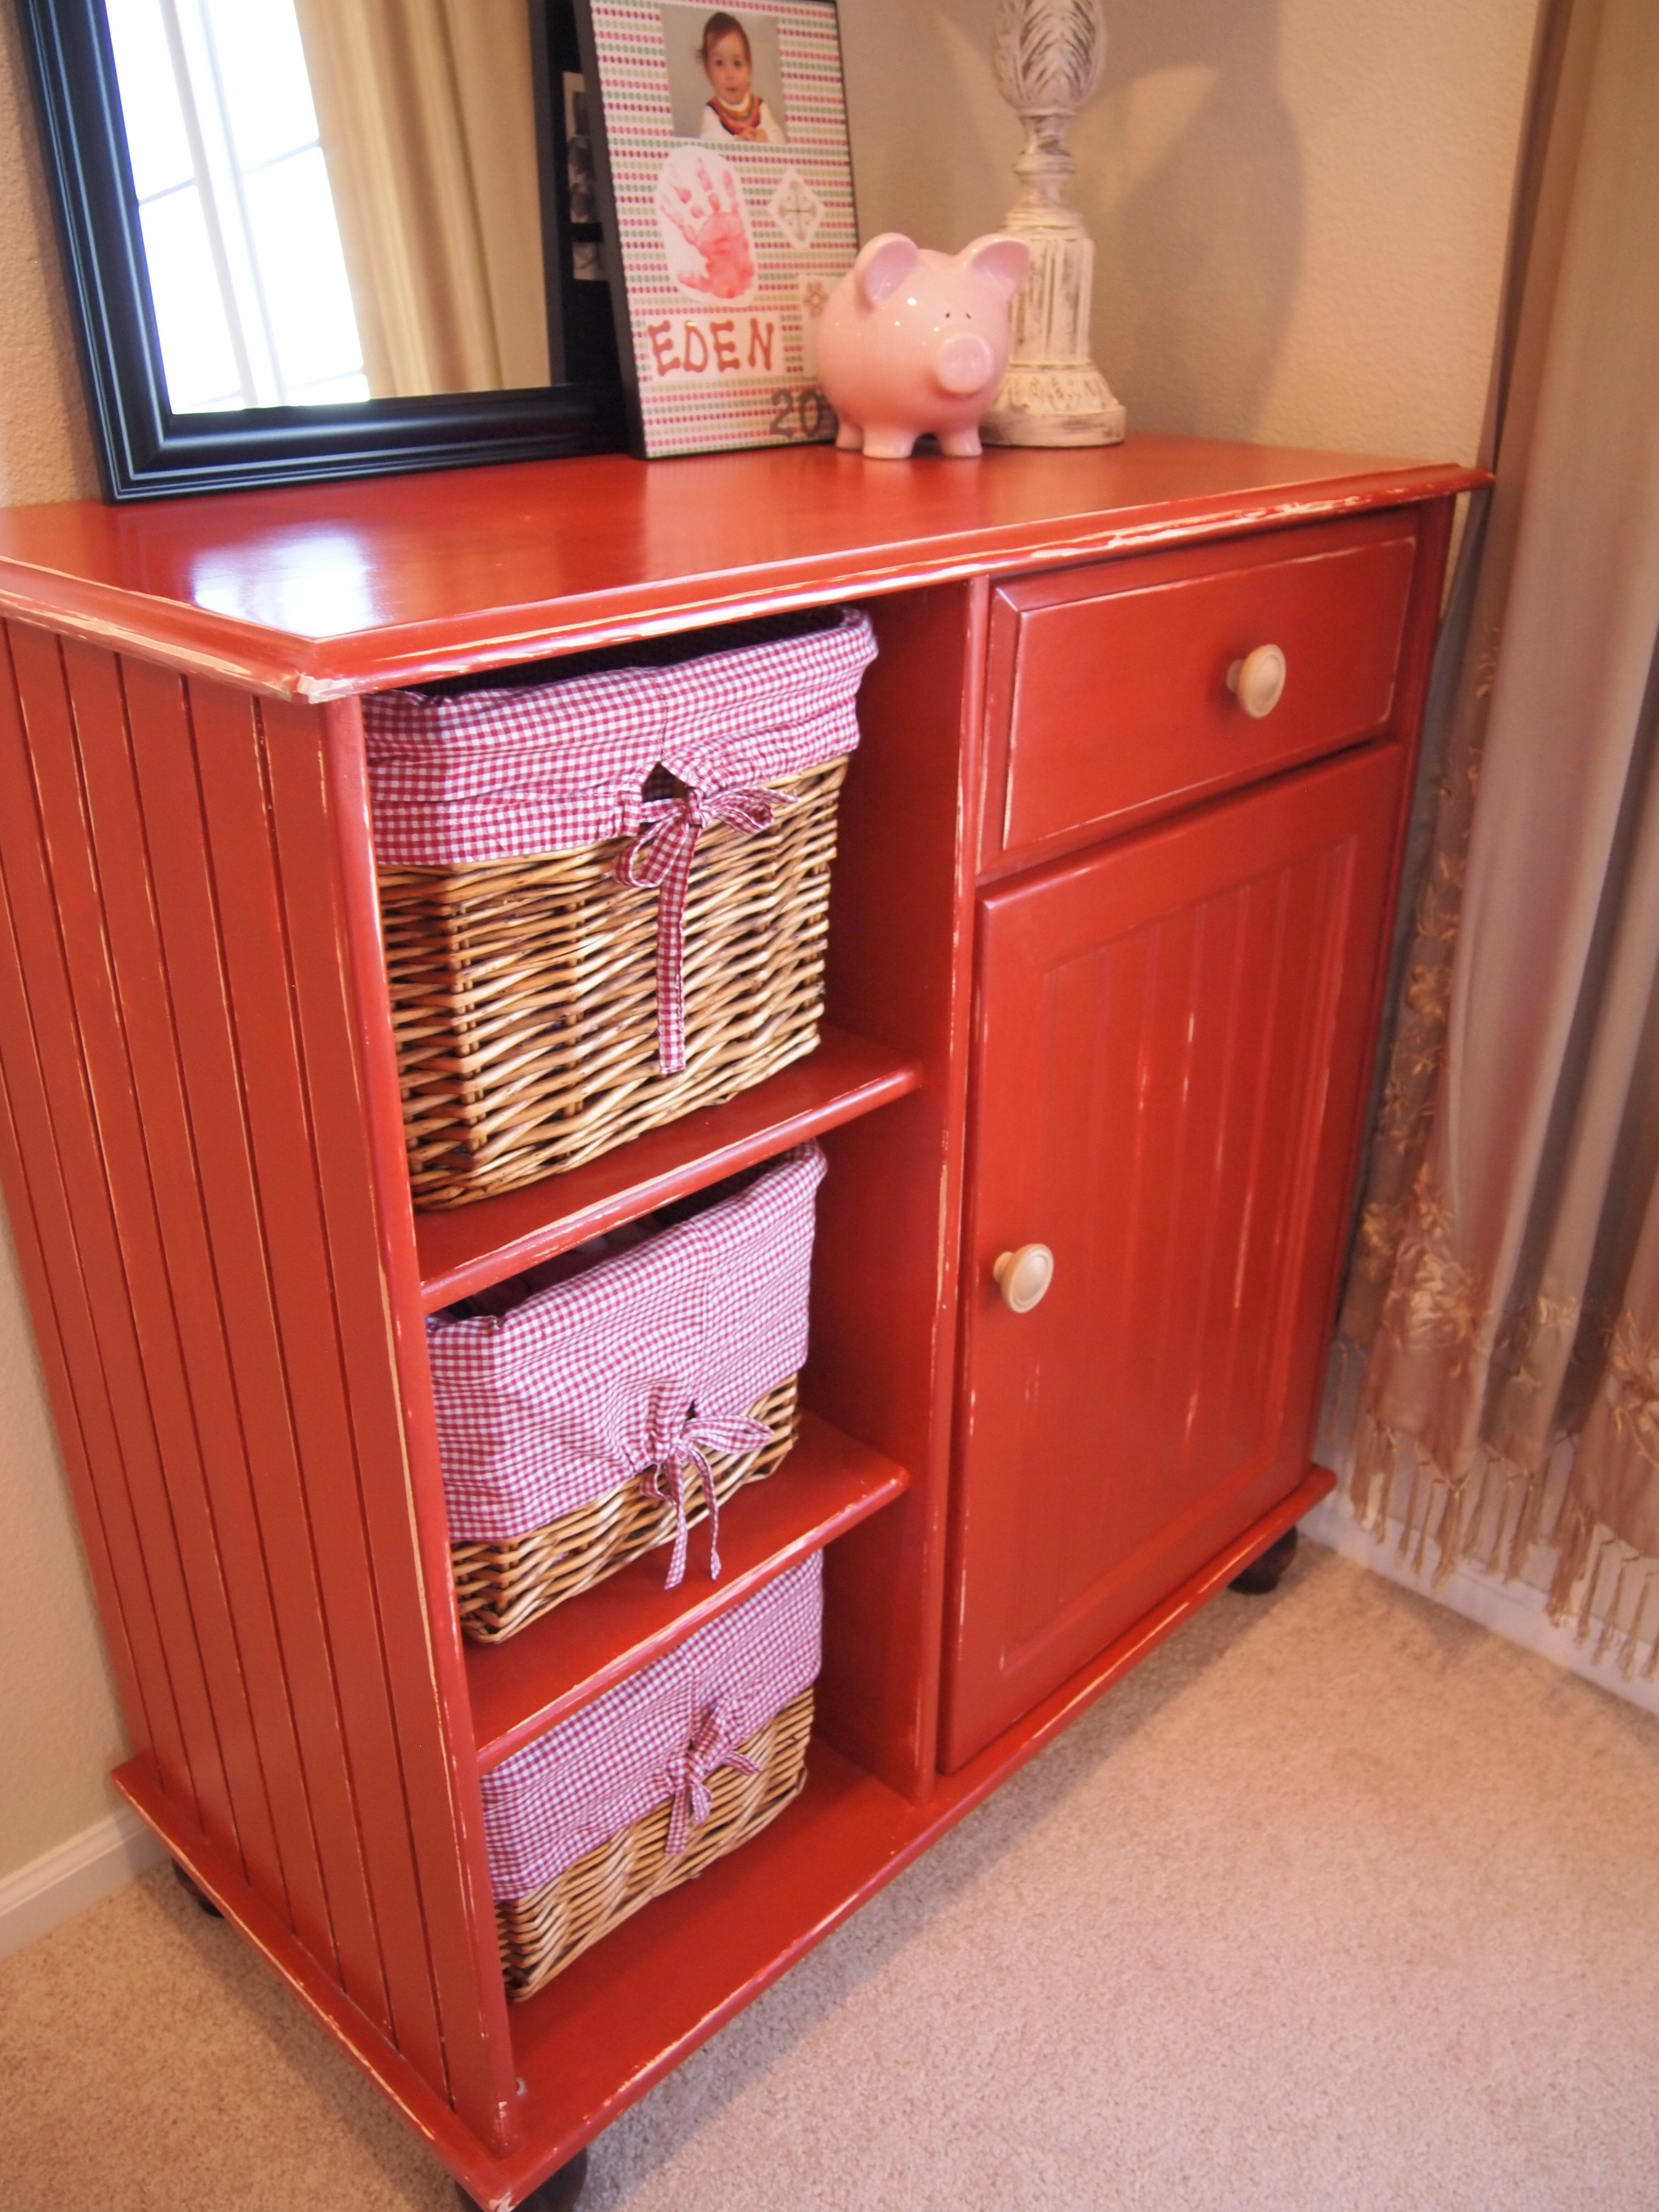
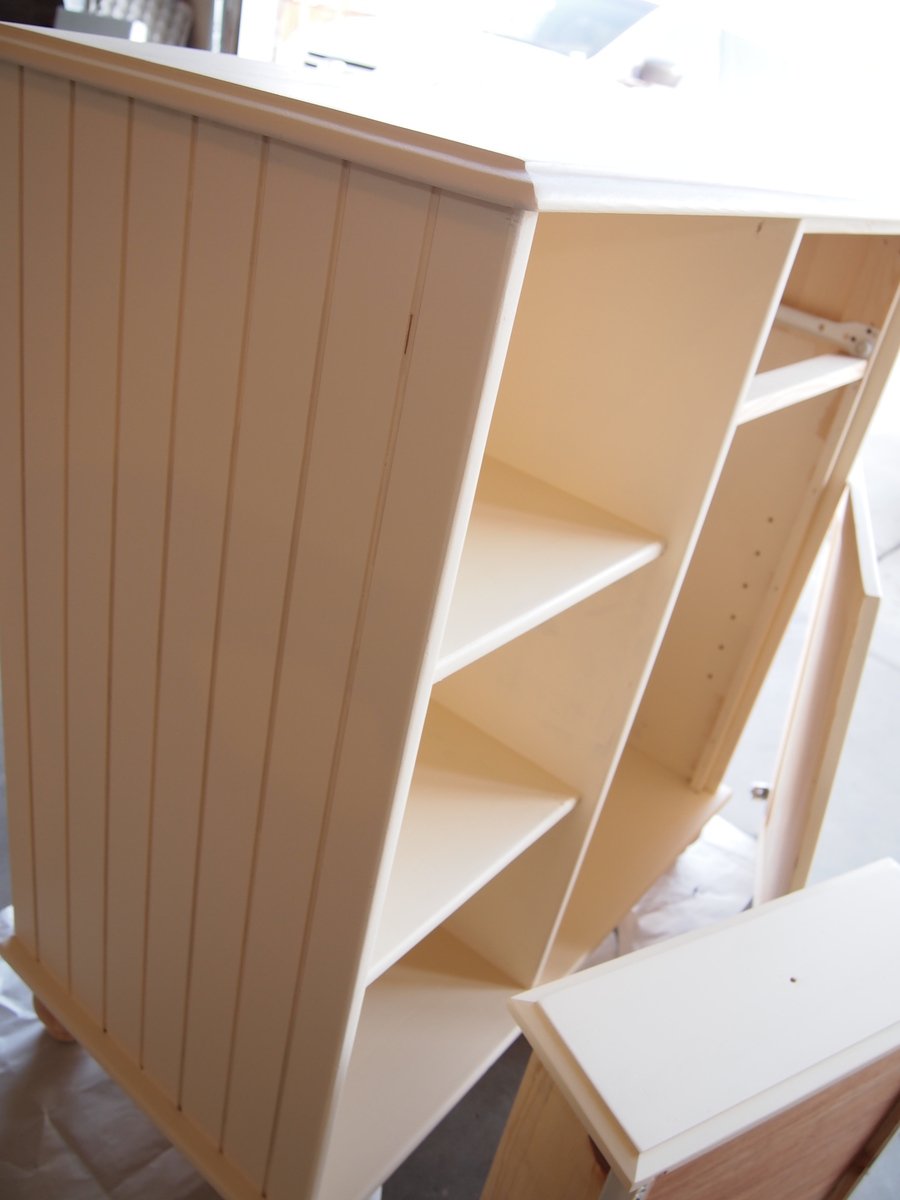
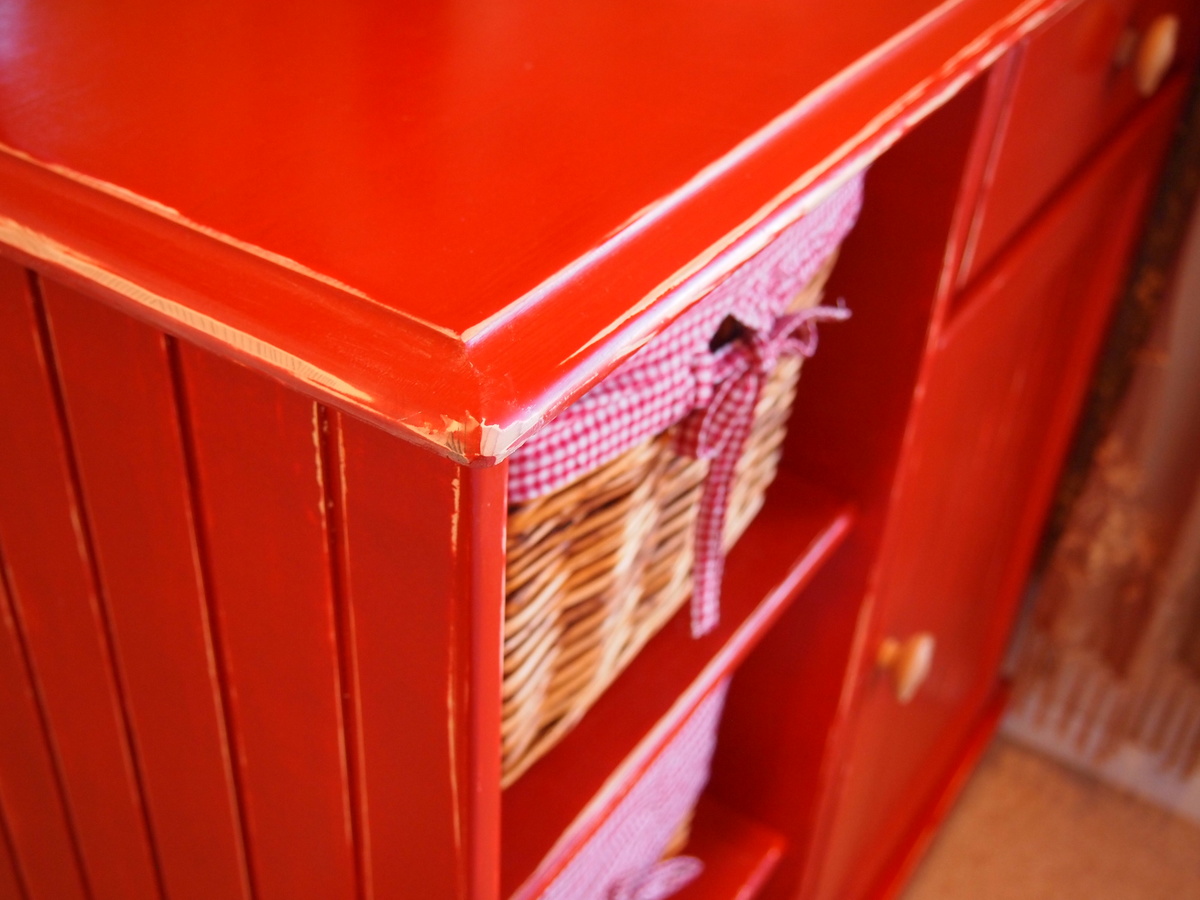
I bought an unfinished dresser from a local furniture refinisher - on clearance. It was intended as a changing table as I was preparing the nursery for our first child (about 5 1/2 year ago). Finally, 5 years and another baby (who is now 3) later, I finally decided to do something with it. So, please note that I did NOT build this piece from scratch. Rather, it was more a finishing project. It was unfinished pine. I failed to capture the "before" photo. Inspired by the Farmhouse Console and the Antique White project, I decided to tackle a distressed look.
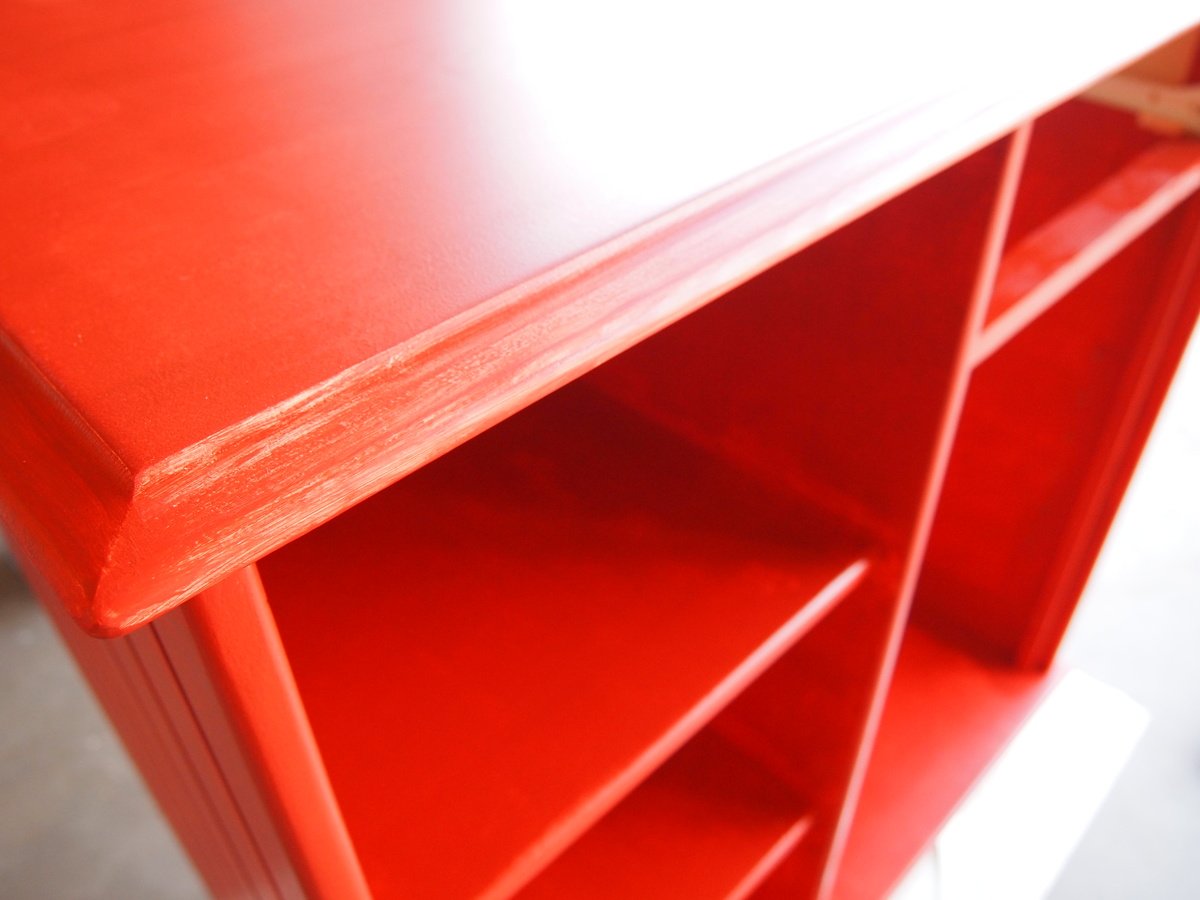
I sanded between each coat, and focused on areas that would naturally be worn. The end result was essentially some areas of bare wood showing through, and other areas where the base color shows through.
I don't remember where the baskets came from, but they fit perfectly and the red-checkered pattern matched nicely. It turned out to be such a cute addition to my daughter's room, and I think it will be a piece that will grow with her.
Built from Plan(s)
Estimated Cost
$50
Estimated Time Investment
Weekend Project (10-20 Hours)
Finish Used
Materials:
Sandpaper in 60, 120 and 320
Behr enamal paint (in Buttercup and Antique Red)
Behr Glaze (not necessary)
Minwax Finishing Wax paste
small paint roller
small paint brush
cotton rags (which I made from old 100% cotton t-shirts)
I sanded... and sanded... and sanded. I have a little handheld Porter Cable sander that works brilliantly, except that it doesn't get into the little cracks and crevices, so I did that by hand. I started with 60 grain, then 120.
I painted 2 coats of Behr interior flat enamel in Buttercup, sanding with 120 in between coats, sanding through to bare wood where it would naturally be worn. Here is where it got interesting and frustrating. When I originally purchased paint, the very nice gentleman at the paint counter asked me what I was doing. I explained that I was doing a faux distressed finish on a dresser. I ordered a pint of the red paint, and he then explained to me that I should go with the Behr glaze. So, he gave me the glaze and that little sample of the red to mix into the glaze.
Glaze fail. I actually liked the look, but it was so not the look I was going for. Nevermind the fact that the glaze dries very quickly and soon became a sticky mess.
So, I left the project for about a week to ensure that the glaze was completely dry.
Then, I sanded with 60 and 120 again. The intention wasn't to get the glaze off, but rather treat it like a base coat. I then painted the entire piece with the red (no glaze). Then sanded with 120 in areas that would naturally be worn. The end result was essentially some areas of bare wood showing through, and other areas where the buttercup color shows through.
I sanded one final time with the 320 grain. I then used 2 coats of Minwax wax, resulting in a very silky, shiny finish. (It seriously is SO soft to the touch!)
Recommended Skill Level
Beginner
Comments
Mon, 11/12/2012 - 11:06
I'm very impressed with your
I'm very impressed with your recycled changing table--beautiful finish on a piece that will indeed grow with your daughter. The piece itself reminded me of the recycling console (pp. 86-91) in Ana's new book. Your finish would look awesome on that plan, too.
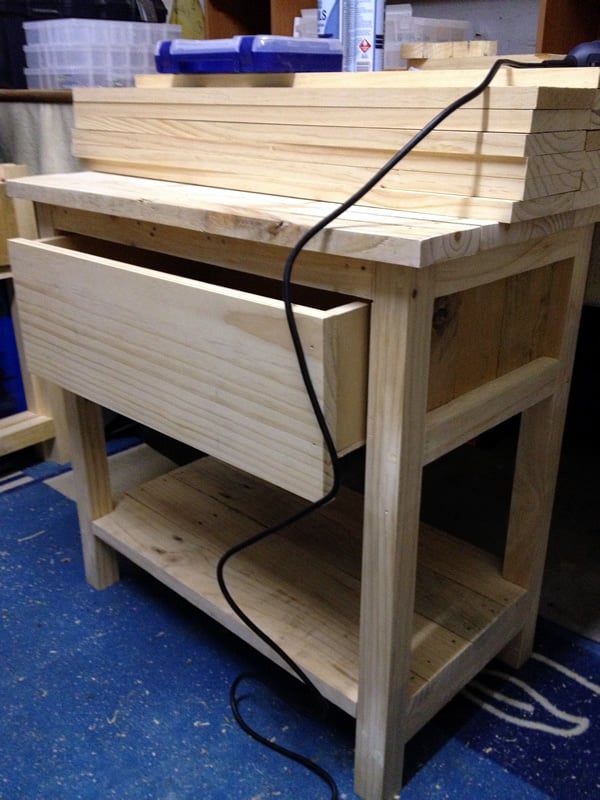
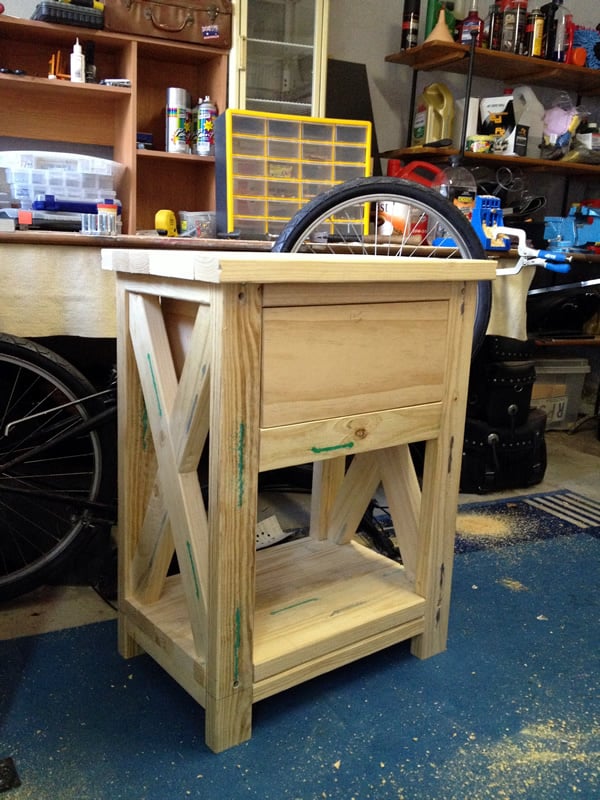
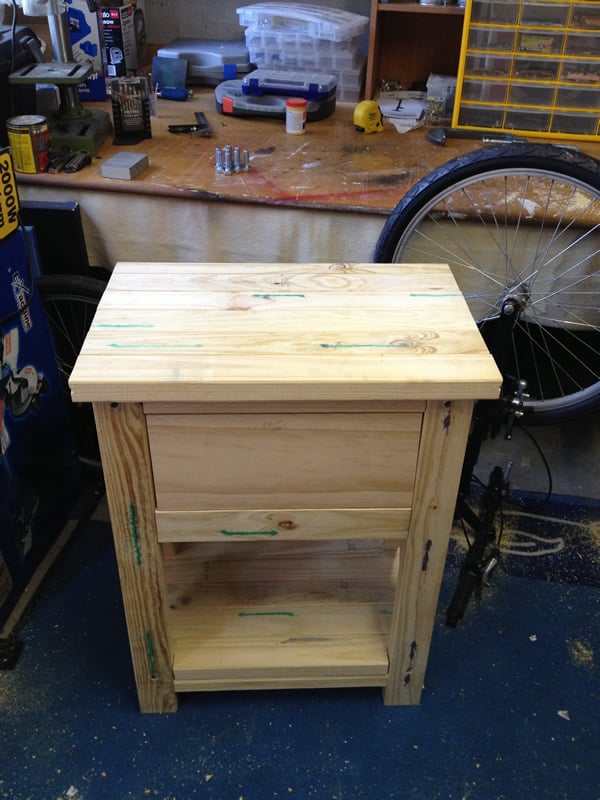
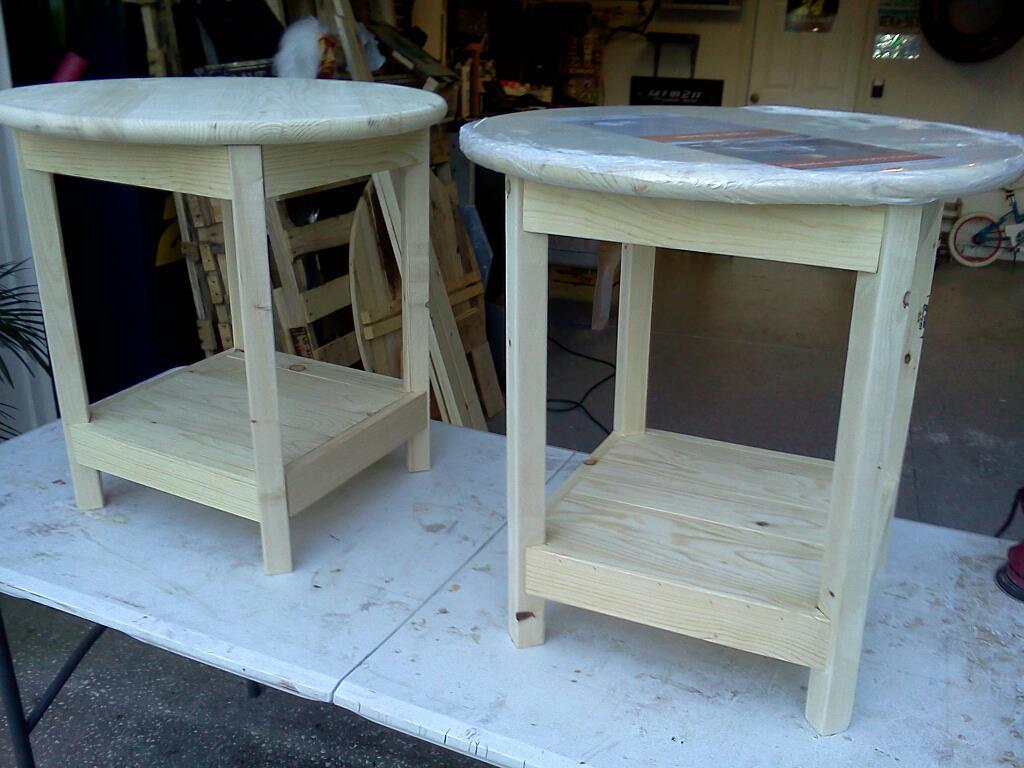
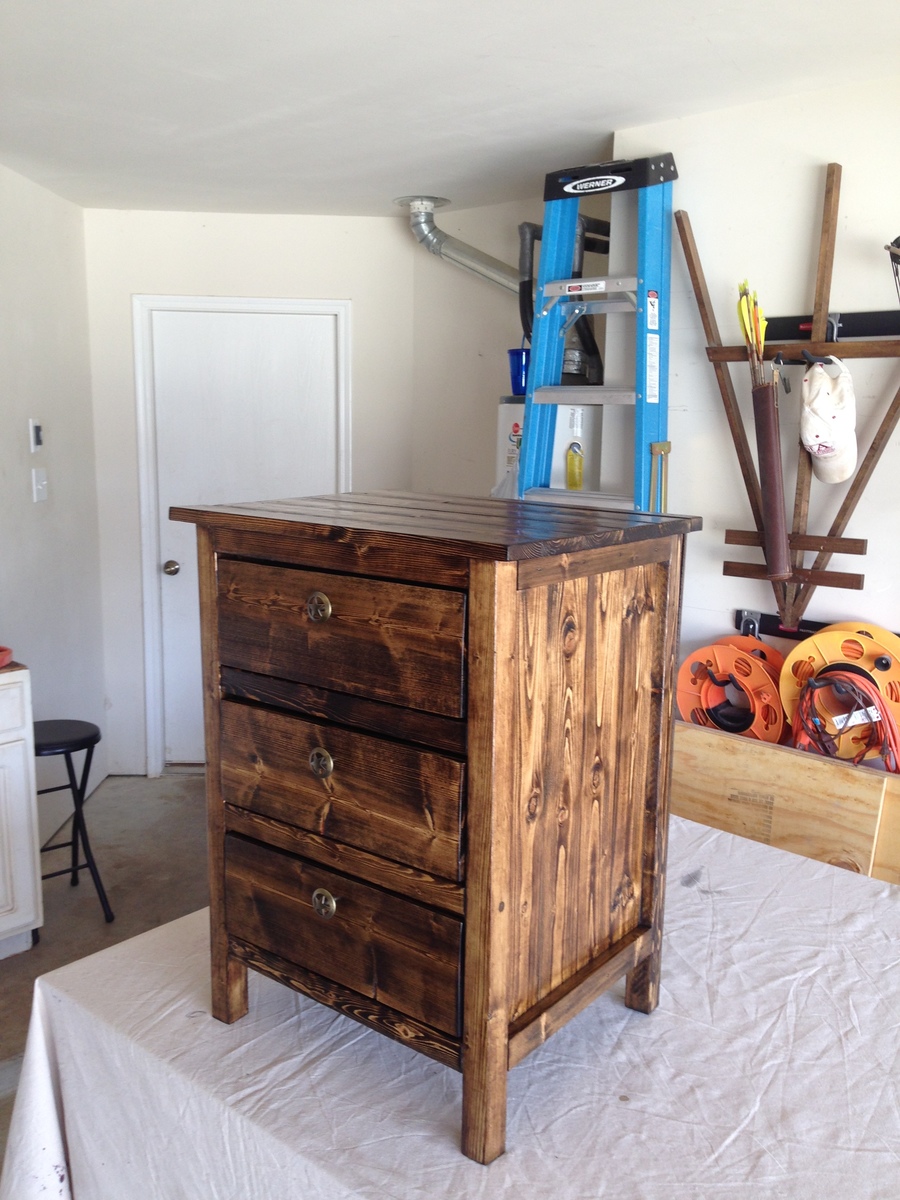
Bedside table
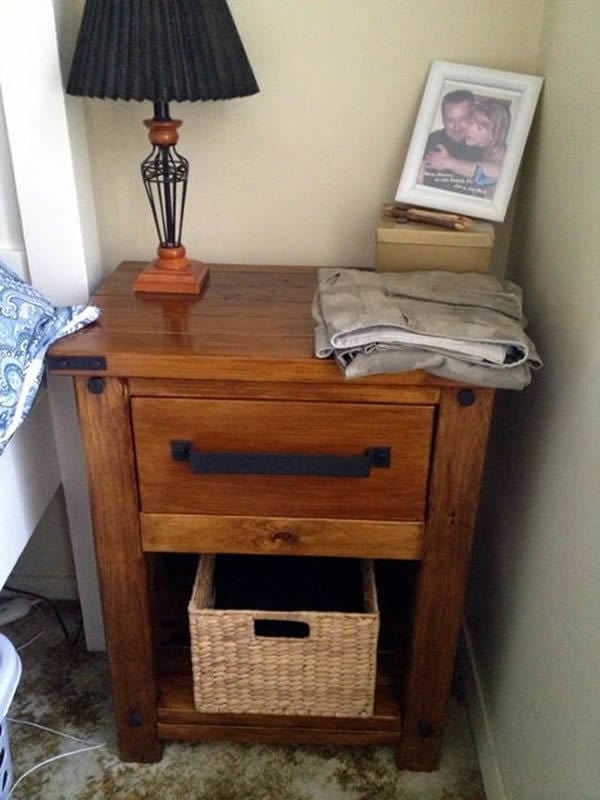
I needed to build a bedside table to go with my farmhouse bed and I wanted to make one that was not matchy matchy with my other one and it also needed to look a little more manly.
I used new chunky pine for this build.
I couldn't find the right handle for this so I bought a steel strip from Bunnings and bent it into shape and drilled holes to attach it to the drawer. I bashed the steel strip with a hammer to make it look more rustic and battered.
The bolts on the legs are purely for decoration.
I think I managed to make a manly looking bedside table and it goes really well with my farmhouse bed and bedside table.

Estimated Cost
$40
Estimated Time Investment
Weekend Project (10-20 Hours)
Finish Used
Walnut Stain
Recommended Skill Level
Beginner
Handmade Farm table
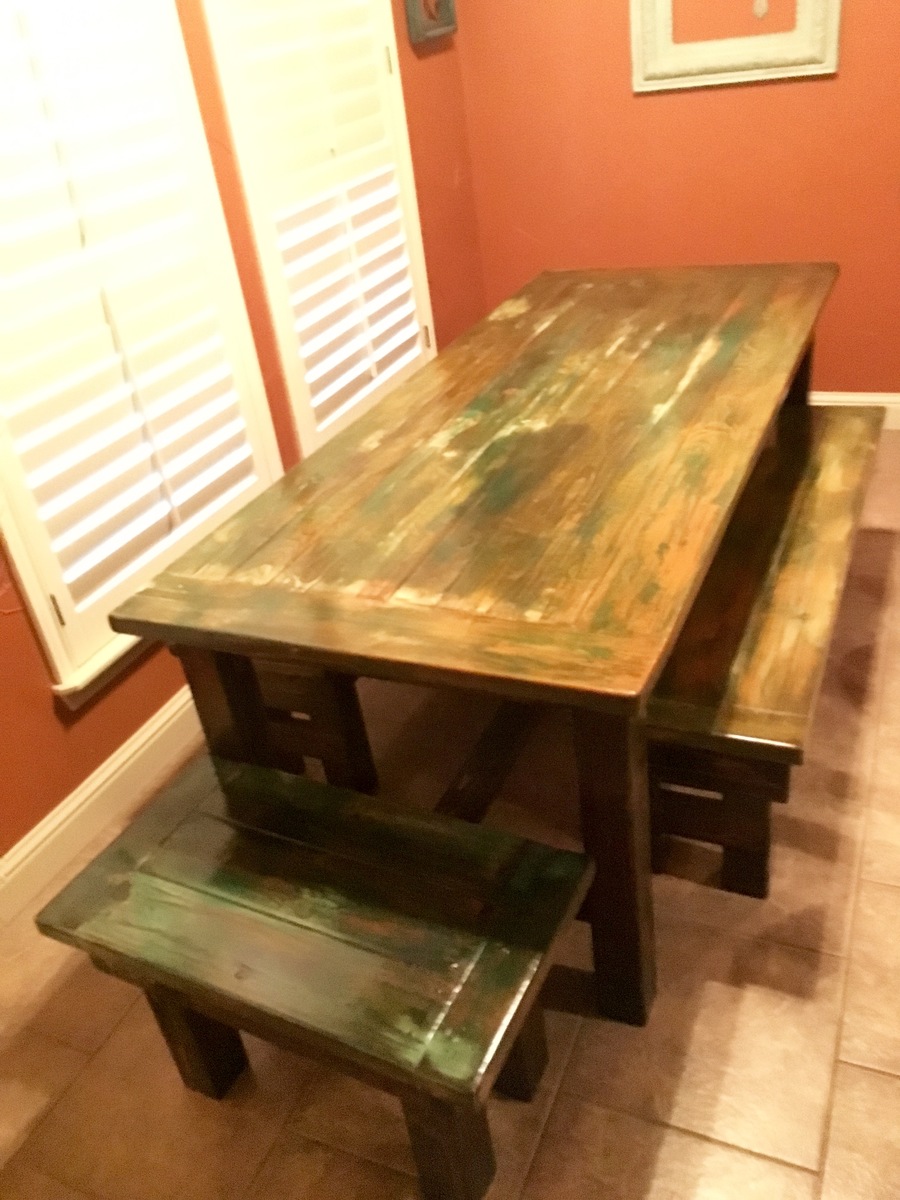
This was my first attempt to build a table . I'm very pleased with the outcome.
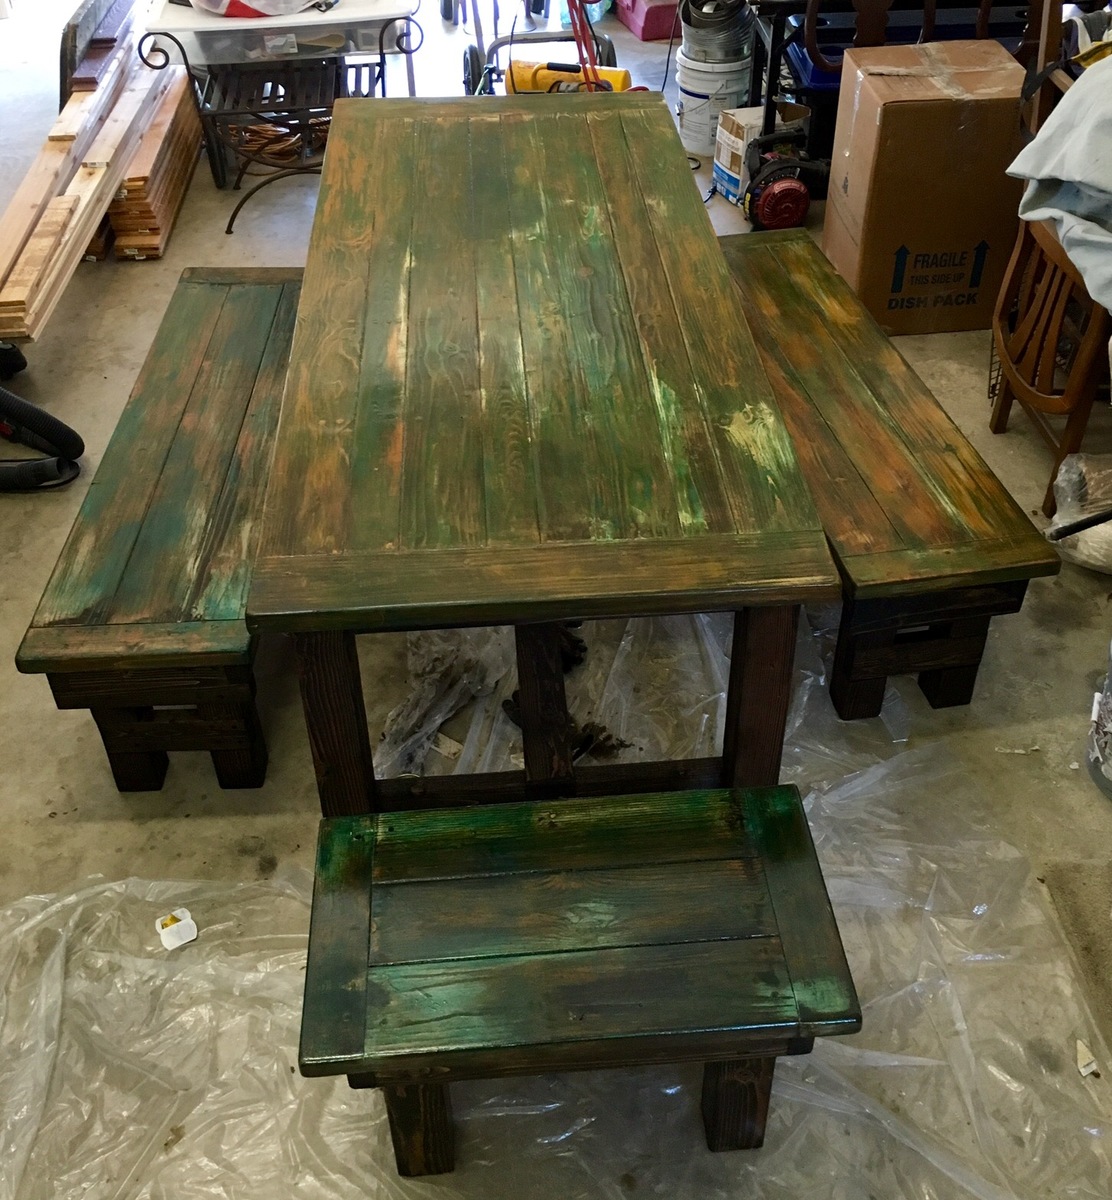
Built from Plan(s)
Estimated Cost
$170.00
Estimated Time Investment
Week Long Project (20 Hours or More)
Finish Used
Teal and burnt orange flat paint brushed on randomly over project.
White semi gloss for some high lights . Stain doesn't dull the finish of semi gloss paints.
Sand entire piece to bring some of the natural wood back out.
Then I applied min wax Jacobean stain color over the top of everything.
Lastly I applied 2 coats of min wax semi gloss poly.
White semi gloss for some high lights . Stain doesn't dull the finish of semi gloss paints.
Sand entire piece to bring some of the natural wood back out.
Then I applied min wax Jacobean stain color over the top of everything.
Lastly I applied 2 coats of min wax semi gloss poly.
Recommended Skill Level
Advanced
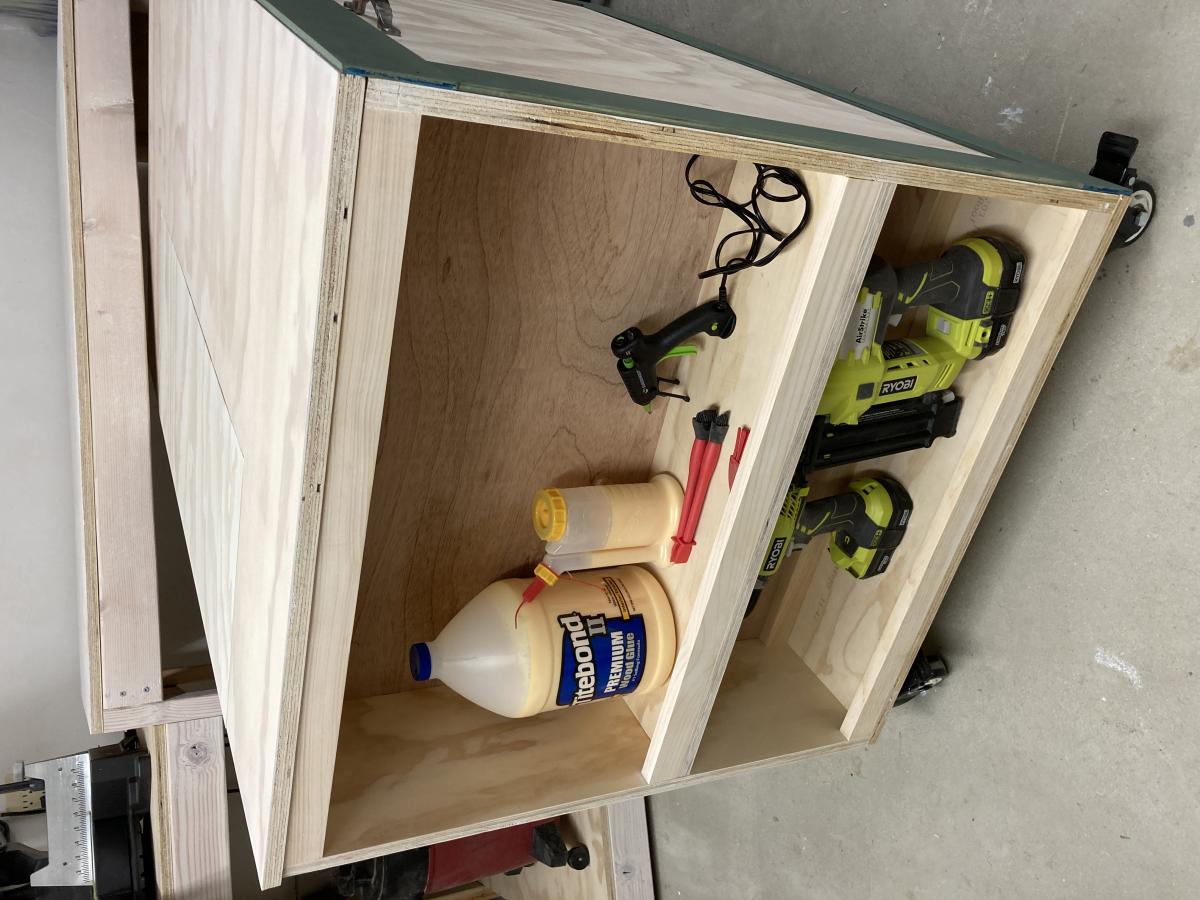
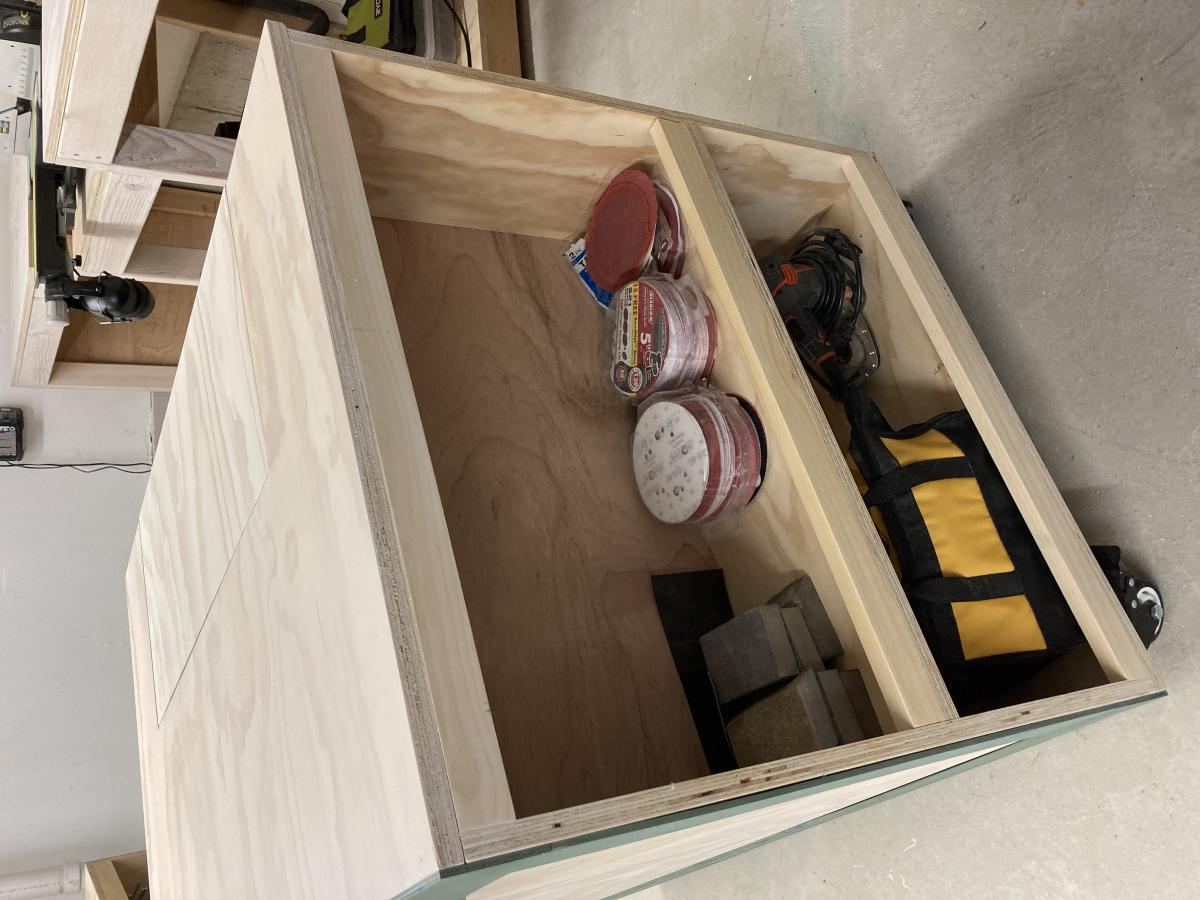
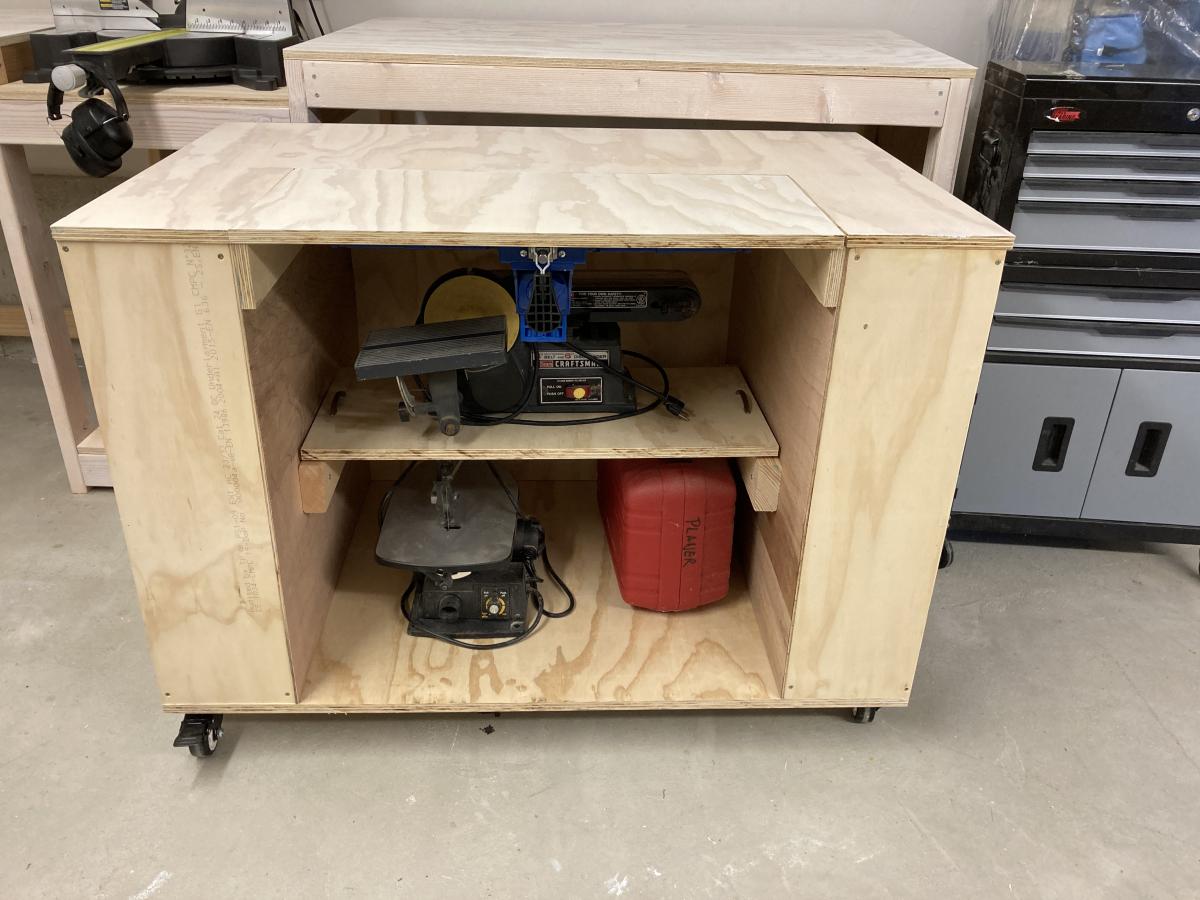
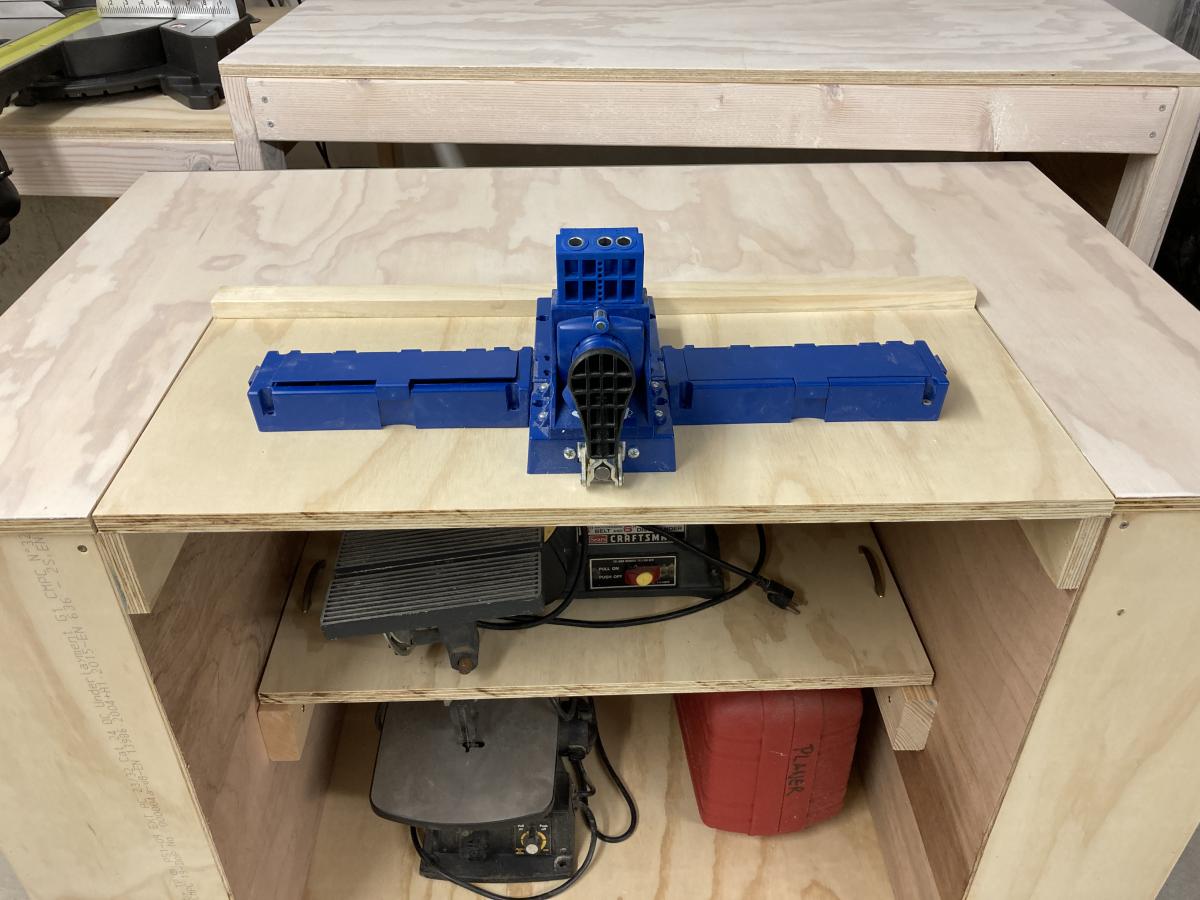
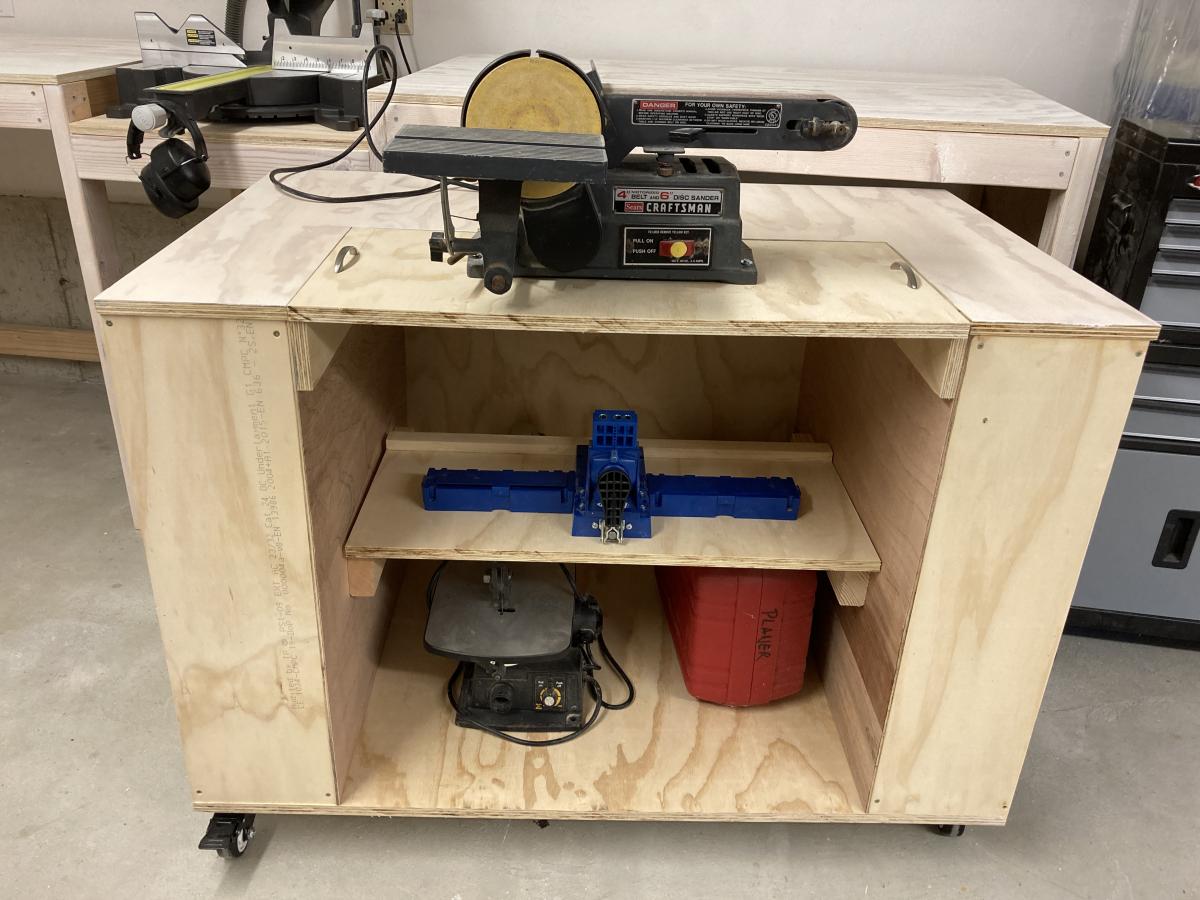
Ultimate Work Bench using Ana's plans

When I first saw Ana's Ultimate Work Bench I was blown away. I *had* to make this. I love how neat the garage looks when everything is put away.
I had to make a few extra cuts in order to allow room for my table saw fence, but other than that the only thing I did differently was to pretty it up using a white gel wood stain that I sealed with finishing paste. I also added trim using the leftover 1/4 inch plywood.
Thank you for being such an inspiration, Ana. I love your plans!
Built from Plan(s)
Estimated Cost
$375
Estimated Time Investment
Week Long Project (20 Hours or More)
Recommended Skill Level
Beginner
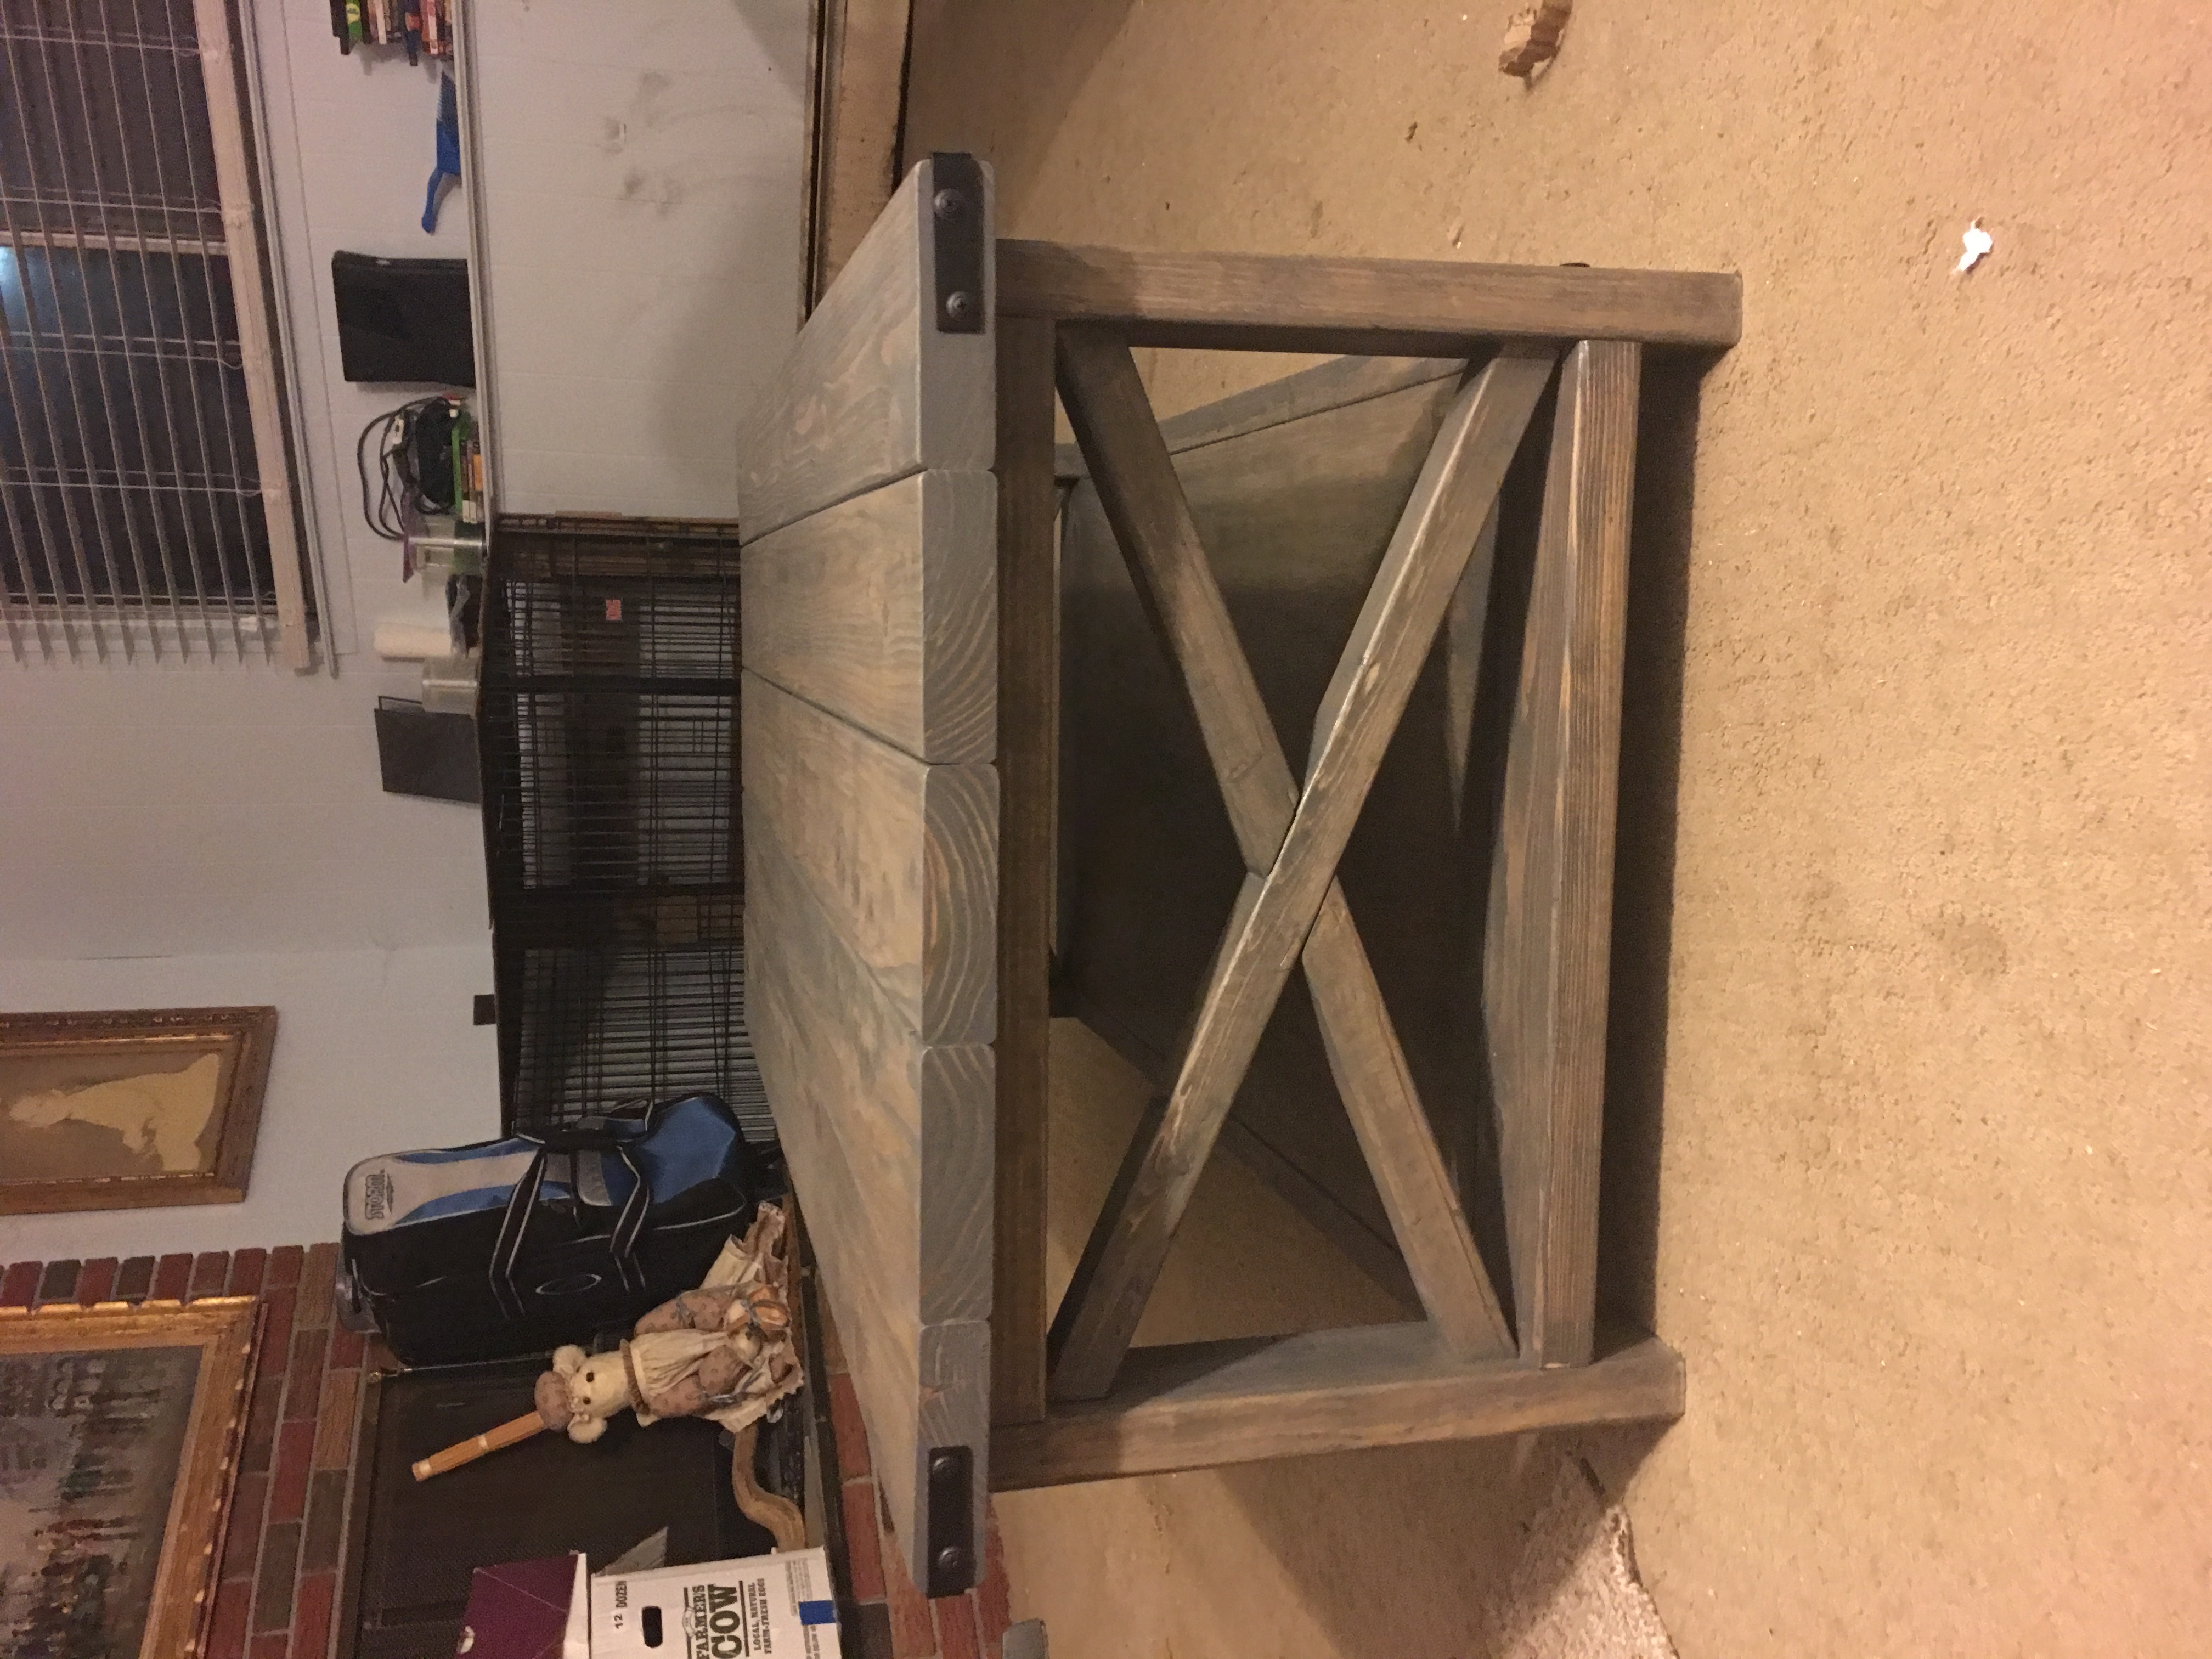
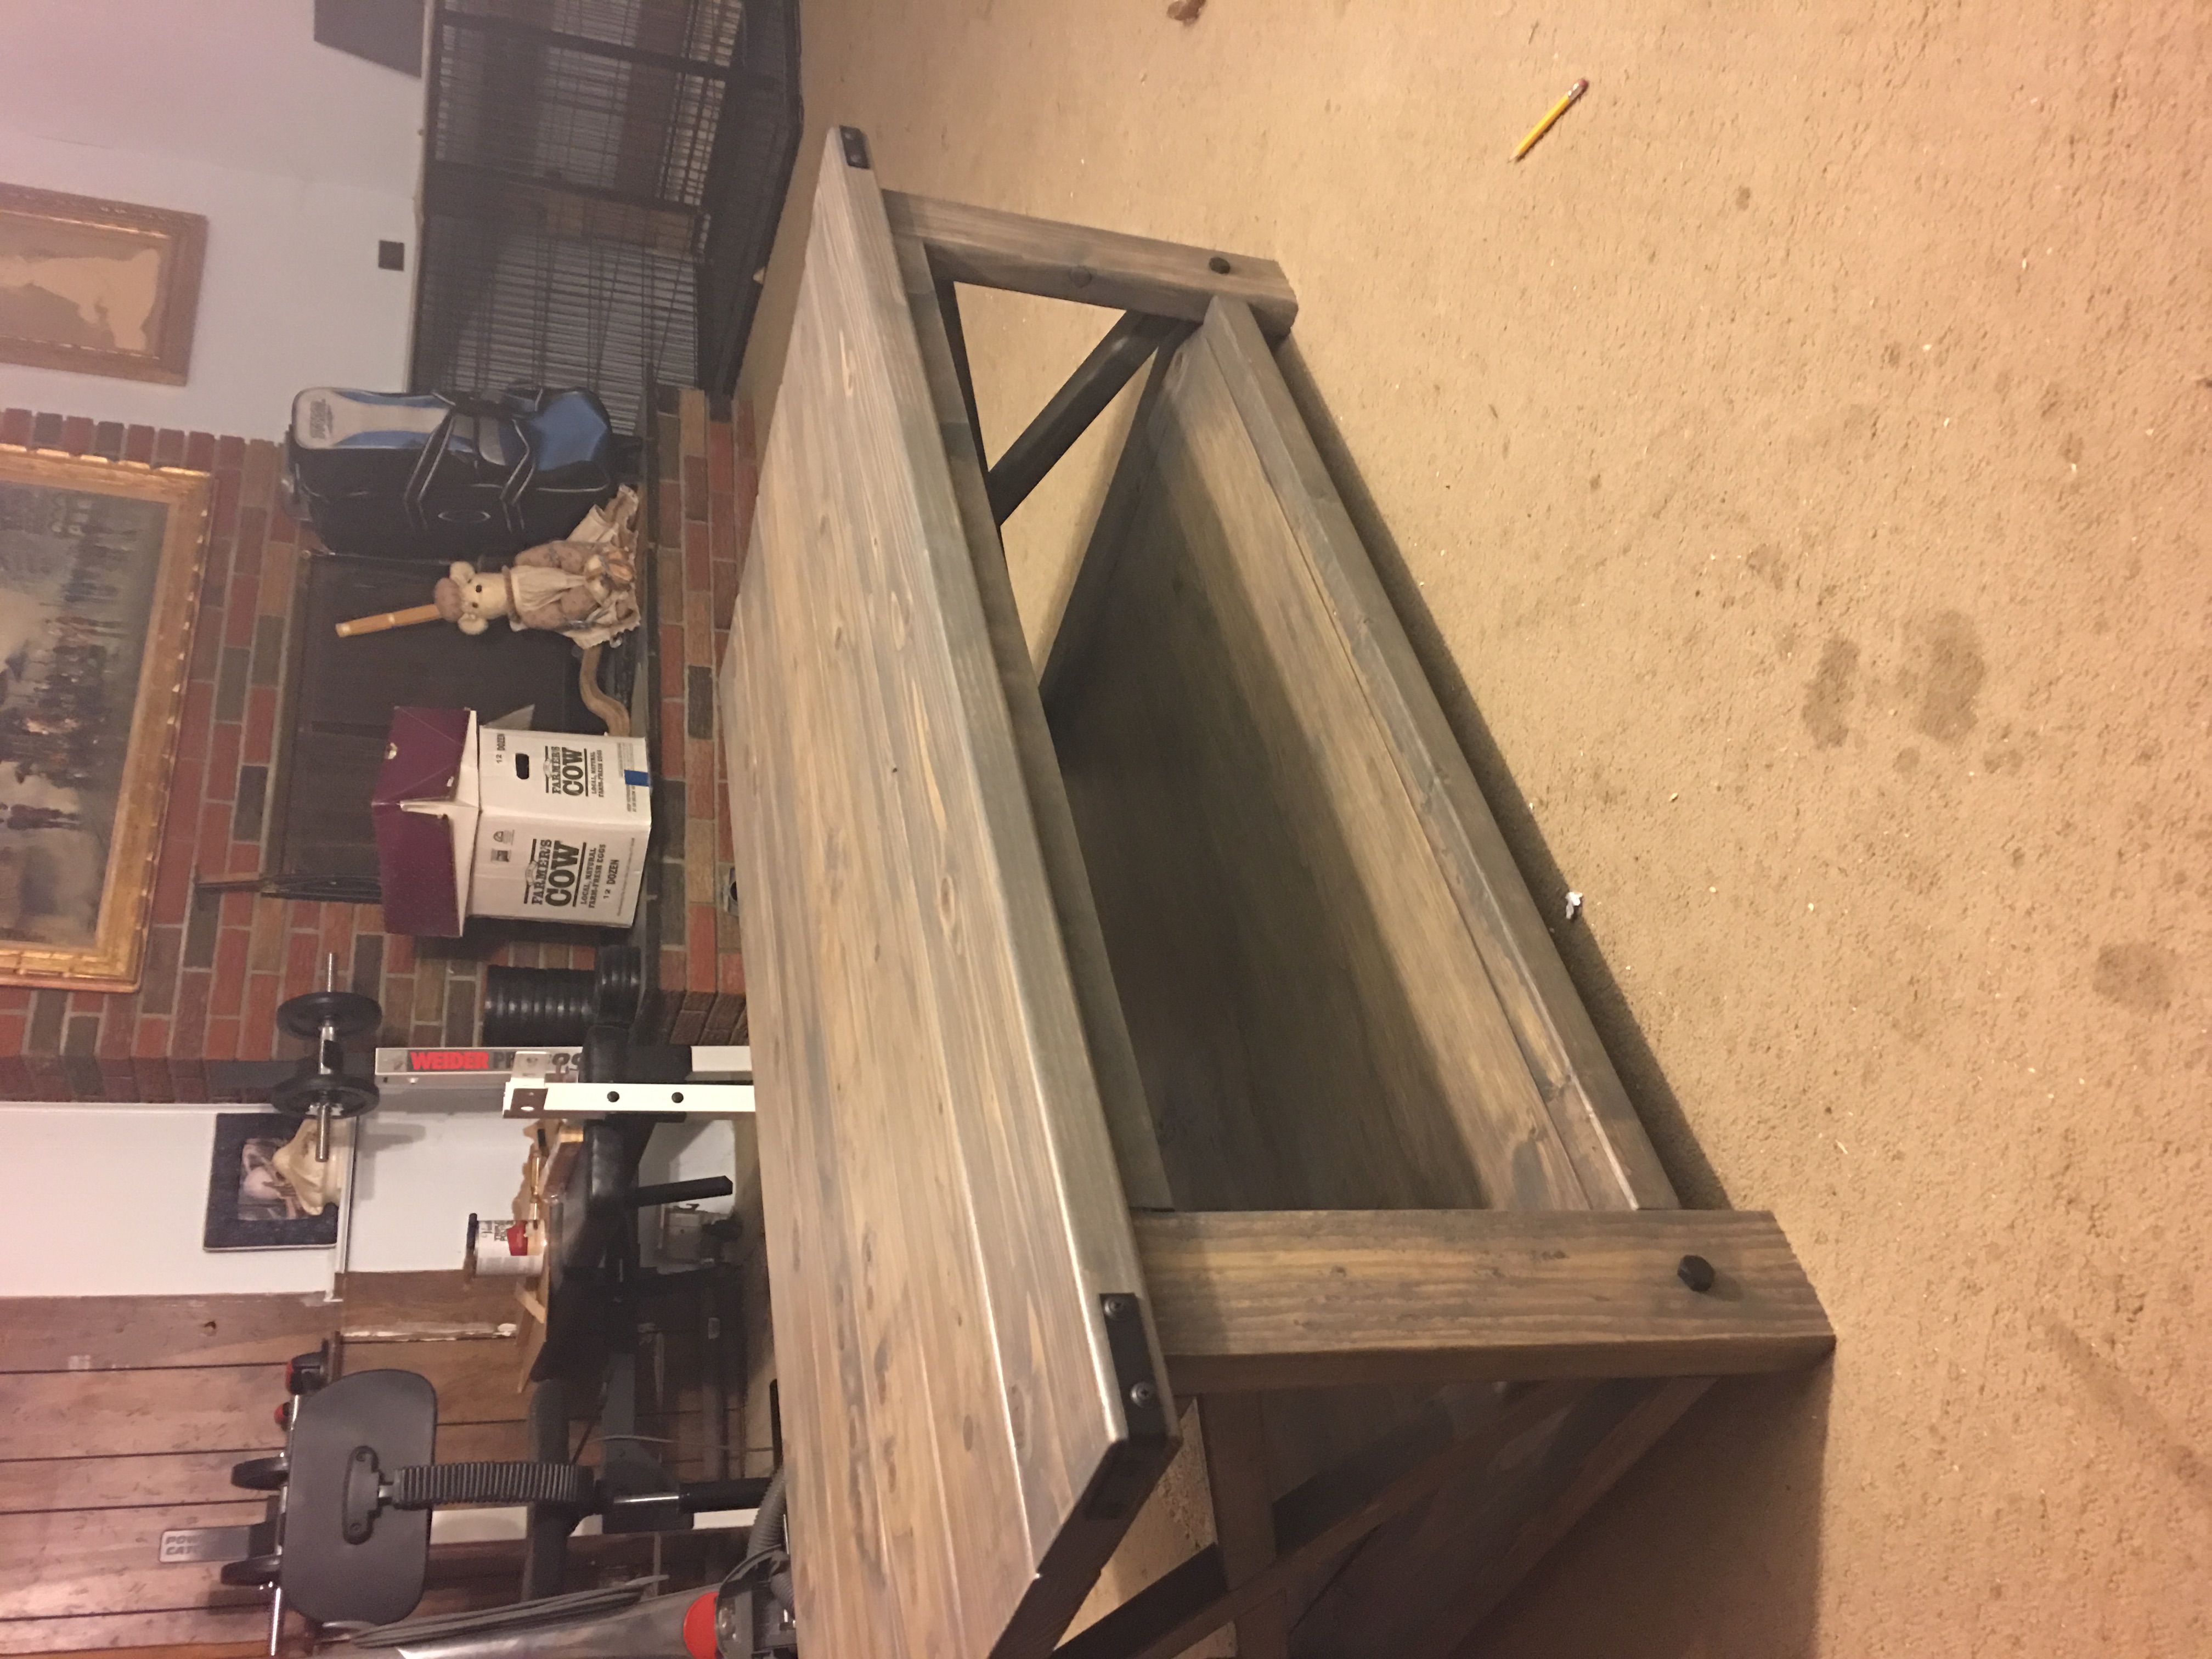
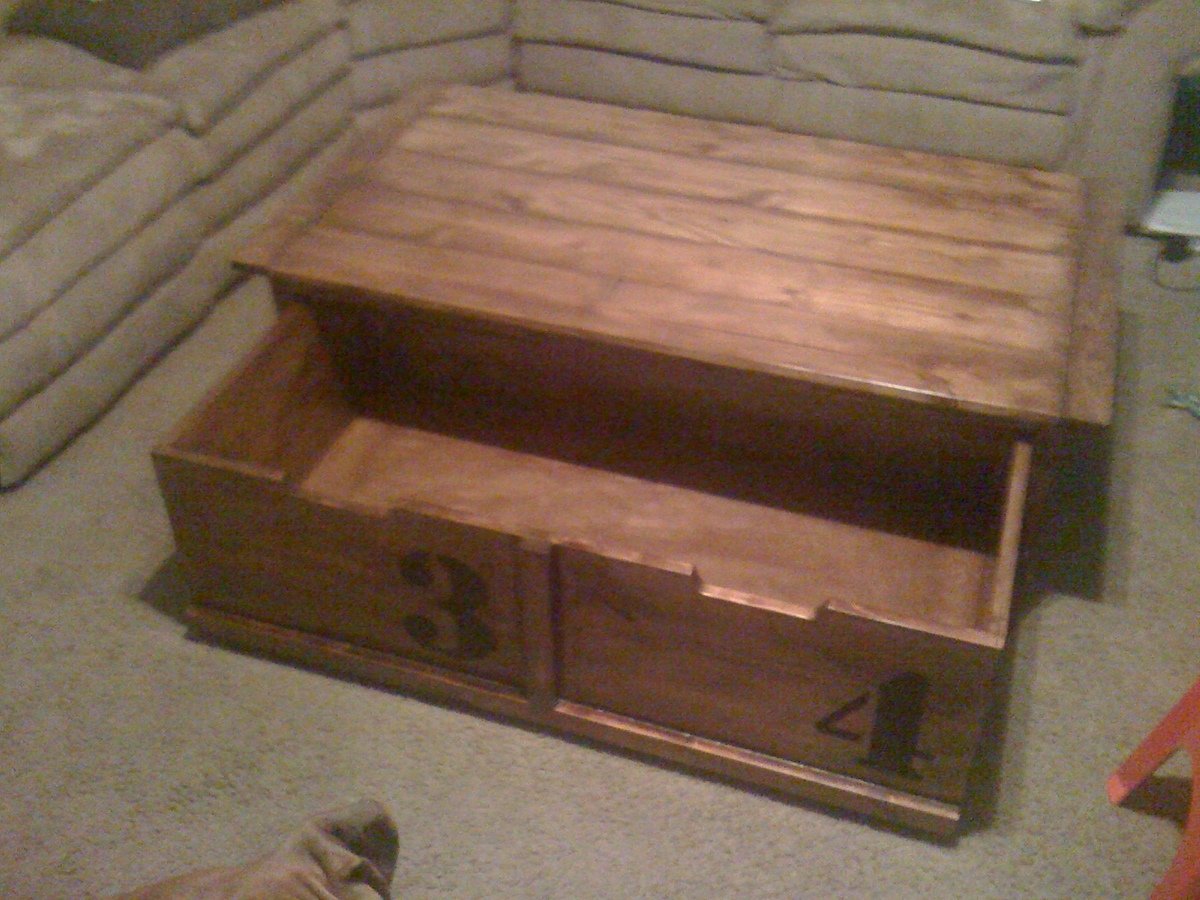
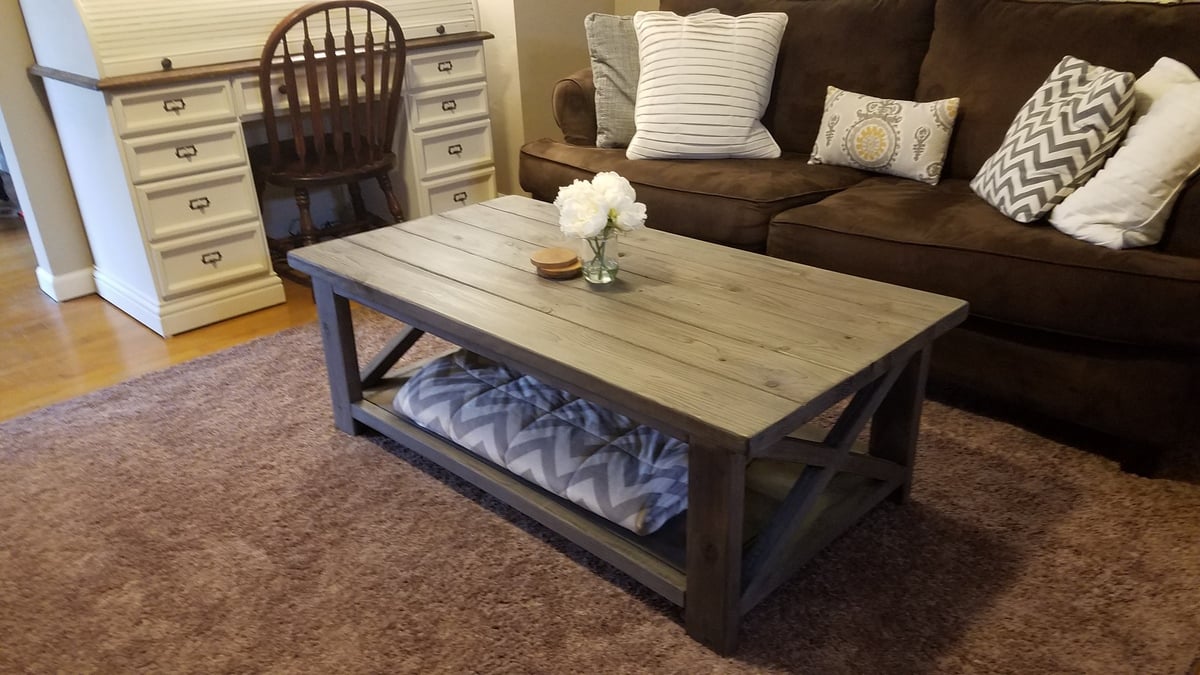
20 sec tidy up coffee table
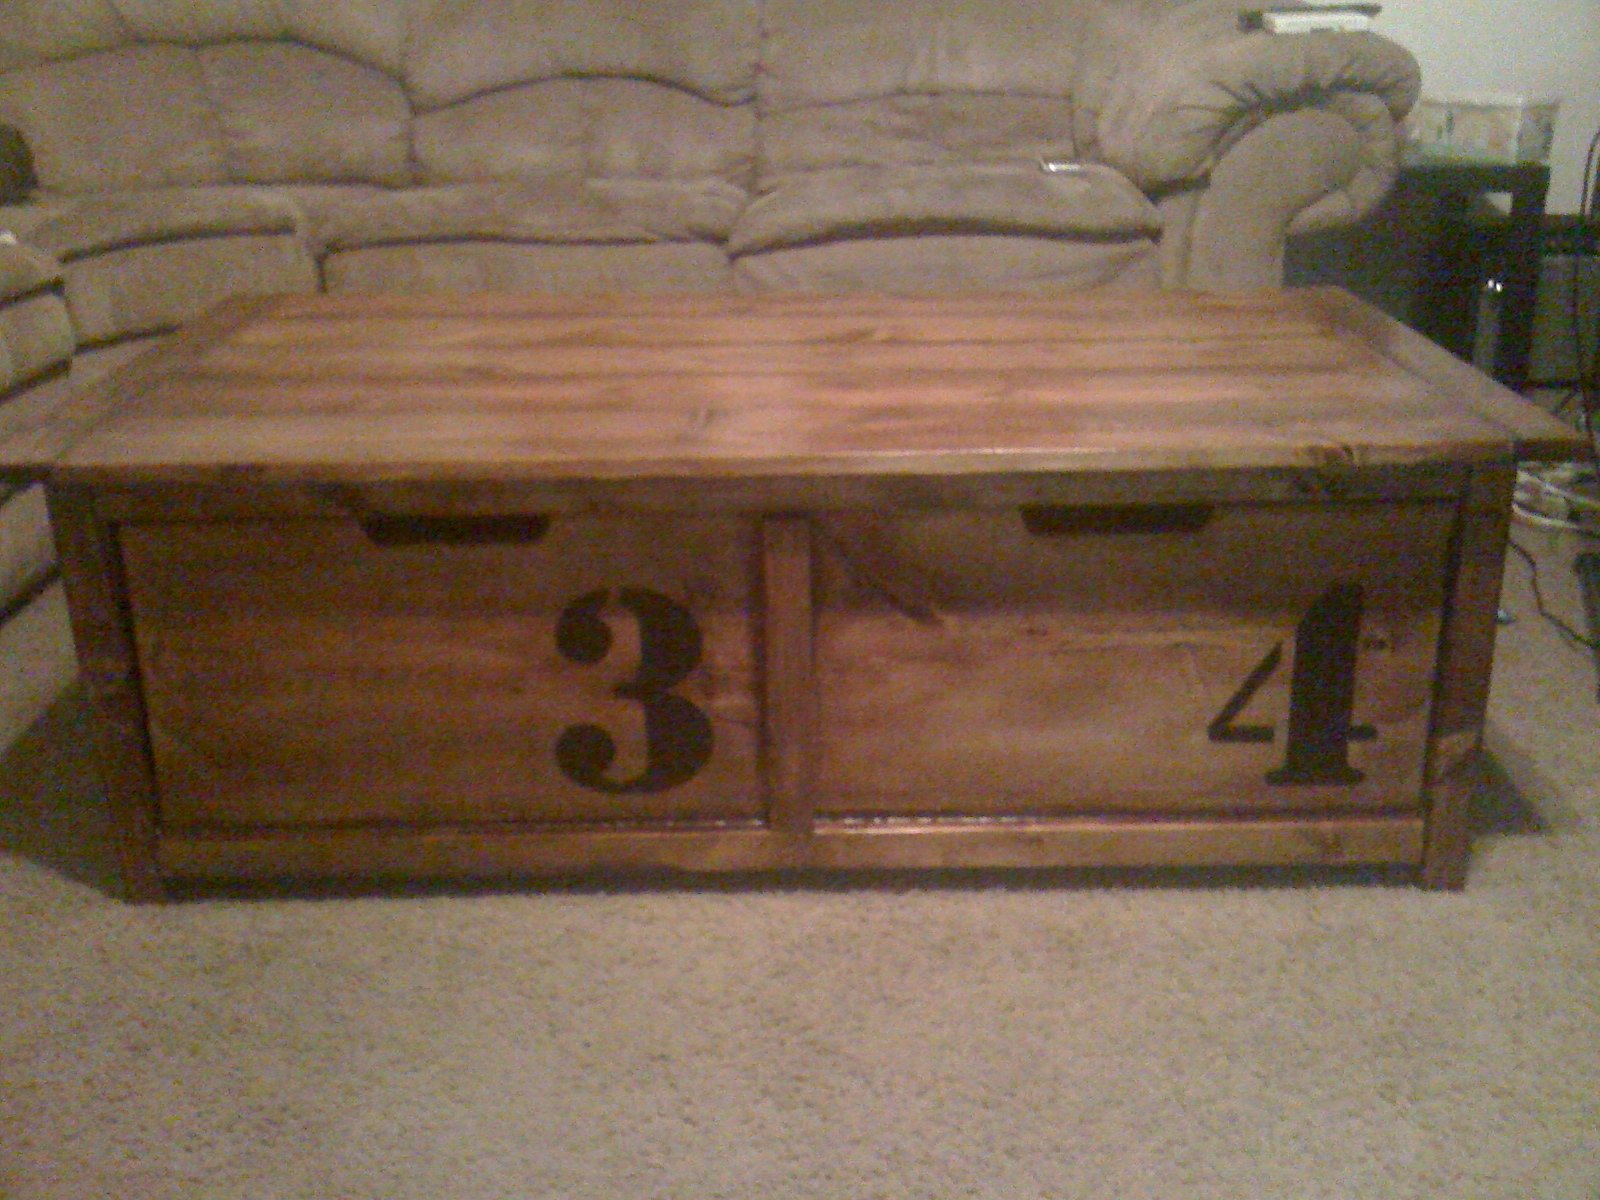
This was one of my first projects that I completed all be myself. I've done lot's of furniture with my dad but never alone. It went pretty smoothly just following the plans. I even used the Kreg jig for the first time and I love it! I completed in about two or three months working on the weekends for a few hours when I could. I was also working on refinishing my son's trundle bed so I'm not really sure how long it took me to finish. Sorry for the poor quality photos, I'm terrible at taking pictures.
Estimated Cost
$75.00
Estimated Time Investment
Weekend Project (10-20 Hours)
Finish Used
First I used wood conditoner with a foam brush. Then I used one coat of Minwax English Chestnut over the whole thing and then added another coat where the boards meet and other raised areas to make them darker, aslo with a foam brush. Then I put two coats of Minwax polyurethane clear satin on with a cheap paint brush and as long as I went back over it after a few seconds I could get rid of any bubbles.
Recommended Skill Level
Beginner
Comments
Fri, 11/16/2012 - 11:21
great finish
I love how the darker areas look on your table. I tried for that look when I made mine but couldn't get it right. I will have to try again next time. Congrats on your first solo project:-)
Fri, 11/16/2012 - 20:22
the finish
thanks, I didn't wipe any of the stain off, I just blended it in to the rest of the board.
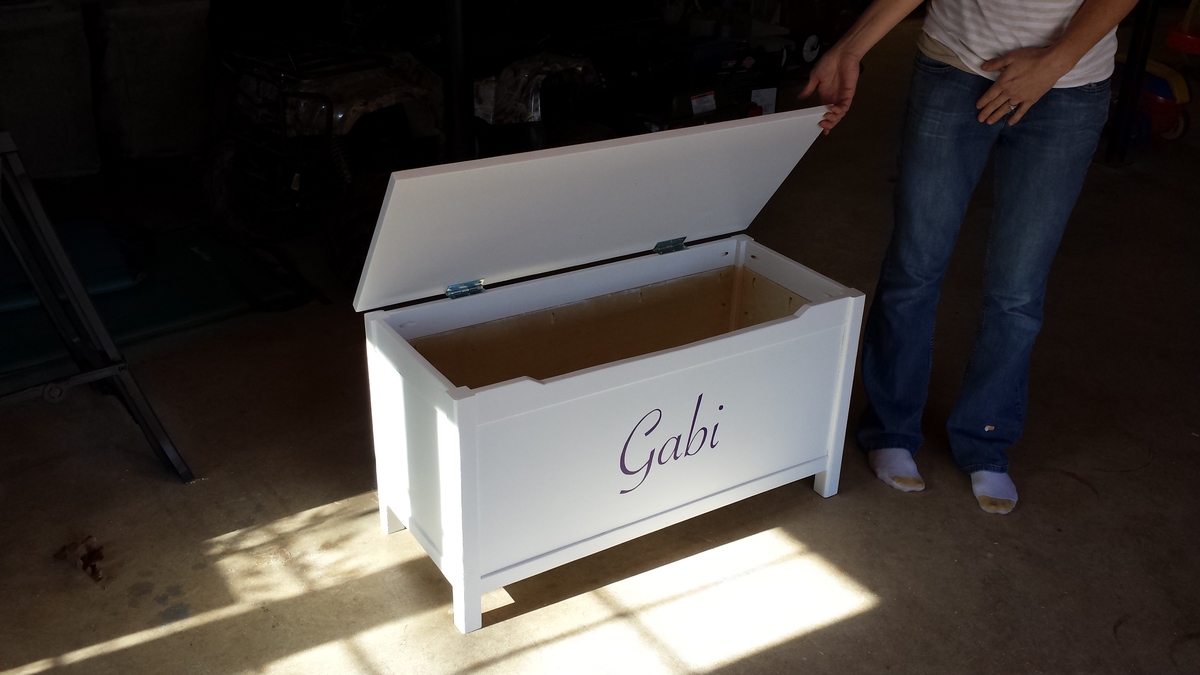
toy box
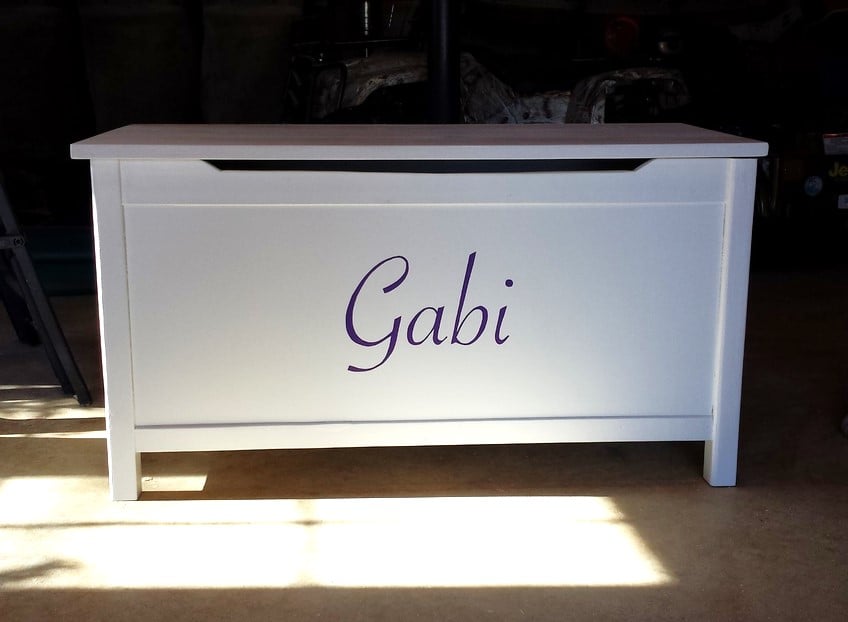
Simple cuts, kreg jig made all the difference when putting this together. Made for my niece's 2nd birthday and both she & my sister loved it.
Built from Plan(s)
Estimated Cost
With finishing products about $90
Estimated Time Investment
Weekend Project (10-20 Hours)
Finish Used
Paint and polyacrylic top coat. White primer after sanding, 2 coats of white paint, hand written name on front of box in purple paint, 2 coats of polyacrylic spray.
Recommended Skill Level
Beginner
Fancy X Farmhouse table with top attachment idea
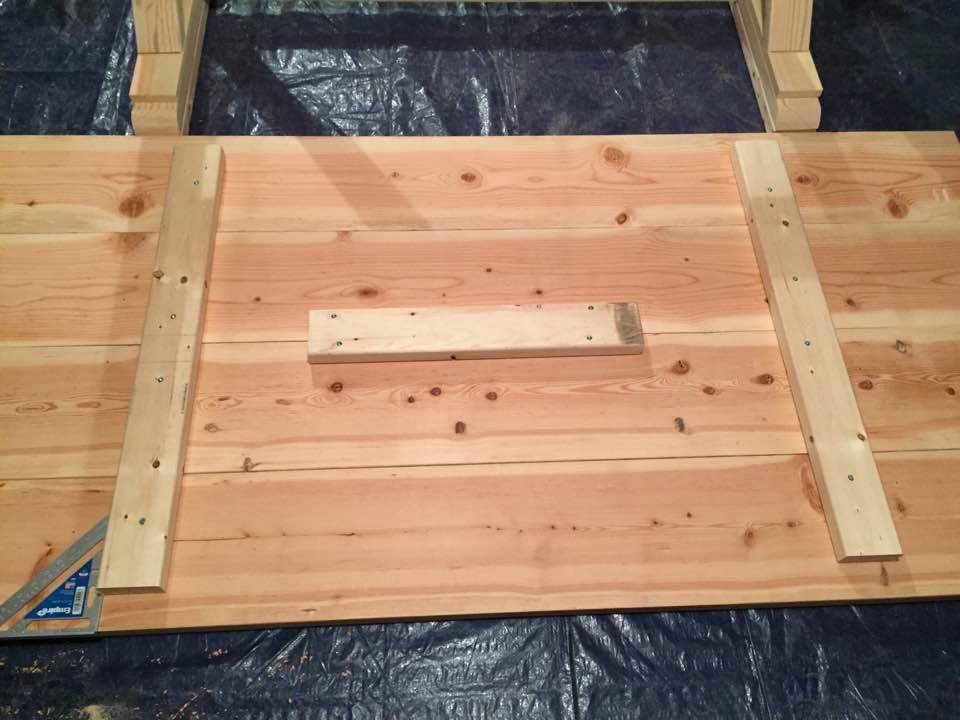
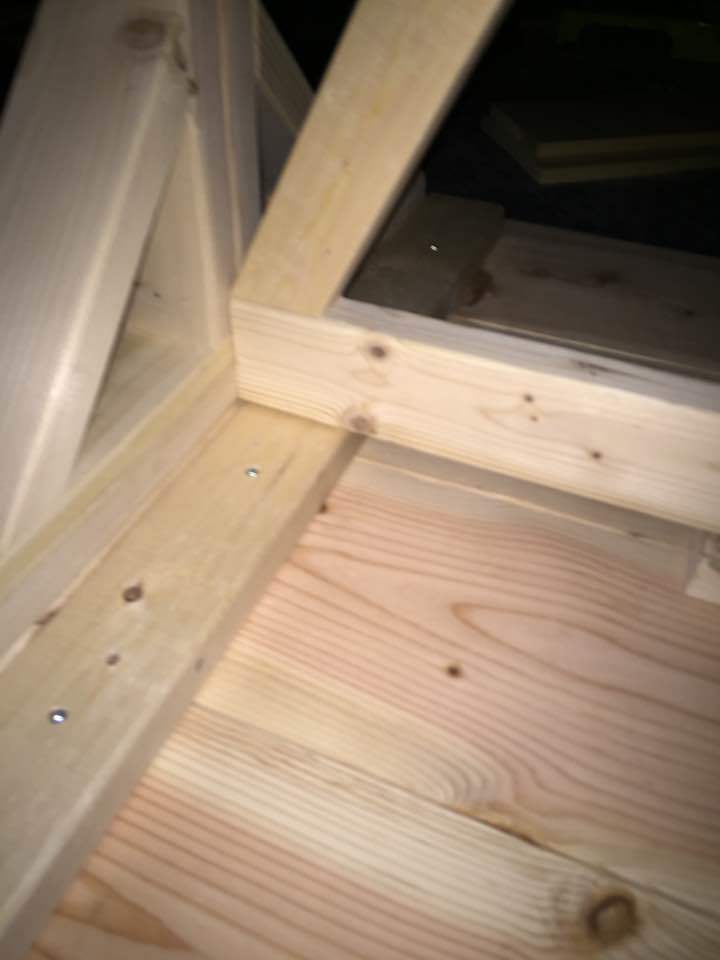
For my third project I built my brother-in-law the Fancy X Farmhouse table cut down to a size suitable for him and his girlfriend. When I read through the comments it seemed like alot of people had the same question: How do I attach the top?!?!?! As this was going to be used for an indoor dining table I didnt want to screw through the top if I didnt have to and I didnt want to use metal bracketry eithery. What I did required 4 inch screws and a 5/8 drill bit. Ive attached pictures to show where I placed the wood suport pieces. Two screws went through the top cross beam (connecting the two leg ends) into the center support piece and I put a total of 2 screws each through the sides of the two longer support pieces and into the top board of the legs. I used a 5/8 bit to drill about an inch (very rough estimate and essentially to countersink the screws an inch deep) into the 3.5 inch width of the 2x4s and then a smaller drill to pre-drill holes for the 4 inch screws. This allowed the head of the screws to sit about an inch into the wood and the threaded portion of the screw to dig deep enough into the second board without going through it. Overall it holds great and there are no visible screw heads on the top of the table!
FYI This technique DOES require aligning the cross beam with the top of the second 2x4 rather than the top 2x4 because you want to save enoughg room the support pieces. (See pictures)
Built from Plan(s)
Estimated Cost
100
Estimated Time Investment
Day Project (6-9 Hours)
Finish Used
None yet. Will be gifted to my brother in law and he and his girlfriend will finish it.
Recommended Skill Level
Intermediate
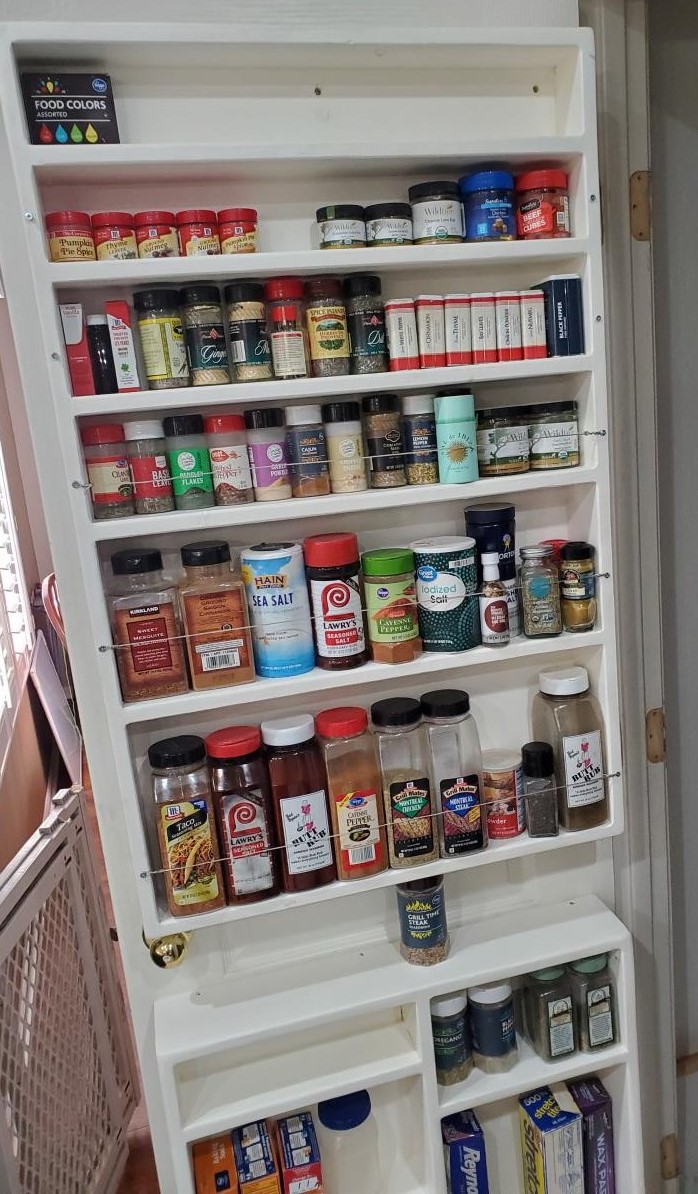
Pantry Door Spice Rack
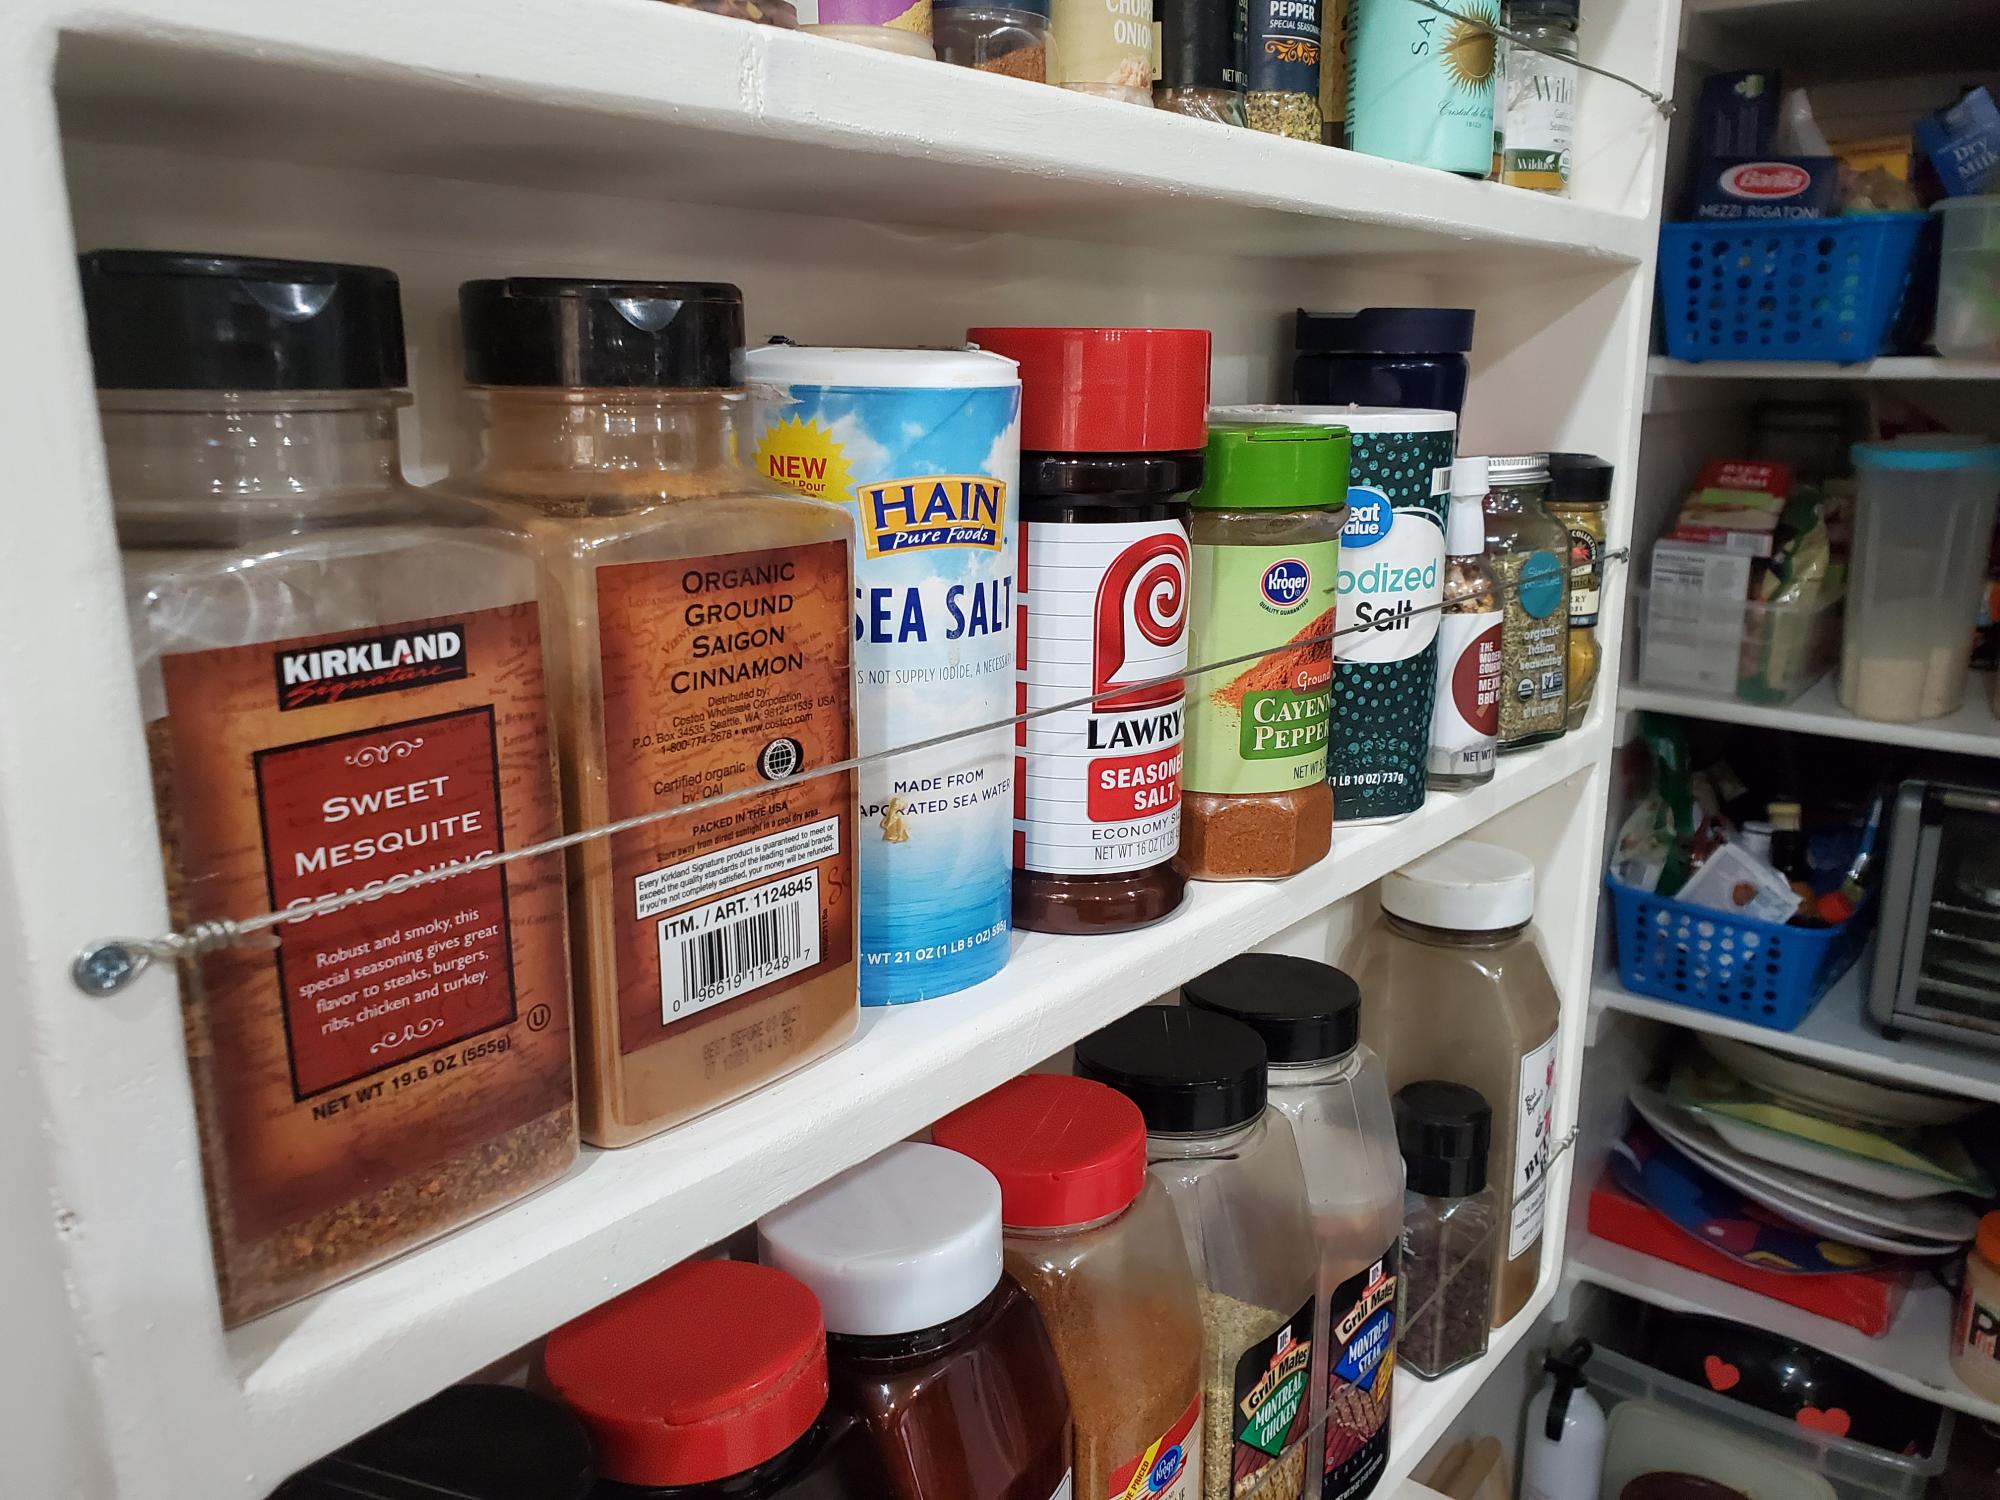
First I had to flip the pantry door from opening into my small pantry to opening out. Doing this allowed me to utilize back of the door for this spice rack. Frees up quite a bit of space in our cabinets, drawers and pantry for other items. Substituted braided picture frame wire for the wood dowels; still keeps all items secure on the shelves but also allows for more flexibility when dealing with canister sizes that are very close to the amount of space in between shelves. Already had the paint from doing some baseboards as well as quarter inch ply. So, final cost was for 1x4's and 1x6's coming out to about $30
Built from Plan(s)
Estimated Cost
$30.00.
Estimated Time Investment
Weekend Project (10-20 Hours)
Finish Used
Equal parts Behr Premium Plus Semi-gloss interior and Minwax Polycrylic Clear Satin
Recommended Skill Level
Beginner
Farmhouse coffee table
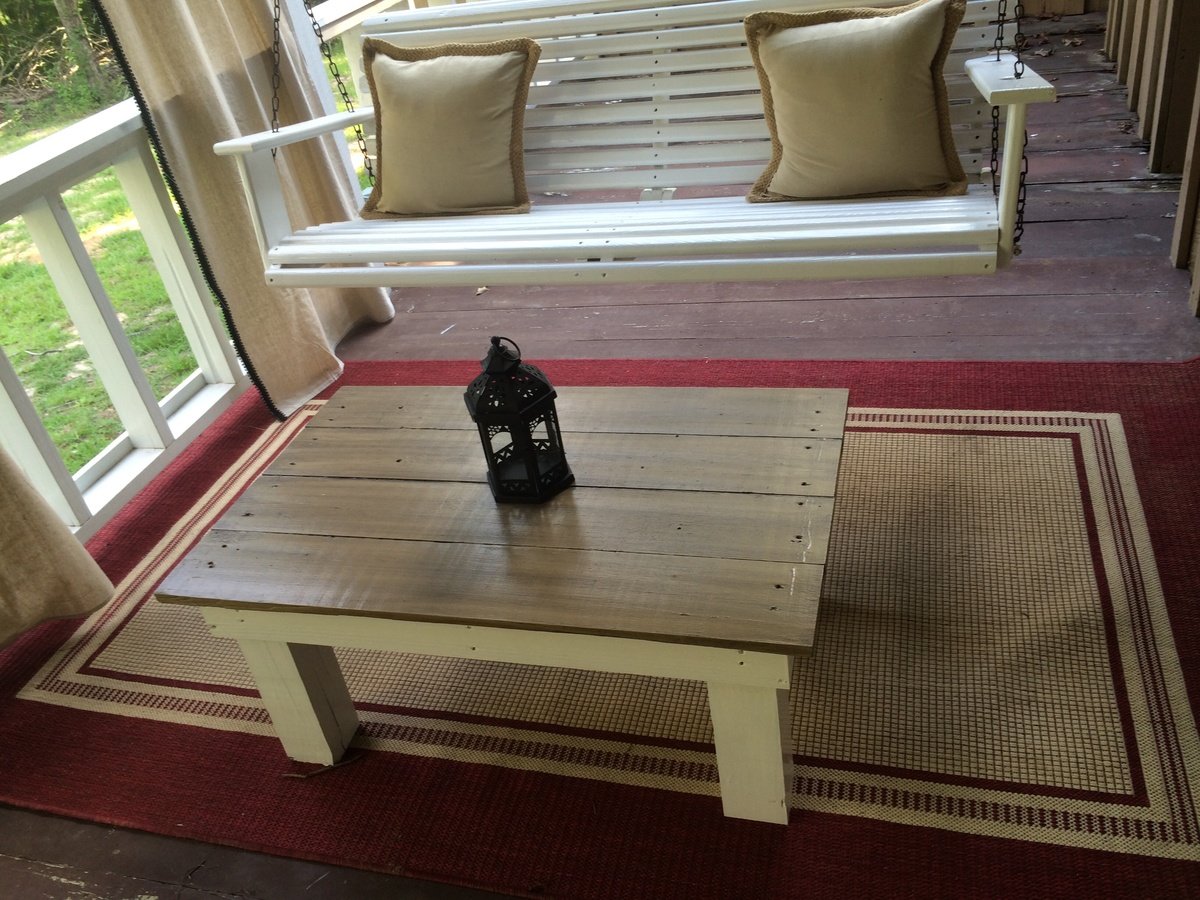
Our new outdoor coffee table
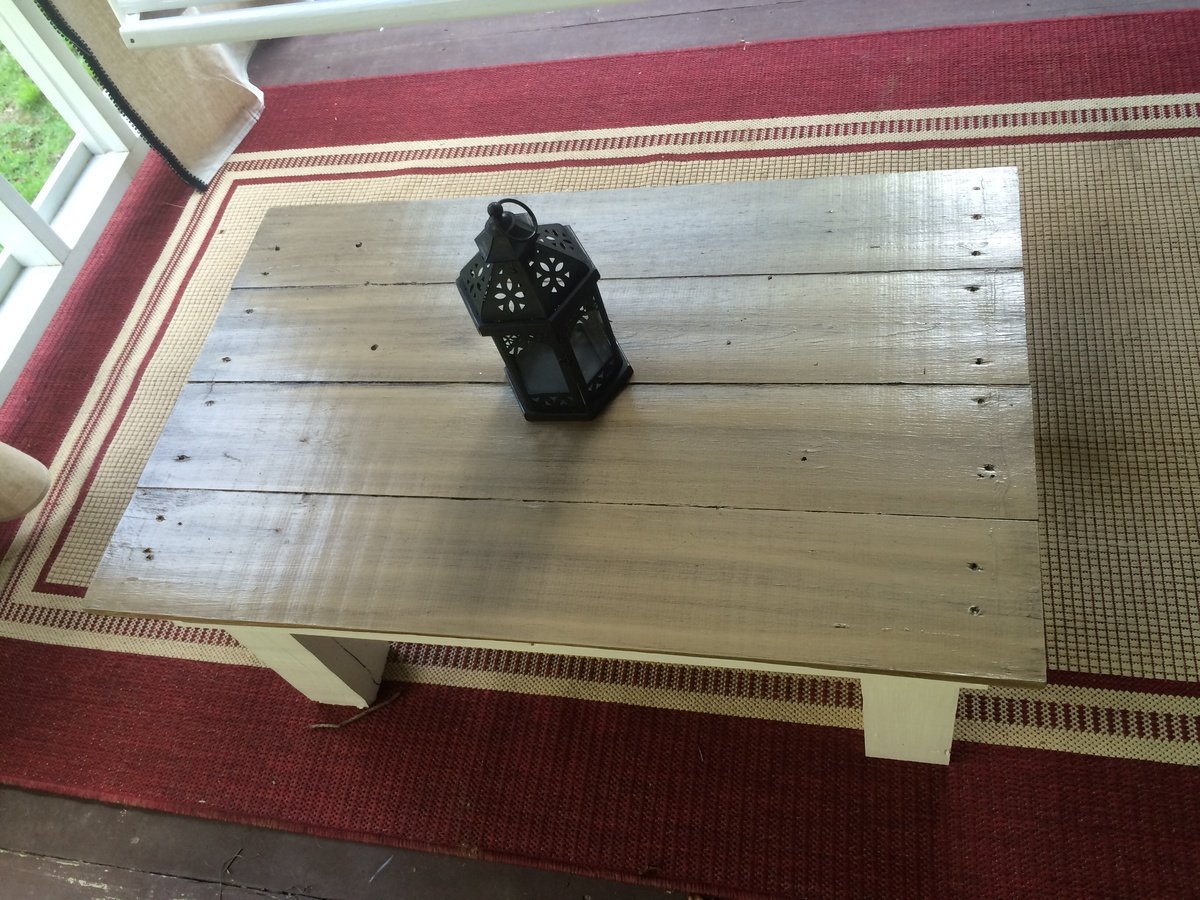
Estimated Cost
Free! We used scrap wood.
Estimated Time Investment
An Hour or Two (0-2 Hours)
Recommended Skill Level
Starter Project
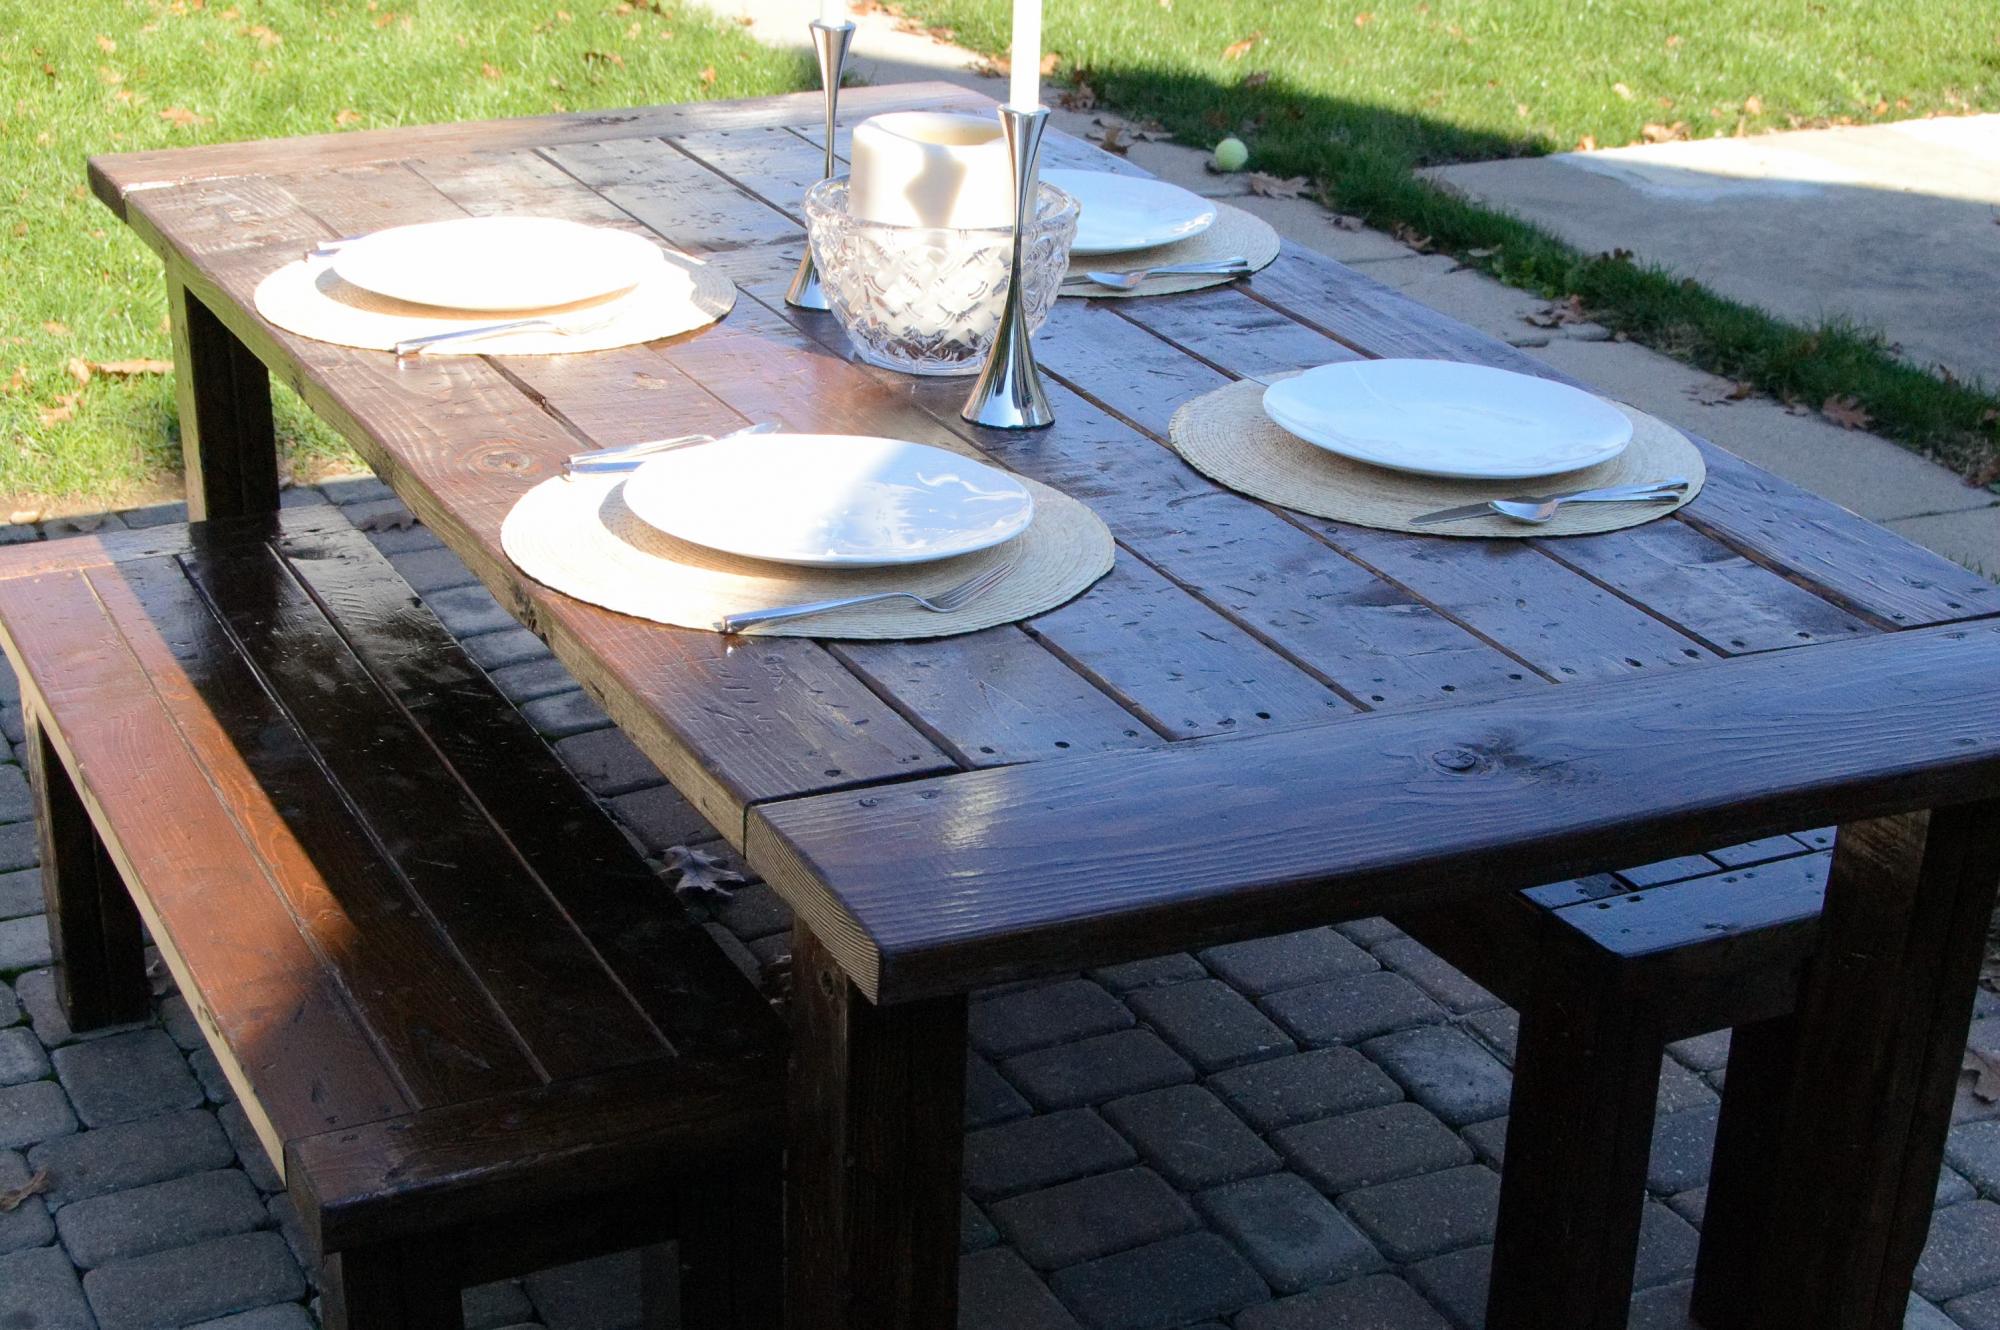
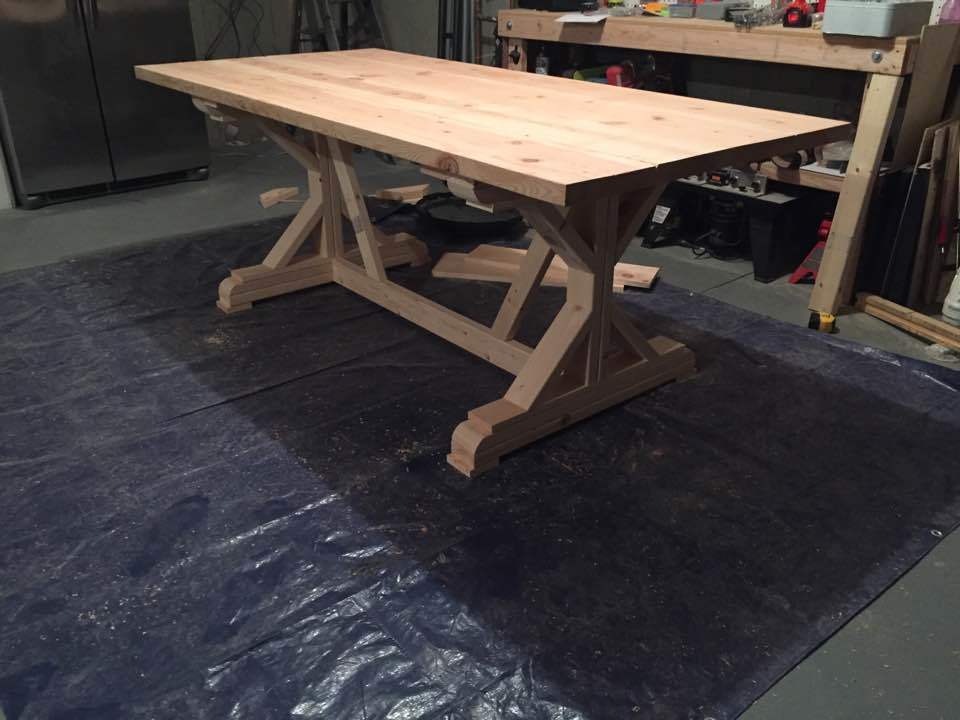
My fancy farmhouse table version. 10' long

Built this fancy farmhouse table for the back patio. Made it 10' long. Instead of 4 2x10's I used 5 2x8's 10' long. All yellow pine from Home Depot. This is the first table or wood type construction project I have ever made. Screwed everything together, filled in holes with stainable wood filler, used 3 coats of Minwax Provencial stain and then 3 coats of outdoors Helmsman Spar Varnish (sanding with 000 steel wool between coats). Turned out great. Total materials including wood, screws, sanding, stain, varnish, and brushes was a little less than $300. The stain and varnish I bought was about $100, 1 gallon can of stain and 1 gallon can of varnish. Tools used were miter saw, cordless and corded drills, and sanders before staining. Thanks for the plans Ana-White.

Estimated Time Investment
Week Long Project (20 Hours or More)
Finish Used
MinWax Provencial stain (3 coats)
Helmsman Outdoor Spar Varnish (3 coats 000 steel wool sanding between coats)
Helmsman Outdoor Spar Varnish (3 coats 000 steel wool sanding between coats)
Recommended Skill Level
Starter Project
Comments
Sat, 11/24/2012 - 04:34
this is beautiful & just what we need
Gorgeous table and i love the finish. is it exposed to the elements or undercover? I need mine weatherproof & just was not sure if it would be possible.
Sat, 11/24/2012 - 08:58
Looks great! I'm a newbie too
Looks great! I'm a newbie too and just finished my first project.
Wed, 07/31/2013 - 10:52
Awesome Table
Looks great. I did the same but I went and bought a Home Depot table(pre-built) and just stained it. Looks almost identical except 1/4 of the time and cost. BTW I love the painted brick. Thanks for sharing. I give your table a 10!
Reclaimed Wood Look Bedside Table 1st Project
My first build! Came out great, my daughter loves it!
Built from Plan(s)
Estimated Cost
$60
Estimated Time Investment
Weekend Project (10-20 Hours)
Finish Used
Dark Walnut Minwax
Recommended Skill Level
Beginner
Hall Tree - Shiplap and Old Growth Fir
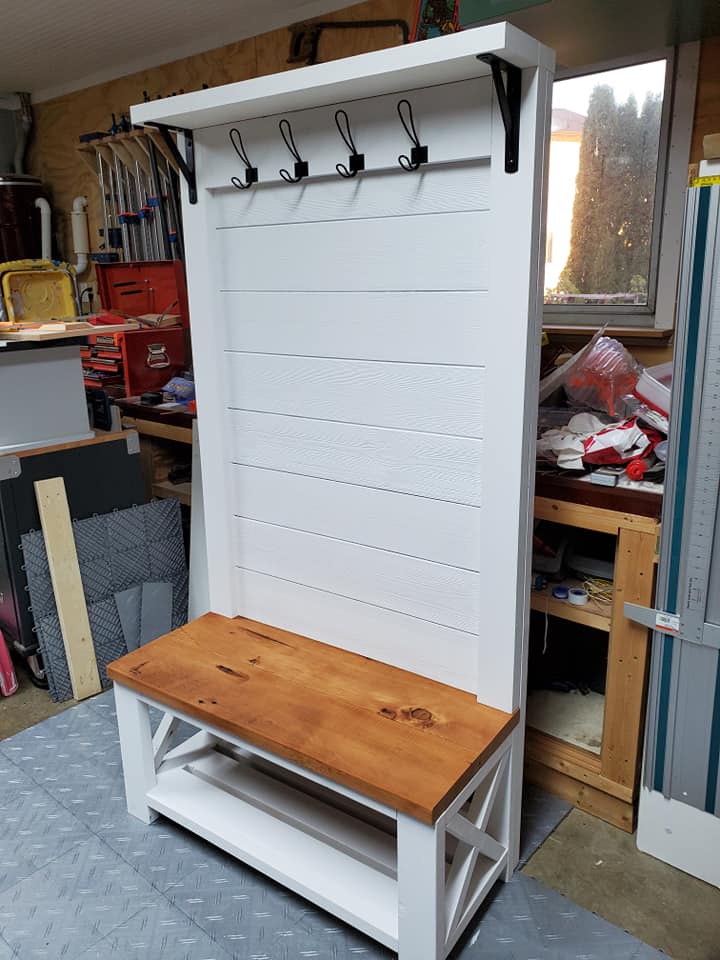
Loved doing this project. Used the Ana White plans with a few mods. Made the back removal so that I could easily transport. This was for my daughter's apartment that had no entry closet for her shoes and coats.
Built from Plan(s)
Estimated Cost
$200
Estimated Time Investment
Weekend Project (10-20 Hours)
Finish Used
Benjamin Moore Ceiling Flat White and Wipe on Poly for the seat.
Recommended Skill Level
Intermediate
Comments
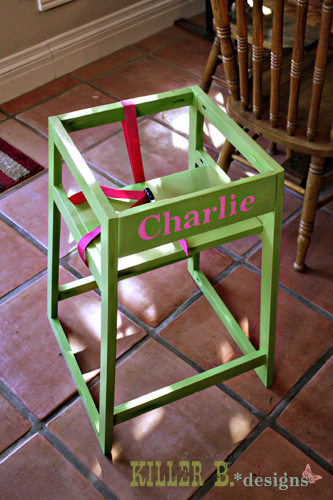
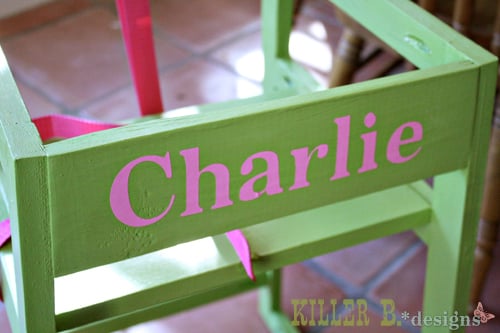
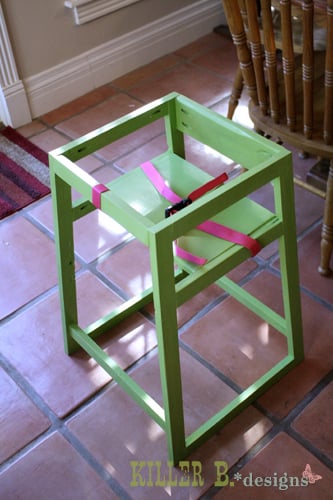
Charlie's Personalized Highchair
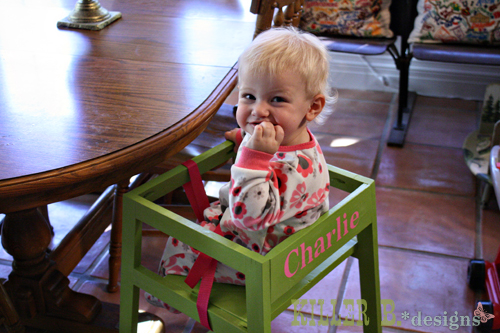
A few days before Thanksgiving, my mom told me she wished we had a restaurant style high chair for my daughter. The old one was so large and bulky, and was hard to reach food on the table. I knew just where to look for plans! I spent $6 on the lumber and used scraps for the seat and back. The chair is painted in three coats of lime green paint. We used my mom's Cricut to cut the vinyl letters and stuck them on the back. Then three coats of polyurethane for easy wiping and it was ready for straps! I picked up $3 worth of 1" webbing from Hobby Lobby along with a parachute snap clip. I used two small cabinet screws for each strap on the bottom to attach. I decided to loop the front strap over the 1x2 front bar to prevent any risk of splitting by drilling into that thin side. Instead both ends are screwed down on the bottom.
We absolutely love this new highchair! It perfectly fits under the table and Charlie has no trouble eating (and throwing) food now. And for $10, you just can't beat it! Solid wood, perfect color, personalized name. I really love DIY
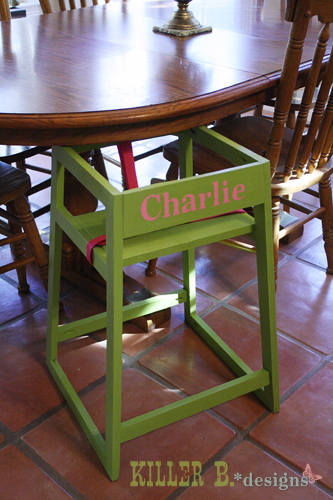
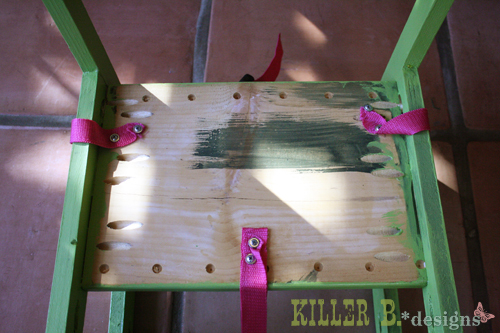
Built from Plan(s)
Estimated Cost
$10
Estimated Time Investment
An Hour or Two (0-2 Hours)
Finish Used
three coats of lime green latex paint, followed by three coats of polyurethane
Recommended Skill Level
Intermediate
Comments


Tue, 11/27/2012 - 20:40
Thank you!
We love it, and love her more ;) She's a cutie pie, that's for sure!