Community Brag Posts
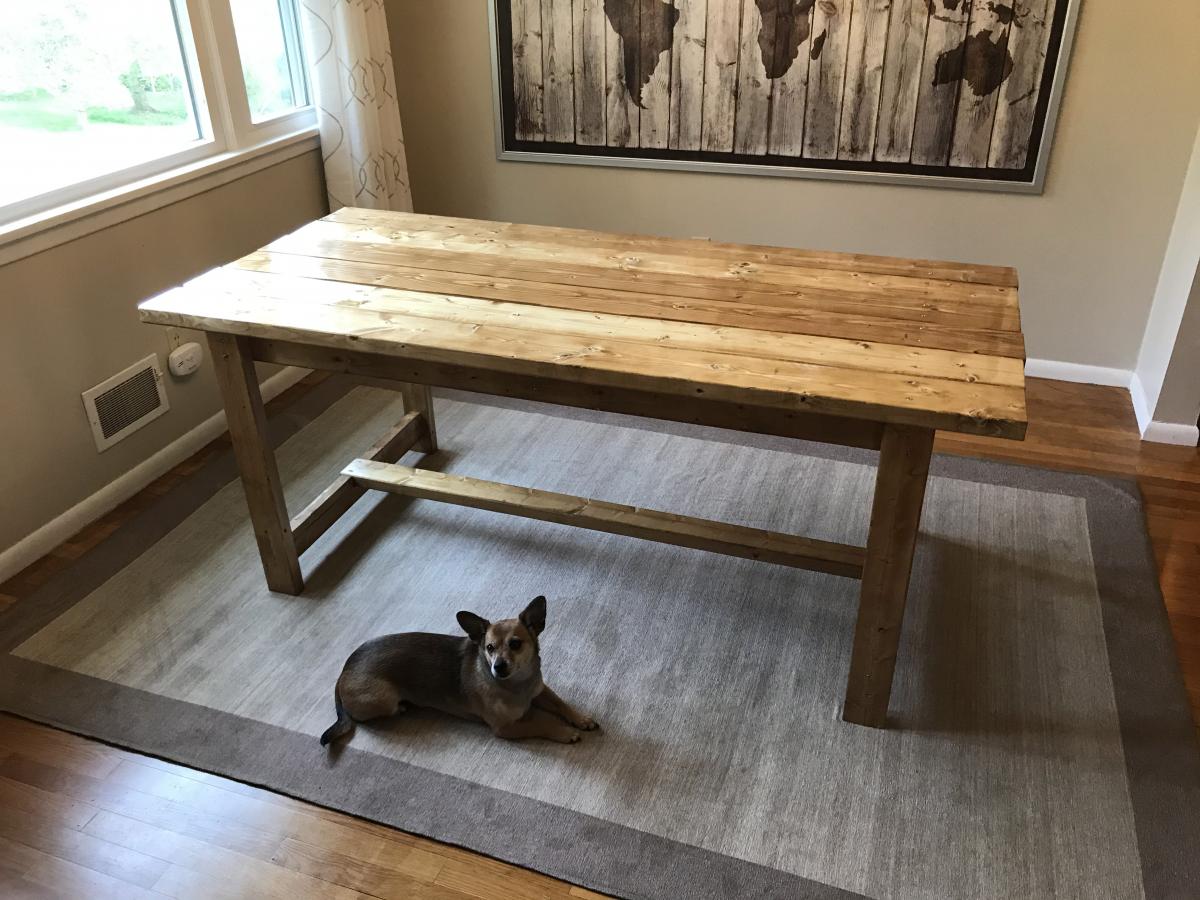
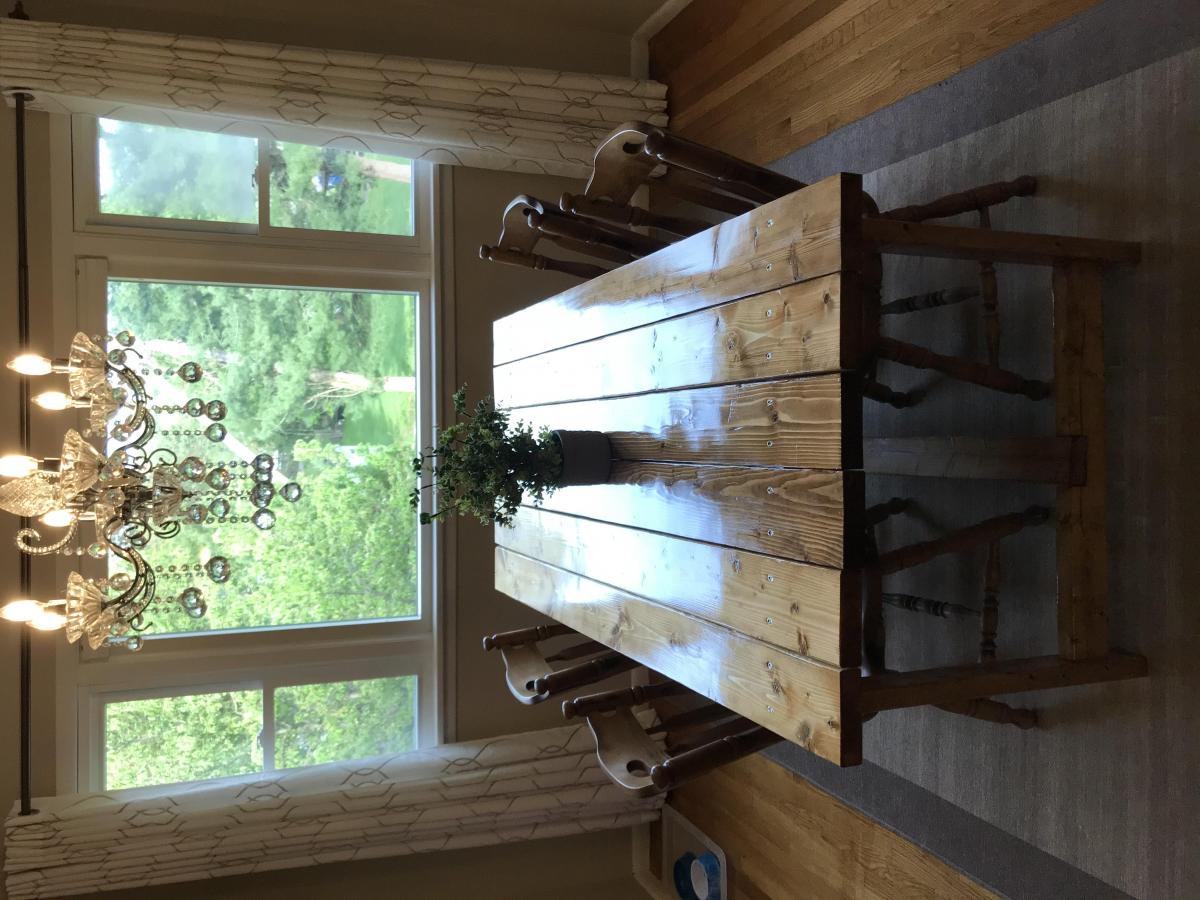
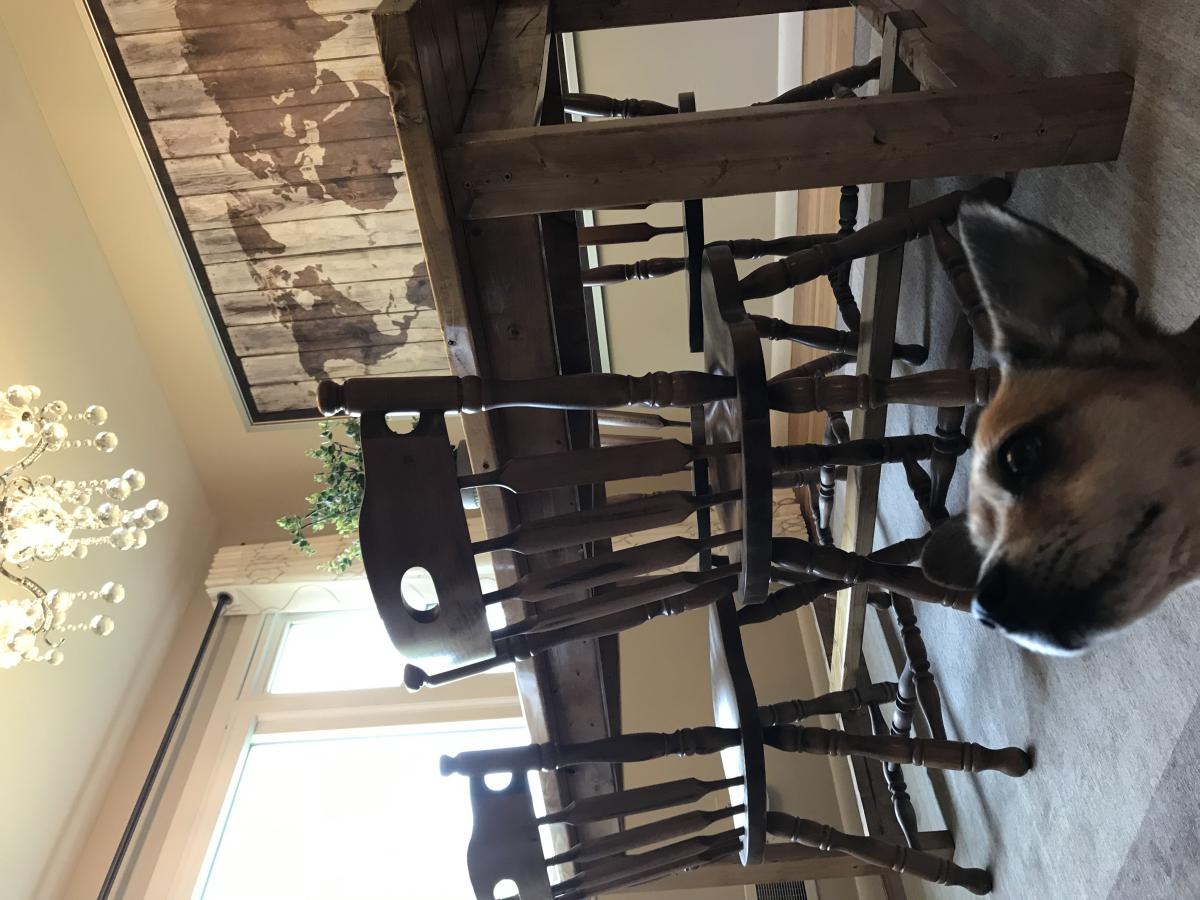
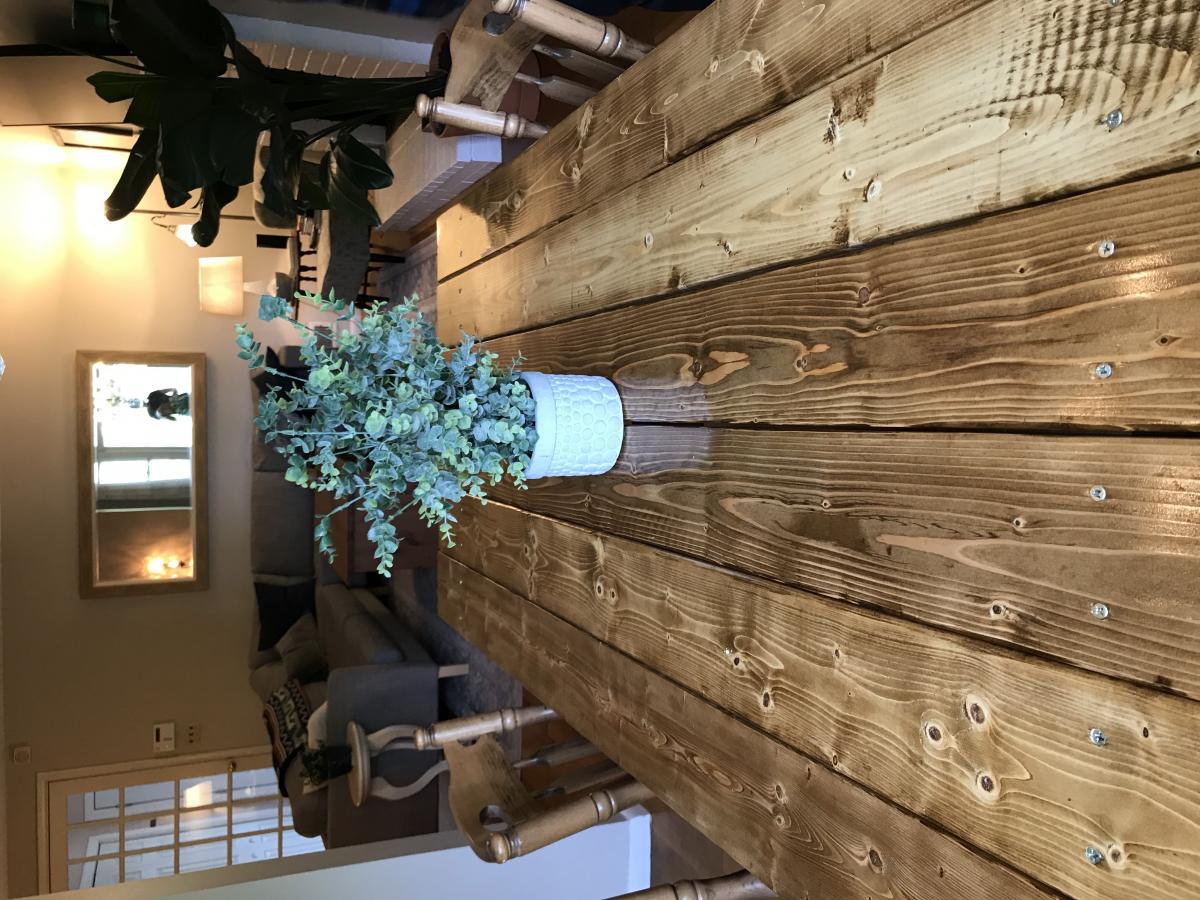
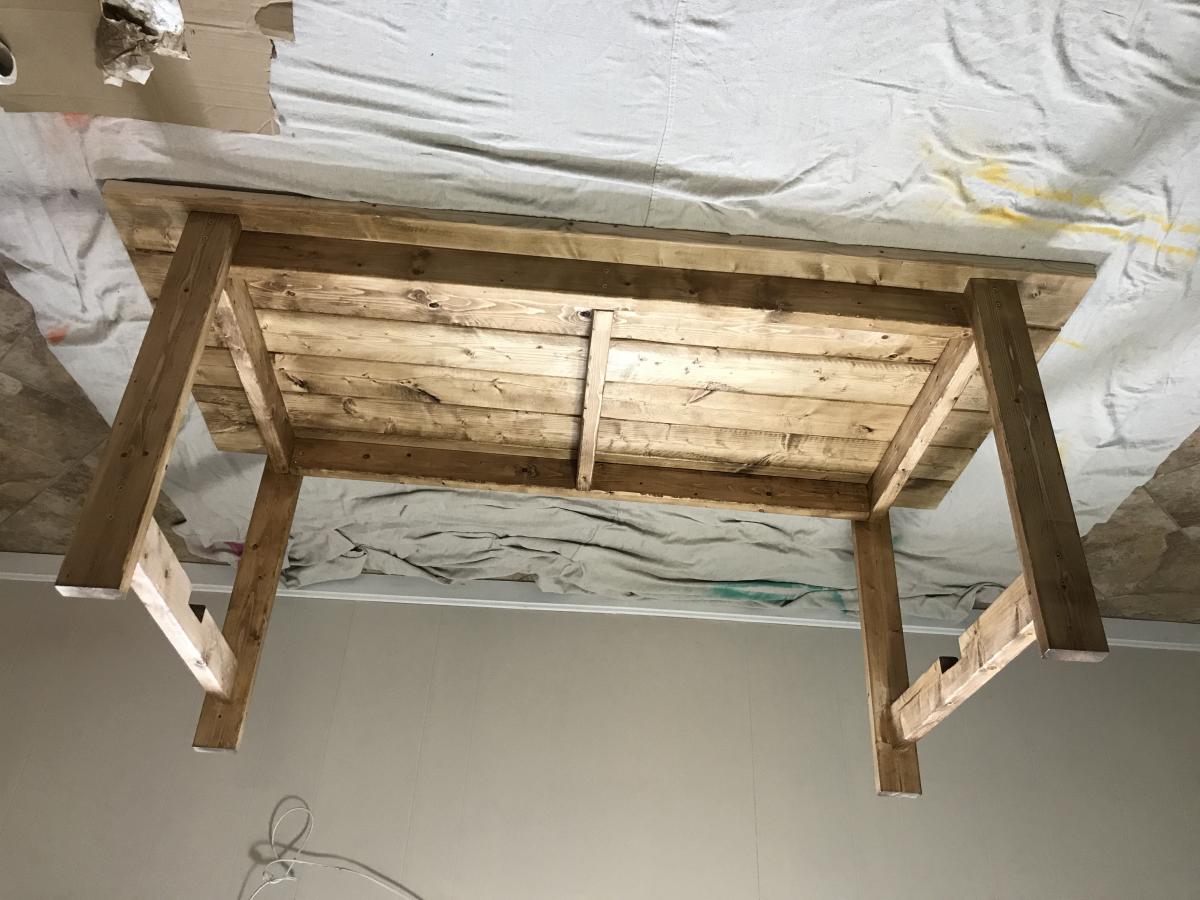
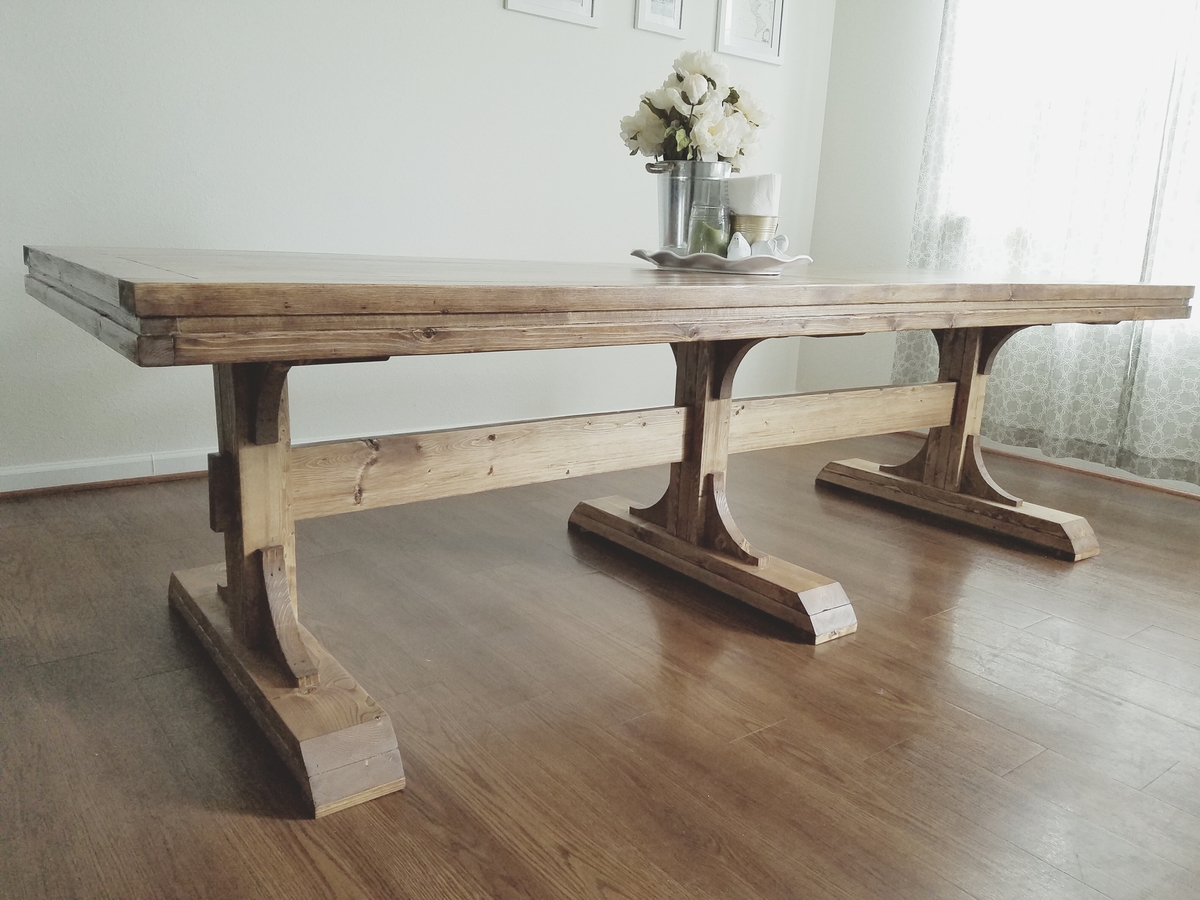
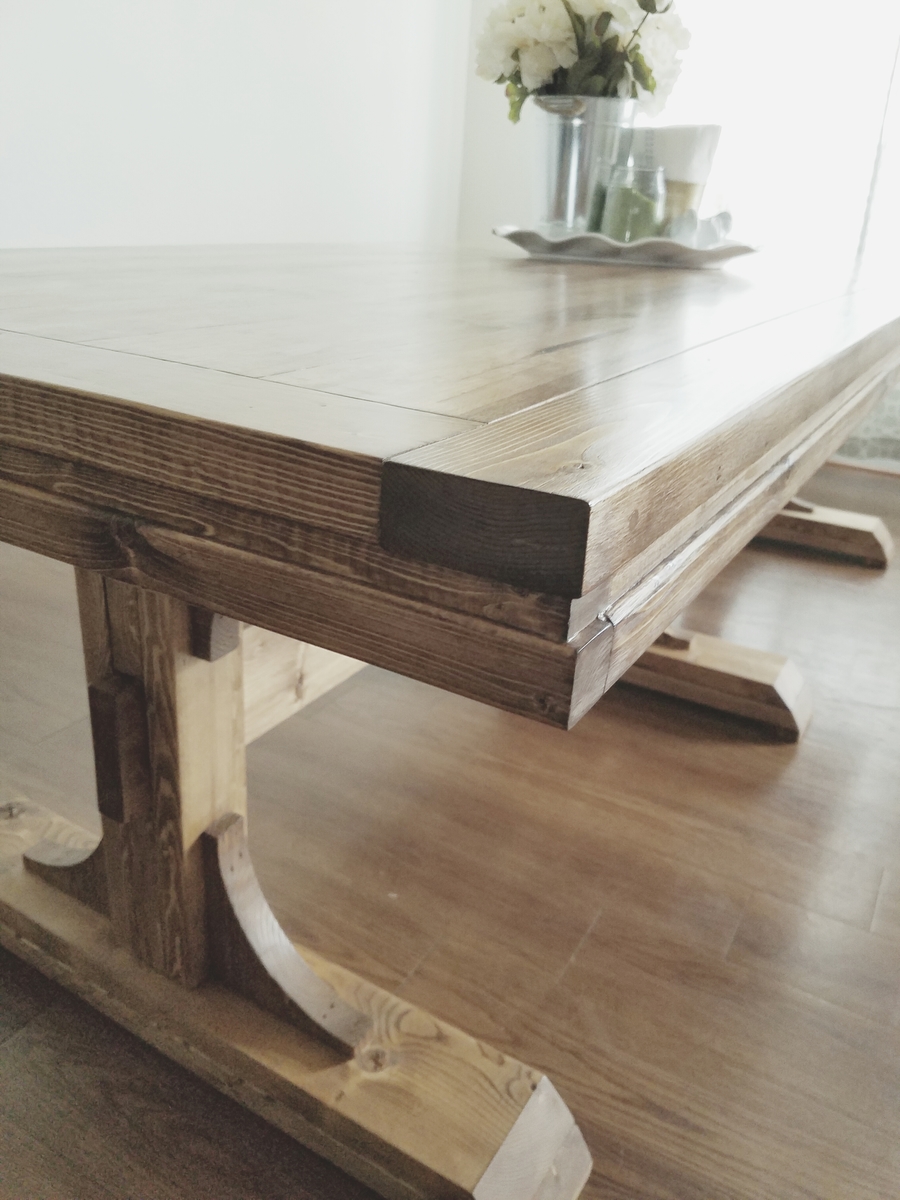
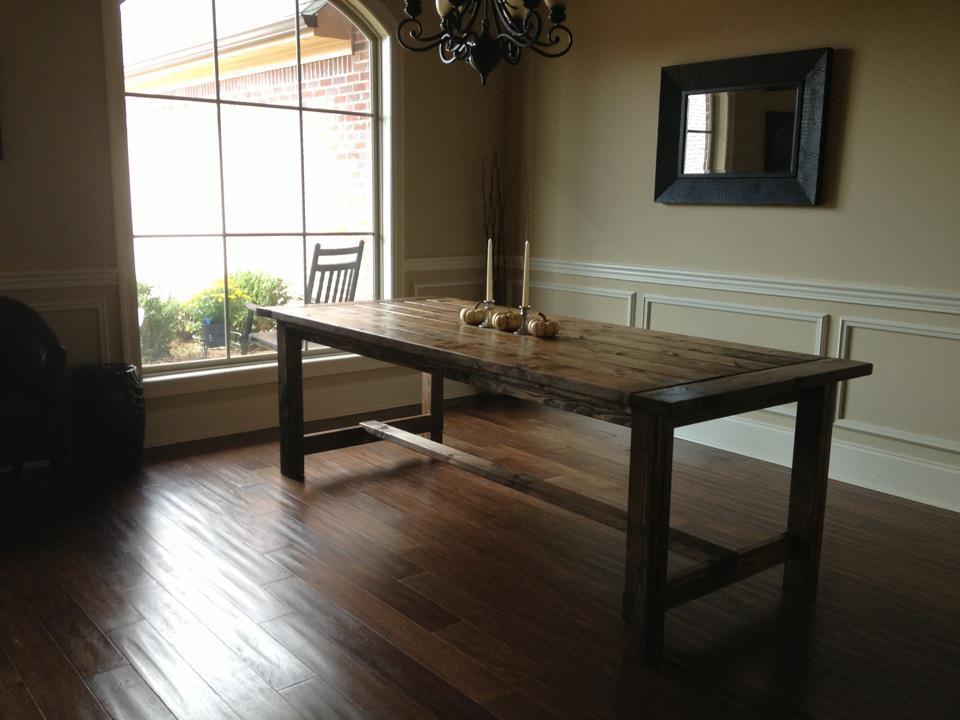
Simple Farm house bench
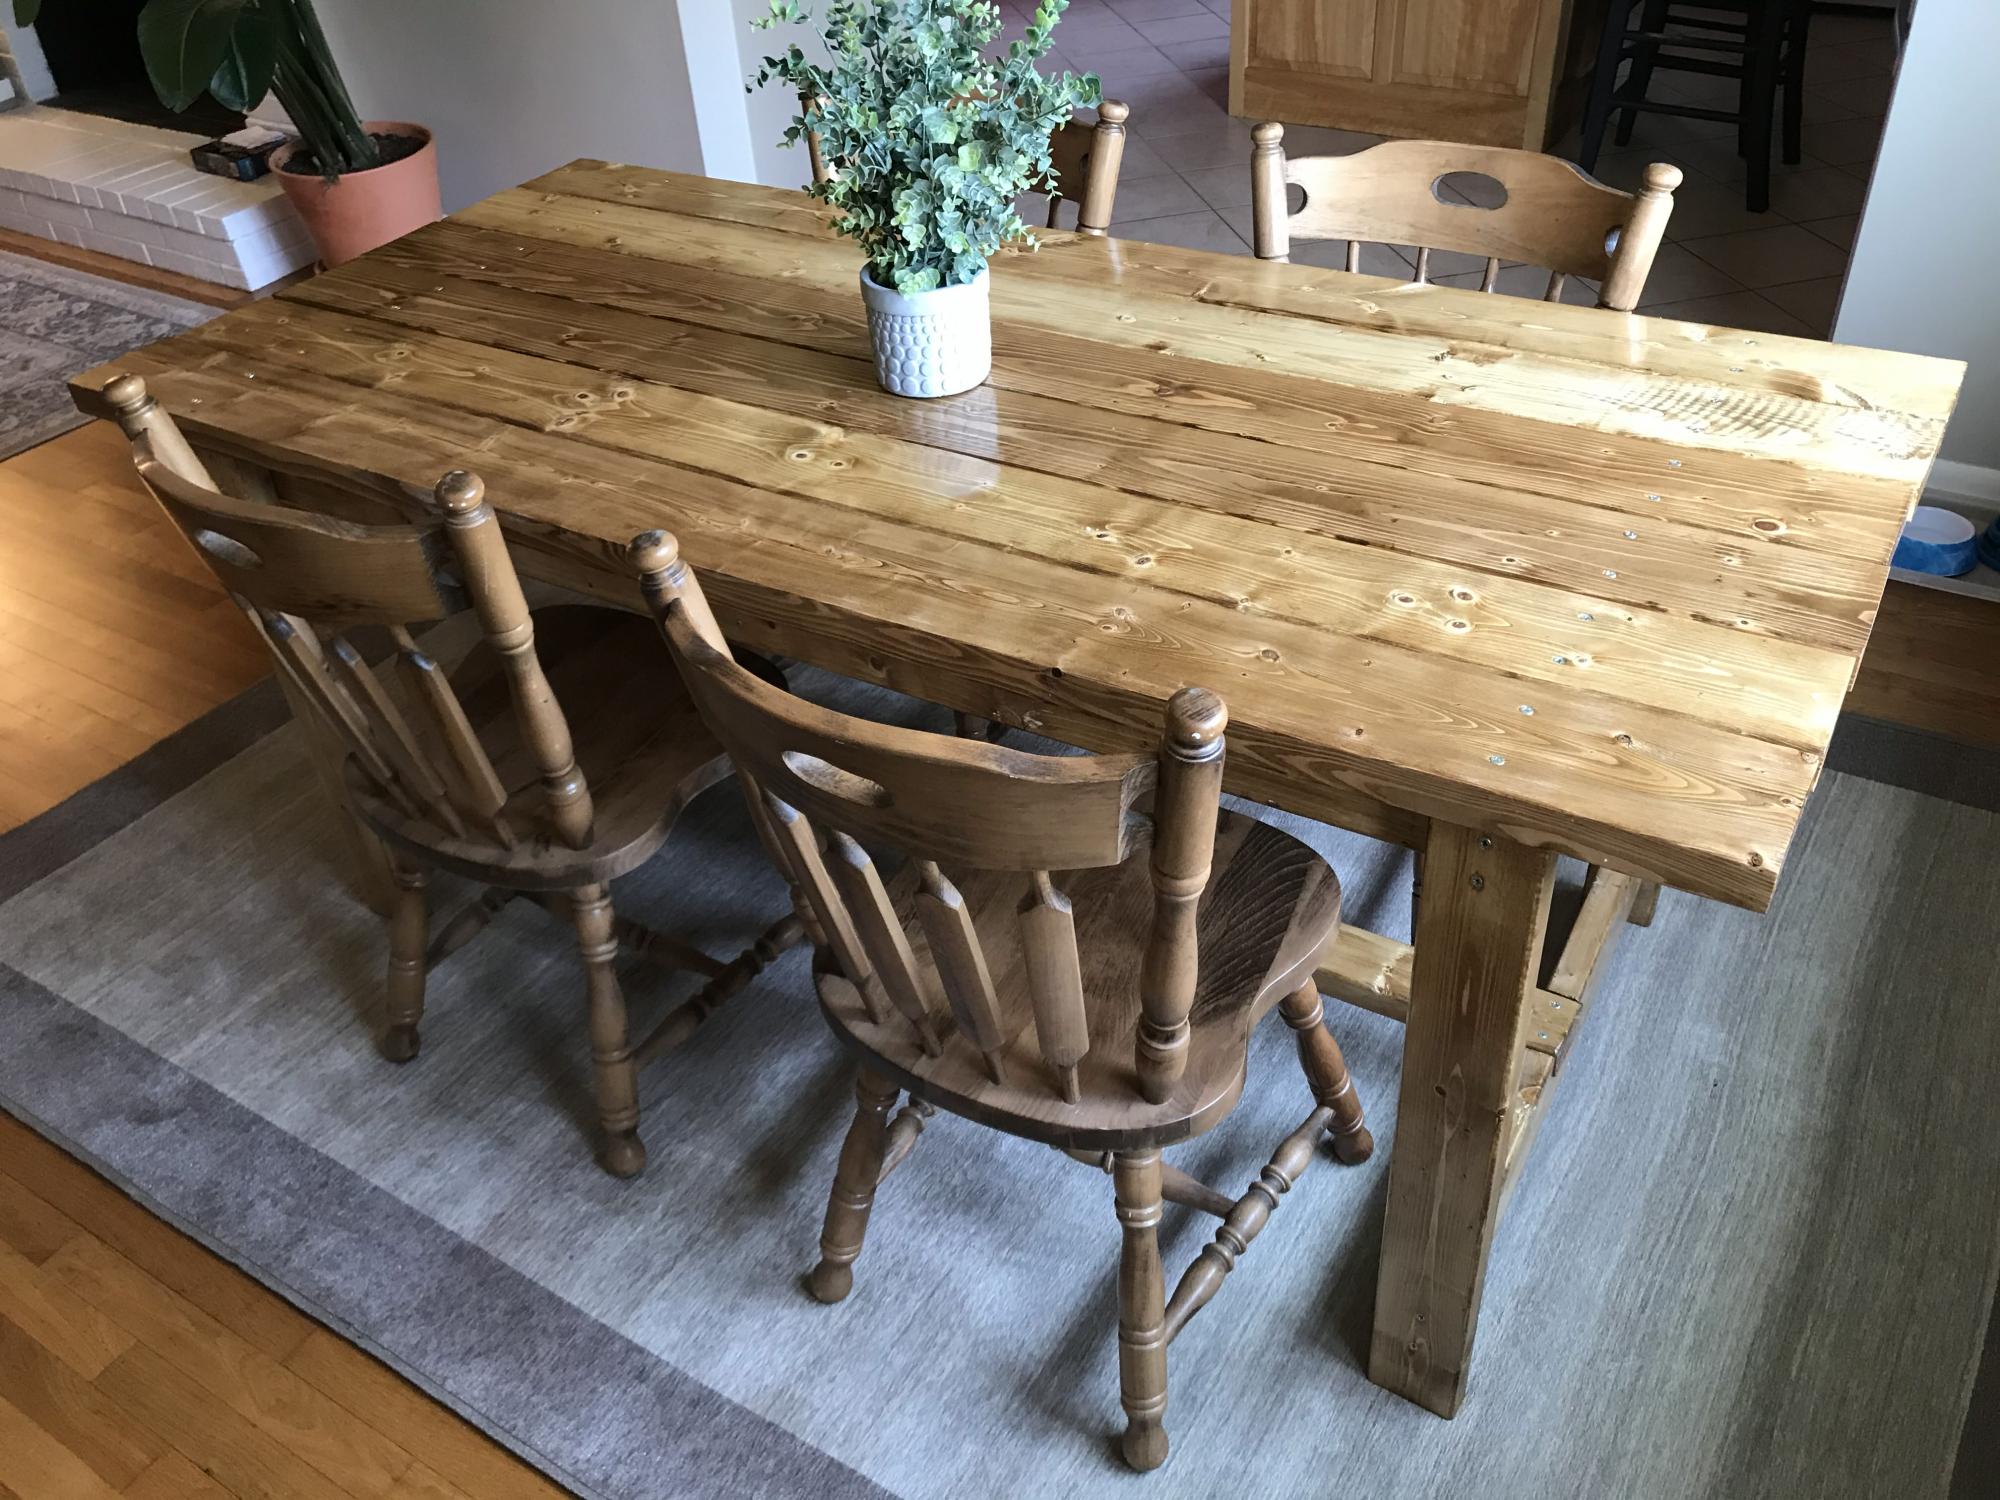
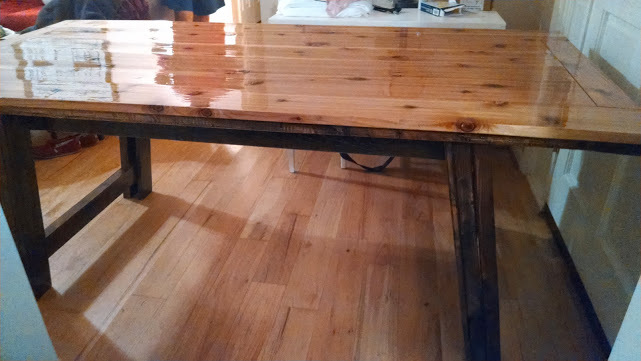
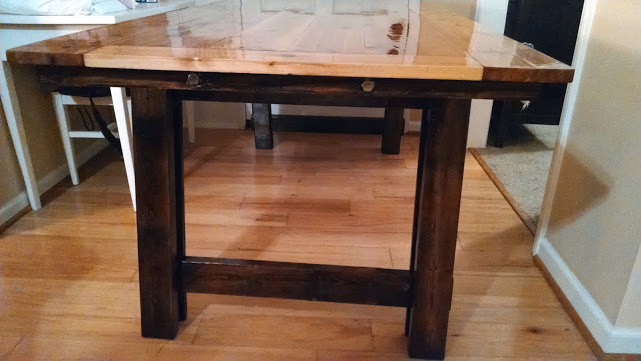
We had recently gotten a house and had acquired an old antique table. After fixing it up with wood glue it was still quite rickety and just didn't have the look and feel I wanted for the room. Loving the rustic look and being pretty new to wood working I took on this project. It was a great a learning experience. I have to completely redo 3 of the top table board because they warped during the staining/polyurethane process.
Built from Plan(s)
Estimated Time Investment
Weekend Project (10-20 Hours)
Finish Used
Dark walnut danish wood oil
Recommended Skill Level
Starter Project
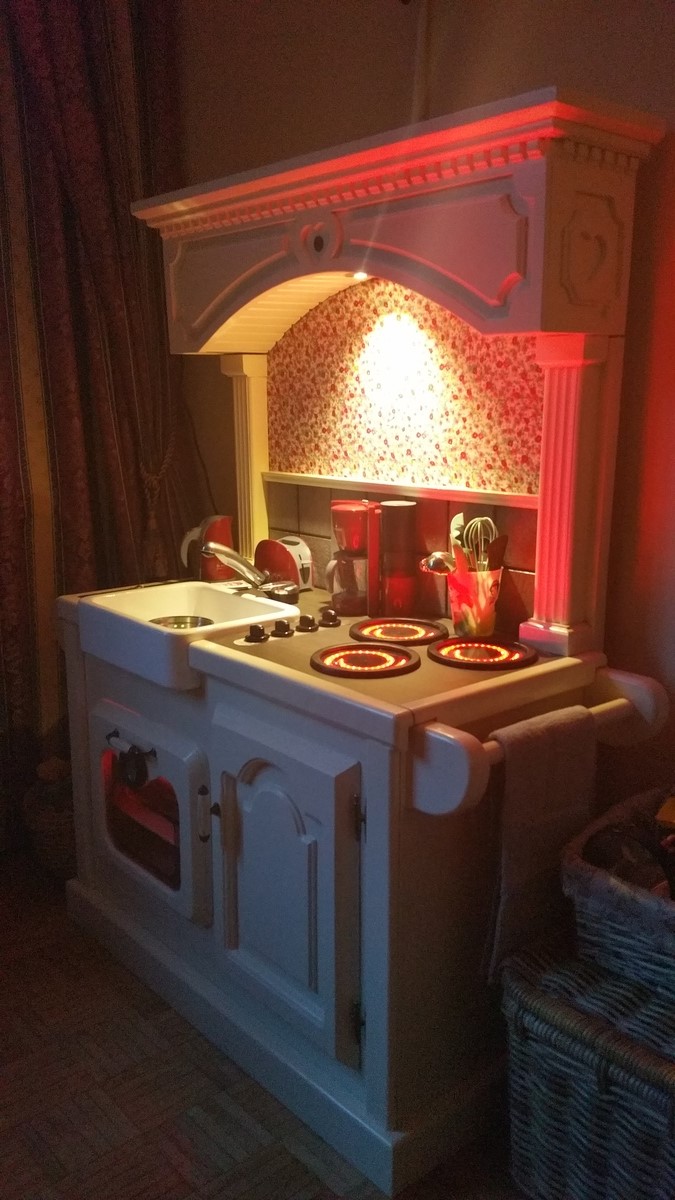
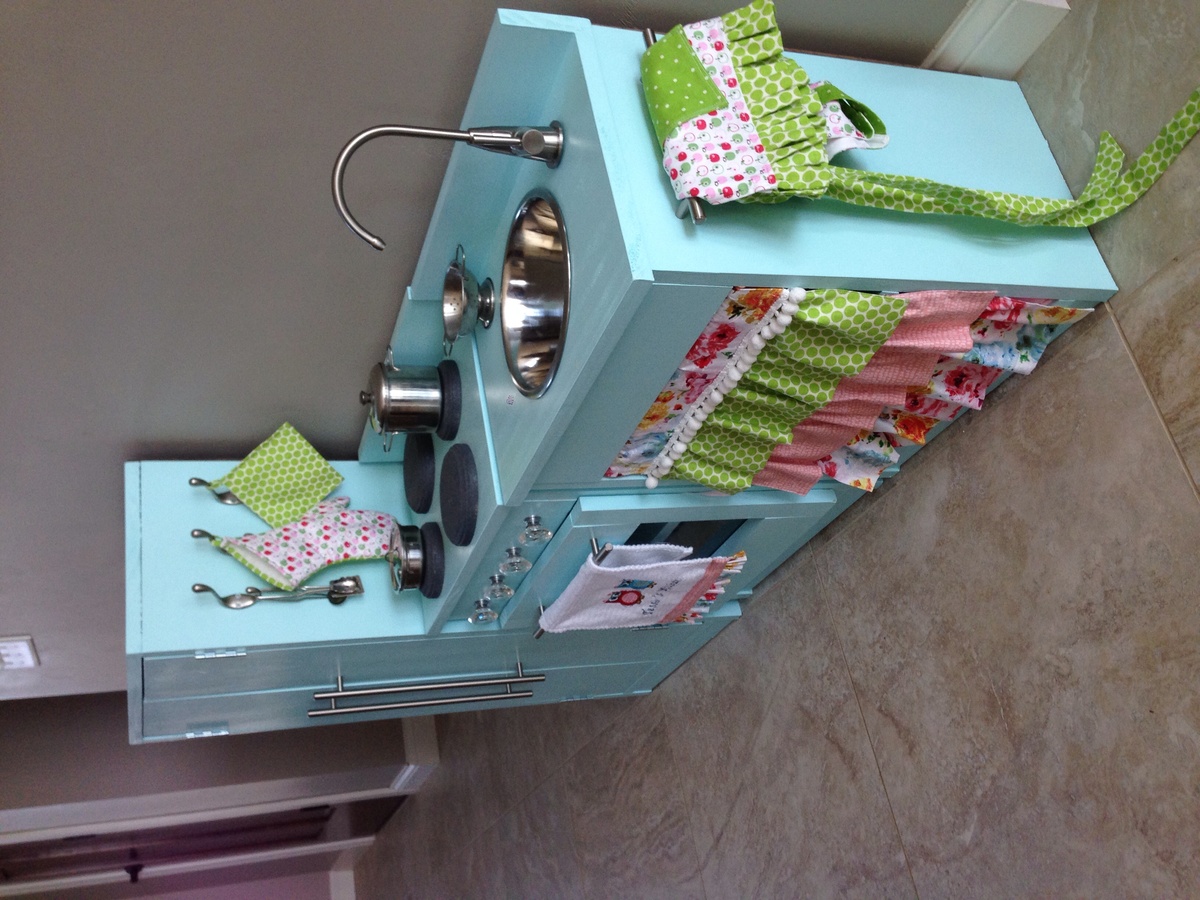
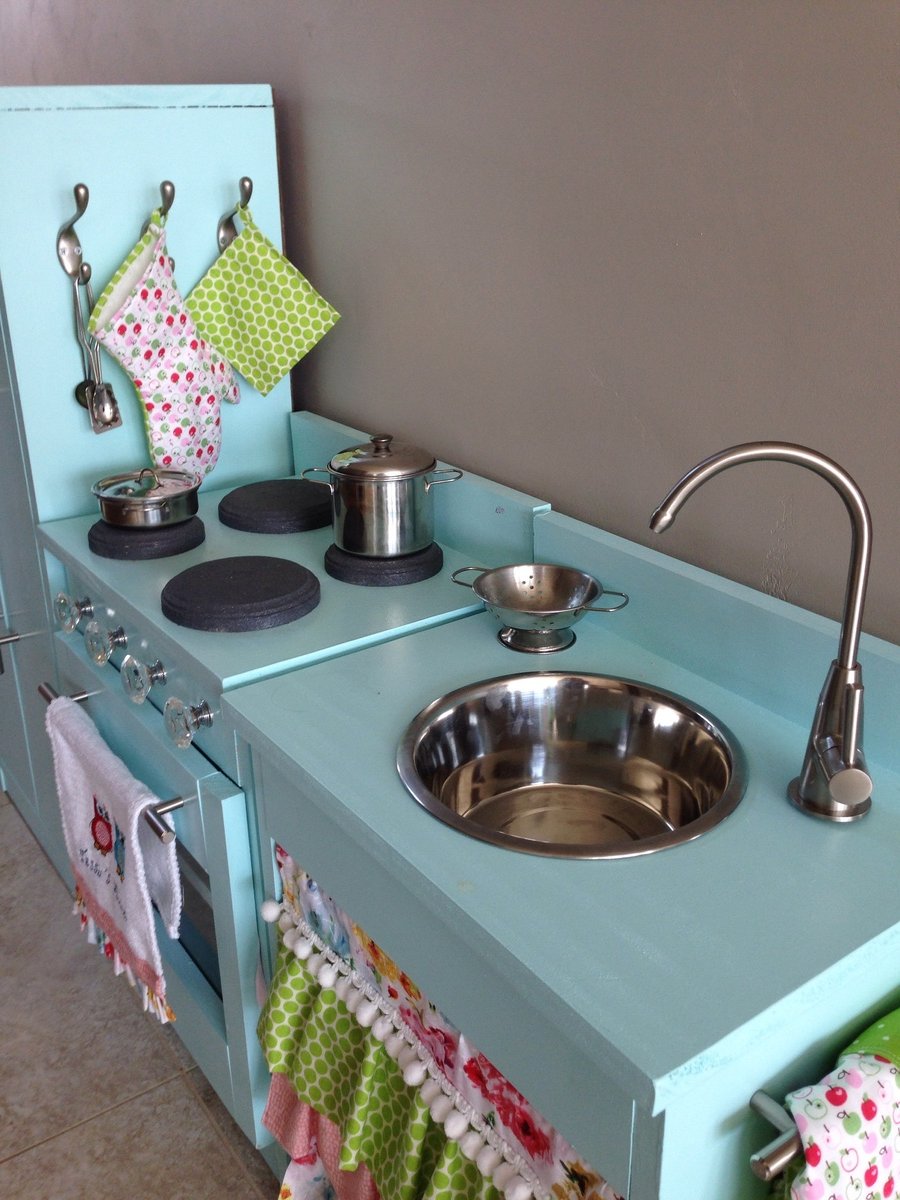
T's play kitchen
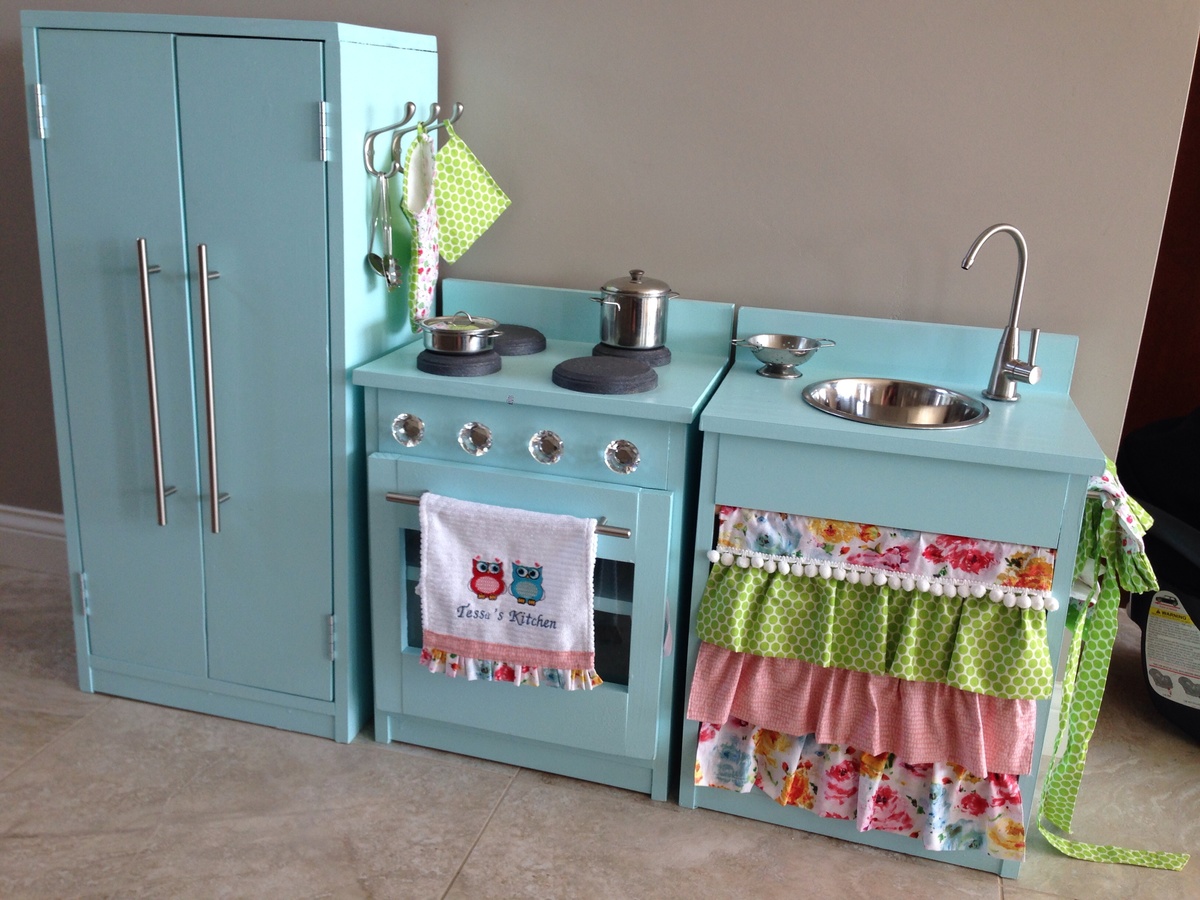
I built this play kitchen for my daughter's second birthday during my newborn son's short naps or often with him strapped to me in his baby carrier. I spent more money on higher quality wood to save myself time and effort sanding the wood down. I splurged on a drinking faucet as it was the perfect size and a mini version of my real kitchen faucet. I used magnets on the fridge doors and oven door and a simple ribbon to prevent the oven door from opening too wide. I have built a few things befor-shelves, table, baby gate but consider myself a beginner who is still learning a lot about woodworking.
Built from Plan(s)
Estimated Cost
$200
Estimated Time Investment
Weekend Project (10-20 Hours)
Finish Used
Dutch Boy Hawaiian Sky Paint
Recommended Skill Level
Beginner
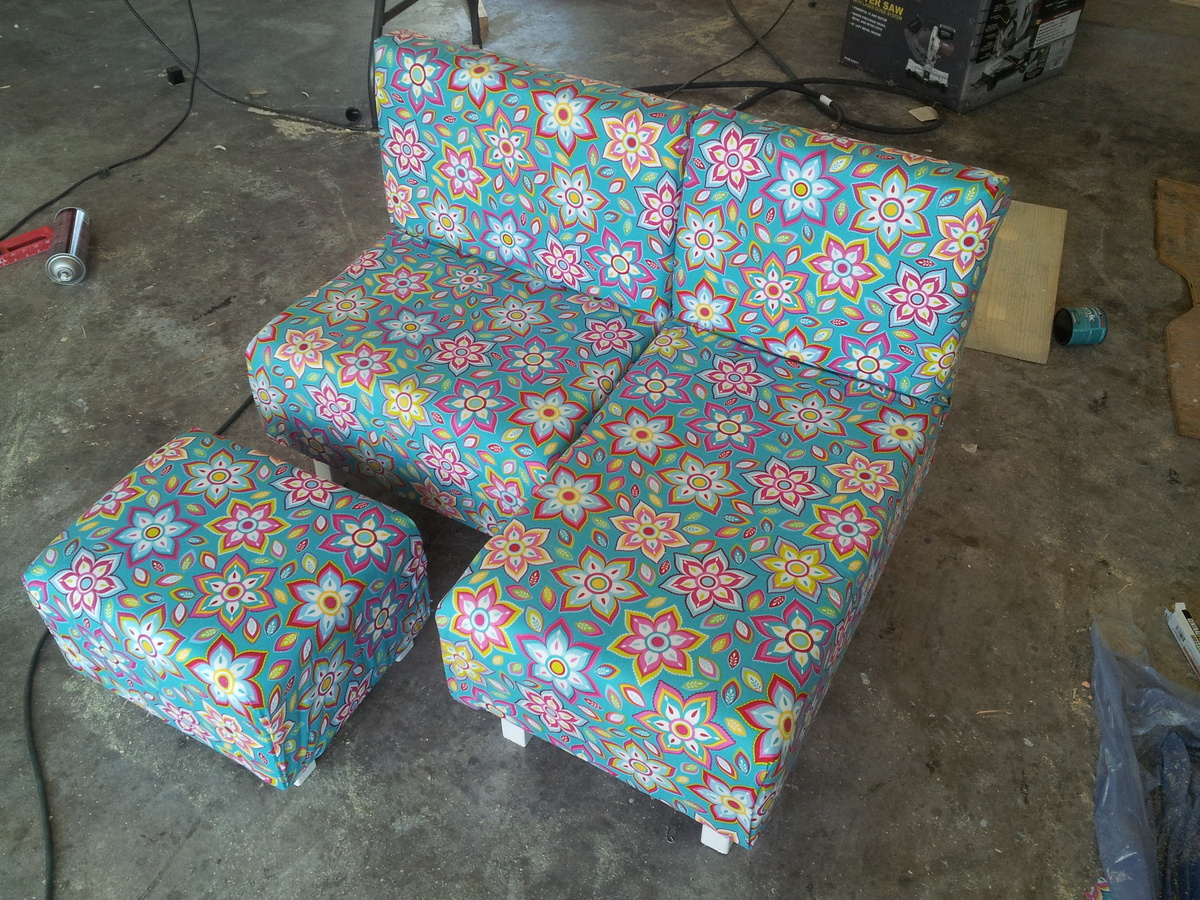
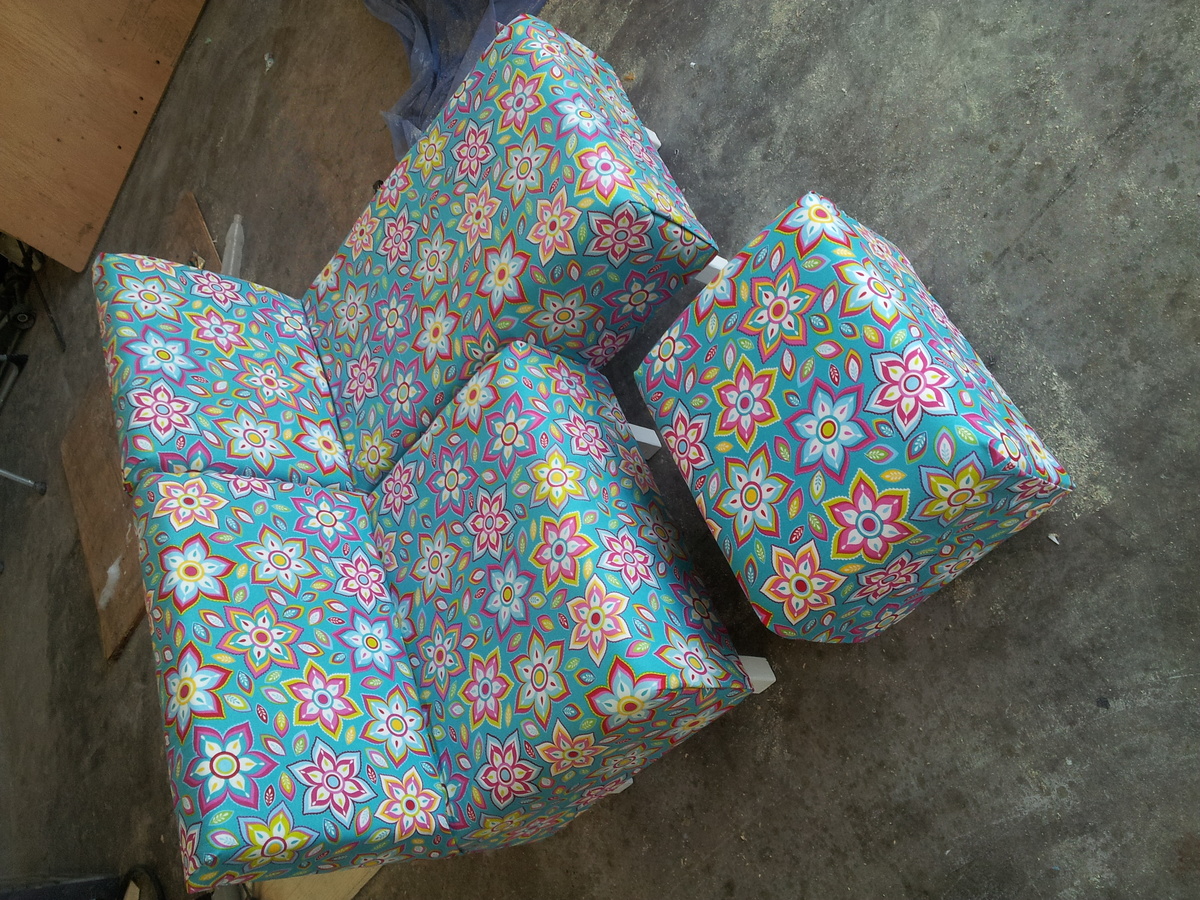
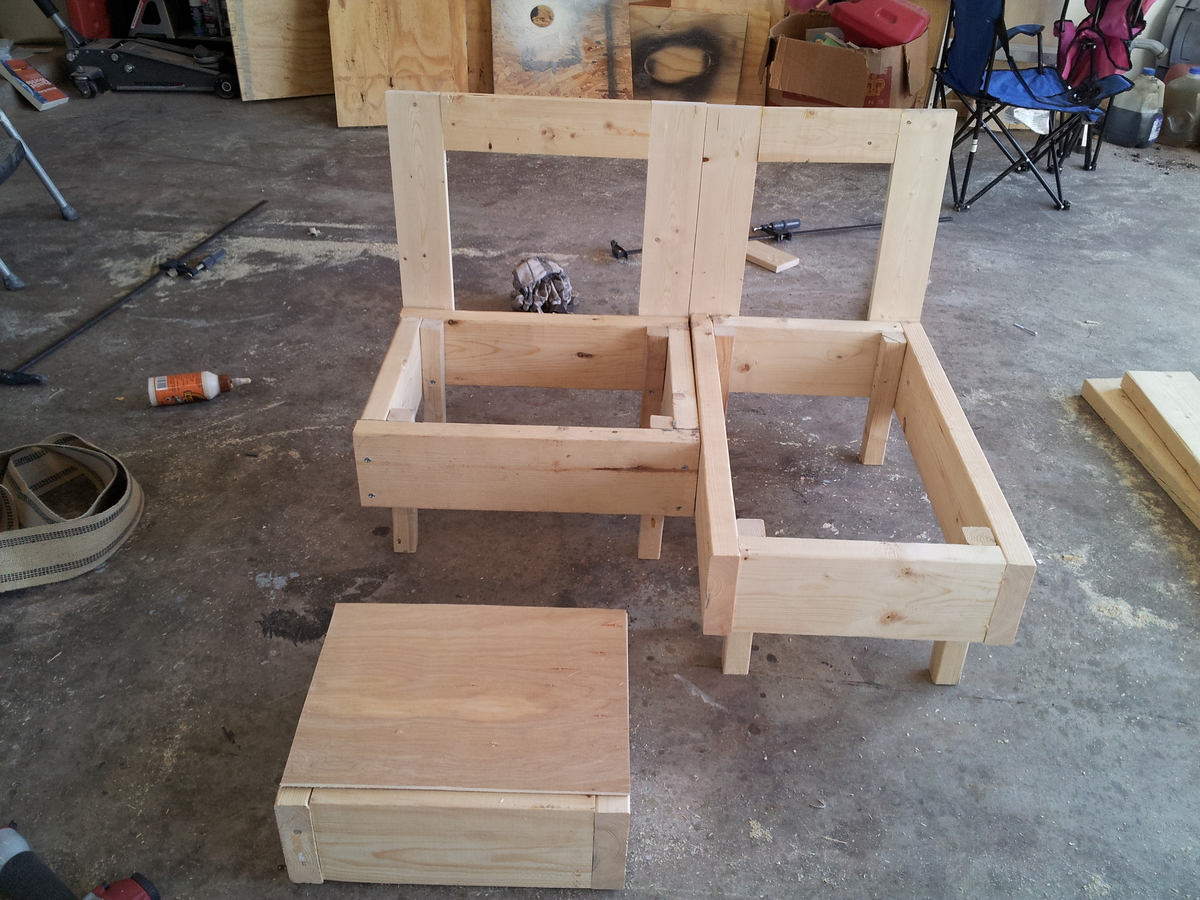
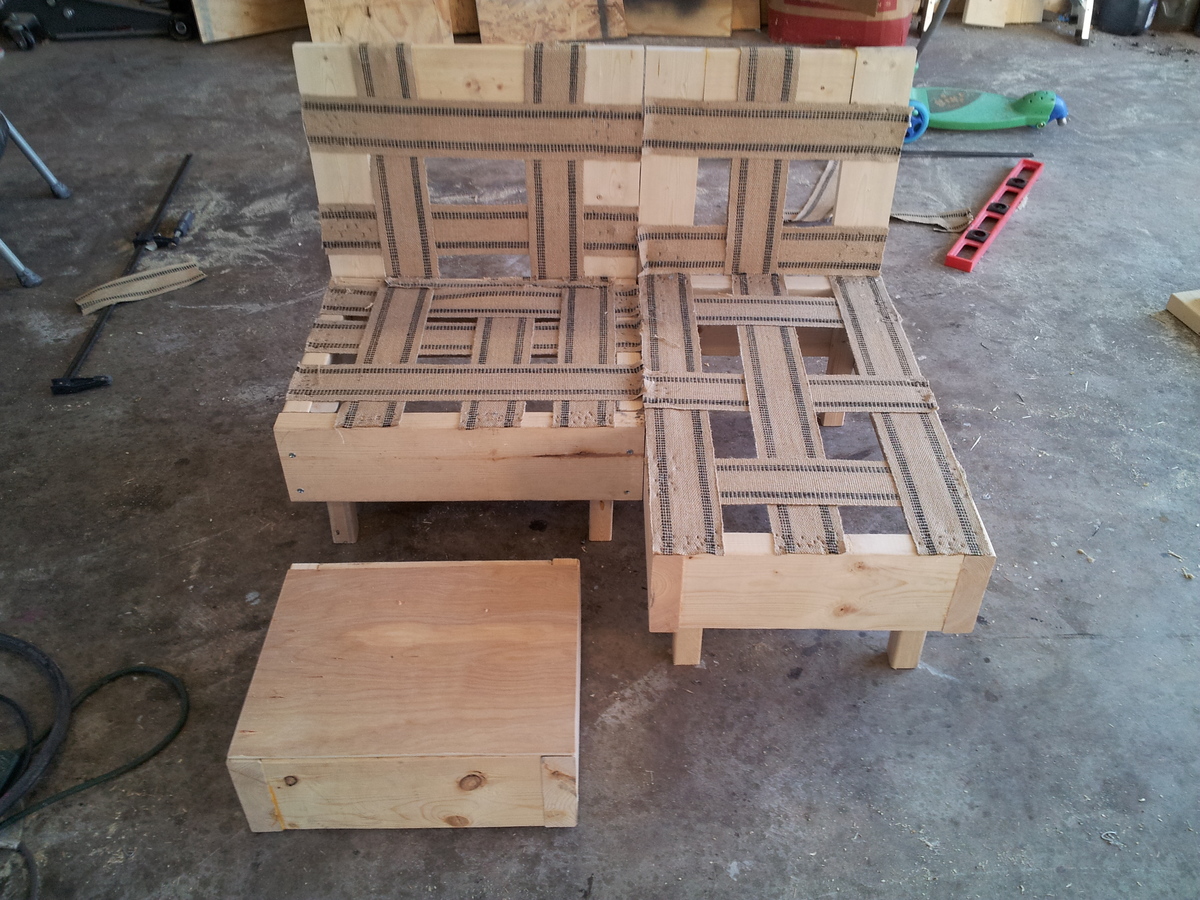
Mini sectional sofa and ottoman
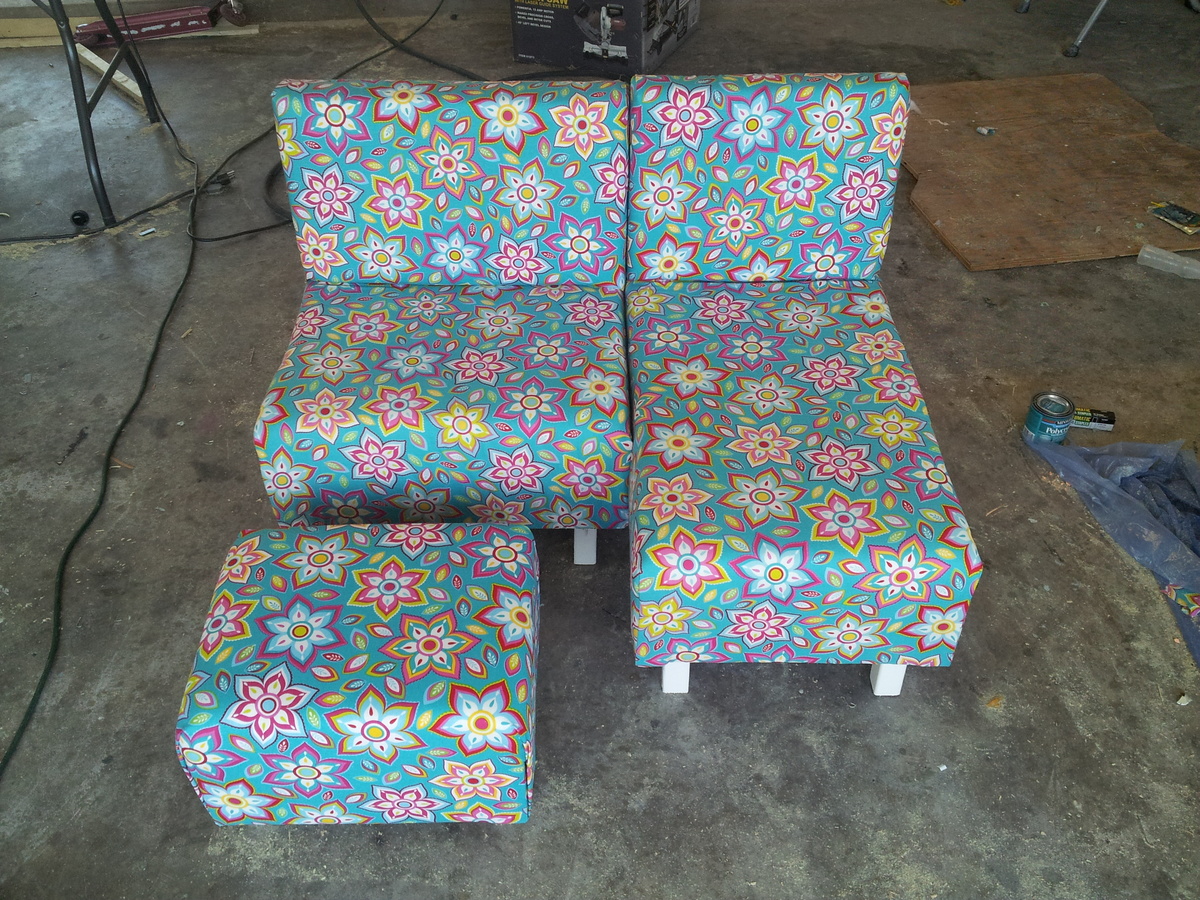
I built this for my daughter to go under her loft bed at the time. It was my very first time upholstering anything before!
Built from Plan(s)
Estimated Cost
$65
Estimated Time Investment
Weekend Project (10-20 Hours)
Recommended Skill Level
Beginner
Rhyan Console Table

I just wanted to thank Lady Goats for the idea for this project. I got the plans from http://ana-white.com/2011/12/plans/rhyan-console-table and made some modifications. I wanted to use the table as an entry table, so I made it taller and longer to fit the space I had for it. I still have to poly it and will post more pics as it comes along.
As far as cost, I used 1x6 instead of 1x12 to reduce the cost for the project. I think at the most it came out to 90 (including stain, poly, screws, brushes).
And yes, I built it in the living room of my small apartment.
Thanks again!

Built from Plan(s)
Estimated Cost
$90
Estimated Time Investment
Weekend Project (10-20 Hours)
Recommended Skill Level
Intermediate
Comments

Tue, 09/25/2012 - 15:15
This looks great!
I immediately though of the rhyan console when I saw this, but wondered if there was another plan out there! Looks great (but don't thank ME! Ana did the plans!!).
Beyond impressed with the mods! And the fact that you built it in your living room!
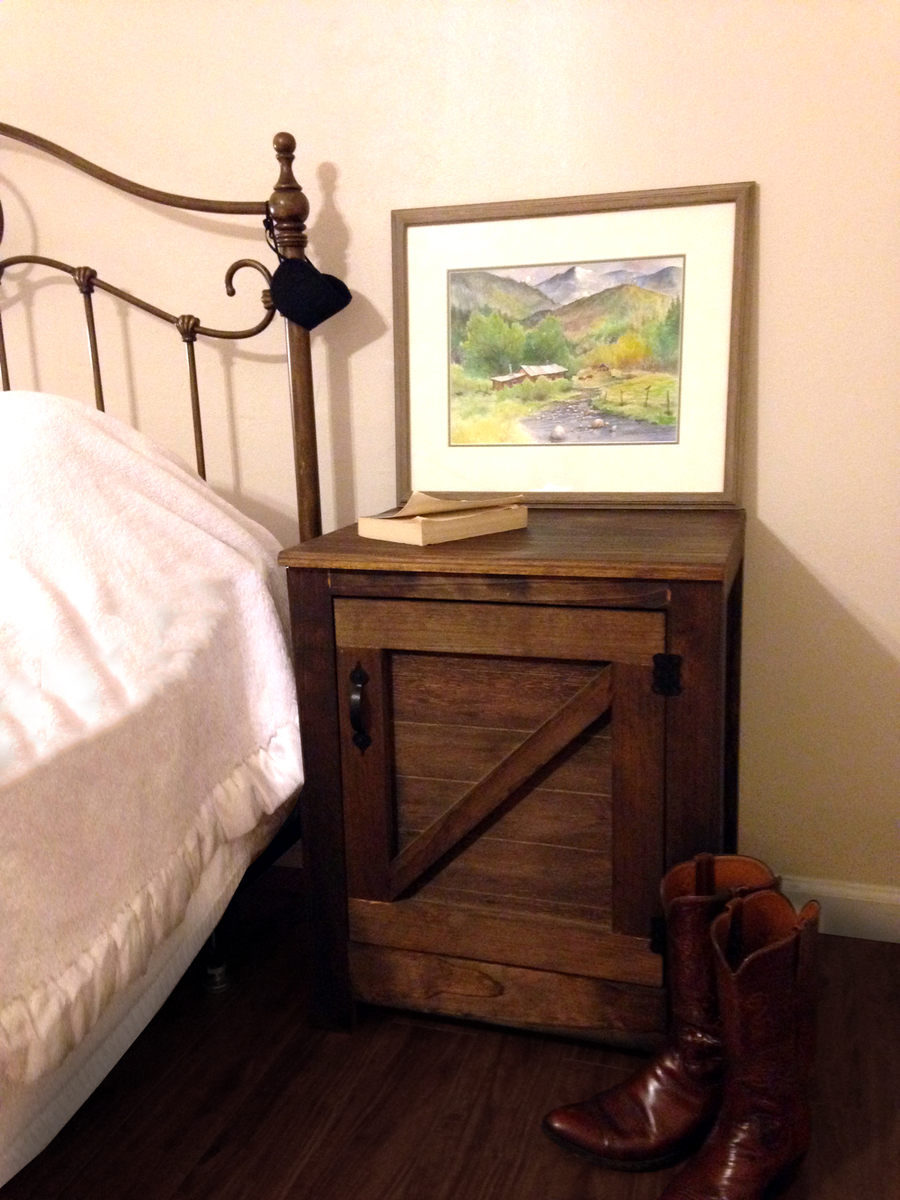
Mini Farmhouse bedside table.
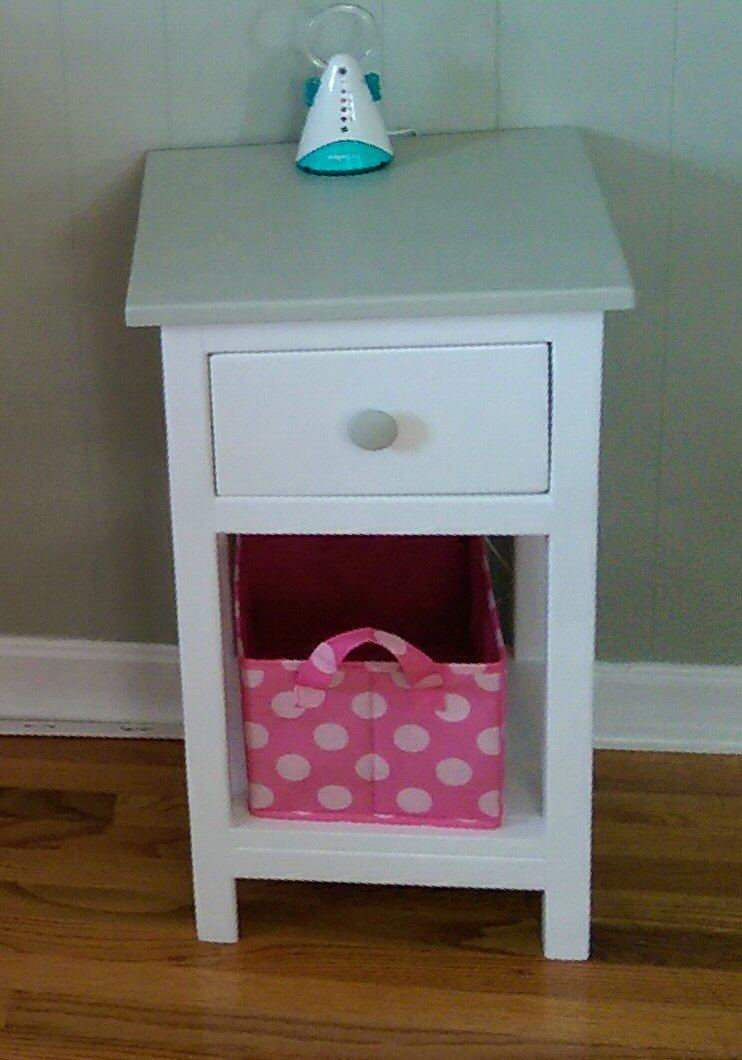
Built this table for my daughter's nursery. She is going to be here next month so I'm trying to make sure her room is perfect for her.
This table was easy to build. I've been doing woodwork for about a year now so if I can do it you can do it, just make sure you have all the tools for the job :-)
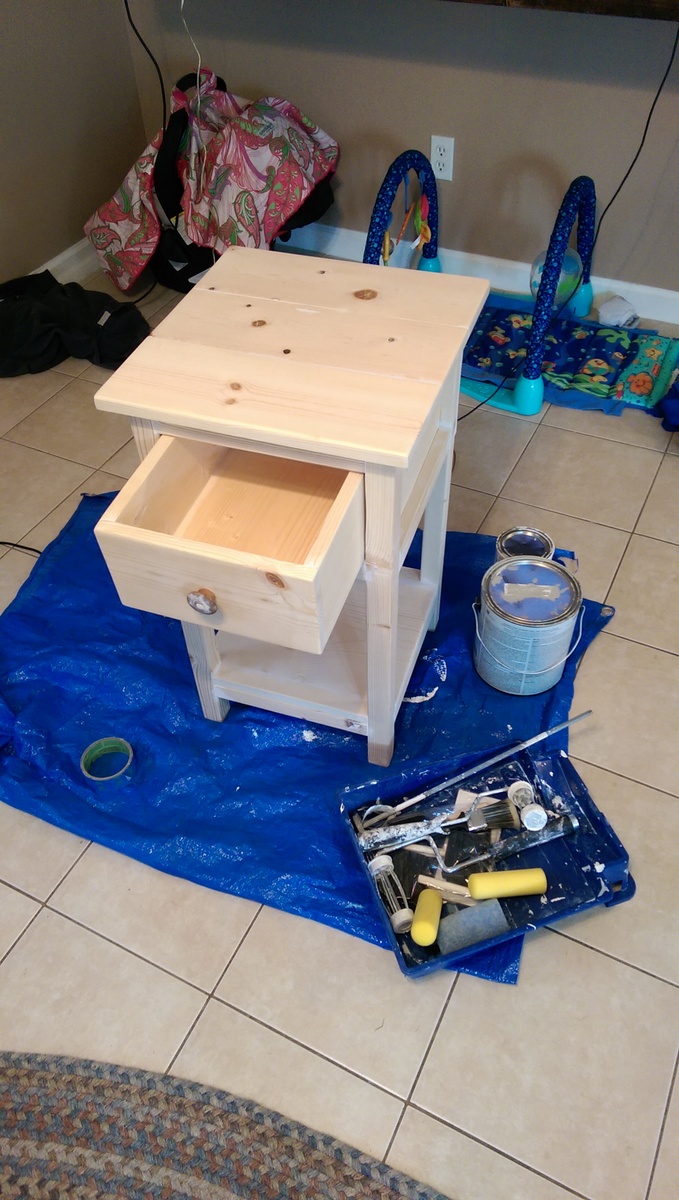
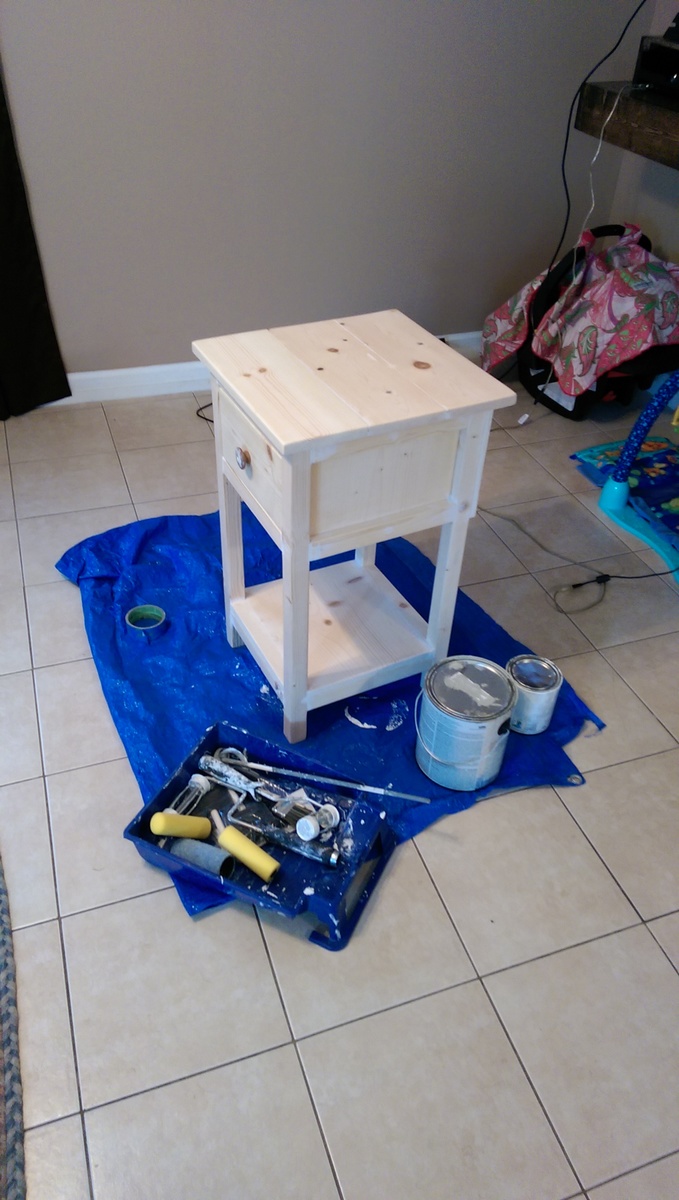

Built from Plan(s)
Estimated Time Investment
Weekend Project (10-20 Hours)
Finish Used
Valspar paint and primer
Recommended Skill Level
Beginner
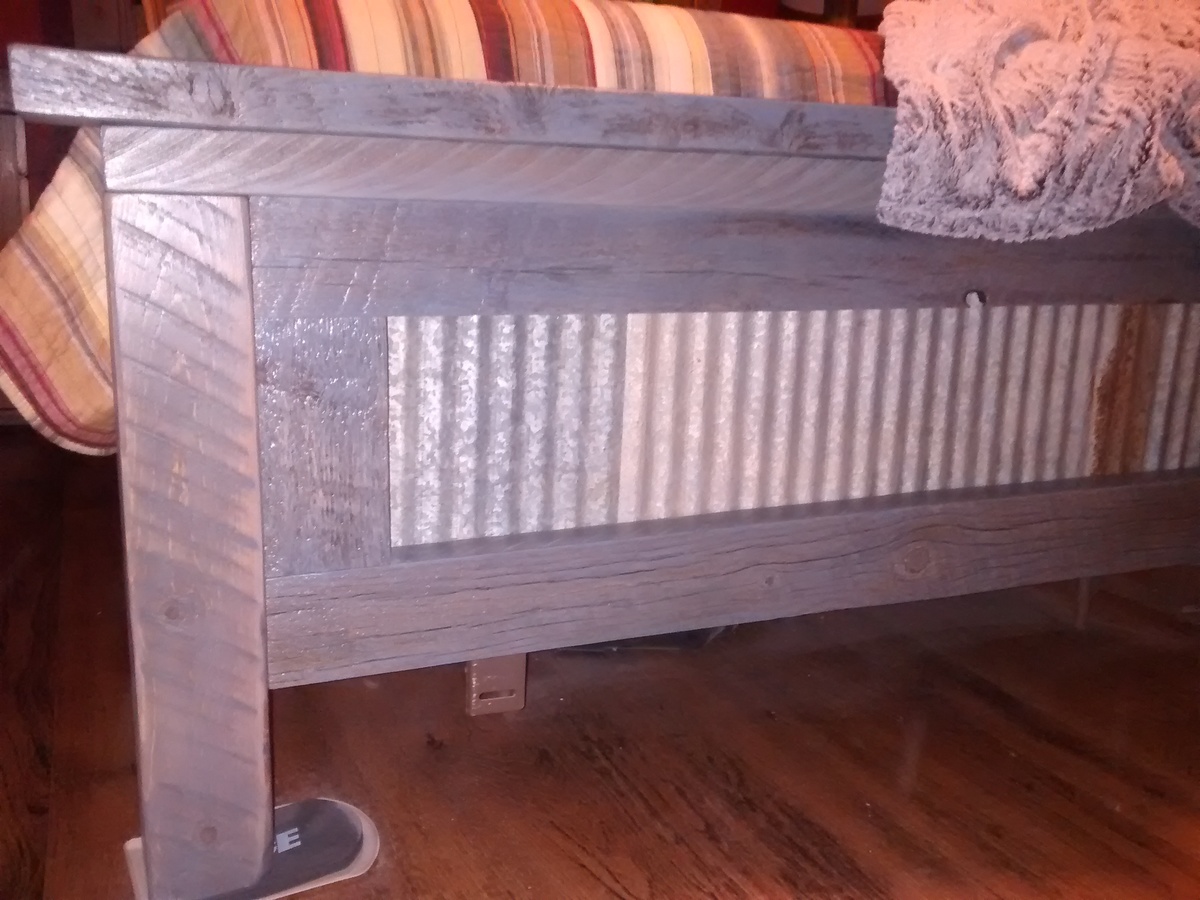
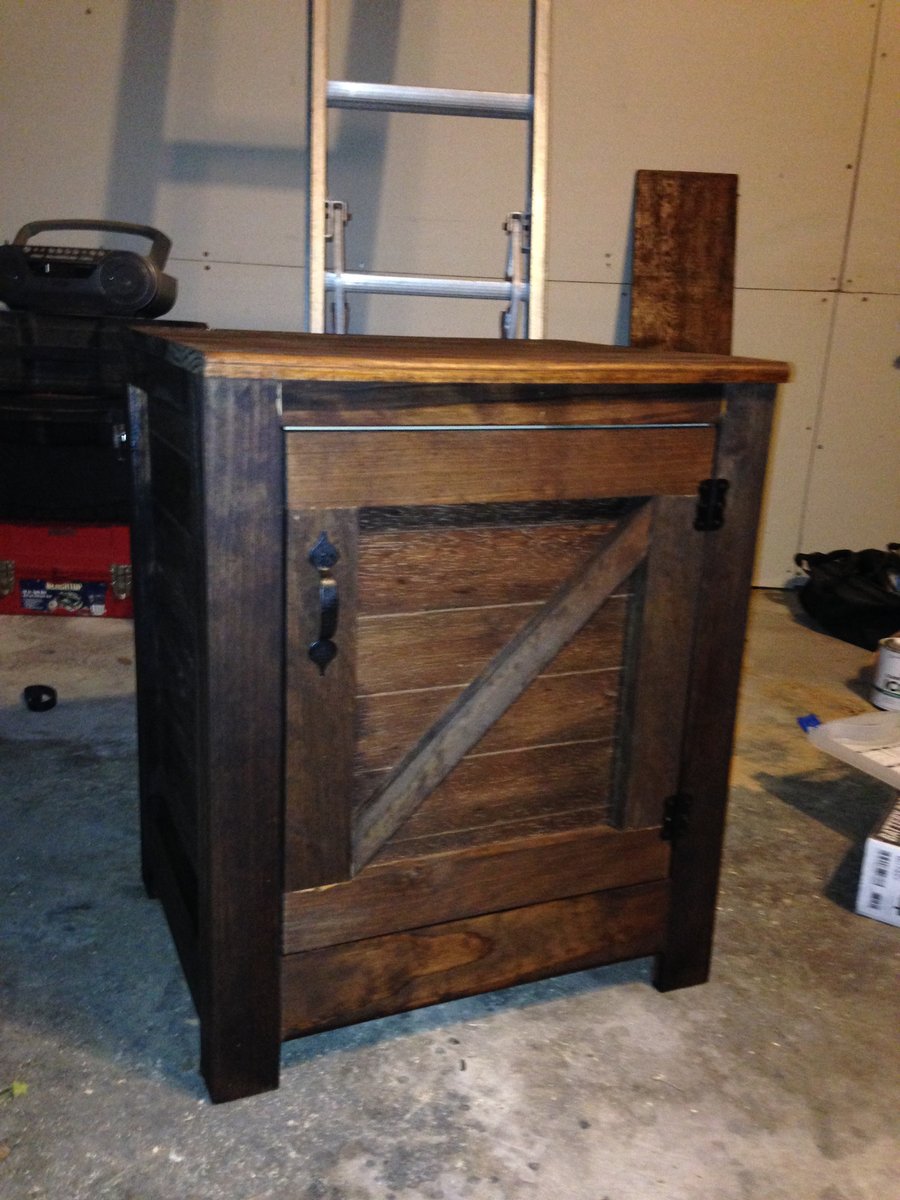
Farmhouse Bed, Workbench Console Nightstands
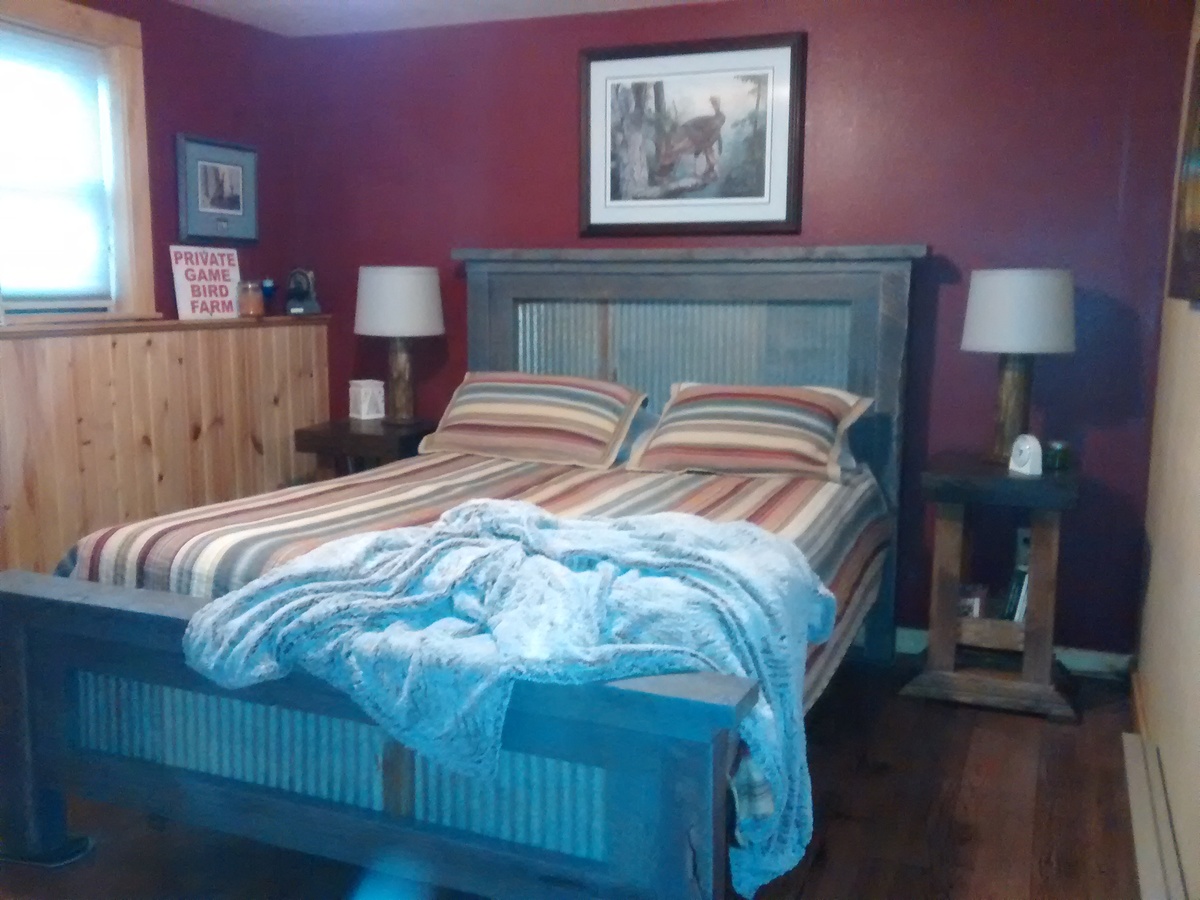
Made the bed from wood that I got from the place I work. It was weathered and rotting. I was able to work around the rot. I had to play with the finish to get it all of the bed pieces to match. The bed is really heavy because the wood was full 2" material. The smaller picture shows the actual color of the bed more accurately.
I love the workbench console plans so made them smaller to work as nightstands.
Decided to try and make lamps out of some firewood. They worked for what I wanted.
Built from Plan(s)
Estimated Cost
Approx $150 for Bed and Nightstands and Lamps. Used Scrap wood from work for the lamps. Used discounted, weathered wood from work for the bed. I traded for the metal.
Estimated Time Investment
Week Long Project (20 Hours or More)
Finish Used
Vinegar and Steel Wool, Weathered Grey Stain and Minwax Varnish on the Bed
Minwax Stain and Varnish on the night stands
Minwax Stain and Varnish on the night stands
Recommended Skill Level
Intermediate
Pallet book holder

Very simple, very easy book holder. Come to find out, it makes a great wine bottle holder as well. The picture alone can suffice as the plans. Enjoy!!!
Estimated Time Investment
An Hour or Two (0-2 Hours)
Finish Used
none
Recommended Skill Level
Starter Project
Comments
Fri, 09/28/2012 - 12:19
Quick rundown
This particular one is made of 1x4's (4) and 2x4's (2). The notches in the 2x4's were already there. Attach one 1x4 on the front and three evenly spaced on the back. And Done! Add stencils for creativity!
armoire/ closet
I modified the plans to make a larger armoire to hand pants and store board games.
Built from Plan(s)
Estimated Cost
$500
Estimated Time Investment
Week Long Project (20 Hours or More)
Finish Used
Provincial by minwax
Recommended Skill Level
Intermediate
Dream Table!

Love love how this turned out! Great plans. We've been wanting to build this for years now. Works great for us...we are a military family and move every 3 years so being given able to break this down into pieces easily makes it easy on our moves! Thank you for the plans!
benches are next!
Built from Plan(s)
Estimated Cost
$126
Estimated Time Investment
Weekend Project (10-20 Hours)
Finish Used
Single coat Minwax early American
Varthane semi gloss poly
Varthane semi gloss poly
Recommended Skill Level
Intermediate
Mini Farmhouse Bedside Table
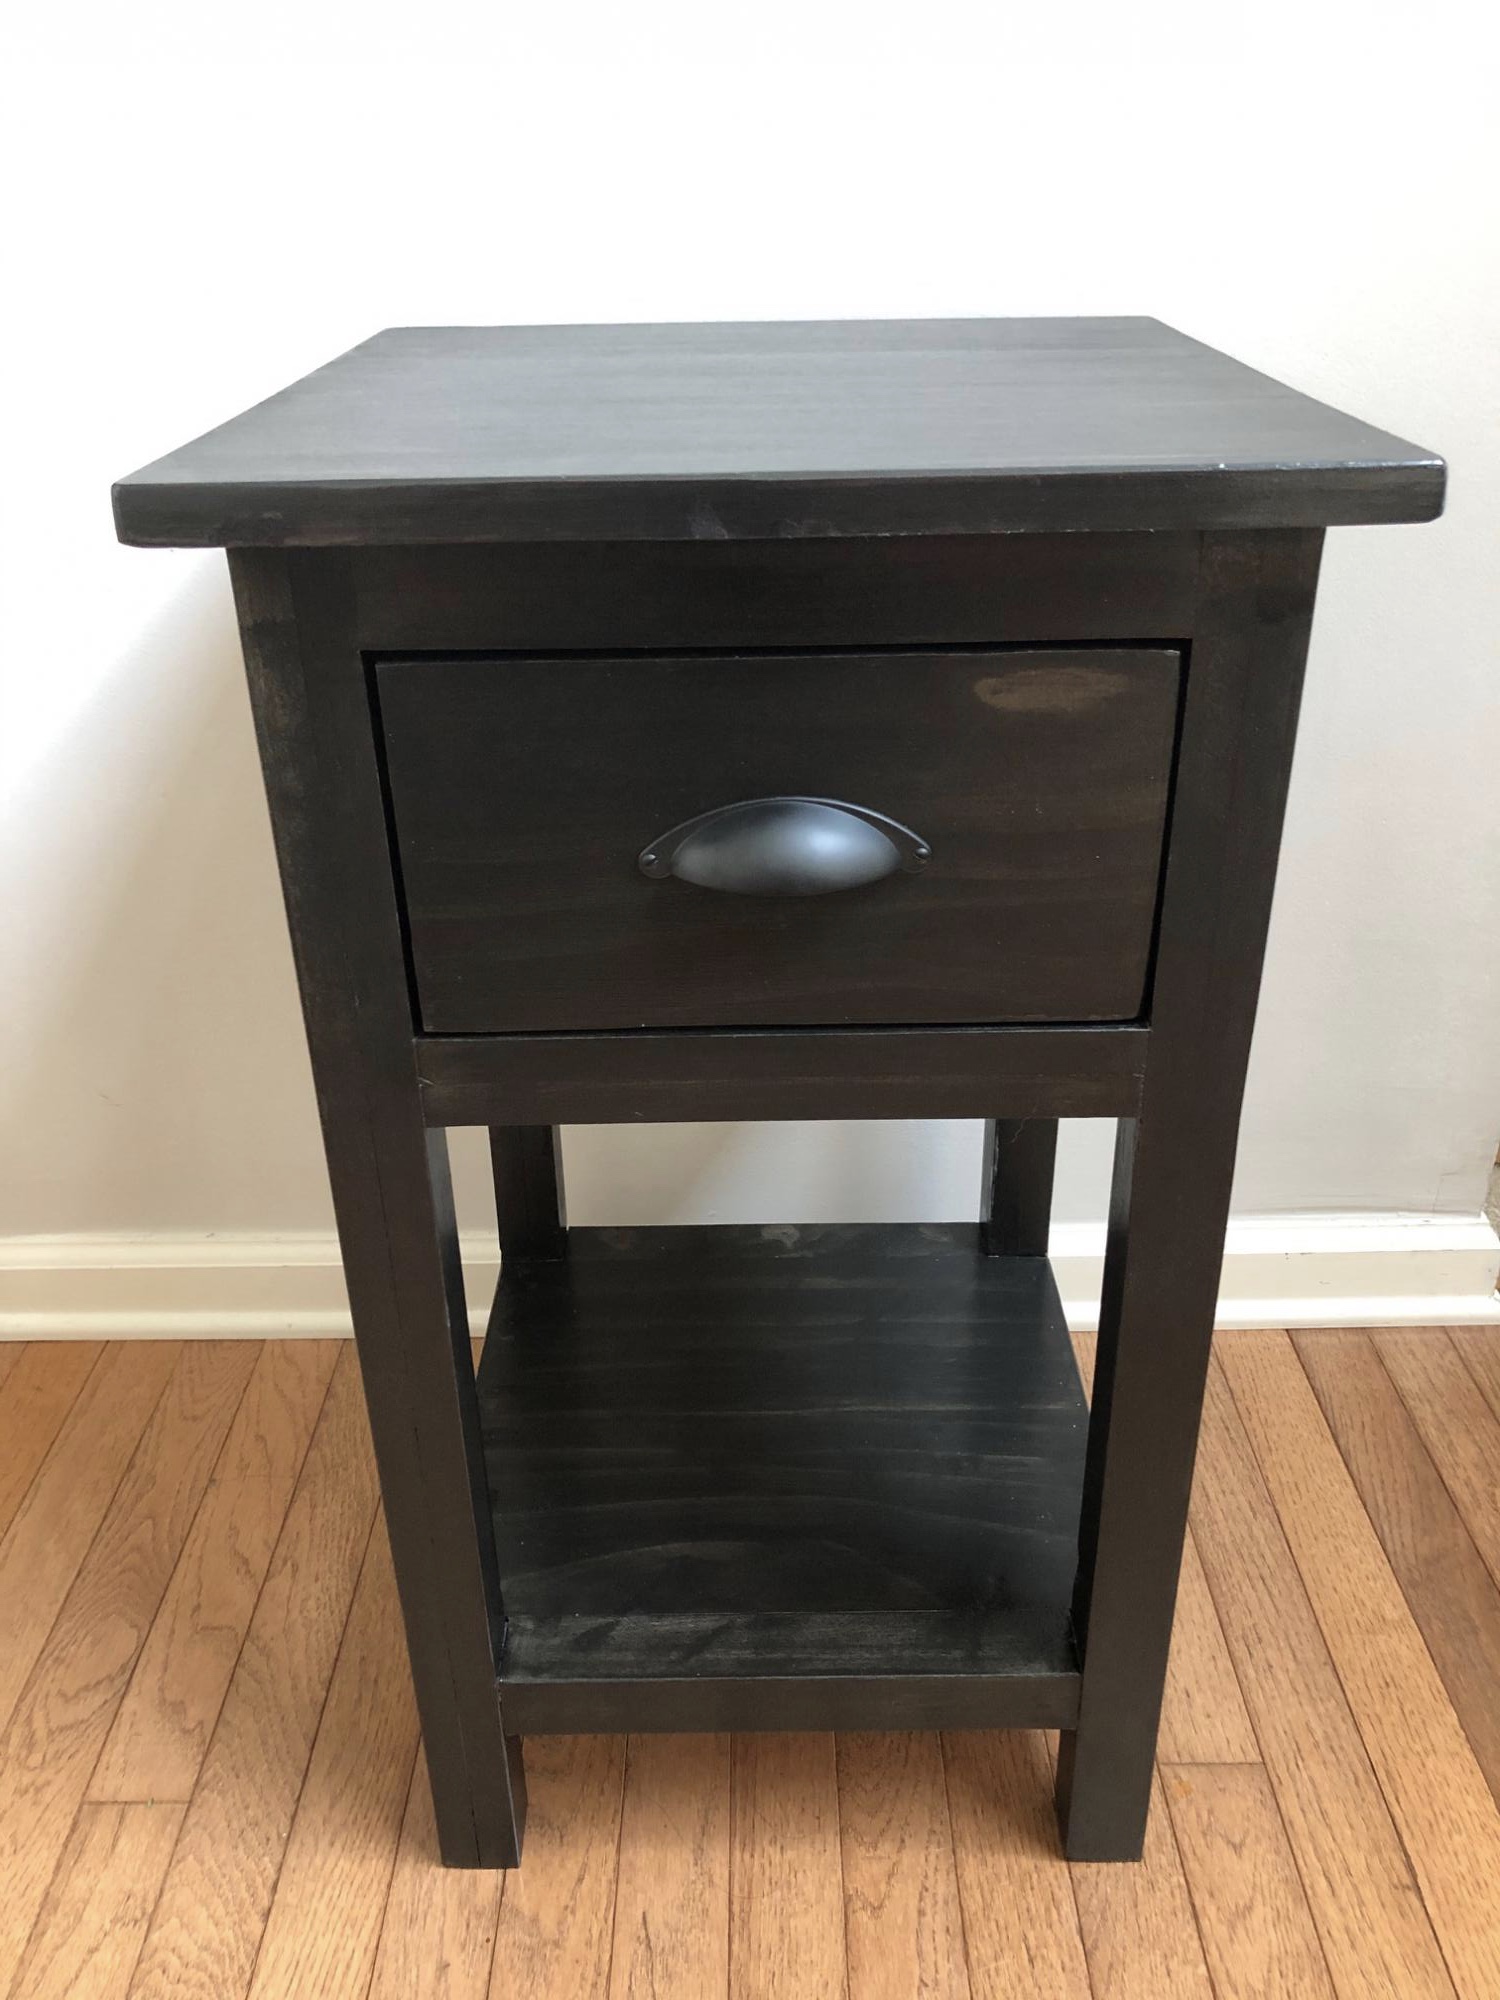
Second table I made from these plans. Dark stain really accents the grain and the glue that I did not clean up :(
Built from Plan(s)
Estimated Cost
$90
Estimated Time Investment
Week Long Project (20 Hours or More)
Finish Used
Minwax Semi Transparent 'True Black 274' (2 coats)
Minwax One Coat Polyurethane Clear Satin (2 coats)
Minwax One Coat Polyurethane Clear Satin (2 coats)
Recommended Skill Level
Intermediate
cubby seats
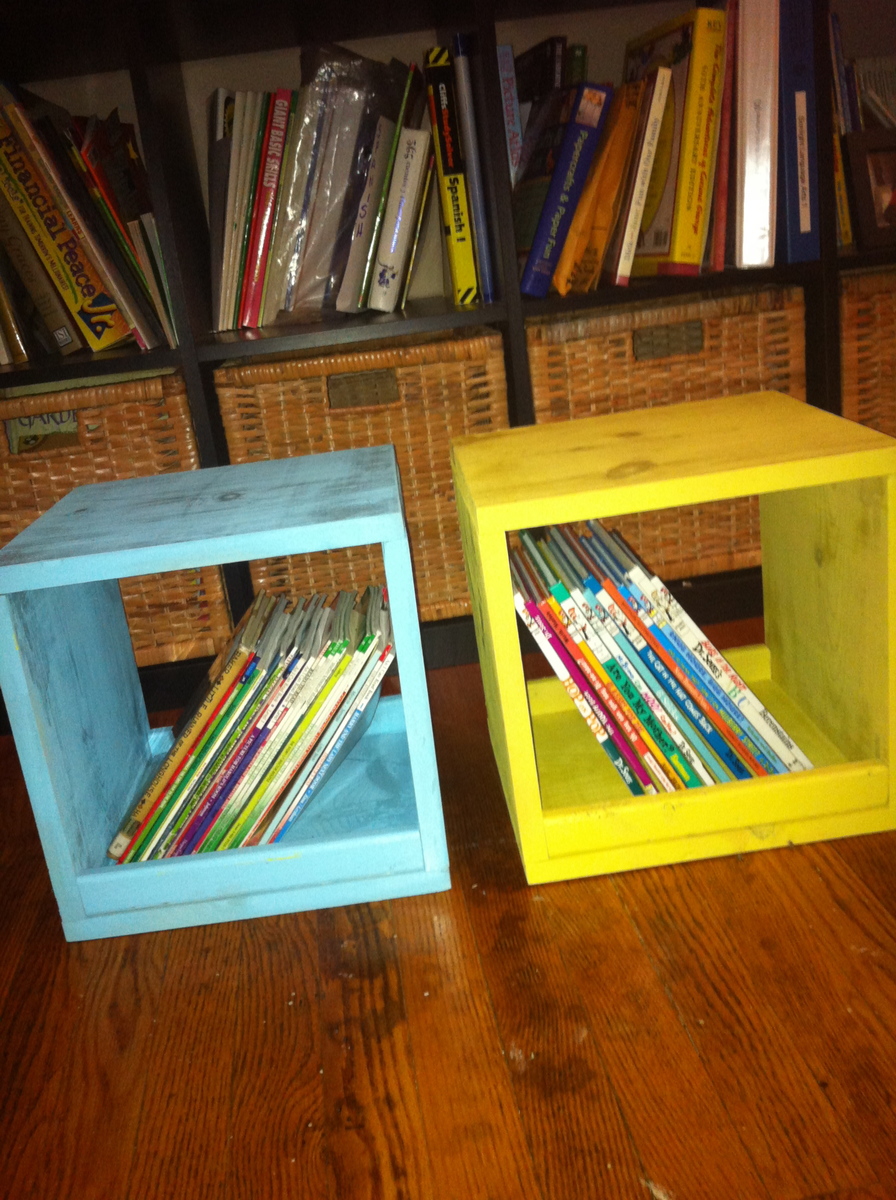
These are the cubby seats featured on Shanty 2 Chic's site along with Pottery Barn inspired Trestle table. This was a lot of fun to make because it was the first project I did using my hand saw. I normally have the wood cut at home depot. But now I can do it on my own!! you can check them out on my blog: goldhoopstochickencoops.blogspot.com
Built from Plan(s)
Estimated Cost
$25
Estimated Time Investment
Afternoon Project (3-6 Hours)
Finish Used
Rust-oleum aqua and lemon grass
Recommended Skill Level
Beginner
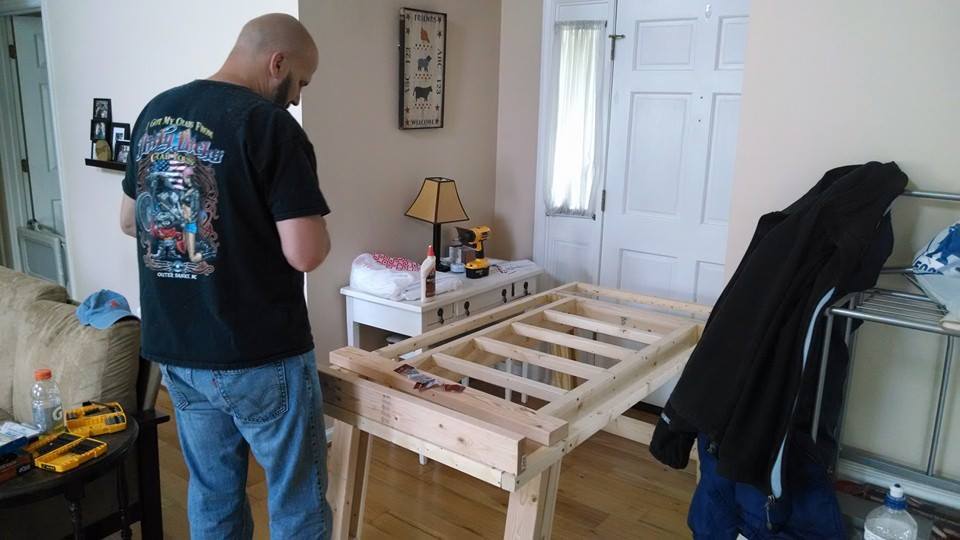
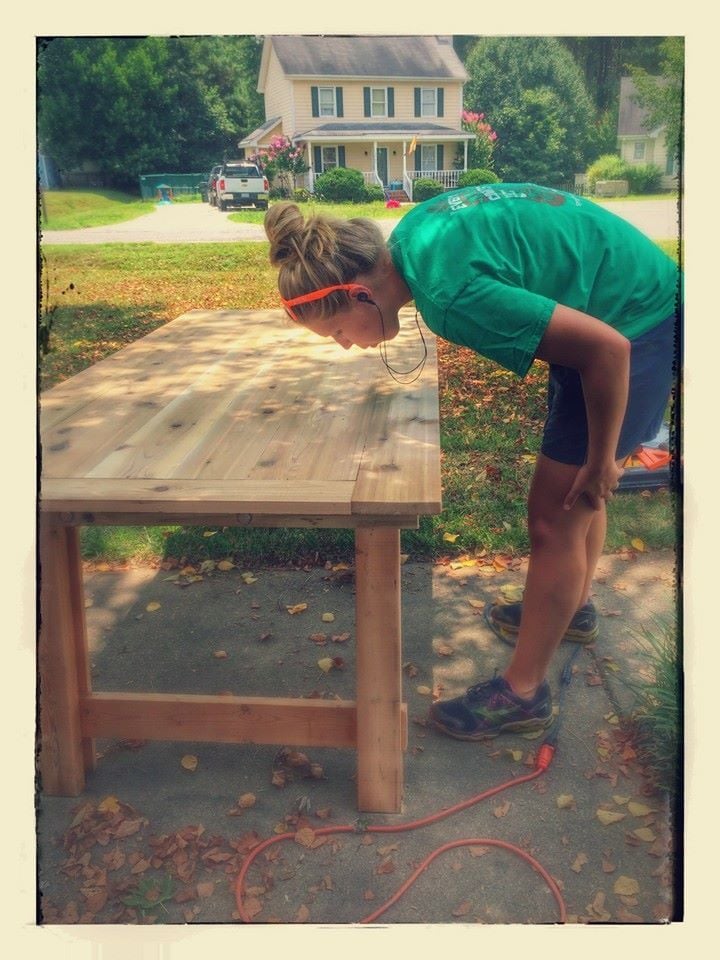
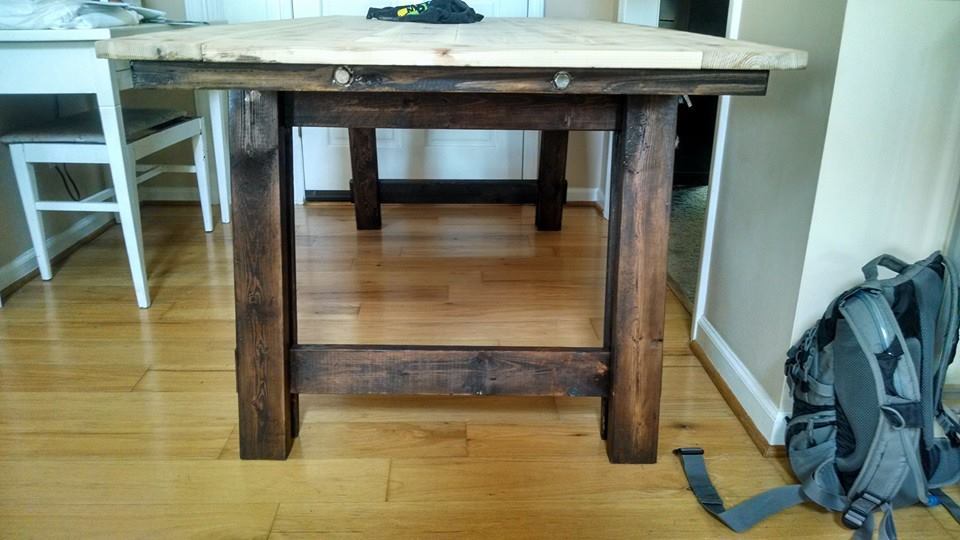
The Christmas present finished in July
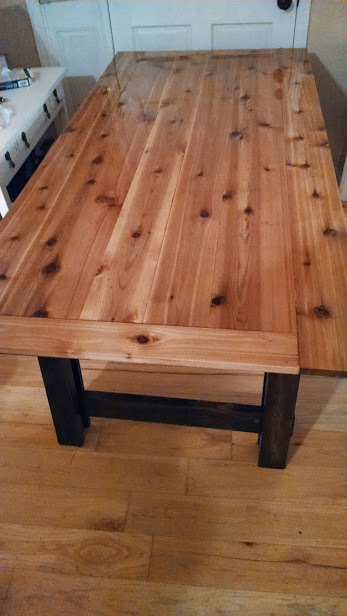
As a Christmas present, SNC promised LFS a new table, her choice of plans. It's July, and we just ate our first meal at the finished table! We'd looked at a few of the plans around the site, but really liked the angled legs of the Benchright Farmhouse Table, and SNC thought the metal accents would get in some manliness!
We didn't quite read all the comments before we began so we faced the issue of plan directions v. cut list not matching up, which we didn't learn until 10 steps further down the build/assembly. We had a hard time finding non-rounded off edges for the 1x2s, as well. If we'd realized the impact those edges have further down the project, we might have been pickier at the lumber store. Using the Kreg Jig came in super handy on the legs & frames. We picked up a DeWalt kit that had extra long driving bits and just used regular Phillips head screws sometimes.
Since we live in NC, surrounded by hundreds of old tobacco barns, LFS wanted to use reclaimed lumber for the table top. After boards that were too thin, warped, short and generally insufficient for our basic skills and tools, we went to a specialty lumber yard and got gorgeous cedar instead.
We weren't loving the sagging of the end frame 2x4s, so we hid them a bit by making the table top breadboard sandwiched between the end 1x6 cedar boards. We used 1x6 and 1x8 boards for the tabletop.
For the stain, LFS further perused the site and went with a Minwax Pecan stain, layered with a Rustoleum Espresso that got wiped off every few minutes to let the pecan have a chance of peeking through on the legs/base. While we both liked the cedar, the light/dark contrast was too contemporary for our taste, so we used the Pecan on the top as well. The table got 3 layers of Minwax Helmsphar, lightly sanded with 220 grit sandpaper between layers.
The aforementioned first meal had guests at the table and comfortably sat 6 adults who all sang it's praises :) Fun awesome (and sometimes awesomely frustrating!) build, super happy the Christmas present monkey is off our backs, but even more glad to eat dinner at it now.
Built from Plan(s)
Estimated Cost
$400
Estimated Time Investment
Week Long Project (20 Hours or More)
Finish Used
Minwax Pecan, Rustoleum Espresso, Minwax Helmsphar
Recommended Skill Level
Intermediate
Comments
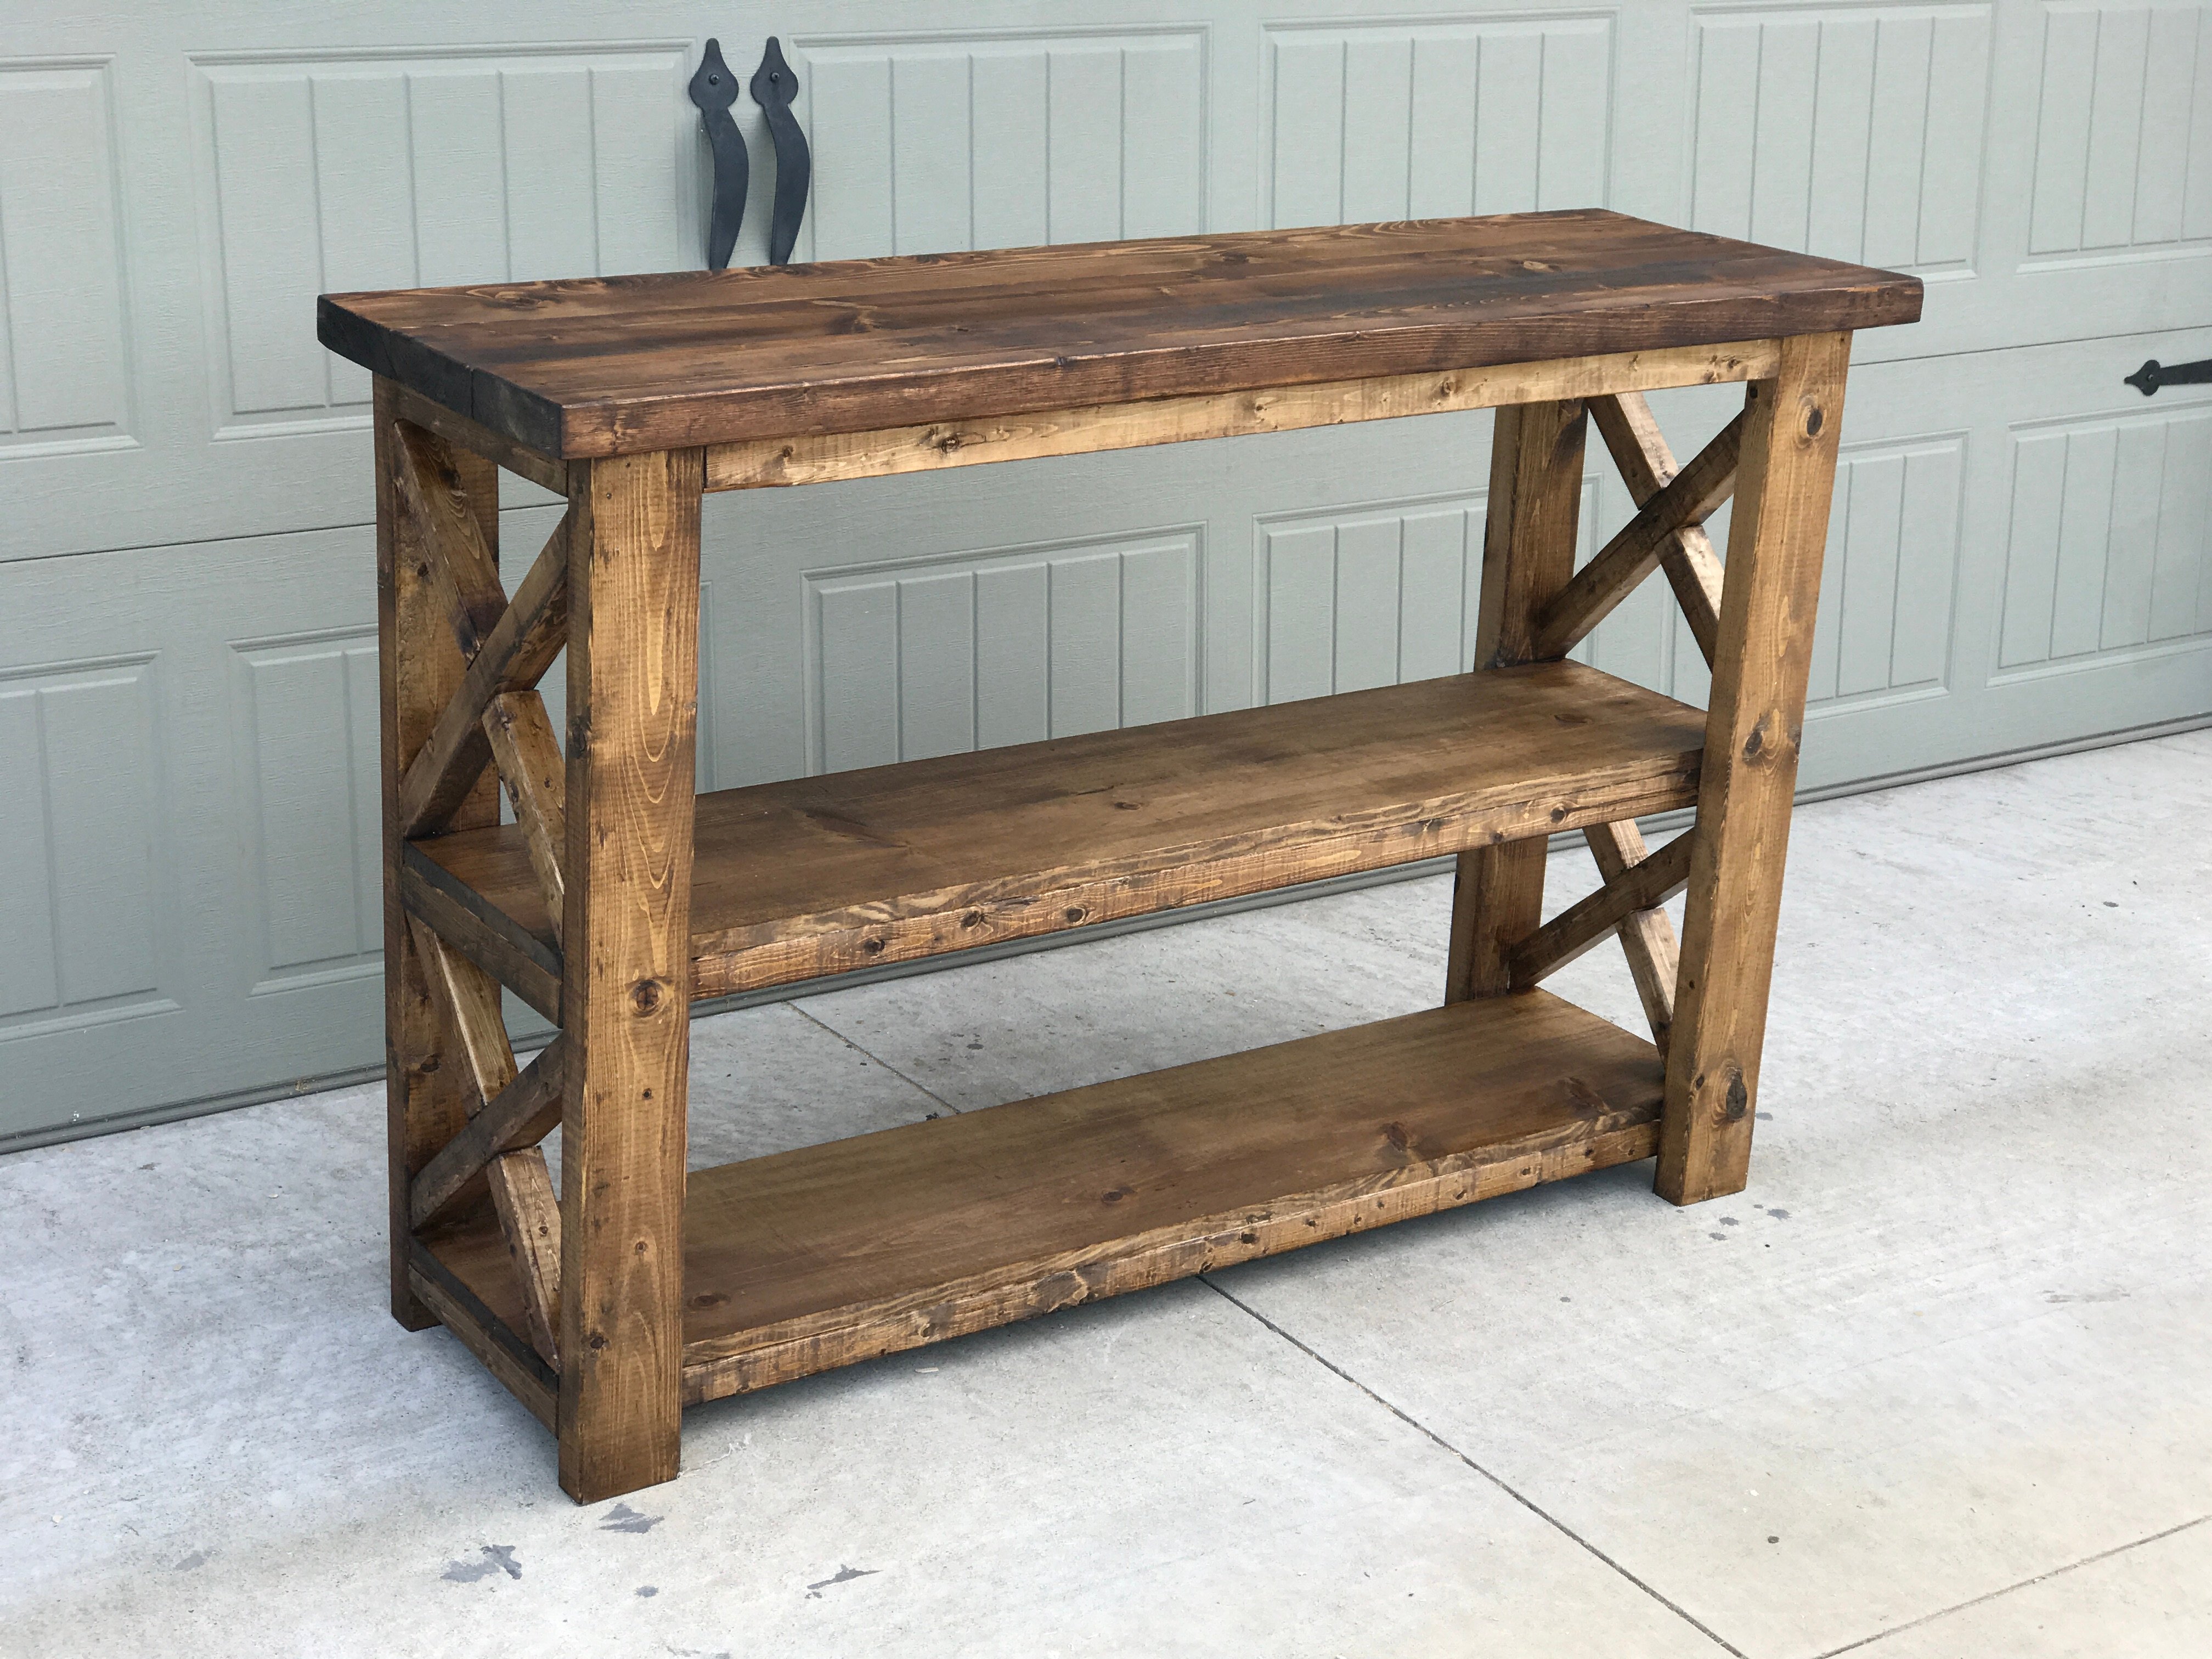
4ft. Rustic Console
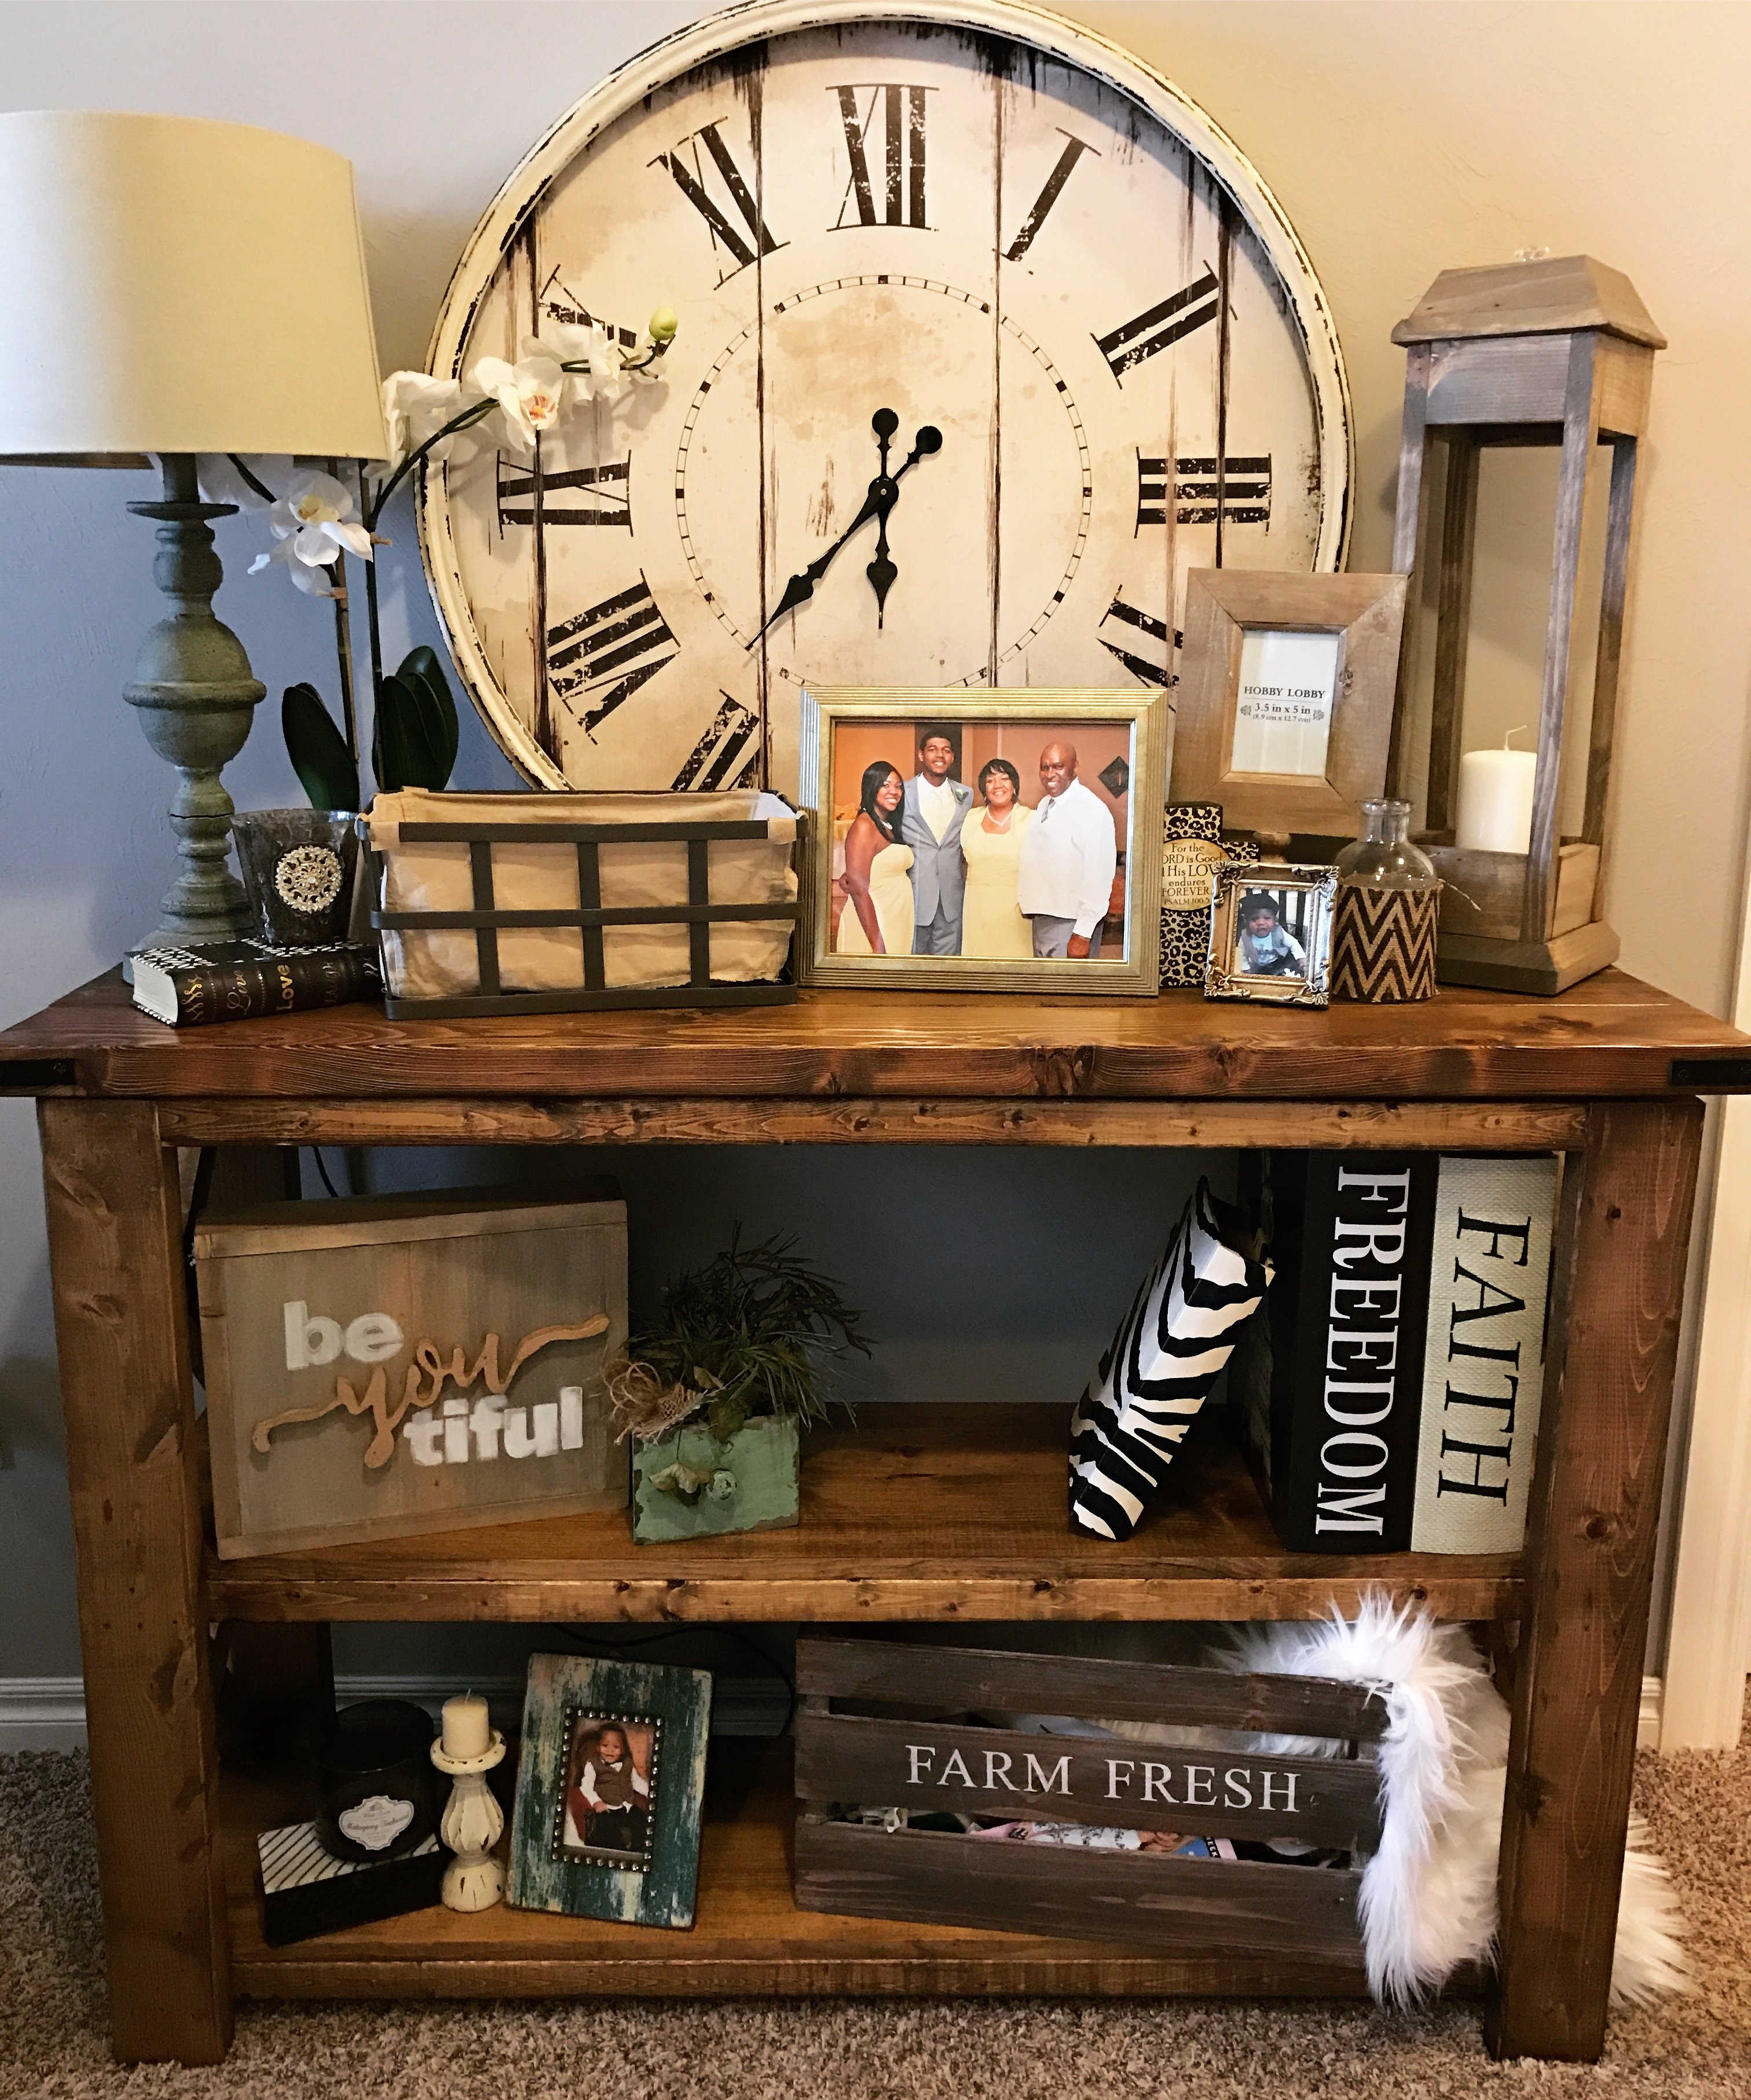
This rustic console was inspired by Ana Whites console, but I made some minor modifications to make it my own. This is one of my favorite pieces to make. I had some scraps laying around and decided to make this piece.

Built from Plan(s)
Estimated Cost
$50
Estimated Time Investment
Afternoon Project (3-6 Hours)
Finish Used
Minwax Wood Conditioner
Minwax Provincial
Minwax Polycrylic Semi Glossy
Minwax Provincial
Minwax Polycrylic Semi Glossy
Recommended Skill Level
Beginner
Kids bookshelf

Had to half the length due to room size, but was happy with the results!
Built from Plan(s)
Estimated Time Investment
Weekend Project (10-20 Hours)
Finish Used
Charcoal spraypaint and clear varnish
Recommended Skill Level
Beginner
Comments
Farmhouse diningroom table
I loved the plans for this table. My husband and I spent about 5 hours making it yesterday. The plans and instructions are well planned and easy to use.
I've made a few projects from Ana's website, it's always so easy to understand and such beautiful projects.

Estimated Cost
$75.00
Estimated Time Investment
Day Project (6-9 Hours)
Finish Used
Minwax (Dark walnut) One coat only.
Recommended Skill Level
Starter Project
Comments

Sun, 11/18/2012 - 20:08
Thank you so much. We love
Thank you so much. We love this table. I'm still looking for two special chairs for the ends.
We are currently almost done building the farmhouse queen bed.
KENTWOOD NIGHTSTAND
This was my first build. I wasn't able to find wainscoting so I ended up making my own by gouging a piece of plywood with a screwdriver.
Built from Plan(s)
Estimated Cost
$60
Estimated Time Investment
Day Project (6-9 Hours)
Finish Used
Minwax Provincial Stain, Satin polyurethane spray
Recommended Skill Level
Starter Project
Modified Camp Loft Bed - Full Size
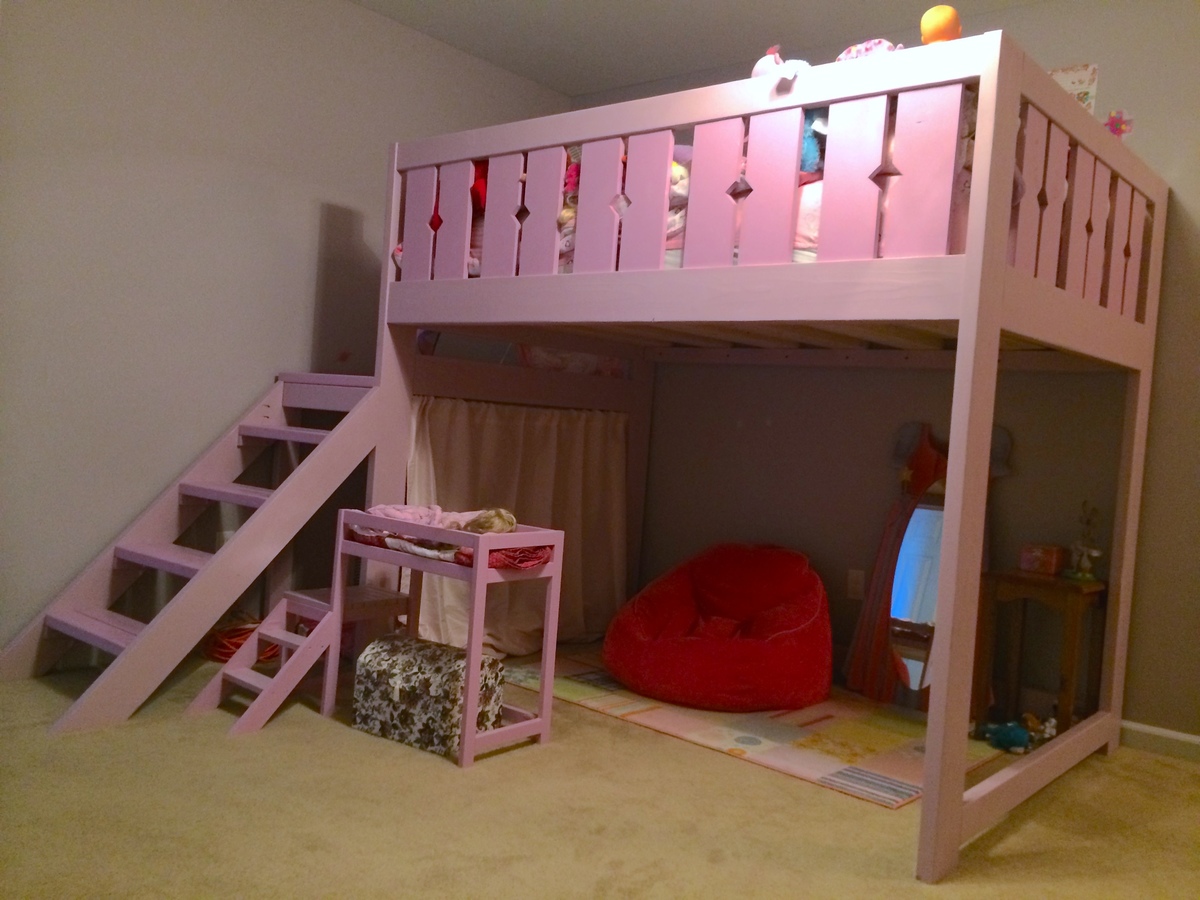
We built two of these beds for our daughters and modified the plan for their full size mattresses. Also modified the rails for a different look. Of course their dolls needed matching beds as well :)
Built from Plan(s)
Estimated Cost
$200
Estimated Time Investment
Weekend Project (10-20 Hours)
Finish Used
Paint
Recommended Skill Level
Beginner
Brian's Greenhouse
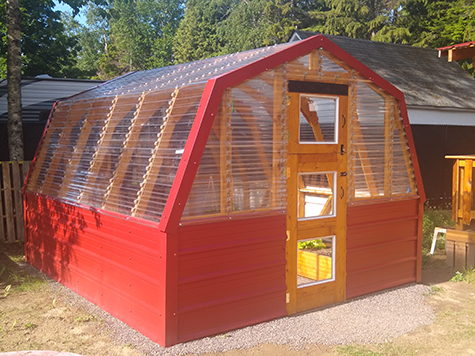
Thank you Ana White for the great plan!
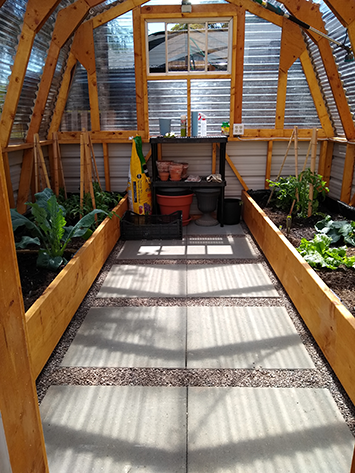
Estimated Cost
$2,000
Estimated Time Investment
Week Long Project (20 Hours or More)
Finish Used
Red tin roofing for siding and edging, cedar penetrating oil stain, concrete 2x2 slabs with pebble fill for floor
Recommended Skill Level
Intermediate
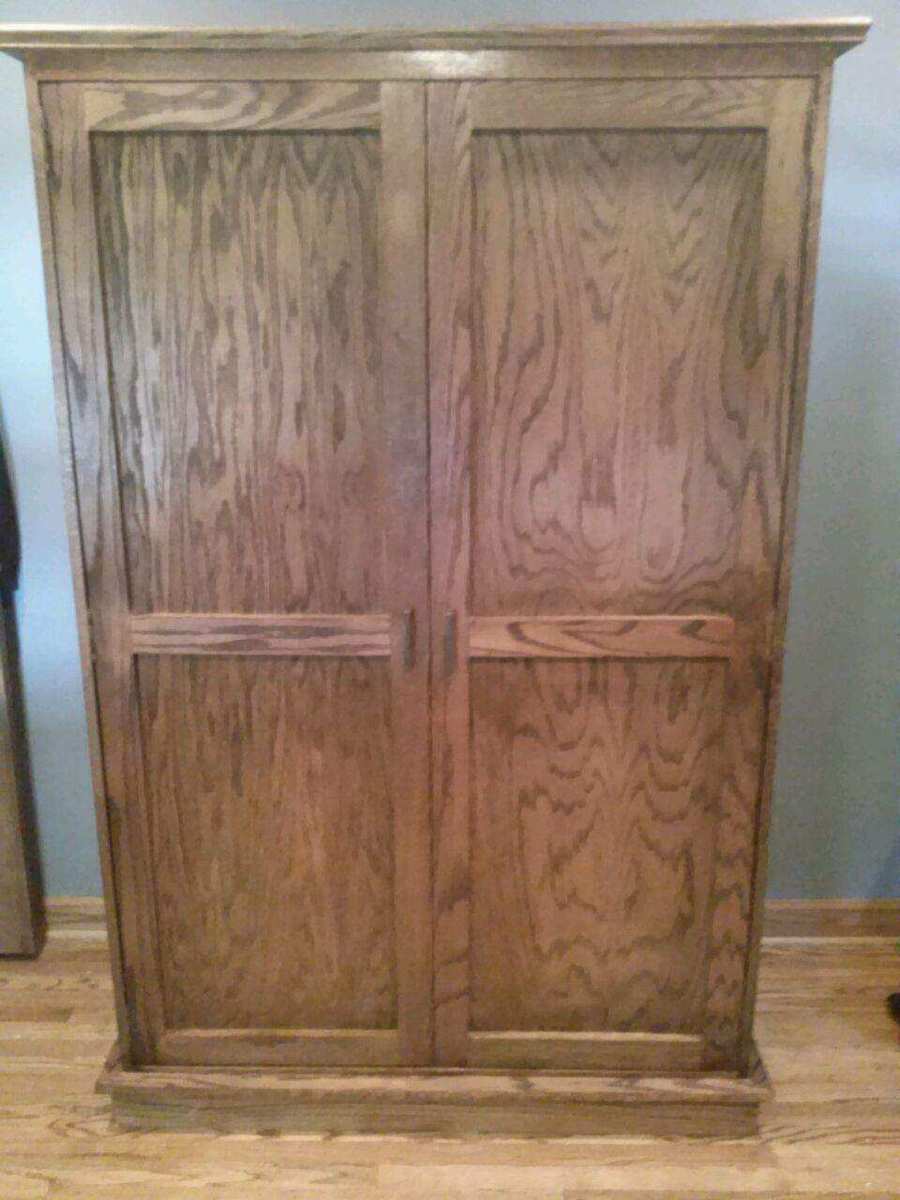
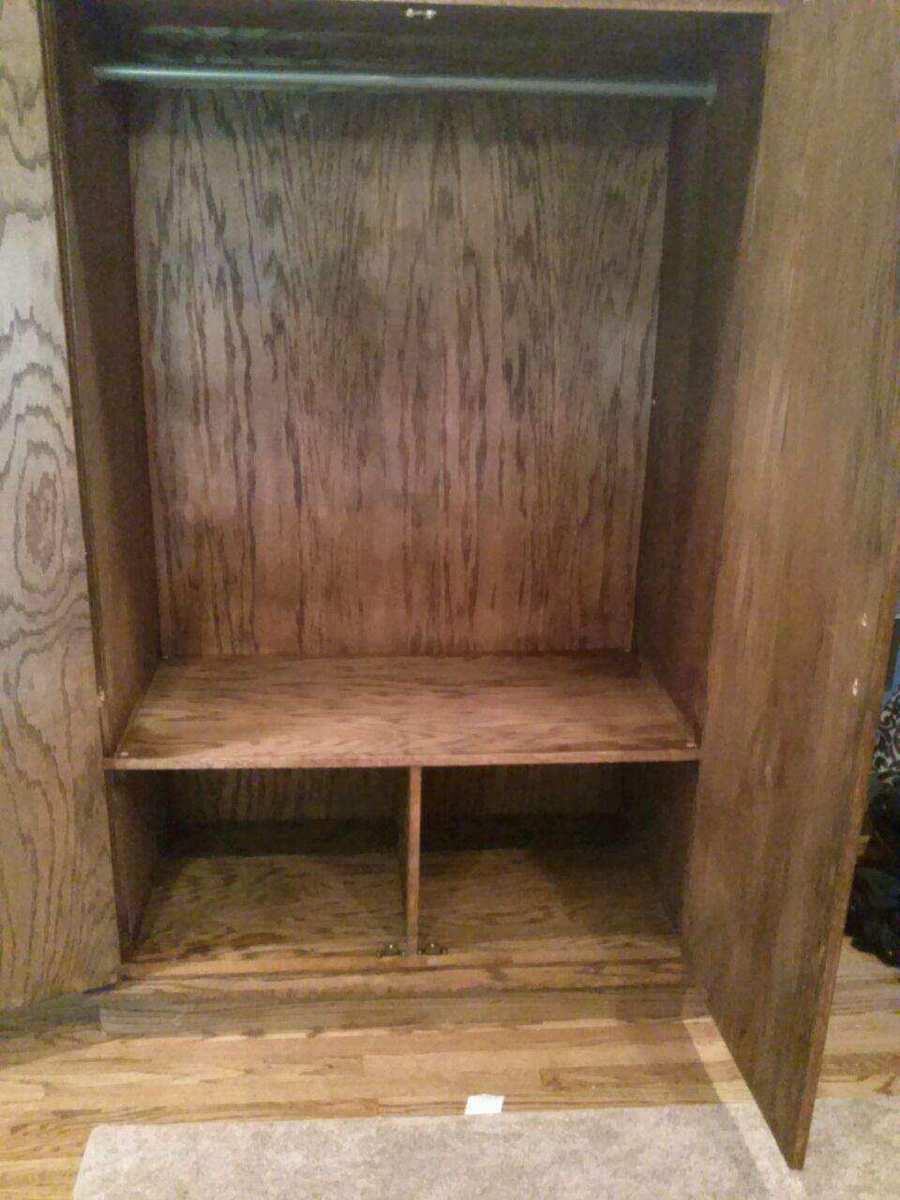
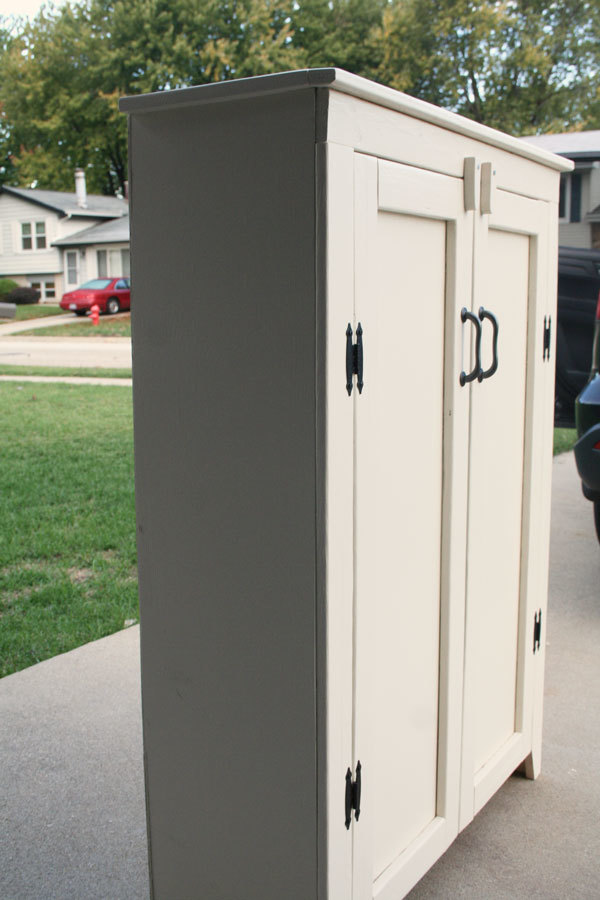
Jelly Cabinet for Heather
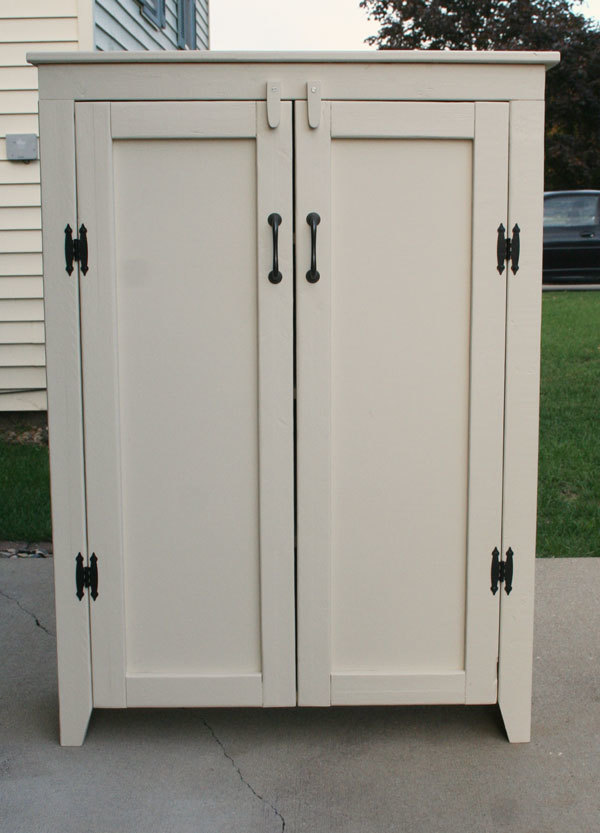
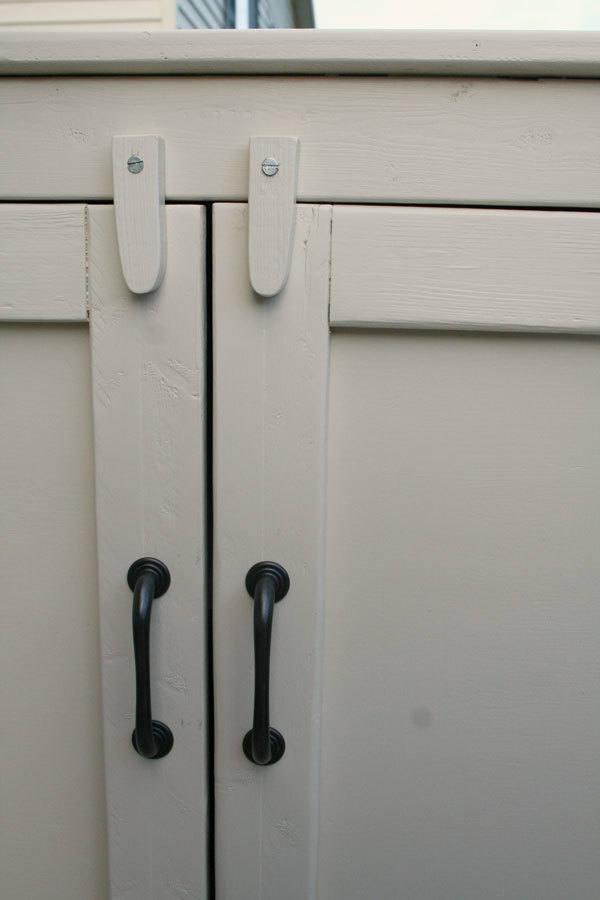
This project was built by my husband, for our daughter who needed some storage for her card-making and scrapbooking supplies. I had the easy part of doing the painting and purchasing the hardware. The hinges and handles are from Home Depot. It is a challenge to find good lumber at our big box stores. That was probably the most difficult part of the build...dealing with warped wood. This piece is suited for the primitive and rustic look so it didn't matter that the wood had some dings and splintering from the edges. Everything was sanded well and these marks just added to the character. He did encounter some problems with drilling the 1 and 1/4" kreg screws into the frame of the door. The wood wanted to split. Also, the plans called for magnetic closures but we could not determine how those would be installed as the shelves do not reach to the doors. So we cut some wooden swinging closures and attached them to the top of the cabinet. They seem to work well. One modification if he builds this again (and our other daughters are now putting in their orders!) would be to add a wooden support down the center front so that the doors would have something to close against. The way it is now, the doors could be pushed inward and put a lot of stress on the hinges. We were very pleased at how this project turned out! Thank you for the plans.
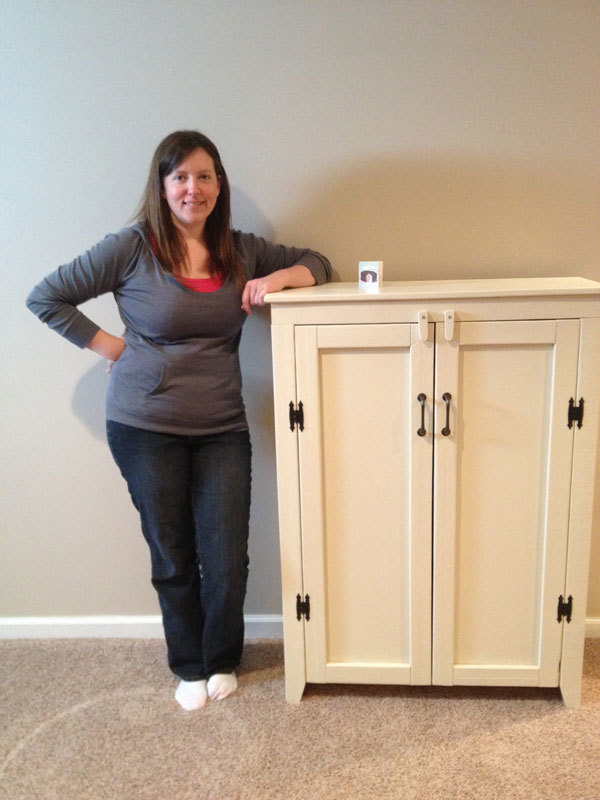
Built from Plan(s)
Estimated Cost
$75.00
Estimated Time Investment
Week Long Project (20 Hours or More)
Finish Used
Top coats are Benjamin Moore Regal, Pearl Finish in Frappe color. I started by thoroughly sanding and then primed using Ace Royal Shield Primer (latex). Then I sanded again to remove the raised grain. The final coats of the Benjamin Moore Regal were applied using a Fuji HVLP spray gun. The inside of the cabinet (shelves) were sanded but not finished in any way. We like the look of the unfinished pine for the shelving.
Recommended Skill Level
Beginner
Comments
Tue, 10/09/2012 - 13:20
Looks Great I had same issues
I like the way that came out and I agree its hard to get good wood at the big box stores it took me a while to go through the stacks they had there to find straight pieces. The other thing I had an issue with was the 1 1/4"
Kreg screws as well but if you dont over drive them it generally will not crack the wood. Just be gentle and if it still does turn the clutch down on the drill that will help as well.
Thu, 10/11/2012 - 18:11
Kreg screws
Lawson4450,
Thank you for your comment, and for the advice on the Kreg screws!
We are in the process of cleaning up our garage, so that future building projects are easier to do! One thing my husband also built was a small workbench, with a lower shelf to store the Kreg jig, screws, etc on. It comes in handy as we always know where to at least find the Kreg stuff! We should also keep some notes on the shelf, too, to refer to when the wood cracks, etc.
-Ann
Wed, 10/10/2012 - 10:37
You could solve the door not
You could solve the door not reaching the shelves problem by installing the magnetic closures on the underside of the top piece so it would also act as a stopper for the doors so they don't swing to the inside. I think that's what Ana meant in the plans. Kinda like this:
Thu, 10/11/2012 - 18:04
Magnetic Closure
Aisha,
Thank you for the photo of the magnetic closure. That makes a lot of sense! We could still add those, and also leave the swinging locks in place, too.
-Ann
Sat, 10/13/2012 - 10:43
Love this!
I am the lucky receiver of this jelly cabinet. It is exactly what I had in mind when I was on the hunt for one. I was so pleasantly surprised when my parents came to visit and showed me my early birthday present in their trunk! :)