Community Brag Posts

my versio play vanity

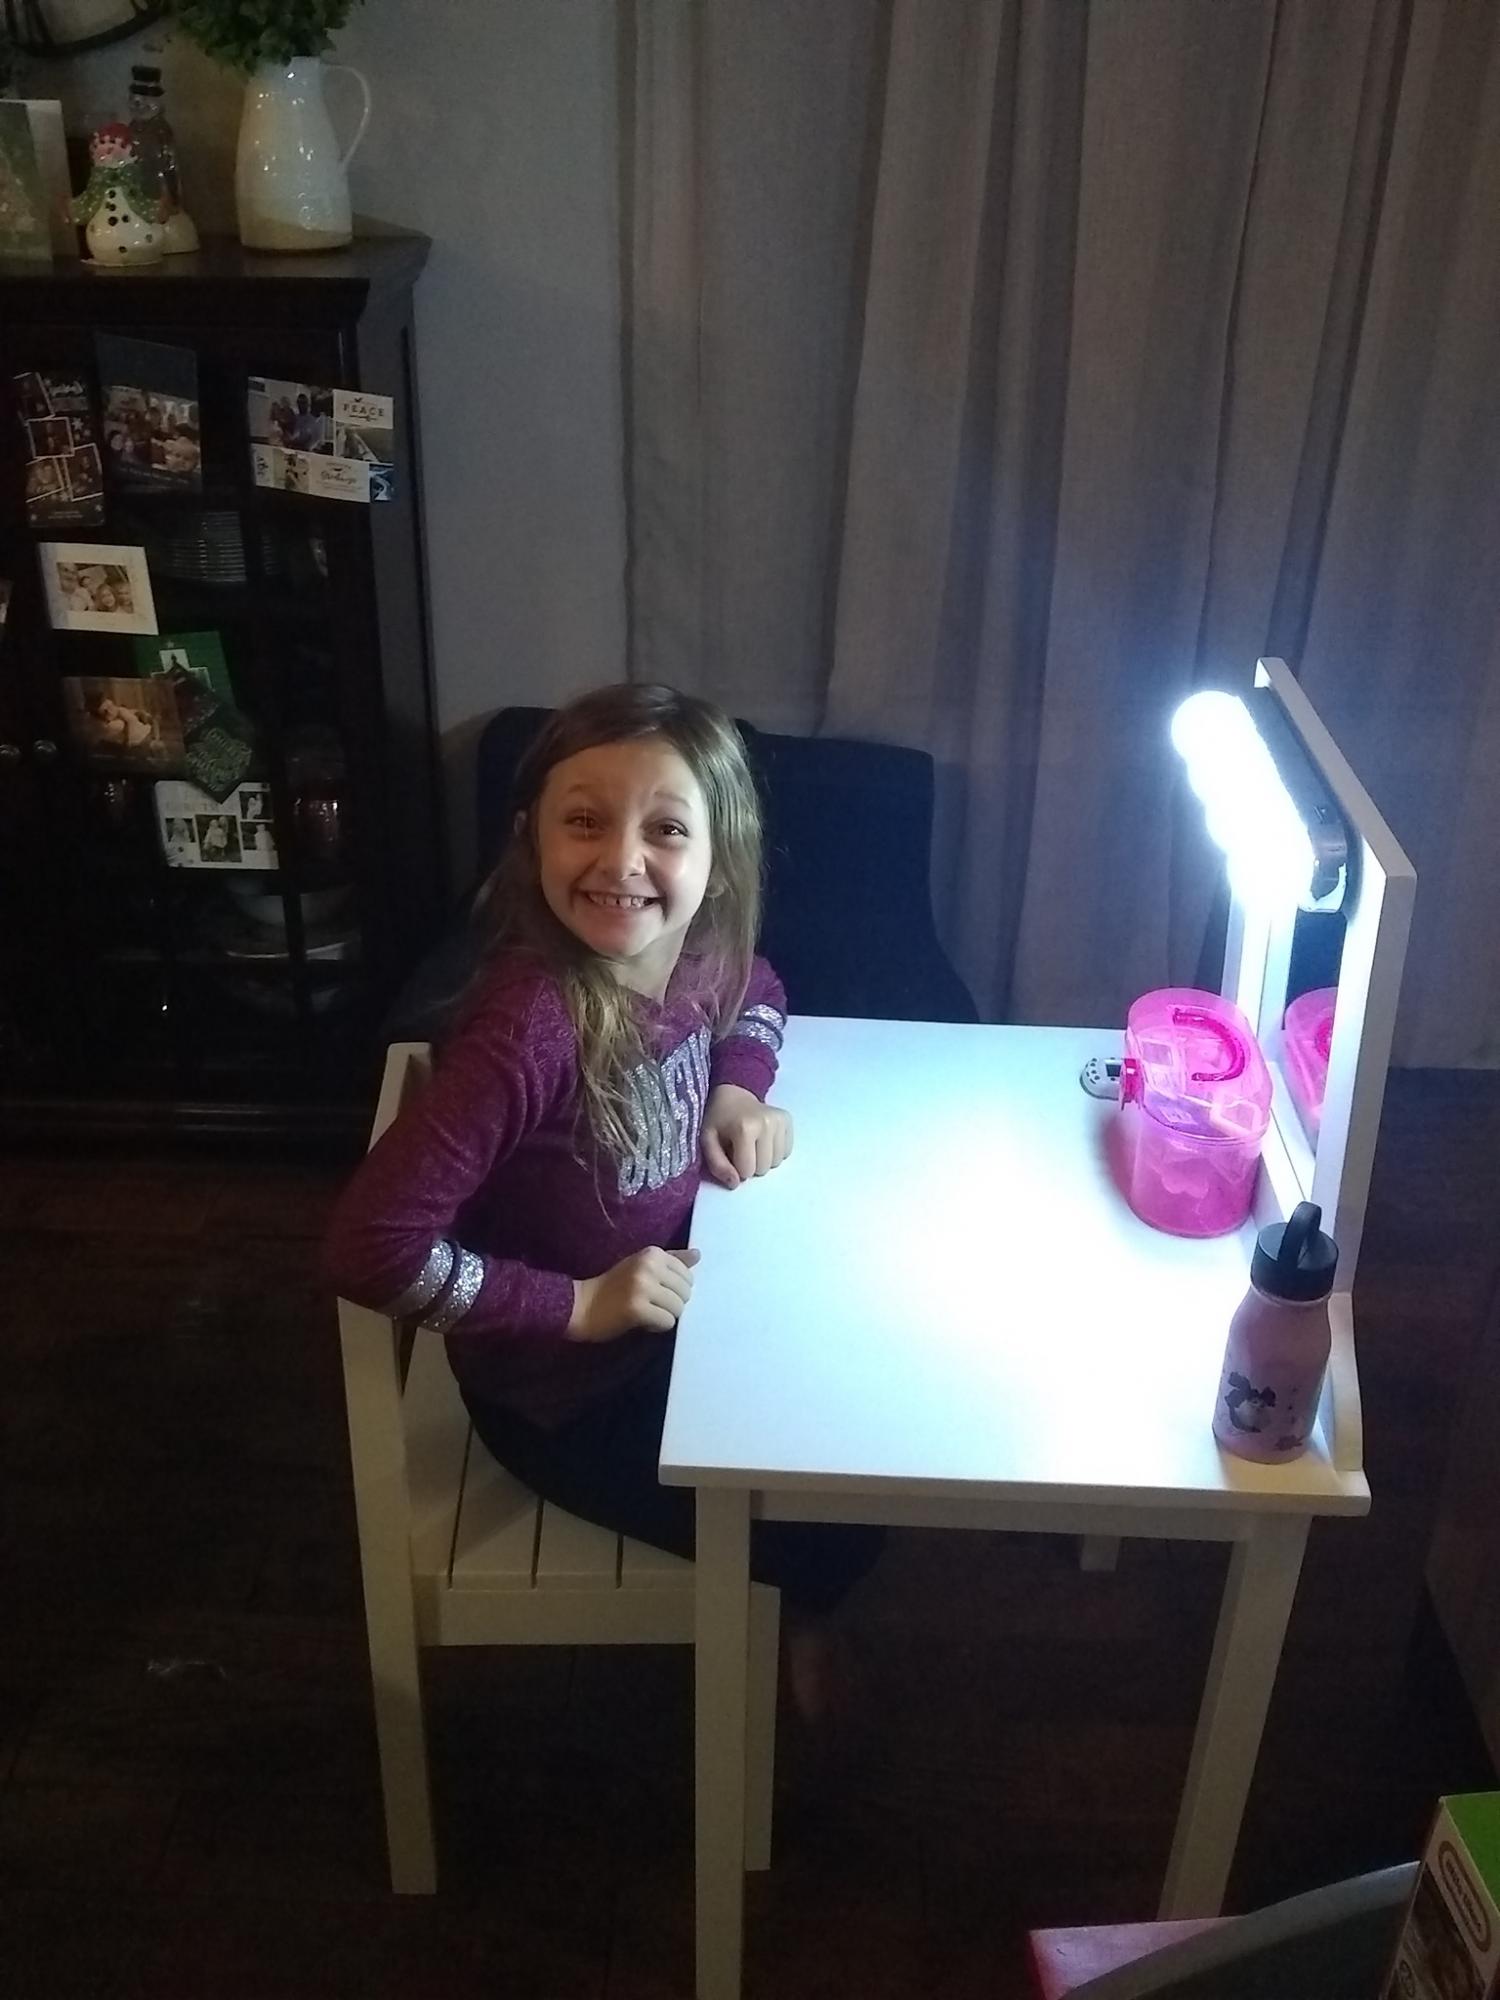
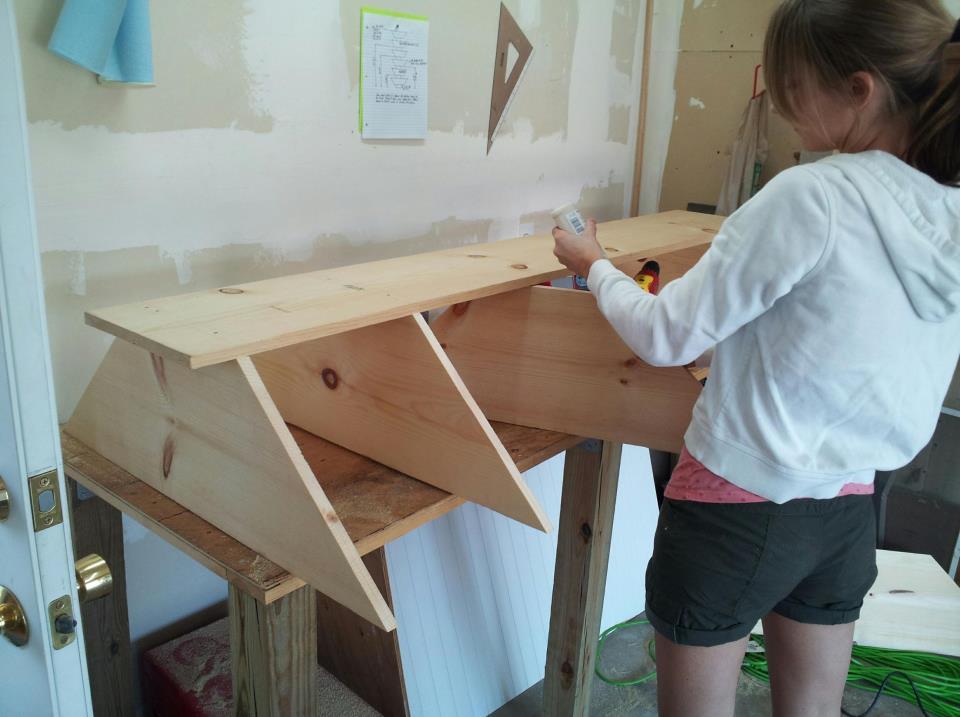
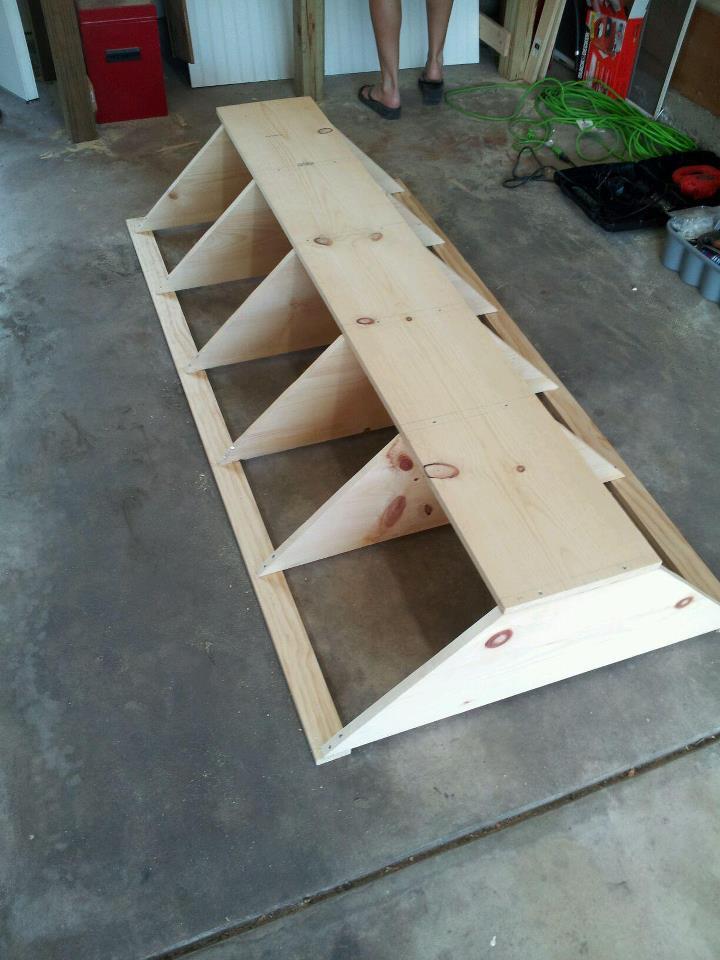
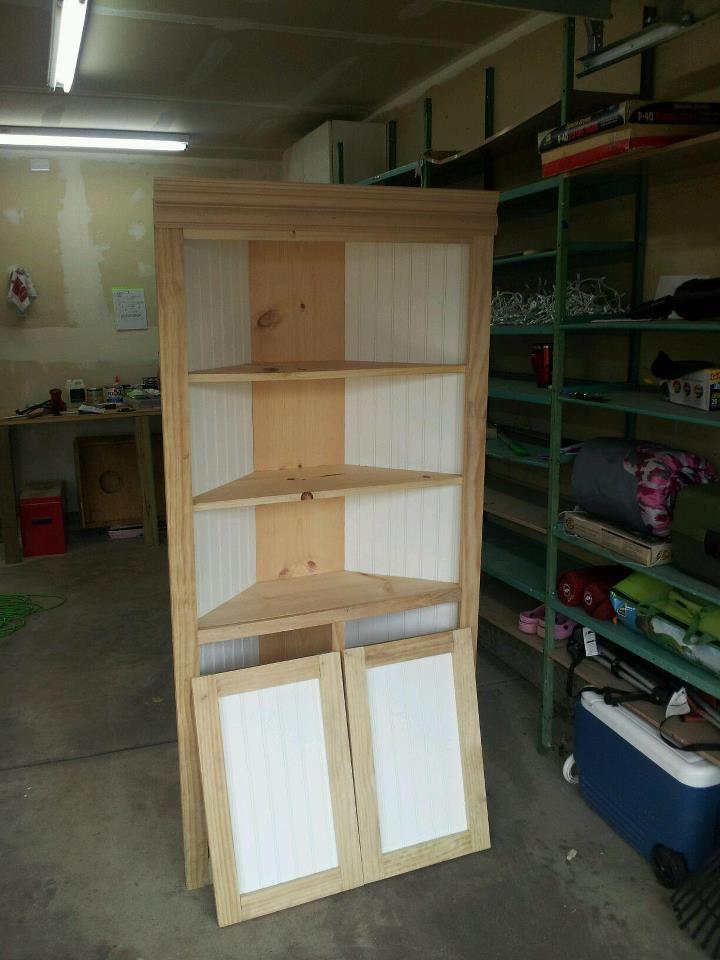
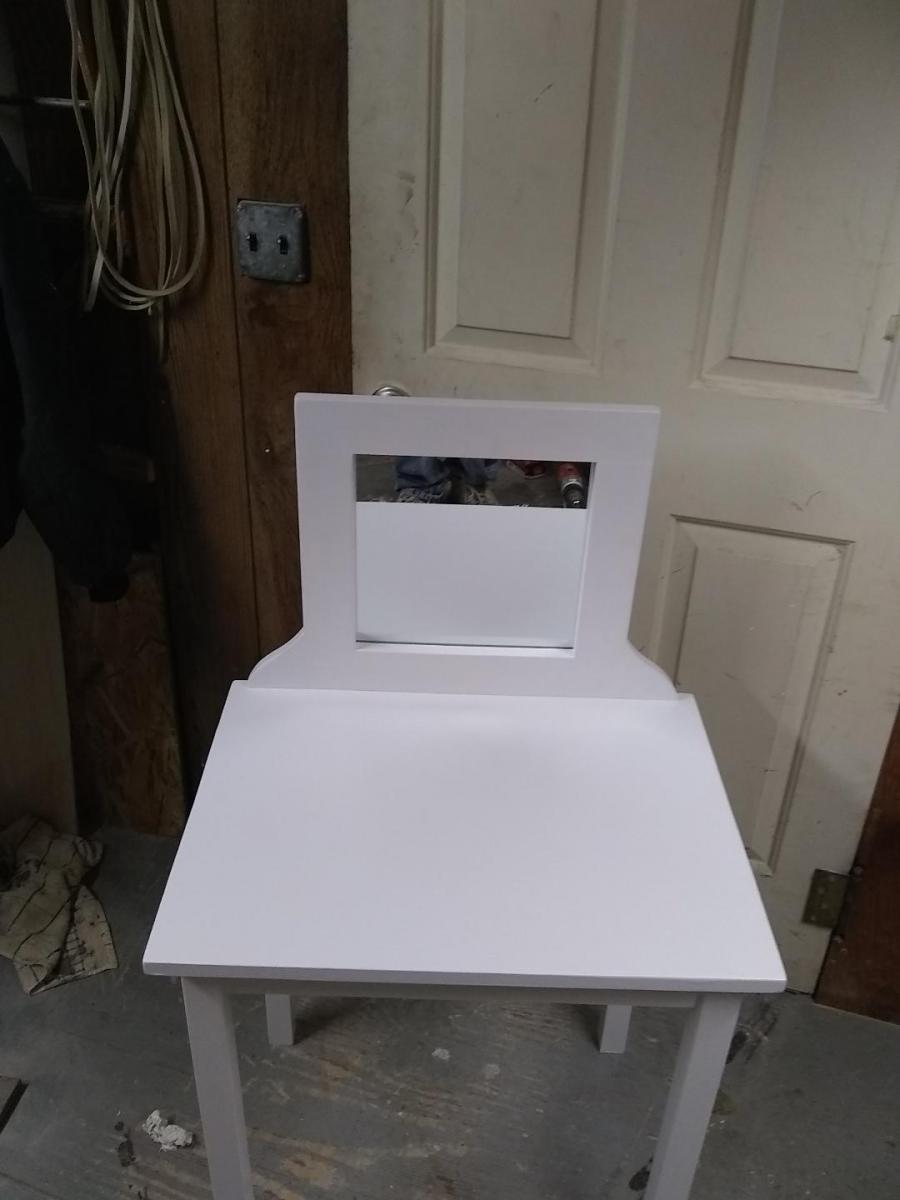
I built this for my 7 year old niece. She out grew her cheap plastic one. Her mother asked for  white. I  decided to modify the kids play table and made own my own mirror frame. I used the 4$ stackable chair plan. Chair height 15in and table top 25in. The table sixe 24w x18deep.She has room to grow. I used l L brackets on the back keep the mirror in place. If she grows up you can take mirror off  and a have table she can use for anything. I had to finish it off with $10  battery powered vanity light from Amazon. I painted it all satin white, I used glitter I put in the paint for the mirror frame. My niece just loved it and so did her parents. 

Estimated Cost
$75
Estimated Time Investment
Week Long Project (20 Hours or More)
Finish Used
Primer, than satin white paint
Recommended Skill Level
Intermediate

Privacy Planter Fence

Submitted by Anonymous (not verified) on Fri, 09/08/2023 - 08:25

Created a privacy planter fence, using multiple planters. Most of the bases were custom sizes due to the existing rock wall. Tongue and groove cedar utilized and coated with linseed oil. I ensured the frames were square and plumb which the directions omit for some reason. Great week long project!

Kyle

Built from Plan(s)
Seasonal And Holiday

My own weathered corner hutch :)

This was my first project. It took me a weekend to build and prime. Since I chose to use a crackle finish, waiting time between coats extended the total time to one full week. My husband and I were supposed to make this hutch together, but I became obsessed and did most of it alone! I adjusted the size a bit to make it larger, so I could fit big pieces on shelves and in cabinets. Thanks for the plan Ana!!

Built from Plan(s)
Estimated Time Investment
Week Long Project (20 Hours or More)
Finish Used
Weathered Crackle Finish done as follows:
1. Killz2 latex primer (highly recommended)
2. Valspar interior satin finish, "Frontier Road" (this is the color that shows in the cracks)
3. Valspar weathered crackle glaze (a suggested substitute that costs less is Elmer's glue)
4. Valspar interior flat finish, "Churchill Hotel Lace" (must be a flat paint, this is the dominant color of your piece)
5. Valspar clear protector (also highly recommended to protect the finish you worked very hard to create, when you paint the same piece of furniture 5 times in one week your sanity will agree!)
Recommended Skill Level
Starter Project

Comments

JoanneS

Fri, 04/13/2012 - 14:47

Wow, this is sooo beautiful! The finish is just awesome. My Hubby hates to paint, and he saw this multi-step finish and said you must have the patience of a saint! :) Congrats on such a stunning first project!

kmsdance (not verified)

Mon, 10/01/2012 - 23:33

Very Nice! What did you do to make it "bigger"...did you make it deeper or wider? Just curious, because I would like to try and make a bigger version as well. Did you still cut the shelves on each side at a 45 degree angle? Thanks!

Farmhouse Table

Submitted by Anonymous (not verified) on Thu, 04/21/2016 - 07:37

This was my first project!!
This plan took me about three weeks start to finish working off and on (multiple hours on weekend days). I widened the table to 48 inches (the dimensions for my table are approx 84" long x 48" wide. Used 4-2x10s and 1-2x12 for the table top and 1x8s for the bread board ends.

Estimated Cost
$100-$150 (I didn't have any of the items on hand or scrap) includes stains/paint/urethane, PH screws etc.
Estimated Time Investment
Week Long Project (20 Hours or More)
Finish Used
Stained with two coats of Minwax Early American and then one coat of Minwax English Chestnut (tried to match another furniture piece) coated top with 3 coats of Minwax Pro Spar Urethane in satin. The base is made with 4x4s for the legs and then 2x4s for the aprons and stretchers. Painted in Valspar Satin "Wet Pavement", 2 coats and clear coated with the satin Pro Spar Urethane, 3 coats.
Recommended Skill Level
Beginner

Rustic bench

Submitted by Anonymous (not verified) on Sat, 01/11/2020 - 11:38

Love this little bench! My bench is a little bigger than Ana's, and the seat is not as deep, but the plans were super easy to follow. It's just what I needed to finish out my living room!

Built from Plan(s)
Estimated Cost
$3
Estimated Time Investment
Afternoon Project (3-6 Hours)
Finish Used
Dark walnut stain
Recommended Skill Level
Beginner

Shoe Dresser - First Project!

Submitted by mashhawkes on Sun, 04/15/2012 - 13:33

I know that Ana says not to do this as your first project but I couldn't help myself! We needed shoe storage BAD!! This project was not bad but did take my husband and I about 3 weeks to build. It had nothing to do with the difficulty just scheduling conflicts. We needed somewhere to house all of my husbands shoes and something that would not take up much space because the only spot we had to put it in our bedroom was between the bathroom door and my husbands closet door. We used Ana's plan for the shoe dresser but did had to modify it to fit the 44" spot we had to work with. The 1x8's that we used were only 7 1/4 instead of 7 1/2 but my husbands size 12 shoes fit without a problem! I can't wait to start our next project! Thanks Ana!

Built from Plan(s)
Estimated Time Investment
Week Long Project (20 Hours or More)
Finish Used
English Chestnut stain with 3 coats of antique white. Distressed by hand using 220 grit sandpaper and then covered with 3 coats of satin polyurethane.
Recommended Skill Level
Intermediate

See-saw

Submitted by bhammond on Tue, 01/28/2014 - 21:03

This easy project made me the best Aunt ever! I made it for my nieces and nephews for Christmas. It was such a huge hit that one of them threw up all over it from laughing so hard. :)

The garage was freezing cold but they stayed there all evening once they discovered their gift.

Built from Plan(s)
Estimated Cost
35 including screws
Estimated Time Investment
Afternoon Project (3-6 Hours)
Recommended Skill Level
Starter Project

Lego Table

Submitted by Anonymous (not verified) on Tue, 04/26/2016 - 06:52

Very Easy project, the plans are straight forward. The kids love having a table to play lego's and we love being able to hide everything away. Very Nice Table. When the girls get older and the Plywood cover shows signs of wear from much use, I'll probably replace the cover with one made from pine 1x6's biscuit-joined to give a nice textured look, but still with the storage for games and stuff.

Estimated Cost
$225 CAD
Estimated Time Investment
Weekend Project (10-20 Hours)
Finish Used
CIL Crisp Linen Paint & Minwax Red Mahogany Stain with 3 coats of Minwax Polyurethane Topcoat.
Recommended Skill Level
Beginner

Long Modern TV Console with Pallet Wood

Submitted by Anonymous (not verified) on Fri, 01/17/2020 - 14:18

This project was a Christmas present for my girlfriend. I modified these plans a little bit to put the open shelf in the middle and used the pallet wood for this instead of it being white. The pallet wood was such a pain to cut up in to usable strips but after cutting them down, gluing them up, and sanding them down (for ages) I couldn't be more pleased with how they turned out. I used Watco Danish in medium walnut for the finish and I think it brought out the imperfections in the wood beautifully. I just used some pre-made legs from Amazon instead of the base out of laziness.

Estimated Cost
$125
Estimated Time Investment
Weekend Project (10-20 Hours)
Finish Used
Watco Danish Oil in medium walnut
Recommended Skill Level
Intermediate

Covered Pergola Walk Way

Submitted by Anonymous (not verified) on Fri, 09/15/2023 - 08:38

Built a pergola with a roof attached to a pool house.

Ed Nixon & Jim Reitenbach

Modified to fit an Earthbox and mounted to a bench

Submitted by BJ D on Wed, 04/18/2012 - 06:16

I took the design of the planter and stretched it to accomodate an "Earthbox" (which is 29 x 13.5x 11 inches) to see if I could boost the results of my little garden. Both planters were made the same size so that if I'd like, next season ,I can use two Earthboxes.

The bench was built to keep out bunnies, our Husky, give us a place to put down the bowl when picking from the garden and lastly to give Georgia a place to climb up and get a better view or help. It is made using some treated 2x6's for legs aand support and untreated 2x4's for the actual benchtop.

I'll add a protective finish (and missing trim on both ends) to the bench part later this week when I have some toddler free time at home :)

Built from Plan(s)
Estimated Time Investment
Afternoon Project (3-6 Hours)
Recommended Skill Level
Beginner

Comments

Fancy Desk - First Build

Submitted by mtairymd on Sat, 02/01/2014 - 04:02

This was the first project for me and my 15 year old son. He wanted a large, sturdy desk for his room. We loved the plans and we think it turned out pretty well.

Estimated Cost
50
Estimated Time Investment
Day Project (6-9 Hours)
Finish Used
Minwax black poly+stain
Recommended Skill Level
Beginner

Comments

Sideboard - 1st Build!

This was my first build from Ana White and my first piece of furniture.  It is doable for a determined, handy beginner/ intermediate.  I took my time and worked on it when I could, thanks to my wife for letting me take over the garage for several weekends and her great painting skills!

Built from Plan(s)
Estimated Cost
$400
Estimated Time Investment
Week Long Project (20 Hours or More)
Finish Used
General Finishes milk paint: Buttercup (yellow)
Sherwin Williams: Blue Bell

General Finishes: Poly Finish - satin

We primed it white
Two coats yellow
Two coats poly
Light sanding between each application with superfine sand paper sponges.
Recommended Skill Level
Intermediate

Modern Farm Bench

This was my first Ana White build, and I’m hooked. Super simple for a beginner to make. 

Built from Plan(s)
Estimated Time Investment
Afternoon Project (3-6 Hours)
Finish Used
Minwax walnut stain
Recommended Skill Level
Starter Project

Scrap Wood Dog Bed

Submitted by Anonymous (not verified) on Mon, 09/18/2023 - 15:22

Scrap wood build for a dog bed. I built a new couch to replace the chair she destroyed and used the old chair cushion in her new bed. Has kept her off the furniture and on her own bed ever since.

Grace LeBlanc

Rosie's Baby Doll Bed

Submitted by nveelover on Sat, 04/21/2012 - 10:13

Made this based on the Oliva's Doll Crib plans with changes to the shape of the top of the ends (to better match my daughter's crib), taller end pieces (about 2 inches), and a shelf under the drawer. To keep the drawer from falling out, I built the crib as usual, then turned the crib upside down, and screwed two rubber stoppers to the front of the underside of the crib bottom. I then put the drawer in place, placed the bottom shelf, and then screwd it in through the bottom (which is on top right now because the whole thing is upside down). I also put in some spacers so that the drawer doesn't get stuck, squished between the bottom of the crib and the shelf.

Built from Plan(s)
Estimated Time Investment
Day Project (6-9 Hours)
Recommended Skill Level
Beginner

Comments

kad050209 (not verified)

Mon, 09/10/2012 - 15:49

Can you tell me the measurements of wood you used? Piece by piece?

nveelover

Thu, 11/15/2012 - 16:05

I really did just follow the plan that Anna made. The ends, the tallest solid pieces of wood that I added length to, are about 21 inches long. Ana had them at 18 or 19 inches long. Everything else was the same.

Bedside Table

Submitted by AndyH on Tue, 02/04/2014 - 10:34

This is my third build based on the Kentwood Nightstand plan. Added a shelf this time to use as a charging station at night. Customized the height as well so matches the height of the bed.

Estimated Cost
$100
Finish Used
Minwax English Chestnut (3 coats) and Minwax Satin Poly (3 coats)..
Recommended Skill Level
Beginner

Comments

My version, cheater style

Submitted by januaryMH on Mon, 05/02/2016 - 17:42

I believe I found the orignal quick version on the Finding Aloha site with a link back to Ana's original Farmhouse Bed. I made the blanket and bedding from some cheap FQ's. It was a hit for my neice's 7th birthday.

Estimated Cost
I had about $12 in all - including the fabric and wood.
Estimated Time Investment
Day Project (6-9 Hours)
Recommended Skill Level
Beginner

Baby Boy Nursery Dresser

Submitted by Anonymous (not verified) on Wed, 01/29/2020 - 08:41

My wife had me build this dresser for our baby boy. She took features from a couple different Ana White dressers and combined it into one. We also added to the height of the drawers, adjusting the overall height of the dresser to serve as a baby changing station.

Estimated Cost
$250
Estimated Time Investment
Week Long Project (20 Hours or More)
Finish Used
Valspar satin finish and a poly clear coat
Recommended Skill Level
Advanced
Back