Community Brag Posts
Modern Outdoor Chair
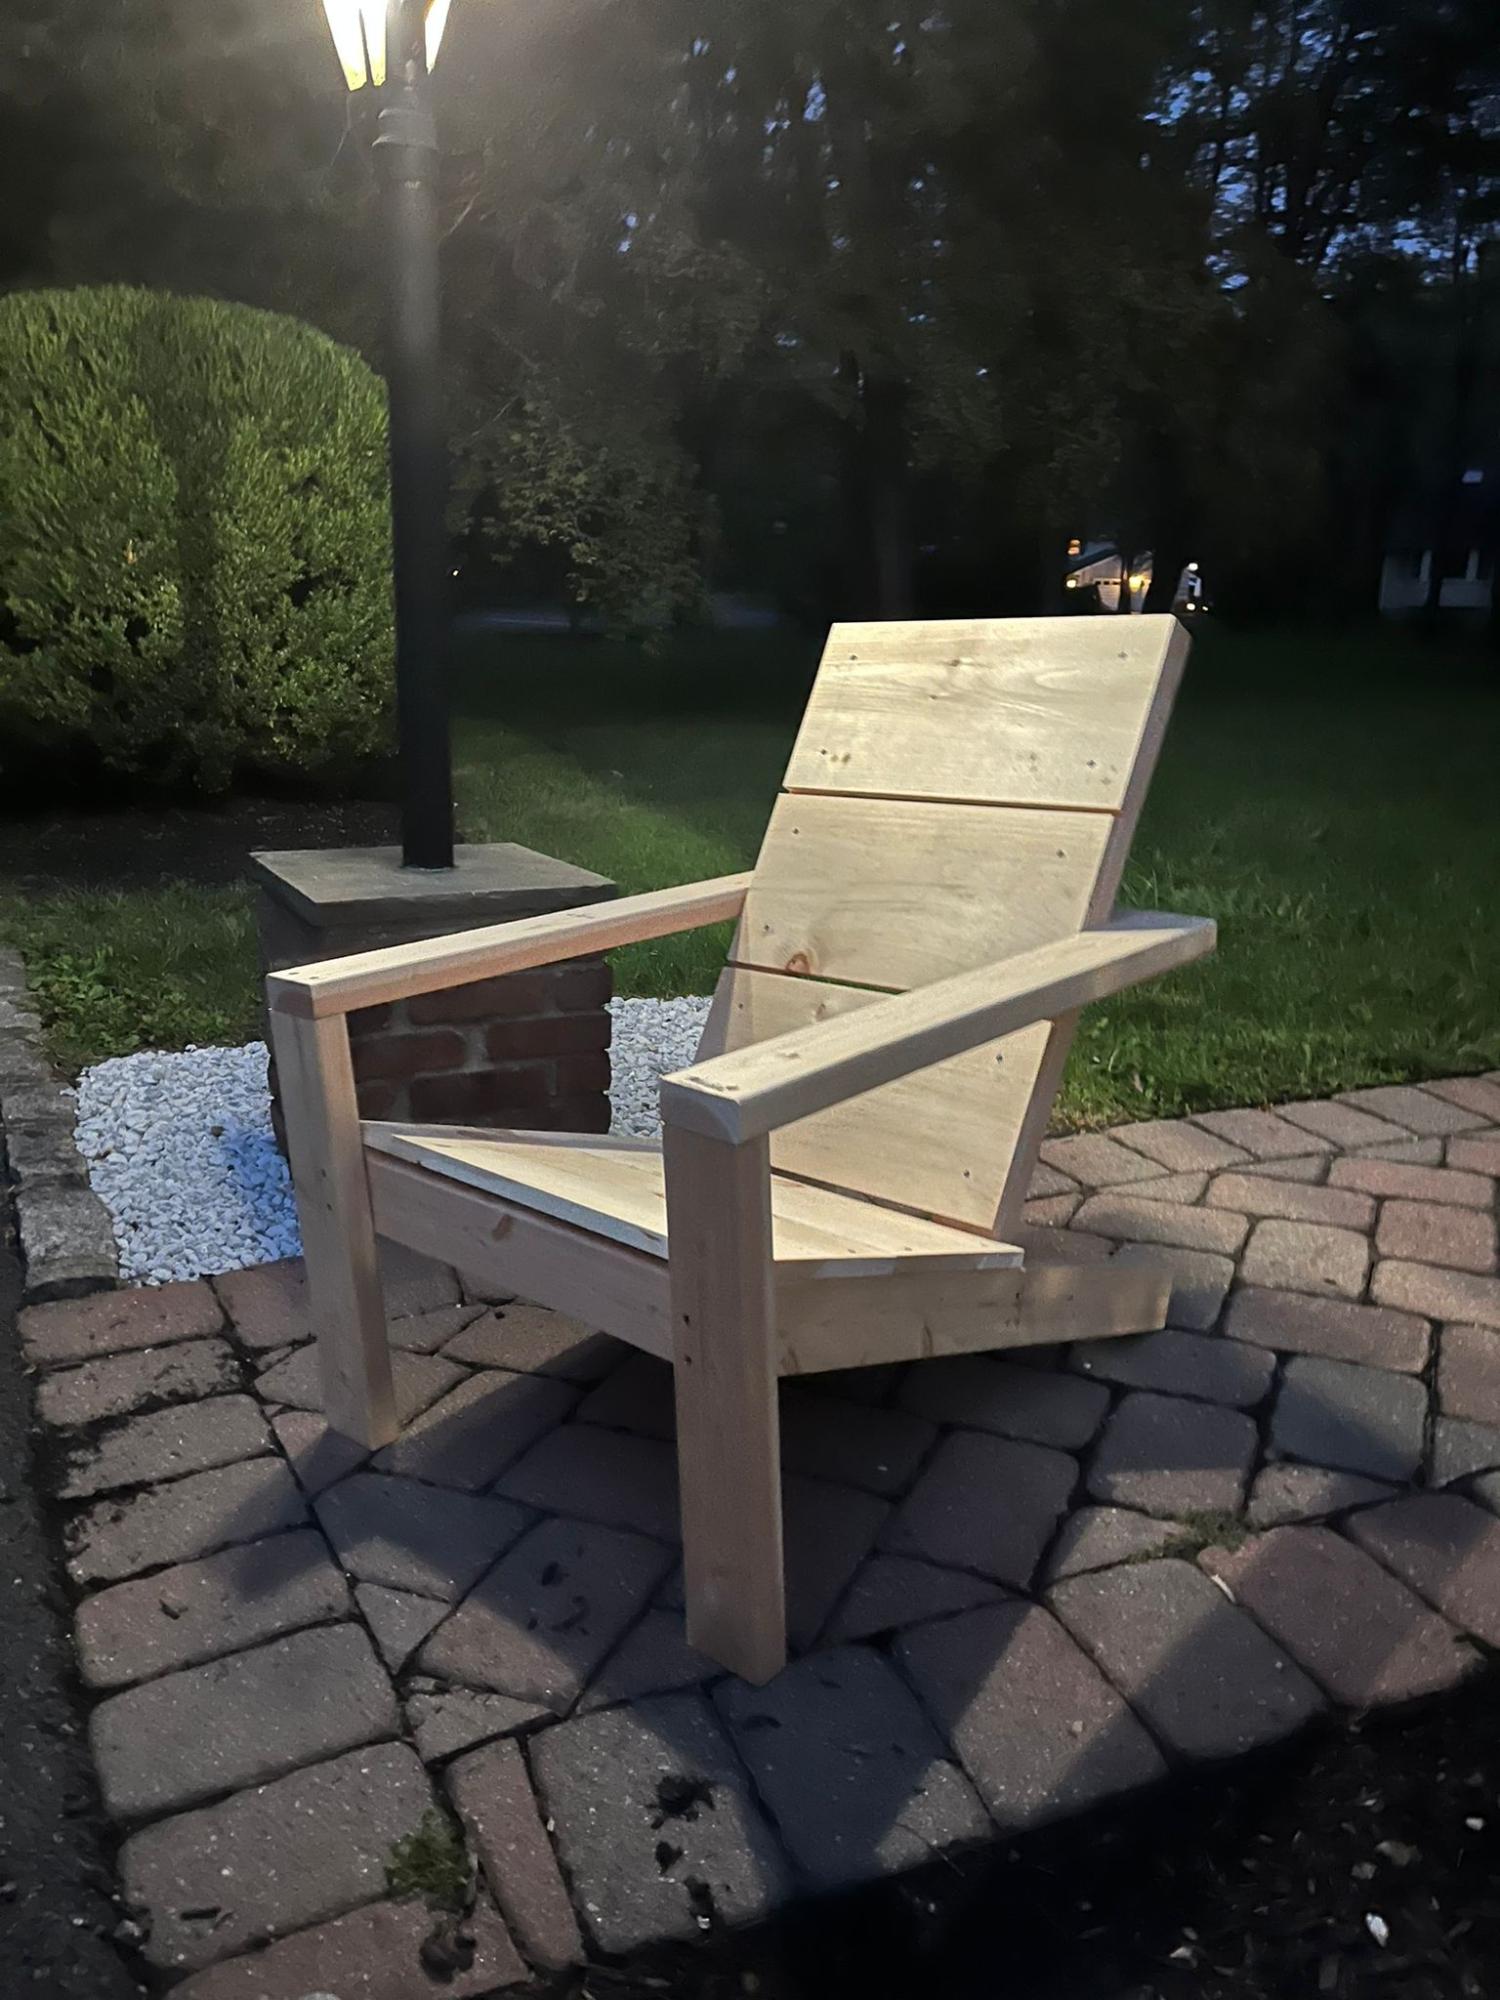
Great Project. We are very happy with the chair. It is modern. Amazing. Ana thanks!! The drawings are great.
Jhrios2003
Built from Plan(s)
Comments
Province Table
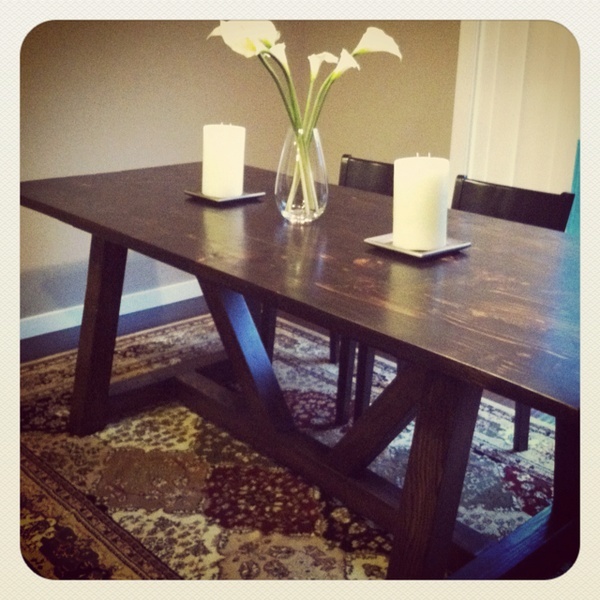
The plans I used were actually from design confidential but it is the same table.
Built from Plan(s)
Estimated Cost
$80.00
Estimated Time Investment
Week Long Project (20 Hours or More)
Finish Used
I mixed what I had together...then did about 10 layers of a wax finish.
Recommended Skill Level
Intermediate
Comments
Tue, 04/24/2012 - 23:16
This looks great! did you
This looks great! did you modify the plans (length) at all? It looks like your cross beams are closer together and I like that look best.
Tue, 05/15/2012 - 04:15
Province Table Wood
My husband and I are looking to build this table very soon. He is unsure as to what wood you may have used for this project. We absolutely love this dark wood. Will you please tell us what wood you used for this project?
Thanks! Can't wait to have this beautiful table sitting in our dining area!!!
Storage locker unit
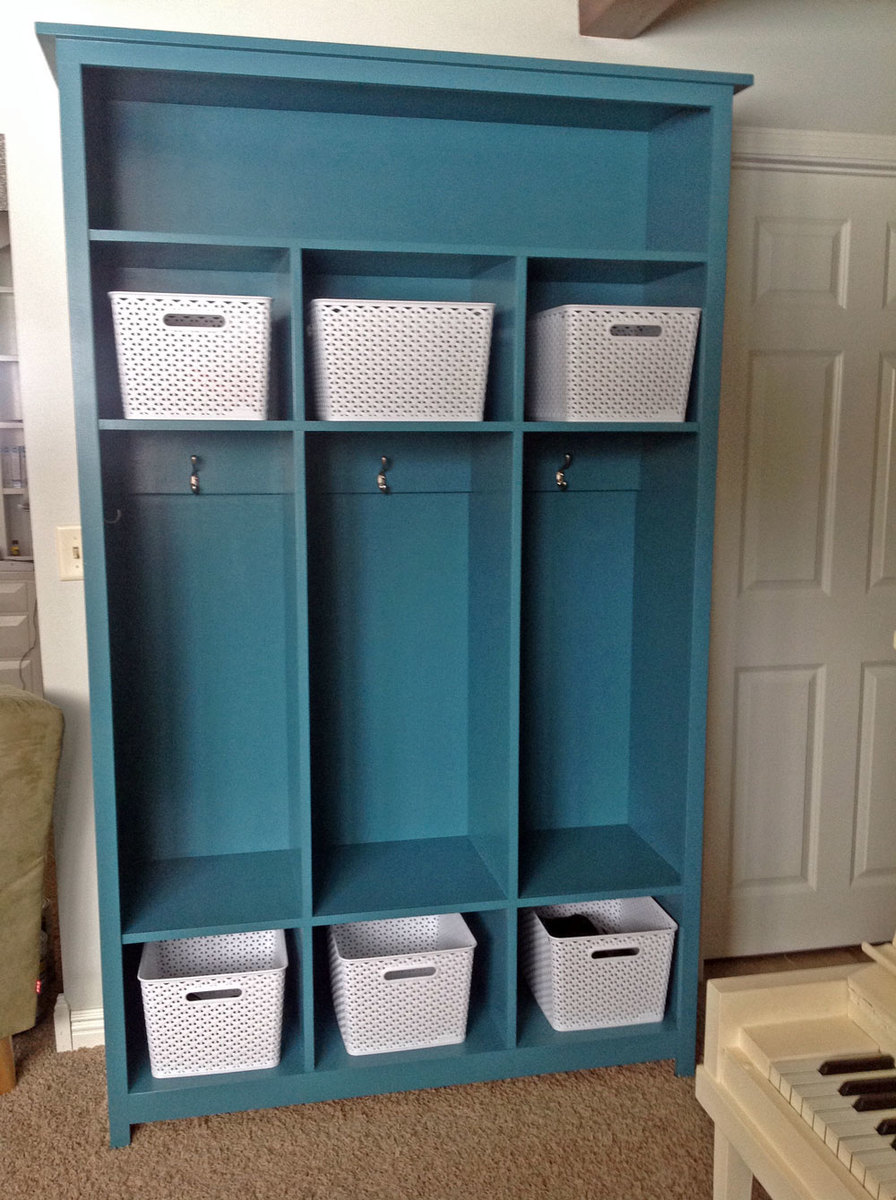
I have been waiting a long time to have this amazing piece of storage. The size is what was intimidating to me but it was easy to build. This project is perfect for a beginner . Make sure you have an extra set of hands due to the size otherwise this was easy and straight forward to build. I love the storage it offers to keep my Minnesota winter gear organized. The kids have a place for all of their snow pants, boots, coats etc.
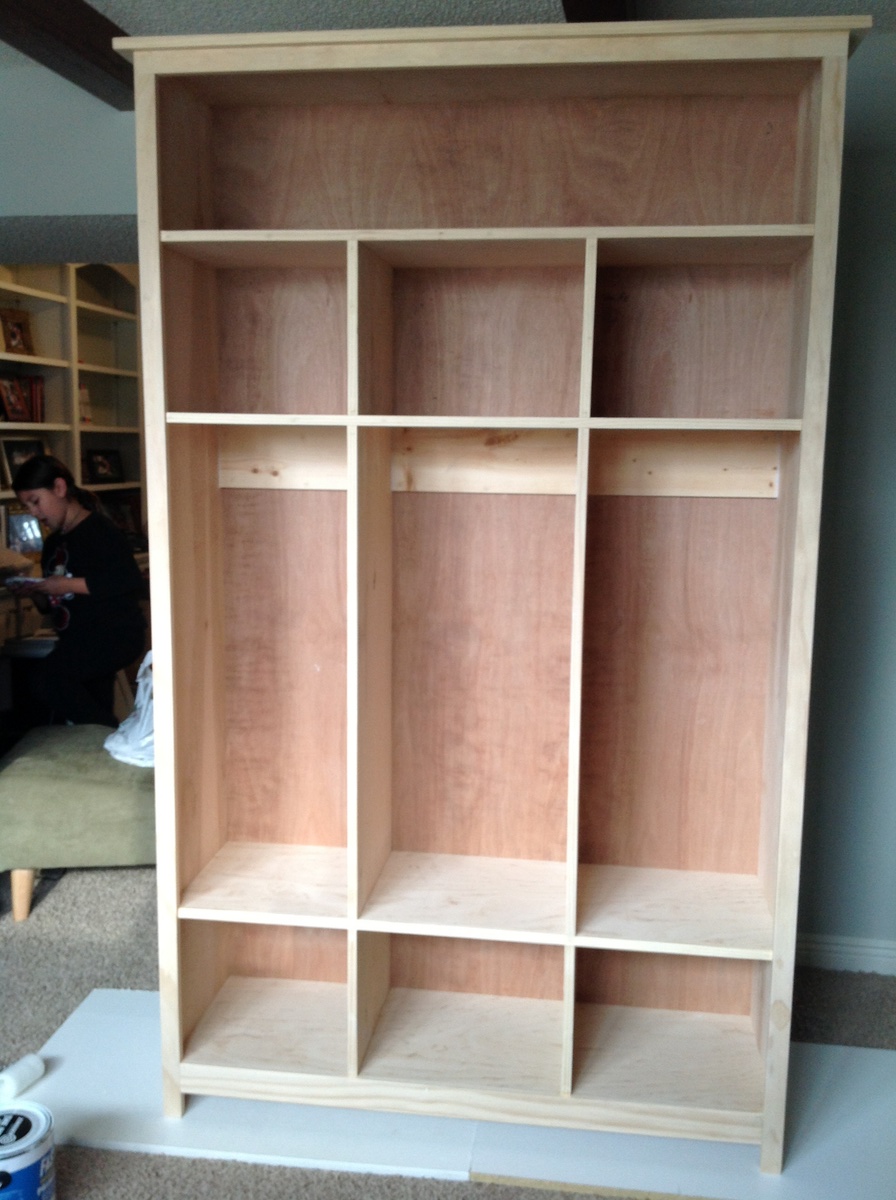
Built from Plan(s)
Estimated Cost
$150
Estimated Time Investment
Weekend Project (10-20 Hours)
Finish Used
I used a custom match color for the beautiful teal finish. I love teal!
Recommended Skill Level
Beginner
Mason jar chandelier
This was a cool project to make
I had saw this online but was very. Expensive to buy some one afternoon I decided to built one my neighbor had a ton of Mason jars so I got 8 from them and I started to put everything together and the end result came out nice I hope u guys like
Thanks
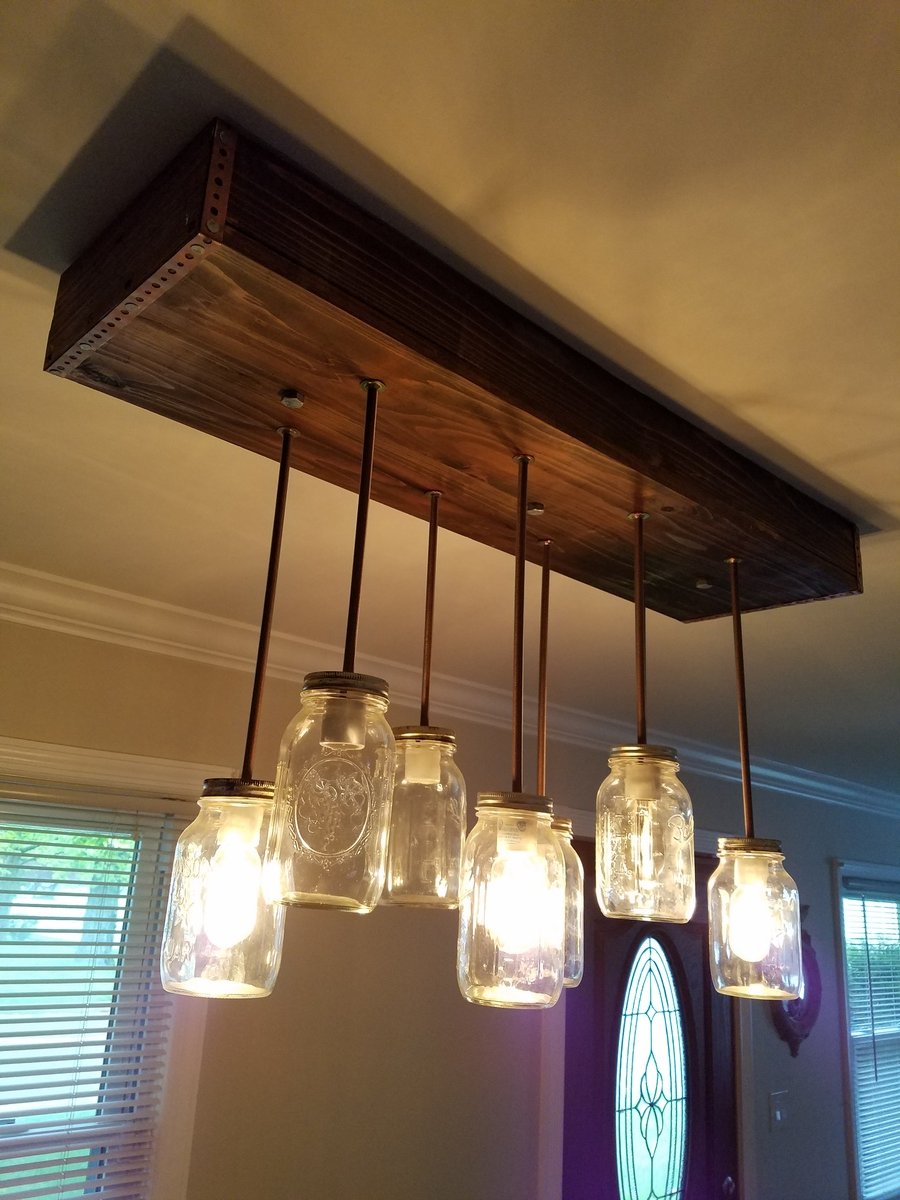
Built from Plan(s)
Estimated Cost
$90
Estimated Time Investment
Afternoon Project (3-6 Hours)
Finish Used
Dark walnut
Recommended Skill Level
Intermediate
Comments

Easiest Teen Platform Bed
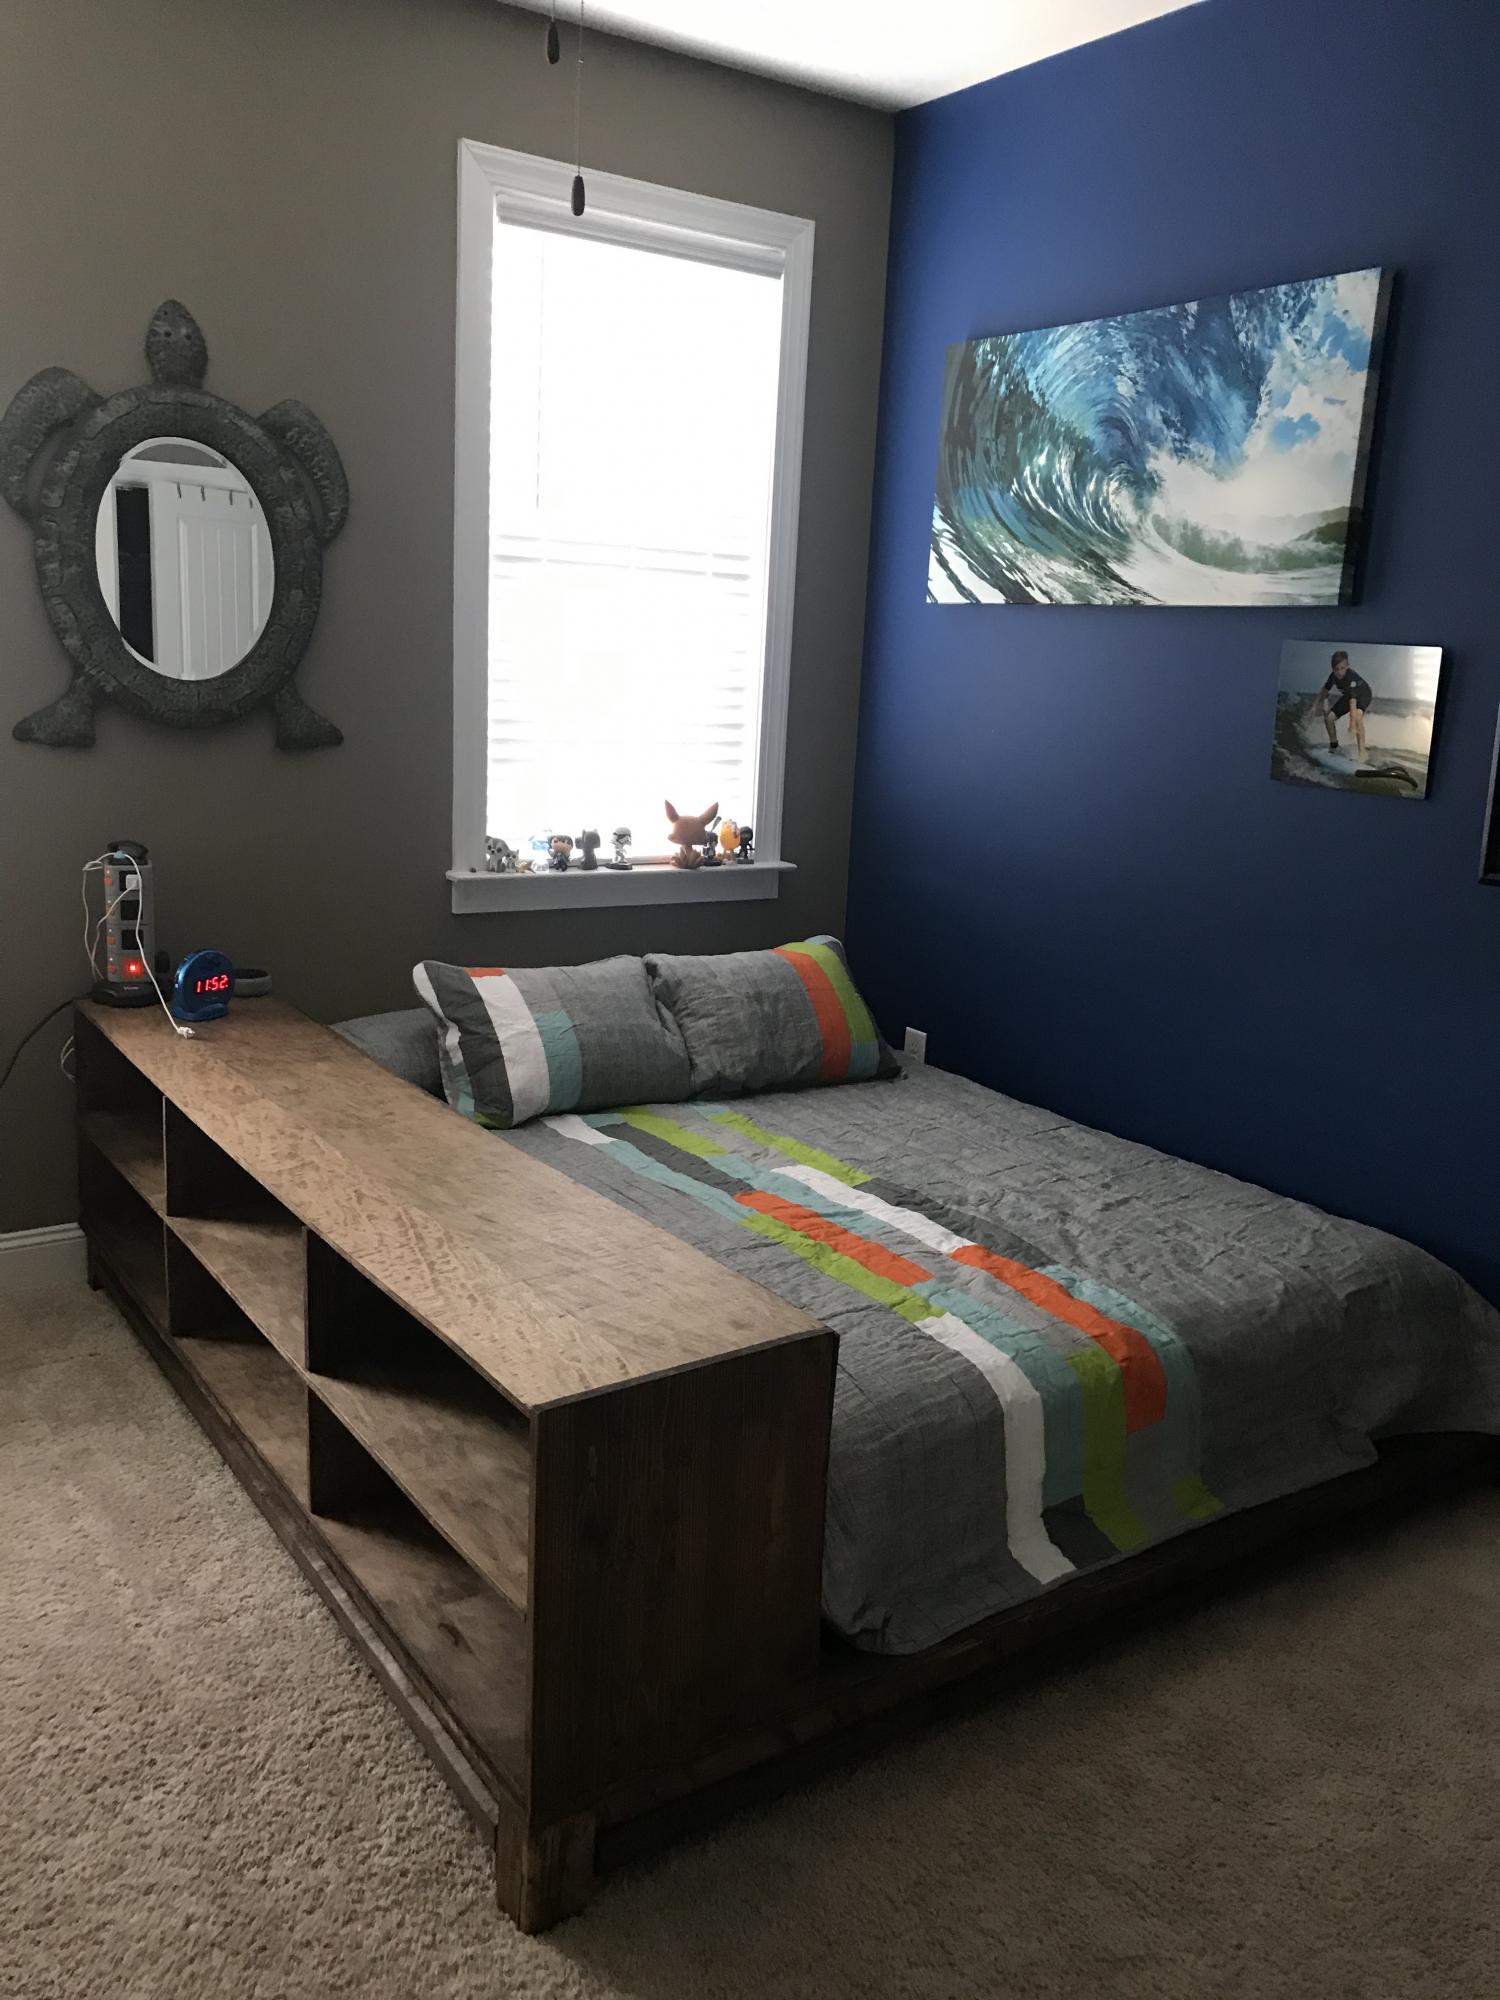
https://www.ana-white.com/woodworking-projects/easiest-teen-platform-bed
This went really well thanks for posting the plans!
Built from Plan(s)
Estimated Cost
$185
Estimated Time Investment
Day Project (6-9 Hours)
Finish Used
50% espresso 50% english walnut minimax stain
Recommended Skill Level
Beginner
Comments

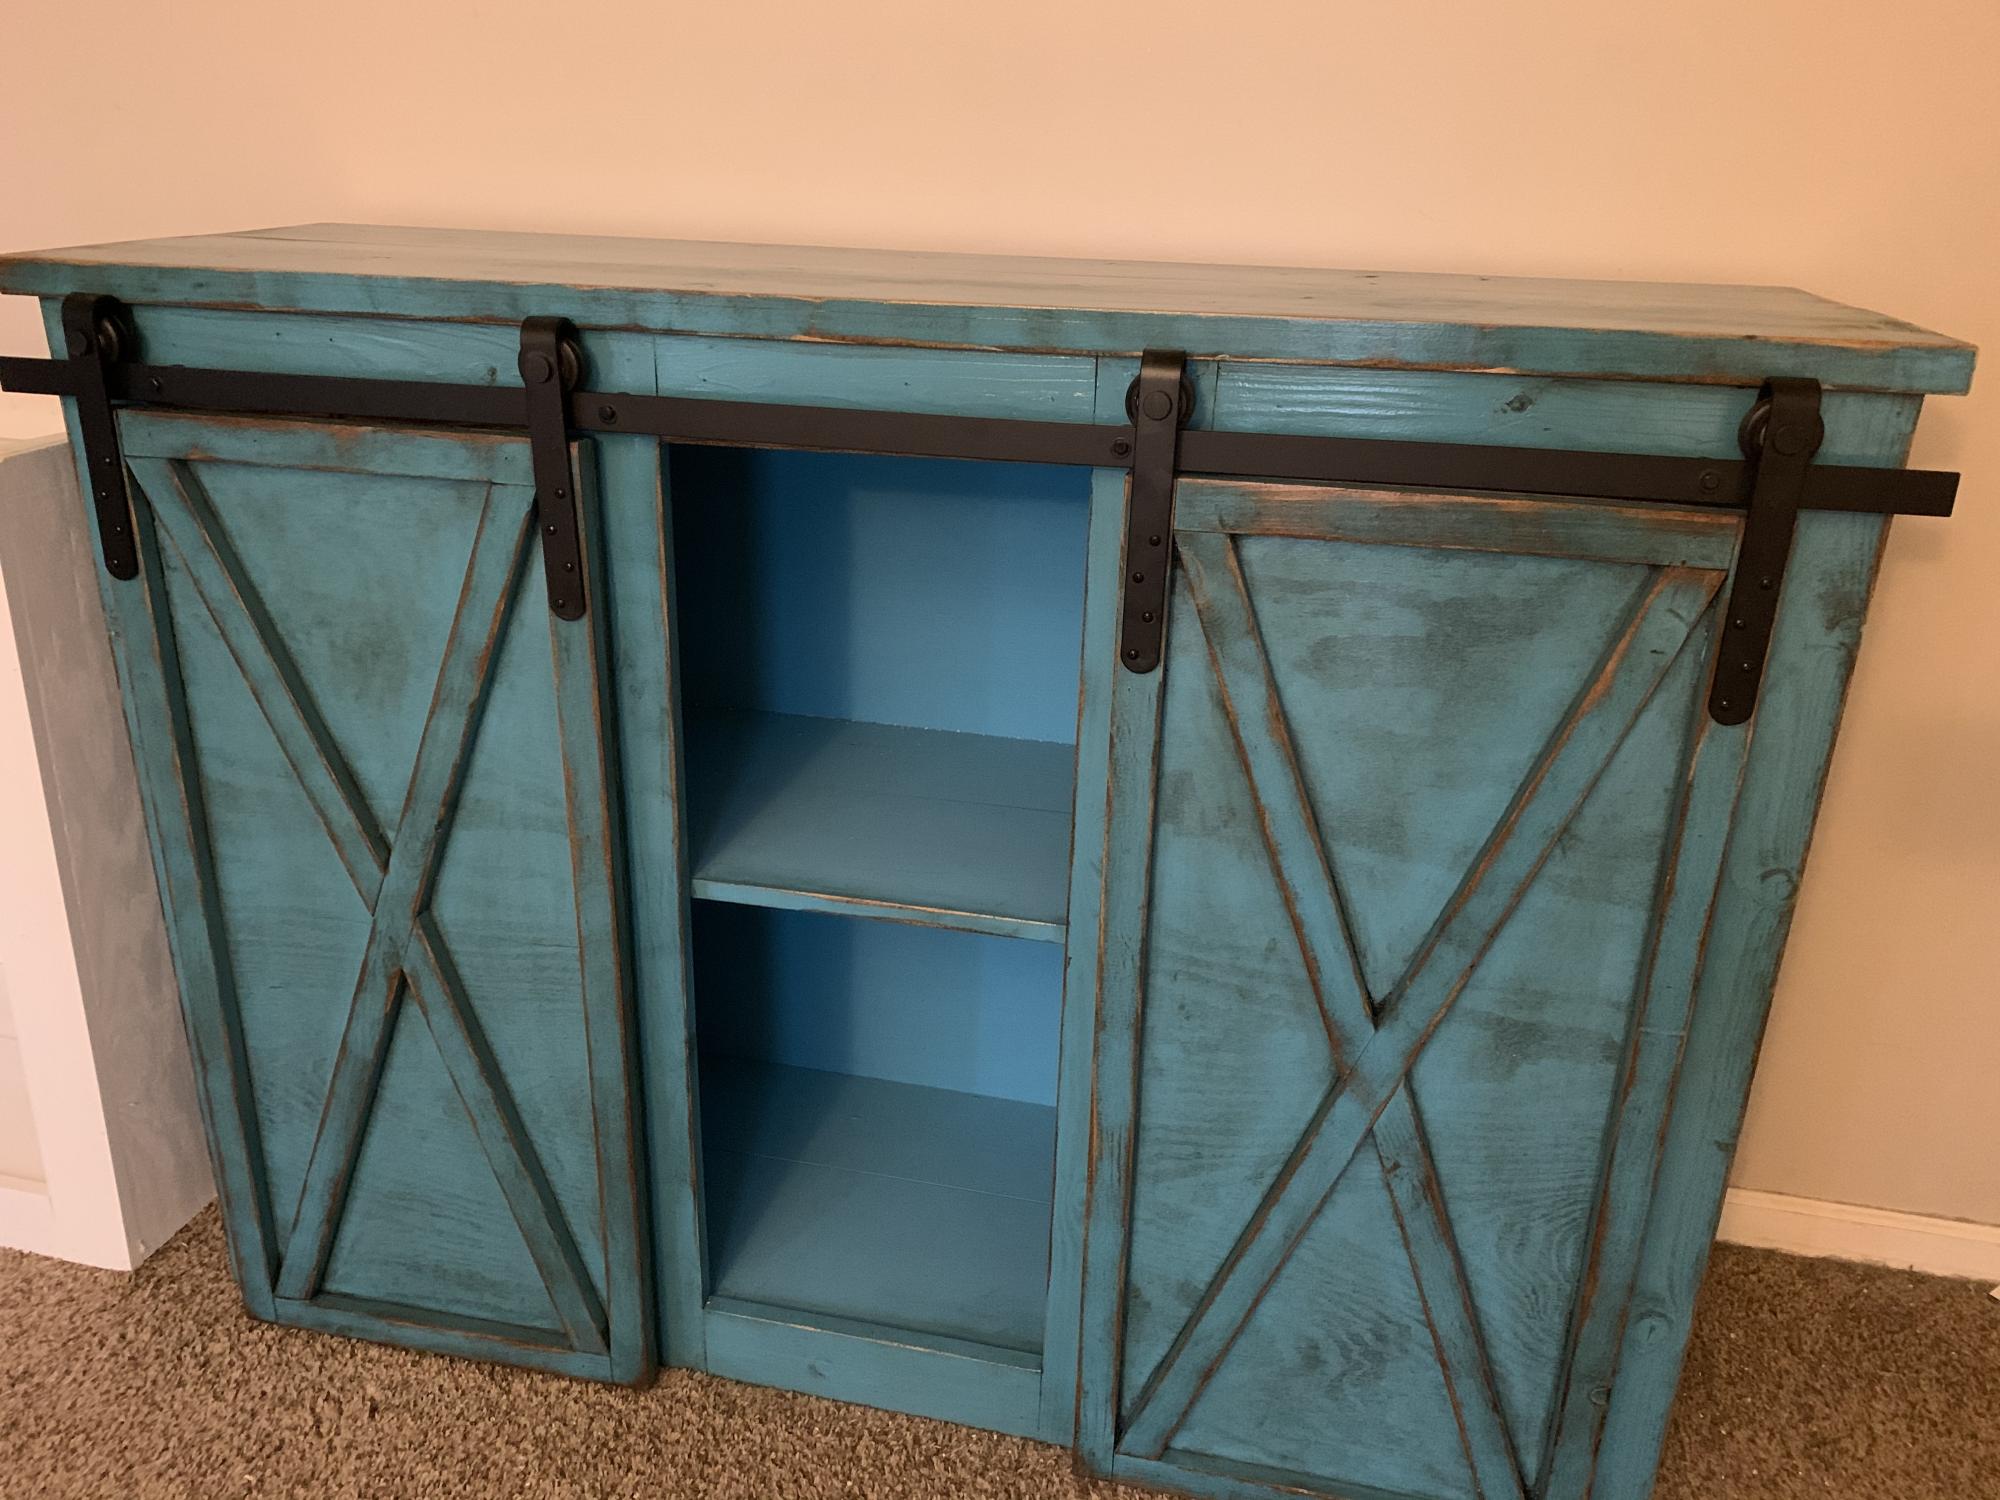
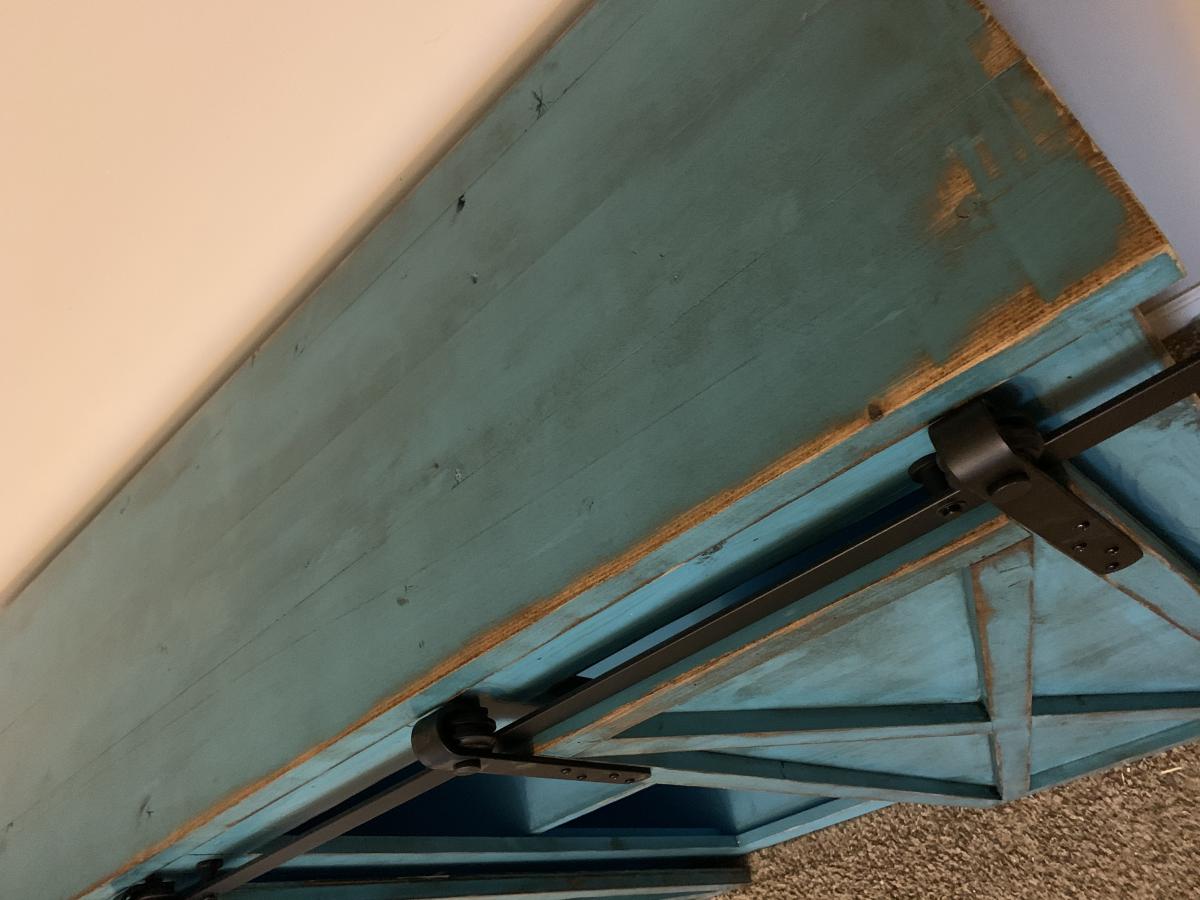
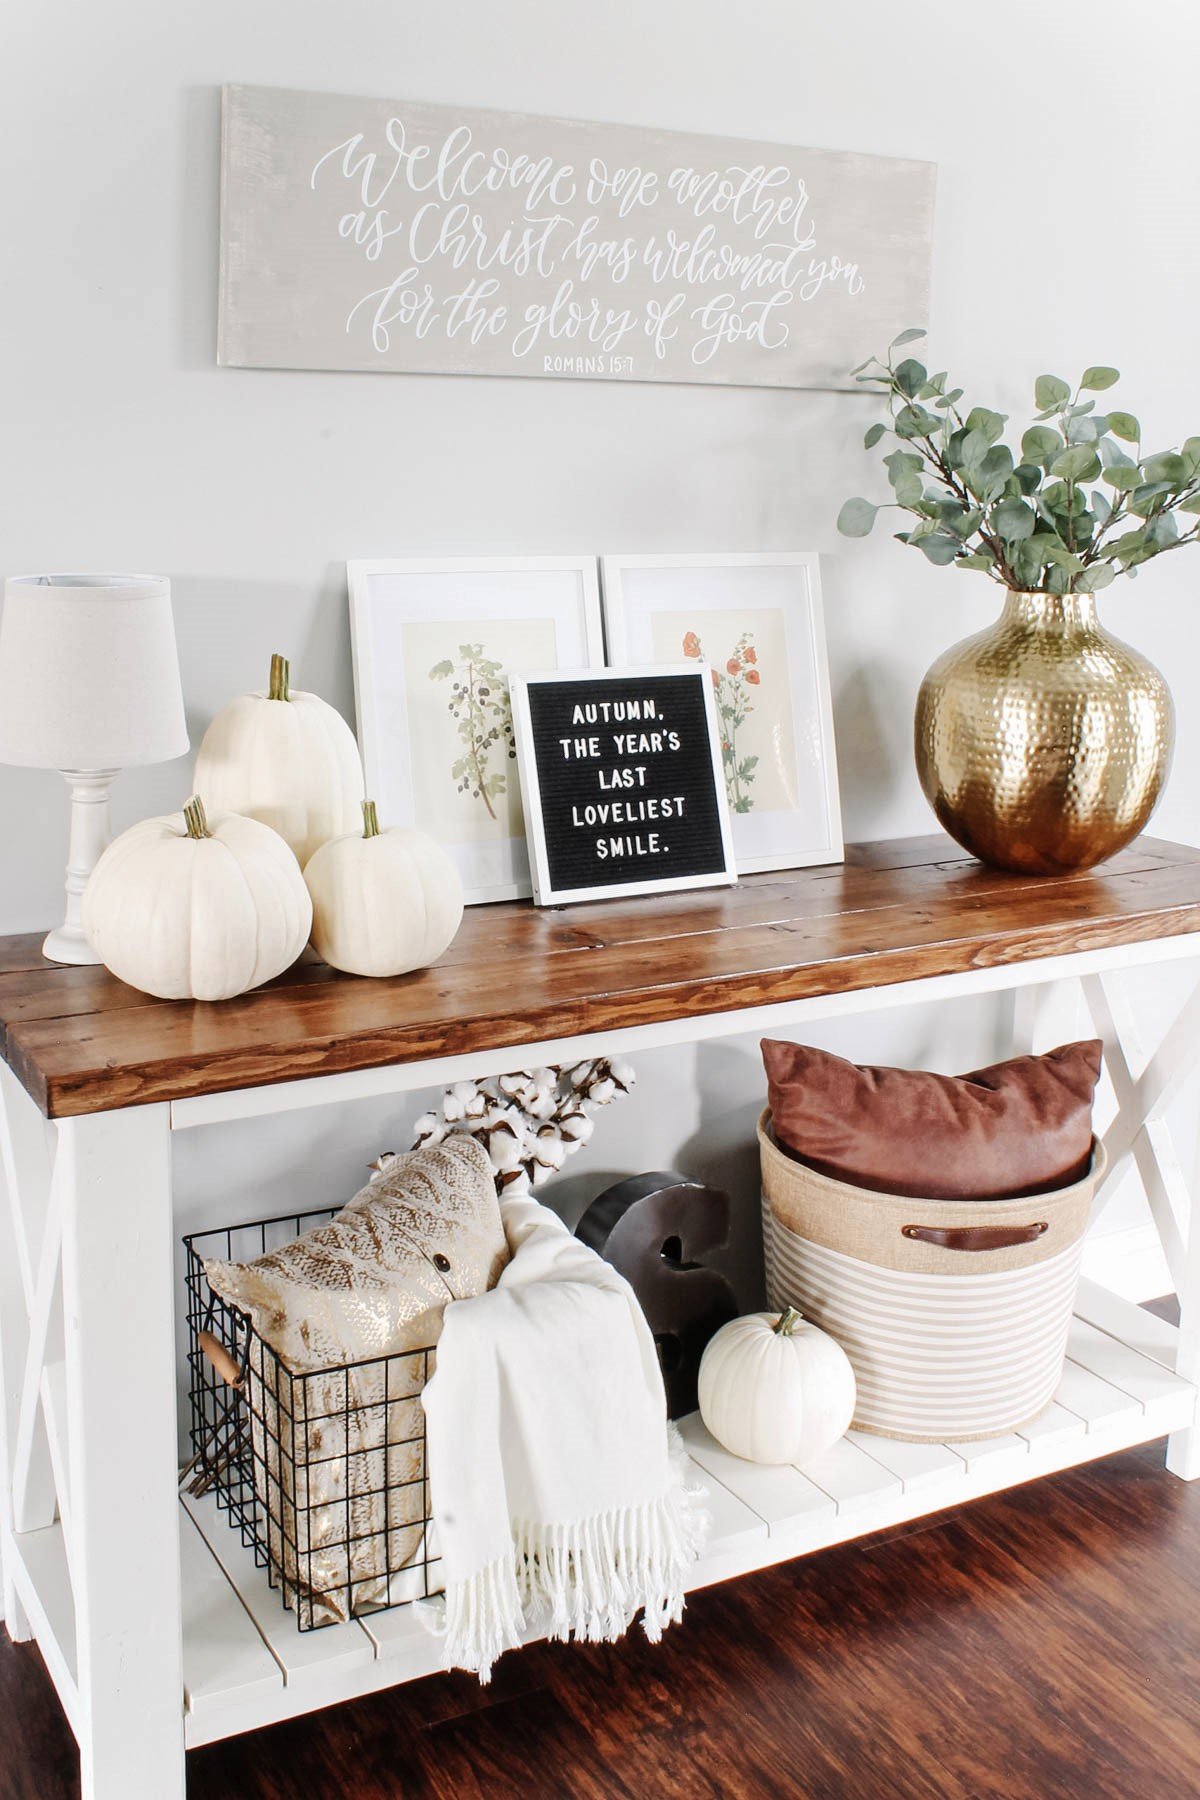
Rustic X Console with Fall Decor
Kids Adirondack Chair
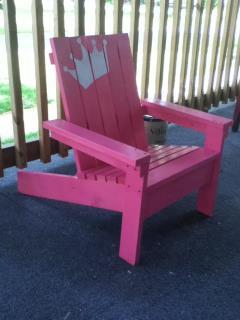
This was my first Ana White project. A kid size Adirondack chair fit for a princess :). The cost was around $25. I finished it in a weekend, but that was trying to fit it in between laundry, dishes, and taking care of kids. It was easy to do and I learned a lot.
Built from Plan(s)
Estimated Cost
$25
Estimated Time Investment
Day Project (6-9 Hours)
Finish Used
Valspar Gloss Frosty Berry
Recommended Skill Level
Beginner
Plane old shelf
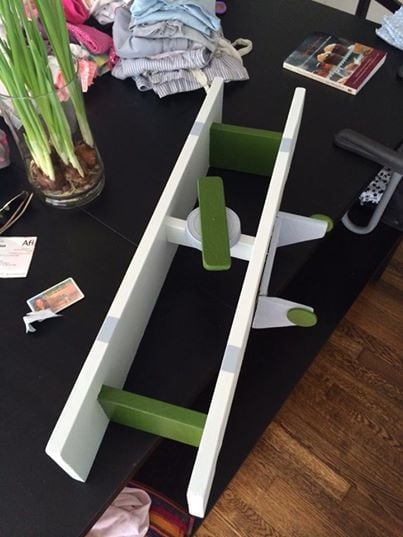
I made this shelf with reclaimed random wood but followed the original plans almost exactly. I used an extra large jar of peanut butters top for the front of the plane and the propeller was made for a random little piece of wood I just sanded down the edges to round them. The landing gear is from two corners of scrap wood and I bought the round pieces of wood for the wheels at michaels for about 10cents because I do not have a hole saw.
Built from Plan(s)
Estimated Cost
5.00 (including paint)
Recommended Skill Level
Beginner
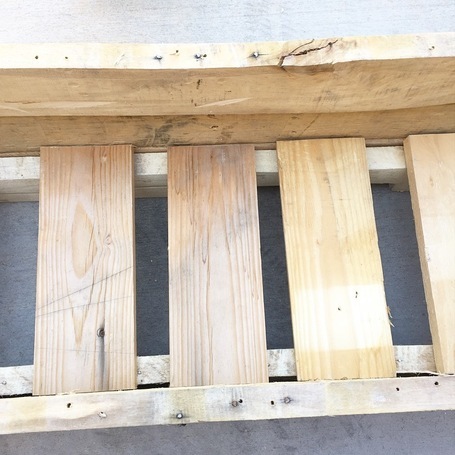
Pallet Wood Planter
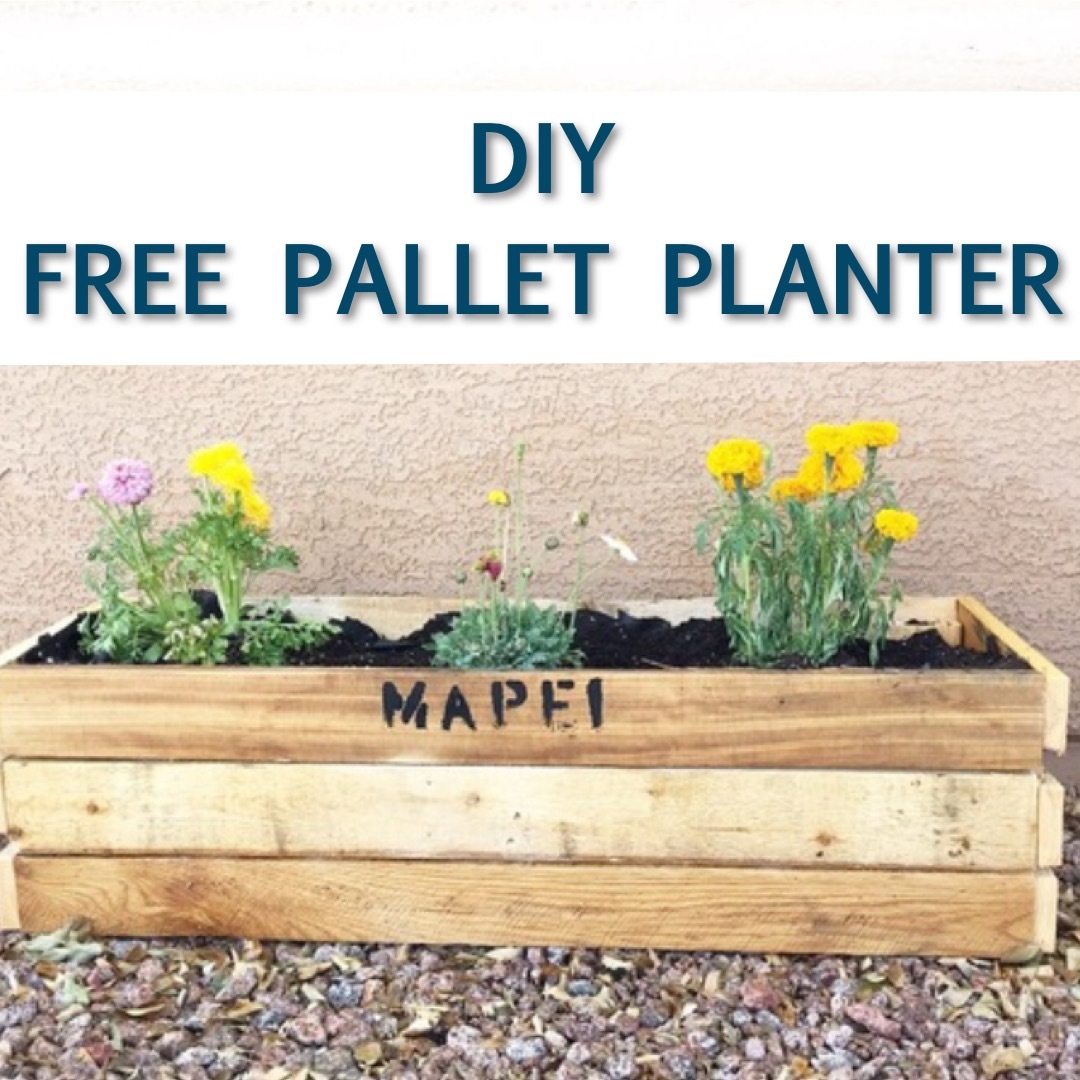
I made this planter out of some left over pallet wood that I had. It was pretty quick. It went together in about 2 hours. I have the step by step plans on my blog.
Estimated Cost
Free
Estimated Time Investment
An Hour or Two (0-2 Hours)
Recommended Skill Level
Starter Project
Bunk beds
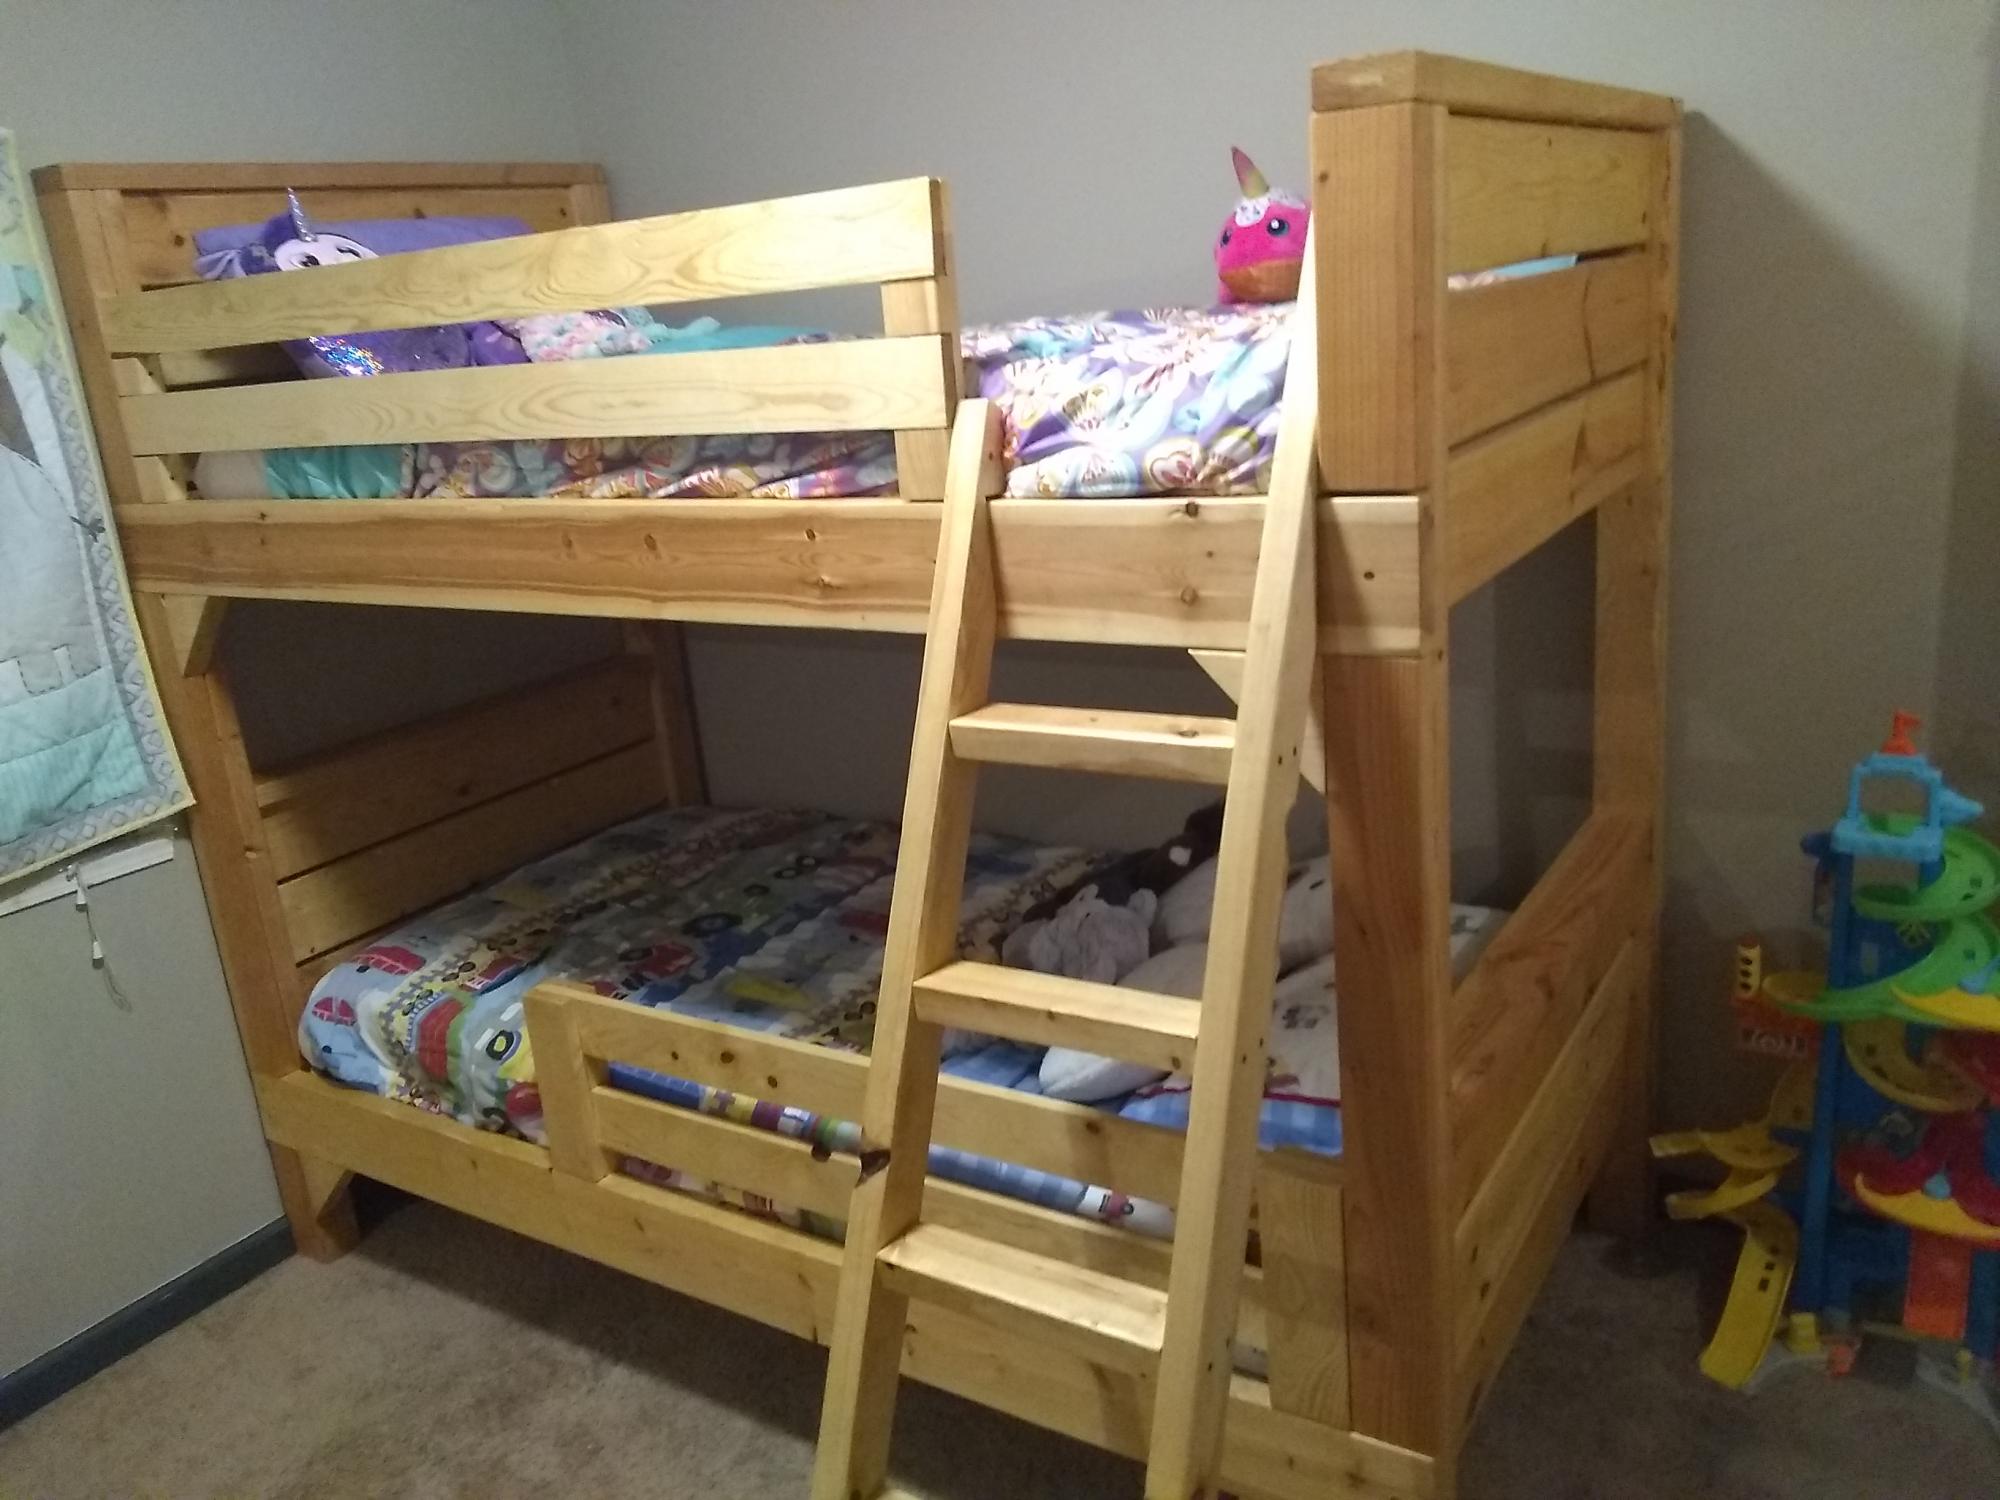
I built this bunk bed from the plans here on Anna white, I love this site. I think it came out really good. It took a little longer than expected because I sanded every piece down, every corner, every side, every end, because it's for my kids.
I devised the ladder myself for my situation and modified the rails I found as well.
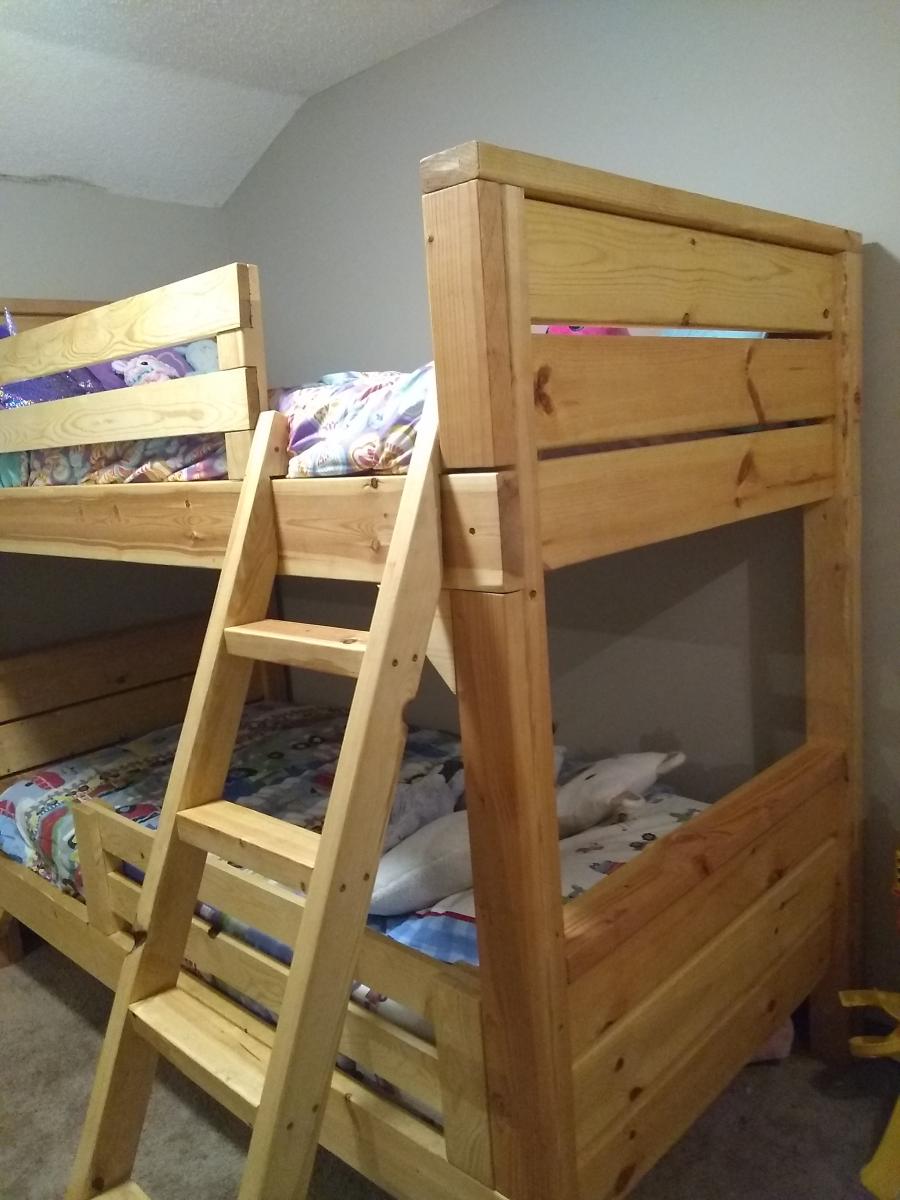
Built from Plan(s)
Estimated Cost
150.00
Estimated Time Investment
Week Long Project (20 Hours or More)
Finish Used
Clear matte polyurethane
Recommended Skill Level
Beginner
Rustic $10 ledges
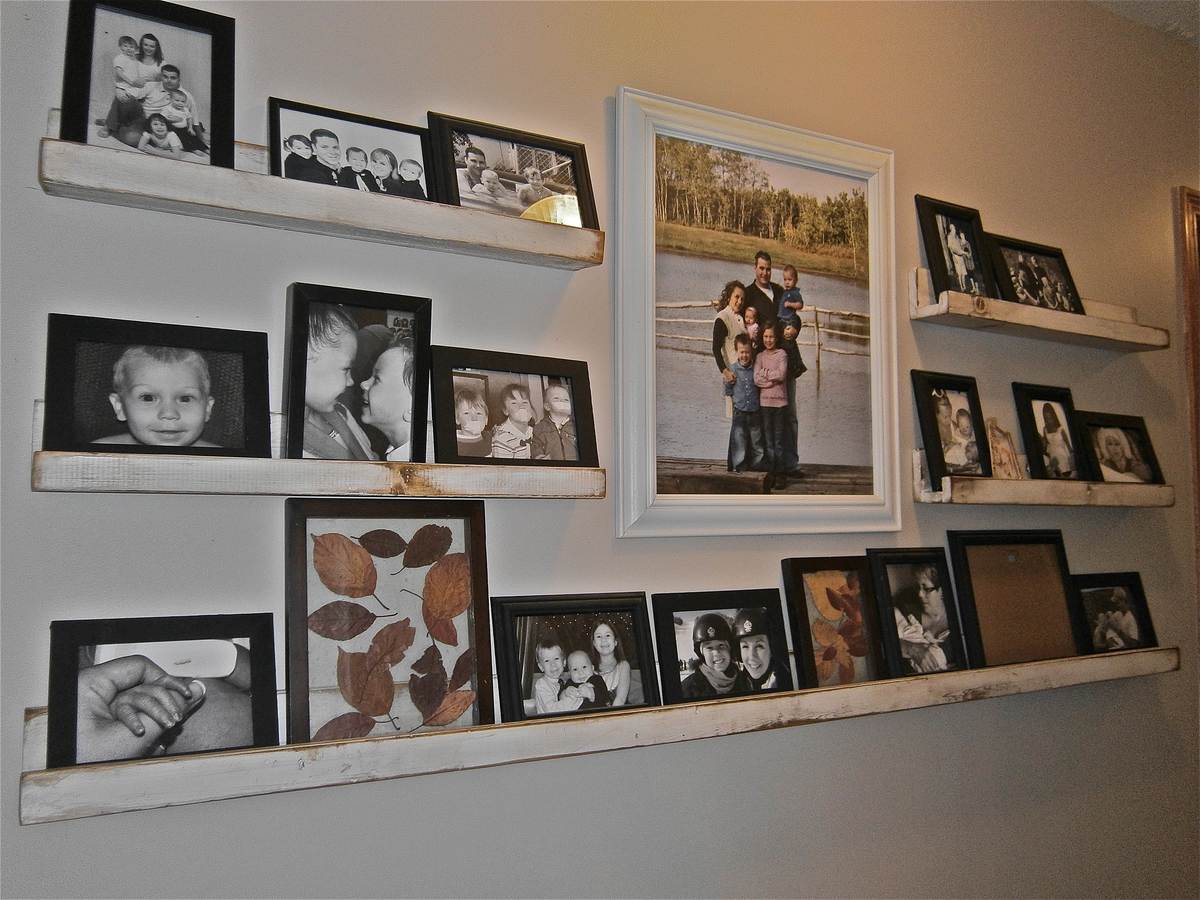
This project took my "picture wall" to a higher level!
So easy too.
Built from Plan(s)
Estimated Time Investment
An Hour or Two (0-2 Hours)
Finish Used
Antique white
Recommended Skill Level
Starter Project
Comments
Sat, 10/20/2012 - 12:01
Love the way these shelves
Love the way these shelves are done with the large family picture in the center.....
Tiled Coffee Table
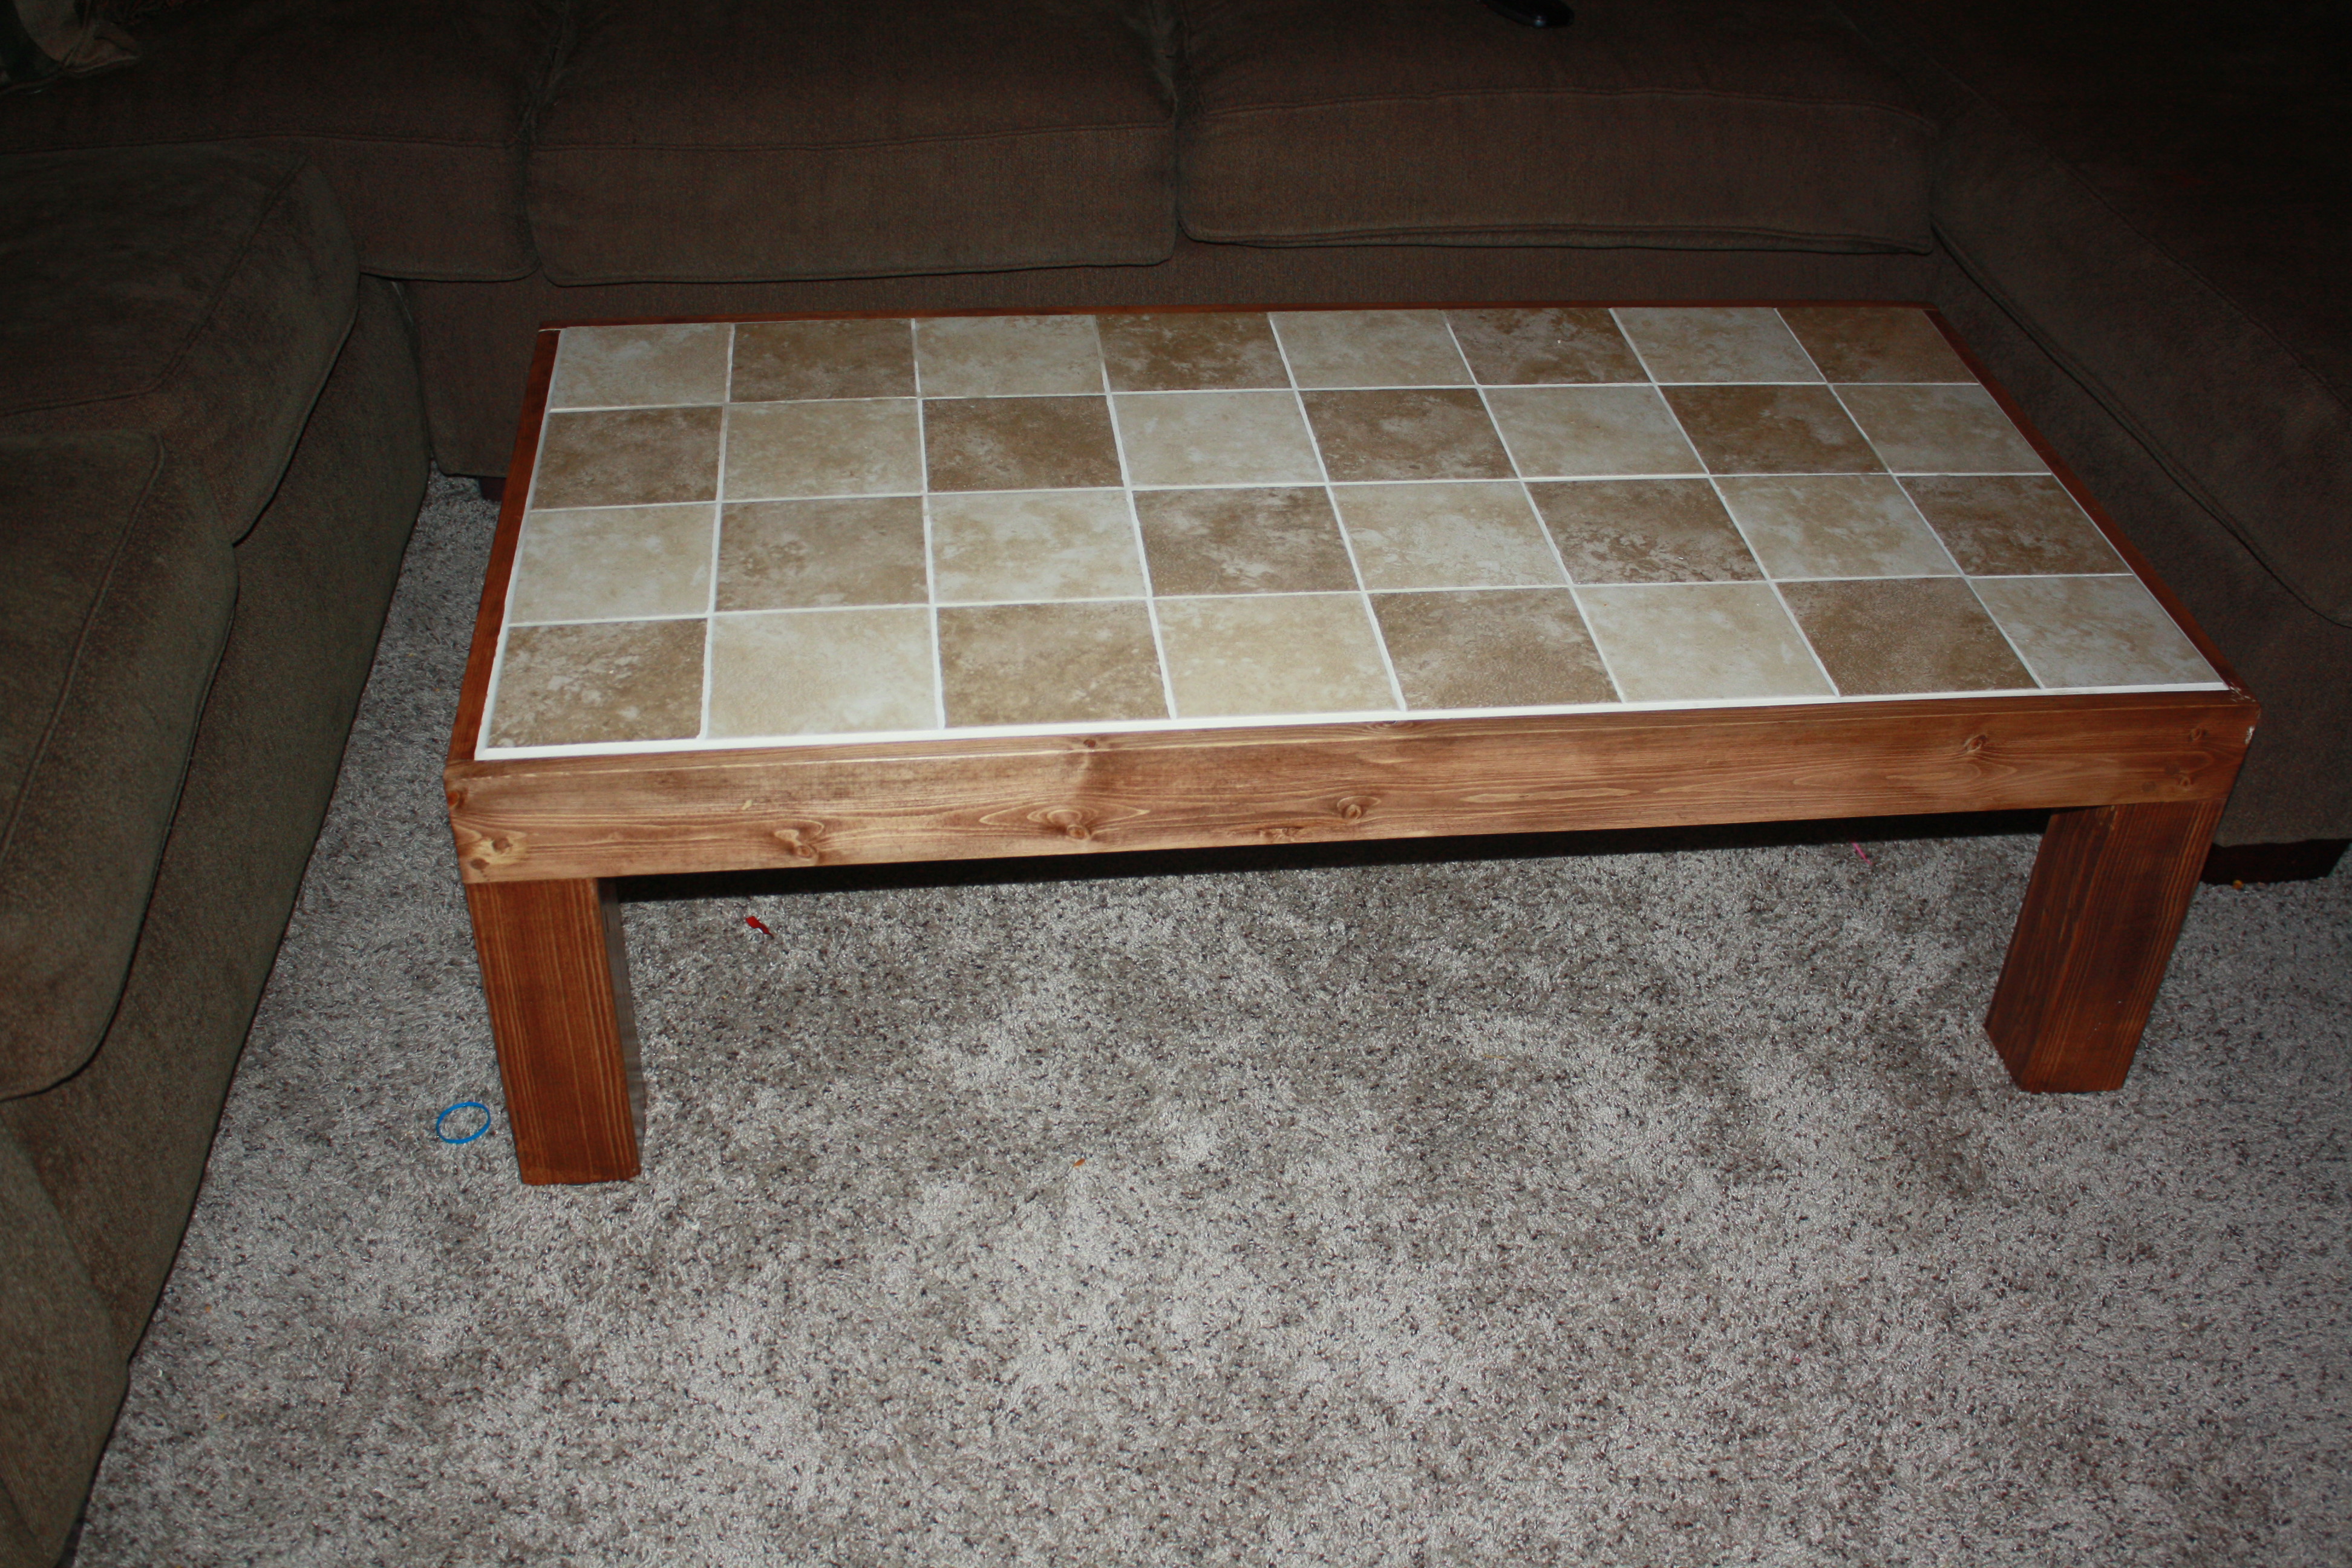
This was one of the 1st woodworking projects I did on my own. I never tiled before so it was a challenge. Even bought myself a tile saw to do it. I could not be more happy with the way it turned out and I love having it in my living room.
Estimated Time Investment
Weekend Project (10-20 Hours)
Finish Used
Stain and poly.
Recommended Skill Level
Intermediate
Comments
Sun, 02/16/2014 - 19:32
Tiled Coffee Table
This was a fun project to do and a great conversation piece when people come over!
Picture Ledges
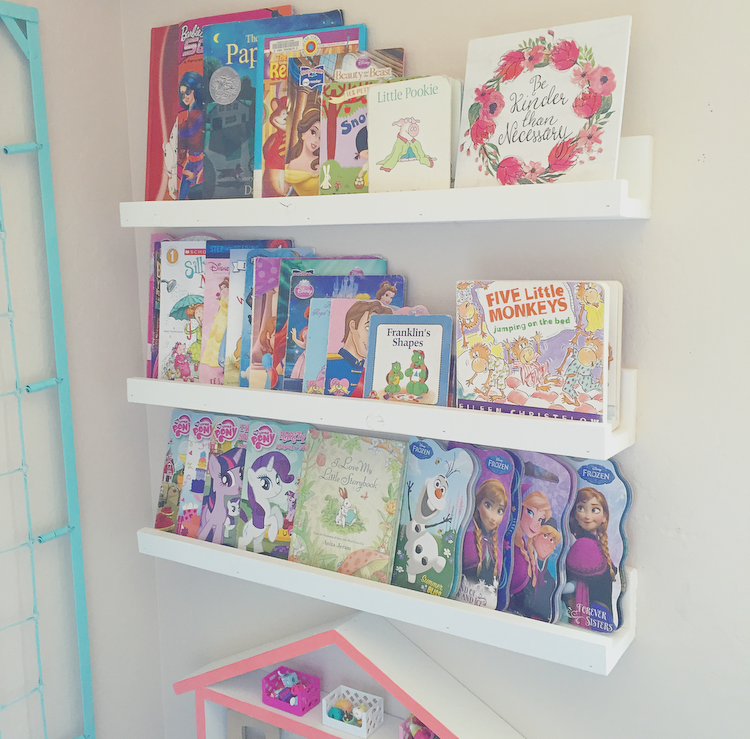
I built 3 30" picture ledges for my daughters for all of their books.
Built from Plan(s)
Estimated Cost
$5
Estimated Time Investment
An Hour or Two (0-2 Hours)
Recommended Skill Level
Starter Project
Bathroom vanity
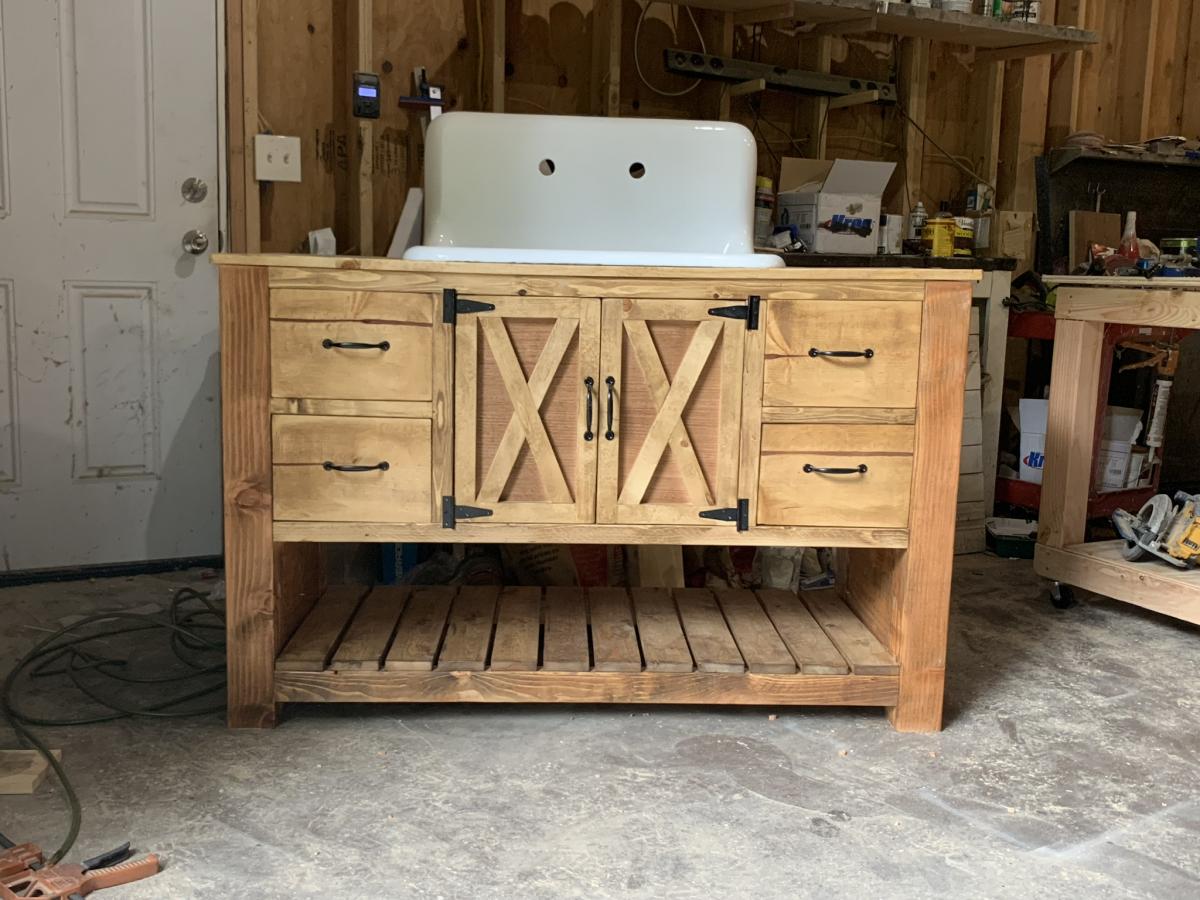
Hand made bathroom vanity

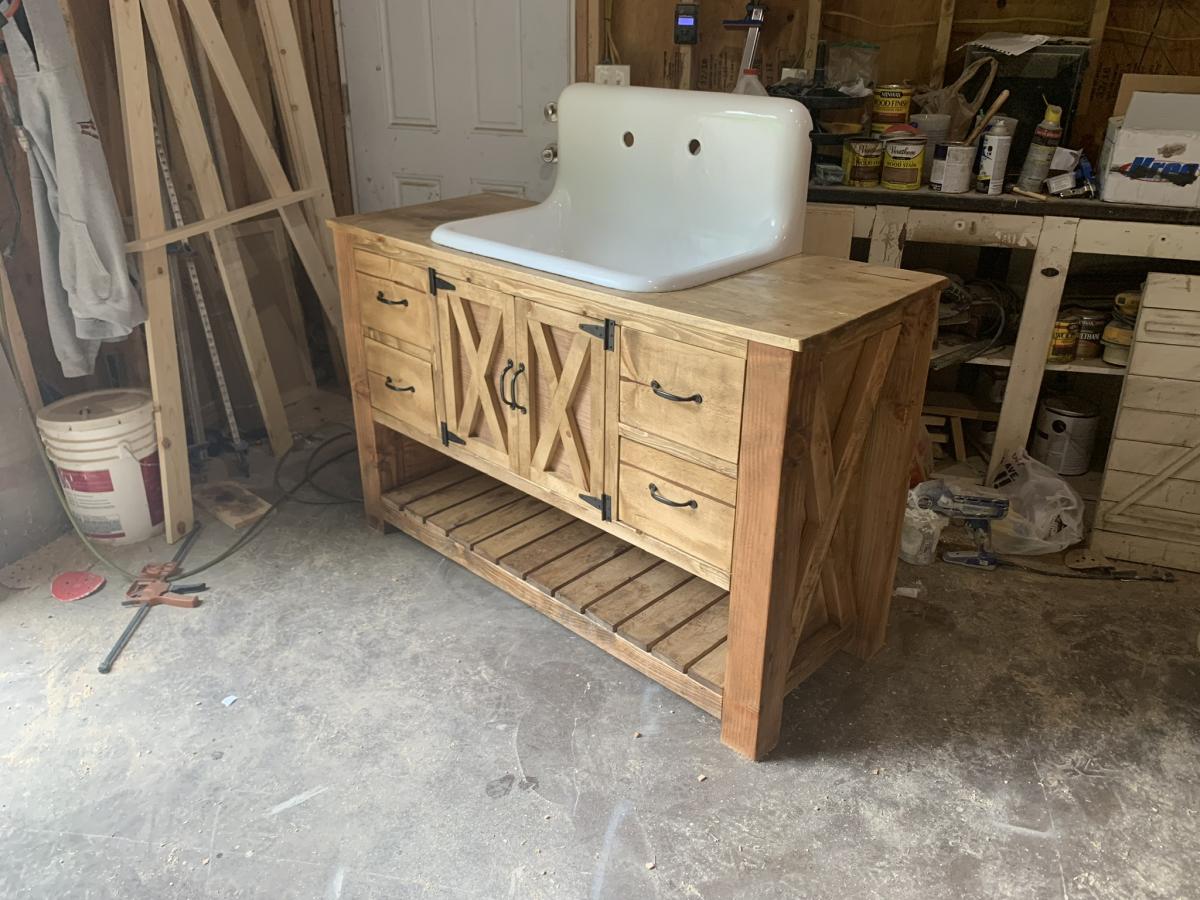
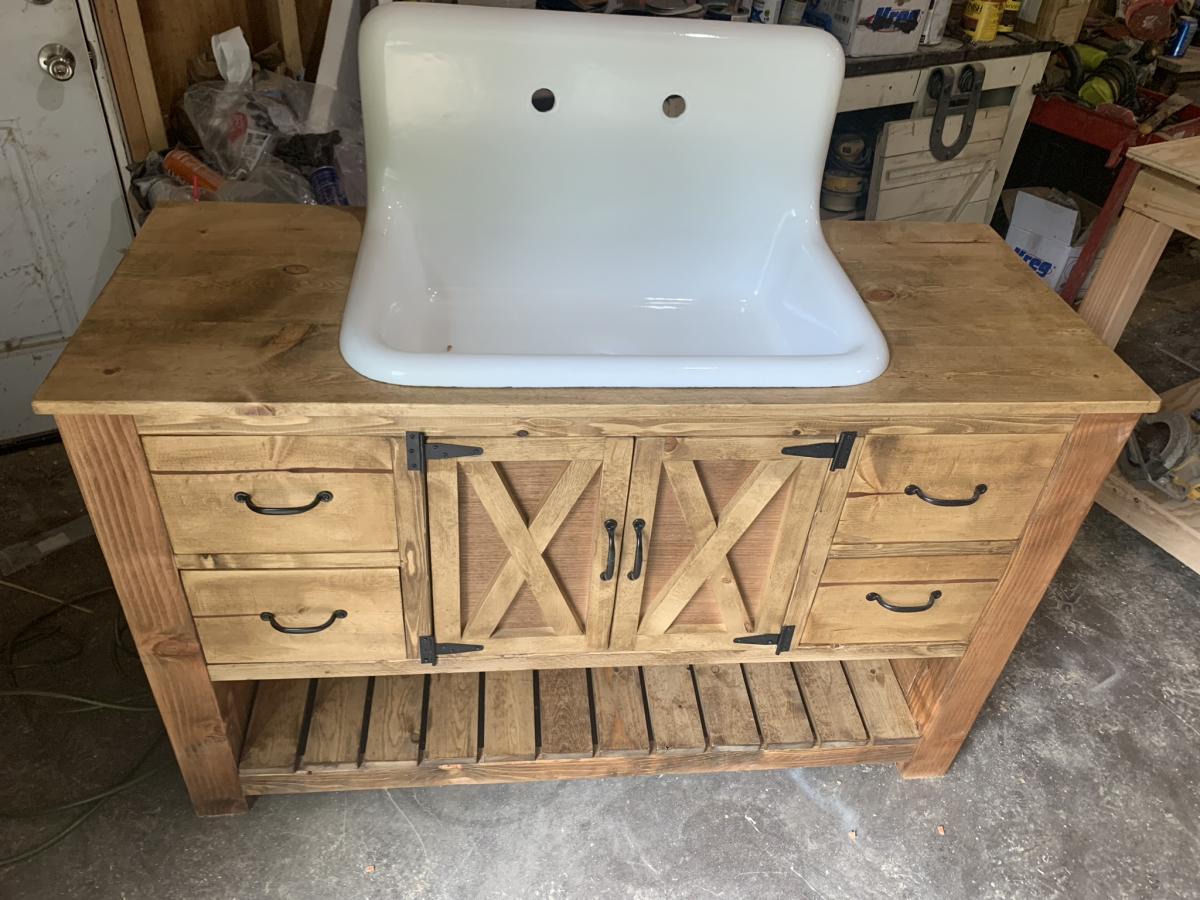
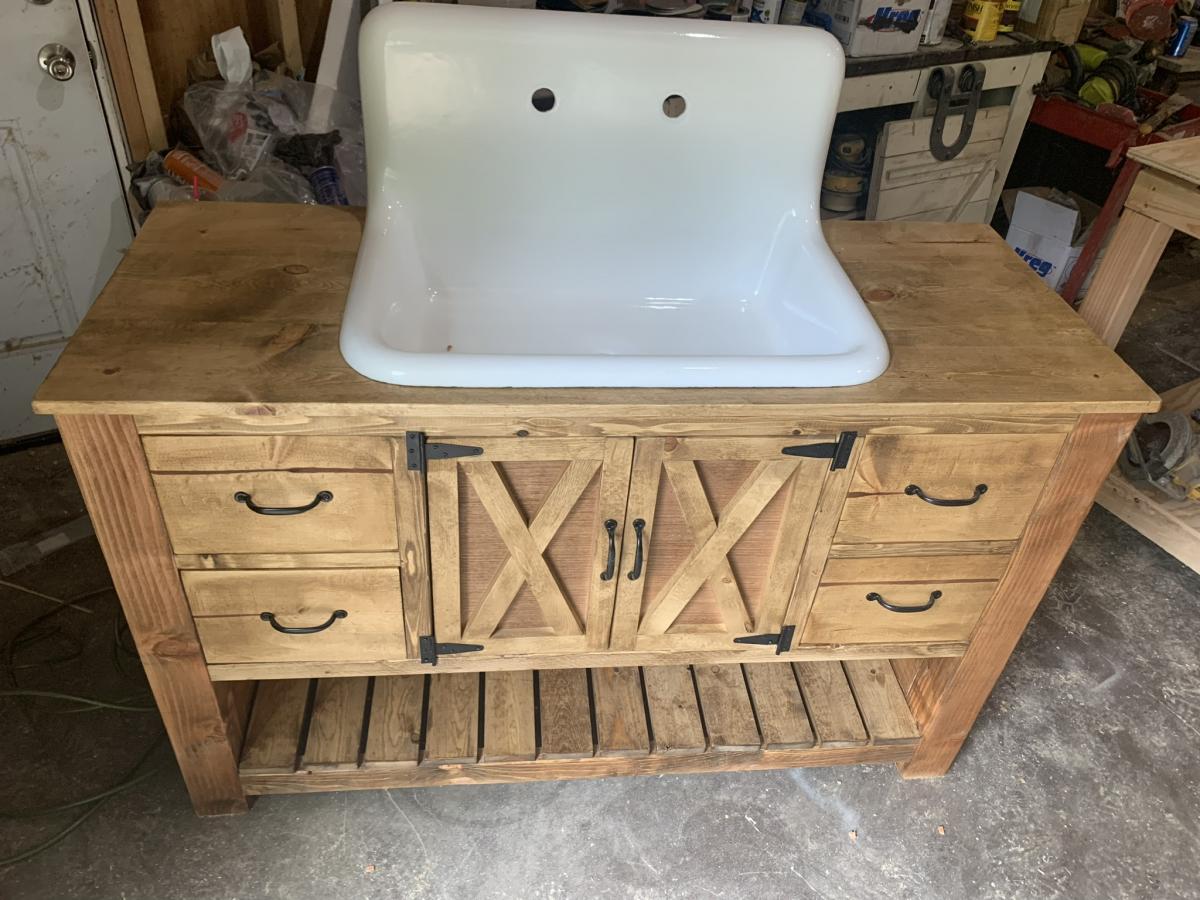
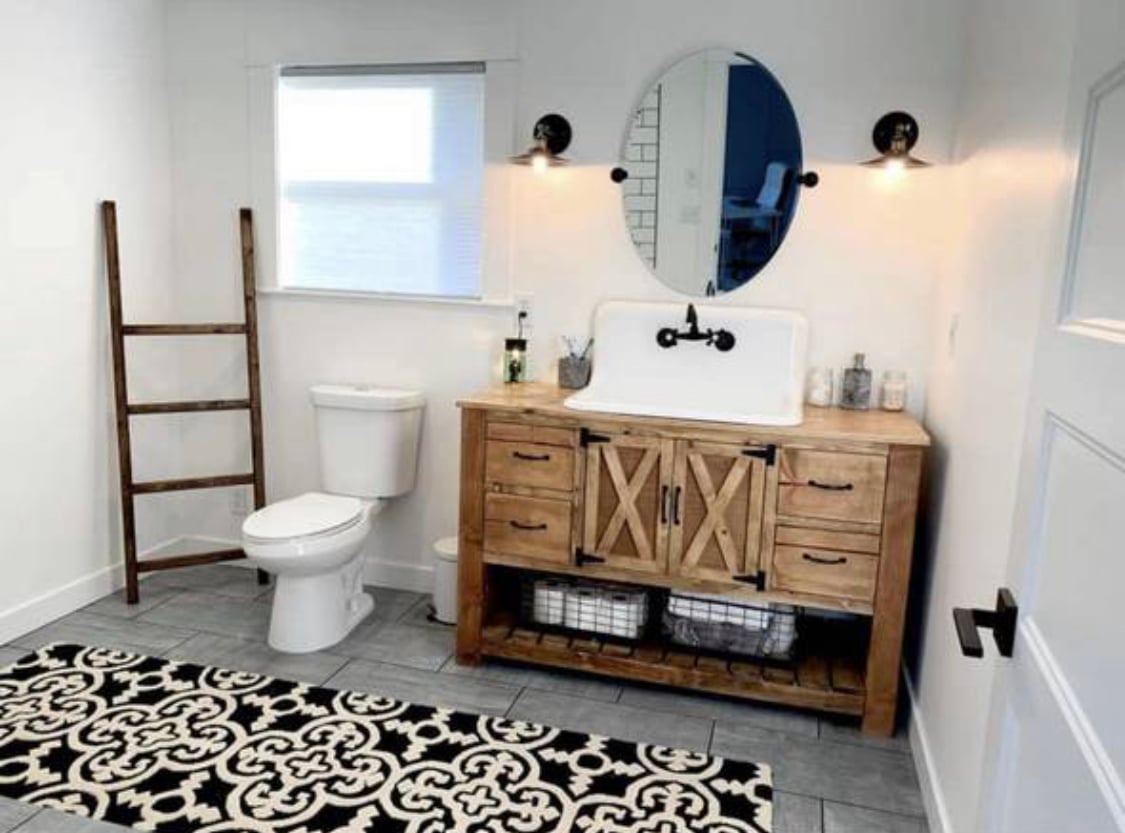
Built from Plan(s)
Estimated Cost
200
Estimated Time Investment
Day Project (6-9 Hours)
Comments


Wed, 06/30/2021 - 23:28
Wrong Video
I've been searching for WEEKS to find this vanity. I knew it existed somewhere but didn't know where. Please, PLEASE, post the plans for this. The video posted above it is for the pantry organizer. Thank you in advance!
Wed, 06/30/2021 - 23:35
Angles for the "X"s
What angles did you cut the "X"s at? They're cut at the top and bottom instead of the sides like the kitchen island plans show and I want to make sure that I cut mine at the correct angle. Thank you again.
Super Simple Farmhouse Coffee Table
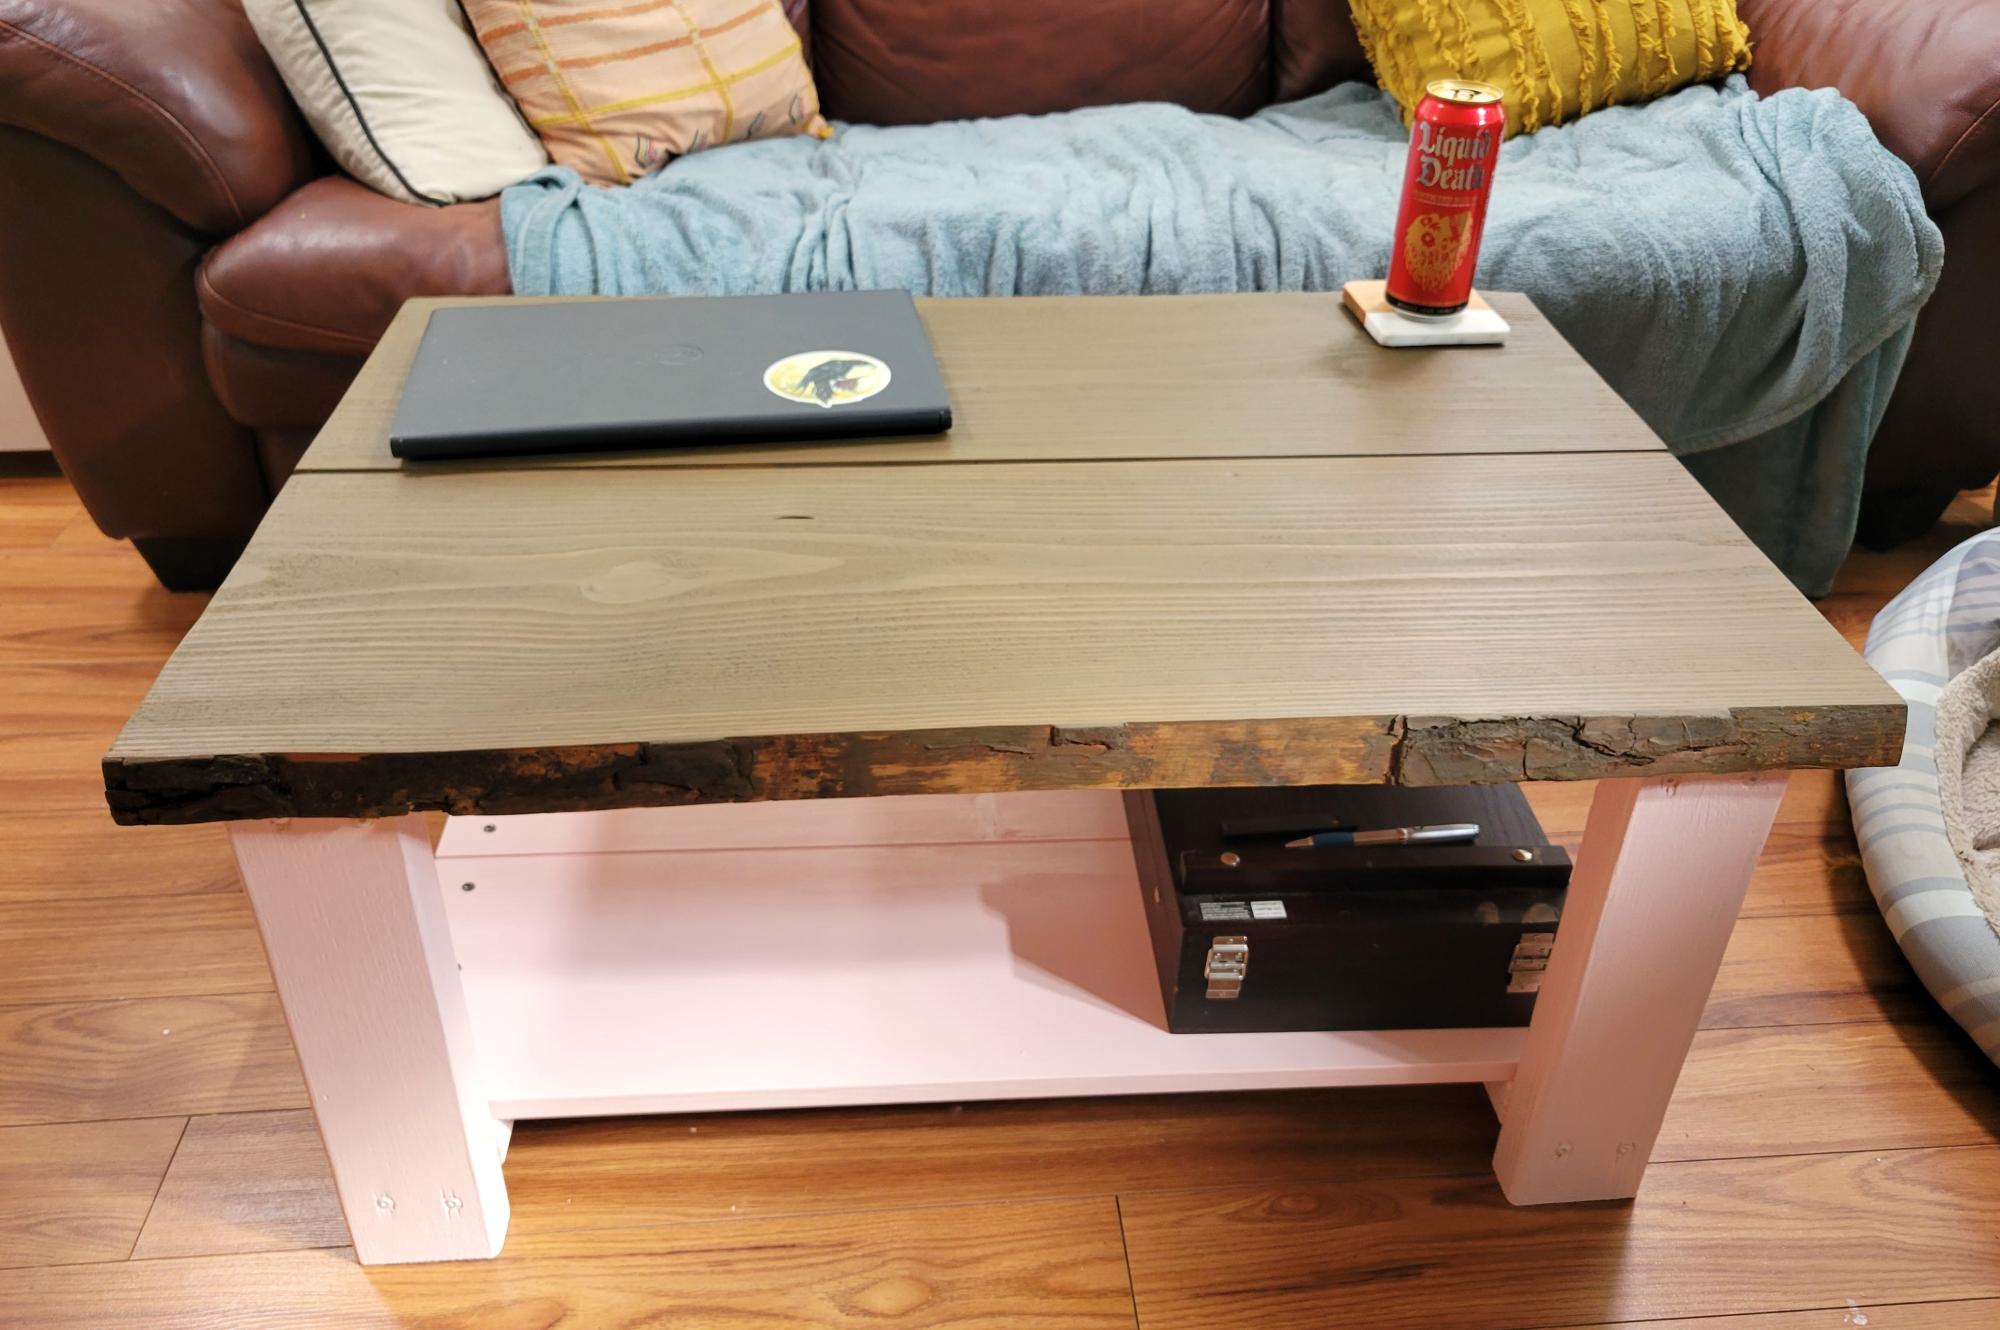
This is my first piece of furniture I've ever made that didn't come in a box ;) The instructions were so clear and easy to follow. I wish I'd had a table saw for the piece of live edge (it had live edge on both sides so I had to make a 6 foot cut with my circular saw that came out not quite perfect, but I am choosing to think of it as adding to the charm. Might go back and add some shine to the top, but for now I'm super happy with it.
emily.rhoades_
Built from Plan(s)
Reading nook tent
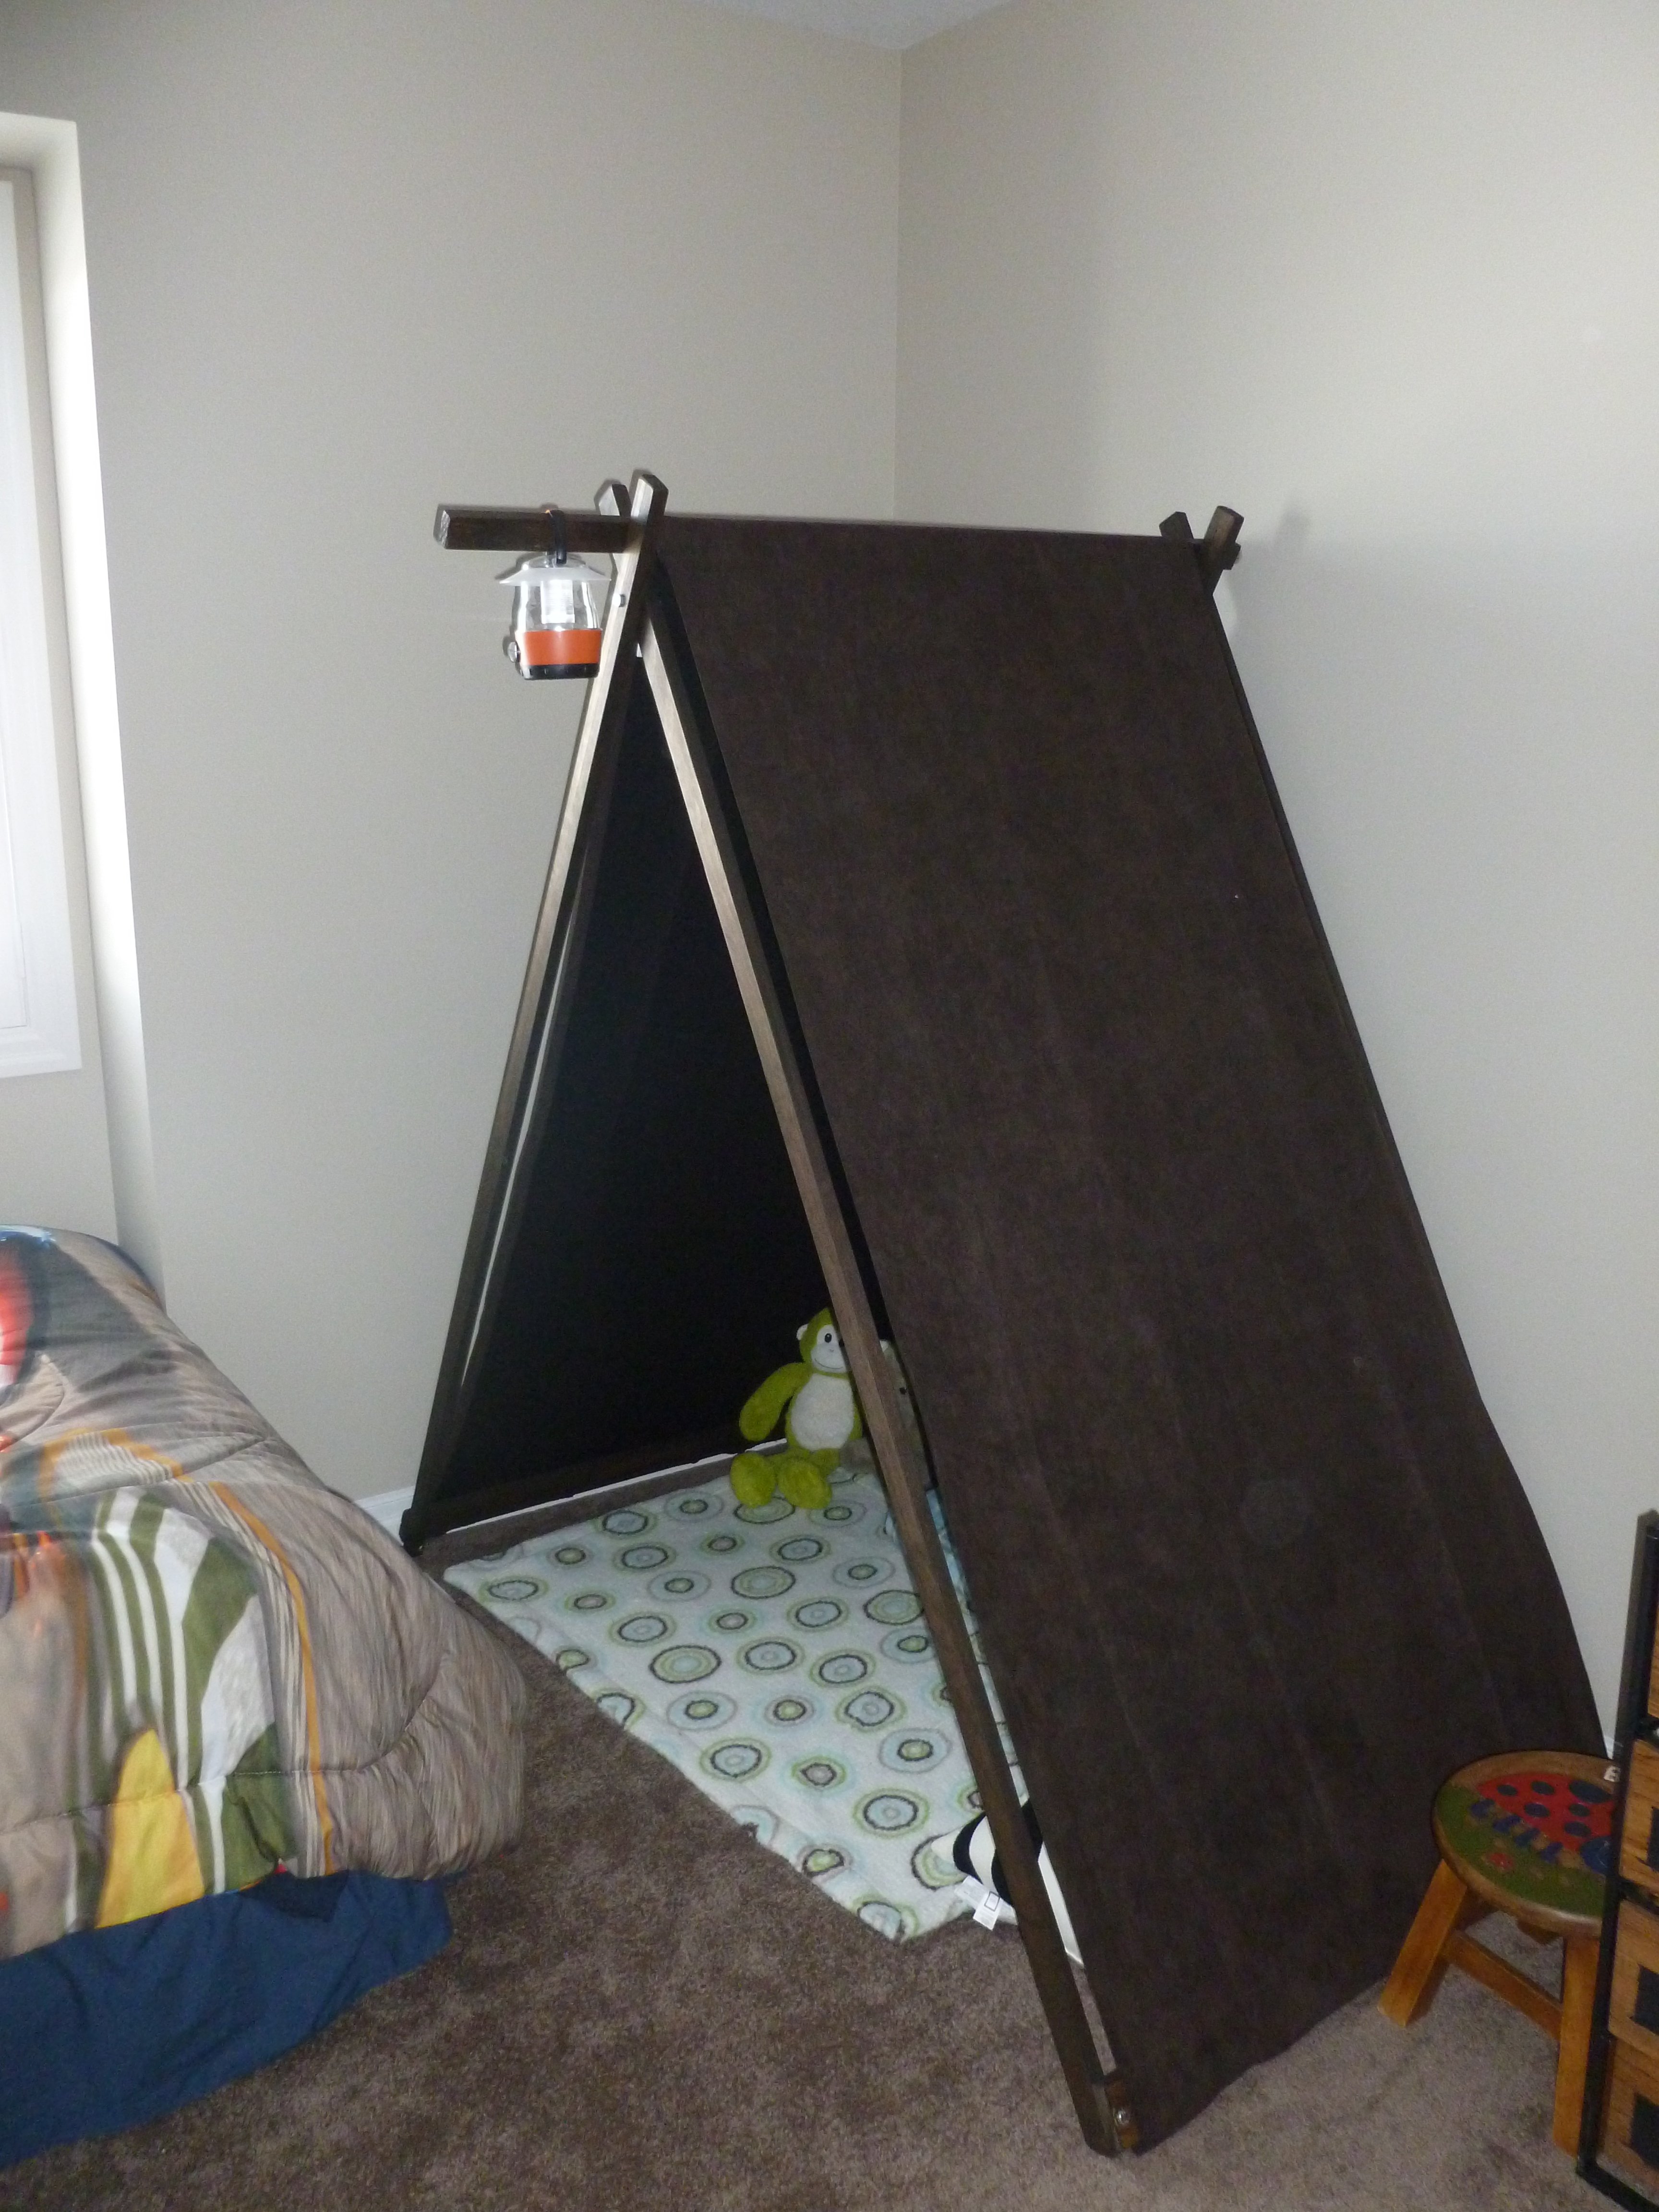
This was the easiest and quickest build I've done yet. The more time consuming part for me was stapling down the curtains on the underside.
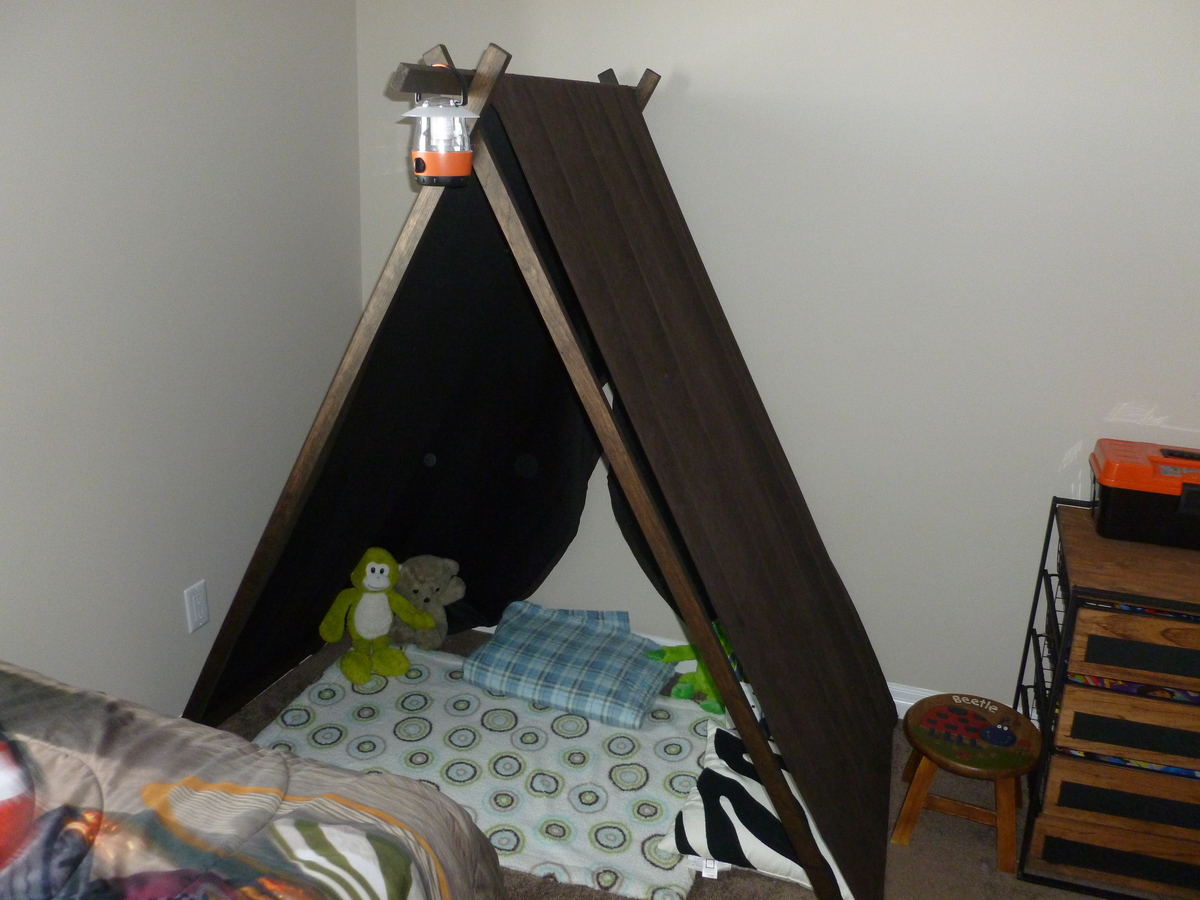
Built from Plan(s)
Estimated Cost
$25
Estimated Time Investment
An Hour or Two (0-2 Hours)
Finish Used
I stained the wood with Minwax's Espresso.
Recommended Skill Level
Starter Project
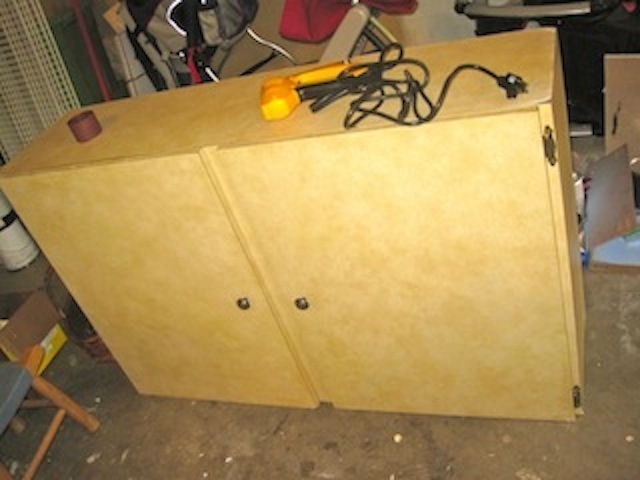
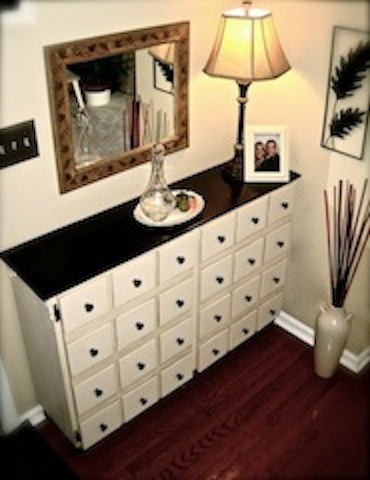
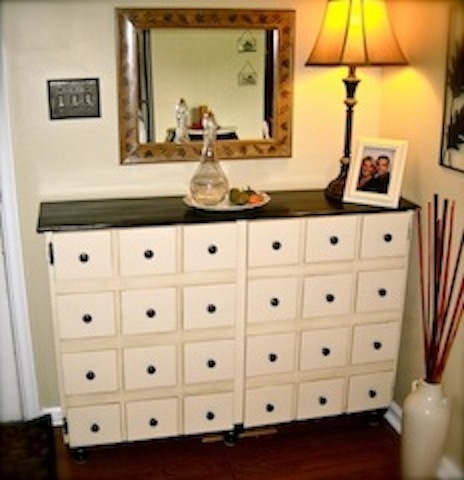
From Cast-off Wall Cabinet to Up-cycled Apothecary Cabinet Conversation Piece!
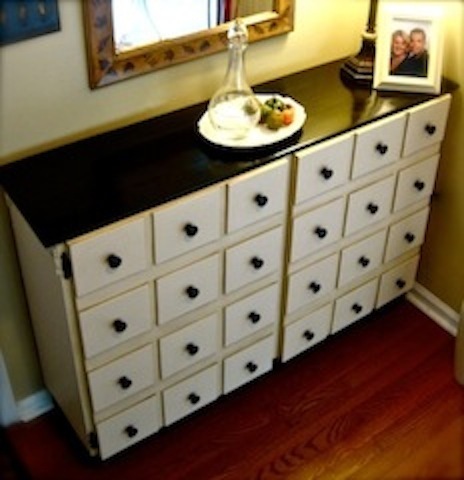
Hello, my name is Natalie Scott & this is my first Ana-White Brag Post! In the beginning, this cabinet was such a silly thing to find. I almost didn't even accept it from a neighbor, who was going to throw it out, when they offered it to me. It ended up becoming my biggest (& longest!) project yet; & the project of which I'm the most proud!
To see the complete process & transformation, go to:
http://TheVintageMagi.blogspot.com/2012/01/from-trash-to-treasure-entry…
Once I had a plan in place,
1. I went to Jo-Ann Fabrics & got a thin, plywood craft boards.They were 1/4" thick, 6" wide, & 36" long.
2. Of course, I already had the base for the cabinet whose dimensions were slightly different than the plans on Ana-white.com, so the math was up to me. After lots & lots & lots & LOTS of equations, I knew that the drawers would have to be 6" long & 7" wide, which is why I went with the 6" wide boards. Less cutting on my part would ensure more uniformity.
3. I started measuring in 7" at a time (& double-checking & measuring again) & cutting with a circular saw.
4. I used a blend of construction adhesive & wood glue to seal the plywood "drawers" to the cabinet doors. I didn't even need to clamp!
5. After drying, I filled in any large cracks that may have popped up with wood-filler & let that dry before sanding it down.
While the seal on the "drawers" was drying,
6. I painted the cabinet with Rust-Oleum's Ivory Silk Satin Finish spray-paint.
7. I also picked out wooden knobs at $0.94 a piece as well as 6 traditional-style furniture feet & spray-painted them with Rust-Oleum's Oil-Rubbed Bronze.
8. The feet had screws that allowed them to attach right in to "Heavy Duty Top Plates" that I were attached to the bottom of the cabinet.
All of these items were available at Home Depot.
9. Next, I sanded, primed & painted the doors.
10. After some careful measuring, I drilled pilot holes for each knob.
11. I added the shelves back in to the cabinet, which required more touching-up of the paint.
12. I had taken apart a wood pallet, measured the wood, & tried to think of a way to make it into a reclaimed wood top for the cabinet.
13. I cut the boards & made a layout, 4 rows of boards deep, on top of the cabinet, careful to remember the overhang. I added 4 little squares of wood, one in each row of planks, in flattering & uniform positions to complete the desired overhang effect.
14. I sanded the wood, rearranged it, & sanded it some more.
15. I glued the top in place, using the same mix of construction adhesive & wood glue I used before.
16. Next, I used STAINABLE wood-filler to fill in all of the cracks. Then I sanded again from 60-grit up to 200-grit,
17. & made sure by using a LEVEL that the finished surface was FLAT & EVEN.
18. Before it's final sanding, it needed to be extra secure; so I got out the finishing nails & put two nails in each board (except the little squares of wood, which only got one nail), one at each end.
19. I sanded with 220-grit sandpaper.
20. Getting the stain just right for the reclaimed wood top took awhile. Just when I was about to give up, paint & distress it instead, I had an idea. I took what was left (which wasn't much) of the little can of Minwax PolyShades stain in Espresso Brown & added some spoonfuls of Minwax Gel Stain in Hickory (which was MUCH easier to apply) straight into the little can. I shook the can & made a mixture of my own stain that was still a beautiful, dark color - but MUCH easier to apply. I applied 2 coats of stain, following drying-time instructions.
21. I touched up any mistakes on the cabinet with "Goof-Off."
22. I finish covered the stained top with a coat of hardening Minwax Paste Finishing Wax (applied in tiny circles just like waxing a car - "wax on, wax off!").
23. I added the decorative wood trim moldings on the side (using Gorilla brand wood glue mixed with construction adhesive again),
24. attached the finishing touches (like magnets to catch the cabinet doors & keep them shut),
25. & touched up all the ivory-colored paint one last time.
26. I used Rust-Oleum Transformations Decorative Glaze in Java Brown to glaze to the ivory-colored cabinet base (I did not glaze the stained wood top).
27. I coated the whole cabinet with a coat of hardening Minwax Paste Finishing Wax (the same as in step 22).
28. I attached the knobs,
29. & added these "Felt-Gard" self-leveling, heavy-duty felt pads to the bottom of the feet to protect my hardwood floors.
30. It went inside & was decorated, but is still not completely fit with it's final accessories. It looks great!
To see the complete process & transformation, go to:
http://TheVintageMagi.blogspot.com/2012/01/from-trash-to-treasure-entry…
Thank you for the inspiration & all the attention this project has brought my blog & business! Everyone has responded very well & I couldn't be more proud of myself & the accomplishment I feel. I mastered a lot of new tools & products on this project & am ready to start another one! Thank you, Ana-White.com!
"It was more than discovering something that I loved to do -
It was discovering someone I had always been."
~ Natalie ;-*
Built from Plan(s)
Estimated Cost
$50
Estimated Time Investment
Week Long Project (20 Hours or More)
Finish Used
1. Rust-Oleum's Ivory Silk Satin Finish spray-paint
2. Rust-Oleum's Metallic Finish Oil-Rubbed Bronze spray-paint
3. Minwax STAINABLE Wood-filler
4. Minwax PolyShades stain in Espresso Brown
5. Minwax Gel Stain in Hickory
6. Minwax Paste Finishing Wax
7. Goof-off
8. Rust-Oleum Transformations Decorative Glaze in Java Brown
2. Rust-Oleum's Metallic Finish Oil-Rubbed Bronze spray-paint
3. Minwax STAINABLE Wood-filler
4. Minwax PolyShades stain in Espresso Brown
5. Minwax Gel Stain in Hickory
6. Minwax Paste Finishing Wax
7. Goof-off
8. Rust-Oleum Transformations Decorative Glaze in Java Brown
Recommended Skill Level
Intermediate
Comments

Sun, 05/06/2012 - 09:14
Wow! What an amazing
Wow! What an amazing transformation! Your hard work really paid off with such a beautiful piece of furniture.
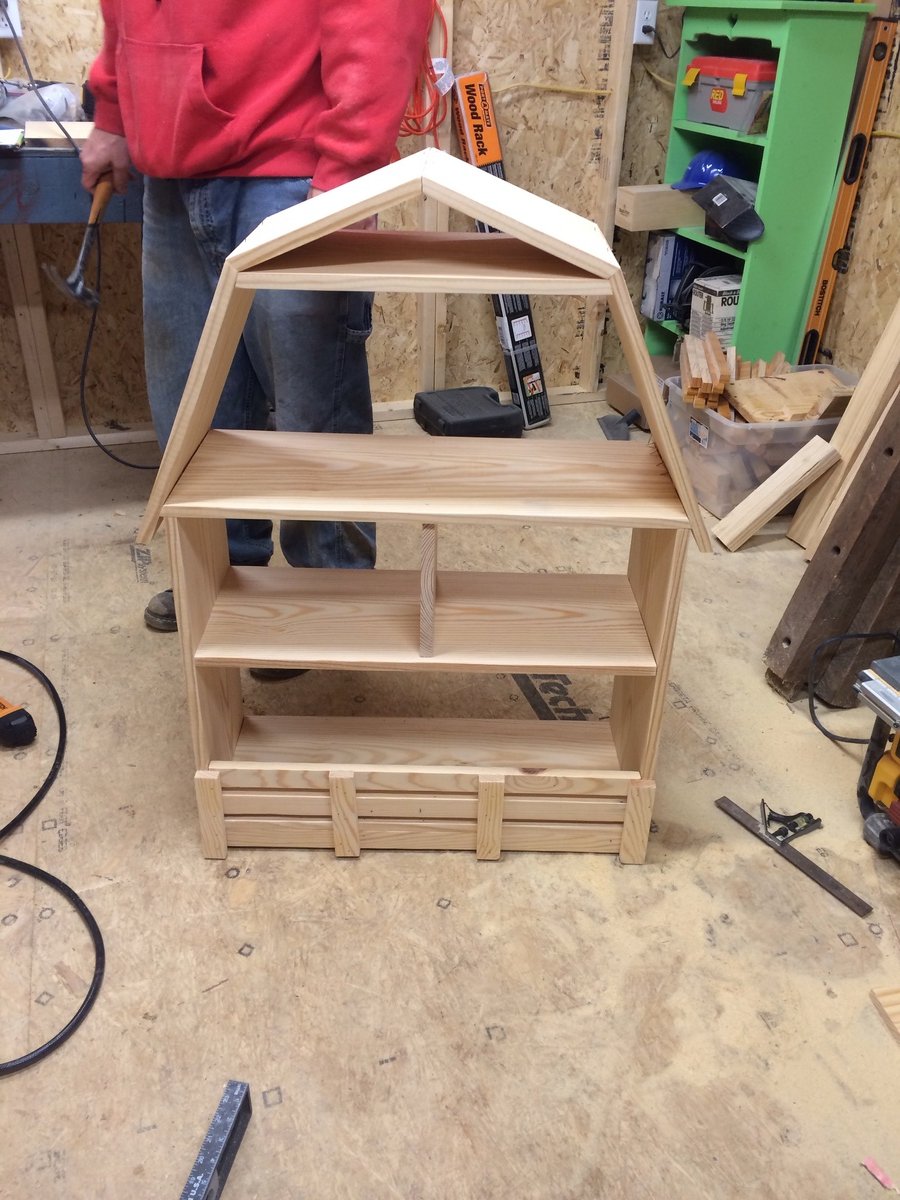
Barn for Tractor Supply animals
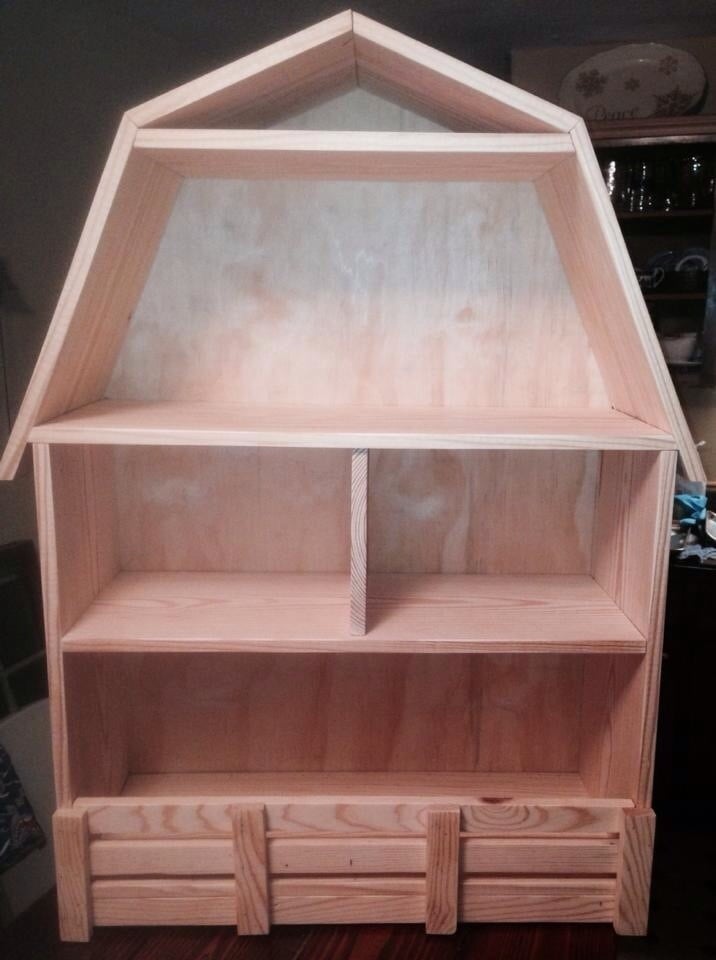
I built this for a friend's daughter who collects the Tractor Supply farm animals. This is the first time I have cut on angles to make the roof. The directions say built it from bottom to top but I found it easier to start for the top and work down. Then attach the whole roof where it marched on the barn... Hope this helps. I did not finish it cause the friend wanted to stain it herself...
Built from Plan(s)
Estimated Cost
$40
Estimated Time Investment
Afternoon Project (3-6 Hours)
Finish Used
None
Recommended Skill Level
Beginner